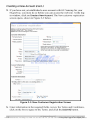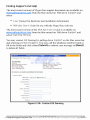
1
GE
Sensing
Protimeter HyaroTroc
Remote Wireless Monitoring System
Instruction Manual
Air lilarkeling Grebp
741 KlAclericamack Rcl Park Ridge NJ 071556 Tel 201-782-1782 Fax • 201-782-1783 Web
WWW
amgair.com Emal infe@arrrgair cern
_._
27.,-_
. .
......
=.
=
•,•••
=
--
--_ =-_
- - - - •
-
- • .-
-- -
-
-
-
-
Service Agreement
GE Sensing and its partner will provide access to the GE Sensine HygroTrac
website, and the Subscriber will utilize GE Sensing's service according to the
followine terms and conditions:
• Service
• Technical Support
• Equipment Utilities
• Cancellation
• Termination by GE Sensing
• Termination by Subscriber
• Data Indemnification
• Limited Warranty
• I Amitation of I.iabitity
• C. orii pl i a n ce with Law
• Law
• Notice
• Pricing
• Fees, Payment Method
The above terms and conditions are described below in detail.
Data
Service
To access data produced by HygroTrac. an account must be created at
WWW, ge hy rotrac.com . the GE Sensing HygroTrac website service (the
"Service . ). Subscriber is responsible for all use of Subscriber's account and
confidentiality of passwords.
Fees an d Paym en t Meth od
Subscriber will select either pricing option l or option 2. The base fee will be
charged at the beginning of each month. Subscriber authorizes charges for
base fees and usage fees to be made to the identified credit card each month
for the duration of this agreement. Notice of charges against Subscriber's
credit card shall be made as provided in section entitled "Natice” on page vi
above. Billing of business subscribers ma...r be made by direct invoicing rather
than debiting a credit card. GE Sensing may change any fee. rate, or packag.e
upon thirty days Notice. Insufficient or invalid credit card details nnay result
in the service being suspended.
141 Kinderkamack Rd Park Rodge NJ 07658 T& 201-782-1782 Fax • 201- 782- 178:3 Web
AWN.'
amgair.com Erna.). info@amga;i4hom
Technical Support
GE Sensing will provide technical support at no Charge to Subscriber to assist
in establishing Subscribers connection to the Service and configuration of
Internet software toots provided by GE Sensing.
Technical support hours are from 8:00 a.m. to 500 p.m EST. Monday
through Friday, except on nationally observed holidays.
Equipment Utilities
Subscriber shall provide his or her own computer equipment necessary to
access to the Service. Subscriber is responsible for all telephone and
broadband charges for connecting to the Service.
Cancellation
To cancel your account, you must notify GE Sensing in the following manner
and with the following:
• By telephone at (800) 321-4878. You must provide your name,
usemame, e-mail address and phone number on the account for
verification purposes in order for the cancellation to be valid. Or,
• In writing by postal mail to GE Sensing - HygroTrac, 1100 Technology
Park Drive, Billerica, MA 01810, USA. Or,
• By Faxing to GE Sensing - HygroTrac at (978) 437-1031. Or
• By electronic mail to [email protected] .
In the event of notifying the cancellation of your account in writing, you may
be contacted by GE Sensing representative to verify your account information
such as your name, username, e-mail address and phone number. This is
required in order for your account cancellation to be valid.Or,
• You may also notify in person at any GE Sensing office.
Failure to use services made available by GE Sensing does not constitute a
valid cancellation. Your account will automatically renew for a renewal
period equal to the original period of service for which you contract unless
specifically terminated per the procedures detailed herein or by GE Sensing
14 Minderkamack
Rd Park Rodge NJ
07658 T& 201-782-1782 Fax • 2O-7-?7a3 Web
WWW
amgair.com Emasi info@ amgair cora
per this Agreement. GE Sensing does not refund prorated intra- period charges
upon cancellation and does not provide any refund for pre-paid services
purchased under this agreement. In the event of cancellation, all services
provided by GE Sensing will terminate on the effective cancellation date and
GE Sensing shall have no further obligation to provide services of any kind
after that date.
Termination by GE Sensing
GE Sensing, at its sole busines.s judgment. may terminate this Agreement
i mmediately or suspend Subscriber's access to the Service for refusal or
failure to pay for Service or by sole judgment of GE Sensing that Subscriber
may be performing activities harmful to GE Sensing or its Subscribers,
employees, vendors, business relationships or any other users of the Internet.
Termination by Subscriber
Subscriber may terminate this Agreement at any time. The termination vi I be
effective 2 working days after the notice is received. In the event an
amendment is adopted by GE Sensing. which was not part of the Agreement
when you purchased your service, and which you find unacceptable or
otherwise impossible to comply with, you have the right and duty to terminate
your services. In order to terminate services, you must notifY GE Sensing of
your intent to cancel (see "Cancellation' on page iv section on the previous
page).
Data Indemnification
Subscriber understands and agrees that the Internet is a conglomeration of online data bases operated by distinct entities having no business or legal
relationship to GE Sensing. GE Sensing has no input whatsoever as to the
content of Internet data accessed via the Service. Subscriber is solely
responsible for any value or reliance it places on information obtained via the
Internet. GE Sensing does not monitor nor control any in fomiation on the
Internet It does not warrant the information is appropriate for families nor
does it warrant that the information available on the Internet does not violate
copyright, libel or privacy laws. Subscriber is liable for his/her users of the
Intemet and will hold GE Sensing harmless from any liability arising because
of the subscriber's use of the Internet.
141 Kinderkamack Rd Park Rodge NJ 07858 T& 201-782-1782 Fax • 201- 782- 1 78:3 Web
WWW
amgair.com Erna.). info@amgairkkorn
Limited Warranty
GE Sensing warrants only that it shall, subject to the terms and conditions of
this Agreement. provide Subscriber access to the Internet.
GE SENSING MAKES NO OTHER WARRANTIES AND SPECIFICALLY
DISCLAIMS ANY IMPLIED WARRANTIES OF MERCHANTABILITY,
FITNESS FORA PARTICULAR PURPOSE, OR AGAINST INFRINGEMENT.
GE SENSING FURTHER DISCLAIMS ANY WARRANTY OR
REPRESENTATION AS TO THE INTERNET AND INFORMATION
THEREFROM,
Limitation of Liability
GE Sensing shall not be liable to Subscribers for more than the monthly fee
for any single month during which any claim arose. GE Sensing shall have no
liability for incidental, consequential, or punitive damages.
Compliance with Law
Subscriber agrees to use the Service in compliance with all applicable laws
and to upload and/or download files:
• Only with the consent of the copyright or patent owner
• Only if such files do not violate anyone's right to privacy
• Only if such files do not contain any defamatory material.
Law
This Agreement shall he construed under the laws of the State of
Massachusetts. Massachusetts courts shall have jurisdiction over this
Agreement and all litigation under this agreement shall be in Massachusetts.
Notice
Notices to either party may be given via e-mail using the e-mail ID assigned
to the parties by GE Sensing. Notice shall he effective upon first access under
that ID number after the notice is posted.
14 Oiknderkamack Rd Parfr Rodge NJ 07658 T& 201-782-1782 Fax • 2o -7-?7a3 Web
WWW
amgair. com Emasi info@ amgair cora
January 2008
Table of Contents
Chapter 1: HygraTrac Overview
System Components .................................
HygroTrac Applications ..............................
Temporary Installations .......................
Permanent Installations .......................
Preliminary Installation Steps ......................
Communicating with the Customer ........
Sensor Placement Guidelines ................
Installing the Wireless Sensors ....................
Data Acquisition Gateway ..........................
Gateway Activation and Site Creation ..........
Gateway Installation Guidelines ..................
Location Preparation ............................
Power ...............................................
Antenna ............................................
Location and Mounting ........................
Rear Panel LEDs ..................................
Connecting Gateway to an Ethernet LAN
Connecting Gateway Using a Modem .....
Troubleshooting .......................................
Technical Specifications .............................
Wireless Sensor ..................................
%RH/Temperature Sensor ....................
Moisture Sensor ..................................
Data Acquisition Gateway ....................
Certification ........................................
Air lilarkeling Group
741 Kinclerkamack Rd Park Ridge NJ 07856 Tel 201-782-1782 Fax • 201- 782-1 783 Web
WWW amgair.com
1-1
1-3
1-3
1-3
1-4
1-4
1-5
1-8
1-10
1-10
1-11
1-11
1-11
1-11
1-11
1-12
1-13
1-14
1-16
1-18
1-18
1-18
1-18
1-19
1-19
Emal infc@arngair corn
January 2008
Table of Contents (cont.)
Chapter 2: Using the HygroTrac Web Site
introduction ...................................................
Creating a New Account ....
Accessing the Web Data Service ........................
Adding On Existing Site .....................................
Creating a New Site and Adding a Gateway .........
Viewing the Job Sites Screen .............................
Looking Up Job Sites Quickly .............................
Viewing and Graphing Sensor Measurements ......
Deactivating and Reactivating Sensors ................
Understanding Inactive Sensors ........................
Plotting Sensor Measurements ..........................
Updating the User List for a Site ........................
Generating a Record of Drying Conditions {RDCI ...
Downloading Specific Site Data ...............................
Generating a Site Report ..................................
Viewing and Setting Alarm Thresholds
How Thresholds Function .............................
Setting Up Thresholds .................................
Updating Site Data ..........................................
Accessing My Account Screen ...........................
Adding, Updating, or Deleting Users ..............
Ma into ining Compa ny Information .....................
Accessing the Equipment Pull-Down Menu ..........
Viewing All Gateways ..................................
Viewing All Sensors .....................................
Finding Support and Help .................................
Exiting the HygroTrac Web Site ..........................
vi ii
2-1
2-1
2-3
2-4
2-5
2-8
2-10
2-11
2-13
2-13
2-13
2-15
2-16
2-17
2-18
2-20
2-20
2-21
2-23
2-24
2-25
2-28
2-30
2-30
2-31
2-33
2-34
Air lilarkeling Grebp
741 KlAderkamack Rd Park Ridge NJ 07856 Tel 201-782-1782 Fax • 201-782-1783 Web
WWW amgair.com
Emal infe@arrrgair corn
January 2008
Table of Contents (cont.)
Appendix A: Glossary
Appendix B: Configuring the Gateway in Specific Situations
Configuring the LAN Connection ............................. B-1
Connecting a Gateway Using Proxy Servers .............. B-1
Configuring Diarup Information ............................... B-2
Other Diolup Settings ........................................... B-2
Accessing the Gateway Configuration Menu ............ B-2
Using an Ethernet Port to Access the Configuration
Menu ............................................................ B-3
Using an RS-232 Port to Access the Configuration
Menu ............................................................ B-6
Air lilarkeling Group C
741 Klmlerkamack Rd Park Ridge NJ 071556 Tel 201-782-1782 Fax • 201- 782-1 783 Web
ix
WWW amgair.com
Emal infe@arrrgair corn
Chapter 1
HygroTrac Overview
The Protimeter flygroTrac is a simple and cost effective system tor remotely
monitoring moisture and temperature levels in buildings. The Proti meter
HygroTrac system measures and logs parameters such as GPP or g./kg. dew
point temperature, relative humidity, air temperature and % moisture in wood.
To set up the system. HygroTrac wireless sensors are placed in the building.
Sensor readings are transmitted to a Data Acquisition Gateway, which is
connected to a dedicated and secure web server via either an Ethernet or
telephone fine connection. The measurements can then be viewed at
www.gehygrotrac.com , using a secure password to access the data.
System Components
The PrOti me ter HYgroTrac kit comprises a carrying case containing the
components detailed in Table 1-1 below, The illustration on the next page
shows a typical BLD9000 kit.
Table 14: Protimeter HygroTrac Kit IBLD90001
Description
Hard Carry Case with Custom Foam Insert
Data Acquisition Gateway* (RI .D90 10)
Detachable Antenna
Nv/R P-S M A
connector
10 Wireless Sensors w/I.ithium Batteries* (RI.D9050)
20 Conductive Mounting Screws
20 Split Washers
3.3v Power Supply
Ethernet Cable (U 45)
Telephone Cable (R.1 II)
Instruction Manual (IN59000)
*Additional sensors (RI D9050) and gateways (RI .D9010) are available. For
European use. append "-EU - to the part numbers.
Note: Batteries must be replaced with 3.6V ER 14505 Lithium Thionyl
Chloride batteries.
1 4i-iggE.abErack Welnefialdge NJ 07656 T& 201-782-1782 Fax • 2a-7-?7R3 Web AWN.' amgaircom Emasi info@ mgla P.-lcorrr
System Components (cont.)
IMPORTANT: The external power supply included in your HygroTrac
BLD9000 kit is fitted with an AC plug suitable for the country
of destination. If
require a different plug. please contact
GE Sensing for assistance.
IM PORTANT: See the Declaration of Conformity at the end of this manual for
IlygroTrac certification information.
1411Ariderkamack Rd Park %ge NJ 07656 7 -& 201-782-1782 Fax 2O-7-?7a3 Web
WWW
amgfriggfgrMGdawd-miewcw,
Hyg roTrac Applications
Temporary Installations
The Prot imeter HygroTrac system can be used in restoration projects to
reduce costly regular visits to take moisture and humidity measurements
when drying a building after water damage. The system allows technicians to
constantly monitor atmospheric conditions and material moisture levels, to
ensure continual progress in restorative drying. It instantly flags such changes
as recurring water sources, tripped breakers, and equipment changes by
occupants. HygroTrac may be used to
• automatically produce detailed professional reports
• get output readings from dehumidifiers
• provide early warnings of targets reached and potential problems through
e-mail alerts and cellular text messages
• provide constant access to temperature, humidity and moisture content
readings
• increase accuracy of temperature, humidity and moisture content readings
with fixed sensing locations
Permanent Installations
The Protimeter HygroTrac system provides warnings of potential moisturerelated problems that can lead to property damage or health risks. This makes
it ideal for locations such as heritage and historic buildings, museums, fbod
storage and apartment buildings.
14
i-kigaaEiaa.gi/elnafi4Ndge NJ 07656 T& 201-782-1782 Fax • 2O -7-?7a3 Web
AWN.' amgaircom
Emasi info@ amglan-lom
Preliminary Installation Steps
A complete installation of your Protimeter HygroTrac system includes the
wireless sensors, the data acquisition gateway and website access. In addition
to the Fll.D9000 kit, technicians require several tools for installation:
• A cordless drill with Philips® bit attachment (with extension) or a cordless
screwdriver
• Zip Ties® for mounting
• A povver strip with surge protector
Other supplies may aiso be necessary, depending on job circumstances:
• A I2-foot phone cord
• A 12-foot 1.11N cable
• An in-wall phone jack splitter
• Additional #10 wood stainless steel course thread screws (with a variety of
lengths)
• Additional helical spring or split-style lock washers (#12, 18-8 steel. 3/8 in
O.D., 3/4-in. I.D.)
Communicating with the C ustomer
Before installation, explain to the customer that the HygroTrac system
provides constant information to the contractor on wood moisture,
temperature and humidity in the areas being restored. It enables technicians to
respond to any changes or to insufficient progress. (If the question arises,
reassure the customers that the sensors do not invade their privacy in any
way.) For households Ivith small children or pets. ask the customer ‘vhich
locations will be safest from interference.
If you are using a modem connection, you in
explain to the customer that
HygroTrac will transfer the data over the customer's telephone line once
every 12 hours, and that the transfer may take up to 6 minutes. While the
customer will be unable to use the phone line during the transmission, the
14.)
transmission will not interrupt an active ca/l. (See page
14
ak4derkamack Rd Park %ge NJ 07658 7-& 201-782-1782 Fax 201- 782- 1783 Web WWW amgfriggfgrMGdawd-miewcw,
Sensor Placement Guidelines
HygroTrac sensors can measure moisture in many different materials:
subfloor, carpet. pad, sill plates, walls, wall insulation. hard woods and other
structure materials. They pick up the highest, rather than the average, reading
in the material. You can install the sensors to focus on materials with the
greatest degree of saturation, or on those materials that have the greatest
drying challenges. Several guidelines are useful for sensor installation:
• Place sensors within 150 feet of the gateway.
• Attach or mount sensors in areas where they will not create a safety or
tripping hazard.
• Use the perimeter of the room or stationary building contents to protect the
sensor from occupant tampering.
• Sensors intended to monitor air space should be installed away from wet
surfaces or materials.
• Unless you specifically intend to monitor these areas. ensure during
installation that the sensors are not influenced by the following items:
• HVAC registers
• Dehumidifier air streams
• Open windows or doors
• Direct sunlight
• Appliances (washer, dryer. or kitchen appliances) in use
• Be sure that the mounting screw completely penetrates the affected portion
of the material.
• Choose a location that presents the best option for repairing the material
surface once it is completely dry.
IMPORTANT: WIVE (moisture content) readings are obtained by the
mounting screw2, while humidit y and temperature readings are
obtained by the black dot on the bottom of the sensor housing.
Ensure that this black dot is in the air stream of any air
targeted for liumidW and temperature monitoring
1 4 iiiigfamack Welnefialdge NJ 07656 7 -& 201-782-1782 Fax • 2O-7-?7R3 Web
AWN.'
amgaircom Emasi info@ amglatdom
Placing the Sensors for Best Results
In the Affected Area:
• Assign at least one sensor to monitor the temperature and humidity in the
affected area. Mount it in a location that represents the ambient air
surrounding the affected materials.
• If possible, mount the sensor at least two feet above wet flooring materials.
• You can secure the sensor to a picture hook on the Nva (with a zip tie), to a
curtain rod, an unused table lamp, or in an inaccessible spot such as the top
of a bookcase.
In an Unaffected Area:
• Assign at least one sensor in a nearby unaffected area (room). Mount it in a
location that represents the majority of the air circulating in the area, and so
that it is inaccessible to the occupants.
Outdoors:
• Assign one sensor outside the monitored structure.
• Do not install in an area that receives exposure to rain, extended direct
sunlight or passersby.
• Some possible outdoor sites include an unused storm door, a covered porch
railing. or a mailbox on the front of the house.
Mechanical Systems:
• Install one sensor to monitor the air exiting from any mechanical system
that controls or changes humidity and/or temperature (e.g., a dehumidifier
output, air conditioner, or furnace). The black dot on the underside of the
sensor must he in the air stream from the unit
• For an HVAC supply, secure the sensor to the grate of a supply vent
(supply register) in such a way that the black dot is directly in the air
stream. Otherwise, if the sensor is moved, it will provide incorrect
temperature and humidity readings. On a floor vent, place the sensor down
into a register to ensure placement in the air flow.
1411-Kraderkamack Rd Parfr %ge NJ 07656 7-& 201-782-1782 Fax 2O-7-?7a3 Web
WWW
amgfriggfgalGdawfidiewcw,
Dehumidifier Outputs:
• Sensors are mounted to dehumidification system outputs, or -process
outlets." As with the illustration below, select a location on the outlet of the
dehumidifier where the sensor can be placed into contact with the outlet
rill. Ensure the black dot (humidity and temperature sensor) is facing the
outlet. and in direct contact with the warm dry air leaving the dehumidifier.
g
Secure the sensor in placer using Zip Ties . Most dehumidification
systems have a grate on the outlet, which will accommodate this method of
mounting.
a
14 thiga-
e... Weinafialdge (v._e 07656 Te., 201-782-1782 Fax • 201- 782-1783 Web
AWN." amgaircom
Emasi info@ amglan-7com
Installing the Wireless Sensors
A photograph of a HygroTrac wireless sensor
appears at the right To install your wireless sensors,
complete the following steps:
1. To help determine the best locations for the
sensors, use a standard moisture meter such as
the Pro timeter Survey Master to establish the
existing moisture conditions within the building.
2. Select sensor locations that are within 150 tl (46
m) of the planned location of the data
acquisition gateway.
Note: The maximum sensor transmission distance varies with the building
construction materials. You may also need additional gatewa ys fyour
sensors are out of the sensor RF transmission range due to distance or
building construction materials. Up to 600 sensors can report to a
single gateway
Caution!
If it becomes necessary to replace a sensor battery, use only a LI SUN
#ER14505 lithium battery and be sure to install it with the correct
polarity. Use of any other battery or installation of the battery with the
incorrect polarity will void your sensor warranty,
3. When mounting the sensors, observe the following precautions:
a. if you use a powered screwdriver, be careful not to overtighten the
screws. The screws should be just tight enough to ensure good contact
between the material and the sensor.
b. Avoid placing sensors in locations where they could be stepped on or in
locations where they might interfere with working machinery.
C. Do not mount sensors in areas where water could enter the electronic
components.
14 d-aderkamack Rd Pa rfr %ge NJ 07656 7-& 201-782-1782 Fax 2O-7-?7R3 Web
WWW
amgfriggfg-FLGdawdview,,m
r
-
'
_
•
Data Acquisition Gateway
To install your Data Acquisition Gateway, refer to the picture below and
proceed to the instructions on the next page.
Antenna
Phone Line Port
SD Card Slot
RS232 Port
LAN Port
Power input
Gateway Activation and Site Creation
A gateway sends all the data it collects to the HygroTrac Database Web
Server (I-IDS), discussed in Chapter 2. Users can then access this data at
www.g ehyg rotrac.com To store and access data, users must first activate the
gateway and assign it to a user-created - site - at www.gehygrotrac.com
When sensors send data through a gateway assigned to a site, those sensors
are automatically assigned to that site as well.
Note: Users must first register as subscribers at www.gehygrotrac.com , as
discussed in Chapter 2. Subscribers can then create sites by logging
into their account at www.gehygrotrac.com and using information
that describes the site to he monitored (customer name, address,
email. etc.)
Record the gateway ID which is on the ID label located on the bottom of the
gateway. You will need this ID in order to assign your gateway to a job site.
14 d-Klarkamack Rd Pa rfr %ge NJ 07656 7 -& 201-782-1782 Fax
2O
-7-?7a3 Web
AWN:
arngfriggf gal
442.0korrr
Gateway Installation Guidelines
Location Preparation
When planning your installation, remember that the gateway requires an AC
power source and either a LAN or modem Internet connection. Also. position
the gateway within 15() feet of the planned sensor locations.
-
Power
The gateway requires 3.3 VDC, pro V ided hy the supplied AC adapter.
Connect the adapter to an AC power source and plug the jack into the
"3.3VDC" receptacle on the gateway rear panel. When power is active, the
PWR LET) will g[ow a constant green.
Antenna
The antenna supplied with your gateway connects to the -Antenna" connector
on the gateway rear panel. It should be screwed on -finger tight." The antenna
is designed to swivel in all directions and nn list he pointed "skyward," or
vertically oriented, for best wireless performance.
Location and Mounting
The gateway can either be wall mounted using the built in teardrop shaped
mounting holes on the bottom of the case (screws not suppl led) or it can be
placed on any horizontal surface. In either case. be sure the antenna is pointed
skyward. For best system wireless coverage, locate the gateway central to
where the sensors are to be installed. Do not locate the gateway close to large
metal obstructions such as filing cabinets or refrigerators.
14
thigaimaa . gvellefialdge (V._e 07658 Te. , 201-782-1782 Fax • 201- 782-1783 Web AWN." amgaircom Emasi info@ Br:1411cm
Rear Panel I,EDs
The gateway rear panel, shown in the figure below, contains several LEDs
which provide useful information on the status of the gateway.
The LEDs indicate the following information:
Wireless
• TX LED consistent rapid green flashing indicates normal transmitter
operation.
• RX LED — flashes briefly while the gateway is receiving data over the
wireless link. The activity ofthis LED depends on the number of sensors in
your system and the sensor reporting interval.
• Status LED —glows a constant green when gateway is communicating
normally with the HygroTrac Web Server.
Modem
• Link LED flashes to indicate modem is attempting to dial out: steady light
indicates modern is connected to far side modern
• Act LED when lit, indicates gateway has successfully logged in to your
ISP: flashes to indicate sending and receiving of packets
LAN
• Speed LED always off. indicating 10 Mh/s link speed
• Link LED Ethernet link is active; flashes orange to indicate transmission
or receipt of packets
• PWR — when tit, indicates power is on
144012erkamack Rd Park %ge NJ 07658 7 -& 201-782- 782 Fax 2O-7-?7R3 Web
WWW
arngfriggf gal
442Worrr
Connecting Gateway to an Ethernet IAN
Using the supplied Ethernet cable, connect the gateway's 'TAN" port to an
available and active data port on your LAN network Power on the gateway,
and the Link LED should go on within 1-2 seconds. if it does not, see the
troubleshooting chart on page 1-16.
141:11191
6. Testing the LAN connection
I
the Status LED lights up. the I .AN connection is working. if the Status LED
does not light up, the LAN connection is not working (see Troubleshooting on
page 1 - 1 6).
14 thigaimaa.
eflifialdge NJ 07656 T& 201-782-1782 Fax
• 201-
782- 178:3 Web AWN.' amgair. com Emasi info@ aragalriom
Cci ution!
Use oniy the GE Sensing power supply provided with your HygroTrac
kit. The use of non-factory power supplies may damage the
equipment and will void your WC1 rra nty.
3. Connect one end ofthe power supply to your data acquisition gateway, and
plug the other end into a suitable AC outlet. As the gateway does not have
an ON/OFF switch, connection and plugging in will immediately power up
the gateway.
N ote: The gateway includes onboardflash data storage that is sufficient for
one year qf data with ten sensors each reporting ever y hour To
upload data . from the internal flash storage, bring the gateway to a
location where you can make a connection to ,vour Internet account.
GE Sensing recommends the use of an SD Card only ifyour data
storage needs exceed the capacio , of the onboard flash storage,
14 iiiigEaticia .gki eflifieNdge rvi 07658 Ta , 201-782-1782 Fax • 201- 782-1783 Web
AWN." amgair.com
Errrasi infe@aragaidem
Trou blesh ooting
Table 1-2 covers possible problems and their solutions.
Table 1-2: Troubleshooting the LAN/Ethernet Connection
Problem
LAN link
I.ED is on:
but Status
I.ED never
goes o n
LAN Link
LED does
not go on
Status LED
is ON, but
when I log on
to the website. I do not
see my data
Solution
Cause
The LAV connection
that the Gateway is
using does not have
Internet access
because Internet connection is down or
does not exist.
Verify the I.AN port you are
using can access the Internet.
The LAN connection
that the Gateway is
using does not have
direct Internet access
because network uses
a proxy server.
See Appendix 13 on operating
with a proxy server.
The LAN Ethernet
port you are using is
not active,
Make sure the Ethernet Jack you
are using is active: check with
another computer or laptop.
The Ethernet cable is
not plugged in
Check the Ethernet cable connections and make sure they
chick - when the plugs are
pushed in.
The LAN Ethernet
port you are using is
configured as a client
Use an Ethernet crossover cable.
The Ethernet cable is
bad.
Replace the Ethernet cable.
Gateway out of range
of sensors.
Place gateway closer to sensors,
or add an additional gateway,
closer to the sensors that are out
of range.
14 ,-1-KelErkamack Rd Pa rfr %ge NJ 07656 7 -& 201-782-1782 Fax 2O -7-?7R3 Web
g
WWW 3MgfriggF
a) Gdagi 4412WOrrr
Table 1-2: Troubleshooting the LAN/Ethernet Connection (cont.)
Problem
Cause
Solution
Not all of my
sensors are
Active on the
website
Gateway out of range
of sensors.
Relocate gateway close to sensors or add additional gateway(s)
to expand wireless coverage.
MODEM
Link 1.ED
goes solidly
on. but Act
LED never
flashes
Rad username and/or
password
Verify usemame and password
are correct.
No dial tone
Verify phone line has dial tone:
move to line that has a tone.
Rad dial up phone
number
Verify dialup phone number is
correct
Missing DSL filter
Assuming your phone line is
used tor DSI. service, add DSI.
filter to the line.
MODEM
Link LED
goes solid
If the light to the left of the MODEM input does not glow a constant green.
the HygroTrac is not properly connected. Complete the following steps:
• Check all cable connections.
• Power cycle (turn off) the gateway unplug it, wait a few seconds, and plug
it hack in.
14 thigaimaa.gki eflifialdge NJ 07656 Te. , 201-782-1782 Fax • 2O -7-?7R3 Web
AWN."
amgair. com Emasi info@ arkeir7com
Technical Specifications
NVireless Sensor
Transmission Distance*: 150 ft (46 m) nominal
Transmission Frequenc y : 902.2 - 907.8 MHz:
8682, 868.4, 869 MHz (EU)
Sift' (l x w x h): 2.25 x 1.5 x 2.25 in. (60 30 x 60 mm
Weight: 2.42 07 (68 g)
*Transmission distance varies with many factors, including the presence
of obstacles such as concrete walls and interference from other electronic
equipment.
°A RH/Temperature Sensor
Range: 0 to 100% (non-condensing)
Accuracy: 10 to 90%±2.5%
Temperature Range: -40 to 185°F (-40 to 85°C)
Temperature Accurac y : ± 1°F (±0.5°C) at 77°F (25°C)
Battery Life: 15 years nominal, when reporting hourly
Moisture Sensnr
Resistance: pm type
Range: 0 to 40%
Accuracy: ±1% in wood, 10 to 25% subject to adjustments for
species and temperature
Calibration Temperature: 68°F (20°C)
14d-Kel gerkamack Rd Pa rfr %ge NJ 07658 7 -& 201-782- 782 Fax 2O -7-?7R3 Web
WWW
arngfriggf gal
442Worrr
Data Acquisition Gateway
Maximum Inputs: 600 sensors
Data Transmission: to secure Internet via
10 Mh/s Ethernet output or
dial on-demand telephone modem
Onboard Data Storage: approximatdy 1 year ofdata
with 10 sensors each reporting hourly
Additional Data Storage: up to 2 GB on SD card (not supplied)
Sife x w x 10: 7.5 x 4.9 x 1.6 in. (190 x
125
x 40 mm)
Weight: 10.8 oz. (305 g)
Power input:
3.3 VDC external power supply (included)
Certification
See the Declaration of Conformity at the end of this manual.
The information contained in this manual is given in good faith. As the method of use of the
instrumertt (and its accessories) and the interpretation of the readings are beyortd the
control of the manufacturers, they cannot accept responsibility for any loss, consequential
or otherwise, resulting from its use
14 thigEaticia.gki eflifialdge (V._e 07656 Te., 201-782-1782 Fax • 201- 782-1783 Web
AWN."
amgair. com Emasi info@ aragairgom
Chapter 2
Using the HygroTrac Web Site
In
Before using the web site, he sure that you have installed the Protimeter
HygroTrac system. configured the gateway. and powered up the system until
the status light is solid green, as discussed in Chapter
Creating a New Account
HygroTrac data is stored on a dedicated and secure web server. To access your
data from a remote location, complete the following steps:
I MPORTANT: There is a montO fee for the HygroTrac service account. You
cannot log in to your account or site unless your company has
previously established a HygroTrac service account with GE
Sensing. and received an authorized user ID and password.
,
1. Using your existing internet connection, go to the following URI.:
WWW.Clehvarotrac.com
2. You will see the "GE Sensing Remote Sensor Network" screen
on the GE HygroTrac home page (Figure 2-1 below). Click on Log-in.
,
1 ,,10 h. •
e
s
• Atlineter Ftrtao cosofes
oolereoent
y
• y monitronn
r. Loyster., L . cen er, onekel Suer neto.F1 are, a lortrLIN Wet. Ate Ito
Ci or.....to of LA... L me,. rerne It . LW, A.
lloonletorfe of
old uord foftes.
Agit. Nu.
M1'0111,1:
Live Demo
s
r11 ,r0r1 ., fyrrsl,'
tfa. OVLIOnYontr,
s
ftrarerY "PR,
•
s
.
Aft. Or. rick Ate IF.. 'Wm.,' d
dd. ,
l A. sir. Si
T
o ow ,.1-101 rke. • te...rtokri
S
teorterdue.
elt
Figure 2-1: GE Sensing Remote Sensor Network Screen
l
14 /1.16430ktiaariAgg PaiffiOiab 054.65 T& 201-782-1782 Fax • 201- 782- / 78:3 Web AWN.' amgaircom Emasi info@ amTricorrr
Creating a New Account (cont.)
3. If you have not yet established a user account with GE Sensing for your
HygroTrac, you must do so before you can access the web site. At the login window; click on Create a New Account. The New customer registration
screen opens, shown in Figure 2-2 below.
New customer registration
1) New customers please fill out the information below.
2) Fields marked with are required.
3) Minimum p assword length is six char.Kters.
Customer information
'Phone: I
"Corrpany Name:
Mobile phone:
*Contact Name:
*Temperature: ®F
*Mailhg Address:
0C
*Email address:
Defaut alarms (low battery ) inactive gatewayisensors)
will be sent to this address. For multiple addresses
separate each by a cumnia. For 'nubile I rr esuages please
contact your mobile servCe provider for email add'ess.
*City:
'state: --- Please Select One --*Zip:
Enter 0 iF no ZIP/Postal Code
*Country:
'Type:
--- Please Select One ---
I --- Please Select One ---
Time Zone:
(GMT) Greemich Mean Tine: Dublin, Edinbugh, Lisbon, London
Account information
*Login name: I
*Password:
*Confirm
paswford.
Payment information
0.11 ea ,:
(as printed cn card)
My Isilkiu address is the same as my mailing address
0
'Bring Adiress:
'Ctty:
"State!
Cease Seleci
One —
'Zip;
Figure 2-2:
22: New Customer Registration Screen
4. Enter information in the required fields_ review the Terms and Conditions,
click on the box to agree to the Terms, and click the [Submit] button.
1402derkamack Rd Fern Rodge NJ 07858 T& 201-782-1782 Fax • 201- 782- / 783 Wela i Sir% :thAkitjgrrAT
kiddri.irrilorrr
Accessing the Web Data Service
1. Open http:www.gehyRrotrac.com on your web browser. In the upper right
corner of the screen, click on Log-in, The Log-in ‘vindow, shown in
Figure 2-3 below, opens.
Mt knork
tet:
Eq4rnent
En_pport
User Log-In
.
Est±ld -ed custcrriu0, please log in now.
2) Click here te Create a rev= auDanr.
3) nick Here if you Fccu.s.l. t oo Pa55.NU'd
y
4) If you are ho ng any trodzle with ycur accoult please Concoct Us.
User Id:
Password
.
I
P
.amerr.bo .. that password; are case sensiti Y e so always check ycur Caps Lock key.
[
GE Sensing ]ndosEries 51rnrlucts Sersnees S °Is E,Sugeort About Us
:
>00 Arend toe world S invensta info nation > Privacy Policy > lens a' use
Ito LW:a'
:45rIght Ini oral
..
Con La 4 10S7-Z006
Figure 2-3: HygroTrac Log-in Screen
2. Enter your GE-confirmed user ID and password, and click
Note: If
have any difficulty logging in, click on Contact Us on tire screen
to contact GE Sensing. If you forgot your password, click on Forgot
Your Password. Enter your e-mail address and click [Submit]. GE
Sensing will e-mail your password.
3. Since you have recently created your account. there are no sites on file for
you. You are now at the initial Job Sites screen. shown in Figure 2-4 below.
You can associate a job site to your account through two ways
• Add an existing site that your company has already created. See page
2-4.
• Create a new site and new gateway from the HygroTrac hardware you
recently installed. See page 2-5.
ai
Figure 2-4: Initial Job Site Screen
l
05irt-fit T& 201-782-1782 Fax • 201- 7-?7R3 Web WWW amgair.com Errrasi info@ amienaam
14 /1.16430ktiaariAgg PaiffiOiab
Adding an Existing Site
If you want to add an existin g job site that your company has already
establish a follow these instructions.
Note: Please see the section titled "Adding, Updating, or Deleting Users"
on page 2-25 fbr further details.
1. Click My Account from the blue menu bar.
2. Click Company User Maintenance.
3. Scroll down until you find your User ID and dick the corresponding link
for Sites.
4. Place a check mark in the box on the leti side of the Site Name you want to
access. Confirm by clicking [Update User Profile] at the bottom of the
screen.
14 0S4derkamack Rd Park Rodge NJ 07658 T& 201-782-1782 Fax • 201- 782-1783 Welai Sir% Vap-tilgrolonGikab-i.itrizzw,
Creating a New Site and Adding a Gateway
If you want to create a new job site and add a new gateway, follow these
instructions:
1. From the blue menu bar. pull-down the Job Sites menu and click Add a
New Site The Add a New Site screen, shown in Figure 2-5 below, opens.
.
Mere, ! 4.2, n12121
(2nni .1.71-.1R7R
Seel Deg
Nt• Sitt
ReeseihdLIS:
•
Nte riBIRO:
-r
:iere
e
Tr h,,A
e7 i
cff.
'Cesar', Levier/Stab.
'Crstact
• nars,
ra,
Thasarre d.tirn Wer:
rn-•1,t I—mat
• Alai CC
AM Chit di m
keen Mtrric.iWe Ten teeneee E-Mal!
g
RepAE6 FP' Pezere e Canna=
Cce•ecr
Figure 2-5: Add ci New Site Screen
2. Fill in all the Required Fields (denoted with a -*") on this screen and click
[Save] to create a new job site.
• Alarm Notification Email: An alarm is generated if any sensor
becomes inactive or if readings exceed user-defined thresholds. To
receive e-mail notification of alarms, enter your e-mail address in this
field. Multiple e-mail addresses may be separated by a semicolon.
l
14 aGSirriaktiaariAgg PaiffiOiab
6465 T& 201-782-1782 Fax • 201- 782- 178:3 Web
AWN.'
amgair. com Emasi info@ amietiom
Creating a New Site and Adding a Gateway (cont.)
• Alarm Notification Text Message Email: You can create a mobile
device e-mail address by Wowing the guidelines below. Multiple
addresses may be separated with a semicolon. Please note this service
is only available in the US and Canada.
• AT&T (new) — 1231234567(ctxt.att.net
• AT&T (legacy) — [email protected]
• Cingular — [email protected]. net , or
123 I 234567(cingularme.com , or
[email protected]
• Nextel /231234567(4messaging.nextel.com
• Rogers — 1231234567(0,pcs.rogers.com
• Sprint 12312341567(4messaging.sprintpcs.com
• T-Mobile 12312345676-itmomail.net
• Verizon — [email protected]
• Virgin Mobile (USA) — [email protected]
• Please contact your mobile phone carrier if not listed above.
3. Associate a gateway with the new site. Add the gateway by selecting the
text click here as shown in Figure 2-6 below.
My dxo_int
3ob Sit
) - a Add A Piekv Ga tev, ay we
Support
e.::n_,
there are no Gateways on fie for GE Protimeter/User's Guide Demo at this time.
GE Senso Industries Pro-ducts & Service.s Tools Pa Support 5 About Us
CE Copora:e i-OME
.arculd :11s
Dot,, —arms of Use
Ir,Rustar IrFornatan
Figure 2-6: Add a New Gateway Screen
14
06derkamack Rd Park Rodge NJ 07858 T& 201-782-1782 Fax • 201-782-1783 We
i
{
:thp-illgraTEOGikiddrifirrilorrr
Creating a New Site and Adding a Gateway (cont.)
4. Enter the eight digit alphanumeric Gateway ID found on the underside of
the gateway and describe the iocation of the gateway, as shown in
Figure 2-7 below. Click Bove].
My Arreun n
kin Sit.
Equiament
SupperT
Re q u irec =reds:
': Gate.,vpr. Id: II
Gate Wa y DESCrIpE10 el!
SLE
Resei
Carce! )
C
GE SEESWEI
IndUSEEIESC Products & Services C Tools &
C-E CCepOe:e Hone > GE ui,jind te %Voile S rweeslcr Inferrioteu
ppC
C
About Us
Polo; > EOM'S OE LSe
Figure 2-7: Enter Gateway ID Screen
The gatevvay should now appear in the Gateways screen shown in Figure 2-8
below.
3Am Sites.
Accomt
Egipment
Sul:ccrt
C.latevvays
u TO Add A Ne.vr .Gatewa y PE9se Tek
+Gateway Id
1231567a
lpUII
denied( Id
States It Actlyely
User's Guide Deno Gate kay
GE Sensiriu 5 Industries 5 Products & Services 5r TOOIS 131 Sijpp p itC RbOU t Us
GO Cerporare Home S CE
Imeus:er Int rnatol
Raley TeeTs ef Use
Figure 2-8: Populated Gateway Screen
5. Ifthis site has mufti * gateways, add the additional gateways by repeating
steps 3 and 4 as necessary.
l
14 /1.16430ktiaariAgg PaiffiOiab 05irt-fit T& 201-782-1782 Fax • 201- 782-1788 Web
WWW amgair.com
Errrasi info@ amieg-Kbm
Viewing the Job Sites Screen
screen is the main screen that allows you to monitor, graph.. mid
download sensor data.
The Job Sites
1. You can access the Job Sites screen in either of two ways:
• From the blue menu bar, select the pull-down menu for Job Sites and
select View Existing Sites. The screen shown in Figure 2-9 below will
appear
• From any screen in the HygroTrac web site, click on the logo in the
upper left corner to return to the Job Sites screen. This logo may say
"GE Sensing" or may be customized for your company. The screen
shown in Figure 2-9 below will appear.
Job 51t4.
Acmunt
E
t
Support
Job Sites for
DaMD St?.
GE CND
Da:e Cen:et
▪
IAA Temp Testing sge
• 101
U
a Guide De-no
7/14;200E.
3/221200:
11/17/2006
6:213200i
6/2G:2007
A
0/25/2007
Figure 2-9: Job Sites Screen
2. You can now navigate through the Job Sites screen.
• Single clicking on the column headers in orange will sort the data by
that column in ascending order; double clicking will sort in descending
order.
• The Claim/Job column shows the Claim Number or Job Number it one
was entered in the Add a New Site screen.
• Clicking on a Site Name shows the details about that site.
• The Alarm column shows -A" if an alarm is present for a sensor under
that gateway. Details on setting alarms appear on page 2-20.
• The Created and Last Activity columns show the date and time the site
was created and the most recent transmission.
• The Status column shows "A" for active gateways ifat least one sensor
is active, ''I" for inactive gateways, and blank ifno data has been taken.
140aderkamack Rd Park Rodge NJ 07651 T& 201-782-1782 Fax • 201- 782- / 783 Welai Sir% :thpitIgnol GiAtiab-i.irrizzw,
Viewing the Job Sites Screen (cont.)
3. Click on the "+” sign to the left of any site to expand the choices as shown
in Figure 2-10 below. The expanded menu allows access to temperature,
humidity, and moisture data in multiple formats.
J.b gtAm
Pty Amount
Job Stes for
GE Prot-mete'
th Slim
Demo Si:e
U5•213
PDC
DoWn!cx
d5
GE Co m Data Centel
Lem Term Metro] abbe
101
U5.915 GUE
Demo
Ga:e.vave
.Created
Last Activity
7f 14/200E
612912007
Sereor5
Report
3.'2232007
,
11. 17e2006
O.!252007
Status
Th-eMo,.d5
612912007
V21_/2007
Figure 2-10: Expanded Job Sites
14
l
05irt-fit T& 201-782-1782 Fax • 201- 782-1788 Web
ilfairriaktiaariAgg PaiffiOiab
WWW
amgair.com Errrasi info@ am4Tra_zm
Looking Up Job Sites Quickly
The Lookup Job Site menu is a quick way to find a known joh site. View the
menu hy following these instructions.
1. From the blue menu bar, select the pull-down menu for Job Sites and
select Lookup Job Site. The screen shown in Figure 2-1 1 below will
appear.
Claim/Job Number Lookup
[
ClairrUlob Number
g
SPri jnn
•
Sea cl- [
/ndi i,FeeS PrnrIne-hr
Servires Tnnrs Sr inenrt All
t lls
Figure 2-11: Job Site Search
2. Enter the Claim/Job Number in the field and ci ick [Search]. The search
results will appear as shown in Figure 2-12 below.
Accarrt
Joh Eites
Equipmat
Sippixt
Job Site for Job Nbr:
User's Guide Dern-
Sensprs Resort
-
E Sensing • Industries a Products & Services 7 fon &Support ] About Us
GE Co-poreth kcne GG rircr_rd the Ns< >I-wens-sr Information > Pri y aoo O njoy
ama o .
Jse
Figure 2-12: Joh Site Search Results
3. Select Sensors or Report to continue.
1404arkamack
Rd Park Rodge (V._ e
07658 T& 201-782-1782 Fax • 201-782-1783 w.lisi. P@ :thAk-iggreol Gikabri.irrizz,r,
Viewing and Graphing Sensor Measurements
The Sensors screen enables you to view current measurements for a specific
site, such as temperature, relative humidity and other parameters.
1. You can access the Sensors screen in two ways:
• From the Job Sites screen. click on the -+" sign for the desired site and
select the Sensors option as shown in Figure 2-10 on page 2-9). This
method shows the sensors for that job site.
• Pull down the Equipment menu at the top of the screen and click on
Sensors. This method shows every sensor at every job site.
2. The Sensors screen, shown in Figure 2-13 below, lists the IDs, status and
most recent activity of the sensors linked to the site.
MyAccoom
3± Sites
Equipment
Si_cp:rt
Z/e1ISUI .
Cnly Show Sensors With Actwe +alarms
0 Yes
(t.,
No
Sensor Id
Description
Last Pictrulty
Sts
Temp
RERS
309E0102
Looser CO Ream f plerriglass door
A
21.5
23 0
0.28F0751
24.2
24.1
OCRE078B
Da-k 1 & 2
P.413 CCM.
03)02.11:31
03)02.11:32
03)02.11:32
iii
21.4
OC8F0929
Losiger Cal room Zb008 door
03)02.11:32
DF01913C
,•
A
A
A
A
A
A
.11VME
OPP
91.70
2E
8.2
31.50
25
23_9
85
24.15
20.7
27.6
9.5
22.20
21.3
26.5
--
31.10
21.3
15.2
8.8
15.70
3.1
09.8
04
31.10
22.2
21.5
0.5
.0!:1
23.6
22.6
8.6
28.
1.2
I I.
1'
D011030C
mimes kirvisex ' ear
00110415
Outode fiDrat Entrance - urder Thr loot4
01:1210428
Outside Robe Lab I eevaters
CO 11041E
Ode in Crotca test. &ea.
03)02.11:30
03)02.11;33
03)02.11:20
03)02 11:31
03)02.11:32
£0110400
Ar al near hogroTrace
03)02.11:30
iii
21.5
25.4
8.5
22.37
10110400
Pa* 6
25.2
0.5
23.05
Ela-k 3
22.4
24.7
0.4
29.10
00111011
Protei..±inet5
A
A
A
22.0
E0110EBO
22.7
23.2
8.4
27.70
0.7
1:0111018
serew humidor toga trerroor
0. 4
5.70
-10.:
0011.10FD
ftrnEmrilyborr matt meraes
•.5
1111113:
servo- humidor bottom clra'oby
03)02.11:31
03;02.1121
03)02.11;33
01)24 09:57
03)02.11:261
03)02.1129
r Val near Ootica Cal 5istem
Figure 2-13:
23.0
A
A
21.9
22.4
9.5
25.50
22.1
19.2
85
22.10
2.
D.0
The Sensors Screen
3. By default, the sensor screen shows all sensors for a particular site. To
Only Show Sensors with Active Alarms, select [Yes] in the upper la
corner.
4 • You can sort columns by clicking on the column heading- one click for
ascending and two clicks for descending.
5. To view sensor details, click on its Sensor ID at the left. From this screen
you can only view sensor information and cannot change any information.
1 4 /1.16430ktiaariAgg
l
05irt-frt T& 201-782-1782 Fax • 201- 782-1783 Web AWN: amgair.com Entail info@ aRgalricerrr
PaiffiOiab
Viewing and Graphing Sensor Measurements (cont.)
6. You can update in fbrmation about a sensor from the Sensors screen. Click
on the Description for a particular sensor. A window similar to Figure 2l4 below will open. You can update a sensor in three N•ays:
• Change the Sensors Description (for example, when a sensor is
moved)
• Change the Atmosphere Type surrounding the sensor. You must define
this field for measurements to display in the RDC, described later.
• Deactivate the sensor, as discussed in "Deactivating and Reactivating
Sensors" below.
7. Click [Save] to confirm the new sensor information. [Reset] to clear the
fields, [Delete] to delete the sensor description and atmospheric type, or
[Cancel] to return to the previous menu.
—
My .4,—t
uhr
avronEni
Fob SILO
Safport
Update A Sensor
Sarso • IC: OCSF0336
Sensor Desc,ptinn:
rrnomb e nc Ty ne: Nore
[
(Dect., I [ wee]
ReaEo -o r Sensc, Des cation:
[ Pmenva:e
Figure 244: Sensor Update Window
14042erkamack Rd Park Rodge NJ 07556
T&
201-782-1782 Fax • 201- 782-1783 WelalSi•P@
Log-at
Deactivating and Reactivating Sensors
When you deactivate a sensor, it no longer transmits data to the HygroTrac.
The sensor will remain on the Sensors screen tbr the job site, though the
Status column will show "EY.
To deactivate a sensor:
From the Sensors screen, dick on the Description for a particular sensor and
a window similar to Figure 2-14 on the previous page will open. Type a
reason tor sensor deactivation in the large field and click [Deactivate].
To reactivate a sensor:
From the Sensors screen, click on the Description for a deactivated sensor. A
new window will appear, similar to Figure 2-14 on the previous page. Then
click [Activate] to reactivate the sensor.
Understanding Inactive Sensors
If a sensor has not successfully transmitted for 24 hours, it enters inactive
status. The HygroTrac web site will send an email and text message stating
that the sensor has become inactive. In addition, the sensor will show up with
a status "I" on the Sensors screen.
Plotting Sensor Measurements
To plot the most recent sensor measurements tor a given parameter, click on
the actual measurement value in the Sensors screen. A new window opens,
similar to Figure 2-15 on the next page. displaying the most recent activity in
graphical form. I f you need to view sensor activity over a different time
period, click on one of the periods (Lost Day, Last Week, Last Month, Lost 3 or 6
Months, Last Year, or All Readings). The screen refreshes with data from the
newly selected period.
l
14 /1.16430ktiaariAgg PaiffiOiab 05irt-fit T& 201-782-1782 Fax • 201- 782- 178:3 Web
AWN.' amgaircom
Emasi info@ a Rgelriom
Plotting Sen sor Measurements (cont.)
Lc.
Sensor Activty AnalKs
,Jra,a, • Artivl.
&ensor: OG9E03313 - West - Door
T
1- resha.ds • A : errrs Errors I
0,55,-r•im.-.
Company: GE Protrneter
Site: Ciena Srte
p
firm Lunt: Ea5-em Daylight Time
Status: Acr,ve
YO
as
:7. 75
L, 70
55
ro
• o:prni 700pm
Y
1:010em aCCIam
7: 00am
Wan)
I CI
.1: Gra aCOpm
Avg value per Minute oo of 00/D01t3:11 at 00 Ptvl
Terperaiurci
Temia
minimum: 55-7
•
•
Figure 2-15: Sensor Activity Analysis Screen
14
06.1dierkamack
Rd Park Rodge NJ
07050 T& 201-782-1782 Fax • 201-782-1783 [email protected],
Updating the User List for
a Site
You can review and update the list of users for a particular job site via the
Users option.
1. From the Job Sites screen, click on the ;+" sign tbr the desired site, and
then on the Users option. The Update Users for [the site] screen opens,
displaying a list of users at your company.
2. To revise this list, check the box to the right of each user you wish to keep
on the list When you have completed checking and unchecking boxes,
click (update Site) at the bottom of the screen. The Job Sites screen
reopens.
Note:
add or update users, you must have an appropriate securit level
assigned to your account. Otherwise, you will not be able to access
these sites.
To
y
3. You can manage access to your web site by adding additional users with
different access levels. To add a new user, refer to -Adding. Updating, or
Deleting Users - on page 2-25.
14 ilfairriaktiaariAgg
l
05it-fit T& 201-782-1782 Fax • 201- 782- 178:3 Web
PaiffiOiab
r
AWN.' amgaircom
Emasi info@ a ro?geixiom
Generating a Record
of
Drying Conditions (RDC)
If you need to access a record of drying conditions (RDC) for a particular site
from a specific day and time to the present, you can obtain this information in
text format To generate the report, complete the following steps:
1. On the Job Sites screen (Figure 2-10 on page 2-9), click on the RDC option
in the menu for the site. The Generate a Record of Drying Conditions
window opens, shown in Figure 2- i 6 below.
Lie Wrotimotor
1100 lochnniogy Park Drive
Matta, MA 11821
[SOD)
Sensing
My Account
Job Sites
Eidipmemt
321-4878
Sr_pidert
Generate P.eLold or Drying Conditions (RDC) Data
Start date: 1
1/
Start time: I
I;
[ Submit
(I
(mrt./6/1.7.1.1y)
24-hoer format
p
GE Sensing S Iodise vies 3 Products S Services 3 Took le Support S Afloat in
GE Cu-o iate holm C GE ?round the World C Invenstor Irformetion 7 Privacy Policy S Terms
• • 1.
of Use
EL,w, .'1?s•s.?s
:
Figure 2-16: Request to Generate a Record of Drying Conditions
2. Enter the date from which you want the record to start (in mm/dd/yyyy
format) and the time (in 24-hour format), and click [Submit].
3. A window will appear. asking, "Do you want to open or save this file?" as
shown in Figure 2-17 below. Clicking (Open) will open the file using a
spreadsheet program: clicking (Save) will save the file to your computer.
My YelAmit
lab Stes
EquiNittrn
Lograktt,
Gel cate Reco . 0 of Drying Conditions (RIX) Data
file Download - Sesurily Warning.
Start date: 101
I : .E.1
1/ 12D:17
Start time: 112
:
124i1.1•
1.1.1- Is
[ Submit
Lk you want to upon or save this file?
Nara RDC_REPORT.cse
Type Mieroseft Excel Coma Separated Values Fib
Of 5ensing 3 Inau stries 10
GE Co-uore :e home
Flom WIWI g hIg rot rec .o:rn
> GE Around ri
I
Open
Save
[
Cancel
j
While files from Ihe Internet oein be useful, His fie lypc can
potenliallp halm your e mptier If you do net bust tie mum., do nal
open or save this soltivala What's the risk?
Figure 2-17:
Open or Save RDC Screen
740a firkamack Rd Perk Ridge NJ 07651 Tel 201-782-1782 Fax • 201-782-1783 Welal Si• P@ Itapiggrol
Downloading Specific Site Data
Instead of a general record, you might need measurements from a site, sensor,
data acquisition gateway, or network, over a specific tulle period. To
download data, follow these instructions:
1. On the Job Sites screen (Figure 2-10 on page 2-9). click on the "+" sign for
the desired site, and then on the Downloads option to the right of the
particular site. The Request a Download screen, shown in Figure 2-18
below, opens.
A
esory
r.,,
.. e,o at ,
Doy..i.road
of These Reds! -
"502: -5ELET-
-
enser 15: . -5ELECTGneway .-5ELEGT-
'Net,ork kr -SELECT"52,or Readros Rom 02:2:
000 '!F.liqiXe!
Crn,Vddfren)
.1
'To 02ze:
,o,r1.e.e:
v:1
24-hour forrrot
I (rrinleddlyyry)
1:
24-hUiifJ:tTEL
.runarrc&n.,,rmary:Dom
Figure 2-18: The Download Request Screen
2. From the pull-down menus, click on a specific Site, Sensor ID, Gateway ID
or Network ID. You can select only one of these parameters.
3. Enter the date on which you want the report to start (in mm/dd/yyyy
format) and the time (in 24-hour format).
4. Enter the date on which you want the report to end (in mm/dd/yyyy
format) and the time (in 24-hour format)
5. Enter the e-mail address tbr the user who should receive the report.
6. When you have finished entering data, click [Submit Request]. The Pending
Downloads screen opens, as shown in Figure 2-19 below.
rmincomn!
bun
Pending Du.vnloads
Simko
Tism
SITE
Id
Site
Re-atoms From
To
Demo Site
Figure 2-19: Pending Downloads
7. Wait a few minutes, then check your e-mail. The download file is attached
to the e-mail.
14
al.16430kliiaialAggPaTM.00E1Difyittit T& 201-782-1782 Fax • 2o1- 782- 178:3 Web
WWW amgair.com
Errrasi info@
aro?glabm
=.
-
==z
_
^
.=
. =
.
_
_
.
=
_
=
=
_
_
.=
_
=
_
=
_
.
=
.
_
=
_
_
_
-
-= -7 ...
.
=
_
.=
.
.
z-
-
-
Generating a Site Report (cont.)
fi httpsnliwww.phygroir0c.corni
rilF1 mri
L
iky Atlaly_;Y_
p
rink thu peg.,
Report Prepared for:
GE Protimeter
1100 Teckmotagy Park Dave
Billerica, MA 0/821
Sensor: OCBFOE3B
Company: GE Protimer
Site: Demo Ste
Status: Active
Time Zone: Eastern Daytht
2 Eep,
112.0
6:807111
10:00
8:007111
,sirr•
8:30011
12.805111
Avg value por Minnie as nf DOIC0 =00 at 10 AM
Temvereturc
:•
Reletrve Flurcultv
'AYMEI
Figure 2-21: Sensor Activity Analysis Report
14 71.16430ktiaariAgg Pa-FM.00E1D 05tirt-fit T& 201-782-1782 Fax • 201- 782-1783 Web
WWW
amgair.com Errrasi info@ aRgairg.,m
Viewing and Setting Alarm Thresholds
If you want to receive an e-mail or text-message alarm when a particular
measurement goes above or below certain parameters, you must enter those
parameters as thresholds in your HygroTrac settings. Figure 2-22 below
illustrates how thresholds limetion.You can set various types of alarms, such
as
• Dehumidifiers (RH threshold to show if unit not working)
• Affected Area (Rfi threshokl to ensure system working properly)
• Structural Material Moisture (WMF.) (set WMF. at your target dry
standard)
• Unaffected Area (Set for normal humidity to ensure humidity is not
causing secondary damages in unaffected area)
1-Inw Thresholds Function
High Vilue on lop
A
High Vdlue off 96
Accettable
Rance
35 ,
Low
Value off 75
Low Value on 69
115-
55 -
as
ID
.3
20
30
40
5.0
60
Figure 2-22: Measurement Range with Thresholds
• In the example shown above for the high value, you will receive an email alarm when the temperature reaches 00°F. When the temperature
drops below 95°F. you will receive another e-mail indicating that the
HygroTrac has returned to the acceptable range.
• For the low value, you will receive an e-mail alarm when the
temperature reaches 69°F. When the temperature rises to 75°F, you will
receive another e-mail to indicate HygroTrac has returned to the
acceptable range.
1402irkamack Rd Parfr
Rodge NJ
07658 T& 201-782-1782 Fax • 201-782-1783 weLisi. P@ :thAk-iggreol GiAtiabri.irrizz,r,
How Thresholds Function (cont.)
Note: To receive e-mail and text message alarms, you must enter your e-mail
and cell e-mail into the Job Sites inibrmation page. See "Updating Site
Data on page 2-23 for more information.
Se1tin2 Un Thresholds
To enter or change a threshold:
1. On the Job Sites screen (Figure 2-10 on page 2-9), click on the "+" sign for
the desired site. and then on the Thresholds option in the menu for the
specific site. The Thresholds window opens, as shown in Figure 2-23
My AECCUnt
Jab ft
Egdiprnent
.5UpyrOrt
Triresholds at Demo Site
1) Click here To Add A Sew Threshold.
There Are No Th r-hoiris On File for This Site At This Trite.
GESene.mgs Industries > Products Er Services Tools Et Support, About Us
• ••
p
—•C C50 P 1 • acy Pdicy >Tens of
GE Cor oraze Hone SUE ,••••_•.: li
•
Use
Figure 2-23: The Thresholds Screen
2. If thresholds exist for this sensor, click the Sensor ID to see threshold
information or click Edit to update the threshold. if you wish to add a new
threshold, click on Add a New Threshold. The Add a New Threshold screen
opens, as shown in Figure 2-24 below.
My Ar_count
lob 5tm
Equistnui t
firimnrt
incnout
Add A New Threshord
RaC ire d Fie CS: ''
Site Name: Deno Ste
5:
0 1501 IC.:
Pelt
I AB Sensors
Type: I — Please Select One — ••n I
Thor. Value Or:
' Thg:1
Value 091
Upper ant
ue War
wheo emeattd., triggers Bri 010011.
p
'Low Value 09:
'Lore Value Or: I
•••••
Upper boundry of crane: ope'seng •ange.
I
Lower bodndry at irrerS DM, li rc -wee.
I
p
to er int value ths7. ..5195 exceeisck nigge, an slarm.
Sass]
[Cancel j
Figure 2-24: Add a New Threshold Screen
-
14 71.16430ktiaariAgg Pa FM.00E1D 05irt-fit T& 201-782-1782 Fax • 201- 782- 1 78:3 Web WWW amgair.com Errrasi info@ arr?ga?rlerrr
Settio2 Up Thresholds (cont.)
3. From the Sensor ID pull-down menu, select the sensor for which you want
to add a threshold or select "All Sensors".
4. Then select the parameter to which you need to apply the threshold:
Temperature, Relative Humidity, Wood Moisture Equivalent (WME), CIPP
(grains per pound). or Dew Point.
5. In the appropriate text boxes, enter the values that mark the boundaries of
the acceptable range (Low and High Value Off) and the values that will
prompt an e-mail alarm (Low and High Value On.)
Note: The input for High Value On must he greater than the input for High
Value Off The input Pr Low Value On must be less than the input fbr
Low Value Off.
6. When you have completed entering values, click [Save]. The program
returns to the Threshold screen. Add more thresholds if necessary.
1 4 0a2erkamack Rd Park Rodge NJ 07658 T& 201-782-1782 Fax • 201- 782-1783
w.lisi. Pg :thAk-iggrolo Gikabriirrizzw,
Updating Site Data
If you need to update information on a specific job site, you can enter the new
data via the Edit option by following these steps:
1. On the Job sites screen (Figure 2-10 on page 2-9), click on the "+" sign for
the desired site, and then on the Edit option in the menu ffir the specific
site. The Update ci Site window opens, as shown in Figure 2-25 below.
Amount
lob Site.
Equipment
Suppert
Update A Site
Renui-ed Felds:
"Ste Narne: IGE an?ng Bo ton Centre
"Address: I Men'.
IBillence
*State: I Messed-was
Figure 2-25: The Update a Site Window
2. Enter the revised in ffirmation in the appropriate text boxes or drop-down
menus.
3. When you have completed entering data, you have four options
• Click (Savel to save your options and return to the Job Sites window.
• Click [Reset] to clear the newly entered data
• Click [Delete] to delete the entire site from the web site.
Note: The program 11411110t delete a site if it detects an active gateway.
• Click [Cancel] to /eave the window without saving data
l
14 /1.16430ktiaariAgg PaiffiOiab
05tirt-fit T& 201-782-1782 Fax • 201- 782-1783 Web
WWW
amgair.com Errrasi info@ arr?ga?xibm
Accessing My Account Screen
The My Account section of the HygroTrac web site allows you to perform
account maintenance activities. Click My Account from the blue menu bar.
My Account is a link rather than a pull-down menu) to the main My Account
page, shown in Figure 2-26 below.
ACCCIllt
1e43 •SIt
-We
Eititaant
; ly Account
v
• Rib Stes
• Request A Elowrifiad
• 1.001 Pendir Dowrloads
• Campaci., User Mainter arce
• :ompany Maim:apatite
•
•
•
g
F
•
Jser P:ofiE
Paserecrd
• .Thange hly Email ..s:c&ess
• ,ifig Cut
GE Sen sin g 0 In d u Aries 0 Prod u cts & Services Tools &Su pport a Abou t Us
.
GE Corporate
>
".-,ensto•
Poky > Terrs Lse
_•
Figure 2-26: My
Account Screen
• From the My Account screen, click Job Sites to open the Job Sites page.
This page is also accessible by selecting Job Sites from the blue menu bar
and then selecting View Existing Sites.
• From the My Account screen, dick Request A Download to open the
Request a Download page. This page is also accessible from the link
Downloads under the expanded Job Sites page. See -Downloading
Specific Site Data on page 2-17 for more information.
• From the My Account screen, dick View Pending Downloads to view any
tiles in process of downloading. For flirther information on downloading,
review the "Downloading Specific Site Data section on page 2-17.
-
1 4 Oaherkamack Rd Pa rfr Rodge NJ 07058 T& 201-782-1782 Fax • 201- 782-1783 wel3isi. P@ :thAk-iggreol Gikiddrifirrizzw,
Adding. Updatine. nr De!dine Users
Ifyou have access privileges at the level of Administrator or Manager, you
can add. update, and delete user accounts under the Company User
Maintenance link.
1. From the My Account screen (Figure 2-26 on page 2-24). click Company
User Maintenance to see a list of all users within your company as shown
in Figure 2-27 below.
My Account
Job Res
Equrtsent
Sugxrt
Users at GE Protimeter
.
1) To Update or Delete a Usti des or a User Id below.
a)
iD Add A Few User.
User Id
Met Name
Security tut
J.F.1.1E0
Jone Doe
F.crrinEtr0001
SrrES
J000
John Doe
Arrinistrator
Sites
Figure 2-27: Users Screen
2. To create a new user account, click Add A New User near the top left of
the page. Enter all required information into the fields shown in Figure 228 below and click [Save] to save, [Reset] to clear all the fields, or
[Cancel] to return to the previous screen. The functions listed in Table 2-I
on the next page are allowed per security level.
:kb sties
My Rackscr
EqiCssect
amort
Requirad Folds:
-Corps-1y
Name: GE Protimete •
'User Name: I
'Phone
Mt; I
Cell rIbr;
"E-Mail Address:
''Secal4 Love;:
I
I— Please Salon 611B —
,
'Te rmeratu re P ef: I —Ream Scic7. Ole —
–
.
Tiire Zone P 'ef: —Please Soles) Ons —
'User 16;
'Requited
For New Users and Password Chanue
'F a son o rc:
'Co of
Pa ss.7 arc:
Pen-el –Per that pa sses e d s are case se n sbsr e so ar, a s ch
[ Sore j
eck cod
•
Caps Lock key.
[ Cancel I
k,..,1-II.
Figure 2-28: User Information
14 ikairriaktiaariAgg Pa-FM.00E1D 05irt-fit T& 201-782-1782 Fax • 201- 7-?7R3 Web www .orrhguir.com Errrasi info@ aRga?dem
Addin2. Upda1in2. or DeMina Users (eint.)
Table 2-1: Functions for Security Levels
Function
Manager
Administrator
Add Gateway
Yes
Yes
Add New Site
Yes
Yes
Add Sites
Yes
Yes
Add Users
Yes
Yes
Delete Gateways From Sites
Yes
Yes
Basic
Delete Site
Yes
Delete/Deactivate Sensors
Yes
Edit Gateway Name
Yes
Edit Own User E-mail Address
Yes
Yes
Yes
Edit Own User Password
Yes
Yes
Yes
Edit Sensor Description
Yes
Yes
Edit Sensor In to nnat ion
Yes
Yes
Edit Site
Yes
Yes
Manage Users
Yes
Yes
Yes
Yes
Request A Download
Yes
Yes
View All Gateways For Company
Yes
Yes
View All Sensors
Yes
Yes
View Pending Downloads
Yes
Yes
View User Profile
Yes
Yes
Print Reports
Yes
3. To update or delete an existing user account, click on its User ID. Change
any fields and click [Save] or delete the user by clicking [Delete].
4. To control a user's access to different job sites, click on Sites for the
appropriate user. Grant or prevent access to any job site by placing or
removing a check mark in the box to the left ofthe job site name, as shown
in Figure 2-29 on the next page.
1404firkamack Rd Park Rodge NJ 07658 7 -& 201-782-1782 Fax • 201- 782-1783 wel3isi. P@ :thAk-iggreol GiAtiabri.irrizzw,
Addin2. 1:pda1in2. or DeMina Users (ennt.)
Update Sites for Jane Doe
sore Unfit&
at-r, slate
GE Sensing Industries Products &Services > Tools & Support > About Us
GE
tne
rirrycv,b, %Fr v=7: PC117,
Figure 2-29: Update User Site Access
1411.1•SiagkthertAggPaTM.00E1D054.6t Ta, 201-782-1782 Fax • 201-782-1783 Web
AWLS'
amgair.com Errrasi act@ arr?g2r7rom
Maintaining Company Information
1. From the My Account screen (Figure 2-26 on page 2-24). click Company
Maintenance to see company details as shown in Figure 2-30 below.
Racua ad Pelc.s:
'Company Name: GE Pratmeter
"Addresal: llDDThthUoIoa y Peek Deve
Acldre552;
Address3:
.City:
'5t2te: Ma5s,saFusett.s
I
`PostlCcce: C-1.S21
I
' CaLrt-y:
III
U p ftcd Stet.
Gantac Na•-re:
"Phare !Mr:
Fax Nbr:
:I
f-Mai Address:
Conlaary Lego:
« Click to change
Imeoe eeet viewed iF 165 ptxels w i de be 65 pxie EHal
T
' YDe: Commeriziel
Last Loair Date:
S]
[F
] [ Delete ] [
Figure 2-30: Company Maintenance
2. Edit company address and contact information as necessary.
3. The HygroTrac web software allows you to display your company logo in
the upper left comer of your HygroTrac web site. To change or add the
logo, click on the artwork or <none> if none is present Browse to the
correct path for your logo file and click [Save] as shown below.
rirt-ps:Ihvww.gehyg,rotrar.comi...
1) To Add
or Change
,our
ka
logo click_Bro . ...se and then Save.
[
ISave
Cancel I
Figure 2-31: Browse For New Logo Screen
4 • Once you have finished editing the fields:
14
0Srieg rkamac• k Rd Park Rodge NJ 07658 T& 201-782-1782 Fax • 201- 782-1783 WelalSi•P@
Maintaining Company Information (cont.)
• Click [Save] to save the revised data.
• Click [Reset] to erase any changes arid remain in the window.
• Click [Delete] to remove the company. Note that you cannot delete the
company if any job sites exist
• Click [Cancel] to cancel any changes and return to the My Account
screen.
Viewing/Changing Your Profile, Password, and Email
• From the My Account screen, click View My User Profile to review your
personal profile. You cannot make any changes to this information. Click
[Back to My Account] to return.
• From the My Account screen_ click Change My Password to update your
web site password. Type the password again to confirm and click [Change]
ng el
to accept [Reset] to erase the fields. or [Cancel] to return to the previous
screen.
• From the My Account screen. click Change My Email Address to update
your email address. Click [Change] to accept, [Reset] to erase the fields,
or [Cancel] to return to the previous screen.
r
l
05it-fit T& 201-782-1782 Fax • 201- 782- 178:3 Web
14 /1.16430ktiaariAgg PaiffiOiab
AWN.'
amgaircom Emasi info@ ar42,gom
Accessing the Equipment Pull-Down Menu
From the Equiprnent pull-down menu, you can review data on all accessible
gateways and sensors.
Viewin2 All Gateways
1. From the blue menu bar, select Equipnnent and then Gateways. This
screen provides a full Iist ofail gateways you can access. Figure 2-32
shown bel OW shows a sample gateway screen.
ity Amount
Itu Stun
Eatipmeet
aat
I 1-1*xit
Gateways
Gateway Id
Desuiptian
Metuutidt Id
Test Ste, A9dover, FAA
DEFADEFA
j
Status Last .Activity
A
629/2007 9:27152 !..rd
de D .?m] G0t99J'SY
.
GE Sensing 5 In d u stries 7 Product. & S er vices Took & Support About Us
ncligy >TE1',5 of Use
GE ::xporefe here > CE .L ongl te cr ,:nvenst • In cormaton >
Liser'E a
Figure 2-32: All Gateways Screen
2. Click on aT,, r Gateway ID to see details about that gateway. Note that you
cannot change any g ateway information in this screen.
• The Stat US colum n shows "A" for active gateways if at least on.e sensor
is active, "I" for inactive gateways, and blank if no data has been taken.
• The Last Activity column shows when the most recent sensor readings
were taken.
• Select Eclit to change the gateway description.
140darkamack
Rd Park Rodge rvi
07658 T& 201-782-1782 Fax • 201-782-1783 weLlsii4g Vap-tilgrecgoaGikabrifirriz..m
Viewing All Sensors
1. From the blue menu bar. select Equipment and then Sensors. This screen,
shown in Figure 2-33 below, provides a complete list of every sensor you
can view, regardless of alarm status.
Pty Ascont
3a8 Sits
toornolt
Sassari
Sen.cors
Orly SF ox Sensms 31th P.ctrie Awns
0 Yes 0
Ho
Sewer Id
Deatiption
Last Acttufko
Temp
RH%
TAME
GPP
Elimr Put.
06062330'
120:5' West - Door
015.'29.09:48
73.40
53.4
9.9
65.00
55.120
7.6892662*
BA sole.
09+29.09:49
72.80
95.5
79.10
65.70
9C.9P.:66e
7:6560548T
Humidor
La L.noe At - 5-e.0 North
06.'29.09:46
00.129.09:49
76.93
71.20
76.9
45.5
14.1
•-•
157.20
63.40
60.20
04.60
26052809'
Bseitriior.t Bern
06129.0950
75.00
56.4
10.0
73.30
55.60
._C_Ef•ARD
:CC 629FC
Roof S ea Se
06129.99:46
06129.09:49
46.7
42.0.
•••
0.4
69.30
62.50
56.00
04.30
7CEFDPIE
Insioe 4 4 . Di .. in . ng Roo
06129.0848
76.95
713.70
77.50
46.2
8.2
65.40
E5 50
-CEFOAD4
r• CSFO1M1"1
Re Fweratar radl en
Basement 'Nest
I
09229.09:47
06129.09:50
8.0
6.3
16.00
70 70
2880
59.00
00E60000"
The mosta
06129.09:49
1C0RODC1
GCSFDDCF
iz u mace Rac-n
H umicity Doe
06.1 29.3 9:16
05129.09:45
26E62E06'
5114 d Rom' - 1521t
t
- Writ Stor.ac,i
Sts
A
A
06 1 29 r9:50
.
43.30
'4.43
77_15
56.6
45,5
8.2
03.130
54.80
73.60
60.40
580
66.1
13.2
8.5
72.30
93.10
55.10
65.20
64.02
62.2
13.0
55.30
51.120
Figure 2-33: All Sensors Screen
2. To view only sensors with threshold alarms (Figure 2-34 below), set Only
Show Sensors With Active Alarms to [Yes].
tOyAcosamt
kg Sits.
Eriatrooni
amerl
Se ors
On.y Show Sensors 'Pith Score AS• nrs 101 Yes 0 Ho
Sensor hiS
Descnotkin
Last Acttutty
Sts
Temp
RH%
%LYME
GOP
Dew Put.
060923313'
Ro •sh West - Door
0E05.09:48
4
73.45
53.4
9.0
55.60
2.2092662"
00012riitrt V,GE WOo 519•.ai;2
Humidor
Lo ..n se Sr • - 5303 North
09229.09:49
A
72.80
14.1
0E09.09:51
A
06120.09:49
4
76.90
70.20
65,5
76,8
46.9
65.00
79.10
_
107.00
62.40
65.70
69.20
54.60
Basement Bean'
09.12089:50
75.00
584
10.8
73.30
55.00
26129.09:50
00329.09,49
26,29.99:50
74:10
77.10
58.6
209
8.2
6.2
04.0
62.2
13.8
71.70
52.90
55.30
65.12
54.60
51.00
,(.9436690
: (662899"
'750
• .-F:FODO D.
dasemert
Thermostat
2C8F022.6.-
Eg ad Rop f - 150
V.a
fi cm
2
.
Figure 2-34: Only Sensors With Alarms Screen
3. I f you select Equipment from the top menu bar. then hover the mouse
over Sensors, and then click on Alarms, you will see a list of only sensors
with current alarms.
1411.k.430ktherldgg fi aTCD.W Y RID ifiLla Tat 201-782-1782 Fax • 201- 7-?7R3 Web www amgair.com Ernal act@ aRgailcorrr
l
A
Viewing All Sen sors (cont.)
GE 13mi:tale:Er
1100 Thchnology Park Drive
Billerica, MA 01821
1 (k OD) 221-1978
Sensing
1.1n1
Sensors
Sensors
Rlerrns
Figure 2-35: Selecting Only Sensors With Alarms
4. Navigate this Sensors screen as described in "Viewing and Graphing
Sensor Measurements - on page 2-11.
140d2erkamack Rd Pa rfr
Rodge NJ
07658 T& 201-782-1782 Fax • 201-782-1783 weiLlsi.P@VaAvillgrolonGiAtiabri,irrizz,m
Finding Support and Help
The most recent versions of Hyg_roTrac support documents are available on
www.gehvgrotrac.com from the blue menu bar Pull down Support and
select
• User Manual for hardware and installation information
• Web Site User's Guide for use with the HygroTrac web site
The most recent version of the Web Site User's Guide is available on
www.qehvqrotrac.com from the blue menu bar. Pull down Support and
select Web Site Manuc[4.
You may contact GE Sensing by pulling-down Support on the blue menu bar
and selecting Contact Support. You may call the telephone number listed or
fill in the fields and click either [Submit] to submit your message or [Reset.]
to delete all fields.
Rconunt
lab St.
Equprient
Contact GE Sensing
Or contact us via email by submitting tile form below:
= Requred Folds
'OesThatbn: Arreicas;
' Your
C EmE4 A51.5: 0
ri me:
Company Harris:
'address:
'OW
'Smte Proynce:
1•
Zp Code:
CO U 70).r.
P1010 kid Tiber
Fan ILrnber
Figure 2-36: Contact GE Sensing
14 aUfaiagktiaariAgg PaiffiGORID
T& 201-782-1782 Fax • 201- 782- 178:3 Web WWW amgair.com Errrasi info@ aRgaUbm
Exiting
th e HygroTrac Web Site
There are two methods to exit the HygroTrac web site.
• From the My Accounts screen, click Log Out.
• From the menu bar, click the orange Log-out.
The screen shown in Figure 2-37 below indicates that you have successfully
logged out of the HygroTrac web site.
My Accairit
Sito
ErOprrent
FAXII:at
User Log-UuL
Thank you or using the GE Sensing TlygroTiac Wehsite.
Figure 2-37: Successful Exit Screen
r
14 Odherkamack Rd Pa fr Rodge NJ
07658 T& 201-782-1782 Fax • 201- 782-1783 Wela l Si• P@ ItapiggrolonGikab-i,irrizzw,
Appendix A
Glossary
/GliasscP4ack Rd Park Rodge (V._ e 07658 Te., 201-782-1782 Fax • 201-782-1783 Web
AWN."
amgair.com Erna.). info@arrr4ricorrr
Appendix B
Configuring the Gateway in Specific
Situations
Configuring the LAN Connection
The gateway is shipped from the 6ctory to plug and play with most common
LAN (local area network) environments, but from time to time you may need
to change the settings to he compatible with -non-standard" LAN
environments. Some possible I_AN configurations include:
• Setting a non-zero "LAN static IP", "LAN default gateway IP" and
"LAN subnet mask"
N ote: You should use a static IP address onl y if instructed to do so by your
network administrator.
• Setting the "LAN Static IP" to 000.000.000.000 (this is the factory
default), which tbrces the gateway to use DHCP to acquire an IP
address from your network's DHCP server.
N ote: If no DHCP server is found. the gateway will default to an autoassigned IP address of 169.254. I. I and will continue to try to get a
DHCP assigned address as well.
Connecting a Gateway Using Proxy Servers
Some networks, especially large corporate networks, block users from direct
access to the Internet. Instead, users must access the Internet through a proxy
server. The gateway can operate with proxy servers you must set the
gateway's - Remote Server IP" to the IP address ofthe network's proxy server.
If you do not know the proxy server IP address, contact your network
administrator To set your gateway back tbr use in a standard (i.e., no proxy
server) network environment, set the "Remote Server IP" to 12.156.76.36.
.
14 iGailitigiidia.941 LateWag f
itthattan gax 201- 782- 1 78:3 Web AWN.' amgair. cern En info@ amA.Acem
Configuring Dialup Information
The gateway requires your Internet Service Provider (ISP) phone number,
user name, and password. You must set these parameters using the New
Customer Registration menu. In most cases. one ISP account can support
many gateways and, in the event your ISP only allows a single login at a time,
the gateway will continue to attempt to login until it reaches the maximum
number of retries.
Other Dialun Settinn
Iii most office environments, you will need to dial 9 for an outside line. in
which case you should change the dial up number on the configuration menu
to include a dialing prefix of"9,". For example:
"Set dialup number(9,18666633679)Be sure to include the comma as it instructs the modem to pause before
dialing the next number. and the pause is required to wait tbr a dial tone from
the outside line.
You can also configure the time between server connection attempts and the
maximum number ofdialup retries used during a connection attempt. By
li miting the number of dialup retries, you can prevent the modem From
monopolizing the phone line in the event your ISP is not responding.
The gateway configuration menu also has a configuration option to allow you
to specify a "Modem Custom AT command string". Rarely used. this string
permits operating the modem outside of North America.
Accessing the Gateway Configuration Menu
N ate: For LAN connections, no configuration changes are usually
necessary For modem connections, ISP login, password, and phone
number are necessary.
To change the gateway configuration. users must enter the configuration
menu. You can access this menu via either the Ethernet port connection or the
RS-232 port connection. using a standard R5232 serial port cable with DB-9
connectors (not supplied). Either connection provides access to the same
menu settings.
141B4derkamack Rd Parfr
Rodge NJ
07858 T& 201-782-1782
EsknfiguraigkeZatekvs4in
Using an Ethernet Port to Access the C On fi2u ration Menu
Use the following steps to access the configuration menu via the LAN
connection:
1. Disable and disconnect ALL network connections on your laptop/PC
except tbr the LAN connection_ and then reboot your PC so that the LAN
connection will use an Auto Assigned IP Address.
2. Connect the gateway to your laptop or PC using supplied Ethernet cable.
3. Apply power to the gateway, and verify that the IAN Link LED is Iit and/
or flashes orange.
Note:If the LAN Link LED does not go on and/or flash. you will need to use
an Ethernet crossover adapter or an Ethernet Huh.
L . Wait for -30 seconds while the PC assigns itself an Auto IP address.
5. On your PC, verify that it has assigned itself the correct Auto IP address
From the Windows Start menu, click on Run, and then enter the command
"cmd /K ipconfig" as shown below. Click OK.
Type the now of a program, roh*r, dxixr4rt.,
rwl
' .
Z.j
Internet !6scurce, and Ylirklu.sts vo1 OP el k for you.
14 iGailitigiidia.941
LateWag
.
iR4p, f
itthattan gax 201- 782- 1 78:3 Web AWN.' amgair. cern Er r eel act@ arrA7dem
1:sin2 an Ethernet Port to Access the Conti2u ration Menu (cont.)
Note: If this command fails, then it is likely your PC is not using an attto
assigned IP address. Make sure . you that have followed the
instructions in step I.
8. Press the space bar to access the configuration menu as well as to view the
current gateway settings. You should see the menu shown below.
c7
Telnet 192.16E1.2.107
adio Firmware Revision : 0126
adio Configuration Revision : 0010
ateway ID : OC960004
AC : 00-16-F1-00-011-131
0-17-2006 17:28:51 GMT
ress space bar for setup menu at any tine.
etup Menu
<a> Set LAN static IP(000.000.000.000)
<b> Set LAN default gateuay 11'(000.000.800.000)
<c> Set LAN subnet mask(000.000.000.000)
<d> Set Remote Seruer )FF(012.043.214.176)
<e> Set Wireless Network Address(12345678)
<f) Set dialup number(2002122)
(g) Set dialup username(chnogenboom@earthlink_net>
(10 Set dialup password(chatham)
(i) Set MODEM custom AT command string()
(j) Set dialup time interval in minutes(720)
(k) Set dialup retries(2>
(1) Use LAN connection<N>
<m> Use MODEM connection<N>
(n) Use Auto Detect Connection<Y>
(q) exit and discard changes
(s) save changes to FLASH and reboot
nter selection>_
9. You can then modify individual settings by selecting the desired menu
item.
Note: Be sure to save your changes: stwing changes . forces a reboot which
will disconnect your telnet session from the gateway.
14 iGailitigiidia.941
LateWa4.1:17,40d f i 6itilottaan gax 201- 782- 1 78:3 Web AWN.' amgair. cern Er r
act@ an-rgr&om
Usin2 an RS-232 Port to Access the Confiauration Menu (cont.)
4. You will then be prompted to select the gateway connection (see below);
usually the connection is through the COM1 port, but it will vary from PC
to PC, and in some cases ma n,.- he through a serial adapter on a USB port.
Select the appropriate COM port name and click O K.
Co n nect To
6111$ gafeway ow:de
Enter cletas for tile phone number that you want to dial.
Countfy/regron:
Area oode:
1
Phone nurriber:
Connect ussng:
CO m
OK
J
Cancel
5. Follow prompts to enter the COM port settings. Configure the COM port
with the following settings and click OK
• Bits per second: 57600
• Data Bits: 8
• Parity: None
• Stop bits: I
• Flow control: None
Bits per cond: 5760:1
Data bits: 9
Paiity: Nene
Stop bits: 1
Fbw center:
•
14 iGailtigilidia.941P LateWag .f
Restore Details
itthattan gax 20:_ 782- 1783 Web WWW amgair.com Ernal [email protected]
Usin2 an RS-232 Port to Access the Confiauration Menu (cont.)
6. You are now ready to power on the gateway. Power on the gateway and
your HyperTerminal window should resemble the screen shown below If
you have problems, be sure that the HyperTerminal window is the
currently selected window on your desktop and that you do not currently
have any text selected in the HyperTerminal window.
MIESEME
.
He ER Wsv Cif
CI a
3
-
TIMTJff HdP.
-ID
6
Welcome to the GE Sensing HvgrolracilM) Gate
For product support please visit www.gehygrotrac.com
Gateway Firmware Revision 0113 Oct 05 2006 15:23:24
Radio Firmware Rouision
0126
Radio Configuration Revision : 0010
Gateway tU : 0C960006
RAC : 00-16-F1-00 00 01
10-1/-2006 17:25:42 GM!
Press sPace bar for setuP menu
2
7. Press the space bar within 5 seconds of power-up to access the gateway
configuration menu.
14 4308derkamack Rd Park
Rodge NJ
07858 T& 201-782-1782
E.,ianfiguraigkeZatekvs4in-...Sfawitiaktglatigtorn
Using an RS-232 Port to Access the l'nnrwuratinn Menu (cont.)
,y
g
Ha Edt iew GA frare Hel]
cii;•
3
=4:)
t?
Radio Firmware Revision : 0126
Radio Configuration Revision : 0010
Gateway ID 0C960004
MAC : 00-16-11A0-00-01
10-17-2006 17:2652 GM!
Press space bar for setup menu ...
Setup Menu
(a) Set LAN static TP(000.000.000.000)
(h) Set LAN default gatewav 1P(000.000.000.000)
(c) Set LAN subnet mask(000.000.000.000)
(d) Set Remote Server IP(012.043.214.176)
(e) Set Wireless Network Addressf123456713)
(f) Set dialup number(2002127)
(g) Set dialup username([email protected] )
p
(h) Set dialu password(chatham)
(i) Set MUM custom AT command string()
(j) Set dialup time interval in minutes(720)
(k) Set dialup retries(2)
(1) Use 14% connection(N)
(m) Use METH connection(N)
(n) Use Auto Detect Connection(Y)
(q) exit and discard changes
(s) save changes to FLASH and reboot
enter selection>_
,:anrected 0:01. • 21
Auto detect
57600 8-N-1
8. You can now modify individual settings by selecting the desired menu
item. Remember to save your changes.
14 iGailitigiidia.941
LateWag .f itthattan
g
ax 201- 782- 1 78:3 Web WWW amgair.com Er r act@ arrtgracm
cE
DECLARATION
OF
CONFORMITY
Sensing
We
GE Sensing
1100 Technology Park Drive
Billerica, MA 01821
declare under our sole responsibility that the
Protimeter HygroTrac Monitoring System
to which this declaration relates, is in conformity with the following standards:
For US and Canada Models Only
• FCC Part 15
This Product Contains Transmitter Module FCC ID: RY20002.
This equipment complies with Parts 15 of the Federal Communications
Commission (FCC) rules for the United States. Operation is subject to the
following two conditions: (1) this device may not cause interference, and(21this
device must accept any interference, including interference that may cause
undesired operation of the device.
The equipment has been tested and found to comply with part 15 of the FCC
rules. These limits are designed to provide reasonable protection against
harmful interference in a residential installation. This equipment generates,
uses and can radiate radio frequency energy and, if not installed and used in
accordance with the instructions, may cause harmful interference to radio
communications. However, there is no guarantee that interference will not
occur in a particular installation. If this equipment does cause harmful
interference to radio or television reception, which can be determined by
turning the equipment off and on, the user is encouraged to try and correct the
interference by one or more of the following measures:
• Reorient or relocate the receiving antenna.
• Increase the separation between the equipment and receiver.
• Connect the equipment into an outlet or on a circuit different from that to
which the receiver is connected.
• Consult the dealer or an experienced radio/TV technician for help.
FCC Part 15 Warning: Changes or modifications to this unit not expressly
approved by the party responsible for compliance could void the user's
authority to operate the equipment.
Air Markeling Group
741 Kinderkamack Rd Park Ridge NJ 071556 Tel 201-782-1782 Fax • 201- 782-1 7e3 Web
AWN." amgair.cam
Emal info@arrrgair corn
-
= =--
-
•-
=- -
=•=- • -
-
--
•
-
_
USA
1100 Technology Park Drive
fv/A 01821-4111
Web: www.gesensing.com/protimeterproducts
Ireland
Sensing House
Shannon Free Zone East,
Shannon, County Clare
Web: wws,v.gesensing.com/prot imeterproducts
Air lilarkeling Group
141 Kinderkamack Rd Park Ridge NJ 07856 Tel 201-782-1782 Fax • 201-783-1783 Web
WWW amgair.com
Emal info@arrrgair corn