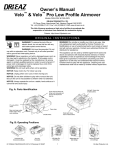
1
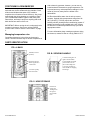
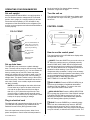
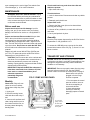
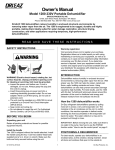
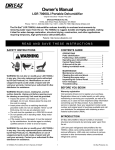
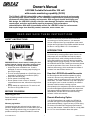
Owner’s Manual
LGR1800 Portable Dehumidifier 230 volt
with remote monitoring capability (F432i)
The Dri-Eaz® LGR1800 dehumidifier reduces humidity in enclosed structural environments
by removing water vapour from the air. The LGR1800 is engineered for improved operating
performance within lower humidity environments. With a rugged, durable and highly portable design, the LGR1800 is ideally suited for water damage restoration, structural drying,
construction, and other applications requiring temporary, high-performance
dehumidification. With built-in humidistat control, the LGR1800 is ideal for environments
that require longer term humidity control, museums, server rooms, etc.
READ AND SAVE THESE INSTRUCTIONS
need to communicate important safety information
concerning your Dri-Eaz product. If you determine
service is required, have your equipment model, serial
number and original proof of purchase available and call
Dri-Eaz on +44 (0)1908-611-211 for assistance.
SAFETY INSTRUCTIONS
WARNING
INTRODUCTION
Dehumidifiers reduce humidity in enclosed structural
environments by removing water vapour from the air.
With proper use, the LGR1800 can help dry carpet,
carpet pad, floors, walls, building contents and more.
Using dehumidifiers can also help prevent secondary
damage caused by high humidity. For best results, use
the LGR1800 with Dri-Eaz TurboDryer airmovers placed
around the perimeter of the room. Airmovers help to
distribute heat energy, which accelerate the release of
moisture from wet surfaces into the air.
WARNING! Electric shock hazard, rotating fan, hot
surface hazards. Unplug unit before opening cover
for cleaning or servicing. Unit must be earthed.
• Inspect the power cord before use. If cord is
damaged, do not use. Always grasp the plug (not
the cord) to unplug.
• The unit must be operated on a 230V/50Hz circuit
protected by a Residual Current Device (RCD).
• Keep motor and wiring dry.
• Do not operate in standing water
• Do not operate in rain or snow. If electrical
components become wet, allow them to dry before
using.
• Do not attempt to repair the unit. For service, call
Dri–Eaz at +44 (0)1908-611-211
How the LGR1800 dehumidifier works
Dri-Eaz refrigerant dehumidifiers operate by pulling
moist air in across a very cold evaporator coil. The
moisture in the air condenses on the coil and drips into a
catch basin. The water collects in a tray and is pumped
out through a hose. In certain conditions, the machine
operates in defrost mode, warming any frost
accumulated on the evaporator coil back into water. LGR
(Low Grain Refrigerant) dehumidifiers have better heat
exchange and defrost abilities than regular refrigerant
dehumidifiers, and are able to continue removing
moisture in drier environments.
BEFORE YOU BEGIN
Unpacking your unit
Retain all packing material and boxes for possible
equipment returns.
Remote Monitoring Option
Your Dri-Eaz distributor can modify the LGR1800 to
work with the HygroTrac Remote Monitoring System
(purchased separately). HygroTrac lets you view drying
environment conditions and equipment performance
from any Web browser. Contact Dri-Eaz on +44 (0)1908611-211 for more information about this option.
Warranty registration
Complete and post the enclosed card to register your
purchase. Registration allows us to better assist you with
using, maintaining and servicing your equipment, and
provides us with your contact information in case we
07-01706B 2010-02
1
Dri-Eaz Products
with a thermo-hygrometer; however, you can use an
indoor/outdoor thermometer to gauge temperature. For
improved accuracy, take temperature readings in in the
center of the room, away from the airflow of the
dehumidifier.
POSITIONING A DEHUMIDIFIER
For best results, operate your dehumidifiers in an
enclosed area, as this creates a drying chamber. Close
all doors and windows that open to the outside to
maximise the unit’s water removal efficiency. Also, keep
traffic though the drying chamber to a minimum. Place
your LGR1800 dehumidifier against a wall, away from
obstructions, and keep it away from anything that could
block airflow into and out of the unit.
Dri-Eaz dehumidifiers warm the air as they remove
moisture. Optimal drying temperatures range from 20–
29°C (68–85°F). This may require the use of the
building’s HVAC (heating and air conditioning) system. If
heating and cooling is not available at the site, contact
Dri-Eaz and a Technical Specialist will help you find an
appropriate solution.
IMPORTANT: Before moving the unit, make sure there’s
no water in the pump. See how to use the PURGE
function under “How to Use the Control Panel” on page
3.
For more information about creating an optimum drying
environment, contact Dri-Eaz on +44 (0)1908-611-211.
Managing temperature rise
Controling temperature in the drying environment is
critical. The most accurate way to monitor temperature is
PARTS IDENTIFICATION
FIG. A: BACK
Handle (in stored
position).
FIG. B: SECURING HANDLE
1. Rotate locking lever to
right to release handle.
2. Raise handle to upright
position and secure in
place with locking lever.
3. Reverse procedure to
secure handle for shipping
and storage.
Hose storage tabs.
Rotate upper tab to
release hose.
Location of pump
and catch basin.
FIG. C: HOSE STORAGE
Rotate hose
storage tab
180 degrees to
the right to
release drain
hose.
07-01706B 2010-02
2
Dri-Eaz Products
OPERATING YOUR DEHUMIDIFIER
let the unit rest for five minutes before restarting.
Otherwise it might shut off again.
Set unit upright
Turn the unit on
Always operate the dehumidifier in an upright position. If
the unit has been stored or transported in a horizontal
position, set it upright (in a vertical position) for at least
30 minutes before operating it. This will allow for any
compressor oil that has flowed into the refrigerant coils
to return to the compressor and allow the dehumidifier to
function properly.
The control panel on the LGR1800 has a display and a
ON/OFF to turn
touchpad with four keys. Press the
the unit on.
CONTROL PANEL
FIG. D: FRONT
PURGE PUMP
DISPLAY
Control panel
Moulded cord storage.
Process (dehumidified) air
outlet. May be used with
standard 300 mm (12 in.)
rigid or layflat ducting.
ON/OFF
Air filter access
door. Lift handle
to release.
DISPLAY
MENU
MENU
SELECTION /
UP KEY
How to use the control panel
The control panel on the LGR1800 has a display and a
touchpad with four keys.
Humid air inlet
(both sides).
ON/OFF. Press the ON/OFF key to turn the unit on or
off. When the machine turns on, the display normally
reads PLEASE WAIT COMP. DELAY and performs a
numeral count down from a maximum of 60 seconds
to 0. This delay allows time for refrigerant pressures to
equalise for easier starting. If you don’t see a
compressor delay countdown, a delay is not necessary
and the machine will begin operation immediately. Once
the unit completes the compressor delay, the display
shows UNIT ON XX HRS and cycles between
INLET TEMP XX°C and INLET RH XX%.
Set up drain hose
The LGR1800 pump connects to a plastic drainage
hose. The hose can be stored on the hose wrap, located
on the back of the unit (see Fig. A). You can release the
hose by rotating the top reel of the hose wrap down;
simply pull outward until you’re able to rotate it (see Fig.
C). Rotate the tab to the right or left until it is pointing
straight down. This feature makes it easy to take off the
entire hose quickly. Place the unattached hose end in a
sink, drain, bucket –even outside; anywhere that water
can drain out safely.
DISPLAY MENU. Press the DISPLAY MENU key to
cycle through the display of additional dehumidifier
conditions and User Settings. To return to the main
menu, press the ON/OFF button once.
NOTE: Uncoil and straighten the entire drain hose.
Do not leave any of part of the hose coiled on the
unit and do not place the end of the hose higher
than 4.5 m (15 ft.) above the top of the unit. Also
check for kinks, or obstructions that would restrict
the flow of water. Failure to do so may cause a water
backup in the pump resulting in leakage.
MENU SELECTION. Press the MENU SELECTION
key to change the values on the "User Defined" settings.
The MENU SELECTON key acts as the UP key for
adjusting the setpoint for Humidistat mode operation.
See User Settings Menu (below) for details.
Plug in electrical cord
PURGE. Press the PURGE key to manually empty
water from the condensate pump reservoir. NOTICE:
Always press the purge key prior to moving the unit.
During normal operation, the pump purges automatically
every six minutes, or whenever the reservoir is full. The
The electrical cord is wrapped around the top of the unit.
The LGR1800 will operate on any standard 230-volt
Residual Current Device (RCD) protected outlet.
If the unit experiences a loss of power, either from a
power interruption or from thermal overload protection,
07-01706B 2010-02
3
Dri-Eaz Products
display will read PUMP PURGING with a numeral
countdown.
INLET
00° 00%
00° 00%
Shows current temperature and RH of inlet and outlet.
The HygroTrac system uses these values to calculate
grain depression.
Main menu display
When unit is first plugged in to AC power, the control
panel display will briefly cycle through a series of
displays. This is part of the unit’s self-diagnosis
procedure and no user intervention is required.
HUMIDISTAT MODE
ON/OFF >
In ON mode, unit will maintain the humidistat setpoint
(see below). Press to toggle between ON and OFF.
NOTE: When in Humidistat mode, the unit will display
HUMIDISTAT on the top line during normal operation
rather than JOB HOURS.
Once the self-diagnosis is complete, the display will
show the following information:
UNIT ON 00 HRS
INLET 00°C / INLET 00%
The first line of the display shows the total number of
hours the unit has been in operation. This value may be
reset to zero to track job hours (see “Job Hours Reset”
below). The second line of the display alternates
between inlet temperature and inlet humidity.
HUMIDISTAT
SETPOINT 00% >
Sets humidity level when unit is in Humidistat Mode (see
to change RH value at 5% increments.
above). Press
Settings cycle upward through 90%RH and start again at
30%RH.
When fitted, the optional LGR1800i wireless transmitter
continuously seeks a connection with a HygroTrac
gateway. When a connection is established, a wireless
symbol appears in the lower right corner of the
display.
TEMPERATURE UNIT
C° >
Shows current temperature scale. Press
Fahrenheit or Centigrade scale.
No information is presented on the display when the unit
is not plugged in.
to select
LANGUAGE
ENGLISH >
Shows current display panel language. Press
select Spanish, German, French or English.
User settings menu
A number of settings may be changed by the user.
System information is also available. These items are
accessed by pressing the DISPLAY MENU key. Each
press of the key will display the next parameter (see list
below). When you reach the parameter you wish to
adjust, press the MENU SELECTON key to increase
DISPLAY MENU again to accept the
the value. Press
setting and re-start the display cycle. If no keys are
selected for 20 seconds the display will automatically
reset and return to the normal display mode.
to
COIL TEMP
00°C
Displays the cold (evaporator) coil temperature.
SENSOR ID >
00000000
When optional remote sensor fitted, shows built-in
wireless transmitter number. The HygroTrac system
uses this to uniquely identify your LGR1800 unit. NOTE:
For convenience, this same number is shown on the
barcode label affixed to the control panel.
Press to cycle through the following values: SENSOR
TYPE, SENSOR REVISION, and SENSOR CONF REV.
A Dri-Eaz service technician may ask you for these
values when diagnosing a problem.
Note that only menu items followed by a greater-than
symbol ( > ) may be adjusted.
JOB HOURS
RESET? >
Press to reset hours to zero. NOTE: When in
Humidistat mode, the unit will display HUMIDISTAT on
the top line during normal operation rather than JOB
HOURS.
COMPRSSR CURRENT
0.0 A
Shows compressor current draw in amps.
LIFE HOURS
00 HRS
Shows total unit operating hours. Value cannot be
modified.
07-01706B 2010-02
OUTLET
Error messages
If the LGR1800 onboard diagnostics discover a problem,
the unit will display an error message. If the unit is used
with the HygroTrac system, it will also transmit most
4
Dri-Eaz Products
Check catch basin tray, and clean when dirt and
debris are present.
error messages to the user’s HygroTrac website. See
“Error Messages,” p. 6, for more information.
1. Wipe clean with a rag.
MAINTENANCE
Check drain hose.
WARNING! ELECTRIC SHOCK HAZARD. Unplug
the LGR1800 before performing any maintenance.
Never use a water hose or pressure washer to clean
coils, as water entering the electrical compartment
could cause a shock hazard.
1. Look for obstructions. Disconnect and clear any debris
present.
2. Reattach gravity drain hose.
Inspect filter cover
1. Remove the filter cover (this can be done without
removing the housing).
Before each use
Inspect the electrical cord for damage. Look for
fraying, cuts, etc. Do not use the unit if you find any
damage. Call Dri-Eaz for service on +44 (0)1908-611211.
2. Vacuum off any visible dirt, or wash with mild soap
and water.
3. Let dry and put back in place.
Inspect and vacuum filter as needed. Keep a clean
filter in the unit at all times to protect internal
components from dust and other particulate build-up.
The LGR1800 is equipped with a 3M™ High Air-Flow
filter. The HAF filter may be vacuumed clean and reused
up to three times. Do not rinse or wash the HAF filter,
as it will reduce the effectiveness of the electrostatic
material.
Annually
Have the pump system inspected by the Dri-Eaz Service
Department on +44 (0)1908-611-211.
To access the LGR1800 pump, remove the four bolts
located at the bottom of the unit (Fig. F). Use a ⅜-in. nut
driver or socket.
Replace only with a new 3M HAF Filter (Dri-Eaz part
no. F372). For parts and service call Dri-Eaz Service
Department on +44 (0)1908-611-211.
TRANSPORT AND STORAGE
CAUTION: Dust can cause the unit to overheat and
shut down. Do not operate when excessive dust or
airbourne particles are present, such as during
sanding or spray-painting. Inspect and clean air filter
elements and coils frequently.
NOTICE: Handle the unit carefully. Do not drop, throw,
or place the unit where it could fall. Rough treatment can
damage this equipment and may create a hazardous
condition or void warranty.
IMPORTANT: Replace the HAF filter whenever 1)
IMPORTANT: Be sure to purge the water from the pump
it has been vacuumed clean 3 times or 2) it has
reservoir before moving the unit. See the PURGE
been used on a mould remediation job or
function under “How to use the control panel” on page 3.
otherwise exposed to
Note that the unit must be
potentially dangerous
plugged in for the Purge
contaminants.
function to operate.
FIG. F: PUMP ACCESS PANEL
Monthly
1. Do not expose the control
panel to moisture, snow or
rain when transporting in
uncovered vehicles.
2. Store and transport
securely to avoid any
damaging impact to internal
parts. READ AND
Check coils. Dirty coils can
cause the unit to overheat.
Clean when visibly dirty. See
Fig. E.
1. Unplug unit
2. Remove housing, locate
coils and allow coils to dry if
wet.
SAVE THESE
INSTR
3. Vacuum coils surfaces until
clean, being careful not to let
the nozzle touch the fins, as
that may cause damage by
bending them.
07-01706B 2010-02
To access the
pump, remove
the four bolts
(circled) on the
lower panel.
5
Dri-Eaz Products
ERROR MESSAGES
The table below shows error message that the system may detect. If the display shows an “ER” message, first unplug the
unit and then plug it back in. This may re-set the electronics, and if so, no further action is required. If the error message
reappears, try the solution under “Explanation.” If this still does not fix the problem, contact Dri-Eaz Service Department
on +44 (0)1908-611-211.
CONTROL
PANEL
EXPLANATION
MESSAGE
ER1 CONTACT SERVICE
CENTER
Check AC power for inadequate voltage. The electronic
control panel may require replacement. Contact service.
ER2 CONTACT SERVICE
CENTER
The electronic control panel may require replacement.
Contact service.
ER3 CONTACT SERVICE
CENTER
Check defrost sensor for proper connection. Check sensor
cable for damage. Sensor assembly may need
replacement. Contact service.
ER4 √ DEFROST SENSOR
CONNECT
– or –
ER4 √ OUTLET SENSOR
CONNECT
Check defrost sensor for proper connection. Check sensor
cable for damage. Sensor assembly may need
replacement. Contact service.
ER5 √ SENSOR CONNECT
ON BOARD
Check temp/RH sensor connections.
ER6 CONTACT
SERVICE CENTER
The high voltage board may need replacing. Contact
service.
ER7 INVALID
MODEL SETTING
Incorrect DIP switch settings or firmware version for that
specific model. Contact service.
ER8 BUTTON STUCK √
ALL BUTTONS
Press each membrane button and check for proper
operation. Membrane overlay may require replacement.
Contact service.
ER9 PUMP BLOCKED √
CHECK PUMP & HOSE
Check for obstructions in drain hose. Check the pump.
07-01706B 2010-02
6
Dri-Eaz Products
TROUBLESHOOTING
FAULT
CAUSE
SOLUTION
Unit does not
operate
Compressor will
not start
No power to machine.
Unit not switched on.
Unit needs 5 minutes before restart
Overload preventing start up
Plug in unit; check power at outlet and at base of unit.
Switch unit on.
Switch off unit, wait 5 minutes before starting.Reduce
room temperature below 32°C.
Blower wheel
not turning
Obstructed blower.
Remove duct ring and grill.
Remove obstruction.
Replace duct ring and grill.
Unit operating,
but room not dry
Not enough time to dry.
Poor air movement in room.
Excessive moist air infiltration.
Allow more time for drying.
Increase air movement with air movers.
Reduce infiltration.
Unit
continuously in
defrost mode
Room temperature too low
Increase room temperature.
Pump does not
function
Stuck float valve
Clean float valve shaft.
Unit collects too
little water
Room air is dry.
Room temperature is too low.
Airflow through unit is restricted
Check humidity with hygrometer.
Increase room temperature.
Check filter and coils; clean as necessary.
If the problem you are experiencing is not listed here, call Dri-Eaz Service Department on +44 (0)1908-611-211.
SPECIFICATIONS
Model
LGR1800 F432 (i)
Type
Low grain refrigerant
Refrigerant
R-410A
Use weight
Dimensions
(H × D × W)
42 kg
Power
2.8 amps, 230 volts
Water removal AHAM
(80°F/60% RH)
Water removal max.
(90°F/90% RH)
CONTACT
EUROPE
Dri-Eaz Products, Ltd.
22 Plover Close
Interchange Park
Newport Pagnell MK16 9PS
United Kingdom
Phone: (0)1908-611-211
Fax: (0)1908-611-363
www.dri-eaz.co.uk
85 × 52,5 × 52,5 cm
35 liters / day
63 liters / day
Max process air
289 CMH*
Operating Range
1–32°C
Air filter
3M HAF filter (part no. F372)
Power cord
7.6 m
Construction
Rotomolded polyethylene housing
Safety
CE
REST OF WORLD
Dri-Eaz Products, Inc.
15180 Josh Wilson Rd
Burlington, WA 98233
United States of America
Phone: 360-757-7776 Fax:
360-757-7950
www.dri-eaz.com
Warranty information is available at www.dri-eaz.com.
MICROBAN® is a registered trademark of Microban
Products Company.
Specifications are subject to change without notice. Some
values may be approximate.
07-01706B 2010-02
7
Dri-Eaz Products
PURCHASE
Purchase date: ________________________
Serial number: ________________________
Distributor: ________________________ Tel. _________________________
MAINTENANCE
DATE
07-01706B 2010-02
SERVICE
PERFORMED
8
PERFORMED
BY
Dri-Eaz Products