1
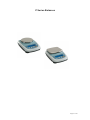
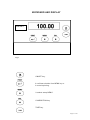
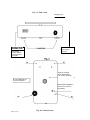
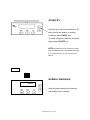
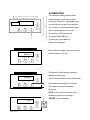
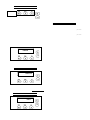
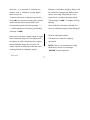
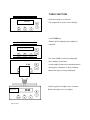
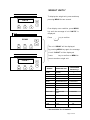
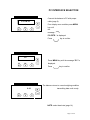
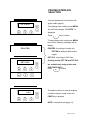
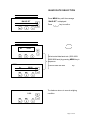
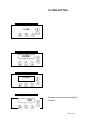
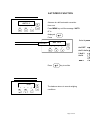
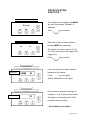
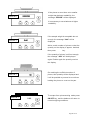
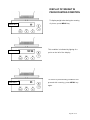
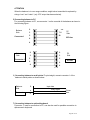
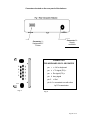
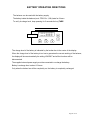
A Higher Level of Precision… A Higher Level of Performance Intell-Lab™ Precision Toploading Balances P Series User Operation Manual June, 2009 SUMMARY Summary ……………………………………………………………………. 2 Installation instructions ..…………………………………………………… 3 Weighing pan assembly ...………………………………………………... 4 Keyboard and display ……………………………………………………… 5 Inputs and outputs …………………………………………………………. 6 Normal 7 weighing Calibration Tare ……………………………………………………………. ……………………………………………………………….…. function 8-9 ……………………………………………………….…….… 10 Weight units …………………………………………………………….….. 11 PC Interface selection …………………………………………………….. 12 Printer Interface selection ………………...……………………………… 13 Baud rate selection ……………….………………………………………. 14 Filters settings ……………………………………………………………... 15 Autozero function ..………………………………………………………… 16 Piececounting function …………………….…………………………. 17-20 Determination of solid density for balances with proper optional software …………………………….. 21 RS232 Interface characteristics ……………………………………… 22-24 Battery operating directions …………………………………………………. 25 Page 2 of 30 INSTALLATION INSTRUCTIONS Remove balance and accessories from the carton. Do not install the balance in a place with draughts, heavy thermic changes and vibrations. Place the weighing pan and the support pan on the balance (see page 4). Level the balance using the level bubble and levelling feet located underneath the case. Connect power supply to connector 2 located on the rear panel of the unit (see page 6). Insert power cord into AC outlet, which shall be easily accessible. Wait 30 minutes from switch on and calibrate the balance following the instructions (page 8-9). Calibrate the balance again every time it is removed from previous place. Check balance calibration periodically. We recommend not to drop heavy objects on balance pan, in order to avoid damages. Assistance service must be effected by specialized staff and the spare parts used must be original. Therefore, it is necessary to apply to the seller who sold the equipment. Keep package in case the balance should be sent back to the factory for service. Page 3 of 30 P Series Balances Page 4 of 30 KEYBOARD AND DISPLAY Intell-Lab™ Fig. 1 ON/OFF key. It confirms selection from MENU key or it controls printing. It selects setup MENU’. CALIBRATION key. TARE key. Page 5 of 30 Fig. 1a - Rear view Weighing Pan CONNECTOR 2 Power supply connector 9 Pin RS232 Interface Output for PC/keyboard and printer Hook for weighing under balance plan. P.S. remove hook cap. B1, B2 and B3,B4 are screws for balance Removing the adjustable feet you can reach the reset button Fig. 2a - Bottom view Page 6 of 30 STAND BY After having connected the balance to AC outlet to bring the balance to working conditions, press ON/OFF key. To switch off again the balance, press and keep pressed ON/OFF key. NOTE: the balance also has a reset key, placed under the adjustable foot, (as illustrated at the pag. 6). It must be used only in case of arrest of the balance. Intell-Lab™ NORMAL WEIGHING 92. 00 Load the good to weight on the pan and read weight value on display. Instructions Page 7 of 30 CALIBRATION The electronic reading balance takes measurement of mass making use of Intell-Lab™ gravity (g). Difference in geographic area -- --- --- and altitude will vary gravity acceleration (g). Therefore, for accurate measurement, scale must be adjusted to the local environment. This adjustment is accomplished by CAL key. At empty pan, press CAL key. Dashes are displayed. When calibration weight value starts to flash, load the weight on the pan. 200 Gr calib. weight The display will stop flashing, indicating calibration weight value. 200.00 Wait for buzzer BEEP to confirm calibration. Unload calibration weight from the pan. The balance is ready for weighing operations. NOTE: if there is an interference during calibration process, the message “ERROR” will be displayed. 0.00 Page 8 of 30 Intell-Lab™ BEL ENGINEERING peso calib. peso calib. L O AD 400.00 0.00 Moreover, it is possible to calibrate the Example: if calibration weight is 200g, it will balance with a calibration weight higher be possible to calibrate the balance with than the one set. values from 200g,300g,400g up to the To perform this sort of calibration,press and highest limit of balance weighing range. keep CAL key pressed at empty pan until the The message "LOAD" on display will stop acoustic alarm will be deactivated, then flashing. release the key and the following string "- - - - Once calibration has been effected, the -" will be displayed, followed by the flashing value of calibrated weight will be displayed. message "LOAD" . Now load on the pan a weight equal or higher Remove calibration weight. than calibration weight set; the balance will The balance is ready for weighing recognise as valid a weight equal or higher operations. than calibration weight as long as it is a NOTE: if there is an interference during whole number in comparison with the most calibration process, the message meaningful digit of calibration weight.. “ERROR” will be displayed. Page 9 of 30 p e so c alib. TARE FUNCTION Load the container on the pan. 80. 16 The weight will be shown on the display Press TARE key. Dashes will be displayed until stability is reached. - - - - - - - - The value “0.00” will then be displayed when stability is reached. 0 .0 0 In case stability cannot be reached because of draughts, vibrations or other problems, dashes will keep on being displayed. Load the goods to weight in the container. Intell-Lab™ Page 10 of 30 Read net weight value on display. WEIGHT UNITS * To display the weight unit, press and keep UNITS pressing MENU for two second . From display zero condition, press MENU key until the message of unit “UNITS” is Intell-Lab displayed. Press key to confirm. GRAM The unit “GRAM” will be displayed. By pressing MENU key again, the message of unit “CARAT” will be displayed. Press key to confirm or MENU to pass to another weight unit. C AR AT SYMBOL MEASURE UNIT CONVERSION FACTOR 1g = GRAM GRAMS CARAT OUNCE CARATS OUNCES 5. 0.035273962 POUND POUNDS 0.0022046226 PENN. ONCETR. PENNYWEIGHTS TROY OUNCES 0.643014931 0.032150747 GRANO TAEL HON GRAINS HONG KONG TAEL SYNGAPORE TAEL 15.43235835 0.02671725 * TAEL ROC R.O.C. TAEL 0.02666666 * MOMME MOMME 0.2667 * x 10 x 10 10. * x 100 x 100 100. * TAEL SGP 1. 0.02646063 * Not available for all models. Page 12 of 30 PC INTERFACE SELECTION Connect the balance to PC with proper P C- P R T R cable (page 6). From display zero condition press MENU key until the message “ PC-PRTR “ is displayed. Press key to confirm. PC Press MENU key until the message “PC” is displayed. Press key to confirm. The balance returns to normal weighing condition 0.00 transmitting data conti nously. NOTE: select baud rate (page 14). Page 13 of 30 PRINTER INTERFACE SELECTION Connect the balance to the printer with PC -PRT R proper cable (page 6). From display zero condition press MENU key until the message “ PC-PRTR “ is displayed. Press key to confirm. To select data printer mode press MENU key until the following messages will be display : PRINTER PRINTER: for printing of weight only PRT TIM:for printing of date,hour and weight PRT GLP: for printing of GLP data PRT GLP (Printing modes PRT TIM and PRT GLP are available only using printer mod. CUSTOM DP24E4 ) Press to confirm. 0.00 The balance returns to normal weighing conditions ready to weigh every time PRINT key is pressed. NOTE: select baud rate (page 14). Page 14 of 30 BAUD RATE SELECTION Press MENU key until the message B AU D R T “BAUD RT” is displayed. Press br key to confirm. 1200 Select serial data baud rate (1200-24004800-9600 baud) by pressing MENU key in sequence. ENGINEERING Confirm baud rate with br key. 9600 The balance returns to normal weighing 0.00 condition. Page 15 of 30 FILTERS SETTING FILTER lb oz ct g FILTER 5 lb PRINT oz MENU ct g CAL The balance returns to normal weighing conditions. Page 16 of 30 It is possible to adapt the balance to the ambient conditions. Five settings are available: FILTER 1 : proportion of ingredients conditions FILTRO 2 : very stable conditions FILTRO 3 : stable conditions FILTRO 4 : unstable conditions FILTRO 5 : very unstable conditions Press MENU key until the message Press key to confirm. select by MENU key FILTER 1, FILTER 2…..FILTER 5. Confirm selected filetr with key. “FILTER” is displayed. Page 17 of 30 AUTOZERO FUNCTION Autozero is a drift automatic correction AUTO 0 lb oz ct from zero. g CAL Press MENU key until the message “AUTO 0” is displayed. Press Select by MEN Au0 OFF Intell-Lab™ lb oz ct g Au0 OFF CAL = au Au0 1 Au0 = le 2 Au0 3 = le Au0 4 = le = lev Press key to confirm 0.00 lb oz ct g CAL The balance returns to normal weighing conditions. Page 18 of 30 PIECECOU NTING FUNCTION * From display zero condition, press MENU PCount key until the message “ PCount “ is displayed. Press key to confirm. Select the number of required pieces nc 10 pressing MENU key repeatedly. The choice of number of pieces (10, 25, 50, 100) is connected to the weight of the single piece. Press key to confirm. Load on the pan the number of pieces Intell-Lab™ indicated on the display. Press key once again. Wait for stabilization of the weight. If the number of samples is enough (for example n. 10 as in picture) their number Intell-Lab™ will appear on the display and it will be possible to effect counting . * Not available for all models. Page 19 of 30 If the pieces to count have a too smaller weight than balance readability, the Intell-Lab™ message “ERROR” will be displayed. It is necessary to use a balance at higher readability. If the sample weight is acceptable but not enough, the message “Add” will be Intell-Lab™ displayed. Add a certain number of pieces so that the quantity on the display is approx. doubled, then press key. If the quantity of pieces is still not enough, the message “Add” will be displayed again. Double again the quantity read on the display. On reaching the sufficient number o f Intell-Lab™ pieces, their quantity will be displayed and it will be possible to proceed to count them loading the pieces to count on the pan. To escape from piececounting mode press Intell-Lab™ BEL 0. 0 0 ON/OFF key, and the balance will return to EN GINEER IN G normal weighing conditions. Page 20 of 30 AUTOMATIC UPDATING OF UNIT WEIGHT After having effected the sampling, it is possible to update the average unit weight Intell-Lab™ as follows : instead of loading all the pieces to count, load a number of pieces equal to the double of the one loaded on the pan. Wait for the symbol C to be displayed followed by a short acoustic message. Now it is possible to repeat this procedure Intell-Lab™ up to a maximum of 255 pieces or proceed to the normal counting of the pieces. This mechanism grants a more precise evaluation of the average unit weight and a better precision in counting of pieces. NOTE: the mechanism of the automatic updating is not active if the sampling has been effected by insertion of the average unit weight from alphanumeric keyboard. Page 21 of 30 DISPLAY OF WEIGHT IN PIECECOUNTING CONDITION To display weight value during the counting Intell-Lab™ Intell-Lab™ of pieces, press MENU key. This condition is indicated by lighting of a point on the left of the display. To return to piececounting condition and Intell-Lab™ proceed with counting, press MENU key again. Page 22 of 30 DETERMINATION OF SOLID DENSITY FOR BALANCES WITH PROPER OPTIONAL SOFTWARE * Balance program allows to determine solid density through four steps: TARE IN AIR; TARE IN WATER; SOLID WEIGHING IN AIR; SOLID WEIGHING IN WATER. STORAGE OF TARE IN AIR Tare in air (weight of the small basket in air) is about zeroing of small basket weight in air. Press TARE key to effect this operation being sure that value displayed is “0”. STORAGE OF TARE IN WATER Select density menu by pressing MENU key. The message “DENS” is displayed. By pressing TARE key the message “t.H20” is displayed. Dip the small basket in water and press TARE key once again. The message starts flashing until stability is reached, then an acoustic alarm is given out. Tare value in water is stored until balance is switched off, and it can be changed repeating the same sequence of operations above mentioned. DETERMINATION OF SOLID DENSITY Select “DENS” by pressing MENU key and then press CAL key. The message “S.AIR” will be displayed. Load a solid in the small basket and press CAL key. The message starts flashing. As soon as it is stable, an acoustic alarm is given out and the message “S.H2O” is displayed. Dip the small basket with the solid in water and press CAL key once again. The message will flash. As soon as stability is reached, an acoustic alarm is given out and density value is displayed. Press MENU key to return to weight display. Press PRINT key to print the value displayed. * Not available for all models I Page 23 of 30 SERIAL INTERFACE RS 232 1) General characteristics The balance sends the value displayed in serial form RS232C, allowing to print weight on PC monitor or on a serial printer. In case of connection with PC, it is also able to get commands, always in RS232C format, that allow to effect all operations with balance keys through PC keyboard. Baud rate is selectable trough MENU and keys, as shown previously, at 1200, 2400, 4800, and 9600 baud. The format of character is of 8 bit preceded by a start bit and followed by a stop bit. Parity is not considered. 1) Interface selection for PC Selecting PC output (personal computer IBM compatible) through MENU and keys, weight is sent continuously at the same frequency with which weight indication is updated on display. It is CODE FUNCTION “T” = H54 TARE “C” = H43 CALIBRATION “E” = H45 ENTER “M” = H4D MENU possible to effect all balance functions directly from PC keyboard, sending to the balance ASCII cods indicated in the list. The connector to use for PC connection is n.1 (fig.1 page 24). 2) Interface selection for printer Otherwise, if it has been selected output for serial printer, weight value will be printed, once this will be stable, pressing PRINT key. If weight does not become stable in 10 seconds, the message “ERROR” will be displayed and an acoustic alarm will be emitted. The connector to use for printer connection is n.1 (fig. 1 page 24). 3) Display format The string sent is composed of 14 characters: first character : weight symbol (space or -) ; - second - ninth character : weight or pieces number ; tenth - twelfth character : measure unit symbol ; thirteenth character : carriage return ; - fourteenth character : line feed. Possible non-meaningful zeroes are spaces. Page 24 of 30 ATTENTION When the balance is in over range condition, weight value transmitted is replaced by strings “over” and “under” (only if PC output has been selected). 5) Connecting balance to PC For connecting balance to PC, use connector 1 on the rear side of the balance as shown in the following figure : Balance Side Connector 1 2 32 3 7 6 5 20 PC Side 25 Poles 6 4 Balance Side Connector 1 2 2 3 3 5 5 6 6 4 PC Side 9 Poles 4 6) Connecting balance to serial printer To print weight, connect connector 1 of the balance to serial printer as shown below : Balance Side 2 4 Connector 5 Input data Busy signal GND Printer Side 7) Connecting balance to optional keyboard Connector 1, used for connection to PC, can also be used for possible connection to alphanumeric keyboard. Page 25 of 30 Connectors located on the rear panel of the balance Connector 2 : Supply connector Connector 1 : Keyboard/PC/ Printer CONNECTOR 1 FOR KEYBOARD OR PC OR PRINTER 9 8 7 6 pin 1 = +5v for keyboard pin 2 = Tx signal (PC) = pin 3 Rx signal (PC) = pin 4 busy signal pin 5 = Gnd pin 4-6 = connected one with other by PC transmission Fig. 3 Fig. 4 Page 26 of 30 BATTERY OPERATING DIRECTIONS The balance can be used with the battery supply. The battery inside the balance (mod. FP612 6v 1,2Ah) lasts for 8 hours. To verify its charge level, keep pressing for 2 seconds the key TARE. BEL Intell-Lab™ EN GINEER IN G The charge level of the battery is indicated by the broken bar in the centre of the display. When the charge level of the battery is too low to guarantee the correct working of the balance, the display will show automatically the writing LOW BAT and all the functions will be disconnected. The supplied external power supply must be connected to re-charge the battery. Battery’s recharge time is about 12 hours. Only when the broken bar will be completely on, the battery is completely recharged. Page 27 of 30 NOTE: Page 28 of 30 WARRANTY CONDITIONS 1. Duration of warranty is of one (1) year from the date of purchase proved by invoice concerning the product or by delivery note. 2. Warranty covers all parts resulting defective at the origin. It does not cover mechanical or electronic parts damaged by wrong installation, tampering or incorrect use. 3. Warranty does not cover damages caused by impacts, balance drops or drop of objects on weighing pan. 4. Shipment to and from service center is at customer charge Intelligent Weighing Technology serves the industrial and laboratory markets in North America with competitive pricing and value for money on a complete range of industrial and laboratory scales and balances, force measurement and load monitoring technology from 0.01 mg to 275 tons. We are the exclusive source for Intel l- Lab™ , Intell-Industrial ™, Intell- Check™ , Intell™ ™ ™ ™ ™ Count , Intell-Weigh , Intel l- Base , Intel l-Scan and Intell -Print laboratory, industrial, counting, analytical, precision and toploading balances, printers, peripherals and weighing equipment. We are the exclusive source for UWE weighing equipment in the US and the Caribbean. We are the exclusive source for Intell- Lift ™ Straightpoint (UK), Ltd. products in North America, Mexico and the Caribbean. We have a combined 50 years of experience in the weighing and measurement industry, both in the USA and worldwide. With contacts in over 50 countries, we provide you with the weighing and measurement equipment you need. QUALITY- Products solidly built from the ground up with superior engineering and components for exacting results. VALUE - Equipment priced for real- world business applications, with superior service and support. EXPERIENCE - Expert advice to help you choose just the right product for your application. Quality + Value + Experience…it adds up to the Intelligent Investment. Intelligent Weighing Technology, Inc. www.intelligentwt.com © Intelligent Weighing Technology, Inc. All rights reserved worldwide. The information contained herein is the property of Intelligent Weighing Technology, Inc. and is supplied without liability for errors or omissions. No part may be reproduced or used escept as authorized by contract or other written permission. The copyright and the foregoing restriction on reproduction and use extend to all media in which the information may be embodie