1
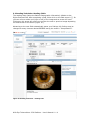
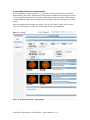
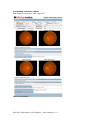
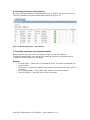
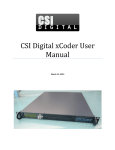
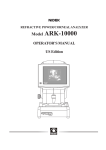
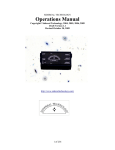
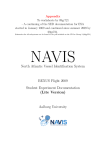
Wills Eye Telemedicine: CDC Platform - User’s Manual v. 1.0
Wills Eye Telemedicine: CDC Platform - User’s Manual V. 1.0
1. ADMINISTRATIVE AREA: 3 1.1. 1.2. 1.3. 1.4. 3 3 3 3 CLINIC ADMINISTRATION: GLOBAL ADMINISTRATION: REGION ADMINISTRATION: SETUP 2. UPLOADING ACCOUNTS: 4 2.1. UPLOADING IMAGES: DEFAULT PAGE 2.2. UPLOADING IMAGES: ADD NEW PATIENT 2.3. UPLOADING IMAGES: DESIGNATE READING TECHNICIAN AND PRINCIPAL INVESTIGATING PHYSICIAN (PIP) 2.4. UPLOADING IMAGES: PATIENT IMAGES 2.5. UPLOADING IMAGES: PROCESS OVERVIEW 2.6. UPLOADING IMAGES: BROWSER UPLOAD 2.7. UPLOADING IMAGES: DRAG AND DROP 2.8. UPLOADING IMAGES: EDIT/REVIEW 4 5 6 6 7 8 9 9 3. READING ACCOUNTS 10 3.1. 3.2. 3.3. 3.4. 3.5. 3.6. 3.7. 10 11 12 13 14 14 15 READING TECHNICIAN: UNREAD PATIENTS READING TECHNICIAN: READING FIELDS READING TECHNICIAN: INTERPRETATION READING TECHNICIAN: REPORT READING TECHNICIAN: READ PATIENTS READING TECHNICIAN: READ PATIENTS DETAILS READING ACCOUNT: PIP 4. CDC TECHNICIAN: DATA MINING Wills Eye Telemedicine: CDC Platform - User’s Manual V. 1.0
16 1. Administrative Area:
The most important section for managing every aspect of the CDC diagnostic
platform is the Administrative Area.
The Administrative area is the control center of the entire platform, making this
section the most important in terms of management and security. For this reason,
Administrative accounts (and access) will be limited to IT specialists and high-level
stakeholders.
In this module, Administrators can perform any of the following functions:
1.1.Clinic Administration:
•
Add/Browse Roles - Roles are the definitions referring to each account
(Reading Technician, Upload Technician, Printing Technician, etc). This section
is technical in nature and it is where the developers enter the code defining
each role. This section should only by edited by technical developers.
1.2.Global Administration:
•
•
Add/Browse Regions – Regions are the geographical or organizational
divisions under which clinics or reading centers can be organized.
Add/Browse Users – This is the area where individual user accounts can be
added. Users will be associated to a specific region/reading center and will be
assigned one or more roles
1.3.Region Administration:
•
Add/Browse Clinics/Reading Centers – The actual name and contact
information to the individual clinic or reading center in a particular Region
1.4.Setup
To set up a new Region or Reading Center and subsequent users, please provide the
Account managers with the following information:
Region: Name, Description
Reading Center: Name, Website, State, Zip Code, Main Phone, Main Address, City,
Region (from above), Clinic setup (CDC, Diabetic, etc.), Clinic Design (upload logo,
upload CSS file for new design).
User: Username, Email, First Name, Last Name, Account Setup (User Profile, User
Role), Contact Information (Address, City, State, Zip, Country, Phone, Fax, Cell
Phone, Mobile Carrier). Cell phone information is for SMS notifications.
Wills Eye Telemedicine: CDC Platform - User’s Manual V. 1.0
2. Uploading Accounts:
The CDC diagnostic platform can manage different functions for Telemedicine. An
important position in the ROP-Telemedicine workflow is the upload technician. Upload
technicians are directly associated with individual Reading Centers and this acts as a
filter in that each upload account can only view patients uploaded to their
corresponding clinic.
2.1.Uploading Images: Default Page
Logging in with an Upload account will bring the user to the default page with the
patient list, designated as either “Read” or “Unread”. On this template (see Figure
1), the user can search for patients, view status, edit information on existing
patients, or “Add” a new patient.
The most common activity on this screen, will be adding new patients for the
Reading Technician to read.
Figure 1. Default Upload template
Wills Eye Telemedicine: CDC Platform - User’s Manual V. 1.0
2.2.Uploading Images: Add New Patient
On the left-hand menu, click on the “Add” link to go to the Patient demographic and
medical information upload module (Figure 2).
Enter all required (in red) demographic and medical Information.
Figure 2. Add Patient
Wills Eye Telemedicine: CDC Platform - User’s Manual V. 1.0
2.3.Uploading Images: Designate Reading Technician and Principal
Investigating Physician (PIP)
After the demographic and medical information has been entered, a Reading Tech
and PIP must be selected. Pay close attention to this part since the correct Reading
Technician assignment is important.
To select the Reading Tech and PIP, use the pull-down menu (Figure 3).
Figure 3. Add Physician Information
2.4.Uploading Images: Patient Images
Once the correct Patient Demographic information, Medical Information, and
Physician information has been added, press the “save” button. You will now see a
“Read Only” version of the Demographic and Medical Information AND an MRN
(Patient ID) plus further instructions. The MRN is used to initiate image capture on
the Navis-Lite software and camera (Figure 4).
Figure 4. Add images through the Upload Interface
Wills Eye Telemedicine: CDC Platform - User’s Manual V. 1.0
2.5.Uploading Images: Process overview
The upload process is outlined below (Figure 5.). The Nidek camera software settings
should be changed in order to output DICOM images. The images will be “dragged
and dropped” into the browser interface where the will transfer and appear. A
“Verify” button, simply confirms that the images uploaded correctly (visual check)
and takes the Tech back to the “Patient Browse” page. NOTE* the DICOM upload
will ONLY work with DICOM images generated by the Navis-Lite/Nidek
camera and software.
WET PH2.5 CDC: Upload Process
4.0
!
The Nidek software
exports DICOM images
to a folder on the PC.
The Upload thech then
drags images/folder into
the browser as instructed
Reading Physician of
Record
5.0
Reading Technician:
MRN:
3.0
Wills Eye/ CDC
Softare
generates
patient MRN.
Patient Info
Patient images
6.0
VERIFY
1.0
Login:
Clinic Upload
Technician
2.0
ENTER
Patient Info
Medical Info
7.0
NEXT PATIENT
Link back "Add Patient"
Upload Technician:
Figure 5. Image upload process
Wills Eye Telemedicine: CDC Platform - User’s Manual V. 1.0
2.6.Uploading Images: Browser Upload
Once images have been taken using the Nidek camera and the Navis-Lite software,
resulting DICOM images will be exported to a designated desktop folder. Go back to
the upload page (Figure 5 above) and press the “Upload Images” button. You will
now see the browser-based Upload interface in your browser (Figure 6.).
Figure 6. Upload images by dragging them into this browser interface
Wills Eye Telemedicine: CDC Platform - User’s Manual V. 1.0
2.7.Uploading Images: Drag and Drop
Drag images from desktop folder to the browser. Images will upload (placement will
be determined by DICOM data such as MRN and time stamp for sequence). Review
uploaded images and click on the “Verify” button to confirm. This lets the system
know that the images are correct (Figure 7) and returns you to the “Browse” page
NOTE* This feature is only supported in FireFox, Chrome, and Safari
Browsers.
Figure 7. Review images and “Verify”
2.8.Uploading Images: Edit/Review
On the main “Browse” page, the right-hand column of the patient list contains a fixed
set of identical actions for each patient.
(Figure 8.)
Figure 8. Actions
Actions:
• Modify (pad/pencil) – Edit Information fields for each patient.
• Upload New Exam (window+ arrow) – Allows Tech to “re-read” the exam.
This generates a NEW report (different MRN)
• Disable (flag) – This essentially turns the patient “off”. Disabled patients can
be enabled at the administrative level.
Wills Eye Telemedicine: CDC Platform - User’s Manual V. 1.0
3. Reading Accounts
There are two types of Reading accounts – Reading Technicians, and Principal
Investigating Physicians (PIP). Reading Technicians are specific to CDC Reading
centers and they are responsible for the primary reading of the patient images.
Principal Investigating Physicians (PIP) are the overseeing Physicians responsible for
all data and report generation within regions (multiple CDC reading centers). These
accounts are limited to “Read Only” privileges. These accounts allow the user to view
images and see the final report as a .PDF file.
Reading accounts are set up by the administrators and managed by the Upload
workflow.
3.1.Reading Technician: Unread Patients
The Reading Tech accounts default to the “Unread” patient list (Figure 9). There is a
single action button – “View All Photo Sessions” (eye). The template uses the same
toggle as the Uploading accounts to filter the patient list (Unread, Read, All).
Figure 9. Reading Technician – home page
Wills Eye Telemedicine: CDC Platform - User’s Manual V. 1.0
3.2.Reading Technician: Reading Fields
The reading chart (below the Patient Demographic information) defaults to the
Right>External field. After completing a field, either click on the field name in [ ]. Or
you can roll over either end (right or left) of the image and an arrow will hover.
Clicking on this arrow will move you to either the next or previous image depending
on the direction of the arrow (Figure 10.).
Advancing to the next field automatically saves your findings. All findings may be
changed as many times as desired BEFORE saving the exam in “Interpretation”.
Figure 10. Reading Technician – Reading Field
Wills Eye Telemedicine: CDC Platform - User’s Manual V. 1.0
3.3.Reading Technician: Interpretation
The Interpretation Chart (Figure 11.) is the last check and opportunity for editing
before saving the report. Images on the left can be replaced with an image from any
of the small thumbnails that are visible underneath the larger image. Comments or
recommendation fields can be edited and the changes will carry through to the final
report.
When the reader has finalized the report, click on the “Save” button you can now
view the final report as a PDF and it has been saved in the database.
Figure 11. Reading Technician – Interpretation
Wills Eye Telemedicine: CDC Platform - User’s Manual V. 1.0
3.4.Reading Technician: Report
Final Report is saved as a .PDF (Figure 12)
Figure 12. Final Report
Wills Eye Telemedicine: CDC Platform - User’s Manual V. 1.0
3.5.Reading Technician: Read Patients
By using the “Show patients” toggle and setting it to “Read”, the patient list can be
filtered by patients that have already been examined (Figure 13).
Figure 13. Reading Technician – Read Patients
3.6.Reading Technician: Read Patients Details
When a patient has been read, this section contains many more options.
The bottom examination was read and the Reading Physician is presented with a
number of different options at this stage.
Actions:
• Re-read Exam – Takes user to the Reading Chart. The exam is read again as
a new session
• View Chart – Shows the reading charts, but they are “read-only” and may not
be edited
• View Interpretation – View “Read-Only Version of the interpretation
• View PDF Report – View PDF copy of the final report
Wills Eye Telemedicine: CDC Platform - User’s Manual V. 1.0
3.7. Reading Account: PIP
The Principal investigating Physician account is similar to the Reading technician with
some important differences. PIP accounts function at the “Regional” level. This
means that they can view patient lists from any of the CDC Reading centers within
the region they are assigned to. PIP accounts can switch to other reading centers in
their region by using the CDC reading center pull-down that is found at the top of the
page. This feature IS ONLY available for PIP accounts (Figure 14). PIP accounts will
only have “Read Only” accounts and will not be able to edit patients or examinations.
Figure 14. PIP
Wills Eye Telemedicine: CDC Platform - User’s Manual V. 1.0
4. CDC Technician: Data Mining
Wills Eye Telemedicine: CDC Platform - User’s Manual V. 1.0