1
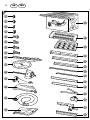
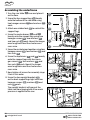
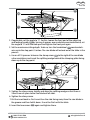
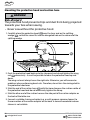
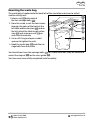
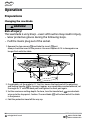
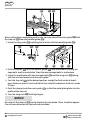
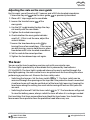
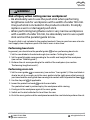
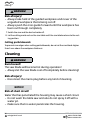
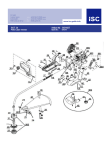
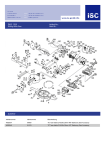
User Manual Spend a little Live a lot GUIDE OPED I N VEL DE nse om my ha NY RMA GE MANUA L Table Saw WZTS 1702 c o n t ro l.c User-friendly Manual ID: #05007 Original instructions QR codes take you where you want to go quickly and easily Whether you require product information, spare parts or accessories, details on warranties or aftersales services, or if you want to watch a product demonstration video, our QR codes will take you there in no time at all. What is a QR code? A QR code (QR = Quick Response) is a type of matrix that can be read with a smartphone camera and that contains a link to a website or contact details, for example. Advantage: You do not need to manually enter a website address or contact details. This is how it works To scan the QR code, all you need is a smartphone with QR code reader software and an internet connection*. This type of software can be downloaded for free from your app store. Try it out now Just scan the QR code with your smartphone and find out more about the Aldi product you have purchased.* Your Aldi Service Portal All details mentioned above can also be found in the Aldi Service Portal at www.aldi.co.uk. * Depending on your tariff plan you may be charged for the connection. Overview..............................................................................4 Use.........................................................................................5 Product contents/device parts............................................6 General information............................................................. 7 Reading and storing the original instruction manual.........7 Explanation of symbols............................................................7 Safety....................................................................................8 Proper use.................................................................................. 8 Safety notes............................................................................... 9 First use............................................................................... 19 Checking the table saw and product contents................... 19 Assembly................................................................................... 19 Operation............................................................................ 26 Preparations.............................................................................26 Turning the saw on and off................................................... 29 Cutting depth.......................................................................... 29 Setting the angle.................................................................... 29 Parallel guide.......................................................................... 29 Cross guide............................................................................... 31 The laser....................................................................................33 Sawing...................................................................................... 34 Cleaning..............................................................................36 Troubleshooting................................................................. 37 Technical data....................................................................38 Ordering spare parts..........................................................40 Declaration of conformity.................................................. 41 Disposal...............................................................................42 Warranty Card.....................................................................43 Warranty conditions...........................................................44 Dok./Rev.-Nr. 93063_20150504 Contents 4 GB IRE A 29 28 1 27 26 25 2 24 23 3 22 21 4 5 20 19 18 6 7 8 9 17 10 11 16 15 12 13 14 GB IRE 5 B 16 17 13 19 30 31 34 32 33 C 40 35 36 39 38 37 GB IRE Product contents/device parts 1 Saw table 21 Push stick 2 Table width extension (2x) 22 Carriage screw M6 x 20 (2x) 3 Table length extension 23 Carriage screw M6 x 16 (4x) 4 Support leg (4x) 24 Hexagon screw M6 x 12 (52x) 5 Centre brace 47 cm (2x) 25 Allen head screw M5 x 10 (6x) 6 Centre brace 44 cm (2x) 26 M6 nut (38x) 7 Table support 48 cm (2x) 27 6 mm washer (52x) 8 Table support 36.5 cm (4x) 28 M5 nut x 4 (4x) 9 Upper brace 43 cm (2x) 29 M5 nut x 2.8 (4x) 10 Upper brace 40.5 cm (2x) 30 Eccentric lever 11 Upright bracket (2x) 31 Adjusting and locking handle 12 Rubber feet 32 Handwheel 13 Parallel guide 33 Mains cord including mains plug 14 Stop rail 34 Power switch 15 Waste bag 35 Laser switch 16 Suction hose 36 Battery compartment screws 17 Saw blade guard 37 Laser 18 Splitting wedge with laser 38 Battery compartment 19 Cross guide 39 Batteries 20 Saw blade (48 teeth) 40 Battery compartment cover The product contents include two type LR03 1.5 V batteries. IRE GB General information General information Reading and storing the original instruction manual This instruction manual accompanies this table saw. It contains important information on start-up and handling. For improved readability, the “original instruction manual” will be referred to only as the “instruction manual”. Before using the table saw, read the instruction manual carefully. This particularly applies for the safety notes. Failure to heed this instruction manual may result in severe injury or damage to the table saw. The instruction manual is based on the standards and rules in force in the European Union. When abroad, you must also observe country-specific guidelines and laws. Store the instruction manual for future use. If you pass the table saw on to third parties, please be absolutely sure to include this instruction manual. Explanation of symbols The following symbols and signal words are used in this instruction manual, on the table saw or on the packaging. This signal symbol/word indicates a hazard with high DANGER! risk that, if not avoided, results in death or a severe injury. WARNING! This signal symbol/word designates a hazard with moderate degree of risk which may lead to death or severe injury if not avoided. CAUTION! This signal symbol/word designates a hazard with low risk that, if not avoided, may result in minor or moderate injury. NOTICE! This signal symbol/word warns against potential damages to property. This symbol provides you with useful supplementary information on assembly or operation. After Sales Support GB 0044 151 649 1500 IRE 0044 1890 946 244 7 [email protected] GB IRE Safety Declaration of conformity (see chapter “Declaration of conformity”): Products marked with this symbol meet all applicable Community regulations for the European Economic Area. Caution: Laser beam! Do not look into the laser beam! Attention! Risk of injury due to sharp edges! Wear protective goggles! Wear ear protection! Wear respiratory protection! Safety Proper use The table saw is only for cutting woods of all kinds lengthwise and crosswise (only with the cross guide) in accordance with the size of the machine. Round lumber, regardless of the kind, may not be cut. Only saw blades suitable for the machine (HM or CV saw blades) may be used. The use of HSS saw blades and cutting discs of any kind is prohibited. The table saw is only intended for private use and not suitable for commercial purposes. Only use the table saw as described in this instruction manual. Any other use is deemed improper and may result in damage to property or even personal injury. The table saw is not a children's toy. The manufacturer or vendor accepts no liability for damage caused by improper or incorrect use. 8 [email protected] After Sales support 0044 151 649 1500 GB IRE 0044 1890 946 244 IRE GB Safety Safety notes General safety notes for power tools WARNING! Read all safety notes and instructions. Failure to follow the safety notes and instructions may result in an electric shock, fire and/or severe injury. Keep all safety notes and instructions for future reference. The term “power tool” used in the safety notes refers to mains-operated power tools (with a mains cord) and battery-powered power tools (cordless). 1. Work place safety a)Keep your work area clean and well lit. Disorganisation or unlit work areas may result in accidents. b)Do not work with the power tool in areas with a risk of explosion where flammable liquids, gases or dusts are present. Power tools may produce sparks that could ignite dust or vapours. c) Keep children and other persons away from the power tool while you are using it. If you are distracted, you could lose control of the device. 2. Electrical safety a)The connector plug for the power tool must fit in the socket. The plug may not be modified in any way. Do not use any adapter plugs in combination with power tools with protective earthing. Plugs that have not been modified and sockets with the proper fit reduce the risk of an electric shock. b)Avoid coming into contact with earthed surfaces like pipes, heaters, stoves and refrigerators. There is an increased risk of electric shock if your body is grounded. c) Keep power tools away from rain or moisture. If water penetrates a power tool, there is an increased risk of electric shock. After Sales Support GB 0044 151 649 1500 IRE 0044 1890 946 244 9 [email protected] GB IRE Safety d)Do not use the cord for purposes other than the intended one such as for carrying the power tool, hanging it up or pulling the plug out of the socket. Keep the cord away from heat, oil, sharp edges or moving parts of the device. A damaged or wound up cable increases the risk of an electric shock. e)If you are working with a power tool outdoors, only use extension cords that are also suitable for outdoor use. The use of an extension cord suitable for outdoor application reduces the risk of electrical shock. f) If operating the power tool outdoors cannot be avoided, use a fault-current circuit breaker. Using a fault-current circuit breaker reduces the risk of an electric shock. g)Do not operate the power tool in a wet or damp environment. Never expose it to rain. Working in a wet and damp environment increases the risk of electric shock and generally increases the risk of injury. 3.Safety of persons a)Be careful, pay attention to what you are doing and approach work with a power tool in a reasonable manner. Do not use any power tool if you are tired or under the influence of drugs, alcohol or medication. A single moment of inattentiveness when using the power tool can result in serious injury. b)Wear personal protective gear and always wear protective goggles. Depending on the type of power tool and how it is used, wearing personal protective gear such as a dust mask, non-slip safety shoes, a protective helmet or ear protection reduces the risk of injury. If you have long hair, wear a hair net. Use a breathing mask if performing dusty work. c) Avoid accidentally activating the device. Make sure that the power tool is turned off before you connect it to the power supply, connect the rechargeable battery, pick it up or carry it. If you have your finger on the switch when carrying the power tool or connect the device to the power supply when it is turned on, this may cause an accident. 10 [email protected] After Sales support 0044 151 649 1500 GB IRE 0044 1890 946 244 IRE GB Safety d)Remove all adjusting tools or spanners before you switch the power tool on. A tool or spanner in contact with a rotating part of the device may result in injury. e)Avoid an abnormal posture. Maintain a safe stand and keep your balance at all times. This will allow you to have better control of the power tool in the event of unexpected situations. f) Wear suitable clothing. Do not wear any loose-fitting clothing or jewellery. Keep your hair, clothing and gloves away from the moving parts. Loose clothing, jewellery or long hair may get caught in the moving parts. It is recommended that you wear firm gloves, non-slip shoes and protective goggles. g)If you can attach dust extractors and dust collectors, make sure that they are connected and used properly. Using a dust extractor may reduce risks associated with dust. 4.Using and handling the power tool a)Do not overload the device. Use the right power tool for your work. The right power tool will ensure that you work more effectively and safely within the specified power range. b)Do not use a power tool if its switch is defective. A power tool that can no longer be switched on or off is dangerous and must be repaired. c) Pull the plug out of the socket and/or remove the rechargeable battery before you make any adjustments to the device, change the accessories or put away the device. This precaution will prevent the power tool from accidentally starting. d)Keep unused power tools out of the reach of children. Do not let persons use the device who are not familiar with the device or have not read these instructions. Power tools are dangerous if used by inexperienced persons. e)Take good care of the power tools. Check to make sure that the moving parts are functioning properly and not stuck, whether parts are broken or damaged so as to affect the function of the power tool. Have damaged parts repaired before you use the device. A large number of accidents are caused by poorly maintained power tools. After Sales Support GB 0044 151 649 1500 IRE 0044 1890 946 244 11 [email protected] GB IRE Safety f) Keep your cutting tools sharp and clean. Well maintained cutting tools with sharp cutting edges are less likely to catch and are easier to guide. g)Use the right tool. Do not use any tools or attachments that are not powerful enough for heavy duty work. Do not use the tools for purposes and tasks which they are not intended for; for example, do not use a circular hand saw to fell trees or cut off branches. h)Use the power tool, accessories, insertion tools etc. in accordance with these instructions. At the same time, consider the working conditions and the work to be performed. Using power tools for applications other than the intended ones may result in dangerous situations. 5.Service a)Only have your power tool repaired by a qualified professional and only with original spare parts. This will ensure that the safety of the power tool is not compromised. WARNING! Danger for children and persons with impaired physical, sensory or mental capacities (e.g. partially disabled persons, older persons with reduced physical and mental capacities) or lack of experience and knowledge (e.g. older children). −− The table saw may not be used by children and persons with impaired physical, sensory or mental capacities or lack of experience and knowledge. −− The operator must be at least 18 years of age; trainees who are at least 16 years of age may only operate the device if they are supervised. −− Children may not play with the table saw. Cleaning and user maintenance must not be performed by children. −− Do not allow children to play with the packaging wrapper. They may get caught in it when playing and suffocate. −− Make sure that children do not insert any objects in the table saw. 12 [email protected] After Sales support 0044 151 649 1500 GB IRE 0044 1890 946 244 IRE GB Safety WARNING! Risk of electric shock! A faulty electrical installation or excessive mains voltage may result in an electric shock. −− Only connect the table saw if the mains voltage of the socket corresponds to the specification on the nameplate. −− Do not kink the mains cord and do not lay it over sharp edges. −− Only connect the table saw to an easily accessible socket so that you can quickly disconnect the table saw from the power supply in the event of a fault. −− If an extension cord is required, make sure its diameter is sufficient to accommodate the power consumption of the saw. Minimum diameter 1 mm2. −− Only use cable drums if the cable is completely rolled out. −− Check the mains connection line. Do not use any faulty or damaged connection lines. −− The table saw is equipped with a safety switch to protect it against reactivation after a voltage drop. −− Never operate the table saw in wet rooms or in the rain. −− If the mains connection line of this device is damaged, it must be replaced by the manufacturer, its customer service department or a similarly qualified person in order to prevent risks. −− Do not open the housing; instead, have a qualified professional perform the repairs. Contact a qualified workshop for this. Liability and warranty claims are waived in the event of repairs performed by the user, improper connection of the device or incorrect operation. After Sales Support GB 0044 151 649 1500 IRE 0044 1890 946 244 13 [email protected] GB IRE Safety WARNING! Risks associated with using the table saw If used improperly or in a negligent manner, the table saw can inflict serious injury! −− Carefully read through the instructions on proper handling, preparatory steps, maintenance, starting and switching off the table saw. Familiarise yourself with all controls and switches as well as proper use of the table saw. −− The rotating saw blade poses a risk of injury for your hands and fingers. Pay attention to the direction of rotation of the motor and saw blade. −− Set up the table saw in a stable position. −− Prevent accidental start-up. Ensure that the power switch is off when connecting to the power supply. −− Safety devices on the machine may not be removed or dismantled. −− Check to make sure that moving parts are functional, that they are not jammed and that the parts are not damaged. All parts must be properly mounted to guarantee the safety of the device. −− Damaged protective devices and parts must be professionally repaired or replaced by a customer service workshop to the extent not otherwise specified in the instruction manuals. −− You must replace a worn or damaged insert. Pull the mains plug before doing so. −− Damaged switches must be replaced by a customer service workshop. Do not use any tools if the power switch cannot be turned on and off. −− Defects in the machine, including defects affecting protective devices and the saw blade, must be reported to the person responsible for safety as soon as they are identified. −− For your own safety, only use accessories and auxiliary equipment specified in the instruction manual or recommended or specified by the tool manufacturer. Using tools or accessories other than those recommended in the instruction manual or catalogue may put you at risk of personal injury. 14 [email protected] After Sales support 0044 151 649 1500 GB IRE 0044 1890 946 244 IRE GB Safety −− The following factors may influence the effect of noise on the operator: • Type of saw blade (e.g. saw blades that reduce the effect of noise) • Workpiece material • The force with which the workpiece is pushed against the saw blade. Safe operation −− The safety, working and maintenance notes of the manufacturer as well as the dimensions specified in the technical data must be complied with. −− Applicable accident prevention regulations and other generally recognised safety rules must be complied with. −− Observe all specification booklets provided by the professional association. −− The operator must be informed about factors affecting the release of dust, e.g. the type of workpiece being cut (classification and source), the importance of local deposit and the correct configuration of hoods / baffles / guides. −− Connect the dust extractor every time you perform any work. Only operate the saw with a suitable dust collector or commercially-available shop vacuum. Recommended suction power of the dust collector: 20 m/s −− Before start-up, all covers and safety devices must be properly mounted. −− The splitting wedge is an important protective device that guides the workpiece and prevents the kerf from closing behind the saw blade and the workpiece from kicking back. Take note of the thickness of the splitting wedge. The splitting wedge may not be thinner than the body of the saw blade and no thicker than the width of the kerf. −− Insert the splitting wedge properly and never operate the table saw without the splitting wedge. −− You must lower the protective hood onto the workpiece for every work step. After Sales Support GB 0044 151 649 1500 IRE 0044 1890 946 244 15 [email protected] GB IRE Safety −− Set the protective hood correctly and never operate the table saw without the protective hood. −− Always position yourself to the side of the saw blade when working. −− Guide the workpiece properly. −− Always use the push stick or a push block to safely push the workpiece by the saw blade. −− Always store the push stick or the handle for a push block on the machine when not in use. −− When cutting pre-processed wood, look out for debris like nails or screws etc. −− Never stress the table saw so that it comes to a stop. −− Always push the workpiece firmly against the worktop. −− Make sure that the pieces of wood cut are not caught by the teeth of the saw blade and projected. −− Never remove loose splinters, chips or clamped-in wood parts while the saw blade is running. −− To rectify faults or to remove pieces of wood that are caught, switch the machine off and pull the mains plug. −− Do not cut any workpieces that are too small to be safely held in your hand. −− Do not use the table saw to cut firewood. −− Do not cross cut round lumber. −− Do not cut rebates or grooves without fitting a suitable protective device, e.g. a tunnel-type device, over the saw table. −− Do not use the circular saw to cut slots (a groove ending in the workpiece). −− It is not permissible to make plunge cuts with this table saw. −− When cutting narrow pieces of wood to size, the parallel guide on the right side of the saw blade must be clamped in place. −− Secure long workpieces against falling off at the end of the cut (e.g. with a roller stand). 16 [email protected] After Sales support 0044 151 649 1500 GB IRE 0044 1890 946 244 IRE GB Safety −− Do not in any case push against the side of the saw blade to stop it after switching off the motor. −− Observe the notes for lubricating and changing tools. −− All protective and safety devices must be immediately remounted once repairs or maintenance are complete. −− Only use the transport fixtures to transport the machine; never use the protective fixtures for handling or transport. The handle openings for transport are located on both sides of the saw housing. −− During transport, cover the top part of the saw blade, for example, with the protective hood. Safety notes for handling saw blades −− Keep your saw blades sharp and clean. Well maintained cutting tools with sharp cutting edges are less likely to catch and are easier to guide. −− Do not use deformed or cracked saw blades. It is not permissible to repair them. Worn, damaged or cracked saw blades may increase the release of dust. −− Do not use any saw blades that do not meet the characteristic data specified in the instruction manual. −− These saw blades are not suitable for resharpening! −− Only use saw blades recommended by the manufacturer that correspond to EN 847-1. When changing the saw blade, make sure that the cutting width is not less and the thickness of the steel blade is no greater than the thickness of the splitting wedge. −− Only use saw blades whose maximum permissible speed is not less than the maximum spindle speed of the table saw. −− Only saw blades that are suitable for the table saw (HM or CV saw blades) may be used for the table saw. The use of HSS saw blades and cutting discs of any kind is prohibited. −− Select a saw blade that is suitable for the material you intend to cut. After Sales Support GB 0044 151 649 1500 IRE 0044 1890 946 244 17 [email protected] GB IRE Safety −− Wear gloves when handling saw blades and rough materials. Whenever convenient, you must carry the saw blade in a container. −− Make sure that all fixtures covering the saw blade are functioning properly. −− The saw blade must be able to rotate unimpaired. −− It is not permitted to use loose reducing rings or bushings to reduce bore holes in circular saw blades. It is permissible to use fitted rings, e.g. pressed into circular saw blades or held in place by means of an adhesive bond or flanged bushings with other tools, if they are manufactured in accordance with the manufacturer's stipulations. −− Due to production tolerances, the reducing rings may have to be fitted in the bore hole on the saw blade with a rubber mallet. For this, place the area around the bore hole on the saw blade on a solid base (e.g. wood); the teeth must be unobstructed when striking to prevent the saw blade from being bent. −− Replace the reducing ring with a new one (available in a professional outlet) if it is no longer able to hold itself in the saw blade. −− Tools and tool bodies must be clamped in place to prevent them from coming loose during operation. −− When mounting the tools, it must be ensured that they are clamped in place on the tool collar or the clamping surface of the tool and that the blades do not come into contact with one another or the clamping elements. −− Fixing screws and nuts must be tightened with the corresponding wrenches etc. and the torque as specified by the manufacturer. −− It is not permitted to use striking tools or extensions for the wrench when tightening. −− The clamping surfaces must be free of dirt, oil and water! 18 [email protected] After Sales support 0044 151 649 1500 GB IRE 0044 1890 946 244 IRE GB First use Residual risks: Despite being used properly, certain residual risk factors cannot be completely ruled out. The following risks associated with the design and construction of the machine may apply: −− Contact with the part of the saw blade that is not covered −− Reaching into the rotating saw blade (cut injury) −− Kickback of workpieces and parts of workpieces −− Saw blade breaks −− Projection of defective hard metal parts of the saw blade −− Hearing loss in the event of failure to use the required ear protection −− Emission of wood dust that is harmful to health if used in enclosed spaces First use Checking the table saw and product contents 1.Carefully take the table saw out of the packaging. 2.Check to make sure that the delivery is complete (see fig. A). 3.Check whether the table saw or the accessories exhibit damage. 4.In the event of damages or missing parts, do not use the table saw. Contact the manufacturer via the service address indicated on the warranty card. Assembly WARNING! Before start-up, assemble the table saw properly and completely, including all covers and safety devices. −− Only once you have completed assembly, may you insert the mains plug in the socket. You will need the following tools for assembly: • two AF 10 ring spanners • one ring and one AF 8 open-ended spanner • one 4 mm Allen wrench • PH2 star-headed screwdriver After Sales Support GB 0044 151 649 1500 IRE 0044 1890 946 244 19 [email protected] GB IRE First use Assembling the underframe 1.Turn the saw table 1 over and place it on the floor. 2.Screw the four support legs 4 loosely onto the bottom of the saw table using two hexagon screws 24 and washers 27 each. 3.Attach one rubber foot 12 to each of the support legs. 4.Screw the centre braces 5 and 6 loosely onto the support legs using two hexagon screws 24 , two washers 27 and two nuts 26 each. Mount the longer ones lengthwise and the shorter ones cross-wise. 5.Screw the centre braces together using four hexagon screws 24 , four washers 27 and four nuts 26 . 6.Screw the top braces 9 and 10 loosely onto the support legs with four hexagon screws 24 , four washers 27 and four nuts 26 each. Mount the longer ones lengthwise and the shorter ones cross-wise. 7.Now tighten all screws for assembly steps 2 to 6 in this order. 8.Screw the two upright brackets 11 on the back support legs tight with two hexagon screws 24 , washers 27 and nuts 26 each. The upright brackets will prevent the table saw from tipping back if too much pressure is applied to the saw. 20 [email protected] 12 4 24 27 1 6 5 9 10 11 24 27 26 After Sales support 0044 151 649 1500 GB IRE 0044 1890 946 244 IRE GB First use Mounting the table extensions 1. Screw the table width extensions 2 and table length extension 3 loosely onto the saw table 1 with two Allen head screws 25 and washers 27 each. 7 3 1 8 2 25 26 2. Screw the 36.5 cm table supports 8 loosely onto the sides of the saw table using two hexagon screws 24 and washers 27 each. 3. Screw the other end of the table supports loosely onto the table width extensions 2 using two hexagon screws 24 , washers 27 and nuts 26 . 4. Screw the 48 cm table supports 7 loosely onto the back end of the saw table using two hexagon screws 24 and washers 27 each. 5. Screw the other end of the table supports loosely onto the table length extension 3 using two hexagon screws 24 , washers 27 and nuts 26 each. 6. Align the table width and length extensions so that they are level with the saw table and tighten all screws. 7. Carefully turn the table saw over and set it upright with its legs on the ground. After Sales Support GB 0044 151 649 1500 IRE 0044 1890 946 244 21 [email protected] GB IRE First use Mounting the parallel guide 1.Hold the eccentric lever 30 up and set the parallel guide 13 on the rail 42 . 14 41 13 30 42 2.Loosen the wing nuts 41 by turning them a few revolutions and push the stop rail 14 onto the parallel guide so that the metal plate glides into the profile of the stop rail. 3.Tighten the wing nuts again. For removal, lift the front of the parallel guide slightly with the eccentric lever 30 and reach under the stop rail with your other hand. Mounting/adjusting the splitting wedge WARNING! Risk of injury! The saw blade is very sharp – even soft touches may result in injury. −− Wear protective gloves during the following steps. −− If necessary, pull the mains plug out of the socket. You must check and, if applicable, adjust the splitting wedge every time after changing the saw blade. 1.Remove the two screws 43 and take the insert 44 out. Always check the insert in the process: Replace it if it is damaged or if it is no longer flush with the table. 22 [email protected] After Sales support 0044 151 649 1500 GB IRE 0044 1890 946 244 IRE GB First use 44 43 32 31 2.If applicable, set the angle to “0”. For this, loosen the front part of the adjusting and locking handle 31 by turning it approx. one revolution counterclockwise; set the angle to “0” with the back part and tighten the front part again. 3.Set the maximum cutting depth: To do so, turn the handwheel 32 counterclockwise up to the stop point. Caution: The saw blade will extend out of the table in the process. 4.Use an AF 10 spanner to loosen the clamp screw 45 to the right of the saw blade a few revolutions and insert the splitting wedge behind the clamping plate facing down up to the stop point. 18 45 5.Tighten the clamp screw slightly and align the splitting wedge so that there is 3 and 5 mm of space to the saw blade on all sides. 6.Tighten the clamp screw. 7.Put the insert back in: First insert it on the side facing away from the saw blade in the groove and then fold it down. It must be flush with the table. 8.Insert the two screws 43 again and tighten them. After Sales Support GB 0044 151 649 1500 IRE 0044 1890 946 244 23 [email protected] GB IRE First use Mounting the protective hood and suction hose WARNING! Risk of injury! The protective hood prevents chips and dust from being projected towards your face when sawing. −− Never saw without the protective hood. 1.Carefully place the protective hood 17 over the laser and on the splitting wedge 18 , so that the screw fits into the elongated hole on the rear end of the splitting wedge. 16 17 46 18 2.Push the protective hood back up to the stop point and do not tighten the wing nut 46 excessively – it must be possible to move the protective hood up and down. The wing nut must always be on the right side. Otherwise, you will encounter problems when performing bevel cuts. Therefore, do not turn the carriage bolt in the protective hood over. 3.Stick the end of the suction hose 16 with the hose clamp on the suction nozzle of the protective hood and do not excessively tighten the clamp. 4.Stick the other end of the suction hose on the side port of the suction adapter on the back of the table saw. 5.Connect a suitable shaving extractor (e.g. a multi-purpose vacuum cleaner) to the connection of the suction adapter on the back. A normal household vacuum cleaner is not suitable. 24 [email protected] After Sales support 0044 151 649 1500 GB IRE 0044 1890 946 244 IRE GB First use Mounting the waste bag The waste bag is hooked onto the back left of the saw table and serves to collect smaller cutting rests. 1.Screw a nut 29 onto each of the four carriage bolts 23 . 2.From the inside, insert the four screws through the holes at the back on the left table width extension 2 and on the left side of the table length extension 3 and screw one nut 28 on each from the outside. 3.Use an AF 8 ring and open-ended spanner to tighten the nuts. 4.Hook the waste bag 15 onto the carriage bolts from the inside. 3 2 23 29 28 15 You should now have two carriage bolts 22 left. Store them well; they are needed to mount the stop rail 14 on the cross guide 19 . You have now successfully completed initial assembly. After Sales Support GB 0044 151 649 1500 IRE 0044 1890 946 244 25 [email protected] GB IRE Operation Operation Preparations Changing the saw blade WARNING! Risk of injury! The saw blade is very sharp – even soft touches may result in injury. −− Wear protective gloves during the following steps. −− Pull the mains plug out of the socket. 1.Remove the two screws 43 and take the insert 44 out. Always check the insert in the process: You must replace it if it is damaged or no longer flush with the table. 44 43 32 31 2.If applicable, set the angle to “0”. For this, loosen the front part of the adjusting and locking handle 31 by turning it approx. one revolution counterclockwise; set the angle to “0” with the back part and tighten the front part again. 3.Set the maximum cutting depth: To do so, turn the handwheel 32 counterclockwise up to the stop point. Caution: The saw blade 20 will extend out of the table in the process. 4.Fold the protective hood all the way up. 26 [email protected] After Sales support 0044 151 649 1500 GB IRE 0044 1890 946 244 IRE GB Operation 47 48 5.Fit a AF 24 ring or open-ended spanner on the fastening nut 47 and an AF 10 open-ended spanner on the drive shaft 48 . 6.Loosen the fastening nut by turning it counterclockwise while holding the drive shaft tight with the second open-ended spanner. 7.Take the fastening nut and the pressure disc off of the drive shaft. 8.Carefully remove the saw blade from the drive shaft flange diagonally in a downward direction. 9.Clean the drive shaft flange, the fastening nut and pressure disc thoroughly. 10.Place the new saw blade on the drive shaft flange. In the process, observe the direction of rotation: the cutting edge of the blade teeth must point in the direction of rotation (forward, see the arrow on the protective hood). Usually, the direction of rotation is indicated on the saw blade. 11.Put the pressure disc back on and screw on the fastening nut by hand. 12.Carefully turn the saw blade in the direction of rotation: It must be exactly centred and may not “wobble”. Otherwise, you should check to make sure the flange is properly seated (step 10). 13.Use the two spanners to tighten the fastening nut again. 14.Check and correct the distance between the saw blade and splitting wedge (see section “Mounting/adjusting the splitting wedge”). 15.Put the insert back in: First insert it on the side facing away from the saw blade in the groove and then fold it down. It must be flush with the table. 16.Insert the two screws 43 again and tighten them. After Sales Support GB 0044 151 649 1500 IRE 0044 1890 946 244 27 [email protected] GB IRE Operation Inserting/changing the batteries of the laser The laser beam shows you exactly where the saw blade will cut next so that you can make very precise cuts. You will need two type Micro/LR03 batteries to operate the laser (included in the product contents). Proceed as follows to insert or change them: 1.Loosen the wing nut 46 by turning it a few revolutions. 2.Push the protective hood 17 forward and carefully lift it up and off. 17 You will now see the laser in front of you 46 (see fig. C). 35 3.Set the laser switch to position “0” (laser off). 4.Loosen the battery compartment screws 36 slightly and turn the retaining plates so that they no longer block the battery compartment cover 40 . 5.Open the battery compartment cover by folding it up and remove it. 6.If necessary, remove the old batteries. Please observe the notes in the chapter “Disposal”. 7.Insert the new batteries. Make sure that the polarity is correct as specified in the battery compartment. 8.Put the battery compartment cover back in place and secure it with the retaining plates and battery compartment screws. 9.Carefully place the protective hood over the laser and on the splitting wedge so that the screw fits into the elongated hole on the rear end of the splitting wedge. 10.Push the protective hood back up to the stop point and do not tighten the wing nut 46 excessively – it must be possible to move the protective hood up and down. 28 [email protected] After Sales support 0044 151 649 1500 GB IRE 0044 1890 946 244 IRE GB Operation Turning the saw on and off WARNING! Risk of injury. −− Before pushing the on switch, make sure the saw blade is correctly mounted and that mobile parts move freely. −− To switch the saw on, push the green power switch “I” 34 . The motor will start. Wait until the saw blade has reached the maximum speed before sawing. −− To switch the table saw back off, push the red power switch “0” 34 . Caution: The saw blade will continue to rotate for some time. Only leave the table saw unattended once the saw blade has come to a stop. Cutting depth Use the handwheel 32 to set the saw blade to the desired cutting depth: −− Turn counterclockwise: Increase the cutting depth. −− Turn clockwise: Reduce the cutting depth. Setting the angle 1.Turn the front part of the adjusting and locking handle 31 approx. one rotation in a counterclockwise direction to loosen it. 2.With the back part of the adjusting and locking handle, set the desired angle on the scale. 3.Turn the front part until it is tight again. Parallel guide 14 13 41 Stop height The stop rail 14 of the parallel guide 13 has two guide surfaces of different height. Depending on the thickness of the materials to be cut, turn the stop rail into an upright position for thick material (workpiece thickness over 25 mm) and into a flat position for thin material (workpiece thickness under 25 mm). After Sales Support GB 0044 151 649 1500 IRE 0044 1890 946 244 29 [email protected] GB IRE Operation To turn the stop rail: 1.Loosen the wing nuts 41 by turning them a few revolutions. 2.Pull the stop rail 14 off of the parallel guide 13 . 3.Turn the stop rail to the desired position. 4.Push the stop rail onto the parallel guide so that the metal plate glides into the profile of the stop rail. 5.Tighten the wing nuts again. Cutting width When cutting pieces of wood lengthwise, use the parallel guide 13 that should be mounted on the right side of the saw blade to the extent possible. A scale is located on the rail for the parallel guide, which shows the distance between the stop rail and saw blade, that is the cutting width. This scale applies only when using the high stop rail NOTICE! (for thick material)! −− When using the low stop rail (for thin material), add 25 mm to the indicated dimension shown. 30 1.Lift the eccentric lever slightly. 2.Push the parallel guide until the desired dimension is visible in the view window. 3.Push the eccentric lever down to lock it. Setting the stop length To avoid clamping the material to be cut, the stop rail 14 can be moved lengthwise. Rule of thumb: The back end of the stop runs into an imaginary line that roughly starts from the middle of the saw blade and runs to the back under 45°. 1.Set the required cutting width. 2.Loosen the wing nuts 41 by turning them a few revolutions. 3.Push the stop rail 14 until its back end touches the imaginary 45° line. 4.Tighten the wing nuts again. Adjusting the parallel guide If the parallel guide 13 is not in line with the saw blade, you can correct the setting. You will need a long 4 mm Allen wrench for this work. 1.Set the saw blade to the maximum cutting depth. 2.Set the stop height of the parallel guide for thick material (upright). 3.Push the parallel guide to “0” so that the stop rail touches the saw blade. 30 [email protected] After Sales support 0044 151 649 1500 GB IRE 0044 1890 946 244 IRE GB Operation 4.Use an Allen wrench to loosen the screws 47 slightly and align the parallel guide and the stop rail parallel to the saw blade. 47 5.Tighten the screws 47 again. Adjusting the scale on the saw table 1.Check that the parallel guide 13 is in line with the saw blade and, if necessary, correct the setting (see section “Adjusting the parallel guide”). 2.Set the stop height of the parallel guide for thick material (upright). 3.Push the parallel guide to “0” so that the stop rail touches the saw blade. 4.Loosen the screw 48 by turning it approx. 2 revolutions. 48 49 5.Move the scale 49 so that the line in the view window of the parallel guide 13 corresponds to the scale's zero line. 6.Tighten the screw 48 again. Cross guide 1.Push the cross guide 19 into a groove 50 on the saw table. 2.Loosen the knurled screw 51 and turn the cross guide until the arrow is pointing to the desired angle. 3.Tighten the knurled screw again. After Sales Support GB 0044 151 649 1500 IRE 0044 1890 946 244 31 [email protected] GB IRE Operation 50 19 51 When cutting larger workpiece parts to size, you can extend the cross guide 19 with the stop rail 14 from the parallel guide 13 : 1.Screw the wing nuts 41 including the washers off of the parallel guide 13 . 14 13 41 19 41 22 14 2.Pull the stop rail 14 off of the parallel guide 13 and also remove the long carriage bolts and the metal plate. Store the long carriage bolts in a safe place. 3.Screw the metal plate with two carriage bolts 22 and the wing nuts 41 along with the washers loosely onto the cross guide. 4.Turn the stop rail 14 to the desired position: upright for thick material (workpiece thickness over 25 mm) and flat for thin material (workpiece thickness under 25 mm). 5.Push the stop rail onto the cross guide 19 , so that the metal plate glides into the profile of the stop rail. 6.Turn the wing nuts 41 until tight again. NOTICE! Do not push the stop rail 14 too far towards the saw blade. There should be approx. 2 cm of space between the stop rail and saw blade. 32 [email protected] After Sales support 0044 151 649 1500 GB IRE 0044 1890 946 244 IRE GB Operation Adjusting the scale on the cross guide For this work, you will need an AF 7 spanner and a PH2 star-headed screwdriver. 1.Screw the stop rail 14 onto the cross guide 19 as previously described. 2.Place a 90° stop angle on the saw blade. 3.Loosen the knurled screw 51 of the cross guide. 4.Use the 90° angle bracket to align the stop rail exactly with the saw blade. 5.Tighten the knurled screw again. 6.Check whether the cross guide indicates exactly 0°. If this is not the case, adjust the scale as follows: 7.Loosen the two domed cap nuts 52 by turning them a few revolutions. If the screws 51 are also turning, you can hold them in place from below with a star-headed screwdriver. 52 8.Set the scale to the correct position. 9.Tighten the two domed cap nuts again. The laser You can use the laser to perform precision cuts with your circular saw. The laser light is produced by a laser diode that is powered by two batteries (1.5 V AA/LR03). The laser light is widened into one line and is emitted through the laser light opening. You can use the line as an optical mark for the cutting line when performing a precision cut. Observe the laser safety notes. −− Switching the laser on: Set the laser switch 35 to “I”. The laser switch can be accessed through the opening on the top side if the protective hood is mounted. A red laser beam will now be emitted out of the laser light opening. Keeping the laser beam along the cutting line mark while sawing will ensure that your cuts are neat. −− Switching the laser off: Sett the laser switch 35 to “0”. The laser beam will go out. To save the battery power, always switch the laser off when it is no longer needed. Dust and chips that have accumulated may block the laser beam. You should therefore remove these particles from the protective hood after every use. After Sales Support GB 0044 151 649 1500 IRE 0044 1890 946 244 33 [email protected] GB IRE Operation Sawing NOTICE! −− Each time after making a new setting, perform a test cut to check the set dimensions. −− After switching on the saw, wait until the saw blade has reached its maximum speed before you perform the cut. −− Attention when cutting into the workpiece! −− Only operate the device with an extractor device. −− Check and clean the suction channels regularly. Performing lengthwise cuts For this you cut through a workpiece lengthwise. Push an edge of the workpiece against the parallel guide 13 with the flat side on the saw table. −− When making lengthwise cuts, you must never be positioned in line with the cutting line. −− Secure long workpieces so that they do not tip over at the end of the cut! Use e.g. a roller stand for this. 1.Adjust the parallel guide 13 to the workpiece height and the desired width (see section “Parallel guide”). 2.Lower the protective hood 17 onto the saw table. The protective hood is pushed up by the workpiece while sawing. 3.Switch on the dust collector first and then the saw. 4.With your fingers closed, place your hands flat on the workpiece and push it along the parallel guide into the saw blade. 5.Only guide it laterally to the front edge of the protective hood 17 with your left or right hand (depending on the position of the parallel guide). 6.Always push the workpiece up to the end of the splitting wedge 18 . 7.Switch the saw and the dust extractor off. 8.Let the cutting waste rest on the saw table until the saw blade returns to the resting position. 34 [email protected] After Sales support 0044 151 649 1500 GB IRE 0044 1890 946 244 IRE GB Operation WARNING! Risk of injury when cutting narrow workpieces! −− Be absolutely sure to use the push stick when performing lengthwise cuts for workpieces with a width of under 120 mm. One push stick is included in the product contents. Promptly replace a worn or damaged push stick. −− When performing lengthwise cuts in very narrow workpieces with a width of under 30 mm, be absolutely sure to use a push stick and set the parallel guide to low. The push stick is not included in the product contents! You can purchase one at a relevant supply store. Replace a push stick that is worn in due time. Performing bevel cuts In general, you should use the parallel guide 13 when performing bevel cuts. 1.Set the saw blade to the desired angle (see section “Setting the angle”). 2.Set the parallel guide corresponding to the width and height of the workpiece (see section “Parallel guide”). 3.Perform the cut corresponding to the width of the workpiece (see section “Performing lengthwise cuts”). Performing cross cuts 1.Set the cross guide 19 as necessary (see section “Cross guide”). If the saw blade is also to be set at an angle, push the cross guide into the right groove that prevents your hand and the cross guide from coming into contact with the protective hood 17 . 2.Use the stop rail 14 if applicable. 3.Lower the protective hood 17 onto the saw table. The protective hood is pushed up by the workpiece while sawing. 4.Firmly push the workpiece against the cross guide. 5.Switch on the dust collector first and then the saw. 6.Push the cross guide and the workpiece towards the saw blade to perform the cut. After Sales Support GB 0044 151 649 1500 IRE 0044 1890 946 244 35 [email protected] GB IRE Cleaning WARNING! Risk of injury! −− Always take hold of the guided workpiece and never of the unguided workpiece that is being cut off. −− Always push the cross guide forward until the workpiece has been cut through completely. 7.Switch the saw and the dust extractor off. 8.Let the cutting waste rest on the saw table until the saw blade returns to the resting position. Cutting particleboards To prevent raw edges when cutting particleboards, do not set the saw blade higher than 5 mm above the workpiece thickness. Cleaning WARNING! Burn hazard! The saw blade will become hot during operation! −− Always let the saw blade cool off completely before cleaning! Risk of injury! −− Disconnect the mains plug before any kind of cleaning. NOTICE! Risk of short circuit! Water that has penetrated the housing may cause a short circuit. −− Do not wash the table saw and also do not spray it off with a water jet. −− Make sure that no water penetrates the housing. 36 [email protected] After Sales support 0044 151 649 1500 GB IRE 0044 1890 946 244 IRE GB Troubleshooting NOTICE! Risk of damage! Improper handling of the table saw may result in damage. −− Do not use any aggressive cleaners, sharp or metallic cleaning utensils such as knives, hard scrapers and the like. They could damage the surfaces. Clean the table saw directly after each use. Keep the protective devices as free of dust and dirt as possible. −− Rub the table saw off with a clean cloth or blow it off with low-pressure compressed air. −− Use a damp cloth and a small amount of soft soap if it is heavily soiled. Troubleshooting WARNING! Risk of injury! −− Disconnect the mains plug before troubleshooting. Problem The motor is not running. Insufficient cutting power, the saw does not run smoothly, large amount of dust produced. Motor produces a large amount of sparks. After Sales Support GB 0044 151 649 1500 IRE 0044 1890 946 244 Possible causes No power. Solutions, tips Use a lamp to check if there is power to the socket. Check the mains cord and, if applicable, the extension cord for damage. Let the table saw cool off for at least 15 – 20 minutes. The house fuse or fault current protection switch has triggered. The motor overload protection has triggered because the motor is overloaded or overheated. Saw blade is dull or Replace the saw blade. defective. Carbon brushes defective. Have the table saw checked by a qualified workshop. 37 [email protected] GB IRE Technical data Technical data Model: Supply voltage: Output: Idle speed n0: Hard metal saw blade: Max. cutting depth: Height adjustment: Saw blade pivotable: Extractor connection: Net weight: Sound pressure level LpA: Uncertainty KpA: Sound power level LWA: Uncertainty KWA: Dimensions: Working height: Table size: Table width extension: Table length extension: Article number: WZTS 1702 230 – 240 V, ~ 50 Hz S6 40 % 1700 W 6500 min-1 Ø 250 x Ø 30 x 2.4 mm 24 teeth 72 mm / 90° 54 mm / 45° continuously 0 to 72 mm continuously 0° – 45° Ø 36 mm approx. 24.5 kg 93.32 dB(A) 3 dB 106.32 dB(A) 3 dB 895 mm 610 x 445 mm 608 x 250 mm 435 x 320 mm 92534 S6 type of operation: Continuous operation To prevent the motor from heating up to an impermissible extent, the table saw may only be used as follows: After being operated for a period of 4 minutes (S 6 = 40 %) under a normal permissible load, the circular saw must be left in idle operation for 6 minutes. 38 [email protected] After Sales support 0044 151 649 1500 GB IRE 0044 1890 946 244 IRE GB Technical data Caution: Noise emission values The noise emission values were determined in accordance with EN 61029-2-1. Wear ear protection. Noise may cause hearing loss. The specified values are emission values and therefore do not necessarily represent safe work place values. Although there is a correlation between the emission and immission levels; they can not be used as a basis for determining with certainty whether additional precautionary measures are necessary or not. Factors that may affect the current immission level present at the workstation include the duration of influential aspects, the unique characteristics of the work room, other sources of noise etc., e.g. the number of machines and other adjacent processes. The permissible work station values may also vary from country to country. However, this information should make it possible for the user to better assess the danger and risk. Keep the production of noise and vibrations to a minimum! • Only use properly functioning devices. • Regularly maintain and clean the table saw. • Make sure your method of work suits the table saw. • Do not overload the table saw. • If necessary, have the table saw checked. • Switch the table saw off if it is not being used. After Sales Support GB 0044 151 649 1500 IRE 0044 1890 946 244 39 [email protected] GB IRE Ordering spare parts Ordering spare parts The following data should be provided when ordering spare parts: • Device type: WZTS 1702 • Article number of the device: 43.405.82 • Device ID number: 11015 • Spare part number of the required spare part (see table) You can find current prices and information at www.isc-gmbh.info. Spare part list Item Description Spare part number 017 Protective hood 434059001001 021 Push stick 434059001002 044 Insert 434059001004 013 Complete parallel guide 434059001005 032 Handwheel 434059001006 031 Locking handle 434059001007 Complete underframe 434059001008 034 Power switch 434059001009 016 Suction hose 434059001010 019 Cross guide 434059001011 Suction adapter 434059001012 003 Extension table 434059001013 014 Width extension table 434059001014 Saw blade flange 434059001015 Table scale 434059001016 Laser 434059001017 Driving belt 434059001018 Saw blade (24 teeth) 434059001003 Saw blade (48 teeth) 434059001019 Carbon brushes (pair) 434059001020 Waste bag 434058001822 020 015 40 [email protected] After Sales support 0044 151 649 1500 GB IRE 0044 1890 946 244 IRE GB Declaration of conformity Declaration of conformity Einhell Germany AG · Wiesenweg 22 · D-94405 Landau/Isar Konformitätserklärung D GB F I NL E P DK S FIN EE CZ SLO SK H erklärt folgende Konformität gemäß EU-Richtlinie und Normen für Artikel explains the following conformity according to EU directives and norms for the following product déclare la conformité suivante selon la directive CE et les normes concernant l’article dichiara la seguente conformità secondo la direttiva UE e le norme per l’articolo verklaart de volgende overeenstemming conform EU richtlijn en normen voor het product declara la siguiente conformidad a tenor de la directiva y normas de la UE para el artículo declara a seguinte conformidade, de acordo com a directiva CE e normas para o artigo attesterer følgende overensstemmelse i medfør af EU-direktiv samt standarder for artikel förklarar följande överensstämmelse enl. EU-direktiv och standarder för artikeln vakuuttaa, että tuote täyttää EU-direktiivin ja standardien vaatimukset tõendab toote vastavust EL direktiivile ja standarditele vydává následující prohlášení o shodě podle směrnice EU a norem pro výrobek potrjuje sledečo skladnost s smernico EU in standardi za izdelek vydáva nasledujúce prehlásenie o zhode podľa smernice EÚ a noriem pre výrobok a cikkekhez az EU-irányvonal és Normák szerint a következő konformitást jelenti ki deklaruje zgodność wymienionego poniżej artykułu z następującymi normami na podstawie dyrektywy WE. BG декларира съответното съответствие съгласно Директива на ЕС и норми за артикул LV paskaidro šādu atbilstību ES direktīvai un standartiem LT apibūdina šį atitikimą EU reikalavimams ir prekės normoms RO declară următoarea conformitate conform directivei UE şi normelor pentru articolul GR δηλώνει την ακόλουθη συμμόρφωση σύμφωνα με την Οδηγία ΕΚ και τα πρότυπα για το προϊόν HR potvrđuje sljedeću usklađenost prema smjernicama EU i normama za artikl BIH potvrđuje sljedeću usklađenost prema smjernicama EU i normama za artikl RS potvrđuje sledeću usklađenost prema smernicama EZ i normama za artikal RUS следующим удостоверяется, что следующие продукты соответствуют директивам и нормам ЕС UKR проголошує про зазначену нижче відповідність виробу директивам та стандартам ЄС на виріб MK ја изјавува следната сообрзност согласно ЕУ-директивата и нормите за артикли TR Ürünü ile ilgili AB direktieri ve normlar gereğince aşağda açklanan uygunluğu belirtir N erklærer følgende samsvar i henhold til EU-direktivet og standarder for artikkel IS Lýsir uppfyllingu EU-reglna og annarra staðla vöru PL Table Saw WZTS 1702 (Workzone) 87/404/EC_2009/105/EC 2005/32/EC_2009/125/EC 2006/95/EC 2006/28/EC X 2004/108/EC 2004/22/EC 1999/5/EC 97/23/EC 90/396/EC_2009/142/EC 89/686/EC_96/58/EC X 2006/42/EC X Annex IV Notied Body: TÜV Rheinland LGA Product Safety GmbH Notied Body No.: 0197 Reg. No.: BM 50307655 0001 2000/14/EC_2005/88/EC Annex V Annex VI Noise: measured LWA = dB (A); guaranteed LWA = dB (A) P = KW; L/Ø = cm Notied Body: 2004/26/EC Emission No.: X 2011/65/EC Standard references: EN 61029-1; EN 61029-2-1; EN 55014-1; EN 55014-2; EN 61000-3-2; EN 61000-3-3; EN 60825-1 Landau/Isar, den 14.04.2015 First CE: 15 Art.-No.: 43.405.82 I.-No.: 11015 Subject to change without notice After Sales Support GB 0044 151 649 1500 IRE 0044 1890 946 244 Weichselgartner/General-Manager Schunk/Product-Management Archive-File/Record: NAPR012037 Documents registrar: Siegfried Roider Wiesenweg 22, D-94405 Landau/Isar 41 [email protected] GB IRE Disposal Disposal Disposing of the packaging Dispose of the packaging separated into single type materials. Dispose of cardboard and carton as waste paper and foils via the recyclable material collection service. Disposing of old devices (Applicable in the European Union and other European states with systems for the separate collection of reusable waste materials) Old devices must not be disposed of with household waste! If at some point it is no longer possible to use the table saw, each consumer is required by law to dispose of old devices separately from their household waste, e.g. at a collection point in their community/ borough. This ensures that old devices are recycled in a professional manner and also rules out negative consequences for the environment. For this reason, electrical devices are marked with the above symbol. Batteries and rechargeable batteries may not be disposed of with household waste! As a consumer, you are required by law to turn in all batteries and rechargeable batteries, regardless whether they contain harmful substances* or not, at a collection point in your community/ borough or in a retail outletso that they can be disposed of in an environmentally-friendly manner. * labelled with: Cd = cadmium, Hg = mercury, Pb = lead 42 [email protected] After Sales support 0044 151 649 1500 GB IRE 0044 1890 946 244 GB IRE Warranty Card Table Saw WZTS 1702 Your details: Name Address E-mail Date of purchase* * We recommend you keep the receipt with this warranty card. Location of purchase Description of malfunction: If after contacting the manufacturer you are requested to return the faulty product please return the completed warranty card together with it. Einhell UK Ltd. Unit 9 Stadium Court Wirral International Business Park Plantation Road Bromborough Wirral, CH62 3QG UK after sales support GB 0044 151 649 1500 IRE 0044 1890 946 244 MODELL: WZTS 1702 [email protected] PRODUCT CODE: 92534 10/2015 At the regular land line rate of your phone company. Years warranty GB IRE Warranty conditions Dear Customer, The ALDI warranty offers you extensive benefits in addition to your statutory rights: Warranty period: 3 years from date of purchase. 6 months for wear parts and consumables under normal and proper conditions of use (e.g. rechargeable batteries). Costs: Free repair/exchange. No transport costs. ADVICE: Please contact our service hotline by phone, e-mail or fax before sending in the device. This allows us to provide support in the event of possible operator errors. In order to make a claim under the warranty, please send us: • the faulty item together with the original purchase receipt and the completed warranty card. • the faulty product with all components included in the packaging. The warranty does not cover damage caused by: • Accident or unanticipated events (e.g. lightning, water, fire). • Improper use or transport. • Disregard of the safety and maintenance instructions. • Other improper treatment or modification. After the expiry of the warranty period, you still have the possibility to have your product repaired at your own expense. If the repair or the estimate of costs is not free of charge you will be informed accordingly in advance. This warranty does not affect your statutory rights. In the event that a product is received for repair, neither the service company nor the seller will assume any liability for data or settings possibly stored on the product by the customer. Spend a little Live a lot Great care has gone into the manufacture of this product and it should therefore provide you with years of good service when used properly. In the event of product failure within its intended use over the course of the first 3 years after date of purchase, we will remedy the problem as quickly as possible once it has been brought to our attention. In the unlikely event of such an occurrence, or if you require any information about the product, please contact us via our helpline support services, details of which are to be found both in this manual and on the product itself. GB IRE Produced in china for: Aldi Stores ltd. po box 26, Atherstone Warwickshire, cv9 2SH Aldi stores (ireland) LTD. Po box 726, naas, co. Kildare. visit us at www.aldi.com AFTER SALES SUPPORT GB IRE 0044 151 649 1500 0044 1890 946 244 Model: WZTS 1702 [email protected] Product code: 92534 10/2015 3 years Warranty