1
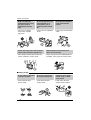
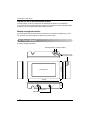
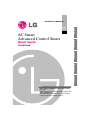
Quick Guide
PQCSW320A0E
ITALIANO
AC Smart
Advanced Control Smart
ENGLISH
LG
ESPAÑOL
FRANÇAIS
DEUTSCH
Note
• Please read this installation/use manual before installing
the product.
• Install the product with an expert installation engineer with
proper qualifications.
• Even after reading this manual, please store this manual
so that you can refer to it during operations.
AC Smart
TABLE OF CONTENTS
Safety precautions .............................................................................................................4
Introduction of AC Smart...................................................................................................7
AC Smart characteristics ...................................................................................................7
AC Smart exterior ..............................................................................................................8
AC Smart component ........................................................................................................9
AC Smart product specification .........................................................................................9
ABOUT AC SMART...........................................................................................................10
Logging on to AC Smart ..................................................................................................10
AC Smart screen composition .........................................................................................11
About control/monitoring menu........................................................................................12
About schedule menu ......................................................................................................16
About record menu ..........................................................................................................21
About automatic control menu .........................................................................................22
About system setting menu .............................................................................................29
About environment setting menu .....................................................................................31
About web server function ...............................................................................................32
Note ...................................................................................................................................34
Disposal of old appliance.................................................................................................34
Guide to disposal of package box....................................................................................34
About customer service ...................................................................................................35
Product warranty..............................................................................................................36
Customer card .................................................................................................................37
Guide to customer dispute resolution criteria ..................................................................38
Quick Guide and Installation/Operation Manual Guide
This manual (Quick Guide) summarizes and describes important information for the user to use AC
Smart effectively. For detail information related to the installation and use of AC Smart, refer to the
installation/user manual included in the CD provided.
2
AC Smart
Safety Precautions
Safety Precautions
WARNING
This symbol indicates the possibility of death or serious injury.
CAUTION
This symbol indicates the possibility of injury or damage.
■ Meanings of symbols used in this manual are as shown below.
Be sure not to do.
Be sure to follow the instruction.
WARNING
■ Operation
Do not operate or stop
the unit by inserting or
pulling out the power
plug.
Ask for Product
equipment at the service
center or establishment
certainly at the specialty
store.
• It will cause electric shock
or fire due to heat
generation.
• It can cause an accident,
electric shock, explosion or
injury.
Use standard parts.
• Use of non standard parts
can cause electric shock,
explosion, injury,
breakdown.
Standard part
Quick Guide
3
ENGLISH
To prevent injury to the user or other people and property damage, the following instructions
must be followed.
■ Incorrect operation due to ignoring instruction will cause harm or damage. The seriousness is
classified by the following indications.
Safety Precautions
While re-installing the
established product, notify
the service center or
establishment specialty
store
• It can cause an accident,
electric shock, explosion,
injury.shock.
Do not use the power cord
near Flammable gas or
combustibles, such as
gasoline, benzene, thinner,
etc.
• It may cause an explosion
or fire.
Do not disjoint randomly or
repair and remodel the
product.
• It may cause fire and electric
shock.
x
Wa Thinner
If water enters the product, turn the power
switch of the main body of appliance off.
• After taking the power-plug out from the
socket, contact the service center.
Keep the product away from the places
which can have moisture.
• Water may enter the unit and degrade the
insulation. It may cause an electric shock.
■ During usage
Do not change or extend the
conductor at random.
• It can cause fire and
electric shock.
4
AC Smart
Do not use concert with in
the octopus-like legs way.
• It can cause fire and
electric shock.
Unplug the unit if strange
sounds, smell, or smoke
comes from it.
• It may cause fire and
electric shock accident.
Safety Precautions
Do not put firearms near
product.
• It can cause fire.
• It can cause fire and
electric shock.
That increase in case of
product was been flood
certainly in the service
center or establishment
specialty store commit .
• I am responsible for fire and
electric shock.
Do not spill water inside
product.
• It can cause fire and
electric shock.
• It can cause electric
shock and breakdown.
Hold the plug by the head of
the power plug when taking
it out.
Do not place heavy goods
on product.
• It may cause electric shock
and damage.
• It can cause product
breakdown.
Protect the product from
handling by a children.
Do not apply shock to
product.
• It can cause accident and
product breakdown.
• I am responsible for
breakdown in case of
shock to product.
Quick Guide
5
ENGLISH
Do not place heavy goods
on wire.
Do not put an electric heater
or conductor near to the
product.
Safety Precautions
CAUTION
■ During usage
Clean by soft hands
using a cleaning material
like a soft cloth.
• It can result in fire and
product transformation.
Use touch screen with a
pen that product offers.
• Otherwise, there can be
breakdown and damage to
the product.
Do not place any live part
on the surface having
water.
• It can cause product
breakdown.
x
Wa Thinner
Use recommended
Adapter.
• Otherwise it can result in
product breakdown
6
AC Smart
Avoid contact to the
metallic goods such as
necklace, coin, key, a
watch which may touch
the battery even for a
short-time.
• It may cause product
breakdown and injury.
Hold the plug by the head
of the power plug when
taking it out.
• It may cause electric shock
and damage.
Introduction of AC Smart
Introduction of AC Smart
AC Smart characteristics
The characteristics of AC Smart are as follows.
Individual and integrated operation & monitoring
AC Smart can control and monitor the following items of the installed air conditioners by selecting
individually, group or all.
• Operating status, operating mode, fan level, fan direction, lock, set temperature, individual lock,
temperature range.
Group management
AC Smart can control and manage the installed air conditioner conveniently and intuitively by Zone
and Group according to the type and location of the units.
Management cost reduction
The administrator can control all the functions from the management office through AC Smart.
Therefore all the air conditioners can be easily managed by one administrator.
Scheduled automatic operation management & energy saving
AC Smart can automatically operate the air conditioner through the schedule. You can reduce
unnecessary operation of the air conditioner through this schedule function and save energy
effectively.
Various automatic control functions
AC Smart provides various control functions such as Automatic switch operation, Temperature limit
operation, Time limit operation etc. You can execute and manage the functionality of maintaining the
temperature to a certain level or limit the operating time of the air conditioner etc.
Expanded operation function
AC Smart provides expansion interface function of controlling the air conditioner interfacing with other
devices. When you use the expansion interface function, you can control maximum of 128 units of air
conditioners.
Quick Guide
7
ENGLISH
AC Smart is a central controller that can manage maximum of 64 air condition indoor units individually
or as a group. Also when you connect the AC Smart expansion kit, you can expand up to 128 units.
With AC Smart, you can monitor or operate the air conditioner and ventilator installed in each room of
the building from a location such as the management office of a building or administrative office of a
school.
Introduction of AC Smart
Web server and E-mail notification function
AC Smart provides a web server function for the administrator to control the air conditioner by
accessing the AC Smart remotely through the network. Also it provides the E-mail notification function
to notify the error to the administrator located remotely via E-mail.
Backup and upgrade function
AC Smart provides the backup and recovery function of the key database for stability of the system.
Also it provides a function to upgrade the software to the latest version.
AC Smart exterior
AC Smart is composed as follows.
Backlight button Keyboard button
Control panel
124mm
Touch pen and
touch pen holder
40mm
217mm
Reset button
USB PORT
8
AC Smart
Introduction of AC Smart
AC Smart component
The components of AC Smart are as follows inside the box. Open the box of AC Smart and check
whether all components are included.
ENGLISH
LG
AC Smart
Power adapter
Quick Guide & Manual CD
Power cord
AC Smart product specification
The product specification of AC Smart is as follows.
Item
CPU
Memory
Boot ROM & Storage
LCD
UART
USB
Buzzer
DI
Power
Touch Screen
OS
Specification
VRender3D VR3611F 32bit RISC microprocessor
DDR-SDRAM 128MB (32MB x 4ea)
NAND Flash 256MB
7.0” WVGA (800 x 480) TFT LCD
• COM1: RS-232 port (on_boarding 4-wire touch controller)
• COM2: RS-485 port (communication)
• One USB 1.1 Host port (use USB Flash)
• One USB 2.0 Device port (use ActiveSync)
BST-0843A
S/W Input
DC 12V (5V/3A, 3.3V/2A, 2.5V/2A, 1.8V/2A)
4-wire, touch controller on_boarding
Windows CE 5.0 core License
Quick Guide
9
About AC Smart
About AC Smart
This chapter describes how to log in to AC Smart and the functional menu of AC Smart.
Logging on to AC Smart
When you turn on the power of AC Smart, the following log in screen will be displayed. You can log in
as installation expert, administrator and general user to AC Smart.
Login for
installation
expert
Login for
administrator
Login for
general user
• Login for installation expert: When you press the top left corner for 5 seconds, a window to enter
the password will be displayed. It is recommended for only the installation expert of AC Smart to log
in and the installation expert will be able to use the additional menu related to the installation. The
password is 'digital21'.
• Login for administrator: When you press the ‘Administrator’ button, a window to enter the
password will be displayed. It is recommended for only the administrator who manages the indoor
unit and ventilator using AC Smart to log in, and the administrator will be ale to use various menus
excluding menu related to the installation. There is no default password.
• Login for general user: When you press the ‘General user’ button, you can log in without entering
the password. General user of AC Smart can use this log in to use only the ‘Control/Monitoring’
menu that can monitor indoor unit status and control the indoor unit.
10
AC Smart
About AC Smart
About AC Smart screen composition
ENGLISH
When you log in to AC Smart, the following screen will be displayed.
AC Smart
menu
Function
execution
screen
Message window
Log out button
AC Smart menu
This displays the menu for the function provided by AC Smart. When you log in as the general user
you can only select the ‘Control/Monitoring’ menu.
Function execution screen
You can operate the function for each menu from the Function execution screen.
Message window
Message window notifies the user of various types of information depending on the functional
operation and status of AC Smart.
Log out button
When you press the log out button, you will log out from AC Smart and return to the log in screen.
Quick Guide
11
About AC Smart
About control/monitoring menu
Control/Monitoring menu is the menu to easily manage various units (Indoor units, ventilator) in one
unit that can be commonly controlled. You can monitor or control the status information from
Control/Monitoring menu in Zone, Group or Unit.
Control/Monitoring menu screen is composed as follows.
Move to higher or
lower hierarchy.
Displays all names included in
higher hierarchy where
selected object is part of.
Changes the information
display method to icon or list
format.
Displays zone,
group or unit
status in icon or
table format.
Displays or
controls the detail
information of
selected zone,
group or unit.
Displays name of currently
selected object (Zone, group
or unit).
12
AC Smart
Stops all
registered units.
About AC Smart
■ Zone, group and unit status display
Status display of zone, group and unit
Status
Icon
Zone
Group
Indoor unit
Ventilator
Normal operation
Alarm
Not in operation
Operating mode display of indoor unit and ventilator
The current operating mode of the indoor unit and ventilator is displayed through the icons as follows.
Unit type
Icon
Description
Icon
Description
Cool mode
Fan mode
Auto mode
Dehumidifie
r mode
Heat mode
Auto mode
Icon
Description
Cool mode
Indoor unit
Ventilator
-
-
General
mode
List type display of zone, group and unit information
Information of Zone, Group and Unit is basically displayed as an Icon. But when you change the ‘Icon’
from the combo box on the top right corner to ‘List’ or ‘Detail list’, you can switch the view from Icon to
List format.
Quick Guide
13
ENGLISH
Control/Monitoring menu displays the status of Zone, Group or Unit (Indoor unit, ventilator) through the
following icons.
About AC Smart
■ Zone, group and unit monitoring and control
Monitoring information display of zone and group
There is the ‘Monitoring’ tab on the bottom of the Control/Monitoring menu. Monitoring tab displays the
detail information of the selected Zone, Group or Unit.
The monitoring information of the Zone or Group is differently displayed as the monitoring information
of the Unit. For the monitoring information of the Zone or Group, the average temperature and number
of units according to the status of the unit included in the applicable Zone or Group are displayed. On
the other hand, for the monitoring information of the unit, the setting and operating status of the
applicable unit are displayed.
<Monitoring tab for zone and group>
<Monitoring tab for unit>
In the monitoring tab of the unit, you can see the more
detailed information of the unit.
When you press the [Detail] button, the monitoring
window showing the detail information of the unit will be
displayed as shown in the left picture.
<Monitoring tab>
14
AC Smart
About AC Smart
Zone, group unit control
Set the desired
temperature.
Current indoor temperature and set
temperature will be displayed. For
zone and group, the average
temperature of the unit included will
be displayed.
Set the mode, fan level and
lock function.
Operates or stops
the unit depending
on the situation.
Set detail
function.
Apply the set
function.
When you press the detail button, you can
see the detail control window as shown on
the left picture. In the detail control, you can
set the detail function of the indoor unit and
ventilator besides mode, fan level and lock
function. Also you can set the function to
turn On/Off the device connected to AC
Smart.
<Monitoring window>
Quick Guide
15
ENGLISH
There is a ‘Control’ tab located at the bottom of the Control/Monitoring menu. You can directly control
the Zone, Group or Unit from the Control tab.
You can set the desired indoor temperature the from the Control tab and execute/stop the operation of
the unit (Indoor unit, ventilator). Also you can set and apply the setting of mode, fan level, fan and lock
function.
About AC Smart
About schedule menu
Schedule is the function to execute the operation at a preset time by setting the operation of the unit
(Indoor unit and ventilator) beforehand. You can set the schedule of the unit in Group from the
schedule menu.
In the schedule menu, you can designate and set the following items.
• Schedule group: Group of units (Indoor unit, ventilator) to apply the same schedule
• Schedule pattern: Unit to designate a certain operation (Event) of the air conditioner on a weekly
or daily basis
The following picture shows a schedule menu to set the schedule. You can select ‘1. Select group’, ‘2.
Apply weekly pattern’ and ‘3. Edit/Save set schedule’ in the order of the numbers displayed to
designate a schedule.
Designate the schedule pattern and
application period. You can create and
edit the schedule pattern by clicking on
the [Edit] button.
List of schedule group is displayed.
You can create, edit or delete the schedule
group by clicking the [Edit] button.
16
AC Smart
Displays the applied schedule pattern.
You can directly edit, copy save and reset.
About AC Smart
Schedule setting example
Schedule group creation
To set the schedule after installing AC Smart, you must first create a schedule group. Here we will
describe an example where a group called ‘3rd floor’ is created and units ‘ac3_1’, ‘ac3_2’ and ‘ac3_3’
are assigned.
1. When you select the ‘Schedule’
menu from the menu of AC Smart,
the schedule screen will be
displayed as shown on the left side.
Press the [Edit] button under
‘1.Select group’.
2. Group edit screen will be displayed.
Press the [Add] button to enter the
name of the group to create. In this
example, enter ‘3rd floor’.
3. Press the [OK] button.
Quick Guide
17
ENGLISH
This chapter describes how to create the schedule group and weekly pattern and how to create the
schedule assuming that you have installed AC Smart.
About AC Smart
4. Designate the group and press the
[ ] and [ ] button to change the
composition of the unit. At this time,
assign ‘ac3_1’, ‘ac3_2’ and ‘ac3_3’
units to group named ‘3rd floor’.
5. Press the [Save] button to save the
current setting.
6. Lastly, press the [Close] button to
return to the previous screen.
Weekly pattern creation
When the schedule group is created, then you must set the weekly schedule pattern. Here, we will
describe an example of creating a pattern named ‘Summer’.
1. Press the [Edit] button under ‘2.
Apply weekly pattern’.
2. When the weekly pattern edit screen
is displayed, press the [Add] button
located under ‘1. Select weekly
pattern’ to create the new weekly
pattern.
3. Enter the name of the pattern to
create and press the [OK] button.
Here, enter the name ‘Summer’.
18
AC Smart
About AC Smart
4. Designate the Group to set the
5. Designate the time and operation of
the event from ‘2. Add event’. You
can use the control command or
apply the daily pattern to the
applicable dates for the operation.
Here, we will select and apply the
control command.
6. Click on the [Add] button. The set
event will be added and displayed.
The saving event will be displayed in
read for the applicable day and time
in ‘3. Save weekly pattern’.
When you press the applicable
event, you can check the set event.
7. Repeat step 4 and 6 to enter all the
events of the planned weekly
pattern.
8. When you have entered all the
events, press the [Save] button to
save the weekly pattern. Then press
the [Close] button to return to the
previous screen.
Quick Guide
19
ENGLISH
schedule from ‘1. Select the weekly
pattern’.
Here, ‘Summer’ is designated as
weekly pattern..
About AC Smart
Schedule creation
When you have created the schedule group and weekly pattern, lastly you must set the period to
apply using based on the group and weekly pattern. Here we will describe an example of completing
the schedule setting using the schedule group, ‘3rd floor’, and weekly pattern, ‘Summer’.
1. Select the group to apply the
schedule from ‘1. Select group’. Here
select the schedule group named
‘3rd floor’.
2. Select the weekly pattern to apply
from ‘2. Apply weekly pattern’, and
set the period to apply using the
calendar icon.
Here, we set the period of
‘2008.07.15~2008.09.20’ to the
weekly pattern named ‘Summer’.
3. Click on the [Add] button. The set
period will be displayed on the
weekly schedule application and the
applicable schedule will be displayed
in ‘3. Edit and save schedule’.
4. Press the [Save] button to apply the
current setting. This completes the
schedule setting.
20
AC Smart
About AC Smart
About record menu
When you select the record menu, the following screen will be displayed.
Displays occurred time, unit and content of the record in the
latest order in a table format.
You can check the usage
information such as operating
time and average temperature of
each unit (Group, zone, unit).
You can categorize and
view the record by period
or type.
You can review the latest
record by refreshing the data.
Quick Guide
21
ENGLISH
When there is a change in status of the unit (Indoor unit and ventilator) interfacing with AC Smart
through the network or in set status of AC Smart, AC Smart records the applicable information. You
can categorize or view the change records by type or period from the record menu.
You can view the operating time and average temperature by unit (Zone, Group or Unit) or period of
each unit from the record menu.
About AC Smart
About automatic control menu
You can automatically control the indoor unit and ventilator interfacing with AC Smart according to the
temperature and time. Automatic control menu provides the following 3 functions.
• Temperature limit operation: Function to set the upper and lower temperature and maintain the
indoor temperature within the set temperature range
• Automatic switch operation: Function to automatically switch the operating mode (Cool, heat) to
maintain the optimal indoor temperature
• Time limit operation: Function to limit the operating time within a specific time for the indoor unit
and ventilator to minimize the energy consumption
You can select the automatic
control function through the
lower menu.
For the automatic control menu, you can create and apply a separate group for each operating
function. Also you can create the same group as the designated group from the ‘System setting’ menu
to apply the function.
22
AC Smart
About AC Smart
■ Temperature limit operation
The group and setting of temperature limit operation are
displayed in table format.
You can create, edit or delete the
group to apply temperature limit
operation.
You can set the condition
for temperature limit
operation.
Edit temperature limit group
When you press the [Edit group] button, ‘Edit
group’ screen to create, edit or delete the
group for Temperature limit operation is
displayed as shown on the left picture.
In the ‘Group’, you can add a new group or
delete/rename the existing group.
In the ‘Group information’, use the [ ] or
[ ] button to add the unit to or remove the
unit from the group.
<Temperature limit operation group edit
screen>
When you press the [Default group setting]
button, you can automatically create the group
according to the group and unit setting set in
the ‘System setting’ menu without creating the Temperature limit operation group separately.
Quick Guide
23
ENGLISH
Temperature limit operation is the function to maintain the indoor temperature within a certain range.
When you set the upper temperature, lower temperature and temperature criteria in the temperature
limit operation, you can operate the stopped indoor unit in cool mode or heat mode depending on the
indoor temperature.
About AC Smart
Temperature limit condition setting
When you press the [Condition setting] button, the
‘Condition setting’ screen to set the Temperature limit
operation function and related items will be displayed as
shown in the left picture.
Designate the Temperature limit operation group and set
the item for Temperature limit operation, and then press
the [Save] button to set the Temperature limit operation
function to the applicable group.
<Temperature limit operating
condition setting screen>
Refer to the following table for the description on the items to set the Temperature limit operation.
Item
Upper limit temperature
Lower limit temperature
Temperature
criteria
Apply/Not apply
24
AC Smart
Description
Set the maximum temperature permitted as indoor temperature.
Set the minimum temperature permitted as indoor temperature.
Select the method to measure the indoor temperature. You can select
one of the two methods to measure the indoor temperature.
- Average all units: Method of operating the Temperature limit
operation function by using the average of the temperature from
indoor units detected within the group
- Fixed: Method of operating the Temperature limit operation function
according to the temperature detected based on the criteria of the
indoor unit registered first within the group
Set whether to execute or not execute the Temperature limit
operation.
- Apply: Execute the Temperature limit operation function
- Not apply: Not execute the Temperature limit operation function
About AC Smart
■ Automatic switch operation
You can create, edit or delete the
group to apply automatic switch
operation.
You can set the condition
for automatic switch
operation.
Edit automatic switch operation group
When you press the [Edit group] button, ‘Edit
group’ screen to create, edit or delete the
group for Automatic switch operation is
displayed as shown on the left picture.
In the ‘Group’, you can add a new group or
delete/rename the existing group.
In the ‘Group information’, use the [ ] or
[ ] button to add the unit to or remove the
unit from the group.
<Automatic switch operation group edit
screen>
When you press the [Default group setting]
button, you can automatically create the group
according to the group and unit setting set in
the ‘System setting’ menu without creating the Temperature limit operation group separately.
Quick Guide
25
ENGLISH
Automatic switch operation is the function to automatically switch the operating mode (Cool/Heat) of
the air conditioner according to set temperature and range. That is, when the current temperature is
more than lower than the set temperature range base don the criteria, it will operate the Heat mode to
maintain the temperature within the set range. On the other hand, when the current temperature is
more than higher than the set temperature range, it will operate the Cool mode to maintain the
temperature within the set range.
The group and setting of automatic switch operation are
displayed in table format.
About AC Smart
Automatic switch operation condition setting
When you press the [Condition setting] button, the
‘Condition setting’ screen to set the Automatic switch
operation function and related items will be displayed as
shown in the left picture.
Designate the Automatic switch operation group and set
the item for Automatic switch operation, and then press
the [Save] button to set the Automatic switch operation
function to the applicable group.
<Temperature limit operating
condition setting screen>
Refer to the following table for the description on the
items to set the Automatic switch operation.
Item
Temperature setting
Temperature
difference
Temperature
criteria
Apply/Not apply
26
AC Smart
Description
Set the criteria temperature to automatically switch the temperature.
Select the temperature difference for Automatic switch operation to
operate. When the difference between the current indoor temperature
and criteria temperature is higher than or lower than this temperature
difference, the operating mode of the indoor unit will automatically
switch.
Select the method to measure the indoor temperature. You can select
one of the three methods to measure the indoor temperature.
- Average all units: Method of operating the Automatic switch
operation function by using the average of the temperature from
indoor units detected within the group
- Average all operating units: Method of operating the Automatic
switch operation function by using the average of the temperature
from operating indoor units within the group
- Fixed: Method of operating the Automatic switch operation function
according to the temperature detected based on the criteria of the
indoor unit registered first within the group
Set whether to execute or not execute the Automatic switch operation.
- Apply: Execute the Automatic switch operation function
- Not apply: Not execute the Automatic switch operation function
About AC Smart
■ Time limit operation
For example, when the administrator is not available during the weekend and the user turns on the
indoor unit and ventilator, this function can enable the user to minimize waste of unnecessary energy
by automatically turning the indoor unit and ventilator off after a certain period of time even when the
user leaves without turning the indoor unit and ventilator off. When the indoor unit and ventilator are
turned off, the user can turn them on again to use them.
The group, unit and setting of time limit operation are
displayed in table format.
You can create, edit or delete the
group to apply time limit operation.
You can set the condition
for time limit operation.
You can review the set group and unit operating time
of time limit operation in latest information by
refreshing the data.
Quick Guide
27
ENGLISH
Time limit operation is the function to limit the using time of the indoor unit and ventilator individually
by the user. When the indoor unit and ventilator operate for more than the time set for the day in Time
limit operation, the operation will automatically stop.
About AC Smart
Edit time limit operation group
When you press the [Edit group] button, ‘Edit
group’ screen to create, edit or delete the
group for Time limit operation is displayed as
shown on the left picture.
In the ‘Group’, you can add a new group or
delete/rename the existing group.
In the ‘Group information’, use the [ ] or
[ ] button to add the unit to or remove the
unit from the group.
When you press the [Default group setting]
button, you can automatically create the group
according to the group and unit setting set in
the ‘System setting’ menu without creating the Time limit operation group separately.
<Temperature limit operation group edit
screen>
Time limit operation condition setting
When you press the [Condition setting] button, the
‘Condition setting’ screen to set the Time limit operation
function and related items will be displayed as shown in
the left picture.
Designate the Time limit operation group and set the
item for Time limit operation, and then press the [Save]
button to set the Time limit operation function to the
applicable group.
<Time limit operation condition
setting screen>
Refer to the following table for the description on the items to set the Time limit operation.
Item
Apply/Not apply
Operation limit time
Applicable day
28
AC Smart
Description
Set whether to execute or not execute the Time limit operation.
- Apply: Execute the Time limit operation function
- Not apply: Not execute the Time limit operation function
Set the time interval to automatically end the indoor unit and
ventilator.
Set the day to operate the Time limit operation function.
About AC Smart
About system setting menu
Zone and group are displayed in tree format.
Press the [Add], [Rename] or [Delete] button to
add, rename or delete the zone or group.
You can add, rename or
delete the zone or group.
Registered or unregistered groups or units
will be displayed. You can press the [ ] or
[ ] button to change the setting.
When the indoor unit or the
ventilator supports detail lock
function, you can set whether
to use this function.
You can add a new unit
or or edit/delete the
existing unit.
Reference: Function limit according to log in authority
‘Detail lock model’ open and [Unit management] button are only displayed when logged on as
installation expert mode. Therefore the general user and administrator cannot use this function.
Quick Guide
29
ENGLISH
You can conveniently manage the units (Indoor unit and ventilator) with AC Smart according to the
installed location or functional characteristics in Zone or Group. The system setting menu provides
function to include or exclude these indoor units or ventilators to or from the Group or Zone according
to the physical structure and logical structure.
The user and administrator will operate AC Smart from the ‘Control/Monitoring’ menu based on the
configuration of Zone, Group and Unit set from this menu.
About AC Smart
Unit management (Unit registration, On/Off device registration, control interface
setting)
When you click on the [Unit management] button located below the system setting menu, the following
‘Unit management’ screen’ will be displayed. In the unit management menu, you can register a newly
connected unit or edit/delete the unit of an existing Zone. Also you can automatically register the unit
through the unit search.
You can enter the information of the indoor unit,
ventilator or On/Off device to register or edit.
You can interface with external central
controllers. You can also interface with other
AC Smart to control maximum of 128 units.
All connected units
are automatically
searched and
registered.
List of currently registered
indoor unit, ventilator and
On/Off device is displayed.
You can add a new unit
or edit/delete the
existing unit.
The following information must be entered to register the unit.
Item
Product type
Name
Address
Model
Capacity
Description
Select the type of unit (Air conditioner, ventilator, On/Off device).
Enter the name of the unit.
Enter the physical address of the unit. The physical address value is a
number between 00 and FF, and cannot be duplicated.
Enter the model of the unit.
Enter the maximum power consumption of the unit.
Caution: Using unit management function
This function is the menu that can be set only by the installation expert during the
installation of AC Smart. Note that the general user cannot and must not use this menu
to reset the product.
30
AC Smart
About AC Smart
About environment setting menu
Environment setting menu is composed of 9 sub menus as shown below in the picture. But for
network, E-mail setting, S/W upgrade and DB management menu, you must log in as the installation
expert mode for the setting.
You can set the administrator log in
password.
You can set the
time of
AC Smart.
You can set the language and
temperature unit (Fahrenheit, Celsius).
You can reset the coordinates of the
touch screen.
You can set the
screen saver,
LCD brightness
etc.
YOU CAN SET THE NETWORK ADDRESS
INCLUDING IP ADDRESS, DNS ETC.
You can upgrade the SW of
AC Smart.
You can set AC
Smart to send error
information via Email.
You can backup and
recover key databases of
AC Smart.
You can check the current S/W
version of AC Smart.
Caution: Network, E-mail setting, S/W upgrade, DB management
These functions are the menu for the installation expert to set up during the installation
of AC Smart. Make sure the general user or administrator does not reset the product
by using this menu.
Quick Guide
31
ENGLISH
Environment setting menu provides function to set the necessary password and network to use AC
smart as well as the screen adjustment function and screen saver function for user convenience.
About AC Smart
About web server function
AC Smart provides the web server function so that the user can connect to AC Smart remotely
through the network. The administrator can monitor and control the air conditioner from a remote
location through this function. To use the web server function, you must set the network information to
AC Smart.
Web server log in
To use the web server function of AC Smart,
you must proceed through the log in
procedure.
In the log in screen, select the language
(Korean, English) and temperature display unit
(Celsius, Fahrenheit).
Control/Monitoring menu
The ‘Control/Monitoring’ menu is similar to the
‘Control/Monitoring’ menu of AC Smart. You
can view the structure of Zone and Group from
this menu. Also you can check the operating
status of the air conditioner in Icon or Table
format and directly set the temperature and
operation.
User management menu and zone
setting menu
From the ‘User management’ menu, you can
assign or delete the authority to other users
besides the system administrator to access
and control the web server of AC Smart to
control the air conditioner.
In the ‘Zone setting’ menu, you can set the
other user besides the system administrator to
control only the air conditioners included in the
specific Zone.
32
AC Smart