1
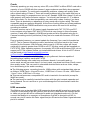
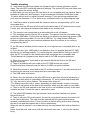
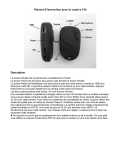
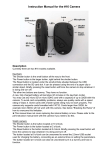
Instruction Manual for the Mobius ActionCam
Description
The above picture shows the arrangement of the user operating features.
The two heat sinks can become very hot during operation. This is normal, but all the
same you should never leave the camera turned on where the surrounding temperature
exceeds ~47°C (118°F) - for example in a car parked in the baking sun. If you wish to
use the camera in very hot conditions you should ensure the heat sinks are adequately
cooled, for example by directing cool air onto the metal plates or using a ventilator to
dissipate the heat away from the metal plates. High temperatures will also damage the
internal LiPo battery. If you use your camera in very hot conditions with external power,
for example as a dashcam, you should consider replacing the battery with a Super
Capacitor pair. These can be purchased from most suppliers who sell the Mobius. A
Super Capacitor pair enables the camera to correctly save the last recording when
external power is removed. A fully charged Supercap has enough energy to keep the
RTC (Real Time Clock) running for several days (about 7-10) without external power
connected. It only takes a few minutes to fully charge the Supercap.
►This manual does not cover replacing the internal battery or lens. If you need to do
this, please refer to the very detailed instructions found at
http://www.rcgroups.com/forums/showpost.php?p=25170910&postcount=4.
►This manual assumes the camera is loaded with the latest firmware available at the
time of writing. Functionality may vary with earlier or later firmware versions.
Cards
Generally speaking you may use any micro SD, micro SDHC or Micro SDXC card with a
capacity of up to 128GB with this camera. Larger cards are most likely also supported
but not yet available. To avoid card compatibility problems, always use quality cards
with a speed rating of Class 4. There are known problems with a few cards that have a
higher class rating, for example some, but not all, Sandisk 32GB Ultra (class 10) will not
work properly with earlier firmware versions. You should use firmware v1.17 or above
with these cards. For the best compatibility use cards with a class 4 rating if you have
them. There is absolutely no advantage in using cards with a higher rating. The most
compatible cards are genuine Kingston. At the time of writing there are known problems
with some 64GB and 128GB cards which may occur when the card is full and loop
recording is enabled.
Firmware versions up to v2.03 support cards formatted with FAT, FAT32 or exFAT.
Later versions only support FAT and FAT32 but this may change in future firmware
versions. Cards with a capacity of 64GB and greater must be formatted using the InCamera formatting routine (see below) if they are to be used with firmware v2.03 and
greater.
Due to technical reasons, you cannot update the firmware if your card is formatted as
exFAT. The In-Camera formatting routine (see below) will format cards to the format
required by the firmware. With firmware versions up to v2.03 the routine will format
cards with a capacity greater than 32GB to exFAT. All other cards will be formatted as
FAT/FAT32. Older operating systems, for example XP 64-Bit and Windows 2003, do not
support exFAT file systems unless you install additional drivers. A list of exFAT drivers
can be found at http://search.microsoft.com/enus/DownloadResults.aspx?q=KB955704.
There are a few programs available, for example guiformat, that are capable of
formatting large capacity cards with FAT32.
►You should always use cards from well known brands. Low quality and noname cards, as well as some class 2 (or less) cards, may draw more than 20mA current
than quality cards. This can result in unwanted electrical noise such as clicks, chirps,
hum and buzzing in the audio recording.
►The following approx. recording times for 1080p videos with a standard data rate are
as follows: 32GB Card = 4 hours 30 mins., 16GB Card = 2 hours 15 mins., 8GB Card =
1 hour 7 mins., 4GB Card = 33 mins.
►This manual assumes a compatible SD card is inserted in the card slot (except for
WebCam mode).
►The card must be carefully inserted face down with the gold contacts upwards and
facing forward. Do not use force or you could damage the lock mechanism inside the
card holder.
USB connector
The Mobius uses a standard Mini USB connector where pin #4 is used as a sense pin.
If this pin is connected to pin #5 (ground) then a built in USB switch will connect pin #2
to video out and pin #3 will be connected to audio-out (playback mode only). Do not
connect the Mobius to a computer or Smartphone if pin #4 is shorted to pin #5. In
normal use, pin #2 carries the Data- signal and pin #3 carries the Data+ signal whereas
pin #4 is unused.
Cables
The camera requires a standard USB cable for charging or connecting to external
battery packs for continuous recording. A standard USB cable is also used to connect
the camera to the PC in order to set the parameters or access the camera as an
external disk or webcam.
A/V-out (or Video-Out) requires a special cable where pin #4 is shorted to pin #5
(ground). When the firmware detects pin #4 connected to ground it will output the video
signal on pin #2 and the audio signal on pin #3. Special cables can be ordered from the
supplier in the form of a harness or you can make one yourself using a 5-pin mini USB
plug. You can also modify a Smartphone OTG (On The Go) cable which already has
pins #4 and #5 shorted in the mini USB plug. The audio signal is only available in
playback mode. The #16 "special" cable will not work with this camera.
You must under no circumstances use any other "special" cable, especially the "special"
cable supplied with the #11. Doing so will destroy your camera beyond repair. So, do
not use a #11 "special" cable under any circumstances.
►Always use HIGH QUALITY USB cables. Cheap cables will lead to all sorts of
problems. If possible, keep the cable as short as possible.
Video-Out
The optional Video-Out cable (see above) should always be connected or disconnected
while the camera is in standby or turned off. If the cable is connected or disconnected
during recording then the recording will be stopped and the camera will enter standby.
The camera will never be recognized as a removable drive when the video-out cable is
connected.
Before you start
Before using the camera for the first time, ensure that the internal battery is fully
charged. See below under "Charging". A new, fully charged battery will last about 80
minutes.
For recording or playback, refer to the picture above and insert a micro SD card upsidedown into the SD Card slot with the gold contacts pointing forward.
The Reset button
The reset button is located on the right side, above the card slot. It can be pressed by
carefully inserting a bent paper clip or similar instrument. The Reset button should only
be pressed in case the camera no longer reacts to button presses. Pressing the Reset
button will force the processor to restart. No parameter settings will be lost and the RTC
(Real Time Clock) will not be interrupted. Do not confuse the reset button with the rear
LED.
The Power button
Press the power button to turn the camera on. The blue LED will turn on for about 1
second before the firmware starts to load. After about 3 seconds the yellow LED will
turn on indicating the camera is ready for use (standby). If Power On Delay is set to ON,
press the power button for about 4 seconds until the yellow LED turns on.
•
•
•
Power On Delay is useful to prevent the camera from being inadvertently turned
on.
If the camera has been configured with Auto Power On Record set to On, the
camera will automatically begin recording in Mode 1.
To turn off the camera, first stop any recordings that may be running by pressing
the shutter button and then press the power button for at least half a second
(some firmware versions require you to press the button for 2 seconds). The
camera will turn off.
The Mode button
The Mode button enables the camera to be sequentially switched between 4 different
modes. Each button press advances to the next mode indicated by the LED color.
•
•
•
•
Video Mode 1 (yellow LED). The frame rate, resolution, AOV and rotation can
be individually configured.
Video Mode 2 (blue LED). The frame rate, resolution, AOV and rotation can
be individually configured.
Photo Mode (red LED) which includes Time-Lapse photos.
Playback Mode (red LED) is only possible when the special A/V-out cable is
connected.
The Shutter button
Press the shutter button to start or end a video recording, to take a picture or to
play/pause when in Playback mode. Playback mode is only available when the A/V
cable is attached.
LED status indicators
Since the camera has many functions, it's important to understand the meaning of the
LEDs. The following LED states are for a camera not connected to the PC.
Yellow LED remains on:
• The camera is in Video Mode 1 and is on standby.
Yellow LED slowly flashes (1 sec. On, 1 sec. Off):
• The camera is in Video Mode 1 and is recording video. The Video Recording
indicator (see configuration) must be ON for this to work.
Blue LED remains on:
• The camera is in Video Mode 2 and is on standby.
Blue LED slowly flashes (1 sec. On, 1 sec. Off):
• The camera is in Video Mode 2 and is recording video. The Video Recording
indicator (see configuration) must be ON for this to work.
Red LED remains on:
• Camera is in Photo Mode or Playback Mode (if an A/V cable is connected) and is
on standby.
Red LED flashes once
• The camera has taken a picture
Green LED is on:
• The battery is charging.
The rear LED
When the camera is turned on, the rear LED will blink one to three times to indicate the
battery charge. Three blinks indicate a full battery, whereas one blink indicates the
battery charge is getting low. The blinks are fast. Slower blinks would unnecessarily
extend the time before the camera reaches standby mode. If the camera is configured
to show the Recording Indicator, then the rear LED will normally blink in sequence with
the main LED while recording. The rear LED will not blink when Photo Mode has been
configured to take Time-Lapse Photos with a time interval of less than 2 seconds.
Connecting the camera to the PC
Make sure a card is inserted and the camera is turned OFF if you want to access the
camera as an external device (disk drive, setup). Always connect the camera directly to
the PC. Do not use a USB hub.
► You cannot record video or photos if the camera is connected to the PC as an
external drive.
Charging
•
•
Connect one end of the supplied standard USB cable to the camera.
Connect the other end to a USB, 5V DC power source (wall charger, PC or
external battery).
• When the yellow LED turns on, briefly press the Power button to turn the camera
OFF.
NOTE: Charging when connected to a PC USB port can be toggled ON or OFF using
the setup program. When connecting to a Smartphone, you should turn this functionality
OFF!
When charging, the green LED will be on, and it will turn off when the battery is fully
charged.
Charging takes about 2.5 hours for a fully discharged battery with the camera turned off
and connected to an external USB Charger. Batteries are not covered under warranty.
Charging is limited to around 140mA which offers the best possible long-term battery
protection. If charged with under-rated chargers or by using a USB hub without an
additional power supply, expect longer charging times. For optimum results, the
charging voltage should be +5V under load. Only use quality chargers capable of
supplying 1000mA (1A) and a stable voltage of at least 5V. Low quality chargers may
not be able to supply enough current and can lead to premature battery failure or, in the
worst case, even destroy the camera.
Formatting
Standard formatting tools provided by the operating system are not always reliable.
Also, they do not optimize the SD card's performance. For optimal card performance it
is recommended to always use the camera's built-in formatter. Instructions for InCamera Formatting are outlined below under "In-Camera Formatting". Another excellent
formatting utility is "SD Formatter" which can be downloaded
from www.sdcard.org/downloads/formatter_4. This utility has been specifically designed
for formatting SD cards but will always format 64GB and greater cards to exFAT.
Firmware v2.03 and above requires all cards be formatted to FAT32 so 64GB/128GB
cards must be in-camera formatted (see below).
Automatic Power Off from Standby mode
If the camera is in Standby mode (Video Mode 1, Video Mode 2 or Photo Mode) you
must take a picture(s) or start a video recording within *30 seconds. The camera will
automatically turn off after *30 seconds of no activity.
*This value can be set using the setup program. Automatic Power Off can also disabled.
When the special A/V cable is connected, automatic power-off will be disabled. This
prevents signal loss during fpv use when Standby times out.
Turn on Camera
Power-On can be configured as "fast" or "delayed". In fast mode, the camera will turn
on immediately when the Power Button is pressed. In delayed mode, press and hold the
Power Button for 4-5 seconds until the Yellow LED turns on and remains on.
Irrespective of whether the camera is configured as "fast" or "delayed" Power-on, the
blue LED will turn on for a second followed by the yellow LED. When the yellow LED
remains on, the camera is ready for use.
• If the camera has been configured with "Auto Power-On Record" set to ON, the
camera will automatically begin recording in Mode 1 as soon as the power button
is pressed or external power is connected. If the recording LED has been
disabled, the yellow LED will blink 3 times and then turn off, indicating
that recording has started. Otherwise the yellow LED will slowly flash at 2 second
intervals indicating that the camera is recording.
• If the camera has been configured with "Auto Record" set to OFF (default
setting), the camera will switch to Video Mode 1 (yellow LED) and remain in
standby mode until a button is pressed or Auto-Power-Off times out.
Turn off Camera
Press and hold the Power Button for at least half a second and then release it (some
firmware versions require you to press the button for 2 seconds). The red LED will blink
3 times and the camera will turn off.
Switching between modes
The camera can be switched between the different modes by pressing the Mode button.
Each button click advances the camera to the next mode. Video Mode1 - Video Mode2 Photo Mode - Playback Mode (only if A/V cable is attached) - Video Mode1 etc.
Recording Video Mode 1 or 2 (yellow or blue LED)
Start video recording and write-protecting important clips.
• Briefly press the shutter button.
• ► If the recording LED has been disabled, the yellow or blue LED will blink 3
times and then turn off, indicating that recording has started.
• ► If the recording LED has been enabled, the yellow or blue LED will slowly
flash at 2 second intervals indicating that the camera is recording.
• The current clip can be write-protected by pressing the Mode button while
recording.
Stop video recording.
• Briefly press the shutter button. The camera will return to the standby mode from
which the video was started.
Taking a Photo (red LED)
•
Briefly press the shutter button. The red LED will flash indicating that a picture
was taken.
Playback Mode
•
•
•
•
•
•
•
•
•
Ensure you have an A/V cable connected between the camera and an external
monitor and a card is inserted.
Turn on the camera if it is not already turned on.
Press the Mode button until the red LED turns on (Photo Mode).
Now press the Mode button once more. The red LED will remain on, but the
camera will be in playback mode and the first frame of the first clip found on the
card will show on the external monitor.
► If no clips are found on the card the display will show "Empty".
Press the Shutter button to play or pause the clip.
Press the Mode button to advance to the next clip.
Press the Power button to exit Playback Mode and turn off the camera.
► It is not possible to exit Playback Mode except by turning off the camera.
Removable Disk Mode
•
•
•
•
•
•
Make sure a memory card is inserted and the camera is turned off.
Connect the camera to the PC using a standard USB cable. The green LED may
turn on indicating that the battery is charging.
The blue LED will turn on for about a second but will then be replaced by the
yellow LED. After a short while the yellow LED may also turn off.
The camera is now in Disk Mode and a new removable drive should be available
on your computer. This may take up to 30 seconds.
► You cannot record video or photos if the camera is connected to the PC in
Removable Disk Mode.
► It is not possible to enter Removable Disk Mode when using a Video-Out
cable (pins #4 and #5 shorted to ground).
Webcam Mode
There are two ways in which you can enter webcam mode.
Method 1:
• Connect the camera as a removable drive (see above).
• Press the Shutter button to enter webcam mode.
• ► If this is the first time you have connected the camera in WebCam mode,
Windows will automatically install the required drivers.
• ► Disconnect the camera or press the Power button to exit webcam mode.
Method 2:
• Remove the flash memory card.
• Connect the camera to the PC using a standard USB cable.
• The yellow LED will blink at 2 second intervals indicating there is no card
inserted. This is normal.
• ► If this is the first time you have connected the camera in WebCam mode,
Windows will automatically install the required drivers.
• The camera is now in Webcam mode.
• Start your favorite WebCam software, such as AMCap. If your screen is black,
the software is not configured correctly. Make sure the program shows the "USB
PC camera" as the "device" selected for video capture. If this option does not
show in the "device" option list, restart the webcam program and check again.
• Disconnect the camera or press the Power button to exit webcam mode.
►Note: Windows XP has an integrated WebCam viewer. Your Mobius should be visible
in Explorer (My Computer) as a "USB Video Device". This functionality does not exist in
Windows 7.
In-Camera Formatting
The Camera contains a built-in formatter which may be used to format the SD card. InCamera formatting is best done using mSetup.exe (see below) but can also be done as
follows:
• Connect the camera to an External USB power supply or to a PC as a
Removable disk (see above).
• Press and hold down the Mode button. DO NOT RELEASE the button until
after the next steps are completed.
• Disconnect the camera from the power supply or the computer.
• The yellow LED will blink for a few seconds followed by three blinks of the red
LED, after which the camera will turn off. You must wait until you see the red
LED blink three times.
• Release the Mode button.
►In firmware versions up to v2.03 cards with a capacity greater than 32GB will be
formatted with exFAT. All other cards will be formatted as FAT32. See the note about
using exFAT in older operating systems in the Description.
Camera Setup (Configuration)
On Windows it is recommended to always use the program mSetup.exe to modify the
camera's configuration. mSetup communicates directly with the camera and makes
configuring the camera a very simple task.
It is, however, also possible to manually change the configuration settings by editing the
"SYSCFG.TXT" file which must be placed in the root folder of the card for the camera to
find and load the new settings. You can use any ASCII editor, for example Notepad, to
modify the parameters. The "SYSCFG.TXT" must be in plain ASCII, it must not be in
Unicode. If you don't know what a root folder is, or you don't know what ASCII is or don't
know how to manually edit ASCII files please only use mSetup.exe.
A "SYSCFG.TXT" file must first be generated by the Camera. The camera's parameters
are self explanatory. It is important not to change the sequence of the square brackets
and not configure invalid combinations. For example, never combine a clip longer than 5
minutes with the continuous loop. If you enter invalid combinations or values, the
Camera will not perform as expected. It is much safer to use the setup program which
will always configure the camera correctly. If you want to keep the camera's current
date and time, replace all the numeric characters withing the square brackets by ?.
The "SYSCFG.TXT" file can be automatically generated as follows:
1. Disconnect the camera from the PC and turn it off.
2. Press and Hold Down the Mode button. DO NOT RELEASE the button until
step 4.
3. Press and Hold Down the Power button until the RED LED blinks 3 times and
the camera turns off. This will take about 5 seconds. During the process, the blue
and yellow LEDs may blink.
4. Release the Mode and Power buttons.
The SYSCFG.TXT file showing the camera's current settings should now be in the
memory card root folder. Now you can edit the SYSCFG.TXT file as indicated above,
and load the new settings back into the camera by using exactly the same method as
outlined in steps 1 through 4, above. Once completed, the "SYSCFG.TXT" file will be
automatically deleted from the card's root folder.
►Some parameter settings are not allowed in combination with other parameter
settings. For example, only clip lengths of 5 minutes and less are allowed when loop
recording is enabled. The Windows configuration setup program mSetup.exe (see
below) guarantees the settings are valid. Use the tool tips to show you which parameter
combinations are allowed and which are not allowed. If you edit the SYSCFG.TXT and
enter invalid values the results are undefined and will lead to unexpected results.
Using Software to configure the camera
The Windows program mSetup.exe will automatically configure the camera with the
parameters you require. Detailed instructions can be found in the program by clicking
the "Help" button. The program is also used to synchronize the camera's internal clock
with the computer's date and time.
►An official configuration tool which will work with many Android devices can be found
in Google's Play Store. Search for "therau2000" to list programs by this author.
Firmware Update
Normally, there is no need to update the firmware. You should only update the firmware
if you are having problems with the current firmware or the new firmware provides
functionality you require that are not available in your current version.
The latest firmware version can be downloaded and installed directly from the setup
program or installed manually by downloading the firmware file from
http://www.rcgroups.com/forums/showpost.php?p=25170908&postcount=3.
Updating the firmware is an easy and safe process, but you should take note that it is
not possible to update the firmware using SD cards with a capacity greater than 32GB
unless they are formatted to FAT32. The firmware update routine is a low-level routine
called before the exFAT file system is loaded. The low-level routine only supports the
FAT32 file system.
Automatic Firmware Update
Use mSetup (Tools) to automatically update the firmware. This is by far the easiest
method.
Manual Firmware Update
DO NOT PRESS ANY BUTTONS during the firmware update process.
There are two methods with which you can update the firmware.
Method 1 without pressing any buttons:
• Turn off the camera.
• Connect the camera to the computer and wait until the card is recognized as a
Removable Drive.
• Copy the new firmware file into the camera's flash card root folder. All firmware
files are named FWTLCAM.BIN. The name must not be changed.
• Disconnect the camera from the computer and wait until it turns off.
• Wait until all the LEDs are turned off.
• Connect the camera to the PC. The blue LED will turn on for about 13 seconds
and then begin to flash. WAIT.
• After another 7 seconds the blue LED will turn off. WAIT.
• After a second or two the yellow LED will turn on. WAIT
• The firmware file will be automatically deleted.
• The camera will automatically be connected as a removable device.
• After about 4 seconds the process is complete and the yellow LED will turn off.
• The camera is now ready for use as a USB drive.
Method 2 by pressing the power button :
• Turn off the camera.
• Connect the camera to the computer and wait until the card is recognized as a
Removable Drive.
• Copy the new firmware file into the camera's flash card root folder. All firmware
files are named FWTLCAM.BIN. The name must not be changed.
• Disconnect the camera from the computer and wait until it turns off.
• Wait until all the LEDs are turned off.
• Turn on the camera and WAIT.
• The blue LED will turn on for about 13 seconds and then begin to flash. WAIT.
• After another 7 seconds the blue LED will turn off. WAIT.
• After a second or two the yellow LED will turn on indicating the firmware file has
been automatically deleted.
• The camera is now in standby mode and ready for use.
Recording using an external power supply
With the Mobius, it is possible to charge the battery and record at the same time using a
standard external USB 5V DC power supply. The power supply may be mains driven
(normal household wall plug), or run off batteries, including the car charger USB plug
(optional accessory) and cable supplied with the camera.
External USB power supplies usually only use the +5V and the - (Ground/Earth) wires.
The 2 data wires are normally not used. However, some USB power supplies designed
for a specific USB device may use different wiring schemes and thus may not work with
this camera. To avoid possible problems, always use a generic power supply.
When turned on, the camera checks for an electric signal on the two Data wires. If a
signal is found, the camera assumes it is connected to a PC and recording will not be
possible - see below "Recording when directly connected to a PC".
For recording video or taking pictures using a standard external power supply
connection, the USB power supply can be connected at any time, i.e. before the camera
is turned on, before the recording is started, or after the recording has been started.
►Only use a quality chargers capable of supplying 1000mA (1A) and a stable voltage
of at least 5V. Low quality chargers may not be able to supply enough current and can
lead to premature battery failure or, in the worst case, even destroy the camera.
Recording when directly connected to a PC
With the Mobius, it is possible to charge the battery and record videos or time-lapse
photos at the same time while connected to a PC for charging only. You cannot access
the SD while recording.
In order to do this, the video or time-lapse photo recording must be started before the
camera is connected to the PC. It is not possible to record if the camera is turned on
while connected to a PC. Likewise it is not possible to take single still pictures while the
camera is connected to the PC.
Special functions
The following functions need additional explanation:
Power On Default
The Mobius startup mode can be set to Video Mode 1, Video Mode 2 or Photo Mode.
The setting will have a direct influence on the Auto Power-on Record parameter (see
below).
Auto Power-on Record
If this parameter is set the Mobius will start recording as soon as external USB power is
connected or the camera is turned on. The type of recording depends on the Power On
Default setting:
Video Mode 1 and Video Mode 2: If a Time-lapse Video parameter is set the
camera will begin recording a time-lapse video. Otherwise it will start recording a
normal video.
Photo Mode: If a Time-lapse Photos parameter is set the camera will begin
recording a sequence of time-lapse photos. Otherwise it will take a single photo
and then enter standby mode.
Recording can be stopped and started manually by pressing the Shutter button. The
camera will normally be turned off when USB power is removed, but, assuming the
camera's internal battery has sufficient power, there will be a delay before the recording
stops. The dalay can be set to zero (immediate), 10 seconds or disabled. If power is
reconnected during this delay, the camera will resume normal operation.
Power-on Delay
This parameter gives the user the choice of having a 2-3 sec. delayed power-up, or an
instantaneous power-up with no delay. Note that the system requires about 2 seconds
after power-on until the buttons become active.
Audio Volume
When the volume is turned OFF, the sound track is completely eliminated from the
video output stream in the selected video mode and will free up a nominal 7% video
recording space.
.
Time Lapse Photos
If Time Lapse Photos is enabled, Motion Detection must be disabled. Time Lapse
photos are taken with the camera in Photo-Mode (red LED). The rear LED will not blink
when Photo Mode has been configured to take Time-Lapse Photos with a time interval
of less than 2 seconds. Likewise, when Time Lapse Photos has been set to less than 2
seconds, photos will always be recorded without a time stamp.
.
FOV (Field Of View)
The field of view setting allows you to either capture the complete area of the image
sensor or a smaller area without noticeable loss in quality. The following table shows
which area of the image sensor is captured and how it is converted using the Wide and
Narrow FOV settings:
Resolution and
Frames per Sec.
FOV
CMOS Area Explanation
1080p @ 5-30fps
Wide
2304 x 1296 Reduced to 1920 x 1080 using pixel binning. Widest possible setting
1080p @ 5-30fps
Narrow
1920 x 1080
720p @ 5-30fps
Wide
2304 x 1296 Reduced to 1280 x 720 using pixel binning. Widest possible setting
720p @ 5-30fps
Narrow
1920 x 1080
Identical to 1080p @ 30fps but reduced to 1280 x 720 using pixel
binning
720p @ 50-60fps
Narrow
1280 x 720
Captured directly from center most portion of CMOS array. No
scaling.
WVGA @ 5-60fps
Wide
2304 x 1296 Reduced to 848 x 480 using pixel binning. Widest possible setting
WVGA @ 5-60fps
Narrow
848 x 480
Captured directly from center most portion of CMOS array. No
scaling
Captured directly from center most portion of CMOS array.
No scaling. Narrowest possible setting
Trouble shooting
Q. I can format the card and update the firmware but the camera refuses to record
video. The rear LED is solid red instead of blinking. The yellow LED may also flash once
when you press the shutter button.
A. Most likely you are using an SD card which is not compatible with the camera. Some
batches of cards don't work properly. A typical example is Sandisk 32GB Ultra (class
10) which did not work on earlier firmware versions. If you are having problems with
your card use firmware v1.17 or above or try a different card or try formatting the card.
Q. I can't take videos or photos and the camera is also not recognized by my PC as a
removable drive.
A. It's likely that the SD card is full or the file allocation table (FAT) has become corrupt.
Format your card using an external card reader or try another card.
Q. The camera is not recognized as a removable disk or as a Webcam.
A. The operating system must be XP or greater. The camera must be connected using
a standard USB cable. Confirm that the cable is not defective by attaching another USB
device using the same cable. Do not use a USB hub. Try using another USB port.
Defective cables are the most common problems when the camera is not correctly
recognized by the PC.
Q. An SD card is installed, but the camera is not recognized as a removable disk or by
mSetup.
A. If you are sure your USB cable is not defective, then it's possible that the PC USB
drivers are not working properly. Try connecting the camera before turning on the PC.
After the PC is turned on, the camera should be recognized as a removable disk.
DriveCleanup.exe (freeware) may also be able to fix USB corruption problems.
Q. When the camera is connected as an external disk all the files on the SD card
appear as corrupt.
A. There is a problem with your cable or the PC USB drivers are corrupt.
DriveCleanup.exe (freeware) may be able to fix USB corruption problems.
Q. When the camera is connected to the PC and then turned on I can take pictures and
movies but the camera is not recognized as a removable disk.
A. The USB cable is defective.
Q. When I turn the camera on the blue LED turns on and then off and is followed by a
short yellow flash which is immediately followed by 15* red or yellow flashes and then
32* very fast red or yellow flashes. The camera then turns off.
*The flashes are either red or yellow, depending on what firmware version is running.
There are 3 red flashes at the end of the sequence which may be visible or not visible.
A. There is no SD card inserted or the card is full or not formatted correctly or the card
contacts are dirty. Format the card or use another card.
Q. The yellow LED flashes once per second 4 times and then flashes very quickly
before turning off.
A. There is no micro SD card inserted, the card is not properly inserted, the card is full
or the card is defective. The card must be inserted with the gold contacts facing
upwards, towards the buttons. There should be a distinct spring action when inserting
the last 5 mm and there should be no friction whatsoever.
When the card is pushed 1 mm inside the body the card should latch with a distinctive
click.
Never force the card, and never push the card more than max. 1 mm into the camera
body.
Q. When the camera is turned on, the blue LED turns on for a second and then the
yellow LED turns on as normal. However, the Mode and Shutter buttons don't react and
I can't take any video or pictures. The camera is also not recognized by my PC as a
removable drive. When connected to the PC the green LED may be on or off.
A. The lens module ribbon cable is not connected properly or the lens module is
damaged.
Q. When recording video, the Yellow LED blinks once after which there is a 1 sec. delay
and then the blue LED blinks once. After another 4 sec. the sequence is repeated. No
video is recorded.
A. The battery is not supplying a steady voltage and needs to be replaced immediately.
Q. When the camera is turned on, the blue LED turns on. It may turn off after a second
or two. The Mode and Shutter buttons don't react and I can't take any video or pictures.
The camera is also not recognized by my PC as a removable drive. When connected to
the PC the green LED may be on or off. The red LED may also blink 3 times while the
camera turns off.
A. The lens module ribbon cable is not connected properly or the lens module is
damaged.
Q. The camera does not react. The green LED may be on or off.
A. The firmware may have entered a continuous loop, or the battery may be discharged.
• Make sure the battery is fully charged.
• Use a paper clip or similar object to press the Reset button. This should force the
camera to be turned off.
• Wait 10 seconds.
• Turn on the camera.
• As a last resort, disconnect the battery and reconnect again after waiting 30
seconds.
Q. The camera functions normally but only records very short (5 sec.) clips and may
turn off.
A. This can be caused by the following:
• The battery may not be charged. Charge the battery for about 2.5 hours until the
green LED turns off.
• The battery is too cold to provide the power needed to record video. Keep the
battery warm before using the camera in cold temperatures (around freezing and
below).
• Check the integrity of your card by using the program h2testw to make sure your
card is genuine and not a fake card that has been up-rated.
• The card used is not compatible with the camera. Use class 4 cards. Kingston
cards are recommended.
• Problematic 64GB cards (or larger) may work better if formatted with FAT32 if
used with firmware v2.03 and below.
Q. Playback is erratic or stutters or the playback colors are psychedelic or the video
flashes, has corrupted blocks etc.
A. Always first copy the video file from the memory card to your hard drive.
• Your PC or graphics card may not be powerful enough to playback the video
stream.
• You may not have enough memory installed in your PC.
• Use VLC Media Player. Window Media Player often chokes on underpowered
machines.
• Psychedelic colors may also indicate problems with the CMOS lens module.
Make sure the CMOS lens cable is correctly seated and not cracked. The lens
cable is very fragile.
Q. There is a distinctive buzzing or clicking noise when videos are played back.
A. Only use quality micro SD cards with a class rating of 4 or above. Low quality cards
can draw excessive current which may result in electrical noise in the recording.
Q. When I update the firmware the blue LED remains on for about 2 seconds and then
the yellow LED remains on. The firmware is not updated, but the firmware file is deleted
from the card.
A. Firmware must be updated using an SD card formatted in FAT32. In firmware
versions up to v2.03 larger cards with a capacity of 64GB and above are formatted with
exFAT. New cards with a capacity up to 32GB are formatted with the FAT32.
Getting Help
This camera, together with the #16, is the best supported camera of it's kind. In case of
problems or questions your first stop should be a visit to:
http://www.rcgroups.com/forums/showthread.php?t=1904559.
This thread is dedicated to questions related to the Mobius ActionCam. It should be
noted that the forum is for aerial RC discussions only, so please avoid post anything offtopic. The first 5 posts contain links to all the important information, including a list of
sources where you can buy this camera. ONLY buy from the sources listed. It is very
probable that other sources will offer fake copies. These copies are NOT original and
will NOT perform as expected.
This manual was last updated on 5 August 2014