1
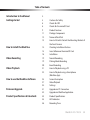
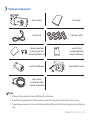
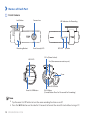
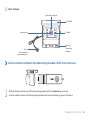
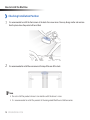
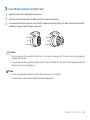
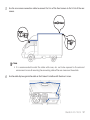
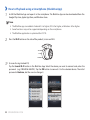
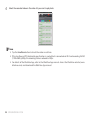
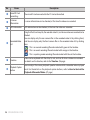
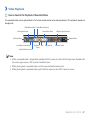
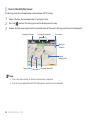
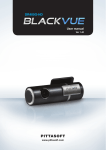
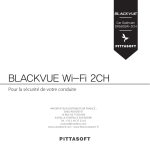
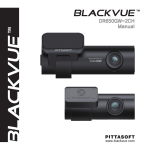
Heavy vehicle dashcam
%3(8$)536$,."/6"Waterproof cable (15M)
Wide
Angle
Wide
Angle
www.blackvue.com
BLACKVUE Wi-Fi 2CH
TRUCK
Table of Contents
Introduction to the Manual
Getting started
How to Install the BlackVue
Video Recording
Video Playback
How to use the BlackVue Software
Firmware Upgrade
Product Specifications & Standards
4
5
8
8
9
11
12
13
Cautions for Safety
Checks for GPS
Checks for the microSD Card
Product Features
Package Components
Names of Each Part
How to Attach & Detach the Mounting Bracket of
the Front Camera
14
15
16
Checking Installation Position
Insert & Remove the microSD Card
Installation
19
19
20
Normal Recording
Parking Mode Recording
Event Recording
21
22
How to Playback using a PC
How to Playback using a Smartphone
(BlackVue App)
25
27
34
Screen Description
Video Playback
Settings
41
42
Upgrade via PC Connection
Upgrade via BlackVue Application
43
45
46
Product Specifications
LED Indicators
Recording Time
DR650GW-2CH TRUCK
3
Introduction to the Manual
Thank you for purchasing a BlackVue by PittaSoft Co., Ltd.
This instruction manual contains information on how to operate your BlackVue.
Before using the product, make sure to read through this manual so as to use the product in the correct way.
To enhance the performance of the product, the contents of this instruction manual may be changed without
prior notice.
Warranty & Support
yy This product records and saves videos of vehicle accidents, but it is not guaranteed to record all
accidents. Accidents with light impact that is not enough to activate the impact detection sensor may
not be recorded.
yy In accordance with Personal Information Security Law & related legislation, PittaSoft Co., Ltd. will not be held
responsible for any problem due to illegal use of this product.
yy The recorded video produced by this product constitutes the secondary data that may help to determine the
circumstances of an accident. PittaSoft Co., Ltd. will not be held responsible for any loss or damage caused by
any accident.
Copyright & Trademark
yy This instruction manual is protected by Copyright Law, and all rights to it are protected by law.
yy It is prohibited to reproduce, copy, modify, or translate this instruction manual without permission.
yy
BlackVue is the registered trademark of PittaSoft Co., Ltd. PittaSoft Co., Ltd. reserves the
rights regarding all works related to the BlackVue brand such as product design, trademarks, and productpromotional videos. It is prohibited to reproduce, copy, modify, or use related works without permission. Any
violation may be penalized in accordance with the relevant regulations.
Caution
yy A formatted microSD card is provided when you purchase the product. Insert the microSD card into
BlackVue, and turn on the power. The microSD card will be initialized, and programs such as BlackVue
Viewer will be installed.
4
BLACKVUE Wi-Fi 2CH
Getting started
Cautions for Safety
The purpose of these cautions is to maintain user safety and avoid damage to property.
Please make sure to read through this manual so as to use the product in the correct way.
DANGER
Death or property damage can be caused for users if the following directions are
not followed:
yy Do not disassemble, repair, or modify the product yourself.
It can cause fire, electric shock, or malfunction. For internal inspection and repair, call your customer service
center.
yy If any foreign matter gets inside the product, detach the power cord straightaway.
Call the customer service center for repair.
yy Do not operate the product while driving.
It can cause an accident. Stop or park your car in a safe place to operate it.
yy Do not install the product where it can interfere with the driver's vision.
It can cause an accident.
yy Do not use a damaged or modified power cord. Use the cords provided by the manufacturer.
Otherwise it can cause explosion, fire, or malfunction.
yy Do not operate the product with wet hands.
It can cause electric shock.
yy Do not install it in an environment with high humidity, or combustible gases or liquids.
It can cause explosion & fire.
DR650GW-2CH TRUCK
5
WARNING
Death or serious injury can be caused for users if the following directions are not
followed:
yy Do not leave the product where infants, children, or pets can reach it.
They might swallow small components, or their saliva could get into it and cause an explosion due to a short
circuit.
yy While cleaning the inside of the car, do not spray water or wax directly onto the product.
It can cause fire, electric shock, or malfunction.
yy If smoke or an unusual smell is emitted from the power cord, detach it immediately.
Call the customer service center or the dealer.
yy Keep the terminal of the power cord clean.
A dirty terminal can cause excessive heat and fire.
yy Use the correct input voltage.
Otherwise it can cause explosion, fire, or malfunction.
yy Connect the power cord firmly so that it cannot easily be disconnected.
Otherwise it can cause fire.
yy Do not cover the product with any material.
It can cause external deformation of the product or fire. Use the product and peripherals where ventilation is
ensured.
6
BLACKVUE Wi-Fi 2CH
CAUTION
Injury or property damage can be caused for users if the following directions are
not followed:
yy Do not spray cleaning products directly onto the outside of the product.
It can cause discoloration, cracks, or malfunction.
yy If the product is used outside the optimal temperature range (0°C ~ 60°C), performance can decline or
malfunction can be caused.
yy Make sure that the product is installed properly.
The product can fall as a result of vibration, and may cause physical injury.
yy While entering or exiting a tunnel, during daytime in the face of bright sunlight, or at night with no
light, the quality of recorded video can deteriorate.
yy If the product is damaged or the power supply is cut due to an accident, video may not be recorded.
yy Excessively tinted windshield glass can distort the recorded video or cause it to be indistinct.
yy Prolonged use of the product can increase the interior temperature and cause burns.
yy microSD cards are a consumable so replace them after prolonged use.
They may not record video correctly after a long time in use, so check their recording capability periodically
and replace it as necessary.
yy Clean the lens regularly.
Foreign material attached to the lens can affect the recording quality.
yy Do not remove the microSD card while it is saving or reading data.
The data may be damaged or malfunction caused.
yy Do not use the product with its cover opened.
yy It is recommended to install the product at the BlackVue installation center. You can check the the
BlackVue installation center from the BlackVue homepage (www.blackvue.com).
yy It is recommended to remove the power cord if the product (BlackVue/Battery Discharge Prevention
Device) is not used for a long time.
DR650GW-2CH TRUCK
7
Checks for GPS
Even if the GPS isn't working, video is recorded, but position coordinates and driving speed are not recorded.
When used for the first time, or when the product is not used for 3 consecutive days, it will take some time for the
GPS to find the current position.
If there is an error with the GPS time when checking recorded video with a viewer program or the BlackVue App, turn
the GPS off and on after a signal is received.
Make sure to observe the following for an uninterrupted GPS signal.
yy Do not have the windshield glass tinted with a metallic component.
yy Be careful with the installation of devices that may interfere with GPS reception (e.g. some wireless starters &
alarms and MP3/CD players).
yy Do not use it simultaneously with other devices that use GPS signal.
yy Cloudy weather can interfere with GPS reception.
yy GPS reception can be poor in tunnels, underpasses, or streets with may Skyscrapers or high rise buildings, and
generating stations, military bases, or broadcasting transmitters etc.
Checks for the microSD Card
Refer to the followings for trouble-free use of your microSD card.
yy It is recommended to format it once a week.
yy If the recorded video suffers from break-up, format the microSD card.
yy For stable function, format it with programs recommended by the SD card association. For more details, refer
to the BlackVue web site (www.blackvue.com).
yy Before formatting it, copy important files to other storage media to store them.
yy Press the Wi-Fi button on the side for 10 seconds to format the microSD card without using a PC.
yy Insert the formatted microSD card into the product so that the microSD card is automatically initialized and the
firmware is installed on it.
yy Insert or remove the microSD card only when the product is turned off.
yy microSD cards are a consumables and they are guaranteed for 6 months.
yy Other manufacturer's microSD cards can cause compatibility problems so it is recommended to use a PittaSoft
microSD card.
yy The use of the Battery Discharge Prevention Device(ex. Power Magic Pro) can shorten the microSD card lifespan.
yy If a 64GB microSD card needs to be used, format it using BlackVue Viewer and insert it into the product. (25 page)
8
BLACKVUE Wi-Fi 2CH
Product Features
Ultra-high quality and smooth video
Full HD(1920x1080) 30 frame ultra-high quality front video
HD(1280x720) 30 frame high quality rear video
High-class design with functionality
Simple but classy all black design with the functionality of a 360-degree revolution to set any
angle
Externally-mountable waterproof rear camera
Possible to mount on the vehicle like truck that is not mountable in the interior because the rear
camera can be protected from the external environment
Rear camera with IR light possible to identify objects at night
Smart infrared sensor in the rear camera detects surrounding brightness, and six IR lights operate
automatically to identify vehicles and objects even at the dark place
Coaxial cable ensuring excellent data transfer
Rear images can be prevented from missing and data loss by using high-quality waterproof
coaxial cables (15m) that enable reliable data transfer
2CH Wi-Fi Video Shooting
Checking the front video as well as rear video through the built-in Wi-Fi
SONY Exmor CMOS sensor
Clearer vision with high image quality SONY image sensor and high-resolution megapixel lens
during both day and night-time driving
VOD & real-time live view function
With built-in Wi-Fi and the BlackVue App, video can be played regardless of place and time
DR650GW-2CH TRUCK
9
129° Wide-angle lens supporting high quality image as default
Support Full HD resolution with 129° lens which allows to show the most clear and detailed
playback of an accident and prevent video distortion
Enhance for user convenience
No necessity for disconnecting coaxial cable with rear camera to insert and remove the microSD
card
Diverse recording options (Normal/Event/Parking)
Event recording and automatic conversion & deactivation of parking mode
Support up to 64GB microSD card
Maximize the capacity of microSD card which allows to save massive recorded vides and
information
High-compression recording mode to extend microSD card life
Efficient memory usage with high-compression storage method
G-sensor & highly-sensitive GPS
Collect the vehicle speed and recording location etc. with GPS data and the detailed driving route
and recording can be checked with BlackVue viewer
BlackVue App
Watch recorded videos and live view through BlackVue App (support Android, iOS)
Support BlackVue Viewer program for Windows PC and Mac
BlackVue Viewer program which allows you to configure various settings including resolution,
voice recording and Wi-Fi and play back the recorded video
10 BLACKVUE Wi-Fi 2CH
Package Components
Front Camera
User Guide
Power Cord
Cable Clips (8 EA)
Double-sided Tape
and Screws for the
Mounting Bracket, etc
microSD Card
(Including BlackVue
Viewer and Manual)
microSD Card Reader
External Rear Camera
Rear Camera
Connection Cable
(15m for waterproof)
Note
yy Pictures of the components may differ from the actual ones.
yy To enhance the performance of the product, components may be changed without prior notice.
yy The package components can be purchased additionally from the BlackVue homepage (www.blackvue.
com).
DR650GW-2CH TRUCK 11
Names of Each Part
Front Camera
Lock Button
Camera Lens
Mounting Bracket
Front Security LED
Wi-Fi LED
LED Indicators for Recording
GPS LED
Speaker
DC in (Power Socket)
V in (Rear camera connection port)
Cover
microSD Card Slot
Voice On/Off Button
Wi-Fi Button
(Format Button: Press for 10 seconds for Formatting)
Note
yy Tap the voice On/Off button to turn the voice recording function on or off.
yy Press the Wi-Fi button on the side for 10 seconds to format the microSD card without using a PC.
12 BLACKVUE Wi-Fi 2CH
Rear Camera
Illumination Sensor
Sun Shield
Camera Lens
V out
(Front camera
connection port)
IR Light
External
Mounting
Bracket
How to Attach & Detach the Mounting Bracket of the Front Camera
1
2
Pull the the front camera out of the mounting bracket with the Lock button pressed.
Insert the front camera into the mounting bracket until you hear clicking sound, to attach it.
DR650GW-2CH TRUCK 13
How to Install the BlackVue
Checking Installation Position
1
2
It is recommended to install the front camera at the back of rear view mirror. Clean any foreign matter and moisture
from the place where the product will be installed.
It is recommended to install the rear camera at the top of the rear of the truck.
Note
yy Do not install the product where it can interfere with the driver's vision.
yy It is recommended to install the product at the designated BlackVue installation center.
14 BLACKVUE Wi-Fi 2CH
Insert & Remove the microSD Card
1
2
3
Open the cover on the side of the front camera.
Insert the microSD card into the microSD card slot, as shown in the picture.
To remove the microSD card, press the microSD card once and then pull it out. Make sure that the microSD
card doesn't pop out while trying to remove it.
Caution
yy Do not remove the microSD card while it is saving or reading data. The data may be damaged or
malfunction caused.
yy Copy important data to other storage media to store. PittaSoft Co., Ltd. will not be held responsible for
data loss due to user negligence.
Note
yy Insert or remove the microSD card only when the product is turned off.
yy microSD cards are consumables. Replace them after prolonged use.
DR650GW-2CH TRUCK 15
Installation
1
2
3
Stop the engine where there is some light and in a safe place, and then remove the key.
Attach the front camera to the windshield glass with the camera lens located in the middle of the vehicle
using the double-sided tape. After installing the product, remove the lens cap.
Use the power cord to connect the DC in of the front camera to car's power socket.
Note
yy It is necessary to use the Battery Discharge Prevention Device(ex. Power Magic Pro) to record video
while the car is parked.
yy To use BlackVue with other equipment that uses a power cable, purchase and use a dual power outlet
adaptor.
4
Firmly mount the bracket of the rear camera at the top of the rear of the truck with screws for fastening
bracket.
16 BLACKVUE Wi-Fi 2CH
5
Use the rear camera connection cable to connect the V in of the front camera to the V Out of the rear
camera.
Note
yy It is recommended to mold the cable with cover, etc. not to be exposed to the external
environment in case of mounting the connecting cable of the rear camera on the outside.
6
Use the cable clip to organize the cable so that it doesn't interfere with the driver's vision.
DR650GW-2CH TRUCK 17
7
Adjust the lens angle of the camera.
Note
yy With smartphone and Wi-Fi connections, it is possible to adjust the angle of the camera lens while
watching real-time video. (22 page)
8
Start the engine and check if the product works properly.
Caution
yy Do not remove the microSD card while it is saving or reading data. The data may be damaged or
malfunction caused.
yy Set the time (time zone) first before using the BlackVue for the first time. (34 page)
Note
yy After a test drive, check if video was correctly recorded.
yy Recorded video is saved in the MP4 format.
yy IR light of rear camera operates automatically by detecting surrounding light with an infrared sensor.
18 BLACKVUE Wi-Fi 2CH
Video Recording
Recording mode will be changed by the status of vehicle.
Note
yy Rear camera is mounted with IR light so that it can identify vehicles and objects in the images recorded at
the dark place.
Normal Recording
1
2
When the engine is started, the BlackVue is turned on automatically.
When the BlackVue is turned on, normal recording is automatically started.
Note
yy The normal recording function can be disabled in the BlackVue viewer setting. (34 page)
Parking Mode Recording
1
2
If the car doesn't move for 5 min or longer when in normal mode, it is automatically converted to parking
mode recording.
In parking mode recording, if movement or impact is detected by the camera, video is recorded.
Note
yy To use parking mode recording while the engine is stopped, connect the Battery Discharge Prevention
Device(ex. Power Magic Pro).
yy Automatic conversion function of parking mode recording can be disabled in the BlackVue viewer
setting. (34 page)
yy When switch to parking mode recording, the GPS feature will turn off automatically.
yy In parking mode recording, the recording frame is reduced to 15 fps.
DR650GW-2CH TRUCK 19
Event Recording
1
2
If an impact is detected in normal or parking mode recording, event recording is started.
It records video for 5 seconds before and 55 seconds after the impact.
Note
yy Sensitivity to impact can be adjusted in the BlackVue viewer setting. (36 page)
yy Event recording time can be adjusted in the BlackVue viewer setting. (34 page) If you set the event
recording time for 2 minute, it records video for 5 seconds before and 115 seconds after the impact.
20 BLACKVUE Wi-Fi 2CH
Video Playback
How to Playback using a PC
Recorded videos can be played back with a movie playback program on a PC. It is enabled to play back recorded
videos in the same way on multimedia devices (navigation, tablet etc.) using a USB storage device.
1
Insert the provided microSD card into a microSD card reader.
2
Connect the microSD card reader to the PC.
3
Open an application to play back recorded videos and select the movie you want to play back from the
removable drive.
Note
yy For how to play back using the BlackVue viewer, refer to Video Playback. (27 page)
yy If there are many recorded videos in the microSD card, it may take a long time to load the file.
yy How to play back recorded videos may differ between multimedia devices, and it may not be possible
to play back according to the model.
DR650GW-2CH TRUCK 21
How to Playback using a Smartphone (BlackVue App)
1
Install the BlackVue App and open it in the smartphone. The BlackVue App can be downloaded from the
Google Play store, Apple App Store, and Windows store.
Note
yy The BlackVue app is enabled in Android 2.3 or higher, iOS 6.0 or higher, or Windows 8.0 or higher.
yy Some functions may not be supported depending on the smartphone.
yy The BlackVue application is optimized for iOS 7.0.
2
Press the Wi-Fi button on the side of the product, to turn on Wi-Fi.
3-1 (In case of using Android OS)
Tap the Search Wi-Fi button in the BlackVue App. Select the device you want to connect and, enter the
password. (e.g. DR650GW-A682DE). Tap the OK button to connect it to the selected device. The initial
password is blackvue, but the user can change it.
22 BLACKVUE Wi-Fi 2CH
3-2 (In case of using iOS OS)
Select Settings > Wi-Fi on smartphone. Select the device to connect in the selection list of network, and
enter the password. (e.g. DR550GW-A682DE) If you touch the Join button, it is connected to the selected
device. The initial password is blackvue, but the user can change it. If the connection is done, press the
BlackVue icon to run the App.
Note
yy If you save the connection information when connecting using Wi-Fi, you can tap the BlackVue Wi-Fi
button in the BlackVue App to connect it without turning on the Wi-Fi function of the smartphone. (Only
for Android smartphone)
yy For the Live View function, Wi-Fi can be used within a 10 m range, although the range may vary in some
circumstances.
yy For playback of recorded videos using Wi-Fi, reception may vary according to the data transfer rate.
yy For details about how to configure Wi-Fi, refer to Wi-Fi & Other Settings. (39 page)
yy If you do not use the Wi-Fi function for 10 minutes, it turns off automatically. And, you cannot change
the time.
DR650GW-2CH TRUCK 23
4
Select the recorded video in the video list you want to play back.
Note
yy Tap the Live View button to check the video in real time.
yy If the Live View or VOD playback & copy function is used while it is connected via Wi-Fi and recording Full HD
(1920x1080) @30fps, the recording frame is reduced to 20 fps.
yy For details of the BlackVue App, refer to the BlackVue App manual. Access the BlackVue website (www.
blackvue.com) and download the BlackVue App manual.
24 BLACKVUE Wi-Fi 2CH
How to use the BlackVue Software
Screen Description
Double-click the BlackVue Viewer icon in the microSD card to run BlackVue Viewer. In order to install BlackVue
Viewer on the PC, connect to the BlackVue website (www.blackvue.com) and download it.
2 3
4
5
1
6
8
7
No.
Name
Description
1
Playback Screen
for Recorded
Videos
2
If you change the language on playback screen, the language for BlackVue Viewer
Language Setting can be changed. For details about language configuration for BlackVue, refer to the
Basic Settings. (34 page)
Videos can be played back using this screen. The mouse can be used to zoom in/out.
DR650GW-2CH TRUCK 25
No.
Name
Description
3
microSD Card
Formatting
The microSD card connected to the PC can be formatted.
4
G-Sensor
Information
G-sensor information can be checked, at the time the video was recorded.
5
GPS Information
GPS information can be checked, at the time the video was recorded.
6
Recorded Video
List
Using the file list and map tab, the recorded video list, and where a video was recorded can be
checked.
You can display only the rear camera files in the recorded video list by clicking Front,
and You can display only the front camera files in the recorded video list by clicking
Rear.
: This is an normal recording file and marked with green in the timeline.
: This is an event recording file and marked with orange in the timeline.
: This is a parking mode recording file and marked with blue in the timeline.
7
Timeline
Video can be explored with the date, hr, min, and sec of when a video was recorded.
For details on the timeline, refer to the Timeline. (28 page)
8
Playback Option
Button
You can adjust the screen, playback speed or volume while a recorded video is played
back. For the details on the playback option buttons, refer to How to Control the
Playback of Recorded Video. (27 page)
26 BLACKVUE Wi-Fi 2CH
Video Playback
How to Control the Playback of Recorded Video
The recorded video can be played back in full screen mode and be reversed upside down. The playback speed can
be adjusted.
Play Previous File Frame Move (Previous)
View Upside-Down
Frame Move (Next)
Playback Speed Control
Full Screen View
Front/Rear Screen Mode
Front/Rear Reverse View
Playback Time
Playback/ Stop
Pause
Play Next File
Volume Control
Note
yy While a recorded video is played back, double-click the screen to switch to full screen view. Double-click
the screen again or press ESC to return to default view.
yy While playing back a recorded video, use the mouse wheel to zoom in/out.
yy While playing back a recorded video, right-click the screen to view 100 % zoom-in screen.
DR650GW-2CH TRUCK 27
Timeline
Video can be explored with the date, hr, min, and sec of when a video was recorded.
Year Selection
Month Selection
Timeline for Hr Selection
Timeline for
Min Selection
Timeline for Sec
Selection
Note
yy In the date selection area, the date with a recorded video is marked by a red circle and the currentlyselected date is marked by a yellow circle.
28 BLACKVUE Wi-Fi 2CH
How to Manage Files
With the recorded video list, a file can be deleted or saved with a different name.
1
2
3
Select a file from the recorded video list and right-click it.
To delete a file, click Delete.
To save it with different name, click Export and select the option you want.
Note
yy When you select Sound Off, the voice is removed from the recorded video to be saved.
4
5
Press the OK button and select the file name you want, together with the path.
Press the Save button to finish.
DR650GW-2CH TRUCK 29
How to Verify Files
With the recorded video list, a file can be verified forgery.
1
Select a file from the recorded video list and right-click it.
2
Click Verification and click OK button.
30 BLACKVUE Wi-Fi 2CH
How to Check the Map
Where a video was recorded can be checked with the map.
1
2
3
Select a file from the recorded video list and play it back.
Press the Map tab.
With the +/- button or mouse wheel, the map can be zoomed in/out.
Speed Unit Change
Map Type
Selection
Map
Zoom-In/Out
Car Location
Note
yy To use the map service, an Internet connection is required.
yy Only for the recorded file with GPS information, the data can be checked.
DR650GW-2CH TRUCK 31
How to Check MyWay Viewer
The driving route of a recorded video can be checked. (GPS Tracking)
1
2
3
Select a file from the recorded video list and play it back.
Press the
button. The driving route will be displayed on the map.
Double-click the map to play back the recorded video of the nearest driving route from the clicked point.
Speed Unit Change
Latitude & Longitude
Car Location
Map Type
Selection
Record
Starting Point
Driving Route
Car Location
Currently-Played File
Note
yy To use the map service, an Internet connection is required.
yy Only for the recorded file with GPS information, the data can be checked.
32 BLACKVUE Wi-Fi 2CH
How to Save as an Image
While playing back a recorded video, some parts can be saved as images if you want.
1
2
Select a file from the recorded video list and play it back.
From the image to be saved, click the
button.
Note
yy Use the timeline or press the
3
4
Press the G
/
button to explore detailed images.
button.
Select the file name you want, together with the path, and click the Save button.
Note
yy JPG and BMP formats are supported for image files.
How to Print Out an Image
While playing back a recorded video, some parts can be printed out as images if you want.
1
2
Select a file from the recorded video list and play it back.
From the image to be saved, click the
button.
Note
yy Use the timeline or press the
3
4
Press the
/
button to explore detailed images.
button.
Select the printer and click the OK button.
DR650GW-2CH TRUCK 33
Settings
Basic Settings
Time, video, and recording settings can be changed.
1
2
Click the G
button and click the Basic tab.
After changing the configuration, click Save & Close.
4
1
3
2
No.
Function
Description
1
Time Zone
Settings
The time zone can be set for location used. The time zone setting is used as information
on a recorded video. The time can be set via BlackVue application.
2
Image Setting
The quality and brightness of the recorded front/rear video can be configured. For
details on the recording time, refer to Recording Time. (46 page)
3
Recording
Configuration
Normal Record, Voice Record, Date and Time Display and Auto Switching to Parking
Mode function can be turned on/off.
Speed Display and Record File Unit can be changed.
34 BLACKVUE Wi-Fi 2CH
No.
Function
4
Language
Setting
Description
The language of BlackVue can be changed.
Note
yy With the normal recording function disabled, only event and parking mode recording videos are
saved.
yy With the speed display unit disabled, the vehicle speed is not displayed when the recorded videos are
played back.
yy On microSD cards, older files are deleted first to mark space for newly-recorded videos. Copy and store
important files such as even recording files to other storage media.
yy Tap the voice On/Off button to turn the voice recording function on or off.
DR650GW-2CH TRUCK 35
Sensitivity Setting
In recording mode, the G-sensor sensitivity(impact sensitivity) and motion detection sensitivity can be set for each
start event recording. The speed alert can be set to start event recording when vehicle exceeds the set speed level.
1
2
Click the G
button and click the Sensitivity tab.
After changing the configuration, click Save & Close.
Note
yy For details about advanced sensitivity configuration, refer to Advanced Sensitivity Configuration.
(37 page)
3
1
2
No.
1
Function
Description
It is possible to set the G-sensor sensitivity for event recording when shock is
Sensitivity for
applied. The G-sensor sensitivity of top and bottom, left and right, front and rear
Normal Recording
each can be set from 0-10 levels.
36 BLACKVUE Wi-Fi 2CH
No.
Function
Description
2
Sensitivity for
Parking Mode
It is possible to set the G-sensor and motion detection sensitivity to start event
recording during parking recording mode. The G-sensor sensitivity of top and
bottom, left and right, front and rear each can be set from 0-10 levels; and the
motion detection sensitivity can be set from 0-5 levels.
3
Speed Alert
When the vehicle speed exceeds the set level, a beep of event recording is created
and switches to event recording mode. You can enter the number of speed limit that
triggers the speed warning.
Note
yy In normal recording mode, 0 level indicates the minimum of impact sensitivity.
yy In parking recording mode, 0 level of motion detection sensitivity indicates that motion recognition is
off.
Advanced Sensitivity Settings
The sensitivity can be configured while watching a recorded video.
1
2
3
Click the G
button and click the Sensitivity tab.
Click the Advanced Setting button of the setting you want.
Play back a recorded video. Saved G-sensor information is displayed at the bottom of the recorded video
which is played back.
DR650GW-2CH TRUCK 37
4
Move the control bar up/down to adjust the sensitivity range. If the range is wide, it is less sensitive, and if
the range is narrow, it is more sensitive.
It is recorded as an event.
It is not recorded as an event.
Note
yy If an event recording is started due to the sensitivity configured while a recorded video is being played
back, the edge of the playback screen blinks in orange.
5
After changing the configuration, click Save & Close.
38 BLACKVUE Wi-Fi 2CH
Wi-Fi and Other Settings
Settings for Wi-Fi, LED indication, and voice announcements can be changed and user information can be
registered.
1
2
3
No.
Function
Description
1
Wi-Fi Setting
You can change Autorun Wi-Fi feature, SSID and your password for the Wi-Fi connection.
The BlackVue App can be accessed with the SSID and password chosen by the user and
you can also reset the password if you have forgotten it.
2
Etc.
For video recording status, normal recording mode, and parking mode recording, the
LED indicators can be turned on/off.
Voice direction item or the volume can be changed.
3
User info.
Registration
When user information is registered in user information registration window, the text
string is displayed in the recorded image. User may register a string of 20 characters or
less, in combination of English uppercase characters (A-Z), numbers (0-9), symbol ( :; ‘/ \ _ () $ # ).
DR650GW-2CH TRUCK 39
How to Apply Configuration
The user's configuration can be applied to the product.
1
2
Insert the microSD card into the product. For details on how to insert the microSD card, refer to Insert &
Remove the microSD Card. (15 page)
When the power is turned on, the user's configuration is automatically applied.
Note
yy Insert the microSD card only when the product is turned off.
40 BLACKVUE Wi-Fi 2CH
Firmware Upgrade
Connect the microSD card via PC, or BlackVue application via Wi-Fi to upgrade firmware.
Upgrade via PC Connection
1
2
3
4
Connect the microSD card to the PC. For details on how to connect, refer to Playback using a PC. (21
page)
Format the microSD card, and connect to BlackVue website (www.blackvue.com). Then, download the
firmware upgrade file, in the form of a zip file.
Unzip the file, and copy the BlackVue folder to the microSD card.
Insert the microSD card in BlackVue, and turn on the power. Then, upgrade will automatically occur.
Note
yy After firmware upgrade, all the user's configurations including the Wi-Fi setting are initiated.
yy For details on how to insert the microSD card, refer to Insert & Remove the microSD Card. (15 page)
yy Insert the microSD card only when the product is turned off.
DR650GW-2CH TRUCK 41
Upgrade via BlackVue Application
1
2
3
4
5
6
7
Select Firmware Download in BlackVue application.
Select Model Name and Language Name and press OK.
When firmware information to download is displayed, press OK to download.
Connect BlackVue via Wi-Fi. For details on how to connect, refer to Playback Using the BlackVue App.
(22 page)
Select Config > Firmware Upgrade in BlackVue application.
Press OK to transfer firmware to BalckVue.
After transfer is complete, BlackVue will reboot and firmware upgrade will automatically occur.
Note
yy Firmware may only be downloaded when the smartphone is connected to the internet.
yy Firmware Upgrade in Config is displayed only when a firmware file is available in the smartphone.
yy BlackVue will automatically reboot after firmware upgrade is complete.
Caution
yy Make sure that the power is never turned off while firmware upgrade is in progress.
42 BLACKVUE Wi-Fi 2CH
Product Specifications & Standards
Product Specifications
Model Name
Color/Size/Weight
Memory
Recording Mode
Camera
Viewing Angle
DR650GW-2CH TRUCK
Front: Black / Width 118.5mm x Height 36mm / 120g
Rear: Black / Width 67.4mm x Height 27.6mm / 250g
microSD Card (16GB / 32GB / 64GB)
Normal Recording, Event Recording (Impact Detection), and Parking mode Recording
(Motion+Impact Detection)
※For Parking mode recording, a battery discharge prevention device is required.
Front: CMOS Sensor (Approx. 2.4M Pixel)
Rear: CMOS Sensor (Approx. 1M Pixel)
Front: Opposite Angle 129°, Horizontal 103°, Vertical 77°
Rear: Opposite Angle 129°, Horizontal 108°, Vertical 57°
Front
Full HD(1920x1080)@30Fps
Resolution/Frame
Rear
HD(1280x720)@30Fps
Full HD(1920x1080)@15Fps
HD(1280x720)@15Fps
HD(1280x720)@30Fps
HD(1280x720)@30Fps
HD(1280x720)@15Fps
HD(1280x720)@15Fps
※ Resolution/frame can be changed
Image Quality
Video Compression Mode
Highest, High, Normal
MP4
Wi-Fi
Built-in (802.11b/g/n(2.4~2.4835GHz)
GPS
Built-in
Microphone
Built-in
Speaker
Built-in
※Voice Directions
DR650GW-2CH TRUCK 43
LED Indicators
Sensor
Illumination Sensor
and Light of Rear Camera
Front: Recording LED, GPS LED, Wi-Fi LED, Front Security LED
3-Axis Acceleration Sensor
850 nano, 6 Infrared(IR) Lights
Wi-Fi On/Off Button
※Self-format Function: Press it for 10 seconds to format the microSD card
Button
Backup Battery
Input Power
Current Consumption
Voice On/Off Button
※The proximity sensor is built-in so that voice recording can be turned on/off by
approaching it with a hand
※Touch the button or it recognizes when a hand approaches to within about 2 cm
Built-in super capacitor
DC 12V-24V
Average 4.6W
※Varies depending on GPS, Wi-Fi, IR usage
Operation Temperature
-20°C ~ 60°C
Storage Temperature
-20°C ~ 70°C
Certificates
Software
Application
44 BLACKVUE Wi-Fi 2CH
Front: KC, FCC, CE, RoHS, Telec, WEEE
Rear: KC, FCC, CE, RoHS, WEEE
BlackVue Viewer
※Windows XP or higher (Windows 8 supported) and Mac Leopard OS X(10.5) or higher
BlackVue Application (Android 2.3 or higher, iOS 6.0 or higher, and Windows 8.0 or higher)
LED Indicators
LED
State
Recording State
(REC)
GPS
Boot-up
Wi-Fi
Front Security
Blinking
Normal
Orange Blinking
White Blinking
Event
Red Blinking
Fast White Blinking
Parking
Green Blinking
Recording
White Blinking
Wi-Fi ON
Lighting
Wi-Fi ON/OFF Change
Blinking
GPS ON
Software Control
Blue Light
Available
Available
White Blinking
White Blinking
White Blinking
Unavailable
Available
DR650GW-2CH TRUCK 45
Recording Time
Resolution
(Front+Rear)
Full HD + HD
@30fps
Full HD + HD
@15fps
HD + HD
@30fps
HD + HD
@15fps
Highest
3 HR
4 HR 10 MIN
3 HR 50 MIN
4 HR 30 MIN
High
3 HR 20 MIN
4 HR 30 MIN
4 HR 10 MIN
5 HR 40 MIN
Normal
4 HR 10 MIN
5 HR 40 MIN
5 HR 40 MIN
7 HR
Highest
6 HR
8 HR 20 MIN
7 HR 40 MIN
9 HR
11 HR 20 MIN
Memory Capacity
16GB
32GB
64GB
Bit rate
(Front+Rear)
High
6 HR 40 MIN
9 HR
8 HR 20 MIN
Normal
8 HR 20 MIN
11 HR 20 MIN
11 HR 20 MIN
14 HR
Highest
12 HR
16 HR 40 MIN
15 HR 20 MIN
18 HR
22 HR 40 MIN
High
13 HR 20 MIN
18 HR
16 HR 40 MIN
Normal
16 HR 40 MIN
22 HR 40 MIN
22 HR 40 MIN
28 HR
Highest
8 Mbps + 3 Mbps
6 Mbps + 2 Mbps
6 Mbps + 3 Mbps
5 Mbps + 2 Mbps
High
7 Mbps + 3 Mbps
5 Mbps + 2 Mbps
5 Mbps + 3 Mbps
4 Mbps + 2 Mbps
Normal
6 Mbps + 2 Mbps
4 Mbps + 1.5 Mbps
4 Mbps + 2 Mbps
3 Mbps + 1.5 Mbps
Note
yy There may be some variation with actual recording time depending on the user's environment.
yy Depending on the image quality, the microSD card lifespan can be shorten.
46 BLACKVUE Wi-Fi 2CH
Before Requesting A/S Service
yy It is required for users to back up important data regularly from storage device (to other separate
media). Depending on the situation, it will be necessary to delete the data from the internal storage
device (component). It might be needed to delete all the data from the product for A/S. So it is required
for users to back up important data by themselves before requesting A/S. For all the A/S products, it is
regarded that the user already backed up the data so there is no additional back-up process. Therefore, it
is important to note that we are not responsible for any data lost during A/S.
FCC Compliance Information
THIS DEVICE COMPLIES WITH PART 15 OF THE FCC RULES.
Operation is subject to the following two conditions;
(1) This device may not cause harmful interference, and
(2) This device must accept any interference received, including interference that may cause undesired
operation.
CAUTION : Changes or modifications not expressly approved by the party responsible for compliance could
void the user’s authority to operate the equipment.
Note: This equipment has been tested and found to comply with the limits for a Class B digital device,
pursuant to part 15 of the FCC Rules. These limits are designed to provide reasonable protection against
harmful interference in a residential installation. This equipment generates, uses and can radiate radio
frequency energy and, if not installed and used in accordance with the instructions, may cause harmful
interference to radio communications. However, there is no guarantee that interference will not occur in a
particular installation. If this equipment does cause harmful interference to radio or television reception,
which can be determined by turning the equipment off and on, the user is encouraged to try to correct the
interference by one or more of the following measures:
yy Reorient or relocate the receiving antenna.
yy Increase the separation between the equipment and receiver.
yy Connect the equipment into an outlet on a circuit different from that to which the receiver is connected.
yy Consult the dealer or an experienced radio/TV technician for help.
Modifications not expressly approved by the manufacturer could void the user's authority to operated the
equipment under FCC rules.
FCC ID: YCK-DR550GW-2CH
208-150023
MSIP-CMM-PTA-DR550GW-2CH
YCK-DR550GW-2CH