1
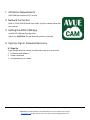
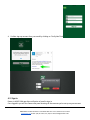
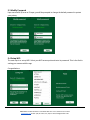
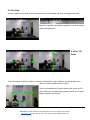
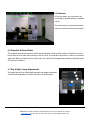
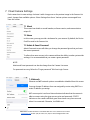
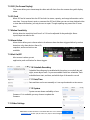
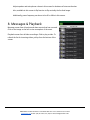
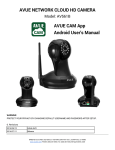
AVUE NETWORK CLOUD HD
CAMERA
AV561B
AVUE CAM App
User’s Manual
WARNING:
PROTECT YOUR PRIVACY BY CHANGING DEFAULT USERNAME AND PASSWORD AFTER SETUP.
0. Revisions
AVUE: Advanced Video Surveillance 1180 MIRALOMA WAY STE C, SUNNYVALE, CA 94085
www.avueinc.com PHONE: (408) 481-9355, FAX: (408) 481-9366, [email protected]
2014/06/12
Initial draft
Table of Content
1. Android Device Requirements
2. Network Connection
3. Getting the AVUE CAM App
4. Sign Up, Log In, Password Recovery
4.1 Sign Up
4.2 Log In
4.3 Password Recovery
5. Adding a AVUE CAM Cloud Camera
5.1 Add Device
5.2 Scan QR Code
5.3 Modify Password
5.4 Setup WiFi
6. Camera List Previews
6.1 Preview & Status
6.2 Camera List Menu
6.3 Live View
6.4 Pan, Tilt, & Zoom
6.5 Intercom
6.6 Snapshot & Record Video
6.7 Day & Night, Image Adjustments
7. Cloud Camera Settings
7.1 About
7.2 Name
7.3 Admin & Guess Password
7.4 Network
7.5 OSD (On-Screen Display)
7.6 SD Card
7.7 Motion Sensitivity
7.8 Alarm Action
7.9 Alert
7.10
Schedule Recording
7.11
Date/Time
7.12
More Settings
8. Messages & Playback
AVUE: Advanced Video Surveillance 1180 MIRALOMA WAY STE C, SUNNYVALE, CA 94085
www.avueinc.com PHONE: (408) 481-9355, FAX: (408) 481-9366, [email protected]
1. iOS Device Requirements
AVUE CAM app requires iOS 5.0 or later.
2. Network Connection
Refer to “AVUE AV561B Quick Start Guide” to get the camera setup with
your internet.
3. Getting the AVUE CAM App
Install AVUE CAM app from App Store.
Search for: AVUE CAM. The app looks like picture on the right.
4. Sign Up, Sign In, Password Recovery
4.1 Sign Up
To get started using the camera you will need to sign up to an account.
1. Provide an email address
2. Create a password
3. Verify password you created
AVUE: Advanced Video Surveillance 1180 MIRALOMA WAY STE C, SUNNYVALE, CA 94085
www.avueinc.com PHONE: (408) 481-9355, FAX: (408) 481-9366, [email protected]
4. Confirm sign up account from your email by clicking on “Verify Now” link
4.2 Sign In
Return to AVUE CAM app after verification of email to sign in.
Once logged in you will see Camera list panel showing all the cameras you’ve set up on your account.
AVUE: Advanced Video Surveillance 1180 MIRALOMA WAY STE C, SUNNYVALE, CA 94085
www.avueinc.com PHONE: (408) 481-9355, FAX: (408) 481-9366, [email protected]
4.3 Password Recovery
If you’ve forgotten the password, click on “Forgot password” (from Sign In panel pictured above) to get a
reset password email.
AVUE: Advanced Video Surveillance 1180 MIRALOMA WAY STE C, SUNNYVALE, CA 94085
www.avueinc.com PHONE: (408) 481-9355, FAX: (408) 481-9366, [email protected]
5. Adding & Remove A Camera
5.1 Add Device
To add an AVUE Cloud Camera, tap menu icon from top right corner of the app (as
pictured below), then select “Add device” from the menu.
5.2 Scan QR Code (or Manually Type in Device ID)
The next screen prompts for cloud camera identification number. You may enter
manually and click next, or use Quick Response (QR) code scanning from . To use the QR
code scan, click the icon on the left on the “Input device ID” field. A QR code scan window
will show.
AVUE: Advanced Video Surveillance 1180 MIRALOMA WAY STE C, SUNNYVALE, CA 94085
www.avueinc.com PHONE: (408) 481-9355, FAX: (408) 481-9366, [email protected]
5.3 Modify Password
Upon successful QR scan or ID input, you will be prompted to change the default password to protect
your privacy.
5.4 Setup WiFi
The next step is to set up WiFi. Select your WiFi access point and enter its password. This is the final in
setting your camera with the app.
Congratulations.
AVUE: Advanced Video Surveillance 1180 MIRALOMA WAY STE C, SUNNYVALE, CA 94085
www.avueinc.com PHONE: (408) 481-9355, FAX: (408) 481-9366, [email protected]
5.5 Removing Camera
To remove a camera from the Camera List, long press
the preview image. A popup menu will display. Select
Delete menu to remove that camera from your account.
6. Camera List Previews
The Camera list panel contains all AVUE cloud cameras you have added to your account. Each preview
picture has various indicators for online, alarm, or password changed status.
6.1 Preview & Status
Each picture in the Camera list has a camera name label. Pull down anywhere
on the screen to refresh the preview picture.
The GREEN, RED, or YELLOW DOT on the lower left of each preview picture
indicates connectivity status as online, offline, or password has changed,
respectively.
6.2 Camera List Menu
The first option in this menu is the selection of resolution for all cameras. You may
choose between four resolutions: Small [160 x 90], Half [320 x 180], Normal
[640x360], and HD [1280 x 720].
AVUE: Advanced Video Surveillance 1180 MIRALOMA WAY STE C, SUNNYVALE, CA 94085
www.avueinc.com PHONE: (408) 481-9355, FAX: (408) 481-9366, [email protected]
6.3 Live View
To view a camera’s live feed, touch a preview picture. Initial display will show a navigation bar with
buttons for speaker, microphone, snapshot, record, and day &
night setting buttons.
6.4 Pan, Tilt,
Zoom
Touch and swipe to the left or right to rotate the camera left or right. Likewise, touch and swipe up or
down to tilt the camera view up or down.
Zoom is accomplish two fingers touching the screen as if to
pinch. Move two touching fingers apart to zoom in; move two
fingers together to zoom out.
AVUE: Advanced Video Surveillance 1180 MIRALOMA WAY STE C, SUNNYVALE, CA 94085
www.avueinc.com PHONE: (408) 481-9355, FAX: (408) 481-9366, [email protected]
AVUE: Advanced Video Surveillance 1180 MIRALOMA WAY STE C, SUNNYVALE, CA 94085
www.avueinc.com PHONE: (408) 481-9355, FAX: (408) 481-9366, [email protected]
6.5 Intercom
In live view mode, you can listen in by
activating the speaker button. By default
it is off.
The next button is a microphone button,
touch it to activate the intercom feature.
6.6 Snapshot & Record Video
The snapshot button will capture a still picture and display it with options to share. Similarly, the record
button will record a video until you stop or exit live view. You may save the picture or video to your device
afterward. When you leave the Live View screen, the video will be stopped and saved automatically to the
SD Card on the camera.
6.7 Day & Night, Image Adjustments
The gears button show Day & Night settings, and image adjustment
functions like Brightness, Contrast, Saturation, and Sharpness.
AVUE: Advanced Video Surveillance 1180 MIRALOMA WAY STE C, SUNNYVALE, CA 94085
www.avueinc.com PHONE: (408) 481-9355, FAX: (408) 481-9366, [email protected]
7. Cloud Camera Settings
Each camera has its own settings. Activate it with a long press on the preview image in the Camera List
panel. A popup lists available options. Select Settings from there. Various options are managed from
from this screen.
7.1 About
This screen has details on model number, software version, and camera device
unique ID.
7.2 Name
In this screen, you may provide a nickname for your camera. By default, the Device
ID will be used in the Camera List.
7.3 Admin & Guest Password
Admin Password screen will allow you change the password given that you know
the current password.
To allow other users access to the camera without the ability to make system wide
settings, it is recommended that you create a guest password.
NOTE:
Admin and Guest password can also be change from the Camera List menu.
For password recovery, follow the “Forgot password” link from Login Screen.
7.4 Network
Ethernet and WiFi network options are enabled or disabled from this screen.
You may change IP address from one assigned by router using DHCP to a
static IP address you assign.
WiFi access point is set here. Network status indicates that the camera is
able to connect using the given access point and password. STATE 1
indicator on the camera will blink green three times every three seconds
when it is connected. Otherwise, it will blink red.
AVUE: Advanced Video Surveillance 1180 MIRALOMA WAY STE C, SUNNYVALE, CA 94085
www.avueinc.com PHONE: (408) 481-9355, FAX: (408) 481-9366, [email protected]
7.5 OSD (On-Screen Display)
This screen allow you to timestamp the video and still shots from the camera along with display
name.
7.6 SD Card
When SD Card is inserted into the SD Card slot its status, capacity, and usage information can be
seen here. You may format, repair, or unmount the SD Card. When you can not view playback video
or view alarm information, you may choose to repair. Though repairing may cause lost of some
data.
7.7 Motion Sensitivity
Motion detection sensitivity level from 0 to 100 can be adjusted for day and night. Alarm
Input/Output can also be set.
7.8 Alarm Action
Alarm Action allow you to choose what to do when an alarm has been triggered either by motion
detection or by alarm device. Alarm I/O,
snapshot, and record actions are
available.
7.9 Alert On/Off
Alert screen is where you set
application push notification for alarm triggers.
7.10 Schedule Recording
Schedule Recording may be enabled with the option to record all day and
night, seven days a week. Or you can enabled it with four schedules. Each
schedule has a start, end time, and which days of the week to record.
7.11 Date/Time
Date and time can be set manually or it can synchronized to a time server.
7.12 System
System screen shows availability of new
firmware. If it is available, you may choose to update the
firmware.
7.13 Other Settings
AVUE: Advanced Video Surveillance 1180 MIRALOMA WAY STE C, SUNNYVALE, CA 94085
www.avueinc.com PHONE: (408) 481-9355, FAX: (408) 481-9366, [email protected]
Adjust speaker and microphone volume in this screen for loudness of intercom function.
Also, available in this screen is flip function to flip vertically the live feed image.
Additionally, power frequency can be set to be 50 or 60Hz in this screen.
8. Messages & Playback
Message screen lists all motion and alarm events that has occurred.
Click on the image on the left to view a snapshot of the event.
Playback screen lists all video recordings. Click to play a video. To
refresh the list for incoming videos, pull up from the bottom of the
screen.
AVUE: Advanced Video Surveillance 1180 MIRALOMA WAY STE C, SUNNYVALE, CA 94085
www.avueinc.com PHONE: (408) 481-9355, FAX: (408) 481-9366, [email protected]