1
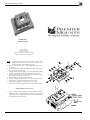
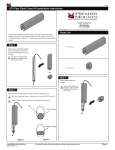
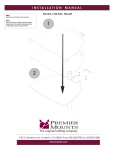
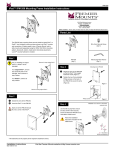
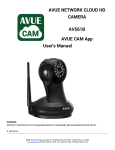
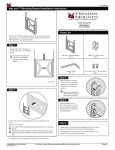
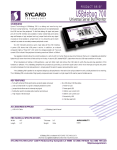
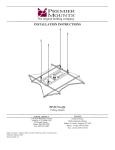
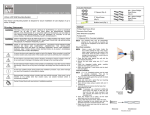
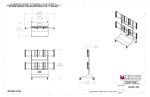
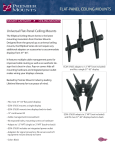
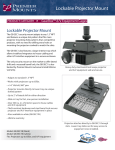
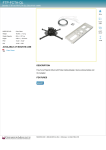
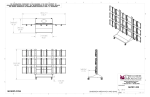
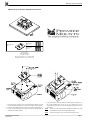
PDS-022 Projector Bracket
PDS-022 Projector Bracket Installation Instructions
M4 x 8mm Phillips
Head Screws
(Qty 3)
PDS-022 Bracket
(Qty 1)
M4 x 8mm Security
Head Screws
(Qty 3)
Premier Mounts
3130 E. Miraloma Ave.
Anaheim, CA 92806
Phone: (800) 368-9700 Fax: (800) 832-4888
[email protected] www.mounts.com
1.
1.
2.
3.
Invert the projector and place it on a soft and flat surface. Remove any foot
levelers that might possibly prevent the correct installation of the bracket.
Locate the three mounting points located on the bottom of the projector.
Line up the mounting points on the projector with the mounting holes on
the PDS-022 mounting bracket.
Using a screwdriver, secure the PDS-022 mounting bracket using three (3)
M4 x 8mm Phillips Head screws. Do not over tighten these screws.
Overtightening the screws may result in damaging the threaded inserts on
the projector.
NOTE: Please refer to the PDS Base Box Installation Instructions to attach
the PDS Base Box to the PDS-022 mounting bracket.
NOTE:
Installation Instructions
IN-PDS022.R0
The projector (shown above) is for illustration purposes only.
Page 1
LOCK-IT™ Security System
LOCK-IT™
Security System
Premier Mounts
3130 E. Miraloma Ave.
Anaheim, CA 92806
Phone: (800) 368-9700 Fax: (800) 832-4888
[email protected] www.mounts.com
NOTE:
1.
2.
3.
4.
5.
6.
7.
8.
To utilize the LOCK-IT™ Security System, all M6 x 12mm
Phillips Pan Head screws (A) must be removed prior to
installing the M6 x 12mm Security Screws (D).
Remove all pre-installed M6 x 12mm Phillips Pan Head screws
(A - 6 total).
Use the M5 Security Wrench (B - supplied) to install and tighten the
M6 x 12mm Security Screws (D).
Using the security wrench (supplied), remove the M6 x 8mm standard
set screw and replace it with the M6 x 8mm security set screw (C).
Insert the nylon washer (G), 1/4” flat washer (H) and the M6 x 12mm
Security Screw (D) into the pivot point (I).
Attach bracket to projector using security screws.
Once the Phillips Pan Head screws have been replaced with the
security screws, re-attach the bracket (E) to the mount (F).
Insert the four tilt adjustment security screws (two per side).
Follow the instructions in the PDS Manual to complete the installation.
Mounting Bracket Security Screws
1.
Using a security wrench (supplied), secure the PDS-022 mounting
bracket using three (3) M4 x 8mm Security Head screws. Do not over
tighten these screws. Overtightening the screws may result in damaging
the threaded inserts on the projector.
Page 2
Installation Instructions