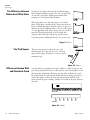
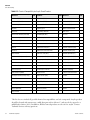
1
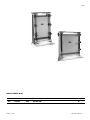
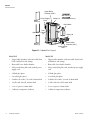
Aluminum Backed Sequencer Models S4S and S3S Operating and Maintenance Manual 7007348 Rev. 0 Visit us online to register your warranty www.thermoscientific.com/warranty Preface S4S S3S MANUAL NUMBER 7007348 0 -- 4/26/12 REV ECR/ECN DATE Thermo Scientific Transfer to Marietta (was T-rex 01-2004) ccs DESCRIPTION By Aluminum Sequencer i Preface Important Read this instruction manual. Failure to read, understand and follow the instructions in this manual may result in damage to the unit, injury to operating personnel, and poor equipment performance. s Caution All internal adjustments and maintenance must be performed by qualified service personnel. s Warning To avoid the risk of personal shock, always disconnect the gel box from the power supply. Further, the power supply must be equipped with a shut-down-ondisconnect circuit. Do not move the unit unless the power source to the unit has been disconnected. s Statement of Proper Use: Use this product only for its intended purpose as described in this manual. Do not use this product if the power leads are damaged or if any of its surfaces are cracked. Running conditions for this unit should not exceed the name plate readings found on the side panel. This system is designed to meet IEC 1010-1 safety standards (IEC 1010-1 is an internationally accepted electrical safety standard for laboratory instruments). Material in this manual is for information purposes only. The contents and the product it describes are subject to change without notice. Thermo Fisher Scientific makes no representations or warranties with respect to this manual. In no event shall Thermo be held liable for any damages, direct or incidental, arising out of or related to the use of this manual. ©2012 Thermo Fisher Scientific. All rights reserved. ii Aluminum Sequencer Thermo Scientific Preface Important operating and/or maintenance instructions. Read the accompanying text carefully. Potential electrical hazards. Only qualified persons should perform procedures associated with this symbol. Equipment being maintained or serviced must be turned off and locked off to prevent possible injury. Hot surface(s) present which may cause burns to unprotected skin, or to materials which may be damaged by elevated temperatures. Marking of electrical and electronic equipment, which applies to electrical and electronic equipment falling under the Directive 2002/96/EC (WEEE) and the equipment that has been put on the market after 13 August 2005. This product is required to comply with the European Union’s Waste Electrical & Electronic Equipment (WEEE) Directive 2002/96/EC. It is marked with the WEEE symbol. Thermo Fisher Scientific has contracted with one or more recycling/disposal companies in each EU Member State European Country, and this product should be disposed of or recycled through them. Further information on Thermo’s compliance with this directive, the recyclers in your country and information on Thermo products will be available at www.thermofisher.com. 4 Always use the proper protective equipment (clothing, gloves, goggles, etc.) 4 Always dissipate extreme cold or heat and wear protective clothing. 4 Always follow good hygiene practices. 4 Each individual is responsible for his or her own safety. Thermo Scientific Aluminum Sequencer iii Preface Do You Need Information or Assistance on Thermo Scientific Products? If you do, please contact us 8:00 a.m. to 6:00 p.m. (Eastern Time) at: 1-740-373-4763 1-800-438-4851 1-877-213-8051 http://www.thermoscientific.com [email protected] www.unitylabservices.com Direct Toll Free, U.S. and Canada FAX Internet Worldwide Web Home Page Tech Support Email Address Certified Service Web Page Our Sales Support staff can provide information on pricing and give you quotations. We can take your order and provide delivery information on major equipment items or make arrangements to have your local sales representative contact you. Our products are listed on the Internet and we can be contacted through our Internet home page. Our Service Support staff can supply technical information about proper setup, operation or troubleshooting of your equipment. We can fill your needs for spare or replacement parts or provide you with on-site service. We can also provide you with a quotation on our Extended Warranty for your Thermo Scientific products. Whatever Thermo Scientific products you need or use, we will be happy to discuss your applications. If you are experiencing technical problems, working together, we will help you locate the problem and, chances are, correct it yourself...over the telephone without a service call. When more extensive service is necessary, we will assist you with direct factory trained technicians or a qualified service organization for on-the-spot repair. If your service need is covered by the warranty, we will arrange for the unit to be repaired at our expense and to your satisfaction. Regardless of your needs, our professional telephone technicians are available to assist you Monday through Friday from 8:00 a.m. to 6:00 p.m. Eastern Time. Please contact us by telephone or fax. If you wish to write, our mailing address is: Thermo Fisher Scientific 401 Millcreek Road, Box 649 Marietta, OH 45750 International customers, please contact your local Thermo Scientific distributor. iv Aluminum Sequencer Thermo Scientific Table of Contents Thermo Scientific Section 1 General Information . . . . . . . . . . . . . . . . . . . . . . . . . . . . . . . . . . . . . . . . . .1-1 Unpack and Check Your Order . . . . . . . . . . . . . . . . . . . . . . . . . . . . .1-1 Gel Casting . . . . . . . . . . . . . . . . . . . . . . . . . . . . . . . . . . . . . . . . . . . .1-3 Section 2 Setting Up . . . . . . . . . . . . . . . . . . . . . . . . . . . . . . . . . . . . . . . . . . . . . . . . . . .2-1 Casting with Casting Tape/Binding Clamps . . . . . . . . . . . . . . . . . . . .2-2 Loading Samples . . . . . . . . . . . . . . . . . . . . . . . . . . . . . . . . . . . . . . . .2-4 Pre-Running the Gel . . . . . . . . . . . . . . . . . . . . . . . . . . . . . . . . . . . . .2-4 Section 3 Using the System . . . . . . . . . . . . . . . . . . . . . . . . . . . . . . . . . . . . . . . . . . . . .3-1 Running the Gel . . . . . . . . . . . . . . . . . . . . . . . . . . . . . . . . . . . . . . . .3-1 Section 4 Technical Tips . . . . . . . . . . . . . . . . . . . . . . . . . . . . . . . . . . . . . . . . . . . . . . .4-1 Loading and Sequencing . . . . . . . . . . . . . . . . . . . . . . . . . . . . . . . . . .4-1 Difference between Well and Sharktooth Comb . . . . . . . . . . . . . . . .4-2 The Third Spacer . . . . . . . . . . . . . . . . . . . . . . . . . . . . . . . . . . . . . . . .4-2 The Difference between Notched and Offset Glass . . . . . . . . . . . . . .4-2 Section 5 Troubleshooting . . . . . . . . . . . . . . . . . . . . . . . . . . . . . . . . . . . . . . . . . . . . . .5-1 Section 6 Care and Cleaning . . . . . . . . . . . . . . . . . . . . . . . . . . . . . . . . . . . . . . . . . . . .6-1 Care of Acrylic . . . . . . . . . . . . . . . . . . . . . . . . . . . . . . . . . . . . . . . . . .6-1 Tips About Caring for Your System . . . . . . . . . . . . . . . . . . . . . . . . . .6-3 Aluminum Sequencer v Section 1 General Information The Aluminum Backed Sequencing System provides smile free, high resolution sequencing gels. The “floating” aluminum plate allows contact with the entire surface of the glass plates, providing a leak free seal and uniform heat distribution without overtightening the clamps. The system features a safety interlocking lid and removable lower buffer chamber for improved safety. The upper buffer chamber drains into a removable container on the back for easy buffer disposal and storage. Unpack and Check Your Order Before starting, unpack the unit and inventory your order. If any parts are missing, contact Technical Services within 7 days of purchase. Reference the order or catalog number on your invoice and check the corresponding parts list. Table 1-1. Maximum Buffer Volume (ml) Thermo Scientific Unit S3S S4S Gel size (W x L) 35 x 45 cm 20 x 45 cm Upper chamber 450ml 300ml Lower chamber 500ml 500ml Aluminum Sequencer 1-1 Section 1 General Information Upper Buffer Chamber (UBC) Well Comb (1) Blank Glass (2) Power Supply Lead Safety Lid Sharktooth Comb (2) Drain Bottle Side Clamps Spacer Set (2) Safety Lid Lower Buffer Chamber (LBC) Power Supply Lead Notched Glass (2) Figure 1-1. Exploded Parts Diagram 1-2 Model S3S Model S4S • Upper buffer chamber with removable drain bottle and built-in side clamps • Upper buffer chamber with removable drain bottle and built-in side clamps • Removable lower buffer chamber • Removable lower buffer chamber • Safety interlocking lids with attached power supply cord • Safety interlocking lids with attached power supply cord • 2 blank glass plates • 2 blank glass plates • 2 notched glass plates • 2 notched glass plates • 2 sharktooth combs: 78 teeth, 0.4mm thick • 2 sharktooth combs: 39 teeth, 0.4mm thick • 1 well comb: 40 well, 0.4mm thick • 1 well comb: 20 well, 0.4mm thick • 2 sets of spacers, 0.4mm thick • 2 sets of spacers, 0.4mm thick • 1 adhesive temperature indicator • 1 adhesive temperature indicator Aluminum Sequencer Thermo Scientific Section 1 General Information Figure 1-2. Sequencing Gel Caster Model Number . . . . . . . . . . . . . . . . . . . . . .Gel Size SGC-1 . . . . . . . . . . . . . . . . . .20-42cm W x 48cm L SGC-2 . . . . . . . . . . . . . . . .20-42cm W x 65.5cm L Gel Casting Casting sequencing gels can be achieved with the Sequencing Gel Caster or by taping around the sides and bottom of the glass plate assembly. Basic laboratory safety procedures should be followed when preparing sequencing gels. When working with acrylamide solutions, always wear proper protective clothing, gloves and eye protection. Careful attention must be given during each step of sequencing gel preparation for consistent results. Begin by cleaning the plates thoroughly; 1) To completely clean glass plates of any acrylamide residue, leftover detergents, and dust, wash plates with warm water and detergent. Ensure plates are clean and free of any powdered detergent. 2) Rinse plates completely with deionized water, then wipe with 95% ethanol to eliminate any traces of detergent and water marks. 3) One plate may be treated with Rain-X or a siliconizing agent or Sigmacote if desired. This process facilitates removal of the gel from the plates following the sequencing procedure. Thermo Scientific Aluminum Sequencer 1-3 Section 2 Setting Up The sequencing system arrives with the lower buffer chamber and glass separate from the upper buffer chamber and clamps. To assemble, follow these steps: 1) Pull the upper piece of packing foam upwards and out of the box. The upper buffer chamber assembly can then be pulled out. 2) The lower buffer chamber is in a narrow oblong box separate from the upper buffer chamber. Pull this box out also and open it up. 3) The glass is in a rectangular cardboard sheath and should be unwrapped and thoroughly cleaned before use. 4) The lower buffer chamber slides onto the base and is kept in place by four plastic stoppers. 5) The unit may be leveled using the two white nylon thumbscrews on the base and the bubble level. 6) While facing the unit (gold colored plate should be facing you) you will notice a small black knob (approximately 1.5cm in diameter) on the right side (your right) of the lid. This knob is connected to a safety rod. The purpose of which is to maintain a secure connection of the cathode to the chamber. To open the lid, pull the black knob upward and then slide the lid to your left. You can now freely rotate the lid open. In order to open the safety lid and disconnect the power to the sequencer, the safety rode must be pulled up. 7) Twist open the knobs on the side clamps. Push the clamps outward to allow room for your gel assembly. 8) After casting a gel, the gel assembly can then be placed in the unit. Thermo Scientific Aluminum Sequencer 2-1 Section 2 Setting Up Casting with Casting Tape/Binding Clamps There are various ways to set up the glass plates and cast the sequencing gel. Always make sure the comb and spacers to be used are of the same thickness. Even slight variations in material may cause differences in gel thickness and cause problems loading samples. Combs and spacers ideally should be stored in sets with each other and labeled with their thickness. 1) Lay the larger blank glass plate suspended on a flat support on the laboratory bench. A regular test tube rack works nicely. 2) Place the two side spacers on the long edges of the glass, being careful not to touch the cleaned plate. The third bottom spacer can then be placed on the bottom of the glass. 3) Lay the shorter offset or notched glass plate on top and line up the glass bottom and sides. 4) If using casting tape, tape all three sides of the cassettes for a leak-proof seal. Care must be taken to eliminate any air channels by pulling the tape firmly and pressing the tape onto the plates making hospital corners at the edge. Binder clamps may be used instead of casting tape, or used in addition to tape to ensure a leak-proof seal. When binder clamps are used a third bottom spacer must also be included. Binder clamps are placed directly over the spacers being Figure 2-2. Clamps instead of Tape careful not to overlap the gel as this may alter the gel thickness causing thin spots on the gel edges. 5) Prepare the appropriate acrylamide gel for your experimental technique in a suitable volume. Regular standard size sequencing plates of 35 x 45cm with 0.4mm spacers require about 70 milliliters of solution. Prepare a volume that is slightly larger to compensate for leaking or spillage. Unit with 0.2mm Spacers with 0.4mm Spacers S3S - 35 x 45cm 35 ml 70ml S4S - 20 x 45cm 25ml 50ml These volumes give you extra in case of spillage. 2-2 Aluminum Sequencer Thermo Scientific Section 2 Setting Up Casting (continued) 6) Fill the cassette resting at a slight incline. If a regular test tube rack is being used, place the plate assembly on the lab bench with the upper plate edges resting on the test tube rack. This provides about 1 to 3 inches of elevation. The solution may be poured directly from a beaker or flask, or introduced using a pipette or syringe. Pour gel to the top of the shorter glass plate. 7) Sharktooth comb: Carefully insert the flat edge of the sharktooth comb between the plates to a depth of 2 to 3mm below the shorter plate. If the flat edge of the comb is inserted too deeply (more than 4 or 5mm) during gel casting, the resulting trough will be too deep to load samples easily with a pipette. It is wise to make marks on the comb to distinguish the right/left sides so the comb can be put back in the same orientation for sample loading later, in the event that the material has any slight variation in thickness. Place binder clamps over the comb and glass plates along the upper edge to force the glass plates against the comb. This will ensure a tight fit of the comb during and after polymerization. If top binder clamps are not used, the comb may not be tight enough to prevent sample leaks between wells following gel polymerization. Do not clamp the outer edges over the side spacers. Allow the gel to completely polymerize. After polymerization, gently wash out the trough with buffer in order to remove any unpolymerized acrylamide and excess urea. Place the comb between the glass plates in the correct left to right orientation (the same orientation the trough was cast in) with the comb teeth pointing down toward the gel. Slowly and carefully slide the comb until it just makes contact with the gel surface, without piercing it. 8) Well comb: Carefully insert the comb. Place binder clamps over the comb and glass plates along the upper edge to force the glass plates against the comb. After polymerization, flood the comb with 1X TBE and remove gently. Rinse the wells out with deionized water or TBE in order to remove excess urea or unpolymerized acrylamide. Thermo Scientific Aluminum Sequencer 2-3 Section 2 Setting Up Pre-Running the Gel 1) After the gel has completely polymerized, the gel assembly can be clamped into the sequencing unit. Open up the side clamps and push them to the side. Place the gel sandwich into the lower buffer chamber with the shorter offset or notched plate facing the apparatus and notched end located against UBC. 2) Push the gel sandwich upright and into contact with the aluminum plate. Push the side clamps toward the gel assembly and line up everything evenly. 3) Screw to tighten the side clamps until the gasket is slightly flattened and a seal has been made. 4) Add buffer to the upper and lower buffer chamber. The buffer level in the upper buffer chamber should be high enough to submerge half the comb and fill the wells with buffer. Clear any bubbles from the bottom of the gel before prerunning. Using a syringe and bent needle is helpful in clearing bubbles under the gel. 5) Pre-run the gel. Pre-running serves to heat the gel and buffer to a temperature that will keep DNA in its denatured state. Samples run on a gel that has not been prerun will appear distorted. It is recommended that you pre-run 30 to 60 minutes prior to sample loading, depending on the power input. A gel surface temperature of 50-60°C is considered ideal. Running Conditions (constant power conditions are recommended) Loading Samples Model Voltage Current Power (wattage) S3S 1600-2200V 40-120mA 50-75W S4S 1200-1600V 30-60mA 40-55W Following the pre-run and before samples are loaded, the gel surface must be flushed. Gentle aspiration removes urea and any small bits of acrylamide that may have settled in the sample wells. Loading samples may be accomplished in various ways. A regular pipette tip, a special flat end sequencing tip or a multichannel syringe pipette may be used. The flat end sequencing tips and syringe pipettes are made to fit directly between the glass plates. Care must be taken to avoid coming into contact with the gel surface when loading so the samples will enter the gel in smooth even bands. Regular pipette tips do not fit between the glass plates but load the sample at the opening between the two plates. While resting the tip of the pipette on the shorter plate the sample is slowly dispensed. The weight of the sample carries it down into the well. 2-4 Aluminum Sequencer Thermo Scientific Section 3 Running the Gel Using the System 1) Run the gel as quickly as possible after loading, refer to p.8, for recommended running conditions. Close the upper and lower buffer chamber lids by flipping them down and sliding until the banana plug connects to the power supply lead. 2) Attach power supply leads to power supply and turn on the power. 3) When finished with the run, turn off power supply and disconnect power cords. 4) Open the lids of the upper and lower buffer chambers. 5) Drain UBC into rear drain bottle by placing the hose coupling on the loose piece of hose into the stopcock attached to the male fitting on the unit. This will open the port. The bottle can then be removed for easy disposal. 6) Loosen the thumbscrews and slide the clamps off of the gel cassette. 7) Lift the gel cassette out of the LBC. Disassemble and proceed with standard fixing, drying and autoradiography. 8) The LBC may now be removed and emptied. Thermo Scientific Aluminum Sequencer 3-1 Section 4 Technical Tips Sample Loading Researchers sometimes load a few sets of samples and then electrophorese them for 2-3 minutes to allow samples to enter the gel. This serves to minimize sample diffusion and well leaking. The power is then shut off and the next set is loaded until all the samples are applied. Double Loading Double loading refers to the common practice of running two sets of a single sample on one sequencing gel. The samples are loaded and electrophoresis is carried out for 1-2 hours. A second set of the same sample is then loaded next to the first set and electrophoresis is continued. The advantage of double loading is that a greater amount of data is obtained for each sample from a single gel. Sequencing Samples Sequencing samples are generally comprised of tracking dyes and glycerol. The glycerol gives density to the samples so they drop into the wells when loading. The tracking dye provides color for visual monitoring of the gel run. Bromophenol blue and xylene cyanol FF are the dyes used in sequencing because it has been determined that they migrate in a position corresponding to DNA chain lengths. On an 8% or 6% acrylamide gel the bromophenol blue migration corresponds to 20 and 30 bases respectively and is a dark blue color. The xylene cyanol FF is a lighter teal blue color and its migration corresponds to 80 and 100 bases on 8% and 6% acrylamide. Thermo Scientific Aluminum Sequencer 4-1 Section 4 Technical Tips The Difference between Notched and Offset Glass Notched or eared glass plates face in towards the upper buffer chamber during a gel run. The “ears” are glass tabs on each side of the plate, which prevent buffer from running out of the upper buffer chamber. Offset glass plates serve the same purpose as notched plates. Offset glass is usually about 2 cm shorter than the front, (or blank) glass plate. Instead of glass ears, pieces of adhesive sponge are adhered either to the top of the spacers or to the apparatus itself. These sponge tips wear out and may leak. Notched glass plates are more fragile and expensive than offset glass and sponge tips, but many researchers prefer notched glass because it is easier to use. BLANK NOTCHED Figure 4-1. Glass OFFSET The Third Spacer This is a bottom spacer, and can be cut to the desired length. It is optional. If you use a bottom spacer when casting, remember to remove it before running the gel. SPONGE TIP SPACER Figure 4-2. Spacer Difference between Well and Sharktooth Comb A well comb has rectangular teeth and is similar to combs used for protein gels. After polymerization, these combs must be removed carefully to avoid destroying the acrylamide walls that create the wells. A sharktooth comb has pointed teeth. It is placed with the flat side down during gel casting to create a flat surface on the top of the gel and reinserted with the teeth down towards the gel for loading. Samples are loaded in the space between the teeth. Sharktooth Standard Figure 4-3. Combs 4-2 Aluminum Sequencer Thermo Scientific Section 5 Troubleshooting Below are some possible solutions to potential problems. If these suggestions are unsuccessful, or you have any other questions regarding the use of this product, call Technical Services. PROBLEM The comb feels loose SOLUTION Try clamping across the top of the plates while the gel polymerizes. This will allow the gel to polymerize more tightly around the comb. These problems are usually caused by glass variability. We use the highest quality glass available but these variations still exist. Glass can also warp over time. PROBLEM The gel is frowning SOLUTION There are usually two causes of this problem: 1) The clamps have been overtightened or unevenly tightened causing the plates to bow. Try loosening the clamps gradually making sure a seal is still present between the plates and the gasket. 2) This may be caused by imperfections in the flatness of the glass plate. Because of the way glass plates are made, one side of the glass is usually flatter than the other. Mark one side of the glass with a lab marker, and try running the gel with the other side of the plate facing the acrylamide. If this doesn’t solve the problem, the entire plate may be defective. Try using a different plate. PROBLEM The gel seems to be dissolving slightly at the top, making it difficult to reload SOLUTION This phenomenon is probably caused by a pH imbalance. Try adding fresh, pre-heated buffer to the upper buffer chamber a few times during the run to prevent this. Thermo Scientific Aluminum Sequencer 5-1 Section 5 Troubleshooting PROBLEM Buffer is leaking from between the UBC and the glass plates SOLUTION Check the red silicone gasket to make sure it is firmly seated. Grease the gaskets if necessary. If a gasket is old, it may need to be replaced. See the catalog for part numbers. PROBLEM Sparks and smoke are coming from the unit SOLUTION First, turn off the power to the apparatus! This is usually caused by a slow leak from the upper chamber. Do not run the apparatus under these conditions. Call Technical Services if this occurs. PROBLEM Bands are smearing SOLUTION Smearing of bands may be caused by template DNA that is not pure. Try repurifying the template. An old gel or the use of old gel components may also give poor quality results. Try making up new gel solutions. DNA samples that were not heat denatured prior to gel loading will not run as flat, smooth bands. Always remember to heat denature samples 5 minutes at 95°C before loading. PROBLEM Blurring of bands SOLUTION Poor contact between the gel and X-ray film during autoradiography will cause the bands to appear blurred, and reading the data will be difficult. This can be eliminated by adding weight to the film cassette during exposure. When using S3S, if the area is not completely rinsed from the gel before X-ray film exposure, sometimes the bands will not be as sharp as is desired. A 15 minute soak in 5% methanol and 5% acetic acid is recommended before film exposure. In addition, a gel run temperature that is too high can cause bands to run at different speeds, causing bands to smear and drag through the gel unevenly. Turning down the voltage can help eliminate this. 5-2 Aluminum Sequencer Thermo Scientific Section 5 Troubleshooting PROBLEM Curving of bands or lanes SOLUTION Curving may be caused by the uneven heating of the gel plates prior to sample loading. Always preheat the gel at least 30 minutes. A 50-60°C gel surface temperature should eliminate smiling and smearing. For best results, it is always best to avoid using the outermost lanes on the gel to eliminate any curving. PROBLEM Cracking of glass SOLUTION Cracking of glass plates can be caused by overheating, overtightening of clamps, and leakage from the UBC. Check to make sure you are running the unit within the voltages recommended. When tightening clamps, turning the knobs until they are just finger-tight is usually enough. If any sparks occur, turn the power off immediately! Call Technical Services. PROBLEM Poor resolution SOLUTION Loading too much sample, as well as using samples of poor quality, may give poor gel resolution. An excess of glycerol in loaded samples can produce a “bulge” effect to bands and appear as smiles or frowns in sample lanes. Thermo Scientific Aluminum Sequencer 5-3 Section 6 Care and Cleaning Care of Acrylic The following chemical compatibility chart is supplied for the convenience of our customers. Although acrylic is compatible with most solvents and solutions found in the biochemical laboratory, some solvents can cause substantial damage. Keep this chart handy to avoid harm to your apparatus by the use of an inappropriate solvent. Codes: S - Safe (no effect, except possibly some staining) A - Attacked (slight attack by, or absorption of, the liquid) (slight crazing or swelling, but acrylic has retained most of its strength) U - Unsatisfactory (softened, swollen, slowly dissolved) D - Dissolved (in seven days, or less) Thermo Scientific Aluminum Sequencer 6-1 Section 6 Care and Cleaning Table 5-1. Chemical Compatibility for Acrylic-Based Products Chemical Code Chemical Code Chemical Code Acetic acid (5%) S Ethyl alcohol (50%) A Naptha S Acetic acid (Glacial) D Ethyl alcohol (95%) U Nitric acid (10%) S Acetic Anhydride A Ethylene dichloride D Nitric acid (40%) A Acetone D Ethylene glycol S Nitric acid concentrate U Ammonia S 2-Ethylhexyl Sebacate S Oleic acid S Ammonium Chloride (saturated) S Formaldehyde (40%) S Olive oil S Ammonium Hydroxide (10%) S Gasoline, regular, leaded S Phenol 5% solution U Hydroxide (10%) S Glycerine Heptane (commercial grade) S Soap solution (Ivory) S Ammonium Hydroxide concentrate S Hexane S Sodium carbonate (2%) S Aniline D Hydrochloric acid (10%) S Sodium carbonate (20%) S Benzene D Hydrochloric acid concentrate S Sodium chloride (10%) S Butyl Acetate D Hydrouoric acid (40%) U Sodium hydroxide (1%) S Calcium chloride (saturated) S Hydrogen peroxide (3% solution) S Sodium hydroxide (10%) S Carbon tetrachloride U Hydrogen peroxide (28% solution) U Sodium hydroxide (60%) S Chloroform D Isooctane S Sodium hydrochlorite (5%) S Chromic acid (40%) U Isopropyl alcohol (100%) A Sulfuric acid (3%) S Citric acid (10%) S Kerosene (no. 2 fuel oil) S Sulfuric acid (30%) S Cottonseed oil (edible) S Lacquer thinner D Sulfuric acid concentrate U Detergent Solution (Heavy Duty) S Methyl alcohol (50%) A Toluene D Diesel oil S Methyl alcohol (100%) U Trichloroethylene D Diethyl ether U Methyl Ethyl Ketone U Turpentine S Dimethyl formamide U Methylene chloride D Water (distilled) S Dioctyl phthalate A Mineral oil (white) S Xylene D Ethyl acetate D This list does not include all possible chemical incompatibilities and safe compounds. Acrylic products should be cleaned with warm water, a mild detergent such as Alconox™, and can also be exposed to a mild bleach solution (10:1). In addition, RNAse removal products are also safe for acrylic. Contact Technical Services with any questions. 6-2 Aluminum Sequencer Thermo Scientific Section 6 Care and Cleaning Tips About Caring for Your System Caution Organic solvents cause acrylic to “craze” or crack. Clean all acrylic systems with warm water and a mild detergent. Do not use ethanol or other organic solvents to clean these products. Do not autoclave, bake, or microwave your unit. Temperatures over 50°C can damage the acrylic. s Note If an RNase free electrophoresis system is desired, there are various methods to rid the system of RNA contamination. For fast and easy decontamination, use RNase AWAY®*. Spray, wipe or soak labware with RNase Away, then wipe or rinse the surface clean; it instantly eliminates RNase. RNase Away eliminates the old methods that include treatment with 0.1% Diethyl Pyrocarbonate (DEPC) treated water and soaking in dilute bleach. DEPC is suspected to be a carcinogen and should be handled with care. This electrophoresis system should never be autoclaved, baked, or placed in a microwave. To order RNase AWAY, contact Technical Services: Part Number . . . . . . . . . . . . . . . . . . . . . .Description 7000 . . . . . . . . . . . . . . . . . . . . . . . . . . .250ml bottle 7002 . . . . . . . . . . . . . . . . . . . . . .475ml spray bottle 7003 . . . . . . . . . . . . . . . . . . . . . . . . . . .1 liter bottle 7005 . . . . . . . . . . . . . . . . . . . . . . . . . . .4 liter bottle *Rnase AWAY® is a registered trademark of Molecular BioProducts Thermo Scientific Aluminum Sequencer 6-3 Section 6 Care and Cleaning Accessories for S4S ACCESSORIES CATALOG NO. Power Supply Leads PSL-5 Side Clamps (1 pair) S3S-CL Buffer Drain Bottle R10384 Replacement Gasket S4S-GK Sponge Tips (package of 10) ST-10 Adhesive Temperature Indicators (package of 5) TEMP-5 Stopcocks (1 pair) STK-10 Replacement Knob S3S-KNOB SPACER SET (set includes 2 sides and 1 bottom) CATALOG NO. Standard 1.0cm W x 0.4mm T S2S-SA4 1.0cm W x 0.2mm T S2S-SA2 Wedge 1.0cm W x 0.4mm T (wedge S2S-SAW spacers include 2 spacers only) GLASS PLATE DIMENSIONS TYPE CATALOG NO. 20cm W x 45cm L x 3/16" T Notched Glass S1S-45R Blank Glass S1S-45G Offset Glass S1S-43G 20cm W x 43cm L x 3/16" T Comb Options for S4S 1 6-4 Aluminum Sequencer Catalog Number Comb Type Number of Teeth Thickness of Teeth Width of Teeth S1S-20A EST Well Number Well 20 0.4cm 6.8 cm S1S-30A Well 30 0.4 4.1 9 S1S-SHARK4 Sharktooth 39 0.4 - 9 S1S-SHARK2 Sharktooth 39 0.2 - 5 S1S-MT21 Sharktooth Micro Well 36 (2X) 0.4 - 10 S1S-MT31 Sharktooth Micro Well 55 (3X) 0.4 - 5.5 S1S-MT441 Sharktooth Micro Well 73 (4X) 0.4 - 3.7 S1S-MT421 Sharktooth Micro Well 73 (4X) 0.2 - 2.0 15μl 8 and 12 channel pipette format Thermo Scientific Section 6 Optional Equipment Accessories for S3S ACCESSORIES CATALOG NO. Power Supply Leads PSL-5 Side Clamps (1 pair) S3S-CL Buffer Drain Bottle R10384 Replacement Gasket S3S-GK Sponge Tips (package of 10) ST-10 Adhesive Temperature Indicators (package of 5) TEMP-5 Stopcocks (1 pair) STK-10 Replacement Knob S3S-KNOB SPACER SET (set includes 2 sides and 1 bottom) CATALOG NO. Standard 1.0cm W x 0.4mm T S2S-SA4 1.0cm W x 0.2mm T S2S-SA2 Wedge 1.0cm W x 0.8mm T (wedge S2S-SAW spacers include 2 spacers only) GLASS PLATE DIMENSIONS TYPE CATALOG NO. 35cm W x 45cm L x 3/16" T Notched Glass S2S-45R Blank Glass S2S-45G Offset Glass S2S-43G 35cm W x 43cm L x 3/16" T Comb Options for S3S 1 Thermo Scientific Catalog Number Comb Type Number of Teeth Thickness of Teeth Width of Teeth S2S-20A EST Well Number Well 40 0.4cm 6.8 cm S2S-30A Well 60 0.4 4.1 9 S2S-SHARK4 Sharktooth 78 0.4 - 9 S2S-SHARK2 Sharktooth 78 0.2 - 5 S2S-MT21 Sharktooth Micro Well 72 (2X) 0.4 - 10 S2S-MT31 Sharktooth Micro Well 110 (3X) 0.4 - 5.5 S2S-MT441 Sharktooth Micro Well 146 (4X) 0.4 - 3.7 S2S-MT421 Sharktooth Micro Well 146 (4X) 0.2 - 2.0 15μl 8 and 12 channel pipette format Aluminum Sequencer 6-5 Thermo Scientific Rev. 0 9/12 REGISTERED ISO 9001 If equipment service is required, please call your Technical Services Department at 1-800-438-4851 (USA and Canada) or 1-740-373-4763. We’re ready to answer your questions on equipment warranty, operation, maintenance, service, and special applications. Outside the USA, contract your local distributor for warranty information. Your local Thermo Sales Office is ready to help with comprehensive site preparation information before your equipment arrives. Printed instruction manuals carefully detail equipment installation, operation and preventive maintenance. THIS WARRANTY IS EXCLUSIVE AND IN LIEU OF ALL OTHER WARRANTIES, WHETHER WRITTEN, ORAL, OR IMPLIED. NO WARRANTIES OF MERCHANTABILITY OR FITNESS FOR A PARTICULAR PURPOSE SHALL APPLY. Thermo shall not be liable for any indirect or consequential damages including, without limitation, damages to lost profits or loss of products. Replacement or repair of component parts or equipment under this warranty shall not extend the warranty to either the equipment or to the component part beyond the original warranty period. The Technical Services Department must give prior approval for return of any component or equipment. At Thermo’s option, all non-conforming parts must be returned to Thermo postage paid and replacement parts are shipped FOB destination. During the first thirty-six (36) months, component parts proven to be non-conforming in material or workmanship will be replaced at Thermo’s expense, including labor. Installation, calibration and certification is not covered by this warranty agreement. The Technical Services Department must be contacted for warranty determination and direction prior to performance of any repairs. Expendable items, glass, filters and gaskets are excluded from this warranty. The Warranty Period starts two weeks from the date your equipment is shipped from our facility. This allows shipping time so the warranty will go into effect at approximately the same time your equipment is delivered. The warranty protection extends to any subsequent owner. THERMO FISHER SCIENTIFIC OWL PRODUCTS WARRANTY USA Section 7 Warranty Information Aluminum Sequencer 7-1 7-2 Aluminum Sequencer Rev. 0 9/12 REGISTERED ISO 9001 If equipment service is required, please call your Technical Services Department at 1-800-438-4851 (USA or Canada) or 1-740-373-4763. We’re ready to answer your questions on equipment warranty, operation, maintenance, service, and special applications. Outside the USA, contract your local distributor for warranty information. Your local Thermo Sales Office is ready to help with comprehensive site preparation information before your equipment arrives. Printed instruction manuals carefully detail equipment installation, operation and preventive maintenance. THIS WARRANTY IS EXCLUSIVE AND IN LIEU OF ALL OTHER WARRANTIES, WHETHER WRITTEN, ORAL, OR IMPLIED. NO WARRANTIES OF MERCHANTABILITY OR FITNESS FOR A PARTICULAR PURPOSE SHALL APPLY. Thermo shall not be liable for any indirect or consequential damages including, without limitation, damages to lost profits or loss of products. Replacement or repair of component parts or equipment under this warranty shall not extend the warranty to either the equipment or to the component part beyond the original warranty period. The Technical Services Department must give prior approval for return of any component or equipment. At Thermo’s option, all non-conforming parts must be returned to Thermo postage paid and replacement parts are shipped FOB destination. During the first thirty six (36) months, component parts proven to be non-conforming in material or workmanship will be replaced at Thermo’s expense, excepting labor. Installation, calibration and certification is not covered by this warranty agreement. The Technical Services Department must be contacted for warranty determination and direction prior to performance of any repairs. Expendable items, glass, filters and gaskets are excluded from this warranty. The Warranty Period starts two months from the date your equipment is shipped from our facility. This allows shipping time so the warranty will go into effect at approximately the same time your equipment is delivered. The warranty protection extends to any subsequent owner. THERMO FISHER SCIENTIFIC OWL PRODUCTS WARRANTY INTERNATIONAL Section 7 Warranty Information Thermo Scientific Thermo Fisher Scientific 401 Millcreek Road Maeritta, Ohio 45750 United States www.thermofisher.com