1
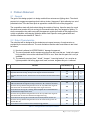
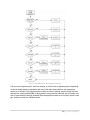
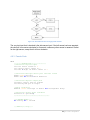
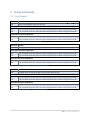
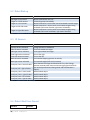
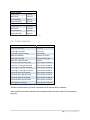
DEPARTMENT OF ELECTRICAL AND COMPUTER ENGINEERING Engineering Team Design Project Final Design Report Presented by Team Beemo (Team #3) COEN/ELEC 390/2 (Fall 2011) 12/7/2011 The following document outlines the design and construction of the COEN/ELEC 390 Team Design Project, as completed by Team Beemo. The document outlines the history of the project, the problem statement defined for the project, as well as some brainstorming solutions made by the team. Next the document describes Team Beemo’s proposed robot design, in terms of both hardware and software, and then the testing of the finished product. Lastly there is an overview of the team’s work breakdown, as well as the budget for the project. Table of Contents Table of Contents ............................................................................................................ 1 Table of Figures .............................................................................................................. 2 Table of Tables ............................................................................................................... 2 1 History/Background .................................................................................................. 3 2 Problem Statement ................................................................................................... 5 2.1 General .............................................................................................................. 5 2.2 Robot Characteristics ......................................................................................... 5 2.3 Playground Characteristics ................................................................................ 6 2.4 General Constraints ........................................................................................... 7 3 Alternative Solutions ................................................................................................. 9 3.1 General .............................................................................................................. 9 3.2 Design ................................................................................................................ 9 3.2.1 Carbot ............................................................................................................. 9 3.2.2 Circlebot ........................................................................................................ 10 3.2.3 Wall-E Bot ..................................................................................................... 11 4 Proposed Design .................................................................................................... 13 4.1 General ............................................................................................................ 13 4.2 Block Diagram .................................................................................................. 13 4.3 Schematic ........................................................................................................ 14 4.4 Components ..................................................................................................... 15 4.4.1 Hardware Components ................................................................................. 15 4.4.2 Electrical Components .................................................................................. 15 4.5 Technical Drawings .......................................................................................... 17 4.6 Software ........................................................................................................... 18 4.6.1 Basic Robot Behaviour ................................................................................. 18 4.6.2 Flowchart ...................................................................................................... 18 4.6.3 Pseudocode .................................................................................................. 23 5 Testing and Results ................................................................................................ 27 5.1 Line Sensors .................................................................................................... 27 5.2 Robot Start-up .................................................................................................. 28 5.3 IR Sensors ....................................................................................................... 28 5.4 Robot Lifted From Ground ............................................................................... 28 5.5 Contact Switches ............................................................................................. 29 5.6 Design Changes............................................................................................... 30 6 Work Breakdown Structure ..................................................................................... 31 6.1 Team Biographies ............................................................................................ 31 6.1.1 Andrew Evans ............................................................................................... 31 6.1.2 Thomas Hayes .............................................................................................. 31 1|Final Report 6.1.3 Kenneth Richards ......................................................................................... 31 6.1.4 Sandra Witzen .............................................................................................. 31 6.2 Project Responsibilities .................................................................................... 31 6.2.1 Andrew Evans ............................................................................................... 32 6.2.2 Thomas Hayes .............................................................................................. 32 6.2.3 Kenneth Richards ......................................................................................... 32 6.2.4 Sandra Witzen .............................................................................................. 32 7 Budget .................................................................................................................... 32 Table of Figures Figure 2.1 - The ring ........................................................................................................ 6 Figure 3.1 - Carbot (artist's rendering) ............................................................................ 9 Figure 3.2 - Carbot searching behavior ......................................................................... 10 Figure 3.3 - Circlebot (artist's rendering) ....................................................................... 10 Figure 3.4 - Circlebot searching behaviour.................................................................... 11 Figure 3.5 - Wall-E Bot .................................................................................................. 12 Figure 3.6 - Wall-E Bot searching behaviour ................................................................. 12 Figure 4.1 - Block diagram of the robot’ ........................................................................ 13 Figure 4.2 - BeemoBot Circuit Schematic ..................................................................... 14 Figure 4.3 - BeemoBot 3D drawing (made in Google Sketchup) ................................... 17 Figure 4.4 - BeemoBot Analog (Front/Rear) Robot Detection ....................................... 18 Figure 4.5 - BeemoBot Digital (Left/Right) Robot Detection .......................................... 18 Figure 4.6 - BeemoBot Main Flowchart ......................................................................... 19 Figure 4.7 - BeemoBot line sensing algorithm flowchart ............................................... 20 Figure 4.8 - BeemoBot contact sensing algorithm flowchart ......................................... 21 Figure 4.9 - BeemoBot front/rear robot seeing algorithm flowchart ............................... 22 Figure 4.10 - BeemoBot side robot seeing algorithm flowchart ..................................... 23 Figure 7.1 - BeemoBot Budget ...................................................................................... 33 Table of Tables Table 2.1 - Scoring parameters and win/lose conditions ................................................. 5 Table 4.1 - Robot electrical components ....................................................................... 16 Table 5.1 - Robot reaction when moving towards the line ............................................. 27 Table 5.2 - Robot reaction when being pushed backwards into the line........................ 27 Table 5.3 - Robot reaction when being pushed forward into the line ............................. 27 Table 5.4 - Robot behaviour on Start-Up....................................................................... 28 Table 5.5 - Robot reactions to IR sensor input .............................................................. 28 Table 5.6 - Robot reaction when lifted from the ground................................................. 29 Table 5.7 - Robot reaction to contact switch inputs ....................................................... 29 2 |F i n a l R e p o r t 1 History/Background Robot building has taken off in recent years. It is a common activity for hobbyists, for high school, CEGEP and university competitions and has even become popular in television, such as The Discovery Channel’s BattleBots. The building and design of a robot is a process that at first seems simpler than it is. Many skills from different disciplines must be applied, such as Mechanical, Electrical and Computer Engineering. The completion of such a task cannot be done by one person alone; it must be completed by a team with skills in all these areas of discipline. It is also important that the members of the team have effective communication skills; a lack of this can result in the failure of the project. Team members must coordinate with each other effectively to run an efficient and highly functioning team. During the course of this project the students learn important project management skills. These include the design of the robot, team management, scheduling, budgeting and testing of the robot. Without proper application of these techniques the project can fall behind, run over budget, or the robot may end up not working properly. There may be issues that only appear on the day of competition unless the device is methodically tested. Another very important aspect of this design project is documentation. Students must, from beginning to end, systematically document their design and any changes to the design (and the reason therefore). This allows the instructors to properly evaluate the students robot, and see how it evolved during the project. This Final Report is the record of the design project, and also the record of how the project was managed by the team, which students participated in which aspects of the design process and how effectively the team solved design problems encountered during the project. 3|Final Report 4 |F i n a l R e p o r t 2 Problem Statement 2.1 General The goal of this design project is to design and build an autonomous fighting robot. The robot’s purpose is to engage an opposing robot inside a circular “playground” while adhering to a set of pre-stated rules. The robot must push to opposition outside the limits of the playground. The competition starts with both robots facing the outside of the ring. Upon the start of a round the robots must remain still (not moving) for 5 seconds before they may engage in fighting. To win the competition the robot must push the opponent outside the border of the playground as quickly as possible, while staying inside the border itself. Specific scoring parameters and win/lose situations are detailed in Table 2.1. 2.2 Robot Characteristics The robot that will be designed by the students must respect an array of requirements, as provided by the course instructor. The main limitations that the robot must adhere to are listed as follows: 1) No robot is allowed to INTENTIONALLY damage its opponent. 2) The use of materials and/or components other than the ones that are listed in the parts list is possible, but must be authorized PRIOR to use. *Note that this parts list is not yet available. 3) The materials used as “plow”, “shield”, “bumper”, “mounting bracket”, etc. must be as light as possible. No heavy gage steel, lead, concrete, tungsten alloy etc. is allowed. # Situation Time allowed, sec Robot scores #1 #2 Clear win and clear-like wins 1. 2. 3. #1 pushes #2 out of the ring. #1 stays in the ring for at least 10 seconds. #1 pushes #2 out of the ring. #1 stays in the ring for less than 10 seconds. #1 pushes #2 out of the ring. #1 leaves the ring during the push while being pulled by #2. Default wins #1 and #2 are in the ring. Both of them have moved from their initial positions 4. AND have detected the edge of the ring at least once. #1 is closer to the center. #2 leaves the ring without being forced to do so. #1 stays within the ring for at 5. least 10 seconds. #1 has detected the edge of the ring at least once. #1 and #2 are in the ring. #1 is moving; #2 has stopped. #1 has touched #2 and 6. has detected the edge at least once. #2 leaves the ring without being forced to do so. #1 stays within the ring for at 7. least 10 seconds. #1 has never detected the edge of the ring. 8. #1 and #2 are in the ring. #1 has moved from the initial position; #2 has not. #2 leaves the ring without being forced to do so. #1 leaves the ring in less 10 9. seconds after #2. 10. #1 and #2 have not moved from their initial (starting) positions. 180 180 5 4 0 0 180 4 2 180 3 2 180 2 0 20 2 0 180 1 0 20 1 0 180 0 0 20 0 0 Table 2.1 - Scoring parameters and win/lose conditions 5|Final Report 4) The chassis provided must not be altered in ANY way (i.e. no holes drilling or enlarging, no cutting, no bending, etc.). 5) All components must be mounted using either machine screws or tie-wraps. 6) No kind of glue is allowed. 7) The maximum robot size is limited by the chassis listed in the parts list. No part (excluding the wheels when the motors) may stick out for more than 10 mm before start and after finish (before any interaction with robot). If any of these requirements are not met, the robot may be disqualified from the competition and the team may receive a deduction in marks from the overall grade for the class. It is very important that the robot design respects these requirements. As well as these limitations, the robot parts must be chosen from a list provided by the course instruction. This list may be referred to in Appendix B Additionally to the list some behavioral characteristics must be met by the robot. Upon the start of a round, the robot must remain in a neutral position (not moving) for 5 seconds before it may engage the opposition. As well as that the robot must start after at the most 20 seconds, otherwise it may be disqualified. Further behavioral requirements can be seen in Table 2.1 2.3 Playground Characteristics The playground on which the competitions will occur is simply a 4’x4’ white MDF board. On this board circle with a 4’ diameter is marked with black electrical type. To win, the robot must stay within the ring and simultaneously push its opponent outside of the ring. When the competition starts the robots must be facing towards the outside of the ring, 15cm away from the edge. In the middle of the ring will be an unspecified material (sand, a block, upturned tape, etc.) of approximately ¼” high and 1-1½’ in diameter. 4" Figure 2.1 - The ring 6 |F i n a l R e p o r t Although the ring is circular, it may not be perfectly circular. During the competition the ring will be illuminated by fluorescent overhead lights. In Figure 2.1 is an image with an approximation of what the ring will look like, including the starting position of our robot and its opponent. 2.4 General Constraints The competition has a list of general constraints not directly applicable to either the robot or the playground. The list is as follows: Must not exceed 200$ budget limit Must be completed within the allotted time frame (1 semester) Maximum round time is 3 minutes (180 seconds) All team members must be present for the competition Availability of laboratory room Limited to the use of parts provided in the Parts List (Appendix B) 7|Final Report 8 |F i n a l R e p o r t 3 Alternative Solutions 3.1 General The following section has brief descriptions of alternative solutions that were thought up by the team. These solutions, and their strengths and weaknesses, were analyzed to come up with the proposed design, outlined in Section 5. 3.2 Design 3.2.1 Carbot Figure 3.1 - Carbot (artist's rendering) The Carbot design is very simple: rectangular box with four wheels. The design mimics a basic version of the everyday car. It is covered with a rectangular chassis for durability and to help with pushing the opponent out of the ring. This design is optimized by using two high torque motors on the rear wheels, for maximum pushing power. Line sensors and proximity sensors would be placed on the front of the robot to detect the edge of the ring and to detect its opponents. The Carbot’s main behavior is to search the ring systematically. Upon start-up, it heads towards the edge of the ring. Once the line has been detected, it will reverse, turn 150° in the direction opposite to the side of contact, and then keep searching the ring. It continues this behavior until a robot is seen. Once a robot is seen, it will follow the robot. Once a robot is no longer seen, the robot will continue this searching routing. A visual representation can be seen in Figure 3.2. This design has the main advantage of being simple and easy to implement. This reduces the amount of labor in building, programming and debugging. The design of the robot is also very square with no angles or curves. This has the advantage of creating a greater area with which the robot is able to push its opponent. 9|Final Report Etc... START Figure 3.2 - Carbot searching behaviour There are some drawbacks to this basic design. Firstly when choosing a motor one must pick between either high torque or high speed. When picking high torque, our robot will have a lower speed. Because of this it becomes more likely that our opponents may out maneuver the robot, even after it has established contact and begun pushing. 3.2.2 Circlebot This is another simple design, inspired by a shopping cart, of all things. This design consists of a small, upright cylindrical chassis with two wheels located underneath the chassis as well as a third caster ball wheel near the front of the chassis. The two wheels will be powered by high torque motors. This robot also uses line sensors and proximity sensors at the front of the robot to detect the edge of the ring and to detect its opponents. The basic behavior in the ring of this robot would be left turning. As it is able to be very maneuverable and quick, it would move forward a distance of approximately 1.5’, then turns 45° to the left. Figure 3.3 - Circlebot (artist's rendering) 10 |F i n a l R e p o r t Etc... START Figure 3.4 - Circlebot searching behaviour This behaviour should allow the robot to quickly find its opponent. It continues this behavior until a robot is seen. Once a robot is seen, it will follow the robot. Once a robot is no longer seen, the robot will continue this searching routing. A visual representation of the behavior can be seen in Figure 3.4. This robot has the advantage of being extremely maneuverable and very quick. By balancing the two back wheels with a caster wheel we are capable of having extremely narrow turning circles. By being short and having a small width, this robot is also not as easily detectable by its opponents. This robot will also be easy to program and debug. The main disadvantage of this robot is its lack of power. It can escape well but lacks the strength to push its opponent out of the ring. Another disadvantage is the difficulty in construction of this robot. We may not have the resources available to use to create a circular chassis or to create a cylindrical chassis cover. 3.2.3 Wall-E Bot As is implied by the title, this design is inspired completely by Pixar’s Wall-E. A square chassis is placed between two triangular sets of tracks. Line sensors will be places on the front and rear of the robot, as well as proximity sensors on the front and rear. This robot will be powered by high-torque motors, to take advantage of the treads. It will also be bi-directional. The Wall-E bot design is very similar to the Carbot in terms of the way it searches the ring. However, instead of turning around, the robot “reverses” its front and back. The robot simple changes which side is forward, goes in that direction and turns at 30° so that it can continue searching the ring. It continues this behavior until a robot is seen. Once a robot is seen, it will follow the robot. Once a robot is no longer seen, the robot will continue this searching routing. A visual representation of the behaviour can be seen in Figure 3.6. 11 | F i n a l R e p o r t Figure 3.5 - Wall-E Bot 1 A main advantage of this design is that it is able to maneuver with absolutely no turning circle. It has high power and high maneuverability, and therefore should be effective in pushing the opponent out of the ring. Some disadvantages come with this robot. The tracks used are not only very expensive, but also very difficult to mount. Another issue is the same as with the Carbot – high torque means low speed. If our opponent is faster than the Wall-E bot it will easily out maneuver the robot. START Etc... Figure 3.6 - Wall-E Bot searching behaviour 12 |F i n a l R e p o r t 4 Proposed Design 4.1 General The general behavior of this robot is that of a sumo bot. The primary function of this robot is to locate opposing robots and push them outside of a circular area marked by a black boundary line along the ground. At the same time, the robot must remain inside the circular area at all times. The behavior of the robot is controlled by the use of 4 line sensors, 4 analog IR sensors, 2 digital IR sensors and 5 micro switches. At each of the four corners of the robot a light sensor is placed underneath the robot chassis facing straight down, at a height of approximately 3mm off the floor. These light sensors are used to detect the black electrical tape used to delineate the end of the ring. On both the front and the rear we will find two analog IR sensors, placed equidistant from the center of the front of the robot facing straight forwards. They will be placed slightly inside the edge of the chassis. These four sensors will be used to find and track the opposing robot. On the center of the sides of the chassis, mounted underneath we will find a digital IR sensor. These sensors are used to detect if an opposing robot is approaching our robot from the side. We use these sensors to appropriately maneuver out of the “danger zone”. There are 2 micro switches on both the front and rear of the robot located behind aluminum bumpers. These micro switches help determine whether the force applied by the opposing robot is on the left, right or center of the bumper. 4.2 Block Diagram In Figure 4.1 we can see the general block diagram of the robot and its main components. Figure 4.1 - Block diagram of the robot’ 13 | F i n a l R e p o r t 4.3 Schematic Figure 4.2 - BeemoBot Circuit Schematic 14 |F i n a l R e p o r t 4.4 Components Our robot’s design components can be broken down into two sections. These sections would be electrical and hardware. 4.4.1 Hardware Components The hardware components of the design include; Chassis Tracks Brackets Miscellaneous (screws, nuts, bolts, tape etc) These parts of the robot do not need an electrical input or signal to run. They are the bones of the robot body. The chassis, which is the structural pillar of our robot, is a 112mm x 106mm Plexiglas board. This board is pre-drilled with many holes which we use to mount the other hardware and electrical components of our robot. Our robot uses tracks rather than the conventional choice of wheels. They are made using 20 tracks each with pins to fasten them together. Each track has two wheels inside which have a center-to-center distance of 3.25”. One of the wheels will be attached to a motor and the other one of which will be mounted to our chassis using shoulder bolts. The motors are also attached to the chassis using L-brackets, along with bolts. 4.4.2 Electrical Components All the other components of the robot, such as the electrical components, will be mounted to the chassis using various hardware components such as nuts, bolts and double-sided tape. The electrical components of our design include; Printed circuit board (PCB) Atmega8 microcontroller Half-quad H-bridge Battery pack Switches Sensors Motors Miscellaneous (resistors, capacitors, wiring, etc) In Table 4.1 we can see a detailed list of electrical components used on the robot. All parts are labeled to match the schematic found in Figure 4.2 - BeemoBot Circuit Schematic. 15 | F i n a l R e p o r t Component Label Part Number Part Description Qty C1 0.33uF Ceramic Capacitor 1 C2 0.1uF Ceramic Capacitor 1 D1 LED Green LED 1 IC1 Atmega8 8-Bit Microcontroller 1 IC2 SN754410 Quad Half H-Bridge 1 J1 LM7805 5V Voltage Regulator 1 J2 N/A Power Switch 1 J3 N/A 12xAA NiMH Battery Pack 1 IR Proximity Sensor (10-80cm) 4 Microswitch 4 J4, J5, J6, J7 GP2D12 J8-J11 N/A J13, J14, J15, J17 QRD1114 Reflective Object Sensor 4 J16, J18 GP2D15 IR Proximity Sensor (24cm) 2 J19, J20 GM8 Servo DC Motor 2 R1-R4 20kΩ Metal-Film Resistor 4 R5 220Ω Metal-Film Resistor 1 R6-R9 10kΩ Metal-Film Resistor 4 R10, R11 12kΩ Metal-Film Resistor 2 R12-R15 160Ω Metal-Film Resistor 4 Table 4.1 - Robot electrical components The core of our robot’s electrical components is the PCB. All the parts listed in Table 4.1 are connected using the breadboard. On our robot we use one small PCB, designed to fit comfortably on the top of the chassis. A PCB is optimal as it has a much lower cost than a breadboard, but also has much sturdier connections. This is because all the wires connected to the PCB would be connected using screw-down connectors. These connections are not likely to come loose during operation. The Atmega8 microcontroller is the brain of the robot. This controls the functions of all parts of the robot. It determines when the robot will go forwards, backwards, turn, chase a robot, avoid the edge of the ring, and so on. The failure of this part of the robot will result in the failure of the whole robot. This microcontroller was chosen as all students have previous experience working with the Atmega8. This also means that there is code written by the students already which can be re-used for this project. The motors used on our robot are two GM8 DC servo motors. They are high-powered and very responsive. The model of motor being used was chosen for its balance of high speed and torque. Since we are using tracks on our robot, it is important that our robot has high torque. 16 |F i n a l R e p o r t Tracks are meant for high grip, and the best way to take advantage of it is to use high torque motors. The quad-half H-Bridge is the controller used for the motors. This controller uses 4 signals from the microcontroller to determine whether the two motors will be going forwards or backwards and whether they are moving simultaneously or moving in opposite directions. It makes use of the two battery packs power supply (14.4V) to power each motor. This specific IC was the most appropriate motor controller available from the parts list provided (refer to Appendix B). An array of digital sensors, analog sensors and micro-switches will be used to help the microcontroller determine the behavior of our robot. These sensors are used to determine the proximity of an opposing robot, where in relation to our robot our opponent lies, whether we’re touching a robot and also if we have approached the edge of the ring. The GP2D12 and GP2D15 IR sensors were chosen as the members of the team have already written a program which uses these sensors. This code can be imported into the robot code, and make completion of the program much more efficient. 4.5 Technical Drawings Figure 4.3 - BeemoBot 3D drawing (made in Google Sketchup) 17 | F i n a l R e p o r t 4.6 Software 4.6.1 Basic Robot Behaviour In the figure below we can see a visual representation of what happens when BeemoBot detects an opponent. In Figure 4.4 we see that BeemoBot is looking for an opponent with its digital IR sensors. In Figure 4.4 (b) an opponent has entered BeemoBot’s field of vision. Next BeemoBot will turn to face its opponent, as can be seen in Figure 4.4 (c). BeemoBot knows that its opponent is straight in front if both digital IR sensors are asserted. If an opponent is seen in the rear, the BeemoBot will change its direction flag, reversing its front and back, and will track the opponent in the new front direction. Figure 4.4 - BeemoBot Analog (Front/Rear) Robot Detection Figure 4.5 - BeemoBot Digital (Left/Right) Robot Detection In the figure above we can see a visual representation of what happens when one of BeemoBot’s digital IR sensors is asserted. These sensors are placed on the left and right of the robot. If Figure 4.5 (a) we see that BeemoBot is checking for a robot at its side. In Figure 4.5 (b) we see that the digital proximity sensor has been asserted. It will then turn to face the opponent, as can be seen in Figure 4.5 (c). 4.6.2 Flowchart The following section discusses the algorithm used in the BeemoBot code. Before discussing the code, there are some points that need to be made clear. The BeemoBot is a bidirectional 18 |F i n a l R e p o r t robot. This means that the BeemoBot, essentially, never goes in reverse, as far as the code goes. Instead of using a “reverse” function, we set a flag, from here on called the “direction flag”. Whenever we “set” the flag, we change the value from 0 to 1, or from 1 to 0. Whenever this occurs, the robot changes its orientation; front becomes rear, rear becomes front, left becomes right and right becomes left. It should also be noted that, unless stated otherwise, when the robot uses the “forward”, “forward- left” or “forward-right” functions, these actions are interruptible only by a line sensor being asserted. Similarly when any “CW” (clockwise) or “CCW” (counter-clockwise) function is being run, this is interruptible by any sensor (line, IR, or contact switch) that is asserted. Figure 4.6 - BeemoBot Main Flowchart In Figure 4.6 we can observe the flowchart which represents the main function in the code. When the robot is turned on, it waits 5 seconds (as required by the customer) before performing any manoeuvres. Once this delay is over, the robot will move forward 1s before it begins checking for any sensor inputs. Next the robot will gather all input data and then move into the appropriate subroutine. 19 | F i n a l R e p o r t Figure 4.7 - BeemoBot line sensing algorithm flowchart If a line sensor is asserted, this subroutine will be called above all others. Depending on which line sensors were asserted at the time of the input data collection, the appropriate maneuver is decided. Multiple line sensor assertion takes priority over only a single line sensor being asserted. If any rear line sensor is asserted, the aforementioned “direction flag” will be set, and the robot will reverse its directions. 20 |F i n a l R e p o r t Figure 4.8 - BeemoBot contact sensing algorithm flowchart The next most important input, after line sensing, is contact with an opposing robot. Depending on which contact switch is asserted at the time of the input data collection, the appropriate maneuver is decided. The highest priority is when our robot is making contact on both the front and the rear, meaning BeemoBot is being pinned. In this case the robot will spin CW either only front or rear sensors are being asserted. Next the algorithm checks for a front pair, then the rear pair, and then checks for individual cases. 21 | F i n a l R e p o r t Figure 4.9 - BeemoBot front/rear robot seeing algorithm flowchart After checking for any possible contact, the next step is to check if a robot is being seen on either the front or rear of the BeemoBot. A tracking algorithm is implemented here. If both front sensors are asserted, the robot need only go straight forward. If a left sensor is asserted, the robot will track left until both front sensors are asserted. If the right sensor is asserted, the robot will veer to the right until both front sensors are asserted. This behaviour is the same for the rear sensors. First, however, if a rear sensor is asserted, the direction flag is set. Then the robot will track its opponent in the same manner. 22 |F i n a l R e p o r t Figure 4.10 - BeemoBot side robot seeing algorithm flowchart The very last input that is checked is the side sensor input. If the left sensor has been asserted, the robot will turn counter-clockwise for 2 seconds, unless any other sensor is asserted. Similar for the right sensor, except that it will turn clockwise. 4.6.3 Pseudo-Code MAIN /////////INITIALISE///////////////// //initialise Digital input set line sensor states to 0 set contact sensor states to 0 set Left & Right IR sensor states to 0 //initilaise Analogue Sensor pins and Data values Enable 60Hz interrupt Enable ADC for Front & Back IRsensors //initialise digital output pins set Motor control Pins as outputs set winning LED pin as output //Delay initialise Enables 1000Hz interrupt on Timer2 for interuptable delay. //initialise global state variables Direction = 0 (forward) //////////////////////////////////////// //5 SECOND DELAY//// do nothing for 5 seconds ////While(1) Loop//// 23 | F i n a l R e p o r t ///GET SENSOR DATA///// Check line sensor data Check contact sensors Check Front & Back IR sensors Check Left & Right IR sensors ////IF A LINE IS DETECTED///// if a line is detected if front left sensor detected the line Set direction flag to 1 go forward turn counter clockwise if front right sensor detected the line set direction flag to 1 go forward turn clockwise if rear left sensor detected the line set direction flag to 0 go forward turn clockwise if rear right sensor set direction flag to 0 go forward turn counter clockwise if both Front sensors detected the line set direction flag to 1 go forward if both rear sensors detected the line set direction flag to 0 go forward /////ELSE IF ROBOT MAKES CONTACT///// if a robot makes contact if robot makes contact on front left set direction flag to 0 move forward and left into robot if robot makes contact on front right set direction flag to 0 move forward and right if robot makes contact behind to left set direction flag to 1 move forward and right into robot if robot makes contact behind to right set direction flag to 1 move forward and left into robot 24 |F i n a l R e p o r t if robot makes contact on both front sensors set direction flag to 1 move forward into robot if robot makes contact on both rear sensors set direction flag to 0 move forward into robot if robot makes contact at front and back turn clockwise to evade being stuck ///ELSE IF ROBOT IS SEEN BY FRONT/BACK IR SENSORS//// if a robot is seen detected at front or back if robot is seen on front left set direction flag to 0 move forward and left toward robot if robot is seen on front right set direction flag to 0 move forward and right toward robot if robot is seen behind to left set direction flag to 1 move forward and right toward robot if robot is seen behind to right set direction flag to 1 move forward and left toward robot if robot is seen by both front sensors set direction flag to 0 move forward toward robot if robot is seen behind set direction flag to 1 move forward toward robot ///ELSE IF ROBOT IS SEEN TO LEFT OR RIGHT/// if a robot is seen to left or right if robot is seen to left turn counter clockwise then move forward if robot is seen to right turn clockwise then move forward ///IF NOTHING IS DETECTED//// else Move forward 25 | F i n a l R e p o r t 26 |F i n a l R e p o r t 5 Testing and Results 5.1 Line Sensors Scenario Result 90° Reverse backwards, away from the line Front right line sensor tripped first 45° 10° Turns toward the sensor that hasn't been tripped until the robot is facing the line at 90° Turns toward the sensor that hasn't been tripped until the robot is facing the line at 90° Front left line sensor tripped first 45° 10° Turns toward the sensor that hasn't been tripped until the robot is facing the line at 90° Turns toward the sensor that hasn't been tripped until the robot is facing the line at 90° Table 5.1 - Robot reaction when moving towards the line Scenario Result 90° Change direct to moving straight forward, away from the line Rear right line sensor tripped first 45° 10° Turns toward the sensor that hasn't been tripped until the robot is facing the line at 90° Turns toward the sensor that hasn't been tripped until the robot is facing the line at 90° Rear left line sensor tripped first 45° 10° Turns toward the sensor that hasn't been tripped until the robot is facing the line at 90° Turns toward the sensor that hasn't been tripped until the robot is facing the line at 90° Table 5.2 - Robot reaction when being pushed backwards into the line Scenario Result 90° Change direct to moving straight forward, away from the line Rear right line sensor tripped first 45° 10° Turns toward the sensor that hasn't been tripped until the robot is facing the line at 90° Turns toward the sensor that hasn't been tripped until the robot is facing the line at 90° Rear left line sensor tripped first 45° 10° Turns toward the sensor that hasn't been tripped until the robot is facing the line at 90° Turns toward the sensor that hasn't been tripped until the robot is facing the line at 90° Table 5.3 - Robot reaction when being pushed forward into the line 27 | F i n a l R e p o r t 5.2 Robot Start-up Scenario Reaction No target on any sensor Target on 2 front sensors Target on 2 rear sensors Moves forward until line is hit Pushes target out immediately Moves forward for 1 second then moves backwards towards target Moves forward for 1 second, then turns towards target moving backwards (left motor forward, right motor backwards) Moves forward for 1 second, then turns towards target moving backwards (left motor backwards, right motor forwards) Target on left side sensor Target on right side sensor Table 5.4 - Robot behaviour on Start-Up 5.3 IR Sensors Scenario Reaction 2 backs sensors activated Side left sensor activated Side right sensor activated Front right sensor activated Front left sensor activated Back left sensor activated Back right sensor activated Change direction to backwards Turns left towards the target Turns right towards the target Turn to the right Turn to the left Turn towards target (right track in reverse) Turn towards target (left track in reverse) Move towards first target until dead zone is hit, then change direction towards other robot and continue going back and forth Spin until object found and then go back and forth between 2 objects Attack newest object Attack newest object Attack newest object Attack newest object 2 objects, front + back of robot 2 objects, left + right of robot 2 objects, front + left of robot 2 objects, front + right of robot 2 objects, back + left of robot 2 objects, back + right of robot Table 5.5 - Robot reactions to IR sensor input 5.4 Robot Lifted From Ground Scenario 28 |F i n a l R e p o r t Reaction Going Forward Front lifted Back lifted Left side lifted Right side lifted Reverse Forward Reverse Reverse Going Backwards Front lifted Back lifted Left side lifted Right side lifted Reverse Forward Reverse Reverse Table 5.6 - Robot reaction when lifted from the ground 5.5 Contact Switches Scenario Reaction Front left activated Front right activated Front left + right activated Back left activated Back right activated Back left + right activated Front left + back left activated Front left + back right activated Front right + back left activated Front right + back right activated All except front left activated All except front right activated All except back left activated All except back right activated All 4 switches activated Turn left Turn right Go forward Reverse to the left Reverse to the right Reverse Spin counter clockwise Spin counter clockwise Spin counter clockwise Spin counter clockwise Spin counter clockwise Spin counter clockwise Spin counter clockwise Spin counter clockwise Spin counter clockwise Table 5.7 - Robot reaction to contact switch inputs *Please note that when any switch is pressed, the IR sensors will not respond. *Also note that the contact switches will not respond when the robot is lifted off the ground at any point. 29 | F i n a l R e p o r t 5.6 Design Changes During the construction of the BeemoBot, some design issues did not become clear until BeemoBot was put under specific testing scenarios. When this happened, we noticed several problems with the design that needed to be changed for efficient fighting behaviour. The first issue that was noted was that the Tamiya tracks used on the BeemoBot caused BeemoBot to “bounce” during operation. This caused issues with the line sensors, as when the robot would bounce up, the ideal distance of the line sensor to the ground (less than 5mm) would be exceeded. This issue was easily solved by lowering the line sensors to approximately 2-3mm from the ground. Another issue was discovered during the robot “trials”, which one of the first occasions for BeemoBot to fight an opponent. The “Grip-Tight” which we taped to the tracks for tractions was falling apart. This was due to rubbing against other robots. The Grip-Tight is made of small rubber nodules, and these nodules were ripping apart. We were both losing traction as well as sabotaging not only our opponent’s line sensors, but our own as well. The last two issues we found with our design were discovered during the final competition, during the first round. To mount the battery pack, we attached a cross-bar to the top of the BeemoBot and secured 12 fully charged 1.2V batteries. First we found the robot was far too topheavy. When the BeemoBot would change direction, it would rock so hard due to the weight of the high battery packs that the ends of our robot would lift. This lifting would also assert our line sensors and cause the robot to change directions again, causing it to rock even more. This kept happening until the robot keeled over. We promptly removed the cross-bars and lowered the battery pack into the robot. At the same time we pulled out 3 of our fully charged batteries and replaced them with half-charged batteries to reduce the speed of the robot. This worked well and BeemoBot had many successful wins afterwards. 30 |F i n a l R e p o r t 6 Work Breakdown Structure Before assigning tasks to the members of the team, it is important to analyze the strengths and weaknesses of each member, as well as their skill sets and any additional features they may have. 6.1 Team Biographies 6.1.1 Andrew Evans Andrew Evans is 22 years old, in his 3rd year in computer engineering at Concordia University. He graduated from John Abbott College in 2009 from the Engineering technologies program with a technologists diploma. He has experience with various programming languages such as: Assembly, C, C++ and Java. He has worked with PIC microcontrollers which will come to a great advantage when working with Atmel’s Atmega chip range. His software knowledge is an asset to the team. 6.1.2 Thomas Hayes Thomas Hayes, the 23 year old who is currently is his third year of electrical engineering at Concordia University was able to bring an electrical and circuit design background to the team as well as knowledge of project management from 5 years of working for CAE Inc. Having graduated from John Abbott College in Engineering Technologies and having a passion for cars he is also mechanically inclined as this came to use when the robot was being constructed. 6.1.3 Kenneth Richards Ken Richards is 22 years old, studying Electrical Engineering at Concordia University in his 3rd year. He has a DEC in Sciences from John Abbott College which he acquired in 2009. He is enrolled in co-op already having completed a work term, which has given him experience in electrical engineering projects and working in a team environment. He has knowledge in circuit design, basic C programming and has strong writing skills. 6.1.4 Sandra Witzen Sandra Witzen is a 23 year old third year Computer Engineering Student at Concordia University. She attended the Engineering Technologies program at John Abbott College from 2005 through 2008. She has knowledge of many basics in engineering such as sheet metal work, circuit design, C hardware programming and circuit analysis. She also has more detailed knowledge of electronics, C++ programming, report writing and documentation. 6.2 Project Responsibilities After analyzing the strengths and weaknesses of each team member, Team Beemo assigned the main roles and responsibilities of the design project to each member. The work done for the design category is categorized mainly into two distinctive categories; hardware and software. As Evans and Andrew have the most knowledge in Software design and debugging, this role has been assigned to them. Hayes and Richards have more knowledge in the electrical hardware, and have therefore been assigned to the hardware side of 31 | F i n a l R e p o r t the project. Team members do not, however, only work on their respective tasks. All aspects of the project will be discussed and designed by the team as a whole. The following is a list of main responsibilities of each team member. 6.2.1 Andrew Evans Andrew Evans’ main responsibility is software implementation. He programs the Atmega8 and ensures the functionality of the components within the program. He also creates the technical drawings for our robot design. 6.2.2 Thomas Hayes Thomas Hayes was nominated Team Leader. First and foremost he is in charge of maintaining order and proper communication of all team members. His main responsibilities include the construction of the chassis and mounting of robot components. He will also contribute to PCB design, with resources from Witzen. 6.2.3 Kenneth Richards Kenneth Richards’ main role in the project is implementing and documenting the testing and troubleshooting of the robot. He also helps Hayes in the construction of the robot chassis, as well as ensuring that the electrical components of the robot work properly before being implemented in the design by Evans. 6.2.4 Sandra Witzen Sandra’s main roles include documentation of the project as well as writing the final report. She also creates the theoretical algorithms for the robot behavior which are implemented in code by Evans. She also helps Evans in troubleshooting problems encountered during the programming of the robot and its parts. There are some critical moments in the design and construction of the robot. Firstly the team must ensure that a testable and programmable temporary assembly of the robot is created so that Evans and Witzen may begin the software programming and implementation. Next the robot chassis must be properly assembled in time for the robot trials. As the team wishes to create a PCB for their robot, they must ensure that the appropriate time and resources are available to them to complete this in time. Next the debugging of the software must be done quickly to ensure functionality for the robot trials and later for the robot competition. Many of these critical design aspects happen simultaneously, so the team must ensure that a proper schedule and good communication allow for the fastest possible design and construction of the robot. In Appendix D is the work breakdown structure of the project, followed by the proposed schedule for this project. 7 Budget The following is the budget of parts used for the building, implementation, testing and completion of Team #3’s BeemoBot. 32 |F i n a l R e p o r t Item # Part Description 1 Plexiglass Chassis Comment Qty (pcs) Unit Cost ($) Total Cost ($) 112mm x 106 mm 1 5.00 5.00 - 1 3.00 3.00 3 Treads Jonny Robot GM Standard 1 30.00 30.00 4 Motor Bracket GMB28 - GM2 / GM8 2 1.35 2.70 5 Motor Solarbotics GM8 2 7.00 14.00 6 H Bridge SN754410N 2 2.00 4.00 7 Microcontroller Atmega8 1 3.00 3.00 8 5V Voltage Regulator LM7805 1 0.50 0.50 - 1 2.00 2.00 - 1 3.50 3.50 11 IR Analog Proximity Sensor AIIRS (10-80cm) 4 9.50 38.00 12 IR Line Sensor 4 1.50 6.00 13 IR Digital Proximity Sensor GP2D15 (24 cm) 2 15.00 30.00 14 Contact Switch 4 1.00 4.00 2 16.00 32.00 1 4.00 4.00 N/A 10.00 20 0.10 2.00 1 1.00 1.00 N/A 3.00 Total Parts Cost 197.70 2 PCB 9 ISP Header 10 ISP Cable 15 Battery Pack QRD1114 6xAA NiMH 16 Battery Charger - 17 Robot Shell Material - 18 Assorted Components - Resistors, capacitors, etc 19 Heat Sink - 20 Handling Fee - - Figure 7.1 - BeemoBot Budget 33 | F i n a l R e p o r t 8 Bibliography “AVR Freaks” News in Weblog format, links, forum, tutorials, articles, specifications; devices, tools, projects, vendors. http://avrfreaks.net (accessed December 12th, 2011) “Battle Bots” Wikipedia, the free encyclopedia. http://en.wikipedia.org/wiki/BattleBots (accessed December 12th, 2011). “Technical Manual Template” http://sydney.edu.au/engineering/aeromech/MTRX3700/ Course_Material/labs/major/Technical Manual Template.doc (accessed December 12th, 2011) “Team S.U.M.O.B.O.T. Final Report” http://users.encs.concordia.ca/~wojciech/390/ 390_final_report_team_sumobot.pdf (accessed December 12th, 2011) “Team S.U.M.O.B.O.T. Technical Manual” http://users.encs.concordia.ca/~wojciech/390/ 390_technical manual_team_sumobot.pdf (accessed December 12th, 2011) “Team S.U.M.O.B.O.T. User Manual” http://users.encs.concordia.ca/~wojciech/390/ 390_user manual_team_sumobot.pdf (accessed December 12th, 2011) “Wall-E Photograph” Disney’s Pixar http://fastcache.gawkerassets.com/assets/images/4/2008/04/ Ultimate%20Wall-E%20GI.jpg (accessed December 12th, 2011) 34 |F i n a l R e p o r t