1
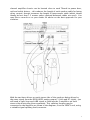
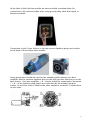
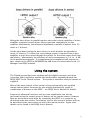
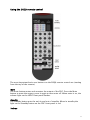
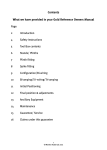
Owner’s Manual
TIKANDI
with
DEQX HDP-3
Digital Driver Correction
Linear Phase Crossovers
Interactive Room Correction
Legend Acoustics
Contents
Their Design ................................................................................2
The Tikandi System ......................................................................1
The Loudspeakers ..................................................................................... 2
The HDP3 Processor .................................................................................. 3
The Amplifiers........................................................................................... 4
Sources ..................................................................................................... 5
Setting up the speakers in your room ...........................................6
Connecting up..............................................................................8
Connecting up source(s) to HDP3 ............................................................... 8
Connecting up HDP3 to loudspeakers......................................................... 8
1. DEQX HDA-3.4 amplifiers ............................................................................................ 8
2. Other 8 channels of amplification: ............................................................................. 11
3. One channels of bass amplification per side .............................................................. 11
Using the DEQX remote control ................................................................ 13
Fine Tuning ................................................................................15
Making a room measurement................................................................... 15
Implementing room correction ................................................................. 20
Changing Profiles .................................................................................... 22
Listening ....................................................................................24
Contacting us.............................................................................25
Appendix 1: Connecting the HPDC to your computer ..................26
Minimum System Requirements ............................................................... 26
Installing DEQX Calibration Software ........................................................ 26
Launching DEQX Calibration Software....................................................... 26
Setting up PDC/PC Communication .......................................................... 26
ü Although we have tried in this Owner's Manual to provide a comprehensive
guide to using the Tikandi loudspeaker system, you may also wish to engage
the services of your local Tikandi dealer to help you maximise the level of
performance of the system.
Version 0.91 © Legend Acoustics 2009
Their Design
Congratulations on your excellent choice! The Tikandi loudspeaker system has
been designed to give maximum enjoyment when you listen to your music.
“Tikandi” is an indigenous Australian word meaning “live”. It was chosen
because we believe this new state of the art loudspeaker, processor and
amplifier system will enable you to enjoy the thrilling experience of live music in
your home or studio.
To achieve this level of “liveness” the cooperation of two of Australia’s most
innovative audio companies, DEQX and Legend Acoustics, was required. Both
companies have a passion for live music and a deep understanding of high
fidelity design. Their long experience and comprehensive knowledge of the
physics, engineering, electronics and Digital Signal Processing were fully
employed to provide this live music experience.
Our methods include sophisticated computer design and measurement systems.
By eliminating deviations from faithful reproduction and carefully equalizing the
output of a pair of Tikandi loudspeakers, we preserve the natural tones of
instruments in an accurate soundstage presentation. In addition, by minimising
distortion and maximizing energy transfer in all components, the Tikandis
convey the foot-tapping speed and emotional impact of the live performance.
Notwithstanding the technology, the final decisions are always made by that
most sensitive of musical test instruments - the human ear. Only after
extensive listening to a wide spectrum of music is final tuning complete.
The Tikandi System
1
The Tikandi system has three main components:
1. A stereo pair of Legend 3-way loudspeakers in which each of the four
state of the art drivers is directly connected to its own amplifier providing the ultimate in control and speed of response;
2. The revolutionary DEQX HDP-3 preamp with processor that calculates very
precisely in the digital domain to correct for driver anomalies, decide
which frequencies and how much energy to send to which loudspeaker
driver, and correct for non-linearities in your room’s response;
3. Eight audiophile grade power amplifiers are provided to drive each
loudspeaker driver. The DEQX-HD™ active configuration means that each
speaker driver, i.e. tweeters, midrange and bass drivers, are individually
and directly driven. This avoids the need for the traditional passive
crossover filters that are directly and indirectly responsible for the
inevitable distortion that make even very high-end passive loudspeakers
the weakest link in the audio chain by roughly an order of magnitude.
All you need to add is an analog or digital music source of similar high quality to
complete the system and begin enjoying the sound of live music.
The Loudspeakers
Each loudspeaker consists of two modules to aid their transporting and set-up,
but more importantly to allow each module cabinet to be tailored to their
respective drivers and to reduce interactions. Thus each module is a truncated
pyramid with non-parallel walls to diminish standing waves inside the cabinets;
while separate modules reduces further the transmission of vibrations through
the cabinets, already very low because of their strength of construction.
The base module, Kumbar, has a pair of 250 mm (10”) bass drivers which have
an extra-long throw of 20 mm (0.8”) enabling them to reproduce very deep bass
down to 20 Hz. To minimise intermodulation distortion and allow best DEQXHD™ operation, each bass driver should be driven by its own power amplifier.
The drivers are located opposite each other on the left and right sides and are
connected in phase so that the vibrational forces transmitted to the cabinet will
2
tend to cancel each other. With their exceptionally strong internal bracing the
Kumbar module provides a very stable base for the Kebi ‘pod’ module.
The upper module, Kebi, contains a pair of the world’s most highly regarded
midrange and tweeter drivers, chosen especially for their very low distortion.
The 112 mm (4.5”) midrange driver incorporates an extremely lightweight and
rigid cone made from an aluminium/magnesium alloy that is heavily anodised
which gives exceptionally low distortion and natural dispersion characteristics
across its operating range.
Similarly, the 25 mm (1”) tweeter provides
exceptionally low distortion being made from ultra-strong ceramic-depositedon-aluminium substrate. With an extremely low moving mass the speed and
transient response are simply stunning.
The HDP-3 Processor
Another major contributor to Tikandi's unprecedented performance is DEQX's
new HDP-3 that provides preamp, speaker correction for each driver, 3-way
active linear-phase crossovers, room correction with user-defined PEQ presets.
Stereophile magazine called the DEQX processor "…the most significant
loudspeaker development to come down the pike in a long time".
The reason DEQX's processing makes such as difference is that it drastically
reduces errors in phase, timing and frequency-response, which are the ‘Achilles
heel’ of all conventional loudspeaker designs. The Tikandi’s also boast DEQXHD™ certification; which is only possible when using a fully active topology where each driver has a dedicated amplifier. While the DEQX-HD™ processing
provides true low-latency linear-phase crossovers combined with time and
frequency domain correction at hundreds of different frequency groups, its
active configuration ensures each driver receives signal energy only in its
‘comfort zone’, further contributing to Tikandi’s low distortion, natural
dispersion, superior efficiency and extraordinary dynamics.
The small errors in frequency and phase that all drivers inevitably exhibit (there
is no ‘perfect’ transducer), are masterfully compensated for by DEQX's patented,
low-latency, inverse FIR digital processing. The result is that Tikandi provides
unprecedented reproduction accuracy compared to other speakers’
performance.
Because the DEQX HDP-3’s dual processors digitally calculate very precisely
which frequencies to send to each loudspeaker driver, it virtually eliminates
crossover distortion and improves efficiency. And because it provides steep
crossovers that are not possible with analogue circuits, the drivers see the
signals only within their optimum operating range. This dramatically reduces
unwanted excursions of the midrange and tweeter drivers, and ‘beaming’ of the
woofer and mid-range drivers; which all combines to minimize distortion at its
source, allowing for more dynamic and less congested sound, especially so for
loud and complex music such as full orchestra or concerts.
3
In addition, Tikandi's HDP-3 processor allows the user to measure and
interactively control correction for the inevitable room acoustic problems that
cause some frequencies to resonate unduly in every listening room. Although
these resonances mainly occur in the lowest three octaves (bass octaves below
160Hz), they psycho-acoustically mask our ability to hear detail far up into the
full spectrum of sound and degrade the listening experience. The combination
of listening-position measurement and user-controlled compensation is highly
effective in minimizing those unwanted room modes.
Finally, the HDP3's controls allow one to switch between four separate input
channels as well as providing fully synchronized (post-DAC) analogue volume
control for all output channels eliminating the need for a separate pre-amplifier.
The Amplifiers
Although the loudspeaker and processor components above must be always
used together, the Tikandi system allows for flexible choice of the amplifiers
used between the HDP-3 preamp/processor and the loudspeaker drivers. The
two sets of [+] and [-] terminals at the back of each of the Kebi and Kumbar
modules allow each driver to be directly connected to its matching power
amplifier for improved control and speed of response. The amplifiers can even
be located adjacent to the loudspeakers to minimise the length of speaker cable.
We highly recommend using the state-of-the-art DEQX HDA-3.4 amplifiers.
Sporting proprietary discrete-component linear circuits with zero global
feedback they afford stunningly fast, articulate and silky-smooth output. Each
HDA-3.4 amplifier has four channels that can provide 400 Watts of power to
each of the stereo speakers. So, two DEQX HDA-3.4 amps are used to drive all
eight drivers in a stereo pair of Tikandi loudspeakers.
Alternatively one can use multi-channel “home theatre” amplifiers to connect
each driver to its own amplification. An example would be the 8-channel
Marantz MM8003 amplifier.
It is also possible to have the channels of
amplification provided by multiple stereo amplifiers, each tailored to the type of
driver (woofer, midrange, tweeter) it is paired with. Of course, the benefits of
mono-blocks can be fully employed with the Tikandi system as well. Ideally, the
amplifiers should provide roughly the same voltage gain – though the DEQX
HDP-3 processor can adjust the output gain separately for each channel. Your
local Tikandi dealer would be happy to discuss the possibilities with you to
achieve the best configuration for your particular situation.
As a bare minimum, one can use 6-channels of implication with each midrange
and treble driver in the Kebi module being connected to a separate amplifier, as
above, but now the pair of bass drivers in each Kumbar cabinet is connected
together, either in series or in parallel, to a single amplifier. There are some
caveats to this configuration (as described below) so the user is encouraged to
proceed with caution and knowledge about the trade-offs; recognizing that this
configuration is not DEQX-HD™ certificated because it is not fully active.
4
Sources
Although the Tikandi system combines superior drivers and the world’s most
advanced digital processing, there is nothing clinical or ‘digital’ about its sound.
Great care has been taken to maintain the character of the best analogue
electronics, such as body and intimacy, while overcoming much of the accuracy
and distortion limitations that analogue signal processing has always imposed.
There is considerable choice of sources that you can combine with a Tikandi
system.
The HDP-3 processor has 4 inputs:
1. Analogue RCA (unbalanced)
2. Digital RCA (S/PDIF)
3. Analogue XLR (balanced)
4. Digital XLR (AES/EBU a.k.a. AES3)
The XLR inputs can be converted to RCA inputs with suitable adapter leads.
All analogue inputs are converted and processed at either 48kHz or 96kHz with
full 24-bit resolution.
The DEQX HDP-3 processor can accept up to 96kHz / 24-bit digital audio
sources. This means that the Tikandi’s low distortion and realistic transparency
is especially well suited to deliver the most from the new High Definition audio
formats that are increasingly becoming available through Internet downloads.
In addition, well recorded CDs, SACDs, DVDs, Blu-Ray discs as well as LPs and
FM or HD radio, even good quality MP3 downloads (especially 250kbit provided
by iTunesPLUS) can also produce stunning results with the Tikandi system.
5
Setting Up The Speakers In Your Room
Sound waves reflected from the boundaries of your room inevitably interact with
the sound waves coming directly from the loudspeakers to the listening
position. Especially at low frequencies, the direct and the reflected waves
combine to form ‘standing waves’ (or ‘room modes’) bouncing back and forth in
your room and these cause unevenness in the bass response of the system,
typically up to 10 dB, by either reinforcing or cancelling (nodes and anti-nodes)
the true signal thus changing how it is perceived at the listening position.
Although the DEQX processor can be used to electronically correct these
reinforcements or cancellations at the listening position (by measuring them and
then applying an inverse correction – see below for more details) it is best to
first try to reduce these standing waves by physical means. This makes sitting
in a single “sweet spot” less critical and enhances the enjoyment of your system.
If your listening room is regularly shaped, you can improve its performance by
judicious use of cupboards, bookshelves, furniture and curtains to break-up or
absorb the reflected waves.
You should try to avoid sitting on the diagonals between the opposite corners of
the room where the room’s standing waves are maximised. If possible, you
should also experiment with positioning of the speakers to find out where they
sound best for your music in your room.
Reflected waves, by arriving later at the ear, confound the sonic image of the
sound-stage. To optimise the soundstage, the Tikandis should be placed at
least 0.5 m from any reflecting surface, particularly from side walls. Ideally, you
would sit near the apex of an approximately equal-sided triangle formed with
the speakers ~ 2-4 m (~ 7-13 ft) apart. Good results can be achieved with the
speakers roughly 20% of the room’s width from the side walls, although the
Tikandis do have an unusually large ‘sweet spot’ so this is not critical.
Unlike traditional passive speakers, the Tikandi’s dispersion at high frequencies
is so remarkable that they do not need to be to be aimed directly at the listening
position. The Tikandi speakers may be ‘toed-in’ roughly mid-way between
pointing parallel to the side walls and pointing at the shoulders of a person
sitting in the central listening position. This allows a more natural timing of
mid-frequency signals as they are reflected from the rear wall to the listening
6
position. You may like to experiment with toe-in however, because the results
vary depending on your room’s geometry, reflective surfaces and speaker
placement. Many people prefer them pointing straight down the room.
Generally, as the speaker increases its distance from the rear wall towards the
listener (up to say 20% of the room’s length), the cleaner the mid-range and
highs might sound, because of slightly less room reflection from the rear wall.
Also for the best tonal balance you should also sit so that your ears are
approximately level with, or slightly below, the tweeter (~ 0.9 m or 36” above
the floor).
Please note that this fine tuning of position is only required to get the ultimate
in performance from the Tikandi system and they will sound superb regardless.
Spikes
The Tikandis can sound tauter and more focussed if the base modules are firmly
connected to the floor with spikes inserted into the base of the Tikandis. The
spikes will penetrate your carpet without damage. If you are using them on
hard, sensitive floors you can put a small coin or ‘spike puck’ under each spike
to prevent damage.
Insert the spikes by about 1/4 of their length into the holders under each corner
of the speaker base. With the locking nuts not yet tightened, adjust the length
of the spikes for the speaker tops to be level. Tighten three of the locking nuts
firmly and then adjust the length of the fourth spike so that the speakers do not
‘rock’. Finally, carefully tighten the fourth locking nut – rechecking for level and
no rocking.
Grilles
The Tikandis have been supplied with their bass grilles on because aside from
aesthetics they protect the drive units from dust and damage. However, the
speakers may sound slightly more dynamic with the grilles removed.
The circular Kumbar module grill frames are held by magnets and can be
removed by simply raising the frames by their outer edge. To reattach, place
the grille frame into the bass unit hole and rotate the frame until the magnets
engage with the iron screws that secure the bass drivers.
7
Connecting Up
Connecting Source(s) To The HDP-3 Processor
Connect your favourite sources (music server, CD/SACD player, turntable, tuner
et cetera ) to the appropriate input socket at the back of the HDP-3. Note that
the HDP-3 will recognise PCM digital signals (up to 96 kHz/24-bit) but not
Dolby Digital, DTS or other proprietary formats.
Note: The PDC-2.6 is shown here but the HDP-3 uses similar connector layout.
Connecting the HDP-3 Processor To Loudspeakers
ü While connecting up, make sure all power is switched off or disconnected.
If purchased with the Tikandi system, please use the cables supplied; otherwise
you really should supply good quality interconnect and loudspeaker cables so
that the signal is not degraded as it transits from one device to the next.
Because the Tikandi system allows for a choice of the power amplifier
organisation between the DEQX HDP-3 processor and the Tikandi loudspeakers,
there are a number of possibilities for proper connection. We will describe some
of the main possibilities here – others should then be clear.
ü You can discuss your particular configuration options in more detail with your
local Tikandi dealer.
1. DEQX HDA-3.4 Amplifiers
Two of these amplifiers provide four channels in each chassis for a total of eight
channels of amplification, one for each Tikandi driver. There are two DEQXHD™ certificated ways to organize these with the Tikandi loudspeakers: final
selection will depend upon one’s preferences and/or physical considerations.
As in the diagram below one chassis can be used for connecting to the mid &
treble drivers; the other to the bass drivers – this reduces the impact, through
the power supply, of large bass signals on the mid & treble. Alternatively, one 4-
8
channel amplifier chassis can be located close to each Tikandi to power bass,
mid and treble drivers - this reduces the length of each speaker cable for better
driver control, though increases the length of interconnect cable (which should
ideally be less than 1.5 metres unless optional balanced cables are used). You
may like to consult us or your dealer for advice on the best approach for your
situation.
With the two bass drivers on each stereo side of the speakers being driven by
the same signal from the DEQX HDP3 analog output L1 (left) and R1 (right), you
will need to split/loop each L&R signal to feed into the 2 amplifiers on each
stereo side driving the driver separately. This splitting/looping may be
connected to the amplifier as shown in the diagram, or at the HPDC3 end, using
a suitable signal splitting lead/connector.
9
At the back of the Kebi top module we have provided a terminal plate for
connection to the mid and treble units using good quality cable with spade or
banana terminals:
Connection to the 2 bass drivers is via high current Speakon plugs and sockets
at the back of the Kumbar base module:
Heavy gauge wire should be used for the speaker cable between your bass
amplifier and the external Speakon plug for the high currents that may go to the
bass drivers. One bass amplifier + & - output should be connected to terminals
1 + & - of the Speakon plug (which are connected by the Kumbar Speakon
socket to one bass driver); likewise the other output to terminals 2 (shown here
in rear view):
10
2. Alternative 8 channels of amplification:
The 2 boxes of 4-channels of amplification may be replaced by alternative
arrangements with similar connection procedures as above.
For example, some “7.1 home theatre” amplifiers have 8-channels of
amplification built into a single box – the Marantz MM8003 amplifier is one such
box (and we have found this amplifier to be very successful with the Tikandis).
The main feature to watch is that the amplifier has enough power/current
capabilities required for 4-ohm load of each bass driver given the large cone
excursions at frequencies as low as 20Hz.
Each channel connected to the bass drivers should have a minimum of 100W –
or 5 amps current delivery. The mid drivers typically require 30-50W while the
tweeters 15-20W.
Alternatives for providing the 8 channels of amplifiers as described above is to
use four stereo amplifiers – or even 8 monoblocks. Providing they meet the
power requirements described above, the amplifiers do not have to be of the
same type or brand, except for each type of loudspeaker driver, so for example
both left and right tweeters, for example mids should use the same amplifier
model. This may allow you to use your existing amplifiers – and to tailor the
amplifiers to each type of driver, for example pure class A low powered amps to
the tweeters. The amps do not have to have identical gain as the output gain
from each channel can be set inside the HDP3 (though you will have to consult
the accompanying DEQX manual to do this).
3. Using just one channel of bass amplification per side
Although each mid & treble driver MUST be connected to a separate amplifier,
the two bass drivers in each cabinet may be driven by a single amplifier.
Note that this does not satisfy full DEQX-HD™ certification which is only
provided when each driver has its own amplifier.
Two possible connections are possible through wiring the Speakon connector on
each cabinet to the HPDC analog bass output 1:
11
Wiring the bass drivers in parallel requires twice the current capability of a bass
amplifier compared to each driver being connected separately to its own
amplifier (alternatively, the minimum impedance in parallel is halved, from 3.6
ohms to 1.8 ohms).
On the other hand, wiring the bass drivers in series doubles the impedance
(from 3.6 ohms to 7.2 ohms) but extra voltage/power is required from a bass
amplifier to push the current through the drivers for the same output level from
the drivers - alternatively, the efficiency of series arrangement is 1/4 (or -6 dB)
of the parallel arrangement. To compensate this arrangement will require the
bass output of the HDP3 to INCREASED by 6dB from its current value in the I/O
Manager (see DEQX manual).
Using the system
The Tikandi system has been supplied with the digital crossover and driver
correction filters needed to operate the loudspeakers optimally through the
DEQX HDPC in the Tikandi system. The system is therefore ready to operate as
supplied.
Most of the basic control of the system is best performed by the supplied
remote control (these functions are also mainly duplicated by single or
combination of buttons on the HPDC – see DEQX User’s Manual for details).
Some more advanced functions such as room equalisation can also be
performed using the central group of buttons on the remote control. However
they are much more easily done by connecting the HPDC to a computer as
described under the section “Fine tuning” and so this group of buttons will not
be described in the next section on use of the remote control. Again more
details can be found in the DEQX User’s Manual.
12
Using the DEQX remote control
The most important basic user buttons on the DEQX remote control are (starting
from the top of the remote):
Mute
The mute button mutes and unmutes the output of the PDC. Press the Mute
button to mute the output, press it again to turn mute off. When mute is on, the
volume light on the HPDC front panel flashes.
Standby
The Standby button puts the unit in and out of standby. When in standby the
light on the Standby button on the PDC front panel is red.
Volume
13
The Volume button adjusts the output volume of the PDC. In other words, each
button press increments or decrements in varying scale steps from 0dB full
volume to full mute 100dB. The ^ button increases the volume, the v button
decreases the volume.
Input Select
There are five input selection buttons:
An RCA – this selects analogue RCA (unbalanced) as the input source
An XLR – this selects analogue XLR (balanced) as the input source
Dig RCA – this selects digital RCA (unbalanced, also known as S/PDIF) as
the input source
Auto – this switches between the last selected analogue source and the last
selected digital source. It will use the digital source if there is a valid PCM
signal received at the digital input from 44.4kHz 16-bit (CD) up to 96kHz
24-bit, otherwise it will use the analog source. (The digital input ignores
compressed or multichannel digital audio such as Dolby, THX or MP3). Note
that some digital sources output a digital signal even when audio is not
playing. If in Auto select mode, this may cause the HDP3 to select the
digital input even when an analogue input might be required. In such cases
use the analogue input selector. The auto select can be useful when both
Home Theatre and CDs might be played in a system. When the PCM signal
is detected by the HDP3 it will select the digital input automatically, but
reverting to analogue inputs for film surround soundtracks. Your dealer can
advise how to use the DP3/Tikandis in surround set ups where only the
main stereo (front left and right) speakers need correcting.
Room Equalisation Profile Select
The HPD3 can store 4 separate room equalisation “profiles” which can be used
for different room equalisations - and/or “tone” controls to modify the sound for
different recordings. As a starting point these have been set in the system as
supplied to you as:
Bypass – Room correction is OFF
P1 –Ideal room correction setting for most material
P2 – as P1 but with mild bass rolloff (for bass heavy situations)
P3 – as P1 but with mild bass boost (for low level listening)
User - This button is currently not functional.
Batteries
The remote control takes two AAA size batteries, supplied with the remote
control. The battery compartment is in the top of the remote control. To install
the batteries, open the battery cover at the back of the remote control by sliding
it upwards, as indicated by the arrow on the battery cover. Install the batteries
with + and – signs matching the + and – signs of the figures in the
compartment. Replace the cover by sliding it back into place.
If the remote control does not work check that the batteries have been installed
correctly and make good contact with the terminals.
14
Fine Tuning
The DEQX HPD3 is a very powerful digital processor. In this section we will
outline some of fine user defined and room tuning that it can perform in
addition to its factory supplied digital crossover and driver correction filters.
Most of these more advanced functions are best performed by connecting a
computer to the HPD3 via the supplied USB cable. The installation of the DEQX
software into your computer and connection the computer to the HPD3 follows
standard computer procedures. Details are described in Appendix 1. For ease of
use a portable computer such as a PC or Mac notebook is generally preferable.
Note that if using Mac, an Intel Mac platform is required running Windows under
Boot camp or VM-ware.
Making a room measurement
Room problems mainly occur in the three to four bass octaves below about
200Hz. In this region, most rooms demonstrate about three to six resonances to
varying degrees due to the room’s dimensions and speaker placement. These
resonances mask other frequencies psycho-acoustically and are easy to reduce
accurately using the HDP3 because the room measurement shows the exact
frequency, magnitude and width of each resonance. The HDP3’s multi-band
paraEQ allows each band to be set to the exact frequency and width of each
resonance, and gain can be cut as required.
Making a room measurement with the speakers in position using the HDP3 is
quite simple, though it does involve a number of steps many of which are
associated with setting up the measurement conditions. It is advisable to keep
background noise to a minimum, for example by shutting doors & windows and
turning off nearby noisy equipment such as air-conditioners. Although the
HDP3 averaging process reduces the effects of background noise, the
measurements will be more reliable if it is kept to a minimum.
To launch the Room Measurement Wizard click on the Measure Room button on
the tool bar in the DEQX Calibration program.
15
The welcome page for the Room Measurement Wizard appears. Click Next to
continue.
The second window gives you the option creating a new room measurement or
loading an existing one. Select the 'Create a new room measurement' radio
button & click Next.
16
You can ignore these advanced options & just click Next to continue.
Select all the speakers. Each speaker will be measured in turn. Click Next to
continue.
Name the measurement position as e.g. “sweet spot”. Click Run to continue.
17
The PDC will be initialized. This will take a few seconds.
The test signal will be played.
The IO Manager will be opened automatically, so that you can set the Master
Volume to an appropriate level. We suggest that it be set so that input level (as
measured by the microphone) peaks at between 80 and 90 dB. Some
experimentation may be required for best results. Click
18
Run to continue.
Once the measurement is completed satisfactorily click the Next button.
If the measurement was successful click Next. Otherwise click Retry, repeating
the measurement with more sweeps, lower ambient noise or higher volume.
19
If you have finished taking measurements, click Finish to observe them.
Implementing room correction
As a first approximation it is a good idea to use the HDP33 automated room
correction – this can then be fine-tuned manually.
To apply an automated equalization of the room measurement, click the Autoset
EQ button (above the frequency response chart, on the left).
The default settings for the Autoset EQ options
Click OK to set the parametric eq points to attenuate the peaks and troughs of
the room measurement.
20
A room measurement with automated EQ set, using the default settings
Your room has now been corrected with DEQX’s automated EQ for profile 1.
Fine-tuning room correction:
While automated room correction can provide good results in many cases, it is
often desirable to use its EQ settings as a starting point, then, while listing to
well known recordings, you should feel free to manually adjust any or all of the
EQ bands to refine the correction according to your taste. You can also add extra
EQ bands if required. All this can be done dynamically while you are listening to
music so that you can instantly hear the results.
Some general results we have found may be helpful:
· ignore very narrow peaks & troughs.
· it is more effective to fill in dips than to reduce peaks. We recommend
that if additional gain seems essential, it should normally not exceed 3dB
and generally no more than 6dB (unless the system is being played at very
low levels).
· don’t overdo the magnitude of any corrections – often correcting only half
the room mode amplitude sounds best.
· Only correct below about 200 Hz.
You can change a point/band on the equalization curve by clicking on it – this
will show the center frequency, gain and width (Q) of the band:
21
These values can be set visually using the mouse:
• To adjust the center frequency of an EQ band, drag the center-point of the
band left or right.
• To adjust the amount of gain of an EQ band, drag the center-point of the
band up or down. Cutting gain is method used to reduce room
resonances (nodes), where cuts in the order of -3dB to -6dB may be
typical. As mentioned above, do not increase the gain (above centre)
more than about 3dB, which represents a doubling of power from the
amplifier to the speaker at the selected frequency; so a 6dB increase is
four times power.
• To adjust the width (Q) of an EQ band, drag either end point of the band
left or right. The narrowest setting is about one semitone wide, the
widest setting is four octaves wide. Room responses can look wide on the
measurement – sometimes in the order of half an octave wide. However,
its may be that the EQ band can be narrower than that – such as only one
quarter of an octave wide - and still effectively reduce the that
resonance. All of this can be adjusted in real-time whole you are listing
to music until you feel you have reduced the responses sufficiently while
not causing unwanted side effects.
The three values of an EQ band (i.e. frequency, gain and width) can also be set
numerically by clicking on the EQ band in question then right-clicking (or by
double-clicking on the band), clicking on Properties then entering the
appropriate values.
To add an extra EQ band to the equalizer, click on the Add Point button on the
tool bar at the top of the screen, then click on the EQ curve at the desired
frequency of the EQ band. The cursor changes to a cross hair and the centre
frequency and bandwidth may be adjusted by clicking and dragging the relevant
point as described above. Up to 10 bands of equalization may be applied (or up
to 7 bands, if you're using the EQ controls on the remote control supplied with
the HDP3).
Changing Stored Equalisations
Because the HDP3 can store 4 separate equalisation “profiles” they can also be
used for “tone” controls to modify the sound for different recordings (on top of
or instead of the room correction[s] done above). As described earlier we have
preset the profiles for some general basic purposes such as changing the bass
roll-off/lift. We will now describe how they can be changed for your particular
needs.
Again the starting point is the equalisation screen of the control panel with your
computer connected to the HDP3. Choose between profiles by clicking on the
buttons of Profile Select on the far left of the screen.
For example, click on profile 2. If you have not added a room correction to this
profile you will see the equalisation curve as it has been preset by us (with your
room measurement in the background if you have done this). If you do not wish
22
to have room correction with this profile you can simply modify our profile by
modifying the equalisation points/bands on the equalisation curve – or by
adding new ones.
Some
·
·
·
·
EQ settings you may like to try are:
changing the preset bass roll-off/gain for your recordings/room.
rolling off the high frequencies for early harsh CD recordings.
using a shallow dip around 2.5 kHz to reduce sibilance in poor recordings.
adding bass and treble gain for low level playback (to compensate for the
ear’s varying perception of loudness at different SPLs).
For example, the last case might look like:
Note that these changes are performed in the digital domain where the can be
done without the amplitude or phase distortion of conventional analogue tone
controls.
23
If you wish to use room correction as well as these other EQ settings in a profile,
then you will need repeat the procedure of the section Implementing Room
Correction for this profile first – and then add or modify the EQ settings as
above.
Saving Profile Settings
The Profile settings you have created will be stored permanently in the HDP3
until you change them. However, if an error occurs that might erase these
settings, or if you wish to try other settings and may want the original ones back
again, it is highly recommended that you save the Profiles into your computer
from which they may be downloaded back into the HDP3 To do this, Click on the
Read EQ from PDC button on the tool bar at the top of the configuration screen.
Once the EQ settings have been loaded into your computer they can be saved in
the project when the Save icon is clicked. – or preferably, to distinguish them
from our settings, using Save as another project name.
More details on all the above procedures can be found in the DEQX Manual.
Listening
Now just relax and play your favourite music - that’s what it is all about. We
hope you enjoy your Tikandis as much as we do.
As previously mentioned, because the Tikandis are so transparent (high fidelity)
to the quality of the signals fed into them, the quality of the sound you get out
will depend largely on the quality of the signals fed into them.
All analogy signals fed into them are converted into 24-bit/96kHz digital signals
using very high quality analog-to-digital converters for digital processing inside
the HDP3.
Digital PCM signals (up to 24-bit/96kHz) do not have to be converted on input
and are processed directly by the HDP3. Thus if your CD player upsamples and
outputs 88.2 kHz/24 bit this will result in a higher sound quality, partly
because the HDP3 can more accurately process crossover & correction filters.
Likewise if your DVD player will output 96 kHz/24 bit signals from your DVD-As
or DADs.
Of course, the quality of the signal from your source also depends on the quality
of the recording itself – on how good was the performance and how well the
recording was engineered. Again because of the high transparency/fidelity of
the Tikandis, poor recordings will sound as such – but good recordings will
sound like ‘live’ i.e. magic!
24
Contacting us
If you would like to contact us, we would appreciate your comments:
email
post:
phone
fax
[email protected]
Legend Acoustics
PO Box 448
Huonville
TAS 7109
Australia
+61 3 6295 0062
+61 3 6295 0064
25
Appendix 1: Connecting the HDP3 to your computer
Minimum System Requirements
The minimum system requirements for DEQX Calibration software are:
• A PC-compatible computer with a Pentium-class processor, 233 MHz or
faster
• Microsoft Windows XP Home, Windows XP Pro or Windows 2000 installed
• 120 MB of free hard disk space
• 128 MB RAM installed
• 800 x 600 pixel, 256 color display
• An RS-232 or USB output connector
Installing DEQX Calibration Software
DEQX Calibration is installed with a standard Windows installation package.
Insert the DEQX Calibration CD-ROM in your CD-ROM drive. If you have autorun
enabled the software installs automatically. Alternatively you can run the file:
setup.exe to start the installation.
You will be prompted to supply the user details and installation directory.
You will also be prompted to supply the user password. This is the activation
code on the back of the Installation CD.
Launching DEQX Calibration Software
To launch, double click the DEQX Calibration icon on your desktop (if installed)
or open the Windows Start Menu and choose DEQX Calibration from the DEQX
Calibration menu.
Setting up PDC/PC Communication
The PDC can be connected to the PC using either a USB cable or an RS232 cable.
When first started, DEQX Calibration defaults to use of a USB cable. WE will only
describe the connection with a USB cable – refer to DEQX if you wish to use an
RS232 cable.
Steps 1 to 6 below are only necessary when connecting to the PC a PDC that has
not been connected via USB to that PC before.
1. Connect the PDC to the PC using the USB cable. The USB socket is at the far
bottom left looking at the back of the HDP3.
2. Turn on the PDC, using the power switch at the back of the PDC.
3. If you have Windows XP, the PC should automatically detect the PDC and
advise that there is new USB hardware.
3a. If this doesn't happen, try turning the PDC off and on. The PC should then
recognize the new device.
26
4. Windows should start up a Found New Hardware Wizard, or a similar Wizard.
This wizard may ask if Windows can connect to Windows Update to search for
software. If so, choose 'No, not this time' then click Next. At the next dialog
choose the option to automatically install the software supplied on the CD-ROM.
4a. The Wizard should be able to find the driver by itself (you don't need to use
the option of manually finding the driver). Windows may pop up a window to say
that the software hasn't passed Windows logo testing. If this happens click on
the Continue Anyway button.
5. The Wizard will install the driver then ask you to click on Finish to close the
Wizard.
6. Windows may pop up a brief message that new hardware has been installed.
7. Launch the DEQX Calibration program installed earlier.
The state of the link between DEQX Calibration and the PDC is indicated by the
Link icon at the right of the status bar, at the bottom of the DEQX Calibration
window.
Your notes
27