1
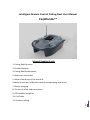
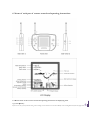
Intelligent Remote Control Fishing Boat User Manual CarpHunterTM Manual Reading Guide 1. Fishing Boat Function 2. Product Features 3. Fishing Boat Performance: 4. Quick start instruction 5. Name of each part of the boat hull 6.Name of each part of Remote control and operating instruction 7. Battery charging 8. The use of safety and precautions 9. GPS satellite navigation 10. Fish finder 11. Product packing 1. Fish boat function:
1‐1. The boat with bait and hook to the depths of lake or river to get fishing through manual and automatic control 1‐2. The boat can be sailing automatically by GPS setting and store sailing points 1‐3. To know well of underwater landscapes and river fishing situation 2. Product Features: 2‐1. 4.33MHZ full digital duplex wireless remote control 2‐2. Operation method: Manual control and automatic control 2‐3. Two sets of bait hopper and hook controlled via electromagnet 2‐4. Lighting by Remote Control 2‐5. Low voltage alarm, weak signal alarm 2‐6. Weed guard cover, waterproof and crushproof 2‐7. Remote control with LCD to display the various working situations 2‐8. GSP can set and store 8 different target points and let the boat with sailing automatically 2‐9. Calculate the distance of boat travel in a straight line and the actual travel time 2‐10. Fish finder can keep track the traveling fishing situation 2‐11. The boat with 2 power form: lead‐acid battery and lithium battery (not compatible) 2‐12. The products are A,B,C,D in four configurations, and still upgrade interface, allowing product upgrade. 3. Fishing Boat Performance 4. Quick start instruction: 4‐1. put the fishing bait into the 2 bait hoppers 4‐2. Put one of the hooks hanging to the pothook of the boat aft, other hooks with bait , lead sinkers and fish line connected with rod in the other end (you can also hang two rows of hooks) 4‐3. Open the power of boat and remote control 4‐4. Operate the joystick and Auto button taking the boat to the destination that you want. 4‐5. If your boat has GPS function, you can open the GPS Menu to set and store the departure after GPS signal flashing stop for 5 minutes, so that your boat our, you just open the GPS menu again, click GO button, the boat will automatically return to your side. 4‐6. If your boat has fish finder function, you can see the fishing size and number in the water through LCD screen, then put the bait into the water and release the hook 4‐7. When the fish bait It’s up to your skill to catch the fish through your hand’s rod High-brightness LED lamp and flashing night lamp are installed at front and back of the product. This bait boat is equipped with
double bait hoppers and double rig releases, which are controlled via electromagnet switches. By the control of the buttons on the
remote-control handset, the following functions can be remote-controlled: running speed/directions, bait release, rig release, lighting
on/off, electronic motor speed control, etc. The boat can work in the following work modes: manual-control, automatic cruising,
automatic demonstration, GPS-guided Automatic navigation and other modes.
The boat has four Models A, B, C and D of configurations to meet the need of different consumers. An interface is reserved for
upgrading from lower model to higher model. When the consumer buys a product with low configurations, he or she can go to the sales
agent to buy upgrading parts when it needs upgrading (easy installation). The remote-control handset does not need to be changed
(pre-equipped with functions for all models), and the upgraded functions will be displayed on the LCD screen automatically.
Attention: This boat might have a leeway, When working in the ANOTHER DIFFERENT environment, because the compass inside will be interfered by the different magnetic field. To solve this problem, please open the MENU, re‐adjust the compass inside the boat and the controller, aligning the direction of the compass with the direction of the new magnetic field. Please refer to G and H in the 6‐1.13 (Menu Button) 5. Name of each part of the boat hull. (See Figure):
6. Name of each part of remote control and operating instructions
6-1. Button name of the remote control and operating instructions of displaying irons
1. Joystick(MANU):
By the use of the joystick, manual sailing control sailing can be carried out for the boat.Mainly control sailing direction(turn left/right and
backward),to go straight,mainly use auto-sailing and GPS navigation saling function to operate.
Go forward: push the joystick forward slowly and the boat will sail forward
Go backward: push the joystick backward slowly and the boat will sail backward
Turn left: push the joystick left slowly and the boat will sail left
Right-hand bend: push the joystick right slowly and the boat will sail right
Stop: when the joystick is at the middle position, the screw propeller will stop turning (the joystick will reset automatically).
The sailing status of the boat will be displayed on the LCD screen with arrowheads; the direction of arrowheads is the direction of boat's
bow, arrowhead up shows sailing forward, arrowhead down shows sailing backward, arrowhead left/right shows the ship is turning (notes:
the front of the remote control handset should be the same as the direction of the boat’s bow.)
Notes: when the handset is placed horizontally, the boat and direction of the handset is the most exact. If it’s placed vertically or tilt, the
boat and the arrowhead direction of the handset will be deviation.
:
2. Stop/Eject hanger Button
when pressing this button, hanger on the upper side of the boat will be released. Repeat above operation, the hanger on one side will be
released, and meanwhile, the working state will be displayed on the screen with icon. When the hangers are closed, icon will display “T”
character; when the hangers are opened, hanger icon is “一”, and when both icon blocks are “一”, it indicate the completion of hanger
release, and when you press this hanger button again, icons will return to “T” character state.
3. Bait tank door release key
:
when pressing this button, bait tank door on one side of the boat will be released. Repeat above operation, the bait tank door on the other
side will be released, and meanwhile, the working state will be displayed on the screen with icon. When bait tank is closed, the rectangular
icon display box is of network-shape; after opening, the icon box is in white color, and if both icon boxes are in white color, it indicates
the bait casting is completed, and when you press this open button of bait tank again, icons will return to the close state.
4. Lighting Remote Control
:
press the button to control the boat light on the front , on/off situation displays on the screen of remote control
5. Automatic cruising System button (AUTO):
When this button is pressed, the boat will automatically sail to the direction locked by electronic compass. When the boat is in
automatically sailing status, AUTO will be displayed on the LCD screen. If manual control is needed, press this button again to stop the
automatic cruising.
6-9 GPS function button(see GPS introduction)
6.GPS Menu Button(GPS)
7.GPS Set Button(SET)
8.GPS Auto-navigation Button(GO)
9.GPS Menu Exit Button(ESC)
10. Automatic demonstration function button (DEMO):
When this button is pressed, the boat will automatically demonstrate its sailing direction (straight line or turning), bait casting, decoupling
device, switch on/off of lighting, simulation signal of fish finder, and repeat these operations.
11. Combination of screen backlight selection button(LCDL)and menu selection button (+): When the light is weak, press the
button to switch on the backlight. When pressing the menu button, use the button to amend and setup the selected menu.
Notes: When the screen backlight is set as On, backlight lamp will always lighten, so much power will be consumed, and the use time of
the battery will be reduced. It is recommended to use this function when there is insufficient light.
12. Combination of alarm sound elimination and menu selection button(-):
When alarm sound is unneeded, you can use the button to eliminate the sound. When pressing the menu button, use the button to amend
and setup the selected menu.
13. Menu button(MENU):
press the button, you can select 6 menu items, and after selecting a certain menu item, press menu selection button to setup, and after
menu setting is completed, press menu button again, and the menu will be stored (Note: only after 5 menu items are continuously pressed,
the setup menus can be stored).
Remark: all functions of Menu were selected before ex-factory, there is no need to select every time if you need to change a certain
function that you can use the Menu button
The following selection can be made by pressing the menu button:
A. Select boat type:
A) TYPE A (Basic type)
B) TYPE B
(Basic type +GPS)
C) TYPE C (Basic type + fish finder )
D) TYPE D (Basic type +GPS+ fish finder )
B. Selection of remote control handset communication channels:
COMM ADDR CHANNEL0,CHANNEL1,CHANNEL2,CHANNEL3,CHANNEL4
There are up to 5 channels to select (Note; before ex-factory, channels selection has been setup, which don’t need to be setted during
use.Only if two boats with the same frequency work at the same time, rechoose different channel again.
C.
Fine-tuning the motor speed on the left and right side of the boat: MOTO ADJU:
L:50- R50 indicates the rotation speed of the motors on the left and the right side of the boat, and when the speeds of two motors
disaccord, press selection button (+,-)to tune their speeds.
For example: the boat is sailing turn to left a little to indicate the left motor speed less than right motor speed, press Menu (+) to increase
the left motor speed, continue to press(+) let L50 upto 51,52,53… at same time R50 reduced to 49, 48,47…..
D.
Metric / Inch Conversion of TEMP UNIT:
E. Metric / Inch Conversion of DEEP UNIT:
F.
Celsius / Fahrenheit
Metres / Feet
Open & close of fish icon(see the instruction of fish finder):
Close fish iron will be better to see the size and number of fish, open fish iron to see if the fish underwater
G.
Adjusted electronic compass directions on boat: COMPA AOJ
(OFF/ON):
Press MENU button to find COMPA AOJ function indicator, press “-” button to turn “OFF” to" ON ", then turn the remote control
clockwise for two circles, then press "- " button to return ”ON” to" OFF ".
H. Adjust the compass directions on the remote control: ARROW ADJ (OFF / ON):
Press MENU button to find ARROW ADJ function indicator, press the "-" button to turn "OFF" to "ON", then turn the remote
control with clockwise for two circles , then press "-" button to back to "OFF". Continue to press the MENU button to end the menu,
turn off the remote control switch, and rebooting, the new compass directions will be setup, the compass direction of the remote control
and direction of the boat will be adjusted to the same
Adjust to the rocker center point and sensitivity of the remote control
I. Adjust to the rocker center point of the remote control:
Press Menu to find ROCKE MID (OFF/ON) function indicator, press “—”button to turn “OFF” to “ON”
G.
Ajust the rocker sensitivity of the remote control :
Press” Menu” button to find ROCKER MAX (off/on) function indicator,
Press “—”button to turn “OFF” to “ON”, then turn the
remote control with clockwise for one circle and press “—”to back “OFF”
For all Menu items adjustment, you should close the MENU after adjustment completed, then turn off the remote control and turn on the
remote control again. So the new data will be store in the remote control.
Note: we completed the adjustment for the center point and sensitivity of the remote control before delivery, so the user doesn’t need to
do it again.
K. Fish finder sensitivity Adjustment:
according to the depth rang 0-4,0-9,0-18,0-36 metres of 4 stalls to adjust to meet users request for different water depth exploration
Adjust to the boat and the compass of remote control ( “Menu” and “-“ combined)
When the boat is working in new environment around a strong magnetic, the compass will be interfered by the local magnetic area let the
boat can not be travelling normally, then need to open the menu, to adjust the boat and the compass of remote control, the compass
direction of magnetic field consistant with the new environment. (note: the compass doesn’t be adjusted everytime, only need to adjust in
new environment ).
L. Version
14. On/Off Button:
press 2 seconds to turn on the power switch of remote control, LCD display the data of the boat, at this time if the boat is no power
supply, buzzer will” beep” sound. Then the buzzer sound will be stop after 7 seconds connection with the boat power. ( if you don’t want
to hear the buzzer sound, the option to turn off the buzzer by click the left button“-”
15. Charging socket with USB interface:
connect it to the charger for charging
6-2. Other functions display and instruction
Signal strength(SM): It indicates the strength of signals between the boat and the remote-control handset. When the signals are strong,
the
signal indicator will indicate full blocks; when the signals are weak, the signal indicator will indicate less blocks, and when there is no
signal, the signal indicator will indicate “X”.
Battery Capacity of boat(BV) and remote control(RV):
It respectively indicates the battery capacities of the boat and the remote-control handset. When there is full electric quantity, the battery
capacity will indicate “full black battery”; when the electric quantity reduces, the battery capacity will indicate less blocks, and when the
power is running out, the battery capacity indication will disappear.
Effective Running Time Display(00:00): At the same time when the boat starts off, it will record the travel time. When the boat
stops, the time counter will also stop counting, thus the Effective Travel Time of the boat is grasped.
Notes: it has no data storage function. After it is switched off, the runing Time Counter will start from “0” again.
6-3. Remote-control handset sound alarm:
A. Low voltage alarm:
1) When the voltage of the boat battery goes down to 10.5V,
the buzzer on the remote-control handset will produce beep sound, which
indicates the boat can only sail for another 10 minutes, and when the voltage on the boat battery goes down to 10.2V, the boat will stop
working.
2)When the voltage on the remote control handset goes down to 3.2 V, the buzzer on the remote-control handset will produce beep
sounds, and the remote-control handset will stop working.
B. Weak signal alarm:
when remote control handset can’t receive the boat’s signal, the buzzer on the remote-control handset will produce beep sounds.
Notes:
* when battery capacity is not enough,the signal will be weak too,and the speed of the boat will be slow.
When the boat sails within specific distance,sometimes it will be disturbed by other signals(such as wind,surf,other beside
boats,airplane in the sky,weather and so on),the signal will be weak temporarily.
* The single received by the remote control handset within specific distance will become weak,normally it will recover
automatically.
* When the boat sails within specific distance,if it is disturbed seriously,the handset can’t receive the signals from the
boat,the buzzer make a sound
of “DiDi…”.It indicates the signal already lost,the boat will stay,at that time the controller
in the boat will start signal automatic repair function,it will recover signal status within 2 seconds.
* If the boat goes wrong and lead to weak signals,and can’t be repaired within short time,the boat will stay for two minutes
and close.
7.Battery charging
The product is equipped with two chargers, which are respectively used for charging the batteries of boat use and battery of remote
control handset use.
7-1. Technical Specification of charger:
Indoor AC input voltage: AC100-240V, 50/60 HZ
Charger for Boat: Output voltage 14.5V charge Current: 1.5A
Output Connector: DC5.5*2.2
Charger for Remote control: Output voltage: 4.5V Charge Current: 1A Output Connector: USB
Charger has LED charging indictor light, red light indicates charging now, after charging is completed, the red light turns into green
7-2 Charger charging method:
A). Boat charge:Insert the charger plug into the boat charging socket to start charging
B). Remote-control handset charge:Insert the charger plug into the charging socket of remote-control handset
C). Separately charge the battery: Special conversion connectors can be used to connect the output end of the charger to the battery for
charging.
7-3. Battery use notice:
* Note: This charger can only charge two lead-acid battery series, and it is not allowed to charge a single lead-acid battery to avoid
overcharging and the battery damage.
* Charging the lithium battery separately is prohibited.
* Before use, the boat batteries and remote-control handset need to be charged, and the initial charge time should be no less than 8
hours.
* After a long-term storage, the battery should be charged once every two months.
* If the fishing boat will not be used for a long term, please take the battery out after charging it.
* Do NOT put the battery in the sun directly or any places near fire sources.
* The battery can NOT be put at places where is accessible to children.
8. The use of safety and precautions
* The antenna is the best conductor for electromagnetic waves and lightning, easily absorbs newly formed lightning. So
when in stormy weather, please switch it off.
* It is dangerous to use the remote-control handset in explosive locations. Please avoid using it in those places.
* As the electronic compass is easily affected by external environment, please avoid using it under high-voltage cables as
well as in the areas surrounded by a strong magnetic field or metal mine.
* The angle between the antenna of remote control handset and the ground should be more than 45 degree, and try to put
the antenna at a relative high position, to ensure the maximal signal between the boat and the remote control handset.
* Do not dismantle the boat and the remote-control handset without authorization. If dismantlement or maintenance is
needed, please handle in a specified after-sales service center. The company will not be responsible for any negative
effects caused as a result of unauthorized dismantlement.
* Keep bait hopper solenoid switch’s cleaning. Before the switch suck & shut, please clean the stained clay and sand or
other adsorbed materials on solenoid switch and iron sheet, to avoid affecting solenoid switch’s performance.
9.GPS satellite navigation
9-1 .function:
A. Set and save 8 different addresses (1 departure and 7 destination),to locate the return and place of play nest for the boat.
B. The boat can navigate and sail automatically between specific addresses.
C. calculate and indicate the effective distance between boat and remote control handset.
9-2. Button function of GPS ( see front view of remote control handset button):
1) GPS menu selection button (GPS):
Press the button to enter into the GPS menu, where there are 8 icons available. One flashing icon indicates the stop position of the button,
and when pressing it once, the cursor will skip an icon after it reach to “8”,return to “1” automatically, you can choose one icon as Origin
while choose the other 7 icons as Destinationts.
2)
GPS setting button(SET):
After selecting the icon, press the button for 3 seconds until the selected cursor block turns black, which indicates it has been setup
successfully. If need to cancel the setup cursor, open the selection button again, to find the cursor needs to cancel, press it for 3 seconds
again until the icon turns to flashing state from black, which indicates the setting has been cancelled. Setting of address can be saved, so
that it can be used next time.
3) GPS automatic cruising (GO):
press GPS key-press menu selection button, and transfer the cursor to the Target Points hope to select, and find the setup Destinations.
Press the button, the boat will carry out automatic cruising according to the setup locations. At the same time, current cruising Destination
(GPS1-GPS8) will be shown on display screen. If you want to cancel automatic cruising function during the automatic cruising state,
please press GPS and GO button again.
4) Exit button of GPS menu(ESC):
press this button to exit of GPS menu, the original destination address of GPS won’t be cancelled.
9-3. LCD screen of the remote control
GPS satellite signals:
the icon is indicated with “origin” with “米” character, and when the icon flashes, it indicates it is searching the satellite signal and when it
stops flashing, it indicates that the signal has been captured.
Boat sailing distance display :
After the satellite signal stops flashing, setup the Origin, and the distance from Origin to Destination will be measured, which will be
displayed once every 5-meter sailing distance.
GPS Auto-navigation(GPS1-8):
when the boat sails by GPS, the LCD shows(GPS1....GPS2-GPS8),when the boat arrives in destination, the boat will stop automatically,
shows returning to manual status(MANU).
9-4 Setting and navigation sailing of GPS
After the boat starts,GPS starts to looking for satellite signal automatically,when signal icon glitters and stops,it shows the signal has been
found.
Setting of departurep:
1. After GPS signal is normal,open GPS menu(GPS),choose departure icon(set icon “1” as departure).
2. Press GPS SET button(SET),to set the chosen departure。
3. Press ESC button to exit GPS menu.
Setting of destination:
1. Open GPS menu button(GPS) to choose destination icon(set 2-8 icons as destination).
2 .Press GPS SET button(SET)to set the chosen destination(the setting method is the same as departure).
3 .Press ESC button and exit GPS menu.
Sail automatically with GPS navigation:
1. open GPS menu, press GPS button, find out the set icon(departure or destination).
2..Press(GO)button,the boat will sail to required desitnation automatically,after reach to the destination,the boat will stop,and exit GPS
nevigation automatically and change to manual saling mode. When the boat is in the mode of GPS nevigation,the LCD shows the
destination selection of“GPS1-GPS8”,after it reaches to departure and destination with GPS nevigation,the LCD will indicate “MANU”.
Note:
* Icon 1-8 of GPS can be both departure and destination, our clients can choose randomly.
* There is automatic saving function of GPS address setting, so that during starting in the second time, still can use
previous saving address.
* As the satellite signal strength depends on the weather and current geographical position, the time length of receiving
signal will vary with different satellite signal strengths, and generally the time is not more than one minute. After capturing
the satellite, generally it can work properly after 5 minutes of satellite navigation, and if it needs to set the departure point
in advance, a big error will occurs when the boat returns; at the same time the returning road will be longer too(will be arc
way).
If target address of nevigation isn’t set,GPS will not complete nevigation funciton,and can’t measure the distance.
* If no origin and destination is setup, the GPS navigation function will become invalid.
* Weather will affect the sensitivity of GPS, and when cloudy or thick clouds, the
GPS satellites capturing time will be
extended;
* When indoor signal is weak, and please use it outdoors;
* Communication launching tower would interfere with GPS, using in its vicinity should be avoided;
9-5. Installation of GPS
If GPS as upgrading parts,the installing steps as follows:
1)on the control circuit board of electric compass on the bow,there is sockets mounted GPS module and 2 copper pillar to fix the
module,insert GPS module,and fix the module and copper pillar by screws.
2)when receiving the satellite signals, to set according to use steps of GPS.
10. Fish finder
10-1.
Function of fish finder
Fish finder consists of sonar probe, central control PCB and LCD display three parts. Sonar transmits ultrasonic wave into water, and then
the reflected wave of the matters in the water will display on the LCD screen of the remote control handset after the treatment of central
control PCB, thus to let us know the contour of river bed, water depth, water temperature, depth range and the activity condition of fish
school and facilitate bait casting and fishing.
10-2 . Detection and display of content:
1. Water depth : It displays the boat depth during sailing, and when the probe is placed in water, the water depth reading will be displayed
on the screen.
2. Water temperature : It displays the water temperature, and when the remote control handset is switched on, if no water, the indoor
temperature reading will be displayed on the screen.
3. Depth range(fish finder): Depth range includes four levels of 0-4,0-9,0-18 and 0-36, which can be regulated according to depth
changes. Depth range will be displayed on the screen, and if depth exceeds the range of 030.4m,“---” will be displayed on the screen.
4. River bed geomorphology : River bed geomorphology will be displayed with different reflection waves of the river bed produced by
sonar.
5. Fish icon : Fish icon will be used to indicate the different reflection waves of the suspensions produced by sonar.
6. Fish finder automatic demonstration: automatically demonstrate simulation signals of river bed contour, fish icon, water temperature,
water depth and depth range.
7. Metric / Inch Conversion of TEMP UNIT:
CELSIUS
8. Metric / Inch Conversion of DEEP UNIT : METRES
FAHRENHEI:
: FEET:
9. Start and close of fish icon:
Close fish icon to control better quantity and size of fish. Start fish icon, check whether there is fish or not in the water.
10-3. Fish finder installation
Open the upper and lower covers of the boat, and install the probe and control board of fish finder respectively as following:
1. Probe installation: Remove the probe cover, drill a¢4mm round hole on the bottom of the boat, lead probe signal line through the
bottom of the boat, install it in the signal-line groove, fix the proble with screws on the bottom of the boat and inject waterproof sealant
in the waterproof cabin, cover the waterproof coverplate well, and fix it with screws.
2. Control board installation: At the bow of the lower cover, four holes are retained for installation of control board, thus the control
board can be fixed with screws.
3. Connection of control board of fish finder and the central control PCB of the boat :
There are three outlets on the fish finder control board, which are separately connected with the probe signal line, power line and fish
finder signal line, their connection methods are as following:
A. The connection of probe data line:
lead probe data lines through the bottom of the boat, and install the terminals of 3 lines respectively, then connect them with probe signal
socket of the control board in an order way.
B. The connection of power lines:
Connect the control board to power output socket of the central control PCB;
C. The connection of signal cables of control board:
Connect the control board to socket of the central control PCB;
D. Notes:
The boat should be handled with care to avoid damaging the sonar probe on the bottom of the boat;
The machine’s water-depth range is 2-30.4m; the machine can’t work normally in depths out of such range.
Fish finder is used to scan the fish situation based on underwater ultrasonic reflection principle, which is not a video camera
or video cassette recorder, and it has no camera’s effect in water, so it can neither identify the shape of each fish and the
quantity of the fish, nor distinguish fish with other suspended matters such as suspended water grass, sea turtle, bubbles
and so on.
Don’t use two identical fish finders in one area, otherwise ultrasonic and radio frequency interference may lead to abnormal
work of the device.
11. Product packing:
No.
Name
Specification
Quantity
1
Hull
2
Remote-control handset
63.5 × 43.5 × 24CM (length × width × height)
1
3.5-inch LCD display, white screen backlight
3
4
5
Charger A,B
Charger conversion plug
battery
Charging the lead acid batteries and lithium batteries respectively
Length 15CM
6V/10AH or 7.4V/10AH
1
2
1
2
6
Lithium battery
3.7V/1.AH
1
7
Outer packing box size
70*51*30.5CM
1


![Rii Mini [Bluetooth]](http://vs1.manualzilla.com/store/data/005730343_1-53cd9486bcc3b780c33a2a4f5175af21-150x150.png)