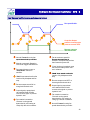
1
High Country Tek, Inc. Hydraulic Fan System Controller : HFS - 2 Electro-Hydraulic Solutions for Mobile, Industrial & Marine Applications. Application, Set-up & Information Manual. Includes the HFS-2Q HFS 2Q option information. Part No. 021-00152 Rev C August - 2008 Hydraulic Fan System Controller : HFS - 2 Important Notes: This product has been designed by High Country Tek, Inc ( HCT ) to interface directly with any manufacturers range of proportional pressure and/or flow control valves, variable pumps, motors and manifold blocks currently available for type of Please contact the factory by the e-mail address given below or nearest High Country Tek, Inc. distributor for further technical information and availability. Application Areas: • ON and OFF road application suitability • Hydraulic system oil • OEM, re-power and retro-fit markets • Automatic Transmission fluid • Mining equipment – above and below ground • Engine sump oil • Drill, exploration and blast hole rigs • Air conditioner refrigerant • Chassis, bus and RV builders • Engine water jacket • Static applications – standby generators • Engine charge air • Industrial cooling operations • ‘External Attachment’ system fluids • Liquid nitrogen/oxygen temperature conditioning • Diesel fuel conditioning System Part Numbers: • Controller Module with 2 part connectors :-………………………………………….….P/No: HFS–2 • Controller Module with Weatherpack connectors :-……………………………….….P/No: HFS–2Q • Controller Graphical User Interface ( GUI )……………………………………………….P/No: 023-00196 • Opto 2000 interface Unit:-…………………………………………………..……………….…P/No: 999- 10064 • HFS controller software CD:-………………….……….……….....................................Contact HCT customer service for info • Controller info manual:-……………………………………………………..……….……..……P/No: 021-00152 Rev B IMPORTANT NOTE:High Country Tek, Inc. reserves the right to upgrade, revise or better any controller as technology improves without notice being given. Wherever possible, full downwards compatibility for both hardware and software on replaced controllers will be maintained but it is the users responsibility to ensure that the latest technical details or literature is being used for application reference. If you are unsure of the literature, hardware or software revisions you have, or suspect that it is an older revision, please send an e-mail request for the latest releases to [email protected] ALL information contained herein is copyrighted to High Country Tek, Inc - © 2008. 2 Hydraulic Fan System Controller : HFS - 2 System Overview: This product has been designed specifically for Hydraulic Fan Drive control and gives the user new levels automation while integrating seamlessly into a typical discrete cooling system. It can control a hydraulically driven fan proportionally or in an ON/OFF manner based on user settings, system configuration and cooling needs with three independent inputs ( zones ) that will interface with industry standard NTC, two wire thermistors. Standard features include a robust vibration, flame proof package, 2 part or ‘Q’ option connectors that provides either easy harness assembly or Waterproof heavy duty connections, both polarized to avoid mis-connections, Alarm output interface, intelligent diagnostics, internal self protection that enables the controller to operate reliably under arduous environmental conditions and a ‘real-time’ graphing and data logging facility that offers the user option to observe and then record several operating parameters that are saved in a common file format for later examination in Microsoft Excel®. LLocall on-board b d diagnostic di ti LED indicators i di t are available il bl for f power ON, ON each h individual i di id l thermistor th i t input, i t the th proportional output , reverse input and reverse valve output status and a specific error code LED which all show through observation, the current status of the controller and connected peripheral devices. Easy to use ‘set-up’ and diagnostic software that is provided with the unit, works in conjunction with the HCT ‘Opto 2000’ interface unit to provide high speed data communications between the controller and the host computer and runs on any PC with a Windows® O/S platform. Once the profile for a particular cooling requirement has been established, the software allows the developer to up/download the complete personality into other blank controllers giving the user a high level of application specific security and keeping company confidential information in-house. The inputs if desired, can also be configured to interface directly with pre-set range ON/OFF Bi-metallic temperature switches without the proportional control offered by the thermistors but giving savings advantages where absolute accuracy is not required and system cost is at a premium. There are no external or onboard potentiometers, switches or adjustments for user settings to ensure controller integrity and operation under harsh environmental and operator conditions. The set-up software allows the controller to be very flexible regarding settings and system configuration with password levels invoked to ensure that characteristics cannot be changed without the proper authority. Each password level entered, affords the user more options and available settings that are kept transparent to the operator or observer to avoid confusion. ALL inputs and outputs on the controller are fully protected, continuously monitored and when connected, displayed by the software in the ‘Status’ window. Readings are also taken and stored of highest temperatures seen in each active zone, supply voltages and other parameters to allow event correlation and system diagnostics if required at a later date. 3 Hydraulic Fan System Controller : HFS - 2 Product Features: EMC compliant product to EN50081-1 and EN50082-2 ( heavy industrial ) EMC compliant product to EN-12895:2000 ( Industrial Trucks ) Fail safe design gives full fan cooling even with NO electrical power. Wide supply voltage range ( 10 – 32VDC ) Set-up & unit configuration up/downloadable to any backup media via PC. Quick select, fan speed for in-field noise inspection ( 75% of Fwd Fan speed ). Full remote (PC) and local ‘smart’ visual diagnostics ( with optional Opto 2000 ). Product Prod ct integrity integrit maintained under nder extreme e treme operational en environments. ironments Fully ‘isolated’ design for improved safety and ease of application in difficult areas. Three independently selectable and configurable temperature sensing inputs Fully protected ( shorts, opens and reverse connection ) Inputs and Outputs. Unit status ‘Diagnostic’ Diagnostic LED’s LED s user visible and functional at all times. times Industry standard, sealed Weatherpack or two part polarized connectors Radiator pack ‘Manual and auto ‘Purge’ or ‘De-ice’ feature. NO external adjustments to maintain system integrity in the field. ‘Ruggedized’ Ruggedized design allowing use on ‘Internal’ Internal OR ‘External’ External applications. Coded error indicator for real time diagnostics at the controller Full remote (PC) and local ‘smart’ visual diagnostics ( with optional Opto 2000 ). Retarded and limit ‘Charge Air’ cooling until engine warm feature. Fan ‘ON-Delay’ y feature to reduce startingg requirements q on a hot system. y Flame proof resin encapsulation. Mount ‘anywhere’ encapsulated modular format. The information in this guide is the intellectual property of High Country Tek, Inc. and should be considered at all times as strictly company confidential. It shall not be copied or transmitted by any format to any third parties without our knowledge and express written permission. 4 Hydraulic Fan System Controller : HFS - 2 CE and EMC ( Electro Magnetic Compatibility ) Notes: The HFS-2 has been tested to comply with the current EN-50081-1 ( Emissions ) and EN-50082-2 ( Immunity ). The unit has been further tested to the new Euro-Norms of:-EN-61000-6-4:2001 ( Emissions ) & EN-61000-62:2001 ( Immunity) The controller was also voluntarily tested to EN-12895:2000 which covers industrial Truck requirements. Use of this controller under conditions not specified by EN-12895:2000 will require the user to clarify the application with HCT technical staff before proceeding. To maintain compliance with the tested EMC specifications listed above, the HFS-2 controller must only be connected to the vehicle battery supply and must NOT be allowed to control or operate the fan system while the vehicle is connected to ANY external power supply ( I.e. battery Charger or engine warmer e.t.c.) and must be fully isolated from external supplies if this situation occurs . This controller has been designed to operate with virtually any manufacturers range of valves, pump strokers, fan drive motors and fluid control manifold blocks as noted in this manual. If you require advice or technical clarification, please contact High Country Tek at: [email protected] Opto 2000 The Opto 2000 interface unit is intended for temporary use during static system set-up, commissioning and HFS-2 module programming only. It is not designed for continuous connection and operation, and should not be used or applied in areas where intense radio Frequency fields ( RF ) are present as unit resetting may occur, system diagnostic information sent or received may be corrupted or the Opto 2000 unit damaged. If any of the above problems are seen, dis-continue operation until the source of the RF has been identified and stopped. 5 Hydraulic Fan System Controller : HFS - 2 Important Notes: ALWAYS - Take a few minutes to FULLY read THESE information / data sheets BEFORE starting. ALWAYS - Keep High Voltage AC cables separate from Low Voltage DC signal and supply cables. ALWAYS - Make sure the unit supply voltage is the same as the coils on the valve being driven ! ALWAYS - Ensure that you are aware of the available adjustments and on the electronics and hydraulics. ALWAYS - Make sure you have the correct tools to do the intended job ( i.e. P.C., software ) e.t.c. ALWAYS – ‘Isolate’ this unit from all other equipment BEFORE any form of welding takes place. ALWAYS - Check ALL connections to and from this unit to ensure NO short or OPEN circuits. ALWAYS - Check the units supply voltage is CORRECT, CORRECT ‘ ELECTRICALLY CLEAN ’ and STABLE. STABLE ALWAYS - Operate the units within specified operating temperature for best & reliable performance. ALWAYS - Ensure that any unused wires / terminals are terminated safely and not shorted together. ALWAYS - Isolate the controller if ANY form of battery charging or boosting takes place on the vehicle. ALWAYS - Ensure ALL valve connectors are wired correctly, secure, locked and connected to correct coils. ALWAYS - Observe the set-up procedures in this manual for best operational results. ALWAYS - Follow and abide by local and country health and safety standards – protect yourself and others ! NEVER - Arc Weld or Charge Batteries with this driver unit connected as damage can occur. NEVER - Attempt to use this unit if you are unsure of electrical OR hydraulic connections. NEVER - Attempt to use this unit if you are unsure of the expected system operation. NEVER - Attempt to use this unit in Areas where other AC or DC coils HAVE NOT been fully suppressed. suppressed NEVER - Use a power supply that is not rated for the correct required O/P current under full load. NEVER - Allow wires TO or FROM the unit to short circuit ( to each other or chassis/cabinet e.t.c. ). NEVER - Attempt to use this unit in areas of intense RF without adequate screening measures. NEVER - Disconnect or connect wires to or from this unit unless it isolated from the power supply. NEVER - Use this unit in temperatures that exceed those specified as operation may be effected. NEVER - Start this unit without ensuring ALL work areas are clear of personnel ! 6 Hydraulic Fan System Controller : HFS - 2 • Module shown with 2 part Weidmuller connectors Electrical Specifications 1) Board Style: HCT Unique Size and Mounting. 2) Connector Types: Weidmuller two part, polarised heavy duty screw type 2a) Connector types ‘Q’ option: Weatherpack sealed connectors 3) Input Supply Voltage: 10 – 32VDC ( Absolute Maximum ) 5) Input Supply Current ( Max ): Valve Current Setting + 200mA Quiescent (Max) 6) Command Input Type(s): 2 wire Thermistor, temperature switch ( software selectable ) 7) Command Input Value(s): Ohms only ( Max temp = 50 ΩMin temp = 2MΩ) 8) Available adjustments: All adjustments in software, see attached literature. 9) Dither Frequency : Software adjustable, adjustable ~30 30 to 250Hz ( menu selectable ) 10) Environmental: Totally ‘ENCAPSULATED’ Printed Circuit Board. 11) IP Rating ( module only ): Designed to meet IP 68 ( MIN ) derate connector as required. 12) NEMA Rating ( module only ): Designed to meet NEMA 6P derate connector as required. 13) Humidity: 95 - 100% Non Condensing. 14) Storage temp.: temp : -40 40 to +85 Deg C ( Max ) 15) Working temp.: -30 to +75 Deg C ( Max ) Inc Ambient. 7 Hydraulic Fan System Controller : HFS - 2 Thermistor Requirements: The controller operation is based on input from up to three temperature measured zones. One, two or all three inputs can be used depending on the system requirements with all three thermistor inputs able to be enabled or disabled independently within the set-up software. The inputs can be from NTC ( Negative Temperature Coefficient ) Thermistors or BiMetallic temperature switches and the choice can be made in the set-up software. Two wire NTC thermistors sensors with both wires brought back to the unit are required for each zone being monitored. DO NOT use thermistors with one lead grounded as the sensor and the measuring accuracy will be severely degraded ! The controller is compatible with most automotive type thermistors with Borg Warner, Delphi and Ford IAT sensors being pre-configured and selectable on a drop down menu. Other transducers not pre-set may have their profiles added and stored under user personnel. selectable names for future use byy HCT factoryy p If other thermistors are to be added, the acceptable Ohmic range is 50ohms at the maximum temperature that can occur in the system to 2Mohm at the minimum temperature that can occur in the system. Open (> 2 M ohm) or shorted (< 50 ohms) thermistor inputs will be detected and cause full fan speed output and indicate with the appropriate alarm response and error code to aide diagnosis of the problem. Each thermistor input can also be configured and used as simple contact closure switch inputs. Fan ‘ON’ Delay: The fan ‘ON’ delay feature is intended to hold the fan at no rotation to avoid unnecessary windage forces and allow the ( hot ) engine to start with minimum loading possible. This ‘Start Up Delay ‘ is programmable by the user via the software set-up program and can be set from zero (0) to sixty ( 60 ) seconds in one second increments. This delay is activated every time the main power supply input is removed and re-applied to the controller. In the case of a normally acting proportional valve, the current is held at zero output for the delay time. If a reverse acting valve is used, the output current is held at the maximum set in the software to ensure the fan is fully OFF. 8 Hydraulic Fan System Controller : HFS - 2 Charge Air: There can be a special case of cooling requirements when the engine is warming up from a cold start. For this situation, the controller has a ‘Cold Engine Fan Limit’ option available to the user which if enabled, will temporarily stop the fans rotation to prevent excessive cooling. The ‘Charge Air’ temperature can easily exceed its desired setpoint value while the Engine Coolant temperature is still too cold to let the standard mechanical thermostat open open. Normal operation would allow the ‘Charge Air’ temperature to capture the fan control, cooling any other above ambient liquids in the radiator. This would typically cause a sudden introduction of cold water when the engine does eventually warm up enough to cause the thermostat to open, resulting in the chance of engine block damage with thermal shock. ‘Charge ‘Ch g Ai Air’’ controlled t ll d ffan speed d can also l slow l d down engine gi warm-up time ti generating g ti g unnecessary pollution, ll ti inefficient running and excess fuel usage. On a cold start, reversing the fan during a ‘purge cycle’ will have a similar effect as most radiators will then be cooled by the air sucked from around the cold engine. The ‘Cold Engine Fan Limit’ feature avoids these problems by not allow the Charge Air OR Reversing inputs to take control of the Fan speed while the Engine Coolant temperature is less than the ‘Engine Warm Temp’ setpoint. The Engine Coolant sensor MUST be connected to Thermistor 1 input and set to type Thermistor. The ‘Charge Air’ sensor MUST be connected to Thermistor 2 input and may be set to type Thermistor or Switch. Fan control byy the thermistor 1 and 3 inputs p is not limited byy the ‘Engine g Warm Temp’ p setpoint. p While the unit is waiting for thermistor 1 to reach engine warm temperature, clearing the ‘Cold Engine Fan Limit’ will not exit the waiting mode. Important Notes: 1 ‘Charge 1. ‘Ch Ai Air’’ ttemperature t reaching hi th the user entered t d ‘O ‘Overtemp’ t ’ setpoint’ t i t’ will ill override id th the ‘C ‘Cold ld E Engine i Fan Limit’ and go to full fan forward rotation while the condition exists, to ensure that damage does not occur and that the Overtemp condition is reduced. 2. The ‘Charge Air’ limiting feature only functions when power is initially applied to the controller. 3. The ‘Warm engine temp’ setting MUST NOT exceed the ‘Coolant’ temperature setpoint. 9 Hydraulic Fan System Controller : HFS - 2 PI ( Proportional/Integral) Logic: The controller uses "PI" to regulate the temperatures to be no more than the Setpoints entered by the user. The P and I terms act on temperature error, with the P term used to instantaneously respond to temperature errors and should be adjusted to respond quickly to large temperature changes, but have little impact otherwise. The I term is used to track the average fan current required to keep the hottest temperature measured closest to its setpoint and should be set-up for slow and smooth response while giving accurate control round the setpoint. setpoint General operation default values for the P & I terms are embedded in the software but may be altered by users with the proper password level of authorization to fine tune a system. Temperature error is the difference between the actual measured temperature and the ‘temperature setpoint’, scaled by the difference between the ‘temperature setpoint’ and the ‘'Overtemp' alarm setpoint. The scaling is required to allow comparison of all the thermistor inputs on an equal basis. The active thermistor input with the largest scaled error above its setpoint will be used by the PI process. If all temperatures are below their user setpoints, the thermistor closest to it’s set point will be used to give control. In a properly tuned system, this process will result in the fan turning just fast enough to keep one temperature regulated to its setpoint and all other temperatures less than their Setpoints. If a thermistor input is shorted or open, the unit will ramp to full fan speed. This error behavior will continue until power is turned off if the user programmable ‘Retry All Faults’ is NOT selected, otherwise, it will resume normal operation when the fault is cleared. A thermistor reaching ‘Overtemp’ is an error that results in ramping to full fan speed. The ‘Overtemp’ error condition is automatically cleared if the thermistor drops below ‘Overtemp’ Overtemp , ramping to the PWM% value demanded by the PI loop. Password Protection: Password protection has been provided to ensure that damage cannot be caused once commissioning is completed There are three levels of security completed. security, all of which may only be accessed via the Opto 2000 and PC software and with the proper password level of authorization: Level 1:- ( NO Password ) Monitor controller operation only, no change in parameters allowed. Level 2:- ( OEM Password ) Authorized user has access to the functions that are needed for programming and set-up. Level 3:- ( Factory Password ) HCT Engineering level which allows access to ALL base controller settings and some RESET functions. Contact HCT on the e-mail address ( [email protected] ) for password . 10 Hydraulic Fan System Controller : HFS - 2 Fan ‘Noise Test’ Feature: The controller allows the user to set a pre-determined value of output current to the proportional valve that will equate to the required 70% forward fan speed required for the noise inspection. Once set to the desired level, this value is saved to the controller then allows the user to quickly demonstrate the noise level of a forward driven fan by following the sequence below:1) Turn controller power supply OFF. 2) Depress and hold the ‘Manual purge’ sequence button. 3) Apply power to the controller. 4) Continue to hold the ‘manual purge’ button down for approx. 5 seconds after power application then release to enter the ‘ Test mode ‘. 5) This ‘ Test mode ‘ will drive the fan in the forward direction for 3 minutes ( this time is fixed ). 6) When the time period has expired, the fan will return to normal system operation and cannot be put back into test mode unless points 1) thro 4) are re-applied. Important Notes:• This is an OPEN LOOP test feature which even after accurate factory setting, can be marginally effected by external conditions such as ambient and oil temperature, oil viscosity and system condition. • The sequence can be stopped / reset at any time during the 3 minute test period by removing the power supply. • The ‘Test mode’ period is pre-set to 3 minutes by the manufacturer and is not changeable by the user. • The set-up software allows the user to pre-set the fan forward speed that is used during this ‘ Test mode ‘. Power Supply and Coil Voltage: For most accurate smooth control with best resolution, protection and product reliability, the following combinations of power supply and valve coil voltage should be adhered to:Proportional coils ( fan speed control…. control NO PURGE OPTION FITTED ):8 – 14VDC:- Use 12V valve coil. 20 – 36VDC:- Use 24V valve coil. Directional coil ( Fan direction control.. NEEDED FOR PURGE OPTION ) :8 – 14VDC:- Use 12V valve coil. coil 20 – 36VDC:- Use 24V valve coil. 11 Hydraulic Fan System Controller : HFS - 2 Proportional Output: A variable current output is used for driving a proportional valve to control the fan speed. The value of the valve drive current is derived from a closed loop calculation relative to the temperature set-points that the user has entered in the set-up. BOTH wires from the valve coil must be connected to the controller where indicated by ‘+Prop Vlv O/P’ and ‘-Prop Vlv O/P’. At NO time should any coil wires be connected to 0V or application chassis e.t.c. as this will effect the operation of the controller and could have damaging effects. The output is internally fully protected against shorted or mis-wired coils with errors being both indicated locally on the associated LED and annunciated on the controller software if the program is running on a PC connected to the unit. Shorted coils or connection wires are detected only when the controller tries to drive the coil and is indicated with a RED FLASHING output LED. Open circuit coils or connection wires are detected only when the controller tries to drive the coil and is indicated with a GREEN FLASHING output LED. In either of the above cases, the ‘Alarm output’ comes ‘ON Steady’ to indicate an error and if connected, the PC program will show annunciators. The proportional valve coil selected must be capable of withstanding the power supply's maximum voltage or the user must set the maximum output current ( I Max ) to a safe value. User adjustable minimum current ( I Min ) and selectable PWM frequency ( 31 to 250 Hz ) allows tuning for smoothly starting the fan from a stop. The proportional output is rated for a 3.3A coil current maximum at the connected supply voltage. voltage The software allows user selection of driving normally open and normally closed proportional valves, this sets the system default fan speed in the event of an electrical power loss to the controller module. The proportional output is turned off if the units internal temperature sensor temperature exceeds 80 C. 12 Hydraulic Fan System Controller : HFS - 2 Fan ‘MAX speed’ setting: This is called ‘ Max Vlv Current %’ in the software and allows current to be adjusted from 0 – 100 % PWM output. If Max Valve Current is set to zero (0) all other settings will also go to zero. Fan ‘MIN speed ‘setting: This is called ‘ Min Vlv Current %’ in the software and allows current to be adjusted from 0 – 100 % PWM output set by ‘Max Vlv Current’ above. Ramp Settings: The user programmable ramp Up and Down times are applied to limit the controllers rate of change in output current to a value that prevents damaging the hydraulic system components and the fan blades. The ramp rate is set in seconds (s) for a full scale current output change in the range of 1 to 10 seconds. This ramp time should be set low enough not to interfere with the temperature control loop response but high enough to give smooth system operation. Dither Frequency Settings: The set-up software allows the dither frequency ( PWM frequency ) to be set from ~30Hz to ~250Hz to cater for the known range of proportional valves that could be used for this application. 13 Hydraulic Fan System Controller : HFS - 2 Fan Reverse Output: This feature is designed to ‘de-clog’ the fan protection guard and cooling elements and not as a permanent running option. The output drive to the coil is rated to 3.3Amps maximum ( at controller supply voltage ) and is either ON or OFF with no proportionality or ramp functions associated. The ‘Purge’ sequence will cancel if at any time, an overtemp alarm is detected. The two individual ‘Purge’ methods and the possible adjustments are noted below. Reverse Sequence: The ‘Reverse’ sequence is specific to avoid damage to the fan blades and the motor/hydraulic system and is a follows ( see page 30 of this manual for more details ):1. Reverse command detected ( manual or Auto reverse signal ) . 2. Fan proportional control valve ramped DOWN to give zero fan speed at ramp rate set in software 3. Fan stopped ‘Dwell’ time starts if ( seconds ) value set in software. 4. Reverse valve O/P switched ON ( change hydraulic state ) 5. Proportional valve ramped UP to reverse current limit set in software 6. Reverse command released ( manual or Auto reverse signal ). 7. Fan proportional control valve ramped DOWN to give zero fan speed at ramp rate set in software 8. / switched ( change g hydraulic y state to original g ) Reverse valve O/P 9. Proportional valve ramped UP to required Forward speed. Manual Reverse Initiation: For this feature to be activated, the operator must initiate the sequence by sending a momentary or pulsed voltage signal ( vehicle supply level ) to the input marked ‘REVERSE I/P +’ on the controller. Upon receiving this signal, the controller will follow the purge sequence to ensure correct and safe operation. Re-initiation of the manual ‘Purge’ signal during a ‘Purge’ sequence will be ignored by the controller. Fan Reverse Notes: The software controls the purge feature such that if the momentary manual input is continuously activated ( I.e. short circuited ), the sequence will complete once, ensure the fan is re-activated in the forward direction and wait until the input is cleared and then re re-initiated initiated before another purge sequence is allowed. allowed Auto Fan Reverse: This automated feature can be used to ensure free air flow through the radiator on a regular basis without operator intervention. Adjustments are available in the set-up software for:• Auto Purge feature ON/OFF select • Auto Repetition rate ( set in minutes up to a maximum of 180 ) • Time to run in reverse ( Purge time ) direction set in seconds ( 60 max ). • Speed of fan in reverse ( as a % of fan maximum forward speed ) The manual ‘Purge’ feature can be actioned between automated operations as required. 14 Hydraulic Fan System Controller : HFS - 2 Diagnostic Indicators: The unit is fitted with LED indicators to show real time diagnostic information and indicate by error codes in a visual manner the current operational status and if a fault develops with the system, where the fault may be originating from. Power ON / Opto 2000 transmitter: The red LED indicates power supply status with the LED ‘OFF’ for less than 8 volts and flashes ‘ON/OFF’ for more than 40 volts volts. This LED also acts as the communications transmitter when connected to the Opto 2000 unit unit. Opto 2000 Receiver: The clear LED is used only for ‘Infra-Red’ communications when connected to the Opto 2000 unit and never shows any visible light. Proportional Valve Output: The proportional coil PWM% LED is fully RED for 0% PWM and fully GREEN for 100% PWM, with shades of red, orange, yellow and green indicating intermediate values. Manual Reverse Trigger: The RED LED for the reversing coil trigger input comes ON only when the input is connected to the +Supply voltage indicating that the manual reverse sequence has been initiated. Once this sequence has been started, and in the duration of the p purge g cycle, y , new or multiple p manual trigger gg inputs p will be ignored g as will anyy automatic p purge g sequence signals. Reverse Valve Output: The RED LED for the reversing coil output comes on with the output. The LED blinks on for about 0.1 seconds and then off for about 0.1 seconds to indicate shorts and blinks on for about 0.5 seconds and then off for about 0.5 seconds to indicate opens. In either cases, the alarm output comes on ‘Steady’ y to indicate an error. Power ON / Opto 2000 transmitter Opto 2000 receiver Proportional Valve output ‘ON’. Manual trigger Reverse Valve sequence Activated. Thermistor input status See page 16 for details Reverse Valve ( Purge ) Output ‘ON’. Two part, polarised heavy duty connectors 15 Hydraulic Fan System Controller : HFS - 2 Thermistor Status : The RED LED for the thermistor that is controlling the fan comes on steadily while the other thermistor LEDs are off, if no more than one thermistor is above setpoint. If multiple thermistors are above setpoint, the thermistor that is controlling the PI process has a blinking LED and the others above setpoint are on steady. Error Indicator: The RED error led that flashes an ‘Error Error code’ code when fault conditions that have no other visual indicator have been detected. The LED blinks error codes if faults have been detected with the thermistor inputs, module temperature, module memory and alarm output. The blink code will occur at a rate of 0.5 seconds on and 0.5 seconds off with a two second pause before repeating. Only the highest priority blink code will be displayed. See table below for blink codes, with the lower number of blinks having higher priority. A controller unit temperature greater than 80C will be indicated by the error LED ‘ON’ until retried if "retry fault" is selected, or until power is cycled OFF then back ON. The unit calculates the checksum of the internal FLASH program and the user settings data file at power up. If the checksum is incorrect, the unit is corrupt and will turn OFF all outputs (except for alarm) and flash ALL LEDs except for the Power LED which is required for OptoLink communication and the Reverse Input LED that is driven directly by the Reverse Input. This condition is cleared by re-loading the FLASH program and/or the stored user characteristic data file. This above situation should never occur unless power is lost during file storage or up or download. If memory checksum failure occurs without an attempt to update FLASH or the user data file file, the corrupted unit should be returned without correcting the problem to HCT for failure analysis. The other fault conditions stop flashing when the triggering error is cleared or if unit power is cycled depending on the ‘Retry Fault’ user setting. Error Indicator ‘Blink’ Code: No. of blinks Fault / Error 1 Memory checksum error 2 Unit temperature p g greater than ( > ) 75C 3 Selected thermistor input shorted 4 Selected thermistor input open 5 Alarm output shorted 6 Over temp reached on one or more thermistor inputs. 16 Hydraulic Fan System Controller : HFS - 2 Alarm Output: This low side on / off output is able to output 3.3A current maximum, and is capable of driving inductive or resistive loads and is Protected against shorted and misfired loads with shorted load detection only able to be detected when driven. The output has two modes of operation, ‘Steady ON ‘ and ‘Pulsing ON/OFF’. The ‘Steady ON’ mode is linked to NON critical errors or those that would allow the unit to keep functioning. This type of error can be dealt with in due time. The ‘Pulsed ON/OFF’ state is intended to show that a critical error has been detected and that the controller/system MUST be stopped and examined immediately or damage may result. Data Logging Option: The facility exists to allow the user to ‘LOG’ data of the thermistors and several other controller functions for later or fault / trend examination. The files can be individually named to suit the application and is suffixed with a *.csv .csv extension for direct and easy reading into Microsoft® Excel® for graphical plotting and mathematical calculations as required. Internal Data Logging: The unit records the controller serial number, date first setup (born date) with a PC, highest supply voltage, the highest temperature of each thermistor input (other than during calibration) and the highest module temperature. The user can not reset these values without a password. password Shorted or open thermistor faults will not be recorded as a high temperature. Connectors – HFS-2 and HFS-2Q: The connectors used on the HFS-2 controller are Weidmuller two part, polarised, heavy duty screw variety to suit the intended ‘in-cab’ application environment while still allowing easy cable access, installation, pre-harness assembly and normal maintenance. maintenance The controller comes complete with all the connectors, male ( on the unit ) & female user wire connections, necessary for immediate installation. Connector:- Weidmuller style SLA and BLS. The HFS-2Q option offers the user the choice of Weatherpack sealed connectors, with a 6 way for thermistor inputs and 2 x 4 way for all other connections, allowing the controller module to be mounted in an external environment. The user can also specify any other connector required to match the intended application arena, please contact the HCT factory for further details. Startup Delay Feature: This is a timed function and is intended to allow the vehicle to be started and running before applying the extra the load of the hydraulic fan and associated hydraulic pump demand. demand The delay time can be adjusted in the set-up software and is calibrated in seconds from zero (0) to a maximum of 60S. This feature is initiated at every power ON/OFF cycle. 17 Hydraulic Fan System Controller : HFS - 2 Retry ALL Faults: The user setting “retry all faults” determines if the unit will retry faults that are detected with the controller or peripheral devices after 4 seconds or if NOT selected, the unit will stop operation until the power supply is turned OFF and back ON. If after a power reset, the fault is cleared, the unit will return to normal operation. If the fault persists, the controller will once again stop and repeat the procedure above. PC Hardware H d R Requirements i t • Windows® NT, 2000 , XP and Vista operating system. • 2mB free hard disk. • 68mB memory( min ) • Unallocated DB9 serial communication port OR • Unallocated U ll t d USB portt with ith user supplied li d USB to t DB 9 hub, h b powered d and d with ith USB d driver i software ft iinstalled t ll d correctly. tl Opto 2000 Communications: This is the method by which the fan controller is set-up and monitored and is explained more fully on page 26 of this manual. The initial Opto 2000 unit must be ordered separately to the main controller but this is a universal communications adapter which will be used with other upcoming HCT controllers and products. products Set-Up Software: High Country Tek Inc. has realized that digital electronics comes with the need for the user to communicate with the controller and with this comes a new set of practical problems associated with having to learn and become proficient with the set-up set up software and hardware connections. The software for this product is available from HCT and loads itself into a subdirectory ( the user is urged to allow the default directory paths ). This new generation of controller setup programs is specifically designed to be easy-to-use with a non threatening approach and with only the necessary items displayed ( determined by password levels ) to give a non-cluttered display that is clear and understandable to both the professional and casual user. The controller-to-PC communications is taken care of by the Opto 2000 unit which is plug and play in that all the user needs to do is physically connect the unit and run the provided software for the full automatic setup. The Opto 2000 should be connected to the host PC first and the HFS software started. The PC will immediately check the available ports, display a list ( shown right ) of available serial ports, find the Opto 2000 and connect. If the Opto 2000 is connected to an HFS that has power applied, the program will take a few seconds to check module validity and then display the settings from that module. At this point, the user may enter a password if changes to settings are required. 18 Hydraulic Fan System Controller : HFS - 2 Software Set-Up Guide ( Menu Bar ): The ‘FILE’ tab brings the ‘SAVE’ and ‘RESTORE’ options to the user. Temporary Memory -> Permanent Memory:- transfers all data from PC to the connected module for onward unattended operation at the current profile settings ONLY. NO backup copy is made ! Temporary Memory -> Permanent Memory & File:- transfers all data from PC to the connected module for onward unattended operation at the current profile settings ONLY. Opens window to allow user to select stored file name and location for backup copy of profile. Permanent Memory -> Temporary Memory:- transfers all data from the connected module to the PC for editing the current profile being used. File -> Permanent and Temporary Memory:- transfers all data from a hard copy PC file to the connected module and onto the PC for editing. Clicking the ‘Dashboard’ tab brings up the ‘real-time’ controller information page which allows the user to observe the status, alarms and access the diagnostic features. • NO adjustments can be done from this page. Depending on the password level, Clicking the Unit Settings tab brings up the available user adjustable windows for setting the controller profile. profile ( shown here at ‘Factory’ level with ALL options displayed ). 19 Hydraulic Fan System Controller : HFS - 2 Software Set-Up Guide ( Menu Bar ): At ‘OEM’ and ‘Factory’ password levels only, Clicking the Trouble Codes tab allows the user to observe a log of any OPEN or SHORT circuit error codes that have been triggered and stored. The currently displayed event log can be reset from both of these levels. Event times and number of occurrences are NOT recorded, rather at e tthat at tthe ee error o occu occurred ed at least east o once ce from o tthe e last ast log og reset. At ‘OEM’ password level only only, Clicking the Permanent Log tab allows the user to observe list of ‘Stored’ data that indicate the maximum levels that the controller has ever seen from initiation:1. The ‘Unit Serial Number’ is unique to every controller. 2. The ‘Motor Serial Number’ is entered at commissioning if required. 3 3. ‘Date Date First Set Up with PC PC’ is the ‘Born Born Date of the controller for warranty uses. 4. Thermistor 1 – 3 Highest temperatures ever seen. 5. ‘Unit Highest Temp’ is the actual controllers internal temperature max. reading. 6. ‘Power Supply Highest Voltage’ is the maximum supply applied to the controller. A • At ‘OEM’ password level only, items 2,3 can be observed and reset. • At ‘Factory’ password level only, items 2,3 and 4 can be observed and reset. Clicking this button starts the data logging process. ALL of the parameters available in the item A drop down menu as well as other profile settings are logged for a period of 255 samples . After the logging period, a popup window asks for file name and storage location. This file Thi fil is i saved d with ith a **.csv extension t i which hi h allows ll direct di t import, i t reading di and d graphing hi in i Microsoft Mi ft Excel. 20 Hydraulic Fan System Controller : HFS - 2 Software Set-Up Guide ( Menu Bar ): • At any password level, Clicking the Help tab allows the user to see contact information, web and e-mail addresses as well as software and hardware revisions for the actual product currently in use use. • This information should be available if contacting HCT for advice or requesting product support. • When ‘Help’ is selected from the dropdown menu, the user can click the ;View Help File’ button to see the text version of the manual or other file. This can be very useful for other languages other than English. NOTE: At any password level, Clicking the “Quit” tab or ‘EXIT’ button turns exits the program in the correct manner 21 Hydraulic Fan System Controller : HFS - 2 Software Setup Guide – Dashboard level: 1 13 2 9 3 6 5 11 10 12 4 8 1 2 7 At the observer level, Dashboard, ‘Help’ and ‘Quit’ is the only options available on the menu bar bar. The window stays as above while there are no errors or alarms reported by the system and/or controller. 10 Analog needle display and digital readout of ‘real-time’ output current to proportional valve drive. 11 Analog bar graph and digital readout of ‘real-time’ output current as a % of the maximum set. 12 Status of the reverse ( Purge ) cycle ( auto or manual ) if reverse is enabled and/or triggered. 13 Clicking the HCT logo, prompts the user for the password level required:- Clicking g this button starts the data logging gg g p process. ALL of the parameters available in the item 5 drop down menu as well as other profile settings are logged for a period of 256 samples . After the logging period, a popup window asks for file name and storage location. This file is saved with a *.csv extension which allows direct import, reading and graphing in Microsoft Excel. 4 General display area for controller information and input / output status. Alarm and Status text window. Error messages are in RED text. 3 9 Window where ‘Real-time’ graphing of selected parameter in 5 is displayed displayed. 13 4 Real time graphing window 5 Drop down list of available parameters for display. 6 Digital representation of the parameter being displayed in 7 Selects Slow, Medium or Fast graph time base setting. 8 Selects Graphic window scaling between FULL scale or AUTO. Auto gives better resolution for lower values. 4 • When Wh th the HCT logo l is i clicked, li k d this thi window i d will open and reset the access level to NONE. • You must enter a password to enter a new level. 22 Hydraulic Fan System Controller : HFS - 2 Software Setup Guide – ( OEM & Factory Password level ): 1 2 3 6 5 9 10 4 8 7 The major differences between the OEM level and the Factory level passwords is the ability at the Factory level to ‘ RESET’ data values in the ‘Permanent Log’ that have been stored during the controllers operation. Both levels allow the user full access to all controller parameters so password confidentiality should be of a high priority. 1 At OEM and d Factory F t password d levels, l l the th full f ll menu b bar options are displayed and available. 5 D Drop d down lilistt off available il bl parameters t ffor di display. l 2 Alarm and Status text window. 6 Digital representation of the parameter being displayed in The window stays as above while there are no errors or alarms reported by the system and/or controller. 7 Selects Slow, Medium or Fast graph time base setting. Clicking this button starts the data logging process. 8 ALL of the parameters available in the item 5 drop down menu as well as other profile settings are logged for a period of 256 samples . After the logging period, a popup window asks for file name and storage location. Selects Graphic window scaling between FULL scale or AUTO. Auto gives better resolution for lower values. 9 General parameter set-up area for controller. See following section in this manual for further details. 10 Thermistor Enable and set-up controls. See following section in this manual for further information. 4 Error messages are in RED text. 3 This file is saved with a *.csv extension which allows direct import, reading and graphing in Microsoft Excel. 4 Window where ‘Real-time’ graphing of selected parameter in 5 is displayed. 23 Hydraulic Fan System Controller : HFS - 2 Software Setup Guide: 1 2 3 4 Click the ‘down arrow ‘ and select from the menu for ‘Proportional or ON/OFF’ type output current. In ON/OFF mode, no Min, Max, Test or Rev Vlv current settings are available and the output will be dependent on the supply voltage to the controller. 16 In ON/OFF mode the ramps are left active to aide the use of a ‘softshift’ valve if used. 1 Click the down arrow and select from the drop down menu, the dith ffrequency b dither between t 31 31.5Hz 5H and d 250H 250Hz th thatt iis nearestt tto the recommended value for the proportional valve product being driven. 3 17 2 18 19 4 20 23 Use the up/down arrows on each box or directly enter a value ( in seconds ) in the range 0 – 60S for the ramp UP and DOWN. 5 7 6 8 22 14 5 6 21 Clicking this button will disable the reversing ( purge ) feature and remove from the display items 6 7 8 3 4 7 12 13 Sets the time ( 1 – 60 seconds ) that the fan will spend in the reverse ( Purge ) direction. Sets the time ( 1 – 180 Minutes) between fan reverse ( Purge ) cycles when Auto-Purge is enabled. 9 Clicking this button Enables the ‘cold engine fan limit’ feature and will prevent the fan from operation until the temperature seen in 10 is reached. If this feature is Disabled, item 10 11 16 Click this button to allow inverted current output to control reverse acting proportional valves. 17 Set the Maximum valve current here from 0 – 100%. Maximum current ( 100% ) depends on coil Ohmic value and supply voltage and will determine the fans maximum speed. is removed from the display. If Thermistor 1 or 2 are disabled, item display. p y 9 is removed from the Both Thermistors 1 & 2 must be enabled for this feature to work with Thermistor 1 being allocated for the warm engine sensor and Thermistor 2 being allocated to the CHARGE AIR SENSOR. 11 Sets the units of temperature displayed throughout the software from Degrees Centigrade ( °C ) to Degrees Farenhieght ( ° F ). 12 Sets the overall ‘Integral constant of the controller. 13 This feature is intended to allow vehicle starting with minimum loading and holds OFF controller action until the time entered her in seconds ( 0 – 60S ) expires. Click this button to enable ‘retry all faults’ which will allow the controller to automatically try an error reset every 4 seconds to see if the fault has cleared. If this feature is disabled, any error will trigger the controller to shutdown and stop functioning until a ‘Power On Reset’ is applied. 15 10 need to be set. 8 14 9 Clicking this button will enable or disable the ‘Auto-purge’ feature but still allow the manual ‘Purge’ feature to operate. In ‘Manual Purge’, items 7 15 Click this button to enable or disable the entire controller. This button on a new controller is defaulted to disabled. The first time that a controller is enabled, the date from the connected PC is ‘Trapped’ and taken as activation date information. This setting must be entered first and the software ensures that no other settings can be greater than this. 18 Set the Minimum valve current here from 0 – 100% of the maximum current in. This current will determine the 17 fans starting speed. Software ensures that this setting cannot be greater than the maximum setting. 19 Set the Test valve current here from 0 – 100% of the maximum current in. 17 This setting determines the fan speed for the noise test mode. Software ensures that this setting cannot be greater than the maximum setting. 20 Set the Reverse valve current here from 0 – 100% of the maximum current in. 17 This setting determines the fan speed for the Purge mode. Software ensures that this setting cannot be greater than the maximum i setting. tti 21 See the ‘Thermistor Set-up ‘, page 23 in this manual. 22 This resets the ‘Auto-Purge’ timer at any time. 23 This sets the ‘Dwell’ time during the Purge sequence, see page 30 for more details. 24 Hydraulic Fan System Controller : HFS - 2 Thermistor Selection: 2 3 4 2a 10 11 12 13 1 The HFS software includes several pre-characterized thermistor calibration profiles. These are accessed by pressing <Unit Settings>, <Setup> (for the thermistor to be calibrated), <Select Profile>. This allows selecting one of these thermistors from a drop down list. This procedure is carried out for each channel which will allow different sensors to be used for different liquid / medium measurement. 1 The window showing Thermistor settings is only available with OEM and Factory password levels and when the menu bar ‘Unit Settings’ tab is clicked. The figure to the right shows the three thermistor inputs with Thermistor 1, enabled as a thermistor and d with ith the th ‘Setup’ ‘S t ’ b button tt d depressed. d Clicking on the radio button marked ‘Setup’ opens a box called ‘Thermistor Setup’ shown to the right. Thermistor 2 is shown enabled as a thermistor and with the ‘setup’ button as normal. 3 Clicking the ‘Save Profile’ button, saves the thermistor points to a file called [Name].dtp in the same directory and will then appear in the [Select profile] list. 4 This window displays the current profile selected for the relevant channel. To change the profile, follow step 2 and press accept. 10 The value in this window is the ‘Set point’ that the controller will attempt to maintain be altering fan speed. This value must be between –40 or +300 Degrees F. 11 Thermistor 3 is shown NOT enabled. In this state, the options associated with the thermistor are removed from the screen for clarity. 2 Clicking this arrow will roll down a menu list [ Select Profile ] ( see 2a above ) of transducer profiles available. Default profiles are supplied and all other ‘user created’ files will be shown if stored in the default file locations. The value in this window is the ‘Overtemp’ alarm threshold that will cause the alarm output to activate if reached. This value must be greater ( > ) than the ‘Set point’ value. If the th difference diff b between t S Sett point i t and dO Overtemp t is i tto small, the controller may keep going into alarm condition as the actual temperature is controlled around optimum. 12 Push this button to accept displayed data and return to the main program. 13 Push this button to disregard all displayed data and return to the main program. NOTE:The set-up software has embedded default settings for Borg Warner, Delphi and Ford AIT sensors available. These files are write protected to prevent accidental editing and should be left in this state for ‘Reset to Datum Operation’ purposes. 25 Hydraulic Fan System Controller : HFS - 2 Opto 2000 Interface Information HCT’s Opto 2000 ( P/No. 999-10064 ) is required to interface between the fan controllers infrared communications LED port and the PC / laptop RS-232 port. This optically coupled interface is provided as an external item which must be ordered separately from the controller unit and allows setup, p, monitoring g and limited data logging gg g from the fan controller unit on the bench, or in the system, via a laptop PC running standard Windows® software. The unit is fully compatible with Windows® ME, 2000 and NT versions ( Vista compatibility to be confirmed – please contact HCT customer service for information. If the user has onlyy USB p port styles y available on the host PC / Laptop, p p, the USB to DB 9 hub must be supplied pp byy the user, with the correct software installed onto the host PC / Laptop. This style of ‘non contacting, non electrical communications port’ has been chosen and developed because it is extremely rugged in physical nature, the method is not prone to connector breakage or ‘clogging’ with foreign matter from the working environment and is free from failure caused by electrolysis or common short circuits as seen with other communications alternatives used by others. The optical communications also allows very high speed data transfer between the host PC and the controller for reall time ti di diagnostics ti and d fast f t set-up t programming i and d allows ll allll the th available il bl units it inputs, i t outputs t t and d options ti t to be displayed from within the user software which is supplied with the controller unit. The Opto 2000 and controller requires that the correct interface software is loaded onto the host PC and run to establish communications with a compatible controller. The program will automatically poll ( check ) all of the com ports available ( In Windows ME, 2000 and NT versions, the software will establish and display all free communications ports but the user will have to manually select one of these ), detect and check the Opto p 2000 unit for operation, p , allocate the respective p port for p communications while at the same time setting the fastest reliable baud rate and default port settings. The Opto 2000 driver software monitors the battery voltage and indicates to the user on the PC / Laptop screen that there is a problem. If this warning is not seen or ignored, and If the Opto 2000 battery voltage is becoming low, the communications will be unstable with typically, the port being re-initialized on a regular basis. If this situation occurs, switch to the external power adapter provided or change the battery. The Opto 2000 unit comes complete with DB 9 Male / Female extension cable, standard 9V battery and external power supply l unitit ( 110VAC @ 60 Hz H only l ) The latest software updates and current GUI versions for the controller and can be requested if required by e-mail at:- [email protected] or from our website at www.highcountrytek.com 26 Hydraulic Fan System Controller : HFS - 2 Dimensional Information: HFS-2 A C L Label Inches Millimeters A 3.77 96.0 B 1.89 48.0 C Ø 0.186 5.0 THERM 3 D 3.82 97.0 THERM 1 E 3.10 78.8 HFS-2 F 0.46 12.0 G 3 25 3.25 82 6 82.6 H 1.6 41.5 I 0.64 16.5 J 0.26 6.5 NOT to t scale, l contact t t HCT customer service for exact dimensions B PW WR COM IN THERM 2 C 3 x #8 screw Prop Vlv PWM % Reverse O/P ON E D Error Reverse I/P ON FAN SYSTEM CONTROLLER S/No:- A00001 Reverse I/P + +V Power I/P +Prop Vlv O/P +Reverse Vlv O/P -Reverse Vlv O/P Alarm O/P -Prop Vlv O/P 0V Power I/P Thermistor 3 SIG Thermistor 3 GND Thermistor 2 SIG Thermistor 2 GND Thermistor 1 SIG Thermistor 1 GND MADE IN U.S.A. F G J Shown with the standard Weidmuller two part connectors. www.highcountrytek.com H I Mechanical Information: Housing Type:- HCT unique ‘encapsulated’ block. Housing Material: Material:- Polycarbonate Housing Color:- Black Surface Finish:- Semi-Gloss Housing Thickness:- ~16.5mm ( main module ) ~42mm incl. 2 way Connectors. Unit size:- See above size detail drawings. Unit Weight:- Approx.... 250 grams ( including Encapsulation material ) Wire entry:- Via heavy duty, polarized, two part ‘Deutsch’ connector. Encapsulation:- Flame Resistant, Black , Two Part Epoxy Resin. Mounting:- Via through holed ( 3 ) suitable for No. 10 ( 4mm ) screw . Temperature range:- - 40 to +75 degrees Centigrade ( operational ) 27 Hydraulic Fan System Controller : HFS - 2 Dimensional Information: HFS-2Q Label Inches Millimeters A 3.77 96.0 B 1.89 48.0 C Ø 0 186 0.186 5.0 D 3.82 97.0 E 3.10 78.8 THERM 1 F 0.46 12.0 HFS-2Q G 3.25 82.6 H 0 64 0.64 16 5 16.5 I 0.26 6.5 A E D THERM 2 PWR COM IN THERM 3 Reverse O/P ON Error Reverse I/P ON FAN SYSTEM CONTROLLER S/No:- A00001 MADE IN U.S.A. F C 3 x #8 screw Prop Vlv PWM % Thermistor 3 SIG Thermistor 3 GND Thermistor 2 SIG Thermistor 2 GND Thermistor 1 SIG Thermistor 1 GND NOT to scale, contact HCT customer service for exact dimensions Sh Shown with ith th the optional ti l ‘Q’ Weatherpack connectors. C L B Reverse I/P + +V Power I/P +Prop Vlv O/P +Reverse Vlv O/P -Reverse Vlv O/P Alarm O/P -Prop Vlv O/P 0V Power I/P www.highcountrytek.com G I Wires and connectors removed for clarity H 4-way 4 way tower #WPT #WPT-4 4 12015797 4 way shroud #WPS 4-way #WPS-4 4 12010974 Mechanical Information: Housing Type:- HCT unique ‘encapsulated’ block. Housing Material: Material:- Polycarbonate Housing Color:- Black Surface Finish:- Semi-Gloss Housing Thickness:- ~16.5mm ( main module ) ~25mm incl. wire radius to connectors. Unit size:- See above size detail drawings. Unit Weight:- Approx.... 250 grams ( including Encapsulation material ) Wire entry:- Via Weatherpack connectors – Tower and Shroud versions. Encapsulation:- Flame Resistant, Black , Two Part Epoxy Resin. Mounting:- Via through holed ( 3 ) suitable for No. 10 ( 4mm ) screw . Temperature range:- - 40 to +75 degrees Centigrade ( operational ) 28 Hydraulic Fan System Controller : HFS - 2 Electrical Connection Information: Alarm output shown driving a simple lamp to indicate fault / error condition has occurred. This same connection circuit can be used with a relay or solenoid ( Always use suitable’ Flyback’ or suppression diode here ) to facilitate system integration as required such that engine shutdown could be initiated if the fault continued un cleared. The maximum switching current of this output is 3.3amps at supply voltage. • Always observe safety when adjusting this controller – fan may start to rotate without warning. • Always fit power supply fuse ( as shown ) externally to controller. • Ensure two wires are used for every temperature sensor. • Use software to make any changes to system configuration and/or options. Fan Max Speed Manual Override: The system using the ‘Reverse acting’ proportional pressure relief valve ( as shown in this manual ) is designed to default to full fan speed in the event of a power supply, fuse or connection failure. The user may also initiate full fan speed regardless of the controller settings by simply turning the unit ‘ OFF ‘ via a simple switch. This option can be used on initial commissioning or during service to prove the hydraulic continuity circuit if required. Once the unit is switched back ‘ ON ‘ , the controller will re-initialize and the real time temperature measurements in each zone used once again to dictate the ideal fan speed. speed NOTE:- If the unit power supply is turned ‘ OFF ‘ to force fan full speed, the ‘Purge’ function, diagnostic indicators and alarm output will not operate until power is restored to the unit. 29 Hydraulic Fan System Controller : HFS - 2 Fan ‘Reverse’ profile ( reverse acting control valve ): Fan speed Profile. 4 10 7 9 3 13 8 6 2 1 5 12 11 14 Controller Output profile to inverting type pressure control valve. Reverse output to directional valve. 1 Normal ‘Forward’ running fan speed determined by controller. 2 3 4 5 6 7 8 Manual or automatic ‘Purge’ or reverse fan trigger detected here. Fan at maximum speed for Reverse time period set in software. This speed may be less than forward to protect fan. 9 Fan speed decays to zero at ‘Ramp Down’ rate set in software. ‘Purge’ timing cycle expired, ramp fan to zero at ‘Ramp Down’ rate set in software. 10 ‘Dwell’ Dwell timer started to allow fan inertia to fully dissipate and fan stop. 11 Reverse output turned OFF to de-energize directional valve. 12 Output signal to proportional valve started fixed mS after reverse valve signal to prevent hydraulic ‘lock’ 13 Fan rotation increased to ‘Forward’ running speed determined by user setting at Ramp Up Up’ rate set in software. ‘Ramp 14 Normal ‘Forward’ running fan speed determined by controller. ‘Dwell’ timer started to allow fan inertia to fully dissipate and fan stop. Reverse output turned ON to energize g directional valve. Output signal to proportional valve started fixed mS after reverse valve signal to prevent hydraulic ‘lock’ Fan rotation increased to ‘Reverse’ running speed determined by user setting at ‘Ramp Up’ rate set in software. 30 On On On On On Off Six Blinks Off Off Off Off Off No Change No Change Off Thermisto or Input Over Temp PWM Outtput Shorted PWM Outtput Open Reverse O Output Shorted Reverse Output Open Power Su upply < 8 Volts Power Su upply Between 8 And 40 Volts Power Su upply > 40 Volts Running In Reverse Off Several T Thermistor Inputs Ab bove Setpoint Off Off Off Off Off Off No Change N Off Off Only One e Thermistor Input Abo ove Setpoint Fan Min, All Thermisto ors Below Setpoint Fan Slow wing, All Thermisto ors Below Setpoint Off Five Blinks Alarm Ou utput Shorted On On Four Blinks or Input Open Thermisto No Change No Change No Change No Change No Change No Change No Change Off No Change No Change Flashing Green / Off Fla ashing Red / Off No Change No Change No Change No Change On No Change No Change Off Off Off No Change No Change No Change No Change No Change No Change No Change No Change Off No Change Off REVERSE Output No Change No Change d / Off With Error Red No Change Green / Off With G Error PW WM Output LED No Change No Change No Change No Change On No Change No Change Off Flashing Slowly Flashing Quickly No Change No Change No Change No Change No Change No Change Same As Error No Change Same As Error REVERSE Output LED Leds All Same As Error No Change All Same As Error Thermistor Selected Is On Closest To Setpoint Is On All Off No Change No Change Selected Is Flashing, No Chang ge Others Above Setpoints Are On No Chang ge No Chang ge No Chang ge ge No Chang g Blinking On No Change Set Power Supply Between 8 And 40 V Set Power Supply Between 8 And 40 V Off Off Power Off Till Fault Corrected No Change ge No Chang Power Off Till Fault Corrected Power Off Till Fault Corrected Power Off Till Fault Corrected Corrected Power Off Till Fault Corrected Power Off Till Fault Corrected No Change No Change No Change O'temp Same As Error No Change Open Same As Error Power Off Till Fault Corrected Power Off Till Unit Temperature < 70c Power Off Till Unit Temperature < 70c Reload Flash Or Data File Cleared By No Chang ge No Chang ge No Chang ge No Chang ge No Chang ge No Chang ge No Chang ge Shorted Same As Error No Chang ge No Chang ge ge No Chang Power LED Unit dia agnostics, Error Codes and Alarm Con nditions Regulating Regulating Slowing Minimum Purge No Change No Change Off No Change No Change Off Off Full Fan Regulating Full Fan Full Fan Off Same As S Error On Two Blinks Unit Temperature > Than 80C C Regulating Same As S Error Three Blinks Two Blinks Unit > Than 75C Off Proportional Valve Output Same As S Error Thermisto or Input Shorted One Blink Error LED Ala arm Output Memory C Checksum Failure Co ondition Hydraulic Fan System Controller : HFS - 2 31 Hydraulic Fan System Controller : HFS - 2 Controller Mounting: The electronic components used in this controller released by HCT, conform to the Commercial temperature range which is -40° to +75 ° Centigrade. This rating means that the components will work reliably and give a good life span if the operating temperature is kept within these ( absolute maximum ) limits. The controllers when in operation do generate and dissipate internal heat. The amount of heat generated is dependent on the amount of work that the controller is being asked to do as well as other factors such as supply voltage, type and voltage of coil being driven e.t.c. with the worst case combination being a 24VDC supply with a 12V coil. In order for the unit not to exceed the +75°C maximum operating temp and cause a ‘self-protection’ shut down situation, the user must mount the controller in a position that is ergonomically preferred especially for visual inspection and system maintenance and also provide for adequate ventilation to ensure that the unit is cooled to maintain operation. In addition to ventilation, the system designer must also look at the mounting arrangement for the cards / controllers and be aware that adequate space should be left around, around in-front in front and behind to allow the above ventilation to take effect. It should be noted that temperatures are ‘Additive’ which means that with a high ambient temperature, the units internal temperature rise need only be quite small to reach the maximum specified levels. If controllers are going to be used in High ambient temperature or unusual application areas, please contact the customer service personnel at HCT for advice on cooling and mounting. Important Notes:• Enclosures should have an ‘IN’ and an ‘OUT’ vent for correct cooling air circulation. • Mount the controller so the operator can see it if required to do so. • Use ‘fan-blown’ air wherever possible to increase air exchange rate. • DO NOT mount controllers in direct sunlight. • Mount M t controllers t ll with ith ‘‘air-gaps’ i g ’ tto allow ll correctt ventilation. til ti • Do not mount controllers in non-ventilated sealed box’s especially in high ambient areas. • DO NOT mount controllers ‘face-face’ or densely as this will cause over-heating problems. p g temp p figures g and work to them. • Read the literature and observe the max operating • Remember…High temp. ambient air used for ‘cooling’ is not a good solution !! 32 Hydraulic Fan System Controller : HFS - 2 FAQ’s: Set-up program does not reflect user changes made immediately:If the controller is in any mid sequence ( I.e. reverse timer was set to a long period and now a new shorter period is entered ), the controller will normally only reflect the new settings once the currently running sequence has ended. The only way to ‘reset’ this type of occurrence is to physically power the controller t ll down d and d then th back b k up. Once O Opto O t 2000 communications i ti h have b been re-established, t bli h d the th new settings will be valid and seen. The Opto 2000 keeps losing communication or keeps resetting:This is normally caused by a bad ‘mechanical’ connection between the Opto 2000 head not being attached to the controller securely or by the Opto 2000 battery level being to low or external power supply not being connected. To remedy remedy, Check that the communications head is attached firmly, that the two small holes are NOT filled with foreign matter and that the controller LED’s are not damaged or dirty. Replace the internal 9V battery or check the external power supply for connection and operation. The controller shows an error saying “unit not communicating”:This error is reported usually if the PC is connected or the set-up program is started after the controller is working. Cycle the controller power ON/OFF to reset the link or wait to see if the communications will synchronise after a few minutes. If the problem still persists, look at the Opto 2000 power supply and ensure this is correct. The controller does NOT recognise open circuits on the valve coils”:The controller senses open circuits by passing a very small current all the time through the connected coils to ensure connectivity and winding integrity. This ‘non reporting’ error is caused by the valve coil plug having a light bulb fitted that appears to the controller to be an electrical load. Remove the light bulb or use an LED variety that uses less current. 33 Hydraulic Fan System Controller : HFS - 2 Temperature Sensor Information: HFS - Thermistor Compatibility Chart Coolant/Oil Sensors Description 1 Delphi Packard Temp Sensor Connector, Female GT-150 (unshrouded) Terminal, Female 16AWG SXL Cable Seal, 16AWG SXL Wire, 16AWG SXL Part number Packard #15326386 Packard #15336024 Packard #15326267 Packard #12191229 2 Borg-Warner Temp Sensor Circular Push on Connector w/ 5" pigtails or Connector Assy TF Metri-Pak 280 series TPA (part of connector assy) Terminal, Female Sealed 16AWG SXL Cable Seal, 16AWG SXL Wire, 16AWG SXL Borg Warner #5028-01666-02 Kysor #1530-00027 Comments 3/8 18 NPTF thread ((-40C 3/8-18 40C to 130C) Preassembled connector Packard #15300027 Packard #15300014 Packard #12077411 Packard #12015359 Air Sensors Description 1 Delphi Packard Temp Sensor Connector, Female GT-150 (unshrouded) Terminal, Female 16AWG SXL Cable Seal, 16AWG SXL Wi Wire, 16AWG SXL 2 Ford IAT Temp Sensor Plug Assembly Receptacle Cable Seal, 18AWG SXL Wire, 18AWG SXL Part number Packard #12110446 Packard #15336024 Packard #15326267 Packard #12191229 Comments 1/4-18 NPTF (-40C to 130C) #F6SZ-12A697-AA or #F6SZ-12A697-AB Amp #184004-1 Amp #184030-1 Amp #184141-1 Also had 0A06A stamped on Part. Contact Ford dealer for part. Parts can be bought directly from Delphi by calling 1-800-packard ( 1-800-722-5273 ) Please e-mail [email protected] for additional information if required, stating your question clearly and giving a valid return e-mail address. 34 Hydraulic Fan System Controller : HFS - 2 Temperature Sensor Information - Cont: S t System Set-Up S t U Hints: Hi t Setting the P term to 64 and the I term to 0, calibrates the controllers output to start giving current ( at the I Min setting % ) at the ‘set point’ temperature and to be at 100% output current ( I max setting % ) at the ‘Overtemp’ temperature. This relationship is linear and ( depending on whether positive or negative logic is applied ) at 100% controller output, the fan will be going at the fastest speed possible. P = 64, 64 I = 0 Set point = 20°C Overtemp = 30°C Fan will go from zero to max over 10°C. P = 64, I = 0 Set point = 20°C Overtemp = 50°C Fan will go from zero to max over 30°C. Fan Full S Speed d Fan zero Speed 100% 5° 10° 15° 20° 25° 30° 35° 40° 45° 50° 55° 35 Hydraulic Fan System Controller : HFS - 2 High Country Tek, Inc has been working with the fluid power industry for many years, solving the tough problems and producing unique and mechanically robust products that continue to work reliably in the most extreme and hostile environments that we see hydraulics being applied in today. Our controllers are ALL designed, manufactured and tested in the U.S.A. and can be sent anywhere in the world. We currently supply to virtually all areas of the fluid power industry, increasing product integration and growing our customers business, by allowing them to approach new, profitable electro-hydraulic markets successfully. Please contact us to discuss your next project, product training or system application; we would be pleased to work with you and your team. Need More Information ? For the latest company and product information, visit us at www.highcountrytek.com or for customer service and application support, contact us through E-mail at [email protected] High Country Tek, Inc. 208 Gold Flat Court Nevada City, CA, 95959 Tel: (1) 530 265 3236 Fax:(1) 530 265 3275 High Country Tek, Inc. reserve the right to improve this product at any time and without notice. This manual may contain mistakes and printing errors. The information in this publication is regularly checked and corrections made in the next issue. Please check our website or contact our customer support for latest version. HCT accepts NO liability for technical mistakes or printing errors, or their consequences. HFS-021-00152 Rev C 36 Copyright © High Country Tek, Inc. - 2008