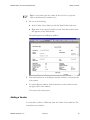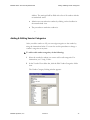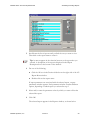
1
MultiSite Suite: Accounts Payable User’s Manual version 6 MultiSite Suite: Accounts Payable Module Copyright & Trademarks Copyright Notice and Trademarks © 2010 MultiSite Systems, All rights reserved. Microsoft, Windows, Excel, and Outlook are registered trademarks of Microsoft Corporation. All other product names and services used throughout this document are trademarks or registered trademarks of their respective companies. The product names and services that appear in this document are used in editorial fashion only and for the benefit of such companies. No such use or the use of any trade name is intended to convey endorsement or other affiliation with this document. MultiSite Systems, LLC version 6 i MultiSite Suite: Accounts Payable Module Table of Contents Table of Contents Overview of Accounts Payable _________________________________________________________ 1 Logging Into Accounts Payable _________________________________________________________ 2 Navigating in Accounts Payable ________________________________________________________ 3 Label Bar/Slider Bar Sections _______________________________________________________ 4 Toolbar Buttons __________________________________________________________________ 5 Menu Commands ________________________________________________________________ 6 Shortcut Menu ___________________________________________________________________ 7 Click-level Sorting ________________________________________________________________ 7 Status Bar ______________________________________________________________________ 8 Selecting Specific Records _________________________________________________________ 8 Navigating in Records _____________________________________________________________ 9 Navigation Workflow ______________________________________________________________ 9 Logging Out of Accounts Payable _______________________________________________________ 9 Viewing Vendors ___________________________________________________________________ 10 Searching by Name ______________________________________________________________ 11 Searching by Category ___________________________________________________________ 13 Searching by Site _______________________________________________________________ 16 Searching by Trade ______________________________________________________________ 17 Filtering Records for Customized Viewing ____________________________________________ 18 Shortcut Menu Commands ________________________________________________________ 19 Adding, Modifying, & Deleting Vendor Notes ______________________________________________ 20 Adding Vendor Notes ____________________________________________________________ 21 Modifying, Deactivating, or Deleting Vendor Notes ______________________________________ 22 Modifying Vendor Details _____________________________________________________________ 24 Printing Vendor Profiles ______________________________________________________________ 25 Adding a Vendor ___________________________________________________________________ 26 Authorizing a Vendor ________________________________________________________________ 30 Adding & Editing Vendor Categories ____________________________________________________ 31 Deactivating a Vendor _______________________________________________________________ 32 MultiSite Systems, LLC version 6 ii MultiSite Suite: Accounts Payable Module Table of Contents Moving a Vendor ___________________________________________________________________ 33 Deleting a Vendor __________________________________________________________________ 35 Viewing the AP History ______________________________________________________________ 36 Viewing the Pay History ______________________________________________________________ 37 Viewing Unpaid Invoices _____________________________________________________________ 39 Searching by User _______________________________________________________________ 39 Searching by Site _______________________________________________________________ 40 Searching by Property Manager ____________________________________________________ 41 Searching by Vendor _____________________________________________________________ 42 Searching by Due Date ___________________________________________________________ 44 Entering Invoices ___________________________________________________________________ 45 Modifying Invoices __________________________________________________________________ 49 AP Accrual Method _________________________________________________________________ 51 AP Invoice Budget Bar _______________________________________________________________ 52 The Budget Bar works like this: _____________________________________________________ 52 The Budget Bar displays: _________________________________________________________ 53 Authorizing Checks _________________________________________________________________ 54 Writing Checks_____________________________________________________________________ 55 Writing Batches of Checks ________________________________________________________ 56 Writing One Individual Check ______________________________________________________ 59 Voiding Checks ____________________________________________________________________ 60 Reprinting Checks __________________________________________________________________ 62 Generating & Printing Reports _________________________________________________________ 62 Generating Regular Reports (Reports Other Than Check Register)_________________________ 63 Generating the Check Register Report _______________________________________________ 65 Navigating in, Printing, Exporting, and E-mailing Reports _________________________________ 67 Setting User Preferences_____________________________________________________________ 69 Setting Reminders __________________________________________________________________ 73 Displaying the Windows Notepad & Calculator ____________________________________________ 75 Rebuilding Layout Files ______________________________________________________________ 75 MultiSite Systems, LLC version 6 iii MultiSite Suite: Accounts Payable Module Overview of Accounts Payable Overview of Accounts Payable The Accounts Payable (AP) module gives users a simple and efficient way to process and pay vendor invoices and to manage vendor information. You can also use the AP module to look up information quickly, such as a vendor’s phone number, and to display histories of invoices received and paid. The AP module exchanges information with the General Ledger module. However, invoices entered into AP are not recorded in GL until the corresponding checks are written unless your AP is setup to use AP Accrual. With the Accounts Payable module, users can do all of the following: View vendors by name, site, trade, and category. View open accounts payable by user, site, property manager, vendor, or due date. Display a history of invoices entered in the AP module or checks written to vendors in the Cash Management or AP module. Add vendors and modify vendor information. Enter and modify invoices. Write, reprint, and void checks. Authorize checks for invoices (authorized users, only) Generate reports. The Accounts Payable module has the following features: Microsoft Outlook® user interface design, for simplicity and consistency with other MultiSite modules. Compatibility with Microsoft Office 97®, 2000, and XP. Note: A mail merge feature that integrates AP with Microsoft Word® for creation of letters and mailing labels is currently under construction. Filters that provide custom views, so that users can see only the information they need to perform their own jobs. MultiSite Systems, LLC version 6 1 MultiSite Suite: Accounts Payable Module Logging Into Accounts Payable Invoice Entry window is designed for minimal mouse usage. Default descriptions and General Ledger codes, which help speed the invoice entry process. Checks can be written individually or in batches on a standard office laser printer, using inexpensive blank check stock. Full 1099 support. Supports both centralized and decentralized processing (data synchronization enables work to be performed at remote locations and then “synced” with the server at the central office). Users at remote sites and traveling property managers can access and update information. Unlimited histories of vendor invoices and checks are automatically maintained in the system. Unlimited journal items, such as notes, correspondence, phone calls, meetings, and so forth, can be added and updated for each user. Word files, Excel® files and image files, such as scanned contracts, photos, or correspondence can be attached to any journal item (note). Automatic posting to the General Ledger module (when checks are written for invoices). Fast, easy generation of reports that can be viewed, printed, exported to Excel, or sent as an e-mail attachment from one simple window. Security levels limit access to sensitive information, as needed. Logging Into Accounts Payable To log into the Accounts Payable module, do the following: MultiSite Systems, LLC 1 On your regular Windows® Desktop, double-click the Remote Desktop shortcut. 2 The system connects to a remote server via the Internet. Your Windows Desktop changes to the one associated with the MultiSite program. version 6 2 MultiSite Suite: Accounts Payable Module Navigating in Accounts Payable 3 The Windows login window appears. 4 If it is not already displayed, enter your user name in the User Name text box. 5 Keep the default Current Period (the current global period for accounts payable activity). Note: Only users with special administrative rights to the Accounts Payable module can change the date in the Current Period text box of this window. 6 Click OK. The default main screen for Accounts Payable appears, as shown in the next section, Navigating in Accounts Payable. Navigating in Accounts Payable The modules in MultiSite Suite are designed to look like Microsoft Outlook®, for simplicity and familiarity. When you first log into Accounts Payable, the following screen automatically appears: MultiSite Systems, LLC version 6 3 MultiSite Suite: Accounts Payable Module Search for Vendor button Navigating in Accounts Payable Clipboard button Note button buttons that open other MultiSite modules Exit button Online Help button label bar column headers slider bar status bar This default screen is already set up to search for and display a list of vendors. You would see the same screen if you clicked the List View folder under Vendor Views or clicked the Search for Vendor button on the toolbar (for more information, see Viewing Vendors). Label Bar/Slider Bar Sections AP is made up of 6 sections—one for each type of activity: Vendor Views for displaying lists of vendors according to various search criteria, displaying details about each vendor, printing vendor profiles, adding vendors, modifying vendor information, and viewing a history of invoices or checks for each vendor. Open AP Views for displaying lists of unpaid invoices, according to various search criteria. Invoices for entering new invoices, modifying existing invoices, and auto-authorizing checks for an invoice. MultiSite Systems, LLC version 6 4 MultiSite Suite: Accounts Payable Module Navigating in Accounts Payable Checks for writing, voiding, and reprinting checks. Letters is still under construction. When it is finished, it will generate letters to vendors directly from AP. Reports for generating, printing, exporting, and/or sending Accounts Payable reports. To navigate to one of these 6 areas, click on the corresponding label bar. The label bar slides to the top, revealing the slider bar area underneath. You click the different icons in the slider bars to display different sets of records, perform various activities, or generate different types of reports. Note: When you first click on a label bar, the other parts of the main screen remain in their previous view until you click an icon inside the newly-opened slider bar. Toolbar Buttons An explanation of each toolbar button is as follows: Exit closes the AP program and returns you to the remote server Desktop. You can also click the Microsoft x button at the top right corner of the screen or choose Exit from the File menu. Search for Vendor places your cursor in the text box above the vendor List View, so that you can search for a vendor by name. You can also search for a vendor by name by clicking the List View icon in the Vendor Views slider bar or by choosing Find Vendor from the Edit menu in the main screen menu bar. Clipboard copies the name and address of the currently selected vendor to the Windows Clipboard®, so that you can paste the information into another software program, such as Microsoft Word®. Note enables you to add a note (journal item) to a vendor’s record. You can also add a note by displaying a vendor’s record and then navigating to the blank line in the Vendor Notes section at the bottom of the view panel. MultiSite Systems, LLC version 6 5 MultiSite Suite: Accounts Payable Module Navigating in Accounts Payable Module buttons in the center of the toolbar open the other modules in the MultiSite Suite. Online Help opens the online help for the program. Menu Commands An explanation of each menu on the menu bar is as follows: File menu enables you to change the setup of your default printer options (Printer Setup). You can also use it to print the current screen that is displayed (Print Screen) or to exit the AP module (Exit). Edit menu enables you search for a vendor by vendor name (Find Vendor). For more information, see Viewing Vendors. View menu contains various filtering commands that enable you to filter records that you view in the system, thus shortening the amount of time that you spend waiting for the system to retrieve unneeded records. For a specific explanation of each filter command, see the Filtering Records for Customized Viewing subsection in the topic Viewing Vendors. Tools menu enables you to do the following: The Preferences command lets you set user preferences, such as the default current accounting period, the parameters for some of the record retrieval filters, the location of the printer to which you send checks, and so forth (see Setting User Preferences). The Move Vendor command enables you to move information from one vendor’s record to a duplicate record for that same vendor. This command is used in conjunction with the Delete Vendor record (explained below). The Delete Vendor command enables you to delete a vendor from the AP system. You would use this command to delete a duplicate record for a vendor after moving the vendor’s information from the duplicate record to the one that you’d like to keep in the system. Rebuild your system layout files when you are experiencing technical trouble (see Rebuilding Layout Files). Note: This is something that customer support may ask you to do if you are experiencing system difficulties; it is not advisable to choose this MultiSite Systems, LLC version 6 6 MultiSite Suite: Accounts Payable Module Navigating in Accounts Payable option on your own. The Show Reminders command lets you set and display reminders to notify you of specific tasks to be done (see Setting Reminders). The Notepad and Calculator commands display the Windows Notepad® and Calculator® (see Displaying the Windows Notepad & Calculator). Help menu displays the online Help and the version number of the AP module. Shortcut Menu A short-cut menu is available from the vendor list, as well as from any specific vendor’s detail record. You can right-click on a vendor’s record to display the menu and select various commands to perform specific tasks or view or print additional information. For more information, see the Shortcut Menu Commands section in the Viewing Vendors topic. Click-level Sorting AP supports click-level sorting. This means that if you click on any of the column headers in a grid of records, all the records will sort according to that column header. The records sort in ascending order. For example, if you click the City column header in the List View panel of vendors below, the records will sort according to City in alphabetical order. MultiSite Systems, LLC version 6 7 MultiSite Suite: Accounts Payable Module Navigating in Accounts Payable column headers Status Bar The status bar at the bottom of the AP screen always tells you where you are in the program. Status information often appears at the top of grids of records, as well. For example, in the picture above, the type of view is displayed in the status bar, as well above the record grid. Selecting Specific Records Many of the records in AP (as well as in other MultiSite modules) display records in a grid, either in the main screen panel or in a popup window. To put your focus on a specific record or row, click anywhere in the row. A small black triangle appears in the selection bar to the left of the record, indicating which record is selected, as shown below. MultiSite Systems, LLC version 6 8 MultiSite Suite: Accounts Payable Module Logging Out of Accounts Payable selection bar Navigating in Records You can move your focus from one text box or cell in a record to another by clicking with your mouse or pressing the Tab key on your keyboard. On some panels and windows, you can also press the Enter key on your keyboard. You can move from one row in a grid to another by clicking with your mouse or pressing the up or down arrow keys on your keyboard. You can also resize columns in grids by placing your cursor between two column headers and dragging your mouse pointer to the left or right. To save the new column size, so that the system displays it whenever you re-open the grid, click anywhere inside the grid after resizing it. Navigation Workflow Typically, after you log into Accounts Payable, you click the label bar of the section you want to use, first. Then you click the icon in the corresponding slider bar and continue working in the panels that appear in the main screen or in popup windows that appear. Specific instructions for each procedure are included in this manual. Logging Out of Accounts Payable To log out of AP, simply click the exit button on the main screen toolbar. You return to the remote server Desktop. To log out of the remote server, click the Start button on the Windows Taskbar and choose Log off [Your Username]. MultiSite Systems, LLC version 6 9 MultiSite Suite: Accounts Payable Module Viewing Vendors Viewing Vendors In AP, you can display vendor information quickly and easily from the Vendor Views slider bar. This slider bar contains icons that enable you to look up vendors by the following search criteria: Name Category Site Trade When you search by name, the system displays a list of vendors containing a brief overview of important information and payments made (List View). From this list, you can navigate easily to the detailed record of any vendor by double-clicking on it or by right-clicking and selecting Vendor 2 Column View from the shortcut menu. When you search by category, site, or trade, the system automatically displays the detailed record of the vendor (2-column view). Specific instructions for each search criteria follow below. Tips: If a vendor calls, the fastest way to find them is to use the List View (see Searching by Name directly below). Right-click on the vendor’s record and choose AP History or Pay History from the shortcut menu (or press Ctrl+H or Ctrl+P, respectively). This is the fastest way to display a vendor’s invoices or checks. You can shorten the list of vendors or vendor details that the system displays by using the various filtering options on the View menu in the main screen menu bar. In this way, you can avoid lengthy data retrieval times and locate records more efficiently. For instructions, see the Filtering Records for Customized Viewing section in this topic. MultiSite Systems, LLC version 6 10 MultiSite Suite: Accounts Payable Module Viewing Vendors Searching by Name To search for a vendor by name, do the following: 1 If the Vendor Views label bar isn’t already open, click on it to display the various viewing options. 2 In the Vendor Views slider bar, click the List View folder icon. The List View panel appears, as shown below. Tip: When you first log into AP, the List View panel appears automatically by default. You can also open the List View by clicking on the Search for Vendor button (binocular button) on the main screen toolbar or by pressing the shortcut key combination Ctrl+L on your keyboard. 3 In the text box at the top of the panel, enter the first few letters of the vendor’s name. 4 Press the Enter key on your keyboard. A list of vendors with names that match the letters you entered appears in the panel. MultiSite Systems, LLC version 6 11 MultiSite Suite: Accounts Payable Module Viewing Vendors 5 Use the scroll bar or the down arrow key on your keyboard to navigate down the list until you find the vendor you want. 6 Do one of the following: Double-click on the vendor name. Select the vendor name, then right-click and choose Vendor 2 Column View from the shortcut menu that appears. The vendor information appears in the standard 2-column view, as shown below. MultiSite Systems, LLC version 6 12 MultiSite Suite: Accounts Payable Module Viewing Vendors Searching by Category When vendors are added to the system, they can be assigned to one or more categories (see Authorizing a Vendor Keeping up with unique vendors is always troublesome with most companies. Eventually, duplicate vendors get setup as new vendors. Usually duplicate vendors become noticeable when 1099’s are printed. MultiSite has an optional method of controlling the creation of new vendors. In essence here is how the new vendors are controlled. Any non-Read-Only user can add new vendors. By default, all Vendors will be saved as “Un-Authorized”. The “Un-Authorized” status does not hinder users from entering invoices using the new un-authorized vendor. o When the invoice prints out large “NOT AUTHORIZED” prints on the invoice. o The new vendor stays in the un-authorized status until an administrator authorizes the new vendor. MultiSite Systems, LLC version 6 13 MultiSite Suite: Accounts Payable Module Viewing Vendors o During the automated check writing in the Check Wizard the un-authorized vendor outstanding invoices will be paid. The top voucher portion of the check will have a bold caption “NOT AUTHORIZED”. This is a last minute effort to put emphasis on an un-authorized vendor. The top voucher portion can be torn off and the check mailed to the vendor. Later, the vendor can be authorized or moved to another existing vendor. “Un-Authorized” vendors can be viewed in the AP module by clicking the icon “UnAuthorized” located in the “Views” group sidebar. The main grid will be filled with a list of all vendors with the un-authorized status. Admin users can authorize vendors by clicking on the checkbox in the unauthorized view. The procedure to authorize vendors is: o Adding & Editing Vendor Categories) to help users find the vendor by category. Note: It is not a system requirement to assign a category to a vendor. Therefore, if you search for a vendor by category and do not see him in the list, it does not mean that his record is not in the system. You might find the vendor by searching by name, trade or some other method. To search for a vendor by category, do the following: 1 If the Vendor Views label bar isn’t already open, click on it to display the various viewing options. 2 In the Vendor Views slider bar, click the Category folder icon. A list of categories appears in the center part of the screen. MultiSite Systems, LLC version 6 14 MultiSite Suite: Accounts Payable Module Viewing Vendors 3 Click on a category to display the expander button (plus sign) to the left of the category name. Then click on the expander button to display the corresponding vendors, underneath. 4 Click on the name of the vendor whose record you want to display. The vendor’s details appear in the 2-column view panel, as shown. MultiSite Systems, LLC version 6 15 MultiSite Suite: Accounts Payable Module Viewing Vendors Searching by Site Different vendors are used to purchase products and services for different sites. If you know the site associated with a vendor, you can look up the vendor by site name by following the instructions below. To search for a vendor by site, do the following: 1 If the Vendor Views label bar isn’t already open, click on it to display the various viewing options. 2 In the Vendor Views slider bar, click the Sites folder icon. A list of sites appears in the center part of the screen. 3 Click on a site to display the expander button (plus sign) to the left of the site name. Then click on the expander button to display the corresponding vendors, underneath. 4 Click on the name of the vendor whose record you want to display. The vendor’s details appear in the 2-column view panel, as shown above. MultiSite Systems, LLC version 6 16 MultiSite Suite: Accounts Payable Module Viewing Vendors Searching by Trade When vendors are added to the system, their trade is identified in their record. Therefore, you can search for a vendor by type of trade. To search for a vendor by type of trade, do the following: 1 If the Vendor Views label bar isn’t already open, click on it to display the various viewing options. 2 In the Vendor Views slider bar, click the Trades folder icon. A list of trade types appears in the center part of the screen. 3 Click on a trade to display the expander button (plus sign) to the left of the trade name. Then click on the expander button to display the corresponding vendors, underneath. 4 Click on the name of the vendor whose record you want to display. The vendor’s details appear in the 2-column view panel, as shown above. MultiSite Systems, LLC version 6 17 MultiSite Suite: Accounts Payable Module Viewing Vendors Filtering Records for Customized Viewing You can filter the records that the system displays when you view vendor records (including a vendor’s AP history and pay history). In this way, you can shorten the amount of time that you spend waiting for the system to retrieve unneeded records, and you can scroll through records more efficiently. To filter views, you choose the filtering commands on the View menu in the main screen menu bar. Note: If you are already viewing vendors and then you select or deselect a filter option from the View menu, you must refresh the screen to see the results. You can do this by re-selecting the vendor, AP history, or pay history. The procedures for each type of filter are as follows: Filter Date Range (for AP History and Pay History) Over time, a large number of records are added to a vendor’s AP history and pay history. To shorten the list of vendor records that appear in either history, choose Filter Date Range from the View menu, to limit the records that the system retrieves by date range. The default date range for filtering the AP history and pay history is set by the system administrator. To change the date range, specify a different one in the Preferences window (for instructions, see Setting User Preferences). For instructions on viewing the AP and pay history, see Viewing the AP History and Viewing the Pay History. Custom View for Vendor Detail Records (2-column View) You can limit the specific information that you see when you view the detailed records of vendors (the standard 2-column view). To do this, use the Custom View tab in the Preferences window to select the specific fields that you want to view (for instructions, see Setting User Preferences). Then, choose Custom View from the View menu. MultiSite Systems, LLC version 6 18 MultiSite Suite: Accounts Payable Module Viewing Vendors Filter Division Note: Only users with system administrator access privileges can filter vendor records by company division. To filter vendor records according to the company division that handles the vendors’ accounts, choose Filter Division from the View menu. The system filters the vendor records by the division that is selected in the Preferences window (for instructions on how to select the division, see Setting User Preferences). Voided Invoices If you want to display only voided invoices in the AP history or pay history, choose Voided Invoices from the View menu. For instructions on viewing the AP and pay history, see Viewing the AP History and Viewing the Pay History. Filter Vendor Status When viewing vendor records, you can filter them by status (active vendors, inactive vendors, or both active and inactive vendors). To filter vendors by status, choose Filter Vendors from the View menu. Then, from the submenu, choose All Vendors, Active Vendors, or Inactive Vendors. For instructions on deactivating vendors, see Deactivating a Vendor. Shortcut Menu Commands A short-cut menu is available from the vendor list (List View), as well as from any specific vendor’s detail record. When you right-click on a vendor in List View or on a row in a vendor’s detail record (standard 2-column view), the short-cut menu commands are displayed, and you can select them to perform specific tasks or view additional information. The choices are: Print All Rows: prints all the rows in the current view. Print Selected Rows: prints all the rows that you have selected in the current view (you can select multiple rows by holding down your Shift or Ctrl key and then clicking the rows with your mouse). MultiSite Systems, LLC version 6 19 MultiSite Suite: Accounts Payable Module Adding, Modifying, & Deleting Vendor Notes Export All to CSV file: exports all the rows in the current view to a .csv file. Export Selected to CSV File: exports all the rows that you have selected in the current view to a .csv file (you can select multiple rows by holding down your Shift or Ctrl key and then clicking the rows with your mouse). AP History: displays a history of the invoices that have been entered into the system for a specific vendor. For more information, see Viewing the AP History. New Invoice: opens a blank on-screen invoice, so that you can create a new invoice for the selected vendor. For more information, see Entering Invoices. Pay History: displays the history of checks written for vendors from the AP module or the Cash Management module. For more information, see Viewing the Pay History. Print Profile: prints a vendor profile for the selected vendor. Vendor 2 Column View: displays the details for the selected vendor. List View: displays the list of vendors. De-Activate Vendor: deactivates the selected vendor. Instructions for managing vendor information are provided in the topics that follow. Adding, Modifying, & Deleting Vendor Notes A Vendor Notes section appears at the bottom of various vendor Views in the AP system. It enables you to view, add, modify, deactivate, or delete notes about a vendor. Tip: No matter which View you are in when you add or modify vendor notes, the additions and changes you make appear in all the other Views where the Vendor Notes section is displayed. MultiSite Systems, LLC version 6 20 MultiSite Suite: Accounts Payable Module Adding, Modifying, & Deleting Vendor Notes Adding Vendor Notes To add a note a vendor, do the following: 1 Search for the vendor by using one of the methods in the Viewing Vendors section and select his record or display the detailed 2-column view. 2 Do one of the following: Click inside the first empty row in the Vendor Notes section. Click the Note button on the main screen toolbar. A message box appears, asking if you want to add a note. 3 Click Yes in the message box. The Note window appears. Tip: You can also add a note by displaying a note that already exists and clicking the Add button in the Note window. For more information, see the Modifying, Deactivating, or Deleting Vendor Notes subsection below. MultiSite Systems, LLC 4 From the Note Type drop-down list, select the type of note you are entering. 5 In the Subject text box, enter a description for the note. version 6 21 MultiSite Suite: Accounts Payable Module Adding, Modifying, & Deleting Vendor Notes 6 If you want to attach a file to the note (e.g., a scanned document), click the F button to the right of the File Attachment text box and use the standard browse window to locate and select the file. Then click OK. 7 Skip over the File Embed Name text box; the File Embed feature is not operational at this time. 8 In the Note text box, enter the note you want to add for the selected vendor. 9 Click the Save button. 10 If you want to print the note, click the Print button. 11 To exit the Note window, click the Close button or the x in the top right corner of the window. You return to the main screen. Modifying, Deactivating, or Deleting Vendor Notes To modify, deactivate, or delete an existing note, do the following: 1 Search for the vendor by using one of the methods in the Viewing Vendors section and select his record or display the detailed 2-column view. 2 In the Vendor Notes section, double-click on the note you want to change or delete. The note appears in the Note window. MultiSite Systems, LLC version 6 22 MultiSite Suite: Accounts Payable Module 3 Adding, Modifying, & Deleting Vendor Notes To modify the note, do the following: a) Click the Edit button. b) Make changes in the drop-down lists and/or text boxes. Tip: When you click the Edit button, the buttons at the bottom of the window change to Save and Cancel. If you make a mistake while modifying a note, you can click the Cancel button and then the Refresh button, which restores the information that appeared when you first opened the note. c) To attach a file to the note, click the F button to the right of the File Attachment text box and use the standard browse window to locate and select the file; then click OK. d) To remove an attachment from the note, click on the file name in the File Attachment text box and press the Delete key on your keyboard. Tip: To view an attachment, double-click directly on the name of the attached file. e) Click the Save button to save the changes you made. 4 To de-activate the note, click inside the Active Entry check box to clear it. Tip: When you deactivate a note, it is not deleted from the system, but it disappears from the Notes section of the selected vendor. You can reactivate it at any time by repeating steps 1 - 3a and then selecting the MultiSite Systems, LLC version 6 23 MultiSite Suite: Accounts Payable Module Modifying Vendor Details check box again. 5 To delete the entire note, do the following: a) Click the Delete button. A confirmation message appears. b) Click Yes in the message box. The Note window closes and you return to the main screen. Note: To see the deletion in the list of notes for the vendor, it is necessary to refresh the screen, first. You can do this by selecting another vendor and then re-selecting the vendor whose note you deleted. 6 To navigate to another note in the list of notes for the vendor without leaving the Note window, use the first, previous, next, and last buttons at the bottom of the window. 7 If you want to print a note, navigate to it and then click the Print button. 8 If you want to add a new note for the vendor at this point, click the Add button and follow steps 4 - 9 in the Adding Vendor Notes section of this topic (above). 9 To exit the Note window, click the Close button or the x in the top right corner of the window. You return to the main screen. Modifying Vendor Details Notes: When editing vendor details, it is important to edit appropriate fields, only. If you have any doubt or question about changing a vendor detail, contact technical support. Whenever a detail is edited, the system notes the person who edited vendor details, as well as the date and time. MultiSite Systems, LLC version 6 24 MultiSite Suite: Accounts Payable Module Printing Vendor Profiles To modify any of the details in a vendor’s record, do the following: 1 Search for the vendor by using one of the methods in the Viewing Vendors section and display the 2-column view of his record. 2 In the vendor’s record, double-click on the value that you want to change. The Editing window appears. The current value appears in the Existing text box, at the top. This text box is for reference purposes, only. 3 Do one of the following: In the New text box, enter the new value, manually. Click the Browse button to display all the possible values; they appear in the larger blank text box in the lower left part of the window. Then, select the one you want to enter by clicking on it. 4 Click OK. The information is changed, and you return to the main screen. Printing Vendor Profiles You can print a vendor profile quickly and easily in AP. To print a vendor profile, do the following: 1 MultiSite Systems, LLC Select the vendor for whom you want print a profile. For instructions, see Viewing Vendors. version 6 25 MultiSite Suite: Accounts Payable Module Adding a Vendor Tip: You can either select the vendor in the List View or open the vendor’s detail record (2-column view). 2 Do one of the following: In the Vendor Views slider bar, click the Print Profile folder icon. Right-click on the selected vendor’s record. From the shortcut menu that appears, choose Print Profile. The profile appears in the Reports window. 3 Click the Print button on the Reports window toolbar to send the profile to the printer. 4 To exit the Reports window, click the x button on the toolbar or in the top right corner of the window. You return to the main screen. Adding a Vendor You can add a vendor to AP directly from the Vendor Views slider bar. The instructions are as follows: MultiSite Systems, LLC version 6 26 MultiSite Suite: Accounts Payable Module Adding a Vendor To add a vendor, do the following: 1 If the Vendor Views label bar isn’t already open, click on it to display the various viewing options. 2 In the Vendor Views slider bar, click the Add Vendor folder icon. The Add New Vendor window appears. 3 Click the button to the right of the Vendor Code text box. The Suggest VID window appears. 4 Enter the full name of the vendor in the text box. 5 Click OK. The system creates a unique vendor code for the vendor and places it in the Vendor code text box of the Add New Vendor window. The system also places the name you entered in step 4 in the Vendor Name text box. 6 MultiSite Systems, LLC From the Main Division drop-down list, select the division in which the vendor will be used. version 6 27 MultiSite Suite: Accounts Payable Module 7 Adding a Vendor From the Main Trade drop-down list, select the type of trade in which the vendor’s goods or services is normally classified. For example, if you are adding an electric company, select Utilities. The system places the information that you entered and selected in the corresponding Value cells of the All Vendor Fields list on the right side of the window. 8 Enter as much information as you can about the vendor in the remaining Value cells of the All Vendor Fields list. To do this, simply click on the corresponding empty cell and enter the information. Notes: There are two types of addresses in the All Vendor Fields list: the business address (B Street, City, State, and ZIP code) and the remit to address (Remit Street, City, State, and ZIP code). Even if these are identical, it is necessary to complete all the cells for both types of addresses. 9 Click the Save button. The vendor is added to the system. The text boxes in the Add New Vendor become blank, so that you can add another vendor. 10 If you want to add another vendor at this point, repeat steps 3 - 9. Otherwise, skip to the next step. 11 When you are finished adding vendors, click the Close button in the Add New Vendor window. You return to the main screen. The vendor appears when you search for a vendor (see Viewing Vendors). Tip: After you add a vendor, you might want to assign categories to it so that you can look up the vendor by using the Category search feature. For instructions, see Authorizing a Vendor Keeping up with unique vendors is always troublesome with most companies. Eventually, duplicate vendors get setup as new vendors. Usually duplicate vendors become noticeable when 1099’s are printed. MultiSite has an optional method of controlling the creation of new vendors. In essence here is how the new vendors are controlled. MultiSite Systems, LLC version 6 Any non-Read-Only user can add new 28 MultiSite Suite: Accounts Payable Module Adding a Vendor vendors. By default, all Vendors will be saved as “Un-Authorized”. The “Un-Authorized” status does not hinder users from entering invoices using the new un-authorized vendor. o When the invoice prints out large “NOT AUTHORIZED” prints on the invoice. o The new vendor stays in the unauthorized status until an administrator authorizes the new vendor. o During the automated check writing in the Check Wizard the un-authorized vendor outstanding invoices will be paid. The top voucher portion of the check will have a bold caption “NOT AUTHORIZED”. This is a last minute effort to put emphasis on an un-authorized vendor. The top voucher portion can be torn off and the check mailed to the vendor. Later, the vendor can be authorized or moved to another existing vendor. MultiSite Systems, LLC version 6 “Un-Authorized” vendors can be viewed in the AP module by clicking the icon “UnAuthorized” located in the “Views” group sidebar. The main grid will be filled with a list of all vendors with the un-authorized status. Admin users can authorize vendors by clicking on the checkbox in the 29 MultiSite Suite: Accounts Payable Module Authorizing a Vendor unauthorized view. The procedure to authorize vendors is: o Adding & Editing Vendor Categories below. For instructions on searching by category, see the Searching by Category section in the topic Viewing Vendors. Authorizing a Vendor Keeping up with unique vendors is always troublesome with most companies. Eventually, duplicate vendors get setup as new vendors. Usually duplicate vendors become noticeable when 1099’s are printed. MultiSite has an optional method of controlling the creation of new vendors. In essence here is how the new vendors are controlled. Any non-Read-Only user can add new vendors. By default, all Vendors will be saved as “Un-Authorized”. The “Un-Authorized” status does not hinder users from entering invoices using the new un-authorized vendor. o When the invoice prints out large “NOT AUTHORIZED” prints on the invoice. o The new vendor stays in the un-authorized status until an administrator authorizes the new vendor. o During the automated check writing in the Check Wizard the un-authorized vendor outstanding invoices will be paid. The top voucher portion of the check will have a bold caption “NOT AUTHORIZED”. This is a last minute effort to put emphasis on an un-authorized vendor. The top voucher portion can be torn off and the check mailed to the vendor. Later, the vendor can be authorized or moved to another existing vendor. MultiSite Systems, LLC “Un-Authorized” vendors can be viewed in the AP module by clicking the icon “UnAuthorized” located in the “Views” group version 6 30 MultiSite Suite: Accounts Payable Module Adding & Editing Vendor Categories sidebar. The main grid will be filled with a list of all vendors with the un-authorized status. Admin users can authorize vendors by clicking on the checkbox in the unauthorized view. The procedure to authorize vendors is: o Adding & Editing Vendor Categories After you add a vendor to AP, you can assign categories to the vendor by using the instructions below. You can also use this procedure to change a vendor’s categories at any time. To add or edit vendor categories, do the following: 1 Select the vendor for whom you want to add or edit categories. For instructions, see Viewing Vendors. 2 In the Vendor Views slider bar, click the Edit Vendor Categories folder icon. The Vendor Category Linking window appears. MultiSite Systems, LLC version 6 31 MultiSite Suite: Accounts Payable Module 3 Deactivating a Vendor In the All Categories list, select a category that you want to assign to the vendor; then click the Add button. Repeat this for each category you want to assign. Tip: After you assign a category, you will be able to look up the vendor by that category, using the Category icon in the Vendor Views slider bar (see Viewing Vendors). The category appears in the This Vendor Categories list on the right side of the window. [NOTE: Review Team: This window was going to be changed so that the Add and Remove buttons work; if this change is not going to take place, let me know and I’ll change the instructions, so that the users will simply single-click on a category to move it to the This Vendor Categories list.] 4 If you want to remove a category assigned to a vendor, select it in the This Vendor Categories list and click the Remove button. Repeat this for each category you want to remove. 5 Click the Save button. 6 To exit the Vendor Category Linking window, click the Close button or the x in the upper right corner of the window. You return to the main screen. Deactivating a Vendor If you are not going to use a vendor anymore, you can deactivate the vendor’s record. After you deactivate a vendor, his record no longer appears when you conduct a vendor search. This helps limit the number of vendor records, thus shortening the amount of time you spend waiting for the system to retrieve records and enabling you to find records more efficiently. To deactivate a vendor, do the following: MultiSite Systems, LLC 1 Select the vendor you want to deactivate. For instructions, see Viewing Vendors. 2 Right click on the vendor’s record and choose De-Activate Vendor from the shortcut menu that appears. version 6 32 MultiSite Suite: Accounts Payable Module Moving a Vendor [NOTE: Review Team: This menu command needs to change to Change Vendor Status or, after it is selected, it needs to change to “Re-Activate Vendor” Let me know if this change is made, and I’ll change the instructions, accordingly.] A message box appears, indicating that the vendor status has been reversed. 3 Click OK in the message box. If you open the detailed record (2-column view) of the vendor’s record, the word “False” appears as the value in the Active field, indicating that the vendor is no longer active. Note: If you are already in the detailed 2-column view when you perform step 2, it is necessary to refresh the view to see “False” in the Active field. You can do this by selecting another vendor and then returning to the 2-column view of the one you selected in step 1. Tip: To change a vendor’s status back to Active, repeat the steps in this procedure. The value in the Active field changes to “True.” Moving a Vendor If you enter duplicate records for a vendor and you want to consolidate the records into one vendor record, you can move the data from the extraneous record to the main one and then delete the one that you no longer need. To move data from one vendor record to another, do the following: 1 From the Tools menu, choose Move Vendor. The Move Vendor Transactions window appears. MultiSite Systems, LLC version 6 33 MultiSite Suite: Accounts Payable Module 2 Moving a Vendor In the From Vendor text box, enter the first few letters of the vendor’s name, as it appears in the record that you want to remove from the system (i.e., the record from which you want to move transactions). A list of corresponding names appears beneath the text box. 3 From the list, select the vendor whose transactions you want to move. 4 In the To Vendor text box, enter the first few letters of the vendor’s name, as it appears in the record that you want to keep in the system (i.e., the record to which you want to move transactions). A list of corresponding names appears beneath the text box. 5 From the list, select the vendor whose record you want to keep. 6 Click the Go button. 7 To exit the window, click the Close button. You return to the main screen. Tip: After you are finished moving the data, you should delete the extraneous record from which you moved the data. For instructions, see Deleting a Vendor below. MultiSite Systems, LLC version 6 34 MultiSite Suite: Accounts Payable Module Deleting a Vendor Deleting a Vendor If you enter duplicate records for a vendor, you can consolidate the records into one vendor. Then you can delete the extraneous record by following the instructions in this topic. Note: Before you delete a vendor, be sure that you have moved all his transactions to the duplicate vendor record that you want to keep in the system. For instructions, see Moving a Vendor above To delete a vendor record, do the following: 1 From the Tools menu, choose Delete Vendor. The Delete Vendor window appears. 2 In the From Vendor text box, enter the first few letters of the vendor’s name, as it appears in the record that you want to delete. A list of corresponding names appears beneath the text box. 3 From the list, select the vendor whose record you want to delete. 4 Click the Go button. 5 To exit the window, click the Close button. You return to the main screen. MultiSite Systems, LLC version 6 35 MultiSite Suite: Accounts Payable Module Viewing the AP History Viewing the AP History The AP system automatically keeps an ongoing history of all the invoices that are entered into AP. You can view this AP history for a specific vendor by following the instructions below. Tip: To view open (unpaid) invoices, only, by system user, site, property manager, vendor, or due date, see Viewing Unpaid Invoices To view the AP history for a vendor, do the following: 1 Select the vendor for whom you want to view the open AP history. For instructions, see Viewing Vendors. 2 Do one of the following: In the Vendor Views slider bar, click the AP History folder icon. Right-click on the selected vendor’s record. From the shortcut menu that appears, choose AP History. Press the shortcut key combination Ctrl+H on your keyboard. A list of invoices that have been entered for the selected vendor appears. MultiSite Systems, LLC version 6 36 MultiSite Suite: Accounts Payable Module 3 Viewing the Pay History To view a specific invoice in the list, double-click anywhere in the corresponding row. The invoice information appears in the Invoice Entry window, as shown below. 4 To close the Invoice Entry window, click the Quit Invoices icon in the Actions slider bar. Tip: You can filter the records that appear in the AP history by setting a date range in the Preferences window and then selecting Filter Date Range from the View menu. In this way, you can shorten the amount of time that you spend waiting for the system to retrieve unneeded records, and you can scroll through records more efficiently. You can also filter the history to view voided invoices, only. For more information, see the Filtering Records for Customized Viewing section in the Viewing Vendors topic and Setting User Preferences. Viewing the Pay History The AP system automatically keeps an ongoing history of all the checks that have been written to vendors in the AP module or the Cash Management module. You can view this pay history for a specific vendor by following the instructions below. MultiSite Systems, LLC version 6 37 MultiSite Suite: Accounts Payable Module Viewing the Pay History To view the pay history for a vendor, do the following: 1 Select the vendor for whom you want to view the pay history. For instructions, see Viewing Vendors. 2 Do one of the following: In the Vendor Views slider bar, click the Pay History folder icon. Right-click on the selected vendor’s record. From the shortcut menu that appears, choose Pay History. Press the shortcut key combination Ctrl+P on your keyboard. A list of checks that have been written for the selected vendor appears. The Source column indicates whether a check was written in AP or in the Cash Management system. Tip: You can filter the records that appear in the pay history by setting a date range in the Preferences window and then selecting Filter Date Range from the View menu. In this way, you can shorten the amount of time that you spend waiting for the system to retrieve unneeded records, and you can scroll through records more efficiently. You can also filter the history to view voided invoices, only. For more information, see the Filtering Records for Customized Viewing section in the Viewing Vendors topic MultiSite Systems, LLC version 6 38 MultiSite Suite: Accounts Payable Module Viewing Unpaid Invoices and Setting User Preferences. Viewing Unpaid Invoices The Open AP Views slider bar contains icons that enable you to display open payables (i.e., invoices that have not yet been paid). You can look up open payables by the following search criteria: By User By Site By Property Manager By Vendor By Due Date Specific instructions for each search criteria follow below. Searching by User The By User icon enables you to look up open payables that a specific user has entered into AP. To search for the open payables that a user has entered, do the following: 1 If the Open AP Views label bar isn’t already open, click on it to display the various viewing options. 2 In the Open AP Views slider bar, click the By User folder icon. A list of AP users appears in the center of the main screen. 3 In the list, select the name of the user whose open invoices you want to display. A list of all the unpaid invoices that the user entered appears in the main panel, as shown. MultiSite Systems, LLC version 6 39 MultiSite Suite: Accounts Payable Module Viewing Unpaid Invoices Tip: To check the approval status of an open invoice, scroll all the way to the right to view the Authorized column. 4 To display a specific invoice, double-click anywhere in the corresponding row. The Invoice window appears, displaying the details for the selected invoice. Searching by Site The By Site icon enables you to look up open payables of invoices written for a specific site. To search for the open payables of a specific site, do the following: 1 If the Open AP Views label bar isn’t already open, click on it to display the various viewing options. 2 In the Open AP Views slider bar, click the By Site folder icon. A list of sites appears in the center of the main screen. 3 MultiSite Systems, LLC In the list, select the site associated with the open payables you want to view. version 6 40 MultiSite Suite: Accounts Payable Module Viewing Unpaid Invoices A list of all the site’s unpaid invoices appears in the main panel, as shown. Tip: To check the approval status of an open invoice, scroll all the way to the right to view the Authorized column. 4 To display a specific invoice, double-click anywhere in the corresponding row. The Invoice window appears, displaying the details for the selected invoice. Searching by Property Manager The By PM icon enables you to look up open payables of sites managed by a specific Property Manager. To search for the open payables of sites managed by a specific property manager, do the following: 1 If the Open AP Views label bar isn’t already open, click on it to display the various viewing options. 2 In the Open AP Views slider bar, click the By PM folder icon. A list of property managers appears in the center of the main screen. MultiSite Systems, LLC version 6 41 MultiSite Suite: Accounts Payable Module 3 Viewing Unpaid Invoices In the list, select the property manager who manages the sites associated with the invoices you want to view. A list of all the unpaid invoices for the sites managed by the PM appears in the main panel, as shown. Tip: To check the approval status of an open invoice, scroll all the way to the right to view the Authorized column. 4 To display a specific invoice, double-click anywhere in the corresponding row. The Invoice window appears, displaying the details for the selected invoice. Searching by Vendor The By Vendor icon enables you to look up open payables that are due for a specific vendor. Tip: For instructions on how to view both open and closed invoices for a vendor, see Viewing the AP History. MultiSite Systems, LLC version 6 42 MultiSite Suite: Accounts Payable Module Viewing Unpaid Invoices To search for the open payables due for a specific vendor, do the following: 1 If the Open AP Views label bar isn’t already open, click on it to display the various viewing options. 2 In the Open AP Views slider bar, click the By Vendor folder icon. A list of vendors appears in the center of the main screen. 3 In the list, select the vendor whose open invoices you want to view. A list of all the unpaid invoices for the vendor appears in the main panel, as shown. Tip: To check the approval status of an open invoice, scroll all the way to the right to view the Authorized column. 4 To display a specific invoice, double-click anywhere in the corresponding row. The Invoice window appears, displaying the details for the selected invoice. MultiSite Systems, LLC version 6 43 MultiSite Suite: Accounts Payable Module Viewing Unpaid Invoices Searching by Due Date The search By Due Date icon enables you to look up open payables by the dates on which they are due. To search for the open payables that are due on a specific date, do the following: 1 If the Open AP Views label bar isn’t already open, click on it to display the various viewing options. 2 In the Open AP Views slider bar, click the By Due Date folder icon. A list of dates appears in the center of the main screen. 3 In the list, select the due date of the open invoices that you want to view. A list of all the unpaid invoices that are due on the selected date appears in the main panel, as shown. Tip: To check the approval status of an open invoice, scroll all the way to the right to view the Authorized column. 4 MultiSite Systems, LLC To display a specific invoice, double-click anywhere in the corresponding row. version 6 44 MultiSite Suite: Accounts Payable Module Entering Invoices The Invoice window appears, displaying the details for the selected invoice. Entering Invoices The New icon in the Invoices slider bar enables you to enter invoices into AP quickly and easily. After you enter an invoice, the system automatically prints a voucher and attaches it to the invoice. Each voucher must be approved before a check can be written for it. Invoice approval and check printing is restricted to authorized personnel. Note: When invoices are entered into the system, they are not recorded in the General Ledger module until checks are written for them unless your property is setup to use the AP Accrual method. For instructions on writing checks, see Writing Checks. Also, see AP Accrual. To enter an invoice, do the following: 1 Select the vendor for whom you want to enter an invoice. For instructions, see Viewing Vendors. 2 Do one of the following: Open the Invoices slider bar and click the New folder icon. Right-click on the selected vendor’s record. From the shortcut menu that appears, choose New Invoice. Press the shortcut key combination Ctrl+I on your keyboard. The New Invoice Entry window appears. MultiSite Systems, LLC version 6 45 MultiSite Suite: Accounts Payable Module 3 Entering Invoices In the Site# text box, do one of the following: Enter the site number associated with the invoice. If you don’t know the site number, double-click inside the Site# text box or press Enter on your keyboard to display the Site Search window (shown below). Enter the first few letters of the site name in the text box at the top and use the scroll bar to locate the site. Double-click on the site or select it and press the Enter key on your keyboard to close the window and place the site number in the Site# text box. 4 MultiSite Systems, LLC Navigate outside the Site# text box. version 6 46 MultiSite Suite: Accounts Payable Module Entering Invoices The site and apartment names automatically appear in the top part of the window. 5 In the Ven# text box, do the following: Enter the vendor number associated with the invoice. If you don’t know the vendor number, double-click inside the Ven# text box or press Enter on your keyboard to display the Vendor Search window. Enter the first few letters of the vendor’s name in the text box at the top and use the scroll bar to locate the vendor. Double-click on the vendor or select it and press the Enter key on your keyboard to close the window and place the vendor number in the Ven# text box. 6 Navigate outside the Ven# text box. The vendor’s business address, remit to address, payment terms, and a default description automatically appear in the corresponding text boxes. Tip: You can change any of this information by entering alternate text and numbers in these text boxes. The vendor’s business address, remit to address, and payment terms come from the vendor’s master file (2column view of the vendor), and you can make more permanent, global changes for these values there (see Modifying Vendor Details). The default description is copied from the last invoice that was entered for the vendor. 7 Using the hard copy invoice, enter the invoice number in the Inv# text box. 8 Enter the amount of the invoice in the Inv Amt text box. 9 Enter the date of the invoice in the Inv Dt text box in mmddyyyy format. 10 If there is an account number associated with the vendor, you can enter it in the Acct# text box. Tips: The Acct# text box in the header is an optional field for an account number that a site may have with the vendor. The Acct# cell in the detail lines of the invoice is a required field for the General Ledger MultiSite Systems, LLC version 6 47 MultiSite Suite: Accounts Payable Module Entering Invoices Account number associated with the invoice (see step 16 below). If you enter an account number in the Acct# text box of the header, the system will enter it automatically the next time you enter an invoice for the vendor. 11 If you want to add a comment, enter it in the Comments text box (located directly underneath the Description text box). 12 If you want to attach a file, such as a scanned document, to the invoice, click the F button to the right of the File text box. Use the standard browse window to locate and select the file; then click OK. 13 If the invoice is associated with a specific building number, select it from the drop-down list that appears when you click inside the Bldg# cell in the detail lines (located in the lower half of the window). 14 If the invoice is associated with a specific unit number, (e.g. if the invoice is for a refrigerator for a specific apartment), you can select it from the drop-down list that appears when you click inside the Unit# cell. 15 If a work order number is associated with the invoice, you can enter it in the Job Code cell of the detail lines. 16 In the Acct# cell of the detail lines, enter the General Ledger account number for this invoice, or select it from the drop-down list that appears. Tip: As shown below, the GL Account number that was used the last time an invoice was entered for the vendor appears in the first line of the drop-down list, for your convenience. Usually, you select or enter that GL account number. 17 The description in the header of the invoice automatically appears in the Description cell of the detail line. If you want to change the description in the detail line, select the cell and enter a different one. MultiSite Systems, LLC version 6 48 MultiSite Suite: Accounts Payable Module Modifying Invoices 18 Put the invoice amount in the Debit cell. The system automatically enters the credit to cash. 19 If other line items are associated with this invoice, use the down arrow key on your keyboard to navigate to the next line item and repeat steps 13 - 18. (For example, if a credit appears on the invoice, you can enter it in the Credit cell on a separate line item.) Tip: If you need to delete a line item that you entered, right-click on the row and choose Delete This Row from the shortcut menu that appears. 20 After all the invoice information is entered, make sure that the total amount of all the debits in the line items equals the number in the Inv Amt text box in the header of the invoice. These numbers must match before you can save the invoice. If they do not, adjust your entries so that they are equal. 21 In the Actions slider bar of the window, click the Save Invoice icon. The system automatically prints the invoice voucher (shown below). You use this voucher to obtain approval so that a check can be written for the invoice. Modifying Invoices Note: The system will only enable you to modify an invoice that has not yet been paid. To change information in an open invoice, do the following: 1 Display a list of invoices that contains the invoice that you want to modify. Tip: The fastest way to do this is to use one of the 5 search methods in the Open AP Views slider bar. The invoice lists in these views are shorter because they contain only unpaid invoices. For instructions, see Viewing Unpaid Invoices. 2 After finding the invoice you want to modify, do one of the following: Double-click on the invoice. MultiSite Systems, LLC version 6 49 MultiSite Suite: Accounts Payable Module Modifying Invoices Select the invoice by clicking on it once; then open the Invoices slider bar and click the Edit Invoice folder icon. The invoice is displayed in the main screen, as shown: 3 Click inside any of the text boxes and/or drop-down lists to change information. For specific information about each one, see the instructions in the Entering Invoices topic. 4 If you want to attach a file, such as a scanned document, to the invoice, click the F button to the right of the File text box. Use the standard browse window to locate and select the file; then click OK. 5 To delete an attached file, select the file name inside the File text box and press the Delete key on your keyboard. Tip: To view an attachment, double-click directly on the name of the attached file. MultiSite Systems, LLC 6 After all the invoice information is modified, make sure that the total amount of all the debits in the line items equals the number in the Inv Amt text box in the header of the invoice. These numbers must match before you can save the invoice. If they do not, adjust your entries so that they are equal. 7 In the Actions slider bar of the window, click the Save Invoice icon. version 6 50 MultiSite Suite: Accounts Payable Module AP Accrual Method The system automatically prints the invoice voucher (shown below). You use this voucher to obtain approval so that a check can be written for the invoice. AP Accrual Method When using AP Accrual the GL is updated when an invoice is saved. AP Accrual must be setup by technical support. Users cannot change AP from the cash method to Accrual. If you are already using the Cash method you and technical support must coordinate the date of switching to accrual. Accrual works like this: When an invoice is entered and saved the GL is updated with a debit of each expense record and a credit for your payable account and the entries are posted to the current period in AP. The current period can be overridden by using the period textbox directly in the AP data entry form. This field is located at the bottom right corner of the form. This field cannot be edited after the invoice is saved. If you posted to the incorrect period and you wish the invoice posted to an alternate period you must Void the invoice and re-enter the invoice in a different period. Note: In Summary: Save Invoice: Db Expenses and Cr Liability. Pay Invoice: Db Liability and Cr Cash. MultiSite Systems, LLC When an invoice is Voided: The GL is updated with a reversal of the original entries and the records are posted in the AP current period. The period of invoice entry and voiding can be in different periods. When an invoice is placed on hold: The GL is not updated. When an invoice is paid: The GL is updated with a debit to the AP Accrual account and credit made to the cash account. version 6 51 MultiSite Suite: Accounts Payable Module AP Invoice Budget Bar Editing an Accrual Invoice: Invoices can be edited in the same period they were originally entered. Invoices cannot be edited in a different period as the original period. If you must edit an invoice you will first Void the Invoice in the current period then enter the invoice as new. If you know the accounting has not closed a previous period you may use the period textbox on the invoice data entry form. Accrual Report: The report “AP-Accrual 2110” report shows all invoices that are un-paid for the period entered as a parameter of that report. Fyi: this report is named “AP-Accrual 2110 but the actual Liability account does not have to be 2110. When technical support sets up your accrual they will enter an account number of your choosing as the payable liability account. AP Invoice Budget Bar The AP Invoice form can, optionally, display the “Budget Bar” at the bottom of the invoice form. This bar can be turned on and off by setting the “Option” “Display Budget”. The Options menu item can be found at the top of the Invoice form. This setting will remain in effect until you change the setting. The Budget Bar works like this: If your setting is not already set to display the budget, turn it on. While you are entering individual line items to the invoice the Budget Bar will be changing to match the information in the line you are entering. o The Budget Bar changes information when you change focus from the “Acct#” column to the Description column. And the Budget Bar changes again when you tab off the Debit Column and your cursor stays in the Credit column. MultiSite Systems, LLC version 6 52 MultiSite Suite: Accounts Payable Module AP Invoice Budget Bar o If you Tab off the current line the display will change to the next item or will clear out the contents. Your cursor has to be in the grid row you want to examine. o In short, the Budget Bar changes display when you change from one column with your cursor to either the “Description” column or the “Credit” column The Budget Bar displays: The budget for the account in the current grid row. Period Actual Activity is the actual amount spent on the budget item so far this accounting period and the YTD (Year To Date) spent. BUDGET INFO: Activity is the amount budget for this accounting period, YTD and the Annual budgeted amount. The last row displays either the Amount Over Budget or the Amount Under Budget. Three visual cues help you quickly determine the relationship between the selected account and the budget. Amounts displayed in brackets ( ) are under budget. Green captions mean under budget and red denotes over budget. The stoplight graphic shines Red or Green to alert you the Annual Budget status. The Invoice data entry grid displaying the invoice line items: Budget Bar Display, under the data entry grid Note: Annual Budget “Stop Light” image will be Green if the Annual Budget is under budget and Red if the Annual Budget will be over MultiSite Systems, LLC version 6 53 MultiSite Suite: Accounts Payable Module budget. The example graphic shows the annual budget is over budget. Authorizing Checks The AP system will not enable users to write checks for an invoice until it has been authorized. Users with system privileges for authorizing invoices can do this directly in AP, either manually or by using the Auto Authorize icon in the Invoices slider bar and a bar code scanner attached to their computers. The instructions in this manual are for manual invoice authorization, only. To authorize checks in AP manually, do the following: MultiSite Systems, LLC 1 If it isn’t already displayed, open the Open AP Views slider bar and use any of the search methods to display the list of open invoices that you want to authorize. For instructions, see Viewing Unpaid Invoices. 2 Scroll all the way to the right side of the list to display the Authorized column (shown below). version 6 54 MultiSite Suite: Accounts Payable Module 3 Writing Checks For each invoice that you want to authorize, select the check box in the Authorized column, so that a check mark appears inside it. When you select the check box, the system saves the authorization automatically. Tip: If you authorized an invoice in error, you can click inside the check box again to remove the check mark. The system saves the change automatically. Writing Checks In AP, you can write one individual check for an invoice, or you can write batches of checks for several invoices at one time. After you write checks, the system removes the corresponding invoices from the Open AP Views, where unpaid invoices appear. The checks appear in the pay history and are posted to the General Ledger module. Notes: The system does not enable you to write checks for an invoice until it has been approved. Check the approval status of invoices before attempting to write checks for them by displaying them in any Open MultiSite Systems, LLC version 6 55 MultiSite Suite: Accounts Payable Module Writing Checks AP View and viewing the Authorized column in the record grid. (For instructions, see Viewing Unpaid Invoices). When invoices are entered into the system, they are not posted to the General Ledger module until checks are written for them. Writing Batches of Checks To write a batch of checks for several vendor invoices at once, do the following: 1 If it isn’t already open, click on the Checks label bar to display the Checks options. 2 In the Checks slider bar, click the Check Wizard icon. The first panel of the Check Wizard appears (shown below). Note: If someone else is writing checks in the system, a message box appears, letting you know that the check writing feature is being used. The name of the system user appears in the message box. If this happens, click OK in the message box, contact the user, and find out when he or she will be finished writing checks. When you know that the person is no longer writing checks, click Yes in the message box that reads “Do you want to change the light to green?” This lets other users know that you are now writing checks. Anyone else attempting to write checks will see the alert message, and your name will appear in it. MultiSite Systems, LLC version 6 56 MultiSite Suite: Accounts Payable Module Writing Checks 3 The default due date for the range of checks that you will print is today’s date. You can change this date to a previous or future one in the Due Date text box. All checks that are due on or before this date will be printed. 4 The default period in which you will post the checks to the General Ledger is the current period. You can change the period by changing it in the Post Checks to Period text box. 5 The default date that will appear on the printed checks is today’s date. You can change the date to a past or future one in the Check Date text box. 6 Select one of the options for the group of checks that you will be printing. You can select any one of the following: Checks due for a specific vendor (Select by Vendor). Checks due for all the open invoices that a specific user has entered into AP (All for Current User) Checks due for a specific site (Select by Site) Checks due for all utility vendors (Utility Vendors) Checks due for sites managed by a specific property manager (Select by PM) 7 Click the Next button. The corresponding selection panel appears in the wizard. The one in the picture below is for the All for Current User option. MultiSite Systems, LLC version 6 57 MultiSite Suite: Accounts Payable Module Writing Checks 8 From the list in the panel, select the vendors, users, sites, utility vendors, or property managers for which you will write checks. To select more than one, use the Shift or Ctrl key on your keyboard while clicking on the choices with your mouse. 9 Click the Next button. The checks associated with the selections you made in steps 6 and 8 appear in the confirmation panel. 10 Examine the check information in the confirmation panel to make sure that you are printing the group of checks that you want to print. If it is correct, go to the next step. If not, click the Back button to go back to the previous panels and select other choices. 11 Click the Print Checks button. A progress panel appears. A thermometer bar displays the progress that the system is making while printing the checks. When the checks are finished, a “Finished” message appears in the panel with the Batch Run ID number, as shown below. Tip: You might want to make a note of the Batch Run ID number because you will need it if you ever want to reprint the checks (see Reprinting Checks). MultiSite Systems, LLC version 6 58 MultiSite Suite: Accounts Payable Module Writing Checks 12 Click the Finish button to exit the Check Wizard. You return to the main screen. Tip: You can change the printer to which you send checks. For instructions, see Setting User Preferences. Writing One Individual Check To write one individual check for a vendor invoice, do the following: 1 If it isn’t already displayed, open the Open AP Views slider bar and use any of the search methods to display the invoice for which you want to write a check. For instructions, see Viewing Unpaid Invoices. 2 In the Actions slider bar, click the Manual Check icon. A message box appears, asking if you want to write a manual check for the selected invoice. 3 Click Yes in the message box. The Choose Bank Account window appears. MultiSite Systems, LLC version 6 59 MultiSite Suite: Accounts Payable Module Voiding Checks 4 Make sure that the Post Period is the period to which you want to post the check to the General Ledger module. If it is not, enter the appropriate period in the Post Period text box. 5 Select the account for which you want to write a check. 6 Click OK. The check is sent to the printer. 7 To exit the Choose Bank Account window, click the x button in the top right corner. [NOTE: Review team: Please check to make sure that this is correct. I’m not sure if they have to close the Choose Bank Account window or if it closes automatically and returns to the main screen, or if it closes automatically and then the system displays a blank invoice.] You return to the main screen. Tip: You can change the printer to which you send checks. For instructions, see Setting User Preferences. Voiding Checks To void checks, do the following: 1 MultiSite Systems, LLC If it isn’t already open, click on the Checks label bar to display the Checks options. version 6 60 MultiSite Suite: Accounts Payable Module 2 Voiding Checks In the Checks slider bar, click the Void Check icon. The Void Check window appears. 3 In the text box at the top of the window, enter the first few letters of the account name that contains the check you want to void. The corresponding accounts appear in the window. 4 In the list, select the account that contains the check you want to void. 5 In the Check Number text box, enter the check number that you want to void. 6 Click the Void Check button. 7 If you want to print a notation about the voided check, click the Print button. 8 If you want to void any other checks, repeat steps 3 - 7. 9 To exit the window, click the Close button. You return to the main screen. MultiSite Systems, LLC version 6 61 MultiSite Suite: Accounts Payable Module Reprinting Checks Reprinting Checks To reprint a batch of checks, do the following: 1 If it isn’t already open, click on the Checks label bar to display the Checks options. 2 In the Checks slider bar, click the Reprint Checks icon. A window appears, asking for the Batch ID of the checks that you want to reprint. 3 In the window, enter the Batch ID number that appeared on the “Finished” panel of the Check Wizard when you first printed the batch of checks (see Writing Checks). 4 Click OK. The checks are sent to the printer and you return to the main screen. Tip: You can change the printer to which you send checks. For instructions, see Setting User Preferences. Generating & Printing Reports There are two icons on the Reports slider bar that you use to generate reports: one that displays a list of reports to select (All Reports) and one that generates the Check Register report (Check Register). A separate icon is necessary for the Check Register report because the system must perform some additional processing to retrieve that report. After you generate a report, it is displayed in the Reports window, where you can view the report, print it, export it to a file, or send it as an e-mail attachment. Instructions for each of these procedures follow. MultiSite Systems, LLC version 6 62 MultiSite Suite: Accounts Payable Module Generating & Printing Reports Generating Regular Reports (Reports Other Than Check Register) To generate any report other than the Check Register report, do the following: 1 If the Reports label bar isn’t already open, click on it to display the two Reports icons. 2 In the Reports slider bar, click the All Reports icon. The AP Report Menu window appears, as shown below. It displays the reports that are assigned to you. Note: If a report that you expect to see does not appear, speak to your supervisor or system administrator about adding the report to your assigned list. MultiSite Systems, LLC version 6 63 MultiSite Suite: Accounts Payable Module 3 Generating & Printing Reports Scroll down the list of reports until you find the one you want to view. Then click on the report name to select it. Tip: An arrow appears in the selection bar next to the report that you selected. A description of the report is displayed in the Report Description box at the bottom of the window. 4 Do one of the following: Click the All icon in the Preview slider bar on the right side of the AP Report Menu window. Double-click on the report name. If report parameters are associated with the selected report, a report parameters window appears. Each parameter window contains different options, depending on which report you selected in step 3. 5 Select and/or enter the parameter values by which you want to filter the selected the report. 6 Click OK. The selected report appears in the Reports window, as shown below. MultiSite Systems, LLC version 6 64 MultiSite Suite: Accounts Payable Module Generating & Printing Reports 7 To navigate in the report, print the report, export it to a file, or send it to someone as an e-mail attachment, use the instructions in the Navigating in, Printing, Exporting, and E-mailing Reports section below. 8 To close the Reports window, click the x button on the toolbar or in the upper right corner of the window. You return to the AP Report Menu window. 9 Click the Close Reports icon in the Preview slider bar of the AP Report Menu window. You return to the main screen. Generating the Check Register Report To generate the Check Register report, do the following: 1 If the Reports label bar isn’t already open, click on it to display the two Reports icons. 2 In the Reports slider bar, click the Check Register icon. The Check Register Report selection window appears. MultiSite Systems, LLC version 6 65 MultiSite Suite: Accounts Payable Module 3 Generating & Printing Reports In the text box at the top of the window, enter the first few letters of the bank account name for which you want to generate the check register report. The corresponding names appear in the window. 4 Scroll to the account name you want and click on it to select it. 5 In the Beginning Date text box, enter the starting date of the date range for which you want to display check register transactions in the report (in mmyydddd format). 6 In the Ending Date text box, enter the ending date of the date range for which you want to display check register transactions in the report (in mmyydddd format). 7 Click the Print button at the bottom of the window. The report appears in the Reports window. MultiSite Systems, LLC version 6 66 MultiSite Suite: Accounts Payable Module Generating & Printing Reports 8 To navigate in the report, print the report, export it to a file, or send it to someone as an e-mail attachment, use the instructions in the Navigating in, Printing, Exporting, and E-mailing Reports section below. 9 To close the Reports window, click the x button on the toolbar or in the upper right corner of the window. You return to the Check Register Report selection window. 10 Click the Close button at the bottom of the window. You return to the main screen. Navigating in, Printing, Exporting, and E-mailing Reports Use the toolbar buttons and labels (shown below) to navigate among the report pages, print the report, export the report to a computer file, and/or send the report as an e-mail attachment to a specified e-mail recipient. Explanations of each button and label (in sequential order from left to right) are as follows MultiSite Systems, LLC version 6 67 MultiSite Suite: Accounts Payable Module Generating & Printing Reports The red x closes the window. The first left-arrow goes to the 1st page in the report. The second left-arrow goes to the previous page in the report. The “1 of 2” indicates the page number that is currently displayed (page 1), followed by the total number of pages (2 pages). The first right-arrow goes to the next page in the report. The last right-arrow goes to the last page in the report. The square stops the viewer from searching for a particular page. You can use this button if you click the 1st page button or last page button, and it is taking too long for the viewer to find the page, due to the length of the report. The reports window displays whatever page the system is retrieving at the moment you click this stop button. The print button prints the report. The print-and-wrench button opens the Printer Setup window to select printer options, such as Landscape orientation for reports that are too wide to print in Portrait orientation. The envelope button is the export button. It opens a standard export window that enables you to export the report to a file or to send it as an e-mail attachment to an e-mail address that you specify. The 100% drop-down list enables you to select different sizes in which to view the current page, creating the effect of zooming in and out. The number next to “Total” indicates the total number of records that are in the report. The percentage that appears next to the Total Records indicator is the percentage of records in the report that have been processed by the system. “49 of 49” label indicates the number of records in the report that have been processed by the system, as well as the total number of records in the report. MultiSite Systems, LLC version 6 68 MultiSite Suite: Accounts Payable Module Setting User Preferences Setting User Preferences The Preferences feature enables you to set default values that the system uses when you work with records in the AP database. You can set any of the following defaults: The current period in which you view and manage records throughout AP. The location on your computer system where the system stores exported AP reports and documents. The report formats that you use for printing check vouchers, checks, and the Check Register report. The printer to which checks are sent for printing. If you have system administrator privileges, you can filter vendor records by company division, office, property manager, or site manager. Note: If you do not have system administrator privileges, you should not change the division, office, property manager, or site manager preferences that the system administrator has set for you. For a more detailed explanation, see the instructions below. The date range that the system uses to filter AP history and pay history records when you filter records by date range. For more information about filtering records, see Filtering Records for Customized Viewing in the topic Viewing Vendors). To set user preferences, do the following: 1 From the Tools menu on the main screen menu bar, choose Preferences. The Preferences window appears, and the General tab is displayed. MultiSite Systems, LLC version 6 69 MultiSite Suite: Accounts Payable Module 2 Setting User Preferences If you want to change the current period in which you want to view and manage AP data, enter the period in the Session Current Period text box. Note: When you change the default current period, the new default value only appears during the current session. When you exit AP, the default current period automatically resets to the actual current period. The actual current period is set by the system administrator at the beginning of each period. 3 If you want to change the location where the system saves and stores exported reports, double-click inside the Default Report Location text box. Then, in the browse window that appears, select the alternate location in the file directory. 4 If you want to change the location where the system saves and stores exported documents, double-click inside the Default Document Location text box. Then, in the browse window that appears, select the alternate location in the file directory Note: Currently, no documents are generated in AP. The Default Document Location preference is for future reference. 5 MultiSite Systems, LLC If you want to define a specific format for check vouchers, double-click inside the Check Voucher Report text box. Then, in the browse window version 6 70 MultiSite Suite: Accounts Payable Module Setting User Preferences that appears, navigate to and select the specific report file that you want to use. 6 If you want to define a specific format for printing checks, double-click inside the Check Printing Report text box. Then, in the browse window that appears, navigate to and select the specific report file that you want to use. 7 If you want to change the printer to which checks are sent for printing, select it from the Check Printer drop-down list. 8 If you want to define a specific format for the Check Register report, double-click inside the Check Register Report text box. Then, in the browse window that appears, navigate to and select the specific report file that you want to use. 9 If you have system administrator privileges, you can filter vendor records by company division, office, property manager, or site manager by selecting the name from the corresponding drop-down lists. Note: If you do not have system administrator privileges, you should not change the Default Division, Default Office, Default Property Manager, or Default Site Manager preferences. This could cause problems. For example, if you are a site manager and you select UNKNOWN for the Default Site Manager, the system will not return any vendor records when you conduct a search. The same thing will happen if you are a property manager and you select UNKNOWN for the Default Property Manager. 10 If you are filtering AP history and pay history records by date range and you want to change the date range in which the system filters those records, enter the starting date in the Filter for Check Dates Beginning text box. Then, enter the ending date in the Filter for Check Dates Ending text box. 11 Click the Save Settings button to save the default values that you selected or entered. 12 If you want to filter the fields that you see when viewing vendor detail records, continue with the next step to define the custom fields. Otherwise, skip to step 18. 13 Click the Custom View tab in the Preferences window. MultiSite Systems, LLC version 6 71 MultiSite Suite: Accounts Payable Module Setting User Preferences The following list boxes appear. 14 In the Available Fields list box, select a field that you want to view when using the Custom View filter for vendor detail records (standard 2column view). Then, click the right-arrow button. The field name is copied to the Fields in Custom View list box. 15 Repeat step 14 for every other field that you want to view when filtering vendor detail records by Custom View. 16 To remove a field from the Custom View, select it and click the leftarrow button. The field name is removed from the Fields in Custom View list box. [NOTE: Review Team: These buttons for adding and removing fields from the Custom View list are not currently working; therefore, these instructions are not entirely correct; before we finalize this AP manual, we need to find out if the right and left arrow buttons will be made operational, to go with the steps above. Otherwise, I’ll need to change the instructions to single-clicking, to move the fields from one list box to another.] MultiSite Systems, LLC version 6 72 MultiSite Suite: Accounts Payable Module Setting Reminders Tip: To add or remove all fields at once, use the double-arrow buttons. 17 Click the Save View button at the bottom of the tab. 18 Click the Save Settings button at the bottom of the window. 19 If you want to enter company information, click on the Company Info. tab in the Preferences window and change the default settings in that tab. Be sure to click the Save Settings button after working in the tab. 20 To exit the Preferences window, click the x in the upper right corner or the Close button in the bottom part of the window. You return to the main screen. Setting Reminders You can set reminders for yourself in the AP system. The system displays the reminders when you log into the system, so that you won’t forget important tasks. For example, if you set a reminder for every Thursday, the system displays the reminder every Thursday, as soon as you log into AP. Note: In order for the system to display reminders, the Show Reminders command on the Tools menu must be selected. To set reminders, do the following: 1 From the Tools menu of the main screen, choose Show Reminders. The Reminders window appears. MultiSite Systems, LLC version 6 73 MultiSite Suite: Accounts Payable Module 2 Setting Reminders Click the Add Reminder button. The Add Reminder window appears. MultiSite Systems, LLC 3 In the Beginning Date text box, select or enter the date on which you want the reminder to start. 4 In the Ending Date text box, select or enter the date on which you want the reminder to end. 5 In the Subject text box, enter the subject of the reminder. 6 In the Description text box, enter a detailed description of the reminder. 7 In the Reminder Frequency list, select the frequency with which you want to be reminded. 8 Click the Save button. version 6 74 MultiSite Suite: Accounts Payable Module Displaying the Windows Notepad & Calculator A message box appears, indicating that the reminder has been saved in the system. 9 Click OK in the message box. 10 To exit the window, click the x button in the top right corner or the Close button in the bottom part of the window. You return to the Reminders window. 11 To add another reminder, repeat steps 2-10. 12 To exit the Reminders window, click the x button in the top right corner or the Close button in the bottom part of the window. You return to the main screen. Tip: After you add reminders, they appear in a list in the Reminders window according to the frequency that you set in step 7. You can dismiss a reminder by clicking inside the corresponding check box in the Dismiss column. You can also dismiss all related reminders by clicking inside the corresponding check box in the Clear All column. If you use these features to dismiss reminders, they do not appear in the Reminders window when you log into the system. Displaying the Windows Notepad & Calculator If you want to open the Windows Notepad® or Calculator® to use while you are working in the AP module, choose Notepad or Calculator from the Tools menu. Rebuilding Layout Files Your system contains a configuration file that determines which AP icons and features appear in your own customized version of the AP screen and which ones do not. Sometimes this file gets corrupted. When that happens, the Rebuild Layout Files feature restores the system defaults so that your AP screens and windows will work properly again. MultiSite Systems, LLC version 6 75 MultiSite Suite: Accounts Payable Module Rebuilding Layout Files You should not rebuild layout files on your own. However, if you are experiencing technical difficulty, a customer support technician may ask you to use this feature. If that happens, then simply choose Rebuild Layout Files from the Tools menu. MultiSite Systems, LLC version 6 76