1
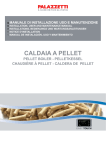
ECON D4
sauna control unit
GB
Assembly and operation instruction
Made in Germany
IP x4
Druck Nr. 29344630en / 21.14
D
1
English
content
Scope of Delivery .........................................................................................................................................4
Technical data .................................................................................................................................................5
General information about using the sauna .......................................................................................6
General safety information ........................................................................................................................7
Assembly of the control unit .....................................................................................................................9
Assembly on the wall .............................................................................................................................9
Assembly in the wall ........................................................................................................................... 10
Connection of the sensor lines.............................................................................................................. 11
Assembly of the stove sensor .......................................................................................................... 11
Installing the optional bench sensor ............................................................................................ 13
Electrical connection ................................................................................................................................ 14
Connecting the sauna heater .......................................................................................................... 14
Connection of a load switching unit (LSG) ................................................................................. 14
Connecting the vaporizer ................................................................................................................. 14
Connecting the sauna lamp ............................................................................................................. 14
Connecting a fan .................................................................................................................................. 14
Installation diagram ............................................................................................................................ 15
Terminal arrangement on the circuit board. ............................................................................. 15
Wiring diagram sauna heater up to 9 kW .................................................................................... 16
Wiring diagram sauna heater > 9 kW............................................................................................ 16
Operation ...................................................................................................................................................... 17
General..................................................................................................................................................... 17
The user interface .......................................................................................................................... 17
Control buttons .............................................................................................................................. 17
Basic stand by screen.................................................................................................................... 18
Basic operating screen ................................................................................................................. 18
Energy-saving screen.................................................................................................................... 18
Cabin lighting .................................................................................................................................. 19
Fans ..................................................................................................................................................... 20
Initial commissioning ................................................................................................................... 21
Changing the language ............................................................................................................... 22
Changing the time......................................................................................................................... 22
Activating the Life-Guard ............................................................................................................ 23
Activation/deactivation of the child lock .............................................................................. 23
Activation of the sauna stove .................................................................................................... 24
Deactivation of the sauna stove in Finnish mode .............................................................. 24
2
GB
Activation of the sauna stove with Life-Guard .................................................................... 24
Individual settings ............................................................................................................................... 25
Cabin temperature ........................................................................................................................ 25
Auto-stop .......................................................................................................................................... 26
Preselection time ........................................................................................................................... 28
Activation of the preselection time ......................................................................................... 29
Deactivation of the preselection time ................................................................................... 29
Life-Guard ......................................................................................................................................... 30
Extend heat-up time restriction ............................................................................................................ 31
Replace device fuse ................................................................................................................................... 31
Error messages ............................................................................................................................................ 32
The device switch (switch-off ) .............................................................................................................. 33
Manual specification of the lighting ................................................................................................... 34
Holiday home mode ................................................................................................................................. 35
Recycling ....................................................................................................................................................... 36
Service address ........................................................................................................................................... 36
Guarantee ..................................................................................................................................................... 36
Handling procedures for return shipments (RMA) - Details for all returns ! .......................... 37
GB
3
Standard delivery
(Subject to change)
Included in control unit scope of delivery:
1. Stove sensor board with over-temperature fuse, PTC sensor with sensor housing, two attachment screws 3 x 25 mm and sensor cable approx. 2.0 m long.
2. Plastic bag containing three mounting screws 4 x 20 mm.
3. Spare over-temperature protection
4
GB
Technical data
• Rated voltage:
400 V 3 N 50 Hz AC
• Switch output:
max. 9 kW resistive load (AC1 mode). Can be expanded to 36 kW via the connection of power switching
devices
• Heat-up time restriction:
6 h, 12 h / without heat-up time restriction
• Display:
LCD display 65 x 37 mm, graphic
• Dimensions (HxWxD):
220 x 250 x 67 mm
• Protection class:
IPx4 acc. to EN 60529 splashwater protection
• Control range in the sauna mode:
30 to 115°C
• Sensor system (temperature):
PTC sensor with safety temperature limiter 142°C
• Control characteristic:
Two-point control with fixed hysteresis of 3K.
For control via the stove sensor offset of 7K to compensate the higher temperatures directly below the
cabin ceiling
• Fan output:
max. 100 W, no capacitor motors, controlled via phase
control
• Light:
max. 100 W (automatic switching phase control / phase cut-off )
• Ambient temperatures:
-10°C to +40°C
• Storage temperature:
-20°C to +70°C
• Temperature display stove sensor
Current value on the stove sensor minus 7K to compensate the higher temperatures directly below the
cabin ceiling
• Temperature display bench sensor:
Current value on the bench sensor
GB
5
Dear customer
You have purchased a high-quality technical
device with which you will have years of sauna
fun. This sauna control unit was designed and
inspected according to the current European
safety standards and manufactured at the factory in accordance with the quality management
standard DIN EN ISO 9001:2000.
This detailed installation and operation manual
has been prepared for your information. Please
observe in particular the important notes and
the information on electrical connection.
We wish you exhilarating recreational experience
and lots of fun with your sauna!
Intended use
This sauna control unit is exclusively intended
for the control of the sauna heater in a sauna
cabin.
Any other use over and above the intended
purpose is not considered as appropriate use!
Compliance of the standard operation, maintenance and repair conditions is also an element
of appropriate use.
The manufacturer cannot be held liable for
deviating, unauthorized alterations and any resulting damages: the initiator of these changes
bears the full risk.
General information
Please check whether the unit has arrived in perfect condition. Any transport damages should be
immediately reported to the freight forwarder
delivering the goods or you should contact the
company that shipped the goods.
Please note that you will only be able to achieve
an optimum sauna climate if the cabin with its air
intake and ventilation, the sauna heater and the
control unit are aligned to each other.
Please observe the information and stipulations
made by your sauna supplier.
Sauna heaters heat up your sauna cabin using
heated convective air. Here, fresh air is drawn
in from the air intake which, when heated, rises
upwards (convection) and is then circulated
within the cabin. Part of the used air is pushed
out through the vent in the cabin. This creates a
typical sauna climate which can achieve temperatures of approx. 110°C measured directly under
the ceiling of your sauna, dropping in temperature to approx. 30-40°C towards the floor. It is
therefore not unusual to measure temperatures
of 110°C on the temperature sensor hanging
over the heater, whilst the thermometer hanging
on the sauna wall, approx. 20-25 cm under the
cabin ceiling, only indicates 85°C. The bathing
temperature generally lies between 80°C and
90°C in the area of the upper bench when the
temperature is set to maximum.
Please note that the highest temperatures are
always generated over the sauna heater and that
the temperature sensor and the safety limiter
must be mounted there in accordance with the
control unit installation instructions.
When heating up for the first time, you may
notice a slight smell caused by evaporating
lubricants used in production processes. Please
ventilate your cabin before beginning your
sauna bath.
6
GB
General safety precautions
•
•
•
This device can be used by children aged
8 upwards and by persons with physical,
sensory, or mental disabilities, or who
have inadequate experience and knowledge if they are supervised or if they have
received adequate instruction in how to
use the device safely and understand the
associated risks. Children may not play
with this device. Children may not clean
or carry out any user maintenance if unsupervised.
Children are to be supervised in order to
make sure that they do not play with this
device.
! Attention: It is forbidden to install
the control box in a closed switch cabinet
or behind a wooden panelling!
•
The electrical installation may be done
only by a qualified electrical technician.
•
You must comply with the regulations of
your power supply company and applicable VDE regulations (DIN VDE 0100).
•
•
held within operating parameters and
a minimal temperature gradient inside
the bench area of the sauna cabin can be
achieved only if unit is assembled correctly.
•
The device may only be used as intended
as a control unit for sauna ovens up to 9
kW (up to 36 kW when combined with a
contactor box).
•
Completely disconnect the control unit
from the electrical circuit, i.e. flip all circuit
breakers or the main circuit breaker during
each installation or repair.
•
Please note the safety and installation
information from the sauna oven manufacturer.
•
Always heed the specifications and instructions of the cabin manufacturer, too.
GB
7
! WARNING: Never attempt repairs or
installations yourself, as this could result
in serious injury or death. Only a qualified
technician may remove the housing cover.
Please note the dimensions in the assembly instructions, especially when installing
the temperature sensor. The temperature
above the oven is critical for the temperature setting. The temperature can be
! Attention!
When using control units that offer the
possibility of external access (GSM-module, remote button, etc.) or time-delayed
switching (preselection time, weekly timer, or similar) a protective system for the
sauna heater is required (cover protection
type 1-6 or S-Guard).
! Attention!
Dear customer,
according to the valid regulations, the
electrical connection of the sauna heater
and the control box has to be carried out
through the specialist of an authorized
electric shop
We would like to draw your attention that
in case of a warranty claim, you are kindly
requested to present a copy of the invoice
of the executive electric shop.
8
GB
Fasten the housing bottom at the two bottom openings (Fig. 4) firmly to the cabin wall.
Installation of the control unit
Wall installation
Eye level
The control unit may only be mounted outside
the sauna cabin. It is advisable to select the outside wall of the cabin to which the sauna heater
is fixed from the inside as mounting position. If
ductwork is already provided for electrical installations then the position of the control unit
is predetermined by that. Please follow the instructions for installation:
Fig. 3
17.7 cm
Fig. 1
Remove the control device cover. In order to do
this loosen the screw at the top of the housing
and pull the housing top upward while swivelling (Fig. 1).
Eye level
17 cm
approx. 34 cm
3
Fig. 3.2
Fig. 3.1
Mounting holes
Upper mounting hole
Surface-mounted installation
1. The 3 mm diameter boreholes for the supplied wood screws 4 x 20 mm are drilled
according to the dimensions shown in Fig. 3
+ 3.1.
2. Insert one of the wood screws into the top
center hole. The control unit is hooked onto
this screw. Therefore, leave the screw out by
approx. 3 mm (Fig. 3.2).
3. Hook the control unit onto the 3 mm protruding screw in the upper mounting hole.
Insert the supplied rubber grommets into
the openings at the rear wall of the housing
and insert the connecting cable through these openings.
Feed-through for:
Mains cable
Heater cable
Evaporator cable
Lamp
Fan
GB
Feedthrough for
sensor lines
Fig. 4
9
Recessed installation
1. Cut out a wall section that is at least 3.5 cm
deep according to the dimension in Fig. 5.
Eye level
202
208
Fig. 5
Insert the supplied rubber grommets into the
openings at the rear wall of the housing and
insert the connecting cables through these
openings.
Place the control unit into the wall opening and
fasten it with 4 wood screws.
Holes to fasten the control unit inside the wall
opening.
Feed-through for:
Mains cable
Heater cable
Evaporator cable
Lamp
Fan
10
Feedthrough for
sensor lines
Fig. 6
GB
Connecting the sensor cables
20 cm
You should not install sensor and power supply
lines together, or lead them through the same
feedthrough. This can lead to interferences in
the electronics, such as "fluttering" in the relays. If it is necessary to lay the cables down
together, or if the line is longer than 3m, use a
shielded sensor cable (4 x 0.5 mm²).
Connect the shielding to ground in the control
unit.
Please note that the following dimensional
information refers to values defined by the device test in compliance with EN 60335-2-53. The
stove sensor always needs to be mounted at
the place where the highest temperatures are
expected. Fig. 7 - 9 provide an overview of the
sensor assembly position, unless the position is
defined in the user manual for the stove.
Figure 9
2. Drill a hole for the cable opening, preferably
in the middle of a profiled plank.
3. Feed the sensor cable through the drilled
hole and then connect the sensor line as
shown in Fig. 10.
4. The lines for the limiter (white) and connect
the temperature sensor (red) according to
Fig. 10 to the sensor board: Then click the
sensor board into position in the housing.
1. The stove sensor is mounted in cabins up to 2
x 2 m in size as shown in Fig. 7 and 8; in larger
cabins it is mounted as shown in Fig. 7 and 9.
Figure 7
>2x2m
Fühlerleitung
6. After mounting and the correct operation of the control unit, the line to the overSensor circuit board
35 cm
Figure 8
Housing
GB
red
19 cm
Fühlerleitung
white (Limiter)
<2x2m
5. Guide the sensor lines to the control unit and feed them into the device
through the right-hand cable opening.
Install the sensor lines within the
control unit as shown in Fig. 11.
Connect the sensor lines as shown in Fig. 12.
To this end, the plug X2 is disconnected from
the board and then reinserted after the connection.
Sensor
red
white (Limiter)
Installation of the heater
sensor
Figure 10
11
Jumper
Sauna heating time limit
6h, 12h, without restriction
Borehole
Sauna ceiling
Centre sensor housing
on middle section
X2
optional bench sensor
F2
F1
Sensor cables
Figure 11
Caution! If the lines on plug X2 are
confused, this can trigger F2 and damage the unit (Replacement, see paragraph "Replace device fuse")
KTY 10/5
142°C
Temperaturfühler
Temperature sensor
X2
Limiter
weiß / white
Sensor
rot / red
Bankfühler
Auxiliary sensor
Ub
E
G
Feuchtefühler (optional)
Humidity sensor (optional)
Figure 12
temperature fuse must be checked for short
circuits. To do this, release one of the white
lines in the sensor housing. The respective
error message appears in the display.
12
12:00
Thermo sicherung
GB
Installing the optional
bench sensor
13
The following error message appears if there is
a bench sensor malfunction:
"Broken bench sensor" - interruption of the
connection in or to the sensor
Assembly site: The bench sensor (2nd temperature sensor) is attached to the ceiling above
the rear bench opposite the stove, as described
in the instructions for the assembly of the stove
sensor.
Bench sensor
or
"Short circuit bench sensor" - short circuit of
the sensor
In this case, arrange for a specialist to check or
possibly replace the sensor. The sensor has a resistance of approx 1.9 kW at 20 °C.
To be able to continue using your sauna even
though the bench sensor is faulty, the bench
sensor can be deactivated by disconnecting
the connection and the device receives power
again from the mains supply after being shut
down.
The bench sensor is connected to the control
unit via a 2-wire silicon line on the terminal on
the right-hand side of the board (see figure).
Once the malfunction has been rectified, the
control unit recognises the sensor again after
the mains supply has been switched on again.
KTY 11/5
142°C
Temperaturfühler
Temperature sensor
X2
weiß/white
rot/red
Ub
E
G
Bankfühler
Auxiliary sensor
Feuchtefühler (optional)
Humidity sensor (optional)
When the sensor is connected correctly, the
control unit recognises the sensor automatically after the mains supply has been switched on
again.
GB
13
Connecting the sauna lamp
Electrical connection
The electrical connection may only be done
by a certified electrician in compliance with
the guidelines of the local utility company
and the VDE.
In general, there may be only one fixed connection to the network; therefore equipment should
be provided that makes it possible to disconnect
the system with all poles from the network with
a contact opening width of minimum 3 mm.
All electrical installations and all connection lines
that are installed inside the cabin must be suitable for an ambient temperature of at least 170 °C.
Only use dimmable lighting and ballasts, because otherwise the lights or
the control unit may become damage.
The type of light is recognised automatically, but
it can also be defined manually. (See paragraph
"Manual definition of the lighting") The sauna
light must correspond to the splashwater protection class (IPx4) and must be resistant to the
ambient temperature. The sauna light can be
mounted anywhere, however never close to the
rising flow of hot air from the stove.
The power supply line is run to the control unit
and connected to the power input terminals.
Connecting a fan
Connecting the sauna
heater
Install the sauna heater and the vaporizer in front
of the air intake according to the manufacturer’s
installation instructions.
Only use fans whose speed can be
controlled via phase control. The fan
must have the splashwater protection
class (IPx4) and must be resistant to the ambient
temperature. The fan can be mounted anywhere,
however never close to the rising flow of hot air
from the stove and must be positioned as far
away as possible from the IR spot (it may not be
in the light path of the spot).
Run the silicone line through the ductwork to
the power unit and connect it to the appropriate
terminals as directed in the wiring diagram.
Note: If there are no empty tubes, drill a hole
next to the vent inlet opening and feed the stove
supply line(s) to the outside through this hole
to the respective terminals on the control unit.
The silicon line needs to be hidden to protect it
from external influences. Therefore use a suitable
cable duct or a PVC tube to guide the line to the
load unit.
LSG
Connecting a load switch
(LSG)
For more details, please refer to the assembly
instructions of the power switching device (LSG).
14
Assembly of a remote start module
Then insert the sauna bus cable enclosed with
the remote start module into the designated
sauna bus connection. The other end is inserted
into the respective socket in the remote start
module. Now mount the remote start module
as shown in the enclosed instructions.
GB
Installation diagram
= optional
optional
4
ECON
LSG
5
3
3
4
5
400 V 3 N AC 50 Hz
The control lamp for public systems without heat-up time restriction must be installed in the
supervisor's room.
Terminal arrangement on the circuit board
X2
Sauna bus
connection
Plug for sensor connection
Plug for bench sensor (optional)
F2
F1
Only use N-connections for fan and light
GB
15
Connecting the sauna heater (max. 9 kW)
KTY 10/5
142°C
N
W
V
U
N
Light
L1 L2 L3
Fan
ECON
X1
Lü N N Li
V1 N S1
X2
Limiter
weiß / white
Sensor
rot / red
max. 100 W
max. 100 W
P max. 9 kW
400 V 3 N AC 50 Hz
Caution: Always connect the neutral conductor (N) of the sauna stove. In humidity
mode, one phase of the sauna stove is deactivated, i.e. the heating load is not symmetrical. The result is that the neutral conductor is then no longer currentless.
Connecting the sauna heater > 9 kW
KTY 10/5
142°C
N
W
V
U
N
WB N
Light
L1 L2 L3
Fan
ECON
X1
WM Lü N N Li
V1 N S1
X2
Limiter
weiß / white
Sensor
rot / red
max. 100 W
max. 100 W
Ub
E
G
P max. 9 kW
LSG
400 V 3 N AC 50 Hz
16
400 V 3 N AC 50 Hz
GB
Operation
Once the system has been installed with all components and all covers have been fixed, you can
put your sauna unit into operation.
Over the following pages we will show you the options provided to you with the control.
Generalities
The user interface
MODE
The LCD display
Operating keys
Operating keys
= Heating on / off (stand-by)
= Cabin lighting
= raise value / next function
= lower value / next function
MODE
= Programming mode
GB
17
Default display Stand-by
is shown if the system is in Stand-by mode.
12:00
Temperatur
Auto-Stop
Vorwahlzeit
The system also returns to this screen from
other menu items, if there is no activity for >15
seconds.
30°C
5 : 59
--:--
Default display in operation
12:15
is displayed if the system is operational. The system also returns to this screen from other menu
items, if there is no activity for >15 seconds.
Temperatur
Auto-Stop
Vorwahlzeit
30°C
5 : 59
--:--
Illustration of the heating performance:
During the heating phase the bars behind the
temperature display fill continuously.
Once the target temperature has been reached,
these bars are displayed as filled.
30°C
30°C
Energy-saving display
If the unit is not used, it will switch into energysaving mode.
A moving time is shown after 5 minutes, similar to a PC screensaver. The back light for the
display is switched off after an additional 15
minutes.
You can return to the basic standby screen by
pressing any button.
12:34
The following applies for all settings:
The following is shown in the top area of the
display:
The light symbol
(is the light is switched on)
The clock symbol
12 : 00
Current time
Rolling
doors
Remote start module recognised
(flashes if contact to the module has
been interrupted in the meantime)
Residual heat phase
(after damp operation)
Child lock active
Preselection time
18
GB
To adapt the individual values to the respective requirements, the MODE button must be
pressed briefly from the standby screen.
12:15
Temperatur
Feuchte
Auto-Stop
Vorwahlzeit
Those parameters that can be changed are
shown in black and the required parameters
can be selected with the
or
buttons.
Parameters that blink on the display can be
changed and are shown in these instructions
as displayed.
30°C
5 : 59
--:--
Temperatur
You can reach the parameter level by pressing
the MODE button.
12:15
Temperatur
Feuchte
Auto-Stop
Vorwahlzeit
The name of the parameter is now blinking and
the modifiable value is highlighted in black.
The value shown in black can be changed via
or
button.
the
30°C
5 : 59
--:--
Modifiable parameter
All settings made from the standby mode are
confirmed by pressing MODE for >3 secs and
are saved in the device.
Modifiable value
The parameter stops flashing and the new value is valid until it is changed again.
12:15
Temperatur
Feuchte
Auto-Stop
Vorwahlzeit
30°C
5 : 59
--:--
If no button is pressed for >15 secs, the device
returns to the basic screen. Any changes made
will not be saved
Cabin lighting
Every time that the sauna system is activated,
the cabin lighting is automatically switched on.
symbol is shown at the top left of the
The
display. If the sauna system is switched off, the
cabin lighting is also switched off after a delay
of 30 minutes.
12:15
Temperatur
Auto-Stop
Vorwahlzeit
30°C
5 : 59
--:--
Regardless of the operational state of the sauna
system, the cabin lighting can be switched on
button.
or off at any time via the
GB
19
The cabin lighting can be dimmed and saves
this value separately for operation mode and
standby mode. To change the value for the
standby, press the light button in standby for
>3s until the light symbol appears with a bar
in the display. Now press the HIGH or DOWN
buttons repeatedly to set the value. Press the
button MODE for >3s to save the value. To set
the lighting when the sauna is operational, proceed in the same way even though the sauna
is activated (display has a black background).
Note: For reasons of safety, the brightness can
only be reduced to 25% in standby mode if this
is lower than the brightness in operation mode!
>3s
12:15
12:15
MODE > 3 s
12:00
Temperatur
Auto-Stop
Vorwahlzeit
30°C
5 : 59
--:--
MODE &
Fan
12:15
Time of day
There are four level settings for the fan in operation mode, level 0 corresponds to deactivation of the fan in operation mode. This value is
entered when the system is commissioned for
the first time, however it can be changed at a later time (see right). In the residual heat phase, a
connected fan is always operated at full power.
12 : 15
12:15
0
MODE
12:15
0
12:15
1
MODE > 3 s
20
GB
Initial commissioning
12:15
Life - Guard
12:00
DE
NL
I
GB
PL
RU
12:15
Life - Guard
12:00
DE
NL
I
GB
PL
RU
MODE > 3 s
MODE > 3 s
12:15
00:00
Tageszeit
0
0 : 00
00:00
Tageszeit
12:15
12 : 00
3
MODE
00:00
MODE > 3 s
Tageszeit
12:00
12 : 00
Temperatur
Auto-Stop
Vorwahlzeit
Life - Guard
30°C
5 : 59
--:-20 min
00:00
Tageszeit
12 : 15
MODE > 3 s
GB
21
Change time
Change language
12:00
Temperature
Auto-stop
Start time
12:00
Temperatur
Auto-Stop
Vorwahlzeit
30°C
5 : 59
--:--
30°C
5 : 59
--:--
MODE &
MODE &
12:00
12:15
Time of day
Tageszeit
12 : 15
12 : 00
MODE
00:00
12:00
DE
NL
I
GB
PL
RU
Tageszeit
0 : 00
MODE
00:00
12:00
DE
NL
I
GB
PL
RU
Tageszeit
12 : 00
MODE
00:00
Tageszeit
12:00
12 : 00
DE
NL
I
GB
PL
RU
MODE > 3 s
00:00
Tageszeit
00:00
Tageszeit
12 : 15
0 : 00
22
MODE > 3 s
GB
Activating the Life - Guard
Life-Guard is a definable, relative short time e.g.
20 min., after which the sauna system is switched off apart from the cabin lights. After this
time, the systems can be activated again for the
set time by pressing the MODE button.
12:00
Temperatur
Auto-Stop
Vorwahlzeit
Activate / deactivate the child lock
If the child lock is activated (the key symbol is
visible in the upper part of the display), only the
cabin lights can be switched. All other buttons
have no function. The child lock can be activated / deactivated both in standby and also operation mode. The system can be switched off in
operation mode.
30°C
5 : 59
--:--
Activate
Stand by
MODE &
Operations
12:15
12:00
Temperatur
Auto-Stop
Vorwahlzeit
12:15
Tageszeit
Temperatur
Auto-Stop
Vorwahlzeit
30°C
5 : 59
--:--
12 : 15
&
>3s
12:00
12:15
Temperatur
Auto-Stop
Vorwahlzeit
30°C
5 : 59
--:--
30°C
5 : 59
--:--
12:15
Temperatur
Auto-Stop
Vorwahlzeit
30°C
5 : 59
--:--
Temperatur
Auto-Stop
Vorwahlzeit
30°C
5 : 59
--:--
Life - Guard
Deactivate
12:15
12:00
12:15
Temperatur
Auto-Stop
Vorwahlzeit
30°C
5 : 59
--:--
Life - Guard
&
MODE > 3 s
12:00
Temperatur
Auto-Stop
Vorwahlzeit
Life - Guard
>3s
12:15
12:00
Temperatur
Auto-Stop
Vorwahlzeit
30°C
5 : 59
--:--
Temperatur
Auto-Stop
Vorwahlzeit
30°C
5 : 59
--:--
30°C
5 : 59
--:-20 min
GB
23
Switching on the sauna unit
12:00
Activation of the sauna system with
Life-Guard
12:00
Temperatur
Auto-Stop
Vorwahlzeit
30°C
5 : 59
--:--
Temperatur
Auto-Stop
Vorwahlzeit
Life - Guard
>3s
30°C
5 : 59
--:-20 min
>3s
12:15
Temperatur
Auto-Stop
Vorwahlzeit
12:15
30°C
5 : 59
--:--
Temperatur
Auto-Stop
Vorwahlzeit
Life - Guard
30°C
5 : 59
--:-20 min
The sauna stove heats up normally, without
Life-Guard time For activation of the function
Life-Guard.
MODE
Deactivation of the sauna system in
Finnish mode
2
12:15
Temperatur
Auto-Stop
Vorwahlzeit
Life - Guard
12:15
Temperatur
Auto-Stop
Vorwahlzeit
30°C
5 : 59
--:-20 min
30°C
5 : 59
--:--
After expiration of the "Life - Guard" - time the
sauna heater is switched off and the entire display blinks.
Auto-Stop-Time
12:15
12:00
Temperatur
Auto-Stop
Vorwahlzeit
Temperatur
Auto-Stop
Vorwahlzeit
Life - Guard
30°C
5 : 59
--:--
30°C
5 : 59
--:-20 min
Restart
MODE
12:00
Temperatur
Auto-Stop
Vorwahlzeit
Life - Guard
30°C
5 : 59
--:-20 min
or switch off the system
Note:
In the Life-Guard mode, no changes can be
made to the temperature or humidity if the device is operational (active heating).
24
12:00
Temperatur
Auto-Stop
Vorwahlzeit
Life - Guard
GB
30°C
5 : 59
--:-20 min
Individual Settings
The following are options for adapting the control systems to your individual needs. The various
parameters can be changed in standby or in operation mode and the changes are saved in the
device. Changes made in operation mode are implemented immediately.
Cabin temperature
Setting range: Finnish mode 30 - 115°C
In operation
In Stand-by
12:15
12:00
Temperatur
Auto-Stop
Vorwahlzeit
Temperatur
Auto-Stop
Vorwahlzeit
30°C
5 : 59
--:--
MODE
MODE
12:15
12:15
Temperatur
Auto-Stop
Vorwahlzeit
Temperatur
Auto-Stop
Vorwahlzeit
30°C
5 : 59
--:--
12:15
Temperatur
Auto-Stop
Vorwahlzeit
30°C
5 : 59
--:--
Temperatur
Auto-Stop
Vorwahlzeit
85°C
5 : 59
--:--
12:15
Temperatur
Auto-Stop
Vorwahlzeit
30°C
5 : 59
--:--
Temperatur
Auto-Stop
Vorwahlzeit
85°C
5 : 59
--:--
12:15
12:15
MODE > 3 s
MODE > 3 s
12:15
15 s
85°C
5 : 59
--:--
12:15
85°C
5 : 59
--:--
Temperatur
Auto-Stop
Vorwahlzeit
12:15
12:15
Temperatur
Auto-Stop
Vorwahlzeit
85°C
5 : 59
--:--
15 s
>3s
12:00
Temperatur
Auto-Stop
Vorwahlzeit
30°C
5 : 59
--:--
MODE
MODE
Temperatur
Auto-Stop
Vorwahlzeit
30°C
5 : 59
--:--
Temperatur
Auto-Stop
Vorwahlzeit
85°C
5 : 59
--:--
GB
85°C
5 : 59
--:--
25
Auto-stop / heat-up time restriction
Auto-Stop is the time to which the heating time is limited. The sauna unit automatically turns off
once this time has expired.
Depending on the configuration of the control unit, a time between 0:01 and 6:00 or 12:00 hours
can be set (see page 31).
In Stand-by
In operation
12:00
12:15
Temperatur
Auto-Stop
Vorwahlzeit
30°C
5 : 59
--:--
Temperatur
Auto-Stop
Vorwahlzeit
MODE
MODE
12:15
Temperatur
Auto-Stop
Vorwahlzeit
12:15
30°C
5 : 59
--:--
Temperatur
Auto-Stop
Vorwahlzeit
12:15
Temperatur
Auto-Stop
Vorwahlzeit
Temperatur
Auto-Stop
Vorwahlzeit
MODE
30°C
5 : 59
--:--
MODE
12:15
Temperatur
Auto-Stop
Vorwahlzeit
30°C
5 : 59
--:--
Temperatur
Auto-Stop
Vorwahlzeit
30°C
3 : 59
--:--
12:15
Temperatur
Auto-Stop
Vorwahlzeit
30°C
5 : 59
5
--:--
Temperatur
Auto-Stop
Vorwahlzeit
30°C
5 : 59
3
--:--
12:15
12:15
MODE
MODE
12:15
26
30°C
5 : 59
--:--
12:15
30°C
5 : 59
--:--
Temperatur
Auto-Stop
Vorwahlzeit
30°C
5 : 59
--:--
12:15
30°C
3 : 59
--:--
Temperatur
Auto-Stop
Vorwahlzeit
GB
30°C
5 : 59
3
--:--
12:15
Temperatur
Auto-Stop
Vorwahlzeit
12:15
Temperatur
Auto-Stop
Vorwahlzeit
30°C
3 : 30
--:--
MODE > 3 s
MODE > 3 s
12:00
Temperatur
Auto-Stop
Vorwahlzeit
15 s
Temperatur
Auto-Stop
Vorwahlzeit
30°C
3 : 30
--:--
12:15
Temperatur
Auto-Stop
Vorwahlzeit
30°C
3 : 30
--:--
12:15
Temperatur
Auto-Stop
Vorwahlzeit
30°C
3 : 30
--:--
15 s
>3s
12:00
30°C
5 : 30
3
--:--
12:15
Temperatur
Auto-Stop
Vorwahlzeit
30°C
3 : 29
--:--
GB
30°C
3 : 29
--:--
12:00
Temperatur
Auto-Stop
Vorwahlzeit
30°C
3 : 30
--:--
27
Preselection time
The preselection time is used to pre-select the activation time of your sauna stove within 24 hours.
Always make sure that there are no objects on the sauna unit before the
heating process begins. Risk of fire!!
Please remember however that the cabin must heat up for approx. 40-50 minutes in order to
achieve a pleasant climate in the cabin. If, for example. you wish to start with your sauna bath at
18:00 hrs, please select 17:10 hrs as your preselection time.
if the sauna system is to be used without a preselection time, "-- : --" must be entered into the display under preselection time. If "00:00" is entered, the sauna will start at 0:00!
In Stand-by
In operation
12:00
Temperatur
Auto-Stop
Vorwahlzeit
12:15
30°C
5 : 59
--:--
Temperatur
Auto-Stop
Vorwahlzeit
MODE
MODE
12:15
Temperatur
Auto-Stop
Vorwahlzeit
12:15
30°C
5 : 59
--:--
Temperatur
Auto-Stop
Vorwahlzeit
12:15
Temperatur
Auto-Stop
Vorwahlzeit
Temperatur
Auto-Stop
Vorwahlzeit
12:15
Temperatur
Auto-Stop
Vorwahlzeit
30°C
5 : 59
--:--
30°C
5 : 59
--:--
12:15
12:15
Temperatur
Auto-Stop
Vorwahlzeit
30°C
5 : 59
17 : - -
MODE
MODE
28
30°C
5 : 59
--:--
MODE
12:15
Temperatur
Auto-Stop
Vorwahlzeit
30°C
5 : 59
--:--
12:15
30°C
5 : 59
--:--
MODE
Temperatur
Auto-Stop
Vorwahlzeit
30°C
5 : 59
--:--
GB
30°C
5 : 59
17 : - -
12:15
Temperatur
Auto-Stop
Vorwahlzeit
12:15
30°C
5 : 59
17 : - -
Temperatur
Auto-Stop
Vorwahlzeit
30°C
5 : 59
--:--
12:15
12:15
Temperatur
Auto-Stop
Vorwahlzeit
Temperatur
Auto-Stop
Vorwahlzeit
30°C
5 : 59
17 : 10
30°C
5 : 59
17 : 10
MODE > 3 s
MODE > 3 s
12:15
12:15
Temperatur
Auto-Stop
Vorwahlzeit
Temperatur
Auto-Stop
Vorwahlzeit
30°C
5 : 59
17 : 10
15 s
15 s
12:15
12:15
Temperatur
Auto-Stop
Vorwahlzeit
30°C
5 : 59
--:--
30°C
5 : 59
17 : 10
Temperatur
Auto-Stop
Vorwahlzeit
30°C
5 : 59
17 : 10
12:15
12:15
Temperatur
Auto-Stop
Vorwahlzeit
30°C
5 : 59
17 : 10
Temperatur
Auto-Stop
Vorwahlzeit
30°C
5 : 59
17 : 10
To the preselection time
12:15
Temperatur
Auto-Stop
Vorwahlzeit
30°C
5 : 59
17 : 10
Deactivate the preselection time
Activate the preselection time
12:15
Temperatur
Auto-Stop
Vorwahlzeit
30°C
5 : 59
17 : 10
12:15
Temperatur
Auto-Stop
Vorwahlzeit
30°C
5 : 59
17 : 10
12:15
To the preselection time
Temperatur
Auto-Stop
Vorwahlzeit
30°C
5 : 59
17 : 10
12:15
Temperatur
Auto-Stop
Vorwahlzeit
30°C
5 : 59
17 : 10
If the sauna system is to be used without a preselection time,
"-- : --" must be entered in the display under
preselection time.
GB
29
Life-Guard
Here you can set the time after which the sauna system should be deactivated and reactivated
again for the Life-Guard time by pressing the MODE button.
This setting can only be made in standby mode if the Life-Guard function is active.
In Stand-by
12:00
Temperatur
Auto-Stop
Vorwahlzeit
Life - Guard
12:00
30°C
5 : 59
--:-20 min
Temperatur
Auto-Stop
Vorwahlzeit
Life - Guard
MODE
15 s
30°C
5 : 59
--:-15 min
>3s
12:00
Temperatur
Auto-Stop
Vorwahlzeit
Life - Guard
30°C
5 : 59
--:-20 min
Temperatur
Auto-Stop
Vorwahlzeit
Life - Guard
30°C
5 : 59
--:-20 min
Temperatur
Auto-Stop
Vorwahlzeit
Life - Guard
12:00
MODE
12:00
Temperatur
Auto-Stop
Vorwahlzeit
Life - Guard
30°C
5 : 59
--:-20 min
12:00
Temperatur
Auto-Stop
Vorwahlzeit
Life - Guard
30°C
5 : 59
--:-15 min
MODE
30
12:15
12:00
GB
30°C
5 : 59
--:-15 min
Temperatur
Auto-Stop
Vorwahlzeit
Life - Guard
30°C
5 : 59
--:-14 min
Extend heat-up time restriction / replace device fuse
By altering a jumper you can extend the heat-up restriction from 6:00 (standard) to 12:00 hours or
"indefinite". Please note that extensions are only allowed in certain commercially operated sauna
systems.
Only allow a specialist to carry out this work. Before working on the open control
unit, disconnect all poles from the mains. (Switch off the master switch, or trigger the FI
switch). Risk of an electrical shock!
Loosen the four screws on the opened unit that hold the circuit board.
Jumper for the heat-up time restriction (6 hours default setting)
Loosen screws
Loosen screws
X2
F2
F1
Jumper
6:00 hours heat-up time restriction (default setting)
Jumper
12:00 hours heat-up time restriction
Jumper
without heat-up time restriction (set auto-stop to - - : - - )
Control board
F2
Load board D4
F1
Unit fuses
F1 = T 2A
Fuse electronics primary and light and fan
F2 = T 315 mA
Fuse of the electronics secondary
GB
31
Error messages
The control unit continuously monitors the sensor for short circuits and interruptions. At the same
time, the system checks to ensure that there is enough water in the vaporizer tank.
The error messages appear as follows:
Display
Cause
12:00
Fuehler bruch
12:00
Remedy
= interrupted room sensor circuit
Arrange for a specialist to
check the lines and PTC.
The temperature sensor (PTC) is faulty, or the line to the temperature
sensor is interrupted.
PTC at 20°C approx. 1.9 kW
replace if necessary.
= short-circuit in the room sensor circuit
Arrange for a specialist to
check the lines and PTC.
temperature sensor (PTC) is faulty, or
the line to the temperature sensor has
a short circuit.
Fuehler schluss
12:00
= interrupted limiter circuit
The temperature fuse (142°C)
has triggered or the line to the
temperature fuse is interrupted.
Arrange for a specialist to check the lines
and temperature fuse.
12:00
= interrupted bench sensor
Arrange for a specialist to
check the lines and PTC.
PTC at 20°C approx. 1.9 kW
replace if necessary.
= short circuit bench sensor
Arrange for a specialist to
check the lines and PTC.
PTC at 20°C approx. 1.9 kW
replace if necessary.
Thermo sicherung
Bankfühler bruch
12:00
Bankfühler schluss
32
GB
The device „Switch-off “ switch
Switch-off by ECON control units
You will find the rocker switch on the top side
of the control unit. You can completely disconnect the control unit from the mains using this
switch.
Switch-off
Unit turned on
(default Position I)
Press the switch on the left side of the rocker
to the first latch (switch setting 0). The switch
will be in the middle position. The unit is now
completely switched off (disconnected).
Unit fully switched off
Position 0.
To turn the light on in the cabin while the unit
is still disconnected push the left side of the rocker to the second latch (switch setting II).
Light switched on;
Unit switched off.
Position II.
Unit switched on.
Position I.
To make the unit ready for operation, switch back
to the initial position (switch setting I). The unit
will return to stand-by mode.
GB
33
Manual specification of the lighting:
The control system recognises inductive loads via a voltage rise and then switches from
phase control to phase cut-off. If there are recognition problems, the phase control type can
be defined manually.
Only a specialist from an authorised specialist company may carry out this work!
1. Disconnect the lighting from the control system
2. Switch the control system on.
3. Go to the menu for setting the light intensity by pressing the
button for >3s
4. Now you can configure the light output:
a. Phase cut-off for capacitative and resistive loads: Press
display R,C in the display
b. Phase cut-off for inductive loads: Press
display
c. Automatic recognition: Press
display
MODE
5. Save the setting by pressing the
+
MODE
MODE
+
at the same time,
at the same time, display L in the
at the same time, display R, C / L AUTO in the
button for >3s
6. Switch the control system off
7. Connect the lighting again
34
+
MODE
GB
Holiday home mode
The holiday home mode allows the control
system to be blocked so that only the most
necessary functions are visible and the language for the menu needs to be selected
every time before use.
The holiday home mode is activated and deactivated by keeping the Up+Down buttons
pressed whilst switching on via Switch-Off.
This setting is saved permanently. When
the holiday home mode is active, a house
symbol is shown at the position of the child
lock key.
The control system functions as follows in
the holiday home mode:
* the language is queried every time the control system is activated or when the system
returns from the energy-saving mode
* preselection time, Life-Guard, auto-stop and
child lock are not available
* the settings menu with the time, language,
fan setting and Life-Guard cannot be accessed
* Only the temperature and humidity (only for
H4) can be set, and the light activated
GB
35
WARRANTY
The warranty is provided according to the legal
regulations at present.
Manufacturer’s guarantee:
- The period of guarantee starts from the date
of purchase and lasts up to 2 years by commercial use and 3 years by private use.
- Always include the completed guarantee certificate when returning equipment.
- The guarantee is void for appliances which
have been modified without manufacturer’s
explicit agreement.
- Damages caused by incorrect operation or
handling through non-authorized persons
are not covered under the terms of guarantee.
- In the event of a claim please indicate the serial number as well as the item number and
model name with detailed description of the
fault.
Please keep this address in a safe place together with the installation guide.
To help us answer your questions quickly and
competently please provide the information
printed on the type shield including the model,
item no. and serial no., in all inquiries.
- This guarantee covers defective parts and labour but not the defects caused by wear and
tear.
In case of complaint please return the equipment in its original packaging or other suitable
packaging (caution: danger of transport damage) to our service department.
Always include the completed warranty certificate when returning equipment.
Possible shipping costs arising from the transport to and from point of repair cannot be overtaken by us.
Service Address:
EOS Saunatechnik GmbH
Schneiderstriesch 1
Outside of Germany please contact your specialist dealer in case of warranty claims. Direct
warranty processing with our service department is in this case not possible.
Equipment commissioning date:
35759 Driedorf, Germany
Tel: +49 (0)2775 82-514
Fax: +49 (0)2775 82-431
Stamp and signature of the authorized electrician:
[email protected]
www.eos-sauna.de
36
GB
Handling procedures for return shipments (RMA) - Details for all returns !
Dear customer
we hope that you will be satisfied with the purchased EOS product. In the rear case if you
may have a claim and will need to return a product, please follow the procedures specified
below. This will enable to ensure a quick and effective handling of the return shipment.
Please observe for all returns!
• Please add the provided RMA-voucher completely filled out together with an invoice
copy to the return shipment! Do not stick it on the goods or on the packaging. We do not
accept return shipments without these papers.
• Not prepaid parcels will be refused and returned to Sender! Please always ask your dealer or
EOS service department about the most economical return shipment way.
• Please pay attention that the goods have to be sent back in the original scope of delivery
and in original packing.
• We recommend to use an additional solid and break-proof covering box which should be
padded out with styrofoam, paper or similar. Transport damages as a result of faulty packing
are for the sender‘s account.
Reason of complaint and proceedings:
1) Transportation damage
2) Faulty goods
• Please check the content
of your parcel immediately and advise the
forwarding company of
a claim (parcel service/
freight forwarder)
• The implied warrenty period is 2 years.Please contact your dealer in case of
faulty or wrong articles
or missing accessories.
He will discuss with you
the individual case and
try for immediate and
customer-friendly solution.
• Do not use damaged
goods!
• Ask the forwarder for a
written acknowledgement of the damages.
• Report
the
claim
promptly by phone to
your dealer. He will discuss with you how to act
in this case.
• If the transport box has
been damaged, please
use an additional covering box. Do not forget to
add the acknowledgement of the damage of
the forwarding company !
• For economic returns
within Germany you will
get an RMA-number
from the manufacturer.
• All returns have to be in
the original packing of
the goods with corresponding accessories.
Please repack the goods
to avoid damages. In case
of wrong delivery, please
do not use this article .
GB
3) Problems of installation and functioning
• Please read the manual
carefully first of all and
pay attention to the indicated assembly or installing instructions.
• Your dealer should be
the first contact person
because he knows his
products best and also
knows possible problems.
• In case of function
problems with an article, please check at
first whether there is an
obvious material defect.
The quality system in our
factory reduces malfunctions of new appliances
to almost zero.
37