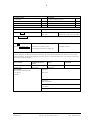
1
ROVSING A/S
GSAF
GWDU Development
Users’ Manual and Operations Manual
Doc. No:
Issue:
Date:
UM-114-001-ROV
1.4
24 February 1999
Ext. Doc. No:
ROVSING A/S
Dyregårdsvej 2, P.O. Box 30
DK-2740 Skovlunde
Phone:
+45 44 200 800
Fax:
+45 44 200 801
VAT No.:
16 13 90 84
ii
CLASSIFICATION
CATEGORY
1. Unclassified
1. Config controlled for approval
2. Industry
2. Config controlled for review
3. Restricted
x
4. Confidential
x
3. Non config controlled for review
4. For information
CONTRACT
Contract number: GSAF-CD-ROVI-34
Issuing organisation: DASA
Programme: GSAF
Contractual date: Issue 2,
April 1996
Work package number:
11QAP-BM, 11QAR-BM & 11QAS-BM
TITLE: Users’ Manual
Issue: 1.4
INTERNAL REFERENCE/:
NUMBER of pages: 51
Issue date: 24 February 1999
R:\PROJECT\114 FWDU_GWDU
Maint\GWDU\Documents\UM-GWDU.doc
NUMBER of annexes:
SUMMARY:
This is the Software Users’ Manual and Operations Manual for the Ground Window Definition Utility (GWDU) part of the project
GWDU Development. This document specifies the instructions necessary to operate the GWDU editor in the creation of Ground Synoptic Displays and Ground Symbols.
HOST SYSTEM
HARDWARE EQUIPMENT
MEDIA
SOFTWARE
LANGUAGE CODE:
Nature: M.O.
Nature and type: DD
Name: Word 97
ENGLISH (UK)
HP LaserJet
Identification:
KEY WORDS:
Prepared by:
Ground Window Definition Utility
Users’ Manual
Claus Olsen
DataViews
Approved by:
Poul Erik Holmdahl
Authorised by:
Allan Mahler
CCB date:
GSAF
ROVSING A/S
GWDU Development
Doc.No. UM-114-001-ROV: Issue: 1.4
USERS’ Manual
Date: 24 February 1999
iii
DISTRIBUTION LIST
USER SYMBOL
o For information
x For action
User Symbol
x
o
o
o
o
Address Codes
DASA-RI, RIT14
ROVSING A/S
ROVSING A/S
ROVSING A/S
ROVSING A/S
Name
Peter Heckmann
Poul Erik Holmdahl
Allan Mahler
Claus Olsen
Project library
This document and the subjects described in it are copyrighted with all rights reserved. Under the copyright laws, the documentation may
not be copied, photocopied, reproduced, translated, or summarised to any electronic medium or machine readable form, in whole or in
part, without written consent of ROVSING A/S.
Copyright©1999, ROVSING A/S
Dyregårdsvej 2
P. O. Box 30
DK-2740 Skovlunde
Denmark
GSAF
ROVSING A/S
GWDU Development
Doc.No. UM-114-001-ROV: Issue: 1.4
USERS’ Manual
Date: 24 February 1999
iv
DOCUMENT CHANGE LOG
Issue
1.0
Draft
Date
13 September 1996
Modified Sections
All
Reason For Change
First issue.(Draft)
1.0
5 November 1996
All
DN-114-001-DASA-UM-001
DN-114-001-DASA-UM-003
DN-114-001-DASA-UM-004
1.1
6 January 1997
All
GWDU v3.1 issue
1.2
30 April 1997
All
GWDU v4.0 changes + GWDU v4.1 changes implemented
early
1.3
13 November 1997
All
GWDU v4.1.1 issue
1.4
29 May 1998
Updated for GWDU version 4.2.1
All
DN-114-001-DASA-UM-018 Editorials
DN-114-001-DASA-UM-019 Outdated / missing info
Section 2.1.1 and 2.1.5
point 1
Section 1.6
point 2
Section 2.6.1 and 2.6.2
point 3
Section 2.6.5 and 2.6.6
point 4
Section 2.6.5 and 2.6.6
point 5
Section 2.3, 2.4.1.5, 2.4.1.6,
2.4.3.4 and 2.1.5
point 6
Section 2.6.5.1
GSAF
ROVSING A/S
SPR-6116
GWDU Development
Doc.No. UM-114-001-ROV: Issue: 1.4
USERS’ Manual
Date: 24 February 1999
v
TABLE OF CONTENTS
1 INTRODUCTION........................................................................................................... 1
1.1 Purpose ................................................................................................................... 1
1.2 Scope ...................................................................................................................... 1
1.3 Definitions and Acronyms...................................................................................... 1
1.4 References .............................................................................................................. 2
1.5 Applicable Documents ........................................................................................... 2
1.6 Overview ................................................................................................................ 2
1.6.1 GWDU Context................................................................................................. 3
2 GWDU Operation .......................................................................................................... 4
2.1 GWDU Start-up...................................................................................................... 4
2.1.1 Invocation.......................................................................................................... 4
2.1.2 GWDU Initial appearance................................................................................. 5
2.1.3 MDB End-Item Locking ................................................................................... 6
2.1.4 General Editing Commands .............................................................................. 6
2.1.5 Default MDB Pathname and the Pathname Support Tool ................................ 6
2.2 Object Creation....................................................................................................... 7
2.2.1 Primitive Elements............................................................................................ 7
2.2.2 Subdrawings...................................................................................................... 7
2.2.3 User-Defined Symbols ...................................................................................... 8
2.2.4 Input Objects ..................................................................................................... 8
2.2.5 Graph Output Objects ....................................................................................... 9
2.2.6 Icon.................................................................................................................... 9
2.2.7 Image................................................................................................................. 9
2.3 Changing and Setting Default Object Attributes .................................................. 10
2.4 Pull-Down Menu Options..................................................................................... 11
2.4.1 File .................................................................................................................. 11
2.4.1.1 Open ......................................................................................................... 11
2.4.1.2 Merge ....................................................................................................... 11
2.4.1.3 Save.......................................................................................................... 11
2.4.1.4 Save As .................................................................................................... 12
2.4.1.5 Load Settings............................................................................................ 12
2.4.1.6 Save Settings ............................................................................................ 12
2.4.1.7 Quit .......................................................................................................... 13
2.4.2 Edit .................................................................................................................. 13
2.4.2.1 Group ....................................................................................................... 13
2.4.2.2 Delete ....................................................................................................... 13
2.4.2.3 Undelete ................................................................................................... 13
2.4.2.4 Cut............................................................................................................ 14
2.4.2.5 Paste ......................................................................................................... 14
2.4.2.6 Copy......................................................................................................... 14
2.4.2.7 Cp. Off ..................................................................................................... 14
GSAF
ROVSING A/S
GWDU Development
Doc.No. UM-114-001-ROV: Issue: 1.4
USERS’ Manual
Date: 24 February 1999
vi
2.4.2.8 Update ...................................................................................................... 14
2.4.2.9 Show Clipboard ....................................................................................... 15
2.4.3 View ................................................................................................................ 15
2.4.3.1 Refresh ..................................................................................................... 15
2.4.3.2 Grid .......................................................................................................... 15
2.4.3.3 Grid Spacing/Color .................................................................................. 15
2.4.3.4 Report....................................................................................................... 16
2.4.3.5 Snap.......................................................................................................... 16
2.4.3.6 Zoom ........................................................................................................ 16
2.4.4 File Indicator ................................................................................................... 17
2.5 Object Manipulation Commands.......................................................................... 17
2.5.1 Grid Snap ........................................................................................................ 17
2.5.2 Edit Text.......................................................................................................... 17
2.5.3 Align................................................................................................................ 17
2.5.4 Aspect.............................................................................................................. 18
2.5.5 Scale ................................................................................................................ 18
2.5.6 Rotate .............................................................................................................. 18
2.5.7 Mirror .............................................................................................................. 19
2.5.8 Reorder............................................................................................................ 19
2.6 Object Editing and End-Item attachment ............................................................. 19
2.6.1 End-Item attachment : General rules............................................................... 19
2.6.2 Subdrawing Editing......................................................................................... 21
2.6.3 Symbol Editing................................................................................................ 23
2.6.4 Input Object Editing........................................................................................ 25
2.6.5 Graph Object Editing ...................................................................................... 27
2.6.5.1 Special notes on Graph Objects ............................................................... 29
2.6.6 Threshold Editing............................................................................................ 30
2.7 Primitive Element Dynamics................................................................................ 32
2.8 Preview ................................................................................................................. 33
2.8.1 User-Defined Run Files................................................................................... 34
2.9 Miscellaneous ....................................................................................................... 36
2.9.1 Drawing Area Key Events............................................................................... 36
2.9.2 Display Parameters.......................................................................................... 36
2.10 Symbol Editing Mode........................................................................................... 37
2.11 GWDU v2 Compatibility ..................................................................................... 37
2.12 Backwards compatibility ...................................................................................... 38
Appendix A: GWDU MESSAGES ..................................................................................A-1
Error messages .....................................................................................A-1
Warning messages................................................................................A-2
Invocation messages.............................................................................A-6
GSAF
ROVSING A/S
GWDU Development
Doc.No. UM-114-001-ROV: Issue: 1.4
USERS’ Manual
Date: 24 February 1999
1
1 INTRODUCTION
1.1 Purpose
This is the Software Users’ Manual and Operations Manual for the Ground Window Definition Utility (GWDU). This document specifies the instructions necessary to operate the
GWDU editor in the development of Ground Synoptic Displays and Ground Symbols.
1.2 Scope
This document will explain all GWDU specific dialogues and editing techniques necessary
to operate the GWDU. It does not, however, explain many of the DataViews concepts
needed. This information should be obtained from the DataViews documentation, ie, the
XDGeck and DV-Draw Users’ manuals, ref [DV-1] [DV-2]. The DataViews Technical
Overview manual, ref [DV-4] also provides a good overview for the complete beginner.
1.3 Definitions and Acronyms
Definitions
DataViews
Graphical User Interface development tool
from DataViews Corporation
Graph
Any DataViews graphical object.
Acronyms
CCU
CDU
CGS
CGSI
GSAF
DASA
GWDU
HCI
I_MDB
ICD
MDA
MDB
GSAF
ROVSING A/S
Configuration Control Unit
Configuration Data Unit
Columbus Ground System
Columbus Ground System Infrastructure
Ground Software Avionics Facility
Daimler-Benz Aerospace (the customer)
Ground Window Definition Utility
Human Computer Interface (CGS SW product)
Interactive MDB Browser
Interface Control Document
Mission Database Application
Mission Database
GWDU Development
Doc.No. UM-114-001-ROV: Issue: 1.4
USERS’ Manual
Date: 24 February 1999
2
1.4 References
[DV-1]
DataViews v9.7 Graphical Editor Construction Kit Users’ Guide,
August 1995, Doc.No. 820-00077-00, Revision B
[DV-2]
DataViews v9.7 DV-Draw Users’ Guide,
July 1995, Doc.No. 820-00013-00, Revision B
[DV-3]
DataViews v9.7 DV-Tools Reference Manual,
July 1995, Doc.No. 820-00017-00, Revision B
[DV-4]
DataViews v9.7 Technical Overview,
July 1995, Doc.No. 820-00116-00, Revision B
1.5 Applicable Documents
[ICD-1]
GWDU ICD, 27-05-98, Issue 1.3, ICD-114-001-ROV
[SPE-1]
GWDU Product Requirement Specification, COL-RIBRE-SPE-0035, Issue 4, 04-07-97
1.6 Overview
The following sections outline the GWDU specific modifications to the XDGeck v3.1 demonstration editor [DV-1, chapter5]. Much of the GWDU functionality is identical to that
available within the commercially available DV-Draw editor [DV-2]. This functionality will
not be repeated in this document. This document will concentrate on the user interface differences of the GWDU editor and DV-Draw, and will show how to obtain the corresponding
DV-Draw functionality in the GWDU.
The main GWDU screen is similar to that of DV-Draw, particularly with respect to the positioning of the various menu items available. However, the GWDU editing dialogues will be
explained as they vary slightly from DV-Draw.
Note that the GWDU version number appears in the title of the GWDU application window.
The figures throughout this document showing screen shots may show older versions than
the current version in the title. This is the case if the screen shot in question has not changed
in subsequent versions.
In this issue of the manual the GWDU application windows are valid for all GWDU versions
4.1.x and 4.2.x, for all values of x.
GSAF
ROVSING A/S
GWDU Development
Doc.No. UM-114-001-ROV: Issue: 1.4
USERS’ Manual
Date: 24 February 1999
3
1.6.1 GWDU Context
The role of the GWDU is shown in Figure 1. The user creates the synoptic displays using the
GWDU. While creating the synoptic displays the GWDU extracts information about the referenced end items from the Mission Database. The synoptic displays are stored as end items
in the Mission Database when the user has completed the synoptic display definition. Synoptic displays already defined in the Mission Database can be extracted and edited by the
GWDU. The synoptic display end items will also contain other information such as crossreference lists containing the identification of referenced end items.
GWDU
USER
Display creation
Ground Based
Mission
Database
(MDB)
Runtime
Executor
(CGS HCI)
User
Figure 1: Product Environment
In the runtime environment, the CGS HCI executor handles the synoptic displays. The executor is not part of this project, but the data formats generated by the GWDU must be in accordance with the requirements of the executor. These formats are described in the [ICD-1].
GSAF
ROVSING A/S
GWDU Development
Doc.No. UM-114-001-ROV: Issue: 1.4
USERS’ Manual
Date: 24 February 1999
4
2 GWDU OPERATION
2.1 GWDU Start-up
2.1.1 Invocation
The GWDU is invoked from the I_MDB by selecting either a Synoptic Display, of type
WDU_GROUND_SYNOPTIC_DISPLAY, or a Symbol, type WDU_GROUND_SYMBOL.
Then select “Tools” from the right-hand mouse button menu, and from the resulting tool list,
select “GWDU Editor…”
The GWDU will appear and load the specified Synoptic Display or Symbol.
The GWDU will then generate an initial “Default Pathname” based on the currently invoked
end-item location within the MDB. The default pathname makes it easier for the user to input
end-item references during the editing session. The initial default path is, in fact, the enditem path string with the end-item name removed.
For example, if the end-item “\EURECA\EGSE\TEST\ROVSINGTEST\DISPLAY_1” is invoked, then the first time the user is prompted for an end-item reference, the string
“\EURECA\EGSE\TEST\ROVSINGTEST\” will be given as pathname.
GSAF
ROVSING A/S
GWDU Development
Doc.No. UM-114-001-ROV: Issue: 1.4
USERS’ Manual
Date: 24 February 1999
5
2.1.2 GWDU Initial appearance
1
2
6
3
7
8
4
5
Figure 2 : GWDU main screen
The designated points are as follows:
1. The window title. The title contains the tool version, the full path name of the object edited, and in
square brackets the navigation scope (CCU), the mode of editing (SYNOPTIC) and access mode
(Read-Write).
2. The main menu. Contains three pull-down menus.
3. The colour palette. Used to select colour. Just above the palette is the colour index, showing the index for the selected colour.
4. Points to the object creation menu column.
5. The drawing area.
6. Message line. A text field used to inform the user, or to prompt the user for actions.
7. Attribute Menu. Contains menus that lets the user specify object attributes, e.g. line weight, text font
etc.
8. Edit and object manipulation menu. Contains menus that let the user edit settings for objects. E.g.
the end-item attachments, the thresholds etc. and the size of the objects.
The application title will show the MDB end-item loaded and will also show whether the
editor is in SYNOPTIC or SYMBOL mode, depending on whether a Synoptic Display or a
GSAF
ROVSING A/S
GWDU Development
Doc.No. UM-114-001-ROV: Issue: 1.4
USERS’ Manual
Date: 24 February 1999
6
Symbol has been loaded. The next sections will concentrate on SYNOPTIC editing mode but
there will be a dedicated section (section 2.10) for SYMBOL editing mode.
2.1.3 MDB End-Item Locking
If the specified MDB end-item cannot be locked for editing, a message will appear in a
warning popup, informing of the reason why. Once the popup is cleared (by clicking on the
“Ok” button) the end-item may be edited as normal but it cannot be saved using the
File.Save menu option (this option will be greyed out). The end-item will then be in ReadOnly mode. The end-item can be saved as another pre-existing end-item in the MDB using
the File.Save As menu option. However, the new end-item must be of the same type as the
originally loaded end-item and itself must be able to be locked otherwise an error popup will
appear.
2.1.4 General Editing Commands
The general editing procedures for the GWDU editor are very similar to that of DV-Draw,
[DV-2], with respect to object creation, selecting objects, moving objects etc.
To select an object, click on the object (either in the centre or on its boundary, depending on
the type of object) with the left-hand mouse button. The object is then denoted by control
points, the number of which depend on the type of object. All objects have a main control
point which is used to move the object - click on this point once with the left button, move
the object, then click again to place the object. If an object has more than one control point, it
can be resized by clicking on the appropriate point and dragging the object to the correct size
and then clicking again to finalise the size.
User defined symbols get a Selection Frame drawn around the bounding box of all included
symbols. This allows the user to determine the extent and contents of a symbol.
The right hand button acts as a cancel button in many occasions, for example, when creating
an object with a rubberband, the right button will cancel the create, or in some cases will
terminate the create e.g. for polygon creation.
The right hand mouse button will also remove any object selections when clicked in the
Drawing Area.
2.1.5 Default MDB Pathname and the Pathname Support Tool
There are several places within the GWDU where the user has to enter an MDB pathname as
an end-item reference. For example to make an end-item attachment or just to load another
synoptic display or symbol. The GWDU provides two means of user assistance for this process.
A default pathname is always suggested. The initial suggestion is the pathname of the synoptic display (or symbol) being edited – without the end-item name. As the user selects other
pathnames as end-item references, these pathnames are used as default pathnames for the
following inputs. In other word the default pathname follows the pathname latest selected by
the user.
The GWDU provides a link to the Pathname Support tool in every place where an MDB
GSAF
ROVSING A/S
GWDU Development
Doc.No. UM-114-001-ROV: Issue: 1.4
USERS’ Manual
Date: 24 February 1999
7
pathname can be entered. This is effectively an end-item browser that shows all the type
compatible and items available in the current scope (i.e. the open CDU or CCU). The user
can then choose a pathname from the list provided to fill the text field in the GWDU dialogues that require a pathname without having to type the pathname.
Every GWDU dialogue containing text fields requiring pathnames has a “Pathname Support” button. If the dialogue has only one pathname text field, just press the button to invoke
the Pathname Support tool. In dialogues with multiple text fields, select the pathname field
to be filled in by clicking in it with the mouse, and then pressing the Pathname Support
button.
The Pathname Support tool may take a while to appear the first time it is used, but after that
the Pathname Support tool just iconises after use until it is used the next time. The Pathname
Support tool will provide a list of end-item pathnames to choose from which is context sensitive i.e. only the end-item types applicable to the operation are displayed. To select an enditem, first click on the pathname desired and then click on the “Apply” button. The pathname selected will then be transferred into the GWDU text field and the Pathname Support
tool will iconise. If the “Reject” button is pressed instead of the “Apply” button when the
Pathname Support tool is active, the Pathname Support tool will iconise and leave the
GWDU text field unchanged.
Further help can be obtained by pressing the “Help” button in the Pathname Support tool.
2.2 Object Creation
By pressing one of the buttons in the Object creation menu on the left of the GWDU Display
you can create all of the following types of objects.
2.2.1 Primitive Elements
Lines, arcs, rectangles, ovals, circles and polygons can be created by pressing the corresponding button in the top 6 buttons of the Object creation menu. These buttons depict a
bitmap image of the object to be created. The remaining two primitive elements, Text and
Vector Text are depicted by buttons labelled, “Text” and “Vtext” respectively.
All of these objects are exactly the same as the corresponding DV-Draw type and are created
in the same way, ie, by clicking the appropriate number of control points in the Drawing
Area. Information on the number of points to click is given in the GWDU Message Line at
the time of creation.
2.2.2 Subdrawings
Subdrawings are not quite the same as a DataViews subdrawing although they use the same
principles. The GWDU Subdrawing’s appearance must be driven by a variable of discrete
type, ie, EGSE_DISCRETE_MEASUREMENT or EGSE_DISCRETE_SW_VARIABLE or
a user defined compatible type. For every state of this discrete variable, a user-defined symbol end-item must be specified. At run-time, whenever the variable has a particular value, the
corresponding symbol for that state will be displayed.
To create a Subdrawing, click on the button marked “Subdrawing”. The “Select end item”
GSAF
ROVSING A/S
GWDU Development
Doc.No. UM-114-001-ROV: Issue: 1.4
USERS’ Manual
Date: 24 February 1999
8
popup appears. A pathname of a discrete type end-item must be entered. If the end-item
specified is not the correct type or is not found in the MDB then an error popup will appear
when the “Ok” button is clicked. If the end-item is acceptable, the “Select end item” popup
disappears and the Message Line prompts for two points to be picked to define the size of the
Subdrawing object. Pick two points in the Drawing Area to create the Subdrawing.
2.2.3 User-Defined Symbols
User-defined Symbols are created in the Symbol Editor, see section 2.10. They are used to
create a common library of frequently used symbols for building synoptic displays. For example, electrical circuitry can be displayed consistently by creating each electrical component as a User-defined Symbol.
To include a User-defined Symbol in a Synoptic Display, click on the button marked “Symbol”. The “Select end item” popup appears. A pathname of a User-defined Symbol end-item
must be entered, ie, any MDB item of type WDU_GROUND_SYMBOL. If the end-item
specified is not the correct type or is not found in the MDB then an error popup will appear
when the “Ok” button is clicked. If the end-item is acceptable, the “Select end item” popup
disappears and the Message Line prompts for two points to be picked to define the size of the
User-defined Symbol object. Pick two points in the Drawing Area to create the Symbol. Note
that the Symbol will maintain its aspect ratio regardless of the shape of the clicked rubberband rectangle.
Note, once created, Symbols have only one central control point. They can then be selected,
de-selected and moved like any other object (see section 2.1.4) but they cannot be resized by
dragging control points like, for example, a graph object can be. Symbols can be resized using the “Scale” button, see section 2.5.5.
2.2.4 Input Objects
Input objects comprise the four object types, which at run-time allow the Synoptic Display to
perform HLCL commands or load another Display. The four types are:
• Push Button. This object has one label attached and when pressed at run-time will cause
the execution of a single HLCL command.
• Popup Menu. This object appears the same as a Push Button, with one label, but when
pressed at run-time, a Popup menu is generated by the HCI with up to 10 menu options to
select from - each one causing an HLCL command to be executed.
• Picture Select. This object also appears the same as a Push Button, with one label, but
when pressed at run-time, it causes the HCI to load in another Synoptic Display.
• Fixed Menu. This object is a fixed menu with up to 10 menu options, which are fixed on
the Display and visible and selectable all the times. Each option will cause the execution
of a single HLCL command.
To create any of the above Input objects click on the button marked “Input”. The Message
Line will then prompt for two points to be picked to select the size of the object in the
Drawing Area. The newly created object will by default be labelled “Push Button” and will
be of “Push Button” type. To change the type of the Input object or to edit its details, the
GSAF
ROVSING A/S
GWDU Development
Doc.No. UM-114-001-ROV: Issue: 1.4
USERS’ Manual
Date: 24 February 1999
9
“Edit...” top level GWDU button must be selected, see section 0.
2.2.5 Graph Output Objects
Graph Output objects are pre-defined output objects that display formatted data from a MDB
end-item, for example, Bar Charts, Line Graphs and Text Graphs. There are many variations
of graph types.
To create a Graph Object, click on the button marked “Graph”. The Message Line will
prompt for two points to be picked to define the size of the Graph in the Drawing Area. Once
placed in the Drawing Area, the Graph will be of type “Bar Chart” which is the default. The
Graph type can be changed using the “Edit...” button, see section 2.6.5.
2.2.6 Icon
An Icon consists of a GIF image file, which is included in a Synoptic Display or Symbol with
its original aspect ratio and size preserved.
To create an Icon, click on the button marked “Icon”. A sub menu will appear and ask
whether the Icon shall be created from an image file, “Filename” or whether it shall be created from a selected rectangle of the Drawing Area, “Screen Area”.
If “Screen Area” is selected, the Message Line will prompt for two points to be picked to select the screen area from which to make an Icon. Then the Icon will be created in the position
where the screen area was selected and will be marked by one control point (as an Icon cannot be resized and will appear the same size regardless of any Zoom settings).
If “Filename” is selected, the “File Ops” file selection box appears and prompts for a Unix
filename of any GIF file. Once a filename has been accepted, the Message Line prompts for a
single point to be picked to position the Icon in the Drawing Area.
2.2.7 Image
The Image object type is exactly the same as the Icon except that it is defined by two control
points and can be resized. It can also be specified from a GIF file or from a Screen Area. To
create an Image, follow the same instructions as for an Icon, except, obviously to click on the
“Image” button rather than the “Icon” button and when placing in the Drawing Area, two
clicks must be made to size as well as position the Image.
GSAF
ROVSING A/S
GWDU Development
Doc.No. UM-114-001-ROV: Issue: 1.4
USERS’ Manual
Date: 24 February 1999
10
2.3 Changing and Setting Default Object Attributes
Colour settings
Text Size
Anchor point
Font
Orientation
Arc
Direction
Fill Mode
Line style
Polygon
Curve
Method
Line Width
Object Name :
Not used for GWDU
Figure 3: Attributes Menu
The Attribute Menu on the top of the GWDU screen has two purposes:
(i)
to set default attributes that newly created objects will have.
(ii)
to change the attributes of existing objects.
If no object is selected in the Drawing Area, then any changes to the Attributes Menu will
change the default attributes for new objects. If an object is selected, then any changes to the
Attributes Menu will change the attributes for that object only. It is possible to change some
attributes for a group of objects at the same time, for example, it is possible to change the
colours of all objects in a group.
Click on the appropriate pixmap image to change an attribute. These attributes are the same
as what are available in DV-Draw, refer to [DV-2] for details.
The colour settings icon is used to change the foreground or background colour of the selected object(s), or if no object is selected then the default colour will be set. The inner rectangle sets the object foreground colour, the next rectangle sets the object background colour,
the next sets the Drawing background colour and the last, outer rectangle sets the OffDrawing colour ie, the area outside the 32K by 32K DataViews Drawing Area.
For included symbols and subdrawings setting the colour attributes affect all contained subobjects.
The Object Name indicator will show the DataViews object name (if any) of the selected
object(s) in a synoptic display. Objects are not currently named in the GWDU and they cannot be set from within the GWDU. However, this display field is left in for future use where
imported objects from DV-Draw could be named, within the scope of the Import facility
rules (see section 2.4.1.2).
GSAF
ROVSING A/S
GWDU Development
Doc.No. UM-114-001-ROV: Issue: 1.4
USERS’ Manual
Date: 24 February 1999
11
2.4 Pull-Down Menu Options
2.4.1 File
2.4.1.1 Open
This option loads a new Synoptic Display or Symbol in to the GWDU editor, replacing the
current MDB end-item being edited. It is possible to switch editing mode from SYNOPTIC
to SYMBOL and visa versa when performing an Open - this is done automatically, depending on the end-item type loaded.
The Select end item popup appears. Enter the pathname of the desired MDB end-item to
load. If the entered end-item is not present in the MDB or is of the wrong type then an error
message will appear. Correct types are WDU_GROUND_SYNOPTIC_DISPLAY and
WDU_GROUND_SYMBOL.
If the MDB end-item being edited has been modified since the last save, a View Modified
popup will appear, asking if the existing end-item should be saved before the new one is
loaded.
2.4.1.2 Merge
This option provides the Import facility for the GWDU. DV-Draw views can be imported
with the following limitations: importing of anything other than DV-Draw views containing
primitive elements (Text, Circles, Lines, Images etc) with no Dynamics attached will cause
problems leading to DataViews error messages and unpredictable GWDU behaviour and
even possible crashes.
The File Ops popup appears and a filename must be given for a DataViews view file in the
Unix file system.
2.4.1.3 Save
This option will save the currently edited Synoptic Display or Symbol in to the MDB with
the same name as it was loaded with. No confirmation or prompt will be given. The mouse
cursor will change in to a watch until the save is complete.
When in synoptic display editing mode, if the synoptic display being edited is inconsistent,
the Consistency/Report Dialogue will appear containing a report identifying the objects that
are inconsistent.
The causes of inconsistencies are:
•
Missing end-item attachments to objects, which require an end-item pathname reference.
For example, Graphs need at least one variable (other than the DEFAULT variable) and
Picture Selection Markers need a synoptic display reference.
•
Incomplete end-items. The driving end-item variables may be incomplete due to missing
attributes, and this makes the object and in turn the Display inconsistent.
•
Invalid end-item attachments. This may be a case where a valid variable has been attached
GSAF
ROVSING A/S
GWDU Development
Doc.No. UM-114-001-ROV: Issue: 1.4
USERS’ Manual
Date: 24 February 1999
12
to the display, but since then the end-item has been deleted or is not visible in the current
MDB scope. I.e. if a Synoptic Display is created in CCU mode and then opened later in
CDU mode with references outside the CDU.
•
Missing HLCL commands. Input objects that require HLCL command strings to be attached must have the minimum number attached for the object type.
The inconsistency report will specify the object type and possibly show a label if applicable.
Position co-ordinate(s) will also be displayed for the object to allow the user to locate and
rectify the inconsistency. When the mouse cursor is in the Drawing Area, its co-ordinate can
be displayed by pressing the ‘C’ key. This displays the cursor co-ordinate in the Message
Line. If the ‘C’ key is held down whilst moving the mouse cursor, the co-ordinates are updated as the cursor moves.
2.4.1.4 Save As
This option allows the currently edited Synoptic Display or Symbol to be saved in to the
MDB with a different name.
The Select end item popup appears. Enter the pathname of the desired MDB end-item to save
to. If the entered end-item is not present in the MDB or is of the wrong type then an error
message will appear. Correct types are WDU_GROUND_SYNOPTIC_DISPLAY and
WDU_GROUND_SYMBOL. Note that you can only save to an end-item of the same type,
for example, if you are editing a Symbol it is illegal to do a Save As to a Synoptic Display
and visa versa.
If the MDB end-item to be saved to cannot be locked, a failure error message will appear and
the Save As operation will be cancelled.
When in synoptic display editing mode, if the synoptic display being edited is inconsistent,
the Consistency/Report Dialogue will appear containing a report identifying the object(s) that
are inconsistent. See previous section for details.
2.4.1.5 Load Settings
Loading default objects attribute settings allow users to retrieve a predefined set of default
object attribute settings for use in creating new elements of a display or a symbol.
The affected settings are the default object attributes of section 2.3 and the grid settings.
A dialog appears prompting the user for a file name of the settings to be loaded. The file
must be situated in the users home directory.
2.4.1.6 Save Settings
Saving the current default objects attribute settings allow the users to retrieve these settings
at a later time. A filename can be chosen for the settings. The file is placed in the users home
directory.The affected settings are the default object attributes of section 2.3 and the grid settings.
GSAF
ROVSING A/S
GWDU Development
Doc.No. UM-114-001-ROV: Issue: 1.4
USERS’ Manual
Date: 24 February 1999
13
2.4.1.7 Quit
The Quit option exits the GWDU. Firstly, a confirmation popup appears to confirm is an exit
is really desired. Choosing ‘No’ from this popup will return to the editing session. Choosing
‘Yes’ will exit the GWDU.
If the MDB end-item being edited has been modified since the last save, a View Modified
popup will appear asking if the existing end-item should be saved before exiting the GWDU.
If ‘No’ is selected the changes will be lost, if ‘Yes’ is selected, the end-item will be saved. If
the end-item being edited is in Read-Only mode then the Select end items popup will appear
so that it can be saved with another name if desired.
The GWDU can be quitted from the standard title bar popup menu. This menu can be invoked in situations where the GWDU will insist on continuing. A warning popup will inform
that the current editing process must be completed before you can quit the GWDU.
2.4.2 Edit
2.4.2.1 Group
The Group option allows one or more objects to be grouped in a selection. There are 6 available Group options:
• Part In. Group any objects within or partly within a user-definable clicked rectangle on the
Drawing Area.
• All In. Group only objects completely within the user selected rectangle.
• All Out. Group only objects completely outside the user selected rectangle.
• Part Out. Group only objects outside or partly outside the user selected rectangle.
• All. Group all objects in the Drawing Area.
• If Dynamic. Groups any dynamic objects, i.e. anything that can have an end-item attached
from the MDB (with the exception of Dynamic User Defined Symbols, which only have
Dynamics internally).
2.4.2.2 Delete
This option deletes the currently selected object(s) from the Synoptic Display or Symbol and
removes any end-item attachments they might have.
2.4.2.3 Undelete
This option undoes the last (and only the last) Delete operation. The undeleted object(s) are
recovered, along with any previous end-item attachments and are left selected after the operation.
Note that, if a Cut operation is performed after a Delete operation then the Undelete option
will be removed for the last Delete, as Cut uses the Delete buffer. Undelete will also be unavailable after an Open or Save As operation i.e. Undelete cannot be performed in another
GSAF
ROVSING A/S
GWDU Development
Doc.No. UM-114-001-ROV: Issue: 1.4
USERS’ Manual
Date: 24 February 1999
14
end-item.
2.4.2.4 Cut
This option removes the currently selected object(s) from the Synoptic Display or Symbol
and removes any end-item attachments they might have and places them in a Clipboard area
so they can be retrieved later.
2.4.2.5 Paste
The Paste option is only available once a Cut operation has been performed at least once
since the GWDU was invoked, OR since the GWDU last changed editing mode i.e. SYNOPTIC or SYMBOL mode.
This option retrieves the contents of the Clipboard area and places it in to the Drawing Area
in exactly the same position as when it was Cut. Any end-item references to objects pasted
will be restored.
Multiple Paste’s can be performed, but beware, if the same object(s) are pasted twice in the
same display they will be stacked exactly on top of each other and it will be impossible to see
how many objects are there until the upper objects (the latest pasted) are moved.
One useful feature of Cut and Paste is that objects can be pasted in to another display i.e. the
Paste option is still available after an Open or Save As operation.
2.4.2.6 Copy
This option makes a copy (including any end-item references) of the currently selected object(s) and places them in the Drawing Area with a fixed offset from the original object(s).
This offset is specified by the “Cp. Off” option. There is an offset so that the copied object(s)
are placed just to the bottom-right of the original object(s).
2.4.2.7 Cp. Off
This option specifies where to place copied objects relative to their originals. Once selected
the Message Line will prompt for two points to be picked which specifies this relative offset.
2.4.2.8 Update
This option updates all User-Defined Symbols already included in the currently edited Synoptic Display with the latest symbol definitions stored in the MDB. Therefore, if the user
modifies a symbol using the symbol editor and wants to reflect this change in a synoptic display containing the old version of the symbol, the Update function must be selected (in Synoptic editing mode only).
This option also updates symbols attached to Subdrawing objects.
The user should note the following when using the update function:
•
The new symbol could be of a different type from the old symbol i.e. the symbol type
could change from STATIC to DYNAMIC or visa versa, see section 2.10 for a descrip-
GSAF
ROVSING A/S
GWDU Development
Doc.No. UM-114-001-ROV: Issue: 1.4
USERS’ Manual
Date: 24 February 1999
15
tion of the two types. This is particularly important for symbols attached to Subdrawing
objects as only STATIC symbols are allowed. An error message will warn if a symbol
cannot be updated.
•
DYNAMIC symbols containing animation class variables (variables attached to graphs
inside the symbol) could be affected in an update. The new symbol may have more or less
Graphs inside the symbol than the old symbol. The Update function tries to match existing end-item attachments to the new symbol, but Update will try and match on a one-toone basis. I.e. if a Graph is inserted in the middle of the new Symbol (in the middle with
respect to the object drawing order - front to back) then the same end-item mapping will
no be preserved. The same applies if a variable type mismatch occurs. I.e. if a Graph in
the new symbol is changed to one expecting a variable of DISCRETE or
BYTE_STREAM type variable and the previous graph was expecting an INTEGER or
FLOAT type or visa versa, then an error will be flagged. In this case, the update will be
performed but the end-item attachment will be left blank.
•
If an updated DYNAMIC symbol contains more graphs than the previous symbol, then
any existing end-item attachments for the previous graph will be attached to the graphs in
the new symbol, but the extra graphs will have no end-item attachments.
•
If a symbol included in a synoptic display no longer exists in the MDB, it will not be deleted during an Update operation but the user will be warned that the symbol could not be
found in the MDB to be updated.
•
Update cannot update reliably a symbol that has been rotated. The symbol will update but
the scaling or rotation may not be as expected. This is a DataViews limitation. If such an
operation is required then the symbol should be deleted, re-included and then rotated to
the desired amount.
2.4.2.9 Show Clipboard
This option popup the Clipboard popup which displays the contents of the Clipboard, i.e. the
contents of the last Cut operation which is what the next Paste will produce. Click on the
Close button to dismiss the Clipboard popup.
2.4.3 View
2.4.3.1 Refresh
This option is exactly the same as the Refresh button on the left hand side object creation
menu. It refreshes the Drawing Area when selected.
2.4.3.2 Grid
This toggle button option toggles the Grid on or off in the Drawing Area.
2.4.3.3 Grid Spacing/Color
This option enables the user to change the spacing between the grid lines and the colour of
GSAF
ROVSING A/S
GWDU Development
Doc.No. UM-114-001-ROV: Issue: 1.4
USERS’ Manual
Date: 24 February 1999
16
the grid. The Grid Spacing & Color popup appears. Here, the grid spacing can be entered, in
a World co-ordinate range of 64 to 2047. To change the Grid Colour, press the Grid Color
button and then click on a colour in the Colour Palette. Hit the Ok button to accept the new
values.
2.4.3.4 Report
This option produces a textual description of the synoptic display or symbol being edited.
The report can be routed to any combination of the following: Screen, User-specified file or
Printer.
When selected, the Report Destination Dialogue appears, use the three toggle buttons
Screen, File and Printer to select where the report output should go. If File is selected, the
user must specify a file name (users home directory is default if no directory path is specified) of the report destination file in the Report File text field. If Printer is selected and the
Printer text field is left blank, the report will be printed to the system’s default printer. If
either the file or printer destination could not be written to then an error message will appear.
The report will describe every object in the synoptic display or symbol. Firstly information
will be displayed to identify the object, such as type, label and position co-ordinates, then the
objects’ attributes and end-item attachments will be displayed.
Any inconsistencies for a synoptic display will also be reported next to the offending object(s).
Notes on the reporting of object attributes:
•
Object colours are given as a colour index value. This is the index value that is displayed
when choosing a colour from the GWDU colour palette.
•
Attributes such as “Line type” or “Line width” are specified as a number. This is the position number in the appropriate menu of the selected attribute e.g. if line type 4 is reported,
this mean the fourth entry in the line type attribute pull-down menu.
•
Some attributes are related purely to DataViews, therefore if an attribute name appears
which is unfamiliar then the DataViews documentation should be consulted [DV-2].
2.4.3.5 Snap
This Snap toggle button option turns automatic grid snap on or off, i.e. when on, if an object
is placed or moved it can only be placed on an exact grid point.
2.4.3.6 Zoom
The Zoom option has several sub-options available:
• Pan. This option allows the user to select a point in the Drawing Area which will then become the centre of the view.
• Zoom in. This will Zoom in to the Drawing Area by the amount specified by the “Zoom
By” option.
• Zoom out. This will Zoom Out from the Drawing Area by the amount specified by the
GSAF
ROVSING A/S
GWDU Development
Doc.No. UM-114-001-ROV: Issue: 1.4
USERS’ Manual
Date: 24 February 1999
17
“Zoom By” option.
• Zoom to. This allows the user to click-and-drag a rectangle to specify the new visible part
of the Drawing Area.
• Reset. This option resets the visible part of the Drawing Area to the default area which is
visible on invocation of the GWDU.
• Zoom by.. . This option allows the user to set the zoom factor to use for “Zoom in” or
“Zoom out” operations by using the Zoom by slider popup.
2.4.4 File Indicator
This indicator on the bottom of the View menu indicates the currently loaded MDB enditem. If the end-item has been modified since the last save, “**” appears after the end-item
name to indicate the change.
2.5 Object Manipulation Commands
The object manipulation commands are buttons located on the right hand side of GWDU for
performing actions on objects. For each of the following commands, at least one object must
be selected to perform the action on:
2.5.1 Grid Snap
This button moves the selected object(s) to the nearest exact grid point. The snap function
acts upon control points rather than the visible edge of the object(s) although they are often
the same. For example, User Defined Symbols have only one central control point, therefore,
the control point is snapped to the nearest grid position, NOT the edge of the symbol.
2.5.2 Edit Text
This button is only selectable when Text or Vtext objects are selected. It enables these text
objects to have their text edited. Once complete, hit <ESC> to finalise.
2.5.3 Align
This button moves the selected object(s) to the position of the mouse cursor in one of six
ways, by hitting the:
•
‘l’ key. This aligns the object(s)’ left side to the mouse cursor position.
•
‘r’ key. This aligns the object(s)’ right side to the mouse cursor position.
•
‘t’ key. This aligns the object(s)’ top side to the mouse cursor position.
•
‘b’ key. This aligns the object(s)’ bottom side to the mouse cursor position.
•
‘x’ key. This aligns the object(s)’ anchor point’s X position to the mouse cursor’s X
position.
GSAF
ROVSING A/S
GWDU Development
Doc.No. UM-114-001-ROV: Issue: 1.4
USERS’ Manual
Date: 24 February 1999
18
•
‘y’ key. This aligns the object(s)’ anchor point’s Y position to the mouse cursor’s Y
position.
2.5.4 Aspect
This button forces an Image or Icon object to revert to its original aspect ration. For example,
if an image is scaled in the X axis only, selecting Aspect will return the image to its original
size.
2.5.5 Scale
This button pops up the scale menu, which will scale the selected object(s) as follows:
• Shrink. This shrinks the selected object(s) by the amount specified by the “Scale by..” option. Scales evenly in X and Y planes.
• Expand. This expands the selected object(s) by the amount specified by the “Scale by..”
option. Scales evenly in X and Y planes.
• Scale by.. . This pops up the “Scale by” slider, which sets the amount to scale objects in
the other scale options.
• X shrink. Shrinks the selected object(s) only in the X direction.
• X expand. Expands the selected object(s) only in the X direction.
• Y shrink. Shrinks the selected object(s) only in the Y direction.
• Y expand. Expands the selected object(s) only in the Y direction.
Note, It is a user responsibility to ensure the aspect ratio of User Defined Symbols is preserved when using Scale. This is easy to do by just using “Shrink” and “Expand” which will
ensure even scaling in X and Y planes.
2.5.6 Rotate
This button pops up the rotate menu, which will rotate the selected object(s) as follows:
• Rotate CW. Rotates the object(s) clockwise by the amount specified by the “Rotate by..”
option.
• Rotate CCW. Rotates the object(s) counter-clockwise by the amount specified by the
“Rotate by..” option.
• Rotate by.. . This pops up the “Rotate by” slider which sets the amount to rotate objects in
the other rotate options.
Rotate is performed by rotating object control points. All rectangles are disrupted by rotation
since they are controlled by two opposite corners. So is user defined dynamic symbols and
graphs (rectangle based) and even the selection frame of such symbols is disrupted by rotation.
GSAF
ROVSING A/S
GWDU Development
Doc.No. UM-114-001-ROV: Issue: 1.4
USERS’ Manual
Date: 24 February 1999
19
2.5.7 Mirror
This button has two options:
• Flip X, which flips the selected object(s) about the Y-axis.
• Flip Y, which flips the selected object(s) about the X-axis.
2.5.8 Reorder
This button has two options:
• Front. This moves the selected object(s) to the front of the object list i.e. the object appears on top of all other objects in the Drawing area.
• Back. This moves the selected object(s) to the back of the object list i.e. the object appears
below all other objects in the Drawing area.
2.6 Object Editing and End-Item attachment
2.6.1 End-Item attachment : General rules
This table lists the valid MDB end-item types for various objects.
Object type
Allowable end-item types
Any Graph type except
“Text” and “Message”
types
All integer and float measurements and software variables(1)
(cannot mix float and integer in one Graph though)
“Text” or “Message”
Graph types
Discrete measurement, software variable or byte stream(5)
Picture Select input object
Synoptic Display(3)
Graph objects inside
Dynamic Symbols
The same rules apply as for Graphs - see above
Subdrawings (State code
end-item)
Driving variable must be a discrete measurement or software variable. (2)
Subdrawings (State
name end-items)
Only static symbols can be attached to each state for the subdrawing.(4)
Dynamic objects
Symbols and Symbol types are explained in section 2.10.
All integer and float measurements and software variables(1)
Table 1 MDB end-item type matrix
Note No.
(1,2,3,4)
MDB End-item Standard Type
(1)
EGSE_FLOAT_MEASUREMENT, EGSE_FLOAT_SW_VARIABLE,
EGSE_INTEGER_MEASUREMENT, EGSE_INTEGER_SW_VARIABLE
(2)
EGSE_DISCRETE_MEASUREMENT, EGSE_DISCRETE_SW_VARIABLE
GSAF
ROVSING A/S
GWDU Development
Doc.No. UM-114-001-ROV: Issue: 1.4
USERS’ Manual
Date: 24 February 1999
20
(3)
WDU_GROUND_SYNOPTIC_DISPLAY
(4)
WDU_GROUND_SYMBOL (of type STATIC)
(5)
EGSE_DISCRETE_MEASUREMENT, EGSE_DISCRETE_SW_VARIABLE,
EGSE_BYTE_STREAM_MEASUREMENT,
EGSE_BYTE_STREAM_SW_VARIABLE
If an end-item attached to the display somehow is incomplete (see below), the display of the
end-item name in a dialog will appear in red in stead of the normal black colour. This should
alert display developers to the inconsistent end-item.
An end-item is considered incomplete if one of the following rules are violatet:
•
INTEGER and FLOAT end-items must have an engineering range (both low and high
limit)
•
INTEGER and FLOAT end-items must have either none or both limits (high and low) of
danger limits and nominal limits. Only one part of either limit set (e.g danger limit low)
is illegal.
•
EGSE_DISCRETE_MEASUREMENT must have at least one calibration.
•
Each calibration STATE_CODE must have a RAW_VALUE and vice versa for all
DISCRETE end-items.
GSAF
ROVSING A/S
GWDU Development
Doc.No. UM-114-001-ROV: Issue: 1.4
USERS’ Manual
Date: 24 February 1999
21
2.6.2 Subdrawing Editing
States for the
discrete enditem variable
Pathnames of
static
symbols
Pathnames of
Default
symbol
Reload
button
Pathname of
the discrete
variable to
drive the
subdrawing’s
appearance
Figure 4
This figure shows the editing dialogue for Subdrawing objects. To edit a subdrawing, select
the subdrawing to edit and click on the Edit subdrawing button.
If the subdrawing has not been edited before, the editing screen will show default pathnames
in the “End Item” text fields. A pathname for a valid WDU_GROUND_SYMBOL from the
MDB must be entered for each “State name” for the discrete variable entered in the “State
code:” field. This will define the symbol that will be displayed at run-time when the driving
variable has that particular State Value.
If the subdrawing has been edited before, any symbol pathnames entered will appear next to
its corresponding “State name”. They can be edited as desired.
The symbols used within a subdrawing must be of type “STATIC” i.e. they must contain no
dynamic output elements. Error messages will appear if an invalid pathnames are given for
any text field or if the end-items are not of the correct type.
If an invalid pathname is entered and the “OK” button is pressed, the text field will keep this
invalid value if the subdrawing is edited again immediately. If not edited immediately the
path name value will revert to its previous value.
A static symbol end-item must be entered for the “DEFAULT STATE” in a subdrawing. At
run-time, this symbol will be used if a raw-value is received which does not map on to any of
the (up to) 31 possible mapped state codes for the discrete end-item.
GSAF
ROVSING A/S
GWDU Development
Doc.No. UM-114-001-ROV: Issue: 1.4
USERS’ Manual
Date: 24 February 1999
22
To change the discrete variable that drives the subdrawing, simply change the “State code:”
text field to another pathname of a discrete variable from the MDB, then click on the “OK”
button. The edit dialogue will not disappear in this case because the variable has been
changed - it will instead update the “State name” and “End item” fields according to the new
variable as the number of states of the new variable may be different from the last variable. If
the new variable has more states than the previous variable, the symbol pathnames already
entered will be kept and the extra states must have symbol pathnames attached. If the new
variable has fewer states than the previous variable then the extra symbol pathnames will be
discarded.
It is possible to “OK” the edit dialogue before entering all the required symbol pathnames
but a warning message will appear. It is not possible to “OK” the edit dialogue if a missing
or invalid pathname is entered for the “State code:” field i.e. the discrete variable.
The “Reload” button will re-read the MDB for the discrete end-item. This can be used if the
discrete calibration of the end-item has changed since the end-item was attached to the display and its new calibration needs to be reflected in the display. The end-item is re-read even
if the text field has not changed.
If the discrete end-item is incomplete (see ICD-1), the path name of the end-item will be displayed in red text (not black). Great care should be taken if the discrete is incomplete. The
order of state codes may change if calibration RAW_VALUEs are missing, and the correspondence between symbols and state codes are based on this order alone.
The cancel button will undo any changes made during the edit session.
GSAF
ROVSING A/S
GWDU Development
Doc.No. UM-114-001-ROV: Issue: 1.4
USERS’ Manual
Date: 24 February 1999
23
2.6.3 Symbol Editing
This button
reloads the
MDB data
for the
variable enditem
The type of
each
dynamic
object
inside the
symbol
This button
enters the
threshold
editing
dialogue for
the end-item
The MDB
end-item
variable
attached to
each
dynamic
object
Figure 5
This figure shows the editing dialogue for Symbol objects (Dynamic only). To edit a Symbol,
select the Symbol to edit and click on the Edit symbol button.
If the Symbol has not been edited before, the editing screen will show default pathnames in
the “End Item” text fields. A pathname for a valid variable from the MDB must be entered
for each “Graph type” object within the symbol. This will define the data source that will
drive each dynamic object (graph) inside with symbol at run-time. The next time the edit
dialogue is “OK”ed the variables pathnames will be checked and if valid, any threshold data
present for the variable will be read. The “Reload” button on the same line as the pathname
that has been entered will cause the pathname to be checked and the threshold data to be read
there and then, when pressed. The “Reload” button will also update the “Threshold” button
GSAF
ROVSING A/S
GWDU Development
Doc.No. UM-114-001-ROV: Issue: 1.4
USERS’ Manual
Date: 24 February 1999
24
for that line.
If the Symbol has been edited before, any previously entered variables will be displayed and
can be changed as desired.
Even if the variable pathname for a “Graph type” has not changed, the MDB data for that
variable can be re-read by pressing the “Reload” button. This can be useful if a variable in
the MDB has changed (maybe a threshold limit has changed) and the change needs to be incorporated in the Synoptic Display.
Once a valid pathname has been entered for a “Graph type”, its thresholds can be edited by
pressing the “Threshold” button for that line. The threshold editing dialogue is use in several
areas and is described in section 2.6.6.
Note, it is only possible to add one data source (MDB variable) for each dynamic output object (graph) in a dynamic symbol.
It is possible to “OK” the edit dialogue before entering all the required variable pathnames
but a warning message(s) will appear.
If an invalid pathname is entered and the “OK” button is pressed, the text field will keep this
invalid value if the symbol is edited again immediately. If not edited immediately the path
name value will revert to its previous value.
The cancel button will undo any changes made during the edit session.
GSAF
ROVSING A/S
GWDU Development
Doc.No. UM-114-001-ROV: Issue: 1.4
USERS’ Manual
Date: 24 February 1999
25
2.6.4 Input Object Editing
Object type selector
Current type indicator
Standard
GECK
input
object
options
Command
and label
editing
area
Menu
label and
command
editing
area
Figure 6
This figure shows the Input object editing dialogue. Input objects allow the user to incorporate HLCL commands and actions (i.e. swapping to a new synoptic display at run-time) in to
a Synoptic Display.
The default Input object type (created by the Input) is BUTTON.
To enter the editing dialogue, select the Input object and click on the Edit.. button.
The top left area of this dialogue is used to select the one of the four possible types of Input
object i.e. BUTTON, POPUP MENU, PICTURE SELECT and FIXED MENU. The “Current type indicator” button displays the current object type. To select the desired type, simply
click on the appropriate button.
The edit dialogue alters slightly depending on which Input object type is selected. The following describes each Input object type:
• BUTTON. This is a simple push button that, when pressed at run-time, causes an HLCL
command to be executed. When this object type is selected, the “Command and label edGSAF
ROVSING A/S
GWDU Development
Doc.No. UM-114-001-ROV: Issue: 1.4
USERS’ Manual
Date: 24 February 1999
26
iting area” contains two text fields, one to enter a label which appears on the push button,
and one to enter the HLCL command to be executed. The “Menu label and command editing area” is insensitive and does not do anything for this object type.
• POPUP MENU. This appears on the screen at run-time in a similar way as the BUTTON.
However, when it is pressed, a popup menu appears with up to 10 items. The desired entry can then be selected and the corresponding HLCL command will be executed. When
this object type is selected, the “Command and label editing area” contains one text field
to enter a label which appears on the popup button. The “Menu label and command editing area” is now sensitive and can be used to add menu items to the popup menu. Clicking
on the Add Variable button will create a row of two text fields, one to enter the label for
the menu option and the other to enter the corresponding HLCL command to be executed
when that option is selected. This process can be repeated to add up to a maximum of 10
menu items. The Delete button on each label/command row will delete the row and hence
the menu option
• PICTURE SELECT. This is a simple push button that, when pressed at run-time will
cause another pre-specified Synoptic Display to be loaded and executed replacing the current Synoptic Display. When this object type is selected, the “Command and label editing
area” contains two text fields, one to enter a label which appears on the picture select
button, and one to enter the MDB pathname of the Synoptic Display to switch to when
pressed at run-time. An error popup will appear if the pathname entered is not present or
is not of the correct type i.e. WDU_GROUND_SYNOPTIC_DISPLAY once the edit
dialogue has been accepted. The “Menu label and command editing area” is insensitive
and does not do anything for this object type.
• FIXED MENU. This is a menu that appears, with all its options displayed on the screen at
run-time (as opposed to the POPUP MENU, which only displays its menu options once it
has been pressed). The menu can have up to 10 items, each one with a label and a corresponding HLCL command to execute at run-time when that item is selected. The menu
items are added in exactly the same way as for the POPUP MENU. Note, the FIXED
MENU has no overall label, unlike the POPUP menu - only a label for each menu item.
Notes,
• The maximum allowable length for an HLCL command is 1024 characters.
• The maximum allowable length for the label fields is 20 characters.
• These fields are limited so it is not possible to enter more.
• The default type of Input object is PUSH BUTTON. A FIXED MENU containing no
commands has no information whatsoever to store within it. If the input object edit dialogue is accepted (with the Accept button) when editing a FIXED MENU that has no
HLCL commands attached, the FIXED MENU will revert to the default input object type,
i.e. PUSH BUTTON.
• The “Standard GECK input object options” are standard editing features which are fully
explained in [DV-2].
GSAF
ROVSING A/S
GWDU Development
Doc.No. UM-114-001-ROV: Issue: 1.4
USERS’ Manual
Date: 24 February 1999
27
The Accept button will make permanent the changes from the editing session.
The Cancel button will discard the changes from the editing session.
2.6.5 Graph Object Editing
Object
type
toggle/
indicator
Standard
GECK
Graph
object
options
End-item
attachment
area to
add
variables
Figure 7
The graph editing dialogue allows graphs (output objects) to be edited i.e. any DataViews
graph object with the exception of any graphs, which require a matrix variable (not supported
by the GWDU). These output elements allow MDB variables to be displayed in a Synoptic
Display in many formats at run-time e.g. Bar Chart, Line Graphs, Pie Chart etc.
To edit a graph, select the graph and click on the Edit.. button.
The “Object type toggle/indicator” indicates the type of the graph being edited. It can also be
used to change the type of the graph by clicking on the button. This displays the full set of
graph types available in the edit dialogue screen area. Click on the desired button to select
the graph type. See the following figure:
GSAF
ROVSING A/S
GWDU Development
Doc.No. UM-114-001-ROV: Issue: 1.4
USERS’ Manual
Date: 24 February 1999
28
Figure 8: GWDU Graph Type Toggle Selections
The “Standard GECK Graph object options” allow the user to configure the appearance of
the graph e.g. Selects whether Legend, Outline, Axis labels etc. shall be present. See [DV-2]
for full details.
When a graph is created it is given a default variable - denoted by a button labelled “DEFAULT”. This can be deleted manually when a MDB variable is added, using the DEL button (on the far right of the DEFAULT variable row - use the scroll bars) or it will be deleted
automatically when the edit dialogue is accepted (if at least one valid MDB variable has been
added).
The Add Variable button can be used to add a variable, or if the default variable is still present, that variable can be replaced by clicking on the button marked “DEFAULT”. Both
these methods will cause the Select end item popup to appear. Enter a valid MDB variable
pathname and select “OK”. If an invalid pathname is entered, an error will appear and another chance to enter a valid pathname will be given.
Once a new variable has been accepted, a row is created (or replaced if the variable was being replaced). The pathname is displayed (in a compressed form) in a button on the far left of
the variable row. The variable row contains the following information:
• The variable button itself, which shows the pathname of the MDB variable. When a graph
a just created, there is only one default variable and the word “DEFAULT” appears in the
GSAF
ROVSING A/S
GWDU Development
Doc.No. UM-114-001-ROV: Issue: 1.4
USERS’ Manual
Date: 24 February 1999
29
button. This button can be used to replace the MDB variable with another. When pressed
the Select end item popup appears and another pathname can be entered.
• Var Min. This is the engineering range low value for the variable. Can be edited, but only
to a larger value resulting in a smaller display range (zoom), since no values outside the
engineering range will ever occur. The engineering range cannot be changed for the enditem variable.
• Var Max. This is the engineering range high value for the variable. Can be edited, but
only lowered - see above.
• Lin/Log Scale. Toggle button to specify a Linear or a Logarithmic scale for the variable.
• Thresholds. Displays the thresholds for the variable (if any). If clicked upon, this button
will enter the threshold editing dialogue for this variable, see section 2.6.6.
• Line Symbol. This toggle button is used to select the symbol to plot on the line in line
graphs to distinguish between multiple variable plots.
• Line Type. This toggle button specifies the line type to plot for line graphs.
• DEL button. Deletes the variable from the graph.
The Accept button will make permanent the changes from the editing session.
The Cancel button will discard the changes from the editing session.
2.6.5.1 Special notes
notes on Graph Objects
This section describes some of the less obvious rules to graph editing in the GWDU and exceptions from the DataViews documentation and the Dvdraw behaviour.
• The maximum number of variables that can be attached to a graph varies depending on
the type of the graph. A warning message will indicate when this limit has been reached.
Some graph types require more than one variable or have some special restrictions, such
as, having to have all variables having the same range. These restrictions are generally
documented in [DV-2]. The preview facility will issue warnings if these rules are broken.
Due to DataViews hard-coded limitations, some limitations may not be as stated in [DV2].
• The GWDU will not allow variables to be deleted from a graph if the graph has already
reached its minimum level of variables (most commonly limited to one). A warning message is issued if you try.
• If a MDB variable has changed in the MDB since it was attached to the Synoptic Display,
its new values will not automatically be introduced in to the Display. A MDB variable can
be updated from its latest state in the MDB, by clicking on the variable button containing
the pathname in the variable row, then immediately hitting <Return> or selecting “OK”
without modifying the pathname. The variable will be re-read and the thresholds, if any,
will be updated accordingly.
• Thresholds are acquired from the attached end-item (in the case of an INTEGER or
FLOAT). The engineering range becomes the min/max range. The danger limits and
nominal limit each contribute a pair of additional thresholds resulting in five intervals
(four separators = five intervals) coloured red, yellow, green, yellow and red. If the limits
GSAF
ROVSING A/S
GWDU Development
Doc.No. UM-114-001-ROV: Issue: 1.4
USERS’ Manual
Date: 24 February 1999
30
are not present (or incomplete) for the end-item, threshold is simply set to the same value
as the next outermost threshold. In the case of missing engineering range, the range and
all threshold pairs are set to 0;32767.
• For “Digit” graphs a C-format string can be supplied to the graph. Unfortunately the behaviour is not always as described in the DataViews documentation. The DV-Tools handling of C-formats is not good and warnings are frequent on many format strings. E.g.
during preview with the ‘%d’ format the Digit graph does not use the format as described
in the manual.
2.6.6 Threshold Editing
Threshold
command
buttons
Threshold
drawing
area
Add
threshold
popup
Threshold
slider
Figure 9
The threshold editing dialogue allows the user to specify or modify the thresholds for a given
MDB variable, also known as data sources. At run-time the variables’ display colour, in
whatever output element they are in, will change according to the variables’ value. This allows the MDB variable display to change colour according to danger or nominal limits being
exceeded.
The threshold editing dialogue can be entered either from the Graph editing dialogue, the
Symbol editing dialogue or from the Dynamics editing dialogue. Any present default MDB
thresholds will be used as default and then the thresholds and the colours associated can be
GSAF
ROVSING A/S
GWDU Development
Doc.No. UM-114-001-ROV: Issue: 1.4
USERS’ Manual
Date: 24 February 1999
31
edited.
Internally the threshold range is stored in 15-bit, which corresponds to a range of [0;32767].
Numbers outside this range can be used for thresholds, but thresholds with values outside the
range [-10.747.418; 10.747.418] generates warning messages on the shell standard output.
The same is the case with very small intervals (<106). Thresholds with such warnings issued
will be prone to loss of precision.
The Threshold editing functions are selected by the series of “Threshold command buttons”
in the top-right of the threshold editing dialogue. The buttons are as follows:
• Add Threshold. Once selected, the “Add threshold popup” appears which provides two
methods of creating a threshold: (I) via text field entry or (II) via the “Threshold slider”.
To add a threshold via method (I), simply add the value for the desired threshold in the
text entry field marked “Add new threshold” and hit <Return>. Then select a colour from
the Colour Palette for the new threshold to have. The value specified in the text field must
be between the variable’s minimum and maximum values i.e. its engineering range. Note,
as the <Return> key is hit, the slider will update to the value in the text field, but due to
the precision of the Slider, the fractional part may vary slightly. This, however, has no effect on the creation of the threshold. Values entered outside the variable’s range will be
ignored.
To add a threshold via method (II), move the slider with the mouse cursor (keeping the
left mouse button pressed down) to the desired value. The up and down arrow keys can be
used at this stage to specify a more precise value. Then release the mouse button and select a colour from the Colour Palette for the new threshold to have. Multiple thresholds
can be created once in this mode. To exit the “Add threshold popup”, click on the Done
button.
• Change Threshold. This button allows the colour for a particular threshold to be
changed. Once selected, click on the area in the “Threshold drawing area” that should
change colour i.e. in between two threshold levels. Then, click on a colour from the Colour Palette to change the threshold’s colour. As the mouse cursor is moved around the
palette before a colour is selected, the threshold changes colour according to the colour
the mouse cursor is over in the palette to preview the change. To exit threshold changing
mode, click on the Done button.
• Delete Value. This button allows threshold values to be deleted. Once selected, you must
click with the mouse cursor either above or below the threshold to be deleted. Observe the
GWDU Message Line for a prompt to say whether to pick below or above the threshold to
be deleted for a particular instance. This difference depends on where the threshold editing dialogue was entered from (a characteristic of GECK due to DataViews using two
methods of threshold generation). The threshold will then be deleted. To exit thresholddeleting mode, click on the Done button.
The Close button will exit the Threshold editing dialogue.
GSAF
ROVSING A/S
GWDU Development
Doc.No. UM-114-001-ROV: Issue: 1.4
USERS’ Manual
Date: 24 February 1999
32
2.7 Primitive Element Dy
Dynamics
Dynamics attributes button
Detach button
MDB end
item
attachment
to drive
dynamics
Dynamic
attribute
row - of
type
threshold
Dynamic
attribute
row - of
type
tranform
Figure 10
The Dynamics editing dialogue allows primitive DataViews elements to dynamically change
their attributes according to a MDB variable e.g. to rotate an object depending on a MDB
variable’s value. Dynamics are explained in detail in [DV-2].
To enter the Dynamics dialogue, select the desired primitive element in the Drawing Area,
e.g. Line, Rectangle, Polygon, Vtext etc. and click on the Dynamics.. button.
To give a dynamic property to the selected object, click on the button with the label “Dynamic”. A list of dynamic attributes appears. Select the desired attribute, noting that not all
attributes are applicable to each type, refer to [DV-2] for details. A dynamic attributes row is
created. The indicator to the left of the attribute name on the newly created row is red if the
attribute is applicable to the object being edited.
Newly created dynamic attribute rows are given a default variable, denoted by the button
marked “DEFAULT”. To replace the default variable with one from the MDB, click on the
“DEFAULT” button and enter a valid MDB variable pathname in the “Select end item”
popup. Once a valid pathname has been entered, the pathname replaces “DEFAULT” in the
button label. This button containing the path can then be used to change the variable in the
GSAF
ROVSING A/S
GWDU Development
Doc.No. UM-114-001-ROV: Issue: 1.4
USERS’ Manual
Date: 24 February 1999
33
same way if desired later.
Two kinds of dynamics attribute rows can be created, either threshold-driven or transformational, depending on the attribute:
• THRESHOLD. Threshold-driven attributes change the object in discrete amounts. If foreground colour is selected, using an MDB variable with a engineering range from 0 to 10,
and thresholds would specify the colour for the object to have in given ranges for the variable, say variable range 0 to 5 would give RED and 5 to 10 would give BLUE. Other
threshold-driven attributes include “Line Width”, “Line Type”, “Visibility” etc.
Threshold attribute rows have the same “In:” range specifying the MDB variable range,
but instead of an “Out:” range, they have a threshold button to enter the Threshold editing
dialogue, see section 2.6.6. The threshold dialogue is used to specify the discrete changes
to be applied to the object, for example, the foreground colour of the object.
The threshold editing dialogue is used in exactly the same way for colour changing attributes as described in section 2.6.6. but it varies slightly for other attributes such as “Line
Type” or “Line Width”. Once a threshold has been added using the Slider or the Text
Field, the threshold value can be selected by clicking on the new threshold in the threshold drawing area. For example, if “Line Type” is selected, to choose the line type for each
threshold, click on the threshold to change in the drawing area until the correct line type is
displayed.
• TRANSFORM. Transform dynamic attributes change the object linearly according to the
driving MDB variable e.g. “Rotate” - The MDB variable’s range would map directly to a
range of rotation, therefore causing a smooth rotation. Other transform driven attributes
include “Scale”, “Abs X Move”, “Abs Y Move” etc.
Transform attribute rows contain text fields that show (and can change) the display range
of the MDB variable, marked “In:”, and the output range, marked “Out:”. For example,
the “In:” range could specify a MDB variable range of 0 to 10 and the “Out:” range could
be set to 0 to 360. In this case the “Rotate” attribute would cause the complete rotation of
the object at run-time if the MDB variable passed through its entire range.
There is a DEL button on each dynamic attribute row to remove that dynamic attribute from
the object. Use the scroll bars on the bottom of the Dynamics dialogue to locate the button.
The “Erase Method” button selects the erase method for the object. It defines how the object
redraws itself (if at all) at run-time. See [DV-2] for specific details of each individual erase
method.
The Detach button removes all dynamics attributes (all the dynamic attribute rows) from the
object.
Click on the Close button to exit the dynamics dialogue.
2.8 Preview
The preview function allows the user to animate a Synoptic Display or a Symbol to simulate
its behaviour at run-time.
GSAF
ROVSING A/S
GWDU Development
Doc.No. UM-114-001-ROV: Issue: 1.4
USERS’ Manual
Date: 24 February 1999
34
The previewer can be started by clicking on the Run.. button from the GWDU left hand
menu.
If no objects were selected when the Run.. button was selected then all objects in the Synoptic Display or Symbol will be previewed, otherwise just the selected object(s) will be previewed. If any of the objects selected for the preview have erroneous settings and as a result
cannot be drawn, a DataViews generated error message will appear to inform of the error to
allow corrective action. Most errors are caused by the object not being sized big enough to
display all the required data. It is, therefore, a good idea to perform a preview before saving
the synoptic display.
Once the Run dialogue appears, there are two ways of manually providing data to the objects:
• Slider. The slider has a scale of 0 to 100%. This means whatever value is given on the
slider will be the value fed to all objects as a percentage of the objects’ ranges. The value
given will be between the objects’ minimum and maximum values. For example, if 75%
is selected from the slider, a Bar chart with a range -10 to +10 would be fed a value of +5.
Therefore, moving the slider from 0 to 100% will animate all objects from their minimum
values to their maximums.
• Scatter button. When the Scatter button is pressed, one set of random data is sent to all
objects in the preview screen. The random data will be within the objects’ minimum and
maximum limits.
There are also Start and Stop buttons which start and stop automated previewing. If no userdefined run-file is specified for providing data, random data is passed to all objects at the rate
specified in the Display Parameter’s refresh rate field, see section 2.9.2, until the Stop button
is pressed. This is effectively the same as the Scatter button being pressed at the specified
refresh rate.
Input objects in a synoptic display can be tested during a preview session. HLCL commands
that are selected by Push Button, Pop Menu or Fixed Menu objects will be written to standard output (the invoking shell). If a Picture Selection Marker object (PSM) is pressed, then
the preview will switch to previewing the synoptic display pointed to by the PSM object.
However, if acquiring data from a user-defined file, the animation of the new display may
look frozen due to incompatibilities between input variables (count and types) in the two displays.
To exit the Run dialogue, click on the Close button.
2.8.1 User-Defined Run Files
If the “Run File” toggle button is selected when the Start button is pressed, previewing will
take place with data from a user-defined file. The user-file is read each time that the Start
button is pressed.
The user file is specified in the text entry field next to the “Run File” toggle button. A Unix
pathname must be entered to point to the text file to supply the data. The user file must contain a list of values for every unique MDB pathname that provides to the synoptic display.
The user file must adhere to the specific format described below. The Make Run File Template button can be used to generate a template run file for the synoptic display being run. It
GSAF
ROVSING A/S
GWDU Development
Doc.No. UM-114-001-ROV: Issue: 1.4
USERS’ Manual
Date: 24 February 1999
35
will produce a text file, with a name as specified in the text entry field, which contains a line
for every variable present in the synoptic display, together with its type.
Each line in the run file shall be in the following format:
VAR <MDB variable pathname> <variable type> <value1> [value2] [value3] …. ENDVAR
where <variable type> is either:
INT for all integer types (including discrete variables that drive Subdrawings)
DOUBLE for all float types
TEXT for all string types (discrete or byte stream types)
Example:
#User-defined data for: GWDU v4:"PREVIEW" (SYNOPTIC)
#Enter values (ensuring correct type) between the typenames and ENDVAR
markers.
VAR \EURECA\EGSE\TEST\DATA\INT_1 INT -50 25 0 11 125 ENDVAR
VAR \EURECA\EGSE\TEST\DATA\STATE_3 INT 2 3 4 5 6 7 ENDVAR
VAR \EURECA\EGSE\TEST\DATA\FLOAT_1 DOUBLE 4.5 9.76 -0.65 ENDVAR
VAR \EURECA\EGSE\TEST\DATA\BYTE_1 TEXT MY_STRING “STRING WITH SPACES”
TEST_STRING ENDVAR
Further rules,
1. Any lines not starting with “VAR” are ignored i.e. can be used as comments
2. A “VAR” line can span several lines in the text file as long there is always a terminating
“ENDVAR” string.
3. Strings entered as data values for string type variables can be with or without quotes, but
if the string has spaces in-between then it must use quotes.
4. For Subdrawing variables, the values entered must correspond with the values expected
by a synoptic display at run-time to display the appropriate symbol, see [ICD-1].
During an automatic preview, whenever a variable comes to the end of its user-specified
data, it reverts back to the start again, hence continually repeating the data cycle. The Reset
Run File button will reset all variables to the start value of their user-defined data.
A warning message will be produced if not all the variables in a display are supplied with
data from the run file (but running will still be possible). Similarly, a warning message will
appear when generating a template file if there are DEFAULT variables present in the display i.e. not connected to MDB variables.
GSAF
ROVSING A/S
GWDU Development
Doc.No. UM-114-001-ROV: Issue: 1.4
USERS’ Manual
Date: 24 February 1999
36
2.9 Miscellaneous
2.9.1 Drawing Area Key Events
The following list shows the mapping between keys and events when editing in the Drawing
Area. See [DV-2] for a detailed explanation of these DataViews concepts.
Key
<Right-Hand
Event
Cancels current selection (Also known as <QUIT>)
Mouse
Button>
<Left-Hand-Mouse
Selects object
Button>
+
Add object to selected group
-
Remove object from selected group
c
Displays the current cursor position X,Y co-ordinates in the GWDU Message Line
m
Merge Control Point (Polygon editing)
s
Split Control Point (Polygon editing)
x
Delete Control Point (Polygon editing)
i
Insert Control Point (Polygon editing)
a
Add Control Point (Polygon editing)
2.9.2 Display Pa
Parameters
The display parameters allow the user to specify the initial size of the Synoptic Display when
executed at run-time, and also the refresh rate of the Display i.e. the rate at which to refresh
the objects’ data input.
Click on the Display Parameters button to bring up the Display Parameters popup.
This popup contains three text fields:
• Display Width. Enter a pixel value between 1 and 1200 (default 800)
• Display Height. Enter a pixel value between 1 and 1200 (default 600)
• Refresh Rate. Enter a value between 1 and 10 seconds (default 1).
Click on OK to accept the changes or Cancel to discard changes.
GSAF
ROVSING A/S
GWDU Development
Doc.No. UM-114-001-ROV: Issue: 1.4
USERS’ Manual
Date: 24 February 1999
37
2.10 Symbol Editing Mode
The Symbol Editor facilitates the generation of libraries of user defined symbols for common
use. These symbols can be created and edited in the Symbol Editor and then, at a later stage,
added to a Synoptic Display.
There are two types of Symbol, STATIC and DYNAMIC. Static symbols contain only
primitive objects i.e. lines, circles, polygons, text, images and icons etc. These primitives can
allow the generation of standard symbol, for example, electrical circuit symbols. DYNAMIC
symbols can contain any objects allowed in STATIC symbols and Graphs i.e. output elements. DYNAMIC symbols can be used to create commonly used objects, such as a thermometer, by using a bar chart Graph with all context features and outline de-selected, surrounded by primitive elements such as lines or circles.
The symbol editor is invoked when a MDB symbol is loaded i.e. type
WDU_GROUND_SYMBOL. The symbol editor is almost exactly the same as the Synoptic
Display editor with some restrictions on what can be done. The restrictions are enforced
automatically by the sensitivity of buttons and menu options. Restricted functions are therefore not selectable.
Here is a summary of the restricted functions:
• No Symbols, Subdrawings or Input objects can be added to a Symbol.
• Dynamics cannot be given to primitive objects.
• The File.Merge menu option is not allowed.
• Display Parameters cannot be set.
• No MDB end-items can be attached inside the Symbol Editor i.e. the Graph editing dialogue does not allow variables to be added to a Graph - this is done in Synoptic Display
editing mode.
• It is not possible to save a Symbol as a Synoptic Display (or visa versa). This enforces that
Symbols are generated in separate libraries from Synoptic Displays.
2.11 GWDU v2 Compatibility
GWDU v3 and above uses the same MDB structures as GWDU v2 and is designed to be
compatible. It is, however, inevitable that there will be some minor problems when using pre
v3.0 Synoptic Displays. The following points should be noted when using v2 Synoptic Displays :
• If a v2 Synoptic Display contains user-defined symbols, they will appear in the v3.0 and
above Synoptic Display exactly the same but they will lose their grouping as a Symbol i.e.
the individual elements that make up the symbol will be in the Synoptic Display on their
own. This makes the “Update” function impossible for these old Symbols. To perform an
Update, simply delete the elements of the Symbol and re-include the Symbol again.
• There may be some colour problems between v2 and v3.0 and above due to differing colour palettes used by the two different GWDU implementations.
GSAF
ROVSING A/S
GWDU Development
Doc.No. UM-114-001-ROV: Issue: 1.4
USERS’ Manual
Date: 24 February 1999
38
• GWDU v2 has a very limited colour palette. It may be necessary to adjust the background
colour of a v2 Synoptic Display when loading in to the v3 and above GWDU.
2.12 Backwards compatibility
GWDU v4.1.1 introduces the concept of incomplete end-items. The Completion State of an
end-item variable is determined on the time of attachment to the display. This state is then
stored with the display and not updated until the end-item is re-attached.
The Completion State is not present in displays made with previous GWDU versions. Thus
all end-items are considered complete in displays saved from previous versions. Not even
loading these display into GWDU version 4.1.1 will update completion states correctly. Each
end-item in such a display must be re-attached one by one.
GSAF
ROVSING A/S
GWDU Development
Doc.No. UM-114-001-ROV: Issue: 1.4
USERS’ Manual
Date: 24 February 1999
A-1
APPENDIX A: GWDU MESSAGES
There are several categories of messages produced by the GWDU. Some are specific GWDU
messages and some are either DataViews or GECK standard messages. Refer to the DataViews DV-Tools manual [DV-3] for the latter category.
The specific GWDU messages are divided into two categories – Warnings and Errors - according to requirements. The GWDU does not have specific info messages. A third type of
messages may appear on erroneous invocation (see INVOCATION MESSAGES further
down).
ERROR MESSAGES
Error messages appear only in case of troubles. The GWDU then is in an illegal situation or
state and things are likely to go wrong, if you continue. Thus the following procedure should
be engaged:
GWDU emergency exit:
•
Try to save the work – preferably in a separate display/symbol end item to avoid losing
your original work
•
It may be desirable 8for later problem analysis) to save the log file (GWDU_LOG.TXT)
from the temporary working/data directory ($GWDU_HOME/data/<machine>_<pid>),
since it will be removed on normal exits
•
Quit the GWDU
•
The circumstances should be noted and reported
The saved display/symbol can then be re-invoked and with a little luck you can continue.
All possible error messages are listed below.
Error
Cause and Corrective action
An internal error occurred.
An internal consistency check within the GWDU has failed. Synoptic
Display/Symbol internal data is corrupted/invalid.
<optional details>
MDB error getting End Item
type
Perform GWDU emergency exit as described in Appendix A:’GWDU
Error Messages’ of the User Manual.
Error return from call to MDB API. The session log file may contain
additional information (see User Manual).
Perform GWDU emergency exit as described in Appendix A:
’GWDU Error Messages’ of the User Manual. Consult MDB support.
MDB lock error
Error return from call to MDB API. The session log file may contain
additional information (see User Manual).
Perform GWDU emergency exit as described in Appendix A:
’GWDU Error Messages’ of the User Manual.
MDB save error
Error return from call to MDB API. The session log file may contain
additional information (see User Manual).
Perform GWDU emergency exit as described in Appendix A:
’GWDU Error Messages’ of the User Manual. Consult MDB support.
GSAF
ROVSING A/S
GWDU Development
Doc.No. UM-114-001-ROV: Issue: 1.4
USERS’ Manual
Date: 24 February 1999
A-2
Memory allocation error
Insufficient free memory on the workstation running the GWDU.
Perform GWDU emergency exit as described in Appendix A:
’GWDU Error Messages’ of the User Manual. Try to free some memory by closing other running programs.
Merge view failed
DataViews error with Merge View operation. Synoptic Display/ Symbol internal data is now probably corrupted/invalid.
Perform GWDU emergency exit as described in Appendix A:
’GWDU Error Messages’ of the User Manual.
Missing DataViews subdrawing
in dynamic Subdrawing
An internal consistency check within the GWDU has failed. Synoptic
Display/Symbol internal data is corrupted/invalid.
Perform GWDU emergency exit as described in Appendix A:
’GWDU Error Messages’ of the User Manual.
Point object could not be created Internal GWDU error during object creation. Synoptic Display internal data is corrupted/invalid. This may be a result of shortage of
memory.
Perform GWDU emergency exit as described in Appendix A:
’GWDU Error Messages’ of the User Manual.
Subdrawing could not be created Internal DV-Tools error during subdrawing creation. Synoptic Display internal data is corrupted/invalid. This may be a result of shortage of memory.
Perform GWDU emergency exit as described in Appendix A:
’GWDU Error Messages’ of the User Manual.
Symbol contained no drawing
DataViews or MDB error when a loaded symbol from the MDB has
no contents.
Fill Symbol End Item with contents or use another valid symbol.
Unable to load View
Internal MDB or DataViews error in Load/Save process.
Try loading another view. Contact support if problem persists.
Unable to save View
Internal MDB or DataViews error in Load/Save process.
Try SaveAs to another End Item. Contact support if problem persists.
WARNING MESSAGES
Warnings are not fatal as the error messages. There is no “exit procedure”. The corrective
actions presented should be used.
All possible warnings are listed below.
Warning
Cause and Corrective action
Cannot generate file <name>
The GWDU was unable to generate a Report File or a Run File of the
specified name in the Unix file system.
Make sure the name is a valid name and that you have write permission for the destination directory.
Cannot open Run File <name>
The GWDU was unable to open the specified Run File.
Make sure the file is present.
GSAF
ROVSING A/S
GWDU Development
Doc.No. UM-114-001-ROV: Issue: 1.4
USERS’ Manual
Date: 24 February 1999
A-3
Cannot print to <printer>
The GWDU was unable to print to the printer specified.
Assert that the printer specified is a valid OS printer name, and that
files referred to in the print command is available.
Could not lock End Item (In
Use). Opened as Read-Only
The End Item could not be locked because it is already locked (accessed) by another user. Changes cannot be saved to this End Item.
Use SaveAs to save to another End Item.
Could not lock End Item (In
Use). Save As failed
The End Item could not be locked as it is locked (accessed) by another user. Changes cannot be saved to this End Item.
Select other destination End Item and re-try.
Could not re-lock End Item.
Opened as Read-Only
The End Item could not be locked as it is locked (accessed) by another user. Changes cannot be saved to this End Item. During a Save
or SaveAs operation someone else managed to lock the End Item
between the save and re-load operation.
Use SaveAs to save to another End Item.
Current editing operation not
completed.
You have tried to quit the GWDU without completing an editing operation (like choosing a colour for an object).
Complete the commenced operation before quitting. The Message
Line in the GWDU window will tell you what to do.
Default variable(s) present in
display.
Some DataViews variables in the display was not attached to an MDB
End Item. The Run File template will be incomplete, since no
VAR/ENDVAR lines for these variables will be present.
Attach all variables to End Items
Encountered unknown action
type <action>
During a preview, an unknown action type (internal type) was encountered.
Verify the value of the action field with the GWDU.
End Item is FROZEN. Opened
as Read-Only
The End Item could not be locked because it is in a FROZEN and
therefore nor writable.
If editing is intended use End Item which is in state DEVELOPMENT
by selection of proper CDU/CCU.
End Item is FROZEN. Save As
failed
The End Item could not be locked because it is in a FROZEN and
therefore nor writable
Select End Item which is in state DEVELOPMENT and re-try.
Error in Run File syntax:
‘ENDVAR’ not found for variable:
The statement of the Run File for the mentioned variable misses the
mandatory ENDVAR keyword at the end.
Use standard editor to correct Run File. Then re-try Preview.
<name>
Invalid min/max range
You have either expanded the range when only shrinking is allowed,
or you have reversed MIN and MAX.
To expand the range you must re-attach the End Item. This will reset
the range to the End Item Engineering Range.
Invalid range
Entered value is out of range.
Use value inside valid range: <expected range> for <item>
MDB Authorisation error.
GSAF
ROVSING A/S
The End Item could not be locked because the current user is not the
GWDU Development
Doc.No. UM-114-001-ROV: Issue: 1.4
USERS’ Manual
Date: 24 February 1999
A-4
Opened as Read-Only
owner of the End Item.
Restart GWDU as user with the proper access rights.
MDB Authorisation error. Save
As failed
The End Item could not be locked as the MDB user is not the owner
of the End Item.
Select other destination End Item with proper access rights and re-try.
MDB Privilege error. Opened as
Read-Only
The End Item could not be locked because it is in REVIEW status
and you do not have CM rights.
Restart GWDU as user with the proper access rights.
MDB Privilege error. Save As
failed
The End Item could not be locked because it is in REVIEW status
and you do not have CM rights.
Select other destination End Item with proper access rights and re-try.
Missing mandatory attributes
You have accessed an input End Item without the following necessary
attributes:
<Attribute name> …
Supply mandatory attributes and then re-attach End Item in GWDU.
No ‘HOME’ environment variable specifying user’s home directory.
Using current directory instead
No discrete calibration data
Since no user home directory could be determined from the standard
environment variable ‘HOME’, the GWDU will use current directories for Settings files.
Check Unix environment and verify shell start-up scripts.
The MDB End Item referenced has no discrete calibration data defined in the MDB.
Supply missing data in MDB. Then re-attach End Item in GWDU.
No discrete calibration data
The End Item referenced has no discrete calibration data defined.
Supply mandatory attributes and then re-attach End Item in GWDU.
No Pathname given
A Pathname was expected in an entry field but none was given.
Supply data.
No type information found for
End Item
MDB error: When End Item <name> was accessed no type information was returned.
Try to regenerate Symbol. Report problem to MDB support.
Only Static Symbols can be included in a Subdrawing
User defined Symbol attached to Dynamic Subdrawings is not of type
STATIC.
Choose a STATIC symbol.
Pathname not found in current
MDB scope
The Pathname <name> was not found in the current scope of the
MDB.
Verify the pathname given.
Pathname Support busy
The Pathname Support utility is occupied by another calling instance.
Try again. Consult MDB support if problem persists.
Pathname Support reported: no
connection to Oracle
The Pathname Support utility was unable to connect to Oracle.
Pathname Support returned er-
The Pathname Support utility returned an unexpected error.
GSAF
ROVSING A/S
Try again. Consult MDB support if problem persists.
GWDU Development
Doc.No. UM-114-001-ROV: Issue: 1.4
USERS’ Manual
Date: 24 February 1999
A-5
ror: <number>
Consult MDB support.
Pathname Support timeout
(type<number>)
The Pathname Support utility did not respond within the time-out
limit. This might be due to heavy load on the workstation. Do not quit
Pathname Support when appearing on desktop. Just reject it. The type
number in paranthesis is the returncode from the MDB system (PNS).
Try again. Consult MDB support if problem persists.
Preview: Line <number> in Run
File is invalid (VAR line)
The Run File did not contain either Pathname or type name for a DataViews variable. The line number indicates which line (VAR ...
ENDVAR) of the Run File is invalid.
End Item Pathname and type not
detected
Use standard editor to correct Run File. Then re-try Preview.
Popup menu has no sub-menus
The activated Popup menu has no sub-menu entries.
Edit display to contain sub-menus
Reached limit of user-defined
items while reading Run file
variable parameters.
The number of user-defined items does not allow for all data items to
be stored.
Requested End Item is not a
<type>
The End Item specified is not of the correct type. Only the one reported type is legal in this context.
Reduce number of data input values for each parameter.
Use the correct type of End Item (refer to User Manual).
Requested End Item is not a cor- The End Item specified is not of the correct type. This message occurs when there are many possible legal types.
rect type in this context
Use the correct type of End Item (refer to User Manual).
Run File does not contain any
input data for the variable:
A DataViews variable contained in the Synoptic Display does not
have a corresponding defintion (VAR/ENDVAR statement) in the
Run File.
<name>
Use standard editor to correct Run File. Then re-try Preview.
The complete filepathname is
too long.
The operation was aborted since the resulting file name is exceeding
256 characters.
Check HOME directory and file name and use a shorter name.
The End Item contains more
states than allowed
The Dynamic Subdrawing contained more than states 31 (excluding
‘other’). Only 31 states are accepted.
Reduce the number of states.
The maximum number of input No more Input objects or commands can be added, as the limit has
symbol actions has been reached been reached.
None.
The maximum number of variables has been reached
No more variables can be added for that particular Graph.
Too few End Items defined for
Symbol
The Symbol editing dialogue was OK’ed but not all necessarry references to End Items were yet attached to the Graph objects inside the
Symbol.
None.
Supply missing End Item references.
Too few Symbols defined for
Subdrawing
GSAF
ROVSING A/S
The Subdrawing editing dialogue was OK’ed but not all necessary
references to Symbol End Items were yet attached for each State of
GWDU Development
Doc.No. UM-114-001-ROV: Issue: 1.4
USERS’ Manual
Date: 24 February 1999
A-6
the Subdrawing.
Supply missing Symbol End Item references.
Too many graphs in Symbol
This Symbol has more that 10 graphs. GWDU only allows 10 graphs.
Edit the Symbol and reduce number of graphs, or use another legal
Symbol.
Type mismatch in update. Text
Graphs/Not Text Graph
During update the GWDU detected that the graph type and input type
does not match.
Text graphs (and only text graphs) should have BYTE_STREAM input. Correct the mismatch.
Unable to access settings file
<filename>
During loading of settings:
Opening of the file was unsuccessful.
Make sure the file does exist, and you have proper access rights.
During saving of settings:
The GWDU was unable to open/create the specified file.
Validate name and access rights for the file, and make sure the file
system is not full.
Unable to find variable referenced in Run File
VAR Pathname: <name>, line
<number>
Unable to read all data from settings file <filename>
Setting not changed.
Unable to write all data to settings file <filename>
A DataViews variable reference (VAR) in the Run File does not have
a corresponding variable in the Synoptic Display.
Use standard editor to correct Run File. Then re-try Preview.
For some unknown reason, the reading of settings from the specified
file was unsuccessful.
The file should be deleted ‘manually’ from an operation system shell.
For some unknown reason, the writing of settings to the specified file
was unsuccessful. The file should not be used to load settings again.
Verify filename and check operating system / file system state.
Unsuccessful PNS Filter construction
An unexpected error occurred during construction of PNS filter including user defined types
End Item list presented in pathname support may be incomplete. Report the incident and confirm End Item name manually.
INVOCATION MESSAGES
Invocation messages are not window popup messages. These messages are sent to the standard output of the program, which is the command tool that either:
•
Invoked the GWDU
•
Invoked the GWDU_SE start-up script
•
Invoked the I_MDB
These messages are the result of using wrong settings or illegal command line parameters for
the GWDU. Something that is very unlikely using I_MDB.
GSAF
ROVSING A/S
GWDU Development
Doc.No. UM-114-001-ROV: Issue: 1.4
USERS’ Manual
Date: 24 February 1999
A-7
All possible messages are listed below.
Invocation Error
Cause and Corrective action
Error in End Item type specification
The End Item type parameter was wrong.
Error in Symbol / Synoptic
specification
Incorrect SID and Internal Version combination specified.
GWDU_HOME environment
variable must be set
Environment variable GWDU_HOME must be set before invocation.
Incorrect number of parameters
Too few parameters provided in command line.
Use either WDU_GROUND_SYNOPTIC_DISPLAY or
WDU_GROUND_SYMBOL as End Item type.
On manual invocation: Check SID and Internal Version numbers. On
MDB invocation: Contact MDB support.
Make sure GWDU_HOME is defined correctly: Check environment
and verify your Unix shell start-up scripts.
See GWDU User Manual for information on invocation parameters.
GSAF
ROVSING A/S
GWDU Development
Doc.No. UM-114-001-ROV: Issue: 1.4
USERS’ Manual
Date: 24 February 1999