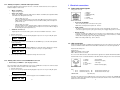
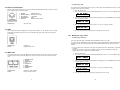
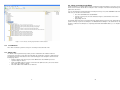
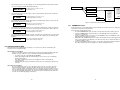
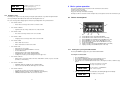
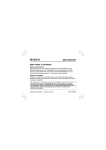
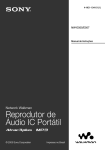
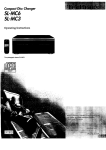
1
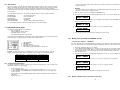
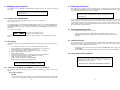
www.coachsound.com
Tourmaster
(MLA2500)
User Manual
© Sirian Pty Ltd 2009 All rights reserved.
Coachsound and logo are registered trademarks of Sirian Pty Ltd
Manual version 1.02
35
•
‘AIN+‘:
All language channels are switched to the first ‘AUDIO-IN’ channel between commentaries. The
audio present at the ‘AUDIO-OUT’ connector is identical to the audio on the selected headphone
channel when set using the “SET AUDIO OUT?” menu option.
1. Enter the option menu
2. Press a “No” key until you get the following display then press the ‘Yes” key to modify this option.
SET LING’L IDLE?
PLAY=Y, OTHERS=N
3. You should see the following (“OFF”, “ZON-”, “ZON+”, “AIN- or “AIN+” may appear).Press the
SEGMENT UP key until you choose the language channel override option you want:
LINGUAL IDLE:ZON
IDLE:ZON-SEGMENT UP, PLAY
4. Once you have selected what you want, press the “Yes” key. You should see the following:
OPTIONS UPDATED,
PRESS ANY KEY...
Press any key to return to normal operation. Changes have been saved.
1
34
1
•
•
‘MIC-B’:
Speaking into microphone connected to ‘MIC-B’ will cause the audio controller channels (except the
microphone channels) to redirect to the ‘MIC-B’ channel. All channels will revert back to their normal
programme a short delay after speaking stops.
‘BOTH’:
Speaking into either microphone will cause the audio controller channels (except the microphone
channels) to redirect to the microphone input triggered by the VOX circuit. All channels will revert
back to their normal programme a short delay after speaking stops.
1. Enter the option menu
2. Press a “No” key until you get the following display then press the ‘Yes” key to modify this option.
SET VOX ON/OFF?
PLAY=Y, OTHERS=N
3. You should see the following (“OFF”, “MIC-A”, “MIC-B”, or “BOTH” may appear).Press the
SEGMENT UP key until you chose the VOX option you want:
VOX OPTION:MICOPTION:MIC-A
SEGMENT UP, PLAY
ELECTRICAL CONNECTIONS ............................................................................................. 4
1.1
Power and control signals............................................................................................................................ 4
1.2
GPS connection .......................................................................................................................................... 4
1.3
Drivers control panel.................................................................................................................................... 5
1.4
USB ............................................................................................................................................................ 5
1.5
Main loom ................................................................................................................................................... 5
1.5.1
Double deckers .................................................................................................................................... 6
1.5.2
Terminators .......................................................................................................................................... 6
1.5.3
Audio controller capacity: ...................................................................................................................... 6
1.6
Audio connections ....................................................................................................................................... 6
1.6.1
Audio In................................................................................................................................................ 6
1.6.2
Audio Out ............................................................................................................................................. 6
1.6.3
Microphones......................................................................................................................................... 7
1.7
Integrated control panel ............................................................................................................................... 7
1.7.1
Using the integrated panel .................................................................................................................... 7
4. Once you have selected what you want, press the “Yes” key. You should see the following:
2
OPTIONS UPDATED,
PRESS ANY KEY...
5. Press any key to return to normal operation. Changes have been saved.
6.2.11 Enable or Disable language channel change-over when idle
This enables or disables the capability to change the language channels to an entertainment channel
between commentaries. This allows music (or other audio) to play between commentaries.
•
•
2.1
Disk and partition structure .......................................................................................................................... 8
2.2
Audio file formats......................................................................................................................................... 8
2.3
Route folder and file structure ...................................................................................................................... 8
2.3.1
SYSTEM folder..................................................................................................................................... 9
2.3.2
MUSIC folder........................................................................................................................................ 9
2.3.3
COMMENTARY folder ........................................................................................................................ 10
3
• Default setting: “OFF”
‘OFF’:
Language channels are silent between commentaries. The audio present at the ‘AUDIO-OUT’
connector is identical to the audio on the selected headphone channel when set using the “SET
AUDIO OUT?” menu option.
‘ZON-‘:
All language channels are switched to the first ‘ZONE’ channel between commentaries. If a
language channel is chosen to be output from the ‘AUDIO-OUT’ connector (using the “SET AUDIO
OUT?” menu option) - only the audio commentary will be present at the connector and will be silent
between commentaries.
•
‘ZON+‘:
All language channels are switched to the first ‘ZONE’ channel between commentaries. The audio
present at the ‘AUDIO-OUT’ connector is identical to the audio on the selected headphone channel
when set using the “SET AUDIO OUT?” menu option.
•
‘AIN-‘:
All language channels are switched to the first ‘AUDIO-IN’ channel between commentaries. If a
language channel is chosen to be output from the ‘AUDIO-OUT’ connector (using the “SET AUDIO
OUT?” menu option) - only the audio commentary will be present at the connector and will be silent
between commentaries.
33
FOLDER AND FILE FORMAT............................................................................................... 8
CONTROL SWITCHES ....................................................................................................... 13
3.1
Required switches ..................................................................................................................................... 13
3.2
Optional switches - Rules .......................................................................................................................... 14
3.3
Other switches .......................................................................................................................................... 15
3.4
Switch examples ....................................................................................................................................... 16
3.5
Naming and switch formatting errors.......................................................................................................... 16
3.5.1
Database errors.................................................................................................................................. 17
4
BASIC SYSTEM OPERATION ............................................................................................ 18
4.1
Drivers Control panel ................................................................................................................................. 18
4.1.1
Turning the system power ON and OFF .............................................................................................. 18
4.1.2
Selecting a ROUTE ............................................................................................................................ 19
4.1.3
Selecting an audio SEGMENT ............................................................................................................ 19
4.2
Manually playing commentaries................................................................................................................. 20
4.3
Stopping a commentary............................................................................................................................. 20
4.4
Headphone channel order ......................................................................................................................... 21
2
5
GPS ..................................................................................................................................... 22
5.1
GPS rules for playback .............................................................................................................................. 22
5.1.1
Tracking rules..................................................................................................................................... 22
5.2
Saving a GPS waypoint ............................................................................................................................. 23
5.3
GPS messages ......................................................................................................................................... 24
5.4
Operation without GPS .............................................................................................................................. 25
5.5
Notes on using Google Earth ..................................................................................................................... 26
6
6.1
CHANGING SYSTEM OPTIONS ......................................................................................... 27
Getting to the OPTION menu..................................................................................................................... 27
6.2
The options ............................................................................................................................................... 27
6.2.1
Modify power-up ROUTE and SEGMENT to resume or load defaults.................................................. 27
6.2.2
Modify power-up ROUTE and SEGMENT defaults.............................................................................. 28
6.2.3
Enable or Disable audio commentary chime alert................................................................................ 28
6.2.4
Modify time delay between alert and commentary start ....................................................................... 29
6.2.5
Enable or Disable GPS tracking function............................................................................................. 29
6.2.6
Modify GPS trigger radius................................................................................................................... 30
6.2.7
Modify microphone, VOX and audio input volumes ............................................................................. 31
6.2.8
Modify audio channel sent to AUDIO OUT connector .......................................................................... 31
6.2.9
Enable or Disable Microphone channels ............................................................................................. 32
6.2.10 Enable or Disable VOX microphone overrides .................................................................................... 32
6.2.11 Enable or Disable language channel change-over when idle ............................................................... 33
4. Once you have made your selection, press the “Yes” key to accept the changes.
OPTIONS UPDATED,
PRESS ANY KEY...
5. Press any key to return to normal operation. Changes have been saved.
6.2.9 Enable or Disable Microphone channels
• Default setting: “ON”
This enables or disables the ‘MIC-A’ and ‘MIC-B’ microphone inputs.
•
ON:
‘MIC-A’ input appears on headphone channel ‘0’ and ‘MIC-B’ input appears on channel ’1’. The first
language channel appears on headphone channel ‘2’.
•
OFF:
Microphone channels are disabled: The first language channel appears on headphone channel ‘0’.
1. Enter the option menu
2. Press a “No” key until you get the following display then press the ‘Yes” key to modify this option.
SET MICS ON/OFF?
PLAY=Y, OTHERS=N
3. You should see the following (“ON” or “OFF” may appear).Press the SEGMENT UP key until you
chose the VOX option you want:
MICS A+B:
A+B: ON
SEGMENT UP, PLAY
4. Once you have selected what you want, press the “Yes” key. You should see the following:
OPTIONS UPDATED,
PRESS ANY KEY...
5. Press any key to return to normal operation. Changes have been saved.
6.2.10 Enable or Disable VOX microphone overrides
• Default setting: “OFF”
This enables or disables the VOX override circuit on the microphone inputs. This option is only available if
the microphone option is set to ON (See “6.2.9 Enable or Disable Microphone channels”)
3
•
‘OFF’:
‘MIC-A’ and ‘MIC-B’ inputs only operate on their dedicated channels ‘0’ and ‘1’ respectively (if
microphones are enabled)
•
‘MIC-A’:
Speaking into microphone connected to ‘MIC-A’ will cause the audio controller channels (except
the microphone channels) to redirect to the ‘MIC-A’ channel. All channels will revert back to their
normal programme a short delay after speaking stops.
32
6.2.7 Modify microphone, VOX and audio input volumes
This allows adjustment of the audio input connectors so all audio controller channels can be equalised to
identical headphone volume levels:
“MIC-A” and “MIC-B”
Adjust microphone gain
•
“VOX-A” and “VOX-B”:
Adjusts the sensitivity to trigger the VOX circuits for “MIC-A” and “MIC-B” (This adjustment will be
unavailable if the VOX option is turned off)
o
•
1.1 Power and control signals
6-way power connector
•
o
1 Electrical connections
VOX sensitivity set too low:
The person operating microphone connected to either MIC may not be able to cause the
VOX to activate or activate erratically. Increase the VOX sensitivity for the microphone in
question in this case.
VOX sensitivity set too high:
All audio controller channels erratically switch, or will be permanently set to a microphone
input even when no one is speaking into the microphone. Decrease the VOX sensitivity for
the offending microphone input in this case.
1.
2.
3.
4.
5.
6.
RELAY1
PCON1
GROUND (Earth)
RELAY2
PCON2
10V – 30V DC
VIEWED FROM SYSTEM
•
10V-30V DC and GROUND:
These are the main power connections for the system.
Note: Over-current protection required: 5A - 10A fuse.
•
PCON1, PCON2:
The Drivers control panel controls the power to the system, but optionally, short these two
connections together to power up the system remotely. Do not apply voltage to these connections.
•
RELAY1, RELAY2:
Contacts of normally-open (N/O) relay. The connections close for approximately 1 second at the
beginning of each audio commentary. These connections can be used (for instance) to activate a
remote chime to alert passengers of the pending commentary.
“AUDIO IN” channels 0,1,2:
Adjust input levels for external audio systems connected to “AUDIO IN” channels 0, 1 and 2.
1. Enter the option menu
2. Press a “No” key until you get the following display then press the ‘Yes” key to modify this option.
ADJUST VOLUMES?
PLAY=Y, OTHERS=N
Note: Power rating of N/O relay: 30V DC, 2A max.
3. You should see the following. Use the ROUTE UP and DOWN keys to select the audio input that
requires adjustment:
1.2 GPS connection
RS232 communication interface to NMEA 0183 standard GPS receiver. The Tourmaster system has been
tested to work with the Garmin GPS16-HVS aerial. Other aerial brands are not tested nor guaranteed.
CHANNEL: MIC
MIC--A
CHANNEL
GAIN
4. Use the SEGMENT UP and SEGMENT DOWN keys to adjust the volume setting for the selected
input. Once you have made your selection, press the “Yes” key to accept the changes:
Required aerial settings are:
4800 baud rate
NMEA-0183 GPRMC sentence output
With or without sentence checksum
OPTIONS UPDATED,
PRESS ANY KEY...
5. Press any key to return to normal operation. Changes have been saved.
The colours of the GPS antennae cable charted below are typical for the Garmin GPS16-HVS but will differ
between brands. Please consult the datasheet for the GPS antennae being used for correct connections.
1.
2.
3.
4.
5.
6.2.8 Modify audio channel sent to AUDIO OUT connector
• Default setting: “CHANNEL: 2” (First language channel)
This selects which audio channel will appear on the stereo “AUDIO OUT” connector. The channel selected
relates to the audio channel selection on the audio controllers.
1. Enter the option menu;
2. Press a “No” key until you get the following display then press the ‘Yes” key to modify this option.
SET AUDIO
AUDIO OUT?
PLAY=Y, OTHERS=N
AUDIO CHANNEL: 2
SEGMENT UP, PLAY
31
Ground (Earth)
RS232 Receive (input)
+12V output
RS232 Transmit (output)
VIEWED FROM SYSTEM
Note:
•
•
Pin 2:
Pin 5:
CONNECTOR:
3. Use SEGMENT UP to select the channel to appear on the “AUDIO OUT” connector.
BLACK:
WHITE:
RED:
no connection
BLUE:
RS232 Receive (Rx)
RS232 Transmit (Tx)
Antenna RS232 Transmit (Tx)
Antenna RS232 Receive (Rx)
5-pin DIN (180°)
Note that some antenna may have additional power-control connections. For instance the “GARMIN GPS16”
requires the yellow remote power wire to be grounded to activate the antenna. Please refer the antenna
datasheet for more information.
4
• Default setting: “ON”
1.3 Drivers control panel
Interface to the drivers control panel. Use CAT-5 cable from the MLA2500 head-unit to the drivers control
panel. Supplied cable is 4 metres in length.
1.
2.
3.
4.
5.
BROWN:
ORANGE/WHITE:
BLUE/WHITE:
GREEN/WHITE:
ORANGE:
GROUND (Earth)
RS232 Receive (input)
+12V Output
PCON
RS232 Transmit (output)
1. Enter the option menu
2. Press a “No” key until you get the following display then press the ‘Yes” key to modify this option.
SET GPS ON/OFF?
PLAY=Y, OTHERS=N
3. You should see the following (“ON” or “OFF” may appear).Press the SEGMENT UP key until you
chose the option you want:
GPS STATUS:
STATUS: ON
SEGMENT UP, PLAY
VIEWED FROM SYSTEM
CONNECTOR:
This option turns the GPS tracking function on and off. This option should be ON unless there is no GPS
antenna connected to the Tourmaster.
5-pin DIN (180°)
4. Once you have made your selection, press the “Yes” key to accept the changes:
OPTIONS UPDATED,
PRESS ANY KEY...
1.4 USB
This is a USB2.0 Full speed compliant mass-storage device interface. Use this interface via PC to modify
and update commentaries and music on the head-unit. When using the USB, ensure the Tourmaster is
powered ON.
5. Press any key to return to normal operation. Changes have been saved.
6.2.6 Modify GPS trigger radius
• Default setting: 100 metres
Note: This option will only be available if “SET GPS ON/OFF” option is set to “On”.
CONNECTOR:
CABLE:
USB type ‘B’
Required cable is ‘A-B’
This option sets the default radius for the commentary segments with no RADIUS switch assigned. This
radius is the distance from the POI at which the Tourmaster will determine that is where the vehicle is
headed.
• Day tour vehicles: If the tour travels on the open road (100km/h), then the default radius of 100m will be
adequate.
• Hop-on, Hop-off vehicles: If the tour is travelling around city streets and the POI’s are fairly close
together, then a radius setting of 50m would be advised.
1.5 Main loom
Two modular RJ45 connectors supply digital audio channels and power to all connected passenger audio
controllers via two CAT-5 cable looms. One loom connects near-side seats; the other connects off-side
seats.
1.
2.
3.
4.
5.
6.
7.
8.
CONNECTORS:
CABLE:
ORANGE/WHITE
ORANGE
GREEN/WHITE
BLUE
BLUE/WHITE
GREEN
BROWN/WHITE
BROWN
RJ45-8/8 for solid conductor
CAT-5, CAT-5E or CAT-6
5
1. Enter the option menu
2. Press a “No” key until you get the following display then press the ‘Yes” key to modify this option.
SET TRIGGER RAD?
PLAY=Y, OTHERS=N
OTHERS=N
3. You should see the following (another distance may appear).Press the SEGMENT UP key until you
select the distance you want:
SET TRIGGER:100m
SEGMENT UP, PLAY
4. Once you have made your selection, press the “Yes” key to accept the changes:
OPTIONS UPDATED,
PRESS ANY KEY...
5. Press any key to return to normal operation. Changes have been saved.
30
1.5.1 Double deckers
• Default setting: “ON”
This option enables or disables the chime that plays over all audio controller headphone channels (except
microphone channels) before the start of each commentary.
1. Enter the option menu
2. Press a “No” key until you get the following display then press the ‘Yes” key to modify this option.
CHIME ON/OFF?
PLAY=Y, OTHERS=N
For double-decker buses, signal splitters are available to split the two main RJ45 loom outputs into four. This
enables each of the 4 looms to supply for example, both near and off-sides of upstairs and downstairs.
1.5.2 Terminators
Each main RJ45 loom output must be terminated at the last PCU431 hub (furthest away from the head-unit)
with a PCU42 terminator module. In a standard configuration, two terminators are required. For double
deckers using signal splitters, 4 terminators are required, one for each of the 4 looms.
1.5.3 Audio controller capacity:
3. You should see the following (“ON” or “OFF” may appear).Press the SEGMENT UP key until you
chose the option you want:
CHIME: ON
SEGMENT UP, PLAY
4. Once you have made your selection, press the “Yes” key to accept the changes:
OPTIONS UPDATED,
PRESS ANY KEY...
5. Press any key to return to normal operation. Changes have been saved.
The number of audio controllers that can be connected to each RJ45 loom output from the head-unit
depends on the supply voltage:
•
12V DC (nominal) power supply:
25 x audio controllers per RJ45 loom output (50 x audio controllers)
•
24V DC (nominal) power supply:
50 x audio controllers per RJ45 loom output (100 x audio controllers)
Note: this is the total number of connected audio controllers per main RJ45 loom. Using PCU432 splitters
does not increase this number.
1.6 Audio connections
6.2.4 Modify time delay between alert and commentary start
• Default setting: 3 seconds
This is the time (0 to 9 seconds) between the activation of the commentary segment via GPS tracking or
manually via the drivers control panel and the actual playback of the audio. During this delay, the audio
controllers in the seats will flash to attract the passengers’ attention and a chime (if enabled) will play over
the headphones. These actions alert passengers to put on their headphones.
Note: A chime delay of zero (‘0’) disables the seat audio
controllers from flashing and starts the playback of
commentaries immediately.
1. Enter the option menu
2. Press a “No” key until you get the following display then press the ‘Yes” key to modify this option.
SET CHIME DELAY?
PLAY=Y, OTHERS=N
3. Press the SEGMENT UP key until you have select the required delay time (0-9 seconds):
1.6.1 Audio In
Up to three external stereo audio sources (DVD player for example) can be connected to the head-unit.
These additional audio channels can then be selected on the passenger audio controllers.
CONNECTORS:
AUDIO FORMAT:
AUDIO LEVEL:
INPUT IMPEDANCE:
VOLUME CONTROL:
RCA
STEREO
1-3V RMS
10k OHMS
Yes (See “6.2.7 Modify microphone, VOX and audio input volumes”)
CHIME DELAY(s):3
SEGMENT UP, PLAY
1.6.2 Audio Out
4. Once you have made your selection, press the “Yes” key to accept the changes:
OPTIONS UPDATED,
PRESS ANY KEY...
5. Press any key to return to normal operation. Changes have been saved.
This connection can be set to output any audio channel that is available on the passenger audio controllers.
This can be any channel that appears on the headphones (‘MIC-A’, ‘MIC-B’, commentary language, music
channel or ‘AUDIO IN’ channel.
CONNECTORS:
AUDIO FORMAT:
AUDIO LEVEL:
OUTPUT IMPEDANCE:
VOLUME CONTROL:
RCA
MONO/STEREO
1-3V RMS
100 OHMS
No (Line level out only)
6.2.5 Enable or Disable GPS tracking function
See “6.2.8 Modify audio channel” for more information.
29
6
stops for lunch and the vehicle is turned off and you want the Tourmaster to remember where it
was up to in the tour.
1.6.3 Microphones
Two sets of connectors are present for two independent microphone channels. Each microphone channel
(‘MIC-A’ and ‘MIC-B’) has two connectors to allow either signal pass-through or the connection of multiple
microphones to each input. Each microphone input appears on different audio controller headphone
channels. ‘MIC-A’ has selectable voice (VOX) override that overrides most* other headphone channels when
voice activated.
•
* The VOX circuit for ‘MIC-A’ does not override the ‘MIC-B’ channel or audio commentary channels.
1. Enter the option menu (See “6.1 Getting to the OPTION menu”)
2. Press a “No” key until you get the following display then press the “Yes” key to modify this option.
CONNECTORS:
AUDIO FORMAT:
AUDIO LEVEL:
INPUT IMPEDANCE:
VOLUME CONTROL:
2 x RCA per microphone
Dynamic microphone
0-100mV RMS
600 OHMS
Yes (also VOX sensitivity adjust for ‘MIC-A’)
See “6.2.7 Modify microphone, VOX and audio input volumes” for more information.
VOLUME DOWN
VOLUME UP
CHANNEL SELECT
LED DISPLAY (selected channel)
VOX SWITCH (VOX circuit enable for “MIC-A” only)
BEWARE: The VOX enable circuit is a combination of the Drivers control panel setting and also the
integrated control panel setting. Below is a truth table of these settings in combination for “MIC-A”:
Drivers panel setting
ON
OFF
ON
OFF
Actual VOX setting
ON
ON
ON
OFF
To adjust the input volume settings for the microphones and audio input channels - or the sensitivity of the
VOX circuit on “MIC-A”, use the following:
•
6.2.2 Modify power-up ROUTE and SEGMENT defaults
• Default setting: “ROUTE 1”, “SEGMENT 1”
Note: This option will only be available if “INITIAL R/S” option is set to “DEFAULT”. This option allows the
user to select which Route and Segment the Tourmaster will default to when the system is powered up.
1. Ensure the “Initial R/S” option is set to “default”.
2. Use the ROUTE and SEGMENT keys to select the route and segment you wish to make default. If
the system was initially ‘seeking’, after 5 seconds the display will revert back to that mode. This is
normal operation and the route and segment you have just selected will still be remembered
3. Enter the option menu;
4. Press any “No” key until you get the following display then press the “Yes” key to modify this option.
SET DEFAULT R/S?
PLAY=Y, OTHERS=N
5. You will see the following message. Press “Yes” to accept or any other “No” key to decline.
ARE YOU SURE?
PLAY=Y, OTHERS=N
1.7.1 Using the integrated panel
•
STATUS: DEFAULT
SEGMENT UP, PLAY
5. Press any key to return to normal operation. Changes have been saved.
This panel provides the similar (but not identical) volume and VOX adjustments as provided via the drivers
control panel (See “5.5 Modify microphone, VOX and audio input volumes”).
•
•
•
3. You should see the following (“DEFAULT” or “RESUME” may appear).Press the SEGMENT UP key
until you select the option you want:
OPTIONS UPDATED,
PRESS ANY KEY...
This allows for volume adjustment of audio inputs:
• MIC-A and MIC-B
• VOX sensitivity for “MIC-A” channel
• AUDIO IN channels 0,1 and 2
• VOX enable ON and OFF for “MIC-A” input
VOX switch setting
ON
ON
OFF
OFF
INITIAL R/S?
PLAY=Y, OTHERS=N
4. Once you have made your selection, press the “Yes” key to accept the changes:
1.7 Integrated control panel
1.
2.
3.
4.
5.
DEFAULT:
This option always loads the ‘default’ Route and Segment when powered up. Example: You travel
the same route every day – possibly a day tour.
Remove the panel cover;
Use the CHANNEL SELECT button to select the channel to adjust: “A”, “b”, “V”, “0”, “1” or “2”;
Use the VOLUME UP and DOWN buttons to adjust the input volume level (or sensitivity) for the
selected channel;
When finished, press the CHANNEL SELECT button until the LED display is blank to finalise the
adjustment;
Replace the cover.
7
6. Once you have made your selection, press the “Yes” key to accept the changes:
OPTIONS UPDATED,
PRESS ANY KEY...
7. Press any key to return to normal operation. Changes have been saved.
6.2.3 Enable or Disable audio commentary chime alert
28
6 Changing system options
2 Folder and File format
The Tourmaster is very configurable. The following options allow the system to be set up to best match your
type of tour.
This chapter assumes that the user has a working knowledge of creating folders, files and general disk and
file management using Windows Explorer. The examples here are explained using Windows XP, but can
also be duplicated with earlier/newer versions of Windows.
Note: Please read the option descriptions carefully as
changing options may cause the Tourmaster to operate in
an unexpected way!
6.1 Getting to the OPTION menu
Before you are able to change any options, you need to access the option menu.
This is how to access it:
Press and hold down the “PLAY/PAUSE” key. Whilst holding down this key, press BOTH “SEGMENT UP”
and “SEGMENT DOWN” keys. (You should be holding down three keys now) If you accidentally play the
commentary instead, you must pause and stop the commentary before attempting to regain access to the
option menu.
Note: Any reference to a ‘disk’ relates to the disk that is integral to the
Tourmaster system. This internal disk holds all commentary and also
music audio files.
The correct folder and file structure on the disk is critical to the operation of the Tourmaster system. This
chapter explains the folder and file format required along with the switches that allow the system to easily
read and interpret the data on the disk. When you first receive your system, the disk contains example
folders and files to allow you to become familiar with the system file structure. Please explore the contents of
the disk and play the supplied audio files.
2.1 Disk and partition structure
You should see the following:
The disk partition and formatting must be as follows
MODIFY OPTIONS?
PLAY=Y, OTHERS=N
Press and hold PLAY/PAUSE, then press
SEGMENT UP and SEGMENT DOWN
Press PLAY/PAUSE to enter the option menu, any other keys will exit. You should now be in the option
menu.
The disk should only contain one partition (Only the first partition will be recognised);
FAT16/FAT32 format including long filenames is supported. Any other file formats are not
supported;
2.2 Audio file formats
6.2 The options
All available options that can be changed with the Tourmaster are listed below. Here is a summary of the
options:
•
•
•
•
•
•
•
•
•
•
•
•
•
Choose whether to resume same Route and Segment from last power cycle;
Set the default Route and Segment that is selected when the system is powered;
Turn the headphone pre-commentary chime alert on or off;
Set the delay between the chime sounding and the start of the commentary,
Turn the GPS tracking function on or off,
Set the GPS trigger radius
Adjust volumes for the microphones, audio inputs and VOX circuit sensitivities;
Set which audio channel appears at the “AUDIO OUT” connection;
Enable or disable the microphone channels;
Enable or disable VOX override capability on “MIC-A”.
Enable or disable the language channel idle override
Note: Within the option menu, the PLAY/PAUSE key is the
“YES” key, any other key (except POWER) is a “NO” key.
The Tourmaster system use the standard CD format of 16-bit PCM audio files sampled at 44.1kHz. These
files must have a suffix of “.wav”. All commentary and music files must be in this audio format. Compressed
audio files such as MP3 and WMA are not supported.
•
•
Commentary audio files (all audio tracks found inside the “COMMENTARY” folder) must be recorded
in PCM MONO.
Music (all audio tracks found inside the “MUSIC” folder) must be recorded in PCM STEREO.
2.3 Route folder and file structure
From this point, any reference to ROUTES (Tours) and SEGMENTS
(Point of Interest) and related examples are taken from the
Tourmaster disk. Please use these examples to enhance your
understanding of system operation.
These demo routes can be safely deleted when not required.
6.2.1 Modify power-up ROUTE and SEGMENT to resume or load defaults
This determines which route and segment is selected when the Tourmaster is powered up. There are two
options:
• Default setting: “DEFAULT”
•
RESUME:
This remembers the last route and segment selected before the Tourmaster was turned off or the
power was lost. (Using GPS tracking removes the need for this option) Example: The tour party
27
8
5.5 Notes on using Google Earth
GE (Google Earth) is an excellent software program to obtain GPS location information for your tour if you do not
want to save the locations with the drivers control panel. It also is handy to check the GPS locations that you have
gathered via other means.
If you use this program to get GPS information to manually insert into you Tour (In the SEGMENT folder name),
make sure you select the correct GPS format:
•
•
•
Go to menu item TOOLS and select OPTIONS
Under the “3D view” panel, check the radio button “Degrees, decimal minutes” in the “Show
Lat/Long” pane.
Apply settings and exit.
The GE maps will now show the correct GPS format in the bottom left hand corner of the map. Note that the GPS
position on the map only shows 3 decimal places. You must add another trailing ‘0’ to the decimal value to extend
the GPS co-ordinate to 4 decimal places as required by the GPSAT and GPSLON switches (see “3.1 Required
switches”)
Figure 1 – Demo Routes showing required Folder and File structure
2.3.1 SYSTEM folder
This is where Tourmaster system files are kept. Do not modify or delete this folder or files.
2.3.2 MUSIC folder
The “MUSIC” folder is optional and may contain your music entertainment. The “MUSIC” folder if it is
required must exist at the root of the disk. This folder allows the Tourmaster to operate in a similar fashion to
a multi-channel Juke-Box. Note that these music channels will appear on the headphone channels after the
final language channel.
•
•
•
Inside the “MUSIC” folder, there may be several “ZONE” folders. Each “ZONE” represents a
separate headphone channel;
Inside each “ZONE” folder, there may be several music files (WAV stereo files). These files randomplay on their own headphone channel;
The folders “ZONE 1” thru “ZONE 10” are valid zones.
9
26
•
The following message occurs when trying to save a GPS waypoint when the GPS option is turned
off (see “6.2.5 Enable or Disable GPS tracking function”)
“MUSIC” (FOLDER)
GPS DISABLED
PRESS ANY KEY..
“ZONE 1” (FOLDER)
The GPS antenna is not turned on. Turn
the GPS function on.
“ZONE 2” (FOLDER)
………….
•
The following message occurs when there is either no GPS antenna connected to the Tourmaster,
or there is a wiring fault.
NO GPS SIGNAL
Art Gallery
•
MORE MUSIC
(FILES)
Figure 2 – MUSIC folder and file structure
2.3.3 COMMENTARY folder
One or more segments in this route do not
have GPS waypoints saved for them.
The following message means that the segment “Top of Hill” is the segment that does not have GPS
waypoint information. GPS information need to be saved for this segment (See “5.2 Saving a GPS
waypoint”)
NO GPS WAYPOINT
Top of Hill
The selected commentary segment does
not have GPS information saved for it.
For the Tourmaster to create a valid database of tour information, the structure of the Tours, POI’s and Audio
commentaries must follow a particular format.
Here is the folder and file format to follow:
• The folder “COMMENTARY” must exist at the root of the disk. This folder contains your tours;
• Inside the “COMMENTARY” folder there may be several “ROUTE” folders. Each “ROUTE”
represents a separate tour;
• Inside each “ROUTE” folder, there may be several “SEGMENT” folders. A “SEGMENT” relates to a
particular POI (point of interest) on the tour;
• Additionally, each SEGMENT folder name contains other information such as GPS waypoint and
rules to ensure playback of the POI only occurs when expected. (See “3.1 Required switches” and
“3.2 Optional switches - Rule”)
• Inside each “SEGMENT” folder, there may be several (up to 20) language audio files (WAV mono
files). Each audio file represents a language on a separate headphone channel;
5.4 Operation without GPS
If the GPS option is not supplied with the Tourmaster, or for some reason, GPS is not functioning; the
Tourmaster can be operated manually.
GPS antennae is not supplied:
In this case, the GPS operation should be turned off to prevent the display flashing the “NO GPS
SIGNAL” message continuously. (See “6.2.5 Enable or Disable GPS tracking function”)
o
o
o
o
(FILES)
Wait longer for a fix or try moving to a new
location with a better view of the sky.
The following message means that at least one commentary segment in the currently selected route
does not have GPS information saved for it. (This message also means that it is not this segment)
WAYPOINTS REQ’D
Art Gallery
•
The GPS antenna does not exist or is not
communicating with the Tourmaster.
The following message means that the GPS antenna is working properly but has not yet found a fix.
Make sure the vehicle is in view of the sky.
NO GPS FIX
Art Gallery
•
“ZONE x” (FOLDER)
STEREO MUSIC
“Track01.wav”
Track02.wav
Track03.wav
Track04.wav
Track05.wav
Track06.wav
Track07.wav
Track08.wav
Track09.wav
………
STEREO MUSIC
“Track_ABC.wav”
Track_DEF.wav
Track125.wav
Track126.wav
Track127.wav
Track10.wav
Track11.wav
Track12.wav
Track13.wav
………
The driver selects the correct ROUTE and SEGMENT.
When approaching the POI, the PLAY/PAUSE key is pressed once. (See “4.2 Manually
playing commentaries”)
The chime, if enabled, will sound over the headphones and the commentary will
subsequently play.
When finished, the Tourmaster will auto-increment to the next commentary segment ready
for PLAY.
GPS system is not working:
There are typically only a few reasons for the GPS not to work. Check out “5.3 GPS messages”
first. During normal operation, sometimes the GPS antennae can lose its fix. This is where it
cannot see enough satellites to triangulate where it is on the Earth. The most probable causes for
this is an obstructed view of the sky (tunnels, narrow roads with tall buildings, dense trees) In this
case the display will blink “NO GPS FIX”. The Tourmaster must be operated manually until a fix is
re-found. See “4.2 Manually playing commentaries”
25
10
•
“ROUTE 1” (TOUR)
(FOLDER)
“SEGMENT 1” (POI)
(FOLDER)
“LANGUAGE 1.WAV”
“LANGUAGE 2.WAV”
……..
(AUDIO FILES)
“SEGMENT 2” (POI)
(FOLDER)
“LANGUAGE 1.WAV”
“LANGUAGE 2.WAV”
……..
(AUDIO FILES)
“SEGMENT 3” (POI)
(FOLDER)
“LANGUAGE 1.WAV”
“LANGUAGE 2.WAV”
……..
(AUDIO FILES)
“SEGMENT x” (POI)
(FOLDER)
LANGUAGE 1
LANGUAGE 2
……..
(AUDIO FILES)
“SEGMENT 1” (POI)
(FOLDER)
“LANGUAGE 1.WAV”
“LANGUAGE 2.WAV”
……..
(AUDIO FILES)
“SEGMENT 2” (POI)
(FOLDER)
“LANGUAGE 1.WAV”
“LANGUAGE 2.WAV”
……..
(AUDIO FILES)
“SEGMENT 3” (POI)
(FOLDER)
“LANGUAGE 1.WAV”
“LANGUAGE 2.WAV”
……..
(AUDIO FILES)
“SEGMENT x” (POI)
(FOLDER)
“LANGUAGE 1.WAV”
“LANGUAGE 2.WAV”
……..
(AUDIO FILES)
“COMMENTARY”
(FOLDER)
“ROUTE 2” (TOUR)
(FOLDER)
“ROUTE x”
Use the segment UP and DOWN keys to select the segment “Top of Hill”. Note that the blinking
message has changed from “WAYPOINTS REQ’D” (as with item ‘4’ above) to “NO GPS
WAYPOINT”. This indicates that this segment does not have GPS information and requires a GPS
waypoint saved for it.
NO GPS WAYPOINT
Top of Hill
“NO GPS WAYPOINT” flashing means this
segment is missing a GPS waypoint.
•
We will now save the GPS location information to this segment. Press and hold down the
PLAY/PAUSE key. Whilst holding down this key, press the ROUTE DOWN/SAVE WAYPOINT key.
(If you accidentally play the commentary instead, you must pause, then stop the commentary before
attempting to resave the GPS waypoint)
•
If successful, you will have the following displayed. (Note that the physical GPS location of the
vehicle is read at this point; therefore driving further down the road will not change the waypoint
value to be saved)
SAVE WAYPOINT?
Top of Hill
•
Press PLAY/PAUSE to save the waypoint. Any other key will abort the save process. Follow the
prompts to save the waypoint.
ARE YOU SURE?
Top of Hill
•
•
Follow the display prompts. PLAY/PAUSE
is “yes”, any other key is “no”.
If successful, you will have the saved GPS location (similar to below) on the display. You can write
this information down if needed. Press any key to return to normal operation
LAT:01234.5678S
LON:12345.6789E
Figure 3 - COMMENTARY folder and file structure
Press and hold PLAY/PAUSE, then press
ROUTE DOWN to save a GPS waypoint.
The Tourmaster displays the location so
you can write them down for future use.
You have now successfully saved a GPS waypoint for the commentary segment “Top of Hill”. Now
that all Segments (POI’s) for “City Tour” have GPS information, you should see the following on the
display:
City Tour
GPS TRACKING...
All GPS information is now saved for “City
Tour” so GPS tracking can now be used.
Note: Any segment that already has GPS waypoint
information saved for it can be updated. The old GPS
information is simply over-written with the new information.
5.3 GPS messages
There are several messages that blink on the top line of the control panel giving the user the current status
of the GPS system. Before you can successfully use the GPS features, you must make sure that there is a
GPS antenna connected to the Tourmaster and the GPS option is turned ON in the option menu (see “6.2.5
Enable or Disable GPS tracking function”)
•
The following “SEEKING” message displays when the Tourmaster is operating correctly. It is
‘seeking’ for when the vehicle is near any POI locations.
City Tour
GPS TRACKING...
11
The Tourmaster will use GPS tracking if all
required GPS conditions are met.
24
In this mode, when the vehicle heads away from a POI and is at a certain distance from it (via the
RADIUS switch), the associated audio commentary will begin to play (at point ‘C’ in Figure 5) Note
that the term POI is loosely used here as the commentary will actually play at the radius, not at the
POI.
This mode is selected by including the “EXIT” switch to the required segment folder name.
“HEADING”:
You can also limit playback of commentaries on a segment-by-segment basis by adding the
HEADING switch (See “3.2 Optional switches - Rules”) Adding this switch will tell the Tourmaster
to only play the commentary segment only if the vehicle is heading in the correct direction. For
instance, to play a certain commentary segment only if you are heading North, you would add the
following to the SEGMENT folder name:
“HEADING N”
Heading values have a tolerance of ±45 degrees; therefore in this case, the vehicle does not need
to be heading exactly north, but anywhere between NE and NW will satisfy the heading rule of ‘N’.
5.2 Saving a GPS waypoint
Before the Tourmaster can be used successfully to use GPS tracking to play commentaries, all SEGMENT
folders must have GPS waypoints saved for each. There are two ways to achieve this:
•
•
Manually editing the SEGMENT folder name to add the GPS information (see “3.1 Required
switches”)
Driving to the location of each POI with the vehicle and use the drivers control panel to save the
GPS location. This method is described below:
Figure 4 – A demo SEGMENT folder for a POI and audio files
Figure 4 shows the “LANGUAGE” commentary audio files contained in the folder for the point of interest
called “Art Gallery”. These audio files will play over separate headphone channels when either the GPS
tracking has triggered them to play or the driver plays them manually.
To be able to save GPS waypoints via the drivers control panel, the following must be true:
• The Tourmaster has a GPS antenna connected and enabled.
• The Tourmaster is receiving a GPS fix (park the vehicle outside).
If you take a look at the example routes on the Tourmaster, you will notice that the commentary segment
“Top of Hill” in the “City Tour” route does not have a GPS location saved for it.
Here (as an example) we are going to save a new GPS location for this POI:
•
•
Ensure that the vehicle is parked outside to gain a GPS fix.
Using the drivers control panel, select the route “City Tour” (See “4.1.2 Selecting a ROUTE”)
City Tour
Art Gallery
•
•
Select this sample route and segment.
If the panel display blinks either of the following messages, then you cannot yet save any GPS
waypoints:
NO GPS SIGNAL
Art Gallery
The GPS antenna is not connected
properly. Check the connection.
NO GPS FIX
Art Gallery
The GPS antenna is trying to find a fix. This
may take a few minutes.
If the GPS is working and has a fix, you should have the following message blinking on the display.
“WAYPOINTS REQ’D” means that at least one segment (but not this one) in the “City Tour” route
does not have GPS information.
WAYPOINTS REQ’D
Art Gallery
One or more segments in this route do not
yet have GPS waypoints saved for them.
23
12
3 Control switches
5 GPS
Switches are special upper case words present in the file or folder name that allow the Tourmaster to
interpret the information into a database. The switches must be in upper case and separated with a comma.
There is a single space between the switch and the value associated with the switch.
By using the GPS receiver and comparing the received position from the satellites to the positions stored in
the Tourmaster tour database (GPSLAT and GPSLON values) we are able to determine how far we are
away from these stored POI locations to within a few metres.
3.1 Required switches
These switches are mandatory for proper operation.
•
GPS (Global Positioning System) is a network of satellites that when used in conjunction with a GPS
receiver such as the one connected to the Tourmaster, can determine your location anywhere on the earth to
within a few metres.
“ROUTE<space><value>”
DESCRIPTION:
This dictates the number of the route. This <value> is used to determine the sequence displayed
when the user searches through routes with the Drivers control panel.
USAGE:
Route folder name only; <value> from 1 to 1000 accepted.
The Tourmaster system calculates the current vehicles position and compare this to the GPS waypoint
information stored in the tour database. This determines the distance between the vehicle and the stored
POI’s. This information is then used to determine when to play back an audio commentary.
The conditions that must be met to successfully use automatic GPS tracking are:
•
•
•
EXAMPLE:
“ROUTE 1, NAME City Tour”
The Tourmaster has a GPS antenna connected and is enabled.
The Tourmaster is receiving a fix from the antenna.
Each commentary segment in the selected route has GPS waypoint information.
“Exit” trigger point
C
N
NW
•
NE
“Proximate” trigger point.
POI (GPS)
location
“SEGMENT<space><value>”
DESCRIPTION:
This dictates the number of the segment. The <value> is used to determine the sequence
displayed when the user searches through segments with the Drivers control panel.
A
W
E
“Entry” trigger point.
Selected RADIUS
USAGE:
Segment folder name only; <value> 1 to 1000 accepted.
B
SW
EXAMPLE:
“SEGMENT 4, NAME Top of Hill”
•
Vehicle heading (~NW)
Figure 5 - Example of travelling through a GPS waypoint
“NAME<space><name>”
DESCRIPTION:
This is the name of the ROUTE or SEGMENT that will be displayed on the Drivers control panel. It
can be of any length but only the first 16 characters will be displayed on the panel. The name
cannot contain any commas or any other upper case switches as part of the <name>. (This switch
can also be used for each commentary audio file for naming reference but is not used by the
Tourmaster)
USAGE:
ROUTE, SEGMENT folder names (and optionally the audio commentary filenames)
EXAMPLES:
“ROUTE 1, NAME City Tour” (folder name)
“SEGMENT 1, NAME Top of Hill” (folder name)
“LANGUAGE 1, NAME German.wav” (file name)
•
SE
S
“LANGUAGE<space><value>”
DESCRIPTION:
This is the sequence in which the commentary audio files (languages) are presented on the audio
controllers channels. The Tourmaster will recognise up to 20 audio files with <value> from
“LANGUAGE 1” through to “LANGUAGE 20”.
5.1 GPS rules for playback
There are a number of rules you can use on a segment-by-segment basis to limit playback of commentaries
to certain situations. These are activated by adding or removing these rules from each SEGMENT folder
name.
5.1.1 Tracking rules
Proximate (default):
This is the default operating mode. The Tourmaster will begin to play the commentary at the
closest approach to a POI, which is at point ‘A’ in Figure 5. This mode should be used in almost all
cases and will typically begin to play commentaries within a few metres of the saved GPS
waypoint.
“ENTRY”:
In this mode, when the vehicle heads towards a POI and is at a certain distance from it (via the
RADIUS switch), the associated audio commentary will begin to play (at point ‘B’ in Figure 5) Note
that the term POI is loosely used here as the commentary will actually play at the radius, not at the
POI.
This mode is selected by including the “ENTRY” switch to the required segment folder name.
“EXIT”:
13
22
USAGE:
All audio commentary files.
4.4 Headphone channel order
The order of audio channels (or how they stack) as they appear on the headphones is as follows:
1.
2.
3.
4.
Microphones (2 channels if enabled) then
Language channels (The “LANGUAGE” files in the selected tour) then
Music channels (The “ZONE” folders) then
“AUDIO IN” channels (From external audio sources)
EXAMPLE:
“LANGUAGE 1, NAME German.wav”
•
The audio controllers have a total capacity of 22 audio channels maximum:
•
•
“GPSLAT<space><ddmm.mmmmh>”
DESCRIPTION:
This is the GPS latitude that will trigger this commentary segment. When combined with the
GPSLON value, it creates the location that will cause the commentary to play for this POI. Saving a
GPS waypoint using the drivers control panel will automatically add or update this switch in the
SEGMENT folder name (See “5.2 Saving a GPS waypoint”)
Microphone channels and Languages each consume 1 X audio controller channel
ZONE folders and “AUDIO IN” channels each consume 2 X audio controller channels
The Tourmaster will stack all available audio channels in the order listed above until it reaches maximum
channel capacity. Therefore some channels may not be available if it exceeds the number of available
headphone channels.
USAGE:
SEGMENT folder name only; required for fully automated GPS tracking. The format must be as
above with leading zeros if necessary:
<dd>:
<mm>:
<.>:
<mmmm>:
<h>:
whole degrees (must be 2 digits)
whole minutes (must be 2 digits)
decimal point (dot)
fractional minutes (must be 4 digits)
hemisphere (N or S in upper case)
EXAMPLE:
“GPSLAT 1234.5678S, GPSLON 12345.6789E”
•
“GPSLON<space><dddmm.mmmmh>”
DESCRIPTION:
This is the GPS longitude that will trigger this commentary segment. When combined with the
GPSLAT value, it creates the location that will cause the commentary to play for this POI. Saving a
GPS waypoint using the drivers control panel will automatically add or update this switch in the
SEGMENT folder name (See “5.2 Saving a GPS waypoint”)
USAGE:
SEGMENT folder name only; required for fully automated GPS tracking. The format must be as
above with leading zeros if necessary:
<ddd>:
<mm>:
<.>:
<mmmm>:
<h>:
whole degrees (must be 3 digits)
whole minutes (must be 2 digits)
decimal point (dot)
fractional minutes (must be 4 digits)
hemisphere (E or W in upper case)
EXAMPLE:
“GPSLAT 1234.5678S, GPSLON 12345.6789E”
3.2 Optional switches - Rules
These switches are optional and contain additional rules for the GPS tracking to further refine the playback
of commentaries (see “5.1 GPS rules for playback”)
•
“ENTRY”
DESCRIPTION:
This rule added to the SEGMENT folder name will cause the audio commentary to play only when
the vehicle is <RADIUS> metres away from the POI and heading towards it.
USAGE:
Segment folder name only; this switch is typically used in conjunction with the RADIUS switch.
21
14
EXAMPLE:
“GPSLAT 1234.5678S, GPSLON 12345.6789E, ENTRY”
•
“EXIT”
Hop on and off
GPS TRACKING...
•
DESCRIPTION:
This rule added to the SEGMENT folder name will cause the audio commentary to play only when
the vehicle is <RADIUS> metres away from the POI and heading away from it.
USAGE:
Segment folder only; this switch is typically used in conjunction with the RADIUS switch.
EXAMPLE:
“GPSLAT 1234.5678S, GPSLON 12345.6789E, EXIT”
•
To play the audio commentaries manually, follow this example:
•
Select the following route and segment.
City Tour
Entering city
•
DESCRIPTION:
If this rule exists, then this value will override the Tourmasters default trigger radius for THIS audio
segment only.
•
EXAMPLE:
“GPSLAT 1234.5678S, GPSLON 12345.6789E, EXIT, RADIUS 1250”
•
“HEADING<space><value>”
DECRIPTION:
This rule will cause the commentary to only play if the vehicle on the correct ‘heading’ when
approaching the POI. For example, you can play a commentary only if you are heading North.
HEADING has a tolerance of ± 45 degrees, therefore a HEADING of ‘N’ (North) will have a
tolerance anywhere from NE to NW.
Route: “City Tour”
Segment: “Entering city”
If the system was initially “GPS tracking”, you must press the PLAY/PAUSE key within 5 seconds
otherwise the system will revert back to GPS tracking. You should then see the following message:
PLAYING AUDIO:
Entering city
USAGE:
SEGMENT folder name only; <value> from 25 to 12000 (25 metres to 12 kilometres). Do not
include commas or spaces.
•
To re-select the same segment after the 5 seconds, press either segment key once. The previously
selected segment will show again. Pressing the segment keys again from here will
increment/decrement through the available segments.
4.2 Manually playing commentaries
“RADIUS<space><value>”
Note that you do not need to add the RADIUS rule to all segments. The default radius setting (See
“6.2.6 Modify GPS trigger radius”) is used when the RADIUS rule is not defined and is adequate in
most cases. The RADIUS setting is typically used in conjunction with the ENTRY or EXIT rule.
After 5 seconds, the Tourmaster will revert to
GPS tracking.
The Tourmaster will be now playing the
audio commentary for “Entering city”
If you need to pause the commentary while it is still playing, press the PLAY/PAUSE key once again.
Whilst paused, an audible ‘chirp-chirp’ will emit from the control panel to signify that it has been
paused. Press the PLAY/PAUSE key once more to continue playing.
PAUSED AUDIO:
Entering city
Press the PLAY/PAUSE key once: The
commentary is now paused.
PLAYING AUDIO:
Entering city
Press the PLAY/PAUSE key once more:
The commentary is again playing.
When the commentary has finished playing, the selected segment will automatically increment to the
next segment. If GPS tracking is enabled and all GPS conditions are met, the Tourmaster will revert
to tracking.
City Tour
Leaving park
The commentary has finished and
incremented to the next commentary.
City Tour
GPS TRACKING...
The Tourmaster will default back to GPS
tracking if GPS conditions are met.
USAGE:
SEGMENT folder name only; <value> can be any of the following:
4.3 Stopping a commentary
N, S, E, W, NW, NE, SE, SW
EXAMPLE :
“GPSLAT 1234.5678S, GPSLON 12345.6789E, HEADING NE”
To stop a currently playing commentary you must first pause it. Once paused, it can then be stopped.
•
The commentary is currently playing:
PLAYING AUDIO:
Entering city
3.3 Other switches
•
“ZONE<space><value>”
•
DECRIPTION:
This switch is the name of a folder found inside the main MUSIC folder. Each ZONE folder
represents a separate audio controller channel. All audio files contained within each ZONE will play
in random order.
USAGE:
To stop the commentary, you must firstly pause it by pressing the “PLAY/PAUSE” button once:
PAUSED AUDIO:
Entering city
•
To stop the commentary, press the “ROUTE UP/STOP” key once.
City Tour
Entering city
15
20
Name of a folder inside MUSIC only; <value> can be from <1> to <10>
•
If there are any database errors such as invalid or missing information, the following will be
displayed:
DB ERROR:(code)
PRESS ANY KEY.
KEY
•
When complete, the Tourmaster will resume from its previous setting, or select the default route and
commentary segment:
City Tour
Art Gallery
•
Errors have been found while building the
database. (See “3.5.1 Database errors”).
Selected ROUTE is “City Tour”.
Selected SEGMENT is “Art Gallery”.
The Tourmaster has finished powering up and is now in operating mode. If all required GPS
conditions are met, the display will show “GPS TRACKING...” on the second line. This is normal
operation.
City Tour
GPS TRACKING...
GPS conditions have been met and the
Tourmaster is now GPS tracking.
Press the POWER key once. The Tourmaster will power down.
POWER OFF
Vx.xx
The power is now OFF
Available routes are selected with the keys labelled ROUTE.
•
The following messages appear when ROUTE UP or DOWN are pressed. You must press the
PLAY/PAUSE button to accept the change in ROUTE:
Hop on and off
PLAY TO ACCEPT
The next Route is displayed. Press
PLAY/PAUSE to accept this new route.
Hop on and off
First Stop
Selected Route is now: “Hop on and off”
The first segment “First Stop” is shown.
If the PLAY/PAUSE key is not pressed to accept the new route within 5 seconds, the Tourmaster will
revert to its previously selected route.
Once the required Route is selected, all available audio segments within the route can be selected with the
SEGMENT keys.
•
EXAMPLE 1:
“SEGMENT 1, NAME Art Gallery, GPSLAT 1234.5678S, GPSLON 12345.6789E”
This example has a GPS waypoint already saved for it signified by GPSLAT and GPSLON switches. The
commentary will play at the GPS location.
This waypoint is an ENTRY mode waypoint. This waypoint mode will play the commentary when you are
heading towards the POI and get to within 12km of it. Note that if the RADIUS switch is not used, the default
radius value will be used (100m) in this case, which is probably too small.
This waypoint is an EXIT mode waypoint. This waypoint mode will play the commentary when you are
heading away from the POI and get to within 5km from it. Note that if the RADIUS switch is not used, the
default radius value will be used (100m) which is probably too small.
EXAMPLE 4:
"SEGMENT 4, NAME Top of Hill"
This segment has no GPS (or other switch) information. When the Drivers control panel is used to save the
GPS location for this segment, the GPSLAT and GPSLON switches are added to the SEGMENT folder
name. (See “5.2 Saving a GPS waypoint”)
EXAMPLE 5:
"SEGMENT 5, NAME Up Main Road, GPSLAT 1234.5678S, GPSLON 12345.6789E, HEADING
NW"
By using the HEADING switch, this commentary segment will only play if you are heading toward the POI on
a North-westerly heading (± 45 degrees).
4.1.3 Selecting an audio SEGMENT
•
The following are examples of how to set up the SEGMENT folder names to enable the Tourmaster to
operate in different tracking modes and settings. These examples can also be found as sample routes and
segments on the supplied Tourmaster.
EXAMPLE 3:
“SEGMENT 3, NAME Leaving Park, GPSLAT 1234.5678S, GPSLON 12345.6789E, EXIT,
RADIUS 5000”
4.1.2 Selecting a ROUTE
•
3.4 Switch examples
EXAMPLE 2:
“SEGMENT 2, NAME Entering City, GPSLAT 1234.5678E, GPSLON 12345.6789S, ENTRY,
RADIUS 12000”
Powering the Tourmaster OFF:
•
EXAMPLE :
“ZONE 9”
Pressing segment UP or DOWN will scroll up or down through the available commentaries. The
order the Segments appear is determined by the SEGMENT switch in the folder name.
Hop on and off
First Stop
Route: “Hop on and off”
Current segment: “First Stop”
Hop on and off
Second Stop
Segment UP key pressed once:
Next segment: “Second Stop”
EXAMPLE 6:
"SEGMENT 6, NAME Entering zone, GPSLAT 1234.5678S, GPSLON 12345.6789E, HEADING
S, ENTRY, RADIUS 1250"
This example combines most available switches. In this case, the commentary will only play when the
vehicle is heading towards the POI on a Southerly heading and gets to within 1,250m from it.
3.5 Naming and switch formatting errors
After 5 seconds without a keypress, if the GPS tracking option in enabled and all required GPS
conditions are met, then the Tourmaster will revert back to GPS tracking.
19
If any errors are found in the formatting of the filenames, folder names or switches, an error message is
displayed on the Tourmaster after it has completed building an information database.
16
BUILDING DB
PLEASE WAIT…
WAIT…
DB ERROR:(code)
PRESS ANY KEY…
KEY…
A database of all tours is created each
time the system powers up.
There is invalid, incorrectly formatted, or
missing information in a Tour.
4 Basic system operation
This section explains the general operation of the Tourmaster. It shows how to:
Power the system on and off.
Select routes and commentaries.
Play, pause and stop commentaries manually.
Examples shown here are taken from the example routes and segments found on the Tourmaster system.
3.5.1 Database errors
Formatting errors may be caused by missing or misspelt required switches or possible missing information
such as providing the GPS latitude value but not the GPS longitude value etc.
4.1 Drivers Control panel
The “code” message that is displayed gives a hint to the potential problem. They are listed below:
•
DB ERROR:ROUTE
o
•
DB ERROR:SEGMNT
o
•
Name switch does not exist
Name exists but does not have text content
GPS values are out of range.
GPSLAT is present without GPSLON or vice-versa.
Incorrect GPS format:
GPSLAT must be in the format: <ddmm.mmmmh>
GPSLON must be in the format: <dddmm.mmmmh>
Leading zeros must be present. Hemisphere must be upper case.
B
D
C
Select ROUTE and also SAVE GPS WAYPOINT
Select ROUTE and also STOP current audio commentary
Audio SEGMENT select DOWN and also OPTION menu select
Audio SEGMENT select UP and also OPTION menu select
PLAY/PAUSE audio segment and also OPTION menu accept
System power ON/OFF
Displays currently selected audio SEGMENT (Name of the POI)
Displays currently selected ROUTE (Name of the Tour)
Radius value is out of range. Values from 25 to 12000 with no commas or spaces are valid.
(25 metres to 12 kilometres)
4.1.1 Turning the system power ON and OFF
Pressing the POWER key toggles the system between ON and OFF.
Powering the Tourmaster ON:
•
•
•
•
DB ERROR:HEADNG
o
o
•
A
B
C
D
E
F
G
H
Language value out of range. Values from 1 to 20 are valid.
DB ERROR:RADIUS
o
•
A
DB ERROR:GPS
o
o
o
o
o
o
•
E
Zone value out of range. Values from 1 to 10 are valid.
DB ERROR:NAME
o
o
•
G
Segment value out of range. Values from 1 to 1000 are valid.
DB ERROR:LANG.
o
•
F
DB ERROR:ZONE
o
•
H
Route value out of range. Values from 1 to 1000 are valid.
HEADING switch present with missing or invalid heading:
Values N, E, W, S, NE, NW, SE, SW in upper case are valid.
DB ERROR:AUDFLE
o
o
o
An audio file is in the incorrect format. Audio files must be in:
MONO, 16-bit PCM, 44.1kHz “wav” for multilingual commentary files,
STEREO, 16-bit PCM, 44.1kHz “wav” for music zone files
17
•
Press the POWER key once,
The Tourmaster will briefly display a model and firmware version,
The Tourmaster will attempt to build an information database,
If the disk does not contain invalid information such as missing files or folders, certain messages will
appear:
INVALID DISK
The disk is not formatted or is formatted
incorrectly. Set up the disk correctly.
NO COMMENTARY
FOLDER FOUND
The disk contains no “COMMENTARY”
folder – which is required.
If the disk contains the correct files and folders, the following will appear momentarily:
BUILDING DB
PLEASE WAIT…
WAIT
A Tour database is being created.
18