1
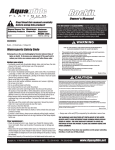
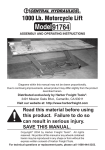
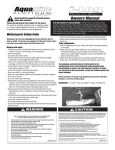
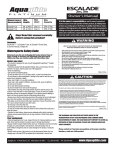
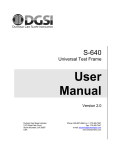
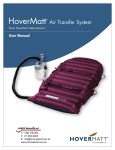
Owners Manual
BOUNCER AND BOARDING PLATFORM
Stop! Read this manual carefully
before using this product!
Max.
Max.
Manual Covers The Max.
Following Products Jumpers Users Weight
One (1)
Rebound™ 12’
Rebound™ Aquapark Set 12’ One (1)
Three (3)
Rebound™ 16’
Rebound™ Aquapark Set 16’ Three (3)
Three (3)
Rebound™ 20
Three (3)
Three (3)
Five (5)
Five (5)
Seven (7)
600 lbs. (272 kg)
600 lbs. (272 kg)
1000 lbs. (454 kg)
1000 lbs. (454 kg)
1200 lbs. (544 kg)
A Q U A P A R K
S Y S T E M
12, 16, 20
It is the owner’s responsibility to read the owner’s manual
and instruct all users in the safe operation of these products. By inflating these
products you hereby agree to the Release of Liability, Claim Waiver, and Assumption of Risk Agreement in this manual. Please read this manual prior to inflating
and using these products and keep for future reference. As with any action sport,
recklessness, inexperience, misuse, or neglect of the equipment may result in
serious injury or death.
Contents Per Product: No Special Tools Required To
Assemble Your New Rebound™ Bouncers
Rebound™ Bouncer 12’ – (1) Rebound™ Tube, (1) SwimStep™ Access Platform, (2) Interloc™ Straps, (1) Repair Kit
Rebound™ Aquapark Set 12’ – (1) Rebound™ Tube, (1) Rebound™ Slide, (1)
i-Log,(1) SwimStep™ Access Platform, (6) Interloc™ Straps, (1) Repair Kit
Rebound™ Bouncer 16’ – (1) Rebound™ Tube, (1) SwimStep™ Access Platform, (2) Interloc™ Straps, (1) 4-Way Mooring Bridle, (1) Repair Kit
Rebound™ Aquapark Set 16’ – (1) Rebound™ Tube, (1) Rebound™ Slide, (1)
i-Log™, (1) SwimStep™ Platform, (1) 4-Way Bridle, (6) Interloc™ Straps, (1)
Repair Kit
USE OF THIS PRODUCT AND PARTICIPATION IN WATERSPORTS
INVOLVES INHERENT RISKS OF INJURY OR DEATH.
•
•
•
•
•
•
•
•
•
•
•
•
Rebound™ 20’ – (1) Rebound™ Tube, (1) SwimStep™ Platform, (1) 4-Way
Bridle, (1) Repair Kit
Watersports Safety Code
Watersports are fun and challenging but involve inherent risks of injury or death. To
increase your enjoyment of the sport and to reduce your risks, use common sense
and follow these rules:
Before you start:
• Familiarize yourself with all applicable federal, state, and local laws, the risks
inherent in the sport, and the proper use of the equipment.
• Know the waterways.
• Use caution and common sense.
• Do not use in recreational swimming pools, within 3,0m (10ft.) of commercial
pool edge, or within 4,5m (15ft.) of boats, docks, or other hard obstructions.
• Do not attempt or allow somersaults. Landing on the head or neck can cause
serious injury, paralysis or death.
• Never use at night, or in low-light conditions.
• Never use in poor weather conditions with excessive wind, waves or lightning.
• Do not use on dry land.
• Do no use without proper anchoring.
• Do not dive head first or swim under your Rebound™.
• Take extreme care when swimming between the shore and the product. Be cautious
of any boat traffic or other obstructions. Ensure all users are capable swimmers and
are not excessively fatigued. Do not allow anyone to attempt to swim to or from the
product that are not physically able to do so.
• Always ensure that the swimming area around the product is free of submerged
logs, rocks and sandbars. Ask about the local water conditiions before use.
• Only allow use of the product with proper supervision. Secure the product when not
in use to prevent access by any other users.
• Do not jump or dive from this item.
• Do not jump onto this item from any other item.
Thisproductshouldneverbeusedbychildrenexceptunderadultsupervision.
Notintendedforusebychildrenunder5yearsofage.
Thisproductisnotapersonalflotationdevice.
Alwayswearafloatationvest(PFD)asrequiredbytheauthoritiesinareaofuse.
Neverplacewristsorfeetthroughhandles.
Donotuseinshallowwater(lessthan8ft[2,44m]deep).
Donotusewithin15ft(4,5m)ofshore,docks,pilingsorotherhardobjects.
Neverswimunderthisproduct.
Donotjumpordivefromthisproduct.
Donotexceedthemanufacturer’srecommendednumberofusersfor
thisparticularproduct.
Donotusewhileundertheinfluenceofalcoholordrugs.
ReadOperator’sManualbeforeuse.
CAUTION
MadeinChina
Watersports can be safe and fun for all levels of enthusiasts. The Operator’s Manual is presented to enhance
your enjoyment of the sport. It is intended to alert you to some of the potentially dangerous conditions that
can arise in all watersports. It is the owner’s responsibility to read the owner’s manual and instruct all users
in the safe operation of these products. By inflating these products you hereby agree to the Release of
Liability, Claim Waiver, and Assumption of Risk Agreement in the Owner’s Manual.
To reduce the risk of injury or death, follow these guidelines:
•
•
•
•
Carefully read the product Owner’s Manual and follow the instructions.
Take all reasonable precautions in the use and operation of your trampoline and/or aquapark.
Teach anyone using your trampoline and/or aquapark about safe guidelines prior to use.
Know your own limits. Stop when you are tired. Act responsibly. Be in good physical
condition and be cautious in your use of this or any other water sports product.
• Periodically check mooring bridles and/or lines to ensure safety. Replace any portion of
mooring and/or connection system that shows signs of wear.
• Do not add any hardware or attachments not otherwise supplied by the manufacturer.
THE WARNINGS AND PRACTICES SET FORTH ABOVE REPRESENT SOME COMMON RISKS
ENCOUNTERED BY USERS AND DOES NOT PURPORT TO COVER ALL INSTANCES OF RISK OR DANGER.
PLEASE USE COMMON SENSE AND GOOD JUDGMENT.
Please contact the dealer or manufacturer of this product if you have any questions about proper selection,
function, or safe use of this product.
Made in China
Please Do Not Return This Product To The Store!
For questions regarding assembly, parts or warranty, contact our customer
service department at 1-509-493-4938 or access product information at
www.aquaglide.net.
• Do not use in water where there are sharks or other animals that could pose a
threat to humans.
• If product is used indoors, always ensure adequate ceiling height overhead.
• Always remove personal items such as rings, watches or other sharp objects
before use.
Aquaglide, Inc. - # 1 North Shore Dr., SE - White Salmon, WA 98672 - Tel: +01 (509) 493-4938 Fax: +01 (509) 493-4966
www.Aquaglide.net
BOUNCER AND BOARDING PLATFORM
A Q U A P A R K
S Y S T E M
12
213cm
122cm
2,44m (8ft)
4,5m
(15ft)
max.
272kg
(600lbs)
0-4
0,083bar
(1.2psi)
AQUAGLIDE, INC.
WHITE SALMON, WA - U.S.A.
STANDARDS: EN 15649: 2012, W.A.S.
PRODUCT: REBOUND 12
MADE IN P.R.C.
DESIGNED IN U.S.A.
1
3
3
Prolonged exposure to salt water can damage and/or shorten the expected lifetime of
this product. The marine environment includes many damaging elements including
corrosion, abrasion and damage from marine life such as barnacles. Regular cleaning
and rinsing with fresh water can reduce these risks. A PVC-safe antifouling paint should
be used to help protect this product against marine growth. DAMAGE CAUSED BY
EXPOSURE TO SALT WATER IS NOT COVERED BY WARRANTY.
Rebound 12
Compliant with
DIN EN-15649: 2012
1
Aquaglide, Inc.
#1 North Shore Dr SE
White Salmon, WA 98672
USA
L: 368 cm (145”)
W: 368 cm (145”)
H: 79 cm (31”)
No protection against drowning!
Keine Schutz gegen Ertrinken!
Pas de protection contre la noayada!
No protege contra el ahogamiento!
Nessuna protezione contro l’affogamento!
Beschermt niet tegen verdrinken!
Only for swimmers!
Nur für schwimmer!
Seulement pour les nageurs!
Sólo para nadadores!
Solo per i nuotatori!
Alleen voor zwemmers!
BOUNCER AND BOARDING PLATFORM
A Q U A P A R K
S Y S T E M
16
213cm
122cm
2,44m (8ft)
4,5m
(15ft)
max.
454kg
(1000lbs)
0-4
0,083bar
(1.2psi)
AQUAGLIDE, INC.
WHITE SALMON, WA - U.S.A.
STANDARDS: EN 15649: 2012, W.A.S.
PRODUCT: REBOUND 16
MADE IN P.R.C.
DESIGNED IN U.S.A.
3
5
5
Prolonged exposure to salt water can damage and/or shorten the expected lifetime of
this product. The marine environment includes many damaging elements including
corrosion, abrasion and damage from marine life such as barnacles. Regular cleaning
and rinsing with fresh water can reduce these risks. A PVC-safe antifouling paint should
be used to help protect this product against marine growth. DAMAGE CAUSED BY
EXPOSURE TO SALT WATER IS NOT COVERED BY WARRANTY.
Rebound 16
Compliant with
DIN EN-15649: 2012
3
Aquaglide, Inc.
#1 North Shore Dr SE
White Salmon, WA 98672
USA
L: 488 cm (192”)
W: 488 cm (192”)
H: 91 cm (36”)
No protection against drowning!
Keine Schutz gegen Ertrinken!
Pas de protection contre la noayada!
No protege contra el ahogamiento!
Nessuna protezione contro l’affogamento!
Beschermt niet tegen verdrinken!
Only for swimmers!
Nur für schwimmer!
Seulement pour les nageurs!
Sólo para nadadores!
Solo per i nuotatori!
Alleen voor zwemmers!
BOUNCER AND BOARDING PLATFORM
A Q U A P A R K
S Y S T E M
20
213cm
122cm
2,44m (8ft)
4,5m
(15ft)
max.
544kg
(1200lbs)
0-4
0,083bar
(1.2psi)
AQUAGLIDE, INC.
WHITE SALMON, WA - U.S.A.
STANDARDS: EN 15649: 2012, W.A.S.
PRODUCT: REBOUND 20
MADE IN P.R.C.
DESIGNED IN U.S.A.
3
7
7
Prolonged exposure to salt water can damage and/or shorten the expected lifetime of
this product. The marine environment includes many damaging elements including
corrosion, abrasion and damage from marine life such as barnacles. Regular cleaning
and rinsing with fresh water can reduce these risks. A PVC-safe antifouling paint should
be used to help protect this product against marine growth. DAMAGE CAUSED BY
EXPOSURE TO SALT WATER IS NOT COVERED BY WARRANTY.
Rebound 20
Compliant with
DIN EN-15649: 2012
3
Aquaglide, Inc.
#1 North Shore Dr SE
White Salmon, WA 98672
USA
L: 599 cm (236”)
W: 599 cm (236”)
H: 98 cm (38”)
No protection against drowning!
Keine Schutz gegen Ertrinken!
Pas de protection contre la noayada!
No protege contra el ahogamiento!
Nessuna protezione contro l’affogamento!
Beschermt niet tegen verdrinken!
Only for swimmers!
Nur für schwimmer!
Seulement pour les nageurs!
Sólo para nadadores!
Solo per i nuotatori!
Alleen voor zwemmers!
Your equipment :
• Check all equipment prior to use. Inspect your Rebound™ for missing,
defective or worn parts. Never use the product if excessive wear or damage
are detected.
• Always check for proper inflation before each use. Temperature and environmental changes can cause changes in tube pressure. Using the product over
or under inflated is dangerous and can cause damage to the product, voiding
the warranty.
• Always check security of the anchor and all attachments before each use.
• Always wear a floatation vest (PFD) as required by the authorities in the area
of use.
THE WARNINGS AND PRACTICES SET FORTH ABOVE IN THE
WATERSPORTS SAFETY CODE REPRESENT SOME COMMON RISKS
ENCOUNTERED BY USERS. THE CODE DOES NOT PURPORT TO COVER
ALL INSTANCES OF RISK OR DANGER. PLEASE USE COMMON SENSE
AND GOOD JUDGMENT.
Please contact us if you have any questions on the proper selection,
function, or safe use of this product.
Assembly
1) Locate a flat, dry area with access to electrical outlet or extension cord.
2) Unroll and place the Rebound™ Bouncer on the ground and locate the valve
as shown in Fig.1. Remove valve cover and push valve plunger in. Twist the
valve stem 90 degrees to open or close the 1-Way valve feature.
3) Using a high output inflator/deflator place the inflation hose with proper adaptor into the valve. Inflate to 1.2 psi (0,083 bar) where tube is firm and tight.
Check for proper air pressure using a manometer. Inflation times can vary
by inflator, but the tube should be firm and tight when completely inflated. In
hot weather, be sure to leave room for air expansion. DO NOT OVER-FILL.
Close the valve and secure valve cap.
Warning: Do not use an air compressor to inflate tube. Air compressors are
designed for high pressure inflation and can cause tube to burst if overinflated. The inflator/deflator described above cannot over-inflate the tube.
4) Roll out your Swimstep™ access platform and connect it to the Rebound™
BEFORE INFLATING the platform using the attached Interloc ™ straps. The
access platform connects on the side of the bouncer where the warnings are
located. Find the 2 rings on the tube, near the water line. Use (2) Interloc™
straps to connect the access platform to the tube as shown in Fig.2. Secure
the straps according to the following Interloc™ instructions shown in Figure
3a- 3e. Once the straps are connected, then inflate the boarding platform
to 0.8 psi (0,055 bar) until it is firm. Check for proper air pressure using a
manometer. This will tighten the platform to the side of the Rebound™. Be
careful not to over-inflate the access platform.
5) Congratulations! You are now ready to place your Rebound™ in the water.
NOTE: If you have purchased a Complete Rebound™ Aquapark Set, please
proceed to the Aquapark section for further assembly details. To launch your
Rebound™ bouncer, make sure to have at least 3-4 people evenly spaced
around the bouncer to help carry the Rebound™ using the provided transport
handles.
NEVER DRAG YOUR REBOUND™! YOU MUST LIFT AND SET TO AVOID
ANY ACCIDENTAL TEARING ON SHARP OBJECTS
Aquapark
Figure 1
If you have purchased a Complete Rebound™
Aquapark Set, please see the following instructions to complete assembly. If not, please
proceed to the Anchoring section.
1) Roll out your i-Log™ and connect it to the
Rebound™ BEFORE INFLATING the
i-Log™ using the attached Interloc™ straps.
The i-Log™ connects on the side of the
bouncer 45 degrees clockwise from the
access platform (viewed from above). Find
2 D-rings on the tube approximately 14”
above the water line. Take the (2) Interloc™ straps and connect the i-Log™ to the
Rebound™ tube according to the Interloc™
instructions shown below. Once the straps
are connected, then inflate the i-Log™ to
1.0 psi (0,069 bar) until it is firm. Check
for proper air pressure using a manometer.
This will tighten the i-Log™ to the side of the
Rebound™. Be careful not to over inflate the
i-Log™.
2) Unroll and place the Slide on the ground next
to the Rebound™ and inflate to 0.8 psi
(0,055 bar) untill it is firm. Check for proper
air pressure using a manometer. Inflation
times can vary by inflator, but the slide
should be firm and tight when completely
inflated. In hot weather, be sure to leave
room for air expansion, or let air out if it
becomes too hot. DO NOT OVER-FILL.
3) Attach the Slide to the Rebound™ using the 4
Interloc™ straps as shown in the instructions
to the right.
Figure 2
Interloc™ s
Interloc™ Strap Assembly Instru
1
3
4) Congratulations! You are now ready to place
your Rebound™ Aquapark in the water. To
launch your Rebound™ Aquapark Set make
sure to have at least 3-4 people evenly
spaced around the Aquapark to help carry
it. Use the molded transport handles. Be
sure to support the end of the i-Log during
transport.
*When connecting multiple items,
use only Aquaglide Interloc™
straps and connecting rings
according to the Interloc™
strap instructions provided.
Make sure that the connection is tight and that there
is NO GAP greater than
25mm (~3/4”) between items.
IMPORTANT: Failure to
connect these items
properly may result in
injury or death.
Aquaglide, Inc. - # 1 North Shore Dr., SE - White Salmon, WA 98672 - Tel: +01 (509) 493-4938 Fax: +01 (509) 493-4966
5
Interloc™ Strap Assembly Instructions
Interloc™ straps should already be attached to
the boarding platform.
1) Thread the end of the Interloc™ strap through
the two D-Rings on the Rebound™, then back
through a single ring (1).
2) Pull all the webbing through the rings until the
white arrow of the Interloc™ logo stops at the
D-ring below. Cinch until it is tight (2).
www.Aquaglide.net
NEVER DRAG YOUR REBOUND™ SET!
YOU MUST LIFT AND SET TO AVOID ANY
ACCIDENTAL TEARING ON SHARP
OBJECTS.
6) When the product is in place, remove the buoy and tie or shackle the anchor
line to the anchor rings underneath the product. Allow AT LEAST several
feet of slack in the line before securing the line. This will allow the product to
move in wind or waves without displacing your anchor.
Anchoring
7) If strong winds or storms are expected, it is best to remove the product from
the water and deflate it. You can also move it closer to shore and secure it
with lines.
NOTE: Take a moment to locate the anchoring
rings underneath your Rebound™ Bouncer.
The Rebound™ 12 has 2 anchor rings on the
underside of the tube. Attach anchor line to
at least 1 ring. We suggest using 2 rings with
a 2-way bridle (not included) for long term
mooring.
Figure 1a
strap
The Rebound™ 16 & 20 each have 4 reinforced anchor rings evenly spaced around the
underside of the tube. The Rebound™ 16 & 20
each come with a 4-Way Mooring Bridle and
stainless swivel, attached. Connect anchor
chain to the lower portion of the stainless
swivel.
IMPORTANT: Proper anchoring is essential to
the safety and performance of your product.
Due to the wide variety of conditions, we advise
using a professional skilled in mooring and
anchoring, and experienced with local conditions. If improperly anchored, the product can
move and/or float away. Aquaglide, Inc. is not
responsible for any damage, injuries or losses
due to improper anchoring.
uctions
2
Here are some general guidelines for anchoring your product. These guidelines are not
intended to replace the need for professional
installation.
4
B
C
A
1) Choose a location for your Rebound™
bouncer and/or aquapark. Place the product in
at least 8 ft. of water depth and in an area protected from the wind and boat traffic. Review
relevant rules and restrictions with your local
authorities.
2) Carefully check area under the bouncer and/
or aquapark for sharp or dangerous objects
(i.e. rocks or stumps).
3) Keep a safe distance from docks, boats, boat
lifts, and any other structures. DO NOT tie the
product to a dock!
3) Pass the end of the webbing back through the
open area of the two D-Rings on top as shown (3).
4) Now bring the webbing through the opening in
the single D-Ring on the platform as shown (4a).
5) Fold the strap over onto the velcro (4b), and
place the other velcro tab in place to lock the
strap (4c).
4) Anchors and anchor line are
sold separately. We recommend
at least 150 lbs. of weight for the
12’ Rebound™ and 250 lbs. of
weight for the 16’ Rebound™.
Ground screws or heavier anchors
(300 lbs. or more) should be
used for Rebound 20’ or smaller
Rebounds™ when on large or
windy bodies of water.
5) Attach anchor line securely to
the anchor. Use a buoy tied to
the other end of the rope to easily
locate your anchor.
Operation
1) This item is a water bouncer. Users bounce near the center of the item. This
item must be used with at least one Aquaglide Platinum boarding platform.
2) When connecting multiple items, use only Aquaglide Interloc™ straps and
connecting rings according to the Interloc™ Strap instructions provided.
Make sure that the connection is tight and that there is NO GAP greater
than 25mm (~3/4”) between items. IMPORTANT: Failure to connect
these items properly may result in injury or death.
Care and Maintenance
1) While your product has been initially treated with UV protectant, long-term
exposure to sunlight will damage the product. Regularly apply a UV protectant to the exposed surface of the tube to ensure the life of your product. We
recommend using ONLY 303 UV Protectant intended for use on vinyl for this
purpose. Monthly application while the product is in use is recommended.
NOT DOING SO OVER LONG TERM WILL VOID THE WARRANTY.
303 Protectant is available at most watersports dealers,or online at
www.303-products.com.
2) WARNING: Certain products, especially petrolium-based solvents, cleaners
and protectants such as ArmorAll can damage the product and use of these
products will void the warranty.
3) WARNING: Use of a high-pressure washer will damage the product and void
the warranty. To clean, use a soft bristle brush with mild soap and fresh
water. 303 UV Protectant contains a ‘safe for vinyl’ cleaner, and can be used
to clean and protect the product at the same time.
4) Check the inflation of your tube often. Check for proper air pressure using
a manometer. It may appear to have lost air early in the morning, but will
expand once the sun warms it. Maximum expansion will occur in the heat
of the day. Under-inflation can cause excessive wear. Proper inflation is
important as this will discourage marine animals from chewing and prevent
damage from wear.
Storage
1) Before storing, place the product on a clean, level area. Clean with mild soap
and water and allow to dry completely. Apply 303 Protectant to the surface
of all tubes before deflating.
2) Remove all attachments and store in a sealed water-proof container (i.e. a
plastic covered box or bin).
3) Remove ALL of the air from the tube using the deflation end of the high
output inflator/deflator.
4) Fold the deflated tube in thirds then flat-fold or roll loosely.
5) Store the product out of direct sunlight and protected from the environment in
a clean, dry location. It is best to store inside a container with moth balls to
prevent damage from rodents. NEVER store uncovered, in a damp location,
or on concrete surface! NEVER store at temperatures below 40 degrees F.
Aquaglide, Inc. - # 1 North Shore Dr., SE - White Salmon, WA 98672 - Tel: +01 (509) 493-4938 Fax: +01 (509) 493-4966
www.Aquaglide.net
Repair Instructions
WORK SPACE AND TOOLS
5. Use solvent (MEK or Rubbing Alcohol) and a fresh cloth to clean the
sanded areas, removing all debris.
1. Take care to position yourself in a clean, dry area with good ventilation. For proper curing of adhesives temperature should remain
above 10°C (50 F). In most cases you will need enough room to
inflate the product.
6. Dry-fit the patch again and use china marker (provided) to carefully
outline where the patch will be located.
2. Repair Kit Contents: PVC Patch material, PVC Glue, Instructions.
3. Additional items that MAY be needed: Air pump, Sharp scissors
and/ or razor knife, Dish washing liquid, water, small bowl or spray
bottle, 120 Grit sandpaper, solvent such as MEK (Methyl Ethyl
Ketone) or Rubbing alcohol, china marker, small ‘chip’ brush or
disposable paint brush.
7. Next, use the glue (provided). Use a disposable ‘chip’ brush to spread
glue if needed. Try to work neatly and quickly.
a. Using disposable brush, apply a thin, even layer of glue to the
repair area making sure to cover the area completely. Stay INSIDE
the china marker outline.
b. Using disposable brush, apply a thin, even layer of glue to the to
the back of the patch making sure to cover the area completely.
c. Allow glue to cure for approximately 60 seconds.
LOCATE LEAK(S)
1. If there is a problem with air leaks, you will need to locate the leak(s)
first.
2. Inflate your Aquaglide Platinum™ product fully. Some small leaks can
close themselves at lower air pressures, so it is best to maintain full
pressure by re-inflating periodically while checking for leaks.
3. Use a soapy water solution (50%/ 50% dish soap & water) and a
cloth to check for leaks. Work slowly around the product spraying or
swabbing-on soapy water solution. Look for growing bubbles, which
indicate a leak.
d. Starting at one corner, carefully align the patch over the repair
area using the china marker outline as a guide. Once the 2 surfaces
touch, the bond will be immediate, so take care.
e. Starting at one corner and working outward, carefully apply the
patch to the repair area using very firm pressure.
f. Rub the entire patch area and the edges of the patch using very
firm pres
sure.
g. Allow to cure for at least 24 hours before inflating.
4. Once a leak is confirmed, dry the area well, mark it and prepare to
patch.
PATCHING
Reinforced PVC Patch with high-grade adhesive.
** IMPORTANT: leaks must be patched with the item completely
deflated, and patches must be allowed to cure for 24 hours.
1. DEFLATE your Aquaglide Platinum™ product completely.
2. Carefully cut PVC patch material to size using sharp scissors or razor
knife.
a. Patch should be least 3 - 5cm (1-2”) larger than hole IN ALL
DIRECTIONS around any air leak. This means a minimum patch size
of 5cm x 5cm (2” x 2”) for a pinhole leak. The larger, the better.
b. Square patches with rounded corners are usually best, as this
reduces the risk of peeling.
3. Dry-fit the patch over the area to be repaired to ensure good fit and
coverage.
4. Use a clean 120 grit sand paper to rough up the surface to be
patched AND ALSO the back of the patch material.
Aquaglide, Inc. #1 North Shore Dr, SE White Salmon, WA 98672
TEL: +01(509) 493-4938
FAX: +01(509) 493-4966
www.Aquaglide.net
NOTICE! - Release of Liability, Claim Waiver, and Assumption of Risk Agreement
By opening and assembling this product, you are agreeing (1) to be bound to the terms set forth below and (2) to require anyone using this
product to be bound by such terms. If you are unwilling to be bound by these terms, return this product (before use) for a full refund.
ASSUMPTION OF RISK: Use of this product and any of its components involves certain inherent risks, dangers, and hazards which can result in serious personal injury
and death. In using the product, you freely agree to assume and accept any and all known and unknown risks of injury while using this equipment. The risks inherent in
the sport can be greatly reduced by abiding by the Warning Guidelines listed in this Owner’s Manual and by using common sense.
RELEASE AND WAIVER OF CLAIMS AGREEMENT: In consideration of the sale of the product to you, you hereby agree to the fullest extent permitted by law as
follows:
TO WAIVE ANY AND ALL CLAIMS that you have or may in the future have against North Sports Inc., and Aquaglide Inc.,its distributors and dealers, resulting from use
of this product and any of its components.
TO RELEASE North Sports, Inc. and Aquaglide, Inc. from any and all liability for any loss, damage, injury, or expense that you or any users of this product may suffer,
or that your next of kin may suffer, as a result of the use of this product, due to any cause whatsoever, including negligence or breach of contract on the part of North
Sports Inc. and Aquaglide Inc. in the design or manufacture of this product and any of its components.
ARBITRATION: In further consideration of the sale to you of this product and any of its components, you hereby agree to submit to binding arbitration any and all
claims which you believe you may have against North Sports Inc. and Aquaglide Inc. arising from the use of any North Sports Inc. and Aquaglide Inc. equipment or
products. The arbitration shall be pursuant to the rules of the American Arbitration Association. Arbitration shall be commenced within (1) year from the date on which
any alleged claim first arose. Further, the arbitration shall be held in White Salmon, Washington unless otherwise mutually agreed to by all parties. The submission to
the American Arbitration Association shall be unlimited and the arbitration award may be enforced by any Court of competent jurisdiction.
BINDING EFFECT OF AGREEMENT: In the event of your death or incapacity, this Agreement shall be effective and binding upon your heirs, next of kin, executors,
administrators, assigns, and representatives.
ENTIRE AGREEMENT: In entering into this Agreement, you are not relying upon any oral or written representations other than what is set forth in this agreement and
the North Sports Inc. and Aquaglide Inc. Owner’s Manual.
Warranty
Aquaglide, Inc. warrants products to be free
of defects in material or workmanship to the
original purchaser for a period of Three (3)
years from date of purchase. This warranty
is subject to the following limitations:
1. Warranty is valid only with dated proof of purchase in the form of the original invoice.
2. Warranty is valid only when the product is used
for normal recreational activities, and does not
cover use in schools or rental operations. Warranty
term for commercial use is 1 year.
3. Aquaglide will make the final warranty determination which may require inspection and/or photos
of the product which clearly show defect(s). We
require the above be sent to another location of our
choice, freight prepaid, or by email to warranty@
aquaglide.net.
4. If a product is deemed to be defective by Aquaglide, the warranty covers the repair or replacement
of the defective product only. Aquaglide will not
be responsible for any costs, losses, or damages
incurred as a result of loss of use of product.
5. This warranty does not cover damage caused
by misuse, abuse, neglect, or normal wear and
tear, including, but not limited to, punctures,
dragging the product over the ground, damage
due to excessive sun exposure or seam failure
due to overinflation in the sun, damage caused by
improper handling and storage, damage caused by
use in waves or shore break, and damage caused
by anything other than defects in materials and
workmanship.
6. This warranty is voided if any unauthorized
repair, change, or modification has been made to
any part of the equipment. Authorization for such
must come in writing from Aquaglide.
7. The warranty for any repaired or replacement
equipment is good from the date of the original
purchase only.
8. Any warranty claims must be accompanied
by the original purchase receipt. The name of the
retailer and date of purchase must be clear and
legible.
9. There are no warranties which extend beyond
the warranty specified here.
Returns and Service Policy
Product can be returned only if a return autho-
Aquaglide, Inc. #1 North Shore Dr, SE White Salmon, WA 98672
TEL: (509) 493-4938
FAX: (509) 493-4966
rization number (RA) is given by Aquaglide in
advance. The RA number must be on the outside
of the package or it will not be accepted at our
warehouse. Freight on the returned product must
be prepaid or it will not be accepted. Upon receipt,
Aquaglide will make a determination within (30)
days. If the product is covered under warranty it
will be returned to the customer at the expense of
Aquaglide, Inc. after repairs can be made. If not,
the customer will receive a quote for repair and/
or replacement as well as any necessary cleaning
and shipping charges. The customer will have
30 days to accept the quotation. At the end of 30
days, or upon refusal of the quote, Aquaglide will
return the product in the condition in which it was
received at the customer’s expense. The customer
agrees to authorize Aquaglide, Inc. to charge the
customer’s credit card for any costs not covered
under the terms and conditions of the Aquaglide
Warranty.
Serial Number
All Aquaglide Platinum products are marked with
a serial number near the main inflation valve (#1).
The serial number may be stamped into the PVC
directly around the valve, or it may be visible on
a welded plate near the valve. Please include
this number when you contact Aquaglide, or your
dealer, with any warranty claim.
www.Aquaglide.net