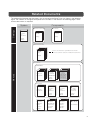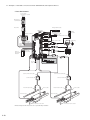
1
-7-Series AC Servo Drive -7W SERVOPACK with Hardware Option Specifications HWBB Function Product Manual Model: SGD7W-700 MANUAL NO. SIEP S800001 72A Basic Information on SERVOPACKs 1 Selecting a SERVOPACK 2 SERVOPACK Installation 3 Wiring and Connecting SERVOPACKs 4 Safety Functions 5 Maintenance 6 Appendices 7 Copyright © 2015 YASKAWA ELECTRIC CORPORATION All rights reserved. No part of this publication may be reproduced, stored in a retrieval system, or transmitted, in any form, or by any means, mechanical, electronic, photocopying, recording, or otherwise, without the prior written permission of Yaskawa. No patent liability is assumed with respect to the use of the information contained herein. Moreover, because Yaskawa is constantly striving to improve its high-quality products, the information contained in this manual is subject to change without notice. Every precaution has been taken in the preparation of this manual. Nevertheless, Yaskawa assumes no responsibility for errors or omissions. Neither is any liability assumed for damages resulting from the use of the information contained in this publication. About this Manual This manual describes the Σ-7-Series AC Servo Drive Σ-7W SERVOPACKs with MECHATROLINKIII Communications References that are equipped with the HWBB function (SGD7W700). It describes the specifications of Σ-7W SERVOPACKs that are different from the Σ-7W SERVOPACKs that do not have the HWBB function. Refer to the following manual for other product information. Σ-7-Series Σ-7W SERVOPACK with MECHATROLINK-III Communications References Product Manual (Manual No.: SIEP S800001 29) Read and understand this manual and the above manual to ensure correct usage of the Σ-7-Series AC Servo Drives. Keep this manual and the above manual in a safe place so that they can be referred to whenever necessary. Finding Information Information on these SERVOPACKs is provided in different manuals. Use the following table to find what information is provided in this manual and what information is provided in the other manual given in the table. Σ-7-Series Σ-7W SERVOPACK with MECHATROLINK-III Communications References Product Manual (Manual No.: SIEP S800001 29) Item Basic Information on SERVOPACKs Selecting a SERVOPACK SERVOPACK Installation The Σ-7 Series SERVOPACKs with HWBB Function Interpreting the Nameplate Part Names Interpreting SERVOPACK Model Model Designa- Numbers tions Interpreting Servomotor Model Numbers Combinations of SERVOPACKs and Servomotors Functions Ratings Ratings and SERVOPACK Overload Protection Specifications Characteristics General Specifications Block Diagrams External Dimensions Examples of Standard Connections between SERVOPACKs and Peripheral Devices EMC Installation Conditions Other installation information − 1.1 1.2 1.3 Σ-7W SERVOPACK with MECHATROLINK-III Communications References Product Manual (Manual No.: SIEP S800001 29) 1.1 − − − 1.4 − − 1.4.2 − − − 1.5 1.6 2.1.1 − 2.1.2 2.1 2.2 2.3 − − − 2.4 − This Manual 3.1 − − Chapter 3 Continued on next page. iii Continued from previous page. Item General Precautions Countermeasures against Noise Grounding Basic Wiring Diagrams Wiring the Power Supply to the SERVOPACK Wiring and Connecting Wiring Servomotors SERVOPACKs I/O Signal Connections Connecting Safety Function Signals Connecting MECHATROLINK Communications Cables Connecting the Other Connectors Basic Functions That Require Setting before Operation Application Functions Trial Operation and Actual Operation Tuning Monitoring Safety Functions Inspections and Part Replacement Alarms Related to the HWBB Function Other Alarms Troubleshooting Alarms Related to the HWBB Function Alarm Displays Troubleshooting Other Alarms Resetting Alarms Maintenance Displaying the Alarm History Clearing the Alarm History Resetting Motor Type Alarms TroubleshootTroubleshooting Problems Related ing Based on to the HWBB Function the Operation and Conditions Troubleshooting other problems of the Servomotor Wiring and Connecting SERVOPACKs Parameter Lists Appendices iv Panel Display during the HWBB Interpreting State Panel Displays Other Panel Display Corresponding SERVOPACK Utility Function Names Corresponding Corresponding Monitor Display SERVOPACK Function Names Related to the and SigmaWin+ HWBB Function Function Other Corresponding SERVONames PACK Monitor Display Function Names 4.1 − − 4.2 − − − 4.3 Σ-7W SERVOPACK with MECHATROLINK-III Communications References Product Manual (Manual No.: SIEP S800001 29) − 4.1.2 4.1.3 − 4.3 4.4 4.5 − − 4.6 This Manual − − − − − − Chapter 5 − 4.7 Chapter Chapter Chapter Chapter Chapter − 10.1 5 6 7 8 9 6.1.1 − − 10.2.1 6.1.2 − − − − − − 10.2.2 10.2.3 10.2.4 10.2.5 10.2.6 6.2 − − 10.5 − Chapter 11 7.1 − − 12.1 − 12.2.1 7.2 − − 12.2.2 Related Documents The relationships between the documents that are related to the Servo Drives are shown in the following figure. The numbers in the figure correspond to the numbers in the table on the following pages. Refer to these documents as required. System Components Catalogs Machine Controllers Servo Drives Machine Controller and Servo Drive MP3300 Σ-7-Series Catalog Catalog General Catalog Machine Controllers Refer to the manual for your Machine Controller for the documents related to the Machine Controllers. MP3000Series Manuals Servo Drives SERVOPACKs Manuals Enclosed Documents Product Manuals (such as this manual) Σ-7-Series Σ-7S/Σ-7W SERVOPACK Σ-7-Series Σ-7S/Σ-7W SERVOPACK with Hardware Option Specifications Product Manuals Servomotors Σ-7-Series Linear Servomotor Σ-7-Series Direct Drive Servomotor Product Manual Product Manual Product Manual Σ-7-Series Peripheral Device Σ-7-Series MECHATROLINK Communications Σ-7-Series Operation Interface Option Module Selection Manual Command Manuals Operating Manuals Enclosed Documents Σ-7-Series Rotary Servomotor User’s Manual v Classification Document Name Document No. Description Describes the features and application examples for combinations of MP3000-Series Machine Controllers and Σ-7-Series AC Servo Drives. Provides detailed information on MP3300 Machine Controllers, including features and specifications. Machine Controller and AC Servo Drive Solutions Catalog KAEP S800001 22 Machine Controller MP3300 KAEP C880725 03 AC Servo Drives Σ-7 Series KAEP S800001 23 Machine Controller MP3000 Series MP3300 Product Manual SIEP C880725 21 Σ-7-Series AC Servo Drive Σ-7S and Σ-7W SERVOPACK Safety Precautions TOMP C710828 00 Provides detailed information for the safe usage of Σ-7-Series SERVOPACKs. Σ-V-Series/Σ-V-Series for Large-Capacity Models/ Σ-7-Series Safety Precautions Option Module TOBP C720829 00 Provides detailed information for the safe usage of Option Modules. Σ-V-Series/Σ-V-Series for Large-Capacity Models/ Σ-7-Series Installation Guide Command Option Module TOBP C720829 01 Provides detailed procedures for installing a Command Option Module in a SERVOPACK. Σ-V-Series/Σ-V-Series for Large-Capacity Models/ Σ-7-Series Installation Guide Enclosed Documents Fully-closed Module TOBP C720829 03 Provides detailed procedures for installing the Fully-closed Module in a SERVOPACK. Σ-V-Series/Σ-V-Series for Large-Capacity Models/ Σ-7-Series Installation Guide Safety Module TOBP C720829 06 Provides detailed procedures for installing the Safety Module in a SERVOPACK. Σ-V-Series/Σ-V-Series for Large-Capacity Models/ Σ-7-Series Installation Guide INDEXER Module TOBP C720829 02 Provides detailed procedures for installing the INDEXER Module in a SERVOPACK. Σ-V-Series/Σ-V-Series for Large-Capacity Models/ Σ-7-Series Installation Guide DeviceNet Module TOBP C720829 07 Provides detailed procedures for installing the DeviceNet Module in a SERVOPACK. Machine Controller and Servo Drive General Catalog MP3300 Catalog Σ-7-Series Catalog MP3000-Series Manuals Provides detailed information on Σ7-Series AC Servo Drives, including features and specifications. Describes the functions, specifications, operating methods, maintenance, inspections, and troubleshooting of the MP3000series MP3300 Machine Controllers. Continued on next page. vi Continued from previous page. Classification Σ-7-Series Σ-7S/Σ-7W SERVOPACK Product Manuals Σ-7-Series Σ-7S/Σ-7W SERVOPACK with Hardware Option Specifications Product Manuals Document Name Document No. Description Σ-7-Series AC Servo Drive Σ-7S SERVOPACK with MECHATROLINK-III Communications References Product Manual SIEP S800001 28 Σ-7-Series AC Servo Drive Σ-7S SERVOPACK with MECHATROLINK-II Communications References Product Manual SIEP S800001 27 Σ-7-Series AC Servo Drive Σ-7S SERVOPACK with Analog Voltage/Pulse Train References Product Manual SIEP S800001 26 Σ-7-Series AC Servo Drive Σ-7S SERVOPACK Command Option Attachable Type with INDEXER Module Product Manual SIEP S800001 64 Σ-7-Series AC Servo Drive Σ-7S SERVOPACK Command Option Attachable Type with DeviceNet Module Product Manual SIEP S800001 70 Σ-7-Series AC Servo Drive Σ-7W SERVOPACK with MECHATROLINK-III Communications References Product Manual SIEP S800001 29 Σ-7-Series AC Servo Drive Σ-7S/Σ-7W SERVOPACK with Hardware Option Specifications Dynamic Brake Product Manual SIEP S800001 73 Σ-7-Series AC Servo Drive Σ-7W SERVOPACK with Hardware Option Specifications HWBB Function Product Manual This Manual (SIEP S800001 72) AC Servo Drive Rotary Servomotor Safety Precautions TOBP C230260 00 Provides detailed information for the safe usage of Rotary Servomotors and Direct Drive Servomotors. AC Servomotor Linear Σ Series Safety Precautions TOBP C230800 00 Provides detailed information for the safe usage of Linear Servomotors. Provide detailed information on selecting Σ-7-Series SERVOPACKs and information on installing, connecting, setting, performing trial operation for, tuning, and monitoring the Servo Drives. Describe hardware option specifications for Σ-7-Series SERVOPACKs. Enclosed Documents Continued on next page. vii Continued from previous page. Classification Σ-7-Series Rotary Servomotor Product Manual Σ-7-Series Linear Servomotor Product Manual Σ-7-Series Direct Drive Servomotor Product Manual Σ-7-Series Peripheral Device Selection Manual Σ-7-Series MECHATROLINK Communications Command Manuals Σ-7-Series Operation Interface Operating Manuals Option Module User’s Manual viii Document Name Document No. Description Σ-7-Series AC Servo Drive Rotary Servomotor Product Manual SIEP S800001 36 Σ-7-Series AC Servo Drive Linear Servomotor Product Manual SIEP S800001 37 Σ-7-Series AC Servo Drive Direct Drive Servomotor Product Manual SIEP S800001 38 Σ-7-Series AC Servo Drive Peripheral Device Selection Manual SIEP S800001 32 Describes the peripheral devices for a Σ-7-Series Servo System. SIEP S800001 30 Provides detailed information on the MECHATROLINK-II communications commands that are used for a Σ-7-Series Servo System. Σ-7-Series AC Servo Drive MECHATROLINK-III Communications Standard Servo Profile Command Manual SIEP S800001 31 Provides detailed information on the MECHATROLINK-III communications standard servo profile commands that are used for a Σ-7Series Servo System. Σ-7-Series AC Servo Drive Digital Operator Operating Manual SIEP S800001 33 Describes the operating procedures for a Digital Operator for a Σ-7-Series Servo System. AC Servo Drives Engineering Tool SigmaWin+ Online Manual Σ-7 Component SIEP S800001 48 Provides detailed operating procedures for the SigmaWin+ Engineering Tool for a Σ-7-Series Servo System. Σ-V-Series/Σ-V-Series for Large-Capacity Models/ Σ-7-Series User’s Manual Safety Module SIEP C720829 06 Provides details information required for the design and maintenance of a Safety Module. Σ-7-Series AC Servo Drive MECHATROLINK-II Communications Command Manual Provide detailed information on selecting, installing, and connecting the Σ-7-Series Servomotors. Using This Manual Technical Terms Used in This Manual The following terms are used in this manual. Term Servomotor Meaning A Σ-7-Series Rotary Servomotor, Direct Drive Servomotor, or Linear Servomotor. A generic term used for a Σ-7-Series Rotary Servomotor (SGM7J, SGM7A, SGM7P, or SGM7G) or a Direct Drive Servomotor (SGMCS or SGMCV). The descriptions will specify when Direct Drive Servomotors are excluded. Rotary Servomotor Linear Servomotor A Σ-7-Series Linear Servomotor (SGLG, SGLF, SGLT, or SGLC). SERVOPACK A Σ-7-Series Σ-7W Servo Amplifier with MECHATROLINK-III Communications References. Servo Drive The combination of a Servomotor and SERVOPACK. Servo System A servo control system that includes the combination of a Servo Drive with a host controller and peripheral devices. servo ON Supplying power to the motor. servo OFF Not supplying power to the motor. Shutting OFF the power supply to the motor by shutting OFF the base current to the power transistor in the SERVOPACK. An abbreviation for hard wire base block, which is a safety function that is designed to shut OFF the current to the motors with a hardwired circuit. One of the cables that connect to the main circuit terminals, including the Main Circuit Power Supply Cable, Control Power Supply Cable, and Servomotor Main Circuit Cable. The Engineering Tool for setting up and tuning Servo Drives or a computer in which the Engineering Tool is installed. base block (BB) HWBB Main Circuit Cable SigmaWin+ Differences in Terms for Rotary Servomotors and Linear Servomotors There are differences in the terms that are used for Rotary Servomotors and Linear Servomotors. This manual primarily describes Rotary Servomotors. If you are using a Linear Servomotor, you need to interpret the terms as given in the following table. Rotary Servomotors Linear Servomotors torque force moment of inertia mass rotation movement forward rotation and reverse rotation forward movement and reverse movement CW and CCW pulse trains forward and reverse pulse trains rotary encoder linear encoder absolute rotary encoder absolute linear encoder incremental rotary encoder incremental linear encoder unit: min -1 unit: N·m unit: mm/s unit: N ix Notation Used in this Manual Notation for Reverse Signals The names of reverse signals (i.e., ones that are valid when low) are written with a forward slash (/) before the signal abbreviation. Notation Example BK is written as /BK. Trademarks • QR code is a trademark of Denso Wave Inc. • MECHATROLINK is a trademark of the MECHATROLINK Members Association. • Other product names and company names are the trademarks or registered trademarks of the respective company. “TM” and the ® mark do not appear with product or company names in this manual. Visual Aids The following aids are used to indicate certain types of information for easier reference. Indicates precautions or restrictions that must be observed. Also indicates alarm displays and other precautions that will not result in machine damage. Important Indicates definitions of difficult terms or terms that have not been previously explained in this manual. Term Example Indicates operating or setting examples. Information Indicates supplemental information to deepen understanding or useful information. x Safety Precautions Safety Information To prevent personal injury and equipment damage in advance, the following signal words are used to indicate safety precautions in this document. The signal words are used to classify the hazards and the degree of damage or injury that may occur if a product is used incorrectly. Information marked as shown below is important for safety. Always read this information and heed the precautions that are provided. DANGER Indicates precautions that, if not heeded, are likely to result in loss of life, serious injury, or fire. WARNING Indicates precautions that, if not heeded, could result in loss of life, serious injury, or fire. CAUTION Indicates precautions that, if not heeded, could result in relatively serious or minor injury, or in fire. NOTICE Indicates precautions that, if not heeded, could result in property damage. xi Safety Precautions That Must Always Be Observed General Precautions DANGER Read and understand this manual to ensure the safe usage of the product. Keep this manual in a safe, convenient place so that it can be referred to whenever necessary. Make sure that it is delivered to the final user of the product. Do not remove covers, cables, connectors, or optional devices while power is being supplied to the SERVOPACK. There is a risk of electric shock, operational failure of the product, or burning. WARNING Use a power supply with specifications (number of phases, voltage, frequency, and AC/DC type) that are appropriate for the product. There is a risk of burning, electric shock, or fire. Connect the ground terminals on the SERVOPACK and Servomotor to ground poles according to local electrical codes (100 Ω or less for a SERVOPACK with a 100-VAC or 200-VAC power supply, and 10 Ω or less for a SERVOPACK with a 400-VAC power supply). There is a risk of electric shock or fire. Do not attempt to disassemble, repair, or modify the product. There is a risk of fire or failure. The warranty is void for the product if you disassemble, repair, or modify it. CAUTION The SERVOPACK heat sinks, regenerative resistors, Servomotors, and other components can be very hot while power is ON or soon after the power is turned OFF. Implement safety measures, such as installing covers, so that hands and parts such as cables do not come into contact with hot components. There is a risk of burn injury. For a 24-VDC power supply, use a power supply device with double insulation or reinforced insulation. There is a risk of electric shock. Do not damage, pull on, apply excessive force to, place heavy objects on, or pinch cables. There is a risk of failure, damage, or electric shock. The person who designs the system that uses the hard wire base block safety function must have a complete knowledge of the related safety standards and a complete understanding of the instructions in this document. There is a risk of injury, product damage, or machine damage. Do not use the product in an environment that is subject to water, corrosive gases, or flammable gases, or near flammable materials. There is a risk of electric shock or fire. xii NOTICE Do not attempt to use a SERVOPACK or Servomotor that is damaged or that has missing parts. Install external emergency stop circuits that shut OFF the power supply and stops operation immediately when an error occurs. In locations with poor power supply conditions, install the necessary protective devices (such as AC reactors) to ensure that the input power is supplied within the specified voltage range. There is a risk of damage to the SERVOPACK. Use a Noise Filter to minimize the effects of electromagnetic interference. Electronic devices used near the SERVOPACK may be affected by electromagnetic interference. Always use a Servomotor and SERVOPACK in one of the specified combinations. Do not touch a SERVOPACK or Servomotor with wet hands. There is a risk of product failure. Storage Precautions CAUTION Do not place an excessive load on the product during storage. (Follow all instructions on the packages.) There is a risk of injury or damage. NOTICE Do not install or store the product in any of the following locations. • Locations that are subject to direct sunlight • Locations that are subject to ambient temperatures that exceed product specifications • Locations that are subject to relative humidities that exceed product specifications • Locations that are subject to condensation as the result of extreme changes in temperature • Locations that are subject to corrosive or flammable gases • Locations that are near flammable materials • Locations that are subject to dust, salts, or iron powder • Locations that are subject to water, oil, or chemicals • Locations that are subject to vibration or shock that exceeds product specifications • Locations that are subject to radiation If you store or install the product in any of the above locations, the product may fail or be damaged. xiii Transportation Precautions CAUTION Transport the product in a way that is suitable to the mass of the product. Do not use the eyebolts on a SERVOPACK or Servomotor to move the machine. There is a risk of damage or injury. When you handle a SERVOPACK or Servomotor, be careful of sharp parts, such as the corners. There is a risk of injury. Do not place an excessive load on the product during transportation. (Follow all instructions on the packages.) There is a risk of injury or damage. NOTICE Do not hold onto the front cover or connectors when you move a SERVOPACK. There is a risk of the SERVOPACK falling. A SERVOPACK or Servomotor is a precision device. Do not drop it or subject it to strong shock. There is a risk of failure or damage. Do not subject connectors to shock. There is a risk of faulty connections or damage. If disinfectants or insecticides must be used to treat packing materials such as wooden frames, plywood, or pallets, the packing materials must be treated before the product is packaged, and methods other than fumigation must be used. Example: Heat treatment, where materials are kiln-dried to a core temperature of 56°C for 30 minutes or more. If the electronic products, which include stand-alone products and products installed in machines, are packed with fumigated wooden materials, the electrical components may be greatly damaged by the gases or fumes resulting from the fumigation process. In particular, disinfectants containing halogen, which includes chlorine, fluorine, bromine, or iodine can contribute to the erosion of the capacitors. Do not overtighten the eyebolts on a SERVOPACK or Servomotor. If you use a tool to overtighten the eyebolts, the tapped holes may be damaged. Installation Precautions CAUTION Install the Servomotor or SERVOPACK in a way that will support the mass given in technical documents. Install SERVOPACKs, Servomotors, and regenerative resistors on nonflammable materials. Installation directly onto or near flammable materials may result in fire. Provide the specified clearances between the SERVOPACK and the control panel as well as with other devices. There is a risk of fire or failure. Install the SERVOPACK in the specified orientation. There is a risk of fire or failure. Do not step on or place a heavy object on the product. There is a risk of failure, damage, or injury. Do not allow any foreign matter to enter the SERVOPACK or Servomotor. There is a risk of failure or fire. xiv NOTICE Do not install or store the product in any of the following locations. • Locations that are subject to direct sunlight • Locations that are subject to ambient temperatures that exceed product specifications • Locations that are subject to relative humidities that exceed product specifications • Locations that are subject to condensation as the result of extreme changes in temperature • Locations that are subject to corrosive or flammable gases • Locations that are near flammable materials • Locations that are subject to dust, salts, or iron powder • Locations that are subject to water, oil, or chemicals • Locations that are subject to vibration or shock that exceeds product specifications • Locations that are subject to radiation If you store or install the product in any of the above locations, the product may fail or be damaged. Use the product in an environment that is appropriate for the product specifications. If you use the product in an environment that exceeds product specifications, the product may fail or be damaged. A SERVOPACK or Servomotor is a precision device. Do not drop it or subject it to strong shock. There is a risk of failure or damage. Always install a SERVOPACK in a control panel. Do not allow any foreign matter to enter a SERVOPACK or a Servomotor with a Cooling Fan and do not cover the outlet from the Servomotor’s cooling fan. There is a risk of failure. Wiring Precautions DANGER Do not change any wiring while power is being supplied. There is a risk of electric shock or injury. WARNING Wiring and inspections must be performed only by qualified engineers. There is a risk of electric shock or product failure. Check all wiring and power supplies carefully. Incorrect wiring or incorrect voltage application to the output circuits may cause short-circuit failures. If a short-circuit failure occurs as a result of any of these causes, the holding brake will not work. This could damage the machine or cause an accident that may result in death or injury. Connect the AC and DC power supplies to the specified SERVOPACK terminals. • Connect an AC power supply to the L1, L2, and L3 terminals and the L1C and L2C terminals on the SERVOPACK. • Connect a DC power supply to the B1/ and 2 terminals and the L1C and L2C terminals on the SERVOPACK. There is a risk of failure or fire. xv CAUTION Wait for six minutes after turning OFF the power supply and then make sure that the CHARGE indicator is not lit before starting wiring or inspection work. Do not touch the power supply terminals while the CHARGE lamp is lit after turning OFF the power supply because high voltage may still remain in the SERVOPACK. There is a risk of electric shock. Observe the precautions and instructions for wiring and trial operation precisely as described in this document. Failures caused by incorrect wiring or incorrect voltage application in the brake circuit may cause the SERVOPACK to fail, damage the equipment, or cause an accident resulting in death or injury. Check the wiring to be sure it has been performed correctly. Connectors and pin layouts are sometimes different for different models. Always confirm the pin layouts in technical documents for your model before operation. There is a risk of failure or malfunction. Connect wires to power supply terminals and motor connection terminals securely with the specified methods and tightening torque. Insufficient tightening may cause wires and terminal blocks to generate heat due to faulty contact, possibly resulting in fire. Use shielded twisted-pair cables or screened unshielded multi-twisted-pair cables for I/O Signal Cables and Encoder Cables. Observe the following precautions when wiring the SERVOPACK’s main circuit terminals. • Turn ON the power supply to the SERVOPACK only after all wiring, including the main circuit terminals, has been completed. • If a connector is used for the main circuit terminals, remove the main circuit connector from the SERVOPACK before you wire it. • Insert only one wire per insertion hole in the main circuit terminals. • When you insert a wire, make sure that the conductor wire (e.g., whiskers) does not come into contact with adjacent wires. Install molded-case circuit breakers and other safety measures to provide protection against short circuits in external wiring. There is a risk of fire or failure. NOTICE Whenever possible, use the Cables specified by Yaskawa. If you use any other cables, confirm the rated current and application environment of your model and use the wiring materials specified by Yaskawa or equivalent materials. Securely tighten cable connector screws and lock mechanisms. Insufficient tightening may result in cable connectors falling off during operation. Do not bundle power lines (e.g., the Main Circuit Cable) and low-current lines (e.g., the I/O Signal Cables or Encoder Cables) together or run them through the same duct. If you do not place power lines and low-current lines in separate ducts, separate them by at least 30 cm. If the cables are too close to each other, malfunctions may occur due to noise affecting the low-current lines. Install a battery at either the host controller or on the Encoder Cable. If you install batteries both at the host controller and on the Encoder Cable at the same time, you will create a loop circuit between the batteries, resulting in a risk of damage or burning. When connecting a battery, connect the polarity correctly. There is a risk of battery rupture or encoder failure. xvi Operation Precautions WARNING Before starting operation with a machine connected, change the settings of the switches and parameters to match the machine. Unexpected machine operation, failure, or personal injury may occur if operation is started before appropriate settings are made. Do not radically change the settings of the parameters. There is a risk of unstable operation, machine damage, or injury. Install limit switches or stoppers at the ends of the moving parts of the machine to prevent unexpected accidents. There is a risk of machine damage or injury. For trial operation, securely mount the Servomotor and disconnect it from the machine. There is a risk of injury. Forcing the motor to stop for overtravel is disabled when the Jog (Fn002), Origin Search (Fn003), or EasyFFT (Fn206) utility function is executed. Take necessary precautions. There is a risk of machine damage or injury. When an alarm occurs, the motor will coast to a stop or stop with the dynamic brake according to a setting in the SERVOPACK. The coasting distance will change with the moment of inertia of the load. Check the coasting distance during trial operation and implement suitable safety measures on the machine. Do not enter the machine’s range of motion during operation. There is a risk of injury. Do not touch the moving parts of the Servomotor or machine during operation. There is a risk of injury. CAUTION Design the system to ensure safety even when problems, such as broken signal lines, occur. For example, the P-OT and N-OT signals are set in the default settings to operate on the safe side if a signal line breaks. Do not change the polarity of this type of signal. When overtravel occurs, the power supply to the motor is turned OFF and the brake is released. If you use the Servomotor to drive a vertical load, set the Servomotor to enter a zero-clamped state after the Servomotor stops. Also, install safety devices (such as an external brake or counterweight) to prevent the moving parts of the machine from falling. Always turn OFF the servo before you turn OFF the power supply. If you turn OFF the main circuit power supply or control power supply during operation before you turn OFF the servo, the Servomotor will stop as follows: • If you turn OFF the main circuit power supply during operation without turning OFF the servo, the Servomotor will stop abruptly with the dynamic brake. • If you turn OFF the control power supply without turning OFF the servo, the stopping method that is used by the Servomotor depends on the model of the SERVOPACK. For details, refer to the manual for the SERVOPACK. Do not use the dynamic brake for any application other than an emergency stop. There is a risk of failure due to rapid deterioration of elements in the SERVOPACK and the risk of unexpected operation, machine damage, burning, or injury. xvii NOTICE When you adjust the gain during system commissioning, use a measuring instrument to monitor the torque waveform and speed waveform and confirm that there is no vibration. If a high gain causes vibration, the Servomotor will be damaged quickly. Do not frequently turn the power supply ON and OFF. After you have started actual operation, allow at least one hour between turning the power supply ON and OFF (as a guideline). Do not use the product in applications that require the power supply to be turned ON and OFF frequently. The elements in the SERVOPACK will deteriorate quickly. An alarm or warning may occur if communications are performed with the host controller while the SigmaWin+ or Digital Operator is operating. If an alarm or warning occurs, it may interrupt the current process and stop the system. After you complete trial operation of the machine and facilities, use the SigmaWin+ to back up the settings of the SERVOPACK parameters. You can use them to reset the parameters after SERVOPACK replacement. If you do not copy backed up parameter settings, normal operation may not be possible after a faulty SERVOPACK is replaced, possibly resulting in machine or equipment damage. Maintenance and Inspection Precautions DANGER Do not change any wiring while power is being supplied. There is a risk of electric shock or injury. WARNING Wiring and inspections must be performed only by qualified engineers. There is a risk of electric shock or product failure. CAUTION Wait for six minutes after turning OFF the power supply and then make sure that the CHARGE indicator is not lit before starting wiring or inspection work. Do not touch the power supply terminals while the CHARGE lamp is lit after turning OFF the power supply because high voltage may still remain in the SERVOPACK. There is a risk of electric shock. Before you replace a SERVOPACK, back up the settings of the SERVOPACK parameters. Copy the backed up parameter settings to the new SERVOPACK and confirm that they were copied correctly. If you do not copy backed up parameter settings or if the copy operation is not completed normally, normal operation may not be possible, possibly resulting in machine or equipment damage. NOTICE Discharge all static electricity from your body before you operate any of the buttons or switches inside the front cover of the SERVOPACK. There is a risk of equipment damage. xviii Troubleshooting Precautions DANGER If the safety device (molded-case circuit breaker or fuse) installed in the power supply line operates, remove the cause before you supply power to the SERVOPACK again. If necessary, repair or replace the SERVOPACK, check the wiring, and remove the factor that caused the safety device to operate. There is a risk of fire, electric shock, or injury. WARNING The product may suddenly start to operate when the power supply is recovered after a momentary power interruption. Design the machine to ensure human safety when operation restarts. There is a risk of injury. CAUTION When an alarm occurs, remove the cause of the alarm and ensure safety. Then reset the alarm or turn the power supply OFF and ON again to restart operation. There is a risk of injury or machine damage. If the Servo ON signal is input to the SERVOPACK and an alarm is reset, the Servomotor may suddenly restart operation. Confirm that the servo is OFF and ensure safety before you reset an alarm. There is a risk of injury or machine damage. Always insert a magnetic contactor in the line between the main circuit power supply and the main circuit power supply terminals on the SERVOPACK so that the power supply can be shut OFF at the main circuit power supply. If a magnetic contactor is not connected when the SERVOPACK fails, a large current may flow, possibly resulting in fire. If an alarm occurs, shut OFF the main circuit power supply. There is a risk of fire due to a regenerative resistor overheating as the result of regenerative transistor failure. Install a ground fault detector against overloads and short-circuiting or install a molded-case circuit breaker combined with a ground fault detector. There is a risk of SERVOPACK failure or fire if a ground fault occurs. The holding brake on a Servomotor will not ensure safety if there is the possibility that an external force (including gravity) may move the current position and create a hazardous situation when power is interrupted or an error occurs. If an external force may cause movement, install an external braking mechanism that ensures safety. Disposal Precautions When disposing of the product, treat it as ordinary industrial waste. However, local ordinances and national laws must be observed. Implement all labeling and warnings as a final product as required. xix General Precautions Figures provided in this document are typical examples or conceptual representations. There may be differences between them and actual wiring, circuits, and products. The products shown in illustrations in this document are sometimes shown without covers or protective guards. Always replace all covers and protective guards before you use the product. If you need a new copy of this document because it has been lost or damaged, contact your nearest Yaskawa representative or one of the offices listed on the back of this document. This document is subject to change without notice for product improvements, specifications changes, and improvements to the manual itself. We will update the document number of the document and issue revisions when changes are made. Any and all quality guarantees provided by Yaskawa are null and void if the customer modifies the product in any way. Yaskawa disavows any responsibility for damages or losses that are caused by modified products. xx Warranty Details of Warranty Warranty Period The warranty period for a product that was purchased (hereinafter called the “delivered product”) is one year from the time of delivery to the location specified by the customer or 18 months from the time of shipment from the Yaskawa factory, whichever is sooner. Warranty Scope Yaskawa shall replace or repair a defective product free of charge if a defect attributable to Yaskawa occurs during the above warranty period. This warranty does not cover defects caused by the delivered product reaching the end of its service life and replacement of parts that require replacement or that have a limited service life. This warranty does not cover failures that result from any of the following causes. • Improper handling, abuse, or use in unsuitable conditions or in environments not described in product catalogs or manuals, or in any separately agreed-upon specifications • Causes not attributable to the delivered product itself • Modifications or repairs not performed by Yaskawa • Use of the delivered product in a manner in which it was not originally intended • Causes that were not foreseeable with the scientific and technological understanding at the time of shipment from Yaskawa • Events for which Yaskawa is not responsible, such as natural or human-made disasters Limitations of Liability • Yaskawa shall in no event be responsible for any damage or loss of opportunity to the customer that arises due to failure of the delivered product. • Yaskawa shall not be responsible for any programs (including parameter settings) or the results of program execution of the programs provided by the user or by a third party for use with programmable Yaskawa products. • The information described in product catalogs or manuals is provided for the purpose of the customer purchasing the appropriate product for the intended application. The use thereof does not guarantee that there are no infringements of intellectual property rights or other proprietary rights of Yaskawa or third parties, nor does it construe a license. • Yaskawa shall not be responsible for any damage arising from infringements of intellectual property rights or other proprietary rights of third parties as a result of using the information described in catalogs or manuals. xxi Suitability for Use • It is the customer’s responsibility to confirm conformity with any standards, codes, or regulations that apply if the Yaskawa product is used in combination with any other products. • The customer must confirm that the Yaskawa product is suitable for the systems, machines, and equipment used by the customer. • Consult with Yaskawa to determine whether use in the following applications is acceptable. If use in the application is acceptable, use the product with extra allowance in ratings and specifications, and provide safety measures to minimize hazards in the event of failure. • Outdoor use, use involving potential chemical contamination or electrical interference, or use in conditions or environments not described in product catalogs or manuals • Nuclear energy control systems, combustion systems, railroad systems, aviation systems, vehicle systems, medical equipment, amusement machines, and installations subject to separate industry or government regulations • Systems, machines, and equipment that may present a risk to life or property • Systems that require a high degree of reliability, such as systems that supply gas, water, or electricity, or systems that operate continuously 24 hours a day • Other systems that require a similar high degree of safety • Never use the product for an application involving serious risk to life or property without first ensuring that the system is designed to secure the required level of safety with risk warnings and redundancy, and that the Yaskawa product is properly rated and installed. • The circuit examples and other application examples described in product catalogs and manuals are for reference. Check the functionality and safety of the actual devices and equipment to be used before using the product. • Read and understand all use prohibitions and precautions, and operate the Yaskawa product correctly to prevent accidental harm to third parties. Specifications Change The names, specifications, appearance, and accessories of products in product catalogs and manuals may be changed at any time based on improvements and other reasons. The next editions of the revised catalogs or manuals will be published with updated code numbers. Consult with your Yaskawa representative to confirm the actual specifications before purchasing a product. xxii Compliance with UL Standards, EU Directives, and Other Safety Standards Certification marks for the standards for which the product has been certified by certification bodies are shown on nameplate. Products that do not have the marks are not certified for the standards. North American Safety Standards (UL) Product SERVOPACKs Model SGD7W-700 North American Safety Standards (UL File No.) UL 61800-5-1, CSA C22.2 No.274 European Directives Product SERVOPACKs Model SGD7W-700 European Directive Machinery Directive 2006/42/EC EMC Directive 2004/108/EC Low Voltage Directive 2006/95/EC Harmonized Standards EN ISO13849-1: 2008/AC: 2009 EN EN EN EN EN EN 55011 group 1, class A 61000-6-2 61000-6-4 61800-3 50178 61800-5-1 Safety Standards Product Model Safety Standards Safety of Machinery SERVOPACKs SGD7W-700 Functional Safety EMC Standards EN ISO13849-1: 2008/AC: 2009 IEC 60204-1 IEC 61508 series IEC 62061 IEC 61800-5-2 IEC 61326-3-1 xxiii Safety Parameters Item Standards IEC 61508 IEC 62061 Performance Level SIL3 SILCL3 Probability of Dangerous Failure per Hour IEC 61508 IEC 62061 Performance Level Mean Time to Dangerous Failure of Each Channel Average Diagnostic Coverage Stop Category Safety Function Mission Time Hardware Fault Tolerance Subsystem EN ISO 13849-1 EN ISO 13849-1 EN ISO 13849-1 IEC 60204-1 IEC 61800-5-2 IEC 61508 IEC 61508 IEC 61508 PFH = 4.04×10⁻⁹ [1/h] (4.04% of SIL3) PLe (Category 3) MTTFd: High DCavg: Medium Stop category 0 STO 10 years HFT = 1 B Safety Integrity Level xxiv Contents About this Manual. . . . . . . . . . . . . . . . . . . . . . . . . . . . . . . . . . . . . . . . . . . . . Finding Information . . . . . . . . . . . . . . . . . . . . . . . . . . . . . . . . . . . . . . . . . . . . Related Documents . . . . . . . . . . . . . . . . . . . . . . . . . . . . . . . . . . . . . . . . . . . Using This Manual . . . . . . . . . . . . . . . . . . . . . . . . . . . . . . . . . . . . . . . . . . . . Safety Precautions . . . . . . . . . . . . . . . . . . . . . . . . . . . . . . . . . . . . . . . . . . . . Warranty . . . . . . . . . . . . . . . . . . . . . . . . . . . . . . . . . . . . . . . . . . . . . . . . . . . . Compliance with UL Standards, EU Directives, and Other Safety Standards . . . . . . . . . . iii . . . iii ...v . . . ix . . . xi . . xxi . xxiii Basic Information on SERVOPACKs 1 1.1 SERVOPACKs with HWBB Function. . . . . . . . . . . . . . . . . . . . . . 1-2 1.2 Interpreting the Nameplate . . . . . . . . . . . . . . . . . . . . . . . . . . . . 1-3 1.3 Part Names . . . . . . . . . . . . . . . . . . . . . . . . . . . . . . . . . . . . . . . . . 1-4 1.4 Model Designations . . . . . . . . . . . . . . . . . . . . . . . . . . . . . . . . . . 1-6 Selecting a SERVOPACK 2 2.1 General Specifications . . . . . . . . . . . . . . . . . . . . . . . . . . . . . . . . 2-2 2.2 Block Diagrams . . . . . . . . . . . . . . . . . . . . . . . . . . . . . . . . . . . . . 2-5 2.2.1 2.2.2 2.3 External Dimensions. . . . . . . . . . . . . . . . . . . . . . . . . . . . . . . . . . 2-7 2.3.1 2.3.2 2.4 SGD7W-1R6A and -2R8A . . . . . . . . . . . . . . . . . . . . . . . . . . . . . . . . . . . . . . 2-5 SGD7W-5R5A and -7R6A . . . . . . . . . . . . . . . . . . . . . . . . . . . . . . . . . . . . . . 2-6 Front Cover Dimensions and Connector Specifications . . . . . . . . . . . . . . . . 2-7 SERVOPACK External Dimensions . . . . . . . . . . . . . . . . . . . . . . . . . . . . . . . 2-8 Examples of Standard Connections between SERVOPACKs and Peripheral Devices . 2-9 SERVOPACK Installation 3 3.1 EMC Installation Conditions . . . . . . . . . . . . . . . . . . . . . . . . . . . . 3-2 xxv Wiring and Connecting SERVOPACKs 4 4.1 Wiring and Connecting SERVOPACKs . . . . . . . . . . . . . . . . . . . . 4-2 4.2 Basic Wiring Diagrams . . . . . . . . . . . . . . . . . . . . . . . . . . . . . . . . 4-4 4.3 Connecting the HWBB Function Signal . . . . . . . . . . . . . . . . . . . 4-6 4.3.1 4.3.2 Safety Functions 5 5.1 Introduction to the HWBB Function . . . . . . . . . . . . . . . . . . . . . . 5-2 5.1.1 5.1.2 5.2 5.3 Risk Assessment . . . . . . . . . . . . . . . HWBB State . . . . . . . . . . . . . . . . . . . Resetting the HWBB State . . . . . . . . Related Commands . . . . . . . . . . . . . Detecting Errors in HWBB Signal . . . HWBB Input Signal Specifications . . HWBB Input Signal Waveform Trace. Operation without a Host Controller . /S-RDY (Servo Ready Output) Signal /BK (Brake Output) Signal. . . . . . . . . Stopping Methods . . . . . . . . . . . . . . ALM (Servo Alarm) Signal . . . . . . . . . . . . . . . . . . . . . . . . . . . . . . . . . . . . . . .5-3 . . . . . . . . . . . . . . . . . . . . . . . . . . . . . .5-4 . . . . . . . . . . . . . . . . . . . . . . . . . . . . . .5-6 . . . . . . . . . . . . . . . . . . . . . . . . . . . . . .5-7 . . . . . . . . . . . . . . . . . . . . . . . . . . . . . .5-8 . . . . . . . . . . . . . . . . . . . . . . . . . . . . . .5-8 . . . . . . . . . . . . . . . . . . . . . . . . . . . . . .5-8 . . . . . . . . . . . . . . . . . . . . . . . . . . . . . .5-9 . . . . . . . . . . . . . . . . . . . . . . . . . . . . . .5-9 . . . . . . . . . . . . . . . . . . . . . . . . . . . . .5-10 . . . . . . . . . . . . . . . . . . . . . . . . . . . . .5-10 . . . . . . . . . . . . . . . . . . . . . . . . . . . . .5-10 EDM1 (External Device Monitor) . . . . . . . . . . . . . . . . . . . . . . . 5-11 5.3.1 5.4 What Is the HWBB Function? . . . . . . . . . . . . . . . . . . . . . . . . . . . . . . . . . . . .5-2 Precautions for the HWBB Function . . . . . . . . . . . . . . . . . . . . . . . . . . . . . . .5-2 HWBB Function . . . . . . . . . . . . . . . . . . . . . . . . . . . . . . . . . . . . . 5-3 5.2.1 5.2.2 5.2.3 5.2.4 5.2.5 5.2.6 5.2.7 5.2.8 5.2.9 5.2.10 5.2.11 5.2.12 EDM1 Output Signal Specifications . . . . . . . . . . . . . . . . . . . . . . . . . . . . . .5-11 HWBB Function Application Example . . . . . . . . . . . . . . . . . . . 5-12 5.4.1 5.4.2 5.4.3 Connection Example . . . . . . . . . . . . . . . . . . . . . . . . . . . . . . . . . . . . . . . . .5-12 Failure Detection Method . . . . . . . . . . . . . . . . . . . . . . . . . . . . . . . . . . . . . .5-12 Procedure . . . . . . . . . . . . . . . . . . . . . . . . . . . . . . . . . . . . . . . . . . . . . . . . . .5-13 5.5 Validating the HWBB Function . . . . . . . . . . . . . . . . . . . . . . . . . 5-14 5.6 Connecting the Safety Function Device. . . . . . . . . . . . . . . . . . 5-15 Maintenance 6 6.1 Alarm Displays . . . . . . . . . . . . . . . . . . . . . . . . . . . . . . . . . . . . . . 6-2 6.1.1 6.1.2 6.2 xxvi Safety Function Connector (CN8) Pin Arrangement . . . . . . . . . . . . . . . . . . .4-6 I/O Circuits . . . . . . . . . . . . . . . . . . . . . . . . . . . . . . . . . . . . . . . . . . . . . . . . . .4-6 Alarms Related to the HWBB Function . . . . . . . . . . . . . . . . . . . . . . . . . . . . .6-2 Troubleshooting Alarms Related to the HWBB Function . . . . . . . . . . . . . . . .6-3 Troubleshooting Based on the Operation and Conditions of the Servomotor . 6-4 Appendices 7 7.1 Interpreting Panel Displays . . . . . . . . . . . . . . . . . . . . . . . . . . . . 7-2 7.1.1 7.2 Panel Display during the HWBB State . . . . . . . . . . . . . . . . . . . . . . . . . . . . . 7-2 Corresponding SERVOPACK and SigmaWin+ Function Names 7-3 7.2.1 Corresponding SERVOPACK Monitor Display Function Names . . . . . . . . . . 7-3 Index Revision History xxvii Basic Information on SERVOPACKs This chapter provides basic information on SERVOPACKs that have the HWBB function. 1.1 SERVOPACKs with HWBB Function . . . . . . 1-2 1.2 Interpreting the Nameplate . . . . . . . . . . . . . 1-3 1.3 Part Names . . . . . . . . . . . . . . . . . . . . . . . . . 1-4 1.4 Model Designations . . . . . . . . . . . . . . . . . . 1-6 1 1.1 SERVOPACKs with HWBB Function 1.1 SERVOPACKs with HWBB Function Some SERVOPACKs are equipped with an HWBB function. Refer to the following chapter for details on the HWBB function. Chapter 5 Safety Functions 1-2 1.2 Interpreting the Nameplate Interpreting the Nameplate The following basic information is provided on the nameplate. SERVOPACK model Degree of protection Surrounding air temperature BTO information Order number Serial number Basic Information on SERVOPACKs 1.2 1 1-3 1.3 Part Names 1.3 Part Names The part names of the SERVOPACK are given below. Parts that are indicated by are unique to the SERVOPACKs with the HWBB function. or With Front Cover Open L1 L2 L3 L1C L2C B1/ Main circuit terminals (on side of 18 SERVOPACK) 19 15 20 16 21 11 17 B2 B3 12 1 22 2 13 Motor terminals 23 Bottom of the SERVOPACK UA 24 14 VA WA No. Name Front Cover Input Voltage Nameplate Model QR Code Description – – Indicates the SERVOPACK model and ratings. The model of the SERVOPACK. The QR code that is used by the MechatroCloud service. Lit while the main circuit power is being supplied. Note: Even if you turn OFF the main circuit power supply, this indicator will be lit as long as the internal capacitor remains charged. Do not touch the main circuit or motor terminals while this indicator is lit. Doing so may result in electric shock. Reference – – – – – CHARGE Main Circuit Terminals The terminals depend on the main circuit power supply input specifications of the SERVOPACK. – Servomotor Terminals (Axis A: UA, VA, and WA; Axis B: UB, VB, and WB) The connection terminals for the Servomotor Main Circuit Cable (power line). – Ground Terminal ( The ground terminals to prevent electric shock. Always connect this terminal. – Connects to MECHATROLINK-III-compatible devices. – 11 12 13 14 15 16 17 18 19 1-4 ) MECHATROLINK-III Communications Connector (CN6A and CN6B) Serial Communications Connector (CN3) Computer Connector (CN7) I/O Signal Connector (CN1) – Connects to the Digital Operator (a peripheral device) or a – computer (RS-422). A USB connector to connect a computer. – Connects to sequence I/O signals. – • Rotary Servomotor: Connects to the encoder in the SerEncoder Connectors (Axis A: vomotor. – CN2A, Axis B: CN2B) • Linear Servomotor: Connects to a Serial Converter Unit or linear encoder. Serial Number – – DIP Switch (S3) Used to set MECHATROLINK-III communications. – Rotary Switches (S1 and S2) Used to set the MECHATROLINK station address. PWR Lights when the control power is being supplied. – L1, L2 Lights during MECHATROLINK communications. – Continued on next page. 1.3 Part Names 20 21 22 23 24 Name CN Analog Monitor Connector (CN5) Panel Display for Axis A Panel Display for Axis B Safety Connector (CN8) Description Lights when the SERVOPACK normally receives a CONNECT command. You can use a special cable (peripheral device) to monitor the motor speed, torque reference, or other values. Displays the servo status with a seven-segment display. Connects to a safety function device. – – – page 4-6 Basic Information on SERVOPACKs No. Continued from previous page. Reference 1 1-5 1.4 Model Designations 1.4 Model Designations SGD7W - 1R6 1st+2nd+3rd digits Σ-7-Series Σ-7W SERVOPACKs 1st+2nd+3rd digits Voltage Code 1R6*1 Three2R8*1 Phase, *1 200 VAC 5R5 7R6 A 4th digit 20 A 5th+6th digits 7th digit 700 8th+9th+10th digits Maximum Applicable 4th digit Voltage Motor Capacity per Axis Code Specification Specification 0.2 kW 0.4 kW A 200 VAC 0.75 kW 5th+6th digits Interface*2 1.0 kW Code Specification 20 MECHATROLINK-III communications reference 7th digit Design Revision Order B 000 11th+12th+13th digits 14th digit Hardware Options 8th+9th+10th digits Specification Code 700 Specification HWBB function Applicable Models All models 11th+12th+13th digits FT/EX Specification Specification Code None 000 None A 14th digit BTO Specification*3 Specification Code None None B BTO specification *1. You can use these models with either a single-phase or three-phase input. *2. The same SERVOPACKs are used for both Rotary Servomotors and Linear Servomotors. *3. The BTO specification indicates if the SEVOPACK is customized by using the MechatroCloud BTO service. This service is available on the e-mechatronics website. You need a BTO number to order SERVOPACKs with customized specifications. Refer to the following catalog for details on the BTO specification. AC Servo Drives Σ-7 Series (Manual No.: KAEP S800001 23) 1-6 Selecting a SERVOPACK This chapter provides information required to select SERVOPACKs, such as general specifications, block diagrams, connector specifications, external dimensions, and connection examples. 2.1 General Specifications . . . . . . . . . . . . . . . . 2-2 2.2 Block Diagrams . . . . . . . . . . . . . . . . . . . . . . 2-5 2.2.1 2.2.2 2.3 External Dimensions . . . . . . . . . . . . . . . . . . 2-7 2.3.1 2.3.2 2.4 SGD7W-1R6A and -2R8A . . . . . . . . . . . . . . . . . . 2-5 SGD7W-5R5A and -7R6A . . . . . . . . . . . . . . . . . . 2-6 Front Cover Dimensions and Connector Specifications . . . . . . . . . . . . . . . . . . . . . . . . . . . 2-7 SERVOPACK External Dimensions . . . . . . . . . . . 2-8 Examples of Standard Connections between SERVOPACKs and Peripheral Devices . . .2-9 2 2.1 General Specifications 2.1 General Specifications This section gives the general specifications of SERVOPACKs. Specifications that are indicated by are unique to the SERVOPACKs with the HWBB function. Item Control Method With Rotary Servomotor Feedback With Linear Servomotor Surrounding Air Temperature Environmental Conditions Specification IGBT-based PWM control, sine wave current drive Serial encoder: 20 bits or 24 bits (incremental encoder/absolute encoder) 22 bits (absolute encoder) • Absolute linear encoder (The signal resolution depends on the absolute linear encoder.) • Incremental linear encoder (The signal resolution depends on the incremental linear encoder or Serial Converter Unit.) -5°C to 55°C (With derating, usage is possible between 55°C and 60°C.) Refer to the following manual for derating specifications. Σ-7-Series Σ-7W SERVOPACK with MECHATROLINK-III Communications References Product Manual (Manual No.: SIEP S800001 29) Storage Temperature Surrounding Air Humidity Storage Humidity 95% relative humidity max. (with no freezing or condensation) Vibration Resistance 4.9 m/s2 Shock Resistance 19.6 m/s2 IP20 2 • Must be no corrosive or flammable gases. • Must be no exposure to water, oil, or chemicals. • Must be no dust, salts, or iron dust. Degree of Protection Pollution Degree Altitude -20°C to 85°C 95% relative humidity max. (with no freezing or condensation) 1,000 m max. (With derating, usage is possible between 1,000 m and 2,000 m.) Refer to the following manual for derating specifications. Σ-7-Series Σ-7W SERVOPACK with MECHATROLINK-III Communications References Product Manual (Manual No.: SIEP S800001 29) Others Applicable Standards Compliance with UL Standards, EU Directives, and Other Safety Standards on page xxiii Base-mounted Mounting Performance Do not use the SERVOPACK in the following locations: Locations subject to static electricity noise, strong electromagnetic/magnetic fields, or radioactivity Refer to the following section for details. Note: Rack-mounted SERVOPACKs are not available. Speed Control Range 1:5000 (At the rated torque, the lower limit of the speed control range must not cause the Servomotor to stop.) Coefficient of Speed Fluctuation*1 ±0.01% of rated speed max. (for a load fluctuation of 0% to 100%) 0% of rated speed max. (for a load fluctuation of ±10%) ±0.1% of rated speed max. (for a temperature fluctuation of 25°C ±25°C) Torque Control Precision (Repeatability) Soft Start Time Setting ±1% 0 s to 10 s (Can be set separately for acceleration and deceleration.) Continued on next page. 2-2 2.1 General Specifications Continued from previous page. Sequence Input Signals Fixed Output I/O Signals Sequence Output Signals Communications Input Signals That Can Be Allocated Output Signals That Can Be Allocated Interfaces 1:N RS-422A Communi- Communications cations (CN3) Axis Address Settings Specification Number of input points: 2 Input voltage range: 0 V to +5 V Allowable voltage range: 24 VDC ±20% Number of input points: 12 Input method: Sink inputs or source inputs Input Signals • /DEC (Origin Return Deceleration Switch) signal • /EXT1 to /EXT3 (External Latch Input 1 to 3) signals • P-OT (Forward Drive Prohibit) and N-OT (Reverse Drive Prohibit) signals A signal can be allocated and the positive and negative logic can be changed. Allowable voltage range: 5 VDC to 30 VDC Number of output points: 2 Output signal: ALM (Servo Alarm) signal Allowable voltage range: 5 VDC to 30 VDC Number of output points: 5 (A photocoupler output (isolated) is used.) Output Signals • /COIN (Positioning Completion) signal • /V-CMP (Speed Coincidence Detection) signal • /TGON (Rotation Detection) signal • /S-RDY (Servo Ready) signal • /CLT (Torque Limit Detection) signal • /VLT (Speed Limit Detection) signal • /BK (Brake) signal • /WARN (Warning) signal • /NEAR (Near) signal A signal can be allocated and the positive and negative logic can be changed. Digital Operator (JUSP-OP05A-1-E) and personal computer (with SigmaWin+) Up to N = 15 stations possible for RS-422A port Set with parameters. Interface Personal computer (with SigmaWin+) USB Communi- Communicacations Conforms to USB2.0 standard (12 Mbps). tions (CN7) Standard CHARGE, PWR, COM, L1, and L2 indicators, and two, one-digit Displays/Indicators seven-segment displays Communications ProMECHATROLINK-III tocol 03 to EF hex (maximum number of slaves: 62) Station Address Settings The rotary switches (S1 and S2) are used to set the station address. MECHAExtended Address TROLINK-III Setting CommuniBaud Rate cations Transmission Cycle Number of Transmission Bytes Selecting a SERVOPACK Item Linear Servomotor Overheat Protection Signal Input 2 Axis A: 00 hex, Axis B: 01 hex 100 Mbps 250 μs, 500 μs, 750 μs, 1.0 ms to 4.0 ms (multiples of 0.5 ms) 32 or 48 bytes per station A DIP switch (S3) is used to select the number of transmission bytes. Continued on next page. 2-3 2.1 General Specifications Continued from previous page. Item Performance Reference Method Reference Input Profile MECHATROLINK-III Communications Setting Switches Analog Monitor (CN5) Dynamic Brake (DB) Regenerative Processing Overtravel (OT) Prevention Protective Functions Utility Functions Inputs Output Safety Functions Applicable Standards*2 Applicable Option Modules Specification Position, speed, or torque control with MECHATROLINK-III communications MECHATROLINK-III commands (sequence, motion, data setting, data access, monitoring, adjustment, etc.) MECHATROLINK-III standard servo profile Rotary switch (S1 and S2) positions: 16 Number of DIP switch (S3) pins: 4 Number of points: 2 Output voltage range: ±10 VDC (effective linearity range: ±8 V) Resolution: 16 bits Accuracy: ±20 mV (Typ) Maximum output current: ±10 mA Settling time (±1%): 1.2 ms (Typ) Activated when a servo alarm or overtravel (OT) occurs, or when the power supply to the main circuit or servo is OFF. Built-in Stopping with dynamic brake, deceleration to a stop, or coasting to a stop for the P-OT (Forward Drive Prohibit) or N-OT (Reverse Drive Prohibit) signal Overcurrent, overvoltage, low voltage, overload, regeneration error, etc. Gain adjustment, alarm history, jogging, origin search, etc. /HWBB1 and /HWBB2: Base block signals for Power Modules EDM1: Monitors the status of built-in safety circuit (fixed output). ISO13849-1 PLe (Category 3), IEC61508 SIL3 None *1. The coefficient of speed fluctuation for load fluctuation is defined as follows: Coefficient of speed fluctuation = No-load motor speed - Total-load motor speed × 100% Rated motor speed *2. Always perform risk assessment for the system and confirm that the safety requirements are met. 2-4 2.2 Block Diagrams 2.2.1 SGD7W-1R6A and -2R8A 2.2 Block Diagrams This section gives the block diagrams of SERVOPACKs with the HWBB function. Parts that are indicated by are unique to the SERVOPACKs with the HWBB function. 2.2.1 SGD7W-1R6A and -2R8A B1/ + Main circuit power supply L1 B2 B3 Servomotor for axis A Fan UA Varistor L2 CHARGE L3 + VA − WA M Dynamic brake circuit 1 2 ENC Voltage sensor UB Relay drive VB M WB Dynamic brake circuit Temperature sensor Voltage sensor Gate drive Gate drive overcurrent protection Current sensor Gate drive overcurrent protection Current sensor ENC Servomotor for axis B CN2A L1C L2C + − Control power supply CN2B Processor (PWM control, position/ speed calculations, etc.) CN5 Analog voltage converter CN1 I/O Analog monitor output I/O signals CN6A Status display MECHATROLINK-III communications I/F CN6B CN3 Digital Operator CN7 Computer CN8 Safety function signal Selecting a SERVOPACK Control power supply Varistor 2 2-5 2.2 Block Diagrams 2.2.2 SGD7W-5R5A and -7R6A 2.2.2 SGD7W-5R5A and -7R6A B1/ + Main circuit power supply L1 B2 B3 Servomotor for axis A Fan UA Varistor L2 CHARGE L3 + VA − WA M Dynamic brake circuit 1 2 ENC Voltage sensor UB Relay drive VB M WB Dynamic brake circuit Temperature sensor Voltage sensor Gate drive Gate drive overcurrent protection Current sensor Gate drive overcurrent protection Current sensor ENC Servomotor for axis B CN2A Control power supply L1C L2C Varistor + − Control power supply CN2B Processor (PWM control, position/ speed calculations, etc.) Analog voltage converter CN5 CN1 I/O Analog monitor output I/O signals CN6A Status display MECHATROLINK-III communications I/F CN6B CN3 Digital Operator 2-6 CN7 Computer CN8 Safety function signal 2.3 External Dimensions 2.3.1 Front Cover Dimensions and Connector Specifications 2.3 External Dimensions 2.3.1 Front Cover Dimensions and Connector Specifications This section gives the front cover dimensions and connector specifications. Parts that are indicated by or are unique to the SERVOPACKs with the HWBB function. • Front Cover Dimensions The front cover dimensions are the same for all models. (15) (7) Front cover CN6A CN6B CN3 (12 0°) CN7 CN1 CN2A CN2B CN8 (4) CN8 • Connector Specifications CN1 CN2A, CN2B CN3 CN6A, CN6B CN7 CN8 Model 10236-59A3MB 3E106-2230KV HDR-EC14LFDTN-SLD-PLUS 1981386-1 2172034-1 1981080-1 Number of Pins 36 6 14 8 5 8 Manufacturer 3M Japan Limited 3M Japan Limited Honda Tsushin Kogyo Co., Ltd. Tyco Electronics Japan G.K. Tyco Electronics Japan G.K. Tyco Electronics Japan G.K. Note: The above connectors or their equivalents are used for the SERVOPACKs. Selecting a SERVOPACK Connector No. 2 2-7 2.3 External Dimensions 2.3.2 SERVOPACK External Dimensions 2.3.2 SERVOPACK External Dimensions • Three-phase, 200 VAC: SGD7W-1R6A and -2R8A Ground terminals 3 × M4 168 160 ±0.5 (mounting pitch) (26) 70 (40) Two sets of terminals 168 8 160 5 3×M4 17 (4) Exterior 60 ±0.5 (mounting pitch) 5 65 70 180 (76) Mounting Hole Diagram CN8 Approx. mass: 1.6 kg Unit: mm • Three-phase, 200 VAC: SGD7W-5R5A and -7R6A Ground terminals 3 × M4 (26) 100 (40) 17 (76) (4) 180 CN8 160 ±0.5 (mounting pitch) 168 Two sets of terminals 8 168 160 5 3×M4 5 Exterior 90 ±0.5 (mounting pitch) 95 100 Mounting Hole Diagram Approx. mass: 2.3 kg Unit: mm 2-8 2.4 Examples of Standard Connections between SERVOPACKs and Peripheral Devices Examples of Standard Connections between SERVOPACKs and Peripheral Devices This section provides connection examples between the SERVOPACK and peripheral devices. Parts that are indicated by are unique to the SERVOPACKs with the HWBB function. • Rotary Servomotors Power supply Three-phase, 200 VAC R S T Molded-case circuit breaker Analog Monitor Cable Noise Filter SERVOPACK MECHATROLINK-III Communications Cable Magnetic Contactor Digital Operator To next MECHATROLINK-III station CN5 Computer CN6 Digital Operator cable SERVOPACK main circuit wires Engineering Tool CN3 Control Power Supply Cable CN7 Computer Cable Host controller I/O Signal Cable CN1 External Regenerative Resistor* 1 External Regenerative Resistor Cable CN2A CN2B Holding brake power supply unit* 2 Magnetic Contactor Battery Case (Used for an absolute encoder.) CN8 Ground cable Safety Function Device Cable (Wires required for a Servomotor with a Brake) Servomotor Main Circuit Cable for axis A Encoder Cable for axis A Servomotor Main Circuit Cable for axis B Encoder Cable for axis B When Using a Rotary Servomotor Rotary Servomotor for axis A Selecting a SERVOPACK 2.4 Rotary Servomotor for axis B 2 When Using a Direct Drive Servomotor Direct Drive Servomotor for axis A Direct Drive Servomotor for axis B *1. External Regenerative Resistors are not provided by Yaskawa. *2. The power supply for the holding brake is not provided by Yaskawa. Select a power supply based on the hold- ing brake specifications. If you use a 24-V brake, install a separate power supply for the 24-VDC power supply from other power supplies, such as the one for the I/O signals of the CN1 connector. If the power supply is shared, the I/O signals may malfunction. 2-9 2.4 Examples of Standard Connections between SERVOPACKs and Peripheral Devices • Linear Servomotors Power supply Three-phase, 200 VAC R S T Molded-case circuit breaker Analog Monitor Cable Noise Filter SERVOPACK Magnetic Contactor CN5 MECHATROLINK-III Communications Cable To next MECHATROLINK-III station Computer CN6 Engineering Tool Digital Operator cable SERVOPACK main circuit wires Control Power Supply Cable Digital Operator CN3 CN7 Computer Cable Host controller I/O Signal Cable CN1 External Regenerative Resistor* External Regenerative Resistor Cable CN2A CN2B CN8 Ground cable Safety Function Device Cable Serial Converter Unit Cable Serial Converter Unit Cable Serial Converter Unit Serial Converter Unit Linear Encoder Cable Linear Encoder Cable Sensor Cable Linear encoder Linear encoder Linear Servomotor for axis A * External Regenerative Resistors are not provided by Yaskawa. 2-10 Sensor Cable Linear Servomotor for axis B SERVOPACK Installation This chapter provides the EMC installation conditions for SERVOPACKs that have the HWBB function. 3.1 EMC Installation Conditions . . . . . . . . . . . . 3-2 3 3.1 EMC Installation Conditions 3.1 EMC Installation Conditions This section gives the installation conditions that were used for EMC certification testing. The EMC installation conditions that are given here are the conditions that were used to pass testing criteria at Yaskawa. The EMC level may change under other conditions, such as the actual installation structure and wiring conditions. These Yaskawa products are designed to be built into equipment. Therefore, you must implement EMC measures and confirm compliance for the final equipment. The applicable standards are EN 55011 group 1 class A, EN 61000-6-2, EN 61000-6-4, and EN 61800-3 (category C2, second environment). Parts that are indicated by or are unique to the SERVOPACKs with the HWBB function. • Three-Phase, 200 VAC Shield box Brake power supply Brake power supply L1, L2, and L3 L1C and L2C Surge absorber Clamp Noise filter CN2A Clamp UA, VA, and WA Clamp Power supply: Three-phase, 200 VAC Clamp SERVOPACK Brake Servomotor Encoder Clamp PE I/O controller CN2B CN1 CN8 Clamp Clamp Clamp CN6A and CN6B Clamp Clamp MECHATROLINK-III Controller PE UB, VB, and WB Brake Servomotor Encoder Clamp Clamp Safety function device Symbol 3-2 Cable Name Specification I/O Signal Cable Shielded cable Motor Main Circuit Cable for axis A Shielded cable Encoder Cable for axis A Shielded cable Motor Main Circuit Cable for axis B Shielded cable Encoder Cable for axis B Shielded cable Main Circuit Power Cable Shielded cable MECHATROLINK-III Communications Cable Shielded cable Safety Function Device Cable Shielded cable PE Wiring and Connecting SERVOPACKs This chapter provides information on wiring and connecting SERVOPACKs to power supplies and peripheral devices. 4.1 Wiring and Connecting SERVOPACKs . . . . 4-2 4.2 Basic Wiring Diagrams . . . . . . . . . . . . . . . . 4-4 4.3 Connecting the HWBB Function Signal . . . . . 4-6 4.3.1 4.3.2 Safety Function Connector (CN8) Pin Arrangement . . . . . . . . . . . . . . . . . . . . . . . . . . . . 4-6 I/O Circuits . . . . . . . . . . . . . . . . . . . . . . . . . . . . . 4-6 4 4.1 Wiring and Connecting SERVOPACKs 4.1 Wiring and Connecting SERVOPACKs DANGER Do not change any wiring while power is being supplied. There is a risk of electric shock or injury. WARNING Wiring and inspections must be performed only by qualified engineers. There is a risk of electric shock or product failure. Check all wiring and power supplies carefully. Incorrect wiring or incorrect voltage application to the output circuits may cause short-circuit failures. If a short-circuit failure occurs as a result of any of these causes, the holding brake will not work. This could damage the machine or cause an accident that may result in death or injury. Connect the AC and DC power supplies to the specified SERVOPACK terminals. • Connect an AC power supply to the L1, L2, and L3 terminals and the L1C and L2C terminals on the SERVOPACK. • Connect a DC power supply to the B1/ and 2 terminals and the L1C and L2C terminals on the SERVOPACK. There is a risk of failure or fire. CAUTION Wait for six minutes after turning OFF the power supply and then make sure that the CHARGE indicator is not lit before starting wiring or inspection work. Do not touch the power supply terminals while the CHARGE lamp is lit after turning OFF the power supply because high voltage may still remain in the SERVOPACK. There is a risk of electric shock. Observe the precautions and instructions for wiring and trial operation precisely as described in this document. Failures caused by incorrect wiring or incorrect voltage application in the brake circuit may cause the SERVOPACK to fail, damage the equipment, or cause an accident resulting in death or injury. Check the wiring to be sure it has been performed correctly. Connectors and pin layouts are sometimes different for different models. Always confirm the pin layouts in technical documents for your model before operation. There is a risk of failure or malfunction. Connect wires to power supply terminals and motor connection terminals securely with the specified methods and tightening torque. Insufficient tightening may cause wires and terminal blocks to generate heat due to faulty contact, possibly resulting in fire. Use shielded twisted-pair cables or screened unshielded multi-twisted-pair cables for I/O Signal Cables and Encoder Cables. Observe the following precautions when wiring the SERVOPACK’s main circuit terminals. • Turn ON the power supply to the SERVOPACK only after all wiring, including the main circuit terminals, has been completed. • If a connector is used for the main circuit terminals, remove the main circuit connector from the SERVOPACK before you wire it. • Insert only one wire per insertion hole in the main circuit terminals. • When you insert a wire, make sure that the conductor wire (e.g., whiskers) does not come into contact with adjacent wires. Install molded-case circuit breakers and other safety measures to provide protection against short circuits in external wiring. There is a risk of fire or failure. 4-2 4.1 Wiring and Connecting SERVOPACKs NOTICE Whenever possible, use the Cables specified by Yaskawa. If you use any other cables, confirm the rated current and application environment of your model and use the wiring materials specified by Yaskawa or equivalent materials. Securely tighten cable connector screws and lock mechanisms. Insufficient tightening may result in cable connectors falling off during operation. Do not bundle power lines (e.g., the Main Circuit Cable) and low-current lines (e.g., the I/O Signal Cables or Encoder Cables) together or run them through the same duct. If you do not place power lines and low-current lines in separate ducts, separate them by at least 30 cm. If the cables are too close to each other, malfunctions may occur due to noise affecting the lowcurrent lines. Install a battery at either the host controller or on the Encoder Cable. If you install batteries both at the host controller and on the Encoder Cable at the same time, you will create a loop circuit between the batteries, resulting in a risk of damage or burning. When connecting a battery, connect the polarity correctly. There is a risk of battery rupture or encoder failure. • Use a molded-case circuit breaker (1QF) or fuse to protect the main circuit. The SERVOPACK connects directly to a commercial power supply; it is not isolated through a transformer or other device. Always use a molded-case circuit breaker (1QF) or fuse to protect the servo sysImportant tem from accidents involving different power system voltages or other accidents. • Install an earth leakage breaker. The SERVOPACK does not have a built-in ground fault protective circuit. To configure a safer system, install a ground fault detector against overloads and short-circuiting, or install a ground fault detector combined with a molded-case circuit breaker. • Do not turn the power supply ON and OFF more than necessary. • Do not use the SERVOPACK for applications that require the power supply to turn ON and OFF frequently. Such applications will cause elements in the SERVOPACK to deteriorate. • After you have started actual operation, allow at least one hour between turning the power supply ON and OFF (as a guideline). Σ-7-Series Peripheral Device Selection Manual (Manual No.: SIEP S800001 32) • The signal cable conductors are as thin as 0.2 mm2 or 0.3 mm2. Do not subject them to excessive bending stress or tension. Wiring and Connecting SERVOPACKs To ensure safe, stable application of the servo system, observe the following precautions when wiring. • Use the cables specified by Yaskawa. Design and arrange the system so that each cable is as short as possible. Refer to the following manual for information on the specified cables. 4 4-3 4.2 Basic Wiring Diagrams 4.2 Basic Wiring Diagrams This section provide the basic wiring diagrams. Parts that are indicated by the SERVOPACKs with the HWBB function. are unique to SERVOPACK R S T Main circuit terminals 1QF 3SA Motor terminals UA/UB VA/VB WA/WB M 1FLT 2KM L1 L2 L3 1KM CN2A/CN2B L1C 5 6 1 2 L2C (For servo alarm display) 1Ry B1/ B2 B3 1 2 1PL Servo power Servo power ON OFF 1KM 1KM 1SA 2KM 1Ry 1KM 2SA Linear servomotor overheat protection input CN5 Sequence input signal +24 V *3 +24VIN power supply input ENC *1 1 3 2 4 Ground to a resistance of 100 Ω or less. TH_A TH_B *1 PS /PS PG5V PG0V Analog Monitors CN1 33 34 1 4.7 kΩ 19 21 ALM_A+ ALM_B+ 20 22 ALM_AALM_B- 23 25 /SO1+ (/BK_A+) /SO2+ (/BK_B+) 24 26 /SO1- (/BK_A-) /SO2- (/BK_B-) 27 /SO3+ 28 /SO3- Servo Alarm Output (OFF for alarm) General-purpose sequence inputs 1 and 7 (Forward Drive Prohibit input: OFF to prohibit drive) /SI01 (P-OT_A) /SI07 (P-OT_B) 3 9 General-purpose sequence inputs 2 and 8 (Reverse Drive Prohibit input: OFF to prohibit drive) /SI02 (N-OT_A) /SI08 (N-OT_B) 4 10 General-purpose sequence inputs 3 and 9 (Origin Return Deceleration Switch input: ON at limit switch) /SI03 (/DEC_A) /SI09 (/DEC_B) 5 11 General-purpose sequence inputs 4 and 10 (External Latch Input 1: ON for latch) /SI04 (/EXT_A1) /SI10 (/EXT_B1) 6 12 29 /SO4+ General-purpose sequence inputs 5 and 11 (External Latch Input 2: ON for latch) /SI05 (/EXT_A2) /SI11 (/EXT_B2) 7 13 30 /SO4- 31 /SO5+ General-purpose sequence inputs 6 and 12 (External Latch Input 3: ON for latch) /SI06 (/EXT_A3) /SI12 (/EXT_B3) 8 14 32 /SO5- General-purpose sequence output 5 17 35 15 16 SG BAT_A+ BAT_B+ Signal ground BAT_ABAT_B- 18 36 8 EDM1+ Battery for absolute encoder *2 2.8 V to 4.5 V *1 + - Switch 24 V Fuse Safety *4 0V /HWBB1+ CN8 4 /HWBB1- 3 /HWBB2+ 6 /HWBB2- 5 7 General-purpose sequence outputs 1 and 2 (Brake output: ON to release brake) General-purpose sequence output 3 General-purpose sequence output 4 EDM1- Connector shell FG Connect shield to connector shell. Frame ground *1. represents twisted-pair wires. *2. Connect these when using an absolute encoder. If the Encoder Cable with a Battery Case is connected, do not connect a backup battery. *3. The 24-VDC power supply is not provided by Yaskawa. Use a 24-VDC power supply with double insulation or reinforced insulation. *4. Refer to the following chapter for details. Chapter 5 Safety Functions If you do not use the safety function, insert the Safety Jumper Connector (provided as an accessory) into CN8 when you use the SERVOPACK. 4-4 4.2 Basic Wiring Diagrams Note: 1. You can use parameter settings to change some of the I/O signal allocations. Refer to the following manual for details. Σ-7-Series Σ-7W SERVOPACK with MECHATROLINK-III Communications References Product Manual (Manual No.: SIEP S800001 29) Wiring and Connecting SERVOPACKs 2. If you use a 24-V brake, install a separate power supply for the 24-VDC power supply from other power supplies, such as the one for the I/O signals of the CN1 connector. If the power supply is shared, the I/O signals may malfunction. 3. Default settings are given in parentheses. 4 4-5 4.3 Connecting the HWBB Function Signal 4.3.1 Safety Function Connector (CN8) Pin Arrangement 4.3 Connecting the HWBB Function Signal This section describes the wiring that is required to use the HWBB function. Refer to the following chapter for details on the HWBB function. Chapter 5 Safety Functions 4.3.1 Safety Function Connector (CN8) Pin Arrangement 1* 2* 3 4 5 6 Pin No. Signal – – /HWBB1/HWBB1+ /HWBB2/HWBB2+ 7 EDM1- Name – Hard Wire Base Block Input 1 Hard Wire Base Block Input 2 External Device Monitor Output 8 Function EDM1+ For a hard wire base block input. The base block (motor power turned OFF) is in effect when the signal is OFF. Turns ON when the /HWBB1 and the /HWBB2 signals are input and the SERVOPACK enters a base block state. * Do not use these pins because they are connected to internal circuits. 4.3.2 I/O Circuits For HWBB function signal connections, the input signal is the 0-V common and the output signal is a source output. This is opposite to other signals described in this manual. To avoid confusion, the ON and OFF status of signals for the HWBB function are defined as follows: Important ON: The state in which the relay contacts are closed or the transistor is ON and current flows into the signal line. OFF: The state in which the relay contacts are open or the transistor is OFF and no current flows into the signal line. HWBB Input Circuit Use a 0-V common to connect the HWBB function signals. You must connect redundant input signals. Input Signal Connection Example SERVOPACK CN8 24-V power supply Switch Fuse Use a switch that has low-current contacts. 0V 4-6 /HWBB1+ 4 4.7 kΩ /HWBB1- 3 4.7 kΩ /HWBB2+ 6 4.7 kΩ /HWBB2- 5 4.7 kΩ 4.3 Connecting the HWBB Function Signal 4.3.2 I/O Circuits Input (HWBB) Signal Specifications Type Connector Pin No. Signal /HWBB1 CN8-4 CN8-3 Status ON (closed) OFF (open) Inputs /HWBB2 CN8-6 CN8-5 ON (closed) OFF (open) Meaning Does not activate the HWBB function (normal operation). Activates the HWBB function (motor current shutOFF request). Does not activate the HWBB function (normal operation). Activates the HWBB function (motor current shutOFF request). The input (HWBB) signals have the following electrical characteristics. Item Internal Impedance Operating Voltage Range Maximum Delay Time Characteristics Remarks 4.7 kΩ − +24 V ±20% − 8 ms Time from /HWBB1 and /HWBB2 signals turning OFF until HWBB function is activated Diagnostic Output Circuits The EDM1 output signal uses a source circuit. The following figure shows a connection example. Host controller SERVOPACK CN8 24-V power supply 8 EDM1+ 7 EDM1- EDM1 Output Signal Specifications Type Output Signal Pin No. CN8-8 CN8-7 EDM1 Output Status ON OFF Meaning Both the /HWBB1 and /HWBB2 signals are operating normally. The /HWBB1 signal, the /HWBB2 signal, or both are not operating. The electrical characteristics of the EDM1 signal are as follows: Item Maximum Allowable Voltage Maximum Allowable Current Maximum ON Voltage Drop Maximum Delay Time Characteristics Wiring and Connecting SERVOPACKs 0V Remarks 30 VDC − 50 mA DC − 1.0 V Voltage between EDM1+ and EDM1- when current is 50 mA 8 ms Time from a change in /HWBB1 or /HWBB2 until a change in EDM1 4 4-7 Safety Functions 5 This chapter provides details on the HWBB function as a safety function of the SERVOPACKs. 5.1 Introduction to the HWBB Function . . . . . . 5-2 5.1.1 5.1.2 5.2 What Is the HWBB Function? . . . . . . . . . . . . . . . 5-2 Precautions for the HWBB Function . . . . . . . . . . 5-2 HWBB Function . . . . . . . . . . . . . . . . . . . . . . 5-3 5.2.1 Risk Assessment . . . . . . . . . . . . . . . . 5.2.2 HWBB State . . . . . . . . . . . . . . . . . . . 5.2.3 Resetting the HWBB State . . . . . . . . 5.2.4 Related Commands . . . . . . . . . . . . . 5.2.5 Detecting Errors in HWBB Signal . . . 5.2.6 HWBB Input Signal Specifications . . 5.2.7 HWBB Input Signal Waveform Trace . 5.2.8 Operation without a Host Controller . 5.2.9 /S-RDY (Servo Ready Output) Signal 5.2.10 /BK (Brake Output) Signal . . . . . . . . . 5.2.11 Stopping Methods . . . . . . . . . . . . . . 5.2.12 ALM (Servo Alarm) Signal . . . . . . . . . 5.3 . . . . . . . . . . . . . . . . . . . . . . . . . . . . . . . . . . . . . . . . . . . . . . . . . . . . . . . . . . . . . . . . . . . . . . . . . . . . . . . . . . . . . 5-3 . 5-4 . 5-6 . 5-7 . 5-8 . 5-8 . 5-8 . 5-9 . 5-9 5-10 5-10 5-10 EDM1 (External Device Monitor) . . . . . . . . 5-11 5.3.1 5.4 . . . . . . . . . . . . EDM1 Output Signal Specifications . . . . . . . . . 5-11 HWBB Function Application Example . . . . . . . . 5-12 5.4.1 5.4.2 5.4.3 Connection Example . . . . . . . . . . . . . . . . . . . . . 5-12 Failure Detection Method . . . . . . . . . . . . . . . . . 5-12 Procedure . . . . . . . . . . . . . . . . . . . . . . . . . . . . . 5-13 5.5 Validating the HWBB Function . . . . . . . . . 5-14 5.6 Connecting the Safety Function Device . . 5-15 5.1 Introduction to the HWBB Function 5.1.1 What Is the HWBB Function? 5.1 Introduction to the HWBB Function 5.1.1 What Is the HWBB Function? An HWBB function is built into the SERVOPACK to reduce the risks associated with using the machine by protecting workers from the hazards of moving machine parts and otherwise increasing the safety of machine operation. When working in hazardous areas inside guards is necessary, such as for machine maintenance, the HWBB function can be used to avoid hazardous moving machine parts. Refer to the following section for information on the HWBB function and safety parameters. Compliance with UL Standards, EU Directives, and Other Safety Standards on page xxiii Products that display the TÜV mark on the nameplate have met the safety standards. Important 5.1.2 Precautions for the HWBB Function WARNING To confirm that the HWBB function satisfies the safety requirements of the system, you must conduct a risk assessment of the system. Incorrect use of the safety function may cause injury. The Servomotor will move if there is an external force (e.g., gravity on a vertical axis) even when the HWBB function is operating. Use a separate means, such as a mechanical brake, that satisfies the safety requirements. Incorrect use of the safety function may cause injury. While the HWBB function is operating, the motor may move within an electric angle of 180° or less as a result of a SERVOPACK failure. Use the HWBB function for an application only after confirming that movement of the motor will not result in a hazardous condition. Incorrect use of the safety function may cause injury. The dynamic brake and the brake signal are not safety-related elements. You must design the system so that SERVOPACK failures will not cause a hazardous condition while the HWBB function is operating. Incorrect use of the safety function may cause injury. Connect devices that satisfy the safety standards for the signals for an HWBB function. Incorrect use of the safety function may cause injury. The HWBB function does not shut OFF the power to the SERVOPACK or electrically isolate it. Implement measures to shut OFF the power supply to the SERVOPACK before you perform maintenance on it. There is a risk of electric shock. 5-2 5.2 HWBB Function 5.2.1 Risk Assessment 5.2 HWBB Function The HWBB function uses a hardwired circuit to shut off the current to the motors. The drive signals to the Power Module that controls the motor current are controlled by the circuits that are independently connected to the two input signal channels to turn OFF the Power Module and shut OFF the motor current. The current to the motors is simultaneously shut off for both axes. You cannot shut off the current to the motor for just one axis. 1. You cannot execute the following functions while the HWBB function is active. Make sure that the HWBB function is not active before you execute these functions. • Polarity detection Important • Jogging • Program jogging • Origin searches • Moment of inertia estimation • Automatic adjustment • Speed ripple compensation • EasyFFT 2. For HWBB function signal connections, the input signal is the 0-V common and the output signal is a source output. This is opposite to other signals described in this manual. To avoid confusion, the ON and OFF status of signals for the HWBB function are defined as follows: ON: The state in which the relay contacts are closed or the transistor is ON and current flows into the signal line. OFF: The state in which the relay contacts are open or the transistor is OFF and no current flows into the signal line. The input signal uses the 0-V common. The following figure shows a connection example. Power supply Fuse /HWBB1+ 4 /HWBB1- 3 Control circuit Drive signal Switch Control circuit Drive signal SERVOPACK CN8 24-V power supply Stopped. Stopped. /HWBB2+ 6 5.2.1 /HWBB2- 5 Stopped. Stopped. Power Module Power Module Motor Motor Risk Assessment When using the HWBB function, you must perform a risk assessment of the servo system in advance to confirm that the safety level of the standards is satisfied. Refer to the following section for details on the standards. Safety Functions 0V 5 Compliance with UL Standards, EU Directives, and Other Safety Standards on page xxiii Note: To meet performance level e (PLe) in EN ISO 13849-1 and SIL3 in IEC 61508, the EDM1 signal must be monitored by the host controller. If the EDM1 signal is not monitored by the host controller, the levels will be safety performance level c (PLc) and SIL1. 5-3 5.2 HWBB Function 5.2.2 HWBB State The following hazards exist even when the HWBB function is operating. These hazards must be included in the risk assessment. • The Servomotor will move if an external force is applied to it (for example, gravity on a vertical axis). Implement measures to hold the Servomotor, such as installing a separate mechanical brake. • If a failure occurs such as a Power Module failure, the Servomotor may move within an electric angle of 180°. Ensure safety even if the Servomotor moves. The rotational angle or travel distance depends on the type of Servomotor as follows: • Rotary Servomotor: 1/6 rotation max. (rotational angle calculated at the motor shaft) • Direct Drive Servomotor: 1/20 rotation max. (rotational angle calculated at the motor shaft) • Linear Servomotor: 50 mm max. • The HWBB function does not shut OFF the power to the SERVOPACK or electrically isolate it. Implement measures to shut OFF the power supply to the SERVOPACK before you perform maintenance on it. • The HWBB function of a Σ-7W SERVOPACK shuts off the current to the motors for both axes at the same time. You cannot shut off the current to the motor for just one axis. Build the system so that a hazardous condition will not result if the current to the motors for both axes is shut off. 5.2.2 HWBB State The HWBB state is when the /HWBB1 or /HWBB2 signal is OFF, the HWBB function is active, and the current to the motor is turned OFF with a hardwired circuit. If the /HWBB1 or /HWBB2 signal turns OFF and the HWBB function is activated, the SERVOPACK will be in the following status. • When HWBB Function Operates after Servo OFF (Power Not Supplied to Motor) ON (normal operation) /HWBB1 /HWBB2 MECHATROLINK-III commands for axis A Motion commands and other commands SV_OFF command SMON command and other commands 1 0 0 0 0 1 Operating state BB state SV_ON command status for axis A ESTP command input signal monitor for axis A SERVOPACK status for axis A MECHATROLINK-III Motion commands commands for axis B and other commands SV_ON command status for axis B ESTP command input signal monitor for axis B SERVOPACK status for axis B 5-4 OFF (motor current shut-OFF request) SV_OFF command HWBB state SMON command and other commands 1 0 0 0 0 1 BB state HWBB state Operating state 5.2 HWBB Function 5.2.2 HWBB State • When HWBB Function Operates While Power Is Supplied to Servomotor MECHATROLINK-III commands for axis A SV_ON command status for axis A ESTP command input signal monitor for axis A SERVOPACK status for axis A MECHATROLINK-III commands for axis B ON (normal operation) OFF (motor current shut-OFF request) Motion commands and other commands SMON command and other commands 1 0 0 1 Operating state HWBB state Motion commands and other commands SMON command and other commands SV_ON command status for axis B 1 0 ESTP command input signal monitor for axis B 0 1 Operating state HWBB state SERVOPACK status for axis B Safety Functions /HWBB1 /HWBB2 5 5-5 5.2 HWBB Function 5.2.3 Resetting the HWBB State 5.2.3 Resetting the HWBB State Normally, after the SV_OFF (Servo OFF: 32 hex) command is received and power is no longer supplied to the Servomotor, the /HWBB1 and /HWBB2 signals will turn OFF and the SERVOPACK will enter the HWBB state. If you turn ON the /HWBB1 and /HWBB2 signals in this state, the SERVOPACK will enter a base block (BB) state and will be ready to acknowledge the SV_ON (Servo ON: 31 hex) command. /HWBB1 /HWBB2 MECHATROLINK-III commands for axis A ON (normal operation) SMON command and other commands SV_ON command SV_ON command status for axis A 0 0 1 ESTP command input signal monitor for axis A 1 0 0 BB state Operating state SERVOPACK status for axis A MECHATROLINK-III commands for axis B SV_ON command status for axis B ESTP command input signal monitor for axis B SERVOPACK status for axis B 5-6 OFF (motor current shut-OFF request) HWBB state SMON command and other commands SV_ON command 0 0 1 1 0 0 HWBB state BB state Operating state 5.2 HWBB Function 5.2.4 Related Commands If the /HWBB1 and /HWBB2 signals are OFF and the SV_ON (Servo ON: 31 hex) command is received, the HWBB state will be maintained even after the /HWBB1 and /HWBB2 signals are turned ON. Send the SV_OFF (Servo OFF: 32 hex) command for axis A and axis B to place the SERVOPACK in the BB state and then send the SV_ON (Servo ON: 31 hex) command. /HWBB1 /HWBB2 MECHATROLINK-III commands for axis A OFF (motor current shut-OFF request) SV_ON command ON (normal operation) SV_OFF command SV_ON command SV_ON command status for axis A 0 0 1 ESTP command input signal monitor for axis A 1 0 0 HWBB state BB state Operating state SV_ON command SV_OFF command SERVOPACK status for axis A MECHATROLINK-III commands for axis B SV_ON command status for axis B ESTP command input signal monitor for axis B SERVOPACK status for axis B SV_ON command 0 0 1 1 0 0 HWBB state BB state Operating state Note: If the SERVOPACK is placed in the BB state while the main circuit power supply is OFF, the HWBB state will be maintained until the SV_OFF (Servo OFF: 32 hex) command is received. Related Commands If the /HWBB1 or /HWBB2 signal turns OFF and the HWBB function operates, the ESTP bit in the servo command input signal monitor (SVCMD_IO) will change to 1. The host controller can monitor this bit to determine the status. If the state changes to the HWBB state during the execution of the next motion command, a command warning occurs. If a warning occurs, clear the alarm to return to normal operating status. After stopping or canceling the motion command, using the sequence of commands to return to the HWBB state is recommended. Applicable Motion Commands SV_ON (Servo ON) INTERPORATE (Interpolating) POSING (Positioning) FEED (Constant Speed Feed) EX_FEED (Constant Speed Feed with Position Detection) LATCH (Interpolating with Position Detection) EX_POSING (External Input Positioning) ZRET (Origin Return) Safety Functions 5.2.4 5 5-7 5.2 HWBB Function 5.2.5 Detecting Errors in HWBB Signal 5.2.5 Detecting Errors in HWBB Signal If only the /HWBB1 or the /HWBB2 signal is input, an A.Eb1 alarm (Safety Function Signal Input Timing Error) will occur unless the other signal is input within 10 seconds. This makes it possible to detect failures, such as disconnection of an HWBB signal. CAUTION The A.Eb1 alarm (Safety Function Signal Input Timing Error) is not a safety-related element. Keep this in mind when you design the system. 5.2.6 HWBB Input Signal Specifications If an HWBB function is requested by turning OFF the two HWBB input signal channels (/HWBB1 and /HWBB2), the power supply to the Servomotors for axis A and axis B will be turned OFF within 8 ms. 8 ms max. /HWBB1 /HWBB2 SERVOPACK Status ON (normal operation) Normal operating state OFF (motor current shut-OFF request) HWBB state Note: 1. The OFF status is not recognized if the OFF interval of the /HWBB1 or /HWBB2 signal is 0.5 ms or shorter. 2. You can check the status of the input signals by using monitor displays. Refer to the following manual for details. Σ-7-Series Σ-7W SERVOPACK with MECHATROLINK-III Communications References Product Manual (Manual No.: SIEP S800001 29) 5.2.7 HWBB Input Signal Waveform Trace You can trace the following input signals with the I/O trace function of the SigmaWin+. • /HWBB1 (Hard Wire Base Block Input 1) signal • /HWBB2 (Hard Wire Base Block Input 2) signal Refer to the following manual for details on the I/O trace function. AC Servo Drives Engineering Tool SigmaWin+ Online Manual Σ-7 Component (Manual No.: SIEP S800001 48) 5-8 5.2 HWBB Function 5.2.8 Operation without a Host Controller 5.2.8 Operation without a Host Controller The HWBB function will operate even for operation without a host controller. However, if the HWBB function operates during execution of the following functions, leave the execution mode for the function and then enter it again to restart operation. Do this for both axis A and axis B. Operation will not be restarted simply by turning OFF the /HWBB1 and / HWBB2 signals. Applicable Functions Resetting the HWBB State ON OFF (motor current (normal operation) shut-OFF request) /HWBB1 /HWBB2 • • • • Jogging Origin search Program jogging Automatic adjustment without host reference • EasyFFT • Adjustment of motor current detection signal offset Function execution mode for axis A SERVOPACK status for axis A HWBB state Operating state Function execution mode Function execution mode for axis B SERVOPACK status for axis B HWBB state Operating state Not function execution mode BB state Not function execution mode BB state Function execution mode Operating state Function execution mode Operating state /S-RDY (Servo Ready Output) Signal The SV_ON (Servo ON: 31 hex) command will not be acknowledged in the HWBB state. Therefore, the Servo Ready Output Signal will turn OFF. The Servo Ready Output Signal will turn ON if both the /HWBB1 and /HWBB2 signals are ON and the servo is turned OFF (BB state). An example is provided below for when the main circuit power supply is ON and the SENS_ON (Turn Sensor ON) command is input when there is no servo alarm. (An absolute encoder is used in this example.) The same operation is performed for axis A and axis B. /HWBB1 /HWBB2 ON (normal operation) /S-RDY (Servo Ready Output Signal) Operating state ON ON (normal operation) OFF ON Servo ON SERVOPACK Status OFF (motor current shut-OFF request) HWBB state OFF BB state ON Safety Functions 5.2.9 Function execution mode ON (normal operation) 5 5-9 5.2 HWBB Function 5.2.10 /BK (Brake Output) Signal 5.2.10 /BK (Brake Output) Signal If the HWBB function operates when the /HWBB1 or /HWBB2 signal is OFF, the /BK (Brake) signal will turn OFF. At that time, the setting in Pn506 (Brake Reference - Servo OFF Delay Time) will be disabled. Therefore, the Servomotor may be moved by external force until the actual brake becomes effective after the /BK signal turns OFF. CAUTION The brake signal is not a safety-related element. You must design the system so that a hazardous condition does not occur even if the brake signal fails in the HWBB state. Also, if a Servomotor with a Brake is used, keep in mind that the brake in the Servomotor is used only to prevent the moving part from being moved by gravity or an external force and it cannot be used to stop the Servomotor. 5.2.11 Stopping Methods If the /HWBB1 or /HWBB2 signal turns OFF and the HWBB function operates, the Servomotor will stop according to the stop mode that is set for stopping the Servomotor when the servo turns OFF (Pn001 = n.X). However, if the dynamic brake is enabled (Pn001 = n.0 or n.1), observe the following precautions. CAUTION The dynamic brake is not a safety-related element. You must design the system so that a hazardous condition does not occur even if the Servomotor coasts to a stop in the HWBB state. Normally, we recommend that you use a sequence that returns to the HWBB state after stopping for a reference. If the application frequently uses the HWBB function, stopping with the dynamic brake may result in the deterioration of elements in the SERVOPACK. To prevent internal elements from deteriorating, use a sequence in which the HWBB state is returned to after the Servomotor has come to a stop. 5.2.12 ALM (Servo Alarm) Signal The ALM (Servo Alarm) signal is not output in the HWBB state. 5-10 5.3 EDM1 (External Device Monitor) 5.3.1 EDM1 Output Signal Specifications 5.3 EDM1 (External Device Monitor) The EDM1 (External Device Monitor) signal is used to monitor failures in the HWBB function. Connect the monitor signal as a feedback signal, e.g., to the Safety Unit. Note: To meet performance level e (PLe) in EN ISO 13849-1 and SIL3 in IEC 61508, the EDM1 signal must be monitored by the host controller. If the EDM1 signal is not monitored by the host controller, the level will be safety performance level c (PLc) and SIL1. • Failure Detection Signal for EDM1 Signal The relationship between the EDM1, /HWBB1, and /HWBB2 signals is shown below. Detection of failures in the EDM1 signal circuit can be achieved by using the four status of the EDM1 signal in the following table. A failure can be detected by checking the failure status, e.g., when the power supply is turned ON. Signal /HWBB1 /HWBB2 EDM1 ON ON OFF ON OFF OFF Logic OFF ON OFF OFF OFF ON WARNING The EDM1 signal is not a safety output. Use it only for monitoring for failures. EDM1 Output Signal Specifications If an HWBB function is requested by turning OFF the two HWBB input signal channels (/HWBB1 and / HWBB2) when the safety function is operating normally, the EDM1 output signal will be turned ON within 8 ms. 8 ms max. /HWBB1 /HWBB2 /EDM1 ON (normal operation) OFF (motor current shut-OFF request) OFF ON Safety Functions 5.3.1 5 5-11 5.4 HWBB Function Application Example 5.4.1 Connection Example 5.4 HWBB Function Application Example This section provides examples of using the HWBB function. 5.4.1 Connection Example In the following example, a Safety Unit is used as the host controller and the HWBB function operates when the guard is opened. Close Guard 24-V power supply Limit switch G9SX-BC202 Safety Unit manufactured by OMRON Corporation Open Fuse A1 Power supply input A2 0V T11 T12 T21 T22 Inputs Reset/feedback inputs T31 T32 T33 Outputs SERVOPACK S24 S14 /HWBB1+ CN8 4 /HWBB1- 3 /HWBB2+ 6 /HWBB2- 5 EDM1+ 8 EDM1- 7 When the guard is opened, both the /HWBB1 and the /HWBB2 signals turn OFF, and the EDM1 signal turns ON. Because the feedback circuit is ON while the guard is closed, the Safety Unit is reset, the /HWBB1 and the / HWBB2 signals turn ON, and the operation is enabled. Note: The EDM1 signal is used as a source output. Connect the EDM1 so that the current flows from EMD1+ to EMD1-. 5.4.2 Failure Detection Method If a failure occurs (e.g., the /HWBB1 or the /HWBB2 signal remains ON), the Safety Unit is not reset when the guard is closed because the EDM1 signal remains OFF. Therefore starting is not possible and a failure is detected. In this case the following must be considered: an error in the external device, disconnection of the external wiring, short-circuiting in the external wiring, or a failure in the SERVOPACK. Find the cause and correct the problem. 5-12 5.4 HWBB Function Application Example 5.4.3 Procedure Procedure 1 Request is received to open the guard. 2 If the motor is operating, a stop command is received from the host controller, the motor stops, and the servo is turned OFF. 3 The guard is opened. 4 The /HWBB1 and /HWBB2 signals turn OFF and the HWBB function operates. (Working inside the guard is enabled.) 5 The worker leaves the guarded area after completing work. 6 The guard is closed. 7 The servo is turned ON by the host controller. Safety Functions 5.4.3 5 5-13 5.5 Validating the HWBB Function 5.5 Validating the HWBB Function When you commission the system or perform maintenance or SERVOPACK replacement, you must always perform the following validation test on the HWBB function after completing the wiring. (It is recommended that you keep the confirmation results as a record.) • When the /HWBB1 and /HWBB2 signals turn OFF, confirm that the Digital Operator displays Hbb and that the Servomotors do not operate for axis A and axis B. • Monitor the ON/OFF status of the /HWBB1 and /HWBB2 signals. If the ON/OFF status of the signals do not coincide with the display, the following must be considered: an error in the external device, disconnection of the external wiring, short-circuiting in the external wiring, or a failure in the SERVOPACK. Find the cause and correct the problem. Refer to the following manual for details on the monitor. Σ-7-Series Σ-7W SERVOPACK with MECHATROLINK-III Communications References Product Manual (Manual No.: SIEP S800001 29) • Confirm that the EDM1 signal is OFF while in normal operation by using the feedback circuit input display of the connected device. 5-14 5.6 Connecting the Safety Function Device Connecting the Safety Function Device This section describes how to connect the SERVOPACK to a safety function device. 1. Use a pair of pliers or a similar tool to remove the Safety Jumper Connector from the connector for the safety function device (CN8). 2. Connect the safety function device to the connector for the safety function device (CN8). Note: If you do not connect a safety function device, leave the Safety Jumper Connector connected to the connector for the safety function device (CN8). If the SERVOPACK is used without the Safety Jumper Connector connected to CN8, no current will be supplied to the Servomotor and no motor torque will be output. In this case, Hbb will be displayed on the Digital Operator. Safety Functions 5.6 5 5-15 Maintenance This chapter provides information on the meaning of, causes of, and corrections for alarms that are related to the HWBB function. 6.1 Alarm Displays . . . . . . . . . . . . . . . . . . . . . . 6-2 6.1.1 6.1.2 6.2 Alarms Related to the HWBB Function . . . . . . . . 6-2 Troubleshooting Alarms Related to the HWBB Function . . . . . . . . . . . . . . . . . . . . . . . . . . . . . . . 6-3 Troubleshooting Based on the Operation and Conditions of the Servomotor . . 6-4 6 6.1 Alarm Displays 6.1.1 Alarms Related to the HWBB Function 6.1 Alarm Displays If an error occurs in the SERVOPACK, an alarm number will be displayed on the panel display. If there is an alarm, the display will change in the following order. Example: Alarm A.E60 Status Indications Not lit. Not lit. Not lit. Not lit. Not lit. This section provides a list of the alarms that are related to the HWBB function and the causes of and corrections for those alarms. Refer to the following manual for information on other alarms and the causes of and corrections for them. Σ-7-Series Σ-7W SERVOPACK with MECHATROLINK-III Communications References Product Manual (Manual No.: SIEP S800001 29) 6.1.1 Alarms Related to the HWBB Function The following alarm table gives the alarm name, alarm meaning, Servomotor stopping method for alarms, and alarm reset possibility in order of the alarm codes for the alarms that are related to the HWBB function. Servomotor Stopping Method for Alarms Refer to the following manual for information on the stopping method for alarms. Σ-7-Series Σ-7W SERVOPACK with MECHATROLINK-III Communications References Product Manual (Manual No.: SIEP S800001 29) Alarm Reset Possibility Yes: You can use an alarm reset to clear the alarm. However, this assumes that the cause of the alarm has been removed. No: You cannot clear the alarm. Alarms for Both Axes If “All Axes” is given below the alarm number, the alarm applies to both axes. If an alarm occurs for one axis, the same alarm status will occur for the other axis. List of Alarms Alarm Number Alarm Name A.Eb1 Safety Function Signal All Axes Input Timing Error A.EC8 Gate Drive Error 1 All Axes A.EC9 Gate Drive Error 2 All Axes 6-2 Alarm Meaning Servomotor Stopping Method Alarm Reset Possible? An error occurred in the input timing of the safety function signal. Gr.1 No An error occurred in the gate drive circuit. Gr.1 No An error occurred in the gate drive circuit. Gr.1 No 6.1 Alarm Displays 6.1.2 Troubleshooting Alarms Related to the HWBB Function Troubleshooting Alarms Related to the HWBB Function The following table describes troubleshooting alarms that are related to the HWBB function. Contact your Yaskawa representative if you cannot solve a problem with the corrections given in the table. Alarm Number: Alarm Name A.Eb1: Safety Function Signal Input Timing Error Possible Cause Confirmation Correction Reference The delay between activation of the /HWBB1 and /HWBB2 input signals for the HWBB function was ten second or longer. Measure the time delay between the /HWBB1 and /HWBB2 signals. The output signal circuits or devices for /HWBB1 and /HWBB2 or the SERVOPACK input signal circuits may be faulty. Alternatively, the input sig- page 5-1 nal cables may be disconnected. Check to see if any of these items are faulty or have been disconnected. A failure occurred in the SERVOPACK. – Replace the SERVOPACK. – Turn the power supply to the SERVOPACK OFF and ON again. If an alarm still – occurs, the SERVOPACK may be faulty. Replace the SERVOPACK. A.EC8: Gate Drive Error 1 (An error occurred in the gate drive circuit.) A failure occurred in the SERVOPACK. A.EC9: Gate Drive Error 2 (An error occurred in the gate drive circuit.) – Maintenance 6.1.2 6 6-3 6.2 Troubleshooting Based on the Operation and Conditions of the Servomotor 6.2 Troubleshooting Based on the Operation and Conditions of the Servomotor This section provides troubleshooting information related to the HWBB function based on the operation and conditions of the Servomotor, including causes and corrections. Refer to the following manual for information on the causes of and corrections for other problems. Σ-7-Series Σ-7W SERVOPACK with MECHATROLINK-III Communications References Product Manual (Manual No.: SIEP S800001 29) Problem Servomotor Does Not Start 6-4 Possible Cause The safety input signals (/HWBB1 or /HWBB2) were not turned ON. Confirmation Check the /HWBB1 and /HWBB2 input signals. Correction Reference Turn ON the /HWBB1 and /HWBB2 input signals. If you are not using the safety func– tion, connect the Safety Jumper Connector (provided as an accessory) to CN8. Appendices This appendices provide information on interpreting panel displays that are unique to the HWBB function, and tables of corresponding SERVOPACK and SigmaWin+ function names. 7.1 Interpreting Panel Displays . . . . . . . . . . . . . 7-2 7.1.1 7.2 Panel Display during the HWBB State . . . . . . . . . . . 7-2 Corresponding SERVOPACK and SigmaWin+ Function Names . . 7-3 7.2.1 Corresponding SERVOPACK Monitor Display Function Names . . . . . . . . . . . . . . . . . . . . . . . . . 7-3 7 7.1 Interpreting Panel Displays 7.1.1 Panel Display during the HWBB State 7.1 Interpreting Panel Displays You can check the Servo Drive status on the panel display of the SERVOPACK. Also, if an alarm or warning occurs, the alarm or warning number will be displayed. This section describes the panel displays during the HWBB state. Refer to the following manual for other panel displays. Σ-7-Series Σ-7W SERVOPACK with MECHATROLINK-III Communications References Product Manual (Manual No.: SIEP S800001 29) 7.1.1 Panel Display during the HWBB State You can check the Servo Drive status on the panel display of the SERVOPACK. During the HWBB state, the display will be changed in the following order. Status Display 7-2 Not lit. Not lit. Not lit. Not lit. 7.2 Corresponding SERVOPACK and SigmaWin+ Function Names 7.2.1 Corresponding SERVOPACK Monitor Display Function Names 7.2 Corresponding SERVOPACK and SigmaWin+ Function Names The following table gives the corresponding monitor display names between the SERVOPACK and SigmaWin+ that are related to the HWBB function. Refer to the following manual for the the compatibility with other monitor display names. Σ-7-Series Σ-7W SERVOPACK with MECHATROLINK-III Communications References Product Manual (Manual No.: SIEP S800001 29) Corresponding SERVOPACK Monitor Display Function Names If “All Axes” is given below the Un number, the monitor display applies to both axes. The total value for all axes or the contents for all axes are displayed on the monitor. SigmaWin+ Menu Bar Button Status Monitor Name [Unit] Safety I/O Signal Monitor SERVOPACK Un No. Un015 All Axes Name [Unit] Safety I/O Signal Monitor Appendices 7.2.1 7 7-3 Index Index S Servo Drive - - - - - - - - - - - - - - - - - - - - - - - - - - - - ix servo OFF - - - - - - - - - - - - - - - - - - - - - - - - - - - - - ix Symbols /HWBB1 - - - - - - - - - - - - - - - - - - - - - - - - - - - - 4-7 /HWBB2 - - - - - - - - - - - - - - - - - - - - - - - - - - - - 4-7 A Alarm - - - - - - - - - - - - - - - - - - - - - - - - - - - - - - 6-2 alarm reset possibility - - - - - - - - - - - - - - - - - - - - 6-2 servo ON - - - - - - - - - - - - - - - - - - - - - - - - - - - - - ix Servo System - - - - - - - - - - - - - - - - - - - - - - - - - - - ix Servomotor - - - - - - - - - - - - - - - - - - - - - - - - - - - - ix SERVOPACK - - - - - - - - - - - - - - - - - - - - - - - - - - - ix inspections and part replacement - - - - - - - - - - - -6-2 part names - - - - - - - - - - - - - - - - - - - - - - - - -1-4 SigmaWin+ - - - - - - - - - - - - - - - - - - - - - - - - - - - - ix storage humidity - - - - - - - - - - - - - - - - - - - - - - - -2-2 B storage temperature - - - - - - - - - - - - - - - - - - - - - -2-2 base block (BB) - - - - - - - - - - - - - - - - - - - - - - - - - ix surrounding air humidity - - - - - - - - - - - - - - - - - - - -2-2 block diagram - - - - - - - - - - - - - - - - - - - - - - - - - 2-5 surrounding air temperature - - - - - - - - - - - - - - - - -2-2 C T CN8 - - - - - - - - - - - - - - - - - - - - - - - - - - - - - - 4-6 troubleshooting alarms - - - - - - - - - - - - - - - - - - - -6-3 coefficient of speed fluctuation - - - - - - - - - - - - - - - 2-4 connecting a safety function device - - - - - - - - - - - 5-15 D diagnostic output circuits - - - - - - - - - - - - - - - - - - 4-7 E EDM1 - - - - - - - - - - - - - - - - - - - - - - - - - - - - 5-11 EDM1 (External Device Monitor) signal - - - - - - - - - - 5-11 H HWBB - - - - - - - - - - - - - - - - - - - - - - - - - - - - - - ix detecting errors in HWBB signal - - - - - - - - - - - - 5-8 HWBB input signal specifications - - - - - - - - - - - - 5-8 HWBB function - - - - - - - - - - - - - - - - - - - - - - - - 5-3 application examples - - - - - - - - - - - - - - - - - - 5-12 HWBB input signal waveform trace - - - - - - - - - - 5-8 precautions - - - - - - - - - - - - - - - - - - - - - - - - 5-2 verification test - - - - - - - - - - - - - - - - - - - - - 5-14 HWBB function signal - - - - - - - - - - - - - - - - - - - - 4-6 HWBB input circuits - - - - - - - - - - - - - - - - - - - - - 4-6 HWBB state - - - - - - - - - - - - - - - - - - - - - - - - - - 5-4 resetting - - - - - - - - - - - - - - - - - - - - - - - - - - 5-6 L Linear Servomotor - - - - - - - - - - - - - - - - - - - - - - - ix M Main Circuit Cable - - - - - - - - - - - - - - - - - - - - - - - ix R risk assessment - - - - - - - - - - - - - - - - - - - - - - - - 5-3 Rotary Servomotor - - - - - - - - - - - - - - - - - - - - - - - ix Index-1 Revision History The revision dates and numbers of the revised manuals are given on the bottom of the back cover. MANUAL NO. SIEP S800001 72A Published in Japan March 2015 15-3 Date of publication Date of Publication March 2015 Rev. No. – Date of original publication Section – Revised Contents First edition Revision History-1 -7-Series AC Servo Drive -7W SERVOPACK with Hardware Option Specifications HWBB Function Product Manual IRUMA BUSINESS CENTER (SOLUTION CENTER) 480, Kamifujisawa, Iruma, Saitama, 358-8555, Japan Phone 81-4-2962-5151 Fax 81-4-2962-6138 http://www.yaskawa.co.jp YASKAWA AMERICA, INC. 2121, Norman Drive South, Waukegan, IL 60085, U.S.A. Phone 1-800-YASKAWA (927-5292) or 1-847-887-7000 Fax 1-847-887-7310 http://www.yaskawa.com YASKAWA ELÉTRICO DO BRASIL LTDA. 777, Avenida Piraporinha, Diadema, São Paulo, 09950-000, Brasil Phone 55-11-3585-1100 Fax 55-11-3585-1187 http://www.yaskawa.com.br YASKAWA EUROPE GmbH 185, Hauptstraβe, Eschborn, 65760, Germany Phone 49-6196-569-300 Fax 49-6196-569-398 http://www.yaskawa.eu.com YASKAWA ELECTRIC KOREA CORPORATION 9F, Kyobo Securities Bldg. 26-4, Yeouido-dong, Yeongdeungpo-gu, Seoul, 150-737, Korea Phone 82-2-784-7844 Fax 82-2-784-8495 http://www.yaskawa.co.kr YASKAWA ELECTRIC (SINGAPORE) PTE. LTD. 151, Lorong Chuan, #04-02A, New Tech Park, 556741, Singapore Phone 65-6282-3003 Fax 65-6289-3003 http://www.yaskawa.com.sg YASKAWA ELECTRIC (THAILAND) CO., LTD. 252/125-126, 27th Floor, Muang Thai-Phatra Tower B, Rachadapisek Road, Huaykwang, Bangkok, 10310, Thailand Phone 66-2693-2200 Fax 66-2693-4200 http://www.yaskawa.co.th YASKAWA ELECTRIC (CHINA) CO., LTD. 22F, One Corporate Avenue, No.222, Hubin Road, Shanghai, 200021, China Phone 86-21-5385-2200 Fax 86-21-5385-3299 http://www.yaskawa.com.cn YASKAWA ELECTRIC (CHINA) CO., LTD. BEIJING OFFICE Room 1011, Tower W3 Oriental Plaza, No.1, East Chang An Ave., Dong Cheng District, Beijing, 100738, China Phone 86-10-8518-4086 Fax 86-10-8518-4082 YASKAWA ELECTRIC TAIWAN CORPORATION 9F, 16, Nanking E. Rd., Sec. 3, Taipei, 104, Taiwan Phone 886-2-2502-5003 Fax 886-2-2505-1280 YASKAWA ELECTRIC CORPORATION In the event that the end user of this product is to be the military and said product is to be employed in any weapons systems or the manufacture thereof, the export will fall under the relevant regulations as stipulated in the Foreign Exchange and Foreign Trade Regulations. Therefore, be sure to follow all procedures and submit all relevant documentation according to any and all rules, regulations and laws that may apply. Specifications are subject to change without notice for ongoing product modifications and improvements. © 2015 YASKAWA ELECTRIC CORPORATION. All rights reserved. MANUAL NO. SIEP S800001 72A Published in Japan March 2015 15-3 14-9-10 Original instructions