1
User Manual
System Telephones
COMfortel쏐 2500
COMfortel쏐 1500
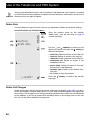
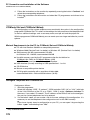
Symbols used in the Manual
Warning
This symbol warns against damage to persons by dangerous electrical voltage.
This symbols warns against property damage.
☞
Attention
This symbol warns about possible user errors and circumstances that might
lead to functional restrictions or malfunctions.
☞
This symbol marks supplemental advice and tips.
Important
Advice
Markers/Formats used
[...]
The text in brackets is a place holder, e.g. [Number] is a place holder for a
numerical number.
The text connected to a display via thin lines is describing the information content
of the display and about the functions operated via softkey.
The thick lines connect an action (e.g. a function started via softkey) in the arrow
direction with the result (e.g. the next menu, the next possible selection).
Abbreviations used in the Manual
TAM
PIN
Telephone Answering Machine
Personal Identification Number. A (often four-digit) secret code that has to be
entered to get access to services or authorizations.
LED
Light Emitting Diode = An electronic device that is very similar to a lamp and is
used for displays (also multi-coloured).
CF
Softkey
Call Forwarding
These special keys next to the display change their functionality depending on
the current situation.
General limitation of legal responsibility and application
Auerswald products are not designed or intended for use in any life-saving and/or life support
application and/or nuclear facility. When using our products for such applications a written
agreement by Auerswald for each individual case is necessary in advance.
Copyright
Passing on or duplicating the contents of this manual or parts of it is only allowed with our
express written permission. Offenders will be subject to claims for damages. All Rights
Reserved.
쏘 Auerswald GmbH & Co. KG, 38162 Cremlingen, 2007
Accessory and Service components
These are available at your authorized dealer or in the Internet shop distriCOM at http://
www.districom-online.de (Only shipping in Germany.)
Contents
Inhaltsverzeichnis
Symbols used in the Manual.............................................................................................. 2
Markers/Formats used .......................................................................................................... 2
Abbreviations used in the Manual......................................................................................... 2
Introduction......................................................................................................................................... 10
Security Advice ................................................................................................................. 10
Usage and Functionality .................................................................................................. 11
Features.............................................................................................................................. 12
Features available for Release in the Upgrade Centre....................................................... 14
Placing and Cleaning of the Device ................................................................................ 14
First Use of the Telephone............................................................................................... 15
Connection of the Receiver................................................................................................. 15
Pic. 1: Connection of the Receiver.................................................................................. 15
Connection to the PBX........................................................................................................ 15
Pic. 2: Connection to the PBX......................................................................................... 16
Mandatory Settings ............................................................................................................. 16
Connection and Mounting of the Key Extension COMfortel Xtension30 (COMfortel 2500) 17
Pic. 3: Connection and Mounting of the Key Extension COMfortel Xtension30.............. 18
Connect the Headset .......................................................................................................... 18
Pic. 4: Connection of a Headset to the COMfortel 2500 ................................................. 19
Insert lettering Label ........................................................................................................... 19
Pic. 5: Insert lettering Label ............................................................................................ 19
First Operation of the Answering Machine (only COMfortel 2500) .............................. 20
Insert the SD Card and start it ............................................................................................ 20
Pic. 6: Insert the SD Card ............................................................................................... 20
Upload standard Announcements with COMfortel Set ....................................................... 21
Buy the Function COMfortel Voicemail in the Upgrade Centre........................................... 21
Enter the Release Code into the Telephone....................................................................... 24
Display-driven Usage of the Telephone.......................................................................... 25
Pic. 7: Display Component.............................................................................................. 25
Pic. 8: Control Elements ................................................................................................. 26
Table 1: Character Codes of the Keypad........................................................................ 27
Table 2: Icons in the Display ........................................................................................... 27
Pic. 9: Display Options in the idle State .......................................................................... 32
Pic. 10: Display Options in the Main Menu (after Pressing the Menu Key)..................... 33
Pic. 11: Function Menu ................................................................................................... 34
Pic. 12: Key Programming Menu .................................................................................... 35
Pic. 13: Settings Menu .................................................................................................... 36
Make a Call .......................................................................................................................................... 38
Telephone with Comfort................................................................................................... 38
Handsfree Operation........................................................................................................... 38
Switch on/off Speaker Mode ............................................................................................... 38
Pic. 14: Handsfree Operation and Speaker Mode (Overview) ........................................ 39
Finish a Call without hanging up the Receiver.................................................................... 40
Pic. 15: Finish a call without hanging up ......................................................................... 40
3
Contents
The Call Partner hangs up .................................................................................................. 40
Muting the Microphone ....................................................................................................... 40
Pic. 16: Mute a Call ......................................................................................................... 41
Make Calls via Headset with the COMfortel 2500 .............................................................. 41
Make Calls via Headset with the COMfortel 1500 .............................................................. 41
Pic. 17: Headset Operation with Handsfree Operation and Speaker Mode (Overview) . 42
Pic. 18: Headset Operation with the receiver (Overview) ............................................... 43
Inbound Call ...................................................................................................................... 44
Pic. 19: Display Options for an inbound Call................................................................... 44
Your own Telephone rings - Accept the Call....................................................................... 45
Your own Telephone rings - Reject the Caller .................................................................... 45
Your own Telephone rings - Put the Caller on Hold............................................................ 46
Call Waiting – Reject waiting Call ...................................................................................... 46
Call Waiting – Accept the second Call ................................................................................ 47
Call Waiting – Ignore the waiting Call (Deactivate the Call Waiting Signal)........................ 47
Answering Machine has accepted the Call – take the Call over ......................................... 48
Another internal Telephone rings – Pickup the Call (Pickup).............................................. 48
Your own Telephone rings (Door Call) – Accept the Call and open the Door..................... 49
Door Call Waiting – Open the Door without taking the Call ................................................ 50
Dialling a Telephone Number .......................................................................................... 51
Pick up the Receiver and dial the Telephone Number........................................................ 51
Dial with Dial Preparation.................................................................................................... 52
Dial stored Telephone Number via Speed Dialling ............................................................. 52
Transfer certain Telephone Numbers (MSN)...................................................................... 53
The called Partner should not see your Telephone Number (Number Suppression) ......... 53
Select a certain VoIP Account ............................................................................................ 54
Split Call Charges by selecting the Exchange Line ............................................................ 55
Dial a Number with a Direct Exchange Line Telephone ..................................................... 56
Outbound Call ................................................................................................................... 57
Pic. 20: Display Options for outbound Calls.................................................................... 57
The called Telephone is busy – Start automatic Recall ...................................................... 58
Nobody takes the Call on the called Telephone - Start Recall............................................ 59
Start Power Dialling if automatic Recall is not possible ...................................................... 60
The called internal Subscriber has Do-not-Disturb enabled – Priority Call ......................... 61
The Query Call is busy/does not answer – Finish the Call ................................................. 61
In the Call........................................................................................................................... 62
Pic. 21: Display Options in the Call ................................................................................. 62
View Information on a Call .................................................................................................. 63
Start a second Call (Query) ................................................................................................ 64
Transfer a Call Partner (Blind Transfer).............................................................................. 64
Put an external Call Partner into the Waiting Loop ............................................................. 65
Another internal Telephone rings – Pickup the Call............................................................ 66
Schedule a Call to the current Call Partner (Reschedule Call) ........................................... 67
Enter Memo (Telephone Number Notice) ........................................................................... 68
Open the Door during a Door Conversation ....................................................................... 68
4
Contents
The Query Call................................................................................................................... 69
Pic. 22: Display Options for two Conversations .............................................................. 69
Switch between Call Partners (Alternation) ........................................................................ 70
Finish one of both Calls ...................................................................................................... 71
Connect both Call Partners................................................................................................. 71
Call internal a 3rd Subscriber and transfer it to the active Call Partner .............................. 72
Talk to both Subscribers at the same Time (Conference) .................................................. 72
In a Conference ................................................................................................................. 73
Connect both Call Partners................................................................................................. 73
Finish the Call with one of the Call Partners ....................................................................... 74
Alternate from one Call Partner to the other again (Alternation)......................................... 74
Telephone Book and Lists ................................................................................................................. 75
Telephone Book ................................................................................................................ 75
Pic. 23: Display Options (after pressing the Telephone Book Key) ................................ 76
Pic. 24: Display of the Lists ............................................................................................. 76
Pic. 25: Extended Presentation....................................................................................... 77
Pic. 26: Edit Contact ....................................................................................................... 77
Pic. 27: New Entry .......................................................................................................... 78
Dial from the Telephone Book ............................................................................................ 78
Create a new Contact ......................................................................................................... 79
Edit/delete Contact.............................................................................................................. 80
Create a Call Macro ............................................................................................................ 81
Copy Telephone Numbers out of the Dial Preparation ....................................................... 82
Transfer an Entry into another Menu .................................................................................. 82
Enter Comment to a Contact .............................................................................................. 83
Redial List.......................................................................................................................... 84
Dial from the Redial List...................................................................................................... 84
Delete Entries in the Redial List.......................................................................................... 84
Pic. 28: Display Options in the Redial List ...................................................................... 85
Calls List ............................................................................................................................ 85
Dial from the Calls List ........................................................................................................ 86
Delete Entries in the Calls List ............................................................................................ 86
Pic. 29: Display Options in the Calls List ........................................................................ 87
Caller List........................................................................................................................... 87
Dial from the Caller List....................................................................................................... 88
Delete Entries in the Caller List........................................................................................... 89
Pic. 30: Display Options in the Caller List ....................................................................... 89
Scheduled Calls List......................................................................................................... 90
Configure a scheduled Call................................................................................................. 90
Edit or delete scheduled Calls in the List ............................................................................ 91
You get a scheduled Call with Dial Preparation.................................................................. 92
You get a scheduled Call (Reminder only) ......................................................................... 93
5
Contents
Use of the Telephone and PBX System............................................................................................ 94
Delete Data ........................................................................................................................ 94
Delete Call Charges .......................................................................................................... 94
Pickup ................................................................................................................................ 95
Switch on/off Headset Operation .................................................................................... 97
Telephone Lock................................................................................................................. 98
Ringer Signal..................................................................................................................... 99
Switch on/off acoustic Ringer Signal................................................................................... 99
Signal Calls via flashing Display Backlight (Ringer Signal/Light)...................................... 100
Subscriber Function of the PBX.................................................................................... 102
Switch on/off Call Waiting ................................................................................................. 102
Switch on/off Do-not-Disturb ............................................................................................. 103
Deactivate Do-not-Disturb for certain Persons (Call Deblocker – inbound)...................... 104
Protection against certain Person’s Calls (Call Restrictor - inbound) ............................... 105
Room Monitoring............................................................................................................... 106
Redirect the Telephone (Subscriber Call Forwarding)...................................................... 107
Redirect your Calls to another Telephone (Follow-me) .................................................... 109
Forward the Connection (MSN/DDI Call Forwarding).................................................. 111
Switch the Configurations of the PBX manually (Day, Night etc.) ............................. 114
Door and Relay Functions of the PBX .......................................................................... 115
Use the Door Terminal...................................................................................................... 115
Switch Relay internally...................................................................................................... 116
Number Memory and Busy Status Overview ............................................................... 118
Key for Exchange Line Selection and Busy Status Overview .......................................... 118
Key for Presentation of a MSN ......................................................................................... 119
Key for Presentation of an MSN and Busy Status Overview ............................................ 120
Function Key to select a VoIP Account ............................................................................ 121
Speed Dialling................................................................................................................... 122
Macro Key......................................................................................................................... 123
Project Assignment ........................................................................................................ 125
Announcement/Intercom via System Telephone (InterCom)...................................... 127
Permit inbound InterCom Calls to the System Telephone (InterCom Authorization)........ 127
Outbound InterCom Calls with the System Telephone ..................................................... 129
Announcement via Loudspeaker .................................................................................. 130
Control the Voicemail Centre 461/461.2........................................................................ 131
Group Functions of the PBX.......................................................................................... 133
Log out/Log in with the Telephone.................................................................................... 133
Log the Telephone out of all Groups................................................................................. 135
Switch on/off Announcement before Answering ....................................................... 135
Switch on/off Announcement before Answering for a Group .................................... 136
Transfer of an Exchange Line Access .......................................................................... 138
6
Contents
Boss/Secretary Function................................................................................................ 139
Configure and operate the Function on the Boss Telephone ........................................... 139
Use the Function on the Secretary Telephone ................................................................. 141
Switch off Boss/Secretary Function for all Secretary Telephones at the same Time ....... 142
Waiting Field.................................................................................................................... 143
Accept External Calls in the Waiting Field ........................................................................ 144
Accept internal Calls in the Waiting Field.......................................................................... 146
Activate/Deactivate Waiting Field Reception .................................................................... 147
Hotel Functions for Reception and Room Telephones .............................................. 149
Configure and operate a Hotel Reception Telephone....................................................... 149
Operate a Hotel Room Telephone .................................................................................... 154
Configuration of the Telephone ...................................................................................................... 155
Key Programming ........................................................................................................... 155
Settings in the Key Programming ..................................................................................... 155
Basic Settings ................................................................................................................. 157
Configure MSN (Internal Telephone Number) .................................................................. 157
Set the Language of the Telephone ................................................................................. 157
Select Type of Headset..................................................................................................... 158
Switch on/off Quick Remote Access to the Voicemail Centre 461.2................................. 158
Display Settings .............................................................................................................. 159
Configure the Display Light (only COMfortel 2500) .......................................................... 159
Set Brightness (only COMfortel 2500) .............................................................................. 159
Set the Contrast ................................................................................................................ 160
Configure the Time Format ............................................................................................... 160
Set the Date Format.......................................................................................................... 161
User Settings................................................................................................................... 162
Configure Macro Display................................................................................................... 162
Configure Menu Selection................................................................................................. 162
Configure the Reachability of the second Key Level ........................................................ 163
Configure the Speed Dialling Keys ................................................................................... 164
Configure Number Blocking .......................................................................................... 164
Configure Function Lock ................................................................................................... 165
Configure Settings Lock.................................................................................................... 166
Configure/change the User PIN ........................................................................................ 167
Signalling......................................................................................................................... 167
Configure LED Signalling for Messages ........................................................................... 167
Configure LED and Tone Signalling for Call Waiting ........................................................ 168
Configure Attention Tone for Waiting Field and Power Dialling ........................................ 168
Configure Headset Ringer ................................................................................................ 169
Configure Ringer Melodies and Volume ........................................................................... 170
Change Ringer Volume automatically............................................................................... 172
Configure Lists................................................................................................................ 173
Calls/Conversations to be taken over into the Calls Lists ................................................. 173
Telephone Numbers to be displayed in the Telephone Book ........................................... 174
7
Contents
PC Connection and Installation of the Software............................................................................ 175
Make a Connection between Telephone/PBX and PC ................................................. 175
Connection to the USB Interface of a PC (COMfortel 2500 only) ..................................... 176
Pic. 31: Plug in the USB cable ...................................................................................... 176
Installation of the Drivers and the PC Software........................................................... 177
Pic. 32: USB driver installation...................................................................................... 177
Install the PC Programmes manually................................................................................ 177
COMfortel Set and COMfortel Melody........................................................................... 178
Minimal Requirements for the PC for COMfortel Set and COMfortel Melody ................... 178
Configure Telephone with COMfortel Set ......................................................................... 178
Tips for COMfortel Set ...................................................................................................... 179
Backup Data or transfer it to other Telephones ................................................................ 180
Service Functions............................................................................................................................. 181
Start an Automatic Firmware Update............................................................................ 181
Distribute Firmware........................................................................................................... 182
Synchronization with the PBX ....................................................................................... 182
Return to the Default Factory Settings ......................................................................... 183
Select PBX ....................................................................................................................... 184
View Information on Telephone and PBX..................................................................... 185
Remote Programming .................................................................................................... 186
Sequence of the Remote Programming for the Service Technician ................................. 186
Technical Data................................................................................................................. 187
Data for the Connection of a Headset........................................................................... 188
Configure and use the Answering Machine ................................................................................... 189
Switch on/off Readiness ................................................................................................ 189
Answering Machine List................................................................................................. 190
Listen to the Recordings (Messages and Call Recordings) .............................................. 190
Dial from the Answering Machine List............................................................................... 191
Pic. 33: Display Options in the TAM List ....................................................................... 192
Pic. 34: During the Playback ......................................................................................... 192
List of Voice Memos ....................................................................................................... 193
Record Voice Memos........................................................................................................ 193
Listen to the Recordings (Voice Memos) .......................................................................... 194
Pic. 35: Display Options in the List of Voice Memos..................................................... 195
Pic. 36: During the Playback ......................................................................................... 195
Configure the Answering Machine................................................................................ 196
Configure the Call Acceptance ......................................................................................... 196
Set the Call Acceptance Time........................................................................................... 196
Configure the maximum Recording Time ......................................................................... 197
Switch on/off the Listen in ................................................................................................. 197
Switch on/off Automatic Playback..................................................................................... 198
8
Contents
Create and edit Announcements................................................................................... 199
Create new Announcements............................................................................................. 199
Edit or delete existing Announcement in the List .............................................................. 200
Assignment of Announcements.................................................................................... 201
Table 3: Priority List for External Calls .......................................................................... 202
Table 4: Priority List for Internal Calls ........................................................................... 202
Table 5: Priority List for Door Calls ............................................................................... 202
Change Announcement Assignment ................................................................................ 203
Switch on/off the Automatic .............................................................................................. 205
Call Recording................................................................................................................. 206
Automatic Call Recording ................................................................................................. 206
Call Recording .................................................................................................................. 207
Switch on/off the Call Recording Info Tone....................................................................... 208
Configure the Remote Access....................................................................................... 209
Switch on/off the Remote Access ..................................................................................... 209
Switch on/off the Remote Access Toll Saver (and Quick Remote Access) ...................... 210
Enter Quick Access Telephone Numbers ......................................................................... 211
Configure Message Forwarding .................................................................................... 211
Answering Machine – Switch on/off Message Forwarding ............................................... 212
Configure Announcement for Message Forwarding ......................................................... 213
Configure Target for the Message Forwarding ................................................................. 214
Configure Delay Time for the Message Forwarding ......................................................... 214
Configure Repetitions for the Message Forwarding.......................................................... 215
Set Repetition Delay Time for the Message Forwarding .................................................. 215
Store the Data (Backup) on the SD Card ...................................................................... 216
Configure Backup ............................................................................................................. 216
Execute Backup (COMfortel 2500 -> SD Card) ................................................................ 217
Restore the Backup (SD Card-> COMfortel 2500) ........................................................... 217
Configure Automatic Backup ............................................................................................ 218
SD Card............................................................................................................................ 218
Format the SD Card.......................................................................................................... 218
Check SD Card ................................................................................................................. 219
Remove the SD Card safely ............................................................................................. 219
Data transfer between PC and SD Card........................................................................ 220
Transfer Recordings and Backups with COMfortel Set .................................................... 220
Make a Remote Access .................................................................................................. 221
Table 6: Functions of the Remote Access .................................................................... 221
Index .................................................................................................................................................. 223
Lettering Labels ................................................................................................................................ 229
9
Introduction
☞
I NTRODUCTION
Important
Dear Customers!
The manual in your hand describes the operation of the system telephones COMfortel 2500
and COMfortel 1500 in detail. In order to get certain information quickly and to the point, the
manual will offer you different helps and guide lines:
쮿 The content on page 3 gives you an idea about content and organization of this manual.
쮿 The index on page 223 helps you to find certain text portions for a certain term.
쮿 In the texts you will be referred to other chapters or pictures with the help of cross references. They will illustrate the respective theme.
쮿 On each page the headline may be used to remember where you actually are. On every
page the headline of the section as well as the headline of the corresponding chapter are
repeated.
Unintended use may cause e.g. functional restrictions or interferences, the destruction of the
device or in a worst case scenario damage to persons.
–
Read the user manual and keep it for reference.
–
Additionally pay attention to the information about guarantee, service, environment, CE
compliance and conformity in the enclosed flyer “Conditions of guarantee, Information
service”
–
The device described in this manual is made for the indicated use only. If you are not sure
about the intended purpose of the product, please contact your dealer.
To be able to use the here described scope of functions completely, the system telephone
and the PBX have to use the following firmware versions:
3.3A or higher (system telephone)
1.5C or higher (COMmander Business and COMmander Basic.2)
2.0A or higher (COMpact 5010 VoIP and COMpact 5020 VoIP)
2.0E or higher (COMpact 2204 USB, COMpact 2206 USB, COMpact 4406 DSL, COMpact
4410 USB and COMmander Basic).
The versions can be reviewed via the system telephone (see chapter View Information on
Telephone and PBX on page 185). If you have devices with older versions, please update
the corresponding devices.
Security Advice
Attention
10
Please pay attention to the following general advice whenever you place, connect or use the
telephone:
– Read the user manual and keep it for reference.
–
The device described in this manual is made for the indicated use only. If you are not sure
about the intended purpose of the product, please contact your dealer.
–
Pay attention to the relevant standards when using 230 Volt power supply and units
operating on the power supply.
–
Repairs should only be done by your authorized dealer. Contact your authorized dealer
or the manufacturer if necessary.
Introduction
Usage and Functionality
Improper use or exchange of the wall-mount power supply may be dangerous to life
or may damage or destroy the device:
Warning
–
Use only the enclosed wall-mount power supply unit COMfortel XT-PS (type number
809).
–
Make sure, the plug is inserted securely into the wall mains outlet. Loose plugs or damaged outlets are a fire hazard.
–
Do not pull at the cable of the wall-mount power supply. Pull at the wall-mount power
supply itself If you want to switch off the device power.
–
In case of damage to the wall-mount power supply: Interrupt the mains power of
the house first before pulling the plug of the wall-mount power supply.
Touching a defective connection cable may cause a dangerous electric shock. Also any
damages of the case and of the device itself may be dangerous to life.
Warning
–
Connect the plugs only to the appropriate wall plugs.
–
The mains cables of the electric devices and the connection cables have to be checked
regularly for damages and to be exchanged in case of damages.
–
Replace damaged components (e.g. components of the case) immediately.
–
Use original components only.
–
Do not touch the plug contacts with sharp, metallic or humid objects.
–
The device should not be carried on the cables.
–
Use the cable channels available on the back side of the telephone for strain relief.
Liquids entering the case may cause a dangerous electric shock or may damage or
destroy the device.
Warning
–
Pay attention when selecting the installation location and when cleaning the case to
prevent liquids from entering the case.
–
The telephone must not be used in wet environments (bath rooms).
Usage and Functionality
The system telephones COMfortel 2500 and COMfortel 1500 are designed for the connection to the following Auerswald PBX systems:
쮿 COMpact 2204 USB
쮿 COMpact 2206 USB
쮿 COMpact 4406 DSL
쮿 COMpact 4410 USB
쮿 COMpact 5010 VoIP
쮿 COMpact 5020 VoIP
쮿 COMmander Basic (19")
쮿 COMmander Basic.2 (19")
쮿 COMmander Business (19")
Thanks to functions like telephone book, Power Dialling and Caller List they make daily telecommunication easy, timesaving and comfortable. Additionally to the telephony they offer
11
Introduction
Usage and Functionality
multiple functions such as call data recording and support for many different PBX system
functions. They can be adapted to your personal requirements with the bundled PC software
or via the comfortable menu.
The modular design of the COMfortel 2500 allows the expansion with up to three key expansion modules COMfortel Xtension30 that can be connected on the left or right side of the telephone at your choice. Fully expanded there are 105 function keys available.
The COMfortel 2500 can additionally be expanded with the function COMfortel Voicemail
(answering machine, backup etc.) by inserting a standard SD card and the release in the
Upgrade Centre (chargeable).
Features
☞
The scope of functions described here is only completely usable with a professional installation and a correct configuration of the PBX and the connected PC. We highly recommend to
Important consult your authorized dealer first.
Please ask your network operator about the availability of some ISDN service attributes.
Some of these functions may be available for an extra fee.
The operation of the telephones on other PBX systems than recommended or on the public
telephone network is not intended.
Some functions described here are only completely usable if the function is available in the
PBX and with a correct configuration of the PBX and if the necessary authorization has been
assigned.
For some functions a chargeable release via Upgrade Centre is necessary.
쮿 The ISDN features of the connected PBX are supported.
쮿 Automatic identification of the connection type S0 or UP0
쮿 Charges review of the last call and of all calls
쮿 800 (COMfortel 2500) or 400 (COMfortel 1500) telephone number entries in the local tel-
쮿
쮿
쮿
쮿
쮿
쮿
쮿
쮿
쮿
쮿
쮿
쮿
1
ephone book of the telephone, up to 4 telephone numbers as well as a text information
can be assigned to one name
Access by name to the telephone book and the internal telephone numbers of the PBX
Number to name conversion
Redialling of the last 30 dialled telephone numbers
Caller list of the last 30 unsuccessful calls with telephone number, name (if stored in the
telephone book), date and time
Calls list of the last 30 successful calls (inbound and outbound) with telephone number,
name (if stored in the telephone book), date and time
Configuration protected by password, telephone lock
Softkeys for special, context sensitive functions of the system telephone
Presentation of the context sensitive softkey functions on the display
Settings are shown as a symbol or text on the display
Time and date display as well as cost and charge unit display
White background light1
USB interface for connection to the PC1
COMfortel 2500 only
12
Introduction
Usage and Functionality
쮿 ISDN PC controller functions (CAPI 2.0 and NDIS-WAN)1
쮿 Can be extended with up to 3 key extensions1
쮿 Headset connection with DHSG support for wireless headsets1
쮿 Destination speed dial keys and busy lamp field for the status display of the subscribers
쮿 Line keys with status display of the exchange lines (external S0 ports)
쮿 Presentation of the door and switching functions of the PBX on the display/on the function
keys
쮿 Function keys to control the PBX functions
쮿 Group and team functions
쮿 Query/Transfer also directly via the destination speed dial keys
쮿 Automatic handsfree operation for internal calls (InterCom)
쮿 Announcement to system telephones (InterCom)
쮿 Waiting field function
쮿 Boss/secretary function
쮿 Hotel function with reception and room telephones
쮿 Macro function, complex function processing by pressing one key
쮿 Schedule calls and repeat unsuccessful calls at a later time
쮿 Power Dialling, automatic redialling (independent of the ISDN feature CCBS - recall on
busy)
쮿 Memo pad function to record telephone numbers during a call (memo)
쮿 Touch-tone dialling during a call
쮿 Dial preparation/dialling correction
쮿 16 (COMfortel 2500) or 8 (COMfortel 1500) ringer melodies, with the enclosed software
an own melody may be created
쮿 Speaker listening/handsfree operation/microphone mute
쮿 Volume of the ringer melodies, of the receiver, of the headset (optional) and the handsfree
operation can be configured
쮿 Comfortable PC software for configuration and operation is bundled
쮿 Remote configuration of the telephone
쮿 Automatic firmware update with copy function
13
Introduction
Placing and Cleaning of the Device
Features2 available for Release in the Upgrade Centre
After the release of the function COMfortel Voicemail in the Upgrade Centre the following features are additionally available for you:
쮿 Answering machine (call dependent announcements, tapping, takeover, message forwarding, remote access with quick entry)
쮿 Call recording
쮿 Voice memos
쮿 Recording (announcements, messages, call recordings and voice memos) as a WAV file
on the SD card
쮿 Manual and automatic backup of the configuration, of the lists and the telephone book on
SD card
쮿 Simple data access to the content of the SD card via standard PC card reader or
COMfortel Set
Placing and Cleaning of the Device
Please pay attention to the following advice when installing and cleaning the telephone:
쮿 Put the system telephone on a non slippery pad. It might be possible that some plastics
or colours used on furniture are aggressive to the device feet. This chemical reaction
might cause damage to the surface of your furniture. The manufacturer is not taking any
responsibility for this kind of damage.
쮿 Do not expose the system telephone to strong electromagnetic fields (electric motors,
mobile phones, TV, video, radio and household appliances). In extreme cases it may
destroy the telephone.
쮿 Protect the device against moisture, dirt, aggressive fluids or steam.
쮿 Avoid placing the device into direct sunshine or other source of temperature.
쮿 If a cleaning is necessary, wipe the case with a damp cloth or use an antistatic cloth. Make
sure, no moisture will enter the case. Please observe the following security advice.
2
Single release for all features is necessary.
Inserting a standard SD card (not in the scope of delivery; see page 20) is necessary.
Only available on the COMfortel 2500.
14
Introduction
First Use of the Telephone
First Use of the Telephone
☞
Advice
COMfortel 2500: If you like to connect the key expansion module COMfortel Xtension30, read
the chapter Connection and Mounting of the Key Extension COMfortel Xtension30 (COMfortel 2500) on page 17 first.
For commissioning of the system telephone, the Auerswald PBX must be connected to the
230-V mains supply.
To be able to use the here described scope of functions completely, the system telephone
and the PBX need the following firmware versions:
3.3A or higher (system telephone)
1.5C or higher (COMmander Business and COMmander Basic.2)
2.0A or higher (COMpact 5010 VoIP and COMpact 5020 VoIP)
2.0E or higher (COMpact 2204 USB, COMpact 2206 USB, COMpact 4406 DSL, COMpact
4410 USB and COMmander Basic).
The versions can be reviewed via system telephone (see chapter View Information on Telephone and PBX on page 185). If you have devices with an older version, please update the
corresponding devices.
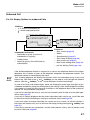
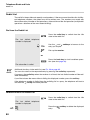
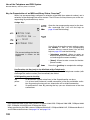
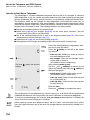
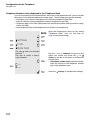
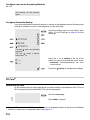
Connection of the Receiver
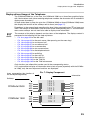
Connect the receiver as follows:
Pic. 1: Connection of the Receiver
1. Insert the plug at the longer
straight end of the spiral cord
into the jack marked with the
on the bottom side of the
telephone and lead the cable
via one of the cable channels to
the outside (Pic. 1).
2. Put the other end of the spiral
cord into the jack of the
receiver.
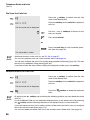
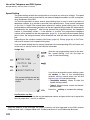
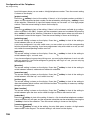
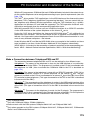
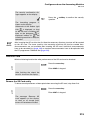
Connection to the PBX
Connect the telephone to the PBX as follows:
1. Put one plug of the enclosed ISDN cable into the jack marked with
on the bottom
side of the telephone and lead the cable via one of the available cable channels to the
outside (Pic. 2 on page 16).
2. Put the other jack of the ISDN cable into an ISDN wall jack connected to the PBX system.
The system telephone can be operated on an internal S0 port as well as on an UP0 port
of the PBX. For each UP0 port only one telephone can be connected (see also manual of
the PBX).
15
Introduction
First Use of the Telephone
3. Put – if existing – the wall-mount
power supply COMfortel XT-PS
(type number 809) in a freely
accessible 230 V mains socket
(only necessary when operating a
key expansion module COMfortel
Xtension30 with a COMfortel
2500; see page 17).
4. Now the system telephone does a
selftest. The LEDs will flash, the
Auerswald logo and then the
name (e.g. “COMfortel 2500”) as
well as the software version of the
telephone are shown and a data
exchange between the system
telephone and the PBX will follow.
Pic. 2: Connection to the PBX
☞
If a system telephone that has been previously attached to another (older) PBX is connected
to a COMpact 5010/5020 VoIP or a COMmander Basic.2/Business (or vice versa), the existImportant ing configuration will be deleted irreversibly and completely – after confirmation of the question in the display if a PBX change should be done (see also page 184).
COMfortel 2500: If no wall-mount power supply is needed (no expansion COMfortel
.
Xtension30 is connected), the bridge plug has to be put into the jack
Mandatory Settings
When performing a first time connection to the PBX, the user language and a valid subscriber
(MSN) has not yet been entered into the system telephone. In this case and after a few seconds, you will be asked for these entries in the display.
☞
The internal telephone number entered here has to be entered for the corresponding internal
S0 - or UP0 port in the configuration programme of the PBX also. Use each of the internal subImportant scriber telephone numbers for only one ISDN devices connected to your PBX.
On the display appears the
menu for the language selection.
Use the
and
softkeys to browse to the
option you require and press the softkey to
the left of the option:
...
On the display appears the
menu for the MSN entry.
16
쮿 [language]: Selects one of the presented
language options as display language.
Introduction
First Use of the Telephone
N
[ internal number]
Enter the internal telephone number.
Press the
softkey to complete the entry.
The telephone is now ready for
use (If the PBX does not known
the date and time yet, the
name and version of the telephone is displayed here).
☞
Advice
The individual configuration of the telephone, the settings of the freely programmable function keys as well as the operation of other functions is done via the main menu after pressing
the menu key (see Pic. 10 on page 33).
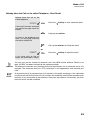
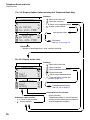
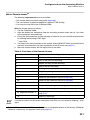
Connection and Mounting of the Key Extension COMfortel Xtension30 (COMfortel 2500)
Before you re-assemble, disconnect the telephone from the PBX and (if already existing) the
wall-mount power supply from the 230-V mains power.
Warning
Exchange of the wall-mount power supply may be dangerous to life or may damage or
destroy the device.
–
☞
Advice
Use only the enclosed wall-mount power supply unit COMfortel XT-PS (type number
809).
To use one or more key extension modules COMfortel Xtension30 with the telephone, you
will need the wall-mount power supply COMfortel XT-PS (type number 809).
The key extension modules can be attached to the right or left side of the telephone (on the
Pic. 3 on page 18 the modules have been attached to the left side next to the receiver). A
connection to both sides is not possible.
The installation material (an special connector with four screws) as well as the connection
cable (RJ-11 to RJ-10) is enclosed with each key extension module.
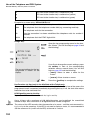
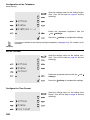
Connect the key expansion module to the telephone as follows:
1. Turn the telephone and the first key extension module to be connected topside down so
that the bottom side is in front of you. Put it together with help of the special connector as
shown on Pic. 3 on page 18 (in the picture the modules have been attached to the left
side next to the receiver).
2. Attach the special connector with help of the four enclosed screws.
3. Insert the smaller plug of the connection cable into the jack marked with
on the bottom side of the telephone.
4. Insert the larger plug of the connection cable into the jack marked with
on the bottom
side of the key extension module.
5. If you like to connect additional key extension modules (up to three are possible), attach
them to the already connected module with help of the special connector and fasten each
special connector with the screws.
6. Insert the smaller plug of the connection cable into the jack marked with
on the bottom side of the already connected key extension module.
7. Insert the larger plug of the connection cable into the jack marked with
on the bottom
side of the next key extension module.
17
Introduction
First Use of the Telephone
8. Insert the Western Modular plug of the wall-mount power supply COMfortel XT-PS into
the jack marked with
on the bottom side of the telephone (remove the bridge plug
from the jack first). Wait with the connection to the 230 V power supply until the first
operation starts.
9. Put the cables into the existing cable channels and empty spaces in such a manner that
the cables will not sink and may cause that the telephone wobbles.
10. Turn the telephone around again.
Pic. 3: Connection and Mounting of the Key Extension
COMfortel Xtension30
Connect the Headset
☞
Advice
The COMfortel 2500 supports the operation of cable connected headsets as well as wireless
headsets (Headsets with a DHSG interface e.g. by GN Netcom or Plantronics). The headset
type in use has to be configured in the telephone (chapter Select Type of Headset on
page 158).
To connect the COMfortel Headset by Auerswald or other cable connected headsets to the
DHSG interface an adapter is necessary that is available as an Auerswald accessory at an
authorized dealer.
The COMfortel 1500 supports the operation of cable connected headsets. In this case the
connection is made instead of the receiver at the receiver jack
. When connecting the
COMfortel Headset by Auerswald an adapter is necessary that is available as an Auerswald
accessory at an authorized dealer.
Technical data for the connection of a headset can be found on page 187.
18
Introduction
First Use of the Telephone
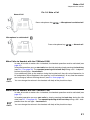
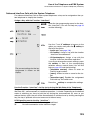
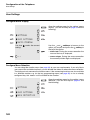
Connect the headset as follows:
☞
1. Only COMfort 1500: Remove the connection plug of the receiver out of the corresponding jack on the bottom side of the telephone.
2. Insert the connection plug to the headset into the jack marked with
(COMfortel 2500)
or
(COMfortel 1500) on the bottom side of the telephone.
3. Lead the cable via one of the cable channels to the outside.
To be able to make calls via headset, you have to activate the headset operation. (chapter
Switch on/off Headset Operation on page 97).
Important
Pic. 4: Connection of a Headset to the
COMfortel 2500
Insert lettering Label
☞
Advice
On page 229 of these instructions you find some lettering label papers to cut out and to label
by hand. With the configuration programme COMfortel Set you can also comfortably create
and print your label stickers.
Insert the lettering label as follows:
1. Contract the flexible transparent cover with thumb and first
finger and lift the cover up (see
Pic. 5).
2. Insert the lettering label.
3. Insert the transparent cover
with the matted surface
upwards again.
Pic. 5: Insert lettering
Label
19
Introduction
First Operation of the Answering Machine (only COMfortel 2500)
First Operation of the Answering Machine (only COMfortel 2500)
The COMfortel 2500 can be expanded with the function COMfortel Voicemail (answering
machine, backup etc.) by inserting a standard SD card and the release in the Upgrade Centre
(chargeable).
☞
Insert the SD Card and start it
Important
After inserting the SD card the SD card functions (e.g. answering machine) are released for
30 days one-time. To use the functions after this time a chargeable release of the function
COMfortel Voicemail via Upgrade Centre is necessary (see page 21).
SD cards that match to the SD memory card specification 1.01 are supported. Therefore SD
cards with a capacity of up to 2GB are possible. Larger SDHC cards according to the SD
memory card specification 2.00 are not supported.
For the correct function a SD card formatted with FAT16 is necessary. A SD card formatted
with FAT32 can be reformatted in the telephone (see page 218).
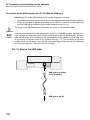
Insert the SD card as follows:
1. Open the plastic cover that is on the left side on the back of the system telephone (see
Pic. 6).
2. Insert the SD card with the contacts first into the slot (see Pic. 6).
Pic. 6: Insert the SD Card
SD card
SD card slot on the
back of the telephone
3. Close the plastic cover again.
4.
will be visible on the display at the right bottom after inserting the controller until the
SD card is initialized.
5. As soon as the pictogram
to start.
☞
Advice
20
is shown instead of
the answering machine is ready
After inserting the SD card for the first time the necessary directory structure will be created
on the SD card. The tones used by the answering machine will also be created then.
Announcements are not available after inserting the SD card. Individual announcements
have to be recorded first (page 199) or standard announcements have to be uploaded with
the PC programme COMfortel Set (page 21).
Introduction
First Operation of the Answering Machine (only COMfortel 2500)
If the initialization has no success after inserting the SD card (
interruptions), the SD card is not supported.
is still visible with short
If you like to remove the SD card again, you can unlock it with slight pressure out of the slot.
To prevent that current processes are interrupted, finish them first (see page 219).
Upload standard Announcements with COMfortel Set
During the installation of the PC programme COMfortel Set with the sw version 1.9 or higher,
standard announcements in three different languages (German, English and Italian) are copied to the PC automatically. These are announcements for the call acceptance STANDARD.WAV, the announcement for the remote access REMOTE.WAV and the announcement
for the message forwarding FORWARD.WAV.
If you have inserted an SD card into the telephone (page 20), you can upload these
announcements via COMfortel Set (page COMfortel Set 왘 Answering machine 왘 Data
exchange 왘 Standard announcements) into the telephone. The answering machine is
ready for operation now.
☞
Which type of standard announcements are used – German, English or Italian – depends on
the language configured in the telephone. For all the languages except German and Italian
the English standard announcements will be used.
With COMfortel Set existing individual announcements (WAV files) can be uploaded into the
telephone, too (page COMfortel Set 왘 Answering machine 왘 Data exchange).
How to record individual announcements via telephone and to assign them is described on
page 199.
Buy the Function COMfortel Voicemail in the Upgrade Centre
After inserting the SD card the SD card functions (e.g. answering machine) are released for
30 days one-time. To use the functions after this time a chargeable release of the function
COMfortel Voicemail via Upgrade Centre is necessary.
The following data have to be held available for the purchasing in the Upgrade Centre:
쮿 User name and password (you will receive them during the registration/creation of a user
account in the Upgrade Centre)
쮿 12-digit serial number of the telephone (see below)
☞
Advice
The 10-digit serial number on the sticker of the telephone or on the package wrapper is not
sufficient for the release.
You can also request your authorized dealer to perform the release in the Upgrade Centre.
For the released function you will get a release code (20-digit). This has to be entered into
the telephone (see page 24).
21
Introduction
First Operation of the Answering Machine (only COMfortel 2500)
Perform the release in the Upgrade Centre as follows:
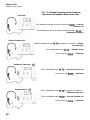
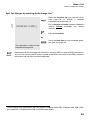
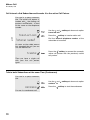
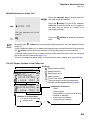
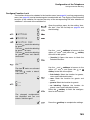
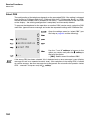
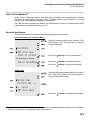
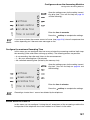
1. Review the 12-digit serial number of the telephone in the information menu and write it down.
Open the information menu (you find help on
page 33).
information
Use the
and
softkeys to browse to the
option serial number.
The serial number of the telephone will be displayed.
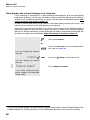
2. Open the Upgrade Centre in the
Internet
(Internet
address:
www.auerswald.de/upgrade-Centre).
3. If not existent, create a user
account first. Click on the buttons/
links one after the other “Forward”, “User administration” and
“Registration (create a user
account)”. Enter the necessary
data into the opened form. Now
you will get an E-mail with the registration data.
4. Enter under “User name” and
“Password” the data that you
have received after creating a user
account.
5. Click on the button “Login”.
22
햳
햵
햶
햴
Introduction
First Operation of the Answering Machine (only COMfortel 2500)
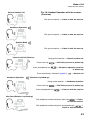
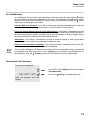
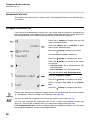
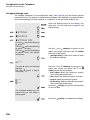
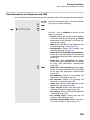
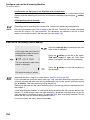
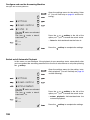
6. Enter the serial number of the telephone into the field “Other:
Device-S/N.:”.
햹
7. Then click on the button “Set”.
8. Now you can select the category
for shopping.
햸
햷
9. Put the selected items into the
shopping basket via mouse click in
the column “Order”.
10. If you have selected all requested
items, click on the field “Shopping
basket / check out”.
햺
햻
11. The selected item is shown in the
basket. If you do not like to change
anything, click on the button “Proceed ...”.
12. Follow the additional instructions.
햽
23
Introduction
First Operation of the Answering Machine (only COMfortel 2500)
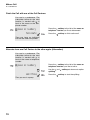
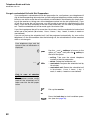
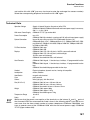
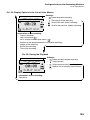
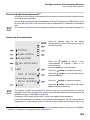
13. The code necessary for the
release is shown to you right after
the purchase in the column
“Release code”.
햿
☞
Advice
If your E-mail address is known to the Upgrade Centre, you will receive the order confirmation
via E-mail again. If you have not entered any E-mail address, please print this page. It is the
order confirmation for your purchase.
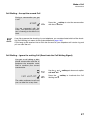
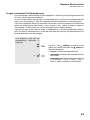
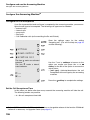
Enter the Release Code into the Telephone
Enter the 12-digit release code via the menu of the telephone. Then the function COMfortel
Voicemail will be released.
Open the settings menu for the setting “release” (You will find help on page 33).
settings
answer.machine
N
24
release
[ release code]
Enter the release code.
Press the
softkey to complete the entry.
Introduction
Display-driven Usage of the Telephone
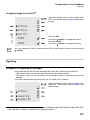
Display-driven Usage of the Telephone
The COMfortel 2500 has a five lines, the COMfortel 1500 has a three lines graphic display
with 16 characters each (when entering telephone numbers the character size is reduced to
display more characters).
On both sides there is place for up to four (COMfortel 2500) or three (COMfortel 1500) icons
that display the function of the softkeys next to them (see page 27).
Exceptions: In the second level menu/function level (after pressing the key ) no icons are
used. The function is described in text form next to the corresponding key. In the information
menu some softkeys are not used to be able to display more information.
☞
Advice
The contents of the display depends on the status of the telephone. The display content is
presented in the following with the help of pictures:
– Pic. 9 on page 32 for the idle state
– Pic. 10 on page 33 for the main menu (after pressing on the menu key)
– Pic. 19 on page 44 for an inbound call
– Pic. 20 on page 57 for an outbound call
– Pic. 21 on page 62 for a conversation
– Pic. 22 on page 69 for two conversations
– Pic. 23 on page 76 for the telephone book
– Pic. 28 on page 85 for redialling
– Pic. 29 on page 87 for the calls list
– Pic. 30 on page 89 for the caller list
– Pic. 33 on page 192 for the TAM list
– Pic. 35 on page 195 for the TAM voice memo
Only functions are offered that can be used in the corresponding status.
If it is not possible to display all information due to lack of space (especially with the COMfortel 1500), only the most important functions are displayed.
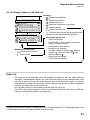
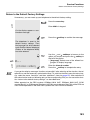
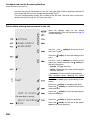
Icons representing the function of
the corresponding softkey
Pic. 7: Display Component
Information
Softkeys
COMfortel 2500
line
line
line
line
line
1
2
3
4
5
COMfortel 1500
line 1
line 2
line 3
25
Introduction
Display-driven Usage of the Telephone
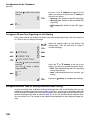
햷 Microphone Key:
– switches off/on the microphone in the receiver,
base device or headset depending on the call
status (mute)
Pic. 8: Control Elements
햲 Receiver
햳 Display (see page 25):
– COMfortel 2500: 5 lines
– COMfortel 1500: 3 lines
햸 Speaker Key:
– switches the speaker on (speaker mode) and
perhaps additionally the microphone in the base
device (handsfree operation)
햴 Softkeys (status dependent keys):
– COMfortel 2500: four on each side
– COMfortel 1500: three on each side
햹 Plus/Minus Keys:
– change voice and ringer volume as well
as contrast and brightness depending
on the status of the telephone
햵 Menu key:
– opens the main menu (see page 33) from
the idle state or already open menu
햺 Telephone Book Key:
– opens the telephone book (see page 75)
from the idle state or already open menu
햶 Exit key:
– returns to the idle state
– unfinished or incorrect settings are not
stored
햲
햴
햳
햻 Redial Key:
– opens the redial list (see
page 84) from the idle state
– dials the last dialled number
when picking up the receiver
햴
햽 Function Keys with LED:
– LED signals the status depending on the configured setting
– freely programmable (see
page 155)
햵 햷 햹 햺
햶 햸 햹 햻
햽
햾
헁 헀 햿
헁
–
–
–
–
26
Message Key with LED:
LED signals (new) entries
opens the caller list (see page 87) from the idle state
opens the TAM list (see page 190) from the idle state
opens the TAM voice memo (see page 193) from the idle state
햾 Keypad:
– alphanumeric
– key occupation see Table 1 on
page 27
햿 Query Key with LED:
– starts query
헀 Hook Key with LED:
– LED signals inbound calls
– substitute for the mechanical
hook switch
Introduction
Display-driven Usage of the Telephone
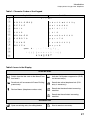
Table 1: Character Codes of the Keypad
Capital Characters
1
2
3
4
5
6
7
8
9
0
*
#
Small Characters
1 -
/
@ +
A B C 2 Ä Æ Å Ç
a b c 2 ä æ å á à â ç
D E F 3 É
d e f
3 é è ê ë
G H I
g h i
4 ì
J K L 5
j
5
M N O 6 Ö Ø
m n o 6 ö ø ñ ó ò ô
P Q R S 7 ß
p q r
T U V 8 Ü
t
W X Y Z 9
w x y z 9
4
space
*
(
’
“
,
:
? ¿ !
)
]
< = > « » ^ ‘
# %& § £ $
î
ï
s 7 ß
u v 8 ü ú ù û ÿ
0 .
[
;
k l
í
¡
_
~ {
}
E
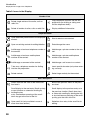
Table 2: Icons in the Display
In the Idle State
Switch from the idle state to the Menu/Function level 2.
Activate Call Number suppression (CLIR)
for the next call(s).
Deactivate still unsuccessful Power Dialling
prematurely.
Deactivate active telephone lock (PIN
entry is necessary).
Review Memo (telephone number note).
Reactivate the deactivated answering
machine.
Deactivate the activated answering
machine.
Scheduled Call
Open an existing entry for editing/delete.
Start to create a new entry.
27
Introduction
Display-driven Usage of the Telephone
Table 2: Icons in the Display
Number Lists
Delete single entries of the caller, calls or
redial list.
Copy telephone numbers into the dial
preparation (for dialling or taking over
into the telephone book).
Delete all entries of caller, calls or redial list.
Display additional information.
Telephone Book
Open extended presentation of the displayed
contact.
Start to create a new contact.
Open an existing contact for editing/deletion.
Enter/change the name.
Add/change a business telephone number of
the contact.
Add/change a private number to the contact.
Add/change a business mobile phone
number of the contact.
Add/change a private mobile phone
number to the contact.
Add/change a comment of the contact.
Add/change a call macro to a contact.
Take over a telephone number for dialling
into the dial preparation.
Insert special character (only when entering a macro).
Delete contact.
Select ringer melody for the contact.
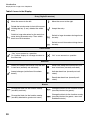
Menu Navigation
28
Switch from the idle state to the menu/function level 2.
Back to the previous menu or the previous level.
Scroll display to the next entry (Scroll-up key)
or next function or automatic scrolling by
holding the key
or by simultaneous pressing of the scrolldown key go to the start of the list.
Scroll display to the previous entry or to
the previous function (Scroll-down key)
or automatic scrolling by holding the key
or by simultaneous pressing of the scrollup key go to the start of the list.
Open scroll list (only available in case of
more than three entries).
Selection of an entry in the scroll list for
editing.
Introduction
Display-driven Usage of the Telephone
Table 2: Icons in the Display
Dial Preparation
Move the cursor to the left.
Move the cursor to the right.
Delete last character in front of the cursor.
The whole entry is deleted by holding the key
(2 seconds).
Take over the telephone number entered
into the dial preparation (or adapted) into
the telephone book.
Return to the idle state.
Accept entry and dial.
During a Call/Conversation
Scroll function display in the display bottom
line to the next function.
Scroll function display in the display bottom line to the next function.
Selection of the call partner (currently not
active/waiting) for additional functions or for
alternation.
Selection of the call partner (currently not
active) for additional functions during a
conference.
Selection of the call partner (currently active)
for additional functions or for alternation.
Selection of the call partner (currently
active) for additional functions during a
conference.
Get information about the current call.
Display only: The speaker mode is
switched on.
Select the function presented in the display
bottom line during a call/conversation.
Display only: The handsfree operation is
activated.
Display only: The microphone is switched
off (mute).
Key Assignment
Enter/change the telephone numbers.
Enter/change the names.
Enter the telephone number to be forwarded.
Switch between different options.
Accept the entry.
29
Introduction
Display-driven Usage of the Telephone
Table 2: Icons in the Display
Entry (Digits/Characters)
Move the cursor to the left.
Move the cursor to the right.
Delete the last character in front of the cursor.
Holding the key (2 sec.) deletes the whole
entry.
Accept the entry.
Switch to large characters for the next character during character entry. Then switch
back to small characters.
Switch to large characters during character entry.
Switch to small characters during character entry.
Confirmation
“Yes” as an answer to a question.
Or: Confirm display of a change to return to
the idle state.
“No” as an answer to a question.
Selection
Select and accept the function near the icon
in text form (currently not activated).
Select and accept the function near the
icon in text form (currently activated).
Accept changes (activation of the check
boxes).
Activate check box (currently not activated).
Deactivate check box (currently activated).
Blocks
30
Change the block for the function nearby
(currently no block).
Change the block for the function nearby
(currently blocked for guests).
Change the block for the function nearby
(currently blocked for guests and users).
Change the block for the function nearby
(currently blocked for guests, users and
SubAdministrator).
Introduction
Display-driven Usage of the Telephone
Table 2: Icons in the Display
Answering Machine Functions
Skip to the next (older) recording.
Or: Skip the current recording during the playback.
Skip to the previous (later/newer) recording.
Or: Repeat the current recording during
the playback.
Start the playback of the recording.
Stop the playback.
Delete the recording.
Display only: The recording is a new
message or notice.
Reactivate the deactivated answering
machine.
Display only: The recording is an old or
already reviewed message or memo.
Deactivate the activated answering machine.
Display only: The recording is a call
recording.
Display only: Data transfer between SD card
and PC.
Display only: The SD card is currently initialized.
Voicemail Functions (with Voicemail Centre 461.2)
Skip the currently heard recording.
Repeat the last or current recording.
Stop the playback or stop the recording of the
announcement.
Delete the currently heard recording.
Start the recording of the announcement.
(If you like to save an announcement “without
recording option”, press the key until “only
announcement” is presented in the display.)
Start the playback of the new, unheard
recordings (hold the key for the playback
of all messages until the “all messages”
is presented in the display).
Start to switch the announcement.
Delete all recordings.
Start manual control.
Switch to the menu/function level 1.
31
Introduction
Display-driven Usage of the Telephone
Pic. 9: Display Options in the idle State
wk 03 Mo 16.Jan 12:44
[ subscriber name]
[ internal number]
e
y
r
Softkeys:
–
: Switch to the function level 2
–
: Suppress the tel. number (page 53)
–
: Review memo (telephone number notice) (page 68)
–
: Deactivate Power Dialling (page 60)
–
: Activate/Deactivate TAM readiness (page 189)
wk 03 Mo 16.Jan 12:44
[ settings]
[ settings]
[ settings]
Monday
m
16.01.06
q
week 03
12:44
16.01.06 12:44
[ settings]
[ settings]
Time Information:
– Day of the week
– Date
– Calendar Week
– Time
Status information:
– Active settings affecting the telephony e.g. call
charge account empty, baby call/hotline
– Current settings restricting the reachability e.g.
Do-not-Disturb, Call Forwarding unconditional,
Follow-me, ringer switched off
– No ISDN connection
– Missed scheduled call
– Power Dialling is activated
Information about the subscriber
(only COMfortel 2500):
– Name of the PBX subscriber
– Internal telephone number of
the PBX subscriber
second level
calls list
pickup
project
Voicemail
schedule
cealls list
project
y
Voicemail
r
32
pickup
m
q
schedule
Softkeys:
– Open calls list (page 85)
– Enter project number (page 125)
– Perform pickup (page 48)
– Start Voicemail functions for Voicemail Centre
461.x (page 131)
– Open scheduled calls list (page 90)
Introduction
Display-driven Usage of the Telephone
Pic. 10: Display Options in the Main Menu (after Pressing the Menu Key)
Softkeys:
–
: Scroll in the selection list
–
: Select menu
–
: Back to the superior menu
select menu
menu
selection
functions
information
define keys
settings
menu
functions
information
define keys
settings
Settings Menu; see Pic. 13 on page 36
Key programming menu;
see Pic. 12 on page 35
Function Menu;
see Pic. 11 on page 34
Selection list* in the Information menu:
– Version telephone (page 185)
– Version PBX (page 185)
– MSN/name (page 157)
– Configuration (page 114)
– Subscriber Call Forwarding unconditional
(page 107)
– Subscriber Call Forwarding on busy
(page 107)
– Subscriber Call Forwarding on no reply
(page 107)
– Call Deblocker (page 104)
– Call Restrictor (page 105)
– Ringer tone (page 99)
– Ringer volume (page 172)
–
–
–
–
–
–
–
–
–
–
–
Call waiting (page 102)
Call waiting signal (page 168)
InterCom authorization (page 127)
Interface (page 185)
Headset type (page 158)
Headset (page 97)
Hardware (page 185)
Call charge (page 185)
Charge allowance (page 185)
Serial number (page 185)
TAM message forwarding (page 212 and
page 214)
– TAM quick access (page 211)
– SD card (page 185)
* Scroll with the
softkeys to the requested selection and press the
the
softkeys to the requested information.
softkey to select the function or scroll with
To return to the previous menu level, press the
softkey.
To return to the idle state, press the exit key. Besides this the telephone switches back to the idle state automatically if no key has been pressed for 30 seconds.
33
Introduction
Display-driven Usage of the Telephone
Pic. 11: Function Menu
Selection list* in the Function Menu:
– Boss/Secretary function off (page 142)
– Call Deblocker (page 104)
– Call Forwarding Subscriber (page 107)
– Call Restrictor (page 105)
– Call waiting (page 102)
– Caller list (page 87)
– Calls list (page 85)
– Delete call charge (page 94)
– Delete data (page 94)
– Do-not-disturb (page 103)
– Door function (page 115)
– Follow-me (page 109)
– Group (page 133)
– Headset (page 97)
– InterCom authorization (page 127)
– Group function off (page 135)
– MSN/DDI Call Forwarding (page 111)
– Phone lock (page 98)
– Pickup (page 95)
– Project (page 125)
– Relay (page 116)
– Ringer backlight (page 100)
– Ringer tone (page 99)
– Room monitoring (page 106)
– Scheduled call (page 90)
– Switch configuration (page 114)
* Scroll to the requested selection with the
–
–
–
–
–
–
–
–
–
TAM announcement (page 201)
TAM automatic (page 205)
TAM automatic call recording (page 206)
TAM list (page 190)
TAM message forwarding (page 211)
TAM readiness (page 189)
TAM voice memo (page 193)
Waiting field reception (page 143)
additional
**
Select the administration level ( ):
– User
– SubAdministrator
– Administrator
Enter the corresponding PIN
softkeys and press the
To scroll back to the previous menu level, press the
softkey to select the function.
softkey.
To return to the idle state, press the exit key. Besides this the telephone automatically switches back to the idle
state if no key has been pressed for 30 seconds.
Some functions are only offered if the function is available on the PBX and has been configured and perhaps an
authorization for the use of this function has been assigned.
34
Introduction
Display-driven Usage of the Telephone
Pic. 12: Key Programming Menu
Press the key to be defined
Select the level to be selected ( ):
– First level
***
– Second level
Selection list* in the Key programming
menu:
– Boss key (page 141)
– Boss/Secretary function off (page 142)
– Call Deblocker (page 104)
– Call Forwarding Subscriber (page 107)
– Call Restrictor (page 105)
– Call waiting (page 102)
– Caller list (page 87)
– Calls list (page 85)
– Do-not-disturb (page 103)
– Door function (page 115)
– Exchange line (page 118 and page 120)
– Exchange line transfer (page 138)
– External MSN (page 119)
– Follow-me (page 109)
– Group (page 133)
– Headset (page 97)
– Hotel room (page 149)
–
–
–
–
–
–
–
–
–
–
–
–
–
–
–
–
–
–
–
–
–
–
–
–
–
–
–
–
–
–
–
InterCom (page 129)
InterCom authorization (page 127)
Group function off (page 135)
Macro (page 123)
MSN/DDI Call Forwarding (page 111)
Phone lock (page 98)
Pickup (page 95)
Project (page 125)
Relay (page 116)
Ringer backlight (page 100)
Ringer tone (page 99)
Room monitoring (page 106)
Scheduled call (page 90)
Secretary key (page 139)
Shift
Speed dialling (page 122)
Switch configuration (page 114)
TAM announcement (page 203)
TAM automatic (page 205)
TAM automatic call recording (page 206)
TAM call recording (page 207)
TAM list (page 190)
TAM message forwarding (page 211)
TAM readiness (page 189)
TAM voice memo (page 193)
Text before answering (page 135)
Voicemail Centre (page 131)
VoIP account (page 121)
Waiting field reception (page 143)
Waiting field (page 143)
additional **
** The functions available in the selection list can be blocked against unauthorized use (page 165). The release or
display of these blocked functions in the selection list requires to enter of the corresponding PIN after selecting “additional” (see also Pic. 11 on page 34). The release stays active during the now following settings and will be reblocked again after 60 seconds without pressing a key or by pressing the selection “logout” in the menu “settings
왘 blocking 왘 additional”. Additionally in this menu it is possible to check and change the now existing releases.
*** If the selected key/level has already been assigned with another function, a selection menu follows for the next
procedure after selecting the level. If you select “new”, you select a new function for the corresponding key. If you
select “Delete”, the key will be empty thereafter. Keys that are assigned with defined functions, can be redefined
via “change” (e.g. new telephone number for Call Forwarding). If you are in error and if you like to continue to use
the previous status, press the
softkey.
35
Introduction
Display-driven Usage of the Telephone
Pic. 13: Settings Menu
Selection List* in the Settings Menu:
– Synchronization
– Answering machine
– Backup
– User settings
– Display
– Default settings
– Lists
– Signalling
– Blocking
Selection List* for Display:
– Date format (page 161)
– Display light (page 159)
– Time format (page 160)
– Brightness max. (page 159)
– Brightness min. (page 159)
– Contrast (page 160)
– additional **
Selection List* for Signalling:
– Attention tone (page 168)
– Call waiting tone (page 168)
– Headset ringer (page 169)
– Message LED (page 167)
– Ringer melody (page 170)
– Ringer volume (page 170)
– additional **
Selection List* for Blocking:
– User PIN (page 167)
– Function lock (page 165)
– Settings lock (page 166)
– additional **
* Scroll to the requested selection with the
Selection List* for Def. settings:
– Headset type (page 158)
– Language (page 157)
– MSN (page 157)
– VMC461.2 FW >= 2.02 (page 158)
– additional **
Selection List* for Lists:
– Caller list (page 173)
– Calls list (page 173)
– Phone book (page 174)
– Redial list (page 173)
– additional **
softkeys and press the
softkey to select the function.
To scroll back to the previous menu level, press the
softkey.
To return to the idle state, press the exit key. Besides this the telephone automatically switches back to the idle
state if no key has been pressed for 30 seconds.
** The functions available in the selection list can be blocked against unauthorized use (page 165). The release or display of these blocked functions in the selection list requires to enter of the corresponding PIN after selecting “additional” (see also Pic. 11 on page 34). The release stays active during the now following settings and will be reblocked again after 60 seconds without pressing a key or by pressing the selection “logout” in the menu “settings
왘 blocking 왘 additional”. Additionally in this menu it is possible to check and change the now existing releases.
36
Introduction
Display-driven Usage of the Telephone
Selection List* for Synchronization:
– Synchronization with PBX (page 182)
– Distribute Firmware (page 182)
– Firmware Update (page 181)
– Select PBX (page 184)
– additional **
Selection List* for Answering machine:
– Release (page 24)
– Accepting call (page 196)
– Announcement (page 199)
– Automatic playback (page 198)
– Call record tone (page 208)
– Forwarding target (page 214)
– Forwarding time (page 214)
– Forwarding announcement (page 213)
– Forwarding repetition time (page 215)
– Forwarding repetitions (page 215)
– Listen in (page 197)
– Quick access (page 211)
– Recording delay time (page 196)
– Recording time (page 197)
– Remote access (page 209)
– Remote access toll saver (page 210)
– additional **
Selection List* for Backup:
– Automatic (page 218)
– Configuration (page 216)
– COMfortel 2500 -> SD-Card (page 217)
– SD-Card -> COMfortel 2500 (page 217)
– additional **
Selection List* for User settings:
– Keys 2nd level (page 163)
– Macro display (page 162)
– Menu definition (page 162)
– Speed dialling key (page 164)
– additional **
37
Make a Call
M AKE A CALL
Telephone with Comfort
Handsfree Operation
In case of handsfree operation the loudspeaker and the microphone are switched on in the
device. This way you can make a call although you do not have any free hand. Besides this
another person in the room can take part in the call.
During a call you can activate loudspeaker and microphone in the device by pressing the
loudspeaker key (approx. 2 seconds) (see Pic. 14 on page 39). In this mode the microphone of the receiver is switched off but the loudspeaker of the receiver stays active.
During the connection setup the handsfree operation can be switched on with the hook
key as well as with the loudspeaker key (see Pic. 14 on page 39). The same way you can
also terminate the call.
During handsfree operation the following symbol is presented on the display:
.
☞
Advice
With help of the plus/minus keys you can change the volume in the loudspeaker during the
handsfree operation.
In case of headset operation there are some differences to this usage because the hook key
is needed for the starting and finishing of a headset call (see page 41).
Switch on/off Speaker Mode
In the speaker mode the loudspeaker in the device is switched on in addition to the loudspeaker and microphone in the receiver. Due to this you can enable a person in the room to
listen to the call, too. You will continue the call via the receiver (no handsfree operation).
You can switch on/off the speaker mode during a call by pressing the loudspeaker key
once and shortly - (see Pic. 14 on page 39).
If you hang up the receiver in the speaker mode, the call will be finished. You can switch from
speaker mode to handsfree operation by pressing the loudspeaker key a longer period of
time (approx. 2 seconds).
During speaker mode the following symbol is presented on the display:
.
☞
Advice
38
With help of the plus/minus keys you can change the volume in the loudspeaker during
speaker mode.
Make a Call
Telephone with Comfort
Pic. 14: Handsfree Operation and Speaker Mode (Overview)
Idle State
Dial telephone number and press loudspeaker key
Dial telephone number and press hook key
–> Handsfree operation
–> Handsfree operation
Handsfree Operation
Press loudspeaker key
–> Idle state
Press hook key
–> Idle state
Pick up the receiver –> Normal call
Normal Call
Hang up the receiver –> Idle State
Hold the loudspeaker key
for approx. 2 seconds –>
Handsfree operation (receiver off-hook)
Press the loudspeaker key
Handsfree Operation
–> Speaker mode
(Receiver is off-hook)
Press loudspeaker key
Press hook key
–> Normal call
and hang up –> Idle State
Speaker Mode
Press loudspeaker key
for approx. 2 seconds –>
Handsfree operation (receiver is picked up)
Press loudspeaker key
–> Normal call
Hang up the receiver –> Idle State
39
Make a Call
Telephone with Comfort
Finish a Call without hanging up the Receiver
If you like to finish the current call and like to start another call right after, you do not have to
hang up the receiver. If you press the hook key, the telephone returns to the idle state in spite
of the picked up receiver and you can start a new call.
☞
If you do not start to dial within 30 seconds, you will hear a busy tone in the receiver.
Advice
Pic. 15: Finish a call without hanging up
Normal Call
Press hook key
–> Idle state (receiver is off-hook)
Idle State (Receiver is picked up)
Dial telephone number and press hook key
–> Normal call
The Call Partner hangs up
If your call partner finishes the call, your telephone will enter the idle state. If the receiver is
off-hook, a busy tone can be heard in the receiver for some seconds and then also in the
loudspeaker of the handset module. This should prevent the case that the receiver has not
been hanged up properly by mistake.
Muting the Microphone
If you like to discuss anything with anyone in the room without being heard by your call partner, you can press the muting key. In this case the currently active microphone – in the
receiver, basic unit or headset – will be deactivated and can be activated again by pressing
the muting key.
While muted the following symbol is shown in the display:
.
40
Make a Call
Telephone with Comfort
Pic. 16: Mute a Call
Normal Call
Press microphone key
–> Microphone is switched off
Microphone is switched off
Press microphone key
–> Normal call
Make Calls via Headset with the COMfortel 2500
☞
Advice
In order to be able to make calls via headset, the headset operation must be activated (see
page 97).
In headset operation you can start calls from the idle state by simply pressing the hook key
(see Pic. 17 on page 42). The repeated pressing of the hook Key during a call – independent from the call type – terminates it.
If you additionally pick up the receiver during the headset call, the call can be listened to via
its loudspeaker (the microphone in the receiver is still switched off). At any time the receiver
can be hung up without finishing the call (see Pic. 18 on page 43).
You can change the volume in the headset with help of the plus/minus keys.
Make Calls via Headset with the COMfortel 1500
☞
Advice
In order to be able to make calls via headset, the headset operation must be activated (see
page 97).
In headset operation you can start calls by simply pressing the hook key during the idle
state (see Pic. 17 on page 42). The repeated pressing of the hook key during a call - independent from the call type – terminates it.
You can change the volume in the headset with help of the plus/minus keys.
41
Make a Call
Telephone with Comfort
Idle State
Pic. 17: Headset Operation with Handsfree
Operation and Speaker Mode (Overview)
Dial telephone number and press hook key
–> Normal
headset call
Dial telephone number and press loudspeaker key
–>
Handsfree operation
Normal Headset Call
Hold the loudspeaker key
for approx. 2 seconds –> Handsfree operation
Press loudspeaker key
–> Speaker mode
Press hook key
–> Idle State
Handsfree Operation
Press loudspeaker key
–> Normal headset Call
Press hook key
Speaker Mode
Press loudspeaker key
for approx. 2 seconds –>
Handsfree operation
Press loudspeaker key
–> Normal headset call
Press hook key
42
–> Idle State
–> Idle State
Make a Call
Telephone with Comfort
Normal Headset Call
Pic. 18: Headset Operation with the receiver
(Overview)
Pick up the receiver –> Listen-in with the receiver
Handsfree Operation
Pick up the receiver –> Listen-in with the receiver
Speaker Mode
Pick up the receiver –> Listen-in with the receiver
Listen-in with the Receiver
Hang up the receiver –> Normal headset call
Press hook key
Press loudspeaker key
–> Idle State (receiver is picked up)
–> Handsfree operation (receiver
is picked up)
Press function key “Headset” (page 97)
Handsfree Operation
–> Normal call
(Receiver is picked up)
Hang up the receiver –> Handsfree operation
Press hook key
Press loudspeaker key
–> Idle State (receiver is picked up)
–> Listen-in with the receiver
Idle State (Receiver is picked up)
Dial telephone number and press hook key
–> Listenin with the receiver
Dial telephone number and press loudspeaker key
–>
Listen-in with the receiver
43
Make a Call
Inbound Call
Inbound Call
Pic. 19: Display Options for an inbound Call
Softkeys:
–
: Scroll in the function list
–
: Select displayed function
[ caller]
[ called MSN]
forwarder
[ called partner]
[ function]
Information on a call:
– Caller or call type (in case of special call
e.g. wake-up call, alarm call)
– Called MSN/exchange line (for external
call) or door bell button (for door call)
– InterCom type (for InterCom call)
– Forwarder3 (in case of a forwarded call)
– Called partner (subscriber or group)
[ caller]
[ called partner]
[ function]
Functions:
– Accept call (page 45)
– Reject call (page 45)
– Put the call on Hold (page 46)
– Ringer off
– Take the waiting call (page 47)
– Reject the waiting call (page 46)
– Switch off the Call Waiting tone
(page 47)
If the telephone number has been entered in the telephone book of your system telephone
or in the central telephone book (short-code dialling numbers) of your PBX, the corresponding name is shown on the display instead of the telephone number as soon as the telephone
has identified the telephone number. When you are called the display shows the telephone
number or the caller’s name even before you pick up the receiver. Required for the display
of the telephone number of an external subscriber is that the caller does not suppress his telephone number or that he has released his telephone number for transmission.
If the caller’s name is not in the telephone book, the name can be searched via the function
Online Name Search 3 on a server in the Internet (see manual of the PBX). If the telephone
number is transferred in case of an inbound call, the PBX searches the corresponding entry
automatically. If an entry was found, this would be shown on the display of the system telephone.
If the telephone number is not available, the display shows “unknown”.
During a current conversation your attention is drawn to a call (external or internal subscriber;
alarm or visitor at the door) via a knocking tone (tone and/or flashing Hook LED; see
page 168).
☞
Advice
3
Your systems telephone will display the functions which are selectable during a call in the
bottom line. With help of the
and softkey you are able to scroll through the different
options. With the
softkey you will start immediately the displayed function.
Only available in case of operation on the PBX systems COMpact 5010 VoIP, COMpact 5020 VoIP,
COMmander Basic.2 and COMmander Business.
44
Make a Call
Inbound Call
With the function Pickup you can take inbound calls to other telephones on your own telephone (see page 48).
If your system telephone is called with the InterCom function, the system telephone takes the
“call” automatically after a short ringer tone. The announcement or the handsfree operation
is limited to 120 seconds for security reasons to prevent an abuse of this function (e.g. eavesdropping in remote rooms). After this time the connection will be interrupted automatically if
the receiver of the system telephone is not picked up within this time frame.
Your own Telephone rings - Accept the Call
You get a call.
A
Pick up the receiver.
or
accept
Press the
softkey to start handsfree operation (see also page 38).
You are connected with the
caller.
☞
Advice
Instead of the
softkey you can also press the hook key or the loudspeaker key to use the
handsfree operation.
If you were not at your place or if you were not ready to take the call now, the telephone
number of the caller would be saved in the caller list – if the telephone number is available.
Then you will be able to call back the caller later. The telephone number will automatically be
dialled from the caller list (see page 87).
Calls generated by the telephone or the PBX (wake-up call, alarm call, door terminal call,
scheduled call) are displayed in clear text and may be confirmed by the
softkey (in case
of alarm calls not before picking up the receiver). Additional functions, see page 90 and
page 49.
Your own Telephone rings - Reject the Caller
You get a call but you do not
like to talk to the caller.
Use the
reject.
reject
Press the
and
softkeys to browse to option
softkey to reject the caller.
The caller hears busy if the exchange line number rings only
on one telephone.
45
Make a Call
Inbound Call
Your own Telephone rings - Put the Caller on Hold
You get a call but you cannot
talk to the caller in this moment.
Use the and
hold inbound.
hold incoming
Press the
softkeys to browse to option
softkey to hold the caller.
You can hear the internal dial
tone. The caller on hold listens
to the Music on Hold.
back
Press the
softkey to start the conversation
with the caller on hold.
You are connected with the
caller.
Call Waiting – Reject waiting Call
During a conversation you get
a call but you do not want to
talk to the caller or do not like
to interrupt your present call.
Use the
reject.
reject
Press the
and
softkeys to browse to option
softkey to reject the caller.
The caller hears the busy tone
- if other telephones do not also
ring.
☞
Advice
46
If you like to prevent to hear the Call Waiting tone on your telephone, you can deactivate/
switch off the knocking tone in the menu of the system telephone (page 102).
Make a Call
Inbound Call
Call Waiting – Accept the second Call
During a conversation you get
a call.
accept
Press the
softkey to start the conversation
with the call waiter.
You are connected with the
caller. Your previous call partner is listening to the Music on
Hold.
☞
Advice
If you like to prevent the knocking in your telephone, you can deactivate/switch off the knocking (Call Waiting) via menu of the system telephone (page 102).
If you hang up the receiver first to finish the current call, your telephone will start to ring and
you can take the call.
Call Waiting – Ignore the waiting Call (Deactivate the Call Waiting Signal)
You get a call during a telephone conversation and like to
postpone the acception some
time to continue your current
conversation.
Use the and
call wait. off.
call wait.off
softkeys to browse to option
Press the
softkey to inactivate the Call
Waiting tone.
The caller continues to call and
you can take him at any time.
47
Make a Call
Inbound Call
Answering Machine has accepted the Call – take the Call over4
The answering machine has already accepted the call.
A
Pick up the receiver.
or
Press the
softkey to start handsfree operation (see also page 38).
accept
You are connected with the
caller.
☞
Advice
Instead of the
softkey you can also press the hook key or the loudspeaker key to use the
handsfree operation.
If the tapping is switched on (page 197), you can hear the announcement or message of the
caller via the loudspeaker of the telephone.
Another internal Telephone rings – Pickup the Call (Pickup)
A telephone next to you rings.
Press the
softkey to switch from the idle
state to the second level.
Press the softkey next to pickup to start
pickup.
pickup
N
Enter the telephone number of the ringing
telephone.
[ internal number]
A
Pick up the receiver.
or
Press the hook key to start handsfree operation (see also page 38).
You are connected to the
caller.
4
only with COMfortel 2500 and inserted SD card. After 30 days a chargeable release of the function
COMfortel Voicemail is necessary via Upgrade Centre (see page 21).
48
Make a Call
Inbound Call
☞
Advice
If you press the softkey after entering the internal telephone number, the handsfree operation function is started too.
If you like to take calls directed to another group, dial the Pickup for the group telephone
number.
If there is a name to the internal telephone number, it will be displayed as soon as this telephone number has completely been entered.
You can assign an internal subscriber/group number to a freely programmable function key
(speed dialling key; see page 122). A red flashing LED signals a call to this number and you
can pickup that call by pressing the key and accepting it. You can also configure a pickup key
(see page 95). After pressing this key, you have to select a telephone as described here.
This way you can also start a call take-over from telephones or answering machines where
this is permitted (see manual of the PBX).
COMpact 5010/5020 VoIP and COMmander Basic.2/Business: Depending on the authorization assigned to your telephone, you can do a Pickup for any available telephones, for telephones within a group or you cannot do it at all.
Your own Telephone rings (Door Call) – Accept the Call and open the Door
You get a Door Call.
A
Pick up the receiver.
or
Press the hook key to start handsfree operation (see also page 38).
open door/light
☞
Advice
Press the
softkey to open the door. (If the
third door relays is used for switching the staircase light, it will be also switched on.)
You will be able to programme the door terminal communication, the door opener and light
switching for a certain door on a freely programmable function key (see page 115). This way
you can also use the door functions without a call to your telephone.
49
Make a Call
Inbound Call
Door Call Waiting – Open the Door without taking the Call
You can handle the door Call Waiting during a call like any external subscriber in general.
That means you are able to take the call to reject it or to ignore it. Additionally you are able
to handle the door opener if you do not like to interrupt your call, but to open the door for the
visitor.
You get a Door Call.
Use the and softkeys to browse to option
open door/light.
open door/light
50
Press the
softkey to open the door. (If the
third door relays is used for switching the staircase light, it will also be switched on.)
Make a Call
Dialling a Telephone Number
Dialling a Telephone Number
If you have already picked up the receiver at the moment of dialling, the dialled telephone
number will immediately be dialled.
The dial preparation - dial first and pick up the receiver later - allows to check the entered
telephone number and make corrections before the connection will be made.
☞
Advice
You can also dial the telephone number from the lists available in the telephone (see
page 75) or take it into the dial preparation.
If you like to present a certain telephone number from your pool of numbers to the called person, you can select the MSN to be presented before picking up the receiver (see page 53).
If you do not want to present your telephone number to the called person, use the telephone
number suppression (see page 53).
You can select one of the available external S0 ports (ISDN connection, exchange line)
before you start calls e. g. to split invoices (see page 55).
Pick up the Receiver and dial the Telephone Number
A
Pick up the receiver.
or
Press the hook key to start handsfree operation (see also page 38).
N
[ telephone number]
Dial a telephone number (external telephone
number with exchange line access number).
If you finished dialling the telephone number, the subscriber
will be called.
☞
Do not forget to enter the exchange line access number “0” in case of external number or
confirm the
softkey next to “public exchange” (Exceptions: Direct Exchange Line TeleImportant phone; see page 56).
☞
Advice
As soon as you have dialled the first digit, you can interrupt the dialling by pressing the
softkey and start again.
51
Make a Call
Dialling a Telephone Number
Dial with Dial Preparation
N
Dial a telephone number (external telephone
number with exchange line access number).
[ telephone number]
A
Pick up the receiver.
or
Press the hook key to start handsfree operation (see also page 38).
The subscriber is called.
☞
Advice
During the telephone number entry you can make corrections. Move the cursor to the left
and right by pressing the
and
softkeys. Delete a digit in front of the cursor by pressing
the
softkey.
You can copy a telephone number of the dial preparation directly into the telephone book by
pressing the
softkey (see page 82).
☞
If you like to quit the menu without dialling the input telephone number, press the exit key.
Please enter the external telephone numbers always with an exchange line access number
“0”. (Exception: Direct Exchange Line Telephone; see page 56.)
Important
Dial stored Telephone Number via Speed Dialling
Press the function key you have programmed
(see page 122) to dial the saved telephone
number.
The name assigned to the
speed dialling key will be displayed.
A
Pick up the receiver.
or
Press the hook key to start handsfree operation (see also page 38).
The subscriber is called
☞
Advice
52
You can configure your telephone to dial the corresponding telephone number directly after
pressing the speed dialling key (see page 164).
Make a Call
Dialling a Telephone Number
Transfer certain Telephone Numbers (MSN)
5
Press the function key you have programmed
(see page 119 and page 120) to activate a
certain MSN for the next call.
The presentation of the MSN is
activated (LED glows)5.
N
Dial a telephone number (external telephone
number with exchange line access number).
[ telephone number]
A
Pick up the receiver.
or
Press the hook key to start handsfree operation (see also page 38).
The subscriber is called
☞
Advice
If you have a “dark glasses” symbol on your display (sunglasses ), the number presentation is currently suppressed. Press the softkey next to the sunglasses to disable the suppression.
If you activate a MSN for the next call and get an inbound call before making the call, the
MSN will be resetted to default.
The called Partner should not see your Telephone Number (Number Suppression)
Press the
softkey to activate the suppression for the next call.
On the display there are dark
sunglasses c to signal the activated telephone number suppression.
N
Dial a telephone number (external telephone
number with exchange line access number).
[ telephone number]
A
Pick up the receiver.
or
5
COMpact 5010/5020 VoIP and COMmander Basic.2/Business: The LED does not glow after the pressing of the key, instead the function is shown in the dial preparation.
53
Make a Call
Dialling a Telephone Number
Press the hook key to start handsfree operation (see also page 38).
☞
The subscriber is called.
You can use this function only if your network provider supports the ISDN feature “Calling
Line Identification Restriction (CLIR)” on your exchange line.
Important
☞
Advice
The activation of the number suppression exists until the
softkey is pressed again.
This softkey can be switched off with the configuration programme COMset of the PBX.
Select a certain VoIP Account6
Press the function key you have programmed
(see page 121) to activate a certain VoIP
account for the next call.
The account number will be
shown in the dial preparation.
N
Dial a telephone number (external telephone
number with exchange line access number).
[ telephone number]
A
Pick up the receiver.
or
Press the hook key to start handsfree operation (see also page 38).
The subscriber is called.
6
Only available when operated on the PBX systems COMpact 5010 VoIP, COMpact 5020 VoIP, COMmander Basic.2 and COMmander Business.
54
Make a Call
Dialling a Telephone Number
Split Call Charges by selecting the Exchange Line 7
Press the Function key you have set up as
(see page 118) to activate a selected
exchange line for the next call.
N
Dial a telephone number (external telephone
number without exchange line access
number).
[ telephone number]
A
Pick up the receiver.
or
Press the hook key to start handsfree operation (see also page 38).
The subscriber is called via the
selected exchange line.
☞
Advice
7
Requirement for this exchange line selection is that your PBX has several ISDN connections.
You can also use the special access number of the PBX (see manual of the PBX) instead of
the function key like from any other telephone.
Only available when operated on the PBX systems COMpact 2204 USB, COMpact 2206 USB, COMpact 4406 DSL, COMpact 4410 USB and COMmander Basic.
55
Make a Call
Dialling a Telephone Number
Dial a Number with a Direct Exchange Line Telephone
If your telephone is configured as a direct exchange line telephone (with the configuration
programme COMset), you will hear the external dial tone right after picking up the receiver.
In order to call an external connection, you have to dial the external telephone number without the exchange line access number “0”.
In order to call the other kinds of call (internal, short-code dialling numbers and so on.), you
have to start an internal call first after picking up the receiver.
If you like to use the dial preparation or e.g. like to make an entry for the telephone book or
destination speed dial key, you have to press the star key twice first for these call types8:
Internal call, Short-code Dialling, private exchange line access, programming of the PBX, etc.
An external number has to be entered without exchange line access number “0”.
A
Pick up the receiver.
or
Press the hook key to start handsfree operation (see also page 38).
You are hearing the external
dial tone.
internal
Press the
softkey to start internal call.
You are hearing the internal
dial tone.
N
[ internal number]
Dial a telephone number.
If you finish dialling the telephone number, the subscriber
will be called.
8
Only valid for internal dialling and speed dialling if operated on the PBX systems COMpact 5010 VoIP,
COMpact 5020 VoIP, COMmander Basic.2 and COMmander Business (see manual of the PBX).
56
Make a Call
Outbound Call
Outbound Call
Pic. 20: Display Options for outbound Calls
Softkeys:
–
: Scroll in the function list
–
: Select displayed function
[ scr or group]
[ called partner]
[ advice]
[ function]
Information on the call:
– Subscriber or group (in case of a
membership in a group)
– Called partner
– Advice (e.g. busy, Do-not-Disturb, no
authorization)
[ called partner]
[ advice]
[ function]
Functions:
– Start a recall (page 59)
– Redial
– Scheduled call (page 67)
– Start Power Dialling (page 60)
– Start priority call (page 61)
– Back to the waiting caller (page 61)
– put into Waiting Field (page 144)
If the dialled telephone number is assigned to a name in the telephone book of the system
telephone, this is shown as soon as the telephone recognizes the telephone number. The
telephone number is overwritten by the name.
☞
Advice
Your systems telephone will display the functions which are selectable during a call in the
bottom line. With help of the and softkeys you are able to scroll through the different
options. With the
softkey you will start the displayed function immediately.
In case of less than nine entered digits, these are displayed in extra large size digits to provide better readability (during the dialling/during the calling). If the dialled telephone number
is assigned to a name with less than nine characters in the telephone book of the system telephone it is also presented in big letters.
If you call a subscriber that is busy, you start an automatic recall in order to avoid redial operations (see page 58).
If you call an internal telephone but the called subscriber does not pick up, you will be able
to reach him without Redialling by starting an automatic recall (see page 59).
If you have called a second subscriber for a query out of a current call and this partner is
busy/does not take the call, you can return to the waiting call by pressing the softkey (see
page 61).
If you tried to transfer your call partner, and the called person is busy, the call partner could
be set on Hold (see page 65).
57
Make a Call
Outbound Call
The called Telephone is busy – Start automatic Recall
The subscriber called by you is
busy.
recall
If the recall has been activated,
you get the message “recall activated”.
Press the
softkey to start automatic recall.
B
Hang up the receiver.
A
Pick up the receiver to initiate the recall.
As soon as the subscriber is
not busy anymore, you are
called by the central office/
PBX.
or
reject
Press the
softkey to cancel the recall.
If you pick up the receiver, the
subscriber is called.
☞
The external connection must meet the technical requirements for an automatic recall. For
example: The automatic recall to a PTP connection is not supported by each network proImportant vider.
☞
Advice
It is possible that you are called by the public exchange as soon as one B channel of the previously called ISDN connection is free. If the person you want to recall is telephoning on the
other B channel, this recall will be without success.
An automatic recall is processed up to 45 minutes in the public exchange. If the subscriber
you like to talk with did not finish his call until then, the automatic recall will be cancelled automatically. If you do not pick up the receiver in time (you are called for 30 seconds), the automatic recall will also be cancelled.
58
Make a Call
Outbound Call
Nobody takes the Call on the called Telephone - Start Recall
Nobody takes the call on the
called telephone.
recall
If the recall has been activated,
you get the message “recall activated”.
Press the
softkey to start automatic recall.
B
Hang up the receiver.
A
Pick up the receiver to initiate the recall.
As soon as the telephone was
used, you would be called by
the central office/PBX.
or
reject
Press the
softkey to reject the recall.
☞
If you have pick up the receiver, the subscriber is called.
You can only use this function for external calls if the ISDN service attribute “Recall on no
reply (CCNR)” has been activated by the network provider.
Important The external connection must meet the technical requirements for an automatic recall. For
example: The automatic recall to a PTP connection is not supported by each network provider.
☞
Advice
An automatic recall is processed up to 45 minutes in the public exchange. If the subscriber
you like to talk with did not finish his call until then, the automatic recall will be cancelled automatically. If you do not pick up the receiver in time (you are called for 15 seconds), the automatic recall will also be cancelled.
59
Make a Call
Outbound Call
Start Power Dialling if automatic Recall is not possible
If the called subscriber is busy, but an automatic recall is not possible, you are able to activate
the function “power dialling” instead. Then the system telephone will try to reach the corresponding subscriber every 10 seconds. The system telephone automatically cancels the
“power dialling” after 10 minutes. Due to interruptions (e.g. calls which you have started) this
period prolongs itself.
As soon as the subscriber is not busy any longer and the system telephone gets the unblocking signal, it will activate the loudspeaker. If the subscriber takes the receiver off-hook, the
communication will start. If he does not take the receiver off-hook, then the “power dialling”
will be cancelled.
The called subscriber is busy.
Use the and softkeys to browse to option
power dialling.
power dialling
Press the
softkey to start power dialling.
Press the
ling.
softkey to deactivate power dial-
As soon as the called subscriber is free, the telephone
will establish the connection.
Deactivate Power Dialling
☞
The telephone tries to establish
a connection.
In case of a call to a VoIP telephone number the function “Power Dialling” must not be used.
Important
☞
Advice
If the called subscriber is not busy, the system telephone automatically activates the loudspeaker and the connection will be started as soon as the called partner has picked up the
receiver. Therefore you should avoid leaving your telephone alone if the power dialling is activated.
If you like to cancel an ongoing “Power Dialling”, you can do this by pressing the corresponding softkey in the idle state of the telephone or during an attempted call by pressing the hook
key.
The automatic activation of the loudspeaker will be signalled by a short information tone (the
volume is subject to the configured ringer volume, but lower). If you are disturbed by the information tone, you could switch it off in the telephone (see page 168).
60
Make a Call
Outbound Call
The called internal Subscriber has Do-not-Disturb enabled – Priority Call
Do-not-Disturb is active on the
telephone you called and you
hear the busy tone but you urgently want to get the called
person on the phone.
priority call
Press the
softkey to start the priority call.
Now the subscriber is called.
The Query Call is busy/does not answer – Finish the Call
The subscriber called for the
Query call is busy.
back
Press the
softkey to finish the query call.
You are connected to the waiting call partner again.
☞
Advice
Do not hang up in this case. You would also disconnect the connection to the waiting person
in the background or start a Blind Transfer.
If you like to try another telephone number, scroll to the function “new: dialling” and start it.
Then you can dial a new telephone number without explaining the second try to the waiting
party in the background.
61
Make a Call
In the Call
In the Call
9
Pic. 21: Display Options in the Call
Softkeys:
–
: Scroll in the function list
–
: Select the displayed function
–
: View information on the call
wk 03 Mo 16.Jan 12:44
[ call partner]
[ charges] [ duration]
[ function]
[ call partner]
[ charges] [ duration]
[ function]
Functions:
– Start recall (page 64)
– Start transfer (page 64)
– Start Pickup (page 66)
– Assign project number (page 125)
– Enter telephone number (memo; page 68)
– Scheduled call (page 67)
– Put into Waiting Loop (page 65)
– Put into Waiting Field (page 144)
– Recording of a call (page 207)
Time information:
– Calendar week
– Day of the week
– Date
– Time
Information on the call:
– Call partner
– Charges (in case of inbound external call)
– Duration in minutes:seconds (after 59:59 in hours:minutes)
Information on the call:
– Telephone number
– Dialled MSN (in case of inbound external call)9
– Exchange line used (for exchange line selection)
– Provider number and name
– Duration
– Charges
– Project number and name
Softkeys:
–
: Scrolling
–
: Exit from the display
9
[ call
[ info
[ info
[ info
[ info
partner]
text]
text]
text]
text]
[ info text]
[ info text]
[ info text]
If operated on the PBX systems COMpact 5010 VoIP, COMpact 5020 VoIP, COMmander Basic.2 and
COMmander Business also outbound MSN used for the call.
62
Make a Call
In the Call
☞
Advice
Your systems telephone will display the functions which are selectable during a conversation
in the bottom line. With help of the and softkeys you are able to scroll through the different options. With the
softkey you will start the displayed function immediately.
On the COMfortel 1500 you can view the time information (date, time, calendar week, day of
the week) by pressing the
softkey followed by scrolling with the and softkeys.
During an existing connection you can send DTMF signals with the keypad (tones according
to the dual-tone multi-frequency standard), e.g. to control an answering machine. The dialled
digits are presented in the display. If there is a bigger quantity of DTMF signals that you often
need, you can configure a function key as a Macro (see page 81).
If you like to call your current call partner later again, you can be reminded by your telephone
at a defined date later (see also page 90).
During a current call your attention is drawn to a call (external or internal subscriber, alarm
or visitor at the door) by a knocking signal (tone and/or flashing hook LED; see page 168).
You can accept the waiting call (page 47), reject it (page 46) or switch off the knocking tone
temporarily (page 47).
With the function Pickup you can also take-over calls to your own telephone during a call to
other telephones (see page 66).
View Information on a Call
During a call you get information on the call and the call partner as well as general time information (date, time, calendar week, day of the week) on the display. As it is not possible to
view all information at the same time, you can view them as described in the following.
You are in a call.
Press the
the call.
softkey to get information about
All available information on the
call
are
presented
(see
Pic. 21).
Use the and
the information.
Press the
☞
Advice
softkeys to browse through
softkey to leave the menu.
The provider used for the call, is only shown if LCR easy is used (see manual of the PBX).
The call charges are only shown if the charge transfer has been activated by the network provider.
63
Make a Call
In the Call
Start a second Call (Query)
You are in a call.
query/transfer
Press the
softkey to start query.
You are hearing the internal
dial tone. Your previous call
partner is on Hold in the PBX
and is hearing the Music on
Hold.
N
[ telephone number]
Dial a telephone number (external telephone
number with exchange line access number).
If you finished dialling the telephone number, the subscriber
will be called.
☞
Advice
If the telephone number of the query subscriber is in the telephone book of the system telephone, you will be able to start the query directly out of the telephone book (without pressing
the
softkey before).
If the telephone number of the query subscriber is on a freely programmable function key
(speed dialling key; see page 122) you will be able to start your query by pressing this key
(without pressing the
softkey before.
Transfer a Call Partner (Blind Transfer)
You are in a call.
query/transfer
Press the
softkey to start transfer.
You are hearing the internal
dial tone. Your previous call
partner is on Hold in your PBX
and is hearing the Music on
Hold.
N
[ internal number]
If you finished dialling the telephone number, the subscriber
will be called.
64
Dial an internal telephone number.
Make a Call
In the Call
B
Replace the receiver.
The internal subscriber is
called further on. If he takes the
call, the connection will be established.
☞
Advice
You can also wait to hang up until you will have talked to the internal subscriber (Transfer
with announcement).
If the called subscriber does not take the call, the call will return to your own telephone after
60 seconds (your telephone rings).
If you like to transfer an external call partner to an internal subscriber and if the internal subscriber is busy, you will be able to put the external call partner into the waiting loop (see
page 65).
If the telephone number of an internal subscriber has been assigned to a freely programmable function key (speed dialling key; see page 122), you can start the query by simply pressing this key (without pressing the
softkey first).
COMpact 5010/5020 VoIP and COMmander Basic.2/Business: To perform call parking, you
dial the internal base telephone number + parking position instead of the internal telephone
number and hang up (see also manual of the PBX). For a comfortable operation you can
assign the internal base telephone number + parking position on several freely programmable function keys (speed dialling key; see page 122). The LEDs of speed dialling keys signals
then if a parking position is available or in use.
If you took another call during an already existing call, e.g. a waiting caller (now you are
already connected with two subscribers), and this second subscriber likes to be transferred
to another one, you will be able to start a third call (see page 72).
If you transfer a call to an external subscriber, you are not allowed to hang up during the calling but you have to announce the call to be transferred with a query. (Please pay attention to
the necessary authorization for call exchange; see manual of the PBX).
Put an external Call Partner into the Waiting Loop
The internal telephone called
by you during a call transfer is
busy.
Use the and
waiting loop.
waiting loop
softkeys to browse to option
Press the
softkey to put the waiting Call
Partner into the Waiting Loop.
65
Make a Call
In the Call
B
Replace the receiver.
The external call partner continues to hear the Music on
Hold. As soon as the internal
subscriber finished the previous call, he is called again. If
he accepts the call, he will be
connected to the waiting caller.
☞
Advice
If you take a waiting call and are in a query now, you will be able to put this call into the Waiting Loop the same way. The call partner to be transferred has to be the active call partner
(marked by ).
If the internal subscriber does not pick up within 60 seconds or if he is still busy after 3 minutes of waiting, the transferring party will be called again.
If you pick up the receiver, you will be connected to the external call partner again and will be
able to put him on hold again. If you do not take the call within 60 seconds, the exchange line
connection will completely be disconnected. (If you are busy in the meantime, the period will
be shorter.)
Another internal Telephone rings – Pickup the Call
You are in a call. During this
time a telephone next to you
rings.
Use the
pickup.
pickup
Press the
and
softkeys to browse to option
softkey to start “pickup”.
Your are hearing the internal
dial tone. Your previous call
partner is hearing the Music on
Hold.
N
[ internal number]
Enter the telephone number of the ringing
telephone.
When you have finished to dial
the telephone number, you are
connected to the caller.
☞
Advice
66
You will be able to programme an internal subscriber/group telephone number on a freely
programmable function key (speed dialling key; see page 122). Then you can see with help
of the red flashing LED that this number is called. Now you can take over the call to your telephone by simply pressing this destination speed dialling key and confirming the pickup.
Make a Call
In the Call
This way you can also start a call take-over from telephones or answering machines where
this is permitted. (see manual of the PBX).
COMpact 5010/5020 VoIP and COMmander Basic.2/Business: Depending on the authorization assigned to your telephone, you will be able to do pickup for any available telephones,
for telephones within your group or not at all.
Schedule a Call to the current Call Partner (Reschedule Call)
You are in a call and like to recall the call partner later again.
Use the and softkeys to browse to option
reschedule call.
reschedule call
N
[ time/date]
with dial prep.
Press the
softkey to start “reschedule call”.
Replace the time and date with the requested
call date.
Press the
softkey to complete your entry.
Press the
softkey to the left of the option
with dial prep.
The number of the call partner
is displayed (if existing).
N
[ telephone number]
If necessary, change telephone number.
Press the
softkey to complete your entry.
The name of the call partner is
displayed (if existing).
☞
N
[ name]
If necessary, change name.
Press the
softkey to complete your entry.
Please enter the external telephone number always with the exchange line access number
“0”. (Exception: Direct Exchange Line Telephone; see page 56)
Important
☞
Advice
If you do not like to be remembered to a call but only to a date, simply select “just a reminder”
after entering the date. In this case no telephone number is entered but an information text.
A scheduled call can be set, modified or deleted via the 2nd level at any time (see page 90).
This feature can also be programmed on a freely programmable function key (see page 155).
67
Make a Call
In the Call
Enter Memo (Telephone Number Notice)
You have a call and like to note
a telephone number.
Use the
memo.
memo
N
[ telephone number]
Press the
and
softkeys to browse to option
softkey to start “memo”.
Enter the telephone number you like to
remember.
Press the
softkey to complete your entry.
Retrieve Memo (Telephone Number Notice)
Press the
softkey to retrieve the memo.
Press the
softkey to take over the telephone number into the dial preparation.
You can delete the telephone number by pressing the
softkey.
After taking over to the dial preparation you can dial the telephone number by taking the
receiver or enter the number directly into the telephone book by pressing the softkey (see
page 82).
☞
☞
Advice
Please enter the external telephone number always with the exchange line access number
“0”. (Exception: Direct Exchange Line Telephone; see page 56)
Important
Open the Door during a Door Conversation
If you are having a door conversation with a person in front of the door, you are able to use
the door opener as described in the following. You are still connected until you hang up.
You get a door call.
open door/light
☞
Advice
68
Press the
softkey to open the door. (If the
third door relays is used for switching the staircase light, it will also be switched on.)
The function “switch light” causes the separate activation of the 3rd relay of the corresponding door station for the time configured in the PBX.
Make a Call
The Query Call
The Query Call
10
Pic. 22: Display Options for two Conversations
Softkeys:
–
: Scroll in the function list
–
: Select displayed function
–
: Change the call partner (page 70)
–
: View information on the call
wk 03 Mo 16.Jan 12:44
[ call type]
[ call partner 1]
[ call partner 2]
[ function]
[ call partner 1]
[ call partner 2]
[ function]
Functions:
– Finish active call (page 71)
– Connect call partners (page 71)
– Connect active call to third call partner (page 72)
– Start conference (page 72)
– Return from conference to alternation (page 74)
– Recording of a call (page 207)
Time information:
– Calendar week
– Day of the week
– Date
– Time
Information on the Call:
– Call partner 1
– Call partner 2
– Call type (alternation or conference)
Information on the Call:
– Telephone number
– Dialled MSN (in case of inbound external call)10
– Exchange line used (for exchange line selection)
– Provider number and name
– Duration
– Charges
– Project number and name
Softkeys:
–
: Scrolling
–
: Exit from display
[ call
[ info
[ info
[ info
[ info
partner]
text]
text]
text]
text]
[ info text]
[ info text]
[ info text]
10
If operated on the PBX systems COMpact 5010 VoIP, COMpact 5020 VoIP, COMmander Basic.2 and
COMmander Business also outbound MSN used for the call.
69
Make a Call
The Query Call
During a query you are talking to a call partner while your previous call partner is put on hold
in the COMmander Basic and listens to the Music on hold. You are starting a query call by
calling a query subscriber, a pickup, or accepting a waiting caller.
☞
Advice
Your systems telephone will display the functions which are selectable during a conversation
in the bottom line. With help of the and softkeys you are able to scroll through the different options. With the
softkey you will start the displayed function immediately.
Supposing that you are already talking and you accept another call, e.g. a waiting caller, (you
have been already connected to 2 subscribers) and this 2nd subscriber likes to be transferred
to another subscriber. In this case you are able to start an internal 3rd call.
Switch between Call Partners (Alternation)
If you start a query and like to talk to both call partners, you will be able to change from one
partner to the other.
You are in a query conversation. The active call partner is
marked with , the waiting call
partner with
in front of the
name or the telephone number.
[ name or number]
You continue the query conversation, but the other call partner is now active.
70
Press the softkey to the left of the name or
telephone number of the call partner you
want to change to.
Make a Call
The Query Call
Finish one of both Calls
You are in a query conversation. The active call partner is
marked with , the waiting call
partner is marked with in front
of the name or the telephone
number.
[ name or number]
curr.call canc.
Press the softkey to the left of the name or
telephone number you like to disconnect.
Press the
softkey to finish active call.
Then you are in a single call
with the previously waiting call
partner.
☞
If one of both call partners hangs up, you are still connected to the other one.
Advice
Connect both Call Partners
You are in a query conversation.
Use the and softkeys to browse to option
conn.both calls.
conn.both calls
Press the
softkey to connect both calls.
Both call partners are connected.
☞
You can also connect both call partners by hanging up the receiver.
☞
Advice
You can only transfer external call partners if the necessary authorization was configured for
your telephone with the configuration programme of the PBX.
Important
71
Make a Call
The Query Call
Call internal a 3rd Subscriber and transfer it to the active Call Partner
You are in a query conversation. The active call partner is
marked with , the waiting call
partner is marked with in front
of the name or the telephone
number.
Use the and
transf.act.call.
N
transf.act.call
[ internal number]
Press the
softkeys to browse to option
softkey to transfer active call.
Dial the internal telephone number of the
subscriber to be called.
As soon as the called person
has accepted the call, you are
in a 3rd internal call.
transfer
Press the
softkey to connect the currently
active call partner with the previously active
call partner.
Then you have a single call
with your first call partner
again.
Talk to both Subscribers at the same Time (Conference)
You are in a query conversation.
Use the and
conference.
conference
You are in a conference call.
72
Press the
softkeys to browse to option
softkey to start the conference.
Make a Call
In a Conference
In a Conference
In a conference call you talk to two subscribers at the same time. By pressing the softkey
you can switch over from one subscriber to the other. The functions available in the bottom
display for only one of both subscribers, always refer to the subscriber marked with in front
of the name or the telephone number.
Connect both Call Partners: If you like to leave your initiated conference and if your call
partners have to continue their conversation, you will be able to transfer them.
Finish the Conversation with one of the Call Partners: If you finish a conference and like
to continue talking with one of the call partners later on, you will be able to terminate the conversation with the other partner. Of course one of your call partners is able to simply hang up
so that you continue to talk with the other one exclusively.
Alternation: If you finish a conference and like to continue talking to both call partners
separately, you can select one call partner to be put on hold.
Finish the Conversation completely: If you hang up during a conference which was initiated by you, the conversation will be finished completely.
☞
Advice
Your systems telephone will display the functions which are selectable during a conference
in the bottom line. With help of the and softkeys you are able to scroll through the different options. With the
softkey you will start the displayed function immediately.
Connect both Call Partners
You have a conference.
Use the and softkeys to browse to option
conn.both calls.
conn.both calls
Press the
softkey to connect both calls.
Both call partners are connected.
73
Make a Call
In a Conference
Finish the Call with one of the Call Partners
You are in a conference. The
subscriber active for the next
function is marked with
in
front of the name or the telephone number.
[ name or number]
terminate
Press the softkey to the left of the name or
telephone number you like to disconnect.
Press the
softkey to finish active call.
Then you have an individual
call with the other call partner.
Alternate from one Call Partner to the other again (Alternation)
You are in a conference. The
subscriber active for the next
function is marked with
in
front of the name or telephone
number.
[ name or number]
Press the softkey to the left of the name or
telephone number, you like to talk to.
Use the and
splitting.
splitting
Then you are in a query.
74
Press the
softkeys to browse to option
softkey to start the splitting.
Telephone Book and Lists
TELEPHONE BOOK AND LISTS
Telephone Book
The telephone book is good for the entry of useful or frequently dialled telephone numbers
with name. If a telephone number that has been entered in the telephone book, is presented
by a caller, the corresponding name is displayed instead of the telephone number.
The telephone book of the COMfortel 1500 offers a memory for up to 400 entries, the telephone book of the COMfortel 2500 800 entries (telephone number, macros and comments).
Up to four entries may be assigned to one name (contact).
Additionally the internal telephone numbers (subscribers, groups, door terminals, emergency
numbers) as well as the telephone book/the short-code dialling numbers of the PBX are displayed. If one of these entries does not have a name assigned, a name is generated for the
telephone book (e.g. int. TN45, KW-A 05306...). These entries are not editable in the telephone book of the system telephone but only with the corresponding PC software of the PBX
(internal telephone numbers with COMset, short-code dialling numbers with COMtools).
Each name (contact) is assigned to one telephone number entry only.
All contacts are displayed in alphabetic order. You can search through the contacts by scrolling or by entering a name and then directly dial the displayed telephone number (in case of
several telephone numbers the last entered or dialled telephone number will be displayed)
from the telephone book.
Press the telephone book key to switch from
the idle state to the telephone book.
Use the
and
softkeys to browse to the
contact you require.
or
N
Enter the first letter (e. g. press 5 twice for K) of
the searched name via keypad.
The first contact existing under
the first letter is displayed.
Use the
and
softkeys to browse to the
contact you require.
☞
Advice
If there is no contact (display “no entry”) for the entered first letter or not the searched contact,
you can delete this letter again by pressing the
softkey and enter another letter.
If there are several contacts for the entered first letter, you could enter additional letters for a
more precise selection.
75
Telephone Book and Lists
Telephone Book
Pic. 23: Display Options (after pressing the Telephone Book Key)
phone book
Softkeys:
–
: Back to the idle state
–
–
new contact
[ no. entr. ] /800
–
: Open the overview
: Scroll in the telephone book
: Create a new contact
Enter contact name
phone book
new contact
[ no. entr.] /400
New entry;
see Pic. 27 on page 78
Information:
– Number of existing entries / max. number of entries
Pic. 24: Display of the Lists
Softkeys:
–
: Back to the idle state
phone book
[ name]
[ number]
–
: Open overview
–
: Open extended presentation
–
: Display comment
–
–
: Scroll in the telephone book
: Take over entry into the dial
preparation (page 52)
phone book
[ name]
[ number]
Softkeys in the overview:
–
: Scroll in the overview
–
76
: Display contact
Extended presentation;
see Pic. 25 on page 77
Information on the contact:
– Name (contact)
– Telephone number (in case of several
entries for this contact the last dialled or
entered telephone number)
Telephone Book and Lists
Telephone Book
Pic. 25: Extended Presentation
phone book
[ name]
business
mobile-business
private
[ name]
business
mobile-business
Softkeys:
–
: Back to the list presentation (see Pic. 24 on
page 76)
–
: Scroll in the selection list
–
: Call business telephone number
–
: Call private telephone number
–
: Call mobile telephone number
–
: Execute call macro
–
: Display comment
–
: Edit contact
Information on the contact:
– Name
– Telephone number
– Comment
Pic. 26: Edit Contact
phone book
edit
[ name]
business
mobile-business
phone book
[ name]
business
Information on the contact:
– Name
– Telephone number
– Comment
– Ringer melody
Softkeys:
–
: Back to the list presentation (see Pic. 24 on
page 76)
–
–
–
: Scroll in the selection list
: Back to the list presentation (see Pic. 24 on
page 76)
: Change the name
–
: Change the business telephone number
–
: Change private telephone number
–
: Change mobile telephone number
–
: Change call macro
–
: Change comment
–
: Change ringer rhythm
–
: New telephone number entry
–
: Delete contact
New entry;
see Pic. 27 on page 78
77
Telephone Book and Lists
Telephone Book
Pic. 27: New Entry
Softkeys:
–
: Back to the list (see Pic. 24 on page 76)
phone book
–
[ name]
–
business
mobile-business
private
phone book
business
mobile-business
: Scroll in the selection list
: Enter business telephone number
–
: Enter private telephone number
–
: Enter mobile telephone number
–
: Enter call macro
–
: Enter comment
Enter telephone number,
macro or comment
Information on the contact:
– Name
– Telephone number (in case of several
entries for this contact the last dialled or
entered telephone number)
Edit contact;
see Pic. 26 on page 77
Dial from the Telephone Book
Press the telephone book key to switch from
the idle state to the telephone book.
Use the
and
softkeys to browse to the
contact you require.
The
standard
telephone
number is displayed (in case of
several entries for this contact
the last dialled or entered telephone number).
A
Pick up the receiver.
or
Press the hook key to start handsfree operation (see also page 38).
The
standard
number is dialled.
☞
Advice
78
telephone
If you like to dial another telephone number of this contact instead of the standard number,
press the
softkey to open the extended presentation. Then press the softkey in front of
Telephone Book and Lists
Telephone Book
the requested telephone number and pick up the receiver. The now dialled telephone number
is now the standard telephone number after this call.
To get faster to the requested contact, you can enter the first letter with the keypad (see also
page 78).
Create a new Contact
Press the telephone book key to switch from
the idle state to the telephone book.
new contact
N [ name]
Press the
softkey to create a new contact.
Enter the name (up to 16 characters).
Press the
softkey to complete your entry.
Use the
and
softkeys to browse to the
option you require and press the softkey to
the left of the option:
앫
앫
...
앫
앫
앫
☞
N
[ telephone number]
business: Allows the entry of a (business) telephone number.
mobile-business: Allows the entry of a
(business) mobile telephone number.
private: Allows the entry of a (private)
telephone number.
mobile-private: Allows the entry of a
(private) mobile telephone number.
macro: Allows the entry of a call macro.
Enter the telephone number (depending on
the PBX up to 40 digits).
Press the
softkey to complete your entry.
Please enter the external telephone number always with the exchange line access number
“0”. (Exceptions: Direct Exchange Line Telephone; see page 56.)
Important
☞
Advice
During the telephone number entry you can change the type of telephone number (business,
private, mobile phone) via the
softkey.
In the subsequently opened menu “edit contact” you can enter additional telephone numbers
or call macros as well as a comment (up to four entries). Besides this you can configure a
certain ringer melody for calls from one of the concerning telephone numbers (see also
Pic. 26 on page 77).
In case of the entry of several telephone numbers or call macros the last created or changed
entry is used as standard telephone number.
If you like to create additional contacts, press the
softkey.
If you like to leave the menu, press the exit key.
79
Telephone Book and Lists
Telephone Book
Edit/delete Contact
Press the telephone book key to switch from
the idle state to the telephone book.
Use the
and
softkeys to browse to the
contact you require.
Press the
softkey to open the extended
presentation.
edit contact
Press the
softkey to open the menu “edit
contact” (see also Pic. 26 on page 77).
Use the
and
softkeys to browse to the
option you require and press the softkey to
the left of the option:
앫
앫
앫
앫
...
앫
앫
앫
앫
☞
앫
[name]: Allows to change the name.
[telephone number]: Allows to change
the telephone number or the type of telephone number.
[telephone number]: Allows to change
the telephone number or the type of telephone number.
[telephone number]: Allows to change
the telephone number or the type of telephone number.
[macro]: Allows to change the call macros.
[comment]: Allows to enter or change a
comment.
[ringer melody]: Allows to select or
change a ringer melody.
new entry: Allows to enter an additional
telephone number or call macro.
delete contact: Allows to delete the contact.
Please enter the external telephone number always with the exchange line access number
“0”. (Exceptions: Direct Exchange Line Telephone; see page 56.)
Important
☞
Advice
In case of the entry of several telephone numbers or call macros the last created or changed
entry is used as standard telephone number.
To get faster to the requested contact, you can enter the first letter with the keypad (see also
page 78).
If you like to leave the menu, press the exit key.
This way you can only edit contacts configured on the phone (recognizable by the
softkey). The internal telephone numbers as well as the telephone book/short-code dialling numbers of the PBX are only editable with the corresponding PC software or with the web
80
Telephone Book and Lists
Telephone Book
interface of the PBX (internal telephone number with COMset, short-code dialling numbers
with COMtools).
Create a Call Macro
Press the telephone book key to switch from
the idle state to the telephone book.
new contact
N [ name]
Press the
Enter a name.
Press the
Use the
macro.
macro
N
[ telephone number]
softkey to create a new contact.
softkey to complete your entry.
and
Press the
macro.
softkeys to browse to option
softkey to the left of the option
Enter a telephone number.
Press the
softkey to enter a control token.
Use the
and
softkeys to browse to the
option you require and press the softkey to
the left of the option:
앫 pause 1 second: Insert a pause of one sec-
ond.
앫 pause 2 seconds: Insert a pause of two
seconds.
...
앫 pause 4 seconds: Insert a pause of four
seconds.
앫 wait for connect: Insert a pause until a con-
nection has been established (if no connection is possible, the macro will be finished).
앫 repl/lift handset: Finishes the connection or
establishes it depending on the status.
Insert additional digits and control characters.
(depending on the PBX up to 40).
☞
Press the
softkey to complete your entry.
Please enter the external telephone number always with the exchange line access number
“0”. (Exceptions: Direct Exchange Line Telephone; see page 56.)
Important
81
Telephone Book and Lists
Telephone Book
☞
Advice
You can also create this call macro also as a new entry for an already existing contact (see
Kapitel Edit/delete Contact auf Seite 80).
Copy Telephone Numbers out of the Dial Preparation
If you like to enter telephone numbers out of different lists (caller list, calls list, redial list) into
the telephone book, you will be able to copy them directly via dial preparation.
Press the message key to switch from the idle
state to the caller list.
Use the
and
softkeys to browse to the
entry you require.
Press the
softkey to copy the telephone
number into the dial preparation.
Press the
softkey to copy the telephone
number into the telephone book.
N [ name]
Enter the name (up to 16 characters).
Press the
softkey to complete your entry.
Use the
and
softkeys to browse to the
option you require and press the softkey to
the left of the option:
앫
앫
...
앫
앫
앫
N
[ telephone number]
business: Enters the telephone number
as a business telephone number.
mobile-business: Enters the telephone
number as a business mobile telephone
number.
private: Enters the telephone number as
a private telephone number.
mobile-private: Enters the telephone
number as a private mobile telephone
number.
macro: Enters the telephone number as
call macro.
If necessary: Change the telephone number.
Press the
softkey to complete your entry.
Transfer an Entry into another Menu
When entering the telephone number for speed dialling, scheduled call (resubmission) or
subscriber Call Forwarding you can select the requested telephone number out of the telephone book. If you have already entered digits manually, the telephone number out of the
telephone book will be attached behind.
82
Telephone Book and Lists
Telephone Book
The menu for the telephone
number entry is opened.
Press the telephone book key to switch from
the menu to the telephone book.
Use the
and
softkeys to browse to the
contact you require.
The
standard
telephone
number (in case of several entries for this contact the last dialled or entered telephone
number) is presented.
Press the
softkey to copy the telephone
number into the menu for number entry.
[ telephone number]
☞
Press the
softkey to complete your entry.
The name is also stored – if it is necessary for the corresponding function.
Advice
Enter Comment to a Contact
Press the telephone book key to switch from
the idle state to the telephone book.
Use the
and
softkeys to browse to the
contact you require.
Press the
softkey to open the extended
presentation.
edit contact
Press the
softkey to open the menu “edit
contact” (see also Pic. 26 on page 77).
Use the and
comment.
comment
N
☞
Advice
[ text]
softkeys to browse to option
Press the softkey to the left of the option
comment.
Enter the comment (up to 40 characters
depending on the PBX).
Press the
softkey to complete your entry.
When scrolling in the telephone book of COMfortel 2500 it is displayed if a comment is available for the contact. By pressing the
softkey this comment can be displayed.
83
Telephone Book and Lists
Redial List
Redial List
The redial list keeps 30 most recently used numbers. If there are more than 30 calls of different telephone numbers, the oldest one will be written over. The numbers are saved with
these information: Number of dial operations, date and time of the dial operation (multiple dial
operations: date/time of the most recent dialling).
Dial from the Redial List
Press the redial key to switch from the idle
state to the redial list.
The last dialled telephone
number is displayed.
Use the
and
softkeys to browse to the
entry you require.
A
Pick up the receiver.
or
Press the hook key to start handsfree operation (see also page 38).
The subscriber is called.
☞
Advice
Additional functions in the redial list, see Pic. 28 on page 85.
You can also scroll to the requested entry by pressing the redial key repeatedly.
If you press the redial key when the receiver is off hook, the last dialled number will be redialled immediately.
If you like to leave the menu without dialling the displayed number, press the exit key.
If the telephone number is dialled from the redialling list in a query, the telephone will start to
dial after the
softkey has been pressed.
Delete Entries in the Redial List
Press the redial key to switch from the idle
state to the redial list.
The last dialled telephone
number is displayed.
Press the
entry.
84
softkey to delete the displayed
Telephone Book and Lists
Calls List
☞
Advice
By pressing the
redial list.
softkey and confirming the following question you can delete the whole
On the COMfortel 1500 you can delete the displayed entry or the whole redial list by pressing
the
softkey and the following selection of the displayed entry or of the whole list.
If you like to prevent that a lot of useless entries will be taken into the list, you can configure
the list for the calls to be taken (page 173).
You can also delete the whole redial list via the function menu “delete data” (see page 94).
Pic. 28: Display Options in the Redial List
Softkeys:
–
: Delete displayed entry
redial
[ caller]
–
: Delete whole list
–
: Delete entry or list
–
: Open overview
–
–
[ called partner]
3x 16.01.06 12:44
Information on the call:
– Caller
– Called partner
– Number of attempts
– Date of the last attempt
– Time of the last attempt
redial
[ called partner]
3x 16.01.06
: Scroll in the redial list
: Take over entry into the dial preparation
and perhaps into the telephone book
(page 82)
12:44
Softkeys in the overview:
–
: Scroll in the overview
–
: Display entry
Calls List
In the calls list of the telephone the calls (inbound and outbound) you made, are saved with
the telephone number of the caller as well as the date, time and duration. A maximum of 30
calls can be stored. In case of more than 30 calls, the oldest one will be written over. You can
directly call a previous call partner out of the calls list (page 86).
85
Telephone Book and Lists
Calls List
Dial from the Calls List
Press the
softkey to switch from the idle
state to the second level.
Press the softkey next to calls list to open the
calls list.
calls list
The last made call is displayed.
Use the
and
softkeys to browse to the
entry you require.
A
Pick up the receiver.
or
Press the hook key to start handsfree operation (see also page 38).
The subscriber is called.
☞
Advice
Additional functions in the calls list, see Pic. 29 on page 87.
You can also open the calls list via the function menu (see page 34).
You can also configure the calls list on a freely programmable function key (page 35). This way
the calls list is opened by simply pressing this key.
If you like to leave the menu without dialling the displayed number, press the exit key.
Delete Entries in the Calls List
Press the
softkey to switch from the idle
state to the second level.
Press the softkey next to calls list to open the
calls list.
calls list
The last made call is displayed.
Press the
entry.
☞
Advice
By pressing the
calls list.
softkey to delete the displayed
softkey and confirming the following question you can delete the whole
On the COMfortel 1500 you can delete the displayed entry or the whole calls list by pressing
the
softkey and the following selection of the displayed entry or of the whole list.
If you like to prevent that a lot of useless entries will be taken into the list, you can configure
the list for the calls to be taken (page 173).
You can also delete the whole calls list via the function menu “delete data” (see page 94).
86
Telephone Book and Lists
Caller List
11
Pic. 29: Display Options in the Calls List
Softkeys:
–
: Delete displayed entry
calls list
[ caller]
[ MSN dialled]
[ called partner]
16.01.06 12:40_12:44
–
: Delete the whole list
–
: Delete entry or list
–
: Additional information (if existing)
–
: Open overview
–
–
calls list
[ called partner]
16.01.06
12:40_12:44
Softkeys in an overview:
–
: Scroll in the overview
–
: Display entry
: Scroll in the calls list
: Take over entry into the dial preparation and
perhaps into the telephone book (page 82)
Information on the call:
– Caller (call partner)
– Dialled MSN (in case of external inbound
calls)11 or project number
– Called partner (call partner)
– Number of call attempts
– Call type: outbound external ( ), inbound
external ( ), outbound internal ( ) and
inbound internal ( )
– Date of the last attempt
– Time of the last attempt
Caller List
The caller list of the telephone saves the telephone numbers of the calls which were not
answered. The telephone numbers are saved with the quantity of the attempted calls, date
and time of the call (if there were more attempts, the last call would be saved). A maximum
of 30 telephone numbers can be saved. If there are more than 30 calls of different telephone
numbers, the oldest one will be written over.
You are able to recall a caller directly out of the caller list (page 88).
The LED on top of the message key draws your attention to entries in the caller list (LED signalling is a configuration options, see page 167).
11
If operated on the PBX systems COMpact 5010 VoIP, COMpact 5020 VoIP, COMmander Basic.2 and
COMmander Business also outbound MSN used for the call.
87
Telephone Book and Lists
Caller List
Dial from the Caller List
Press the message key to change from the
idle state to the list selection.
Right to the list selection there
is the number of new recordings/calls displayed.
caller list
Press the
softkey in front of the selection
caller list to open the caller list (is skipped if
the other lists are empty or if there is no
answering machine; see page 190).
2
The last received call is displayed.
Use the
and
softkeys to browse to the
entry you require.
A
Pick up the receiver.
or
Press the hook key to start handsfree operation (see also page 38).
The subscriber is called.
☞
Advice
Additional functions in the caller list, see Pic. 30 on page 89.
You can also open the caller list via the function menu (see page 34).
You can also configure the calls list on a freely programmable function key (page 35). This way
the calls list is opened by simply pressing this key.
You can scroll to the requested entry by multiple pressing of the message key.
If you like to leave the menu without dialling the displayed number, press the exit key.
As soon as a connection (inbound or outbound) has been established to one of the callers,
the corresponding telephone number will be deleted from the caller list. If it has been a group
call, the telephone number will also be deleted from of the caller lists of all the other group
members.12
12
Only available if operated on the PBX systems COMpact 5010 VoIP, COMpact 5020 VoIP, COMmander Basic.2 and COMmander Business and activated in the configuration manager of the PBX.
The group-wide deleting does not happen if the recaller has deleted his caller list first or if the same
caller has called to his personal subscriber number again.
88
Telephone Book and Lists
Caller List
Delete Entries in the Caller List
Press the message key to change from the
idle state to the list selection.
Press the
softkey in front of the selection
caller list to open the caller list (is skipped if
the other lists are empty or if there is no
answering machine).
caller list
The last received call is displayed.
Press the
entry.
☞
Advice
By pressing the
caller list.
softkey to delete the displayed
softkey and confirming the following question you can delete the whole
On the COMfortel 1500 you can delete the displayed entry or the whole caller list by pressing
the
softkey and the following selection of the displayed entry or of the whole list.
If you like to prevent that a lot of useless entries will be taken into the list, you can configure
the list for the calls to be taken (page 173).
You can also delete the whole caller list via the function menu “delete data” (see page 94).
Pic. 30: Display Options in the Caller List
Softkeys:
–
: Delete displayed entry
caller list
[ caller]
[ MSN dialled]
[ called partner]
3x 16.01.06
12:44
caller list
[ called partner]
3x 16.01.06
12:44
Softkeys in the overview:
–
: Scroll in the overview
–
: Display entry
–
: Delete whole list
–
: Delete entry or list
–
: Open overview
–
–
: Scroll in the caller list
: Take over entry into the dial preparation
and perhaps into the telephone book (page 82)
Information on the call:
– Caller
– Called partner
– Dialled MSN (in case of external call)
– Number of attempts
– Date of the last attempt
– Time of the last attempt
89
Telephone Book and Lists
Scheduled Calls List
Scheduled Calls List
This function will remind you on a date or a call. The telephone allows you to schedule up to
16 incidents.
Configure a scheduled Call
If you like to be remembered to make a call, you will be able to configure a scheduled call
with your telephone. Your telephone will ring at the programmed date and you are able to call
the configured telephone number simply by picking up the receiver (page 92).
Press the
softkey to change from the idle
state to the second level.
schedule
new entry
N
[ time/date]
Press the softkey next to schedule to open
the list of the scheduled calls.
Press the
softkey to create a new entry.
Overwrite time and date if necessary.
Press the
softkey to complete your entry.
Press the
softkey to the left of the option
you require:
...
앫 with dial prep.: Set a scheduled call with
dial preparation.
앫 just a reminder: Set a dial preparation.
Only with the option with dial preparation:
N
[ name]
☞
N
[ telephone number]
Enter the telephone number.
Press the
softkey to complete your entry.
Enter a corresponding name or an information.
Press the
softkey to complete your entry.
Please enter the external telephone number always with the exchange line access number
“0”. (Exceptions: Direct Exchange Line Telephone; see page 56.)
Important
☞
Advice
You can also open the scheduled calls list via the function menu (see page 34).
You can also configure the scheduled calls list on a freely programmable function key
(page 35). This way the scheduled calls list is opened by simply pressing this key.
If the telephone book key is pressed when entering the telephone number, you can select
the requested telephone number in the telephone book.
90
Telephone Book and Lists
Scheduled Calls List
If you like to be remembered simply to a date/appointment instead of a call, select “just a
reminder” after the date entry. In this case there will be no telephone number entry but only
an information entry.
Edit or delete scheduled Calls in the List
Press the
softkey to change from the idle
state to the second level.
schedule
Press the softkey next to schedule to open
the list of the scheduled calls.
Use the
and
softkeys to browse to the
entry you require.
Press the
softkey to start editing the entry.
Press the
softkey to the left of the option
you require:
...
앫 change: Permit the editing of the entry.
앫 delete: Delete the entry after confirmation of
the following question.
N [ time/date]
Overwrite time and date if necessary.
Press the
softkey to complete your entry.
Press the
softkey to the left of the option
you require:
...
앫 with dial prep.: Configure a scheduled call
with dial preparation.
앫 just a reminder: Configure a scheduled call.
N
[ telephone number]
N
[ name]
☞
Advice
Only with the option with dial prep.:
Enter the telephone number.
Press the
softkey to complete your entry.
Enter the corresponding name or an information.
Press the
softkey to complete your entry.
You can also delete the whole scheduled calls list via the function menu “delete data” (see
page 94).
91
Telephone Book and Lists
Scheduled Calls List
You get a scheduled Call with Dial Preparation
If you configured a scheduled call with dial preparation for a call partner, your telephone will
ring at the corresponding date and show you the configured telephone number and the name.
Now you are able to make the call immediately as described in the following (by simply picking up the receiver or taking over of the telephone number into the dial preparation). If you
do not like to make the call any more, you will be able to cancel this scheduled call in the
menu. If you like to be reminded on the call to be made later, you are able to postpone the
call. Then the scheduled call will be made again 10 minutes later.
If you like to postpone the call for more than 10 minutes, start the resubmission instead and
select one of the periods (30 minutes, 1 hour, 2 hours, 1 day, 1 week, 2 weeks, 4 weeks or
user-defined).
If you do not pick up the scheduled call, it will be postponed automatically. As soon as the
telephone is in the idle condition after the following call, the scheduled call will be executed
within a minute again.
Your telephone rings and the
name of the call destination is
displayed.
Use the
and
softkeys to browse to the
option you require and press the softkey to
the left of the option:
앫 calling: Take over the stored telephone
number to the dial preparation.
앫 delete: Delete the scheduled call.
...
앫 reschedule: Postpone the scheduled call by
10 minutes.
앫 reschedule call: Restart the scheduled call
in 30 minutes, 1 hour, 2 hours, 1 day, 1
week, 2 weeks, 4 weeks or user-defined.
Only in case of selection
“call”:
The telephone number configured for the scheduled call is
taken over into the dial preparation.
A
Pick up the receiver.
or
Press the hook key to start handsfree operation (see also page 38).
92
Telephone Book and Lists
Scheduled Calls List
You get a scheduled Call (Reminder only)
If you configured a scheduled call for your telephone, it would ring at the configured time and
will show you the entered information.
You can simply confirm the call (then it will be deleted) or if you like to be remembered later
again, you can postpone it. Then the scheduled call will be executed in 10 minutes again.
If you like to postpone the call for more than 10 minutes, start the resubmission instead and
select one of the periods (30 minutes, 1 hour, 2 hours, 1 day, 1 week, 2 weeks, 4 weeks or
user defined). Thanks to this you can be reminded e.g. to a weekly meeting.
If you did not pick up the receiver during a scheduled call, it would be postponed automatically. As soon as the telephone is in the idle state after the next use, the scheduled call will
be executed within one minute again.
Your telephone rings and the
corresponding information is
displayed.
Use the
and
softkeys to browse to the
option you require and press the softkey to
the left of the option:
앫 confirm: Confirm the scheduled call.
...
앫 reschedule: Postpone the scheduled call by
10 minutes.
앫 reschedule call: Restarts the scheduled call
in 30 minutes, 1 hour, 2 hours, 1 day, 1
week, 2 weeks, 4 weeks or user-defined
93
Use of the Telephone and PBX System
USE OF THE TELEPHONE AND PBX S YSTEM
☞
Some of the described functions are only offered in the telephone if the function is available
in the PBX and has been properly configured and the necessary authorization for the use of
Important these functions has been assigned.
Delete Data
You can delete your personal data such as e.g. telephone numbers and function settings.
Use the Function via Function Menu:
Open the function menu for the function
“delete data” (You will find help on page 33
and the following).
functions
delete data
Use the
and
softkeys to browse to the
option you require and press the softkey to
the left of the option:
앫 caller list: Delete all entries in the caller list.
앫 calls list: Delete all entries in the calls list.
앫 redial list: Delete all entries in the redial list.
...
앫 scheduled call: Delete all entries in the
scheduled calls list.
앫 phone book: Delete all entries in the tele-
phone book of the telephone.
앫 function keys: Delete all not blocked func-
tion keys.
앫 all: Delete all data listed above.
...delete?
Press the
message.
softkey to confirm the security
Delete Call Charges
Under “Information” the call charges are shown since the last deletion (page 185). In order to
control the charges in certain time intervals, you are able to delete the total call charges from
time to time. The charges or call charge recording registered by the PBX are not influenced
by this deletion. If you like to prevent that somebody looks at your charge units of your last
call, you will be able to delete this charge also.
94
Use of the Telephone and PBX System
Pickup
Use the Function via Function Menu:
Open the function menu for the function
“delete call charge” (You will find help on
page 33 and the following).
functions
del.call charge
Press the
softkey to the left of the option
you require:
...
앫 most recent call: Delete the call charges of
the last call.
앫 call charge total: Delete all call charge.
Press the
message.
...delete?
softkey to confirm the security
Pickup
With the function pickup you can take over the inbound calls of the other telephones to your
own telephone.
Use the Function via Function Menu:
A telephone next to you rings.
Open the function menu for the function
“pickup” (You will find help on page 33 and the
following).
functions
pickup
N
Enter the internal telephone number of the
ringing telephone.
[ internal number]
A
Pick up the receiver.
or
Press the hook key to start handsfree operation (see also page 38).
You are connected with the
caller.
95
Use of the Telephone and PBX System
Pickup
Assign Key:
Open the key programming menu for the function “pickup” (You will find help on page 33
and the following).
define keys
function key...
... level
pickup
Press the
softkey to complete the settings.
Use Function via Key:
You can open the function menu for the function “Pickup” (s. a.) by pressing the key.
LED Signalling next to the Key:
none
☞
Advice
You can also open the function menu for the function “Pickup” via the 2nd level of the idle
state (see page 48).
You can also do a pickup during a call and start a query with it. This is possible by selecting
the function in the bottom display line (see page 69).
If you like to take-over calls addressed to a group, select the pickup fort the group number.
If there is a name for the internal telephone number, it will be displayed as soon as the telephone number has been entered completely.
You can assign an internal subscriber/group number to a freely programmable function key
(speed dialling key; see page 122). A red flashing LED signals a call to this number and you
can pickup that call by pressing the key and accepting it. This way you can also start a call
take-over from telephones or answering machines where this is permitted (see manual of the
PBX).
COMpact 5010/5020 VoIP and COMmander Basic.2/Business: Depending on the authorization assigned to your telephone, you can do Pickups of any available telephones, of telephones within a group or not at all.
96
Use of the Telephone and PBX System
Switch on/off Headset Operation
Switch on/off Headset Operation
If you connected and selected (see page 158) a headset to your system telephone, you can
switch between receiver and headset operation.
Use the Function via Function Menu:
Open the function menu for the function “headset” (You will find help on page 33 and the following).
functions
headset
The icon
setting.
marks the current
Press the
softkey to the left of the option
you require:
앫 activating: Switch on the headset operation.
...
앫 switching off: Switch off the headset opera-
tion.
Assign Key:
Open the key programming menu for the function “headset” (You will find help on page 33
and the following).
define keys
function key ...
... level
headset
The current settings for the key
assignment is shown on the
display.
If you like to change the current settings, press
the softkey in front of the corresponding
selection once or several times (You will find
help on page 155 and the following):
앫 [switching type]: Enables the assignment
with switch on, off and over.
Press the
softkey to complete the settings.
Use Function via Key:
The headset operation is switched on, off or over by pressing the key.
LED Signalling next to the Key:
green
The headset operation is switched on.
off
The headset operation is switched off.
97
Use of the Telephone and PBX System
Telephone Lock
Telephone Lock
With the telephone lock telephone can be locked against unauthorized use. The following
functions are still available after the activation of this function:
앫 Switch off the telephone lock (by pressing the
softkey followed by the entry of the user
PIN 13)
앫 Start emergency calls (only manual dialling)
앫 Accept inbound calls
Use the Function via Function Menu:
Open the function menu for the function
“phone lock” (You will find help on page 33
and the following).
functions
phone lock
Assign Key:
Open the key programming menu for the function “phone lock” (You will find help on
page 33 and the following).
define keys
function key ...
... level
phone lock
Press the
softkey to complete the settings.
Use Function via Key:
By pressing the key in the idle state the telephone lock is switched on.
By pressing the key again followed by the entry of the user PIN 13) the telephone lock is
switched off.
☞
LED Signalling next to the Key:
red
The telephone lock is switched on.
off
The telephone lock is switched off.
To be able to switch the telephone lock on, a user PIN 13) has to be defined for the telephone
before to switch the telephone lock off again. (see page 167).
Important
13
On the PBX systems COMpact 5010 VoIP, COMpact 5020 VoIP, COMmander Basic.2 and COMmander Business the telephone lock can also be deactivated by entering the admin or subAdmin PIN.
98
Use of the Telephone and PBX System
Ringer Signal
Ringer Signal
The system telephone signals inbound calls as follows:
앫 Acoustic ringer signal (the telephone rings in the configured ringer melody; page 170)
앫 Display message (text)
앫 Flashing LED on top of the hook key
앫 Display backlight (page 159)
앫 Flashing display backlight (page 100)
Switch on/off acoustic Ringer Signal
If the surrounding must not be disturbed by the ringing of the telephone, you can switch off
the ringer signal. This function is different from the PBX function “Do-not-Disturb” (page 103)
insofar that inbound calls are still possible. But they are not signalled acoustically anymore
but visually only.
Use the Function via Function Menu:
Open the function menu for the function “ringer
tone” (You will find help on page 33 and the
following).
functions
ringer tone
The icon
setting.
marks the current
Press the
softkey to the left of the option
you require:
앫 activating: Switch on the acoustical ringer
...
signal.
앫 switching off: Switch off the acoustical
ringer signal.
Assign Key:
Open the key programming menu for the function “ringer tone” (You will find help on page 33
and the following).
define keys
function key ...
... level
ringer tone
99
Use of the Telephone and PBX System
Ringer Signal
The current settings for the key
assignment is shown on the
display.
If you like to change the current settings, press
the softkey in front of the corresponding
selection once or several times (You will find
help on page 155 and the following):
앫 [switching type]: Enables the assignment
with switch on, off or over.
Press the
softkey to complete the settings.
Use Function via Key:
By pressing the key the acoustical ringer signal is switched on, off or over.
By pressing the key during an inbound call the acoustic ringer signal is immediately switched
on, off or over for this call.
LED Signalling next to the Key:
off
The acoustic ringer signal is switched on.
red
The acoustic ringer signal is switched off.
☞
Advice
If you need a more noticeable signalling when the acoustic ringer signal is switched off, calls
can be signalled by a flashing display backlight (see next chapter).
If you do not like to switch off the ringer signal completely but to switch on a slight attention
acoustic ringer signal, select the setting “single ringer tone” (see page 172).
Signal Calls via flashing Display Backlight (Ringer Signal/Light)14
If the surrounding must not be disturbed by the ringing of the telephone, you can signal calls
via blinking of the display backlight instead (in addition to other visual signals). Dependent on
the room brightness a very noticeable visual signalling is possible.
Use the Function via Function Menu:
Open the function menu for the function “ringer
backlight” (You will find help on page 33 and
the following).
functions
ringer backlight
The icon
setting.
marks the current
Press the
softkey to the left of the option
you require:
앫 activating: Switch on the flashing display
...
14
not on COMfortel 1500
100
lighting and switch off the acoustical ringer
signal at the same time.
앫 switching off: Switch off the flashing display
lighting and switch on the acoustical ringer
signal on at the same time.
Use of the Telephone and PBX System
Ringer Signal
Assign Key:
Open the key programming menu for the function “ringer backlight” (You will find help on
page 33 and the following).
define keys
function key ...
... level
ringer backlight
The current settings for the key
assignment is shown on the
display.
If you like to change the current settings, press
the softkey in front of the corresponding
selection once or several times (You will find
help on page 155 and the following):
앫 [switching type]: Enables the assignment
with switch on, off or over.
Press the
softkey to complete the settings.
Use Function via Key:
By pressing the key, the flashing display backlight is switched on, off or over.
LED Signalling next to the Key:
off
The flashing display light is switched off and the acoustical ringer signal is
switched on.
red
The flashing display light is switched on and the acoustical ringer signal is
switched off.
Warning
Some people are susceptible to epileptic seizures or loss of consciousness when exposed to
certain flashing lights or light patterns. If you had symptoms related to epilepsy when
exposed to flashing lights, do not activate this function.
☞
By switching the function “ringer signal/light” on and off, the function “ringer signal” is also
switched on/off (see previous chapter).
Advice
101
Use of the Telephone and PBX System
Subscriber Function of the PBX
Subscriber Function of the PBX
Switch on/off Call Waiting
If you like to prevent the Call Waiting function in your telephone (see page 47), you will be
able to disable the Call Waiting via menu of the system telephone.
Use the Function via Function Menu:
Open the function menu for the function “call
waiting” (You will find help on page 33 and the
following).
functions
call waiting
The icon
setting.
marks the current
Press the
softkey to the left of the option
you require:
앫 activating: Switch on the Call Waiting signal.
...
앫 switching off: Switch off the Call Waiting
signal.
Assign Key:
Open the key programming menu for the function “call waiting” (You will find help on
page 33 and the following).
define keys
function key ...
... level
call waiting
The current settings for the key
assignment is shown on the
display.
If you like to change the current settings, press
the softkey in front of the corresponding
selection once or several times (You will find
help on page 155 and the following):
앫 [switching type]: Enables the assignment
with switch on, off or over.
Press the
softkey to complete the settings.
Use Function via Key:
By pressing the key the Call Waiting is switched on, off or over.
LED Signalling next to the Key:
green
The Call Waiting is switched on.
off
The Call Waiting is switched off.
102
Use of the Telephone and PBX System
Subscriber Function of the PBX
Switch on/off Do-not-Disturb
If you do not like to be called by anybody, you will be able to block your system telephone for
internal and external calls with the function “Do-not-Disturb service”. Then a caller will get the
busy signal. In case of emergency you can be reached with a priority call by an internal subscriber. Of course you are able to make a call with your Do-not-Disturb protected telephone.
Use the Function via Function Menu:
Open the function menu for the function “Donot-Disturb” (You will find help on page 33 and
the following).
functions
do-not-disturb
The icon
setting.
marks the current
...
Press the
softkey to the left of the option
you require:
앫 activating: Switch on the Do-no-Disturb.
앫 switching off: Switch off the Do-no-Disturb.
Assign Key:
Open the key programming menu for the function “Do-not-Disturb” (You will find help on
page 33 and the following).
define keys
function key ...
... level
do-not-disturb
The current settings for the key
assignment is shown on the
display.
If you like to change the current settings, press
the softkey in front of the corresponding
selection once or several times (You will find
help on page 155 and the following):
앫 [switching type]: Enables the assignment
with switch on, off or over.
Press the
softkey to complete the settings.
Use Function via Key:
By pressing the key Do-not-Disturb is switched on, off or over.
LED Signalling next to the Key:
yellow
The call protection is switched on.
off
The call protection is switched off.
103
Use of the Telephone and PBX System
Subscriber Function of the PBX
Deactivate Do-not-Disturb for certain Persons (Call Deblocker – inbound)
If you like to be reachable for certain persons with the activated “Do-not-Disturb”, it will be
possible to enter their external telephone number into a list with the PC software of the PBX.
This list is valid for all subscribers and you are able to activate or deactivate it for your telephone if necessary. The presentation of the caller telephone number is necessary for the
PBX to recognize the caller.
Use the Function via Function Menu:
Open the function menu for the function “Call
Deblocker” (You will find help on page 33 and
the following).
functions
Call Deblocker
The icon
setting.
marks the current
...
Press the
softkey to the left of the option
you require:
앫 activating: Switch on the Call Deblocker.
앫 switching off: Switch off the Call Deblocker.
Assign Key:
Open the key programming menu for the function “Call Deblocker” (You will find help on
page 33 and the following).
define keys
function key ...
... level
Call Deblocker
The current settings for the key
assignment is shown on the
display.
If you like to change the current settings, press
the softkey in front of the corresponding
selection once or several times (You will find
help on page 155 and the following):
앫 [switching type]: Enables the assignment
with switch on, off or over.
Press the
softkey to complete the settings.
Use Function via Key:
By pressing the key the Call Deblocker is switched on, off or over.
LED Signalling next to the Key:
green
The Call Deblocker is switched on.
off
The Call Deblocker is switched off.
104
Use of the Telephone and PBX System
Subscriber Function of the PBX
Protection against certain Person’s Calls (Call Restrictor - inbound)
If you do not like to be called by certain persons, you are able to enter their external telephone
numbers into a list with the PC software of your PBX. This list is valid for all subscribers and
you are able to activate or to deactivate it for you telephone if necessary. The presentation
of the caller telephone number is necessary for the PBX to recognize the caller.
Use the Function via Function Menu:
Open the function menu for the function “Call
Restrictor” (You will find help on page 33 and
the following).
functions
Call Restrictor
The icon
setting.
marks the current
...
Press the
softkey to the left of the option
you require:
앫 activating: Switch on the Call Restrictor.
앫 switching off: Switch off the Call Restrictor.
Assign Key:
Open the key programming menu for the function “Call Restrictor” (You will find help on
page 33 and the following).
define keys
function key ...
... level
Call Restrictor
The current settings for the key
assignment is shown on the
display.
If you like to change the current settings, press
the softkey in front of the corresponding
selection once or several times (You will find
help on page 155 and the following):
앫 [switching type]: Enables the assignment
with switch on, off or over.
Press the
softkey to complete the settings.
Use Function via Key:
By pressing the key the Call Restrictor is switched on, off or over.
LED Signalling next to the Key:
red
The Call Restrictor is switched on.
off
The Call Restrictor is switched off.
105
Use of the Telephone and PBX System
Subscriber Function of the PBX
Room Monitoring
If you like to monitor the acoustics of a room e.g. in order to check whether your toddler
sleeps, you will be able to use the function “room monitoring”. The telephone in the room will
have to be properly configured for this function.
Then you call the configured telephone from another internal telephone. The connection will
immediately be established and you can listen into the room.
Use the Function via Function Menu:
Open the function menu for the function “room
monitoring” (You will find help on page 33 and
the following).
functions
room monitoring
activating
Press the
softkey to the left of the option
activating to start room monitoring.
Assign Key:
Open the key programming menu for the function “room monitoring” (You will find help on
page 33 and the following).
define keys
function key ...
... level
room monitoring
Press the
softkey to complete the settings.
Use Function via Key (only in the idle State of the Telephone):
By pressing the key the room monitoring is switched on.
LED Signalling next to the Key:
red
The room monitoring is switched on.
off
The room monitoring is switched off.
☞
Advice
The microphone of the base module switches on automatically.
How to listen into the room from an external telephone can be learned from the user manual
of the PBX.
By pressing the hook key or by taking the receiver and then hang up the room monitoring will
be deactivated.
106
Use of the Telephone and PBX System
Subscriber Function of the PBX
Redirect the Telephone (Subscriber Call Forwarding)
Thanks to the subscriber call forwarding (CF) you are able to redirect internal and external
calls from your telephone to other internal and external connections. You or your substitute
will be able to take these calls with another telephone. The subscriber call forwarding will let
you or your substitute be always available under your telephone number although you are
not able to take calls with your original telephone.
There could be different reasons for not being able to take a call, e.g. you are not in the office
or you are currently talking with another person on the line. Therefore you have three different
kinds of call forwarding: “call forwarding unconditional”, “call forwarding on busy” and “call forwarding on no reply”.
Use the Function via Function Menu:
Open the function menu for the function “Call
forwarding subscriber” (You will find help on
page 33 and the following).
functions
Call fwd.: scr
Use the
and
softkeys to browse to the
option you require and press the softkey to
the left of the option:
앫 deactivate
all: Switch off all currently
switched on Subscriber Call Forwardings.
(no additional entry is necessary)
앫 unconditional: Switch on or off the Subscriber Call Forwarding “unconditional”.
앫 on busy: Switch on or off the Subscriber Call
Forwarding “on busy”.
앫 on no reply: Switch on or off the Subscriber
Call Forwarding “on no reply”.
...
The icon
setting.
marks the current
Press the
softkey to the left of the option
you require:
앫 activating: Switch on the Subscriber Call
Forwarding.
...
N
[ target number]
앫 switching off: Switch off the Subscriber Call
Forwarding.
(no additional entry is necessary)
Enter the target telephone number.
Press the
softkey to complete the entry.
107
Use of the Telephone and PBX System
Subscriber Function of the PBX
Assign Key:
Open the key programming menu for the function “Call forwarding subscriber” (You will find
help on page 33 and the following).
define keys
function key ...
... level
Call fwd.: scr
Use the
and
softkeys to browse to the
option you require and press the softkey to
the left of the option:
앫 deactivate all: Assign the key with the func-
...
The current settings for the key
assignment is shown on the
display.
tion “deactivate all”.
(no additional entry is necessary)
앫 unconditional: Assign the key with the function “Subscriber Call Forwarding unconditional”.
앫 on busy: Assign the key with the function
“Subscriber Call Forwarding on busy”.
앫 on no reply: Assign the key with the function
“Subscriber Call Forwarding on no reply”.
If you like to change the current settings, press
the softkey in front of the corresponding
selection once or several times (You will find
help on page 155 and the following):
앫 [telephone number]: Allows to enter a target telephone number.
앫 [name]: Allows to enter a name for the target.
앫 [switching type]: Enables the assignment
with switch on, off or over.
Press the
softkey to complete the settings.
Use Function via Key:
By pressing the key the Subscriber Call Forwarding is switched on, off or over to the configured target.
Exception: A key assigned with “deactivate all” deletes only the currently switched on Call
Forwardings.
LED Signalling near the Key (not in case of “Delete all”):
red
The Subscriber Call Forwarding is switched on to the configured target.
yellow
The Subscriber Call Forwarding is switched on to another configured target.
off
The Subscriber Call Forwarding is switched off.
108
Use of the Telephone and PBX System
Subscriber Function of the PBX
☞
Please enter the external telephone numbers always with an exchange line access number
“0”. (Exception: Direct Exchange Line Telephone; see page 56.)
Important A subscriber forwarding call is not effective for inbound group calls. If you like to prevent that
your telephone rings for group calls, you will have to log out of this group (page 133). If the
group numbers are to be redirected, please refer to the manual of the PBX.
☞
Advice
For each of the three kinds of call forwarding you can set another redirection target. If the “call
forwarding on busy” and “call forwarding on no reply” are activated at the same time, both
settings will work. It depends on what will happen – the telephone is busy or nobody takes
the call – and the call may even be forwarded to different telephone numbers.
If the “call forwarding unconditional” is activated additionally to the “call forwarding if busy”
and/or the “call forwarding on no reply”, all calls will be redirected immediately. In this case
the other variants are never used, but they are still active. As soon as “call forwarding unconditional” is deactivated, the other variants, still active, are used again.
If the telephone book key is pressed when entering the telephone number, you can select the
requested telephone number in the telephone book.
Redirect your Calls to another Telephone (Follow-me)
Follow-me is an internal “subscriber call forwarding unconditional” that is configured on the
target telephone (instead of the redirected telephone). This way you are able to go from office
to office and to take your calls with you.
Use the Function via Function Menu:
Open the function menu for the function “Follow-me” (You will find help on page 33 and the
following).
functions
Follow-me
Use the
and
softkeys to browse to the
option you require and press the softkey to
the left of the option:
앫 deactivate
...
all: Switch off all currently
switched on Follow-me activations.
(no additional entry is necessary)
앫 activating: Switch on Follow-me for a
subscriber. 15)
앫 switching off: Switch off Follow-me for a
subscriber. 15)
Use the
and
softkeys to browse to the
option you require and press the softkey to
the left of the option:
...
앫 [name/number]: Switches on/off Follow-me
for a subscriber selected by his name/his
number 15)
109
Use of the Telephone and PBX System
Subscriber Function of the PBX
Assign Key:15
Open the key programming menu for the function “Follow-me” (You will find help on page 33
and the following).
define keys
function key ...
... level
Follow-me
Press the
softkey to complete the settings.
Use Function via Key (only in the idle State of the Telephone):
Open the function menu for the function “Follow-me” (s. a.) by pressing the key.
Exception: A key assigned with “Deactivate all” only deletes the currently switched on Followme activations.
LED Signalling next to the Key:
none
☞
Advice
15
Follow-me can also be switched off again on the redirected telephone – with “switch off Follow-me” for the own telephone number (COMpact 5010/5020 VoIP and COMmander
Basic.2/Business) or “CF subscriber” (COMpact 2204/2206/4410 USB / 4406 DSL, COMmander Basic).
When operating on the PBX COMpact 2204 USB, COMpact 2206 USB, COMpact 4406 DSL, COMpact 4410 USB and COMmander Basic it is not possible to switch off Follow-me for only one single
subscriber. The telephone only offers the selection “Delete all” and “[Name/number]” to activate Follow-me for a single subscriber.
110
Use of the Telephone and PBX System
Forward the Connection (MSN/DDI Call Forwarding)
Forward the Connection (MSN/DDI Call Forwarding)16
If you like to be always reachable for external connections - even away from home -, you can
use the MSN/DDI Call Forwarding.
With the MSN/DDI Call Forwarding you can forward calls for your external telephone numbers (dialled by an external caller) to other external connections. This way these calls can be
taken on another telephone e.g. a mobile telephone if nobody can take the call internally.
As there are different reasons for not taking a call, e.g. nobody is available for a short or
longer period, there are three different types of Call Forwarding: the “CF unconditional”, the
“CF on busy” and the “CF on no reply”.
Use the Function via Function Menu:
Open the function menu for the function “Call
forwarding: MSN/DDI” (You will find help on
page 33 and the following).
functions
MSN/DDI CF
Use the
and
softkeys to browse to the
option you require and press the softkey to
the left of the option:
앫 unconditional: Switch on or off the MSN/
DDI Call Forwarding “unconditional”.
...
앫 on busy: Switch on or off the MSN/DDI Call
Forwarding “on busy”.
앫 on no reply: Switch on or off the MSN/DDI
Call Forwarding “on no reply”.
N
[ No. to redirect]
The icon
setting.
marks the current
Enter the external telephone number of the
PBX to be forwarded (without exchange line
access number).
Press the
softkey to complete the entry.
Press the
softkey to the left of the option
you require:
앫 activating: Switch on the MSN/DDI Call For-
warding.
...
N
16
[ target number]
앫 switching off: Switch off the MSN/DDI Call
Forwarding.
(no additional entry is necessary)
Enter the target telephone number (with
exchange line access number).
Press the
softkey to complete the entry.
Only available when operated on the PBX systems COMpact 5010 VoIP, COMpact 5020 VoIP, COMmander Basic.2 and COMmander Business. On the other PBX systems this function can be set via
programming sequence (see manual of the PBX).
111
Use of the Telephone and PBX System
Forward the Connection (MSN/DDI Call Forwarding)
Assign Key:
Open the key programming menu for the function “Call forwarding: MSN/DDI” (You will find
help on page 33 and the following).
define keys
function key ...
... level
MSN/DDI CF
Use the
and
softkeys to browse to the
option you require and press the softkey to
the left of the option:
앫 deactivate all: Assign the key with the func-
...
The current settings for the key
assignment is shown on the
display.
tion “deactivate all”.
(no additional entry is necessary)
앫 unconditional: Assign the key with the function “MSN/DDI Call Forwarding unconditional”.
앫 on busy: Assign the key with the function
“MSN/DDI Call Forwarding on busy”.
앫 on no reply: Assign the key with the function
“MSN/DDI Call Forwarding on no reply”.
If you like to change the current settings, press
the softkey in front of the corresponding
selection once or several times (You will find
help on page 155 and the following):
앫 [telephone number]: Allows to enter a target telephone number.
앫 [name]: Allows to enter a name for the target.
앫 [switching type]: Enables the assignment
with switch on, off or over.
앫 [no. to redirect]: Allows to enter an external
telephone number of the PBX (without
exchange line access number).
Press the
softkey to complete the settings.
Use Function via Key:
By pressing the key the MSN/DDI Call Forwarding is switched on, off or over to the configured
target.
Exception: A key assigned with “deactivate all” deletes only the currently switched on Call
Forwardings.
112
Use of the Telephone and PBX System
Forward the Connection (MSN/DDI Call Forwarding)
☞
LED Signalling near the Key (not in case of “Delete all”):
red
The MSN/DDI Call Forwarding is switched on for the defined destination in the
public exchange/PBX.
yellow
The MSN/DDI Call Forwarding is switched on for another destination in the public
exchange/PBX.
off
The MSN/DDI Call Forwarding is switched off in the public exchange/PBX.
Always enter the destination number (not the telephone number to be forwarded) with a preceding exchange line access number “0”.
Important For the configuration of MSN/DDI Call Forwardings the used telephone needs an authoriza-
tion.
When using the function via function menu there is no feedback about the success/failure of
the configuration in the public exchange. When using the function via key the success/failure
is shown via colour of the LED. During the configuration in the public exchange (this may last
from a few seconds up to a minute) the LED glows yellow.
A key allocated with the function (“switch all off”) only switches the MSN/DDI Call Forwardings off that have been switched with a still existing key. MSN/DDI call forwardings switched
with the function menu or programming functions are not considered.
☞
Advice
For each of the three kinds of call forwarding you can set another redirection target. If the “call
forwarding on busy” and “call forwarding on no reply” are activated at the same time, both
settings will work. It depends on what will happen – the telephone is busy or nobody takes
the call – and the call may even be forwarded to different telephone numbers.
If the “call forwarding unconditional” is activated additionally to the “call forwarding on busy”
and/or the “call forwarding on no reply”, all calls will be redirected immediately. In this case
the other variants are never used, but they are still active. As soon as “call forwarding unconditional” is deactivated, the other variants, still active, are used again.
If the telephone book key is pressed when entering the telephone number, you can select the
requested number in the telephone book.
If you like to forward internal calls also, use the subscriber or group Call Forwarding (see
page 107 or operation manual of the PBX) instead of the MSN/DDI Call Forwarding. This way
a forwarding is also possible to internal telephones, e.g. to the colleague’s telephone or to
the answering machine.
113
Use of the Telephone and PBX System
Switch the Configurations of the PBX manually (Day, Night etc.)
Switch the Configurations of the PBX manually (Day, Night etc.)
It is possible to programme different configurations for day, night with the configuration programme of the PBX. You can switch over from one configuration to another one manually.
The PBX can automatically switch over the configuration based on a date/time calendar.
Use the Function via Function Menu:
Open the function menu for the function
“switch configuration” (You will find help on
page 33 and the following).
functions
switch config.
The icon
setting.
marks the current
Use the
and
softkeys to browse to the
option you require and press the softkey to
the left of the option:
앫 [name]:
...
Switches on the configuration
selected by its name.
Assign Key:
Open the key programming menu for the function “switch configuration” (You will find help
on page 33 and the following).
define keys
function key ...
... level
switch config.
The current settings for the key
assignment is shown on the
display.
If you like to change the current settings, press
the softkey in front of the corresponding
selection once or several times (You will find
help on page 155 and the following):
앫 [general/defined]: Switches over between
general and defined assignment.
앫 [name]: Allows to select the configuration by
its name.
Press the
softkey to complete the settings.
Use Function via Key:
Generally assigned key (only during the idle state of the telephone): By pressing the key, the
function menu for the function “Switch configurations” (s. a.) opens.
Defined assigned key: By pressing the key the configured configuration is switched on.
114
Use of the Telephone and PBX System
Door and Relay Functions of the PBX
LED Signalling next to the Key (only for defined Assignment):
green
The configuration defined for the key is switched on.
off
The configuration defined for the key is not switched on.
Door and Relay Functions of the PBX
Use the Door Terminal
The functions described in the following are only available with at least one door terminal connected to your PBX (see manual of the PBX).
Via the menu “functions” you can talk with the door terminal, open the door and switch the
light on even without a call to your telephone.
Use the Function via Function Menu:
Open the function menu for the function “door
function” (You will find help on page 33 and
the following).
functions
door function
Use the
and
softkeys to browse to the
option you require and press the softkey to
the left of the option:
...
The icon
setting.
앫 [name/number]: Selects a door by its name/
its number.
marks the current
Use the
and
softkeys to browse to the
option you require and press the softkey to
the left of the option:
앫 open door/light: Open the door and switch
on the stairway light.
앫 open door: Open the door.
...
앫 light on: Switch on the stairway light.
앫 talk: Establish a voice connection to the
door.
115
Use of the Telephone and PBX System
Door and Relay Functions of the PBX
Assign Key:
Open the key programming menu for the function “door function” (You will find help on
page 33 and the following).
define keys
function key ...
... level
door function
The current settings for the key
assignment is shown on the
display.
If you like to change the current settings, press
the softkey in front of the corresponding
selection once or several times (You will find
help on page 155 and the following):
앫 [general/defined]: Switches between general and defined assignment.
앫 [telephone number]: Allows to select a door
by its name/number.
앫 [name]: Allows to enter a new name for the
door.
앫 [door function]: Enables the assignment
with open the door and/or switch on the light
as well as door conversation.
Press the
softkey to complete the settings.
Use Function via Key:
General assigned key (only during the idle state of the telephone): By pressing the key the
function menu for “door functions” (s. a.) opens.
Defined assigned key: By pressing the key the voice connection with the door is established
(after picking up the receiver) or the door opener and/or the light is switched on.
LED Signalling next to the Key:
green
The door opener is switched on.
red
There is a voice connection with the door terminal.
yellow
The light is switched on.
off
No function assigned to the key, is switched on.
☞
Advice
The function “light on” switches the 3rd relay of the corresponding door terminal separately
on during the period configured in the PBX.
Switch Relay internally
If the PBX is equipped with one or more relays and if these are configured as universal relays
(see manual of your PBX), they will be switched on and off by this function.
116
Use of the Telephone and PBX System
Door and Relay Functions of the PBX
Use the Function via Function Menu:
Open the function menu for the function “relay”
(You will find help on page 33 and the following).
functions
relay
Use the
and
softkeys to browse to the
option you require and press the softkey to
the left of the option:
...
The icon
setting.
앫 [name/number]: Selects a relay by its
name/its number.
marks the current
...
Press the
softkey to the left of the option
you require:
앫 activating: Switch on the relay.
앫 switching off: Switch off the relay.
Assign Key:
Open the key programming menu for the function “relay” (You will find help on page 33 and
the following).
define keys
function key ...
... level
relay
The current settings for the key
assignment is shown on the
display.
If you like to change the current settings, press
the softkey in front of the corresponding
selection once or several times (You will find
help on page 155 and the following):
앫 [name]: Allows to select the relay by its
name.
앫 [switching type]: Enables the assignment
with switch on, off or over.
Press the
softkey to complete the settings.
Use Function via Key:
By pressing the key the relay is switched on, off or over.
LED Signalling next to the Key:
green
The relay assigned to the key is switched on.
off
The relay assigned to the key is switched off.
117
Use of the Telephone and PBX System
Number Memory and Busy Status Overview
Number Memory and Busy Status Overview
Key for Exchange Line Selection and Busy Status Overview 17
With a key correspondingly programmed an exchange line selection can be started. The LED
near the key informs you on the corresponding S0 port busy status.
Assign Key:
Open the key programming menu for the function “exchange line” (You will find help on
page 33 and the following).
define keys
function key ...
... level
exchange line
The current settings for the key
assignment is shown on the
display.
If you like to change the current settings, press
the softkey in front of the corresponding
selection once or several times (You will find
help on page 155 and the following):
앫 [name]: Allows to select the exchange line
by its name.
Press the
softkey to complete the settings.
Use Function via Key (only in the idle State of the Telephone):
By pressing the key an exchange line is selected. Then an external telephone number (without exchange line access number) can immediately be dialled.
LED Signalling next to the Key:
red
Both B channels of the S0 port are busy.
yellow
One B channel is still available. By pressing the key you can allocate the still
available connection.
off
The S0 port is free. By pressing the key you can allocate one of both available connections.
17
Only when operated on the PBX systems COMpact 2204 USB, COMpact 2206 USB, COMpact 4406
DSL, COMpact 4410 USB and COMmander Basic.
When operated on the PBX systems COMpact 5010 VoIP, COMpact 5020 VoIP, COMmander Basic.2
and COMmander Business see page 120.
118
Use of the Telephone and PBX System
Number Memory and Busy Status Overview
Key for Presentation of a MSN18
With a correspondingly configured key you can select which MSN (own external telephone
number) should be presented for an exchange line call. The selected MSN is used for the call
started after the key is pressed.
Assign Key:
Open the key programming menu for the function “external MSN” (You will find help on
page 33 and the following).
define keys
function key ...
... level
external MSN
The current settings for the key
assignment is shown on the
display.
If you like to change the current settings, press
the softkey in front of the corresponding
selection once or several times (You will find
help on page 155 and the following):
앫 [telephone number]: Allows to enter an
external telephone number of the PBX (without exchange line access number).
앫 [name]: Allows to enter a name for this telephone number.
Press the
softkey to complete the settings.
Use Function via Key (only in the idle State of the Telephone):
By pressing the key is selected which MSN should be presented for the following external
call. Now the call can be started by dialling an external telephone number (with exchange line
access number).
LED Signalling next to the Key:
green
The MSN assigned to the key is presented for the next outbound external
call.
off
The standard telephone number is presented for the next outbound call.
18
Only when operated on the PBX systems COMpact 2204 USB, COMpact 2206 USB, COMpact 4406
DSL, COMpact 4410 USB and COMmander Basic.
When operated on the PBX systems COMpact 5010 VoIP, COMpact 5020 VoIP, COMmander Basic.2
and COMmander Business see page 120.
119
Use of the Telephone and PBX System
Number Memory and Busy Status Overview
Key for Presentation of an MSN and Busy Status Overview 19
With a key correspondingly configured a selection of the MSN (own external number) and a
selection of the exchange line can be started. The LED near the key informs you on the corresponding S0 port/bundle busy status.
Assign Key:
Open the key programming menu for the function “exchange line” (You will find help on
page 33 and the following).
define keys
function key ...
... level
exchange line
The current settings for the key
assignment is shown on the
display.
If you like to change the current settings, press
the softkey in front of the corresponding
selection once or several times (You will find
help on page 155 and the following):
앫 [telephone number]: Allows to enter an
external telephone number of the PBX (without exchange line access number).
앫 [Name]: Allows to enter a name for the telephone number.
Press the
softkey to complete the settings.
Use Function via Key (only in the idle State of the Telephone):
By pressing the key an exchange line is selected. Then an external telephone number (with
exchange line access number) can immediately be dialled.
LED Signalling next to the Key:
red
All B channels (usable voice lines) of the S0 port/bundles are busy.
yellow
It is at least one B channel (usable connection) of the S0 port/bundle available. By pressing the key you can allocate the still available connection.
off
S0 port/bundle is free. By pressing the key you can allocate one of the free
connections.
19
Only when operated on the PBX systems COMpact 2204 USB, COMpact 2206 USB, COMpact 4406
DSL, COMpact 4410 USB and COMmander Basic.
When operated on the PBX systems COMpact 5010 VoIP, COMpact 5020 VoIP, COMmander Basic.2
and COMmander Business see page 118 and page 119.
120
Use of the Telephone and PBX System
Number Memory and Busy Status Overview
Function Key to select a VoIP Account 20
An external call can be started with a corresponding defined key via a certain VoIP account.
The corresponding LEDs inform you about the current busy status.
Assign Key:
Open the key programming menu for the function “VoIP account” (You will find help on
page 33 and the following).
define keys
function key ...
... level
VoIP account
The current settings for the key
assignment is shown on the
display.
If you like to change the current settings, press
the softkey in front of the corresponding
selection once or several times (You will find
help on page 155 and the following):
앫 [telephone number]: Allows to select a
VoIP account by name/number.
앫 [Name]: Allows to enter a name for the VoIP
account.
Press the
softkey to complete the settings.
Use Function via Key:
By pressing the key a VoIP account is selected. Now the external telephone number (with
exchange line access number) can be dialled immediately.
LED Signalling next to the Key:
red
VoIP access is busy (no call possible).
yellow
VoIP access is partially busy (at least one line of the VoIP access is still available). By pressing the key you can allocate the still available line.
off
VoIP access is free. By pressing the key you can allocate one free line.
20
Only when operated on the PBX systems COMpact 5010 VoIP, COMpact 5020 VoIP, COMmander
Basic.2 and COMmander Business.
121
Use of the Telephone and PBX System
Number Memory and Busy Status Overview
Speed Dialling
The speed dialling enables the configuration of a function key with up to 20 digits. The speed
dialling key can be used to save internal and external telephone numbers as well as programming sequences of the PBX.
You have the possibility to press several speed dialling keys in turns in order to put parts of
telephone numbers (e.g. provider area code) onto separate keys. These can be composed
as you like it. If digits have already been entered or another speed dialling key has been
pressed before, the exchange line access of the next speed dialling number will automatically
be deleted by the telephone.21 After having pressed the programmed key, the telephone
number is immediately dialled – if the receiver is on-hook, the programmed telephone
number will be copied into the dial preparation (page 52). If you press several speed dialling
keys in turns, the assigned names will be displayed one after the other in the second display
line.
Depending on the situation functions like Query (page 64), Pickup (page 48) or Call Takeover can be started via the speed dialling keys.
If you set speed dialling keys for internal subscribers, the corresponding LEDs will inform you
on the busy or activity status of the individual subscriber.
Assign Key:
Open the key programming menu for the function “speed dialling” (You will find help on
page 33 and the following).
define keys
function key ...
... level
speed dialling
The current settings for the key
assignment is shown on the
display.
If you like to change the current settings, press
the softkey in front of the corresponding
selection once or several times (You will find
help on page 155 and the following):
앫 [telephone number]: Allows to enter the
speed dialling number.
앫 [name]: Allows to enter a name for the telephone number.
Press the
softkey to complete the settings.
Use Function via Key:
In the idle state: By pressing the key the telephone number assigned to this key is copied into
the dial preparation - also as an addition.
21
Automatic deletion of the exchange line access numbers not when operated on the PBX systems
COMpact 5010 VoIP, COMpact 5020 VoIP, COMmander Basic.2 and COMmander Business.
122
Use of the Telephone and PBX System
Number Memory and Busy Status Overview
Exception: If the assigned telephone number is an internal telephone number and if this one
is currently called, a pickup of this call is offered.
After picking up the receiver: By pressing the key the telephone number assigned to this key
is dialled.
During the conversation: By pressing the key the active call partner is put on Hold and the
telephone number assigned to this key is dialled.
LED Signalling next to the Key (with internal Subscribers’ Telephone Numbers):
red (flashes)
The internal telephone is currently ringing. By pressing the key you can
start a pickup.
red
The internal telephone is in a telephone conversation. By pressing the
key you can start a Call Take-over.
green (flashes)
You have been called from the internal telephone and the call has not
been accepted.
yellow
The internal telephone is not reachable (Do-not-Disturb or Subscriber
Call Forwarding is active).
off
The internal telephone is not busy. By pressing the key you can start a
call.
LED Signalling next to the Key (with internal Group Telephone Number):
red
Calls are made on all logged-in telephones or no telephone of the group is
logged-in.
☞
Advice
If you have assigned telephone numbers to speed dialling keys, these will automatically be
added to the telephone book.
You can configure your telephone that after pressing a speed dialling key the corresponding
telephone number is dialled immediately (see page 164).
Macro Key
The function “Macro” enables the assignment of a function key with digits and different
sequential commands. The entry of commands is done with letters via keypad. In contrast to
the entry of the names only the letters that represent a command are allowed during the
macro entry. The following table shows which commands are available and which letter represents it.
Command [expansion]
Description of the command
Z [order of the digit]
dialling of an order of digits including * and # (any length
allowed)
W [digit 1-5]
waiting time/time of pause in a range of 1-5 seconds
K
switching to keypad
M
switching to DTMF
H
on hook/off hook with the hook key
C
waiting for the connection
Lo
LED next to the function key is switched off
123
Use of the Telephone and PBX System
Number Memory and Busy Status Overview
Lr
LED next to the function key is switched on (red)
Ly
LED next to the function key is switched on (yellow)
Lg
LED next to the function key is switched on (green)
Example for a macro entry: “HZ300CW2Z#22#”
H
After pressing the macro key the telephone switches to handsfree operation.
Z300
The telephone dials the telephone number 300 (e.g. answering machine).
C
The telephone waits for the connection.
W2
After the connection has been established the telephone waits for another 2
seconds.
Z#22#
The telephone dials the DTMF digits #22#.
Assign Key:
Open the key programming menu for the function “Macro” (You will find help on page 33 and
the following).
define keys
function key ...
... level
Macro
The current settings for the key
assignment is shown on the
display.
If you like to change the current settings, press
the softkey in front of the corresponding
selection once or several times (You will find
help on page 155 and the following):
앫 [name]: Allows to enter a name for the
macro.
앫 [macro]: Allows to enter a macro.
Press the
softkey to complete the settings.
Use Function via Key (only in the idle State of the Telephone):
If the command H (off hook/on hook with the hook key) is on the first place of the macro, the
programmed macro is executed immediately by pressing the key. If not, the start of the macro
execution has to be confirmed first.
☞
LED Signalling next to the Key:
Depends on the use of the commands Lo, Lg, Lr and Ly.
Up to 10 keys with a maximum of 100 digits/characters can be defined. An unrestricted
number of keys with a maximum of 40 digits/character can be configured.
Important The status of the LED remains after the execution of a macro - until the next command Lo,
Lg, Lr or Ly for the same key. If the LED is not used to display a status, it is recommended to
add the command Lo (switch off the LED) at the end of a macro.
124
Use of the Telephone and PBX System
Project Assignment
At the beginning of a macro no pauses can be entered.
The maximum length of the pause may be 5 seconds. This restriction is not valid for the command “wait for a connection”.
☞
Advice
If there is a macro on both levels of a function key, the LED control will also be done by the
macro on the second level. This enables e.g. to switch on the LED with the macro on the first
level of the key and to switch off the LED with the macro on the second level of the key. This
way the switching status of a parallel switched function can be reviewed by the LED.
The execution of a macro can be cancelled at any time by pressing the Exit key.
The display is configurable during the execution (page 162).
The execution of a macro is immediately stopped if an outbound call finds a busy destination
or if the current connection gets busy. This may happen e.g. if the other partner finishes the
call or if there is a programming sequence in the macro without authorization.
Project Assignment
The exchange line access with project assignment enables the assignment of an external call
to a certain project/customer/client (e.g. within a lawyer’s office). With the call data management fees and time expenses can be assigned to different projects. A project number can be
selected in an ongoing call or also before the call by opening the second menu level.
With the PC programme COMfort Set a list of project numbers to be used can be configured.
If there is no list, the number (2- to 6-digit) has to be entered during the project allocation.
This number is not saved in the list.
Use the Function via Function Menu:
Open the function menu for the function
“project” (You will find help on page 33 and the
following).
functions
project
If a project list has been created with the PC programme
COMfortel Set, this list is
offered for selection.
Use the
and
softkeys to browse to the
option you require and press the softkey to
the left of the option:
앫 [name/number]: Selects a project by its
name/number.
...
or
N
[ Project number]
Enter the project number.
Press the
softkey to complete the entry.
125
Use of the Telephone and PBX System
Project Assignment
Assign Key:
Open the key programming menu for the function “project” (You will find help on page 33
and the following).
define keys
function key ...
... level
project
The current settings for the key
assignment is shown on the
display.
If you like to change the current settings, press
the softkey in front of the corresponding
selection once or several times (You will find
help on page 155 and the following):
앫 [general/defined]: Switches from general to
defined assignment.
앫 [project number]: Allows to enter a two-digit
to 6-digit project number.
앫 [name]: Allows to enter a name for the
project number.
Press the
softkey to complete the settings.
Use Function via Key:
Generally assigned key: By pressing the key the function menu “Project number” (s. a.)
opens.
Defined assigned key: Pressing the key defines which project number is assigned to the following external call. Then the call can be started by dialling an external telephone number
(with public exchange access number).
LED Signalling next to the Key:
green
The project number assigned to the key is active to the next outbound external call.
off
The next outbound call is not assigned to any project.
☞
Advice
You can also call the function menu for “Project number” via the 2nd level of the idle state
(see Pic. 9 on page 32).
You can also assign a project number during a call. This is possible by pressing a defined
key or by selecting the function in the bottom display line (see Pic. 21 on page 62).
If you like to enter a project number for the next outbound call and if you are receiving a call
before this call is started, the project number will be cancelled by the telephone.
126
Use of the Telephone and PBX System
Announcement/Intercom via System Telephone (InterCom)
Announcement/Intercom via System Telephone (InterCom)
This function enables the announcement to a system telephone from any internal telephone
without actively being taken by anyone (e.g. in a doctor’s office). The caller can also order
the system telephone to activate the microphone additionally to the loudspeaker (handsfree
operation). A person who is nearby is able to talk to the caller via this two-way intercom system.
For inbound InterCom calls InterCom has to be permitted on the corresponding system telephone (see page 127).
If your system telephone is called with the InterCom function, the system telephone takes the
“call” automatically after a short ringer tone. The announcement or the handsfree operation
is limited to 120 seconds for security reasons to prevent an abuse of this function (e.g. eavesdropping in remote rooms). After this time the connection will be interrupted automatically if
the receiver of the system telephone is not picked up within this time frame.
For outbound InterCom calls to other system telephones a key can be defined on the system
telephone to simplify the function. But the function can also be done from any other internal
telephone. The telephone number of the called system telephone has to be preceded by a
digit sequence (see manual of the PBX).
Permit inbound InterCom Calls to the System Telephone (InterCom Authorization)
The function must be permitted on the corresponding system telephone (via configuration
programme COMset or on the telephone itself).
Use the “InterCom Authorization” via Function Menu:
Open the function menu for the function “InterCom (Auth)” (You will find help on page 33
and the following).
functions
InterCom (Auth)
The icon
setting.
marks the current
Press the
softkey to the left of the option
you require:
앫 activating: Switch on the InterCom authori-
...
zation.
앫 switching off: Switch off the InterCom
authorization.
127
Use of the Telephone and PBX System
Announcement/Intercom via System Telephone (InterCom)
Assign a Key with the Function “InterCom Authorization”:
Open the key programming menu for the function “InterCom (Auth)” (You will find help on
page 33 and the following).
define keys
function key ...
... level
InterCom (Auth)
The current settings for the key
assignment is shown on the
display.
If you like to change the current settings, press
the softkey in front of the corresponding
selection once or several times (You will find
help on page 155 and the following):
앫 [switching type]: Enables the assignment
with switch on, off or over.
Press the
softkey to complete the settings.
Use the Function “InterCom Authorization” via Key:
By pressing the key the InterCom Authorization is switched on, off or over.
LED Signalling next to the Key “InterCom Authorization”:
green
The InterCom authorization is switched on.
off
The InterCom authorization is switched off.
128
Use of the Telephone and PBX System
Announcement/Intercom via System Telephone (InterCom)
Outbound InterCom Calls with the System Telephone
For outbound InterCom Calls to other system telephones a key can be assigned on the system telephone to simplify the function.
Assign a Key with the Function “InterCom”:
Open the key programming menu for the function “InterCom” (You will find help on page 33
and the following).
define keys
function key ...
... level
InterCom
Use the
and
softkeys to browse to the
option you require and press the softkey to
the left of the option:
앫 Audio out: (see page 130).
...
앫 IC-OneWay: Assign a key with the function
“InterCom Announcement”.
앫 IC-Speakerphone: Assign a key with the
function “InterCom handsfree operation”.
The current settings for the key
assignment is shown on the
display.
If you like to change the current settings, press
the softkey in front of the corresponding
selection once or several times (You will find
help on page 155 and the following):
앫 [telephone number]: Allows to enter an
internal target number.
앫 [name]: Allows to enter a name for the target.
앫 [execution type]: Enables the assignment
with hold key and switch over.
Press the
softkey to complete the settings.
Use the Function “InterCom” via Key (only during the idle State of the Telephone):
By pressing the key the configured internal subscriber is called and the defined mode of the
InterCom call - announcement or handsfree operation - is started. Depending on the defined
mode of switching you have to hold the key during the announcement (as soon as you
release the key again, the call will be disconnected) or switched over by shortly pressing the
key (the key is pressed at the start once and at the end once).
LED Signalling next to the Key “InterCom”:
green
Connection to the InterCom target established
off
No active connection to the InterCom target
129
Use of the Telephone and PBX System
Announcement via Loudspeaker
Announcement via Loudspeaker 22
This function enables an announcement via loudspeaker system or an amplified loudspeaker
connected to the audio output of the PBX (e.g. in a department store/supermarket). A previously configured telephone number has to be called by an internal telephone. The voice connection is immediately established after dialling this telephone number.
The telephone number for the audio output as well as the necessary announcement authorization for individual telephones can be configured with the configuration programme COMset. For calls to the audio output a key can be assigned on the system telephone to simplify
the function. The function can also be made from any internal telephone with the corresponding authorization. For this purpose a certain digit order is necessary (see manual of the PBX).
Assign a Key with the Function:
Open the key programming menu for the function “InterCom Audio out” (You will find help on
page 33 and the following).
define keys
function key ...
... level
InterCom
Audio out
The current settings for the key
assignment is shown on the
display.
If you like to change the current settings, press
the softkey in front of the corresponding
selection once or several times (You will find
help on page 155 and the following):
앫 [execution type]: Enables the assignment
with hold key or switch over.
Press the
softkey to complete the settings.
Use Function via Key (only in the idle State of the Telephone):
By pressing the key the configured audio output is called. Depending on the defined execution type you have to hold the key during the announcement (as soon as the key is released,
the connection will be finished) or switch over by shortly pressing the key (the key is pressed
at the start once and at the end once).
LED Signalling next to the Key:
green
Connection to the InterCom target established
off
No active connection to the InterCom target
22
COMpact 5010/5020 VoIP and COMmander Basic/Basic.2/Business: Announcement/Audio out function only available with a door/switching module.
COMpact 4410 USB: If a door/switching module is used in slot C the announcement function is not
available.
130
Use of the Telephone and PBX System
Control the Voicemail Centre 461/461.2
Control the Voicemail Centre 461/461.2
If you have one or several Voicemail Centre 461/461.2 (special accessory by Auerswald)
connected to your PBX, the interrogation/operation of the available mailboxes on the device
can be made via the second level (softkey ) or a freely programmable function key of a
system telephone.
Assign Key:
Open the key programming menu for the function “Voicemail centre” (You will find help on
page 33 and the following).
define keys
function key ...
... level
Voicemail center
The current settings for the key
assignment is shown on the
display.
If you like to change the current settings, press
the softkey in front of the corresponding
selection once or several times (You will find
help on page 155 and the following):
앫 [general/defined]: Switches from general to
defined assignment.
앫 [telephone number]: Allows to select a
Voicemail Centre 461/461.2 by its name/its
number.
앫 [name]: Allows to enter a new name for the
Voicemail Centre 461/461.2.
앫 [mailbox type]: Switches between global
mailbox and individual mailbox.
앫 [subscriber]: Allows to select the subscriber
assigned to the individual mailbox br its
name/number.
앫 [remote access code]: Allows to enter the
remote access code of the mailbox.
Press the
softkey to complete the settings.
Use Function via Key (only in the idle State of the Telephone):
Generally assigned key: By pressing the key the menu for the selection between global mailbox or single mailbox opens. After selecting the mailbox followed by the entry of the corresponding remote access code and picking up the receiver, you will be connected with the
configured Voicemail Centre 461/461.2. If there are new recordings, they will be played back
immediately. With the softkeys you can control the Voicemail Centre 461/461.2.
Defined assigned key: By pressing the key followed by picking up the receiver, you will be
connected with the configured Voicemail Centre 461/461.2. If there are new recordings, they
will be played back immediately. With the softkeys you can control the Voicemail Centre 461/
461.2.
131
Use of the Telephone and PBX System
Control the Voicemail Centre 461/461.2
During a connection with the Voicemail Centre 461/461.2: By pressing the key you can takeover the call.
LED Signalling next to the Key:
red (flashes)
Voicemail Centre 461/461.2 is called.
red
Voicemail Centre 461/461.2 has accepted the call. By pressing the key you
can take the call over.
green (flashes) There are new recordings (in case of a defined keys only for the preconfigured mailbox; in case of a general key for all mailboxes).
green
There are old recordings (in case of a defined keys only for preconfigured
mailbox; in case of a general key for all mailboxes).
☞
The complete description of the installation and operation can be learned from the following
manuals: For the Voicemail Centre 461.2 the “Manual for Operation with Auerswald PBX sysImportant tems” or for the Voicemail Centre 461 from the corresponding “Operation Manual”.
☞
Advice
Compared with the Voicemail Centre 461, the Voicemail Centre 461.2 supports a quicker
remote access. If you like to operate a Voicemail Centre 461.2 with the telephone, you can
activate the quicker remote access (see page 158).
When selecting an individual mailbox you have to use the remote access code entered at
the following location: in Voicemail Centre 461.2 under create mailboxes 왘 ...mailbox
왘 remote access or in Voicemail Centre 461 under mailboxes 왘 remote access code.
When selecting global mailbox you have to use the remote access codes entered at the following location: in Voicemail Centre 461.2 under settings 왘 remote access 왘 remote
access code or in Voicemail Centre 461 under settings 왘 remote access code.
132
Use of the Telephone and PBX System
Group Functions of the PBX
Group Functions of the PBX
The PBX is able to manage groups (teams) additionally to the internal subscribers. Subscribers can be members of multiple groups. These groups can be used in order to reach the internal subscribers of certain departments (e.g. support, marketing, sales).
Your membership in a group does not mean that you are always called when your group is
called. If you do not like to be reachable via the group telephone number for a certain time
but only as an individual subscriber, you will be able to “log out” of this group.
This way there are active and passive members of the group. This function can be important
for members of service or call centres who do not like to be available for their customers
around the clock. Group functionality is not available for a subscriber that is logged out, but
only for a certain period. There are three different modes to log you in:
앫 1st inbound + outbound, 2nd only inbound, 3rd only outbound
A subscriber which is member of several groups can be only be “logged in outbound” in one
single group at the same time. If he likes to get also the calls of the other groups in this case,
he will be able to log in there as “inbound”. Therefore he will be in the call distribution of more
groups for internal -, public exchange - and door calls.
With “log in outbound” into a certain group, the subscriber gets a number of features/authorizations of the group which will replace his own features/authorizations as an individual subscriber in case of outbound business calls.
If you are configured to be only member of one single group you will be able to log in/out only
as a member of one group. This is the simple case, most often used! If you are member of
several groups, nevertheless you will only be allowed to be “logged in outbound” in one
group. If you try to “log in outbound” into different groups, you will be only “logged in outbound” in the last group tried. In the other groups you will only be “logged in inbound”.
Log out/Log in with the Telephone
In the menu of the telephone all groups with a membership of the telephone are offered for
log in or out.
Use the Function via Function Menu:
Open the function menu for the function
“group” (You will find help on page 33 and the
following).
functions
group
Use the
and
softkeys to browse to the
option you require and press the softkey to
the left of the option:
...
앫 [name/number]: Select a group by its name/
its number.
133
Use of the Telephone and PBX System
Group Functions of the PBX
...
Press the
softkey to the left of the option
you require:
앫 logging in: Log the telephone into a group.
앫 log out: Log the telephone out of a group.
Use the
and
softkeys to browse to the
option you require and press the softkey to
the left of the option:
앫 outbound: Select the call mode outbound.
...
앫 inbound: Select the call mode inbound.
앫 inbnd. & outbnd.: Select the call mode
inbound and outbound.
Assign Key:
Open the key programming menu for the function “group” (You will find help on page 33 and
the following).
define keys
function key ...
... level
group
The current settings for the key
assignment is shown on the
display.
If you like to change the current settings, press
the softkey in front of the corresponding
selection once or several times (You will find
help on page 155 and the following):
앫 [general/defined]: Switches over from general to defined assignment.
앫 [telephone number]: Allows to select the
group by its name/number.
앫 [name]: Allows to enter a name for the
group.
앫 [action]: Allows the assignment with log in,
log out or log over.
앫 [direction]: Allows the assignment with
inbound, outbound or inbound & outbound.
Press the
softkey to complete the settings.
Use Function via Key:
By pressing the key the telephone is logged in or out of the group configured for the key.
LED Signalling next to the Key:
green
The telephone is logged into the group.
off
The telephone is logged out of the group.
134
Use of the Telephone and PBX System
Switch on/off Announcement before Answering
Log the Telephone out of all Groups
If the telephone is logged into several groups at the same time, it can be logged out of all of
these groups at the same time.
Use the Function via Function Menu:
Open the function menu for the function “log
out all groups” (You will find help on page 33
and the following).
functions
log out all grp.
Assign Key:
Open the key programming menu for the function “log out all groups” (You will find help on
page 33 and the following).
define keys
function key ...
... level
log out all grp.
Press the
softkey to complete the settings.
Use Function via Key:
By pressing the key the telephone is logged out of all groups.
LED Signalling next to the Key:
none
Switch on/off Announcement before Answering
23
Announcement before Answering allows to play a greeting to the caller before accepting the
call. If a called partner does not take the receiver when it starts ringing (within 5-24 seconds),
the call is taken by the PBX (charges will accrue for the external caller). The external caller
hears an announcement (e.g. with information about the company) while the telephones continue to ring. As soon as one of the called partner picks up the receiver, he will be connected
to the external caller.
The activation of the function is separately done for each external telephone number.
23
Only available when operated the PBX systems COMpact 4406 DSL, COMpact 4410 USB and COMmander Basic.
135
Use of the Telephone and PBX System
Switch on/off Announcement before Answering for a Group
You can store the Announcement before Answering as WAV file in the PBX or record it via
telephone (see manual of the PBX).
Assign Key:
Open the key programming menu for the function “text before answering” (You will find help
on page 33 and the following).
define keys
function key ...
... level
text bef.answer
The current settings for the key
assignment is shown on the
display.
If you like to change the current settings, press
the softkey in front of the corresponding
selection once or several times (You will find
help on page 155 and the following):
앫 [telephone number]: Allows to enter an
external
telephone
number
(without
exchange line access number).
앫 [name]: Allows to enter a name for this telephone number.
앫 [switching type]: Enables the assignment
with switch on, off or over.
Press the
softkey to complete the settings.
Use Function via Key (only in the idle State of the Telephone):
By pressing the key Announcement before Answering is switched on, off or over for the
defined telephone number.
LED Signalling next to the Key:
green
Announcement before Answering is switched on for the defined telephone
number.
off
Announcement before Answering is switched off for the defined telephone
number.
Switch on/off Announcement before Answering for a Group 24
In case of external calls announcement before Answering allows to play a greeting to the
caller before accepting the call (charges will accrue for the external caller). If all group members are busy, the caller is put into the Waiting loop after the announcement. The activation
of the function is separately done for each group in two possible variants:
24
Only available for the operation on the PBX COMpact 5010 VoIP, COMpact 5020 VoIP, COMmander
Basic.2 and COMmander Business.
136
Use of the Telephone and PBX System
Switch on/off Announcement before Answering for a Group
앫 on busy (The caller only hears the announcement, if all members of the group are busy.)
앫 always (The caller always hears the announcement.)
You can configure in the configuration manager of the PBX if the telephones should ring
already during the announcement for the variant “always” and if the caller should hear the
Music on Hold after the announcement. Besides this one of ten Announcement before
Answering files have to be selected for the group. You can store the Announcement before
Answering as WAV files in the PBX or record it via telephone (see manual of the PBX).
Assign Key:
Open the key programming menu for the function “text before answering” (You will find help
on page 33 and the following).
define keys
function key ...
... level
text bef.answer
The current settings for the key
assignment is shown on the
display.
If you like to change the current settings, press
the softkey in front of the corresponding
selection once or several times (You will find
help on page 155 and the following):
앫 [telephone number]: Allows to select the
group by its name/number.
앫 [name]: Allows to enter a name for the
group.
앫 [switching type]: Allows the assignment
with switch off, switch on (on busy), switch
on (always), switch over (on busy) or switch
over (always).
Press the
softkey to complete the settings.
Use Function via Key (only in the idle State of the Telephone):
By pressing the key Announcement before Answering (“on busy” or “always”) for the defined
group is switched on, off or over.
LED Signalling next to the Key:
green
Announcement before Answering is switched on for the defined group.
off
Announcement before Answering is switched off for the defined group.
137
Use of the Telephone and PBX System
Transfer of an Exchange Line Access
Transfer of an Exchange Line Access25
An authorized telephone e.g. the telephone reception can assign another internal telephone
with the exchange line authorization needed for an outbound call for a short period of time.
This makes sense e.g. if this telephone is in a public room and if it is only used for external
calls by an employee from time to time. So if an external call has to be made from this telephone, an internal call has to be started to a telephone that is authorized to transfer the
exchange line access. After pressing the function key “ext. line transfer” at the telephone
authorized for the transfer, both internal subscribers hear the confirmation tone and the internal call has to be finished.
The calling telephone owns the exchange line settings now configured for this purpose in the
PBX. These exchange line settings exist until the first successful outbound external call or
until the time limit for starting the external call expires.
Assign Key:
Open the key programming menu for the function “ext. line transfer” (You will find help on
page 33 and the following).
define keys
function key ...
... level
ext.line transfer
Press the
softkey to complete the settings.
Use the Function on the transferring Telephone via Key:
By pressing the function key in an inbound internal call the call partner receives the exchange
line authorization. Both internal subscribers hear the confirmation tone and the internal call
has to be finished.
☞
LED Signalling next to the Key:
none
The transferring telephone needs for the transfer of an exchange line itself the authorization
“Transfer of external calls to external”.
Important The calling telephone needs at least the exchange line authorization access for inbound
external calls.
☞
Advice
25
The configuration of the function “Transfer of an exchange line access” is made in the configuration programme of the PBX.
Only available when operated on the PBX systems COMpact 5010 VoIP, COMpact 5020 VoIP, COMmander Basic.2 and COMmander Business.
138
Use of the Telephone and PBX System
Boss/Secretary Function
Boss/Secretary Function
This function protects the boss’ telephone against direct calls by forwarding them to the secretary. The essential difference in comparison with the call forwarding is the fact that the
boss’ telephone can still be called by the secretary’s telephone and the secretary can transfer
important calls to the boss’ telephone.
To be able to use the function matching keys have to be configured on the boss and on the
secretary telephone.
☞
Advice
Both key types cannot be configured at the same time. So one telephone cannot be boss and
secretary telephone at the same time.
Configure and operate the Function on the Boss Telephone
Assign a Key on the Boss Telephone:
Open the key programming menu for the function “secretary key” (You will find help on
page 33 and the following).
define keys
function key ...
first level
secretary key
The current settings for the key
assignment is shown on the
display.
If you like to change the current settings, press
the softkey in front of the corresponding
selection once or several times (You will find
help on page 155 and the following):
앫 [telephone number]: Allows to select an
internal telephone number of the PBX as
secretary telephone.
앫 [name]: Allows to enter a name for the telephone number.
Press the
softkey to complete the settings.
Use the Function via Secretary Key on the Boss Telephone:
In the idle state: By pressing the key the boss/secretary function is switched on or off for the
secretary telephone configured on the key. After the activation all internal and external calls
(also Call Through) as well as the door calls and queries started by the call partner are forwarded to the corresponding secretary telephone.
Inbound call: Forwarded calls are shown on the display of the boss telephone and can be
taken by pressing the secretary key (pickup).
139
Use of the Telephone and PBX System
Boss/Secretary Function
LED Signalling next to the Secretary Key:
red (flashing) A call is forwarded to the corresponding secretary. By pressing the key you
can start a pickup.
red
The corresponding secretary is not reachable. A caller is hearing the busy
tone now, unless Call Waiting is activated at the secretaries telephone. If
the boss/secretary function is also switched on for additional telephones,
the call is forwarded to these.
green
The boss/secretary function is activated. On the secretary telephone
nobody is talking. By pressing the key the boss/secretary function can be
switched off.
off
The boss/secretary function is switched off. By pressing the key the boss/
secretary function can be switched on.
☞
☞
Advice
Important
26
To identify a call from the secretary can by the ringer melody, the secretaries number can be
entered into the telephone book of the boss telephone with the PC programme COMfortel Set
and assigned with a special ringer melody.
On a telephone a maximum of five secretary keys are possible.26
The configuration of the function is only possible on the first level of the keys.
The function can only be switched on at the boss’ telephone if the corresponding boss key
was configured on the secretary telephone. If the LED glows red instead of green, the secretary is currently talking. The function is nevertheless activated.
Alarm, Schedule, InterCom (if allowed) and Wake-up calls as well as recalls started on the
boss’ telephone will not be forwarded when the function is activated. The same is the case
for recalls after a PBX firmware update and for re-transfers after transfers from the boss’ telephone.
The activated Boss/Secretary function has the first priority over Do-not-Disturb (is also valid
for an active Robinson function) and Subscriber Call Forwarding on the boss’ telephone.
Inbound calls will be forwarded to the secretariat. On the other hand a call from the secretary
to the boss’ telephone will be forwarded by an existing Call Forwarding or get a Busy in case
of an active Do-not-Disturb.
When operated on the PBX systems COMpact 5010 VoIP, COMpact 5020 VoIP, COMmander Basic.2
and COMmander Business only one secretary key is possible. Several secretary telephones have to
be combined into one group.
140
Use of the Telephone and PBX System
Boss/Secretary Function
Use the Function on the Secretary Telephone
Assign a Key on the Secretary Telephone:
Open the key programming menu for the function “boss key” (You will find help on page 33
and the following).
define keys
function key ...
first level
boss key
The current settings for the key
assignment is shown on the
display.
If you like to change the current settings, press
the softkey in front of the corresponding
selection once or several times (You will find
help on page 155 and the following):
앫 [telephone number]: Allows to select an
internal telephone number of the PBX as
boss telephone.
앫 [name]: Allows to enter a name for the telephone number.
Press the
softkey to complete the settings.
Use the Function via Boss Key on the Secretary Telephone:
If a forwarded call on the secretary telephone is accepted on the telephone, the call can be
treated as usual. If there are several boss keys, the LED blinking in red next to the boss key
indicates the corresponding boss telephone.
By pressing the boss key a call or a query can be started to the boss telephone.
☞
On the secretaries telephone the configuration of a speed dialling key with the boss´ telephone number in addition to the Boss key makes sense to be informed about the busy status.
☞
LED Signalling next to the Boss Key:
red (blinking) The inbound call was forwarded by the corresponding boss telephone. By
pressing the key a query to the boss telephone can be started.
green
The boss/secretary function is switched on.
off
The boss/secretary function is switched off.
On a telephone a maximum of five boss keys are possible.
The configuration of the function is only possible on the first level of the keys.
Advice
Important
141
Use of the Telephone and PBX System
Boss/Secretary Function
Switch off Boss/Secretary Function for all Secretary Telephones at the same Time 27
With this function the boss/secretary function can also switched off for several secretary telephones at the same time without pressing all secretary keys individually.
Use the Function via Function Menu (only on the Boss Telephone):
Open the function menu for the function “boss>secretary off” (You will find help on page 33
and the following).
functions
boss->secr.off
deactivate all
Press the
softkey to the left of the option
deactivate all to switch off the boss-secretary
function for several secretary telephones on
the boss telephone
Assign Key (only on the Boss Telephone):
Open the key programming menu for the function “boss->secretary off” (You will find help on
page 33 and the following).
define keys
function key ...
... level
boss->secr.off
Press the
softkey to complete the settings.
Use Function via Key:
By pressing the key all boss-secretary functions activated on the boss telephone are
switched off.
LED Signalling next to the Key:
none
27
Only available when operated on the PBX systems COMpact 2204 USB, COMpact 2206 USB, COMpact 4406 DSL, COMpact 4410 USB and COMmander Basic. When operated on the PBX systems
COMpact 5010 VoIP, COMpact 5020 VoIP, COMmander Basic.2 and COMmander Business only one
secretary key is available.
142
Use of the Telephone and PBX System
Waiting Field
Waiting Field
The Auerswald PBX systems COMpact 4406 DSL, COMpact 4410 USB, COMpact 5020
VoIP, COMmander Basic (19"), COMmander Basic.2 (19") and COMmander Business (19")
enable the configuration of one Waiting Field. In this Waiting Field callers can be parked
automatically28 or by pressing a key and then they can be retrieved selectively and transferred. The configuration of the Waiting Field is made with the configuration programme/manager (COMset) of the PBX. Consult the manual of the PBX.
The operation of the Waiting Field is done via one or serval29 Waiting Fields reception telephones. System telephones COMfortel 1500/2500 as well as COMfort 2000 plus can be
selected as Waiting Field receptions and configured as follows:
앫 Select one or several 29) system telephones as Waiting Field receptions with the configu-
ration programme/manager (COMset) of the PBX. Consult the manual of the PBX.
앫 To configure the Waiting Field receptions, assign one or several keys with the function
“Waiting Field” on each Waiting Field reception (see chapter Accept External Calls in the
Waiting Field on page 144 and chapter Accept internal Calls in the Waiting Field on
page 146).
After configuring a Waiting Field key on a system telephone the function “Waiting Field reception” is automatically activated for the corresponding system telephone and can be switched
on and off if necessary.
If several system telephones have been defined as Waiting Field receptions 29) and switched
on, several members can operate the Waiting Field in parallel. Inbound calls and waiting callers are signalled on all Waiting Field receptions. But if any Waiting field reception talks with
a caller, this caller is not signalled on the other Waiting Field receptions.
☞
Advice
If a caller is put into the Waiting Field, he will hear the Announcement before Answering
and later the Music on Hold.
30
A caller is on Hold in the Waiting Field for a maximum of 16 minutes without interruption. If
the waiting time is not interrupted by a conversation with the waiting party or transferred, the
caller will be disconnected.
You are remembered about the still waiting subscriber by a short tone once a minute.
28
The automatic acception of a caller is only possible when operated on the PBX systems COMpact
5020 VoIP, COMmander Basic.2 and COMmander Business (depending on the setting on busy or on
no reply).
29
When operated on the PBX systems COMpact 4410 USB and COMpact 4406 DSL a maximum of 1
Waiting Field reception can be defined for the operation of the Waiting Field, when operated on the
PBX system COMmander Basic a maximum of 4 Waiting Field receptions. When operated on the PBX
systems COMpact 5020 VoIP, COMmander Basic.2 and COMmander Business a group has to be defined for the operation of the Waiting Field with several Waiting Field receptions. This way the quantity
is only restricted by the number of possible group members.
30
When operated on the PBX systems COMpact 5020 VoIP, COMmander Basic.2 and COMmander
Business the use of Announcement before Answering can be configured individually and therefore
e.g. can be played before the ringing.
143
Use of the Telephone and PBX System
Waiting Field
Accept External Calls in the Waiting Field
Waiting Field keys have to be programmed on the Waiting Field receptions selected for the
operation of the Waiting Field to control and handle exchange line calls. During the configuration each Waiting Field key is assigned to one S0 port/bundle31. After selecting the bundle
the keys are allocated dynamically. This offers the option to adapt the number of keys for
each S0 port and for the S2M port to the number of parallel calls to be handled.
If calls come in via a S0 port/a bundle, they will show up on the corresponding free keys. If
there are more calls via a S0 port/a bundle than there are keys, they are only visible if a key
gets available.
The number of the possible Waiting Field keys depends on the number of existing external
lines/B channels and therefore on the possible maximum number of parallel callers. 32
Assign a Key on the Waiting Field Reception:33
Open the key programming menu for the function “waiting field external” (You will find help
on page 33 and the following).
define keys
function key ...
first level
waiting field
external
The current settings for the key
assignment is shown on the
display.
If you like to change the current settings, press
the softkey in front of the corresponding
selection once or several times (You will find
help on page 155 and the following):
앫 [telephone number]: Allows to select the
external S0 port/bundle.
앫 [B channel]: Allows to select the B channel
1 or 2. 33)
Press the
31
softkey to complete the settings.
When operated on the PBX systems COMpact 5020 VoIP, COMmander Basic.2 and COMmander
Business the bundle may be one S0 port, several bundled S0 ports, one S2M port (not COMpact 5020
VoIP) or a VoIP account.
32
When operated on the PBX systems COMmander Basic, COMpact 4410 USB and
COMpact 4406 DSL 2 keys per S0 port may be defined, that means a maximum of 8 keys for the
COMmander Basic. When operation on the PBX systems COMpact 5020 VoIP and COMmander Basic.2/Business 2 keys per S0 port, 30 keys per S2M port and 1 key for the VoIP access may be defined,
that means a maximum of 39 keys on the COMmander Business and a maximum of 35 keys on the
COMmander Basic.2.
33
When operated on the PBX systems COMpact 5020 VoIP, COMmander Basic.2 and COMmander
Business the selection of the B channel is not necessary.
144
Use of the Telephone and PBX System
Waiting Field
Use Function via Key:
By pressing the key the caller signalled on the key can be put into the Waiting Field or a connection with the caller can be done from the Waiting Field. The reaction after pressing the
key depends on the actual status - shown via the LED next to the key. Consult the following
description of the LED signalization:
LED Signalling next to the Key “Waiting Field external”:
green
There is a connection with an external subscriber. Information on the call partner
are shown on the display.
(If additional Waiting Field Receptions are activated, the call partner is not signalled at these.)
By pressing the key once, the call partner can be put into the Waiting Field.
yellow
An external subscriber is still in the Waiting Field. Information on the waiting
caller are shown on the display.
(If additional Waiting Field Receptions are activated, the LED glows red for
these.)
By pressing the key once, a connection to the waiting caller can be established.
red
An external subscriber is kept in the Waiting Field.
By pressing the key once, information on the waiting caller can be shown on the
display – if there is no call/conversation.
yellow
An external subscriber is calling. Information on the caller are shown on the dis(flashing) play.
The caller can be put into the Waiting Field by pressing the key once.
A connection to the caller can be established by pressing the key twice (double
click).
red
An external subscriber is calling.
(flashing) By pressing the key once, the caller can be put into the Waiting Field.
☞
The function Waiting Field can only be configured for the first level of the keys. The second
level will be deactivated then. If there has already been a function on the second level, this
Important will be deleted.
☞
Advice
34
If a caller is put into the Waiting Field by pressing the Waiting Field key, the LED next to the
key glows yellow. If a caller is put into the Waiting Field automatically34 or by another Waiting
Field Reception, the LED glows red then.
You can transfer an external subscriber in the Waiting Field to an internal target as usual (see
page 64). If the called person is busy, the external subscriber can be put into the Waiting
Loop of the called subscriber (see page 65). If the called person does not take the call, the
external subscriber falls back into the Waiting Field. This is signalled via a signal tone - if activated (see page 168).
If there is nobody in the Waiting Field, you can start calls as usual. As long as information on
a waiting caller is available in the display (LED glows yellow), some keys are without function.
If you pick up the receiver, you are connected to the waiting caller. You can prevent this by
The automatic acception of a caller is only possible when operating on the PBX systems COMpact
5020 VoIP, COMmander Basic.2 and COMmander Business (depending on the setting immediately,
time delayed or on busy.
145
Use of the Telephone and PBX System
Waiting Field
pressing the exit key. The LED glows red now and the display is in the idle state. Now you
can start a call as usual (e.g. select a telephone number from the telephone book.
In case of ongoing conversations inbound public exchange line calls will be signalled with
flashing LEDs and additionally with an advice tone - if activated (see page 168). In case of
several active Waiting Field receptions a caller put into the Waiting Field is also signalled via
a signal tone to the other Waiting Field receptions.
Accept internal Calls in the Waiting Field35
An internal Waiting Field key can be defined to put a single internal call (also emergency calls
and door calls) on hold.
Assign a Key on the Waiting Field Reception:
Open the key programming menu for the function “waiting field internal” (You will find help
on page 33 and the following).
define keys
function key ...
first level
waiting field
internal
Press the
softkey to complete the settings.
Use the Function “waiting field internal” via Key:
By pressing the key the internal caller can be put into the Waiting field or a connection can
be established with the caller in the Waiting Field. The function of the key depends on the
current status - displayed by the LED next to the key. Consult the description of the LED signalling in the following.
LED Signalling next to the Key “waiting field internal”:
green
There is a connection with an internal subscriber. Information on the call partner
are shown on the display.
(If additional Waiting Field Receptions are activated, the call partner is not signalled to these)
By pressing the key once, the call partner can be put into the Waiting Field.
35
An internal waiting Field key is only available when operated on the PBX systems COMpact 5020
VoIP, COMmander Basic.2 and COMmander Business. When operated on the PBX systems COMmander Basic, COMpact 4410 USB and COMpact 4406 DSL internal calls, emergency calls and door
terminal calls to the Waiting Field reception are only possible if there is no external caller in the Waiting
Field.
146
Use of the Telephone and PBX System
Waiting Field
yellow
An internal subscriber is on Hold in the Waiting Field. Information on the waiting
caller are shown on the display.
(If additional Waiting Field Receptions are activated, the waiting call is not signalled to these)
By pressing the key once, a connection is established to the waiting caller.
red
An internal subscriber is on Hold in the Waiting Field.
(If additional Waiting Field Receptions are activated, the waiting caller is not signalled to these.)
By pressing the key once, information on the waiting caller are shown on the display - unless there is no call/conversation.
yellow
An internal subscriber calls. Information on the caller are shown on the display.
(flashes) By pressing the key once, the caller can be put into the Waiting Field.
By pressing the key twice (double click), a connection to the caller can be established.
☞
red
An internal subscriber calls.
(flashes) By pressing the key once, the caller can be put into the Waiting Field.
A maximum of one internal Waiting Field key is possible per telephone.
The function Waiting Field can only be configured for the first level of the keys. The second
Important level will be deactivated then. If there has already been a function on the second level, this
will be deleted.
Activate/Deactivate Waiting Field Reception
After the activation of one or several Waiting Field receptions calls in the Waiting Field are
signalled on the Waiting Field keys of the activated Waiting Field receptions. If all Waiting
Field receptions are switched off, these telephones will ring according to the normal call distribution.
Use the Function “Waiting Field Reception” via Function Menu:
Open the function menu for the function “waiting field reception” (You will find help on
page 33 and the following).
Functions
w.fld.reception
The icon
setting.
marks the current
Press the
softkey to the left of the option
you require:
앫 activating: Switch on the Waiting Field
...
Reception.
앫 switching off: Switch off the Waiting Field
Reception.
147
Use of the Telephone and PBX System
Waiting Field
Assign a Key with the Function “Waiting Field Reception”:
Open the key programming menu for the function “waiting field reception” (You will find help
on page 33 and the following).
define keys
function key ...
... level
w.fld.reception
The current settings for the key
assignment is shown on the
display.
If you like to change the current settings, press
the softkey in front of the corresponding
selection once or several times (You will find
help on page 155 and the following):
앫 [switching type]: Allows the assignment
with switch on, off or over.
Press the
softkey to complete the settings.
Use the Function “waiting field reception” via Key:
By pressing the key in the idle state of the telephone the function is switched on, off or over.
LED Signalling next to the Key “Waiting Field Reception”:
green
The Waiting Field Reception is switched on.
off
The Waiting Field Reception is switched off.
☞
The deactivation of a Waiting Field Reception is only possible if there is no caller in the Waiting Field. If there are several Waiting Field Receptions this restriction applies only if one
Important remaining Waiting Field Reception is active.
As long as the Waiting Field reception is activated, calls/conversations are not entered into
the caller/calls/redialling list.
After the activation of the Waiting Field reception existing Subscriber Call Forwardings configured for this telephone, parallel calls as well as Do-no-Disturb are switched off. After the
deactivation of the Waiting Field reception (on the telephone) these functions (e.g. a Call Forwarding to the answering machine) are possible again. The corresponding function (except
parallel call) has to be activated again.
COMpact 5020 VoIP and COMmander Basic.2/Business: When switching off the Waiting
Field reception the subscriber is automatically logged out inbound and when switching on it
will be automatically logged in again.
COMpact 4406 DSL, COMpact 4410 USB and COMmander Basic: When activating the Waiting Field reception this subscriber will automatically be logged out of all groups. After the
deactivation you have to log the subscriber in again - if necessary.
148
Use of the Telephone and PBX System
Hotel Functions for Reception and Room Telephones
Hotel Functions for Reception and Room Telephones36
The hotel function enables the comfortable room and call data management if the PBX is
used in a hotel. The scope of functions can be divided into three main areas.
Hotel Reception Telephone: 37 The hotel reception telephone enables various control and
information functions via display and LEDs on the Xtension module. An additional PC is not
necessary at the reception in many cases. The guests’ Check in and Check out are directly
controlled with the menu of the telephone. There are various functions available for the
affected room in different phases.
Hotel Room Telephones: The PBX has many functions not making sense or being harmful
if used from a hotel room telephone. This is the reason for blocking programming functions
(like e.g. Do-not-disturb, Call forwarding) exchange functions and special exchange line
access types. This way, the guest can only make outbound calls and accept calls and configure the personal wake-up time. In addition to this it is possible for the room service to configure the room status (clean, uncleaned, blocked) by entering a digit sequence.
Print-out Function:38 This function enables the output of the accrued telephone charges as
a guest invoice (or informational invoice) with a separate line for each call. This function is
controlled by the hotel reception telephone.
☞
Advice
The configuration of the hotel functions is done with the configuration programme COMset.
The print template has to be edited there also. The configuration is described in the manual
of the PBX.
Configure and operate a Hotel Reception Telephone
The configuration of individual telephones as a hotel reception- or hotel room telephones are
done with the configuration programme of the PBX. After that there must be one programmable function key configured for each hotel room telephone on the hotel reception telephone.
The hotel functions are opened on the reception telephone with the hotel room key configured for the corresponding room (double click or with the shift key for the 2nd level). The
available functions are dependent on the status - checked in or out - of the room. These different options are described in the following.
36
Only when operated on the PBX systems COMpact 4406 DSL, COMpact 4410 USB, COMmander Basic, COMpact 5020 VoIP, COMmander Basic.2 and COMmander Business
37
When operated on the PBX systems COMpact 4410 USB and COMpact 4406 DSL a maximum of 1
reception telephone is possible, when operated on the PBX system COMmander Basic a maximum
of 4 reception telephones. When operated on the PBX systems COMmander Business and COMmander Basic.2 the number of the available hotel telephones (reception and room telephones) have
to be released in the Upgrade Centre. When operated on the PBX system COMpact 5020 VoIP the
hotel function has to be released once in the Upgrade Centre.
38
Recommended printers see manual of the PBX.
149
Use of the Telephone and PBX System
Hotel Functions for Reception and Room Telephones
Define Room Keys on the Reception Telephone:
Open the key programming menu for the function “hotel room” (You will find help on page 33
and the following).
define keys
function key ...
... level
hotel room
The current settings for the key
assignment is shown on the
display.
If you like to change the current settings, press
the in front of the corresponding selection
once or several times (You will find help on
page 155 and the following):
앫 [telephone number]: Allows to select a
room telephone by its name/number.
앫 [name]: Allows to enter a new name for the
room telephone.
☞
Press the
softkey to complete the settings.
The function can only be configured on the first level of the keys. Afterwards the second level
is blocked. An existing function on the second level will be deleted.
Important
☞
Advice
The simultaneous use of a system telephone as a waiting field reception and as a hotel
reception telephone is not possible.
Please pay attention that the hotel reception telephone is not available for inbound calls during the check in or check out (caller hears the busy signal). The configuration of a call forwarding on busy is recommended.
Please make sure that the listing of internal calls in the caller list is activated if you like to be
informed about unsuccessful guest calls to the hotel reception telephone.
Use the Function via Room Key on the Reception Telephone:
During the idle state: By pressing the key twice (double click or with shift key for the 2nd level)
the menu for checking in/out of the room telephone configured on the key opens. The available functions are dependent on the status of the room - checked in or out. These different
options (arrival, stay and departure of the guest) are described in the following.
By pressing the key once, the telephone number programmed on this key is copied into the
dial preparation - also additional. Exception: If the telephone number is ringing, a pickup of
the call is offered.
After picking up the receiver: By pressing the key, the telephone number programmed on the
key is dialled.
During the conversation: By pressing the key, the active call partner is put on Hold and the
telephone number configured on the key is dialled.
150
Use of the Telephone and PBX System
Hotel Functions for Reception and Room Telephones
LED Signalling next to the Room Key:
red (flashes)
The room telephone is currently ringing. By pressing the key you can
start a pickup.
red
The room telephone is in a telephone conversation.
green (flashes)
You have been called from the room telephone and the call has not
been accepted.
yellow
The internal telephone is not reachable (Do-not-Disturb or Subscriber
Call Forwarding is active).
off
The internal telephone is not busy. By pressing the key you can start a
call.
Arrival of the Guest (Check In)
At a guest’s arrival the hotel room key offers two functions. You can immediately check in the
guest or ask for the room status first (clean, unclean, blocked). If the room is blocked, a check
in will not be possible. The two other status conditions are for information only. The status
can be changed in this menu only.
2x
Click twice on the correspondingly programmed function key (see page 149) to open
the menu for check in/out.
Press the
softkey to the left of the option
you require:
앫 check in: Checks the guest in.
(no additional entry is necessary)
...
앫 room status: Allows to check/change the
room status.
The icon
setting.
marks the current
Use the
and
softkeys to browse to the
option you require and press the softkey to
the left of the option:
앫 clean: Mark the room as “clean”.
...
앫 unclean: Mark the room as “unclean”.
앫 blocked: Mark the room as “blocked”.
While the Guest stays in the Room (After the Check In)
From the moment of check in some configuration and interrogation functions can be used
with the hotel room key. Exactly like on the hotel room telephone itself - the call charges with
the date of check in can be interrogated and a wake-up time for the guest can be set.
If a guest likes to see a list of accrued call charges during his stay, you can directly print out
an intermediate invoice to the printer – provided charges occurred and a printer is connected.
After selecting the function, the printer starts printing immediately. The form of the intermediate invoice is similar to the final invoice, only the date of check out is replaced by the print
date. The printed data will not be deleted and will be printed again when checking out.
If a guest wants e.g. that the kids cannot do external calls from their room, these calls can be
blocked by the hotel reception telephone. Then internal calls only can be done. External calls
can still be accepted.
151
Use of the Telephone and PBX System
Hotel Functions for Reception and Room Telephones
2x
Click twice on the correspondingly programmed function key (see page 149) to open
the menu for check in/out.
Use the
and
softkeys to browse to the
option you require and press the softkey to
the left of the option:
앫 check out: Check the guest out.
(see “departure of the guest”)
앫 wake up call: Switch on or off the wake up
call for the room telephone.
invoice: Print an intermediate
invoice - if there are costs and a printer is
connected.
앫 call charges: Show the call charges including the date of check in (no additional entry
is necessary).
앫 external access: Switch on or off the permission to make external calls for the room
telephone.
앫 interim
...
The icon
setting.
After selecting wake up time:
Use the
and
softkeys to browse to the
option you require and press the softkey to
the left of the option:
marks the current
앫 switched off: Switch off the wake up call.
(no additional entry is necessary).
앫 wake up once: Switch on the wake up time
...
for a single wake up.
앫 wake up daily: Switch on the wake up time
for daily wake up.
N
Enter the time.
[ time]
Press the
softkey to complete the entry.
The Guest leaves (Check Out)
After selection of the function check out – provided charges occurred and a printer is connected - you are asked whether you like to have a print-out of the final invoice. If you confirm,
the printer starts printing. The print-out contains a list of individual connections between the
time of check in and check out. The sum of the invoice corresponds to the call charge meter
that can be viewed with the selection call charges.
2x
check out
152
Click twice on the correspondingly programmed function key (see page 149) to open
the menu for check in/out.
Press the
softkey to the left of the option
check out.
Use of the Telephone and PBX System
Hotel Functions for Reception and Room Telephones
If there are call charges and a
printer is connected, you are
asked if you like to get a printout of the total invoice.
print-out?
Press the
softkey to start printing.
The print-out is executed.
print-out OK?
Press the
softkey to accept the print-out
and finish the “check out”.
☞
After the end of the “check out” all room data are initialized, the call charge meter and also the
call data are deleted. If you have selected check out by mistake or if e.g. problems with the
Important printer prevents a correct print-out, you have different possibilities to cancel the procedure:
- Press the exit key. The procedure is cancelled and the room remains in the status “check in”.
- If you are asked print-out ok?, you press the
softkey and then the selection cancel
print. The procedure will be stopped and the room remains in the status “check in”.
- If you are asked print-out ok?, do not press any key. After three minutes the procedure will
be cancelled and the room will remain in the status “check in”.
- If you are asked print-out ok?, press the
softkey and then the selection print again.
The print-out will be repeated and you can decide again whether you like to cancel the procedure.
- If call charges have occurred, you will be asked if a print-out is necessary after the selection
of check out. If you negate this question with the
softkey the check out will be finished
then. If you like to cancel this procedure, press the exit key.
- If there were no call charges, you would be informed that no charges had occurred after the
selection of check out. If you confirm this display with the
softkey the check out will be
finished then. If you like to cancel this procedure, press the exit key.
☞
Advice
If there is a simultaneous access from another hotel reception telephone or from the hotel
room telephone to the room data you will get the message that the data is already in use.
The number of copies set in the configuration programme COMset is not used for an intermediate invoice because it´s for the guest’s information only. If you need a copy, press the
softkey if you are asked if the print-out is ok and then the selection print again.
The PBX has a call data memory for call data sets. If the memory capacity has been
exceeded and e.g. the calls of a long-time guest are overwritten, there will be a note on the
invoice that not all calls are listed. The sum of charges stated in the invoice is read from the
call charge meter that counts the charges independently from the call data.
If the data recording of certain calls was deactivated to save memory space, they will not be
listed as individual connections on the telephone invoice. The sum of charges stated in the
invoice is taken from the call charge meter counting the call charges independently of the call
data.
The generated invoice number is listed under project number when a read out via PC is made
(e.g. with the programme COMlist). This number will automatically be assigned when checking in.
In the status “check in” the room status is set back to “unclean” every day at midnight.
153
Use of the Telephone and PBX System
Hotel Functions for Reception and Room Telephones
Operate a Hotel Room Telephone
The advantage of a system telephone compared with the use of an analogue or standard
ISDN telephones is e.g. the remote controlled delete function when checking out the guest
(privacy protection), the various comfort functions and specifically configured function keys.
The functions which are still allowed for room telephones are handled the same way as
described for normal telephones. With one exception: A programmable function key configured with the function “hotel room” allows the setting of a wake-up time and the display of call
charges and of the check in time. The following functions are also possible:
왎 Starting and accepting internal and external calls
왎 Delete data (page 94) and charges (page 94) via the menu point “functions” (the call
charge meter of the PBX is not influenced)
왎 Use of the caller/call/redialling list as well as the telephone book (page 78). Parts of the
telephone book can be blocked; page 174)
왎 Scheduled call (page 90) and Power Dialling (page 58)
왎 Interrogation of call charges and setting of the wake-up time with a function key.
Press the correspondingly programmed function key to open the menu.
Press the
softkey to the left of the option
you require:
앫 wake up call: Switches a wake up time for
the room telephone on/off.
...
앫 call charges: Show the call charges includ-
ing the date of check in.
(no additional entry is necessary).
The icon
setting.
marks the current
After selecting wake up call:
Use the
and
softkeys to browse to the
option you require and press the softkey to
the left of the option:
앫 switched off: Switch off the wake up call.
(no additional entry is necessary).
앫 wake up once: Switch on the wake up time
...
for a single wake up.
앫 wake up daily: Switch on the wake up time
for daily wake up.
☞
N
[ time]
Enter the time.
Press the
softkey to complete the entry.
The configuration of the telephone (e.g. function keys) has to be done with the programme
COMfortel Set because the configuration via menu is blocked on hotel room telephones.
Important To avoid misunderstandings the value for cost per charge unit configured in COMfort Set
should match the value configured in COMset.
☞
Advice
154
When checking out the local telephone book, the lists (caller, calls and redial lists), schedules, the ringer volume as well as the local call charge meter are automatically deleted or initialized.
Configuration of the Telephone
CONFIGURATION OF THE TELEPHONE
The configurations listed in this chapter are usually made only once. If you like to simplify this
task, you can configure the telephone also via PC. The necessary PC software is enclosed
in the scope of delivery (see page 175).
Key Programming
The system telephones COMfortel 1500 and COMfortel 2500 offer both 15 freely programmable function keys. If the system telephone COMfortel 2500 has been expanded with key
extension modules COMfortel Xtension30 (up to 3 modules are possible), 30 function keys
per module are available.
The freely programmable function keys can be configured double – on two levels – with internal and external telephone numbers as well as different functions.
Additionally to the function keys you have a multicoloured LED near each key. This LED
informs you on busy or activity status of an internal subscriber or on the switching status of
a function. In this case the LED refers to the function/the subscriber of the first level. Please
pay attention to this functionality when programming your keys.
Which functions can be programmed on keys and where these functions are described in
detail is listed on page 35. Under the functional description you also find a description for the
programming and use of the key as well as for the LED signalling.
Some basic rules for the programming of the keys are described in the following.
☞
Advice
Functions that have been programmed on a function key, are also still available via the menu
- if it has been the case before.
COMfortel 2500: To use one or several key extension modules COMfortel Xtension30 with
the telephone, you need the wall-mount power supply COMfortel XT-PS (type number 809).
Settings in the Key Programming
After selection of the function all settings necessary for the programming of the key are
shown one after the other.
[general/defined]
The current setting is shown on the display. Press the
softkey in front of the setting to
switch between general and defined. The quantity of necessary settings changes at the same
time.
With this setting you can preselect for some functions (door and group functions, project
numbers, configurations) if you like to define all settings when programming the key (defined)
or if you like to make some settings individually when pressing the key (general).
The advantage of a defined programmed key is the simple and fast operation. Besides this
you can also press this key during a call (except the function “Voicemail Centre”) because
the telephone can make the settings in the background without changing the display content.
Disadvantage of this variant is that in some cases many keys are necessary if e.g. different
log and call types have to be considered for different groups.
[telephone number]
Press the
softkey in front of this setting. If there is a list of telephone numbers available
(e.g. door terminals available on the PBX) it will be opened and the requested telephone
number can be selected by pressing the softkey in front of the selection. Otherwise an
155
Configuration of the Telephone
Key Programming
input field opens where you can enter a 20-digit telephone number. Then the current setting
is shown on the display.
[project number]
Press the
softkey in front of the setting. If there is a list of project numbers available, it
opens and the requested project number can be selected by pressing the softkey in front
of the selection. Otherwise an input field opens where you can enter a 2- to 6-digit project
number. Then the current setting is shown on the display.
[name]
Press the
softkey in front of the setting. If there is a list of names available (e.g. configurations available in the PBX), it opens and the requested name can be selected by pressing
the softkey in front of the selection. Otherwise an input field opens where you can enter a
16-character name with the keypad. Then the current setting is shown on the display.
[switching type]
The current setting is shown on the display. Press the
switch between from on, off and over.
softkey in front of the setting to
If you have configured a key with switch over, you can switch on or off the corresponding
function with each key pressing. If you have programmed a key with switch on or off, you can
only switch the corresponding function on or off.
[operation]
The current setting is shown on the display. Press the
switch between log in, -out and -over.
softkey in front of the setting to
If you have configured a group key with log over, you can log the telephone in and -out with
each key pressing. If you have configured a group key with log in or -out, you can only log
the telephone in or out.
[direction]
The current setting is shown on the display. Press the
softkey in front of the setting to
switch between inbound, outbound and inbound & outbound.
[execution type]
The current setting is shown on the display. Press the
switch between “hold the key” and “switch over key”.
softkey in front of the setting to
[mailbox type]
The current setting is shown on the display. Press the
softkey in front of the setting to
alternate between global mailbox and individual mailbox. The quantity of necessary settings
changes at the same time.
[door function]
The current setting is shown on the display. Press the
softkey in front of the setting to
switch between open the door and/or switch the light on and/or door terminal call.
[subscriber]
Press the
softkey in front of the setting. If there is a list of subscriber telephone numbers/
names available, this will open and the requested subscriber can be selected by pressing the
softkey in front of the selection. Then the current setting is shown on the display.
[remote access code]
Press the
softkey in front of the setting. An entry field opens to enter a 4-digit remote
access code via the keypad. The current setting is not shown on the display.
156
Configuration of the Telephone
Basic Settings
Basic Settings
Configure MSN (Internal Telephone Number)
You absolutely have to enter one of the internal subscriber telephone numbers as MSN in the
telephone so that the telephone is able to work on the internal S0-Bus of your Auerswald PBX
as a system telephone.
Open the settings menu for the setting “MSN”
(You will find help on page 33 and the following).
settings
def.settings
☞
N
MSN
[ internal number]
Enter the internal telephone number.
Press the
softkey to complete the entry.
Use each of the internal subscriber telephone numbers only for one of the ISDN units that
are connected to the internal S0 bus of your PBX.
Important
Set the Language of the Telephone
Open the settings menu for the setting “language” (You will find help on page 33 and the
following).
settings
def.settings
language
The icon
setting.
marks the current
Use the
and
softkeys to browse to the
option you require and press the softkey to
the left of the option:
앫 [language]: Selects one of the languages as
...
☞
display language.
The menu language can be reached by pressing the keys
, # and 0.
Advice
157
Configuration of the Telephone
Basic Settings
Select Type of Headset
If a headset has been connected, the type of headset in use has to be configured.
Open the settings menu for the setting “headset type” (You will find help on page 33 and
the following).
settings
def.settings
headset type
The icon
setting.
marks the current
Use the
and
softkeys to browse to the
option you require and press the softkey to
the left of the option:
앫 wired headset: Select the type “wired head-
...
set”.
앫 DHSG headset: Select the type “wireless
headset with DHSG interface”.
Switch on/off Quick Remote Access to the Voicemail Centre 461.2
Compared to the Voicemail Centre 461 the Voicemail Centre 461.2 supports a quicker
remote access. If you like to operate a Voicemail Centre 461.2 with the telephone (see
page 131), you can activate the quick remote access here.
Open the settings menu for the setting
“VMC461.2 FW > 2.02” (You will find help on
page 33 and the following).
settings
def.settings
VMC461.2 FW>2.02
The icon
marks an activated
selection.
The icon
marks a deactivated selection.
Press the or softkey in front of the option
you require to invert the current status:
앫 VMC461.2 FW > 2.02:
Activate/deactivate
the quick remote access.
...
...
Press the
158
softkey to complete the settings.
Configuration of the Telephone
Display Settings
☞
Advice
If you like to operate (additionally) a Voicemail Centre 461 with the telephone, let the quick
remote access switched off in order to avoid incorrect access to the device.
The Voicemail Centre 461.2 has to use at least the firmware version 2.02 for the support of
this function.
Display Settings
Configure the Display Light (only COMfortel 2500)
You can adapt the display backlight to the requirements of your work place.
Open the settings menu for the setting “display
light” (You will find help on page 33 and the
following).
settings
display
display light
The icon
setting.
marks the current
Use the
and
softkeys to browse to the
option you require and press the softkey to
the left of the option:
앫 deactivate: Switch off the light completely.
앫 on during call: Additionally to the defined
...
☞
Advice
time in the selection “automatically” (see
below) the light stays active during the call
and thereafter for a short transition period.
앫 automatically: As soon as a key is pressed,
the receiver is picked up or the telephone is
called, the light (maximum brightness) is
switched on and stays active for a short transition period thereafter. But the light remains
to be always active (minimum brightness).
The selection “on during call” or “automatically” requires the additional setting of the brightness (see next chapter).
Set Brightness (only COMfortel 2500)
You can adapt the brightness of the display backlight to the requirements of your work place.
Under “brightness min.” you set the basic brightness in the idle state of the telephone.
Under “brightness max.” you set the brightness of the display in the state of ringing, during a
call as well as during the operation.
159
Configuration of the Telephone
Display Settings
Open the settings menu for the setting “brightness” (You will find help on page 33 and the
following).
settings
display
brightness (...)
Define the requested brightness with the
and softkeys.
☞
Press the
softkey to complete the settings.
If you have switched off the display backlight completely (see page 159), this setting is without effect.
Important
Set the Contrast
Open the settings menu for the setting “contrast” (You will find help on page 33 and the
following).
settings
display
contrast
Define the requested contrast with the
softkeys.
Press the
and
softkey to complete the settings.
Configure the Time Format
Open the settings menu for the setting “time
format” (You will find help on page 33 and the
following).
settings
display
time format
160
Configuration of the Telephone
Display Settings
The icon
setting.
marks the current
Use the
and
softkeys to browse to the
option you require and press the softkey to
the left of the option:
앫 HH:MM: Select the time format in the order
hour, minute separated by a colon.
앫 HH.MM: Select the time format in the order
...
hour, minute separated by a point.
Set the Date Format
The selected date format is presented in e.g. the calls and caller lists. In the idle state the
format is changed as follows:
In the idle state of the COMfortel 1500 the year is presented with 4-digits (e.g. 03.06.2006).
In the idle state of the COMfortel 2500 the month is presented with three letters and there is
no year (e.g. 03.Jun).
Open the settings menu for the setting “date
format” (You will find help on page 33 and the
following).
settings
display
date format
The icon
setting.
marks the current
Use the
and
softkeys to browse to the
option you require and press the softkey to
the left of the option:
앫 DD.MM.YY: Select the date format in the
...
order day, month, year separated by points.
DD/MM/YY: Select the date format in the
order day, month, year separated by
slashes.
앫 DD-MM-YY: Select the date format in the
order day, month, year separated by
hyphens.
앫 YY-MM-DD: Select the date format in the
order year, month, day separated by
hyphens.
161
Configuration of the Telephone
User Settings
User Settings
Configure Macro Display
Open the settings menu for the setting “macro
display” (You will find help on page 33 and the
following).
settings
user settings
macro display
The icon
setting.
marks the current
Use the
and
softkeys to browse to the
option you require and press the softkey to
the left of the option:
앫 static text: During the macro execution the
name of the key is displayed.
...
앫 macro steps: During the macro execution
the currently dialled digits are displayed.
Configure Menu Selection
You can adapt the function menu (see page 34) to your own requirements. If you only like to
use some of the available functions, you can disable the others to reduce the menu selection.
The fading out only concerns the function menu. If the concerning functions are also available
in a different manner, e.g. via the key programming menu (see page 35) or via an already
configured key, this access is still available for the function.
Open the settings menu for the setting “menu
definition” (You will find help on page 33 and
the following).
settings
user settings
menu definition
162
Configuration of the Telephone
User Settings
The icon
marks an activated
selection.
The icon
marks a deactivated selection.
...
...
Use the
and
softkeys to browse to the
option you require and press the
or
softkey to the left of the option to reverse the
actual status:
앫 [function]: Activates/deactivates the pres-
entation of the function on the display.
Press the
softkey to complete the settings.
Configure the Reachability of the second Key Level
The freely programmable function keys can have two functions each (on 2 levels). Here you
can configure how the activation of the second level of the function keys will happen. The
mode “Activation with shift key” is always set. If you like to use it you will have to configure
one of your function keys as a shift key. The mode “Activation with double click (300 ms)” is
additionally set in the factory setting. This can be deactivated if you do not want it.
Open the settings menu for the setting “keys
2nd level” (You will find help on page 33 and
the following).
settings
user settings
keys 2nd level
The icon
marks an activated
selection.
The icon
marks a deactivated selection.
...
...
Press the
or
softkey to the left of the
option you require to reverse the actual status.
앫 double click: Activate/deactivate the use of
the double click to reach the 2nd level.
Press the
softkey to complete the settings.
163
Configuration of the Telephone
Configure Number Blocking
Configure the Speed Dialling Keys
For all speed dialling keys programmed on function keys (see page 122) you can define after
pressing in the idle state if automatic off-hook should be enabled (when using the headset)
or switched to handsfree operation.
Open the settings menu for the setting “speed
dialling key” (You will find help on page 33 and
the following).
settings
user settings
speed dial.key
The icon
marks an activated
selection.
The icon
marks a deactivated selection.
...
...
Press the
or
softkey to the left of the
option you require to reverse the current status.
앫 auto. off hook: Activate/deactivate the auto-
matic off-hook when using the speed dialling
key.
Press the
softkey to complete the settings.
Configure Number Blocking
To prevent unauthorized persons from changing important settings, there are different levels
of authorization on the telephone.
When operating on the PBX COMpact 5010 VoIP, COMpact 5020 VoIP, COMmander
Basic.2 and COMmander Business the access to the telephone is divided into four levels of
authorization:
앫 Administrator (access with the Admin PIN of the PBX),
앫 Sub administrator (access with one of the four SubAdmin PINs of the PBX),
앫 User (access with the user PIN that has been allocated to the subscriber) and
앫 Guests (unprotected access).
The PINs are transferred from the PBX and cannot be changed on the telephone.
When operating on the PBX COMpact 2204 USB, COMpact 2206 USB, COMpact 4406 DSL,
COMpact 4410 USB and COMmander Basic the access to the telephone is divided into two
levels of authorization:
앫 User (access with the user PIN) and
앫 Guests (unprotected access).
The user PIN is configured on the telephone as described in the following.
164
Configuration of the Telephone
Configure Number Blocking
Configure Function Lock
The functions that can be selected in the function menu (see page 34) and key programming
menu (see page 35) can be blocked against unauthorized use. The display of these blocked
functions in the selection list requires the entry of the corresponding PIN after selection of
“additional” at the end of the selection list.
Open the settings menu for the setting “function lock” (You will find help on page 33 and
the following).
settings
blocking
function lock
The icon
marks the blocking
for guests.
The icon
marks the blocking
for guests and users.
The icon
marks the blocking
for guests, users and SubAdministrators.
Use the
and
softkeys to browse to the
option you require and press the
softkey
to the left of the option:
앫 [function]: Opens the menu to block the
selected functions.
...
The icon
marks an activated
selection.
The icon
marks a deactivated selection.
Use the
and
softkeys to browse to the
option you require and press the
or
softkey to the left of the option:
앫 Sub Admin: Block the function for guests,
users and SubAdministrators.
앫 user: Block the function for guests and
users.
...
...
앫 guests: Block the function for guests.
앫 no blocking: Release the function for
guests, users and SubAdministrators.
Press the
softkey to finish the configurations for this function.
The changed configurations
are displayed and you can
select a function again.
Press the
softkey to complete the settings.
165
Configuration of the Telephone
Configure Number Blocking
Configure Settings Lock
The settings selectable in the configuration menu (see page 36) can be blocked against
unauthorized use. The display of these blocked settings in the selection list needs the entry
of the corresponding PIN after selection of “additional” at the end of the selection list.
Open the settings menu for the setting “settings lock” (You will find help on page 33 and
the following).
settings
blocking
settings lock
The icon
marks the blocking
for guests.
The icon
marks the blocking
for guests and users.
The icon
marks the blocking
for guests, users and SubAdministrators.
Use the
and
softkeys to browse to the
option you require and press the
softkey
to the left of the option:
앫 [configuration]: Opens the menu to block
the selected settings.
...
The icon
marks an activated
selection.
The icon
marks a deactivated selection.
Use the
and
softkeys to browse to the
option you require and press the
or
softkey to the left of the option:
앫 Sub Admin: Block the setting for guests,
users and SubAdministrators.
앫 user: Block the setting for guests and user.
...
...
앫 guests: Block the setting for guests.
앫 no blocking: Release the setting for guests,
users and SubAdministrators.
Press the
softkey to finish the configuration
for this function.
The changed settings are displayed and you can select a
setting again.
Press the
166
softkey to complete the settings.
Configuration of the Telephone
Signalling
Configure/change the User PIN39
Open the settings menu for the setting “User
PIN” (You will find help on page 33 and the following).
settings
blocking
User PIN
N
N
☞
Advice
******
Enter the PIN.
Press the
softkey to complete the entry.
******
Re-enter the PIN.
Press the
softkey to complete the entry.
You can delete the PIN by not entering any PIN in both menus but by only pressing the
softkey.
Signalling
Configure LED Signalling for Messages
In the idle state the LED near the message key shows the condition of the caller list:
앫 LED flashes: In the list are new entries that have not yet been viewed.
앫 LED glows: There are no new entries. All the entries in the list have been read but not
deleted.
If you like to deactivate the glowing LED you can switch it off as follows.
Open the settings menu for the setting “message LED” (You will find help on page 33 and
the following).
settings
signalling
message LED
39
Only available when operated on the PBX systems COMpact 2204 USB, COMpact 2206 USB, COMpact 4406 DSL, COMpact 4410 USB and COMmander Basic.
167
Configuration of the Telephone
Signalling
The icon
setting.
marks the current
Use the
and
softkeys to browse to the
option you require and press the softkey to
the left of the option:
앫 flashing + on: Switch on the LED signalling.
앫 flashing only: Switch on the restricted LED
...
signalling.
앫 LED always off: Switch off the LED signal-
ling.
Configure LED and Tone Signalling for Call Waiting
In this menu can be set whether an inbound call will be signalled during a call by a tone and/
or a LED or only via display message.
Open the settings menu for the setting “call
waiting tone” (You will find help on page 33
and the following).
settings
signalling
call wait.tone
The icon
marks an activated
selection.
The icon
marks a deactivated selection.
...
...
Press the
or
softkey to the left of the
option you require to reverse the actual status.
앫 LED: Activate/deactivate the LED signalling
above the hook key.
앫 tone: Activate/deactivate the acoustic sig-
nalling.
Press the
softkey to complete the settings.
Configure Attention Tone for Waiting Field and Power Dialling
In case of existing calls, additional inbound exchange line calls to the Waiting Field are signalled by an attention tone and flashing LEDs (page 144). As soon as a subscriber called with
Power Dialling is not been busy anymore (page 60), the system telephone activates the loudspeaker and signals this with an attention tone, too. If you are disturbed by the attention tone,
you can switch it off. The volume of the attention tone depends on the configured ringer volume.
168
Configuration of the Telephone
Signalling
Open the settings menu for the setting “attention tone” (You will find help on page 33 and
the following).
settings
signalling
attention tone
The icon
marks an activated
selection.
The icon
marks a deactivated selection.
...
...
Press the
or
softkey to the left of the
option you require to reverse the current status.
앫 waiting field: Activate/deactivate the atten-
tion tone for the Waiting Field.
dialling: Activate/deactivate
attention tone for the Power Dialling.
앫 power
the
Press the
softkey to complete the settings.
Configure Headset Ringer
In the headset operation (headset is activated; see page 97) three types of call signalling are
possible:
1. Ringing in the loudspeaker (like with the receiver operation)
2. Ringing in the loudspeaker + short attention tone in the headset
3. Short attention tone in the headset
The headset ringer has to be activated for the 2nd and 3rd operation mode as described here.
For the 3rd operation mode the ringer has to be switched off (see page 99).
Open the settings menu for the setting “headset ringer” (You will find help on page 33 and
the following).
settings
signalling
headset ringer
169
Configuration of the Telephone
Signalling
The icon
marks an activated
selection.
The icon
marks a deactivated selection.
...
...
Press the
or
softkey to the left of the
option you require to reverse the current status.
앫 activated: Activate/deactivate the headset
ringer.
Press the
softkey to complete the settings.
Configure Ringer Melodies and Volume
To identify different call types there are 16 (COMfortel 2500) or 8 (COMfortel 1500) ringer
melodies. You can edit or overwrite these ringer melodies with the PC programme
COMfortel Melody (see page 178).
These defined ringer rhythms can be assigned to the different type of calls, callers or call destinations. Assign priority to the information being the most important to you and make the settings as follows:
앫 If you like to identify different call types by ringer melodies, make the corresponding set-
tings via the configuration menu or in the PC programme COMfortel Set under “settings ...
signalling” as described in the following. The following type of calls are offered: - alarm
calls, - external call, - internal call, - group call (call directed to a group), - InterCom call,
- external query, - internal query, - scheduled call, - door call, - Call Deblocker call
(released call in spite of Do-no-Disturb), - wake-up call, - other calls.
앫 If you like to identify different callers by different ringer melodies, enter the telephone num-
bers of these persons into the local telephone book and assign a ringer melody to the corresponding contact (page 79; requirement for this function is the presentation of the
caller’s telephone number).
앫 If you like to identify which of your telephone numbers has been dialled by the caller by
different ringer melodies, make the corresponding settings in the PC programme COMfortel Set. Enter the external telephone numbers under “settings ... signalling defined” that will
reach your telephone and assign an individual ringer melody to these telephone numbers.40
앫 If you like to identify which of your groups has been called by the caller by different ringer
melodies, make the corresponding settings in the PC programme COMfortel Set. Enter the
group number with membership of your telephone under “settings ... signalling defined”
and assign an individual ringer melody to these numbers.
As external calls, internal calls and door calls are influenced by more than one of these four
settings, these will be signalled by a fixed order (priority list). The caller is always identified
first. If no special ringer melody has been defined for the caller, the external telephone
number dialled by the caller or the called group telephone number will be checked. If there
has not been defined any special ringer rhythm either, the ringer melody of the call type will
be considered.
40
Only available when operated on the PBX systems COMpact 5010 VoIP, COMpact 5020 VoIP, COMmander Basic.2 and COMmander Business.
170
Configuration of the Telephone
Signalling
Priority list for external calls:
1. Ringer melody defined in the telephone book if the caller can be identified in the telephone
book
2. For the call type “Call Deblocker” defined ringer melody if the caller has been identified as
part of a Call Deblocker in case of activated Do-no-Disturb
3. For a certain external number defined ringer melody as far as this telephone number has
been dialled by the caller
4. For a certain group number defined ringer melody as far as the group has been called
5. For the call type “group call” defined ringer melody as far as a not otherwise defined group
has been called
6. For the call type “external call” defined ringer melody
Priority list for internal calls:
1. Ringer melody defined in the telephone book as far as the caller can be identified as a telephone book entry
2. Ringer melody defined for the group number as far as the group has been called
3. For the call type “group call” defined ringer melody as far as a not otherwise defined group
has been called
4. Ringer melody defined for the “internal call”
Priority list for door calls:
1. For the call type “door call” defined ringer melody as far as the door can be identified as
telephone book entry
2. Ringer melody defined for the “door call”
Open the settings menu for the setting “ringer
melody” (You will find help on page 33 and the
following).
settings
signalling
ringer melody
Use the
and
softkeys to browse to the
option you require and press the softkey to
the left of the option:
...
앫 [call type]: Selects one of the offered call
types for editing.
You hear the currently configured ringer melody. The corresponding name is shown on
the display
Use the
and
softkeys to browse to the
option you require.
You hear the displayed ringer
melody
171
Configuration of the Telephone
Signalling
Press the plus-/minus keys to configure the
volume.
You hear the displayed ringer
melody in the configured volume.
Press the softkey in front of the corresponding selection:
앫 [ringer melody]: Selects one of the offered
ringer melodies.
...
☞
Advice
It is possible to configure a ringer melody for InterCom calls. But pay attention that it will be
played for a maximum of 1 second before the telephone takes the call automatically.
The here defined ringer melodies are not valid if “single tone” has been configured under
ringer volume (see below).
Change Ringer Volume automatically
You can increase/reduced the volume of the telephone automatically. Then the telephone
starts ringing in the volume configured by you (see page 170) and increases/reduces the volume every 5 seconds by one step until the maximum/minimum volume has been reached.
Open the settings menu for the setting “ringer
volume” (You will find help on page 33 and the
following).
settings
signalling
ringer volume
The icon
setting.
marks the current
Use the
and
softkeys to browse to the
option you require and press the softkey to
the left of the option:
앫 steady: Select a steady volume during the
whole phase of ringing.
Select an automatic
increase of the volume during the ringing
phase.
앫 auto-reduction: Select an automatic reduction of the volume during the ringing phase.
앫 single ringtone: Select a single silent tone
instead of the configured ringer melody.
앫 autom. increase:
...
...
Press the
172
softkey to complete the settings.
Configuration of the Telephone
Configure Lists
Configure Lists
Calls/Conversations to be taken over into the Calls Lists
If you like to prevent that a lot of useless entries will be taken into the lists, you can configure
the lists for the calls to be taken over. The following calls/conversations are for selection – if
it makes sense in the context – in the three lists:
앫
앫
앫
앫
앫
앫
앫
external calls/conversations
unknown external calls/conversations (without CLIP information)
internal calls/conversations
alarm calls/conversations
door calls/conversations
“calls that are taken” by other telephones that are in the call distribution
other
settings
lists
...
The icon
marks an activated
selection.
The icon
marks a deactivated selection.
Open the setting menu for the configuration of
the telephone lists (You find help on page 33
and the following):
앫 caller list: Allows the configuration of the
caller list.
앫 calls list: Allows the configuration of the
calls list.
앫 redial list: Allows the configuration of the
redial list.
Use the
and
softkeys to browse to the
option you require and press the
or
softkey to the left of the option to reverse the
actual status:
앫 [call type/conversation type]: Activates/
...
...
deactivates the acception of the call type/
conversation type into the telephone list.
Press the
softkey to complete the settings.
173
Configuration of the Telephone
Configure Lists
Telephone Numbers to be displayed in the Telephone Book
If you like to prevent that unwanted entries are shown in the telephone book, you can restrict
the display of the different telephone number types. The following types can be selected:
앫 Emergency call numbers (emergency call numbers configured in the PBX)
앫 Internal numbers (internal telephone numbers configured in the PBX)
앫 Telephone book of the PBX (telephone book entries/short-code dialling numbers configured in the PBX)
앫 Local telephone book (local telephone book entries in the telephone)
Open the configuration menu for the setting
“Telephone Book” (You will find help on
page 33 and the following).
settings
lists
phone book
The icon
marks an activated
selection.
The icon
marks a deactivated selection.
Use the
and
softkeys to browse to the
option you require and press the
or
softkey to the left of the option to reverse the
current status:
앫 [telephone number type]: Activates/deacti-
...
...
vates the display of the telephone number
type in the telephone book.
Press the
174
softkey to complete the settings.
PC Connection and Installation of the Software
PC CONNECTION AND I NSTALLATION OF THE SOFTWARE
With the PC programmes COMfortel Set and COMfortel Melody included in the extent of supply the system telephone can be configured according to your special requirements (see also
page 178).
The TAPI41 driver enables TAPI applications via the USB interface of the Auerswald system
telephone (TAPI=Telephony Application Programming Interface). You can control the system telephone with different Window applications using the TAPI interface (e.g. a dialler).
Applications for Windows XP and 2000 are supported. The TAPI operation mode will automatically be configured when the corresponding application starts.
With the Auerswald CAPI 2.0 driver you can imitate the functions of an ISDN PC-controller
via the USB interface of the system telephone on the internal S0 port.41
During the CAPI driver installation the Auerswald NDIS-WAN driver 41 will additionally be
copied onto your harddisk. You will need these drivers to establish the connection to the
Internet. Your Auerswald system telephone will work like an ISDN network controller in a network of many different computers – the Internet.
Under Windows 98 SE and Me the NDIS-WAN drivers are copied to the harddisk and have
to be installed by you then. Under Windows 2000 and XP this happens automatically.
(NDIS-WAN is a standard for the connection of network controllers to the corresponding protocols. NDIS = Network-Device-Interface-Specification; WAN = Wide-Area-Networking).
Make a Connection between Telephone/PBX and PC
The connection between telephone/PBX and PC can be realized by four different ways:
1st option41 : The access to the telephone is done via the USB interface of a system telephone connected to the PBX42. The programme is installed on the PC that is connected with
the telephone via USB. (How to connect the COMfortel 2500 to the PC is described on
page 176.)
2nd option: The access to the telephone is done with an ISDN PC-controller (CAPI 2.0) or
the ISDN PC-controller function of a system telephone via the internal S0 bus. The programme is installed on the PC that is connected to an internal S0 bus of the PBX via an ISDN
PC-controller/system telephone. (This type of connection of the PC to the PBX is described
in the manual of the PBX.)
3rd option43: The programming of the telephone is made via the USB/serial interface of the
PBX. The programme will be installed on the PC that is connected to the USB/serial interface
of the PBX. (This type of connection of the PC to the PBX is described in the manual of the
PBX.)
4th option 44: The access to the telephone is made via the IP network. The programme is
installed on the PC that is connected to the Ethernet interface of the PBX. (For this option the
connection of the PC to the PBX is described in the manual of the PBX.)
41 Only
COMfortel 2500.
with COMfortel 2500 or COMfort 2000 plus.
43 Does not work with the PBX systems COMpact 5010 VoIP and COMpact 5020 VoIP.
44
Only when operated on the PBX systems COMpact 5010 VoIP, COMpact 5020 VoIP, COMmander
Basic.2 and COMmander Business.
42 Only
175
PC Connection and Installation of the Software
Make a Connection between Telephone/PBX and PC
Connection to the USB Interface of a PC (COMfortel 2500 only)
Connect the PC to the USB interface of the system telephone as follows:
☞
1. Open the plastic cover on the back of your system telephone that is closer to the receiver.
2. Plug in the flat plug of the delivered cable into a USB jack of the PC and the other plug
into the USB jack on the back of the system telephone (see Pic. 31).
The length of the USB cable must not exceed 3 m (such as the enclosed cable).
☞
If you have connected the system telephone to your PC via the USB interface, the New Hardware assistant will automatically be started under Windows 98 SE, Windows Me, Windows
2000 and Windows XP to support you with the installation of the necessary driver (see chapter Installation of the Drivers and the PC Software on page 177). This will search for the most
suitable driver for the device, insert the CD (Auerswald Mega Disk) into the CD ROM drive
and enter the directory “<CD drive>\driver\” as target.
Important
Advice
Pic. 31: Plug in the USB cable
USB jack on the back
of the telephone
USB jack of the PC
176
PC Connection and Installation of the Software
Installation of the Drivers and the PC Software
Installation of the Drivers and the PC Software
COMfortel 2500:
COMfortel 1500:
Consult the detailed description of the enclosed CAPI/TAPI manual
for the driver and software installation. Proceed such as described for
the system telephone COMfort 2000.
Continue with the chapter Install the PC Programmes manually on
page 177 for the software installation now.
Pic. 32: USB driver installation
Windows 2000
Windows XP
Install the PC Programmes manually
The installation assistant will be started automatically after having finished the USB driver
installation of the Auerswald Mega Disk and enables the installation of the PC programmes
and drivers belonging to the device.
If the assistant does not start automatically or for the COMfortel 1500, start the PC programmes as described in the following.
1. Insert the CD (Auerswald Mega Disk) into the CD ROM disk drive.
2. If the Setup programme does not start automatically, please run “Start 왘 Run” in the task
bar.
3. Click on “Search” and open the CD ROM disk drive. There you select the application
“autostart.exe” in the root directory by clicking twice. Then you click on “OK”.
177
PC Connection and Installation of the Software
COMfortel Set and COMfortel Melody
4. Follow the instructions on the monitor by repeatedly pressing the button “Continue” and
select the corresponding telephone.
5. Follow the instructions on the monitor and select the PC programmes and drivers to be
installed45.
COMfortel Set and COMfortel Melody
The configurations of the system telephone can comfortably be made via the configuration
programme COMfortel Set. This refers to the settings that are possible on the telephone itself
as well as additional settings such as currency name, cost per unit and the project list.
With the programme COMfortel Melody you can create your own ringer melodies for your telephone.
Minimal Requirements for the PC for COMfortel Set and COMfortel Melody
쮿 PC with Intel Pentium 500 MHz or compatible processor
쮿 Windows 2000 (Service Pack 4 or better) or Windows XP (Service Pack 2 or better)
쮿 RAM memory: 64 MB, recommended 128 MB;
for Windows XP: 128 MB, recommended 256 MB
쮿 Harddisk memory used by the PC programme after the installation for
COMfortel Set: 5 MB, for COMfortel Melody: 4 MB
+ 44 MB for the one-time installation of Java Runtime
쮿 USB interface (if used) according to USB specification 1.1 or 2.0
쮿 CD ROM drive
쮿 Mouse or compatible pointer device
쮿 SVGA graphic controller with a resolution of 800 x 600;
recommended 1024 x 768 and 65536 colours (16 Bit)
Configure Telephone with COMfortel Set
Configure as follows:
1. Start the programme.
2. Select the interface “USB”, “IP network”, “ISDN controller CAPI 2.0” or “V.24” (with help
of the V.24-COM-Port of the PC; e.g. COM 1, COM 2) under “Options 왘 interface” in
the menu. If you select “IP network”, the IP address of the PBX as well as the configuration port for system telephones has to be entered.
3. Via the button “new” you can create a file for the new settings of the configuration. It is
necessary to set the telephone to be configured as well as the PBX correctly.
or
If you have already stored a configuration on your PC, you can open it by pressing the
button “open” and selecting from “file”.
45 Only
178
COMfortel 2500.
PC Connection and Installation of the Software
COMfortel Set and COMfortel Melody
4.
5.
6.
7.
8.
☞
or
You can load the existing configuration from the telephone by pressing the button
“open” and select from “telephone”. You can select the requested telephone among
all system telephones connected to the PBX in the following dialogue “connection paths”.
A PIN entry may be necessary for the transfer of the configuration from the telephone.
For the operation on the PBX systems COMpact 2204 USB, COMpact 2206 USB, COMpact 4406 DSL, COMpact 4410 USB and COMmander Basic it is the 6-digit user PIN
stored in the telephone. For the operation on the PBX systems COMpact 5010 VoIP,
COMpact 5020 VoIP, COMmander Basic.2 and COMmander Business the access to the
telephone is only possible via the 6-digit PIN assigned in the PBX. First select the authority level in the dialogue “PIN entry” to define which PIN you like to enter: the Admin PIN,
one of the SubAdmin PINs or the user PIN belonging to the telephone.
Define the expansion status 46 of the system telephone first. Place the base device and
the key extension modules in their proper order on the monitor.
Then the other settings can be done one after the other.
If you have made all settings, it is recommended to save the corresponding files by pressing the button “save” and select “file” then.
Then you have to transfer the data via “save” and “telephone” into the telephone. You
have to select the corresponding telephone via the dialogue “connection paths” and enter
the necessary PIN in the dialogue “PIN entry”.
You can open a help window for explanations on the open page via the menu “help 왘 help
subjects” or with the F1 key.
Tips for COMfortel Set
To use the options of the programme in the best possible way, here are some tips: The view
is divided into two parts:
쮿 At the left side the subjects are listed.
쮿 The page in the right shows the page of the selected theme. For working on the pro-
gramme pages you do not need the menu line. All the entries and changes are made
directly on the pages via mouse or keys.
Entry into a free field: A free entry field lets you enter a name or a number. Click into the
corresponding field with the left mouse key and then enter a number or a name with the keyboard.
Change number or name: If you entered a number or a name and like to completely change
these, click twice onto the entry to be written over with the left mouse key. After that it will be
marked blue and can be directly written over or be deleted with delete/backspace.
Extendable tables (e.g. project lists): In order to delete an entry in extendable tables (e.g.
project lists), the whole line can be deleted here. Therefore click with the left mouse key into
a field of the line to be deleted. This field gets a blue margin. By pressing the right mouse key
then, a menu opens. Click on “delete line”. If you marked several fields by drawing with a
pressed left mouse key, several fields would be deleted.
Switch on/off functions: A square displays a switch field. An empty square means “off” or
“no”; a little hook means “on” or “yes”. The switch over happens by simply clicking on it with
the left mouse key.
46 Only
COMfortel 2500.
179
PC Connection and Installation of the Software
COMfortel Set and COMfortel Melody
Switch over functions: Some switches offer more then on/off, a small selection of settings.
These switches have a predefined definition. If you like to change this, you will have to make
a choice in the opened popup menu with the left or right mouse key.
쮿 If there is a single field with an down arrow, open the popup menu by mouse click with the
left mouse key onto the field.
쮿 If there are several fields in a table column, mark the corresponding fields first. You can
click into the corresponding field or click on the headline of the column to mark the whole
column or drag with the pressed left mouse key over the corresponding fields. Then you
can open the popup menu with the right mouse key.
Backup Data or transfer it to other Telephones
☞
If you like to save the configuration and/or other data and settings, you can create a backup
file of your telephone47 with COMfortel Set. This backup data can be transferred later to the
same or to any other system telephone COMfortel 1500/2500. You can select the requested
areas (such as e.g. configuration, telephone book or melodies).
You need the user PIN of the source telephone for the transmission of personal data (e.g.
caller list, calls list) to another telephone.
Important The telephone book of a COMfortel 2500 cannot be transferred to a COMfortel 1500.
47
When operated on the PBX systems COMpact 5010 VoIP, COMpact 5020 VoIP, COMmander Basic.2
and COMmander Business the admin PIN is needed to create a backup file.
180
Service Functions
SERVICE F UNCTIONS
Start an Automatic Firmware Update
An update of the firmware of the telephone e.g. could make sense if additional features are
offered. Contact your dealer whether an update is a benefit for you. Or stay informed about
improvements in the telephone software - on our homepage in the Internet. The version
number of the software in your telephone can be viewed as described in the chapter View
Information on Telephone and PBX on page 185.
If the update is started as described in the following, the telephone will be connected to the
stated server to receive the current software from there (the settings of the telephone remain
unchanged). The update is free of charge: Only the charges for the necessary telephone connection have to be paid.
Open the settings menu for the setting
“Firmware Update” (You will find help on
page 33 and the following).
settings
synchronization
firmware update
The server number has been
entered with the PC programme COMfortel Set.
N
0053069200510_
Change the server telephone number if necessary.
Press the
softkey to complete the entry.
Press the
softkey to confirm the message.
☞
The firmware update is made.
Afterwards is displayed if the
update was successful.
Please enter the external telephone number always with the exchange line access number
“0”. (Exceptions: Direct Exchange Line Telephone; see page 56.)
Important
☞
Advice
In the configuration programme COMset of the PBX an automatic update of all connected
system telephones can be configured additionally. This way an update is regularly done (e.g.
annually) “via exchange line” with one system telephone and the new firmware is “distributed”
to the other system telephones then. (The update time is freely selectable in COMset and is
preferably done at night. - On the display of the distributing system telephone “Server Mode”
is shown during the distribution process. In this time an operation is not possible.
181
Service Functions
Synchronization with the PBX
Distribute Firmware
If you have made the firmware update manually, you can distribute this new firmware version
from the same telephone to all the other system telephones connected to the PBX and identically constructed. You can select “immediately” (if the telephones are not busy) or “within
def. time frame” (configured time in the PBX) for the time of execution.
Open the settings menu for “distribute
firmware” (you find help on page 33 and the
following).
settings
synchronization
distr. firmware
The firmware update is made.
Afterwards is displayed if the
update was successful.
Press the
☞
Advice
softkey to confirm the message.
On the display of the distributing system telephone “Server Mode” is shown during the distribution process. In this time an operation is not possible.
If different system telephones (COMfortel 1500 and COMfortel 2500) are connected to the
PBX, the manual firmware update has to be done on a COMfortel 1500 and on a COMfortel
2500. Then the distribution of the firmware can be started from both telephones. If there are
older system telephones (COMfort 1000, COMfort 1200 and COMfort 2000 plus), an additional manual firmware update will be necessary for them, too.
Synchronization with the PBX
If necessary, a complete data synchronization with the PBX can be started.
Open the settings menu for “synchronization
with PBX” (you find help on page 33 and the
following).
settings
synchronization
sync.with PBX
182
Service Functions
Return to the Default Factory Settings
Return to the Default Factory Settings
If necessary, you can reset up your telephone to the default factory setting.
Press the menu key.
N
Enter #201 via keypad.
On the display appears a confirmation message.
Press the
softkey to confirm the message.
The telephone is reset to the
default factory settings. Then
the language has to be selected
again and the internal telephone
number of the telephone MSN)
has to be entered.
Use the
and
softkeys to browse to the
option you require and press the softkey to
the left of the option:
...
N
☞
Advice
[ internal number]
앫 [language]: Selects one of the offered lan-
guages as display language.
Enter the internal number.
Press the
softkey to complete the entry.
If you get the display message “function not possible” after selecting of the function, the telephone has not the necessary authorization level. To switch to the level, press the menu key,
e.g. select the menu “functions” and then “additional” (see also page 34). After selection of
the authorization level and following entry of the corresponding PIN, you can restart the function “return to the default factory settings” as described here.
When operated on the PBX systems COMpact 5010 VoIP, COMpact 5020 VoIP, COMmander Basic.2 or COMmander Business the PINs remain because the PINs of the PBX are
used. When operated on the other PBX systems the user PIN will be deleted.
183
Service Functions
Select PBX
Select PBX
The configuration of the telephone depends on the connected PBX. If the setting is changed
here (instead of COMpact 5010 VoIP, COMpact 5020 VoIP, COMmander Basic.2 or COMmander Business another PBX is selected or vice versa) – after confirmation of the new PBX
on the display – the existing configuration is completely and irrevocably deleted.
To prepare the telephone for the operation on another PBX (service case), select the PBX
used later. Ignore the error message and make the requested settings with COMfortel Set.
Open the settings menu for “select PBX” (you
find help on page 33 and the following).
settings
synchronization
select PBX
...
☞
Advice
184
Use the
and
softkeys to browse to the
option you require and press the softkey to
the left of the option:
앫 [PBX]: Selects one of the offered PBX.
If the wrong PBX has been selected, this is detected and an error message is sent (display
message as well as a repeated acoustic tone). If the selection of the wrong PBX is wanted
for service reasons, the error message has to be ignored: Do not confirm the question “select
PBX ... execute?” but press only the n softkey.
Service Functions
View Information on Telephone and PBX
View Information on Telephone and PBX
You can view important information on your telephone with the following information function.
Open the information menu (You will find help
on page 33 and the following).
information
Use the
and
softkeys to browse to the
option you require:
앫 Version: Shows the version of the telephone
앫
앫
앫
앫
앫
앫
앫
앫
앫
앫
앫
앫
and of the PBX. By pressing the
softkey
Information on the changes in the new version can be viewed.
MSN: Shows the MSN of the telephone and
the corresponding name (page 157).
configuration: Shows the currently activated configuration (page 114).
subscriber call forwarding unconditional:
Shows an active Subscriber Call Forwarding
unconditional with destination number/name
(page 107).
subscriber call forwarding on busy:
Shows an active Subscriber Call Forwarding
on busy with destination number/name
(page 107).
subscriber call forwarding on no reply:
Shows an active Subscriber Call Forwarding
on no reply with destination number/name
(page 107).
call deblocker: Shows if any existing Call
Deblocker is activated (page 104).
call restrictor: Shows if any existing Call
Restrictor is activated (page 105).
ringer tone: Shows if the ringer tone of the
telephone is activated (page 99).
ringer volume: Shows how the ringer volume acts during the ringing (page 170).
call waiting: Shows if the Call Waiting tone
is activated (page 102).
call waiting signal: Shows how the call
waiting is signalled (page 168).
InterCom authorization: Shows if the InterCom authorization is active (page 127).
185
Service Functions
Remote Programming
Use the
and
softkeys to browse to the
option you require:
앫 interface: Shows if the telephone was con-
nected to the PBX via UP0 or S0.
앫 headset: Shows which headset type has
앫
앫
앫
앫
앫
앫
앫
앫
been selected (page 158) and if the headset
operation is active (page 97).
hardware: Shows how many Xtension30
modules the telephone are connected.
Call charge most recent call: Shows the
call charges accrued for the most recent call.
Call charge total: Shows the call charge
sum accrued since the last deletion.
Charge allowance: Shows the current
charge status of the charge allowance
account.
Serial number: Shows the serial number of
the telephone.
TAM message forwarding: Shows an activated message forwarding with destination
number (page 211 and page 214).
TAM quick access: Shows the configured
quick access numbers (page 211).
SD card: Shows the available memory on
the SD card.
Remote Programming
If you like to have the settings of the system telephone changed by your authorized dealer at
a later time, it will not be necessary for a service technician to come to your house. The function remote programming enables the service technician with the corresponding devices during an external telephone connection to read or programme the data of the PBX or the telephone. He needs your authorization of course. That means only if you have released it by
dialling certain digits (release of the PBX), the service technician can make the remote programming once.
Sequence of the Remote Programming for the Service Technician
The necessary hardware is a PC connected with a COMfortel 2500 on an internal S0 port of
your PBX or alternatively an ISDN PC-controller operated on an internal S0 port or on the
public telephone network. The necessary software consists of the configuration software
COMfortel Set and the CAPI 2.0 driver for the system telephone or ISDN PC-controller.
After the release of the customer’s PBX you can read out the configuration with the configuration programme COMfortel Set or reprogram it. Select the “Interface” “ISDN PC-controller
(CAPI 2.0)” in the menu under “Options”. Start with pressing the button “open” or “save”,
then press the key “Telephone”, enter the external telephone number of the customer’s PBX
186
Service Functions
Technical Data
and confirm this with “OK” (you may also have to enter the exchange line access number).
Select the corresponding telephone and confirm with “OK” again.
Technical Data
☞
Advice
Operation Voltage
Supply via internal S0 port or UP0 port out of the PBX;
COMfortel 2500 with COMfortel Xtension30: wall-mount power supply is necessary;
230 V 쓒; 앧10%; 50 Hz
Wall-mount Power Supply
COMfortel XT-PS; Type number 809
Power Consumption
max. 2 W
COMfortel 2500 fully extended: a maximum of 8 W (with wall-mount power supply)
System Connection
internal S0 port or UP0 port of the PBX (COMmander Business (19"),
COMmander Basic.2 (19"), COMmander Basic (19"), COMpact 5020 VoIP, COMpact 5010 VoIP, COMpact 4410 USB, COMpact 4406 DSL, COMpact 2206 USB
or COMpact 2204 USB)
PC-/Data Interface
COMfortel 1500: none
COMfortel 2500: USB
Displays
COMfortel 1500: LCD, 128 x 32 pixels; 18 LEDs, some multi-coloured
COMfortel 2500: LCD, 128 x 64 pixels; white backlight;
18 LEDs, some multi-coloured
COMfortel Xtension30: 30 LEDs, multi-coloured
User Elements
COMfortel 1500: Keypad, 11 function keys, 6 softkeys, 15 programmable function
keys
COMfortel 2500: Keypad, 11 function keys, 8 softkeys, 15 programmable function
keys
COMfortel Xtension30: 30 programmable function keys
Handset
Electret microphone, dynamic receiver, hearing aid compatible
Loudspeaker
8 Ohm, Ø 66 mm
Hook Switch
magnetic switch contact
Case
plastic material
Colours
white (light grey), dark blue, black
Size (W x D x H)
COMfortel 1500: 261 mm x 216 mm x 89 mm
COMfortel 2500: 261 mm x 216 mm x 109 mm
COMfortel Xtension30: 146 mm x 216 mm x 55 mm
Weight
COMfortel 1500: approx. 980 g
COMfortel 2500: approx. 1120 g
COMfortel Xtension30: approx. 410 g
Temperature Range
0 to 40°C
Safety
CE
Make sure that the power consumption of the terminals on the internal S0 and UP0 ports of
the Auerswald PBX do not exceed the listed values in the following table. If you like to connect more than the here stated number of system telephones COMfortel 1500/2500, you
have to operate some of the COMfortel 2500 with the wall-mount power supply COMfortel
XT-PS (type number 809).
187
Service Functions
Data for the Connection of a Headset
48
PBX
max. power consumption 48) max. number of
of the sum of all internal S0 COMfortel 1500 and
and UP0 Ports
COMfortel 2500 without wallmount power supply
COMpact 2204 USB
2,5 W
COMpact 2206 USB
4W
2
COMpact 4406 DSL
12 W (4 W per port)
6 (2 per port)
COMpact 4410 USB
12 W (4 W per port)
6 (2 per port)
COMpact 5010 VoIP
8 W (4 W per port)
4 (2 per port)
COMpact 5020 VoIP
24 W (4 W per port)
12 (2 per port)
COMmander Basic
32 W (4 W per port)
16 (2 per port)
1
COMmander Basic.2
60 W (4 W per port)
30 (2 per port)
COMmander Business
160 W (4 W per port)
80 (2 per port)
Data for the Connection of a Headset
Current Consumption Microphonemax. 0.5 mA
Sensitivity of Microphone
45 dB
Impedance of Loudspeaker 150 Ohm
Pinout of the Receiver Jack
1500)
1: Microphone +
2: Loudspeaker +
3: Loudspeaker 4: Microphone -
48
(COMfortel Pinout of the Headset Jack
fortel 2500)
1: DHSG BUS_IN
2: DHSG GND
3: Microphone 4: Loudspeaker 5: Loudspeaker +
6: Microphone +
7: DHSG + 3.3 V
8: DHSG BUS_OUT
(COM-
In case of the PBX COMmander Basic, COMmander Basic.2 and COMmander Business the max.
power consumption additionally includes the analogue ports. For each connected analogue subscriber
you have to deduct 1 W from the max. power consumption.
188
Configure and use the Answering Machine
CONFIGURE AND USE THE ANSWERING M ACHINE
Switch on/off Readiness49
If the answering machine should take calls and record messages, the readiness (call acception) has to be switched on.
Use the Function via Function Menu:
Open the function menu for the function “TAM
readiness” (You will find help on page 33 and
the following).
functions
TAM readiness
The icon
setting.
marks the current
...
Press the
softkey to the left of the option
you require:
앫 activating: Switch on TAM readiness.
앫 switching off: Switch off TAM readiness.
Assign Key:
Open the key programming menu for the function “TAM readiness” (You will find help on
page 33 and the following).
define keys
function key ...
... level
TAM readiness
The current settings for the key
assignment is shown on the
display.
If you like to change the current settings, press
the softkey in front of the corresponding
selection once or several times (You will find
help on page 155 and the following):
앫 [switching type]: Enables the assignment
with switch on, off or over.
Press the
softkey to complete the settings.
Use Function via Key:
By pressing the key the TAM readiness is switched on, off or over.
LED Signalling next to the Key:
green
TAM readiness assigned to the key is switched on.
off
TAM readiness assigned to the key is switched off.
49
Only on COMfortel 2500 with SD card. After 30 days a chargeable release of the function COMfortel
Voicemail is necessary via Upgrade Centre (see page 21).
189
Configure and use the Answering Machine
Answering Machine List
☞
Advice
You can also activate the readiness in the idle state by pressing the
softkey and switch
it off by pressing the
softkey (see Pic. 9 on page 32). The pictogram reflects always the
current status.
You can also switch on/off the readiness via remote access (see page 221).
Even with an activated readiness only calls with an activated call acceptance will be accepted
(see page 196).
For each message of a caller a WAV file is stored on the SD card. The WAV files can be
transferred from the SD cards to a PC (see page 220). Besides this the recordings are collected in the caller list and can be played via message key (see page 190).
Answering Machine List50
In the answering machine list of the telephone up to 100 messages and call recordings are
stored with the following information: Name and recording time as well as telephone number
of the caller/call partner. Besides this the recordings have counting numbers with the last
recording having the number 1.
You can call a caller back directly out of the answering machine list (page 191).
The LED above the message key informs you about entries in the answering machine list
(LED signalization is configurable, see page 167).
Listen to the Recordings (Messages and Call Recordings)
Press the message key to switch from the idle
state to the list selection.
On the right side next to the list
selection the number of new recordings/calls is shown.
TAM list
2
Press the
softkey to the left of the option
TAM List to open the answering machine list
(is jumped over if the other lists are empty).
The last recorded, latest massage or the last recorded/latest
call recording is displayed.
Press the softkey to start the reproduction
of the recording.
The latest recording is played.
☞
Advice
50
Additional functions in the answering machine list, see Pic. 33 on page 192.
If you activated the automatic replay (see page 198), the latest recordings are played automatically one after the other after you open the answering machine list (without pressing the
softkey). The latest recording will be played first.
Only on COMfortel 2500 with SD card. After 30 days a chargeable release of the function COMfortel
Voicemail is necessary via Upgrade Centre (see page 21).
190
Configure and use the Answering Machine
Answering Machine List
Please pay attention that the latest recording has always the top position and therefore has
the number 1.
If new recordings are “broken” or incomplete during playback, the SD card may be too fragmented. To make enough space for later recordings, delete the recordings that you do not
need anymore or store them on your PC (see page 220). With an existing standard PC card
reader the SD card can also be defragmented via PC.
If you like to leave the menu, press the exit key.
You can also listen to the recordings via remote access (see page 221).
You can also open the TAM list via the function menu (see page 34).
You can also configure the TAM list on a freely programmable function key (page 35). This
way the TAM list is opened by simply pressing this key.
Dial from the Answering Machine List
Press the message key to switch from the idle
state to the list selection.
Press the
softkey to the left of the option
TAM List to open the answering machine list
(is skipped if the other lists are empty).
TAM list
The latest recorded message
or the latest call recording is
shown.
Scroll with the
and
requested recording.
A
softkeys to the
Pick up the receiver.
or
Press the hook key to start handsfree operation (see also page 38).
The subscriber is called.
☞
If you like to leave the menu without dialling the displayed number, press the exit key.
Advice
191
Configure and use the Answering Machine
Answering Machine List
Pic. 33: Display Options in the TAM List
Softkeys:
–
: Delete displayed recording
TAM List
[ caller]
[ MSN dialled]
[ called partner]
1/4 16.05.07
12:44
–
: Start playback of the recording
–
: Scroll to the next (older) recording
–
: Scroll to the previous (newer) recording
–
: Take over entry into the dial preparation
and perhaps into the telephone book
(page 82)
Information on the recording:
– Caller
– MSN dialled (for external call)
– Called partner
– Type of recording
new message ( ),
old or already listened message (
call recording ( )
),
– Current number of the recording/number of the available recordings
– Date of the recording
– Time of the recording
Pic. 34: During the Playback
TAM List
[ caller]
[ MSN dialled]
[ called partner]
1/4 16.05.07
12:44
Information on the recording:
See above
192
Softkeys:
–
: Delete currently played recording
–
: Stop playback
–
: Skip currently played recording
–
: Repeat last or currently played recording
–
: Take over entry into the dial preparation and perhaps into the telephone book
(page 82)
Configure and use the Answering Machine
List of Voice Memos
List of Voice Memos51
In this list up to 100 voice memos with date, time and length of the recording are available
(recording of voice memos see page 193). The voice memos are attached to a running
number. The latest/newest recording has the number 1.
The LED near the message key informs you about entries in the list of voice memos (LED
signalization is configurable, see page 167).
Record Voice Memos
The function voice memo enables the recording of personal information.
Use the Function via Function Menu:
Open the function menu for the function “TAM
voice memo” (You will find help on page 33
and the following).
functions
TAM voice memo
start of record.
Press the
softkey to start the recording.
Press the
softkey to stop the recording.
Press the
softkey to store the recording.
The recording is running.
end of recording
Assign Key:
Open the key programming menu for the function “TAM voice memo” (You will find help on
page 33 and the following).
define keys
function key ...
... level
TAM voice memo
Press the
51
softkey to complete the settings.
Only on COMfortel 2500 with SD card. After 30 days a chargeable release of the function COMfortel
Voicemail is necessary via Upgrade Centre (see page 21).
193
Configure and use the Answering Machine
List of Voice Memos
Use Function via Key (only in the idle State of the Telephone):
By pressing the key in the idle state of the telephone the recording of a voice memo will be
started. After the recording you can finish and store the recording by pressing the softkey
twice.
LED Signalling next to the Key:
red (flashes) A voice memo is recorded.
☞
Advice
Recordings with a recording time shorter than 1 second are deleted by the telephone.
For each voice memo a WAV file is stored on the SD card. The WAV files can be transferred
from the SD card to a PC (see page 220). The recordings are collected in the list of voice
memos and can be played via the message key (see page 193).
Listen to the Recordings (Voice Memos)
Press the message key to switch from the idle
state to the list selection.
On the right side next to the list
selection the number of new recordings/calls is shown.
TAM voice memo
2
Press the
softkey to the left of the option
TAM voice memo to open the TAM voice
memo (is skipped if the other lists are empty).
The last recorded, latest voice
memo is displayed.
Press the
softkey to start the playback of
the recording.
The latest recording is played.
☞
Advice
Additional functions in the list of voice memos, see Pic. 35 on page 195.
If you activated the automatic replay (see page 198), the latest recordings are played automatically one after the other after you have opened the list of voice memos (without pressing
the
softkey). The latest recording will be played first.
Please pay attention that the latest recording always has the top position and therefore has
the number 1.
If new recordings are “broken” or incomplete during playback, the SD card may be too fragmented. To make enough space for later recordings, delete the recordings that you do not
need anymore or store them on your PC (see page 220). With an existing standard PC card
reader the SD card can also be defragmented via PC.
If you like to leave the menu, press the exit key.
194
Configure and use the Answering Machine
List of Voice Memos
Pic. 35: Display Options in the List of Voice Memos
Softkeys:
–
: Delete displayed recording
&TAM voice memo
No. 1/5
00:20
–
: Start replay of the recording
–
: Scroll to the next (older) recording
–
: Scroll to the previous (newer) recording
16.05.07 12:44
Information on the recording:
– Type of recording
new voice memo ( ),
old or already listened voice memo (
–
–
–
–
)
Number of the recording/number of available recordings
Length of the recording
Date of the recording
Time of the recording
Pic. 36: During the Playback
TAM voice memo
No. 1/5
00:08
Softkeys:
–
: Delete currently played recording
–
: Stop playback
–
: Skip currently played recording
–
: Repeat last or currently played recording
16.05.07 12:44
Information on the recording:
See above
195
Configure and use the Answering Machine
Configure the Answering Machine
Configure the Answering Machine52
Configure the Call Acceptance
If you like to prevent that each call types is accepted by the answering machine, you can configure the call type to be accepted. The following call types can be selected:
앫 external calls
앫 internal calls
앫 group calls
앫 door calls
앫 Call Deblocker calls (calls overriding the Do-not-Disturb)
Open the settings menu for the setting
“accepting call” (You will find help on page 33
and the following).
settings
answer.machine
accepting call
The icon
marks an activated
selection.
The icon
marks a deactivated selection.
Use the
and
softkeys to browse to the
option you require and press the
or
softkey to the left of the option to reverse the
actual status:
앫 [call type]: Activates/deactivates the call
...
...
acceptance of the call type by the answering
machine.
Press the
softkey to complete the settings.
Set the Call Acceptance Time
In this menu you define after how many seconds the answering machine will take the call.
The following entries are possible:
앫 0...99: call acceptance time 0-99
52
Only on COMfortel 2500 with SD card. After 30 days a chargeable release of the function COMfortel
Voicemail is necessary via Upgrade Centre (see page 21).
196
Configure and use the Answering Machine
Configure the Answering Machine
Open the settings menu for the setting “recording delay time” (You will find help on page 33
and the following).
settings
answer.machine
rec.delay time
N
☞
Advice
[ time in seconds]
Enter the time in seconds.
Press the
softkey to complete the settings.
If you have activated the remote access toll saver (see page 210), the call acceptance time
varies depending on if there are new messages or not.
Configure the maximum Recording Time
In this menu you can configure after how many minutes the answering machine itself stops
the recording (if the caller does not hang up earlier). The following entries are possible:
앫 0: no recording, the caller only listens to the announcement
앫 1...98: max. recording time 1-98 minutes
앫 99: unlimited recording time (limited by the memory size)
Open the settings menu for the setting “recording time” (You will find help on page 33 and
the following).
settings
answer.machine
recording time
N
☞
[ time in minutes]
Enter the time in minutes.
Press the
softkey to complete the settings.
Recordings shorter than 1 second are deleted by the telephone.
Advice
Switch on/off the Listen in
In this menu you can configure if during the call acceptance of the answering machine the
loudspeaker of the telephone has to be switched on to listen in to the caller.
197
Configure and use the Answering Machine
Configure the Answering Machine
Open the settings menu for the setting “listen
in” (You will find help on page 33 and the following).
settings
answer.machine
listen in
The icon
marks an activated
selection.
The icon
marks a deactivated selection.
...
...
Press the
or
softkey to the left of the
option you require to reverse the actual status.
앫 listen in: Activate/deactivate the listen in.
Press the
softkey to complete the settings.
Switch on/off Automatic Playback
In this menu you can configure if the playback of new recordings starts automatically after
you have opened the answering machine list or the list of voice memos or only after pressing
the
softkey.
Open the settings menu for the setting “automatic playback” (You will find help on page 33
and the following).
settings
answer.machine
autom.playback
The icon
marks an activated
selection.
The icon
marks a deactivated selection.
...
...
Press the
or
softkey to the left of the
option you require to reverse the actual status.
앫 autom. playback: Activate/deactivate the
automatic playback.
Press the
198
softkey to complete the settings.
Configure and use the Answering Machine
Create and edit Announcements
Create and edit Announcements53
In addition to the standard announcements the answering machine allows the administration
of individual announcements.
You can copy already existing announcements with the PC programme COMfortel Set to the
SD card (see page 220) or you can record new announcements via telephone as described
later.
☞
The use and assignment of announcements to different call types is described on page 203.
Advice
Create new Announcements
Open the settings menu for the setting
“announcement” (You will find help on page 33
and the following).
settings
answer.machine
announcement
new announcement
N [ name]
start of record.
Press the
softkey to record a new
announcement (is skipped if there is no
announcement).
Enter the name (up to 8 characters).
Press the
softkey to complete your entry.
Press the
softkey to start the recording of
the announcement.
The recording is running.
☞
Advice
end of recording
Press the
softkey to stop the recording.
store
Press the
softkey to the left of the option
store to store the recording.
The recently created announcement is stored in the list of announcements and can be
changed at any time (see page 200). How to assign the here created announcements to the
different call types is described on page 203.
Recordings with a length shorter than 1 second are deleted by the telephone.
If new announcements are “broken” or incomplete during playback, the SD card may be too
fragmented. To make enough space for later recordings, delete the recordings that you do
53
Only on COMfortel 2500 with SD card. After 30 days a chargeable release of the function COMfortel
Voicemail is necessary via Upgrade Centre (see page 21).
199
Configure and use the Answering Machine
Create and edit Announcements
not need anymore or store them on your PC (see page 220). With an existing standard PC
card reader the SD card can also be defragmented via PC.
For each announcement a WAV file is stored on the SD card. The WAV files can be transferred from the SD cards to a PC (see page 220).
Edit or delete existing Announcement in the List
Open the settings menu for the setting
“announcement” (You will find help on page 33
and the following).
settings
answer.machine
announcement
Use the
and
softkeys to browse to the
entry you require.
Press the
entry.
softkey to start the editing of the
Use the
and
softkeys to browse to the
option you require and press the softkey to
the left of the option:
...
앫 change: Change the entry.
앫 delete: Delete the entry after confirming the
security question.
앫 playback: Play the stored announcement.
N [ name]
Only available when selecting the option
change:
Overwrite the name (up to 8 characters) if necessary.
Press the
softkey to complete your entry.
Press the
softkey to overwrite the current
announcement.
start of record.
Press the
softkey to start the recording of
the announcement.
The recording is running.
200
end of recording
Press the
softkey to stop the recording.
store
Press the
softkey to the left of the option
store to store the recording.
Configure and use the Answering Machine
Assignment of Announcements
Assignment of Announcements54
In addition to the standard announcements the answering machine allows the administration
and use of individual announcements. You can copy existing announcements with the PC
programme COMfortel Set to the SD card (see page 220) or record new announcements via
telephone (see page 199).
Now these announcements can be assigned to different call types, callers or call destinations. Assign them depending on the priority and make the configuration as follows:
앫 If you like to assign different announcements to individual call types, make the correspond-
ing settings via function menu or function keys as described in the following (page 203).
Or configure with the PC programme COMfortel Set under Answering machine
왘 Automatic and activate the automatic.
Independent from the configuration location the following call types are offered:
- external calls,
- internal calls,
- group calls,
- door calls,
- Call Deblocker calls (calls overriding the Do-not-Disturb).
앫 If you like to assign different announcements to the callers, depending on the external tel-
ephone numbers dialled by the caller, configure these settings with the PC programme
COMfortel Set. Under Settings 왘 defined signalization you can enter the external telephone number used to reach your telephone. Then you assign an announcement to each
telephone numbers under Answering machine 왘 Automatic.55 Activate the automatic.
앫 If you like to assign different announcements to the callers, depending the group called by
the caller, configure these settings with the PC programme COMfortel Set. Under Settings
왘 defined signalization you can enter the group number used to reach your telephone.
Then you assign an announcement to the telephone numbers under Answering machine
왘 Automatic. Activate the automatic.
As external, internal, group -, door - and Call Deblocker calls can be influenced by more than
one of these settings, the announcements are used in a pre-defined priority (priority list). But
it will always be checked first if an announcement has been assigned via function menu or key.
54
Only on COMfortel 2500 with SD card. After 30 days a chargeable release of the function COMfortel
Voicemail is necessary via Upgrade Centre (see page 21).
55
Only available when operated on the PBX systems COMpact 5010 VoIP, COMpact 5020 VoIP, COMmander Basic.2 and COMmander Business.
201
Configure and use the Answering Machine
Assignment of Announcements
Table 3: Priority List for External Calls
1. Announcement assigned to the call type “Deblocker calls”
if the caller can be identified as a part of the Call Deblocker
in case of an activated Do-no-Disturb.
2. Announcement assigned to the call type “group calls”
via function menu
or function key
3. Announcement assigned to the call type “external calls”
4. Announcement assigned to the call type “Deblocker calls”
if the caller can be identified as a part of the Call Deblocker
in case of an activated Do-no-Disturb.
5. Announcement assigned to a certain group telephone
number if the group is called
6. Announcement assigned to a certain external telephone
number if the telephone number was dialled by the caller
via PC programme
COMfortel Set
(automatic on)
7. Announcement assigned to the call type “group calls” if a
non-defined group was called
8. Announcement assigned to the call type “external calls”
9. Standard announcement (STANDARD.WAV) if no other
announcement has been assigned
Table 4: Priority List for Internal Calls
1. Announcement assigned to the call type “group calls”
2. Announcement assigned to the call type “internal calls”
3. Announcement assigned to a certain group telephone
number if the group is called
4. Announcement assigned to the call type “group calls” if a
non-defined group was called
via function menu or
function key
via PC programme
COMfortel Set
(automatic on)
5. Announcement assigned to the call type “internal calls”
6. Standard announcement (STANDARD.WAV) if no other
announcement has been assigned
Table 5: Priority List for Door Calls
1. Announcement assigned to the call type “door calls”
via function menu or
function key
2. Announcement assigned to the call type “door calls”
via PC programme
COMfortel Set
(automatic on)
3. Standard announcement (STANDARD.WAV) if no other
announcement has been assigned
202
Configure and use the Answering Machine
Assignment of Announcements
Change Announcement Assignment
Via function menu or function key you can assign an individual announcement instead of the
standard announcement (STANDARD.WAV) for the following call types:
- external calls,
- internal calls,
- group calls,
- door calls,
- Call Deblocker calls (calls overriding the Do-no-Disturb).
These announcements are also used if a previous announcement assignment for these call
types has already been done via PC programme COMfortel Set and the automatic has been
switched on (see page 201).
Use the Function via Function Menu:
Open the function menu for the function “TAM
announcement” (You will find help on page 33
and the following).
functions
TAM announcement
Use the
and
softkeys to browse to the
option you require and press the softkey to
the left of the option:
...
The icon
setting.
앫 [call type]: Allows the selection of a call
type.
marks the current
Press the
softkey to the left of the option
you require:
앫 own announcement: Switch on an individ-
ual announcement for the selected call type.
앫 standard announcement: Switch on the
...
standard
announcement
(STANDARD.WAV) for the selected call type - or if
the automatic has been switched on the
announcement assigned via PC programme
COMfortel Set instead of the standard
announcement.
(No additional entry is necessary)
Use the and softkeys to browse through
the announcement list (see page 199) to the
option you require.
The announcement name with
creation date and time is displayed.
Press the
ment.
softkey to select the announce-
203
Configure and use the Answering Machine
Assignment of Announcements
Assign Key:
Open the key programming menu for the function “TAM announcement” (You will find help
on page 33 and the following).
define keys
function key ...
... level
TAM announcement
The current settings for the key
assignment is shown on the
display.
If you like to change the current settings, press
the softkey in front of the corresponding
selection once or several times (You will find
help on page 155 and the following):
앫 [general/defined]: Switches from general to
defined assignment.
앫 [name]: Allows to select an announcement
from the list of announcements (see
page 199).
앫 [switching type]: Enables the assignment
with switch on, off or over.
앫 [call type]: Allows to select a call type.
Press the
softkey to complete the settings.
Use Function via Key:
Generally assigned key (only during the idle state of the telephone): By pressing the key, the
function menu for the function “TAM announcement” (s. a.) opens.
Defined assigned key: By pressing the key the configured announcement is switched on.
LED Signalling next to the Key (only for defined Assignment):
green
The announcement assigned to the key is switched on for the corresponding call
type.
off
The announcement assigned to the key is not switched on.
☞
Advice
The announcement assignment configured via PC programme COMfortel Set is overridden
but not overwritten. That means if the announcement is switched off via function menu or
function key or the option standard announcement is selected, an announcement previously
switched on via automatic will be used again.
The announcements to be selected in the announcement list have to be transferred to the SD
card with the PC programme COMfortel Set (see page 221) or recorded via telephone first
(see page 199).
204
Configure and use the Answering Machine
Assignment of Announcements
Switch on/off the Automatic
If the automatic has been switched on, the announcements assigned via PC programme
COMfortel Set will be used (see also page 201).
Use the Function via Function Menu:
Open the function menu for the function “TAM
automatic” (You will find help on page 33 and
the following).
functions
TAM automatic
The icon
setting.
marks the current
...
Press the
softkey to the left of the option
you require:
앫 activating: Switch on the automatic.
앫 switching off: Switch off the automatic.
Assign Key:
Open the key programming menu for the function “TAM automatic” (You will find help on
page 33 and the following).
define keys
function key ...
... level
TAM automatic
The current settings for the key
assignment is shown on the
display.
If you like to change the current settings, press
the softkey in front of the corresponding
selection once or several times (You will find
help on page 155 and the following):
앫 [switching type]: Enables the assignment
with switch on, off or over.
Press the
softkey to complete the settings.
Use Function via Key:
By pressing the key the automatic is switched on, off or over.
LED Signalling next to the Key:
green
The automatic is switched on.
off
The automatic is switched off.
☞
Advice
You can also switch on/off the automatic via remote access (see page 221).
The announcement assignment switched on with the function automatic can be overridden
via function menu or function key (see page 203).
205
Configure and use the Answering Machine
Call Recording
Call Recording56
The function call recording enables the recording of your telephone calls e.g. for a later evaluation.
Automatic Call Recording
After switching on the automatic call recording every newly started call (inbound or outbound)
will be recorded completely.
Use the Function via Function Menu:
Open the function menu for the function “TAM
automatic call recording” (You will find help on
page 33 and the following).
functions
TAM aut.call rec
The icon
setting.
marks the current
Press the
softkey to the left of the option
you require:
앫 activating: Switch on the automatic call
...
recording.
앫 switching off: Switch off the call automatic
recording.
Assign Key:
Open the key programming menu for the function “TAM automatic call recording” (You will
find help on page 33 and the following).
define keys
function key ...
... level
TAM aut.call rec
The current settings for the key
assignment is shown on the
display.
If you like to change the current settings, press
the softkey in front of the corresponding
selection once or several times (You will find
help on page 155 and the following):
앫 [switching type]: Enables the assignment
with switch on, off or over.
Press the
56
softkey to complete the settings.
Only on COMfortel 2500 with SD card. After 30 days a chargeable release of the function COMfortel
Voicemail is necessary via Upgrade Centre (see page 21).
206
Configure and use the Answering Machine
Call Recording
Use Function via Key:
By pressing the key the automatic call recording is switched on, off or over.
LED Signalling next to the Key:
red
The automatic call recording is switched on.
red (flashes) The current call is recorded.
(The signalization is only done here if the automatic call recording is switched
on but not after the manual activation of the call recording during the call.)
off
The automatic call recording is switched off.
☞
Advice
To inform the call partner about the recording, you can switch on the info tone (page 208).
Recordings shorter than 1 second will be deleted by the telephone.
For each call a WAV file is stored on the SD card. The WAV files can be transferred from the
SD card to a PC (see page 221). The recordings are collected in the answering machine list
and can be played via the message key (see page 190).
Call Recording
Besides of the automatic call recording a manually controlled call recording is possible. This
works independently of the automatic call recording. The calls can also be recorded partially.
Assign Key:
Open the key programming menu for the function “TAM call recording” (You will find help on
page 33 and the following).
define keys
function key ...
... level
TAM call record.
The current settings for the key
assignment is shown on the
display.
If you like to change the current settings, press
the softkey in front of the corresponding
selection once or several times (You will find
help on page 155 and the following):
앫 [switching type]: Enables the assignment
with switch on, off or over.
Press the
softkey to complete the settings.
Use Function via Key (only during a call):
By pressing the key during a call the call recording is switched on, off or over.
LED Signalling next to the Key:
red (flashes) The current call is recorded.
207
Configure and use the Answering Machine
Call Recording
☞
Advice
You can also start the call recording via the call menu (page 62) during a call by selecting
TAM call record. and by pressing the softkey. Then you can stop the recording by selecting end of record. again and by pressing the
softkey.
To inform the call partner about the recording, you can switch on the info tone (page 208).
Recordings shorter than 1 second will be deleted by the telephone.
For each call a WAV file is stored on the SD card. The WAV files can be transferred from the
SD card to a PC (see page 221). The recordings are collected in the answering machine list
and can be played via the message key (see page 190).
Switch on/off the Call Recording Info Tone
To draw the call partner’s attention to the recording of the call (page 206), you can switch on
the call recording tone.
Open the settings menu for the setting “call
recording tone” (You will find help on page 33
and the following).
settings
answer.machine
call rec.tone
The icon
marks an activated
selection.
The icon
marks a deactivated selection.
...
...
Press the
or
softkey to the left of the
option you require to reverse the current status.
앫 call recording tone.: Activate/deactivate the
call recording info tone.
Press the
208
softkey to complete the settings.
Configure and use the Answering Machine
Configure the Remote Access
Configure the Remote Access57
If you also like to access the answering machine via another internal telephone or via an
external telephone and to operate it (see page 221), configure the remote access first as follows:
앫 Switch on the remote access as described in the following.
앫 Assign a user PIN (page 167).58
앫 If you like to save money, as long as there are no new messages, switch on the remote
access toll saver (page 210).
앫 If you like to simplify the remote access without the use of the user PIN and like to transfer
your telephone number instead, switch on the quick remote access in addition to the
remote access (page 210). Enter also one or two quick access telephone numbers
(page 211).
앫 If you like to be informed by the answering machine away from home way as soon as a
new message has been recorded, configure the message forwarding (page 211) and activate it on demand (page 213).
Switch on/off the Remote Access
In this menu you can define if a remote access to the answering machine is possible.
Open the settings menu for the setting “remote
access” (You will find help on page 33 and the
following).
settings
answer.machine
remote access
The icon
marks an activated
selection.
The icon
marks a deactivated selection.
...
...
Press the
or
softkey to the left of the
option you require to reverse the current status.
앫 remote
access: Activate/deactivate the
remote access.
Press the
softkey to complete the settings.
57
Only on COMfortel 2500 with SD card. After 30 days a chargeable release of the function COMfortel
Voicemail is necessary via Upgrade Centre (see page 21).
58
When operated on the PBX systems COMpact 5010 VoIP, COMpact 5020 VoIP, COMmander Basic.2
and COMmander Business the user PIN has to be assigned in the configuration manager of the PBX.
209
Configure and use the Answering Machine
Configure the Remote Access
Switch on/off the Remote Access Toll Saver (and Quick Remote Access)
The following variants are available:
앫 Remote Access Toll Saver off: The answering machine will accept a call always according to the defined call acceptance time (page 196).
After the answering machine has accepted the call, you can start the remote access during
the announcement and the following 10 seconds (by entering the star + user PIN + hash;
see also page 221).
앫 Remote Access Toll Saver on: The answering machine will only accept the call after the
defined call acceptance time (page 196) if there are new messages. But if there are no new
messages, the call acceptance time will be extended by ten seconds (approx. 2 ringback
tones) compared with the defined call acceptance time.
So you can detect even before the call acceptance by the answering machine that an
access is not necessary and perhaps disconnect the call in time.
After the answering machine has accepted the call, you can start the remote access during
the announcement and the following 10 seconds (by entering the star + user PIN + hash;
see also page 221).
앫 Remote Access Toll Saver with Quick Remote Access: The answering machine will
take a call immediately if a quick access telephone number has been presented and if
there are new messages. But if there are no new messages, the call acceptance time is
extended by 10 seconds (approx. 2 ringback tones) compared with the defined call acceptance time.
If the answering machine has taken the call, you can start with the remote access immediately (se page 221). The entry of the user PIN is not necessary.
Open the settings menu for the setting “remote
access toll saver” (You will find help on
page 33 and the following).
settings
answer.machine
r/a toll saver
The icon
setting.
marks the current
Press the
softkey to the left of the option
you require:
앫 off: Switch off the remote access toll saver.
앫 on: Switch on the remote access toll saver.
앫 quick access: Switch on the remote access
...
☞
Advice
210
toll saver with quick access. The entry of a
quick remote access number is necessary
(page 211).
Pay attention that the call acceptance time will be extended by 10 seconds for each caller (if
there are no new messages) if the remote access toll saver is active. Remind this when setting the call acceptance time.
Configure and use the Answering Machine
Configure Message Forwarding
In case of an activated quick access the call acceptance time only varies for the correctly presented quick access telephone numbers. For all other callers the answering machine takes
the call according to the defined call acceptance time (if there are new messages or not).
If you have made settings in your PBX that delays the call to the telephone (e.g. subscriber
Call Forwarding on no reply), the remote access toll saver and /or quick access is not efficiently usable.
Enter Quick Access Telephone Numbers
For the function remote access toll saver with quick access up to two quick access telephone
numbers can be entered.
Open the settings menu for the setting “quick
access” (You will find help on page 33 and the
following).
settings
answer.machine
quick access
Press the
softkey to the left of the option
you require:
---
앫 – – – : Allows to enter a quick access tele-
phone number.
앫 [telephone number] : Allows to change the
☞
N [ telephone number]
existing quick access telephone number.
Enter the quick access telephone number.
Press the
softkey to complete the entry.
Please enter the external telephone numbers always with an exchange line access number
“0”. (Exception: Direct Exchange Line Telephone; see page 56.)
Important
☞
Advice
If the telephone book key is pressed when entering the telephone number, you can select the
requested number in the telephone book.
Configure Message Forwarding59
If you like to be informed by the answering machine away from home way as soon as a new
message has been recorded, configure the message forwarding. The message forwarding
59
Only on COMfortel 2500 with SD card. After 30 days a chargeable release of the function COMfortel
Voicemail is necessary via Upgrade Centre (see page 21).
211
Configure and use the Answering Machine
Configure Message Forwarding
can be switched on on demand (e.g. if you leave your home) (page 211). If you have configured a message forwarding, it will be executed by the telephone as follows:
앫 As soon as a caller has recorded a new message, the telephone dials the entered desti-
nation number (page 214) - after expiration of the delay time (see page 214).
앫 If the called person takes the call, an announcement is played first to him (page 213) and
then the new message is played.
앫 After the playback of the new message, a remote access can be started within 30 seconds
(without PIN entry; see page 221).
Answering Machine – Switch on/off Message Forwarding
If you have configured message forwarding (page 211), you can start it on demand (e.g if you
leave your home).
Use the Function via Function Menu:
Open the function menu for the function “TAM
message forwarding” (You will find help on
page 33 and the following).
functions
TAM message fwd.
The icon
setting.
marks the current
Press the
softkey to the left of the option
you require:
앫 activating: Switch on the message forward-
...
ing.
앫 switching off: Switch off the message for-
warding.
Assign Key:
Open the key programming menu for the function “TAM message forwarding” (You will find
help on page 33 and the following).
define keys
function key ...
... level
TAM message fwd.
The current settings for the key
assignment is shown on the
display.
If you like to change the current settings, press
the softkey in front of the corresponding
selection once or several times (You will find
help on page 155 and the following):
앫 [switching type]: Enables the assignment
with switch on, off or over.
Press the
212
softkey to complete the settings.
Configure and use the Answering Machine
Configure Message Forwarding
Use Function via Key:
By pressing the key the message forwarding is switched on, off or over.
LED Signalling next to the Key:
green
The message forwarding is switched on.
off
The message forwarding is switched off.
☞
Advice
You can also switch on/off the message forwarding via remote access or enter a new destination telephone number (see page 221).
Configure Announcement for Message Forwarding
Before playing the new message(s) the standard announcement FORWARD.WAV is played
to the called person (provided that the standard announcement has been copied to the SD
card; see page 21).
If you like to use an individual announcement for the message forwarding instead of the
standard announcement, configure it here.
Open the settings menu for the setting “forwarding announcement” (You will find help on
page 33 and the following).
settings
answer.machine
fwd.announcement
The icon
setting.
marks the current
Press the
softkey to the left of the option
you require:
앫 own announcement: Switch on an individ-
...
ual announcement for the message forwarding.
앫 standard announcement: Switch on the
standard announcement for the message
forwarding.
(no additional entries are necessary)
Scroll with the and softkeys through the
announcement list (see page 199) to the
requested selection.
The name of the announcement with creation date and
time is displayed.
Press the
ment.
☞
Advice
softkey to select the announce-
The announcements available in the announcement list have to be copied with the PC programme COMfortel Set to the SD card first (se page 221) or recorded via telephone (see
page 199).
213
Configure and use the Answering Machine
Configure Message Forwarding
Configure Target for the Message Forwarding
Here you can enter the external telephone number that will be used as target to forward the
messages.
Open the settings menu for the setting “forwarding target” (You will find help on page 33
and the following).
settings
answer.machine
forward.target
☞
N [ telephone number]
Enter the external target telephone number.
Press the
softkey to complete the entry.
Please enter the external telephone numbers always with an exchange line access number
“0”. (Exception: Direct Exchange Line Telephone; see page 56.)
Important
☞
Advice
If the telephone book key is pressed when entering the telephone number, you can select the
requested telephone number in the telephone book.
Configure Delay Time for the Message Forwarding
Here you can define after how many seconds the latest recorded message will be forwarded
automatically.
The following entries are possible:
앫 0...99: 0-99 seconds
Open the settings menu for the setting “forwarding time” (You will find help on page 33
and the following).
settings
answer.machine
forwarding time
N
214
[ time in seconds]
Enter the delay forwarding time between
recording of a new message and start of the
forwarding.
Press the
softkey to complete the entry.
Configure and use the Answering Machine
Configure Message Forwarding
Configure Repetitions for the Message Forwarding
Thanks to this function you can define if and how often the message forwarding will be
repeated if it was not successfully made. This may be the case for example if the subscriber
with the entered target telephone number cannot be reached or a new message could not be
played to its end.
The following entries are possible:
앫 0: no repetition
앫 1...9: 1-9 repetitions
Open the settings menu for the setting “forwarding repetitions” (You will find help on
page 33 and the following).
settings
answer.machine
fwd.repetitions
N
[ number]
Enter the number of repetitions.
Press the
softkey to complete the entry.
Set Repetition Delay Time for the Message Forwarding
If you have defined one or several repetitions for the message forwarding, you can define the
delay time between the individual repetitions.
The following entries are possible:
앫 1...9: 1-9 minutes
Open the settings menu for the setting “forwarding repetition time” (You will find help on
page 33 and the following).
settings
answer.machine
fwd.repet.time
N
[ time in minutes]
Enter the delay time between the repetitions.
Press the
softkey to complete the entry.
215
Configure and use the Answering Machine
Store the Data (Backup) on the SD Card
Store the Data (Backup) on the SD Card60
With the function Backup the data of the telephone can be stored manually or automatically.
On the SD card a maximum of 14 complete or partial backups can be stored. When exceeding this number the oldest backup will be overwritten.
For each storage a directory is set on the SD card where a file is stored for each partly storage. The files can be backed-up by the SD card on the PC (see page 221).
Besides this the backups are collected in a list in the telephone from which they can be
selected for restore into the telephone again (see page 217).
Configure Backup
Instead of a complete backup of the telephone, also parts of the data can be selected for the
storage. The setting is valid for both the manual and the automatic backup.
The following ranges can be selected:
앫 caller list (entries in the caller list)
앫 settings (settings made in the settings menu (except restrictions))
앫 functions (settings made in the function menu)
앫 function keys (programming of the function keys)
앫 calls lists (entries in the calls list)
앫 local telephone book (entries in the local telephone book)
앫 ringer melodies (individual melodies created with COMfortel Melody)
앫 project number (existing project list)
앫 restrictions (settings made in the setting menu for “restrictions”)
앫 scheduled calls (entries in the scheduled calls list)
앫 redial list (entries in the redial list)
Open the settings menu for the setting “configuration” (You will find help on page 33 and the
following).
settings
Backup
configuration
The icon
marks an activated
selection.
The icon
marks a deactivated selection.
60
Only on COMfortel 2500 with SD card. After 30 days a chargeable release of the function COMfortel
Voicemail is necessary via Upgrade Centre (see page 21).
216
Configure and use the Answering Machine
Store the Data (Backup) on the SD Card
...
...
Use the
and
softkeys to browse to the
option you require and press the
or
softkey to the left of the option to reverse the
actual status:
앫 [range]: Activate/deactivate the storage of
the range for the backup.
Press the
softkey to complete the settings.
Execute Backup (COMfortel 2500 -> SD Card)
If you like to start the backup manually, follow these instructions:
Open the settings menu for the setting
“CF2500 -> SD” (You will find help on page 33
and the following).
settings
Backup
CF2500 -> SD
The backup will be started.
Restore the Backup (SD Card-> COMfortel 2500)
If you like to restore the backup, follow these instructions:
Open the settings menu for the setting “SD ->
CF2500” (You will find help on page 33 and
the following).
settings
Backup
SD -> CF2500
Use the
and
softkeys to browse to the
backup you require.
Displayed are date and time of
the storage.
Press the
backup.
softkey to restore the selected
217
Configure and use the Answering Machine
SD Card
The backup will be restored
again.
Configure Automatic Backup
If you have activated the automatic backup, a backup of the telephone data will be done daily
starting at midnight (as soon as the telephone is in the idle state).
Open the settings menu for the setting “automatic” (You will find help on page 33 and the
following).
settings
Backup
automatic
The icon
marks an activated
selection.
The icon
marks a deactivated selection.
...
...
Press the
or
softkey to the left of the
option you require to reverse the actual status.
앫 automatic: Activate/deactivate the auto-
matic backup.
Press the
softkey to complete the settings.
SD Card61
Format the SD Card
An SD already used for other applications can be formatted in the telephone wit FAT16. An
SD card previously formatted with FAT32 will be reformatted.
Press the menu key.
N
61
Enter #206 via keypad.
Only on COMfortel 2500 with SD card. After 30 days a chargeable release of the function COMfortel
Voicemail is necessary via Upgrade Centre (see page 21).
218
Configure and use the Answering Machine
SD Card
The security confirmation dialogue appears on the display.
Press the
question.
The formatting progress
shown on the display.
softkey to confirm the security
is
Afterwards at the bottom right
side
is displayed, as long
as the SD card is initialized. As
soon as the pictogram
is
displayed instead of
, the
answering machine is ready for
operation.
☞
Advice
After inserting the SD card for the first time the necessary directory structure will be created
on the SD card. The tones used by the answering machine will also be created then.
Announcements are not available after inserting the SD card. Individual announcements
have to be recorded first (page 199) or standard announcements have to be uploaded with
the PC programme COMfortel Set (page 220).
Check SD Card
With the following function the write performance of the SD card can be checked.
Press the menu key.
N
Enter #205 via keypad.
After finishing the check the
result is shown on the display.
Remove the SD Card safely
To leave current processes uninterrupted when removing the SD card, stop them first.
Press the menu key.
N
Enter #207 via keypad.
The message “Remove SD
card” appears on the display,
as soon as all current processes will have been finished.
219
Configure and use the Answering Machine
Data transfer between PC and SD Card
Data transfer between PC and SD Card62
Transfer Recordings and Backups with COMfortel Set
For each recording – announcement, message, call recording, voice memo – a .WAV file as
well as a .DAT file (with information about the recording) is stored on the SD card. For each
storage (Backup) a directory has been created on the SD card with a DAT file for each partly
storage.
The files can be transferred comfortably via COMfortel Set (page COMfortel Set
왘 Answering machine 왘 Data exchange) from the SD card to the PC or back from the PC
to the SD card.
By transferring with COMfortel Set the SD card can stay in the telephone – in opposite of the
transfer with an external card reader. Additionally name and telephone number of the caller
are displayed in case of WAV files of messages or call recordings on the SD card. Another
advantage for the administration of the data: If you stay with the mouse arrow on top of a
WAV file for a certain time, a short information will be opened automatically. It displays the
name, telephone number, date, length, playback duration and the file name of the corresponding recording.
62
Only on COMfortel 2500 with SD card. After 30 days a chargeable release of the function COMfortel
Voicemail is necessary via Upgrade Centre (see page 21).
For the support of the function COMfortel Set with SW version 1.9 or newer is necessary.
220
Configure and use the Answering Machine
Make a Remote Access
Make a Remote Access63
The following requirements have to be fulfilled:
앫 The remote access has been configured (page 209).
앫 The used internal or external telephone supports DTMF dialling.
앫 You know the user PIN of the COMfortel 2500.
Start the remote access as follows:
1. Call the COMfortel 2500.
2. After the defined call acceptance time the answering machine takes the call. You listen
to the configured announcement.
3. During the announcement and the following 10 seconds you can start the remote access
by entering the following DTMF digits:
* user PIN #
4. You listen to the announcement for the remote access REMOTE.WAV (provided that the
standard announcement has been transferred to the SD card; see page 21).
5. Make the remote access with the digits listed in the table.
Table 6: Functions of the Remote Access
2
Playback of new recordings (only messages).
3
Playback of all recordings (call recordings and messages).
4
Back to the previous recording.
5
Repeat currently played recording.
6
Skip to the next recording.
7
Deleting the currently played recording.
8
Stop the recording.
* 10
Switch off the readiness (see also page 189).
* 11
* 20
* 21
* 30
* 31
* 32
* 70
☞
Advice
63
Switch on the readiness (see also page 189).
Switch off the automatic (see also page 205).
Switch on the automatic (see also page 205).
Switch off the message forwarding (see also page 212).
Switch on the message forwarding (see also page 212).
telephone number #
Change target of the message forwarding (see also
page 214).
Delete all recordings.
If you have made a mistake when entering the user PIN, you can restart by entering * (star)
again.
Only on COMfortel 2500 with SD card. After 30 days a chargeable release of the function COMfortel
Voicemail is necessary via Upgrade Centre (see page 21).
221
Configure and use the Answering Machine
Make a Remote Access
Correct entries are confirmed with a positive confirmation tone (6 short tones) and wrong
entries with a negative confirmation tone (3 long tones).
In case of an activated remote access toll saver (page 210) the call acceptance time may
change. In case of an activated remote access toll saver with quick access you will hear the
announcement for remote access (REMOTE.WAV) immediately and you can start with the
remote access (without PIN entry).
222
Index
I NDEX
A
Abbreviations ............................ 2
Alternation
connect both partners .............. 71
finish active call ....................... 71
from conference ...................... 74
message forwarding target .... 214
quick access number ............ 211
readiness ....................... 189, 196
record new messages ........... 199
record voice memos .............. 193
remote access toll saver ....... 210
C
Call ............................................62
accept ......................................45
alternate between
subscribers ...............................70
connect both subscribers
in a Query ................................71
transfer standard
announcements ....................... 21
dial DTMF digits .......................63
transfer to third subscriber ....... 72
Answering machine
(Voicemail Centre 461.2) ..... 131
door terminal ............................68
Announcement before answering
Answering machine list ....... 190
from Query .............................. 70
transfer active call partner ....... 72
assign key (COMpact 2204/2206/
4410 USB / 4406 DSL,
COMmander Basic) ............... 135
assign key (COMpact 5010/5020
VoIP, COMmander Basic.2/
Business) ............................... 136
Announcements
dial number ........................... 191
listen to recordings ................ 190
Answering machine
handsfree operation .................38
ignore waiting call ....................47
Automatic .............................. 205
interrupt for pickup ...................66
Automatic firmware update . 181
Automatic recall on busy ....... 58
B
automatic playback ................ 198
Backlight ............................... 159
call acceptance ...................... 196
call recording ......................... 206
interrupt for a Query .................64
mute .........................................40
reject ........................................45
reschedule call .........................67
speaker mode ..........................38
automatic call recording ........ 206
call acceptance delay ............ 196
from the answering
machine list ............................191
Autom. redialling
(Power Dialling) ..................... 60
answering machine list .......... 190
automatic ............................... 205
finish with replacing the
receiver ....................................40
Attention tone ....................... 168
assign (answering machine) .. 201
record (answering machine) .. 199
dialling from the redial list ........84
Backup
to SD card ............................. 216
start another call during a
call (Query) ..............................64
transfer to third subscriber .......72
transfer to Waiting Field ...........65
via selected exchange line .......55
via selected VoIP account ........54
Backup data .......................... 180
call recording, info tone ......... 208
view information .......................63
Backup file ............................ 180
view number .............................63
data transfer .......................... 220
Basic settings ....................... 157
view project ..............................63
installation ............................... 20
Blocking
configure the remote access . 209
listen in .................................. 197
listen to messages
(answering machine list) ........ 190
configure ............................... 164
view provider ............................63
with headset .............................41
with two call partners ...............69
Brightness ............................. 159
with two subscribers .................67
Busy tone
finish call in a Query ................ 61
with two subscribers at the
same time ................................72
listen to voice memos ............ 194
priority call (Do-not-Disturb) .... 61
Call acceptance .....................196
make a remote access .......... 221
start Power Dialling ................. 60
message forwarding .............. 212
start Recall .............................. 58
listen to recordings
(answering machine list) ........ 190
message forwarding
announcement ....................... 213
message forwarding
delay time .............................. 214
message forwarding
repetitions .............................. 215
Call acceptance delay time ...196
Call acceptance readiness ...189
Call charge account
view ........................................185
Call charges
deletion ....................................94
223
Index
Call Deblocker inbound ........ 104
Change of modules ................ 15
D
Call forwarding ...................... 107
Change volume
Data
subscriber/telephone ............. 107
Call forwarding (MSN/DDI) ... 111
Call macro
configure .................................. 81
Call recording
automatic ............................... 206
info tone ................................. 208
listen to recordings (answering
machine list) .......................... 190
automatically ......................... 172
Charge information
delete .......................................94
Data backup
view ....................................... 185
to SD card ..............................216
Cleaning .................................. 14
Data transfer to SD card .......220
COMfortel Melody ................. 178
Date format ............................161
COMfortel Set ........................ 178
Day/night switching
manually ...............................114
Comment ................................. 83
Conference
Default factory settings ........183
Delete
use ......................................... 206
back to alternation ................... 74
Call Restrictor inbound ........ 105
back to simple call ................... 74
call charges ..............................94
finish completely ...................... 73
data ..........................................94
Call take-over .......................... 48
Call take-over (like pickup)
in a conversation ..................... 66
Call Waiting
initiate ...................................... 72
separate .................................. 74
Configuration
function keys ......................... 155
a door call is waiting ................ 50
remote programming ............. 186
accept the second call ............. 47
telephone .............................. 155
disable Call Waiting signal ...... 47
enable/disable ....................... 102
Configuration lock
lists ...........................................94
Description
keys ..........................................26
Dial preparation .......................52
Dialling
a number ..................................51
DTMF digits ..............................63
configure ............................... 166
during a call ..............................64
reject waiting call ..................... 46
Configuration software ........ 178
select LED and tone
signalling ............................... 168
Configuration switching
from the answering
machine list ............................191
ignore the waiting call .............. 47
select signalling LED/tone ..... 168
manually ................................ 114
Configure
Caller list .................................. 89
function keys ......................... 155
delete entries ..................... 84, 89
telephone .............................. 155
dial number .............................. 88
display options ......................... 89
select call types ..................... 173
select LED signalling ............. 167
Calls list ................................... 85
delete entries ........................... 86
dial numbers ............................ 86
display options .........87, 192, 195
select call types ..................... 173
CCBS ........................................ 58
CCNR (recall on no reply) ...... 59
CE compliance ...............see flyer
“Conditions of guarantee, Information service”
224
Configure the remote
access .................................. 209
Conformity ...see flyer “Conditions
of guarantee, Information service”
Connection
of the headset ......................... 18
of the key extension module ... 17
to the PBX ............................... 15
to the PC (USB) .................... 176
Contrast ................................. 160
Control elements .................... 26
with direct exchange
line telephone ...........................56
with speed dialling key .............52
Direct exchange line
telephone ................................56
Index
caller list .................................. 89
with Direct Exchange
Line Telephone ....................... 56
calls list ....................87, 192, 195
Exchange line selection ....... 118
Display
function menu .......................... 34
idle state .................................. 32
Headset
connect ....................................18
make a call ...............................41
pinout .....................................188
External Call
in a call .................................... 62
dial a number from the
redial list .................................. 84
in a Query call ......................... 69
start a second call (Query) ...... 64
ringing ....................................169
switch on/off .............................97
technical data .........................188
inbound call ............................. 44
type ........................................158
information menu ..................... 33
main menu ............................... 33
outbound call ........................... 57
Hold
F
Features ................................... 12
redialling .................................. 85
settings menu .................... 33, 36
telephone book ........................ 76
usage ....................................... 25
Display backlight .................. 159
set brightness ........................ 159
use as a ringer signal ............ 100
Firmware
distribute update .................... 182
update ................................... 181
Do-not-Disturb ...................... 103
accept door call ....................... 49
Call Waiting from the
door terminal ........................... 50
open door .......................... 49, 68
First use of the telephone ...... 15
Function keys
activation of the
second level .......................... 163
E
Enter ....................................... 211
Environment see flyer “Conditions
of guarantee, Information service”
Exchange line access number
when dialling a number ........ 51
Exchange line call ................... 51
select MSN .............................. 53
selected exchange line ............ 55
suppress number
presentation ............................. 53
I
Icons .........................................27
Idle state
display options .........................32
Inbound call .............................44
display options .........................44
hold the caller ...........................46
configuration .......................... 155
insert label ............................... 19
Inbound external call
reject ........................................45
Function menu ........................ 34
Information menu ....................33
Door functions ...................... 115
Driver installation ................. 177
use hotel reception
telephone ...............................149
in a Query ................................ 71
First use ................................... 15
Door
operate hotel room
telephones .............................154
during a conference ................ 73
Display settings .................... 159
switch on/off .......................... 103
Hotel function ........................149
Finish a call
view version .......................... 185
override (Priority Call) .............. 61
put the caller on Hold ...............46
Installation
G
answering machine ..................20
Glasses .................................... 53
Installation of the software ...177
Groups
InterCom
log in/out ................................ 133
make a call ...............................93
Guarantee ....see flyer “Conditions
of guarantee, Information service”
InterCom authorization .........127
H
Handsfree operation ............... 38
Hanging up the receiver ......... 40
Introduction .............................10
K
Key extension module
connect ....................................17
insert label ................................19
programme keys ....................155
Key programming ..................155
225
Index
Key programming menu ........ 35
Mounting of the telephone ..... 17
Keypad layout ......................... 26
MSN selection
Keys ......................................... 26
L
Labels
insert ........................................ 19
programme key (COMmander
Basic/COMpact) .................... 119
programme key (COMmander
Business/Basic.2) .................. 120
MSN/DDI Call Forwarding .... 111
LEDs ......................................... 26
Lighting .................................. 159
Listen in ................................. 197
Listen to recordings (answering
machine list) ........................ 190
Lists ......................................... 75
in a call .....................................66
PIN
configure ................................167
Playback, automatic ..............198
Power Dialling ..........................60
attention tone .........................168
Mute ......................................... 40
Presentation
LED signalling
configure ................................ 167
Pickup .......................................95
select MSN ...............................53
N
Name of the telephone ........... 32
No response
start recall ................................ 59
Number presentation
programme key (COMmander
Basic, COMpact) ................... 119
Log in to group ..................... 133
programme key (COMmander
Business/Basic.2) .................. 120
Log out from group .............. 133
select MSN .............................. 53
suppress .................................. 53
suppress number .....................53
Printing
hotel function ..........................149
Priority call ...............................61
Programming
basic settings .........................155
remote programming ..............186
Project
view used project in a call ........63
Provider
view in the conversation ...........63
M
Macro
configure ................................ 123
Main menu
O
Open the door
door call waiting ...................... 50
Q
Query ................................. 67, 69
called subscriber is busy or
does not answer .......................61
Display options ........................ 33
in a conversation ..................... 68
Make a remote access .......... 221
Operate a room telephone ... 154
finish .........................................71
Meaning of the icons .............. 27
Outbound call ......................... 57
initiate .......................................64
Quick access telephone number
211
Memo (voice note) .................. 68
Menu selection
configure ................................ 162
P
PBX
Message forwarding ............. 212
connect system telephone ...... 15
R
announcement ....................... 213
select ..................................... 184
Readiness ..............................189
delay time .............................. 214
view settings .......................... 185
Recall
repetitions .............................. 215
target ..................................... 214
Microphone
mute ........................................ 40
Minimum requirements PC .. 178
Modules
mount ...................................... 17
226
PC
start on busy ............................58
minimum requirements .......... 178
start on no response ................59
software/driver installation ..... 177
Reception ...............................149
PC software
install ..................................... 177
Reception (Waiting Field)
use .........................................144
Index
Reception telephone
use ......................................... 149
S
Software tips ..........................179
Scheduled call
Speaker mode ..........................38
Record voice memo .............. 193
accept ...................................... 93
Recording time ...................... 197
configure ................................. 90
Redialling ................................. 84
automatic (Power Dialling) ...... 60
delete entries ........................... 84
display options ......................... 85
select call types ..................... 173
Reject
caller ........................................ 45
Relay
remote switching ................... 116
Reminder
configure scheduled call .......... 90
delete ...................................... 91
edit .......................................... 91
postpone ................................. 93
reschedule calls ...................... 67
Scheduled calls list ................ 90
Schedules
Reschedule call ....................... 67
SD card
backup ................................... 216
insert ....................................... 20
Second level .......................... 163
Remote access toll saver ..... 210
Select a location ..................... 14
Remote programming .......... 186
Select exchange line
Remote switching ................. 116
Reschedule call
configure .................................. 67
Ringer
increase volume
automatically ......................... 172
select melody ........................ 170
select volume ........................ 170
Ringer rhythm (ringer melody)
select ..................................... 170
operation ................................. 55
Speed dialling key
configure ................................122
Speed-dial key
dial number ..............................52
Start a call ................................51
from caller list ...........................88
from calls list ............................86
from telephone book ................78
via selected exchange line .......55
with dial preparation .................52
with direct exchange line
telephone .................................56
with speed-dial key ..................52
Start a second call ...................64
Start call
from the answering
machine list ............................191
select ....................................... 55
via selected exchange line .......55
Select PBX ............................. 184
via selected VoIP account ........54
Server mode (firmware
update) ................................. 181
Service .....see flyer “Conditions of
guarantee, Information service”
Service functions .................. 181
Settings
daily use .................................. 94
Start external call
from the answering
machine list ............................191
via selected exchange line .......55
via selected VoIP account ........54
Subscriber Call Forwarding .107
Suppress
view ....................................... 185
number presentation ................53
switch on/off ............................ 99
Settings menu ......................... 36
via flashing display
backlight ................................ 100
Signalling .............................. 167
Switch between Call Partners
(Alternation) ............................70
Ringer signal
Single tone
Robinson list
change ringer volume ............ 172
Call Restrictor inbound .......... 105
Switch between call partners
(Alternation) ............................70
Switch relay ...........................116
Room monitoring .................. 106
Single tone (change ringer
volume) ................................ 172
Symbol of the softkeys ...........27
Room telephone .................... 149
Small/upper case letters ........ 30
Synchronization with PBX ....182
Softkey ..................................... 27
Software ................................ 178
Installation ............................. 177
T
Tapping ..................................197
perform update ...................... 181
view version .......................... 185
Technical data .......................187
227
Index
Telephone ................................ 38
accept the call ......................... 45
in a conference ........................ 73
V
Version
view software version ............ 185
in a Query ................................ 69
in the call ................................. 62
reject call ................................. 45
Telephone book ...................... 75
comment .................................. 83
create call macro ..................... 81
Voice memos (list) ................ 193
listen to recordings ................ 194
Voicemail Centre 461.2 ........ 131
quick remote access ............. 158
VoIP access
create new contact .................. 79
assign key ............................. 121
dial number .............................. 78
perform .................................... 54
edit contact .............................. 80
search by letter ........................ 75
settings .................................. 174
Telephone lock ........................ 98
Telephone ringer
switch on/off ............................ 99
Telephoning with three persons
(Conference) .......................... 72
Three-party conference .......... 72
Time format ........................... 160
Transfer
to 3rd call partner .................... 72
to Waiting Field ........................ 65
U
Update telephone software .. 181
Upgrade Centre
releasable functions ................ 14
Upload standard announcements ...................................... 21
Upper/lower case letters ........ 30
USB interface ........................ 176
User PIN
configure ................................ 167
User settings ......................... 162
view ....................................... 185
228
W
Waiting Field functions ........ 143
internal calls .......................... 146
Waiting Field Reception
activate/deactivate ................ 147
attention tone ........................ 168
use ........................................ 144
Waiting Loop
transfer call partner ................. 65
Lettering Labels
229
230
231
232
233
234
02 08/07
Environmentally friendly – 100% recycled paper
884241