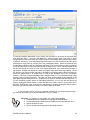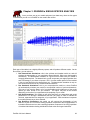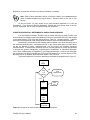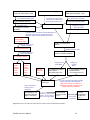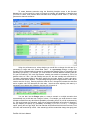
1
Version 3.8
USER’S MANUAL
LISA FAUST
JOANNE EARNHARDT
CARRIE SCHLOSS
YEE MAN BERGSTROM
January 31, 2008
ZooRisk 3.8, Release Date January 31, 2008
Programmers:
Yee Man Bergstrom, Lincoln Park Zoo
Adrian Lin, Lincoln Park Zoo
Development Team:
Joanne Earnhardt, Ph.D., Lincoln Park Zoo
Lisa Faust, Ph.D., Lincoln Park Zoo
Carrie Schloss, Lincoln Park Zoo
Steve Thompson, Ph.D., Lincoln Park Zoo
Design Team:
Andrew Baker, Ph.D., The Philadelphia Zoo
Jon Ballou, Ph.D., Smithsonian National Zoological Park
Louise Bier, AZA Population Management Center
Katie Cronin, Lincoln Park Zoo
Randy Fulk, Ph.D., North Carolina Zoological Park
Bob Lacy, Ph.D., Chicago Zoological Society
Sarah Long, M.S., AZA Population Management Center
Colleen Lynch, M.S., AZA Population Management Center
Kristine Schad, M.S., AZA Population Management Center
Brandie Smith, M.S., Association of Zoos and Aquariums
Robert Wiese, Ph.D., San Diego Zoo
Kevin Willis M.S., Minnesota Zoological Gardens
Support for development of ZooRisk by the Institute of Museum and Library Services,
Conservation Project IC-06-02-0131-02 and IC-06-06-0106-06, AZA's Conservation Endowment
Fund, Lincoln Park Zoo, Chicago Zoological Society, Minnesota Zoological Gardens, Smithsonian
National Zoological Park, Association of Zoos and Aquariums (AZA), and United Airlines
ZooRisk is shareware that is distributed free of charge by the Lincoln Park Zoo. The software
and the manual are not guaranteed to be free of bugs and errors, and the user is responsible for
insuring that the application of ZooRisk is appropriate to the problem at hand. ZooRisk is owned
and copyrighted by Lincoln Park Zoo, but not copy-protected. Individuals can hereby make
unlimited copies of ZooRisk for the purposes of population management, research, and
education.
Zoo Risk was made possible by the following components and their authors
ChartFX.net
Author: SoftwareFX
Website: http://www.softwarefx.com
Synfusion for Windows Forms
Author: Synfusion Inc.
Website: http://www.syncfusion.com
ZooRisk Icons by FOOOD, used with permission from FOOOD’s Icons
Website: http://www.foood.net/
Manual citation: Faust, LJ, Earnhardt, JM, Schloss, CA, and Bergstrom, YM. 2008. ZooRisk: A
Risk Assessment Tool. Version 3.8 User’s Manual. Lincoln Park Zoo. Chicago, IL.
Software citation: Earnhardt, JM, Bergstrom, YM, Lin, A, Faust, LJ, Schloss, CA, and Thompson,
SD. 2008. ZooRisk: A Risk Assessment Tool. Version 3.8. Lincoln Park Zoo. Chicago, IL.
ZooRisk 3.8 User’s Manual
2
TABLE of CONTENTS
Chapter 1. Introduction and Overview…………………………………………….4
Program Information………………………………….…………………………………………..6
System Requirements……………………………….……………………………….................6
Installation Instructions………………………………………………………………….............7
How to use this manual…………………………………………………………..….….............7
Getting Help in ZooRisk………………………………………………..………........................8
General Setup of ZooRisk…………………………………….………………………...............8
Parting Advice…………………………………………………………………………................9
Chapter 2. Setting up a Single-Species Analysis………………...……………10
Overview……………………………………………………..…………………...……….……..10
Orientation to the Single-Species Module…………………………………………..………..10
Studbook Extraction…………………………………………………………..……………...…11
Data Entry and Model Setup…………………………………......……………………………13
Living Population Data………………………………………………………………...13
Data Tables………………………………………………………………………….…18
Male and Female Data Tables……………………………..……………….18
Annual Number of Offspring………………..……………………………….21
Age Pyramid………………………………………..…………………………22
Birth Sex Ratio………………………………………..………………………23
Clipboard………………………………………..………………………………………24
Model Parameters………………………………………………………………..……25
Main Parameters…………………………………………..…………………25
Target Population Size………………………………………………………28
Genetic Management…………..….………............................……………31
Imports and Exports……………………………………….…………………32
Catastrophes……………………………………………………...………….34
Inbreeding Depression……………………………….……………………...35
Chapter 3. Running a Single-Species Analysis…………………………..……39
In Depth Description of Deterministic Simulations…………………………………..………40
In Depth Description of Stochastic Simulations………………………………………..…….44
In Depth Description of Risk Categorizations + Resilience Simulations...……..………….52
Chapter 4. Analyzing Results from a Single-Species Analysis…………….54
Result Graphs………………………………………………..................................................54
Result Tables…………………………………………………………..………………………..55
Risk Results…………………………………………………………..………………………….57
Comparative Risk Results……………………………………………………………………...59
Resilience Results………………………………………………………………………………60
Age Pyramid Graphs……………………………………………………………………………60
Chapter 5. Creating and Managing Scenarios………………... ………….…...61
Creating Scenarios…………………………………………………………………….61
Managing Scenarios…………………………………………………………………..62
Running Simulations for Multiple Scenarios………………………………………..62
Sensitivity Analysis.…………………………………………………………………………..63
Background…………………………………………………………………………….63
Create Sensitivity Analysis Scenarios………………………………………………63
Chapter 6. Space and Risk Analysis……………………………………………..66
Overview……………………………………………………………………………..………….66
Creating your space and risk project………………………………….………..….…………66
Running your space and risk project……………………………………………..…………..69
Results from your space and risk project………………………………………..…………..70
Literature Cited……………………………………………………….…………...…72
Appendix 1. Data Extraction In ZooRisk……………………………………...…73
Appendix 2. Definitions…………………………………………………….………75
ZooRisk 3.8 User’s Manual
3
Chapter 1: INTRODUCTION and OVERVIEW
ZooRisk is a tool designed to help in the assessment of a population’s risk of extinction
due to the demographic, genetic, and management processes that affect captive populations.
Why conduct such an assessment? Captive managers constantly make decisions about
populations based on the perception of their long-term security in captivity, and these decisions
focus conservation and research programs, education activities, and long-term collection planning
and exhibit construction. Optimally, these decisions should be based on the best science
possible.
An assessment of a population’s status in captivity could be conducted in a number of
ways. To use a parallel example, imagine the process of deciding whether to bring an umbrella
to work in the morning. At the most basic level, you use the qualitative information available—is it
raining outside currently? Your assessment can be slightly more quantitative by relying on past
history—in the past 7 days when the sky looked like this, how frequently did it rain? Finally, you
might use more precise quantitative information that the weather center at the local news station
has gathered—the chance of rain based on the recent storm systems, the larger weather patterns
picked up using weather-tracking equipment, and sophisticated storm modeling.
After
considering this information, you must integrate it with your tolerance for getting wet – how much
will it impact your activities? How much will you be outside? Is it one of those days you need to
be “presentable”?
In assessing risk for captive populations, a similar range of qualitative information,
quantitative information, and risk tolerance can be used to guide decisions. The status of the
population could be assessed based on manager’s opinions about the population size, how it
“seems” to be doing based on talking to colleagues at other institutions, and the perception of
whether there are enough individuals to meet institutional needs. Information could be collected
on what has happened in the past and used for basic projections of what might happen in the
future. Or, given knowledge of a population’s history, captive management practices, and the
principles of small population biology, more sophisticated modeling could be used to fully explore
the potential risks to the population. Moving along the continuum from qualitative to quantitative
analysis in an assessment of weather or population viability, computer models become a useful
tool. They can help us organize and systematically approach our analysis. They can help
integrate multiple interacting processes that can influence the outcome we’re interested in,
especially when such processes are so complex that they become difficult for our brains to
synthesize. Finally, they can help us produce understandable and standardized results that can
assist in communicating our results to others.
ZooRisk is a computer program designed to assist managers in making appropriate,
quantitatively based goals for captive populations. It provides a quantitative assessment based
on a population’s past history, the science of the biology of small populations, and the ability to
manage captive populations. This quantitative assessment should help managers provide
logical, transparent, and justifiable decisions about how and why captive populations are
maintained and prioritized. Throughout the rest of this introduction, we’ll highlight some of the
major features of the new approaches within ZooRisk, and then in Chapter 2 we’ll plunge into
using ZooRisk to assist in managing populations.
ZooRisk conducts single-species risk assessments and space and risk analyses
ZooRisk allows the user to conduct two types of risk assessments: an in-depth singlespecies assessment for an individual population, and a comparative space and risk assessment
for multiple species that share similar space. A single-species analysis is used to fully explore
the status of a population under current management conditions, and then ask “what if” questions
to determine how specific management actions (for example, importing individuals, changing
mortality or fecundity rates, adding additional spaces) will impact the population’s viability. The
space and risk analysis is used to analyze tradeoffs between space allocation and risk for an
individual population or for multiple species that share the same types of spaces within captive
institutions. This type of analysis allows quantitative assessment of how changing the target
ZooRisk 3.8 User’s Manual
4
population size of one population (and allocating that space to another population) affects the risk
of both populations.
ZooRisk’s conceptual framework - the concept of “risk”
Many of the goals of captive population management, including goals of maintaining
genetic diversity and reaching target population sizes, are centered around the question of
whether there will be a reliable population of healthy (genetically and medically) animals at some
point in the future. A “reliable” population means that individuals would be available to meet
exhibition needs or reintroduction needs. ZooRisk is designed to help managers determine the
risk that the population will not be able to have a reliable source of healthy animals at some point
in the future.
ZooRisk uses a set of five tests to assess each population’s risk level; because these
tests are standardized, they can be used as a metric of comparison between populations. Each
population has specific characteristics based on its past history or projected future dynamics
which assign it to one of four risk categories. These four categories—Critical in Captivity,
Endangered in Captivity, Vulnerable in Captivity, or Low Risk in Captivity—can help identify how
secure a captive population is, and what specific characteristics are threatening that population.
Like in the earlier umbrella example where an aspect of the final decision was whether
getting wet really mattered on a given day, managers may often have different risk tolerances and
the level of risk acceptable for different populations will vary. Population managers can use the
standardized risk results for each population to compare between populations, and then decide
what level of risk is acceptable for a given population. By providing a framework for making
decisions about risk tolerance, management goals will be more transparent and justified, and
these goals will help managers achieve or maintain population goals for the long-term.
ZooRisk is an individual-based model
ZooRisk is a simulation model, in which information from a population’s recent history is
used to project what might happen in the future for that population. ZooRisk is an individualbased model; in this approach, each individual in the initial population is created in the computer’s
memory, and births in the model result in new individuals with unique identities that are also
stored in the computer’s memory. Each “event” – death, pairing for reproduction, importation, etc.
– happens to this population of individuals over each year of the model projection. Managers of
captive populations have extensive information on the individuals in their populations, including
data from studbooks on each individual’s current status (age, sex, location), pedigree, origin,
rearing type, and behavior. Because ZooRisk uses the individual data, it can more realistically
simulate the potential growth or decline of populations in the short and long term.
ZooRisk is a stochastic model
Another aspect of small population dynamics which is important to viability is the impact
of stochasticity or randomness on events. Models that do not include any random variability are
termed deterministic models. Such models use a single estimate (usually a mean) for each
model parameter (e.g. mortality rate), and produce the same results every time they are run with
those parameter values. Stochastic models include variation and randomness in parameter
values, e.g. they might randomly draw individuals to breed, or draw a mortality rate from a
distribution with a specified mean and variance. Because of this variation, stochastic models will
produce different results each time the model is run, and to fully explore a population’s dynamics
the model is run many times (often several hundred iterations). Results for stochastic models will
give an idea about the range of potential trajectories a population might take.
ZooRisk is a stochastic model, and incorporates variation into population dynamics in
several ways. The model automatically generates demographic stochasticity (DS), or the
variation in mortality, fecundity, and sex ratio due to random variation among individuals. DS is
important to include in models of small population dynamics because the impact of this type of
randomness is magnified by small sample size: for example, a 40% mortality rate for a population
will produce close to 4000 deaths in a population of 10,000, but may produce 3 or 5 deaths in a
population of 10. To generate variation due to DS, ZooRisk uses monte carlo methods and the
binomial distribution to determine the number of deaths, the sex of offspring, and whether a
ZooRisk 3.8 User’s Manual
5
female is pulled into the breeding pool or not. Chapter 3 gives more details on how DS is
simulated in each of these decisions. ZooRisk also simulates genetic stochasticity, depending on
model setup.
Because stochastic models have inherent variation, each model run (or iteration) will
produce a slightly different population trajectory and outcome. To fully explore a population’s
potential dynamics, stochastic models are run hundreds or thousands of iterations, and model
results are usually reported as averages of all iterations.
Deterministic model results
Stochastic model results
ZooRisk allows feedback between genetics and demography
Cooperative management of captive populations attempts to create the best genetic (and
demographic and logistical) pairs/groups for breeding. Implicit within this management is the idea
that the goal for captive populations is to maintain as much of the genetic diversity of the founders
of the population as possible. As a population loses genetic diversity and inbreeding (breeding
between close relatives) becomes more common, inbreeding depression may start to affect the
demography of the population. Research on captive, laboratory, and wild populations has shown
that inbreeding impacts survival and fecundity for various life stages (Earnhardt et al, in prep).
ZooRisk allows the user to model the impact of inbreeding on demographic rates to determine
how genetic changes over time influence population viability.
GETTING STARTED
Program Information
ZooRisk is a complex model and is designed to be used by scientific advisors to
managed programs, primarily the population biologists of the AZA Population Management
Center (PMC) and the members of the Small Population Management Advisory Group (SPMAG).
It may also be useful to researchers as a simulation tool.
If you have any comments, questions, bugs, or compliments to report about ZooRisk,
please contact us directly at [email protected]. We will attempt to identify and fix run-time errors
within the software, especially in the initial release period; more substantive changes may be
made based on consensus from the development team. If you experience a bug during
operation, please send a description of what you were attempting when you found the bug and
the project file you were working on (which is in the ZOORISK folder, and in either single-species
or Space and Risk projects) to [email protected].
The latest version of the ZooRisk program and the manual will be accessible via the
website http://www.lpzoo.org/zoorisk. You should check the website occasionally to ensure that
you’re running the most up-to-date and bug-free version.
System requirements
• Computer with the United States English version of the operating system.
• Screen Resolution: 800x600 pixels
• Windows XP, Zoo Risk can be run on Vista, but full compatibility is still being tested
ZooRisk 3.8 User’s Manual
6
Installation of ZooRisk
To install ZooRisk from the internet on a computer running Windows XP
1. Download the current version of the program from the program’s website at
www.lpzoo.org/zoorisk and save it to your computer
2. Use Windows Explorer to navigate to the downloaded zip file, ZooRisk X.XX.zip) (e.g.
ZooRisk3.8.zip), double click on the file to extract (or unzip) the files into the folder
you designate on your computer.
3. Open the folder with the extracted files and double click on the Setup.exe installation
file. The installer will then guide you through the rest of the process. You may be
asked whether you’d like to install the .Net Framework 2.0 and MDAC 2.8; ZooRisk
requires these libraries to run. You can install ZooRisk into any directory; the default
is to install it in a directory in C:/Program Files. The installation will automatically put
a shortcut on your Desktop.
If you’re installing ZooRisk on a computer running Windows Vista
1. Follow installation steps 1-3 above.
2. After installation, use Windows Explorer to go to C:\Program Files\ZooRiskX.XX (or
wherever you had selected to install ZooRisk). Right click on ZooRisk.exe and Select
Properties. Go to the Compatibility tab. Check two boxes:
a. “Run this program in compatibility mode for:” and make sure “Windows XP
(Service Pack 2)” is selected right below.
b. “Run this program as an administrator.”
3. After these are checked, click Ok. This setup step is very important as it will
ensure that ZooRisk projects are saved within the ZooRisk program and can be
viewable on your hard drive.
Note that an US English computer is required for installation.
Also, note that the
minimum screen resolution needed for ZooRisk is 800x600 pixels. If you notice that certain
features are not being displayed on your screen in ZooRisk, adjust the screen resolution on your
computer.
If you have an older version of ZooRisk installed on your computer, we recommend that
you remove it using the Add/Remove programs function on your control panel before installing
the updated version in order to eliminate confusion. However, because of the major changes to
ZooRisk between versions, none of your projects from previous versions of ZooRisk will be
transferable to newer versions ZooRisk.
How to use this manual
The ZooRisk User’s Manual has been written to provide technical guidance in how to
utilize ZooRisk and conceptual guidance in some of the principals behind its design. The manual
will take you through the process of creating a single-species project (Chapters 2-5) and a space
and risk project (Chapter 6), including data extraction/entry, model setup, analysis of results, and
reporting. The appendices in the back of the manual provide additional information, including
definitions, literature cited, and more technical information. A couple of special aids will help
orient you throughout the manual:
NOTE: there’ll be special reminders here that will prompt you about important
points or confusing concepts to pay attention.
TECHNICAL NOTE: this will highlight more in-depth technical details about
how the “guts” of the program works; this documentation is provided for
transparency in model algorithms.
ZooRisk 3.8 User’s Manual
7
Getting help in ZooRisk
There are two mechanisms to provide assistance while you’re working with ZooRisk:
1. You can refer to your printed or electronic version of this manual. The electronic version
can be downloaded from the website and is included in the Help menu in the software.
2. While in the program, brief text is located in the grey box on the bottom left of each
screen to instruct you on the appropriate input for each screen.
General setup of ZooRisk
The program is designed to be worked through from left to right—within each general
area, you’ll be able to view and edit data on multiple screens, and it will be easiest to step through
them in left-to-right order. In any data tables, fields that can be altered/edited by the user are
highlighted in light green.
Your work within ZooRisk is organized into projects. Within the single-species module,
you’ll have a project for each population you are working with. Within your single-species project,
you can create multiple scenarios that you’re interested in modeling and comparing. Within the
space and risk module, you’ll have a project for each group of populations you’d like to compare
risk of extinction for (usually species that share similar space requirements in captivity). In this
space and risk analysis, ZooRisk will use the Baseline scenario for each included single-species
population. For example, you might create the following projects in the single- and space and risk
modules:
SINGLE-SPECIES MODULE
SPACE AND RISK ANALYSIS MODULE
Project Name: Sunbittern
Scenarios:
Baseline
Reduced infant mortality
Improved reproduction
Imports
Inbreeding Depression
Project Name: Guam rail
Scenarios:
Baseline
Inbreeding Depression
Steady exportation
Reduced adult mortality
Project Name: Nesting Birds
Populations:
Sunbittern (Baseline scenario)
Guam rail (Baseline scenario)
Bali mynah (Baseline scenario)
Project Name: Bali mynah
Scenarios:
Baseline
Reduced infant mortality
Catastrophe
No genetic management
You’ll learn more about projects and scenarios and how to manage your work in ZooRisk in the
Creating and Managing Scenarios chapter.
If you ever need to transfer projects between computers or between users, you can go
into the ZooRisk file structure to copy the project of interest. Simply go to the directory where you
installed ZooRisk, go to the ZooRisk 3.8 folder, and open either the SINGLE SPECIES or SPACE
AND RISK project folder. Copy the project folder you want, and paste it into the same folder
(single- or space and risk) in the ZooRisk directory on the new computer. If you’re moving a
space and risk project, you’ll also have to copy all the single-species projects used by the space
and risk analysis.
ZooRisk 3.8 User’s Manual
8
Some parting advice:
Document!
It’s a very good idea to document your model as you proceed—making notes on where
your data came from, why you changed a particular parameter value, why you decided to turn a
particular model option on, etc. It is also a good idea to record data sources if you’ve changed
any model values based on life history information from a source other than the studbook
database for the population. These details will be important in explaining and justifying your
modeling choices, and are difficult to reconstruct after the fact.
ZooRisk incorporates a notes bar at the bottom right of the screen to help you
document your project as you work. Type comments into the box and hit the “Save
Notes” button directly to the right of the notes bar; the comments will be contextspecific when they are saved, so that any notes you write will be displayed again when
you return to a screen. When you copy a table to the clipboard any notes that were
written would also be pasted with it.
NOTE: unless you hit the “Save Notes” button, even if you have written notes
in the note bar they will not be saved!
You can save select portions of your project to a clipboard which can then be copied to
a word processing program. By hitting the “Paste to Clipboard” button (shown to the
left) on any of the screens where you see it, the information stored in that
table/graph/screen will be sent to the clipboard. See Chapter 2 for further details.
Save often!
Save your project after you’ve done your initial data extraction, after any data entry, and before
and after analytical runs.
Data quality matters!
Like any modeling exercise, the analyses you get out of ZooRisk will only be as good as the data
that you put into ZooRisk. For populations that are small and/or have historically been small, it is
possible that demographic rates cannot be accurately determined, and you should seriously
consider the appropriateness of running analyses with poor quality data.
Use a clean database!
Starting your modeling with a clean, good quality studbook will produce the most useful analytical
results. This is because data that has not been validated and cleaned may have errors that
complicate data extraction. ZooRisk can’t cope with certain SPARKS (ISIS 2002) data entry
errors. If you have an analytical studbook that includes assumptions about parentage for generic
individuals (e.g. MULT, UNK (Thompson et al. 1997)), you should use that version because
ZooRisk utilizes the genetic identities of your living population as it projects the population
forward. You should also run clean-up files in SPARKS before running a ZooRisk studbook
extraction.
Exiting ZooRisk
Make sure to save your project before exiting ZooRisk. However, if you must abort ZooRisk, you
may do so at anytime by using the key-commands control+shift+escape. Your project will not be
saved automatically.
ZooRisk 3.8 User’s Manual
9
Chapter 2: SETTING UP a SINGLE-SPECIES ANALYSIS
OVERVIEW
The general purpose of a single-species analysis is to explore the future viability and risk for
a population to assist with setting goals for management. The process for exploring risk includes
the steps of:
1. Extracting data for the project from a studbook
2. Creating a Baseline scenario that describes the most likely management scenario for the
population,
3. Simulating the Baseline scenario, including deterministic simulation, stochastic
simulation, risk categorization simulation, and resilience simulations
4. Exploring model results through graphs, tables, and the risk categorization results, and
5. Creating alternate scenarios to examine the impact of management changes, data
uncertainty, and factors that may impact your population’s dynamics.
ZooRisk includes notes and clipboard functions that facilitate documentation of your modeling as
you’re developing your analysis.
ORIENTATION TO THE SINGLE-SPECIES MODULE
Starting a Single-Species Project
The first step in creating a single-species project is to double-click on the ZooRisk icon on
your desktop to start the program and, at the Project Start screen, click on the “Create a Single
Species Project” tab if you are not already there. On this start screen, you’ll be able to name your
project and provide a short description of the project. This short description is useful because in
the future it will be displayed with your project name in the Load section of the project start
screen, so it can be a good reminder about the purpose of the specific project (especially if you
create multiple projects for a single species).
ZooRisk 3.8 User’s Manual
10
Once you’ve named and described your project, click on the “Create new single-species
project” button. If you have already created a single-species project (or would like to view the
sample projects), you can load it in the “Load a Single Species Project” tab.
Studbook Data Extraction
When you first create a single-species project, you must extract your data from a
studbook in SPARKS (ISIS 2002) format. For populations with a SPARKS studbook database,
the model setup process involves selecting windows for data extraction, reviewing and verifying
extracted data, and setting up additional model parameters
ZooRisk utilizes date and geographic windows that you specify to extract data from your
SPARKS studbook. There are three separate windows for data extraction; in each window, you
have the option to limit the extracted data to specific time periods and locations. The fecundity
extraction window limits the historic data extracted for male reproduction, female probability of
breeding, annual number of offspring, birth sex ratio information, and generation time to the dates
and locations that you specify. The mortality extraction window limits the data extracted for
historic mortality rates to the dates and locations that you specify. The Living Population
Extraction and Analysis determines which individuals will be extracted into your current, living
population. This is also the date used for analyses in certain Risk Test calculations. ZooRisk will
extract age, sex, location, and pedigree information on any individuals alive on this date within
your geographic window, and use these individuals as the initial population for the model.
Essentially this means that the living population extraction and analysis date is also the starting
date for your simulation.
You can set both the fecundity and mortality extraction date windows by using the start
date and end date fields. Dates should be entered in the Month-Day-Year format. Both of these
fields should be set so that they include enough data for fecundity and mortality rates to be
calculated accurately. They should also reflect the period of modern management for the
population, when modern veterinary care and management practices are reflected in the number
ZooRisk 3.8 User’s Manual
11
of births and deaths that occurred. You have the option of setting identical date ranges for both
extraction windows, but for certain populations you may wish to set two different windows. For
instance, if a population had a breeding moratorium for the last 10 years, including those data
would severely decrease the reproductive rates included in the model and not necessarily reflect
potential growth. Or, if a population is long-lived it may require a wider date range for mortality
data extraction to accurately calculate mortality rates, but “modern” reproductive management
may not have been practiced during that wider date range. The Living Population Extraction and
Analysis window requires only a single date rather than a date range. For most analyses, the
living population extraction and analysis date will be today’s date or the currentness date for your
studbook. Note that your fecundity and mortality end dates and your living population extraction
and analysis date do not have to be identical.
Just as you select a date or date range for each window, you will select a set of
institutions to limit your extraction to a specific geographic region. You have several options for
imposing a geographic limit for each extraction window. If you select “all institutions”, data on
individuals at all institutions in your studbook (within the date window) will be extracted. Selecting
“North America” will limit your extraction to institutions with an institution code of 31xxxxxxx. You
can also limit your extraction by a FED file, which the program will prompt you to navigate and
find; you can use AZA.fed or any other regional FED file, or create your own FED file to
incorporate the specific institutions (e.g., within your SSP, or including multiple regions) you
would like to include in your extraction. You have the option of extracting fecundity, mortality, and
living population extraction and analysis data from the same institution window, but for certain
populations you may wish to set different institution windows. For instance, you may wish to
include only individuals from specific institutions in the starting population of your model by
extracting your living population and analysis data from a FED file, however, you may wish to
include a broader range of data for your historic reproductive and mortality rates by extracting
these data from “All Institutions”.
After you have set the appropriate date and geographic windows, click on the button to
extract data from your studbook. ZooRisk will prompt you to navigate to find your master.dbf and
moves.dbf files in your studbook folder and your FED file in the SPARKS folder, if appropriate.
Though you may set 3 different date and institution windows for extraction, all windows will
extract from the same studbook. The name of the studbook you use for extraction will be
displayed in the bottom right corner of the data extraction screen for your reference.
After you’ve identified the appropriate files, ZooRisk will extract your studbook data. This
may take several minutes if your studbook is large, but the program is still extracting if the
hourglass pointer is present or the progress bar at the bottom of the screen is moving.
Getting Around in your Single-Species Project
Once you’ve created or loaded your project, the program will open into the single-species
module of ZooRisk. To focus on the organization of this module, let’s first look at the toolbars at
the top of the window:
The bar at the very top of the window displays your project name and your scenario name. The
pull-down menus beneath the bar contain basic program commands, including saving/opening
projects from the File menu and access to the manual or program information in the Help menu.
The toolbar directly beneath the pull-down menus contains (from left to right), a shortcut
to save your project, and tabs for data entry, run, results, clipboard and a shortcut to the scenario
manager. ZooRisk automatically makes your starting scenario your Baseline scenario (see the
Chapter 5 for more details on working with scenarios).
ZooRisk 3.8 User’s Manual
12
All the functions in a single-species analysis can be accessed through the main menu
and sub-menu tabs in the single-species window. The main menu tabs include:
• Data Entry, where multiple sub-menus will display model parameters for your population
• Run, where you can run your analyses and observe model progress
• Results, where you can view figures and tables of model output
• Clipboard, where you can retrieve tables and graphs you’ve pasted from within your
ZooRisk project
• Scenario Manager, which allows you to create scenarios, generate scenarios for a
sensitivity analysis, and automate runs for selected tests for multiple scenarios
The rest of this chapter will focus on the Data Entry area of the Single-Species module.
DATA ENTRY AND MODEL SETUP
Living Population Data
Once data extraction is completed, ZooRisk will advance to the Living Population Data
screens. Here you can:
1. review the individuals in the starting population for your model
2. designate individuals as non-breeders, so that they will hold space in your population but
will not be allowed to breed
3. exclude any individuals that are not in your managed population from further analyses
4. make analytical assumptions about individuals with unknown age or sex
Included/Excluded Individuals Tables
The Included Individuals table will initially display all the individuals of known sex and
age that were alive on the date and within the institution window that you set in the living
population extraction and analysis window during extraction from your studbook. Individuals in
ZooRisk 3.8 User’s Manual
13
this table will be used as your starting population in the model. The table includes columns for an
individual’s Studbook ID, whether the individual is Allowed to Breed, Sex, % Known, Mean
Kinship, Age, Institution on analysis date, Sire and Dam. The columns are sortable by clicking on
the header—note that currently ZooRisk sorts numbers as text, so individual IDs or ages will be
grouped as 1, 11, 18, 110, 2, 22, etc.
Using the “Allow Breed” column in the Included Individuals table, you can designate the
breeding capability of specific individuals in your population. The initial extraction of individuals
may include the following designations:
1. Yes: most individuals in your studbook will be considered eligible for breeding now or in
the future, including individuals marked as contracepted
2. No: individuals are automatically designated as non-breeders that either are neutered or
have completely unknown pedigrees (UNK in both dam and sire fields, or individuals with
identified parents who themselves have completely unknown pedigrees)
You can change any individual’s breeding designation from Yes to No or from No to Yes. If an
individual will hold space in your population throughout its lifetime, but will not be allowed to breed
due to behavioral issues, genetic status, medical condition, or logistical issues (e.g. individuals in
educational programs), you can switch that individual from Yes to No in the Allow Breed column.
Note that entire age-classes can be designated as reproductive elsewhere in the program, so you
do not need to designate old or young individuals as non-breeders. Also, because animals are
frequently not allowed to breed due to a partially unknown pedigree, ZooRisk allows you to
incorporate that type of management in the genetic management screens (see page 31).
Note: Individuals designated as non breeders using ‘No’ in the Allow Breed column
will not display an individual mean kinship value and will not be included in the
population mean kinship calculation because they are not a part of the reproductive
population. All mean kinship values including the population mean kinship will be
recalculated to reflect the current reproductive population when you save your
project, so make sure you save your project after you make any changes to
the included individuals table.
All individuals that are older than the oldest reproductive age class for each sex will not display a
mean kinship value and will not be included in the population mean kinship calculation because
they are not a part of the reproductive population. They will not be included in the pool of
potential breeders no matter what Allow Breed option you have selected. If you wish to include
these older individuals in the reproductive population, you can adjust the oldest age class capable
of reproduction in the Male and Female data tables (see page18).
Similarly, if you choose to manage your population by prohibiting the breeding of individuals with
a partially known pedigree (see page 31 on genetic management), these individuals also will not
display an individual mean kinship value and will not be included in the population mean kinship
calculation because they are not a part of the reproductive population. They will not be included
in the pool of potential breeders no matter what Allow Breed option you have selected.
Potential founders (individuals with WILD/WILD parents and no living offspring) will display an
individual mean kinship value of 0, however, they will not be included in the population mean
kinship calculation. Founders (individuals with WILD/WILD parents and living offspring in the
Included Individuals table) will display an individual mean kinship value in the table. However,
this individual mean kinship value is not included in the calculation of the population mean kinship
per PM2000 convention. The Allow Breed designation will determine whether these individuals
are included in the reproductive pool.
The Excluded Individuals table on the right-hand side of the screen will initially display
any individuals with unknown sex and age that were alive and in your institution window on your
ZooRisk 3.8 User’s Manual
14
living population extraction and analysis date. Any individuals that remain in this table will not be
included in your starting population and will not contribute to future population growth. This table
includes an “Exclusion Reason” column where you can use a pull-down list to document the
reason behind exclusions (i.e., unknown sex, unknown age, institution, etc.). You may also want
to document reasons for exclusions in the notes box at the bottom right corner of the screen.
The arrows in the center of the screen can be used to move individuals between the
Included and Excluded tables; note that you can highlight multiple individuals using the shift or
control keys and move them between tables as a group. You should move any individuals that
are not in your managed population (e.g. individuals of a different sub-species or at institutions
that are not included in your program) from the Included Individuals table into the Excluded
Individuals table. When individuals are moved between tables, they are placed at the bottom of
the table. Note that if you move individuals from the Excluded table to the Included table, their
breeding status (in the “Allow Breed” column) will need to be reentered.
If your population initially has individuals of unknown age and sex in the Excluded
Individuals table, these individuals will also be listed in the Individuals with Unknown Ages and
Individuals with Unknown Sex tables. If you want to exclude these individuals from analyses, you
do not have to make any changes (because they are already in the Excluded Individuals table). If
you want to include these individuals in your analyses, you have to make assumptions about their
age or sex in these tables. As you move individuals from the Included Individuals table to the
Excluded Individuals table or from the Excluded Individuals table to the Included individuals table,
all individuals’ mean kinship values will be automatically recalculated to reflect the population in
the Included Individuals table. The population level genetic statistics on later screens will also be
automatically updated to represent the individuals included in the living population.
Individuals with Unknown Ages Table
The Individuals with Unknown Ages table will display individuals that have a “U” in
their birth date estimate field that are alive and in the institution window on the living population
extraction and analysis date. (For individuals with any other date estimator, ZooRisk uses the
ZooRisk 3.8 User’s Manual
15
date given and ignores the estimator). This table displays the duration of time since the
individual’s first studbook record with a known date, which you can use as a guide if you have no
information about that individual’s age. If you wish to include unknown age individuals in your
population, you can assign each individual an age separately in the “User-defined age” column. If
you have a large group of individuals and would like to make a general analytical assumption, you
can use the box at the bottom of the screen to assign all individuals in the table an age equivalent
to the known duration of time in zoos plus X years. This date assumption is only used in the data
held in ZooRisk; your studbook data are not modified in any way.
Note that if you make a user-defined age that is older than any individual has
lived in your population within the data extraction window and choose to include
this individual (by moving the individual into the Included individuals table), a
pop-up box will remind you that you will need to adjust your male or female data
table to account for this individual—further description of how to do this will be
given in the Male and Female Data Table section later in this chapter.
Individuals with Unknown Sex Table
The Individuals with Unknown Sex table will display individuals that have a “U” in their
sex field. If you want to include these individuals in your analysis, use the pull-down list to assign
them a sex individually. You can also click on the “Randomly Assign Sex” button to have
ZooRisk randomly assign sex to each individual in the table based on the assumption of an equal
(0.50) sex ratio. Because this is a stochastic process (i.e., ZooRisk essentially “flips a coin” to
decide what sex to assign), note that you might see a slight bias in the final sex ratio of these
individuals.
After you have made (and documented!) assumptions about age and sex, return to the
Included/Excluded Individuals tab and move the specimens you just made assumptions for from
the Excluded table to the Included table. You can then make any additional change necessary
ZooRisk 3.8 User’s Manual
16
(i.e. designate them as non-breeders). These individuals will still be displayed in the Unknown
tables so that you have documentation of the original and modified data for the individuals.
REMINDER: Any individuals in your Included Individuals table will be used as your
starting population; any individuals in your Excluded Individuals table will be
excluded from subsequent analyses. If you make analytical assumptions about
individuals with unknown age or sex, you still need to move them from the
Excluded to the Included table!
Once you’ve reviewed each of the Living Population tables and decided which individuals to
include in your population and which of these individuals to designate as non-breeders, you are
ready to begin reviewing your extracted demographic and genetic data. You should save your
project at this point.
ZooRisk 3.8 User’s Manual
17
DATA TABLES
In the Data Tables section of ZooRisk you’ll be able to review, edit, and enter data into
five different tables, accessed via the submenu tabs. To summarize the main functions of each
table:
TABLE NAME
MAIN ACTIVITIES FOR MODELER
Male Data Tables
Review extracted data,
edit data used in model if desired
TABLE TYPE
Required
Female Data Tables
Review extracted data,
edit data used in model if desired
Required
Annual Number of
Offspring
Review extracted data,
edit data used in model if desired
Required
Age Pyramid
Review extracted data
Birth Sex Ratio
Review extracted data,
enter Birth Sex Ratio to be used in model
Display only
Required
Male and Female Data Tables
The Male and Female Data tables contain information on the historic, age-specific vital
rates for each sex; these data were extracted from your studbook based on the fecundity and
mortality extraction windows. On both screens, the table on the left contains the Actual data
extracted from your studbook. The data in the Actual Data Tables cannot be changed.
The values in the Model Data Table on the right can be altered; these are the values that
will be used for model projections. To modify table values (columns that can be modified are
ZooRisk 3.8 User’s Manual
18
displayed in green), click on the cell you wish to edit. If you’ve made a mistake and want to reset
the values in the Model Data tables, hit the “Copy To Model Data” button and the values will be
reset to the original extracted data. Remember to use the notes tool to document changes that
you make. Be sure to save your project after editing the tables.
For each age class, the tables show:
1. The mortality rate (Qx), defined as the proportion of individuals alive at age x that are
expected to die during that age class. The range for Qx is between 0 and 1. ZooRisk
uses the age- and sex-specific Qx values to determine which individuals die in each year
of the model projections. For more information on how ZooRisk extracts and calculates
Qx from studbook data, see Appendix 1.
Note that ZooRisk requires that Qx=1 in one (and only one) age class in the
Male and Female data tables in order to run properly. If the oldest individual
was still alive at the end date of your mortality extraction window, the Qx value
for the oldest extracted age class will be <1. Review your extracted data
carefully and make sure to edit the mortality data so that the Qx in the oldest
age class you wish to model is equal to 1.
2. The number of animals at risk for mortality (@risk (Qx)) within your mortality
extraction window. The number at risk is the denominator (or sample size) used to
calculate mortality rates; low numbers of individuals at risk would indicate less certainty in
the calculated vital rates, and you may want to consider altering mortality rate values in
the model data tables if low sample size has led to biologically unrealistic values. The
number at risk is not used further in the model, but is displayed for information purposes.
For more information on how ZooRisk extracts and uses the number at risk from your
studbook data, see Appendix 1.
3. The reproductive characteristics of each age class.
a. In the Male Tables, the Reproductive? Column shows whether an age class is
reproductive or not, based on whether any individual in that age class has
produced an offspring (of either sex) within the extraction window. You may want
to check whether there are any “No”s imbedded within the males’ reproductive
age classes, and consider changing them to Yes in the Model data table if it is
likely that that age class is biologically capable of breeding.
b. In the Female Tables, the probability of breeding column displays the
probability that an individual in that age class will produce at least one offspring
(of either sex) in a year. The range for the female age classes’ probability of
breeding is between 0 and 1.
For more information on how ZooRisk extracts and calculates reproductive variables from
your studbook data, see Appendix 1.
Note that changing the ‘Reproductive?’ status in the oldest reproductive age
class of the Male Data Table or the Probability of Breeding value in the
oldest reproductive age class of the Female Data Table may alter the mean
kinship values of the individuals in your living population data table.
Individuals older than the oldest reproductive age will not display a mean
kinship value and will not be included in population mean kinship calculations
as they are not a part of the reproductive population. If you made changes to
reproductive values of the oldest reproductive age classes, individual mean kinship and
population mean kinship values may be affected. It is a good idea to go back and review the
Included Table of your Living Population so that you are aware of the effects of the changes that
you made. The Living Population Data will only be updated after you save your project, make
sure to save your project after making any changes to the Male and Female Data Tables.
ZooRisk 3.8 User’s Manual
19
4. The number of individuals at risk for reproduction within your fecundity extraction
window.
a. In the Male Tables, this is the number of males that have bred at least once in
each age class, to give you an idea of the “sample size” the “Reproductive?”
Yes/No is based on.
b. For the Female Data table, @risk (prob of breeding) column displays the
number at risk which is the denominator (or sample size) used to calculate the
probability of breeding. Again, low numbers of individuals at risk would indicate
less certainty in the calculated vital rates, and you may want to consider altering
reproductive values in the model data tables if low sample size has led to
biologically unrealistic values. The number at risk is not used further in the
model, but is displayed for information purposes. For more information on how
ZooRisk extracts and uses the number at risk from your studbook data, see
Appendix 1.
ZooRisk automatically enters notes into the notes section of the Female Data tables. These
notes contain counts of the number of offspring that were used to calculate the female probability
of breeding and the number of offspring that were excluded from this calculation along with the
reason for exclusion (e.g. offspring with unknown age dam, offspring with unknown dam, offspring
with unknown birth date). The same inclusions and exclusions are used for calculations of all
reproductive values. For populations in which a large proportion of the offspring were excluded
for various types of unknowns, reproductive values may be skewed and should be reviewed
carefully.
Adjusting the number of age classes in your Data Tables
On the left hand side of the Male and Female Data Tables screens, ZooRisk reports the
number of age classes retrieved from the studbook; this will be equivalent to the age of the oldest
animal (currently living or dead) in your extraction window. In certain cases, e.g. very young
populations that have not been held in captivity very long, you may want to add extra age classes
to your data tables; to do this, enter the total number of age classes (essentially, the lifespan of
your species) in the box on the left and press “Adjust age classes”. The additional age classes
will be added to the Model Data on the right, and you should then enter in appropriate mortality
rates and reproductive information for those age classes. ZooRisk will always make the mortality
rate in the last age class 1.0; remember that if you add age classes you must change the
mortality rate from 1.0 in whatever your previous oldest age class was (i.e. make sure you don’t
have two values of 1.0 in your mortality data).
You will need to adjust the age classes in these tables if you assigned a user-defined age
for an individual that was older than any other individual that had lived in your data extraction
window (a pop-up would have reminded you of this when you assigned such an age). For
example, if the oldest age class in your male data table is 14, but you had a male with an
unknown age that had been in zoos at least 18 years and you assigned this male an age of 18
(and moved him to your Included Individuals table), you would need to adjust your male data
table to have 18 age classes (or more, if you feel it is appropriate), change the mortality rate in
age class 14 from 1.0 to something smaller, and make any adjustments to mortality rates and
reproductive parameters for age class 15-18.
More details on how mortality rates, number at risk, and reproductive characteristics are
extracted and calculated in ZooRisk can be found in the technical documentation in Appendix 1.
For more detail on how ZooRisk uses the data in these data tables in model simulations, see
Chapter 3.
ZooRisk 3.8 User’s Manual
20
Annual Number of Offspring
The Annual Number of Offspring (ANO) screen displays the distribution of the total
number of offspring an individual female could produce in a year, based on the studbook data
within your extraction window. For annual breeders, this is analogous to a litter size distribution
(see Appendix 1 for further details). For species with the potential for multiple clutches in a year,
this value is the cumulative annual total.
The Actual ANO table contains data extracted from your studbook, and the Model ANO
table includes the data that will be used in model simulations. For each number of annual
offspring, the tables display the Frequency of occurrence within the studbook data. The Actual
ANO table also displays N, the number of occurrences within the extraction window (the sample
size).
The Actual ANO distribution is based on historic data; if there are not enough
reproductive data in your studbook, the distribution may not be a good description of what a given
female could produce in a year. If you have further information or can make an educated guess
about potential values, the distribution can be edited by altering values for the frequency of
occurrence in the Model table. You can also add additional entries to the table by inputting the
number of additional entries you’d like in the box and clicking on “Add Additional Entries”.
Additional rows with blank frequencies will be added to the model data table, and you can fill in
the frequency for the new row. Make sure that if you alter frequencies or add additional entries,
the frequencies add up to 1.0. You can also create your own Model ANO table to contain as
many or as few rows for # of offspring as you chose. All rows in your created table will have
blank frequencies and you can fill in the desired frequency. Again, make sure the frequencies in
the model table add up to 1.0.
ZooRisk uses the distribution in the Model ANO table to generate births in model
simulations, but the number of occurrences is for display purposes only. The data in either table
can be displayed in the figure on the right of the screen by clicking on one of the Graph buttons.
For further details on how the annual number of offspring distribution is used in model
simulations, see Chapter 3.
ZooRisk 3.8 User’s Manual
21
Age Pyramid
The Age Pyramid screen displays information on your population size and the total
number of males and females, a table with the number of individuals in each age class, and an
age pyramid with males displayed in blue and females in red. These data are based on the
individuals in the Included Individuals table in your Living Population data, and this is the initial
population that will be used to start your simulation. This screen is just for review; you do not
alter any data. Note that you can edit the appearance of the figure by right-clicking on the axes,
labels, or bars of the graph.
ZooRisk 3.8 User’s Manual
22
Birth Sex Ratio
The Birth Sex Ratio (BSR) screen displays information on the historic birth sex ratio
based on the on the number of male and female infants born within the limits of your fecundity
window, results of a chi-square significance test based on the historic BSR value, and a blank
box to input the model BSR that you wish to use in your simulations.
The Actual Birth Sex ratio summary information and table are based on data extracted
from your studbook within your fecundity extraction window; they are just for reference and
cannot be altered. The summary information includes the total number of male and female
infants born within the limits of your fecundity window, the date range set for fecundity extraction,
and the birth sex ratio calculated as [total male births/(total male births + total female births)]. An
unbiased BSR (equal number of males and females) would be 0.50 (50% male) whereas a BSR
value between 0.00 and 0.49 would show a female bias and a BSR value between 0.51 and 1.00
would show a male bias. The table below the summary information displays the number of infant
births (male, female, other, and total) separated by year. The last row gives the column totals.
The chi-square test evaluates whether the difference between an unbiased birth sex ratio
(BSR = 0.50) and the historic BSR is statistically significant. ZooRisk calculates the chi-square
as
χ2 =
observed male births − expected male births observed female births − expected female births
+
expected male births
expected female births
where the expected numbers are based on an unbiased BSR (0.5) (Hardy 2002).
ZooRisk will display whether or not the historic BSR for your population is significantly
different from an unbiased BSR based on the calculated chi-square value, one degree of
freedom, and an alpha level of 0.05.
Using the information from the historic BSR and the Chi-Square Test, you can decide on
the Birth Sex Ratio that you would like to use for your simulations. Using the box on the right
ZooRisk 3.8 User’s Manual
23
labeled ‘Fill in the Model Birth Sex Ratio’, enter a value between 0 and 1. Remember that a BSR
value of 0.50 represents an unbiased BSR, but you may also wish to simulate more female
biased (0.00 and 0.49) or male-biased (0.51 and 1.00) BSR values to compare the impact such
biases may have on your population’s growth rate. ZooRisk does not provide a default BSR
value, so you must enter a value for BSR on this screen.
If your chi-square value indicates that there is no significant bias in birth sex ratio, we
recommend that you use a model BSR of 0.50 even if your historic BSR value differs slightly from
an equal sex ratio.
If your chi-square value indicates that there is a significant bias in birth sex ratio, you may
want to consider modeling an alternate scenario using the biased value of your historic BSR (or
several values in the direction of the bias). Although there may be a significant difference in the
observed value and the expected value, historic birth sex ratio data can be complex to interpret
because they are dependent on biological factors, management practices, and data recording
practices, so be careful when choosing your model BSR.
TECHNICAL NOTE— Birth Sex Ratio
There are many hypotheses for why mothers might potentially bias offspring sex, how
these patterns may change over time, and how to test for differences (Hardy 2002). The chisquare test is a simple means for testing for bias, but if significant bias is detected, further
research into the patterns is important--do they vary over time or are they consistently in one
direction? Are there management explanations? Data explanations? Remember that the Actual
BSR is based on historic data that may be incomplete or have their own biases. For example, it
is possible that historically some studbooks may not have recorded all births that occurred, but
only those that survived a certain period; this may bias results if males and females have different
early mortality rates. Some of this may be explored by extracting different fecundity windows
(historic, modern) and looking at the impact on BSR biases. In addition, unknown sex births are
not included in the chi-square test, but if they make up a large portion of the births and there is
some underlying bias in the true sexes of the unknown individuals it can be difficult to determine
whether BSR is biased. In many studbooks unknown sex individuals (especially historic ones)
were stillbirths or individuals that died shortly after birth; if more of these individuals were male
than female (or vice versa), the true BSR may not be determined.
CLIPBOARD
Every table, graph, and figure displayed on the screens within all tabs and sub-tabs for
both data entry and results can be exported to the clipboard. You may use the clipboard feature
to keep a record of decisions you made or to generate a specialized report. In order to move a
table, graph, or screen to the clipboard click on the clipboard icon adjacent to the information you
wish to send to the clipboard. If you have entered and saved notes on this screen, the notes will
be sent to the clipboard along with the table, screen, or graph. Navigate to the Clipboard tab on
your menu bar to view the items you have sent to the clipboard; you can copy and paste these
items into word processing programs to document your model setup, decisions, and the results
from the model run. Be careful when you clipboard tables, graphs, and screens from multiple
scenarios as these figures will not be labeled with the scenario they came from.
Note that information sent to the clipboard IS NOT SAVED when you save your
project and exit ZooRisk. This clipboard function is designed to be generated while
you are working within your project, and then copied and pasted into a word
processing application for editing and formatting, printing, etc.
ZooRisk 3.8 User’s Manual
24
MODEL PARAMETERS
In the Model Parameters section of ZooRisk you’ll be able to set up your model
simulations and make decisions on which additional options you want to include. The Model
Parameters are separated into six different screens, accessed via the submenu tabs. To
summarize the main functions of each screen:
TAB NAME
Main Parameters
Target Population Size
(TPS)
Genetic Management
Imports and Exports
MAIN ACTIVITIES FOR MODELER
Select sex ratio for breeding pairs
Select number of years between pairing
Input model settings
Review and select model options
Decide whether to impose a Target Population Size
Select TPS and method to approach the TPS
Review population parameters,
Decide whether to simulate genetic management
Select type of genetic management
Decide whether to simulate imports and exports
Input data on frequency/type of imports/exports
ACTION TYPE
Required
Optional
Optional
Optional
Catastrophes
Decide whether to simulate catastrophes
Input data on frequency/type of catastrophes
Optional
Inbreeding Depression
Decide whether to simulate inbreeding depression
Input data on impact of inbreeding depression
Optional
Main Parameters
ZooRisk 3.8 User’s Manual
25
In this screen, you must select a breeding system for your population. ZooRisk
automatically fills in the number of males per breeding group as 1, this cannot be altered. For
monogamous species, or species that are managed monogamously in captivity, you should enter
a 1 for the number of females in a breeding group. For polygynous species, ZooRisk can model
breeding groups that allow one male the opportunity to breed with multiple females. Enter the
number of breeding-aged females you wish to incorporate in each breeding group. Note that in
stochastic simulations, selecting a polygynous breeding system does not guarantee that each
male will breed with multiple females, but rather a polygynous mating system gives males the
opportunity to breed with the number of females that you have selected. The number of females
that each male actually breeds with will be determined stochastically (see page 47).
After choosing to model a monogamous mating system or a polygynous mating system,
you will need to determine how long the pair will be kept together. If you enter a 1 in the Number
of Years Between Pairing box, ZooRisk will reshuffle all pairs each year in accordance with
whether and how you have chosen to model genetic management (random or using mean kinship
and other genetic criteria). However, many species are managed as longer-term (2 or more
years) pairs because of social/behavioral considerations or logistical challenges (e.g. to minimize
costly transfers between institutions, to allow time for different management techniques for
challenging breeding pairs, etc.). If you wish to model this type of management, enter the
number of years you would expect an “average” pair in your population to stay together. In this
case, ZooRisk will not reshuffle most pairs for that duration of time. See manual page 49 for
more in-depth description on how this long-term pairing option functions. Note that the Number
of Years Between Pairing must be an integer.
Long-term pairing may have both demographic and genetic consequences. For example,
long term pairing could be genetically detrimental to your population if you are managing your
population by ranked mean kinship or avoidance of genetically detrimental pairs (see page 31).
Because pairs will not be reevaluated every year, pairs that are no longer genetically ideal may
still have the opportunity to reproduce and may even reproduce preferentially over more ideal
pairs. However, if long-term pairing more realistically represents the way you manage your
population, that management will affect retention of mean kinship, and this ZooRisk option
enables you to test its effects. We recommend that you compare long-term pairing to repairing
every year to help understand the potential effects of this model option.
In the Model Settings table, you should enter the Number of Years you would like to
project forward. To fully evaluate risk, it is a good idea to look at long-term dynamics of your
population (i.e. 100-200 years, or many generations). For management purposes and evaluation
of more immediate risk, you should look at a shorter time frame, perhaps 20-40 years. The
Number of Iterations is the number of times you would like ZooRisk to repeat the simulation.
Large populations or complicated setups take longer to run, and so during your initial runs where
you’re doing preliminary analysis and making sure you’ve set up the model correctly, you might
run your model 10-20 iterations. For analyses used in decision making and final reports, you
should run your model 200-1000 iterations.
ZooRisk also requires that you make decisions about demographic and genetic
thresholds. The Extinction Threshold for your population is the population size ZooRisk will use
in stochastic simulations to determine when your population is considered extinct. You can enter
0 or some small population size (i.e., a quasi-extinction threshold, or some population size it is
unacceptable to fall below) that you will consider “extinct”. You must enter an extinction threshold
that is less than or equal to your initial population size. ZooRisk uses the extinction threshold to
calculate various model results related to when and in what proportion of iterations the population
drops below the threshold; see page 56 for further details.
The Gene Diversity (GD) Threshold for your population is the number ZooRisk will use in
stochastic simulations to determine when your population will reach a benchmark level of gene
diversity. Conventional GD thresholds could be 0.9 (90% of the founding population’s GD
retained) or losing no more than 10% of the current GD (viewable on the Genetic Management
ZooRisk 3.8 User’s Manual
26
tab). ZooRisk uses the GD threshold to calculate various model results related to when and in
what proportion of iterations the population crosses the threshold; unlike the Extinction threshold,
these metrics are based on when a population crosses the threshold either from above (i.e. initial
GD is greater than the GD threshold) or below (i.e. initial GD is less than the GD threshold). See
page 57 for further details. Risk Simulations do not use the GD Threshold that you set in your
main parameters. Risk simulations only consider your populations initial and mean final GD and
use standardized cutoffs to determine the level of risk (see page 57 on risk results).
Also in the Main Parameters tab, ZooRisk gives you the option to decide what calculations
you wish ZooRisk to perform during the simulation, what management strategies you wish to
incorporate in the model, and what factors you wish to affect your population. In the Model
Options section on the right, you can turn various model options on or off by toggling the button
to the right of each option:
Calculations
ZooRisk automatically calculates and saves most of the results from the model simulations,
however, data tracking and calculations for some results are optional. Running ZooRisk without
these extra calculations may slightly decrease the run time of the model, however, if you run the
model without selecting these calculations, you will not be able to recover and view the results for
these calculations.
1. Select Calculate Genetics for ZooRisk to track the pedigree of each individual through
each year of the simulation. With Calculate Genetics selected, ZooRisk will calculate the
% known, inbreeding coefficient (F), and mean kinship value for all individuals and the
population each year of the simulation.
2. Select Calculate Age Pyramids for ZooRisk to track the age structure of the population
for each year of the simulation. With this option selected, ZooRisk will be able to display
the mean number of males and females in each age class in both table and graph (age
pyramid) form for each year of the simulation.
3. Select Calculate standard deviations for ZooRisk to calculate and be able to display
the standard deviations around the means for population sizes, gene diversity, and other
parameters. If this option is not selected, ZooRisk will only store and display the mean
results across all iterations for model parameters.
Management and Other Factors
ZooRisk allows you to make decisions on how you wish to manage your population (i.e.
incorporate importations/exportations, impose a target population size, etc.) or on what factors
may affect your population (e.g. catastrophes or inbreeding depression). You will set up the
specifics of these factors or management decisions on subsequent tabs, which will toggle these
buttons ON on the Main Parameters tab. Once toggled, ON, you can subsequently decide to turn
the options OFF on this Main Parameter screen. It is a good idea to review this screen after you
make changes to the other model option tabs to be sure you are including all the options you wish
to incorporate.
ZooRisk includes several model options that can help you more realistically simulate the
management of your captive populations. You can select any combination of Target Population
Size, Genetic Management, Imports/Exports, Catastrophes, and Inbreeding Depression (or none
of them) for your simulations.
ZooRisk 3.8 User’s Manual
27
Target Population Size
ZooRisk was designed to answer the question “Will there be a reliable source of healthy
animals when needed in the future?” The answer to that question depends on whether a
population can grow to and maintain itself at a sustainable population size. Zoo and aquarium
populations can be limited in their growth by different factors. Population biology factors (e.g.,
more deaths than births cause the population to decline) or management actions (e.g., limiting
the number of recommendations for births) can limit population growth. ZooRisk models each of
these limitations. Population biology factors are automatically included in the model (based on a
population’s mortality and reproductive rates, breeding system, and stochasticity).
ZooRisk can also model the management actions that limit growth, such as the way
managers limit the number of births per year if there are space constraints on the population.
This can be modeled by setting a Target Population Size (TPS) for the model. The TPS will be
set by managers based on the goals for their population, and the basis for setting these goals can
vary from population to population. A TPS may be based on population biology factors (e.g., the
size that allows the population to maintain 90% GD for 25 years or the size that allows for an
acceptable level of extinction risk), on space constraints (e.g., a space survey reveals what
current and future space availability may be), or on institutional demand for a species (e.g.,
institutions have designed spaces for a specific species). The TPS may be greater, equal to, or
less than the current population size. In evaluating the impact of TPS on a population’s
dynamics, the Baseline Scenario should reflect the established management goal for the
population. Alternate TPS can be evaluated by producing alternate scenarios and comparing
with the Baseline results. You can also use the Space and Risk Analysis module in ZooRisk to
do a more in-depth testing of risk levels at different TPS for your Baseline scenario.
If you wish to use a TPS in your simulations, click on “Yes” at the top of this screen and
enter your population’s TPS and then document the rationale behind that TPS in the Basis for the
TPS box. The Main Parameters screen will automatically be updated and the Impose Target
Population Size option will be toggled on. The TPS will only be used in your simulations if you
keep the “Impose Target Population Size” option toggled on in the Model Options menu.
ZooRisk 3.8 User’s Manual
28
Once you have selected a TPS (and documented the rationale behind your decision), select a
strategy for reaching the TPS. There are three strategies to approach the Target Population
Size:
1. Try to reach TPS as soon as possible
2. Approach TPS gradually over a number of X years
3. Approach TPS gradually with a max of X births per year
Try to reach TPS as soon as possible
If you select this strategy, the target population size that you set is treated as a
conventional carrying capacity. Your population will either grow or decline, within the biological
constraints of the species, to this TPS. If you set a TPS that is greater than the initial population,
the population will be allowed to grow at its maximum biological potential until limited space, as
determined by the TPS, restricts the number of births allowed. If you set a target population size
that is less than your initial population, the model will not generate any births until your population
size minus expected deaths is less than the TPS. Note that a long period without births may
destabilize your age structure, as many empty age classes may result in later problems with
having enough individuals to pair or reproduce.
It may be important to model the fastest biologically possible approach to TPS as rapid
growth to reach the TPS is often one of the primary goals of genetic management.
Approach TPS gradually over a number of X years
In this method of approaching the TPS from the initial population, the model uses a linear
approach over your specified number of years until TPS is reached. The model calculates a TPS
for each year between year 0 and year X (where X is the number of years to approach TPS you
entered on the TPS screen) as TPSModel year = Ninitial+ {Model Year x [(TPS – Ninitial) / # of years to
approach TPS)]}; after year X, ZooRisk uses the TPS entered. ZooRisk uses each year’s TPS to
limit the births for each model year. With this strategy, your population will be less likely to both
grow at its maximum biological potential or have years of no births. The longer the time period
that you enter, the more gradual the change in TPS will be.
Just as populations are dynamic, the institutional space constraints or exhibit goals for a
species may change over time. Your current space constraints may change if institutions add
exhibit space in the future or eliminate species from their collection. ZooRisk allows you to model
this gradual change in the TPS over a number of years. This strategy is also useful if you wish to
grow or decline your population to a specified target, but it is important to the stability of your
population to avoid drastic alterations to the age pyramid (i.e., a period of no births or a period
with an abundance of births).
Approach TPS gradually with a max of X births per year
Approach TPS gradually with a max of X births per year imposes an extra limitation on
population growth along with biological capability and space available. This approach may force
the population to grow at a more gradual rate and will be used throughout the entire model run.
In this strategy, ZooRisk allows you to choose a maximum number of births that the model can
generate each year. Your population will be restricted by this maximum number of births, the
biological potential (if it is below the maximum) and space constraints for every year of the model.
Even if you wish to grow your population to a specified TPS, for populations with the
biological potential for rapid growth, you may wish to restrict the number of births that occur each
year (e.g., you may only be able to place a certain number of infants each year).
Note that in all three approaches to the TPS, if your current population size
minus the number of expected deaths is still above the TPS for that year, no
births will be generated for that year. Multiple years of no births could have
severe effects on your population’s stability. The method of approaching TPS
over X number of years is best equipped to handle populations with an initial
ZooRisk 3.8 User’s Manual
29
population size that is greater than the specified TPS. We recommend that you
use this strategy in these situations
These three different strategies are designed to incorporate some of the varied ways in which
TPS can be used to manage populations. You may choose to model alternate scenarios with
different approaches to your Target Population Size in order to compare the effects of different
strategies.
ZooRisk 3.8 User’s Manual
30
Genetic Management
The genetic management screen displays basic information on your starting population’s
genetic status at the top right of the screen. The population mean kinship (MK) is the average,
weighted by % known, of all the “mks” of the reproductive individuals in the living population,
excluding founders and potential founders; each individual’s mean kinship (mk) is the
coefficient of kinship or relatedness between the individual to every other living, reproductive,
non-founder individual in the population (Lacy 1995). The population gene diversity is a
measure of the genetic variation retained in your population relative to the founding population
that started your studbook, and population gene diversity = 1 - MK. The population % known is
the mean % known of all individuals in your starting population in the Included Individuals table.
The Population Inbreeding Coefficient (F) is the average of all the reproductive individuals’
inbreeding coefficients in the Included Individuals table, excluding founders and potential
founders. See Lacy (1995) for a more in-depth discussion of genetic terms.
Note: These genetic population statistics may change as changes are made
to the reproductive population (i.e., changing the Allow Breed column of
individuals in the Included Individuals table, altering the oldest reproductive
age class in the Male or Female data tables, or Excluding/Including
individuals from your starting population). Updates to the population
parameters often do not take effect until you save your project. Be sure to
save your project after making any changes to the reproductive
population!
ZooRisk has an optional function for simulating genetic management of your population
using techniques similar to those that captive population managers use in their year-to-year
management of captive populations. If you leave the genetic management option off, ZooRisk
will select breeding pairs randomly (based only on reproductive constraints). If you turn on the
genetic management option on this screen, you will need to decide which criteria you want
ZooRisk to base its management on:
ZooRisk 3.8 User’s Manual
31
1. Rank by Mean Kinship: if this option is selected, all males and females in the breeding
pool will be ranked by mk, and individuals will be paired starting with the two individuals
with the lowest mk, the second lowest, etc.
2. Percent Known: if this option is selected, you need to enter in a threshold level for %
Known (ranging between 0 and 100). Individuals whose % Known value is below your
threshold will not be paired for breeding or be allowed to produce any offspring in the
simulation. These individuals will no longer have an individual mk value in the included
individuals table and will not be used to calculate the population mean kinship. Changes
to mean kinship values will only take effect after your project is saved. Be sure to save
your project after setting a cutoff for percent known.
3. Inbreeding Level: if this option is selected, you need to enter in a threshold level (ranging
between 0.0 and 1.0). Potential pairs which would produce an offspring with an
inbreeding coefficient (F) greater than or equal to this threshold level will not be paired for
reproduction.
4. Genetically Detrimental pairs: if this option is selected, potential pairs which would
produce an offspring that has an individual mean kinship value (mk) below the population
mean kinship (e.g. worse than the population MK) for that model year will not be paired
for reproduction.
Note that, with the threshold levels set, reproduction of certain individuals in the population will
not be allowed in the model even if the population cannot meet its space goals as defined by its
TPS.
You use the toggle buttons to the left of each management strategy to turn that strategy
“on” for a simulation. You can simulate the effects of each genetic management strategy
separately by only turning on one of the options. You can also simulate any combination of
genetic management strategies together. Chapter 3 goes into greater detail about how these
combinations are made and the genetic management algorithms ZooRisk utilizes.
Imports and Exports
One optional function of ZooRisk is simulating importation/exportation events for your
population. Captive managers utilize importation for genetic and demographic management
ZooRisk 3.8 User’s Manual
32
purposes. Exportation is frequently used to transfer individuals between regions or to reintroduce
individuals into the wild. If you want to simulate such events, you need to turn on the simulate
import/export events option on this screen, and click the “Add New Entry” button. To add multiple
entries, click the “Add New Entry” button multiple times.
Once the Import/Export table has been created, you can describe the specifics of the
events you’d like to simulate. You can use the pulldown menu in the “Type” column to designate
which type of event you’d like to simulate. An Importation event will bring a specific number of
unrelated individuals of the designated sex and age into the population in the year you’ve
designated. ZooRisk does not allow you to select a Genetic Strategy for Importation events. All
imported individuals will be potential founders of unrelated lineages (WILD/WILD parents). An
Export simple event will select the number of individuals of the specific sex and age classes to
export in the year you designate. An Export threshold event will use the total population size of
the designated sex and the designated threshold (the number input in the “# number of
individuals/ threshold” column) to determine the number of animals to be exported. If your male
or female population exceeds the population size that is designated as the threshold in the
specific year, ZooRisk will calculate how many “extra” males or females are in the population and
select that number of males or females from the age classes you’ve designated to export. This
option is useful for populations that are reintroduction sources that breed as many individuals as
possible and release any individuals above a certain population size.
If you would like to model importing/exporting individuals of a single age class, put the
same age in the Min and Max Age fields. If you would like to model a general range (e.g., you
don’t know what specific age individual you’ll be bringing in, but you know it will be prereproductive), you can input that range using the Min and Max Age fields. ZooRisk will randomly
assign an age for imported individuals based on the age range. Due to the order of events in the
model run (exports occur before births), ZooRisk cannot export individuals of age class 0 that
were born during a model year. Any individuals age 1 or older can be exported. For an Export
event, you must also select a Genetic Strategy. Select Least Valuable or Most Valuable to
prioritize certain individuals of the specified age range and sex for export based on their potential
genetic “value” to the reproductive population. Select Random to ignore genetic criteria in
exportation decisions. See chapter 3 for more details.
Note that if you have a recurring importation or exportation (e.g. 5 individuals are brought
in every year), you need to add each year’s event as an individual table entry; thus for a 30 year
simulation, you would need to add 30 events to your table. You can use the Add Entries by
Copying Highlighted Entries button to make this data entry easier; just fill in your initial event in
the table, highlight the event, and click the Add Entries by Copying Highlighted Entries button.
Each time you click this button an identical row will be added to the table. If you use this feature,
make sure that you change the year of the copied events so that not all the
importations/exportations occur in the same year.
For more details on how importation/exportation events are simulated, see Chapter 3.
ZooRisk 3.8 User’s Manual
33
Catastrophes
ZooRisk also allows you the optional function of simulating catastrophes, which are
important to consider in risk assessments. While we would not expect captive populations to
experience the same frequency of catastrophes as wild populations, as they are buffered from
habitat destruction and resource shortages, captive populations are still at risk of decline due to
catastrophes. For example, a disease epidemic might cause increased mortality and decreased
fecundity in individual animals and/or limit the ability to transfer individuals between institutions for
breeding purposes because of quarantine requirements.
To simulate catastrophes in your model, turn on the option on the catastrophes screen
and add a new entry by clicking the “Add New Entry” button. To simulate the opportunity for
multiple catastrophes, click the “Add New Entry” button multiple times. Note that each
catastrophe is an isolated event with a one year duration; the catastrophe has the same
probability of occurring each year of the model simulation, regardless of an occurrence in
previous years.
Once you have added catastrophe entries to your table, select which sex is affected
(male, female, or both sexes) and enter the probability that the catastrophe will occur as a
decimal number between 0.0 and 1.0. Note that a probability of occurrence of 0.25 means that
the catastrophe will likely occur 25 times in 100 years, between 7 and 8 times in 30 years, and
between 2 and 3 times in 10 years. ZooRisk will randomly decide whether catastrophes occur in
a given year based on this probability. In the table you should also enter the single age class or
range of ages (e.g. 3-7) that will be affected by the catastrophe, and then click on the button
directly below the table. This will fill in the “initial” vital rates in the table, which display what the
normal current model values are for mortality and probability of breeding for the age and sex
class you’ve entered. If you have entered a range of age classes, ZooRisk will display the lowest
and highest rates within those age classes. Select the type of Impact (mortality or probability of
breeding), look at the baseline vital rate for your specified impact type, and input the New Vital
Rate (ranging between 0 and 1), which is the rate that will be applied to individuals of the
specified age/sex in catastrophe years. If a range of values is displayed in the baseline rate (i.e.
if you selected a range of age classes), you still need to select a single catastrophe rate. If you
ZooRisk 3.8 User’s Manual
34
are simulating multiple catastrophe types, you can use the Add Entries by Copying Highlighted
Entries button to make this data entry easier; just fill in your initial event in the table, highlight the
event, and click the Add Entries by Copying Highlighted Entries button. Each time you click this
button an identical row will be added to the table.
INBREEDING DEPRESSION
Inbreeding occurs when two related individuals mate; the offspring resulting from such a
mating are inbred. The level of inbreeding in an individual is measured by the inbreeding
coefficient (F), which can range from 0.0 (no inbreeding) to 1.0 (complete inbreeding).
In some animal populations, inbreeding has been found to have negative effects. This
decrease in fitness is known as inbreeding depression. The genetic cause of inbreeding lies in
the fact that inbreeding reduces heterozygosity in a population and increases homozygosity, and
therefore also increases the likelihood of expression of recessive deleterious alleles.
The severity of inbreeding depression, or whether it occurs at all in a population, depends
upon the genetic load (i.e. the amount of deleterious genetic conditions) of that population. In
order for inbreeding depression to occur, recessive deleterious alleles must exist within the
population; if the genetic load of a population is low and there are no recessive deleterious alleles
to be exposed by inbreeding, inbreeding depression will not occur. Due to the differences in
genetic load that can exist between populations, different populations of the same species can
have different responses to inbreeding.
As previously stated, inbreeding changes the frequency of genotypes within a population
by decreasing heterozygosity and increasing homozygosity. Genetic diversity is thus lost more
rapidly in inbred populations than in non-inbred populations. The loss in heterozygosity can leave
a population with a lowered capacity for immediate adaptation to changing environmental
conditions.
In addition to genetic effects, inbreeding depression is also exhibited in demographic
characteristics. Inbreeding depression has been found to increase the mortality rate within a
population – including infant, juvenile, and adult mortality. These factors can dramatically alter
the population size in future generations. Additionally, inbreeding can have several non-lethal
effects. Inbreeding can affect reproductive characteristics such as fertility and fecundity and
result in lower clutch or litter sizes. Such negative reproductive effects can lead to decreased
population growth rates and decreased population size. Thus, even though inbreeding may not
exhibit lethal effects in a population, it can still have considerable effects on the population’s
demography. For more details on inbreeding depression, see Cronokrak and Roff (1999),
Hedrick and Kalinowski (2000), Keller (1998), and Ralls et al. (1998).
ZooRisk includes an optional function that allows you to model the impact of increased
inbreeding on the demographic processes of your population using the Inbreeding Depression
screens. Few data exist on how (or whether) specific populations will be impacted by inbreeding
depression, so this section of the model has a few caveats:
1. you should simulate your population with and without inbreeding depression, and use
the results for comparative purposes
2. if you have specific data on the impact of inbreeding in your species, you can use that
information in the model; if you use more general values, recognize that there is no
good way to determine whether that impact is realistic or not
As part of the development of ZooRisk, researchers at Lincoln Park Zoo have conducted an
extensive literature review on the impacts of inbreeding on birds and mammals; these analyses
are based on laboratory studies, livestock studies, and captive zoo studies. We have
summarized these data to provide guidance on potential values, and complete results will be
published (see Technical Note—Modeling Inbreeding Depression).
ZooRisk 3.8 User’s Manual
35
TECHNICAL NOTE— Modeling Inbreeding Depression
Number of results
For populations with little or no available information on inbreeding, consider the following
suggestions for modeling the effects of inbreeding. The data used in these suggestions and the
accompanying figures were collected from studies reporting quantitative measures of the effects
of inbreeding in mammals and birds. Studies were collected through a comprehensive literature
search of articles published in or after 1980. The figures are summary graphs of the results from
the collected studies (Joanne Earnhardt, Louise Bier and Steve Thompson, in prep).
Inbreeding in a population does not necessarily result in negative effects, such as
increased mortality or decreased birth rate (Fig. 1). Many effects are statistically “neutral”, neither
significant for negative nor positive effects. Therefore, we recommend developing both a baseline
population model without imposing inbreeding depression and an additional model to assess the
possible negative effects of inbreeding.
500
400
300
200
100
0
Negative
Neutral
Positive
Effect
Figure 1. The number of negative, neutral and positive effects of inbreeding on all characteristics. (N=656).
Percentage of results
Inbreeding can affect various traits in different ways (Fig. 2). ZooRisk provides the option
of imposing inbreeding depression on mortality and reproduction. While negative effects on
reproduction due to inbreeding depression can be somewhat adjusted through population
management, negative effects in mortality rates are more difficult to remedy. Therefore, we
suggest first assessing the possible impact of inbreeding on mortality, and then, if desired,
assessing the possible impact on reproductive traits.
70
60
50
40
30
20
10
0
Negative
Neutral
Positive
Effect
Mortality (N=193)
Reproduction (N=303)
Figure 2. Percentage of negative, neutral and positive effects of inbreeding on reproduction and mortality.
Inbreeding can affect mortality at different life stages, such as the infant, juvenile or adult
stage (Fig. 3). Inbreeding depression exhibited through increased infant mortality will have a
different effect on the population than through increased adult mortality. Previous studies have
indicated that populations of long-lived, slowly reproducing species are most sensitive to changes
in adult female mortality (Saether and Bakke, 2004). If your population is characterized as this
type of species, we recommend that you first consider the effect of inbreeding depression on
ZooRisk 3.8 User’s Manual
36
female adult mortality. Conversely, it is thought that populations of short-lived, quickly
reproducing species are most sensitive to changes in fecundity. If your population is
characterized in this way, we recommend that you first consider the effect of inbreeding
depression on reproduction or infant mortality.
Percentage of results
80
70
60
50
40
30
20
10
0
Negative
Neutral
Positive
Effect
Infant (N=49)
Juvenile (N=91)
Adult (N=10)
Unspecified (N=41)
Figure 3. Percentage of negative, neutral and positive effects of inbreeding on infant, juvenile and adult
mortality.
When imposing inbreeding depression on either mortality or reproduction, we
recommend first using a negative 50% change in the trait to compare alternate scenarios. This
comparison will help to determine the sensitivity of long-term population dynamics to that trait.
You can include inbreeding depression in your ZooRisk simulation by using the
Inbreeding Depression Data Table.
ZooRisk 3.8 User’s Manual
37
To include inbreeding depression in your model, turn the option on at the top of the screen and
click “Add New Entry”. Click the “Add New Entry” button multiple times if you wish to model
multiple effects (each effect could have a different level of inbreeding, affect different age classes,
or different vital rates). In the Inbreeding Depression table, input the sex affected and the age(s)
affected (as a single value or a range, like in the Catastrophes table). Select the threshold level
of inbreeding; individuals with an inbreeding coefficient (F) at or above this level will be impacted
by the specified effect. Click on the button below the table to fill-in ‘‘initial’ vital rates based on the
age and sex criteria you’ve set up. Like in the Catastrophes table, if you have entered a range of
age classes, ZooRisk will display the lowest and highest rates within those age classes. Select
the vital rate you want to impact (mortality or probability of breeding) and the New Vital Rate you
would like applied when F is greater than or equal to the threshold level in the ‘inbreeding’
columns. If a range of values is displayed in the baseline rates (i.e. if you selected a range of age
classes), select a single inbred rate. The New Vital Rate will be applied to any individual in the
appropriate age/sex classes with an F greater than or equal to the specified threshold level. If
you are simulating multiple effects of Inbreeding Depression, you can use the Add Entries by
Copying Highlighted Entries button to make this data entry easier; just fill in your initial event in
the table, highlight the event, and click the Add Entries by Copying Highlighted Entries button.
Each time you click this button an identical row will be added to the table.
If you’ve made it this far, you have completed data entry for your single species project—
you can now save what you’ve done and prepare to run your model!
Reminder: To properly run your model, you need to have at least:
1. extracted data from a studbook into the appropriate data tables
2. reviewed the tables to make sure each table has one age class with Qx=1
3. filled in the birth sex ratio
4. filled in the species biology and model settings sections
ZooRisk 3.8 User’s Manual
38
Chapter 3: RUNNING a SINGLE-SPECIES ANALYSIS
Once you have set up your model and saved your data entry, there are four types
of simulations you can run in ZooRisk on the model’s Run screen.
Each type of simulation has a slightly different purpose, and will produce different results. On the
Run screen, you can select to:
1. Run Deterministic Simulations—this is the quickest and simplest model run, and will
simulate the demography of your population deterministically, without any demographic
stochasticity. The deterministic simulation is a good check to make sure your model is
correctly parameterized. The deterministic run will incorporate your target population size
and TPS strategy if you chose to impose a TPS. No other model options will be included
in this run (see page 40 on the deterministic run). The deterministic simulation is only run
once since there will not be any variation between iterations.
2. Run Stochastic Simulations—this is your comprehensive model run, where ZooRisk
will stochastically simulate your model for the specified number of years and iterations.
This type of run uses the data in all of your data tables and includes any of the model
options you have turned on for your scenario. This option may take a few minutes
depending on the size of your population and complexity of your model.
3. Run Risk Simulations—this model run will utilize data from your data tables and model
parameters to run through a standardized risk test (100 years) in order to evaluate the
risk level, separated into five categories, of your population. Risk simulations incorporate
the model options that you have selected.
4. Run Resilience Simulations—this model run will compare the demography of two
different 10 year runs: one with a starting population composed of the living population of
Included Individuals and one with a starting population composed of the living population
of Included Individuals excluding individuals housed at the two largest institutions.
ZooRisk 3.8 User’s Manual
39
Be patient—a popup box will inform you when a simulation is complete.
Note: Each of these simulations will be run using the data in your current scenario
(which is always displayed as Project Name + Scenario Name on the top of your
screen).
On the run screen, you may choose to run each simulation separately or to “Run All
Simulations”. If you choose to Run All Simulations, ZooRisk will cycle through each of the four
types of simulations until all of the simulations have been completed.
IN DEPTH DESCRIPTION—DETERMINISTIC SIMULATIONS IN ZOORISK
In a deterministic simulation, ZooRisk uses the model data from the Male, Female, and
Annual Number of Offspring (ANO) data tables as well as the model Birth Sex Ratio and settings
in the Model Options (TPS only) and Species Biology Table (i.e., breeding system). It applies
these rates and parameters to the initial population structure of the Included Individuals table.
Deterministic simulations use the breeding status indicated in the Allow Breed column of
the Included Individuals table. Individuals with “No” in this column hold space until their death,
but are not allowed to breed. Individuals with “Yes” are used in the breeding algorithms
described below. A deterministic simulation does not calculate genetics or project age pyramids
or simulate any genetic management, imports/exports, catastrophes, or inbreeding depression
even if those model options are toggled on in your Model Options table. However, this simulation
will incorporate your target population size (TPS) and TPS strategy if you chose to impose a TPS.
Because there is no variation, the deterministic model is only run once.
The general sequence of events in deterministic simulations is diagrammed in Figure 3.1.
Initialization
&
Year 0
Year
<= #
Model
No
End
Deterministic
Yes
Births
TPS
Info
Deaths
Current
Year
Tallies
Increment
by a Year
Figure 3.1. Sequence of model events for deterministic simulations.
ZooRisk 3.8 User’s Manual
40
Deterministic simulations
If the Impose Target Population Size option is turned off, ZooRisk does not limit
reproduction for space reasons. If you choose to impose a TPS, ZooRisk will limit reproduction
as specified by the TPS and TPS strategy (these optional model steps for TPS calculations are
below in red). The three strategies to approach the Target Population Size are discussed in
detail in Chapter 2.
As presented in figure 3.2, for each year of the simulation, the model
1. Determines the number of possible birth events by
a. Taking the number of Males with a Yes in the Allow Breed column of the Included
Individuals table and within the reproductive age span (based on minimum and
maximum ages with a “Yes” the Reproductive? column in the Model Male Data
table) as the number of Potential Male Breeders
b. Taking the number of Females with a Yes in the Allow Breed column of the
Included Individuals table and within the reproductive age span (based on
minimum and maximum ages with a Probability of Breeding (P(b)) value greater
than 0 in the Model Female Data table) as the number of Potential Female
Breeders
c. Multiplying the Number of Potential Female Breeders in each age class by the
P(b) value for each age class to determine the Female Breeding Potential
d. Adjusting the Female Breeding Potential by
i. Multiplying the number of Potential Male Breeders (1a) by the Number of
Females per Breeding Group (from the Main Parameters tab) to
determine the number of breeding group Spaces for Breeding Females
ii. Comparing the number of Spaces for Breeding Females with the Number
of Potential Female Breeders; if the number of Spaces for Breeding
Females is greater than or equal to the Number of Potential Female
Breeders, the Female Breeding Potential is not adjusted, and is used as
the Total Number of Possible Birth Events. If the number of Spaces for
Breeding Females is less than the Number of Potential Female
Breeders, the Female Breeding Potential is adjusted by
1. Dividing the Number of Potential Male Breeders by the Number
of Potential Female Breeders to determine the sex ratio of the
population of potential breeders
2. Dividing the Number of Males per Breeding Group by the
Number of Females per Breeding Group to determine the sex
ratio of breeding pairs
3. Dividing the sex ratio of the population of potential breeders by
the sex ratio of breeding pairs and multiplying this ratio by the
Female Breeding Potential to determine the Total Number of
Possible Birth Events
2.
Generates number of biologically possible offspring by
a. Calculating the mean ANO from the distribution in the Model ANO table
The mean ANO is calculated from the distribution in the Model ANO
table. For this reason, when you input your own ANO frequencies,
it is important that the sum of all the frequencies is equal to 1.
3.
b. Multiplying the Total Number of Possible Birth Events by the mean ANO to obtain
the Total Number of Possible Offspring
c. Dividing that Total Number of Possible Offspring into possible male and female
births by multiplying by the birth sex ratio (BSR) (for males) or 1-BSR (for
females) from the model BSR on the Birth Sex Ratio tab
If you have selected to limit your population to a specified target population size (TPS),
Zoorisk calculates the number of free spaces in the upcoming year by
ZooRisk 3.8 User’s Manual
41
a. Deterministically assessing how many deaths might be expected in the upcoming
year based on the mortality rates in the data tables and the number of individuals
in each age class (i.e., Nx*Qx).
b. Calculating the total number of spaces that could be filled as (target population
size – current population size + expected deaths).
Note that the TPS used in this calculation is either the TPS you entered
or a model-calculated TPS, depending on the strategy you chose and the
model year. See page 29 for more details on TPS strategy.
4.
Determines the number of model offspring. Without a target population size, this is the
number of biologically possible births (#2 above). If you have selected to limit your
population to a specified TPS, ZooRisk compares the number of male and female infants
needed to fill space to the number of biologically possible births, and takes the minimum
of the two numbers as the number of births that can be produced. If you have set the
TPS strategy of gradually approach TPS with a maximum of X births per year, then the
minimum of this specified max number of births, the number of biologically possible
births, and the number of infants needed to fill space is used as the number of births that
will be produced in a model year.
5.
After calculating births, the model deterministically generates deaths by taking the total
number of individuals in each age class (male or female) and multiplying it by the agespecific mortality rate for each age class. Mortality rates are based on Male and Female
Model Data Tables. Note that these calculations are calculated for the entire age-based
cohort at once.
In the first year of the deterministic simulation, individuals in age class 0 who
were not generated by the model (i.e., infants in the Included Individuals
table of the starting population) are not subjected to the morality rate for age
class 0. It is assumed that these individuals have already survived the high
mortality for infants because much of the mortality in this age class occurs in
the first 30 days. In all subsequent years of the model, mortality rates affect
all individuals in every age class.
Individuals in each age class are aged one year and the simulation repeats for the next year of
the model. The simulation will repeat the calculations in the above steps for every year of the
model as specified in Model Settings.
The deterministic model makes all these calculations without rounding, and thus “parts” of
animals can be produced or can die, e.g. a total population size could be 16.5.
ZooRisk 3.8 User’s Manual
42
Males in Included Individuals
Table with Allow Breed = YES
# of Females per Breeding group
Remove individuals outside of
the reproductive age span
Females in Included Individuals
Table with Allow Breed = YES
Remove individuals outside of
the reproductive age span
Divide the sex ratio of the
reproductive population by
breeding group sex ratio
# Potential Male Breeders
Multiply by # of females per
breeding group
# Potential Female Breeders
Birth Event Adjustment
Multiply by P(B) for
each age class
# of Spaces for Female
Breeders
Female Breeding Potential
Compare with # of Potential Female Breeders; if #
of spaces is less than # of Potential Female
Breeders, adjust Female Breeding Potential
All individuals in
the Included
Individuals Table
Total # of Possible Birth
Events
Multiply by age and sex
specific mortality
# of expected deaths
Multiply by Mean ANO
TPS-Current Pop Size
+ Expected Deaths
Total # of Possible Offspring
# of available spaces
# of
male
births
needed
to fill
space
# of
female
births
needed
to fill
space
Multiply by the
model BSR
Max # of
births per
year
# of biologically possible
male infants if
unconstrained by TPS
# of births for
model year
Add to individuals
already alive in
population
All individuals in the
Included Individuals
Table + new births
Multiply by age and sex
specific survivorship (1Qx for each age class)
Multiply by
1-(model
BSR)
# of biologically possible
female infants if
unconstrained by TPS
If no TPS, add # of biologically possible
male and female infants together; if
TPS, take minimum of 3 values: #
biologically possible, # needed to fill
space, and max # of births)
# of individuals
surviving model
year n
Current
Individuals in
Add one to age
model year
of surviving
N+1
individuals
Figure 3.2. Sequence of model steps to determine the number of births for deterministic simulations.
ZooRisk 3.8 User’s Manual
43
IN DEPTH DESCRIPTION—STOCHASTIC SIMULATIONS IN ZOORISK
In a stochastic simulation, ZooRisk utilizes the data in the Included Individuals table of your
living population, the model data tables, and all the model parameters you’ve selected in the data
entry screens to project what will happen to your population over time. This section gives more
complete details on how this simulation occurs for users who are interested in the ‘behind-thescenes’ algorithms of the program.
At the beginning of each simulation, the model is ‘initialized’ with the starting population as
defined by the Included Individuals table of your Living Population. ZooRisk stores the ID, age,
sex, and genetic identity of each individual in its memory, and tracks the events that happen to
those individuals (e.g. deaths, reproduction, exportation) over the course of your simulation. The
order of events in ZooRisk is as follows:
1. Importation/Exportation (optional)
2. Determine whether it’s a catastrophe year (optional)
3. Reproduction
4. Mortality
5. Tally annual data
6. Make individuals one year older
7. Begin next year…
A general diagram of the steps in simulation can be seen in Figure 3.3, and a detailed diagram of
model algorithms in Figure 3.4.
Initialization &
Year 0 Tallies
No
Year <=
# Model
Years
End
Stochastic
Yes
Imports/
Exports
TPS Info
Catastrophes
Births
Genetic
Management
Inbreeding
Depression
Deaths
Current
Year
Tallies
Increment
by a Year
Figure 3.3 Sequence of model events for stochastic determinations
ZooRisk 3.8 User’s Manual
44
The simulation of stochastic models is dependent on the use of random number
generators. In ZooRisk, pseudo-random numbers are chosen with equal probability from a finite
set of numbers. The chosen numbers are not completely random (hence, pseudo-random)
because a definite mathematical algorithm is used to select them, but they are sufficiently random
for practical purposes. ZooRisk sets the seed value for the random number generator as the
current tick of the system clock when the program is started, which then produces a long series of
random numbers used throughout the simulation each time a random number is needed.
Simulating Genetics in ZooRisk
Throughout a model run, ZooRisk simulates changes in the population’s genetic structure
over time by tracking the genetic relationships of individuals in the population, rather than by
utilizing mathematical approximations of change in gene diversity based on effective population
size and generation length. The relationships between the individuals in the Included Individuals
table are used to create the initial genetic structure of the population. Individuals with “generic”
parentage are treated as follows:
1. Individuals with WILD/WILD parents are treated as founders. For individuals with WILD#
parentage, the appropriate genetic relationships are created in the initial genetic matrix
(i.e. if two individuals have WILD2 as a sire and unrelated dams, they are half-siblings
with the same founder (WILD) sire).
2. For individuals with HYP#/HYP# (hypothetical) parentage, the appropriate genetic
relationships are created in the initial genetic matrix
3. Any MULT or MULT# parent is treated as unknown. If you wish to include assumptions
about relationships between individuals with MULT parentage, you should create those
assumptions in an analytical studbook and use that studbook for your ZooRisk extraction.
4. Individuals with UNK/UNK parentage are included in the initial genetic matrix but are not
given a mean kinship value since their genetic relationships are unknown
Simulating imports and exports in ZooRisk
If the imports/exports option is turned on, ZooRisk will simulate adding or removing
individuals from your population as specified in the Imports/Exports table. In importation events,
individuals immigrating in are unrelated founders (i.e., equivalent to WILD/WILD) to your
managed population. Depending on the genetic options you have included in your model, these
individuals will be prioritized for breeding similar to any wild-caught individual. During a year with
an importation event, ZooRisk adds males or females of the appropriate age; if you input a range
of ages, ZooRisk randomly selects the age of the imported individual from within that range.
Exportation events involve the emigration of individuals from your managed
population. There are three Genetic Strategies for selecting among the individuals to export from
the population. If you have selected Random, ZooRisk looks at all individuals of the appropriate
age(s) and sex and randomly selects the specified number of individuals to export without paying
any attention to their genetic value to the reproductive population. In the other Genetic Strategies,
ZooRisk looks at all individuals of the appropriate age(s) and sex, assesses these individual’s
genetic value to the population, and exports either the Most or Least Valuable individuals. The
population is ranked using mean kinship: the least valuable individuals are those that have no
mean kinship value (i.e. individuals that are not included in the reproductive population), followed
by the individuals with the highest mk, through individuals with the lowest mk, and finally the most
valuable individuals are any potential founders (i.e. individuals with WILD/WILD parents whose
mk is 0).
The number of individuals exported is either a set number of individuals (in the Export
Simple option) or any excess individuals above a specific threshold population size (in the Export
Threshold option). If there are not enough individuals of the appropriate age/sex class to export in
the specified year, ZooRisk exports as many individuals as it can; if there are no individuals of the
appropriate age/sex, the export will not occur.
ZooRisk 3.8 User’s Manual
45
Simulating Catastrophes in ZooRisk
If your Catastrophes option is turned on and you have provided data in the Catastrophes
data table, before ZooRisk allows the population to breed or be exposed to mortality it will
determine whether it is a catastrophe year or not. To do this, ZooRisk compares a random
number between 0 and 1 to the probability of occurrence in your Catastrophes data table. If the
random number is less than or equal to the probability of occurrence, it is a catastrophe year and
ZooRisk will adjust the reproduction and mortality rates of the age classes and sexes specified in
the Catastrophes data table to the catastrophe levels. These adjusted values will be used in
simulating reproduction and mortality as described below. The adjusted rates will only be used
for a single year and then returned back to the normal vital rates. If the random number is greater
than the probability of occurrence, the normal vital rates will be used for all age classes.
Simulating Reproduction in ZooRisk
Each year in the reproduction routine, ZooRisk determines how many offspring should be
made based on limitations in reproductive or biological potential, sex ratio, space, and genetics,
depending on what model settings are turned on. Slightly different algorithms are used
depending on whether you choose to Simulate Genetic Management (in green text) and/or
Impose Target Population Size (in red text). These algorithms are also dependent on whether
you have chosen to simulate long-term pairing (e.g. entered a number greater than 1 in the
Number of Years between Pairing box); the impact of that decision will be described at the end
of this section. See Figure 3.4 for a diagram of these processes.
Remember that if it is a “catastrophe” year, ZooRisk will adjust the probability of
breeding of the appropriate age/sex classes for the year as specified in the
Catastrophe table.
If you are not-modeling long-term pairing, for all years of the model, ZooRisk will:
1. Create pool of potential male breeders:
ZooRisk creates a pool of potential male breeders composed of all Included living
males within the reproductive age span (based on minimum and maximum ages with a
“Yes” the Reproductive? column in the Model Male Data table). Individual males with a
“No” in the Allow Breed column of the Included Individuals table are not pulled into the
pool of potentially breeding males. If you are simulating genetic management by
prohibiting breeding below a certain % known, males with a pedigree less than the %
known threshold level you’ve designated will be removed from this pool of potential
breeders.
2. Create pool of potential female breeders:
ZooRisk creates a pool of potential female breeders composed of all Included
living females that are within the reproductive age span (based on the minimum and
maximum ages with a non-zero probability of breeding in the Model Female Data table or
the vital rates specified in the case of a catastrophe or inbreeding depression). Individual
females with a “No” in the Allow Breed column of the Included Individuals table are not
pulled into the pool of potentially breeding females. If you are simulating genetic
management by prohibiting breeding below a certain % known, females with a pedigree
less than the % known threshold level you’ve designated will be removed from this pool
of potential breeders.
3. Rank individuals in breeding pools
Unless you are simulating genetic management by mean kinship, individuals are
ranked for breeding randomly within each pool of potential breeders—this ranking ignores
age and genetic background. If you are simulating genetic management by Mean
ZooRisk 3.8 User’s Manual
46
Kinship, the male and female pools of potential breeders are ranked and sorted by mk
values.
Note that all pairing schemes using mean kinship are based on static
rather than dynamic mean kinship lists. In a static list, all mks are only
calculated at the beginning of the process, whereas in a dynamic list,
mks would be recalculated each time a pair is made based on the
assumption that offspring are produced, and the list of males and
females would be re-ranked based on the newly calculated mks.
4. Create pairs of potential breeders
Potential pairs are made sequentially according to rank and the number of
females per breeding group in your Species Biology data table. Pairing starts with the
top ranked male and female and continues until there are no more individuals in one or
both of the pools of potential breeders (male or female). In polygynous species, if a
complete group cannot be made but there are females remaining (i.e., if the number of
breeding females in a group is 4 but there are 2 females remaining after sequential
pairing), a smaller breeding group will be made as long as there is a male left to be
paired. For simplicity, in the rest of this discussion, “pairs” will be used to refer to either a
breeding pair or a part of a breeding group. ZooRisk continues pairing individuals until it
pairs all individuals in the breeding pool or runs out of individuals of one sex.
The breeding system ZooRisk uses for pairing will be the same
each year, however, specific “Breeding groups” will not be
remembered from year to year, unless you choose to model longterm pairing. Thus, the projections of genetic management in
polygynous populations might be slightly more optimistic than what
can actually be achieved (because many actual groups will stay
together for social reasons and a male might monopolize a group for
multiple years). If you choose, you can model this long term pairing
situation (see page 49).
If you are simulating genetic management by level of inbreeding, pairs of
potential breeders are still made sequentially starting with the top ranked male; however,
a pairing between this male and the top ranked female will be evaluated based on the
inbreeding coefficient (F) of their potential offspring before the pair is actually made. If
this value (F) is less than the threshold you’ve designated, the male and female are
paired. If this value (F) is greater than or equal to the threshold you’ve designated, the
male and female are not paired and the pairing of this male with subsequent females is
evaluated sequentially until an acceptable pair can be made. If you have selected a
polygynous mating system, each male will be evaluated with as many females in the pool
of potential female breeders as needed or possible, until he has been acceptably paired
with the designated number of females. If a male or female cannot form an acceptable
pair with any individual, they will not be included in any pair. In a polygynous system, if a
complete group cannot be made due to unacceptable F levels, a smaller group will be
made for that male. Note that this is not an optimized avoidance of inbreeding strategy.
ZooRisk continues pairing individuals until it pairs all individuals, runs out of individuals of
one sex, or cannot make any additional pairs due to genetic constraints (i.e., no
individuals that would produce an acceptable level of inbreeding).
If you are simulating genetic management by prohibiting the creation of
genetically detrimental pairs, pairs of potential breeders are still made sequentially
starting with the top ranked male, but each pair is evaluated for whether their offspring’s
mean kinship (mk) is worse than (i.e. greater than) that year’s population mean kinship
value. If mk is greater than the population mean kinship value, the male and female are
not paired and the male’s suitability with subsequent females is evaluated sequentially
until an acceptable pair can be made. If you have selected a polygynous mating system,
each male will be evaluated with as many females in the pool of potential female
breeders until he has been acceptably paired with the designated number of females. If
a male or female cannot form an acceptable pair with any individual, they will not be
included in any pair. In a polygynous system, if a complete group cannot be made due to
ZooRisk 3.8 User’s Manual
47
unacceptable mk values of potential offspring, a smaller group will be made for that male.
Note that the population mean kinship is a static value and will not be recalculated each
time a pair is made based on the assumption that offspring are produced. The population
mean kinship value is calculated at the beginning of the process and is used to evaluate
all potential pairs during pairing for that year.
5. If Impose TPS is selected, determine space and births needed to fill space
deterministically
a. Calculates the total number of spaces available by calculating the existing
spaces (target population size – current population size) and deterministically
assessing how many deaths might be expected in the upcoming year based on
the mortality rates in the data tables and the number of individuals in each age
class (i.e., Nx*Qx). The total number of spaces available = target population size
– current population size + expected deaths.
b. Calculates the number of births needed to fill that space, factoring in infant
mortality (since infant mortality is high in some populations, managers might
recommend more births than there is actually space for with the expectation that
some infants would not survive. ZooRisk mimics this). ZooRisk divides the total
number of spaces to be filled into male and female spaces based on the userinput birth sex ratio (BSR), and then uses the infant mortality rates to determine
how many total infants would be needed to fill space. So:
Infants needed to fill space = total spaces * BSR + total spaces * (1 – BSR)
(1 – Qinfant females)
(1 – Qinfant males)
c. ZooRisk takes the number of births needed to fill space (calculated above) or, if
you have selected the strategy to approach TPS gradually using a max number
of births per year, the minimum of the number of births needed to fill space and
the max births per year as the number of allowed births.
d. Calculates the number of successful pairs needed to produce the allowed births,
by dividing the number of infants by the mean Annual Number of Offspring
(which is calculated based on the distribution in the model Annual Number of
Offspring table). This is the number of successful pairs needed to create the
allowed births.
6. Create pool of pairs with the opportunity to breed
With no space restrictions (i.e., no TPS set), ZooRisk adds all pairs of potential
breeders (created in #4) to this pool of pairs that will have an opportunity to breed. If you
choose to impose a TPS, this pool can only be as large as the number of successful pairs
needed to create the allowed births calculated in 5d above. To do this, pairs of potential
breeders (created in step 4 above) are added sequentially by order of ranked pairs
(within polygynous pairs, females are ranked according to the order that they were added
to the “pair”). Because each pair added might not be successful in breeding, and
because managers frequently take this into account and have “extra” pairs to ensure they
get the desired number of births, the number of pairs that are added to the pool depends
on the probability of each pair breeding (determined by the female’s probability of
breeding (P(b)) value. Pairs are added to the pool until the sum of the P(b) of all the
paired females in the pool is greater than the number of successful pairs needed to fill
space or ZooRisk runs out of potential pairs. In polygynous pairs, partial groups may be
added if there isn’t enough space in the pool of pairs with the opportunity to breed to
include the whole group.
7. Determine Breeding Success
For every pair in the pool of pairs with the opportunity to breed (determined in #6
above), ZooRisk generates a random number and compares it to the female’s agespecific probability of breeding. If the random number is less than or equal to the
probability of breeding, that female (and the male it is paired with) are considered
successful breeders for that model year. Note that demographic stochasticity is inherent
in this process, as the use of Monte Carlo processes means that occasionally greater or
fewer breeders will be successful than would be expected based on the probability of
ZooRisk 3.8 User’s Manual
48
breeding. ZooRisk completes this process for each pair in the pool of pairs with the
opportunity to breed.
8. Generating Offspring
Once a female (and the male it is paired with) has been determined as a
successful breeding pair, ZooRisk stochastically determines the number of offspring the
female will produce using the annual number of offspring distribution and a random
number. Remember that this is equivalent to picking her clutch/litter size if the species
only breeds once a year, or picking the total annual number of offspring she will have if
the species has multiple breeding events in a year. ZooRisk generates a random number
between 0 and 1, and generates the appropriate number of offspring based on where in
the distribution of annual number of offspring that random number corresponds to (i.e. if
the distribution is 40% singletons and 60% twins, then a random number from 0-0.4
would produce a single offspring and a random number from 0.41-1.0 would produce
twins). This process is repeated for every successful pair.
9. Assign offspring sex
For each birth, ZooRisk draws a random number, compares it to the birth sex
ratio (BSR) input in the model Birth Sex Ratio box, and assigns a sex to the birth.
Because this is a probabilistic process (both in the model and, as far as we know,
biologically) subject to demographic stochasticity, in any given year the simulated BSR
may be slightly different from the input BSR.
Note that management options in ZooRisk are not optimized. For example,
when simulating genetic management by mean kinship, ZooRisk prioritizes
pairs with the lowest mean kinship values to have the opportunity to breed,
however, the pairs that are successful breeders may not be these low mean
kinship pairs. Similarly, in polygynous mating systems, males will be given
the opportunity to breed with a specified number of females, however, each
male may not successfully breed with every female that he has the
opportunity to breed with, so the ratio of males to females that actually breed
may be lower than expected.
Simulating long-term pairing
The number you enter in the Number of Years between Pairing box is the number of years
between “major” re-pairing in the population – the time before all mating pairs have the chance of
being reshuffled; there is some opportunity to re-pair individuals in the “minor” pairing years that
occur in between the “major” years. If you are modeling long-term polygyny, the following
adjustments are made to the process used to create the pool of pairs of potential breeders:
1. Breeding pairs are created as described above at major pairing years. These pairs will
remain together for the number of years between pairing unless one member of the pair
dies or ages beyond the maximum age capable of reproduction based on the male or
female data tables. If you have chosen a polygynous mating system, a male will remain
in his paired situation as long as at least one of the females he was initially paired with
remains alive and within the reproductive age span.
2. If it is a minor pairing year, male and female breeding pools are made consisting of any
non-paired individuals who are still within reproductively viable age classes. This
includes individuals whose mate had died or aged past the maximum age of reproduction
in the previous model year and any individuals who became old enough to reproduce (i.e.
aged into the reproductive age span). These breeding pools are ranked as described
above (randomly or based on mean kinship depending on what genetic management
options are being used. Pairs of potential breeders are then created using these ranked
pools. New pairs are added to the bottom of the list of pairs created at the major pairing
year (and in any minor pairing years since) and, depending on space constraints, may
not have the opportunity to breed.
3. On both major and minor pairing years, the same process occurs for determining TPS
constraints, breeding success, and generating offspring.
ZooRisk 3.8 User’s Manual
49
Note that individuals in a non-reproductive age class (i.e. P(b)=0), but within the
reproductive age span, will be paired during major pairing years (and minor pairing
years if they are in the pool of ‘new breeders’). These individuals will also remain
paired during non-pairing years with a probability of breeding of 0.
Simulating mortality in ZooRisk
After the reproduction process is completed, ZooRisk generates the deaths for the year.
To do this, it generates a separate random number for each living individual and compares that
random number to the mortality rate for the appropriate age/sex class from the Model Male and
Female Data tables. If the random number is less than or equal to the age-specific rate in the
table, ZooRisk changes that individual’s status to dead. Note that infants (0 age class) in the
initial population are not subjected to any additional mortality in the first year, as they have likely
already survived a large proportion of the mortality sources for that age class (i.e. the causes of
30-day mortality, which account for a majority of the deaths in the first age class of most species).
In simulations where inbreeding depression is turned on, ZooRisk will also look at each
individual’s inbreeding coefficient; if F falls within the specifications set up in the Inbreeding
Depression table, ZooRisk will adjust the mortality rate of that individual, and the random number
will be compared against this rate.
If it is a “catastrophe” year, ZooRisk will adjust the mortality rates of the appropriate
age/sex classes for the year.
Final processes
At the end of the year, ZooRisk stores data that it uses later in model results, updates the
age by adding one year to the age of all living individuals, and advances to the next year, where it
starts the processes of catastrophes, imports/exports, births, and deaths over. ZooRisk loops
through all of these processes for each year you have designated in the Model Settings table,
and, when completed with a single run, reinitializes the model and starts the next iteration. It
loops through each iteration until it reaches the number of iterations designated in the Model
Settings table. It then calculates summary results, which can be viewed in the Model Results
section.
ZooRisk 3.8 User’s Manual
50
Catastrophe
Imports/Exports
Current Population
Multiply by age and sex
specific mortality
Current Population
Pull individual into pool if: in reproductive age
span, Allow Breed = YES, %known> threshold
# of expected deaths
TPS-Current Pop Size
+ Expected Deaths
Pool of Potential
Male Breeders
Rank individuals in pools randomly;
rank individuals by mean kinship
# of available spaces
male
births
needed
to fill
space
female
births
needed
to fill
space
Pool of Potential
Female Breeders
Ranked Pool of Potentially
Breeding Males
Max #
of births
per year
Ranked Pool of Potentially
Breeding Females
Create pairs sequentially according to rank and #
of females per breeding group; only form pair if F
of potential offspring is < threshold; only form pair
if mk of potential offspring is < population MK
Ranked Pool of Potential Breeding Pairs
Allowed Births
Multiply by Mean ANO
All pairs added; pairs added until cumulative
P(b) > # of successful pairs needed
Successful Pairs Needed
Pairs that will get the opportunity to breed
Stochastically determine breeding
success based on female P(B)
Successful Pairs
Stochastically generate offspring
based on model ANO
Offspring
Male
Current Population
Stochastically determine
sex of offspring based
on model BSR
Female
Stochastically
determine
deaths
Individuals
surviving Model
Year N
Add 1 year to
age of all
individuals
Figure 3.4. Sequence of model steps for stochastic simulations.
ZooRisk 3.8 User’s Manual
51
Current
Individuals
in model
year N+1
Stochastic vs. Deterministic Runs
As described above, the stochastic run differs from the deterministic run due to both stochastic
variation (which is incorporated into the stochastic model, but not the deterministic model) and the
model options that you have selected (which are also incorporated in the stochastic model but not
the deterministic model). Depending on the settings you have selected for your model and the
structure of your population, the difference in the two types of runs could be very extreme. You
can expect to see extreme differences between the two runs in the following situations:
Percent Known – if you have chosen to manage your population by prohibiting the pairing
of individuals with pedigrees less than a specified percent known, ZooRisk will not allow
those individuals to breed in your stochastic model. Alternatively, the deterministic model
does not incorporate genetic management settings, and so, will not prohibit these
individuals from breeding. In order to incorporate this type of management into your
deterministic projections, change the ‘Allow Breed’ status of the individuals in the
Included Individuals table with unacceptable levels of unknowness in their pedigree to
No.
Genetically Detrimental pairs – Genetics are not simulated in deterministic calculations.
If you choose the genetic management option to avoid the creation of genetically
detrimental pairs, you may be limiting the total number of pairs that can be made in
stochastic simulations. If reproduction is limited for this reason, your deterministic and
stochastic projections will differ as the deterministic run will not be affected by these
limitations on reproduction.
IN DEPTH DESCRIPTION—RISK CATEGORIZATIONS + RESILIENCE TEST
In order to assess the risk level of your population, ZooRisk runs risk tests that are
designed to evaluate different aspects of a population’s demography, genetics, and management
that might put it at risk of not meeting the management goals set for it. These risk tests are
standardized, so that populations with different biology and management can be compared with a
single metric.
The Risk Categorization tests are designed to categorize your population into one of four
risk categories: Critical in Captivity, Endangered in Captivity, Vulnerable in Captivity, and Low
Risk in Captivity. Some of the risk tests are modeled after the criteria used in the Red Lists of the
World Conservation Union (IUCN)
(http://www.iucn.org/themes/ssc/redlists/RLcategories2000.html). There are also risks unique to
the captive situation, and we address those with individual tests as well.
We will describe how ZooRisk simulates each risk test here, and then go over how the
risk results are interpreted in Chapter 4.
Some of the risk tests (described in further detail below) are based on historic or current
data extracted from your studbook database. Other risk tests are based on model simulations,
and when you hit “Run Risk Simulations” ZooRisk will utilize the settings and model values in
your current scenario and simulate the model for the specified number of iterations for each
different test. Note that the risk simulation uses all Model Parameters that you set except that it
uses at absolute extinction N=0 as the extinction threshold and runs the simulation for 100 years.
RISK CATEGORIZATION TESTS
1. Probability of extinction (P(E)) in 100 years
This risk test is designed to look at the risk of declining to extinction within 100 years.
ZooRisk simulates your current scenario for the number of iterations specified in your Model
Settings table; we recommend at least 10 iterations for initial set-up and testing, and 200-1000
iterations for final reports.
ZooRisk 3.8 User’s Manual
52
2. Distribution of breeding-aged, mixed-sex groups
This risk test addresses the concentration of reproductive potential in your population. If
the distribution of currently breeding-aged, mixed-sex groups is limited to 3 or fewer institutions,
this suggests a vulnerability (e.g. to disease or disaster eliminating a few institutions) and you
may want to consider increasing the number of institutions that hold mixed-sex breeding groups.
ZooRisk uses information on the current, Included Individuals table of your living population and
their current institutions extracted from the studbook for this test.
3. Current number of breeding-aged animals
This test addresses how large the breeding-aged population is (without consideration of
whether animals are actually paired appropriately or in breeding situations). ZooRisk uses the
individuals in the Included Individuals Table in your current, living population that are in
reproductive age classes designated in the model male and female data tables in your current
scenario. Note that for this test ZooRisk does not take breeding system into account: for
example, if your population had 3 males and 30 females with a 1:10 breeding group ratio,
although you have 30 breeding females you would still be in the critical category because of your
low number of males.
4. Reproduction in the last generation
This test is designed to determine whether there has been “reliable” breeding in your
population in the past; low levels of breeding within the last generation may indicate that
husbandry may not have been developed adequately or only developed at particular institutions.
ZooRisk calculates generation length from the historic data in your studbook extraction window
(based on the date range and institutions you choose in your fecundity data extraction window) by
calculating the average age of all dams within the window (dams with unknown ages or offspring
with unknown birth dates are not included in this calculation). This risk test looks at the level of
breeding in your population by counting unique pairs that reproduced in the last generation length
back from your date set in the Living Population Extraction and Analysis window. A pair is
counted if the male/female pair is unique, regardless of either individual being unique. UNK/UNK
pairs and UNK/known pairs are not counted.
5. Gene diversity
This test looks at the genetic factors impacting your population’s risk, and is based on
both the GD of the starting living population (based on the Included Individuals table) and on the
GD of the modeled population in 100 years. This test is based on the idea that decreases in GD
are undesirable and will impact your population’s vital rates through inbreeding depression.
ZooRisk simulates your current scenario for the specified number of iterations from your Model
Settings table.
The categorization of results for each of these tests into specific risk categories will be discussed
further in Chapter 4.
RESILIENCE SIMULATIONSS
Resilience simulations
This simulation focuses on the risk that your population will not be able to recover from a
significant catastrophe or setback, which is simulated as a scenario where the institutions with the
two largest holdings are lost from your program. Such a loss could be caused by disease
quarantines, changes in accreditation, institutional disasters, etc. This test asks whether, without
the individuals in those two institutions, your population has the demographic vital rates and
population structure to “bounce back” or recover. ZooRisk simulates this by eliminating the two
institutions from the initial population at year 0 and using the rest of the settings in the current
scenario. This test compares the average population size after 10 years with and without the two
largest institutions.
ZooRisk 3.8 User’s Manual
53
Chapter 4: ANALYZING RESULTS from a SINGLE
SPECIES ANALYSIS
After you have run your single-species model, you should save your project and go to
ZooRisk’s Results screens. In this area you can graph various model parameters, look at tables
with summary results from stochastic model runs, and view results from risk and resilience
simulations.
RESULTS
While most results are viewable from the Results screens in the program (described
below), some results are directly exported (e.g. individual iteration results for demographic and
genetic variables) for more sophisticated graphing and statistical analyses. The exported results
can be found by navigating to the Stochastic folder in the ZooRisk / Single Species / project /
results folder. Results are saved as .csv files which can be opened with Microsoft Excel. When
result files are opened, each row is an individual iteration and each column is a year.
The following results are displayed within the ZooRisk program. In graphs and tables, ZooRisk
displays 4 decimals for parameter values.
Result Graphs
The graphing section of ZooRisk allows you to create and view graphs of various
parameters of any scenario that you have run. You may select to see the graphs of multiple
scenarios and/or multiple variables at once. In the Scenario Select box in the upper left, select
which scenario(s) you wish to graph by clicking on the scenario name. A check will appear in the
ZooRisk 3.8 User’s Manual
54
box to the left of the name for the scenarios that you have selected. Click the scenario name
again to remove the check. The default is to graph results from the current scenario.
Once you have selected the scenario (or scenarios) you wish to graph, you can specify
what variable(s) you’d like to graph. The navigation tabs in the lower left menu group the different
variables that you can graph. Highlight the Deterministic, Stochastic, Genetics, or Various Model
Parameters menu to view the list of variables. For the stochastic model, you can graph various
population size (N) values (total, male, female), births, deaths, and standard deviations around
each of these mean values. Also from the stochastic model, you can graph various genetic
parameters (gene diversity, % known, inbreeding coefficient and their respective standard
deviations [SD]) by selecting the Genetics menu. The deterministic tab allows you to graph
variables from your deterministic run; it is often useful to compare stochastic and deterministic
results for the same variable.
Clicking specific variables once displays them on the graph to the right, and clicking on
them again removes them from the graph. You can add multiple variables to each graph,
although some combinations cannot be graphed together due to scaling differences (i.e. GD and
population size). You can clear the entire graph with the button at the bottom.
The model results displayed on the graph are the mean result over all iterations in which
N>0; it is important to remember that there may be variation around this mean result due to the
impact of stochasticity on your population’s dynamics. To display this variation, you need to have
had the “Calculate Standard Deviation” turned on in the Model Options screen before your model
run. If ZooRisk was told to calculate and store this information, you can display the variation
around your variables by selecting the SD variables within the Stochastic and Genetics menus on
the lower left.
The icons on the toolbar above the graph allow you to modify the appearance of the
graph; if you hover over these icons you can see the functions of each one. The most useful are:
• The “Copy” function, which allows you to paste the data from your current graph into your
clipboard and then into excel (export as a text file)
• The “Data Editor”, which allows you to display the values of the variables you have
displayed
You can also modify the appearance of most graph elements by right-clicking on them,
including changing the legend, the graph lines, the scale of the axes, colors of lines, etc. You can
use the boxes at the bottom of the graphing window to add axis labels to your figure.
You can use the clipboard button to paste the graph currently displayed onto the
clipboard—see the Clipboard section in Chapter 2 for more information.
Result Tables
There are four tables in this section that give more detailed results for your simulations.
1. The Demographic Summary Table includes results for each scenario for which you
have run deterministic and stochastic simulations for. For each scenario that has
been run the table displays:
a. The number of years the model was projected forward and the number of
runs or iterations
b. The mean population growth rate, Lambda, for the Deterministic and
Stochastic models and the standard deviation (SD) around the stochastic
lambda. Lambda for an individual simulation is calculated by:
i. Calculating annual lambdas as Nt+1 / Nt for each year that the
population is still extant (surviving) in the simulation, and
ii. Calculating the geometric mean of the annual lambdas over all years
of the simulation, which is that simulation’s overall growth rate, or
lambda
For the deterministic model, the lambda value is calculated using the single
population size produced at each year. For the stochastic lambda, a lambda
ZooRisk 3.8 User’s Manual
55
is calculated for each model iteration as described above; the values
displayed in the table are the mean and SD across the lambdas of all
iterations. The Initial and mean Final population sizes, and the SD around N.
The Final N is the mean ending population size across all iterations where
the final N >0 in your stochastic model.
c. The probability of reaching the extinction threshold (that you set in Main
Parameters in Data Entry), the median number of years to reach this
threshold across all iterations that reach the threshold, and the minimum time
to reach the threshold (i.e. the minimum number of years it took a single
iteration to reach the extinction threshold). The probability of reaching the
extinction threshold is calculated as the number of populations that reach the
extinction threshold divided by the total number of simulated runs. Note that
if few iterations reach the extinction threshold, the median and minimum
times to reach it are also based on only a few iterations.
ZooRisk considers a population extinct from the first year that it reaches the
extinction threshold that you set. A population that declines below a quasiextinction (i.e., non-zero) threshold can subsequently increase in size; however, if
it exceeds a size greater than the quasi-extinction threshold, this population will
still be categorized as ‘extinct’. ZooRisk will only count the number of years it
takes to reach the extinction threshold for the first time, despite subsequent
fluctuations. Although a population that drops below the quasi-extinction threshold is considered
extinct for the remainder of the simulation, the run continues unless the population reaches an
absolute extinction (N=0). Populations that reach the quasi-extinction threshold are still included
in calculations of all mean demographic and genetic results, despite the fact that they are
considered extinct. Populations that reach an absolute extinction (N=0) are not included in mean
calculations of any mean demographic and genetic results once they reach N=0 no matter what
extinction threshold is set.
d. The probability of reaching the target population size (TPS that you set in
Model Option in Data Entry), the median number of years to reach the TPS
across all iterations that reach the TPS, and the minimum time to reach the
TPS (i.e. shortest period of time for an individual iteration to reach the target
population size). The probability of reaching the target population size is
calculated as the number of populations that reach the target population size
divided by the total number of simulated runs. . Note that if few iterations
reach the TPS, the median and minimum times to reach it are also based on
only a few iterations.
Because you can set the TPS at, above, or below your initial population size, a
population can approach the TPS from either direction. The TPS results are
calculated based on the first time each run reaches the TPS regardless of the
direction of approach (e.g., increasing or decreasing) or subsequent fluctuations
(i.e., a population that reaches the TPS, but fails to remain around the TPS will still
be included in all TPS calculations). For populations where the initial population size is equal to
the TPS, the results are calculated for year 0, so that the probability of reaching the TPS will
always be 1 and the median and minimum number of years to reach the TPS will be 0.
2. The Genetic Summary Table includes results for each scenario you’ve run
stochastic simulations for. For each scenario that has been run the table displays:
a. The number of years the model was projected forward and the number of
runs or iterations
b. The Initial gene diversity (GD), mean Final GD, and SD around mean final
GD. The Initial GD value reflects the population’s GD at year 0 after all of the
individual mean kinship values have been recalculated to include only the
ZooRisk 3.8 User’s Manual
56
c.
relatedness of the individuals in the reproductive population of the Included
Individuals table, excluding founders and potential founders. (Individuals that
are excluded, not allowed to breed, are older than the oldest reproductive
age class, or fall below the % known cutoff are not considered a part of the
reproductive population). The final is the mean final GD across all the
iterations with a final N>0.
The probability of reaching the genetic diversity threshold (GD that you set in
Main Parameters in Data Entry), the median number of years to reach this
threshold for the first time across all iterations that reach the threshold, and
the minimum time to reach the threshold (i.e. the minimum number of years it
took a single iteration to reach the GD threshold). The probability of reaching
the GD threshold is calculated as the number of populations that reach the
GD threshold divided by the total number of simulated runs.
Gene diversity has the potential to increase (e.g. importation of founders or
careful genetic management) or decrease (e.g. loss of heterozygosity).
ZooRisk considers the population to have reached the threshold the first
time that it crosses the value that you set, regardless of whether the
population’s GD is increasing or decreasing when it reaches the threshold.
ZooRisk will ignore all other instances that the population passes the threshold
after it reaches the threshold for the first time.
.
d. The Initial %Known for the population, the mean Final %Known and the SD
in final %Known. Again, the final is the mean final %known across all the
iterations and only includes iteations with a final N>0.
e. The Initial inbreeding coefficient (F), the mean Final F, and SD around F.
Inbreeding coefficient is only calculated for individuals in the reproductive
population, excluding potential founders. (Individuals that are excluded, not
allowed to breed, are older than the oldest reproductive age class, or fall
below the % known cutoff are not considered a part of the reproductive
population). (The final F is the mean final F across all the iterations and only
includes iterations with a final N>0..
3. The Demographic Details Table includes annual mean results for each scenario for
the total population size, number of males (M) and females (F), number of Births,
Deaths, mean number of Pairs that reproduced each year, annual Imports/Exports
and Catastrophes. These averages are calculated in each year for all iterations with
surviving populations (i.e., N>0); if a population reaches N=0, subsequent years are
not averaged into any of the results.
4. The Genetic Details Table includes annual mean results and standard deviations for
each scenario for the Gene Diversity, % known, and Inbreeding Coefficient. These
averages are calculated in each year for all iterations with surviving populations (i.e.,
N>0); after a population reaches N=0, subsequent years are not averaged into any of
the results
Risk Results
Based on the results of each of the five Risk Categorization tests discussed in Chapter 3,
a population will be scored into one of four risk categories for each test: Low Risk in Captivity,
Vulnerable in Captivity, Endangered in Captivity, and Critical in Captivity. All of these are in the
context of whatever geographic window is set in the data extraction window, (e.g. Endangered in
Captivity in North America, in the institutions within the entire studbook, or in the institutions within
your selected FED file). The ZooRisk development team has worked to come to a consensus on
the boundaries and cutoffs for each category and each test based on scientific and management
opinions. The category boundaries for each of the five risk tests are:
ZooRisk 3.8 User’s Manual
57
Critical in
Captivity
Endangered in
Captivity
Vulnerable in
Captivity
Low Risk in
Captivity
1. Probability of
extinction (P(E)) in 100
years
50-100% P(E)
within 100 years
20-49% P(E)
within 100 years
10-19% P(E)
within 100 years
0-9% P(E) within
100 years
2. Distribution of
breeding-aged, mixedsex groups
1 zoo
2 zoos
3 zoos
>3 zoos
3. Current number of
breeding-aged animals
(male.female)
0.0 to 3.3
4.4 to 6.6
7.7 to 10.10
More than 10.10
4. Reproduction in the
last generation
Little success:
0-2 pairs
reproducing
Sporadic success:
3-5 pairs
reproducing
Inconsistent
success;
6-9 pairs
reproducing
Consistent
success:
More than 9 pairs
reproducing
5. Gene diversity of
starting population or
modeled population in
100 years
Starting GD < 0.75
or
modeled GD in
100 years < 0.5
Starting GD < 0.8
or
modeled GD in
100 years < 0.75
Starting GD < 0.9
or
modeled GD in
100 years < 0.9
Starting GD > 0.9
and
modeled GD in
100 years > 0.9
RISK TEST
In the single-species Risk Results window, these boundaries are used to categorize the
risk of your population for each test.
ZooRisk 3.8 User’s Manual
58
The overall risk level for your population is displayed across the top of the table. Like the
IUCN Red list categories, your population’s overall risk level is equal to the most severe score it
achieved for any of the five tests. In the table, the left column displays a description of each of
the five Risk Tests. The specific results for each individual test are displayed in blue in the “Risk
Results” column of the table, and the risk scores for each test are displayed in the “Risk
Category” column. The four columns on the right of the table include the category definitions
(identical to those in the above table) for reference.
ZooRisk highlights the cell (red for Critical, orange for Endangered, yellow for Vulnerable,
green for Low Risk) if the results for your population are within the range for that risk category. In
general, in order to reduce risk to your population, you want to shift those highlighted squares to
green on the right of the table. You can look at your scores for the different risk tests to help
identify what the particular threats are to your population—e.g. are they genetic (test 5),
demographic (tests 3,4), should you think about spreading your population out across more
institutions (test 2)?
Comparative Risk Results
The Comparative Risk Results includes the risk categories and specific results for each
scenario that has been run for each of the 5 categorized risk tests, as well as their overall score.
This table provides a quick comparison of risk levels between different scenarios. The results
and categories of alternate scenarios are displayed in blue for easy identification.
ZooRisk 3.8 User’s Manual
59
Resilience Results
This screen displays the results of the Resilience Simulation. This simulation illustrates
how well the population modeled in the current scenario can “recover” if all the individuals from
the two largest institutions are removed. This screen displays the mean final N after 10 years
with all included institutions and without the two largest institutions.
Age Pyramid Graphs
If you turned on the model option to “Calculate Age Pyramids”, then you can view the
projected age structure of your population over time in the Age Pyramid Graphs tab. This screen
will show the initial starting population structure, and then the average population structure for
your projections. ZooRisk calculates the average size of each age and sex class across all
iterations in which N>0; because these numbers are averages, individual age classes may have
sizes with decimals (e.g. 5.5 male 7 year olds). If you run your model for one iteration, you can
use these graphs to see the exact structural changes in the projected population of that iteration
over time.
After you view the results, if you choose to go back and make changes to the data entry
section of your project, the results will not be cleared automatically. Make sure to rerun all
simulations with the new settings. To avoid confusion, we suggest creating a new scenario when
you wish to make data entry changes.
ZooRisk 3.8 User’s Manual
60
Chapter 5: CREATING and MANAGING SCENARIOS
Within the single-species module you will create a project for your population and then
multiple scenarios for that project; these multiple scenarios can be used to explore the impact of
different model options, different hypothetical management regimes, or different breeding
strategies. For example, alternate scenarios may be added to explore questions such as
• What is the impact of removing a certain portion of individuals from my population?
• What is the impact of reducing infant mortality?
• How would my population be impacted if inbreeding depression occurred?
•
How would different genetic management strategies impact my population’s genetic
diversity?
The scenario you currently have loaded is listed next to the project name at the top of the
screen; this is the scenario that will be used when you run any analyses on the Run screen or
view results (unless you choose to compare results of multiple scenarios).
Your main or Baseline scenario should include all the most likely model parameters and
settings for your population—the most realistic model based on what you can reasonably expect
to happen for your population in terms of its own biology and potential management. The “extra”
model options like imports/exports, catastrophes, effects of inbreeding, etc. may be more
appropriate in alternate scenarios but you may want to include genetic management options in
your Baseline scenario if that will be a part of continued management of the population.
You can create alternate scenarios to explore the population’s potential future under
different conditions and how management actions would impact the population. These alternate
scenarios might include turning specific model options on or off (e.g. inbreeding depression,
changing types of genetic management) or modifying vital rates based on how specific
management actions might impact mortality or reproductive rates. It’s a good idea to alter only
one aspect of the model at a time, and then compare the results under that new scenario to the
Baseline results.
Creating Scenarios
Create Scenarios – manually
To create alternate scenarios, click on the Scenario Manager tab.
ZooRisk 3.8 User’s Manual
61
Within the Scenario Manager, click the button “Create New Scenario from Current
Scenario”. A pop-up box will appear that will ask you to enter a name for your new scenario; it’s a
good idea to name it something that will describe what model option or variable you’re changing.
The scenario will be added to the Scenario List where you can add a short description of the
scenario (or edit previous descriptions). The new scenario you just created will be a copy of all
the data from whatever your current scenario is (the scenario listed next to your project name at
the top of the screen). This includes the living population tables, all your data tables (male data
tables, female data tables, etc.), and any options specified in the Model Parameters tabs. After
you’ve created and described your new scenario, you need to switch to that scenario. Highlight
your new scenario in the Scenario List by clicking on the cell to the left of the scenario name.
Once your scenario is highlighted, click the “Load Highlighted Scenario” button (make sure you’ve
saved your old scenario before switching to the new one). Once you’ve switched into your new
scenario, you can then alter any of the data tables or turn model options on or off.
•
•
•
•
What is the impact of removing a certain portion of individuals from my population?
What is the impact of reducing infant mortality?
How would my population be impacted if inbreeding depression occurred?
How would different genetic management strategies impact my population’s genetic
diversity?
Managing Scenarios
Once you have created new scenario(s) ZooRisk provides the following options for
Managing your Scenarios
• Load Highlighted Scenario
• Choose Highlighted Scenario as New Baseline
• Rename Highlighted Scenario
• Delete Highlighted Scenario
• Save All Scenario Descriptions
Use the Load Highlighted Scenario to switch from your current scenario to the highlighted
scenario. Your current scenario is displayed next to the project name on the top of the screen.
When switching between scenarios, make sure you have saved any changes made in the current
scenario. Rename, Delete, and Save All options can be used to further manage your Scenario
List.
ZooRisk automatically makes the first scenario in your project the Baseline scenario. This is
important if you are running Space and Risk analyses which will automatically use the Baseline
scenario data or if you are creating sensitivity analyses which will create scenarios from the
Baseline. If, after exploring your model, you decide that you’d like to make a different scenario
your baseline, you can highlight the scenario you’d like to make baseline and click on the
“Choose Highlighted Scenario as New Baseline” button. ZooRisk will then ask you to rename
your first (former baseline) scenario.
Running simulations for multiple scenarios
In some instances, you may want to run simulations for multiple scenarios all at once—
for example, if you’ve done all your setup, reviewed preliminary results, and would like to run all
your analyses overnight or while your computer is not in use. To facilitate this, ZooRisk allows
you to run multiple simulations for multiple scenarios from the Scenario Manager screen. To do
this, highlight the scenarios you wish to run simulations for, check the boxes on the bottom left of
the screen to choose which simulations you’d like to run, and click “Run Checked Test(s) for
Highlighted Scenario(s)”. If you happen to be watching during these runs you will see each
scenario load. A pop-up box will let you know when ZooRisk has finished all of the selected runs.
ZooRisk 3.8 User’s Manual
62
Sensitivity Analysis
Sensitivity Analysis - Background
Sensitivity Analysis is a powerful tool to systematically test the effects of variation in vital
rates on the projections and risk level of your population. Sensitivity analyses in modeling are
used to evaluate:
1) the impact or importance of particular vital rates or parameters: parameters that,
when changed, result in a large change in population growth or dynamics relative to other
parameters are generally important to population growth; such parameters may be good
targets for population management if they are flexible. Parameters that have little impact
on population growth as they change value may not be good targets for population
management. For example, if your model indicated that decreasing infant mortality rates
by 10% had a larger effect on population growth than decreasing older adult mortality by
10%, it would make sense to focus management efforts on improvements of infant
survival if any improvements could be made.
2) the impact of parameter uncertainty: if a particular parameter is based on a small
sample size or there is uncertainty about the “true” value of the parameter, sensitivity
analysis can be used to vary that parameter across its range of potential values and
evaluate how much population growth and dynamics changed; if the dynamics are not
“sensitive” to the parameter’s values then it is likely not important to invest effort in getting
a more accurate parameter value, but if the dynamics are sensitive then estimating the
parameter correctly will be very important to model accuracy.
Create Sensitivity Analysis Scenarios
To conduct a sensitivity analysis, you should run multiple scenarios in which a single
model parameter is varied and compare model results to your Baseline scenario. You could
create all these alternate scenarios by hand, but to facilitate this process you can use the
Sensitivity Analysis feature in ZooRisk to create alternate scenarios with changes in mortality and
probability of breeding for males and females.
Note that to conduct a complete sensitivity
analysis you may want to investigate systematic changes in variables other than mortality and
probability of breeding; to do this, create alternate scenarios manually using the Scenario
Manager functions.
ZooRisk 3.8 User’s Manual
63
To create alternate scenarios using the Sensitivity Analysis screen in the Scenario
Manager tab, you first specify the types of changes to mortality and probability of breeding that
you’d like to make, then preview what scenarios those changes would result in, and finally
generate the alternate scenarios.
Using the pull down menu, select whether you would like to change the vital rate by a
percentage or range and click “Create Data Table.” In a percentage change, a single new
scenario will be generated which increases or decreases the Baseline value of vital rates by the
percentage you specify. For example, you could choose to increase Baseline mortality rates for
0-5 year old males by 10%; each age classes’ mortality rate would be increased by 10% of its
baseline value, so if the 1 year old mortality rate was 0.2, the new mortality rate would be 0.22.
To setup a percentage change in the table, specify the sex (male, female, or both), age range,
and vital rate that will be affected. The percentage change should range between 0 and 100 (no
need to enter the % sign). Entering a positive value for the % change will increase the vital rates
and a negative value will decrease the vital rates. Note that when adjusting vital rates by a
percentage, age classes with a Baseline vital rate of 0 will remain 0.
You can also use the Range option to create a scenario or multiple scenarios that
systematically vary a vital rate over a range of values. For example, you could choose to create
multiple scenarios that vary adult female probability of breeding from 0.10 to 0.90 incremented by
0.1; this would create nine scenarios, each with an adjusted probability of breeding for females in
the age classes you specify (e.g. probability of breeding = 0.10, 0.2, 0.3, etc.). If using this
option, specify the sex, age range, and vital rate that will be affected and the Initial vital rate, Final
vital rate, and Increment By values. New scenario(s) will be created that change the age(s) and
ZooRisk 3.8 User’s Manual
64
sex(es) you specify. As with % changes, age classes with 0 for a Baseline vital rate will remain 0
(e.g. you cannot turn a non-reproductive age class to reproductive using this function – you’d
need to do that by hand if you are interested in that change.
Once you have completed the top data table, click on the middle Preview button to see a
preview of the scenarios in the box below with the changes to the vital rates that you specified
above; you can use this preview to double-check that you setup the top table correctly.
Scenarios will automatically be named with this convention:
SA (sensitivity analysis)_Vital Rate_Age Range_ New Vital Rate or % Change
If you wish, you can select a new prefix convention for all scenarios created by the sensitivity
analysis by entering the new prefix into the box above the preview button. You can also change
the scenario names in the Sensitivity Analysis Preview table by typing in the new name into the
green Scenario Name cells in the preview window.
Once you have reviewed the scenarios to make sure the vital rates have been altered the
way you intended and are satisfied with the scenario names, click the bottom Generate button to
have ZooRisk create the scenarios. Unless you click this button, no scenarios will be created.
The new scenarios will be added to the Scenario List in the Scenario Manager screen.
ZooRisk will automatically generate a description for each scenario that gives details on the
change in vital rates. You can alter this description by typing in the green description cells. If you
add or change a description, click the “Save All Scenario Descriptions” button under Scenario
Options.
If you want to generate changes for multiple parameters (mortality and probability of
breeding), multiple age groups (infants and adults), or sexes, you can simply return to the
sensitivity analysis page and enter options for your additional Sensitivity Analysis scenarios in the
Sensitivity Analysis Options table. Changing the tables on this page will not alter the Sensitivity
Analysis scenarios that you have already created.
ZooRisk 3.8 User’s Manual
65
CHAPTER 6. Space and Risk Analysis
OVERVIEW
The general goal of a Space and Risk analysis is to help determine how different amounts of
captive space (essentially, different population sizes) affect the risk level of a given population.
The analysis is used to compare the risk levels of multiple populations which utilize similar spaces
within managed programs. The module should help the manager make decisions about
allocating space optimally between populations. The process for conducting a Space and Risk
analysis includes the steps of:
1. Creating single-species projects for each population you want included in your Space and
Risk analysis,
2. Adding individual single-species projects into your Space and Risk project and running
the Space and Risk analysis
3. Comparing risk levels for each single-species population, and identifying where
reallocation of space would change/improve risk level
As an example project to follow throughout this section, you can use the “Space and Risk
Analysis Sample” project included with the software. This sample project will run the Space and
Risk Analysis for the single species sample projects, Project 1 and Project 2.
Creating your Space and Risk project
The first step in creating a Space and Risk project is to create single-species projects for
all the populations that will make up your Space and Risk analysis. ZooRisk will utilize the
Included Individuals and other model data in data tables in the Baseline scenario of your singlespecies project, however, the Space and Risk analysis does not incorporate any Model Options
(e.g. TPS, imports and exports, genetic management, changes in vital rates due to catastrophes
Space and Risk
or inbreeding depression) even if they are set in your baseline scenario.
Analysis uses the following information for the run:
• Included Individuals table (including the allow breed options) from your Baseline Scenario
• Vital rates from the Model Male and Female data tables in your Baseline Scenario
• Model Annual Number of Offspring in your Baseline Scenario
• Model Birth Sex Ratio from your Baseline Scenario
• Number of females per breeding group from you Baseline Scenario
• Number of Iterations that you specify in your Space and Risk run screen
• Space and Risk is always run for 100 years
• Space and Risk always uses a true extinction (N=0)
Note that because none of the model options are included in your Space
and Risk analysis even if they are included in your baseline scenario, your
baseline results in your Single Species analysis may be different from the results
of your Space and Risk analysis. For example, if you choose to manage your
population by excluding individuals from the reproductive population using a
genetic management cutoff for % known, you may have harsher demographic
projections in your Single Species analysis than in your Space and Risk analysis
because individuals that are not included in the Single Species simulations will
be included in Space and Risk projections.
Review the parameters you set in your baseline scenario to double check that the model
represents the most realistic options for the near future since it will be used for you Space and
Risk analysis.
ZooRisk 3.8 User’s Manual
66
After you have created all the relevant single-species projects, you are ready to create
your Space and Risk project. To do this, open ZooRisk and, at the Project Start screen, click on
the “Create a Space and Risk Project” tab.
In this window, you can select all the relevant single-species projects and click on the
right arrow button to move the project to your Loaded Single-Species Projects window. You can
remove any projects you decide not to include in the Loaded Single-Species Projects window by
clicking the left arrow button. Once you have finished, name and describe your project and click
on the “Create Space and Risk Project” button.
ZooRisk 3.8 User’s Manual
67
You can also load a Space and Risk project you’ve already created in the “Load a
Space and Risk Project” tab. Highlight the Space and Risk project you wish to load and click
the “Load Space and Risk Project” button. ZooRisk will advance to the run screen even if you
have already run your Space and Risk project. If you know that you have already completed the
Space and Risk run, proceed to the Results tab.
ZooRisk 3.8 User’s Manual
68
Running your Space and Risk project
Once you have created your project, the Space and Risk module will open to the Space
and Risk Run screen. Enter the number of iterations you would like to use for the Space and
Risk simulations in the box. The simulations of each species included in your Space and Risk
project will be run for this many iterations. We recommend running your Space and Risk
analyses at least 15-20 times for testing and at least 100 times for final reports. Then, click on
the button to run your Space and Risk simulations. Because you are running multiple simulations
for each population, running your Space and Risk project may take some time.
The Space and Risk analysis focuses on the population’s probability of extinction (P(E))
at 100 years, the first risk test in ZooRisk’s set of five tests. Remember that P(E) uses a true
extinction (N=0), rather than the extinction threshold. This test is used in the Space and Risk
module to evaluate what the impact of adding or removing spaces would be on each population’s
long-term viability.
To simulate the Space and Risk analysis, ZooRisk takes each single-species Baseline
model and systematically varies the target population size (TPS). The steps of this analysis are:
1. ZooRisk begins by imposing a target population size of 0 on your population. The Space
and Risk analysis always uses the strategy Approach TPS As Soon As Possible (see
Chapter 2, Model Options for more information on how this strategy for TPS is imposed).
ZooRisk then completes a stochastic model simulation for 100 years and the specified
number of iterations, calculates the P(E), and determines the risk category of the
population (Critical in Captivity, Endangered in Captivity, Vulnerable in Captivity, and Low
Risk in Captivity). This categorization uses the same definitions as in the single-species
risk test:
RISK TEST
Critical in
Captivity
Endangered in
Captivity
Vulnerable in
Captivity
Low Risk in
Captivity
Probability of
extinction in 100
years
50-100% P(E)
within 100 years
20-49% P(E)
within 100 years
10-19% P(E)
within 100 years
0-9% P(E)
within 100 years
ZooRisk 3.8 User’s Manual
69
2. ZooRisk then cycles through the same simulation with different values of TPS (ranging
from 0 to greater than your initial population size) to determine the population size
breakpoints for each risk level for the single-species population.
3. ZooRisk completes these two steps with each single-species population in your Space
and Risk project.
Results from your Space and Risk project
The results for the Space and Risk project are displayed in the Space and Risk Analysis
table.
Each population is listed separately, along with relevant information for interpreting the
Space and Risk analysis results. The current N column displays the population size in your
included individuals table as of the analysis date. The P(E)100 years at current N column
displays the risk category for each population if the current N is used as the target population
size.
The space columns on the right of the table show the Space and Risk analysis results of
the range of population sizes that would place the population in a given risk category. If the
target population size (TPS) was set at any number within each range, the population would be in
the specified risk category in terms of its probability of extinction in 100 years. If a cell displays
“cannot be attained”, the population will not achieve that risk level for its probability of extinction
within 100 years. The category that each population falls into with its current N is highlighted (red
for Critical, orange for Endangered, yellow for Vulnerable, and green for Low Risk).
The Spaces for Critical column displays values of the TPS that would cause the
population’s probability of extinction to be greater than 50% over 100 years (i.e., the population
went extinct in at least 50% of the iterations). The Spaces for Endangered column displays values
of TPS that would cause the population’s probability of extinction to be 20-49% over 100 years.
The Spaces for Vulnerable column displays values of TPS that would cause the population’s
probability of extinction to be 10-19% over 100 years. The Spaces for Low Risk column displays
ZooRisk 3.8 User’s Manual
70
values of TPS that would cause the population’s probability of extinction to be 0-9% over 100
years.
In using this table to make decisions on space allocation between different populations,
you want to compare the range of population sizes under each risk level; you should be able to
determine which populations may have “excess” space (either in their current population size or
target population size) and which populations are in need of space. Managers should consider
what level of risk is acceptable for a given population. You should also consider whether there
are things besides space constraints that are putting the population at risk. Because the Space
and Risk module does not use many of the model options in ZooRisk, once you have used it to
guide you on potentially viable TPS you should reevaluate those TPS in the single-species risk
analysis, which can incorporate the full range of model options.
As an example of how you might utilize the Space and Risk Analysis table, we’ll use two
populations, Project 1 and Project 2. In the screen capture above, the Risk Score for P(E) at 100
years for the population in Project 1 is Vulnerable— if the population was permanently limited to
its current spaces (44) the risk of extinction at 100 years for the population places it in the
Vulnerable category. The columns on the right of the table illustrate how that result would change
based on allocating more or less space—if it was only allocated 0-31 spaces, it would be Critical
in Captivity, if it was allocated 32-41 spaces, it would be Endangered in Captivity, etc. The Risk
Score for P(E) at 100 years for the population in Project 2 is Low Risk – if the population was
permanently limited to its current spaces (97) the risk of extinction at 100 years for the population
places it in the Low Risk category. Again, the columns on the right of the table illustrate how that
result would change based on allocating more or less space
By comparing the P(E) at 100 years at current N and the ranges in the columns on the
right between populations, you should be able to determine which population has “excess” space
and which populations is in need of space. In this case, Project 1 is Vulnerable based on P(E) at
100 years and Project 2 is Low Risk. Project 2 currently has 97 spaces, however, even with
fewer spaces it would still be Low Risk for P(E) at 100 years. If you reallocate 25 spaces from the
Project 2 population to the Project 1 population, you could alleviate the probability of extinction for
the Project 2 population. At target population sizes of 69 and 72 for populations in Project 1 and
Project 2 respectively, both populations will be at Low Risk for probability of extinction within 100
years.
It is important to remember that these scores are based only on the probability of
extinction at 100 years. There may be other factors (e.g., GD, distribution of breeding
pairs, etc) besides space that are putting the population at risk; you may want to return
to the single-species risk analysis and evaluate how those other risks might impact
your prioritization decisions.
The results can be documented in two ways: you can create a standardized report using
the Report tab, or you can create a specialized report using the Clipboard tab. On the Report tab,
you can enter information about the project, the program, and the planning meeting where the
project was discussed. Once you have entered the information that you wish to be included in
your report, click on the Generate Report button. ZooRisk will take a moment to automatically
generate a report. Along with the Space and Risk Analysis Table, the report includes a table with
spaces for the common name, scientific name, and studbook name for each single-species
project. This information should be entered manually after the report is created. The clipboard
feature can be used as described for Single-Species Analysis (page 24).
ZooRisk 3.8 User’s Manual
71
Literature Cited
Armbruster, P., Fernando, P., & Lande, R. 1999. Time frames for population viability analysis of
species with long generations: an example with Asian elephants. Animal Conservation 2, 69-73.
Ballou, Jonathan D. and Thomas J. Foose. Demographic and genetic management of captive
populations. Wild Mammals in Captivity: Principles and Techniques. Ed. Devra G. Kleiman,
Mary E. Allen, Katerina V. Thompson, Susan Lumpkin, and Holly Harris. Chicago: University of
Chicago Press, 1996.
Cronokrak, Peter and Derek A. Roff. 1999. Inbreeding depression in the wild. Heredity. 83:260270.
Earnhardt, JE, L Bier, SD Thompson. Inbreeding depression in captive populations. In prep.
Hardy, Ian C.W. Sex ratios: Concepts and research methods. Cambridge: Cambridge University
Press, 2002.
Hedrick, Philip W. and Steven T. Kalinowski. 2000. Inbreeding depression in conservation
biology. Annual Review of Ecology and Systematics. 31:139-62.
ISIS. 2002. SPARKS 1.5: Single Population Analysis and Record Keeping System. Apple
Valley, MN: International Species Information System.
Keller, Lukas. 1998. Inbreeding and its fitness effects in an insular population of song sparrows
(Melospiza melodia). Evolution. 52:240-250.
Lacy, R. C. 1995. Clarification of genetic terms and their use in the management of captive
populations. Zoo Biology 14, 565-578.
Pollak, J. P., R. C. Lacy and J. D. Ballou. 2005. Population Management 2000, version 1.210.
Chicago Zoological Society, Brookfield, IL.
Ralls, Katherine, Jonathan D. Ballou and Alan Templeton. 1988. Estimates of lethal equivalents
and the cost of inbreeding in mammals. Conservation Biology. 2:185-193.
Thompson, S.D., Earnhardt, J.M., and Turner-Erfort, G. 1997. Guidelines for Data Entry and
Maintenance of North American Regional Studbooks. Lincoln Park Zoo, Chicago, Illinois.
ZooRisk 3.8 User’s Manual
72
APPENDIX 1. DATA EXTRACTION IN ZOORISK
ZooRisk extracts the demographic data needed to calculate age-specific vital rates for
males and females from a SPARKS dataset. The program extracts data directly from the
master.dbf and moves.dbf files of your studbook, rather than taking an exported file from
SPARKS. Using the views set in your extraction windows, ZooRisk calculates mortality and
reproductive rates with the number of death or reproductive events as a numerator and the
number of individuals “at risk” for a given event as the denominator. Because these values are
essential to your model simulations, we have provided full details on how data are extracted and
how vital rates are calculated.
Mortality data extraction
For data that falls into the mortality date and institution window specified in the studbook
data extraction screen, ZooRisk tallies the number of deaths in each age class for males and
females. For individuals with unknown sex, ZooRisk assigns 0.5 to the appropriate female age
class and 0.5 to the appropriate male age class. For dead individuals with estimated birth or
death dates (estimated to day, month or year), ZooRisk uses the entered date to calculate an age
at death. ZooRisk excludes data from dead individuals with completely unknown birth dates.
ZooRisk calculates mortality rates (Qx) for each age class as:
the number of deaths
the number of individuals at risk for death
Reproductive data extraction
For males, ZooRisk only tracks whether an individual age class is reproductive or not. To
determine this, ZooRisk looks at the data within your fecundity date and institution window and
makes any age classes in which a male has sired an offspring reproductive.
For females, ZooRisk uses two reproductive variables to determine the number of births in a
given simulation year: a specific age classes’ probability of breeding and the population’s
observed annual number of offspring. Note that all offspring are used to calculate the female’s
reproductive variables; this is different from calculations in SPARKS and PM2000, where female
offspring are used to calculate female fecundity values and male offspring are used to calculate
male fecundity values.
An age classes’ probability of breeding is calculated, for each age class, as
the number of females that gave birth at least once
the number of females at risk for reproduction
Thus a female who had one offspring when she was 20, a female that had a litter of three
offspring when she was 20, and a female that had two litters of five offspring each when she was
20 would each be assigned a 1 in the numerator of age class 20. The number of offspring they
had is considered in the annual number of offspring distribution.
The distribution of the annual number of offspring is based on the total number of offspring an
individual mother has been observed to produce during the duration of one year (starting and
ending on each Dam’s birthday, not the calendar year). This is an annual number because the
model time step is a year. This means that:
• for a species with a single offspring per year, this “distribution” would be 1 offspring per
year 100% of the time
ZooRisk 3.8 User’s Manual
73
•
for a species that produces a litter/clutch in a single breeding event (i.e. seasonal
breeders), this distribution corresponds to a conventional “litter size distribution”, where
ZooRisk determines, from all the breeding events within the extraction window, the
frequency distribution of each litter size (singletons, twins, triplets, etc.)
• for a species with multiple potential breeding events per year (i.e. multiple-clutching,
“fast” species), this distribution is the total number of offspring an individual female could
potentially give birth to in a year.
The annual number of offspring distribution applies to the entire female population, not a specific
age class.
NOTE: the annual number of offspring distribution is based on historic data limited to
the date and geographic restrictions in your fecundity data extraction window; if there
is not enough reproductive data, the distribution may not be a good description of what
a given female could produce in a year. If you have further information or can make
an educated guess about potential values, the distribution can be edited in the “Model
Annual Number of Offspring” table.
Both the probability of breeding and the annual number of offspring values are easily extracted
and calculated for individuals with known birthdates and known parentage. Unknown data
complicates extraction and estimation; for consistency, data with the following situations are
excluded from all reproductive values:
• Offspring has a known dam (i.e. a specific ID is identified as an offspring’s dam) but the
dam has an unknown birthdate
• Offspring has an unknown dam (i.e. an offspring’s parent is completely unknown)
• Offspring has an unknown birthdate (U in the birthdate estimator field)
This excluded data is displayed in the Notes section on the Female Data Table screen. Review
the counts of excluded unknown data of each type along with the number of offspring that are
included. If a large proportion of data from your studbook are excluded from the reproductive
calculations or if the number of offspring that the calculations are based on is very low, interpret
your reproductive values with caution as the values may not be representative of what your
population is capable of. If you have more information on what the reproductive values should
be, edit the reproductive values. Be sure to document your changes!
“At Risk” data extraction
ZooRisk uses slightly different methods than SPARKS and PM2000 to calculate the
number of individuals at risk for demographic events within a date window—ZooRisk does not
pro-rate risk.
An individual is considered “at risk” for a specific age class if it was alive and within the
data window (also called a “view”) during that age class. Your data windows are set in the
Studbook Extraction Window. The Institution Windows define the subset of institutions that you
are considering in your managed population (or that you want to use demographic data from),
and if an individual is living at a zoo that is included in that institution window it can be considered
at risk. The start and end dates in the mortality and fecundity windows define the time span of an
individual’s life that it can be considered at risk.
Instead of giving an individual partial credit for being within the date/institution window for
a portion of an age class, ZooRisk assigns full credit (a 1 in the denominator) for each individual
that was at risk at all during the age class. For example, if an individual turned 3 on January 1st
and then transferred out on July 15th, prorating methods would give that individual 0.5 credit in the
calculation of risk. ZooRisk’s methods give that individual full credit for the entire age class.
Individuals with completely Unknown birthdates are not included in at risk calculations.
ZooRisk 3.8 User’s Manual
74
APPENDIX 2. DEFINITIONS
ZooRisk Variables
Data Extraction
Start date: The start date is the beginning date in your mortality or fecundity date span in the
data extraction window.
End date: The end date is the final date in your mortality or fecundity date span in the data
extraction window.
Living Population and Analysis date: The Living population and analysis date is the date on
which your current (“living”) population will be extracted. For most analyses this will be today’s
date or the currentness date for your studbook.
Institution windows: The institution windows limit your data extractions to “geographic”
windows (North America, all institutions in the studbook, or institutions within a FED file).
Living Population
Included individuals: The Included Individuals table displays all the individuals that will be used
in your starting population. You can designate individuals as non-breeders using the “Allow
Breed” column; these individuals will hold space but not be allowed to reproduce. You can sort
this list by clicking on the column titles.
Excluded individuals: Individuals in the Excluded Individuals table will not be included in the
starting population for your simulations. If you have accidentally added individuals to this table,
you can remove them by using the left arrow button.
Individuals with unknown ages: This table displays all the individuals living on your analysis
date with unknown birthdates (their birth date estimator = U). You can assign ages to these
individuals in the “User Defined Age” column. The years since first known event date may be
used as a guideline for the minimum age. After assigning an age, move the individuals from the
Excluded to the Included Individuals table.
Individuals with unknown sex: Use this table to assign sexes to individuals with unknown sex
that are in your living population. Select the sex of individuals in the “Sex” column. After
assigning a sex, move the individuals from the Excluded to the Included Individuals table.
Data Tables
Mortality (Qx): Probability that an individual of age x dies during time period, or the proportion of
individuals that die during an age class. It is calculated from the number of animals that die during
an age class divided by the number of animals that were alive at the beginning of the age class
(i.e. the number at risk).
@Risk (Qx or reproduction): The number of individuals that have lived during an age class. The
number at risk is used to calculate P(b) and Qx by dividing the number of births and deaths that
occurred during an age class by the number of animals at risk of dying and reproducing during
that age class.
Probability of breeding (P(b)): The age-specific probability that a female will have at least one
offspring in a year.
ZooRisk 3.8 User’s Manual
75
Annual number of offspring (ANO): the distribution of the total number of offspring an
individual female could produce in the duration of one year, based on the studbook data within
your extraction window. For annual breeders, this is analogous to a litter size distribution. For
species with the potential for multiple clutches in a year, this value can be thought of as the
cumulative annual total.
Birth sex ratio: The birth sex ratio (BSR) is the ratio of male births: total births (0.5 is a nobiased BSR, >0.5 is male-biased, <0.5 is female biased).
Model Parameters
Iterations: The number of iterations is the number of times you want the model to run. We
recommend 5-10 model runs for initial set-up and testing, and 100-500 iterations for final
analyses and reports.
Extinction threshold: The extinction threshold is the population size your population will be
considered extinct at; this can either be 0 or some quasi-extinction level.
Gene Diversity threshold: The gene diversity (GD) threshold is a benchmark level of gene
diversity. A conventional GD threshold is 0.9 (90% of the founding population’s GD retained)
Number of males per breeding group and number of females per breeding group: The
number of males/females per breeding group allows you to select the appropriate breeding
system for your population. Monogamous species should have 1 male and 1 female per breeding
group; polygynous species would have 1 male and multiple females per breeding group.
Number of years between pairing: The number of years between pairing is the number of
years a breeding pair that was formed on a “major” pairing year will stay together before repairing (i.e. the number of years before all mating pairs have the chance of being reshuffled).
Target population size (TPS): The target population size is the maximum number of specimens
that a program is willing to support. This parameter is only used in your simulations if you turn on
“Impose Target population size” in the menu to the right.
Reproductive Population: The reproductive population refers to any individuals in the Included
Individuals table that are allowed to breed (have a “Yes” in the Can Breed? Column), are younger
than the oldest reproductive age class, and are above the % known cutoff set in the genetic
management tab.
Population mean kinship: The population mean kinship (MK) is the average, weighted by %
known, of all the “mks” of the reproductive individuals in the living population, excluding founders;
each individual’s mean kinship (mk) is the coefficient of kinship or relatedness between the
individual to every other living, reproductive, non-founder individual in the population. The
calculated MK is based on the reproductive population in the Included Individuals table, excluding
founders and potential founders, and is displayed on the genetic management tab.
Population gene diversity: The population’s gene diversity is a measure of the genetic variation
retained in your population relative to the founding or baseline population that started your
studbook. The calculated GD is based on the reproductive population in the Included Individuals
table, excluding potential founders, and is displayed on the genetic management tab.
Population Inbreeding coefficient (F): The mean inbreeding coefficient of a population will be
the proportional decrease in observed heterozygosity relative to the expected heterozygosity of
the founder population. The population’s inbreeding coefficient is the average of all individual
inbreeding coefficients in the living, reproductive population, excluding potential founders. An
ZooRisk 3.8 User’s Manual
76
individuals inbreeding coefficient is the probability that the two alleles at a genetic locus are
identical by descent from an ancestor common to both parents. The population’s inbreeding
coefficient is displayed on the genetic management tab.
Population Percent known: The mean Percent known is the average of all the percent known
values of individuals in the Included Individuals table. An individual’s percent known is the
percent of an animal's genome that is traceable to known Founders. Thus, if an animal has an
UNK sire, the % Known = 0.5. If it has an UNK grandparent, % Known = 0.75. The population’s
percent known is displayed on the genetic management tab.
Risk Results
Overall risk level: The overall risk level for your population is the highest risk category received
in any of the 5 risk tests.
Risk Test: The 5 risk tests are different tests of population risk based on model results or past
studbook data.
Test Results: The criteria results display the results for your population for each risk criteria.
These results are based on model simulations or on data extracted from your studbook.
Risk Category: The risk category (Critical, Endangered, Vulnerable, Low Risk) for your
population for each risk criteria.
Critical in Captivity: The most serious risk category, indicating that the population scored in the
Critical category for at least one of its tests.
Endangered in Captivity: The second most serious risk category, indicating that the population
scored in the Endangered category for at least one of its tests.
Vulnerable in Captivity: The second least serious risk category, indicating that the population
scored in the Vulnerable category for at least one of its tests.
Low Risk in Captivity: The risk category indicating that the population is stable and not in
danger from multiple sources of risk.
Results
Population Growth Rate (Lambda, λ): The proportional change in population size from one year
to the next. Lambda is based on observed changes in population size from year to year. A
lambda of 1.11 means a 11% per year increase; lambda of 0.97 means a 3% decline in size per
year.
Extinction: probability of reaching: The probability a population will reach the extinction
threshold during a set of runs, calculated as the number of populations that reach the extinction
threshold divided by the total number of simulated runs.
Extinction: median years: For individual iterations that reach the extinction threshold, the
median number of years to the extinction threshold.
Extinction: minimum years: The shortest period of time for an individual iteration to reach the
extinction threshold.
Target Population Size: probability of reaching: The probability a population will reach the
target population size at least once during a set of runs, calculated as the number of populations
that reach the target population size divided by the total number of simulated runs.
ZooRisk 3.8 User’s Manual
77
Target Population Size: median years: For individual iterations that reach the target population
size, the median number of years to the target population size.
Target Population Size: minimum years: The shortest period of time for an individual iteration
to reach the target population size.
GD threshold: probability of reaching: The probability a population will reach the gene diversity
threshold at least once during a set of runs, calculated as the number of populations that reach
the gene diversity threshold divided by the total number of simulated runs.
GD threshold: median years: For individual iterations that reach the gene diversity threshold,
the median number of years to the gene diversity threshold.
GD threshold: minimum years: The shortest period of time for an individual iteration to reach
the gene diversity threshold.
ZooRisk 3.8 User’s Manual
78