1
STARCOIN
C&A User Manual
Volume I of II
AV
ER
S
co
nf
ide
nt
ia
l
Edition 26.04.1999
Author G&D
Status FINAL/CONFIDENTIAL
Version 2.0.0/Revision 15.04.99
Giesecke & Devrient GmbH
Prinzregentenstr. 159
Postfach 80 07 29
81607 München
co
nf
ide
nt
ia
l
AV
ER
S
© Copyright 1999 – All rights reserved
Giesecke & Devrient GmbH
Prinzregentenstr. 159
Postfach 80 07 29
81607 München
Germany
The information or material contained in this document is property of G&D/GAO and any recipient of this
document shall not disclose or divulge, directly or indirectly, this document or the information or material
contained herein without the prior written consent of G&D/GAO.
All copyrights, trademarks, patents and other rights in connection herewith are expressly reserved to the
Giesecke & Devrient group of companies and no license is created hereby.
All brand or product names mentioned are trademarks or registered trademarks of their respective holders
Content
Table of content
1 INTRODUCTION ...................................................................................................................................................................... 6
1.1 PURPOSE..................................................................................................................................................................................... 6
1.2 SCOPE ......................................................................................................................................................................................... 6
1.3 ACRONYMS AND ABBREVIATIONS .............................................................................................................................................. 7
1.4 RELATED PUBLICATIONS ............................................................................................................................................................ 9
1.5 ORGANISATION OF THIS DOCUMENT.......................................................................................................................................... 10
1.6 GENERAL DESCRIPTION ............................................................................................................................................................ 11
1.7 WRITING STYLE ........................................................................................................................................................................ 12
co
nf
ide
nt
ia
l
1.8 MENU BAR ............................................................................................................................................................................... 12
1.8.1 Colour Codes ................................................................................................................................................................... 12
1.8.2 Date Format..................................................................................................................................................................... 12
1.8.3 Menu Hierarchy ............................................................................................................................................................... 13
1.9 STARTING STARCOIN............................................................................................................................................................. 17
2 SYSTEM SETUP AND ADMINISTRATION ....................................................................................................................... 19
2.1 INTRODUCTION ......................................................................................................................................................................... 19
2.2 MENU HIERARCHY .................................................................................................................................................................... 20
2.2.1 Prerequisites .................................................................................................................................................................... 20
2.3 KEY MANAGEMENT .................................................................................................................................................................. 21
2.3.1 Introduction ..................................................................................................................................................................... 22
2.3.2 Install New Key ................................................................................................................................................................ 24
2.3.3 Add New Key Instance ..................................................................................................................................................... 27
2.3.4 View Keys......................................................................................................................................................................... 28
2.3.5 Delete Key........................................................................................................................................................................ 29
AV
ER
S
2.3.6 Reinstall Key .................................................................................................................................................................... 30
2.3.7 Update Topical Version ................................................................................................................................................... 31
2.3.8 Change LMK.................................................................................................................................................................... 32
2.3.9 Issue Key Card................................................................................................................................................................. 32
2.4 SYSTEM INIT. PARAMETER MAINTENANCE (SET-UP)................................................................................................................ 32
2.4.1 Introduction ..................................................................................................................................................................... 32
2.4.2 Customer Card Parameters - ICC Param........................................................................................................................ 33
2.4.3 Customer Card ISO Parameters - ISO Param................................................................................................................. 35
2.4.4 Settlement Bank................................................................................................................................................................ 38
2.4.5 Service Charge Parameters ............................................................................................................................................. 40
2.4.6 Terminal Card Parameters - TK Param. ......................................................................................................................... 44
2.4.7 CA-Provider..................................................................................................................................................................... 47
2.4.8 Redlist Params................................................................................................................................................................. 48
2.5 ROLE ITEM MASTER (ADMINISTRATION) .................................................................................................................................. 49
2.5.1 Insert a Role Item record ................................................................................................................................................. 49
2.5.2 Update a Role Item record............................................................................................................................................... 50
2.5.3 Delete a Role.................................................................................................................................................................... 51
2.6 NEW USER ENTRY (ADMINISTRATION)..................................................................................................................................... 51
2.6.1 Insert New user record..................................................................................................................................................... 52
STARCOIN C&A User Manual
Version 2.0.0/Revision 15.04.99
Volume I of II/26.04.99
Page 3 of 107
Content
2.6.2 Retrieve the User record .................................................................................................................................................. 52
2.6.3 Update / Delete User record ............................................................................................................................................ 53
2.7 CHANGE PASSWORD ENTRY (ADMINISTRATION) ...................................................................................................................... 53
2.8 ARCHIVE TRANSACTION (ADMINISTRATION) ............................................................................................................................ 54
2.9 PURGE TRANSACTION (ADMINISTRATION)................................................................................................................................ 55
2.10 VIEW / PRINT SYSTEM LOG..................................................................................................................................................... 55
2.11 PURGE SYSTEM LOG ............................................................................................................................................................... 56
2.12 EXPORT OF KEYS .................................................................................................................................................................... 57
2.12.1 Exported key groups....................................................................................................................................................... 57
2.12.2 Export ICC Personalisation Key.................................................................................................................................... 59
2.12.3 TK Personalisation transport Key.................................................................................................................................. 59
2.12.4 Transfer Card Personalisation transport Key................................................................................................................ 60
co
nf
ide
nt
ia
l
2.12.5 Settlement Data Securing Keys transport key ................................................................................................................ 60
2.12.6 Personalisation Data Securing Keys transport key........................................................................................................ 61
2.12.7 Card Register / Create Keys transport key..................................................................................................................... 62
2.12.8 TK Personalisation keys................................................................................................................................................. 62
2.12.9 Transfer Card Personalisation key ................................................................................................................................ 63
2.12.10 Settlement Data Securing Keys .................................................................................................................................... 64
2.12.11 Personalisation Data Securing Keys............................................................................................................................ 64
2.12.12 Card Register / Create Keys......................................................................................................................................... 65
3 REDLIST MANAGEMENT .................................................................................................................................................... 66
3.1 MENU HIERARCHY .................................................................................................................................................................... 66
3.1.1 Prerequisites .................................................................................................................................................................... 66
3.2 GENERATE REDLIST DATA ........................................................................................................................................................ 66
3.3 PURGE REDLIST DATA .............................................................................................................................................................. 67
4 TERMINAL CARD UPDATE ................................................................................................................................................. 68
4.1 INTRODUCTION ......................................................................................................................................................................... 68
AV
ER
S
4.2 PREREQUISITES ......................................................................................................................................................................... 68
4.3 NAVIGATION FUNCTIONS........................................................................................................................................................... 69
4.4 INSERT A NEW UPDATE COMMAND ........................................................................................................................................... 69
4.5 REMARKS TO UPDATE MANAGEMENT........................................................................................................................................ 70
5 MASTER MAINTENANCE .................................................................................................................................................... 71
5.1 INTRODUCTION ......................................................................................................................................................................... 71
5.1.1 Prerequisites .................................................................................................................................................................... 71
5.1.2 Navigation functions ........................................................................................................................................................ 71
5.2 POOL MAINTENANCE ................................................................................................................................................................ 72
5.2.1 Pools and terminal cards ................................................................................................................................................. 72
5.2.2 Insert a new Pool ............................................................................................................................................................. 72
5.2.3 Update an existing Pool Record ...................................................................................................................................... 73
5.2.4 Query Pool ....................................................................................................................................................................... 74
5.3 BANK MAINTENANCE ............................................................................................................................................................... 75
5.3.1 Insert A New Bank............................................................................................................................................................ 76
5.3.2 Update an Existing Bank Record ..................................................................................................................................... 80
5.3.3 View Pool Details............................................................................................................................................................. 80
5.3.4 Issue Bank Authorisation Card (BAC) ............................................................................................................................. 81
Page 4 of 107
STARCOIN C&A User Manual
Volume I of II/26.04.99
Version 2.0.0/Revision 15.04.99
Content
5.3.5 Update Bank Authorisation Card (BAC) ......................................................................................................................... 81
5.3.6 Replace Bank Authorisation Card (BAC) ........................................................................................................................ 81
5.4 BANK AUTHORISATION CARD (BAC) INFORMATION MAINTENANCE ....................................................................................... 81
5.4.1 Issue a Bank Authorisation Card ..................................................................................................................................... 82
5.4.2 Update a Bank Authorisation Card ................................................................................................................................. 82
5.4.3 Replace a Bank Authorisation Card ................................................................................................................................ 82
5.4.4 Generate a New Bank Clerk............................................................................................................................................. 82
5.4.5 Search for existing Bank Clerk ........................................................................................................................................ 82
5.4.6 Show Bank Clerk Details ................................................................................................................................................. 83
5.4.7 Create a New Bank Authorisation Card .......................................................................................................................... 83
5.4.8 Show Bank Authorisation Card Details ........................................................................................................................... 84
5.4.9 Exporting Bank Authorisation Card Details.................................................................................................................... 84
co
nf
ide
nt
ia
l
5.4.10 Updating Bank Authorisation Card ............................................................................................................................... 84
5.4.11 Replacing Bank Authorisation Card .............................................................................................................................. 84
5.4.12 Clear Form .................................................................................................................................................................... 85
5.4.13 Close Form .................................................................................................................................................................... 85
5.5 BANK CLERK MAINTENANCE ................................................................................................................................................... 85
5.5.1 Create a New Bank Clerk................................................................................................................................................. 85
5.5.2 Clear the screen ............................................................................................................................................................... 85
5.5.3 Close the screen ............................................................................................................................................................... 86
5.6 POOL - BANK MAINTENANCE ................................................................................................................................................... 86
5.6.1 Generate a New Pool ....................................................................................................................................................... 86
5.6.2 Select a Particular Pool................................................................................................................................................... 87
5.6.3 Attach a Bank to a Pool ................................................................................................................................................... 87
5.6.4 Detach a Bank from a Pool.............................................................................................................................................. 87
5.6.5 Show Pool Information in Details.................................................................................................................................... 87
5.6.6 Show Bank Information in Details ................................................................................................................................... 88
5.7 MANUFACTURER MAINTENANCE.............................................................................................................................................. 88
5.7.1 Insert a new Terminal Manufacturer ............................................................................................................................... 88
AV
ER
S
5.7.2 Deleting A Manufacturer ................................................................................................................................................. 89
5.7.3 Update an Existing Manufacturer Record ....................................................................................................................... 89
6 CUSTOMER AND CUSTOMER CARD HANDLING PROCESS ..................................................................................... 91
6.1 INTRODUCTION ......................................................................................................................................................................... 91
6.1.1 Purpose ............................................................................................................................................................................ 91
6.1.2 Prerequisites .................................................................................................................................................................... 92
6.2 ISSUE CUSTOMER CARD ........................................................................................................................................................... 92
6.2.1 Access customer and card set-up screens ........................................................................................................................ 92
6.2.2 Enter New Customer ........................................................................................................................................................ 92
6.2.3 Issue a Card to an Existing Customer ............................................................................................................................. 94
6.2.4 Replace Customer Card ................................................................................................................................................... 99
6.2.5 Update a Customer Card Status .................................................................................................................................... 102
6.2.6 Update Customer ........................................................................................................................................................... 106
6.2.7 Delete Customer Information......................................................................................................................................... 107
STARCOIN C&A User Manual
Version 2.0.0/Revision 15.04.99
Volume I of II/26.04.99
Page 5 of 107
1 Introduction
1
FINAL/CONFIDENTIAL
Introduction
Congratulations on your purchase of a STARCOIN Payment System.
The STARCOIN system is primarily perceived to introduce an Electronic Purse,
Cheque system and on-line/off-line Debit-POS payment services for the customers.
1.1
Purpose
co
nf
ide
nt
ia
l
Information on various transactions like loading/unloading of customer card and
uploading of purchase transactions are being handled by the system. It also deals with
clearance/settlement of customer and merchant transactions. The system takes care of
issuance/replacement/updating of Customer/Merchant cards. These data are maintained
in a database. This application generates a set of reports to facilitate the users with
relevant information.
This manual is intended to provide information of the STARCOIN Clearing &
Administration system (C&A System), about the features and capabilities of the system
to enable the user to efficiently operate with it.
It also guides the User /System Administrator to a successful installation of the software.
1.2
Scope
AV
ER
S
The system scope includes the following functionality:
• System Processes
One of the main subprocess of this process is the system ‘Set-up’process. The
system ‘Set-up’ process includes
• The set-up of the system security keys of the system through the ‘Key
Management’process.
• Set-up of the system initialisation data for initialisation of the system through the
‘SysInit’ (System initialisation) process.
Other subprocesses of the system are System ‘Administration’ for maintenance of the
users of the system and periodic archival and purge of historic data , periodic purge of
System Log and ‘Export Keys’for exporting keys for external usage.
• Master Maintenance
This process includes the set-up of ‘Pools’, ‘Banks’, and association between the
Pools and Banks through the ‘Pool-Bank’process. Issue, Update and Replace of
Bank Authorisation Cards are handled from Bank Entry module. Terminal
manufacturer details are also maintained through this process.
Page 6 of 107
STARCOIN C&A User Manual
Volume I of II/26.04.99
Version 2.0.0/Revision 15.04.99
FINAL/CONFIDENTIAL
1 Introduction
co
nf
ide
nt
ia
l
• Customer and Customer Card Handling Process.
Deals with maintenance of customers for the system and the Issue, Renew, Update
and Replace of Customer Cards for the full life cycle of the card.
• Merchant / Bank Terminal / Terminal Card Handling Process
Deals with issue and update of Merchant/Bank Terminals for the system and the
Issue, Renew, Update and Replace of Terminal Cards for the full life cycle of the
card.
• Personalisation Process
Deals with the generation of personalisation data of customer cards for the system
and the reception of the personalisation confirmation file.
• Settlement Process
Does the settlement of Load, Unload and Purchase Transaction, if a manual
settlement has been chosen during system setup.
• Other processes including Queries / Reports and Utilities.
These processes are not mutually exclusive and have additional functionality that
administrates and links the above processes.
1.3
Acronyms and Abbreviations
The System consists of a set of terminology which are commonly abbreviated.
Phrases less than 6 characters can also be abbreviated with proper justification. The
System reserves a standard list of abbreviations. A simple list of abbreviations is shown
here.
Abbreviation
Account
A/c
Address
Addr
Amount
Amt
BANK
BNK
BANK_POOL
BPL
CA_PROVIDER
CAP
CARD_POOL
CPL
Clearing
Clr
Clearing and Administration
CNA
Confirmation
Conf
Credit
Cr
CUST_CARD
CRD
CUST_TRANSACTION
CTN
Customer
Cus
CUSTOMER
CST
AV
ER
S
Long Name
STARCOIN C&A User Manual
Version 2.0.0/Revision 15.04.99
Volume I of II/26.04.99
Page 7 of 107
1 Introduction
FINAL/CONFIDENTIAL
DAV
Debit
Db
Details
Dtls
ECH_STLADVICE
ESL
Electronic Cheque
ECH
Host Security Module (=HSM)
HSM
IEP_STLADVICE
ISL
IEPECH
IEH
Information
Info
Intersector Electronic Purse
IEP
KEY_VERSION
KVR
Local Master Key
LMK
Manufacturer
Manf
Merchant
MERCHANT
MRC_POOL
co
nf
ide
nt
ia
l
DB_ADVICE
MRC
MPL
PC-Security Module (=HSM)
HSM
Personalisation
Pers
Point of Sales
PUR_TRANSACTION
Purchase
Query
Report
Request
Response
Result
AV
ER
S
Settlement
Page 8 of 107
Mrc
POS
PTN
Pur
Qry
Rpt
Req
Resp
Rslt
Stl
Signature
Sig
SYSADM_CURRENCY
CUR
SYSADM_ERRORS
ERR
SYSADM_ITEMS
ITM
Reserved for future use
RFU
SYSADM_ROLE_ITEMS
RLI
SYSADM_ROLES
ROL
SYSADM_USERS
RLU
SYSADM_USERS
USR
Temporary
Temp
TERM_MANF
TMF
Terminal
Trm
TERMINAL
TRM
Transaction
Trans, Tx
Transfer
Trnsf
STARCOIN C&A User Manual
Volume I of II/26.04.99
Version 2.0.0/Revision 15.04.99
FINAL/CONFIDENTIAL
1 Introduction
TRM_CARD
TRD
•Table -1-1 Definitions, Acronyms and abbreviations
Related Publications
Ref
Name
Version/Date
Author
[GD1]
STARCOIN Payment scheme
1.3.0 / 28.01.99
G&D
[GD2]
STARCOIN Specification - Debit POS 1.1.1 / 20.11.98
on-line authorisation
G&D
[GD3]
STARCOIN - Key update strategies
G&D
1.0.0
co
nf
ide
nt
ia
l
1.4
AV
ER
S
•Table 1-2 Referenced documents
STARCOIN C&A User Manual
Version 2.0.0/Revision 15.04.99
Volume I of II/26.04.99
Page 9 of 107
1 Introduction
1.5
FINAL/CONFIDENTIAL
Organisation of this document
This User Manual is organised into the following 10 Chapters.
Chapter 1
Introduction
Gives a General Introduction of the Scope and System Functionality. It also
gives a description of the configuration files required by the system.
Chapter 2
System set-up and Administration process
Describes the operation of System Administration.
Master Maintenance
co
nf
ide
nt
ia
l
Chapter 3
Describes the operation of Master Maintenance and Bank Clerk’s Card
handling.
Chapter 4
Customer and Customer card handling process
Describes the operation of Customer Card handling process.
Chapter 5
Terminal and Terminal Card handling process
Describes the operation of Terminal Card handling process.
Chapter 6
Personalisation Confirmation process
1. Describes the batch export process of Customer Card Data
2. Describes the operation of Import of Personalisation Confirmation
Process.
Chapter 7
Settlement Process
AV
ER
S
Describes the operation of Settlement Process.
Chapter 8
Queries and Reports
Describes the operation of Queries and Report.
Chapter 9
Utilities
Describes the operation of different utilities.
Chapter 10
Appendices
Describes a list of executables, errors and Tables in the System.
Page 10 of 107
STARCOIN C&A User Manual
Volume I of II/26.04.99
Version 2.0.0/Revision 15.04.99
FINAL/CONFIDENTIAL
1.6
1 Introduction
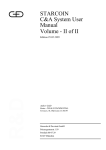
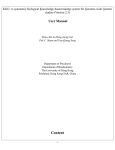
General Description
STARCOIN - System overview
Settlement bank
Sett. Bank Host
Settlement advices
C&A system provider
co
nf
ide
nt
ia
l
C&A System
Settlement advices
Communication
networks
(Public, Bank own, ...)
Transfer data upload
Parameter/redlist update
Load authorisation requests
Load/unload/service
Acquirer/Issuer Bank
Bank Host
AV
ER
S
Customer
Bank service terminal
Customer card
Merchant
Transfer card
Purchase terminal
Card transactions
On-line transactions
o:\..\sys_ovr2.af3
•Fig. 1-1 System structure overview
STARCOIN C&A User Manual
Version 2.0.0/Revision 15.04.99
Volume I of II/26.04.99
Page 11 of 107
1 Introduction
1.7
FINAL/CONFIDENTIAL
Writing Style
Font
Size
Font
Type
Top level Headings
14
Bold
Second Level
Headings
12
Bold
Third Level Headings
10
Bold
Normal Texts
10
Normal
Italic Texts
10
Bold
Enterable Fields
10
Bold
(Blue)
•Table 1-3 Writing Style
1.8
Menu Bar
1.8.1
Colour Codes
Font Name
co
nf
ide
nt
ia
l
Description
Following types of colour codes have been used in the screen layout of the STARCOIN
Menus:
:
Black
• Screen Legends For Optional Fields
:
Blue
• Screen Legends For Searchable Fields
:
Yellow
• Screen Legends For System Generated Fields
:
Dark Red
AV
ER
S
• Screen Legends For Mandatory Fields
1.8.2
Date Format
There is no Date format provided in the application. Oracle default date format
‘DD.MM.YYYY’have been used throughout the application.
Page 12 of 107
STARCOIN C&A User Manual
Volume I of II/26.04.99
Version 2.0.0/Revision 15.04.99
FINAL/CONFIDENTIAL
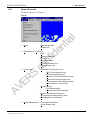
1.8.3
1 Introduction
Menu Hierarchy
The menu structure is as follows:
• Setup
co
nf
ide
nt
ia
l
System
→ Key Management
→ System Init
• Administration → Role-Item
→ User
→ Change Password
→ Archive
→ Purge Database
→ View/Print System Log
→ Purge System Log
AV
ER
S
• Export Keys
→ Transport Key Encryption Key
→ ICC Personalisation Keys
→ TK Personalisation Keys
→ Transfer Card Personalisation Keys
→ Settlement Data Securing Keys
→ Personalisation Data Securing Keys
→ Card Register / Create Keys
→ Initialised Keys
→ TK Personalisation
→ Transfer Card Personalisation
→ Settlement Data Securing Keys
→ Personalisation Data Securing Keys
→ Card Register / Create Keys
• Redlist Management → Generate Redlist Data
→ Purge Redlist Data
STARCOIN C&A User Manual
Version 2.0.0/Revision 15.04.99
Volume I of II/26.04.99
Page 13 of 107
1 Introduction
FINAL/CONFIDENTIAL
• Terminal Card Update
• Log Out
• Exit
AV
ER
S
• Customer
co
nf
ide
nt
ia
l
• Masters
Page 14 of 107
STARCOIN C&A User Manual
Volume I of II/26.04.99
Version 2.0.0/Revision 15.04.99
FINAL/CONFIDENTIAL
1 Introduction
co
nf
ide
nt
ia
l
• Terminal
AV
ER
S
• Personalisation
• Export → Export Personalisation Data
• Import → Personalisation Confirmation
STARCOIN C&A User Manual
Version 2.0.0/Revision 15.04.99
Volume I of II/26.04.99
Page 15 of 107
1 Introduction
FINAL/CONFIDENTIAL
AV
ER
S
• Queries / Report
co
nf
ide
nt
ia
l
• Settlement
• Utilities
Page 16 of 107
STARCOIN C&A User Manual
Volume I of II/26.04.99
Version 2.0.0/Revision 15.04.99
FINAL/CONFIDENTIAL
1 Introduction
1.9
co
nf
ide
nt
ia
l
• Help
Starting STARCOIN
The STARCOIN Invocation Process is initiated by starting STARCOIN.EXE which
invokes the STARCOIN Key Server process and also the Main Menu of the STARCOIN
C&A System as child processes.
The STARCOIN Key Server process creates a shared memory that can be accessed from
any other process. It stores the information regarding the keys used by the system in the
shared memory for faster access and better performance.
Login
AV
ER
S
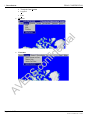
Upon starting STARCOIN the following login-screen appears.
The screen contains two fields, namely User Id and Password.
Enter the user id (e.g. ‘SYSTEM’) and the password. (e.g. ‘MANAGER’)
A maximum of two tries (Invalid “User Id / Password”) are allowed. After the third
STARCOIN C&A User Manual
Version 2.0.0/Revision 15.04.99
Volume I of II/26.04.99
Page 17 of 107
1 Introduction
FINAL/CONFIDENTIAL
attempt, the login sequence closes.
Authorisation & Security
After a valid User Id / Password is entered, the system searches for the role
corresponding to the entered User Id and enables the corresponding menu items assigned
to the role. For example the default administrative user 'SYSTEM' belongs to the Role
'ADMINISTRATOR' which has all the menu items of the application assigned to it
during installation.
NOTE:
co
nf
ide
nt
ia
l
1. If the STARCOIN system configuration file (STARCOIN.INI) is not properly set-up
during installation or has been later tempered with beyond recognition by the
STARCOIN application, the application will automatically exit.
2. If some of the initialisation data, set-up during installation process, are not set-up
properly, it won't be possible to work with the system.
AV
ER
S
3. In both the cases as above, report the error immediately to the STARCOIN support
team.
Page 18 of 107
STARCOIN C&A User Manual
Volume I of II/26.04.99
Version 2.0.0/Revision 15.04.99
FINAL/CONFIDENTIAL
2 System Setup and administration
2
System Setup and administration
2.1
Introduction
After the STARCOIN system is installed, the C&A system has to be set-up with a set of
initialisation data and a hierarchy of security keys for security management of the
system. Export of certain keys for external and administrative usage is also done after.
The system initialisation data is categorised into seven groups depending on the
requirement of these data in the system.
co
nf
ide
nt
ia
l
The system keys are to be set-up first using the ‘Key Management’process of the
STARCOIN system. If the keys are not set-up properly, the system initialisation data
cannot be set-up. The key set-up requires that the HSM board and KCT-800
Keyboard/ICT-800 terminal is set-up in the server machine and the HSM server process
(HSMSERV.EXE) is running.
After the hierarchy of keys has been successfully installed in the system, the system
initialisation data has to be set-up. These data initialise the different functionality if the
system. Most of the data shouldn’t be changed once they are set-up as these data
determine the behaviour of the system components over the life cycle of the system.
The running system requires regular administration. Certain administration facilities
such as setting up of new roles with different privileges and users with these roles,
changing passwords for these users , archival and purging transaction tables.
AV
ER
S
This section describes the maintenance of:
• Set-up information of initial STARCOIN data
The basic work data of the STARCOIN database must be set up before starting the
payment system. Some of them have already be preconfigured by G&D, while other
system specific data elements can be set individually by the C&A system operator.
Set-up involves three important process namely, Set-up of system keys and set-up of
System initialisation data .
• Administration
The provided menu helps to install and organise the different users of the C&A
system and controls their access rights and passwords.
Additionally the archival of 'old' and already settled transactions is managed from
here.
• Export of Keys
For various reasons there must be keys exported from the database to other
STARCOIN C&A User Manual
Version 2.0.0/Revision 15.04.99
Volume I of II/26.04.99
Page 19 of 107
2 System Setup and administration
FINAL/CONFIDENTIAL
participants of the STARCOIN payment system. E.g. G&D receives the keys for
proper card initialisation. A secure method of exporting the different keys is
described in this section.
2.2
Menu hierarchy
co
nf
ide
nt
ia
l
• Set-up
• Key Management
• System Init
• Administration
• Role / Items
• User
• Change Password
• Archive
• Purge Database
• Export Keys
• Transport Key Encryption Key
• Initialised Keys
→ ICC Personalisation Keys
→ TK Personalisation Keys
→ Transfer Card
→ Personalisation Keys
→ Settlement Data Securing Keys
→ Personalisation Data Securing Keys
→ Card Register / Create Keys
→ TK Personalisation
→ Transfer Card Personalisation
AV
ER
S
• Settlement Data Securing Keys
• Personalisation Data Securing Keys
• Card Register / Create Keys
2.2.1
Prerequisites
• G&D initialisation data has been set-up by G&D.
• HSM should be set-up in the server.
• The HSM server program HSMSERV.exe should be running in the background.
• For Administration: None.
• For Export Keys: All keys must be installed in the database.
Page 20 of 107
STARCOIN C&A User Manual
Volume I of II/26.04.99
Version 2.0.0/Revision 15.04.99
FINAL/CONFIDENTIAL
2.3
2 System Setup and administration
Key management
The Key Management process is required to Install the LMK (Local Master Key), Top
Level Keys and High level Keys in the C&A System. This process should be completed
before System Initialisation process and all Customer/Terminal Card Handling
Operation. The Key hierarchy structure of the C&A system is depicted in the annex.
There are two groups of keys in STARCOIN: Version dependent keys and Expiry Date
dependent keys. Depending on their expiry conditions, the C&A system is no more
allowed to accept signatures calculated with an old key.
co
nf
ide
nt
ia
l
The update of version keys in the participating instances takes a certain time while the
C&A system still must accept signatures generated with the older version. The
acceptation time is defined in ‘Deactivation date offset’ of system initialisation (System
-> Setup -> System Init -> ICC Param.: "Deactivation Date Offset").
The version dependent keys split into two groups
• Card related keys (derived from KGG_CARDS)
• C&A system related keys (derived from KGG_SYSTEM)
Card related keys are derived and personalised on different types of smartcards, while
the system related keys are used for specific tasks e.g. securing the data transfer between
C&A system and settlement bank.
AV
ER
S
Expiry date dependent keys become invalid with the begin of the day after their expiry
date. They are derived from KGG_EXPIRY.
A Local Master Key (LMK) is used to encrypt all keys stored in the database. Depending
on the type of key, a different LMK is used. Before any other key may be generated, the
LMKs must be installed. Please note, that only one LMK ever leaves the HSM (for
backup purposes), the others are derived from it.
Certain derivative bases are used to derive High Level Keys (KM_GEN, KM) from a
Top Level Keys (KGG). These keys are stored in the database, all keys below the High
Level Keys are derived dynamically when required.
STARCOIN C&A User Manual
Version 2.0.0/Revision 15.04.99
Volume I of II/26.04.99
Page 21 of 107
2 System Setup and administration
2.3.1
FINAL/CONFIDENTIAL
Introduction
•
Access Path
System → Set-up
→ Key Management
The STARCOIN Key management functions organise the key handling in the C&A
System.
Select one of the following available options from the listbox for the ‘Option’field:
2.3.1.1
co
nf
ide
nt
ia
l
• Install New Key
Install new Top Level Key and all related High Level Keys
• Add New Key Instance
Add additional instance of version/expiry date dependent key of an existing key
• View Key
View basic key data
• Delete Key
Delete (Invalidate) Top Level Key and all related High Level Keys
• Reinstall Key
Reinstall Top Level Key from Key Card
• Update Topical Version
Change topical version of system key
• Change LMK
Generate new LMK and update the key database
• Issue Key Card
Generate individual PINs for a Key Card
HSM surveillance screen
AV
ER
S
When any of the above key management functions are invoked, an initial screen is
popped up, indicating the status of the HSM board attached to the host computer. Some
key management functions are automatically invoked to display the state of important
HSM elements. The HSM Server program HSMSERV.exe should be running in the
background. This program provides the C&A system a software pipe interface to the
HSM hardware. The HSM elements displayed are:
• LMK State
Functional state of the Local Master Key. On any other message than 'HSM New
LMK installed' please call STARCOIN-Service Hotline.
• HSM State
Functional state of the HSM. On any other message than 'HSM State o.k.' please call
STARCOIN-Service Hotline.
• HSM Mode
Functional state of the HSM. On any other message than 'HSM Mode o.k.' please
call STARCOIN-Service Hotline.
Page 22 of 107
STARCOIN C&A User Manual
Volume I of II/26.04.99
Version 2.0.0/Revision 15.04.99
FINAL/CONFIDENTIAL
2 System Setup and administration
• Battery Level
Charge of the HSM own battery from 1...16. A value above 8 is o.k. The average life
time of the battery given is 4 years.
• Please care for ordering a new one before level becomes critical (below 8), because
a low level battery will cause loss of all HSM software. The type of the battery is
defined in the delivered HSM Manual.
• HSM Id
Unique identification number of the HSM-board
Corresponding Key data
co
nf
ide
nt
ia
l
2.3.1.2
The HSM functions show as a standard functionality the characteristics of the key:
• Key Id
Key identification number
• LMK Variant
Indicates the variant of the LMK used to encrypt this key when stored in the C&A
database.
• Activation Date
Date, when this key has become the valid one - Not supported anymore.
• Deactivation Date
Date, when this key was replaced by a new one (see also 'Activation Date').
• Dependency
Key is either version dependent or expiry date dependent
AV
ER
S
• Hierarchy
• Keys in the system e.g.:
KM_GEN Generation key
KM
Master Key
Both keys belong to the group of High Level Keys.
• Cryptography I
Single DES key (8 byte) or double DES key (16 byte)
• Card Relation
Indicates if this key is a terminal card or customers card related key
• Cryptography II
Version dependent keys:
Expiry date dependent keys:
(payment)
STARCOIN C&A User Manual
Version 2.0.0/Revision 15.04.99
Volume I of II/26.04.99
Key is a DES or RSA key
Key is related to a STARCOS function or other
Page 23 of 107
2 System Setup and administration
•
FINAL/CONFIDENTIAL
Purpose Relation
Card related key or system related key.
• Please note, that the STARCOIN C&A System is designed in a way that NO key
appears ever in readable form. You can only view the above mentioned data or with
certain tools the key's encrypted form in the database.
2.3.2
Install New Key
• Install LMK
co
nf
ide
nt
ia
l
Install New Key provides three options:
• Install Top Level Key
• Install High Level Key
Installing a LMK as new key requires that the HSM should be set to factory settings and
the firmware loaded in the HSM, i.e. the LMK status should be NEW.
• Please note: Loading the appropriate STARCOIN specific HSM-software can only
be done by G&D and the HSM must therefor be sent to G&D.
AV
ER
S
The process automatically installs a new LMK and one instance of the three top level
keys KGG_CARDS, KGG_SYSTEM and KGG_EXPIRY. After the top level keys are
installed, one instance of all the related high level keys are automatically installed. To
add new instances of top level and high level keys, use the option ‘Add new key
instance’.
The option, ‘Install new key’ -> ‘Top level key’ is possible only if no instances of the
corresponding top level and high level keys exists in the C&A database.
The following key management functionalities are supported:
• Install a LMK - This is the first process before installation of any key. This process
involves three sub functionalities namely:
• Installation of new LMK at system installation
• Restoring a LMK from Key cards
Transfer an existing LMK to a new HSM.
• Changing a LMK of a running system
Can periodically been done if very high security is required.
• Install a Top Level Key (KGG) - automated process at system installation for the
first instance of each of these keys.
Page 24 of 107
STARCOIN C&A User Manual
Volume I of II/26.04.99
Version 2.0.0/Revision 15.04.99
FINAL/CONFIDENTIAL
2 System Setup and administration
• New/Add KGG_CARDS
• New/Add KGG_SYSTEM
• New/Add KGG_EXPIRY
• Install a High Level Key (KM_GEN, KM) - automated process every time the
related high level key receives a new instance.
• New High Level Key (New Key_Name, what must be checked)
Automated process.
• Add High Level Key (Add new version/exp. date instance of existing key)
Automated process.
co
nf
ide
nt
ia
l
• As defined, the first installation of all STARCOIN keys is an automated process.
When setting up the database, one instance of every key is installed.
• Further instances of the top level keys (KGG_SYSTEM, KGG_CARDS,
KGG_EXPIRY) can be added, the related KM_GENs/KMs will be generated then
automatically right after.
• The only data which can be entered manually are ‘Version’ and ‘Expiry Date’, all
other data are set automatically at key installation process.
AV
ER
S
After installation of the first set of keys, at least four additional instances of
KGG_CARDS must be added, because the customers cards are personalised with five
versions of all payment related keys. This allows later a convenient version change for
all cards in the field, by just updating the terminal card keys.
2.3.2.1
Install LMK
Install LMK installs a new LMK and one instance of the top level keys and related high
level keys. This process is only required on new system installation. If the HSM has
been replaced for any reason, the LMK must be restored.
1. Select 'LMK' of the ‘Key Hierarchy’:
2. Press ‘Ok’to get a new screen containing Version and Expiry Date.
3. Enter Expiry date for subsequent automatic generation of Top and High Level keys.
4. Press ‘Ok’(the HSM state is displayed)
5. Press ‘Ok’to install a new LMK Key (or press ‘Cancel’to return to the previous
screen)
6. Follow the instructions on the screen, asking you to insert the respective Key Cards
for backing up the LMK components.
STARCOIN C&A User Manual
Version 2.0.0/Revision 15.04.99
Volume I of II/26.04.99
Page 25 of 107
2 System Setup and administration
FINAL/CONFIDENTIAL
The LMK installation process checks the LMK status. If the LMK state is ‘(81) HSM
New LMK Not Installed’, then either a LMK can be reinstalled from existing LMK Key
Cards or a new LMK can be installed at users choice.
If the LMK state is ‘(00) HSM New LMK Installed’, then the user can only change the
LMK using the ‘Change LMK’ option.
On any other HSM status reports, Install LMK cannot be performed and the control is
returned to key management main screen.
Install Top Level Key
co
nf
ide
nt
ia
l
2.3.2.2
This process installs the first instance of the selected top level key and the related high
level keys into the C&A Database and is only required on new system installation.
Further instances of top level and high level keys can be installed using the option ‘Add
New Key Instance’.
The option, can be manually fired only if new LMK has been installed and no instances
of the corresponding top level and high level keys exists in the C&A database. However
this function is automatically fired after a new LMK is installed with the option ‘Install
new key’=> ‘LMK’or the option ‘Change LMK’
AV
ER
S
• Please note: When installing one of the Top Level Keys, all related High Level Keys
are also generated and written to the database, encrypted under their respective
LMK.
1. Select 'Key hierarchy': Top Level Key
2. Select any of the following ‘Key Name’:
− KGG_CARDS
− KGG_SYSTEM
− KGG_EXPIRY
3. The corresponding key data are displayed.
4. The next (available) value for Version (For KGG_CARDS and KGG_SYSTEM) is
shown which is not updateable.
5. For KGG_EXPIRY Key, enter
6. Expiry Date (Date in ‘DD.MM.YYYY’format)
7. Press ‘Ok’(the HSM state is displayed)
Page 26 of 107
STARCOIN C&A User Manual
Volume I of II/26.04.99
Version 2.0.0/Revision 15.04.99
FINAL/CONFIDENTIAL
2 System Setup and administration
8. Press ‘Ok’to install a new Top Level Key (or press ‘Cancel’to return to the
previous screen)
9. Follow the instructions on the screen, asking you to insert the respective Key Cards
for backing up the new instance of the key.
2.3.3
Add New Key Instance
At any time a new instance of a key can be generated, related to either a version number
(KGG_SYSTEM, KGG_CARDS) or an expiry date (KGG_EXPIRY).
co
nf
ide
nt
ia
l
For version dependent keys (KGG_SYSTEM, KGG_ CARDS), the next higher version
number is automatically taken. There can me a maximum of 255 versions of keys
existing in the system.
For expiry date dependent keys (KGG_EXPIRY), the expiry date has to be manually
entered. The expiry date entered has to be later than the latest KGG_EXPIRY key in the
system. At any instance the active expiry date keys are the generation of keys which has
an expiry date later than the current date and nearest to the current date. After the expiry
date of a generation of keys, these keys automatically expires and the keys with the next
expiry date automatically active.
All the cards personalised with the expired/deactivated keys are automatically blocked
either by the terminal cards during a transaction or by the C&A system.
• Please note: When adding a Top Level Keys instance, all related High Level Keys
are also generated and written to the database, encrypted under their respective
LMK.
AV
ER
S
1. Select Top Level Key for ‘Key Hierarchy’.
2. Select any one of the following ‘Key Name’:
− KGG_CARDS
− KGG_SYSTEM
− KGG_EXPIRY
3. The corresponding key data are displayed.
4. Enter
− Version (for KGG_CARDS and KGG_SYSTEM)
(Number ranging from 1 to 255)
− Expiry Date (for KGG_EXPIRY)
(Date in ‘DD.MM.YYYY’format)
5. Press ‘Ok’(the HSM state is displayed)
6. Press ‘Ok’to Add New Key Instance of Top Level Key and all related High Level
Keys (or Press ‘Cancel’to return to the previous screen)
7. Follow the instructions on the screen, asking you to insert the respective Key Cards.
STARCOIN C&A User Manual
Version 2.0.0/Revision 15.04.99
Volume I of II/26.04.99
Page 27 of 107
2 System Setup and administration
2.3.4
FINAL/CONFIDENTIAL
View Keys
The keys stored in the C&A system are the top level and high level keys. These keys are
either version dependent or expiry date dependent. At any instance of time only one
version of version dependent keys is active. Similarly at any instance of time only one
set of expiry date dependent keys is active. The active expiry date dependent keys are the
set of keys whose expiry date is greater then and nearest to the current date.
Each key in the C&A system is associated with a key id and Key Type. The Key Type is
a 1 byte bit map indicating
• Whether the key is version dependent or expiry date dependent.
co
nf
ide
nt
ia
l
• The hierarchy level of the key.
• The cryptography used (DES or double DES).
• Whether Card related or system related key.
• Whether Terminal Card specific or Cardholder card specific.
• Variant of the LMK.
The function allows to retrieve the above information about a certain key, which is
stored in the database.
AV
ER
S
• Select any one of the following for ‘Key Hierarchy’:
− Top Level Key
− High Level Key
• If Top Level Key is selected for ‘Key Hierarchy’
• Select any one of the following ‘Key Name’for Top Level Key:
− KGG_CARDS
− KGG_SYSTEM
− KGG_EXPIRY
• If High Level Key is selected for ‘Key Hierarchy’
• Select any one of the following ‘Related Top Level Key Name’for High Level
Key:
− KGG_CARDS
− KGG_SYSTEM
− KGG_EXPIRY
• Corresponding to any one of the above ‘Related Top Level Key Name’you can
have a number of Key Names. Any one of them can be chosen
• Corresponding key information will be displayed (see 2.3.1.2 Corresponding Key
data).
Page 28 of 107
STARCOIN C&A User Manual
Volume I of II/26.04.99
Version 2.0.0/Revision 15.04.99
FINAL/CONFIDENTIAL
2.3.5
2 System Setup and administration
Delete Key
Only deactivated keys can be deleted. For expiry date dependent keys, only keys that
have expired since ‘Deactivation date offset’ days (defined in System initialisation) can
be deleted.
For version dependent keys, keys whose version number is less than the current active
version number can be deleted.
co
nf
ide
nt
ia
l
Please note that if a key expires, all the cards that has been personalised with these keys
also expires. That means ‘Load’, ‘Unload’ and ‘Purchase’ transactions are immediately
blocked by the terminals with the expired terminal cards or customers cards. However
transfer of purchase data for purchases done before the expiry of the terminal card is
technically possible from the terminals. But if the transfer is done ‘Deactivation date
offset’ days after the expiry date of the terminal cards are blocked by the C&A system.
Keys can be deleted at any time, but please be aware, that deletion of any key blocks the
validation of any signature calculated from that key!
Keys can be deleted only after their expiry e.g. for KGG_EXPIRY after their expiry date
and a KGG_SYSTEM after it has been replaced by a new version.
AV
ER
S
• Select Top Level Key for ‘Key Hierarchy’:
• Select any one of the following ‘Key Name’:
− KGG_CARDS
− KGG_SYSTEM
− KGG_EXPIRY
• The corresponding data are displayed
• Select from a list
− Version (For KGG_CARDS and KGG_SYSTEM)
− Expiry Date (For KGG_EXPIRY)
• Press ‘Delete’to delete an existing Top Level Key
Important notes:
• Keys which are active can not be deleted.
• The deleted top level key and all related high level keys are then blocked at once for
further usage by the C&A system.
• A deleted key cannot be reactivated anymore.
STARCOIN C&A User Manual
Version 2.0.0/Revision 15.04.99
Volume I of II/26.04.99
Page 29 of 107
2 System Setup and administration
FINAL/CONFIDENTIAL
The keys remain in the database until they are archived and the database is purged.
(System
→ Administration
→ Archive
→ Purge Database)
2.3.6
Reinstall Key
co
nf
ide
nt
ia
l
This option is used to reinstall keys from key cards. The Top Level Keys that are stored
in the key cards can be reinstalled from the cards. This process must be executed every
time the LMK has been changed. Otherwise this may only happen in the worst case
scenario if the database has been corrupted and no backup of the key database is
available.
With the Reinstall Key option it is possible to:
• Reinstall the LMK
• Reinstall the Top Level Keys
• Reinstall the High Level Keys
The LMK has to be reinstalled whenever the
• HSM-board has been replaced for any reason.
• The HSM batteries have been exchanged
• A ‘LMK change’ has not been successful.
The LMK is read from the LMK key cards, validated and the installed in the HSM .
AV
ER
S
A reinstallation of all Top Level and High Level Keys is necessary, when the key
database has been corrupted by any reason or the LMK was changed and the key must be
reencrypted with the new LMK. The top level keys are installed from the corresponding
key cards and the high level keys are automatically installed by stepping through the
complete key database (which e.g. has been restored from a C&A system backup),
searches for a KM_GEN/KM and if found re-derives the key from the related top level
key (KGG_).
To Reinstall LMK or Top Level Keys
1. Select any one of the following ‘Key Hierarchy’:
• LMK
• Top Level Key
2. If ‘Key Hierarchy’ entered is LMK
• Press ‘Ok’(the HSM state is displayed).
Page 30 of 107
STARCOIN C&A User Manual
Volume I of II/26.04.99
Version 2.0.0/Revision 15.04.99
FINAL/CONFIDENTIAL
2 System Setup and administration
• Press ‘Ok’to reinstall an existing LMK Key (or press ‘Cancel’to return to the
previous screen)
co
nf
ide
nt
ia
l
3. If ‘Key Hierarchy’ entered is Top Level Key
• Select any one of the following ‘Key Name’:
− KGG_CARDS
− KGG_SYSTEM
− KGG_EXPIRY
• The corresponding data are displayed.
• The default value for Version (For KGG_CARDS and KGG_SYSTEM) is
shown which is non updateable.
• For KGG_EXPIRY Key, enter
− Expiry Date (Date in ‘DD.MM.YYYY’format)
• Press ‘Ok’. (the HSM state is displayed)
• Press ‘Ok’to reinstall an existing Top Level Key (or press ‘Cancel’to return to
the previous screen)
4. Follow the instructions on the screen, asking you to insert the respective Key Cards.
2.3.7
Update Topical Version
Here a key version update is only possible for KGG_SYSTEM and related High Level
Keys. Card related keys version and expiry date update requires a more complex
process, which is defined later in this document.
AV
ER
S
Please note, that several instances of KGG_SYSTEM can be set to active at the same
time (opening key tree for usage), but from their related KM_GEN/KM only one
instance.
This command is only valid for version dependent keys. Expiry date dependent keys
never change, they just expire.
1. Select Top Level Key for ‘Key Hierarchy’:
2. Select KGG_SYSTEM for ‘Key Name’:
3. The corresponding data will be displayed
4. Select a Version from an existing list (preferably the next higher one)
5. Press ‘Ok’(the HSM state is displayed).
6. Press ‘Ok’to Update Topical Version of an existing Top Level Key (or Press
‘Cancel’to return to the previous screen.
• The lower version of the Top Level Key and all related High Level Keys become
blocked at once.
STARCOIN C&A User Manual
Version 2.0.0/Revision 15.04.99
Volume I of II/26.04.99
Page 31 of 107
2 System Setup and administration
2.3.8
FINAL/CONFIDENTIAL
Change LMK
A change of the LMK allows to re-encrypt all keys stored on the C&A database with the
new version of the LMK. For very high security requirements it is recommended to do it
on a periodic basis (e.g. once a year).
Please note, that this is a time consuming process, because all (!) Top Level Keys must
be reinstalled from their key cards and all related High Level Keys derived newly.
1. Select LMK for ‘Key Hierarchy’:
2. Press ‘Ok’ (the HSM state is displayed)
3. Press ‘Ok’to change an existing LMK Key (Or press ‘Cancel’to return to the
previous screen)
2.3.9
Issue Key Card
co
nf
ide
nt
ia
l
4. Follow the instructions on the screen, asking you to insert the respective Key Cards.
Key Cards can be issued before usage. All key cards are issued with the standard PIN '00
00 00'. On issuing they receive two individual PINs: One for usage by the C&A System
provider only (internal PIN) and one for the user of the key card outside in the field (e.g.
G&D when initialising the key cards)
1. Press ‘Ok’. A new screen is invoked.
2. Press ‘Ok’to issue a Key Card (Or press ‘Cancel’to return to the previous screen)
3. Follow the instructions on the screen, asking you to insert the respective Key Cards.
Be sure to have the PIN-Mailer Printer attached and the PIN Mailers are inserted.
A key card can be issued at any time, even after certain keys have been loaded.
System Init. Parameter Maintenance (Set-up)
2.4.1
Introduction
AV
ER
S
2.4
Access Path
System → Set-up → Sys. Init
Before working with the STARCOIN C&A System some basic data must be entered,
defining general data elements used by various processes of the C&A System.
Depending upon the requirement of these data in different functionalities and system
components, these initialisation data are categorised into seven groups. The input screen
is organised seven tabs corresponding to the groups. All the mandatory fields in all the
seven tabs has to be entered. Saving of these data is allowed only if all the mandatory
fields are entered. So either you can enter all the mandatory data elements in all the tabs
of the sysinit screen or you enter none. The six groups sysinit data elements are:
Page 32 of 107
STARCOIN C&A User Manual
Volume I of II/26.04.99
Version 2.0.0/Revision 15.04.99
FINAL/CONFIDENTIAL
2 System Setup and administration
• ICC-Param(eters)
Data valid for all customers cards
• (ICC) ISO-Param(eters)
Data elements controlling the usage of the Debit-POS function of a card.
• Settlement Bank
Settlement bank data
• Service Charges
Definition of the service charge schemes
• TK-Param(eters)
Data valid for all terminal cards
co
nf
ide
nt
ia
l
• CA-Provider
C&A system provider data
• Redlist Params
System Redlist Parameters
Navigation
AV
ER
S
• Press ‘Clear’button to clear all the fields of the particular tab in which the cursor is
situated if incorrect entry is made. If any change has been made, then the system will
ask for a confirmation from the user before clearing the form.
• Press ‘Reset’button to revert to the database value of all the field of the group after
changes have been made and before the new values are stored in the database.
• Press 'Ok' button to save valid records in the database. On pressing OK, the system
validates whether all the mandatory data elements has been entered.
• Press ‘Close’button to close the form. If any change has been made which has not
been saved, then the system will ask for a confirmation from the user before closing
the form.
2.4.2
Customer Card Parameters - ICC Param.
This group of initialisation data are required for initialisation and Personalisation of
customer cards. Some of these data elements are also required for validation and security
management of on-line transaction and off-line clearing process.
• After customer cards are initialised or personalised some of these data
elements must not be modified (see explanation of each one of them)!
Modification will cause malfunction of the system!
• For security purposes, personalised customers cards can NOT be updated
anymore. If data elements are changed, you must be aware, that these cards
STARCOIN C&A User Manual
Version 2.0.0/Revision 15.04.99
Volume I of II/26.04.99
Page 33 of 107
2 System Setup and administration
FINAL/CONFIDENTIAL
still contain the original values.
Most of the values can be see in the customers cards related screens, which related
data are not changed automatically, because they represent the state of the card.
The following fields must be entered:
co
nf
ide
nt
ia
l
• Currency Code
The currency code is defined in ISO 4217 for all currencies world-wide. Beside it is
up to the system provider to choose an appropriate one if the system may be used
with a 'private' currency. The leftmost digit of the currency code defines the minor
unit (currency exponent), the fractional part of a currency. E.g. US-Dollar: '2xxx'
2: Minor unit (Cents) and ‘xxx’: Currency code.
(Number ranging from 0001 to 9999).
Do not change at any time after installation!
• Max. Holding Amount for IEP
Defines the maximum balance, which can be loaded on an el. purse.
(Number ranging from 1 to 4294967295)
• Max. Holding Amount for ECH
Defines the maximum balance, which can be loaded on an el. cheque.
(Number ranging from 1 to 4294967295)
AV
ER
S
• Deactivation Date Offset
After the deactivation of a customers card, there may be still transactions in the field
which have not been cleared yet, due to the reason, that there is a certain delay for the
transfer of transaction data from the merchant terminals to the C&A system. The
maximum time these data will be accepted is defined here, typical value: 60 days.
After this period of time the incoming purchase transaction is rejected. Please note,
that load transactions are not possible anymore from the date of deactivation on.
(Number ranging from 0 to 999)
• Card No. Init Value
At the discretion of the system provider the starting value of the number circle of the
customers cards can be defined. Please note that the number stored in the card is
always preceded with the so called Pilot-Id of this system.
(Number ranging from 1 to 9999999999999)
Page 34 of 107
STARCOIN C&A User Manual
Volume I of II/26.04.99
Version 2.0.0/Revision 15.04.99
FINAL/CONFIDENTIAL
2 System Setup and administration
• Customer Card Expiry Date
Expiry date of the customers card. The date is related to a key expiry date. It can be
changed if a new generation of cards shall be issued.
(Date in ‘DD.MM.YYYY’format)
• PIN Change Allowed Indicator
Data element of the customers card indicating, if this card is allowed to do a PIN
change at the bank service terminal (recommended: 'YES')
(Select ‘YES’or ‘NO’)
co
nf
ide
nt
ia
l
• Min. Loading Amount
The minimum load amount for IEP/ECH to be defined here.
(Number ranging from 1 to 4294967295)
• On-line Authorisation Limit
For the on-line authorisation for the transacted amount at load or Debit-POS payment
transaction to the customers cards issuing bank, above the here defined limit, an online authorisation will be required (see also [GD2]).
(Number ranging from 0 to 4294967295).
• Cardholder Id
The value of this field indicates the scheme that the application should follow while
generating the ‘Cardholder Id’for Customer Cards. Valid values are
• ISO 7812-1 → ISO Specific Value (The Default one)
AV
ER
S
• Bank Account Number
• Manual Data Entry (numeric values only!)
• Bank specific Customer Id (numeric values only!)
• Issuer Id
This field also takes part in Customer Card’s ‘Cardholder Id’ generation. This field in
enterable only if ‘Cardholder Id’ value is set to ‘ISO 7812-1’
2.4.3
Customer Card ISO Parameters - ISO Param.
To support on-line/offline Debit-POS Purchase and Load/Unload Transactions from
ATM, the Customer’s Card needs to be personalised with certain parameters to provide
necessary security of these transactions concerning the usage of off-line payment
authorisations, depending on various parameters. Additionally, the customers cards
STARCOIN C&A User Manual
Version 2.0.0/Revision 15.04.99
Volume I of II/26.04.99
Page 35 of 107
2 System Setup and administration
FINAL/CONFIDENTIAL
contain a mechanism controlling an maximum amount to be spent within a week,
calculated from Monday to Monday. If the defined amount has been spent, no more offline Debit-POS transactions are possible! The defined amount can not be reloaded, if
used before end of the credit cycle.
Not all parameters need to be used at the same time. Their usage depends on the
requirements of the planned payment scheme. They are 'deactivated' by setting to their
maximum value.
Please note, that all parameters serve as default values for the bank related ISO
parameter tables and from there are used for the card specific ones. This way either
system wide, bank wise or even card individual parameterisation can be used.
POS Related Fields
co
nf
ide
nt
ia
l
2.4.3.1
The following fields must be entered to parameterise the Debit-POS function:
•Floor Limit of TK (ISO 401 TK)
Maximum amount that the merchant terminal allows in case of a Debit POS
transaction, valid for on-line and off-line transactions.
(Value in minor units of defined currency - Number ranging from 0 to 4294967295)
•Max(imum) Total Terminal off-line Amount (ISO 406 Term)
Maximum total amount that the merchant terminal allows in case of off-line Debit
POS transactions.
(Value in minor units of defined currency - Number ranging from 0 to 4294967295)
AV
ER
S
•Floor Limit of ICC (ISO 401)
Maximum amount which can be spent through Customer Card for a single Debit POS
transaction, valid for on-line and off-line transactions.
(Value in minor units of defined currency - Number ranging from 0 to 4294967295)
•Credit Cycle Limit (ISO 408)
Maximum cumulated amount which can be spent in off-line Debit-POS transactions
within the defined period (weekly or daily). Please note, that this limit is decremented
by the respective amount with every off-line and on-line Debit-POS transaction, but
only taken into consideration for off-line authorisations: If the limit is to low for an
off-line payment, the on-line payment is still possible.
This value is also decremented on funds raising for any purse or cheque load
transactions, thus the higher load limits of el. cheques must be considered.
(Value in minor units of defined currency - Number ranging from 0 to 4294967295)
Page 36 of 107
STARCOIN C&A User Manual
Volume I of II/26.04.99
Version 2.0.0/Revision 15.04.99
FINAL/CONFIDENTIAL
2 System Setup and administration
•Max(imum) No. of off-line Authorisation (ISO 402)
Maximum number of off-line authorisations allowed for Debit POS transactions.
If the defined number of off-line authorisations is reached, the cardholder must do an
on-line Debit-POS transaction (either a load or an on-line Debit-POS purchase). The
off-line Debit-POS payment function will be blocked until then, but is resetted to the
full value on the next on-line transaction.
(Number ranging from 0 to 999)
•Credit Cycle Length (ISO 409)
co
nf
ide
nt
ia
l
Please choose between ‘Daily’ (the default one) or ‘Weekly’ from the list box
provided. The weekly credit cycle length lasts for Monday to Monday, considering
above defined limit ('Credit Cycle Limit')!
•Max(imum) Days off-line (ISO 404)
Maximum number of days where off-line Debit-POS purchases are valid. After that
period of time an on-line authorisation (purse/cheque load or on-line Debit-POS
purchase) must be executed. With each on-line transaction, this parameter is reset
back to '0' and the full number of days off-line can be used again.
(Number ranging from 0 to 65535)
•Authorisation Sequence No.
AV
ER
S
Current authorisation sequence number, used to identify the authorisation sequence to
the card issuing bank.
Each request for funds authorisation to the card issuing instance will carry a new
sequence number allow later identification if required. If the maximum value is
reached, the counter restarts with '000001'.
(No manual entry possible - Number ranging from 0 to 999999)
•Max(imum) Total off-line Amount (ISO 406)
Maximum (cumulated) total amount allowed in off-line Debit POS Transaction.
With each sequential off-line Debit-POS payment transaction this value will be
cumulated up to the defined limit. If this is reached, no more off-line payment
transaction can be executed, until an on-line transaction (purse/cheque load or Debit
POS payment) has been done.
(Value in minor units of defined currency - Number ranging from 0 to 4294967295)
•Threshold Value (IEP/POS Switch)
Threshold value for the proposed service. Above the here defined limit, the merchant
STARCOIN C&A User Manual
Version 2.0.0/Revision 15.04.99
Volume I of II/26.04.99
Page 37 of 107
2 System Setup and administration
FINAL/CONFIDENTIAL
terminal will propose Debit-POS as preferred payment method, but the cardholder
can still select manually the el. purse or el. cheque payment (as available and balances
are sufficient).
(Value in minor units of defined currency - Number ranging from 0 to 4294967295)
2.4.3.2
ATM Related Fields
2.4.4
co
nf
ide
nt
ia
l
All ATM related fields provide the same functionality then the Debit-POS ones, but are
completely independent configurable!
Please refer to the descriptions above for detailed information of the fields meaning and
parameterisation.
The "Threshold value" is not existing for ATMs.
Settlement Bank
The following fields must be entered:
• Bank Name
• Name of the settlement bank.
(Characters with maximum length - 30)
• Bank BIN
Bank Identification number according to the national/international standards.
(Number ranging from 1 to 999999999999999)
AV
ER
S
• Bank A/c No.
Bank account number (for information reasons only) according to the
national/international standards.
(Number ranging from 1 to 99999999999999999999)
• Street
(Characters with maximum length - 30)
• City
(Characters with maximum length - 30)
• ZIP Code
(Characters with maximum length - 30)
Page 38 of 107
STARCOIN C&A User Manual
Volume I of II/26.04.99
Version 2.0.0/Revision 15.04.99
FINAL/CONFIDENTIAL
2 System Setup and administration
• Country
(Characters with maximum length - 30)
• Telephone
(Characters with maximum length - 30)
• Fax
(Characters with maximum length - 30)
co
nf
ide
nt
ia
l
• Contact Person
(Characters with maximum length - 30)
• Mode of Settlement
There are two modes of settlement. ‘Manual’and ‘Automatic’
Manual settlement means that the ‘Debit Advice’ and ‘Settlement Advice’ can be
started manually. If ‘Manual’ is entered, the sub menu options of ‘Settlement’ menu
option is enabled. If there are valid unsettled load/unload transactions in the system,
manual ‘Debit Advice’ can be raised at any time. However manual ‘Settlement
Advice’ is meant only for valid purchase transactions that has been read from the
transfer files and loaded in the C&A database, but due to some reasons (oracle error,
pipe error etc.) couldn’t be settled.
AV
ER
S
Manual/Automatic settlement can be fired only once in a day. If settlement has to be
fired more than once in a day, the settlement export files has to be moved/deleted
from the designated directory.
On 'Manual' the Settlement must be started via:
Settlement
Debit Advice
Settlement of Load/Unload transaction
Settlement Advice
Settlement of IEP/ECH Purchase transactions
After successful settlement, the settlement data files must be exported also manually:
Utilities
Export
Debit Advice
Export Load/Unload settlement advice
→ Settlement Advice Export Purchase settlement advice
STARCOIN C&A User Manual
Version 2.0.0/Revision 15.04.99
Volume I of II/26.04.99
Page 39 of 107
2 System Setup and administration
FINAL/CONFIDENTIAL
On 'Automatic' the complete settlement and export process of all transactions
(load/unload/purchase) having arrived until this time is started at the time defined in
'Settlement time'. Later incoming transactions are cleared the next day.
Please note the off-line cbserver process ( cbserver /t ) should be started and running.
This process checks whether the system time has crossed the ‘Settlement time’. If so,
then it checks whether the settlement has already run for the day by checking
whether any of the settlement files has been created for the day in the designated
directory. If the files doesn’t exists, the settlement process starts.
The settlement data are exported to the following files:
IEP/ECH load/unload settlement data
IEP purchase settlement data
ESLddmmy.dat
POSddmmy.dat
ECH purchase settlement data
POS purchase settlement data
co
nf
ide
nt
ia
l
DAVddmmy.dat
ISLddmmy.dat
• Security Identifier
On 'Hashed' the settlement data are transferred in plain text, but secured against
manipulation by an encrypted hash value.
On 'Combined' each settlement data record is additionally encrypted.
(Select ‘Hashed’ or ‘Combined’)
AV
ER
S
• Settlement Time
At this time all transferred purchase data received via the bank software from the
merchant terminals (tnnnnnnn.dat - n...n is serial number) are read into the database
after successful validation of all contained signatures. This process is independent of the
settlement mode (manual/automatic).
If automated mode is selected, after signature validation, the settlement and export of
the data is done.
(Time in ‘HH24:MI’ format)
2.4.5
Service Charge Parameters
The C&A system provides a scheme for raising service charge . According to this
scheme, service charge is raised for six different services provided by the system. The
table below depicts the different instances to be charged.
Sl# Service
Page 40 of 107
Alternative instances to be selected for charging
STARCOIN C&A User Manual
Volume I of II/26.04.99
Version 2.0.0/Revision 15.04.99
FINAL/CONFIDENTIAL
2 System Setup and administration
Load from account
Loading Bank
Customer
2
Load by cash
Loading Bank
-
3
Unload to account
Unloading Bank
Customer
4
Unload to cash
Unloading Bank
-
5
IEP purchase
Merchant Bank
Merchant
6
ECH Purchase
Merchant Bank
Merchant
7
Debit POS Purchase
Merchant Bank
Merchant
8
ATM IEP Load
Loading Bank
Customer
9
ATM IEP Unload
Unloading Bank
Customer
10
ATM ECH Load
Loading Bank
Customer
11
ATM ECH Unload
Unloading Bank
Customer
•Table
co
nf
ide
nt
ia
l
1
2-1 Service charge instances
All service charges are raised during clearing process, according to the defined charging
scheme. The instance to be selected for charging is decided per bank at bank installation
time. It can be decided who takes the service charges, while it is assumed, that a bank
may be may be a issuing bank and merchant bank at the same time. The following cases
are possible:
1. Bank is charged for load, unload and IEP/ECH/POS purchase.
2. Bank is charged for load, unload and merchant is charged for IEP/ECH/POS
purchase.
3. Bank is charged for IEP/ECH/POS purchase and customer is charged for load and
unload .
AV
ER
S
4. Bank is not charged at all, customer is charged for load and unload and merchant
is charged for IEP/ECH/POS purchase.
Every service charge raised, can be set according to the following model:
Sl# Type
Condition
Charge
1
Minimum Charge
Tx-Amount < Minimum
Limit
Fixed Charge
2
Rate
Tx-Amount
% of Tx-Amount
3
Maximum Charge
Tx-Amount > Maximum
Limit
Fixed Charge
•Table
2-2 Service charge scheme
1. Minimum Charge: If the transaction amount is below the Minimum Limit, the
defined charge is raised.
2. Rate: If the transaction amount is between the Maximum Limit and the Minimum
limit, the service charge is a percentage of the transacted amount.
STARCOIN C&A User Manual
Version 2.0.0/Revision 15.04.99
Volume I of II/26.04.99
Page 41 of 107
2 System Setup and administration
FINAL/CONFIDENTIAL
3. Maximum Charge: If the transaction amount is above the Minimum Limit, the
defined charge is raised.
Eight different charging schemes are possible:
1
Min: 0
Rate: 0
Max: 0
Charge
2
Charge
Tx-Amount
Min: m
Rate: 0
Max: 0
Charge
Tx-Amount
6
Min: 0
Rate: x
Max: 0
Charge
Min: m
Rate: 0
Max: n
Charge
Tx-Amount
3
4
Charge
Tx-Amount
7
Min: 0
Rate: x
Max: n
Min: m
Rate: x
Max: 0
Tx-Amount
8
Min: m
Rate: x
Max: n
co
nf
ide
nt
ia
l
5
Min: 0
Rate: 0
Max: n
Charge
Tx-Amount
Charge
Tx-Amount
Tx-Amount
•Fig. 2-1 Charging schemes
AV
ER
S
• Please be aware, that for IEP purchase only charging scheme '3' will return
reasonable values, because only the cumulated pool sums are returned from the
merchant terminal for settlement. The amount of each IEP purchase transaction can
not be compared to a minimum or maximum limit.
The following services of the C&A System can be charged:
• Unload to Account
The full or partial balance of an electronic purse/cheque is debited from the card and
credited to the cardholders account at a BST.
• Unload to Cash
The full or partial balance of an electronic purse/cheque is debited from the card and
given to the cardholder in cash at a BST.
• Load From Account
The customers card is loaded from account of the cardholder at a BST
• Load From Cash
The customers card is loaded by cash given to the bank clerk. Seen technically the
card is then loaded from the cash account of the bank.
Page 42 of 107
STARCOIN C&A User Manual
Volume I of II/26.04.99
Version 2.0.0/Revision 15.04.99
FINAL/CONFIDENTIAL
2 System Setup and administration
• IEP Purchase
Purchase at merchant terminal with IEP.
• ECH Purchase
Purchase at merchant terminal with ECH.
• Debit POS Purchase
Purchase at merchant terminal with on-line/off-line Debit-POS.
• ATM IEP Load
The customers card el. purse is loaded from account of the cardholder at an ATM.
co
nf
ide
nt
ia
l
• ATM IEP Unload
The full or partial balance of an electronic purse is debited from the card and
credited to the cardholders account or given as cash at an ATM
• ATM ECH Load
The customers card el. cheque is loaded from account of the cardholder at an ATM.
• ATM ECH Unload
The full or partial balance of an electronic cheque is debited from the card and
credited to the cardholders account or given as cash at an ATM
The following fields must be entered corresponding to each of the above Services:
• Minimum Limit
Any transaction amount below or equal to that limit will be charged with 'Minimum
charge'.
(Number ranging from 1 to 9999999999)
AV
ER
S
• Minimum Charge
Amount debited for a transaction below or equal to 'Minimum Limit'.
(Number ranging from 1 to 9999999999)
• Maximum Limit
Any transaction amount above or equal to that limit will be charged with 'Maximum
charge'.
(Number ranging from 1 to 9999999999)
• Maximum Charge
Amount debited for a transaction above or equal to 'Maximum Limit'
(Number ranging from 1 to 9999999999)
STARCOIN C&A User Manual
Version 2.0.0/Revision 15.04.99
Volume I of II/26.04.99
Page 43 of 107
2 System Setup and administration
FINAL/CONFIDENTIAL
• Service Rate
Any transaction amount above 'Minimum limit' but below Maximum limit' will be
charged with the defined rate.
(Number ranging from 0. 01 to 100)
Please note:
• For IEP Purchase , Minimum Limit , Minimum Charge and Maximum Limit fields
are not allowed .
2.4.6
Terminal Card Parameters - TK Param.
co
nf
ide
nt
ia
l
These set of data determine how the terminal card behaves in the STARCOIN payment
system. These data are very vital for the proper functioning of the system and should not
be changed while the system is running.
The following fields must be entered:
•Check of Bank Authorisation Card (BAC)
Bitmap entered as hex value, defining at what transactions the presentation of the
Bank Authorisation Card is required for authentication of the bank clerk:
Bitmap: b32....b1
Description
bit 1
Load IEP/ECH from account
bit 2
bit 3
Load other card from account
bit 4
Unload IEP/ECH to account
bit 5
* Unload IEP/ECH to cash
bit 6
RFU
bit 7
* Reset PIN counter on customers card
bit 8
* Check customer authorisation
bit 9
Check customers card
bit 10
Display customers card data
bit 11
Upload of transfer data received from transfer card
bit 12
Check transfer card
bit 13
End of day
bit 14
Statistics
bit 15
Display log files
bit 16
* Change and Save parameters of bank software
bit 17
* Reset PIN counter on other BAC
AV
ER
S
Page 44 of 107
* Load IEP/ECH by cash
STARCOIN C&A User Manual
Volume I of II/26.04.99
Version 2.0.0/Revision 15.04.99
FINAL/CONFIDENTIAL
2 System Setup and administration
bit 18
* Change PIN of customers card
bit 19...32
RFU
•Table
2-3 Check of Bank Authorisation card
* typical definitions, resulting in: 00 03 80 D2
(In Hex. Length - 8)
Please note that no validation on this value is done by the C&A system.
•Check of Bank Authorisation Card PIN
co
nf
ide
nt
ia
l
Bitmap entered as hex value, defining at what transactions entering the Bank
Authorisation Card PIN is required for authentication of the bank clerk:
Order an function of the Bits is the same as for the Check of Bank authorisation card,
described above.
* typical definitions, resulting in: 00 03 80 D2
(In Hex. Length - 8)
Please note that no validation on this value is done by the C&A system.
AV
ER
S
• Expiry Date of Terminal Card Generation
Expiration date of the issued terminal cards. It can be set independently of the
customers card one. This date is always linked to a key expiration date. Change of
expiry date indicates the start of a new generation of cards and it is recommended
that the system operator should take care not to issue to many different card
generations.
(Date in ‘DD.MM.YYYY’format)
• Key Version of Card Generation
Actual version of all version dependent key personalised on all terminal and
customer (!) cards.
Starting from the version defined here, four additional instances of each key are
personalised on the customer cards (e.g. Key Version is 01, then versions 02..05 are
also personalised). The terminal cards receive only the version defined here.
Using this field a key version update for all customer cards and terminal cards in the
field is possible. Please refer to document [GD3].
(In Hex. Length - 2)
• RSA Checking Ratio
RFU, enter '00'
When customers cards with static RSA authentication will be available, here it can
STARCOIN C&A User Manual
Version 2.0.0/Revision 15.04.99
Volume I of II/26.04.99
Page 45 of 107
2 System Setup and administration
FINAL/CONFIDENTIAL
be defined how often the terminal card checks the RSA signature.
(In Hex. Length - 2)
co
nf
ide
nt
ia
l
• Show Balance Indicator
Indicates, if a terminal shows the actual balance of an IEP/ECH during the
transaction.
'00' - Never show the cards balances
'01' - Show right when card is inserted into the terminal
'02' - Show, when transaction has been executed
'03' - Show on insertion and transaction execution
(Number ranging from 0 to 999)
• Transaction Recording Limit
Purchase amount, above which a single transaction of an IEP purchase is recorded in
the merchant terminal, additionally to the cumulating of the pool sum.
For all pilot installations it is recommended to enter '0' (record all transactions).
Please note: As the number of transactions for larger implementations increases
(>100.000 cards), this value can be reduced, but then the STARCOIN accounting
feature is not more available for el. purse transactions and can never be reactivated
again.
(Number ranging from 0 to 4294967295)
AV
ER
S
• Transaction Recording Ratio
Ratio of recording a single transaction of an IEP purchase in the merchant terminal,
additionally to the cumulating of the pool sum.
For all pilot installations it is recommended to enter '255' (record all transactions).
Please note: As the number of transactions for larger implementations increases
(>100.000 cards), this value can be reduced, but then the STARCOIN accounting
feature is not more available for el. purse transactions and can never be reactivated
again.
(Number ranging from 0 to 255)
• Signature Check by Terminal Card
RFU. Indicates, if a terminal card must check certain cards - please enter '00'
(Number ranging from 0 to 100)
• Please Note : The switching ON and OFF of accounting depends on two System
Initialisation. parameters viz., ‘Transaction Recording Limit’and ‘Transaction
Page 46 of 107
STARCOIN C&A User Manual
Volume I of II/26.04.99
Version 2.0.0/Revision 15.04.99
FINAL/CONFIDENTIAL
2 System Setup and administration
Recording Ratio’. If either of these two fields is changed from ‘0’ and ‘255’ the
accounting process is switched off. Once the recording is stopped then it is not
allowed to revert back i.e. if ‘Transaction Recording Limit’ is modified to non-zero
or 'Transaction Recording Ratio' is made less than ‘255’then though they are
allowed to revert back to ‘0’and ‘255’respectively, but the recording of IEP
transaction balance will still remain disabled.
2.4.7
CA-Provider
co
nf
ide
nt
ia
l
To receive the service charge for clearing and administration process, the C&A system
provider holds a service charge account at a bank where all charges are settled. This
bank is entered as a participating bank in the C&A system and can be viewed from the
bank screen.
All address data and especially the location of the Service charge account of the C&A
System provider must be entered here:
•CA-Provider Name
(Characters with maximum length - 30)
•Service Bank Id
AV
ER
S
Bank identification number (according to national/international standards) of the
bank holding the account, where all service charges raised in the system are credited
to.
Please note, that this field is mandatory if service charges are raised.
(Number ranging from 1 to 9999)
•Service A/c No.
Account number (according to national/international standards) of the service charge
account.
Please note, that this field is mandatory if service charges are raised.
(Number ranging from 1 to 99999999999999999999)
•Street
where the C&A service provider is located.
(Characters with maximum length - 30. Not mandatory.)
•City
where the C&A service provider is located.
STARCOIN C&A User Manual
Version 2.0.0/Revision 15.04.99
Volume I of II/26.04.99
Page 47 of 107
2 System Setup and administration
FINAL/CONFIDENTIAL
(Characters with maximum length - 30. Not mandatory.)
•ZIP Code
of city where the C&A service provider is located.
(Characters with maximum length - 30. Not mandatory.)
•Country
•Telephone
co
nf
ide
nt
ia
l
where the C&A service provider is located.
(Characters with maximum length - 30. Not mandatory.)
of C&A service provider.
(Characters with maximum length - 30. Not mandatory.)
•Fax
of C&A service provider.
(Characters with maximum length - 30. Not mandatory.)
•Contact Person
C&A System administrator.
(Characters with maximum length - 30. Not mandatory.)
•Sector Id
AV
ER
S
RFU - Optional: Bank group, the C&A provider belongs to.
(Number ranging 1..99. Not mandatory.)
2.4.8
Redlist Params
To generate Redlist data for Customer Card and transferring Redlist information to
Terminal card , System Redlist parameters must be entered here
• Update Depth
RFU: Update depth is a number , either given as default or can be modified by the
User. If Update depth is Zero, then Complete List would be sent. Default Update
depth is 3. If difference of Red Number and Terminal Card RedNumber is greater
than default Update Depth, then complete redlist must be sent .
RFU - Currently only complete redlists are sent.
(Number ranging from 0 to 999)
Page 48 of 107
STARCOIN C&A User Manual
Volume I of II/26.04.99
Version 2.0.0/Revision 15.04.99
FINAL/CONFIDENTIAL
2 System Setup and administration
• Generation Period
It is basically the mode of generation of Redlist data . If the value given is 1 , this
means, Redlist Data must be generated once a day.
(Number ranging from 1 to 999)
• Valid Interval
The number of days up to which the generated Redlist is valid . If the value given is
13, it means, from the start date, the Redlist information is valid for 13 days.
Terminals containing older redlists will refuse every off-line transaction.
(Number ranging from 1 to 999)
co
nf
ide
nt
ia
l
• Red date
This is the generation date of redlist data. Date is automatically generated when
Redlist information is created.
• Red Length
It represents the number of redlisted Cards at an instance in the System. The value is
generated automatically.
The field is disabled here.
• Red Number
While checking the status of Customer Cards, if found redlisted, a number is
generated as Red Number through process. User input is not allowed here .
2.5
Role Item Master (Administration)
AV
ER
S
• Access Path
System → Administration → Role-Item
The System Administrator can create several Roles in the system. Each role indicates a
class of users having a certain privilege to operate certain menu items within the system.
Any user of the STARCOIN C&A System is linked to a certain 'Role' allowing him to
operate only in the menus assigned to the role, defined before by the system
administrator.
2.5.1
Insert a Role Item record
Create a new role for a class of users.
• Insert new
• Role Id
Short identifier of a certain role
(Characters with maximum length - 10)
STARCOIN C&A User Manual
Version 2.0.0/Revision 15.04.99
Volume I of II/26.04.99
Page 49 of 107
2 System Setup and administration
FINAL/CONFIDENTIAL
• Role Name
Name of the role specifying a class of users with certain access rights.
(Characters with maximum length - 30)
• For a particular Role Id
• Either
Enter valid data for Menu Item Description
• Or
Select valid data for Menu Item Description from List of Values by pressing the
‘Search’button.
2.5.2
co
nf
ide
nt
ia
l
• Press ‘Save’button to save the new record.
Update a Role Item record
Add or delete a particular menu item related to a role for a class of users.
• To retrieve the Role Item record Press the ‘Query’button
• Fetch the data for a particular Role Id (or press the ‘Cancel’button to cancel the
query)
• Either
• Enter data in either ‘Role Id’or ‘Role Name’field (searchable fields are in
Yellow legend. Wildcarding may be used in both of the fields) to fetch an
existing record.
• Press ‘Execute’button to retrieve the corresponding Menu Items attached
to that particular Role Id.
AV
ER
S
• OR
Press ‘Search’button to get a list of Roles, which is shown in List of Values
form. On selection of desired Role Id press ‘OK’button in List of Values
form. This will fetch the Role Information and the corresponding Menu
Items attached.
• To fetch the data for all Role Ids and their corresponding Menu Items, press
‘Execute’button.
Update a Role Item record
• Attaching new Menu Items
• It is possible to attach new Menu Items to a particular existing Role by entering
valid Menu Items or selecting valid Menu Items from List of Values . by
pressing the ‘Search’button.
• Press ‘Save’button to save the modifications.
• Deleting existing Menu Items
Page 50 of 107
STARCOIN C&A User Manual
Volume I of II/26.04.99
Version 2.0.0/Revision 15.04.99
FINAL/CONFIDENTIAL
2 System Setup and administration
• Place the cursor on a particular Menu Item. Immediately the ‘Delete’button of
the ‘Menu Item’block is enabled.
• Press ‘Delete’button. The corresponding record will be removed from the display
table.
• Press ‘Save’button to delete the record.
2.5.3
Delete a Role
The function allows to delete a complete role of a class of users.
Either
co
nf
ide
nt
ia
l
• Press the ‘Query’button
• Retrieve the Role Item record
fetch the data for a particular Role Id (or Press the ‘Cancel’button to cancel the
query)
• Enter data in either ‘Role Id’or ‘Role Name’field (searchable fields are in
Yellow legend. Wildcarding may be used in both of the fields) to fetch an
existing record.
• Press ‘Execute’button to retrieve the corresponding Menu Items attached
to that particular Role.
Or
AV
ER
S
Press ‘Search’button to get a list of Roles, which is shown in List of Values
form. On selection of desired Role press ‘OK’button in List of Values form.
This will fetch the Role Information and the corresponding Menu Items
attached .
To fetch the data for all Role Id-s and their corresponding Menu Items, press ‘Execute’
button.
Delete Role Item record
• Check the ‘Deleted’check box in ‘Role’block.
• If a User is assigned to the Role, record cannot be deleted.
• Otherwise, press ‘Save’button to delete the record.
2.6
New User Entry (Administration)
•Access Path
System → Administration→ User
STARCOIN C&A User Manual
Version 2.0.0/Revision 15.04.99
Volume I of II/26.04.99
Page 51 of 107
2 System Setup and administration
FINAL/CONFIDENTIAL
Any user working at the STARCOIN C&A System has to be entered here and receives
his own password. By building a link to a Role Item, this user is only allowed to operate
within the defined menus of the Role.
2.6.1
Insert New user record
Please enter the following fields to define a new user:
• User Id
Identifying name of the user, when entering the STARCOIN C&A System.
(Characters with maximum length - 6)
co
nf
ide
nt
ia
l
• Name
Name of the user (e.g. family name)
(Characters with maximum length - 30)
• Designation
Description of the users professional status.
(Characters with maximum length - 30. Not mandatory)
• Role Id
Search/enter one of the roles, as defined in menu Administration → Role Item
(Enter a valid Role Id or select a valid Role Id from List of Values)
• Password
(Characters with maximum length - 10)
• Confirm Password
(Characters with maximum length - 10. Must be same as Password)
AV
ER
S
• Expiry Date
Date after which the user is not accepted anymore by the C&A System.
(Date in 'DD.MM.YYYY' format. Not mandatory)
• Press ‘Save’button to save the inserted record.
2.6.2
Retrieve the User record
Find the role information for a certain user.
• Press the ‘Query’button
• Fetch the data for a particular User Id (or press ‘Cancel’button to cancel the query)
• Either
Enter valid data in either ‘User Id’or ‘User Name’field (searchable fields are in
Yellow legend. Wildcarding may be used in both of the fields).
• OR
Page 52 of 107
STARCOIN C&A User Manual
Volume I of II/26.04.99
Version 2.0.0/Revision 15.04.99
FINAL/CONFIDENTIAL
2 System Setup and administration
Press ‘Search’button to get a list of Users, which is shown in List of Values
form. On selection of desired User, press ‘OK’button in List of Values form.
• Press ‘Execute’button to retrieve the data for a single User or all Users.
2.6.3
Update / Delete User record
Retrieve the User record
• Press the ‘Query’button
• Fetch the data for a particular User Id (or press the Cancel button to cancel the query)
• OR
co
nf
ide
nt
ia
l
• Either
Enter valid data in either ‘User Id’or ‘User Name’field (searchable fields
are in Yellow legend. Wildcarding may be used in both of the fields).
Press ‘Search’button to get a list of Users, which is shown in List of Values
form. On selection of desired User, press ‘OK’button in List of Values
form.
• Press ‘Execute’button to retrieve the data for a single User or all User-s.
Update / Delete User record
AV
ER
S
• ‘Save’button is enabled after any modification in any or all of the following fields:
• Designation
• Role Id
• Press ‘Save’button to save the new updated record in the database.
• For Delete, make the ‘Deleted’check box marked. ‘Save’button is enabled now.
• Press ‘Save’button to save the changes made.
2.7
Change Password Entry (Administration)
• Access Path
System → Administration → Change Password
Allows to change the password of a defined user.
• After entering data in
• Old Password
(Characters with maximum length - 10)
STARCOIN C&A User Manual
Version 2.0.0/Revision 15.04.99
Volume I of II/26.04.99
Page 53 of 107
2 System Setup and administration
FINAL/CONFIDENTIAL
• New Password
(Characters with maximum length - 10)
• Confirm Password
(Characters with maximum length - 10. Must be same as New Password)
• Press ‘Save’button, to save the change in password.
Note: Once a user is created and a password is assigned by the system administrator, the
password can only be modified by the user (not by system administrator) using ‘Change
Password’ option after logging into the application (using given user id). The System
Administrator cannot modify / change other’s password.
Archive Transaction (Administration)
• Access Path
co
nf
ide
nt
ia
l
2.8
System → Administration → Archive
All transactions ever transferred to the C&A system (load/unload/transfer data from
payments) are stored in the database and should be archived periodically (e.g. once a
month).
Until their archival, the data remain in the database an may slow down accesses to it.
Only archival and purging of the database deletes 'old' transactions.
Please note, that only fully settled and exported transactions can be archived and purged.
AV
ER
S
• Enter ‘Period From’& ‘Period To’(Date in DD.MM.YYYY format) for which the
following transactions are to be archived:
• Customer Load and Unload Transactions
• Individual recorded purchase Transactions (ECH)
• Pool related purchase Transactions (IEP)
• POS related purchase Transactions (POS)
• Customer load/unload settlement Advice
• IEP purchase Settlement Advice
• ECH purchase Settlement Advice
• POS purchase Settlement Advice
• Transfer Files of IEP/ECH purchases
• Press the ‘Archive’button.
• This process will generate the following flat files respectively in the Server Export
directory mentioned in STARCOIN. INI file
(SETTLEMENT_EXPORT_DIR=<Path>\<Filename>):
• ctnarch.dat
Page 54 of 107
STARCOIN C&A User Manual
Volume I of II/26.04.99
Version 2.0.0/Revision 15.04.99
FINAL/CONFIDENTIAL
•
•
•
•
•
•
•
•
ptnarch.dat
cplarch.dat
dptarch.dat
davarch.dat
islarch.dat
eslarch.dat
dpaarch.dat
trfarch.dat
Purge Transaction (Administration)
• Access Path
co
nf
ide
nt
ia
l
2.9
2 System Setup and administration
System → Administration → Purge Database
This process will delete all the records from the database within the specified period
which are already archived.
AV
ER
S
• Enter ‘Period From’& ‘Period To’(Date in DD.MM.YYYY format) for which the
following transactions are to be purged:
• Customer Load and Unload Transactions
• Individual recorded purchase Transactions (ECH)
• Pool related purchase Transactions (IEP)
• POS related purchase Transactions (POS)
• Customer load/unload settlement Advice
• IEP purchase Settlement Advice
• ECH purchase Settlement Advice
• POS purchase Settlement Advice
• Transfer Files of IEP/ECH purchases
• Press the ‘Purge’button.
2.10
View / Print System Log
• Access Path
System → Administration → View / Print System Log
STARCOIN C&A User Manual
Version 2.0.0/Revision 15.04.99
Volume I of II/26.04.99
Page 55 of 107
2 System Setup and administration
FINAL/CONFIDENTIAL
This process will generate a report consisting of all the transactions made by different
users within the specified period . The transactions are basically, system log records
retrieved from database.
• Do the following operations in the Parameter Form :
• Enter 'Period From' & 'Period To' (Date in DD.MM.YYYY format) to specify
the period .
• Select Destination Type as Screen/File/Printer/Preview . For 'Printer' , generated
report is redirected to printer device. For 'File' , report content is stored in a file.
• Enter a filename with proper path if Destination Type is 'File'.
co
nf
ide
nt
ia
l
• Select User from the list of Users having entries in System Log.
• Select Table Name from the list of tables on which transactions
(Insert/Update/Delete) are made.
• Select Operation Mode as All/Insert/Update/Delete.
• Select Report Flag as Non Printed/Already Printed/All.
• Select Module Name from the list of modules having entries in System Log.
• If you want to Purge the selected System Log records, choose 'Yes' , else 'No'
from the corresponding list.
• Press the 'Run Report' button.
AV
ER
S
• Press the 'Cancel' button. The parameter form will be closed.
2.11
Purge System Log
• Access Path
System → Administration → Purge System Log
This process will delete all system log records , which are marked for Purging , from the
database within the specified period .
• Enter 'Period From' & 'Period To' (Date in DD.MM.YYYY format) for which
system log records are to be purged .
• Press the 'Purge' button.
• Press the 'Close' button . Form 'Purge System Log' will be closed .
Page 56 of 107
STARCOIN C&A User Manual
Volume I of II/26.04.99
Version 2.0.0/Revision 15.04.99
FINAL/CONFIDENTIAL
2.12
2 System Setup and administration
Export of Keys
Keys must be exported from the C&A System database to be available for external
participants of the STARCOIN system, e.g. G&D must receive the keys for customer-,
terminal-, and transfer card initialisation.
Keys are either exported in component form on chip cards or in encrypted form on
chipcards or disks. The chipcards can only be accessed by entering the correct PIN.
2.12.1
Exported key groups
•Access Path
co
nf
ide
nt
ia
l
As it can be seen on the screen, some of the exported keys can be stored on the same key
card together with other keys, to save key cards.
System → Export Keys
→ Transport Key Encryption Key
→ ICC Personalisation Keys
→ TK Personalisation Keys
→ Transfer Card Personalisation Keys
→ Settlement Data Securing Keys
→ Personalisation Data Securing Keys
→ Card Register / Create Keys
There are types of keys
•Transport keys
These keys are only used to encrypted the keys exported from the C&A system. When
exported they are written in component form on three different key cards (System →
AV
ER
S
Export Keys → Transport Key Encryption Key → ...).
.
•Other exported keys
Depending on their definition they are used for card initialisation, data encryption or
other purposes. If exported, they are encrypted by the above defined "Transport key
encryption keys".
• Please note: When keys are exported, at least four (!) key cards will be used:
- 3 keys cards carrying the transport key components
- 1 key card containing the encrypted exported keys.
Please note that key cards can either carry keys split in component form or encrypted
key, but never both on the same card.
STARCOIN C&A User Manual
Version 2.0.0/Revision 15.04.99
Volume I of II/26.04.99
Page 57 of 107
2 System Setup and administration
FINAL/CONFIDENTIAL
The following keys can be stored on one (set of) key cards:
- G&D initialisation keys and their transport keys
• ICC Personalisation keys
• TK Personalisation keys
• Transfer card Personalisation keys
- Settlement data securing keys
- Bank related keys:
co
nf
ide
nt
ia
l
• Personalisation data securing keys
As long as the Personalisation takes place in the C&A system centre, the
Personalisation data securing keys are stored on different cards than the bank data
upload securing keys.
AV
ER
S
- Card Register / Create Keys
Page 58 of 107
STARCOIN C&A User Manual
Volume I of II/26.04.99
Version 2.0.0/Revision 15.04.99
FINAL/CONFIDENTIAL
2.12.2
2 System Setup and administration
Export ICC Personalisation Key
This is the customers card personalisation key. With this key all keys personalised on a
customers card are encrypted.
Way of export:
Recipient:
3 different Key Cards (+ PIN Mailers, if required)
G&D, for initialisation of customers cards
To export the key:
• System
→ Export Keys
co
nf
ide
nt
ia
l
→ Transport Key Encryption Key
→ ICC Personalisation Keys
• HSM-Board Status displayed.
• Press ‘Ok’to export ICC Personalisation Keys. The key components will be saved
in key cards - please follow the instructions on the screen, asking you to enter
sequentially key cards and PINs.
After successful export, ‘Ok’ button gets disabled.
Press ‘Cancel’to come back to the Main screen from where it has been called.
2.12.3
TK Personalisation transport Key
AV
ER
S
This key is a transport key, encrypting the terminal cards Personalisation keys, when
they are on their way to G&D.
Way of export:
Recipient:
3 different Key Cards (+ PIN Mailers, if required)
G&D, to decrypt the terminal card personalisation keys, which are
initialised then on the terminal cards.
To export the key:
• System
→ Export Keys
→ Transport Key Encryption Key
→ TK Personalisation Keys
• HSM-Board Status displayed.
• Press ‘Ok’to export transport key. The key components will be saved in key cards please follow the instructions on the screen, asking you to enter sequentially key
STARCOIN C&A User Manual
Version 2.0.0/Revision 15.04.99
Volume I of II/26.04.99
Page 59 of 107
2 System Setup and administration
FINAL/CONFIDENTIAL
cards and PINs.
After successful export, ‘Ok’ button gets disabled.
Press ‘Cancel’to come back to the Main screen from where it has been called.
2.12.4
Transfer Card Personalisation transport Key
This key is a transport key, encrypting the transfer cards Personalisation key, when on its
way to G&D.
3 different Key Cards (+ PIN Mailers, if required)
G&D, to decrypt the transfer card personalisation key, which is
initialised then on the transfer cards.
To export the key:
• System
→ Export Keys
co
nf
ide
nt
ia
l
Way of export:
Recipient:
→ Transport Key Encryption Key
→ Transfer card Personalisation keys
• HSM-Board Status displayed.
AV
ER
S
• Press ‘Ok’to export transport key. The key components will be saved in key cards please follow the instructions on the screen, asking you to enter sequentially key
cards and PINs.
After successful export, ‘Ok’ button gets disabled.
Press ‘Cancel’to come back to the Main screen from where it has been called.
2.12.5
Settlement Data Securing Keys transport key
This key is a transport key, encrypting the settlement data securing keys, when on their
way to the settlement bank.
Way of export:
Recipient:
Page 60 of 107
3 different Key Cards (+ PIN Mailers, if required)
Settlement bank, used to decrypt the keys securing the data transfer
from the C&A System.
STARCOIN C&A User Manual
Volume I of II/26.04.99
Version 2.0.0/Revision 15.04.99
FINAL/CONFIDENTIAL
2 System Setup and administration
To export the key:
• System
→ Export Keys
→ Transport Key Encryption Key
→ Settlement Data Securing Keys
• HSM-Board Status displayed.
2.12.6
co
nf
ide
nt
ia
l
• Press ‘Ok’to export transport key. The key components will be saved in key cards please follow the instructions on the screen, asking you to enter sequentially key
cards and PINs.
After successful export, ‘Ok’ button gets disabled.
Press ‘Cancel’to come back to the Main screen from where it has been called.
Personalisation Data Securing Keys transport key
This key is a transport key, encrypting the Personalisation data securing keys, when on
their way to the Personalisation instance (issuing bank or at the C&A System provider).
Way of export:
Recipient:
3 different Key Cards (+ PIN Mailers, if required)
Personalisation software at the C&A system provider or card issuing
bank, to decrypt the keys securing the personalisation data.
To export the key:
• System
AV
ER
S
→ Export Keys
→ Transport Key Encryption Key
→ Personalisation Data Securing Keys
• Enter a valid 'Bank Id'. If all cards are personalised at the C&A System provider,
enter bank id of settlement bank.
• HSM-Board Status displayed.
• Press ‘Ok’to export transport key. The key components will be saved in key cards please follow the instructions on the screen, asking you to enter sequentially key
cards and PINs.
After successful export, ‘Ok’ button gets disabled.
Press ‘Cancel’to come back to the Main screen from where it has been called.
STARCOIN C&A User Manual
Version 2.0.0/Revision 15.04.99
Volume I of II/26.04.99
Page 61 of 107
2 System Setup and administration
2.12.7
FINAL/CONFIDENTIAL
Card Register / Create Keys transport key
This key is a transport key used to encrypt Card Register and Create keys, when on their
way to the STARCOIN service provider.
Way of export:
3 different Key Cards (+ PIN Mailers, if required)
Recipient:
STARCOIN service provider, used to decrypt the keys securing the
customers card application generation.
• System
→ Export Keys
co
nf
ide
nt
ia
l
To export the key:
→ Transport Key Encryption Key
→ Card Register / Create Keys
• HSM-Board Status displayed.
• Press 'Ok' to export transport key. The key components will be saved in key cards please follow the instructions on the screen, asking you to enter sequentially key
cards and PINs.
• After successful export or failure , 'Ok' button gets disabled.
• Press 'Cancel' to come back to the Main screen from where it has been called.
TK Personalisation keys
AV
ER
S
2.12.8
These keys are the initial terminal card Personalisation keys. They are replaced by the
first Personalisation command. The terminal card Personalisation keys secure the
Personalisation process.
Way of export:
Recipient:
1 Key Card (+ PIN Mailer, if required)
G&D, initialising them on the terminal cards.
To export the key:
• System
→ Export Keys
→ Initialised Keys
→ TK Personalisation
Page 62 of 107
STARCOIN C&A User Manual
Volume I of II/26.04.99
Version 2.0.0/Revision 15.04.99
FINAL/CONFIDENTIAL
2 System Setup and administration
• Select either ‘Card’ or ‘File’ for mode of saving keys
• Enter a valid ‘File Name’if ‘File’option is chosen, the key stored then on a disk.
• HSM-Board Status displayed.
2.12.9
co
nf
ide
nt
ia
l
• Press ‘Ok’to export keys.
If 'Card' option has been chosen, the encrypted key will be saved in the key card please follow the instructions on the screen, asking you to enter key card and PIN.
If ‘File’option is chosen for mode of saving keys, the encrypted keys will be saved
in a file having the entered file name as its name.
After successful export, ‘Ok’ button gets disabled.
Press ‘Cancel’to come back to the Main screen from where it has been called.
Transfer Card Personalisation key
This key is the transfer card Personalisation key. It is used to authorise the C&A System
process for Personalisation of the transfer card.
Way of export:
Recipient:
1 Key Card (+ PIN Mailer, if required)
G&D, initialising it on the transfer cards.
To export the key:
• System
→ Export Keys
AV
ER
S
→ Initialised Keys
→ Transfer Card Personalisation
• Select either ‘Card’ or ‘File’ for mode of saving keys
• Enter a valid ‘File Name’if ‘File’option is chosen, the key stored then on a disk.
• HSM-Board Status displayed.
• Press ‘Ok’to export key.
If 'Card' option has been chosen, the encrypted key will be saved in the key card please follow the instructions on the screen, asking you to enter key card and PIN.
If ‘File’option is chosen for mode of saving keys, the encrypted key will be saved in
a file having the entered file name as its name.
After successful export, ‘Ok’ button gets disabled.
Press ‘Cancel’to come back to the Main screen from where it has been called.
STARCOIN C&A User Manual
Version 2.0.0/Revision 15.04.99
Volume I of II/26.04.99
Page 63 of 107
2 System Setup and administration
2.12.10
FINAL/CONFIDENTIAL
Settlement Data Securing Keys
These keys secure the data sent from the C&A system to the settlement bank.
Way of export:
Recipient:
1 Key Card (+ PIN Mailer, if required)
Settlement bank, for checking MAC, hash value and decrypt the
settlement data.
To export the key:
• System
co
nf
ide
nt
ia
l
→ Settlement data securing keys
• Select either ‘Card’ or ‘File’ for mode of saving keys
• Enter a valid ‘File Name’if ‘File’option is chosen, the key stored then on a disk.
• HSM-Board Status displayed.
• Press ‘Ok’to export keys.
If 'Card' option has been chosen, the encrypted keys will be saved in the key card please follow the instructions on the screen, asking you to enter key card and PIN.
If ‘File’option is chosen for mode of saving keys, the encrypted keys will be saved
in a file having the entered file name as its name. After successful export, ‘Ok’
button gets disabled.
Press ‘Cancel’to come back to the Main screen from where it has been called.
2.12.11
Personalisation Data Securing Keys
AV
ER
S
These keys secure the data sent from the C&A system to Personalisation software (either
at the C&A system provider or the issuing bank).
Way of export:
Recipient:
1 Key Card (+ PIN Mailer, if required)
Customer card Personalisation instance, to decrypt and validate the
received personalisation data.
To export the key:
• System
→ Personalisation data securing keys
• Select either ‘Card’ or ‘File’ for mode of saving keys
• Enter a valid ‘File Name’if ‘File’option is chosen, the key stored then on a disk.
• HSM-Board Status displayed.
Page 64 of 107
STARCOIN C&A User Manual
Volume I of II/26.04.99
Version 2.0.0/Revision 15.04.99
FINAL/CONFIDENTIAL
2 System Setup and administration
• Press ‘Ok’to export keys.
If 'Card' option has been chosen, the encrypted keys will be saved in the key card please follow the instructions on the screen, asking you to enter key card and PIN.
If ‘File’option is chosen for mode of saving keys, the encrypted keys will be saved
in a file having the entered file name as its name.
After successful export, ‘Ok’ button gets disabled.
Press ‘Cancel’to come back to the Main screen from where it has been called.
2.12.12
Card Register / Create Keys
co
nf
ide
nt
ia
l
These keys are exported from STRACOIN C&A database to authorise the Service
Provider to generate new data structures.
Please note, that this application generation feature is only available for specific
customers cards with free memory.
Way of export:
Recipient:
1 Key Card (+ PIN Mailer, if required)
STARCOIN Service Provider which gets authorisation to generate
new data structures.
To export the key:
• System
→ Export Keys
→ Card Register / Create Keys
AV
ER
S
• HSM-Board Status displayed.
• Press 'Ok' to export key. The key components will be saved in key cards - please
follow the instructions on the screen, asking you to enter sequentially key cards and
PINs.
• After successful export or failure, 'Ok' button gets disabled.
• Press 'Cancel' to come back to the Main screen from where it has been called.
STARCOIN C&A User Manual
Version 2.0.0/Revision 15.04.99
Volume I of II/26.04.99
Page 65 of 107
3 Redlist Management
3
FINAL/CONFIDENTIAL
Redlist Management
STARCOIN provides a redlist to restrict the use of customer cards in the payment
system. Any card requesting load or unload transaction is checked on these lists and if
found the request is rejected, the C&A system sends a respective error code.
A redlist can be transferred to the purchase terminals and is used there to check all cards
arriving for purchase transaction.
Always a complete list is transferred (currently max. 4096 cards).
Menu hierarchy
co
nf
ide
nt
ia
l
3.1
• Redlist Management
• Generate Redlist Data
• Purge Redlist Data
3.1.1
Prerequisites
For Purge Redlist Data
3.2
The default archive file must exist
in the correct directory, as defined
in STARCOIN.ini.
Generate Redlist Data
•Access path
AV
ER
S
System → RedList Management → Generate Redlist Data
All Customer Cards with Status 'Active' or 'New' are checked to verify whether the
Cards are stolen/counterfeit/lost. In this case, status of card is updated as 'Redlisted' and
a number is generated to identify Redlisted cards.
•If new redlist data is not generated, updating is not required in for the terminals. For
this reason, an information is displayed.
Page 66 of 107
STARCOIN C&A User Manual
Volume I of II/26.04.99
Version 2.0.0/Revision 15.04.99
FINAL/CONFIDENTIAL
3.3
3 Redlist Management
Purge Redlist Data
•Access path
System → RedList Management → Purge Redlist Data
This process displays all redlist and reset records, retrieved from database, which are
'update depth' below the maximum redlist number. Update depth is a number, either
given as default or can be modified by the User. The displayed data can be archived
(optional) and purged.
co
nf
ide
nt
ia
l
•Check ‘Archive’ to bring the default archive file and to make the system ready to
archive while purging.
•Uncheck ‘Archive’ if it is already checked to remove default archive file and to
mention that archive not necessary.
•Press ‘Query’button to clear the Form and make it ready for executing query
corresponding to new Update depth which should be entered now by the user.
•Press ‘Purge’button to purge records appeared in the screen. Records will be
archived while purging if the check box ‘Archive’ is checked.
AV
ER
S
•Press ‘Close’button to return to main menu.
At any point of time, you can press the ‘Close’, button.
STARCOIN C&A User Manual
Version 2.0.0/Revision 15.04.99
Volume I of II/26.04.99
Page 67 of 107
4 Terminal Card Update
FINAL/CONFIDENTIAL
4
Terminal Card Update
4.1
Introduction
For a STARCOIN payment system, there may be requirement of updation of terminal
card(s) which are already issued and in operational because of either change in
functionality or some feature enhancement. The application, therefore provides a
functionality to update Terminal Card parameters and keys in all the terminals.
co
nf
ide
nt
ia
l
The basic idea is as follows :
In the event of any requirement for updation of terminal card, an update command is
created and stored in the C&A System. During the uploading of transfer files into the
terminals, STARCOIN checks the latest update command to be sent and transfers the
same to the transfer card or on-line connection and then through purchase terminal the
terminal card gets updated with that update information. The confirmation of the update
process is received back in the C&A system through Transfer Card or on-line connection
during subsequent transfer process.
The update parameter can for example:
• set the transaction recording ratio of el. purse transactions in the range of 0..100%
• set the transaction recording limit of el. purse transactions to any requested value
• update the terminal card expiry date and related keys
• update the used key versions of the payment keys (e.g. used if a new customers card
generation is issued)
AV
ER
S
• ...
4.2
Prerequisites
• UCT (Update Control Table) file and its Text description corresponding to ‘UCT
Version’entered must be present in the directory ‘STARCOIN\EXEC\UCT’.
• Please note: Due to the complexity and functional relations inside the terminal
cards, these files define the updated parameters and/or keys and are generated upon
request by G&D only!
• Terminal information should be present , if update card command is generated for
specified, a group or all terminals (see below).
Page 68 of 107
STARCOIN C&A User Manual
Volume I of II/26.04.99
Version 2.0.0/Revision 15.04.99
FINAL/CONFIDENTIAL
4.3
4 Terminal Card Update
Navigation functions
Clear the screen
• Press ‘Clear’button.
• If any change has been made, then an Alert message will pop up asking for
confirmation. Press ‘Yes’button to clear the form.
• If no change has been made, then on pressing the ‘Clear’button, the form will be
cleared.
Close the screen
4.4
co
nf
ide
nt
ia
l
• Press ‘Close’button .
• If any change has been made, then an Alert message will pop up confirming the Exit.
Press ‘Yes’button to close the form and exit.
• If no change has been made, then on pressing the ‘Close’button, the form will be
closed without showing any alert.
Insert a new Update Command
This process allows the entry of a new update command for terminal card(s). This
command will be created for all terminals or for a specific family of terminals depending
on the following user choices, where case a) and b) are the recommended ones.
a) Only valid ‘Operator Id’is entered
→ The update command will be prepared for all terminals falling under this
Operator Id. That way terminal cards of a specific merchant can be updated.
b) Only valid ‘Cluster Id’is entered
AV
ER
S
→ The update command will be prepared for all terminals falling under this Cluster
Id. The cluster id may be used to identify a specific group of merchants (e.g.
according to ISO 8583).
c) Only valid ‘Terminal Id’& ‘Operator Id’(opt. Cluster id) is entered
→ The update command will be prepared for that particular terminal. We do not
recommend to update only terminal cards of specific terminals, because the
overview on which terminal card may have received which feature can be lost
easily, even that the changes are reflected in the database.
d) Only valid ‘Operator Id’& ‘Cluster Id’is entered
→ The update command will be prepared for all terminals falling under this
Operator Id and Cluster Id. To be used if the terminal cards of a specific group
of terminals of one merchant need to be updated.
• Enter valid values in the following fields:
STARCOIN C&A User Manual
Version 2.0.0/Revision 15.04.99
Volume I of II/26.04.99
Page 69 of 107
4 Terminal Card Update
FINAL/CONFIDENTIAL
4.5
co
nf
ide
nt
ia
l
• UCT Version
Identifying version for the UCT File
(Numeric values with fixed length - 001..999)
• Operator Id
Operator Id for the Terminal, as defined in the merchant terminal table.
(Numeric values with maximum length - 10)
• Cluster Id
Cluster Id for the Terminal, as defined in the merchant terminal table.
(Numeric values with maximum length - 4)
• Terminal Id
• Terminal Id, as defined in the merchant terminal table.
(Numeric values with maximum length - 5)
• Once a valid UCT version is entered, the contents of the UCT file will appear on
‘Description’ field. User can edit the contents by pressing the ‘Edit’button.
• Press ‘Search’button. A list of values will appear containing ‘Operator Id’, ‘Cluster
Id’ and ‘Terminal Id’. Press ‘OK’button to retrieve the selected one.
• Press 'Start' button. A new update command will be generated for the user defined
choice.
• Press ‘Description’button to view the description of the update command. Please
note that this view is ‘Read Only’.
• Press ‘Delete Flag’ check box for a particular command. System will ask for user’s
confirmation before the operation. On positive response the selected command will
be marked as deleted there after. The System Date will appear as ‘Deactivated Date’.
Please note that user can not undelete any of the deleted commands.
Remarks to update management
AV
ER
S
The validation of a successful update is done by the update confirmation an a
information in the transfer data indicating, that an update has been executed in the
terminal card. If an error occurred, the update will be repeated.
Handling several "waiting" updates
If several updates must be processed (e.g. load a new key generation) the process logic
will update the terminal cards according to their specific requirements and the terminal
selection given for each update command. Updates are generated sequentially and only
on successful confirmation of an update, the next relevant one will be sent.
Page 70 of 107
STARCOIN C&A User Manual
Volume I of II/26.04.99
Version 2.0.0/Revision 15.04.99
FINAL/CONFIDENTIAL
5 Master Maintenance
5
Master Maintenance
5.1
Introduction
co
nf
ide
nt
ia
l
Certain entities of the C&A system such as the pools , participating banks and terminals
manufacturers are some of the top level entities of the C&A system. Most of the other
entities depend on these entities. Pools in the system will generally be entered once
during system set-up and the details of these pools will generally not change. Similarly
participating bank details and their relationship with the pools will also be changed less
frequently. These are some of the vital information in the system whose access has to be
restricted from a class of users of the C&A system. Hence these items are grouped under
master maintenance.
The described software functionality manages banks, pools and their relation.
For a general description of the STARCOIN pool management, please refer to [GD1].
Also the terminal manufactures must be entered here.
5.1.1
Prerequisites
For Pool
Maintenance
For Bank
Maintenance
AV
ER
S
For Pool - Bank
Maintenance
For Manufacturer
Maintenance
5.1.2
Related bank must have been entered
None.
There should be banks entered, which
are not attached to any pool.
None.
Navigation functions
Clear the screen
• Press ‘Clear’button.
• If any change has been made, then an Alert message will pop up asking for
confirmation. Press ‘Yes’button to clear the form.
• If no change has been made, then on pressing the ‘Clear’button, the form will be
cleared.
Close the screen
• Press ‘Close’button .
• If any change has been made, then an Alert message will pop up confirming the Exit.
Press ‘Yes’button to close the form and exit.
STARCOIN C&A User Manual
Version 2.0.0/Revision 15.04.99
Volume I of II/26.04.99
Page 71 of 107
5 Master Maintenance
FINAL/CONFIDENTIAL
• If no change has been made, then on pressing the ‘Close’button, the form will be
closed without showing any alert.
5.2
Pool Maintenance
• Access Path
Masters → Pool
co
nf
ide
nt
ia
l
The management of pools is one of the major features of the STARCOIN System. A
pool is an account in a bank, where all money, which is stored on the customers card
when loading with electronic units, is transferred to. This money is now at the disposal
of the bank. Within STARCOIN a pool represents one or several card issuing banks.
When all pool transactions are cleared at the end of the day, the C&A system sends the
settlement bank the pool transaction advice that then manages the transfers of the
amounts to the different bank accounts.
For a general description of the STARCOIN pool management, please refer to [GD1].
5.2.1
Pools and terminal cards
All available pools are already initialised on the terminal cards.
In the STARCOIN terminal card version 1.6 there are 13 IEP pools and one for ECH
payments checking (the payment amounts are cumulated, but not settled). The version
2.2 terminal card contains 19 IEP pools and one for the ECH.
AV
ER
S
Depending on the number of participating pool holding banks, only some or all of them
are used. Up to the maximum number of pools a new pool holding bank can be added at
any time, which means that all pools are available on a terminal card right at the begin of
its life cycle, but will be used later in its life time.
• Important note: As long as version 1.6 terminal cards are used within the system,
not more than 13 pools must be used, because customers cards linked to a higher
pool number will not be accepted at terminals with version 1.6 terminal cards!
• From terminal card version 2.2 on 19 pools can be used.
5.2.2
Insert a new Pool
This process allows for entry of a new IEP pool in the C&A system. One ECH Pool with
pool id 32769 (hex ‘80 01’) is automatically installed in the system during the system
initialisation process (‘sysinit’). This pool is maintained for statistical purpose. This pool
does not have any pool account number hence there is no pool bank for this pool. No
Page 72 of 107
STARCOIN C&A User Manual
Volume I of II/26.04.99
Version 2.0.0/Revision 15.04.99
FINAL/CONFIDENTIAL
5 Master Maintenance
bank can be attached to this pool. The maximum number of pools that can be entered in
the C&A system is controlled by G&D during system set-up time.
• Enter valid values in the following fields:
• Pool Name
Identifying name for each Pool.
(Characters with maximum length - 30)
co
nf
ide
nt
ia
l
• Bank Id
C&A specific number of the bank managing the pool. Please be sure having
entered the bank before inserting a new pool.
When cursor is on ‘Bank Id’field, on pressing ‘Search’button, a List of Values
showing all Banks not yet attached to any pool will appear. Select a particular
Bank and press ‘Ok’button of the List of Values. Bank Id and corresponding
Bank Name will be displayed on the screen.
(Number ranging from 1 to 9999)
• Pool A/c Number
Account number of the pool according to national/international standards. The
settlement takes this account number for all debiting and crediting of load and
purchase amounts.
(Number ranging from 1 to 99999999999999999999). If Bank Id is entered then
this data element is mandatory.
• Press 'Save' button. On proper condition check, a new Pool record will be saved
with system generated Pool Id displayed in Hex.
5.2.3
Update an existing Pool Record
AV
ER
S
Allows to update the Pool Name, the related Bank Id or the Pool account number.
• Press 'Query' button. The cursor will be at Pool Id.
• Either
Enter data in ‘Pool Id’or in ‘Pool Name’ field to fetch an existing record.
• Pool Id (To be entered in Hex, Maximum Length -4 ).
• OR
Press ‘Search’button to get a list of Pools shown in List of values. searchable fields are
in Yellow legend. Wildcarding may be used in both of the fields. On selection of desired
Pool, press ‘OK’button. Pool Id and Pool Name will be displayed on the screen.
•Press ‘Execute’button to retrieve the record from the database. At this stage, ‘Up’,
’Down’, ‘Query’, ‘Clear’, ’Save’& ‘Close’buttons are enabled.
•Use ‘Up’and ‘Down’arrow keys to navigate between Pool records.
STARCOIN C&A User Manual
Version 2.0.0/Revision 15.04.99
Volume I of II/26.04.99
Page 73 of 107
5 Master Maintenance
FINAL/CONFIDENTIAL
•Do necessary modifications in ‘Pool Name’/ ’Bank Id’/ ‘Pool A/c No’field if
required.
•Press ‘Save’button to save the updated record in the database.
Note that, changing ‘Bank Id’ and ‘Pool A/c No’will affect the settlement
5.2.4
Query Pool
Displays the actual pool data as related bank and account, the pool id and especially the
pool balances.
• Press 'Query' button. The cursor will be at Pool Id.
co
nf
ide
nt
ia
l
• Either
Enter data in ‘Pool Id’or in ‘Pool Name’field to fetch an existing record.
• Pool Id (To be entered in Hex, Maximum Length -4 ).
• OR
Press ‘Search’button to get a list of Pools shown in List of values. searchable fields are
in Yellow legend. Wildcarding may be used in both of the fields. On selection of desired
Pool, press ‘OK’button. Pool Id and Pool Name will be displayed on the screen.
• Press ‘Execute’button to retrieve the record from the database. At this stage, ‘Up’,
’Down’, ‘Query’, ‘Clear’, ’Save’& ‘Close’buttons are enabled.
• Use ‘Up’and ‘Down’arrow keys to navigate between Pool records.
AV
ER
S
‘Pool Load Tm’ shows the cumulated load amount for all the customer cards belonging
to the pool. ‘Pool Load No’shows the total number of successful load transactions for
that pool resulting in ‘Pool Load Tm’.
‘Pool Unload Tm’ shows the cumulated unload amount for all the customer cards
belonging to the pool. ‘Pool Unload No’shows the total number of successful unload
transactions for that pool resulting in ‘Pool unload Tm’.
These values are updated immediately after the cards are loaded /unloaded and the C&A
system receives a valid confirmation. This value will not be updated if a transaction is
aborted half way or some signature validation for confirmation fails.
‘Pool Payment Tm’ shows the cumulated purchase amount for all the customer cards
belonging to the pool. ‘Pool Payment No’shows the total number of successful purchase
transactions for that pool resulting in ‘Pool Purchase Tm’.
Page 74 of 107
STARCOIN C&A User Manual
Volume I of II/26.04.99
Version 2.0.0/Revision 15.04.99
FINAL/CONFIDENTIAL
5 Master Maintenance
‘Pool Payment Tm’ is updated during the Off-line Clearing and Settlement process. For
ECH Pool, ‘Pool Payment No’is incremented for every transaction. Since IEP pools
purchases are settled pool-wise, ‘Pool Payment No’ is incremented for every pool
clearing. Thus , ‘Pool Payment No’ for ECH pools reflects the actual number of ECH
purchases done, however for IEP pools this value reflects the number of times pool
clearing has been done. ‘Pool Payment Tm’also reflects the total amount to be paid to
all the merchants by the Pool holding bank.
‘Pool Tm’ is updated during the Off-line Clearing and Settlement process, where :
‘Pool Tm’= ‘Load Tm’ - ‘Unload Tm’ - ‘Payment Tm’.
co
nf
ide
nt
ia
l
This amount shows the total Pool balance after settlement and is equal to the sum of the
card balance for all the cards belonging to the pool. This value may be negative or less
than ‘Load Tm’ - ‘Unload Tm’ - ‘Payment Tm’ under the following circumstances:
1. Load transactions could not be settled for some technical reasons, but unload /
payment transactions has been cleared.
2. Unload / payment transactions have been cleared but load transactions are yet to be
cleared.
3. Cards have been loaded but due to some technical reasons, the load confirmation
validation failed, later unload/purchase has been settled.
5.3
Bank Maintenance
AV
ER
S
•Access Path
Masters → Bank
The banks involved in the different processes of the C&A system are called participating
banks. depending upon the role of the bank in the C&A system, the participating banks
can be broadly be classified into four categories namely:
•Acceptor bank
Every bank accepting STARCOIN cards for load unload process. An acceptor bank
does not need to be an issuer bank itself, but can be.
•Issuer bank
Every bank issuing cards to their customers.
•Merchant bank
Bank of a merchant, who accepts STARCOIN IEP/ECH/POS cards for payments.
This bank only needs to participate in the clearing process, but needn’t have to be
card issuer itself.
STARCOIN C&A User Manual
Version 2.0.0/Revision 15.04.99
Volume I of II/26.04.99
Page 75 of 107
5 Master Maintenance
FINAL/CONFIDENTIAL
•Settlement bank
For the reason that the C&A system provider needn’t have to be a bank, a settlement
bank managing the payments between the different participating banks is foreseen in
every C&A system.
• Please note: All described roles of a bank can be taken by only one or different
banks in various combinations
The bank maintenance allows to insert all relevant bank data.
co
nf
ide
nt
ia
l
Please be sure to enter proper values for bank identification number and all required
accounts, as these data are transferred to the settlement bank for inter-bank payment
exchange.
• Please note: If STARCOIN is operated as a 'closed' payment system, the system
provider may operate as a 'bank' and no relation to any "real" bank is necessary,
because all accounting is done inside STARCOIN.
5.3.1
Insert A New Bank
The bank entered can be an issuer, acceptor, merchant or settlement bank, or a
combination of these. If the banks also acts as an issuer bank, then Cash A/c number has
to be entered because this account is required for settlement of load / unload to cash.
Service A/c number is mandatory if the Service code entered is anything other then
‘None’. Any of the banks entered here can be attached to one pool.
AV
ER
S
• Enter valid values in the following fields:
• Bank Name
(Characters with maximum length - 30)
• Bank BIN
Bank Identification number according to national/international standards. Please
note that this field has to be entered correctly conforming to national /
international standards as the C&A system does not validate this value.
(Number ranging from 1 to 999999999999999)
• Street
where the bank is located.
(Characters with maximum length - 30)
• City
where the bank is located.
(Characters with maximum length - 30)
Page 76 of 107
STARCOIN C&A User Manual
Volume I of II/26.04.99
Version 2.0.0/Revision 15.04.99
FINAL/CONFIDENTIAL
5 Master Maintenance
• ZIP Code
of the city where the bank is located.
(Characters with maximum length - 30)
• Country
where the bank is located.
(Characters with maximum length - 30)
• Telephone
(Characters with maximum length - 30)
• Fax
(Characters with maximum length - 30)
co
nf
ide
nt
ia
l
• Contact Person
(Characters with maximum length - 30)
• Cash A/c No.
This account is required for settlement of Load / Unload transactions. For Load
from Cash, this is the source account. For Unload to cash, this is the destination
account. Thus this account is required in the C&A system only if the bank also
performs the role of an acceptor bank. For other roles this account may be
transparent.
(Number ranging from 1 to 99999999999999999999)
AV
ER
S
• Service A/c No.
This account is required if the bank pays the service charge for load/unload ( in
case of acceptor bank) or for purchase (in case of merchant bank). The
requirement of this field depends on the Service code.
(Number ranging from 1 to 99999999999999999999)
• Service Code
(Value is ‘All’, ‘None’, ‘Load/Unload’ and ‘Purchase’)
Depending on, for what service provided by the C&A system, this value
determines whether the bank pays the service charge.
If the service code is ‘All’then the bank pays the service charge for Load/Unload
and purchase.
If the service code is ‘None’, then the customer pays the service charge for
load/unload and the merchant pays the service charge for purchase.
If the service code is ‘Load/Unload’, then the bank pays the service charge for
load/unload but the merchant pays the service charge for purchase.
If the service code is ‘Purchase’, then the bank pays the service charge for
purchase but the customer pays the service charge for Load/Unload.
• Does This Bank Pay Service Charge For Transactions Done At Other
Bank?
STARCOIN C&A User Manual
Version 2.0.0/Revision 15.04.99
Volume I of II/26.04.99
Page 77 of 107
5 Master Maintenance
FINAL/CONFIDENTIAL
(Value is ‘Yes’or ‘No’). To understand the implication, let us take the following
example :
Suppose a Customer has an account in Bank B1 and does a load / unload
transaction at bank B2. Here of course these two banks are not same. Also
suppose that the ‘Service Code’value for the bank B2 is set to ‘None’/
‘Purchase’. Then for the issuer bank B1 , if this flag is set to ‘Yes’, B1 will pay
the service charge, otherwise customer will pay the service charge.
Press ‘More’button to get another screen consisting of rest of the fields. Enter valid
values in the following fields :
co
nf
ide
nt
ia
l
•On-Line Authorisation Time Out
Maximum time limit within which the customers card issuing bank should respond to
the on-line authorisation request from the STARCOIN C&A system. For detailed
information, please refer to [GD2].
(Number ranging from 1 to 999)
•ATM Related Fields
Only required if ATMs are used in the system, otherwise the same values as for the
POS function are recommended.
The default values for the following fields will be populated from System
Initialisation parameters (System → Setup → System Init → ISO Param.).
AV
ER
S
Even that "ATM" is a completely independent payment function, the meaning and
functionality of the ATM related fields is the same as for the POS function. For
detailed description, please see below.
•POS Related Fields
The default value for the following fields will be populated from System Initialisation
parameters (System → Setup → System Init → ISO Param.).
•On-Line Authorisation Limit
On any request for authorisation of a Debit-POS transaction (either load or
purchase) above the limit defined here an on-line request to the customers card
issuing bank will be generated by the C&A system. For detailed information,
please refer to [GD2].
(Value in minor units of defined currency - Number ranging from 1 to
4294967295)
Page 78 of 107
STARCOIN C&A User Manual
Volume I of II/26.04.99
Version 2.0.0/Revision 15.04.99
FINAL/CONFIDENTIAL
5 Master Maintenance
•Off-line Floor Limit of ICC
Maximum amount which can be spent through Customer Card for a single Debit
POS transaction, valid for on-line and off-line transactions.
(Value in minor units of defined currency - Number ranging from 0 to
4294967295)
•Max(imum) No. of off-line Authorisation
co
nf
ide
nt
ia
l
Maximum number of off-line authorisations allowed for Debit-POS transactions.
If the defined number of off-line authorisations is reached, the cardholder must do
an on-line Debit-POS transaction. The off-line Debit-POS payment function will
be blocked until then, but is resetted to the full value on the next on-line
transaction.
(Number ranging from 0 to 999)
•Max(imum) Days off-line
Maximum number of days where off-line Debit-POS purchases are valid. After
that period of time an on-line authorisation must be executed. With each on-line
transaction, this parameter is reset back to '0' and the full number of days off-line
can be used again.
(Number ranging from 0 to 65535)
•Max(imum) Total Terminal off-line Amount
AV
ER
S
Maximum total amount that the merchant terminal allows in case of off-line
Debit-POS transactions.
(Value in minor units of defined currency - Number ranging from 0 to
4294967295)
•Credit Cycle Limit
Maximum cumulated amount which can be spent in off-line Debit-POS
transactions within the defined period (weekly or daily). Please note, that this
limit is decremented by the respective amount with every off-line and on-line
Debit-POS transaction, but only taken into consideration for off-line
authorisations: If the limit is to low for an off-line payment, the on-line payment
is still possible.
This value is also decremented on funds raising for any purse or cheque load
transactions, thus the higher load limits of el. cheques must be considered.
(Value in minor units of defined currency - Number ranging from 0 to
STARCOIN C&A User Manual
Version 2.0.0/Revision 15.04.99
Volume I of II/26.04.99
Page 79 of 107
5 Master Maintenance
FINAL/CONFIDENTIAL
4294967295)
•Credit Cycle Length
Please choose between ‘Daily’ (the default one) or ‘Weekly’ from the list box
provided. The weekly credit cycle length lasts for Monday to Monday,
considering above defined limit ('Credit Cycle Limit')!
Press ‘Back’button to get back the original screen.
5.3.2
co
nf
ide
nt
ia
l
Press 'Save' button. On proper condition check, a new Bank record will be saved with
system generated Bank Id.
Update an Existing Bank Record
Change the bank's address, cash account number or service account number:
• Press 'Query' button. The cursor will be at Bank Id.
• Either
Enter data in ‘Bank Id’or in ‘Bank Name’field to fetch an existing record
• OR
Press ‘Search’button to get a list of Banks shown in List of values. searchable fields are
in Yellow legend. Wildcarding may be used in both of the fields On selection of desired
Bank, press ‘OK’button. Bank Id and Bank Name will be displayed on the screen.
AV
ER
S
• Press ‘Execute’button to retrieve the record from the database. At this stage, ‘Up’,
’Down’, ‘Query’, ‘Clear’, ’Save’& ‘Close’buttons are enabled.
• Use ‘Up’and ‘Down’arrow keys to navigate between Bank records.
• Do necessary modifications in any of the enterable fields.
The following bank information can be updated:
1. Address.
2. Cash A/c Number.
3. Service A/c Number.
Note: Change of Cash A/c no and service a/c no affects settlement.
• Press ‘Save’button to save the updated record in the database.
5.3.3
View Pool Details
Access to the pool related data from the bank screen:
• Press 'Pool Details' button to open 'Pool Master Entry' screen in 'Read only' mode.
• Cursor is on the 'Close' button of the 'Pool Master Entry' screen displaying detailed
information of Pool to which the bank is attached .
• Press 'Close' button to close the form .
Page 80 of 107
STARCOIN C&A User Manual
Volume I of II/26.04.99
Version 2.0.0/Revision 15.04.99
FINAL/CONFIDENTIAL
5.3.4
5 Master Maintenance
Issue Bank Authorisation Card (BAC)
Start generation of Bank Authorisation Card personalisation data.
• Press ‘Issue BAC’button to open ‘Issue Bank Clerk Card’ screen which displays
Bank Authorisation Card Details .
• For further details please refer to chapter 5.4 Bank Authorisation Card (BAC)
Information Maintenance.
Update Bank Authorisation Card (BAC)
co
nf
ide
nt
ia
l
5.3.5
Update Bank Authorisation Card status.
• Press ‘Update BAC’button to open ‘Update Bank Clerk Card’ screen which
displays Bank Authorisation Card Details .
• For further details please refer to chapter 5.4 Bank Authorisation Card (BAC)
Information Maintenance.
5.3.6
Replace Bank Authorisation Card (BAC)
Replace an expired/returned/invalid/... BAC by a new one.
• Press ‘Replace BAC’button to open ‘Replace Bank Clerk Card’ screen which
displays Bank Authorisation Card Details .
AV
ER
S
• For further details please refer to chapter 5.4 Bank Authorisation Card (BAC)
Information Maintenance.
5.4
Bank Authorisation Card (BAC) Information
Maintenance
• Access Path
Masters → Bank
This functionality allows to do the following operation :
1. To generate a new Bank Clerk.
2. To search for an existing Bank Clerk and show Bank Authorisation Card details.
3. To create a new Bank Authorisation Card.
4. To show details of an existing Bank Authorisation Card.
5. To export either Issued or Replaced Bank Authorisation Card.
STARCOIN C&A User Manual
Version 2.0.0/Revision 15.04.99
Volume I of II/26.04.99
Page 81 of 107
5 Master Maintenance
FINAL/CONFIDENTIAL
6. To Issue a Bank Authorisation Card.
7. To Replace a Bank Authorisation Card.
8. To Update an existing Bank Authorisation Card.
5.4.1
Issue a Bank Authorisation Card
• Press ‘Issue BAC’button of ‘Bank Maintenance’screen to invoke this screen .
• Generate a New Bank Clerk .(See below)
• Generate a New Bank Authorisation Card.(See below)
5.4.2
co
nf
ide
nt
ia
l
• Export Bank Authorisation Card Details. (See below)
Update a Bank Authorisation Card
• Press ‘Update BAC’button of ‘Bank Maintenance’ screen to invoke this screen.
• Update Card List Status, Card Status and Card Status Reason of Bank Authorisation
Card. (See below)
5.4.3
Replace a Bank Authorisation Card
• Press ‘Replace BAC’button of ‘Bank Maintenance’ screen to invoke this screen.
• Export Bank Authorisation Card Details. (See below)
AV
ER
S
• Replace a Bank Authorisation Card. (See below)
5.4.4
Generate a New Bank Clerk
• Press ‘New’button in ‘Bank Clerk’block to open the screen of ‘Maintain Bank
Clerk Details’. Refer to process No. 5.5 .
5.4.5
Search for existing Bank Clerk
• Press ‘Search’button .
• If C&A Specific Bank Clerk exists
• List of values pops up showing list of Bank Clerk customers attached to this
bank
Page 82 of 107
STARCOIN C&A User Manual
Volume I of II/26.04.99
Version 2.0.0/Revision 15.04.99
FINAL/CONFIDENTIAL
5 Master Maintenance
• Press ‘OK’button in List of values. Control comes back to the form with
the selected Bank Clerk’s information.
• The ‘Details’button in ‘Bank-Clerk’block for ‘Issue BAC’, ’Update
BAC’and ‘Replace BAC’ options gets enabled.
• ‘New’and ‘Details’buttons in the ‘BAC Card’block for ‘Issue BAC’
option gets enabled.
• Only the ‘Details’button in the ‘BAC Card’block for ‘Update BAC’
and ‘Replace BAC’ options gets enabled.
• ‘Update’ button if the BAC is updatable for ‘Update BAC’option gets
enabled.
co
nf
ide
nt
ia
l
• ‘Replace’ button if the BAC is replaceable for ‘Replace BAC’option
gets enabled.
• Press ‘Cancel’button in List of values . Control comes back to the form
with no information of Bank Clerk.
• Else, shows information that no record exists.
5.4.6
Show Bank Clerk Details
• Press ‘Details’button in ‘Bank-Clerk’block .
• The screen ‘Bank Clerk Maintenance’ is called in Read Only mode . ‘Close’
button is enabled.
• Press ‘Close’button .
AV
ER
S
• Control comes back to the parent form.
5.4.7
Create a New Bank Authorisation Card
• Press ‘New’button in ‘BAC Card’block .
• Window pops up showing details of bank clerk’s Card. User can input in the field
‘Credit Cycle Limit’which has already a default value.
• Press ‘Close’button in this window. A dialog box pops up with warning message .
•
STARCOIN C&A User Manual
Version 2.0.0/Revision 15.04.99
•
Press ‘Yes’button in the dialog box . Control comes back to the parent form and
no bank customer is created.
•
Press ‘No’button in the dialog box . Control stays in window showing the
details of bank clerk’s details.
Press ‘Ok’button in this window . Create New BAC Card information with ‘Card
List Status’->‘Neither’, ‘Card Status’->‘NEW’and ‘Card Status Reason’->NULL
and control comes back to the parent form .
Volume I of II/26.04.99
Page 83 of 107
5 Master Maintenance
Show Bank Authorisation Card Details
•
Press ‘Details’button in ‘BAC Card’block .
•
Window pops up showing details of bank clerk’s Card .
•
Change the field ‘Credit Cycle Limit’.
•
•
•
5.4.9
•
Press ‘No’button. Control stays in the window of BAC card details .
•
Press ‘Yes’button. Control comes back to the parent form with no
change in data.
Press ‘OK’button . Control comes back to the parent form the record is
updated.
Don’t change the field ‘Credit Cycle Limit’.
•
Press ‘Close’button . Control comes back to the parent form .
•
Press ‘Ok’button . Control stays in the window.
Exporting Bank Authorisation Card Details
•
Press ‘Export’button . Call the form ‘Export Personalisation Data’to export
BAC details .
Updating Bank Authorisation Card
•
Press ‘Update’button .
•
Window pops up with header ‘Update Card Status’. You can change ‘Status
Reason’and ‘List Status’of this window .
•
Press ‘Cancel’button . Control comes back to the parent form with no change in
card status.
•
Press ‘Ok’button. Dialog box pops up with warning message .
AV
ER
S
5.4.10
Press ‘Close’button. A dialog box pops up showing warning message .
co
nf
ide
nt
ia
l
5.4.8
FINAL/CONFIDENTIAL
5.4.11
Press ‘No’button of this dialog box . Control stays in the window.
•
Press ‘Yes’button of this dialog box . Card status is changed according to the
user’s choice and control comes back to the parent form.
Replacing Bank Authorisation Card
•
Page 84 of 107
•
Press ‘Replace’button .
STARCOIN C&A User Manual
Volume I of II/26.04.99
Version 2.0.0/Revision 15.04.99
FINAL/CONFIDENTIAL
•
Dialog box pops up with warning message asking for whether you want to replace
the card or not .
•
Press ‘No’button .Card is not replaced and control comes back to the parent form.
•
Press ‘Yes’button .Card is replaced by a new card and control comes back to the
parent form.
Clear Form
•
5.4.13
Close Form
•
5.5
Press ‘Clear’button .Clear the screen .Cursor is on the field ‘C&A Specific Bank
Clerk Id’.
co
nf
ide
nt
ia
l
5.4.12
5 Master Maintenance
Press ‘Close’button .Close the screen .Control comes back to the parent form ‘Bank
Master Maintenance’.
Bank Clerk Maintenance
•
Access Path
Masters → Bank → Issue Bank Clerk Card
This process is used to create a new Bank Clerk record with Bank details and address
information.
Create a New Bank Clerk
AV
ER
S
5.5.1
•
5.5.2
Enter the mandatory field(s) along with Bank Clerk information . Press ‘Ok’button .
•
Show error message if mandatory fields are not entered and invalid user input is
given.
•
For proper user input , save the transaction . Close this screen . Control comes
back to the parent form (Issue BAC) . Show Bank Clerk information in ‘Bank
Clerk’ block of ‘Issue Bank Clerk Card’screen .
Clear the screen
•
Press ‘Clear’ button . Dialog box pops up showing warning message comes asking
for whether you want to clear the form .
•
Press ‘Yes’ button in this dialog box. The screen will be cleared. Cursor is on the
field ‘Bank Specific Clerk Id’.
STARCOIN C&A User Manual
Version 2.0.0/Revision 15.04.99
Volume I of II/26.04.99
Page 85 of 107
5 Master Maintenance
•
5.5.3
FINAL/CONFIDENTIAL
Press ‘No’button in this dialog box . No changes occur .
Close the screen
• Press ‘Close’button . The screen will be closed. Control comes back to the parent
form ‘Issue Bank Clerk Card’.
5.6
Pool - Bank Maintenance
• Access Path
Masters → Pool-Bank
co
nf
ide
nt
ia
l
Through this process an user can attach an existing bank to a Pool under the following
conditions:
1. The Pool has to be an IEP pool (Pool id from 1 to 19) and not an ECH pool (Pool Id =
'8001'hex).
2. The Pool should have the pool holding ‘Bank Id’ and ‘Pool A/C no’ specified.
3. There should be banks in the system which is not attached to any pool.
4. The bank should have a Cash A/c number specified.
There can be several banks attached to a pool, even if they are all card issuing banks.
This process allows for the attachment of banks to a pool. One bank can be attached
to one and only one pool. Thus to attach a bank to a pool there should be bank in the
system which is not attached to any pool.
The pool managing bank is always displayed in the first line in the list of related
banks.
Generate a New Pool
AV
ER
S
5.6.1
• Press ‘New’button.
• If total number of Pools are already generated (Maximum Pool limit), then an Error
message will be shown in an Alert. At this stage, you cannot generate a new Pool.
• Else, the ‘Pool Master Entry’screen will be opened.
• Insert valid values and press ‘Save’button.
• On proper validation check, a new Pool will be created with system generated
Pool Id displayed in Hex.
• Press ‘Close’ button. ’Pool Master Entry’ screen will be closed and control
comes back to ‘Pool - Bank Details’form.
Now, ‘Bank Pool’ block of the screen shows the Pool information of the newly
generated Pool and all the fields are greyed out.
• At this stage, the ’Details’button [of ‘Bank Pool’block] is enabled if ‘Pool Bank
Id’and ‘Pool A/c No’fields are blank, then, ‘Remove’and ‘Attach’buttons are
Page 86 of 107
STARCOIN C&A User Manual
Volume I of II/26.04.99
Version 2.0.0/Revision 15.04.99
FINAL/CONFIDENTIAL
5 Master Maintenance
disabled. Press the ‘Details’button to go to the Pool entry screen and enter the ‘Pool
Bank Id’and ‘Pool A/c No’. Press ‘Save’and close the screen to return to the ‘Pool
Bank’screen, The pool holding bank is automatically attached to the pool. If there
are free banks in the system, not attached to any pool, than ‘Attach’and ‘Remove’
buttons are enabled.
5.6.2
Select a Particular Pool
• Press ‘Search’button. A list of values showing all undeleted Pools not attached to
any Bank will pop up. Select a particular Pool and press ‘Ok’. Pool Id and Pool
Name will be displayed on the respective fields of the screen.
co
nf
ide
nt
ia
l
• If the selected Pool has valid ‘Pool Bank Id’and ‘Pool A/c No’, then ’Details’[of
‘Bank Pool’block], ‘PoolBank’and ‘Attach’buttons are enabled.
• If the selected Pool has Bank(s) attached to it or the Pool has a valid Pool’s Bank,
then ‘Remove’and ‘Details’buttons [of ‘Bank’block] will be enabled along with
the other buttons mentioned above.
5.6.3
Attach a Bank to a Pool
• A bank can be attached to a pool if it is not attached to any pool. By default the pool
holding bank is attached to the pool.
• Press ‘Attach’button. A list of values containing all banks which are yet to be
attached will pop up. Select a Bank. If the bank has a valid Cash A/c No., then the
bank is attached to the Pool. At this stage, ’Details’[of ‘Bank’ block] and ‘Remove’
buttons are enabled.
AV
ER
S
• ‘Bank Id’, ’Bank Name’and ‘Bank BIN’fields of block ‘Bank’will show the
attached Bank information.
5.6.4
Detach a Bank from a Pool
• Select a particular Bank from block ‘Bank’and press ‘Remove’button.
• If the Bank has no customers attached to it or the Bank is not any Pool’s Bank, then
the bank is allowed to be detached from the Pool.
• When all the Banks in block ‘Bank’are removed, then ‘Remove’and ‘Details’
buttons [of block ‘Bank’] are disabled.
5.6.5
Show Pool Information in Details
• If ‘Pool Bank Id’and ‘Pool A/c No’fields are not null and the Pool selected has
Bank(s) attached to it then
STARCOIN C&A User Manual
Version 2.0.0/Revision 15.04.99
Volume I of II/26.04.99
Page 87 of 107
5 Master Maintenance
FINAL/CONFIDENTIAL
• You can open the ‘Pool Master Entry’screen by pressing ‘Details’button [of
‘Bank Pool’block] but cannot modify the Pool Information.
• Else
• You can open the ‘Pool Master Entry’screen by pressing ‘Details’button [of
‘Bank Pool’block] and modify ‘Pool Name’/ ’Bank Id’/ ‘Pool A/c No’field
if required.
• If ‘Pool Bank Id’and ‘Pool A/c No’fields are empty, then press ‘New’button [of
‘Bank Pool’block] to open ‘Pool Master Entry’screen.
• In ‘Pool Master Entry’screen, insert ‘Bank Id’and ‘Pool A/c No’fields.
• Press ‘Save’ button. On proper validation, the Pool record will be updated.
co
nf
ide
nt
ia
l
• Press ‘Close’button and control comes back to ‘Pool - Bank Details’form.
• ‘Pool Bank Id’ and ‘Pool A/c No’ fields of block ‘Bank Pool’ will show the
modified Pool information.
• Since the Pool’s Bank is automatically attached to the Pool, ‘Bank’ block will
show the attached Bank information.
• At this stage, ’PoolBank’[of block ‘Bank Pool’] and ‘Attach’buttons are
enabled.
5.6.6
Show Bank Information in Details
• Press ‘PoolBank’[of block ‘Bank Pool’] button to open ‘Bank Master Entry’
screen to show Pool’s Bank record but cannot modify Bank Information.
AV
ER
S
• Press ‘Details’[of block ‘Bank’] button to open ‘Bank Master Entry’screen to
show the attached Bank’s information in details but cannot modify the Bank record.
5.7
Manufacturer Maintenance
This functionality allows to maintain terminal manufacturers in the system. All relevant
data of a particular manufacturer can be entered.
5.7.1
Insert a new Terminal Manufacturer
• Enter valid values in the following fields:
• Manufacturer Name
(Characters with maximum length - 30, Mandatory)
• Street
where the manufacturer is located.
(Characters with maximum length - 30, Not Mandatory)
Page 88 of 107
STARCOIN C&A User Manual
Volume I of II/26.04.99
Version 2.0.0/Revision 15.04.99
FINAL/CONFIDENTIAL
5 Master Maintenance
• City
where the manufacturer is located.
(Characters with maximum length - 30, Not Mandatory)
• ZIP Code
of the city where the manufacturer is located.
(Characters with maximum length - 30, Not Mandatory)
• Telephone
(Characters with maximum length - 30, Not Mandatory)
• Contact Person
(Characters with maximum length - 30, Not Mandatory)
5.7.2
co
nf
ide
nt
ia
l
• Press 'Save' button. On proper condition check, a new Manufacturer record will be
saved with system generated Manufacturer Id.
Deleting A Manufacturer
A terminal manufacturer can be deleted if there are no terminals in the C&A database
from that manufacturer.
• Press 'Query' button. The cursor will be at Manufacturer Id.
• Press 'Search' button. A List of values for selecting Manufacturer Id will pop up.
Select a particular Manufacturer and press 'Ok' button in the List of Values.
• Press 'Execute' button. The Manufacturer record will be fetched.
AV
ER
S
• Click on 'Delete Flag'. If all the conditions for deleting the Manufacturer is satisfied,
then the Manufacturer is ready for deletion. Press the ‘Save’button to confirm
deletion.
5.7.3
Update an Existing Manufacturer Record
• Press 'Query' button. The cursor will be at Manufacturer Id.
• Either
Enter data in ‘Manufacturer Id’or in ‘Manufacturer Name’field to fetch an existing
record
• OR
Press ‘Search’button to get a list of Manufacturers shown in List of values. Searchable
fields are in Yellow legend. Wildcarding may be used in both of the fields On selection
of desired Manufacturer, press ‘OK’button. Manufacturer Id and Manufacturer Name
will be displayed on the screen.
•Press ‘Execute’button to retrieve the record from the database. At this stage, ‘Up’,
’Down’, ‘Query’, ‘Clear’, ’Save’& ‘Close’buttons are enabled.
•Use ‘Up’and ‘Down’arrow keys to navigate between Manufacturer records.
STARCOIN C&A User Manual
Version 2.0.0/Revision 15.04.99
Volume I of II/26.04.99
Page 89 of 107
5 Master Maintenance
FINAL/CONFIDENTIAL
•Do necessary modifications in of the enterable fields.
AV
ER
S
co
nf
ide
nt
ia
l
•Press ‘Save’button to save the updated record in the database.
Page 90 of 107
STARCOIN C&A User Manual
Volume I of II/26.04.99
Version 2.0.0/Revision 15.04.99
FINAL/CONFIDENTIAL
6 Customer and Customer Card Handling Process
6
Customer and Customer Card Handling
Process
6.1
Introduction
This process deals with Issue and Replacement of Customer Card. It also Updates the
Card Status. In addition the process also maintains Customer Information.
co
nf
ide
nt
ia
l
Cards can be issued to an existing customer in a C&A system or a new customer of an
issuer bank. Cards are issued bank wise for a card service (IEPPOS/ECHPOS/BAC). If
the card issued is of service IEPPOS, then the card contains one electronic purse with an
IEP number. If the card issued is of service ECHPOS, then the card contains one
electronic cheque with an ECH number. Card with service BAC does not contain any
purse/cheque
Certain card data of the issued customer cards of a particular service are exported into
certain files. These files are used by the Personalisation machine for electrical and
optical Personalisation of the customer cards. The response of the electrical and optical
Personalisation process generates a flat file. This response file is used by the C&A
system to import the response of Personalisation process and setting the card to an active
state.. After this process the Personalisation of the customer card is complete and the
card is ready for use.
Purpose
AV
ER
S
6.1.1
Issue Cards
This task serves either of following two purposes:
Add a new Customer along with the Customer Card(s).
Add new Card(s) to an existing Customer.
Replace Cards
This task Replaces an existing Customer Card with a new
Card with same Card Functionality.
Update Card Status
This task updates the status of an existing Customer Card.
Update Customer
Updates existing Customer Information.
STARCOIN C&A User Manual
Version 2.0.0/Revision 15.04.99
Volume I of II/26.04.99
Page 91 of 107
6 Customer and Customer Card Handling Process
6.1.2
FINAL/CONFIDENTIAL
Prerequisites
6.2
co
nf
ide
nt
ia
l
• For Issue of Customer Card:
• For new Customer as well as Card entry, record(s) should exist for Bank
(mandatory), BankPool (mandatory).
• For Issue of new Card(s) to an existing Customer, records should exist for
Customer (mandatory)
• For Replacement of Customer Cards, records should exist for Customer, Customer
Card.
• For Updating of Customer Card Status, records should exist for Customer, Customer
Card.
• For Updating of Customer information, records should exist for Customer.
Issue Customer Card
• Access Path
Customer → Issue Cards
6.2.1
Access customer and card set-up screens
Issue of customer card is done bank wise for a service. Thus the user has to select the
bank (card issuer bank) to which the customer belongs, and the card service (card type)
required.
• Customer → Issue Cards
AV
ER
S
• Bank Id (Either enter a valid Bank Id, or select a valid Bank Id from the List of
Values)
• Service Type
IEPPOS:
Electronic Purse
ECHPOS:
Electronic Cheque
IEPECHPOS: Electronic Purse and Cheque (multipurse functionality)
(Select from a given list of Customer Card Services)
• Either
• Press ‘Cancel’to return to the main menu
• Or
• Press ‘OK’to invoke a screen for entering Customer & Card information and
exporting card data.
6.2.2
Enter New Customer
If the card to be issued is for a new customer in the C&A system, then the new customer
data has to be entered in the system else an existing customer is selected for issuing the
Page 92 of 107
STARCOIN C&A User Manual
Volume I of II/26.04.99
Version 2.0.0/Revision 15.04.99
FINAL/CONFIDENTIAL
6 Customer and Customer Card Handling Process
card. Note that a customer in the C&A system can have more than one card of the same
service or different service.
6.2.2.1
Create a new Customer record
The only mandatory field that the user has to enter here is the ‘Bank Customer Id’. The
issuing bank will generally provide the ‘Bank Customer Id’. The bank may or may not
provide the customer’s Bank Account number. In case the issuer bank provides only the
customer’s ‘Bank A/c No.’, other the entering the data in the specified field, it also has
to be entered in the ‘Bank Customer Id’ field because the customers settlement advice
will always be generated on ‘Bank Customer Id’.
co
nf
ide
nt
ia
l
Please note that Customer name, address and account number are non mandatory fields.
Customer name and address will generally be the Optical Personalisation data for
customer cards. So if these fields are not specified, these data will not be optically
personalised on the cards.
• Press ‘New’Button of Customer Block of the initial screen.
• It will take you to the Customer Details screen, where you have to enter the
following fields:
• Bank Customer Id
This identifier is bank specific and allows to identify the customers transactions
in the bank, even if no other data of the customer are known to the C&A System.
(Characters with maximum length - 20. mandatory)
• Title
(e.g. Mr./Mrs./Company/...)
(Characters with maximum length - 30. Not mandatory)
AV
ER
S
• Name
Family name of the customer
(Characters with maximum length - 30. Not mandatory)
• First name
(Characters with maximum length - 30. Not mandatory)
• Bank A/c No
Bank account number of the customer (according to national/international
standards) where all account related transactions are debited or credited.
If no bank account number is given, the booking of transaction amount to/from
the account must be done via the 'Bank Customer Id'.
(Number of maximum length 20. Mandatory)
• Date of Birth
(Date in 'DD.MM.YYYY' format. Not mandatory)
STARCOIN C&A User Manual
Version 2.0.0/Revision 15.04.99
Volume I of II/26.04.99
Page 93 of 107
6 Customer and Customer Card Handling Process
FINAL/CONFIDENTIAL
• Street
(Characters with maximum length - 30. Not mandatory)
• City
(Characters with maximum length - 30. Not mandatory)
• ZIP Code
(Characters with maximum length - 30. Not mandatory)
• Country
(Characters with maximum length - 30. Not mandatory)
• Telephone
(Characters with maximum length - 30. Not mandatory)
co
nf
ide
nt
ia
l
• Bank Id and Bank Name are already shown on the screen.
• C&A Customer Id is system generated.
• Press ‘OK’to come back to the initial screen along with Bank Customer Id,
Customer Name, Customer FirstName, Customer Title and C&A Customer Id.
A new Customer record will be saved.
• If at any point of time, after making some changes, if ‘Clear’or ‘Close’button is
pressed system will ask for a confirmation and will act accordingly.
• To issue a card, follow the Issue New Card procedure of Issue a Card to an
Existing Customer.
6.2.3
Issue a Card to an Existing Customer
6.2.3.1
Retrieve the existing customer record
AV
ER
S
• Enter either Bank Customer Id or Name or FirstName or Title or C&A Customer
Id fields (Searchable fields are in Yellow legend. Wildcard entry can be used in all
the above fields) to fetch the record.
• Press ‘Search’button in the Customer block and select a Customer record.
Note: No Customer information will be shown in the List of Values for which no Card
record present.
• Customer, Customer Card & respective IEP/ECH details (if any) are now on the
screen.
6.2.3.2
Issue New card
• Press ‘New’button on the Customer Card Block of the screen.
• The following are the non enterable fields for customer card details:
• Customer Card No.
Customers card serial number.
Page 94 of 107
STARCOIN C&A User Manual
Volume I of II/26.04.99
Version 2.0.0/Revision 15.04.99
FINAL/CONFIDENTIAL
6 Customer and Customer Card Handling Process
This number is automatically generated. It is a 16 digit number. The first number
generated is ‘Pilot Id’ appended with ‘Card No. Init Value’of System Init - ICC
Param. i.e. if the Pilot Id is 255 and the ‘Card No. Init Value’ is 6700000000001
then the first Card number generated is 00002556700000000001. The
subsequent card number generated are the last number incremented by 1.
• C&A Customer Id.
The customer id that is generated when the customer is installed in the system.
co
nf
ide
nt
ia
l
• Card Expiry Date
The date on which the Customer card will expire.
This value is taken from sysinit - ICC Param - ‘Customer Card Expiry Date’.
Beyond this date all transactions with this card will be blocked.
• Card List Status
States whether the Card is ‘Red Listed’. If the card is not Red Listed then the list
status is ‘Neither’. A card can be Red Listed from Customer -> Update Card
status. A Red Listed card cannot be made ACTIVE again nor can it be replaced
by another card.
• The field ‘Cardholder Id Number’(required for the Personalisation of the
customer card) will be generated or to be entered depending on the following
conditions :
a) If the value of ‘Cardholder Id ’in ‘System Initialisation Screen’ is set to
‘ISO 7812-1’ then ‘Cardholder Id Number ’ will be automatically generated
using the Card Number and certain other parameters.
AV
ER
S
b) If the value of ‘Cardholder Id ’in ‘System Initialisation Screen’ is set to
‘Bank Account Number’ then ‘Cardholder Id Number ’ will be automatically
generated using the Customer’s Bank A/c No. and certain other parameters.
c) If the value of ‘Cardholder Id ’in ‘System Initialisation Screen’ is set to
‘Manual Data Entry’ then the field ‘Cardholder Id Number ’ will require
manual entry from the user.
d) If the value of ‘Cardholder Id ’in ‘System Initialisation Screen’ is set to
‘Bank Specific Customer Id’ then ‘Cardholder Id Number ’ will be
automatically generated using the Customer’s Bank Specific Id and certain
other parameters.
• Service Type
The service provided by the card. The values may be
IEPPOS
el. purse + Debit-POS
ECHPOS
el. cheque + Debit-POS
IEPECHPOS
el. purse + el. cheque + Debit-POS
STARCOIN C&A User Manual
Version 2.0.0/Revision 15.04.99
Volume I of II/26.04.99
Page 95 of 107
6 Customer and Customer Card Handling Process
FINAL/CONFIDENTIAL
• Card Issue Date
The date on which the card has been set-up in the C&A system.
• Card Effective Date
The date on which the card has been exported for Personalisation.
• Transaction Number
Indicates the number of transactions (load/unload/purchase) done by the card.
The value is initialised to 0 during card set-up time.
• Card status
Indicates the current status of the card. The status may be:
co
nf
ide
nt
ia
l
• ‘NEW’ if the card has been set-up in the system but the Personalisation
response has not yet been imported properly.
• ‘ACTIVE’after proper import of Personalisation response. The status
remains active until either the card has expired or its status is changed
explicitly.
• ‘RESTRICTED USE’ if the card has expired or has been explicitly
updated.
• ‘DEACTIVATED’if the card status is updated with status reason as
Alert
• ‘LOCKED’if the card status is updated on ‘Bank Request’or ‘Locked by
C&A system’
• Currency Code
Indicates the currency used in the system. This field is populated from System
Initialisation parameters.
AV
ER
S
• The following are the non enterable fields for Customer Card IEP/ECH details:
• Type
Code defining the type of customers card:
IEP+POS
IEP
ECH+POS
ECH
IEP+ECH+POS IEH
Depending on the Service Type entered. while invoking the screen. The value
cannot be changed.
• IEPECH No.
Purse or cheque serial number.
Automatically generated. The value displayed is the integer value of the number
having the hex value ‘XX YY YY YY YY’ where ‘XX’ is one byte Pilot Id in
hex and ‘YY YY YY YY’is a 4 byte number in hex starting from ‘00 00 00 01’.
• Maximum Holding Amount
The maximum amount that can be loaded into the card.
The value is taken from sysinit->ICC Param->‘Max Holding amount for
Page 96 of 107
STARCOIN C&A User Manual
Volume I of II/26.04.99
Version 2.0.0/Revision 15.04.99
FINAL/CONFIDENTIAL
6 Customer and Customer Card Handling Process
IEP/ECH’. This value is personalised in the card. Loading beyond this amount is
blocked by the terminal itself.
• Expiry Date
The expiry date of the el. purse and/or el. cheque.
This value is taken from System Init -> ICC Param -> IEP/ECH Expiry date.
• Deactivation Date
It is the IEP/ECH Expiry date plus "Deactivation date offset" mentioned in
sysinit -> ICC Param -> ‘deactivation date offset’. Purchases made by the
customer card before the expiry of the card will not be settled if the purchases
are transferred to the C&A system after the Deactivation date
co
nf
ide
nt
ia
l
• Currency Code
Currency for the purse. Current implementation allows purse of single currency.
This value is taken from sysinit->ICC param -> ‘Currency Code’
• Phase Number
Phase number of IEP.
• Purse Provider
Purse provider for the system. In the current system this value is pilot id
appended to currency code.
Please enter the following fields :
•On Line Debit POS Authorisation Information (ATM Related)
AV
ER
S
Please note that these fields are by default populated from the related issuing bank
parameters.
For detailed information please refer to the description of the "POS Related" fields:
•On Line Debit POS Authorisation Information (POS Related)
Please note that these fields are by default populated from system initialisation
parameters.
•Off-line Floor Limit of ICC
Maximum amount which can be spent through Customer Card for a single Debit
POS transaction, valid for on-line and off-line transactions.
(Value in minor units of defined currency - Number ranging from 0 to
4294967295)
•Max(imum) No. of off-line Authorisation
Maximum number of off-line authorisations allowed for Debit-POS transactions.
If the defined number of off-line authorisations is reached, the cardholder must do
STARCOIN C&A User Manual
Version 2.0.0/Revision 15.04.99
Volume I of II/26.04.99
Page 97 of 107
6 Customer and Customer Card Handling Process
FINAL/CONFIDENTIAL
an on-line Debit-POS transaction. The off-line Debit-POS payment function will
be blocked until then, but is resetted to the full value on the next on-line
transaction.
(Number ranging from 0 to 999)
•Max(imum) Days off-line
co
nf
ide
nt
ia
l
Maximum number of days where off-line Debit-POS purchases are valid. After
that period of time an on-line authorisation must be executed. With each on-line
transaction, this parameter is reset back to '0' and the full number of days off-line
can be used again.
(Number ranging from 0 to 65535)
•Max(imum) Total Terminal off-line Amount
Maximum total amount that the merchant terminal allows in case of off-line
Debit-POS transactions.
(Value in minor units of defined currency - Number ranging from 0 to
4294967295)
•Credit Cycle Limit
AV
ER
S
Maximum cumulated amount which can be spent in off-line Debit-POS
transactions within the defined period (weekly or daily). Please note, that this
limit is decremented by the respective amount with every off-line and on-line
Debit-POS transaction, but only taken into consideration for off-line
authorisations: If the limit is to low for an off-line payment, the on-line payment
is still possible.
This value is also decremented on funds raising for any purse or cheque load
transactions, thus the higher load limits of el. cheques must be considered.
(Value in minor units of defined currency - Number ranging from 0 to
4294967295)
•Credit Cycle Length
Please choose between ‘Daily’ (the default one) or ‘Weekly’ from the list box
provided. The weekly credit cycle length lasts for Monday to Monday,
considering above defined limit ('Credit Cycle Limit')!
Enter the remaining field in section IEP/ECH:
• ECH A/c No.
This value is null for IEP and is mandatory for ECH or IEPECH. This account is
Page 98 of 107
STARCOIN C&A User Manual
Volume I of II/26.04.99
Version 2.0.0/Revision 15.04.99
FINAL/CONFIDENTIAL
6 Customer and Customer Card Handling Process
the destination account for ECH load and source account for ECH unload /
purchase.
• Press ‘More’button to view the following fields for the purse :
a) IEP and/or ECH Load Amount
b) IEP and/or ECH Unload Amount
c) IEP and/or ECH Purchase Amount
d) IEP and/or ECH Current Balance
• Press ‘Back’button to return to the original screen.
co
nf
ide
nt
ia
l
• Press ‘OK’button. to come back to the original calling screen after saving a new
Customer Card.
• If at any point of time ,‘Clear’or ‘Close’button is pressed system will ask for a
confirmation and will act accordingly.
• Customer Card No., Cardholder Id Number (depending on the condition) &
IEP/ECH No. are C&A system generated.
• You can see a Card entry in the Customer Card block along with IEP/ECH details
in IEP/ECH block(if any).
• Now, at this stage, you may wish to view the Card Data or you may Export the card
data.
• If you wish to view the Card Data, then press ‘Details’button in the
Customer Card block which will take you to the Customer Card details
screen.
AV
ER
S
• If you wish to export Card Data, then press the ‘Export’button.
6.2.4
Replace Customer Card
•Access Path
Customer → Replace Cards
Customer cards can be replaced if they have been expired, lost, stolen or returned for any
reason.
6.2.4.1
Retrieve the existing customer record
On selection of this option from the menu item, the corresponding form appears on the
screen with the cursor positioned on ‘Bank Customer Id’field.
STARCOIN C&A User Manual
Version 2.0.0/Revision 15.04.99
Volume I of II/26.04.99
Page 99 of 107
6 Customer and Customer Card Handling Process
FINAL/CONFIDENTIAL
• Enter either Bank Customer Id or Name or FirstName or Title or C&A Customer
Id fields (Searchable fields are in Yellow legend. Wildcard entry may be used in all
the fields) to fetch the record.
• Press ‘Search’button in the Customer block.
• Customer, Customer Card & respective IEP/ECH details are now on the screen.
6.2.4.2
Replace card
• Select a Customer Card.
• Cards can be replaced under the following combinations of ‘Status Reason’, ‘List
Status’and ‘Card Status’:
Re
pla
ce
Remarks
Red Listed DEACTIVAT
ED
N
If Status Reason is ‘Alert’ this is
the only possible combination
Neither
LOCKED
N
Locked cards cannot be Replaced.
Card Status of LOCKED card can
be changed to ACTIVE again.
Red Listed LOCKED
N
Neither
LOCKED
N
Red Listed LOCKED
N
Neither
RESTRICTED
USE
Y
Red Listed RESTRICTED
USE
N
List Status Card Status
1
Alert
2
Bank
Request
3
Defect
AV
ER
S
4
Locked by
C&A
System
co
nf
ide
nt
ia
l
Sl# Status
Reason
5
6
7
Page 100 of 107
Lost/Stolen Neither
Returned
System
Provider
RESTRICTED
USE
Y
Red Listed RESTRICTED
USE
N
Neither
RESTRICTED
USE
N
Red Listed RESTRICTED
USE
N
Neither
RESTRICTED
USE
Y
Red Listed RESTRICTED
N
If a defective card is not Red
Listed, then it can be replaced.
If a Lost/Stolen card is not red
listed it can be replaced.
A card is returned to the C&A
system only when the customer
decides not to use the card
anymore. Hence it cannot be
replaced.
The system provider may set the
card to restricted use to restrict
further load/unload with the card
STARCOIN C&A User Manual
Volume I of II/26.04.99
Version 2.0.0/Revision 15.04.99
FINAL/CONFIDENTIAL
6 Customer and Customer Card Handling Process
USE
8
Replaceme
nt
Neither
RESTRICTED
USE
Y
This status cannot be updated
manually. These values are
automatically set on the Expiry
date of the card. This card can be
replaced.
DEACTIVAT
ED
Y
On the deactivation date (expiry
date + offset), the card is
automatically deactivated. This
card can be replaced.
•Table 6-1 Customer card replacement criteria
co
nf
ide
nt
ia
l
If the Card Status is 'DEACTIVATED' or 'RESTRICTED USE' and Status Reason is not
'ALERT' or ‘RETURNED’and List Status is not ‘Red Listed’, then 'Replace' button will
be enabled. Else the 'Replace' button will be disabled.
Status reason indicates, that the card is suspected to be faked. In this case a replacement
can not be allowed.
• Note that, on the date of expiry of the customer card , the card status is
automatically set to RESTRICTED USE and the Status reason is set to
REPLACEMENT. The card can be replaced.
• After the deactivation date, the card status is automatically set to 'DEACTIVATED'
and the card can no longer be replaced.
• If 'Replace' button is enabled, press the button.
AV
ER
S
• An alert appears asking for replacing the selected Card. If 'Yes', the system replaces
the Card and a 'New' Card is added with same Card Service as the original card and
the cursor goes to the 'New' replaced Card. After that an information comes in the
console window stating the 'Original Card’ and the 'Replaced Card’ Nos. The
'Replace' button is disabled.
• If a card is replaced, the card number of the new card is recorded
STARCOIN C&A User Manual
Version 2.0.0/Revision 15.04.99
Volume I of II/26.04.99
Page 101 of 107
6 Customer and Customer Card Handling Process
6.2.5
FINAL/CONFIDENTIAL
Update a Customer Card Status
A customer card may go through different states during its life-cycle. Each state leads to
the change of card status. Figure below shows the state transitions during the life-cycle
of a customer card:
co
nf
ide
nt
ia
l
RE
DE
AV
ER
S
•Figure 6-1 State transition of Customer Card Status
•Access Path
Customer → Update Card status
During its lifetime the status of a card can change, e.g. it may be locked for loading by
the issuing bank, because of overdrawn account.
Page 102 of 107
STARCOIN C&A User Manual
Volume I of II/26.04.99
Version 2.0.0/Revision 15.04.99
FINAL/CONFIDENTIAL
6.2.5.1
6 Customer and Customer Card Handling Process
Card status overview
The tables below depicts the restrictions posed on different transactions for the different
card status.
NEW - card data has been started in the database
Transaction
Allowed
Denied
Load
x
Unload
x
PIN cntr. reset
x
Payment
x
Red Listed
co
nf
ide
nt
ia
l
•Table 6-2 Restrictions for customer card status NEW
Set: This status is set by the C&A system whenever a customer card is set-up in the
system. It is the initial status of any card. All the transactions are denied and the card
cannot be Red Listed.
ACTIVE - card has been successfully personalised: 'working'
Transaction
Load
Allowed
Denied
Red/Black List
x
Unload
x
PIN cntr. reset
Payment
x
x
•Table 6-3 Restrictions for customer card status ACTIVE
AV
ER
S
Set: The card status changes from NEW to ACTIVE whenever the a proper
Personalisation confirmation is received by the system. Import of Personalisation
confirmation can be done through
Personalisation → Import → Personalisation Confirmation
LOCKED - Load denied
Transaction
Allowed
Load
Unload
x
PIN cntr. reset
x
Payment
x
Denied
Red/Black List
x
B (R)
•Table 6-4 Restrictions for customer card status LOCKED
STARCOIN C&A User Manual
Version 2.0.0/Revision 15.04.99
Volume I of II/26.04.99
Page 103 of 107
6 Customer and Customer Card Handling Process
FINAL/CONFIDENTIAL
Set: Manually by C&A Supervisor (e.g. on request of issuer bank)
or Bank data upload process. The status can be reset to ACTIVE be the C&A
Supervisor.
RESTRICTED USE- Card is blocked for certain transactions
Transaction
Denied
Red/Black List
Load
x
B (R)
Unload
x
B (R)
PIN cntr. reset
x
B (R)
Payment
Allowed
x
co
nf
ide
nt
ia
l
•Table 6-5 Restrictions for customer card status RESTRICTED USE
Set: Manually by C&A Supervisor (Card returned/Lost/Stolen/Defect/Other)
or C&A Process (Card has expired)
DEACTIVATED - End of card life cycle, no transactions allowed
Transaction
Allowed
Load
Unload
PIN cntr. reset
Red/Black
List
x
B (R)
x
B (R)
x
B (R)
x
B (R)
AV
ER
S
Payment
Denied
•Table 6-6 Restrictions for customer card status DEACTIVATED
Set: By C&A Process if Expiry data offset has expired or Reason 'Alert' has been
selected - List state is 'Red listed' then
Table below depicts the overview of card status
Reason
Status
NULL Bank
C&A Rerequest superv. turned
NEW
x
ACTIVE
x
LOCKED
x (R)
Lost/
Stolen
Defect ReAlert
placed
x (R)
RESTRICTED
x (R)
x (R)
x (R)
x (R)
x (R)
DEACTIVATED
x (R)
x (R)
x (R)
x (R)
x (R)
R
•Table 6-7 Card Status Overview
Page 104 of 107
STARCOIN C&A User Manual
Volume I of II/26.04.99
Version 2.0.0/Revision 15.04.99
FINAL/CONFIDENTIAL
6 Customer and Customer Card Handling Process
Please note: As to be seen in the table above card state is set by a certain process (data
entry - ‘NEW’, Personalisation - ‘ACTIVE’) or manually by an authorised user. The
respective list states is set accordingly by the C&A system or can be set manually.
Coding of list status
•(R)
Red listed at the discretion of the system provider (manually)
•R
Red listed automatically
Status Reason overview
co
nf
ide
nt
ia
l
•Alert:
Card is suspected/known to be faked or able to corrupt the system in any way.
•Bank request:
Request of the issuing bank by phone/fax/letter to set a card to state locked.
•C&A supervisor:
The C&A supervisor may set a card to certain state if it seems necessary from
security or system point of view (e.g. card suspected to be faked).
•Defect:
The customer reports a defect of his card to the issuing bank, which informs the
C&A system and sends the card there for testing.
•Lost/Stolen:
AV
ER
S
The customer reports a loss or theft of his card to the issuing bank, which must
inform the C&A system at once. If available the date/time of loss theft need to be
reported too.
•Replacement:
The customer card has expired and is replaced in the normal card live cycle. The
process of generating a new set of cards is initiated from an extra screen.
•Returned:
The customer returns his card to the issuing bank for any reason and the bank must
inform the C&A system (phone/fax/letter).
6.2.5.2
Retrieve the existing Customer record
On selection of this option from the menu item, the corresponding form appears on the
screen with the cursor positioned on ‘Bank Customer Id’field.
• Enter either Bank Customer Id or Name or FirstName or Title or C&A Customer
Id fields (Searchable fields are in Yellow legend. Wildcard entry may be used in all
the fields) to fetch the record.
STARCOIN C&A User Manual
Version 2.0.0/Revision 15.04.99
Volume I of II/26.04.99
Page 105 of 107
6 Customer and Customer Card Handling Process
FINAL/CONFIDENTIAL
• Press ‘Search’button in the Customer block.
• Customer, Customer Card & respective IEP/ECH details(if any) are now on the
screen.
6.2.5.3
Update Card Status
• If the Card Status is not 'DEACTIVATED' or 'RESTRICTED USE', then 'Update'
button will be enabled. If 'Update' button is enabled, press the button.
• A window appears. After selecting proper Status Reason and List Status, Card
Status is automatically set with Status Date as current date. If 'Ok' is pressed, Card
Status, Status Reason and List Status, for the selected Card, are updated.
Update Customer
• Access Path
co
nf
ide
nt
ia
l
6.2.6
Customer → Update customer
6.2.6.1
Retrieve the existing Customer Record
On selection of this option from the menu item, the corresponding form appears on the
screen with the cursor positioned on ‘C&A Customer Id’field.
• Either
• Enter a valid C&A Customer Id in the ‘C&A Customer Id’field.
• Press ‘Tab’, the whole record is fetched on the screen
AV
ER
S
• OR
• With the cursor placed on the ‘C&A Customer Id’or ‘Bank Customer Id’or
‘Title’or ‘First Name’or ‘Name’ field, press ‘Search’button. A List of Values
of Customer Information will be displayed on the screen .
• Select the desired Customer, press ‘OK’button
• Record is displayed on the screen.
• OR
• Enter valid Bank Customer Id, Title, First Name, Name and ‘C&A Customer Id’
combination.
• Press ‘Tab’, the whole record is fetched on the screen.
6.2.6.2
Update Customer Record
• The following fields can be modified:
• Date of Birth
(Date in 'DD.MM.YYYY' format)
Page 106 of 107
STARCOIN C&A User Manual
Volume I of II/26.04.99
Version 2.0.0/Revision 15.04.99
FINAL/CONFIDENTIAL
6 Customer and Customer Card Handling Process
• Street
(Characters with maximum length - 30. Not mandatory)
• City
(Characters with maximum length - 30. Not mandatory)
• ZIP Code
(Characters with maximum length - 30. Not mandatory)
• Country
(Characters with maximum length - 30. Not mandatory)
• Telephone
(Characters with maximum length - 30. Not mandatory)
co
nf
ide
nt
ia
l
• Press ‘Save’button to restore the changes made.
6.2.7
Delete Customer Information
6.2.7.1
Retrieve the existing Customer Record
On selection of this option from the menu item, the corresponding form appears on the
screen with the cursor positioned on ‘C&A Customer Id’field.
• Either
• Enter a valid C&A Customer Id in the ‘C&A Customer Id’field.
• Press ‘Tab’, the whole record is fetched on the screen
AV
ER
S
• OR
• With the cursor placed on the ‘C&A Customer Id’or ‘Bank Customer Id’or
‘Title’or ‘First Name’or ‘Name’ field, press ‘Search’button. A List of Values
of Customer Information will be displayed on the screen .
• Select the desired Customer, press ‘OK’button
• Record is displayed on the screen.
• OR
• Enter valid Bank Customer Id, Title, First Name, Name and ‘C&A Customer Id’
combination.
• Press ‘Tab’, the whole record is fetched on the screen.
6.2.7.2
Delete Customer
• Check the ‘Deleted’check box to delete a particular Customer .(The user can
delete a Customer Information when all the Card(s) of the Customer are
‘DEACTIVATED’.)
• Press ‘Save’button to delete the record marked for deletion.
Note: If at any point of time, after making some changes ‘Clear’or ‘Close’button is
pressed system will ask for a confirmation and will act accordingly.
STARCOIN C&A User Manual
Version 2.0.0/Revision 15.04.99
Volume I of II/26.04.99
Page 107 of 107