1
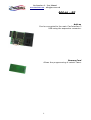
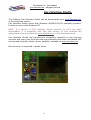
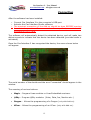
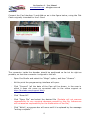
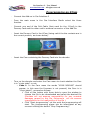
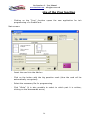
Cas Interface 2 – User Manual www.duolabs.com – all rights reserved Cas Interface 2 & Add-On User Manual English - 9 september 2004 - 1 Cas Interface 2 – User Manual www.duolabs.com – all rights reserved © 2003-2004 Duolabs srl Duolabs, Cas interface2, Cas Interface Studio, Cas Interface 2 are all trade marks of Duolabs srl in Italy and worldwide. Names of other products mentioned here with may be trade marks of their respective producers. Duolabs srl will not accept any responsibility for technical errors or ommisions contained within this document, nor for damages, accidental or consequent to the use of theis material. The information contained within this document is provided “as is”, and without garuntee of any sort including, without limited intent, garuntees implicit of commerciability or ability to specific scopes and are subject to variation without notice. Nothing contained within should be interpreted as constituting any sort of garuntee. Any reproduction, total or partial, of this document must be expressly authorised by Duolabs Srl. 2 Cas Interface 2 – User Manual www.duolabs.com – all rights reserved Summary What is Cas Interface 2 Pag. 4 Cas Interface 2 – Kit Pag. 6 What is the Add-on Pag. Add-on – Kit Pag. 7 9 Driver Installation Pag. 10 Cas Interface Studio Connection Product Registration Duolabs Website Forum Help Private Pag. Pag. Pag. Pag. Pag. Pag. Pag. 11 12 13 13 13 13 13 Programming a Ucas Cam (Magic or similar) Magic Xtreme Manhattan Pag. Pag. Pag. Pag. 14 14 Programming an @sky Cam Pag. 18 Programming a Dragon Cam Pag. 20 Programming an XCam Pag. 21 Using the functions of Phoenix/Smartmouse Pag. 23 Using the Prog function Pag. 24 Programming a Titanium Card Pag. 26 Resetting Dreambox Boot Pag. 27 Troubleshooting Pag. 29 General Information Pag. 30 3 15 16 Cas Interface 2 – User Manual www.duolabs.com – all rights reserved What is Cas Interface 2 Cas Interface 2 is the latest evolution of the older Cas Interface and Cas Interface Plus. It can be connected to any USB port and is one of the most flexible and magnificently versatile ever constructed for interface with various external environments, including Common Access Modules, recievers, smartcards, cells and much more. Thanks to its ability of updating its firmware based on the developing functions, its obsoletion is highly unlikely. Some of its tecnical aspects render this product potentially adaptable to functions not yet discovered; its high speed of communication - Full Speed USB 1.1 and 2.0 (12 Mbit/sec), generation of a clock function up to 90 Mhz, multifunctional connectors and much more! The increible flexibility of the software and its continual evolution invites the question : what will we program today? This manual contains the basic elements for programming certain CAM modules and DVB recievers. Other information, not including the operating software and its supplements, are availble on our website www.duolabs.com Cas Interface 2 annexes its predecessor, Cas Interface +Plus through its added functionality. Apart from Magic, Matrix and Ucas, Cas Interface 2 allows the programming of other Cam types such as Joker, Zeta, Ice, Neotion etc. Its expansion connector enhances communication with the outside world, which otherwise could have only been achieved through a PCMCIA slot. In fact, thanks to the Add-on, the already wide range of functions available is increased considerably, allowing the programming of spates of devices such as SmartCard, X-Cam, Dragon Cam, and Titanium Card; all this done with incomparable speed and ease. The new Cas Interface 2, conceptually different, represents a new multifunctional device, capable of finding secure application even in different fields from those for which it has been designed. Any eventual devices found to be supported will be indicated in the download area of our website. We ask you therefore to subscribe to the Forum on our website in order to be able to recieve continual updates on the evolution of both the hardware and software. We also remind you that each new device comes with its own unique serial number. In case of any problems, we kindly ask you to contact us only after haing read this manual carefully parti. In the case that you do have to contact us, please provide precise information on any problems that occur. 4 Cas Interface 2 – User Manual www.duolabs.com – all rights reserved 5 Cas Interface 2 – User Manual www.duolabs.com – all rights reserved Cas Interface 2 – Kit J-Card Can be connected to the main unit using a Flat Cable provided. (this is for exclusive use with the @sky Cam) Keep the contacts clean and insert into the Cam Module. Cas Interface 2 Central Unit. Can be connected to the computer through the USB port using It is not necessary to provide an external power supply as it takes it is fuelled directly from the USB port. Flate Cable connector. Connected the Cas Interface 2 with the J-Card and other external devices. 6 Cas Interface 2 – User Manual www.duolabs.com – all rights reserved What is the Add-on This exceptional device (optional) can be connected directly to the external connector on the Cas Interface 2 and introduces some interesting features. The Add-on tranforms Cas Interface 2 into a powerful programmer for Smartcard and thanks to its 20 pin connector can be connected directly to most decoders. The Smartcards supported are: PIC-based: Wafercard (16C84, 16F84, 16F84A) Goldcard (16F84/16F84A + 24C16) Silvercard (16F876/16F877 + 24C64) Greencard (16F876/16F877 + 24C128) Greencard2 (16F876/16F877 + 24C256) Bluecard (16F84A + 24C64) CanaryCard (16F628 + 24C16) EmeraldCard (16F628 + 24C64) Singlepic (16F876, 16F627, 16F628). AVR-based: Funcard/Funcard2 (AT90S8515 + 24C64) PrussianCard/Funcard3 (AT90S8515 + 24C128) PrussianCard2/Funcard4 (AT90S8515 + 24C256) PrussianCard3/Funcard5 (AT90S8515 + 24C512) PrussianCard4/Funcard6 (AT90S8515 + 24C1024) PrussianCard5/Funcard7 (AT90S8515 + 2*24C1024) JupiterCard (AT90S2343 + 24C16) JupiterCard2 (AT90S8535 + 24C64) FunCard ATmega161 (ATmega161 + 24C64) FunCard ATmega163 (ATmega163 + 24C256) FunCard Atmega8515/Funkey2 (Atmega 8515 + 24C256) BlackCard (ATmega128 + 24C256) Cas Interface 2 with its Add-on can programs Smartcards at a rate 30% faster than other programmers on the market and this can be still increased through its updating Firmware. Furthermore, this device can be used asssere usato come programmatore di Smartcard ISO 7816 in modalità Phoenix, through an RS232 serial port, allowing for the use of third party software. It is also one of the most secure programmers for programming the Titanium 7 Cas Interface 2 – User Manual www.duolabs.com – all rights reserved Card and is predisposed also to the use of the “Unlooping” function, which allows the resetting of an ATR (this function is not garunteed). This device can also be used to program X-Cams and Dragon Cams using the included Dummy Card. For the reparation of Dreambox and other recievers such as Xtreme it is no longer necessary to construct cables and circuits; simply connect the included cable directly at the receiver. For further information on this function, we recommend visitng our website www.duolabs.com . 8 Cas Interface 2 – User Manual www.duolabs.com – all rights reserved Add-on – Kit Add-on Can be connected to the main Cas Interface 2 USB using the expansion connector. Dummy Card Allows the programming of certain Cams. 9 Cas Interface 2 – User Manual www.duolabs.com – all rights reserved Driver Installation All information relating to driver information are contained in the Driver Installation Manual for CAS Interface 2, which can be downloaded from our official website www.duolabs.com in the download section realting to CAS Interface 2, under the Windrivers for CAS Interface 2 link. 10 Cas Interface 2 – User Manual www.duolabs.com – all rights reserved Cas Interface Studio The software Cas Interface Studio can be downloaded from www.duolabs.com in the download section. Cas Interface Studio works with Windows 98/ME/2000/XP operating systems. It does not work with Windows NT. NOTE: If a version of CAS Interface Studio previous to 4.5.0 has been downloaded, it is necessary with this new version to first dowload the appropriate drivers available at www.duolabs.com in the downloads area. Cas Interface Studio has transformed completely repective to the previous versions and many new functions and improvements have been introduced. WE recommend using the latest version posbbile, available at www.duolabs.com Each function is explained in detail below. 11 Cas Interface 2 – User Manual www.duolabs.com – all rights reserved Connection After the software has been installed: ➢ ➢ ➢ Connect Cas Interface 2 to the computer's USB port. Activate the Cas Interface Studio software. The eventual connection of the Add-on should be done BEFORE opening the desired operation. To connect the Dummy Card, use the cable provided for the J-Card. The software will automatically detect the attached device, and will make two dstinct sounds to indicate that the device has been detected (provided audio is activated). Once the Cas Interface 2 has recognised the device, the menu shown below will appear: The serial number of the devide and the word “connected” should appear in the window. The meaning of various buttons: • Magic – Program Ucas modules or Ucas Embedded receivers. • @Sky – Program @Sky modules (Joker, Zeta, Ice, Neotion etc…) • Dragon - Allows the programming of a Dragon (only with Add-on). • XCam – Allows the programming of an XCam. (only with Add-on). 12 Cas Interface 2 – User Manual www.duolabs.com – all rights reserved • Phoenix – Allows the activation of Phoenix/Smartmouse functions through a serial port. • Prog – Allows the activation of a program dedicated to programming a Smartcard. • Titanium – Allows the programming of a Titanium card. • DreamBox – Reprograms the bootloader of the Dreambox receiver. • Registration: Connection to On-line product registration. • Duolabs Website: Connection to the Duolabs website in order to always keep up with the latest news. • Forum: Connection the the Duolabs forum, in order to keep in contact with other Duolabs product users. • Help: Connection to online support for the resolution of general probelms. • Private: This funtion is dedicated only to certain users, do not use. 13 Cas Interface 2 – User Manual www.duolabs.com – all rights reserved Programming a Ucas Cam (Magic and similar) Selecting the Magic option the user can program this “Sidsa Based” Cam: Magic: - Open Cas Studio and disconnect the Add-on (if connected). - Click the “Magic” button: at this point a programming interface will open. - Insert the Cam into the CAS Interface 2 board. - Click “Connect” (all the data of the Cam will be shown, in the case in which it does not come up corrected refer to the online support at http://duolabs.com/support.htm). - Click “Erase All”. - Click “Open File” selecting the appropriate file (Duolabs will not assume responsibility for any eventual damages caused by this file, futhermore will not assume responsibility for the malfunction of the file). - Click “Write” in the inset Read/Write Functions; a progress bar will be shown that will continue moving until the message is shown “writing complete”. - In case a complete reprogamming of the Cam is required, it is also necessary to rewrite the Xilinx xhip. To do this click on “Write” in the inset Xilinx Functions and select the desired file relative to the Xilinx chip: this will activate the programming (Duolabs will not assume responsibility for any eventual damages caused by this file, futhermore will not assume responsibility for the malfunction of the file). - Enjoy. For more details on the use of various buttons contained in this mask of the CIS please refer to our website www.duolabs.com . 14 Cas Interface 2 – User Manual www.duolabs.com – all rights reserved Xtreme: Connect the Cas Interface 2 and Add-on as in the figure below, using the Flat Cable originally intended for the J-Card: The connector inside the decoder should be positioned as far tot he right as possible, so that the connector is aligned to the left. - Open Cas Studio and select the ”Magic” option, and then “Xtreme”. - At this point the programming interface will open. - Click “Connect” (all the data of the Cam will be shown, in the case in which it does not come up corrected refer to the online support at http://duolabs.com/support.htm). - Click “Erase All”. - Click “Open File” and select the desired file (Duolabs will not assume responsibility for any eventual damages caused by this file, futhermore will not assume responsibility for the malfunction of the file). - Click “Write”; a progress bar will move until it is replaced by the message “writing complete”. 15 Cas Interface 2 – User Manual www.duolabs.com – all rights reserved - In case a complete reprogamming of the Cam is required, it is also necessary to rewrite the Xilinx xhip. To do this click on “Write” in the inset Xilinx Functions and select the desired file relative to the Xilinx chip: this will activate the programming (Duolabs will not assume responsibility for any eventual damages caused by this file, futhermore will not assume responsibility for the malfunction of the file). - Go for it. Manhattan: - Open Cas Studio and disconnect the Add-on (if connected). - Click the “Magic” button: at this point a programming interface will open. - Connect Manhattan to the CAS Interface 2 as shown in the diagram below: - Click “Connect” (all the data of the Cam will be shown, in the case in which it does not come up corrected refer to the online support at http://duolabs.com/support.htm). - Click “Erase All”. - Click “Open File” selecting the appropriate file (Duolabs will not assume responsibility for any eventual damages caused by this file, futhermore will not assume responsibility for the malfunction of the file). - Click “Write” in the inset Read/Write Functions; a progress bar will be shown that will continue moving until the message is shown “writing complete”. 16 Cas Interface 2 – User Manual www.duolabs.com – all rights reserved - In case a complete reprogamming of the Cam is required, it is also necessary to rewrite the Xilinx xhip. To do this click on “Write” in the inset Xilinx Functions and select the desired file relative to the Xilinx chip: this will activate the programming (Duolabs will not assume responsibility for any eventual damages caused by this file, futhermore will not assume responsibility for the malfunction of the file ). - Have fun. 17 Cas Interface 2 – User Manual www.duolabs.com – all rights reserved Programming an @sky Cam - Open Cas Interface Studio and select the “@sky” option. - The programming interface for the @sky Cam will open. - Insert the J-Card as shown in the figure below: (Note: it is important to insert the J-Card at an angle, as shown in the second photo) - Insert the Cam into the Cas Interface 2 (it is very important to insert the J-Card FIRST) and to finish connect the other end of the Flat Cable tot the external connector on the Cas Interface 2. - Click on the “Connect” button: at this point the words "joker connected" should appear and a green LED will light up (if "joker not connected" is shown and two green lights are shown, it means the Jcard has not been positioned correctly, and it is necessary to move it delicately to the right until one of the LEDs turns off and "joker connected" is shown). Once the J-Card has been correctly positioned (the frame on the screen should also turn green) press the button “When you have a stable connection click Here”. If problems persist refer to our online support page: http://www.duolabs.com/Faq_tree/Cas Interface2usb/ihaveaproblem/connected/joker/yes/notconnected/notcon. html - Click “erase all”: only if the message “Joker Erased” is shown will it be possible to relay successive instructions to Cam. - Click "open file" and select the desired file (Duolabs will not assume responsibility for any eventual damages caused by this file, futhermore 18 Cas Interface 2 – User Manual www.duolabs.com – all rights reserved will not assume responsibility for the malfunction of the file). - Click "write", the process bar shoould move and after about 5 mintutes the message "writing done" should appear. The “Verify” option allows the execution of the script with corresponding verification of byte transfer. - DISCONNECT THE CAM AND ONLY AFTERWARDS THE J-CARD 19 Cas Interface 2 – User Manual www.duolabs.com – all rights reserved Programming a Dragon Cam Actually support is only offered for the programming of the Loader Card. After having connected the Add-on to the external connector of the CAS Interface 2 select in the main menu the Dragon function and afterwards insert the Dragon Loader Card in the SmartCard reader of the Add-On. It will be possilbe to repair the Dragon Loader Card, for this reason we recommend reading the instructions carefully conatined in the part relative to the programming of a Smartcard, though the “PROG” function in the main menu. - Click on the “Open File” button with the folder (Duolabs will not assume responsibility for any eventual damages caused by this file, futhermore will not assume responsibility for the malfunction of the file). - Click “Write”. 20 Cas Interface 2 – User Manual www.duolabs.com – all rights reserved Programming an XCam - Connect the Add-on to Cas Interface 2 - From the main menu in the Cas Interface Studio select the Xcam function. - Connect one end of the Falt Cable (that used for the J-Card) to the Dummy Card and the other end to external connector of the Add-On. - Insert the Dummy Card in the XCam (being carful the the contacts are in the correct position, as shown below). - Insert the Cam containing the Dummy Card into the decoder. - Turn on the decoder and enter the Cam menu to check whether the Cam is in “virgin state” or not: o Case 1: In the Cam menu the words “XCAM MODULE” should appear, in this case the firmware is not present( the Cam is in “virgin state”), proceed as follows: Click on the button with three dots to open the window to choose the file to be downloaded and select the desired file (Duolabs will not assume responsibility for any eventual damages caused by this file, futhermore will not assume responsibility for the malfunction of the file ). Click “Start programming”: at this point the programming will start. The programming phase can be interrupted at any moment clicking the button “Stop Programming”. 21 Cas Interface 2 – User Manual www.duolabs.com – all rights reserved As soon as the programming phase has finished a message will appear “Programming successfully”. To be able to use the successfully programmed Cam it is necessary to extract it from the decoder and then reinsert it. o Case 2: in the case that a firmware is already present, something else apart from XCAM MODULE will be written. It will be necessary to cancel this firmware BEFORE proceeding to reprogram the cam. To cancel the current contents of the Cam: On the decoder select the link XCAM xxxxxx (the x's indicate the the code relative to the actual fimware conatined in the Cam) and click OK. In the successive menu click the link “Serial Update” and press OK. Click the “Erase XCAM Module” button in the Xcam mask in the CAS Interface 2 software: from this moment there will be 7 seconds to press OK on the the decoder at the link “Activate Loader”: once pressed this last part of the procedure will cancel the Cam. Once terminated the cancellation will confirm the message of the completion of the operation; extract the Cam from the decoder and reinsert it: after a few moments the writing “XCAM MODULE” whould show that the Cam has returned to a “virgin state”). Now follow the steps shoen in the Case 1. 22 Cas Interface 2 – User Manual www.duolabs.com – all rights reserved Use of the Phoenix / Smartmouse functions The Add-on must be connected to the computer using a serial Pin to Pin cable. Clicking on the Phoenix button will open a window in which it is possible to select the desired function. The “Hide” button allows the main window to be hidden: the functions selected will however remain in the very practical tray bar. Main screen: Tray ba menu: Open Tray bar menu: Once the functions have been selected they can be launched through the operating COM port. IMPORTANT: use a serial Pin to Pin cable (the number 1 pin in one part should correspond to the number 1 pin on the other) 23 Cas Interface 2 – User Manual www.duolabs.com – all rights reserved Use of the Prog function - Clicking on the “Prog” function opens the new application for teh programming of a SmartCard: Main screen: - Insert the card into the Add-on - Click on the button with the big question mark (thus the card will be automatically recognised) - Select the necessary file for programming. - Click “Write” (it is also possible to select to which part it is written, clicking on the downwards arrow) 24 Cas Interface 2 – User Manual www.duolabs.com – all rights reserved - Read: allows the user to read the SmartCard - Erase: allows the user to erase the SmartCard The programmer is set to detect automatically which type of card is inserted int he Add-on: it is possible also to deactivate this function in the options menu. To repair the Dragon Card Loader insert the Smartcard directly into the Slot: it will show up as Funcard or Gold Card. At this point (on top of the Smartcard image), “Repair Dragon Card Loader” will appear. Press this button and await the reparation! Note for expert users: To edit a file click on the Notepad item of the relative file. 25 Cas Interface 2 – User Manual www.duolabs.com – all rights reserved Programming a Titanium Card - From the main menu in the CAS Interface Studio select the Titanium function. - Insert the Titanium into the Add-on. - Erase: Allows the return of the board to its original state. - Programming: o Select the desired file for flash add eeprom (Duolabs will not assume responsibility for any eventual damages caused by this file, futhermore will not assume responsibility for the malfunction of the file). o Click “write”. - Upgrade: is used to pass from version 1.03 to 1.06. - Downgrade: is used to pass from version 1.06 to 1.03. - Repair: allows the resetting of the card in order to not emmit the ATR after the programming (this operation will not recuperate the ATR on all the cards). This function is not garunteed. Any client inteding to buy the Add-On and the Cas Interface 2 exclusively for this pupose is advised that this function is not garunteed 100% even if in test phases produced good results. 26 Cas Interface 2 – User Manual www.duolabs.com – all rights reserved Reset of the Dreambox Boot This function allows the resetting of the Boot of a Dreambox. To determine whether effectively the Boot is damaged, verify on the display of the Dreambox: if nothing happend then the boot can be reset; any other type of error is not actually supported. - Connect the Dreambox and Add-on as shown below: - Select the “Dreambox” from the CIS menu. - Click “connect” witht the decoder turned on. - If the automatic detection goes correctly try other buttons such as “open file” and ”write”. - Click “open file” and select the file (Duolabs will not assume responsibility for any eventual damages caused by this file, futhermore will not assume responsibility for the malfunction of the file). 27 Cas Interface 2 – User Manual www.duolabs.com – all rights reserved - Click “Write” N.B. The file to be used should be a boot file of 128k which you can find on a website dedicated to Dreambox. 28 Cas Interface 2 – User Manual www.duolabs.com – all rights reserved Troubleshooting Any recurring and common problem are resolved by our tecnitions and are inserted in out online databse which you can consult: http://duolabs.com/support.htm Furthermore, our forum with help and information exchange with other users (any piracy is forbidden) is available at: http://www.duolabs.com/forum/ If you have any tecnical difficulty or difficulty in using CAS Interface 2, please follow the following procedure BEFORE contacting Duolabs personally: • read carefully every part of the latest manual downloaded from the website www.duolabs.com in the download section; • click on the link http://www.duolabs.com/Faq_tree/root.htm to consult the FAQ section of our website, with its tree and branch structure, relative to your relative problem; • visit out forum in the section where problems are discussed l'argomento; • only in the case that the problem cannot be resolved, send an email to [email protected], indicating clearly in the message: 1) the type of product intalled (eg CAS Interface 2 + Add-on, ecc.) - 2) the version of the software installed (eg Rel. 4.6.2) – 3) the version of the operating system of your computer (eg Windows XP Home Edition)– 4) and a complete description of the type of problem encountered. 29 Cas Interface 2 – User Manual www.duolabs.com – all rights reserved General Information Duolabs Srl will not take any responsibility for any eventual damage caused by the malfunction or incorrect use of CAS Interface 2. Duolabs Srl will not repair any product that has been used in any way that has not been indicated on the manual or on the internet site www.duolabs.com. Any eventual client who uses the product for functions on devices other than those mentioned expressly in the manual will not be reimbursed! For the reperation of software please refer exclusively to the website www.duolabs.com as this is the ONLY official site. No individual .bin files or other will be supplied. If you would like more deatiled information on updates please refer to our Forum at www.duolabs.com. We would remind you that piracy is forbidden. Anyt reproduction of this manual, in part of in full must be expressly authorised by Duolabs Srl. This project is independent and is in no way connected with Sidsa or its official channels. Duolabs Srl thanks expressly everybody who has suported this reserach and the development of this product non to mention all the beta testers and the forum who have provided important news and comments relating to our product. Duolabs Srl Riccardo Alessi Duolabs Srl Via Europa, 21 36050 Cartigliano (vi) Italia Tel. +39 0424 828355 Fax. +39 0424 598665 www.duolabs.com Email: [email protected] 30