1
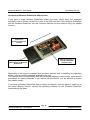
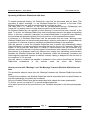
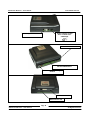
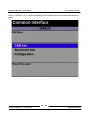
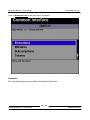
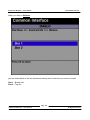
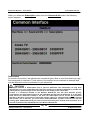
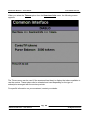
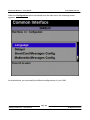
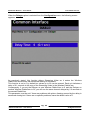
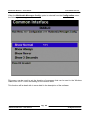
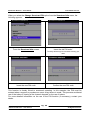
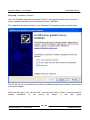
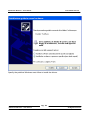
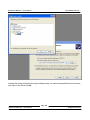
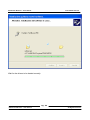
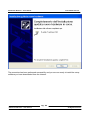
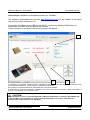
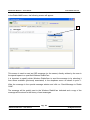
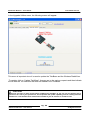
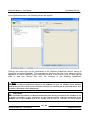
DiabloCam Wireless – User Manual
www.diablocam.com
User Manual
19/04/2006
Pg. 1
DiabloCam Wireless – User Manual
All Rights Reserved.
DiabloCam Wireless – User Manual
www.diablocam.com
Contents
1. Introduction and legal information…………………… Pg. 3
2. Wireless DiabloCam
What is the Wireless DiabloCam?
………………………….…… Pg. 4
……………………………………………………
Pg.
4
Pg.
6
Operating of Wireless DiabloCam without base ……………………...………...…...…... Pg.
6
Operating of Wireless DiabloCam with base ………………….………………….………
Pg.
7
How to proceed with "Marriage" and “De-Marriage” between Wireless DiabloCam and base…Pg.
7
Where and how does it work? ……………………………..………………………………
How to use Home Sharing ……………………..…………………………….....…………
3. Screenshots of Wireless DiabloCam used with receiver….....
Pg. 11
Pg. 12
4. Use of base with PC ……………………………………………… Pg. 29
Installation of software for base on PC………………………………………….…….….
Pg. 29
First step. Installation of drivers………………………………………………..……….….
Pg. 30
Second step. Installation of dedicated software for TwinBase……….…….….….….
Pg. 36
5. Important Notes ……………………………………………….… Pg. 43
Pg. 2
DiabloCam Wireless – User Manual
All Rights Reserved.
DiabloCam Wireless – User Manual
www.diablocam.com
1. Introduction and legal information.
Two versions of the DiabloCam are available, the Wireless version and the Light version. The
Wireless DiabloCam version is the subject of this manual. The manual also includes a
description of the stand-alone operating mode (not connected to a PC) and the operating
mode that uses a PC with Windows operating system and relative management software.
The Wireless DiabloCam features a new, revolutionary system that shares one or more
smartcards among several viewing points (TVs) simultaneously. This function is limited to
enabled smartcards for which providers have given special permission to use the service in
this way. For more detailed information on providers and how to use the channel, refer to the
site www.DiabloCam.com
Sharing smartcards is only permitted in a home environment and is strictly forbidden between
several different home units that are not the property of the subscriber.
The use of this smartcard sharing system is subject to the acceptance of restrictions imposed
by the manufacturer and TV company. Any changes made by the user to the hardware or
software of the devices described in this manual is strictly forbidden.
Parts of this manual including graphics, captions, words, phrases, etc. are subject to change
without notice or may vary according to the marketed versions. The purpose of the manual is
therefore purely informative and the manufacturer is not obliged in any way to update it.
Carefully read the important notes in Chapter 5 of this manual.
Duolabs, DiabloCam and Twinbase are trademarks of Duolabs srl in Italy and other countries.
The names of other products mentioned in this manual may be trademarks of respective
companies.
Duolabs Srl shall not be liable for errors or omissions of technical information contained
herein or accidental or consequential damages in connection with the furnishing,
performance, or use of this material. The information contained in this document is provided
“as is” without warranty or guarantee of any kind including, but not limited to, implied warranty
of merchantability or fitness for a particular purpose and is subject to change without notice.
Nothing herein shall be construed as an additional warranty.
Any reproduction, total or partial, of this document must be expressly authorized by Duolabs
Srl.
© 2003-2006 Duolabs Srl
Pg. 3
DiabloCam Wireless – User Manual
All Rights Reserved.
DiabloCam Wireless – User Manual
www.diablocam.com
2. Wireless DiabloCam.
What is the Wireless DiabloCam?
The product consists of a PCMCIA card with a wireless antenna. The Wireless DiabloCam
has a ISO 7816 compliant plug-in smartcard similar to the smartcards used in mobile
telephony. The Wireless DiabloCam can be interfaced for a number of uses that are
described below via the base with a PC with a Windows operating system. In this way, the
Wireless DiabloCam or base can be updated, if necessary. If the Wireless DiabloCam or base
need to be updated to access specific present or future functions, any updates are the sole
responsibility of the user undertaking them. The second part of this manual explains how to
connect the base to the PC and how to access the various functions.
Where and how does it work?
The Wireless DiabloCam is designed to work in a Common Interface receiver in stand-alone
mode or with a base device.
The Wireless DiabloCam does not work with receivers that do not have at least one Common
Interface PCMCIA slot. Before you purchase one, make sure that your receiver has this
feature.
If it is used separately, the card that is part of the kit (check conditions of sale) can be inserted
in the smartcard reader so that the channels for which the smartcard is enabled can be
viewed.
If, on the other hand, you want to use the Wireless DiabloCam with the base, you can share
the smartcard in the kit with one or more Wireless DiabloCams that are part of the home
network. Communication between the Wireless DiabloCam and the base is via a wireless
connection and the Wireless DiabloCam does not need to be connected to a PC. The range
between the Wireless DiabloCam and base is approximately 100/150 metres in the open field
without the presence of obstacles blocking the signal path. This distance can be significantly
reduced if obstacles are present (walls, doors, etc.) and it is impossible to establish the exact
range of the location beforehand.
Tip!
To improve reception, we recommend placing the base at the same distance from the various
Wireless DiabloCams. The following diagram indicates how to install a hypothetical Home
Sharing system.
Pg. 4
DiabloCam Wireless – User Manual
All Rights Reserved.
DiabloCam Wireless – User Manual
www.diablocam.com
Home Network
The various Wireless
Diablocams must, as far
as possible, be placed at
the same distance from
the base to ensure
maximum efficiency
The above diagram indicates a hypothetical Home Network. The presence of walls, obstacles
and interfering devices (microwave ovens, cordless phones) can lead to a loss of signal and
reduced efficiency.
Pg. 5
DiabloCam Wireless – User Manual
All Rights Reserved.
DiabloCam Wireless – User Manual
www.diablocam.com
Operating of Wireless DiabloCam without base.
If you have a single Wireless DiabloCam without the base, simply insert the smartcard
included in the kit (check conditions of sale) in the SIM card slot of the Wireless DiabloCam
and the Wireless DiabloCam into the Common Interface receiver without using any special
function.
Direction of
insertion in
Common Interface
receiver
SIM card (plug-in)
format smartcard
insertion slot
Wireless antenna and
LED housing of Wireless
DiabloCam.
Depending on the type of smartcard that has been inserted and its enabling and operating
modes, you can view the channels enabled by the card.
This manual does not specifically deal with smartcard enabling modes and/or other specific
procedures for viewing channels. If you require this information, you are advised to contact
your dealer directly.
If you have a Wireless DiabloCam and you want to combine it with the base to make use of
the Home Sharing function, consult the operating methods for the Wireless DiabloCam
combined with the base.
Pg. 6
DiabloCam Wireless – User Manual
All Rights Reserved.
DiabloCam Wireless – User Manual
www.diablocam.com
Operating of Wireless DiabloCam with base
To enable smartcard sharing, the DiabloCam must first be associated with the base. This
procedure is called “marriage”, i.e. the Wireless DiabloCam is “married” to the base. Each
Wireless DiabloCam can only be associated with one base at a time.
The base that it is “married” to can also be dis-associated through De-Marriage and
“remarried” to another base or simply disconnected from the Home Network.
No Wireless DiabloCam can operate in Home Sharing if it has not first been “married” to the
base. To do this, the Wireless DiabloCam must be physically placed in the base as described
below. In this way, undesired “marriages” to unassociated bases in a specific Home Network
are prevented and problems related to security and use of the smartcard are avoided.
A maximum of 6 Wireless DiabloCams can be associated with the base. Although more
Wireless DiabloCams can be technically associated, optimum performance is guaranteed with
a maximum of 6 devices as well as excellent simultaneous sharing of the smartcard.
With this purpose in mind, the Wireless DiabloCam has a system that automatically delays
Video Streaming or signal input before decoding that can be set up to 2.6 seconds. When this
system is set by the user and there is a delay in communication with the smartcard (e.g.
problems caused by the lack of wireless signal or interference with external devices), it avoids
interruptions in programme viewing by delaying the viewing thus permitting communication
between the Wireless DiabloCam and the smartcard. When this extremely innovative and
technologically advanced function is enabled, channel viewing is delayed for the set time up
to a maximum of 2.6 seconds.
How this option is enabled and handled is explained in the section describing the Wireless
DiabloCam screenshots in the receiver under the menu item Delayer.
How to proceed with "Marriage" and “De-Marriage” between Wireless DiabloCam and
base
This procedure takes its name from the “Marriage” between the Wireless DiabloCam and the
base.
Through this procedure, the Wireless DiabloCam can be associated with one specific base so
that the smartcard(s) it contains can be shared.
Only the Wireless DiabloCams that are associated with a base can share smartcard(s).
To do this, you do not need a PC or special technical expertise.
Let’s take a quick look at the connections in the TwinBase as shown in the three photographs
below:
Pg. 7
DiabloCam Wireless – User Manual
All Rights Reserved.
DiabloCam Wireless – User Manual
www.diablocam.com
Power supply socket
max 12 Volts nonstabilized.
PC USB port connection
Status LED of base
PCMCIA slot for insertion of
WirelessDiabloCam
Marriage/De-Marriage
button
Smartcard 2 slot
Smartcard 1 slot
Pg. 8
DiabloCam Wireless – User Manual
All Rights Reserved.
DiabloCam Wireless – User Manual
www.diablocam.com
First of all, you need a 12 Volts/500 mA (non-stabilized) power supply for the base with
negative external-positive central polarity. This is not supplied. Connect the power supply to
the
220Volts
mains
socket
and
then
connect
it
to
the
base.
The lights on the back of the base will now come on and stay lit.
Marriage:
Base/CAM
User
1. Insert the Wireless DiabloCam in the
PCMCIA slot between the rear lights of the
base.
2. Base: The LEDs stay on.
3. Simply click on the button to the left of the
red LED.
3.
Base: The yellow LED on the base will go off
for a few seconds.
Wireless DiabloCam: The red and yellow
LEDs on the Wireless DiabloCam will light up
one after the other for a moment. This will not
last long (less than 2 seconds).
4.
Wireless DiabloCam: The LEDs on the
Wireless DiabloCam will go off.
Base: The yellow LED on the base will come
on again.
The Marriage procedure is now over.
Remove the Wireless DiabloCam from the base.
Pg. 9
DiabloCam Wireless – User Manual
All Rights Reserved.
DiabloCam Wireless – User Manual
www.diablocam.com
The Wireless DiabloCam can now be considered “married” to the base and is ready to
operate in the home network.
To check that this procedure has been successful using the Wireless DiabloCam, follow the
instructions in Chapter 3.
CAUTION!
If the Wireless DiabloCam has already been associated with the base and another Marriage is
attempted, the red and yellow LEDs on the Wireless DiabloCam will flash for approx. 5 seconds and
the yellow and green LEDs will flash on the base. This signal indicates that the Wireless DiabloCam is
already “married” to that base.
If you also want to remove the Wireless DiabloCam from the home network, you must use the
De-Marriage procedure. This procedure can also be performed without a PC as shown below.
De-Marriage:
User
Base/Cam
1. Insert the Wireless DiabloCam in the
PCMCIA slot between the rear lights of the
base.
2. Base: The LEDs stay on.
3. Press the button on the base and hold it
down until the green LED goes off.
4.
Base: The yellow LED on the base goes out.
Wireless DiabloCam: The yellow and red
LEDs on the Wireless DiabloCam will flash
on and off.
5. Base: The green LED goes out.
6. When the green LED goes out, release the
button.
7.
Base: The green LED on the base goes on
Pg. 10
DiabloCam Wireless – User Manual
All Rights Reserved.
DiabloCam Wireless – User Manual
www.diablocam.com
and off for a few seconds and the yellow LED
stays off.
Wireless DiabloCam: The yellow and red
LEDs on the Wireless DiabloCam will flash
on and off.
8.
Base: The green and yellow LEDs come on
again.
Wireless DiabloCam: The yellow and red
LEDs on the Wireless DiabloCam stop
flashing and go out.
The De-Marriage procedure is now over.
Remove the Wireless DiabloCam from the base.
The Wireless DiabloCam may no longer be able to operate with the base that it was
previously associated with.
How to use Home Sharing.
Once several Wireless DiabloCams have been associated with the same base, the smartcard
supplied in the kit can be inserted in the smartcard slot in the base.
The smartcard must be inserted with the golden pad facing downwards in the smartcard
reader. The base has two readers. The smartcard can be inserted in either of the two readers.
If there are two supported smartcards, they can both be inserted into the base’s two readers.
By simply inserting the Wireless DiabloCams into the receivers, the smartcard in the base can
be shared.
Pg. 11
DiabloCam Wireless – User Manual
All Rights Reserved.
DiabloCam Wireless – User Manual
www.diablocam.com
3. Screenshots of Wireless DiabloCam used with receiver.
The following screenshots are those available at the time of writing this manual and are
subject to change without notice. They may also change if the Wireless DiabloCam firmware
is updated.
If you insert the Wireless DiabloCam in the Common Interface slot on your receiver and go to
the Common Interface module menu, you will see the following screenshots when the module
is inserted:
Initialization of Wireless DiabloCam.
Pg. 12
DiabloCam Wireless – User Manual
All Rights Reserved.
DiabloCam Wireless – User Manual
www.diablocam.com
When the Wireless DiabloCam has initialized, the following message appears:
To access the menus, press Diablo 1.X
Pg. 13
DiabloCam Wireless – User Manual
All Rights Reserved.
DiabloCam Wireless – User Manual
www.diablocam.com
Click on “DIABLO 1.X” (it varies according to the firmware version) to access the following
menu:
Pg. 14
DiabloCam Wireless – User Manual
All Rights Reserved.
DiabloCam Wireless – User Manual
www.diablocam.com
Select CAM Info from the menu to access the following screen that is purely descriptive.
CAM Serial Number: XX XX XX XX XX XX
This number indicates the serial number of the CAM and is different for each Wireless
DiabloCam.
CAM IP: XXXX
This indicates the unique IP number of the Wireless DiabloCam.
Base IP: XXXX
This indicates the IP number of the base associated with the Wireless DiabloCam.
Base Status: CONNECTED or NOT CONNECTED
This indicates the connection status of the Wireless DiabloCam with the base. This value can
also be used to understand if the Wireless DiabloCam is within range of the base.
Free Storage Memory: XXXXXXX bytes
This indicates the number of free bytes in the Wireless DiabloCam Dataflash.
Pg. 15
DiabloCam Wireless – User Manual
All Rights Reserved.
DiabloCam Wireless – User Manual
www.diablocam.com
Click on Smartcard Info in the main menu to access:
Embedded
This indicates the type of smartcard in the Wireless DiabloCam.
Pg. 16
DiabloCam Wireless – User Manual
All Rights Reserved.
DiabloCam Wireless – User Manual
www.diablocam.com
When you click on Wireless
you are asked which of the two smartcard reading slots in the base you want to consult.
Slot 1 – Bottom slot
Slot 2 – Top slot
Pg. 17
DiabloCam Wireless – User Manual
All Rights Reserved.
DiabloCam Wireless – User Manual
www.diablocam.com
When you select Slot, as in the previous figure,
Fig. 7
the type of smartcard inserted in the chosen slot on the base and the smartcard ATR (Answer
To Reset) is indicated.
Pg. 18
DiabloCam Wireless – User Manual
All Rights Reserved.
DiabloCam Wireless – User Manual
www.diablocam.com
When you select the Subscription option from the Smartcard Info menu, the following
screen appears:
Subscription
As shown in the screen, this indicates the smartcard rights. Bear in mind that these may vary
from smartcard to smartcard. Those shown in the screens are provided as an example and
may be different from those indicated on your smartcard.
CAUTION!
The rights indicated in Subscription refer to just one Smartcard. This information can only been
displayed for one of the smartcards that have been inserted. It is therefore important to consider the
priority that the system assigns to the smartcards for the display of this information.
If there is a smartcard inserted in the Wireless DiabloCam, this will have absolute priority.
Consequently, the Subscription values for the embedded smartcard will be displayed. If, on the other
hand, there are smartcards inserted in the base, the Subscription will be for the first smartcard
inserted in the base. If you want to consult the viewing rights of a smartcard that has been inserted
after another one in the base, you must remove both smartcards and then insert the one with the
viewing rights (Subscription) that you want to consult. Obviously, this must be done when there is no
smartcard inserted in the embedded slot of the Wireless DiabloCam.
Pg. 19
DiabloCam Wireless – User Manual
All Rights Reserved.
DiabloCam Wireless – User Manual
www.diablocam.com
When you select the Tokens option from the Smartcard Info menu, the following screen
appears:
The Tokens menu can be used (if the smartcard has them) to display the tokens available to
use the service. These tokens can be reloaded and used depending on the type of
subscription arranged with the service provider.
For specific information on your smartcard, contact your dealer.
Pg. 20
DiabloCam Wireless – User Manual
All Rights Reserved.
DiabloCam Wireless – User Manual
www.diablocam.com
When the Configuration option is selected from the main menu, the following screen
appears:
As shown below, you can modify the different configurations of your CAM.
Pg. 21
DiabloCam Wireless – User Manual
All Rights Reserved.
DiabloCam Wireless – User Manual
www.diablocam.com
When the Language option is selected from the Configuration menu, the following screen
appears:
You can selected your preferred language. With subsequent updates of the Wireless
DiabloCam firmware versions, other languages will also be added to the two indicated here.
To select the language, highlight the one you prefer and press OK on your receiver’s remote
control.
Pg. 22
DiabloCam Wireless – User Manual
All Rights Reserved.
DiabloCam Wireless – User Manual
www.diablocam.com
When the Delayer option is selected from the Configuration menu, the following screen
appears:
As previously stated, this function delays Streaming Video as it enters the Wireless
DiabloCam and ensures that smartcard sharing is successful.
This function is set to 0 by default but values up to 26 can be entered. Each unit indicates a
delay of 0.1 seconds in the entry of the Streaming Video in the Wireless DiabloCam.
Consequently, if you set the Delayer on one Wireless DiabloCam to O and the Delayer on
another Wireless DiabloCam to 26, you will see the same channel delayed by 2.6 seconds on
the second DiabloCam.
This parameter must be set if there are problems with picture freezing caused by the delay in
smartcard sharing but if there are no specific problems, leave the default value of 0.
Pg. 23
DiabloCam Wireless – User Manual
All Rights Reserved.
DiabloCam Wireless – User Manual
www.diablocam.com
When the Smartcard Messages Config. option is selected from the Configuration menu,
the following screen appears:
This menu can be used to set the duration of messages on viewing the selected channel
displayed by the receiver. Leave this setting on the Normal value.
Pg. 24
DiabloCam Wireless – User Manual
All Rights Reserved.
DiabloCam Wireless – User Manual
www.diablocam.com
When the Multimedia Messages Config. option is selected from the Configuration menu,
the following screen appears:
This menu can be used to set the duration of messages that can be sent to the Wireless
DiabloCam via PC. Leave this setting on the Normal value.
This function will be dealt with in more detail in the description of the software.
Pg. 25
DiabloCam Wireless – User Manual
All Rights Reserved.
DiabloCam Wireless – User Manual
www.diablocam.com
When the Administrator Menu option is selected from the Configuration menu, the
following screen appears:
If you select this option, you can modify the status of the Wireless DiabloCam PIN. This
should not be confused with the smartcard PIN.
This function is currently not in use.
Pg. 26
DiabloCam Wireless – User Manual
All Rights Reserved.
DiabloCam Wireless – User Manual
www.diablocam.com
When the Administrator Menu and then the CAM’s PIN Function options are selected from
the Configuration menu, the following screen appears:
As previously stated, you can enable, disable or change the Wireless DiabloCam PIN in this
menu.
This function should not be confused with the Smartcard PIN function in the Smartcard Info
menu.
Pg. 27
DiabloCam Wireless – User Manual
All Rights Reserved.
DiabloCam Wireless – User Manual
www.diablocam.com
When you select the Change Smartcard PIN option from the Smartcard Info menu, the
following appears:
From the Smartcard Info screen
Insert the old PIN code*
*Normally 1234 although we recommend contacting your
dealer
Insert the new PIN code
Confirm the new PIN code
This function is closely linked to smartcard operating. In this example, the PIN must be
entered when a request to purchase an event using tokens is made. This prevents accidental
use of the tokens if viewing of the channel depends on the use of tokens.
For more detailed information on the use of the PIN function (if necessary), contact your
dealer.
Pg. 28
DiabloCam Wireless – User Manual
All Rights Reserved.
DiabloCam Wireless – User Manual
www.diablocam.com
4. Use of base with PC.
If you use the base, from now on referred to as the TwinBase, with a PC, you will improve
control of our home network. Use of a PC may also be useful or necessary for updating the
Wireless DiabloCam or TwinBase with more recent versions. These new versions may
include new features or simply enhance existing ones.
To connect the TwinBase to a PC, you will need a type A to type B USB cable. Through
connection to the USB port of the PC, the base does not need powering since it is powered
by the PC.
Installation of software for base on PC.
There are two steps to be taken when installing the software on a PC.
1-Connect the TwinBase to the USB port on the PC and when asked if you want to install
drivers, continue with the installation as explained below.
2-Install the TwinBase management software.
The software has been written in Windows .NET and will therefore request the installation (if
not previously effected for other software) of Windows .NET Framework 2.0.
This procedure is a Windows procedure and Windows will guide you through it.
CAUTION!
Remember that if Framework 2.0 for .NET is not installed, the software will never work. Framework 2.0
can be directly downloaded from the Microsoft site and is therefore safe and up-to-date. It can also be
used by other software that will be installed in the future.
The development in .NET technology guarantees maximum flexibility and enhanced software
efficiency. In addition, the software updates for the TwinBase will not require long setups to be
downloaded since most of the .NET libraries will have already been downloaded the first time the
software was used.
Pg. 29
DiabloCam Wireless – User Manual
All Rights Reserved.
DiabloCam Wireless – User Manual
www.diablocam.com
First step. Installation of drivers.
Once the TwinBase has been connected to the PC, the operating system will request the
drivers needed to operate and communicate with the TwinBase.
The installation process for drivers on the Windows XP operating system is shown below.
The PC will ask you to proceed with the driver installation wizard and if Windows can connect
to Windows Update.
Select the last option “No, not this time"” as shown and click on “Next” to proceed with the
manual
installation
of
the
drivers
as
shown
in
the
next
figure:
Pg. 30
DiabloCam Wireless – User Manual
All Rights Reserved.
DiabloCam Wireless – User Manual
www.diablocam.com
Specify the path that Windows must follow to install the drivers.
Pg. 31
DiabloCam Wireless – User Manual
All Rights Reserved.
DiabloCam Wireless – User Manual
www.diablocam.com
Indicate the folder containing the setup software that you have downloaded from the Internet
and click on the Drivers folder.
Pg. 32
DiabloCam Wireless – User Manual
All Rights Reserved.
DiabloCam Wireless – User Manual
www.diablocam.com
Click on “Continue” during this part of installation.
Pg. 33
DiabloCam Wireless – User Manual
All Rights Reserved.
DiabloCam Wireless – User Manual
www.diablocam.com
Wait for the drivers to be loaded correctly.
Pg. 34
DiabloCam Wireless – User Manual
All Rights Reserved.
DiabloCam Wireless – User Manual
www.diablocam.com
The procedure has been performed successfully and you are now ready to install the setup
software you have downloaded from the Internet.
Pg. 35
DiabloCam Wireless – User Manual
All Rights Reserved.
DiabloCam Wireless – User Manual
www.diablocam.com
Second step. Installation of dedicated software for TwinBase.
The software downloaded from the site www.DiabloCam.com can be installed in the same
way as any normal software for PC.
Connect the TwinBase to the USB port on the PC, remove any Wireless DiabloCams or
smartcards from their slots and launch the software.
If the connection is successful, the following screen will appear:
1
3
2
1. Information on TwinBase. software version, TwinBase IP (useful to compare with the IP in the CAM Info menu
of the Wireless DiabloCam), virtual COM port, TwinBase serial number.
2.Information on Wireless DiabloCam associated with connected TwinBase.
3. Information on smartcards inserted in TwinBase. If you click on the pane to the right of “NOT AVAILABLE”, if
there is a card inserted, you can see the ATR.
CAUTION!
The information in point 3 cannot be displayed if a Wireless DiabloCam is inserted in the PCMCIA slot
of the TwinBase. The information in point 2 cannot be displayed if one or more smartcards are
inserted in the smartcard slot of the TwinBase.
Pg. 36
DiabloCam Wireless – User Manual
All Rights Reserved.
DiabloCam Wireless – User Manual
www.diablocam.com
In the Diablo MMS menu, the following screen will appear:
1
This screen is used to send an OSD message (on the screen) directly written by the user in
the special space to a specified Wireless DiabloCam.
It is important to specify which Wireless DiabloCam to send the message to by selecting it
from those available (previously associated) in the dropdown menu as shown in point 1.
Write the message in the special message window and click on “Send Message to Diablo
CAM”.
The message will be quickly sent to the Wireless DiabloCam indicated and a copy of the
message will be stored in the history of sent messages.
Pg. 37
DiabloCam Wireless – User Manual
All Rights Reserved.
DiabloCam Wireless – User Manual
www.diablocam.com
In the Upgrade Utilities menu, the following screen will appear:
This menu is important since it is used to update the TwinBase and the Wireless DiabloCam.
To update, click on “Update TwinBase”. Answer yes to the various requests and then indicate
the file with the .tuf extension that must be loaded in the TwinBase.
CAUTION!
Make sure you have a valid .tuf file before updating the TwinBase. If you are not sure that the file is
genuine or it is not in your possession, do not perform the update. Updating cancels existing firmware
and there is a risk that the base will become unusable if you do not have a .tuf file to load.
Pg. 38
DiabloCam Wireless – User Manual
All Rights Reserved.
DiabloCam Wireless – User Manual
www.diablocam.com
Once the Wireless DiabloCam has been inserted, the following menu will appear in the same
Upgrade Utilities menu:
DataFlash Function:
CREATE BACKUP – This function is used to create a backup of the Dataflash in the Wireless
DiabloCam. This type of procedure creates an image of the Dataflash that may be useful in
the future and preserves the integrity of the Wireless DiabloCam.
RESTORE BACKUP – This function is used to restore a backup of the Dataflash that has
previously been created.
Update Diablo CAM:
UPDATE DIABLOCAM – This function is used to program new firmware in a Wireless
DiabloCam. The file must have the extension .dup
RESTORE ORIGINAL BOOT DIABLO CAM 1.X – This function is used to automatically
restore the last version of the Diablo Boot or the original version of the firmware
CAUTION!
Make sure that the files loaded into the Wireless DiabloCam are genuine. Loading a non-original file
may cause irreparable damage to your Wireless DiabloCam.
Pg. 39
DiabloCam Wireless – User Manual
All Rights Reserved.
DiabloCam Wireless – User Manual
www.diablocam.com
In the FileSystem menu, the following screen will appear:
Through this menu files can be transferred in the Wireless DiabloCam without having to
reprogram the entire Dataflash. This revolutionary structure that has never been previously
applied to a CAM is backed by the FileSystem (similar to the one on your PC) that can be
used to add and remove files from the contents of the Wireless DiabloCam.
N.B.!
If there is no Wireless DiabloCam inserted in the PCMCIA slot, you can establish which Wireless
DiabloCam you wish to work on via a wireless connection by selecting the IP associated with it. This
function is described in more detail below.
CAUTION!
You can handle the contents of a Wireless DiabloCam when directly connected to the TwinBase or via
a wireless connection. In this screenshot, we have already inserted a Wireless DiabloCam in the
PCMCIA slot of the TwinBase and so we simply need to click on “Connect” as shown above.
Pg. 40
DiabloCam Wireless – User Manual
All Rights Reserved.
DiabloCam Wireless – User Manual
www.diablocam.com
Once you have clicked on the Connect button and the Wireless DiabloCam has been inserted
in the PCMCIA slot of the TwinBase, the following screen appears:
In this situation, you can see the contents of the Wireless DiabloCam Dataflash. This function
enables you to work directly on the files in the same way as the hard disk on a PC.
Remember that in the base version of the firmware, some values in the Dataflash are preset.
We recommend modifying its contents only if you know exactly what you are doing since if
incorrect values or files are entered, this could cause irreparable damage to the Wireless
DiabloCam.
Pg. 41
DiabloCam Wireless – User Manual
All Rights Reserved.
DiabloCam Wireless – User Manual
www.diablocam.com
If there is no Wireless DiabloCam in the PCMCIA slot, this screen appears:
You can now decide which Wireless DiabloCam to communicate with among those
associated with the TwinBase. In the same way as when a Wireless DiabloCam is connected
to the PCMCIA slot (previously shown), you can interact with the files in the Dataflash.
Pg. 42
DiabloCam Wireless – User Manual
All Rights Reserved.
DiabloCam Wireless – User Manual
www.diablocam.com
5. Important Notes.
NOTE 1
Do not, under any circumstances, insert any other CAM other than the Wireless DiabloCam in
the PCMCIA slot on the base. Accidental insertion may cause irreparable damage to the
base.
NOTE 2
If you are asked to start directly in boot mode from the base, simply power the base (from the
USB or power supply) by holding down the button on the back of the base. This should only
be done when requested or when there is a specific need.
Pg. 43
DiabloCam Wireless – User Manual
All Rights Reserved.