1
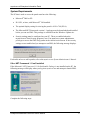
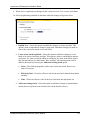
Enterprise Information Portal
Enterprise Maintenance Services
(EMS)
User's Manual
Copyright 2004
MICROS Systems, Inc.
Columbia, MD USA
All Rights Reserved
mymicros.net Enterprise Information Portal
Declarations
Warranties
Although the best efforts are made to ensure that the information in this manual is complete and
correct, MICROS Systems, Inc. makes no warranty of any kind with regard to this material,
including but not limited to the implied warranties of marketability and fitness for a particular
purpose. Information in this manual is subject to change without notice. No part of this manual
may be reproduced or transmitted in any form or by any means, electronic or mechanical,
including photocopying, recording, or information recording and retrieval systems, for any
purpose other than for personal use, without the express written permission of MICROS
Systems, Inc. MICROS Systems, Inc. shall not be liable for errors contained herein or for
incidental or consequential damages in connection with the furnishing, performance, or use of
this manual.
Trademarks
Adobe® and Acrobat® Reader® are trademarks of Adobe Systems, Inc.
Microsoft®, SQL Server™, Excel®, Windows® ,Visio 2000® are either registered trademarks or
trademarks of Microsoft Corporation in the United States and/or other countries.
Design & Production
This manual was written with Microsoft Word ® 2000
Printing History
New editions of this manual incorporate new and changed material since the previous edition.
Minor corrections and updates may be incorporated into reprints of the current edition without
changing the publication date or the edition number.
Edition
1st
Month
November
Year
2003
Software Version
2.50
2nd
November
2004
3.30
Enterprise Maintenance Services User's Manual
2
mymicros.net Enterprise Information Portal
Preface (Don't Read This)
Nobody ever reads the preface. Even your author doesn't read the preface. But in case you were
wondering about the target audience and layout of this manual…
Who Are You?
This manual is intended for the individual(s) who set up and maintain the restaurant's enterprise
database on mymicros.net. The manual is written for persons who are familiar with:
Restaurant industry concepts
POS concepts
POS database(s)
Your enterprise's POS database(s)
Your enterprise's locations structure
Basic web site navigation
What is food cost?
What Is a major group?
MICROS 3700, 9700, or 8700
How are our menu items organized? What discounts do we
offer, and where? What tax rates apply in various locations?
Which restaurants are included in each district?
Can you buy a book from Amazon.com?
What's in Here?
This manual contains the following information:
What is EMS?
EMS Concepts
How-to
How does EMS work?
What are the basic tasks, navigational elements, etc.?
How do I add a menu item, edit a discount, or modify a batch?
What Did You Find?
Your feedback on this manual is very valuable. The Publications team would like to hear about:
Good ideas
Ideas that need work
Information not included
The secret of life
Information that's not clear
Information that's not correct
If something works particularly well, we'll retain and reuse it
If something needs improvement, we'll punch it up
Is something missing?
In case you happen to know
Is something hard to follow? point it out and we'll try again
Did something sneak buy hour Thoreau editing process?
Please send comments, criticisms, corrections to [email protected].
Enterprise Maintenance Services User's Manual
3
mymicros.net Enterprise Information Portal
Table of Contents
Before You Begin ..........................................................................5
What is EMS?
How Does it Work?
System Requirements
User Requirements
5
5
6
7
Basic Tasks in EMS.......................................................................7
EMS Concepts ...............................................................................8
Batches
Filtering Criteria
POS Numbers
Other Navigational Elements
9
13
14
15
Menu Items...................................................................................16
Add a Menu Item
Edit a Menu Item
17
31
Modify Prices ...............................................................................34
Discounts .....................................................................................39
Add a Discount
Edit a Discount
39
43
Tax Rates .....................................................................................46
Edit a Tax Rate
46
Administration .............................................................................50
Add a Number Range
Edit a Number Range
Delete a Number Range
Add a Batch
Edit a Batch
Delete a Batch
51
52
52
53
54
55
Error Messages and Prompts.....................................................56
Enterprise Maintenance Services User's Manual
4
mymicros.net Enterprise Information Portal
Before You Begin
What is EMS?
The Enterprise Maintenance Services (EMS) application is an enterprise solution that provides
the following advantages:
•
EMS is a centrally based implementation solution, allowing an organization to make changes
to all of its POS systems from within a single application.
•
Multiple POS types are supported. An enterprise that has MICROS 3700s, 9700s, and/or
8700s installed at different properties can manage them all with EMS.
•
Users can make day-to-day POS changes quickly and easily. EMS is intended for use by the
F&B staff, rather than the IT staff.
•
Changes that can be made include:
•
Adding or editing menu items and discounts.
•
Changing prices.
•
Editing tax rates.
•
Database changes can take effect immediately, or the changes can be implemented in
scheduled batches.
•
EMS can be accessed in a browser via the Internet, making it a convenient solution that is
available anywhere, anytime.
•
Privileges can be secured. Each portal user is assigned a role, which can limit the locations
and Revenue Centers that they can access.
How Does it Work?
The EMS portlet resides in the mymicros.net side menu. Through this portlet, you can make
enterprise-wide changes to menu items, discounts, and tax rates.
Database changes are made by copying an existing item, then editing the copy. To add an item,
an item with similar operating characteristics (class, type, printer definitions, etc.) must already
exist. This approach enables staff with less POS training and experience to perform the tasks
available in EMS, since there is no need to delve into the complex POS configuration detail.
To simplify multi-location maintenance, changes are made on master records. These records
represent organization-wide items, and are used to consolidate reporting for menu items,
discounts, and tax rates. When changes are made, the designated "master store" will
automatically link unaligned menu items with master menu items, by matching their POS
Number, and/or Name.
For details about Alignment, refer to the mymicros.net System Administrator's Manual.
Enterprise Maintenance Services User's Manual
5
mymicros.net Enterprise Information Portal
System Requirements
The PC that is used to access the portal must have the following:
•
Microsoft® 2000 or XP.
•
IE 6 SP1, or later, with Microsoft® VM installed.
•
The optimal display setting for viewing the portal is 1024 x 768 (XGA).
•
The Microsoft.NET Framework version 1.1 package must be downloaded and installed
before you can use EMS. This package is available from the Windows Update site.
•
Security settings must be configured on your PC. These are enabled when the
mymicros.net Client Security program is run. You must have system administrator
privileges to access the EMS Setup portlet in the Administration menu. If the security
settings are not enabled and you attempt to run EMS, the following message displays:
For details on how to add a portlet, refer to the mymicros.net System Administrator's Manual.
If the .NET Framework 1.1 Isn't Installed
If the Microsoft .NET Framework 1.1 Redistributable Package is not installed on the PC, the
following message will display when you log in to mymicros.net and attempt to launch EMS:
Complete the following steps:
Enterprise Maintenance Services User's Manual
6
mymicros.net Enterprise Information Portal
1. Select the Always trust content from MICROS Systems, Inc. option.
2. Click Yes. The following message displays:
This application requires the Microsoft .NET Framework 1.1. Download and
install the .NET Framework 1.1 from Microsoft Windows Update.
3. Click on the Microsoft Windows Update link.
4. Go to the Downloads page and locate the .NET Framework 1.1 Redistributable Package.
5. Download the selection to a temporary directory on your server, and then run dotnetfx.exe to
install it.
6. Close all instances of Internet Explorer and then log back in to mymicros.net.
User Requirements
•
Your ability to perform the tasks in the EMS menu will depend on the privileges assigned
to your Role. For more information on Roles and Security, refer to the mymicros.net
System Administrator's Manual.
Basic Tasks in EMS
The EMS menu allows users to:
•
Add or Edit Menu Items or Discounts, and Modify Prices.
•
Edit Tax Rates.
•
Create POS Number Ranges for menu items and discounts.
•
Create new batches to go into effect as soon as possible or at a specific date and time, edit
pending batches, and view pending and completed batches.
•
View the tasks the user has opened, but not completed.
Enterprise Maintenance Services User's Manual
7
mymicros.net Enterprise Information Portal
EMS Concepts
The EMS home page includes the following controls:
•
Logout – logs out the current user, and returns to the mymicros.net home page.
•
Home – returns to the EMS home page.
•
Menu Items, Discounts, Tax Rates—add or modify items.
•
Administration – Edit POS number ranges, or EMS batches.
•
Open Tasks—view a list of unfinished tasks selected by the current user.
•
View—examine the contents of a (completed or pending) batch.
•
Refresh—refresh the contents of the current page.
The Completed Batches pane displays a list of all batches sent within the last seven days.
The Pending Batches pane displays batches that are in transmission, or are waiting to be sent
within the next seven days.
Enterprise Maintenance Services User's Manual
8
mymicros.net Enterprise Information Portal
Batches
A batch is a packet of information that includes menu item or discount additions or changes, or
changes to tax rates. When the additions and changes are made, the user specifies the time and
date that the changes will take effect, and the locations that will receive the changes.
Before a batch is sent, it is listed under Pending Batches on the EMS Home page and the
Administration | Edit Batches screen. After a batch is successfully sent, it is listed under
Completed Batches.
•
The Completed Batches window displays the batches that have been successfully sent over
the last seven days. Select a batch. Click View to examine the contents of the batch.
Since Completed Batches have already been sent to the POS systems(s), they cannot be
modified.
•
The Pending Batches window displays batches that are in transmission, or waiting to be sent
within the next seven days. Select a batch. Click View to examine the contents.
•
A batch that is waiting to be sent within the next seven days has a status of Awaiting
Transmission.
•
A batch with a status of In Progress will display in the Pending Batches window for 30
days.
•
If a Pending Batch has not begun transmission, it can be modified until transmission
begins. After a Pending Batch is successfully transmitted, it displays in the Completed
Batches window, at which point it cannot be modified.
Detailed procedures for editing and deleting batches start on page 53. Procedures to add a batch
are described in Add a Menu Item on page 17, and Add a Discount on page 39.
Enterprise Maintenance Services User's Manual
9
mymicros.net Enterprise Information Portal
Viewing and Changing Batches
Batches can be viewed or changed from the EMS Home page, or from the Edit Batches task
located in the Administration menu. Either method brings up the same editing screen. The only
difference between viewing and changing batches from the Home page versus the Edit Batches
screen is:
•
From the Home page, you can view one Completed or Pending batch at a time, or
•
From the Edit Batches screen, you can view all items in all Completed and Pending batches
on the same screen.
After you select a batch, select a view type—Batches or Items.
Batches View
This is the default. This option allows you to view the entire batch.
Batches view fields
Publish Date
This is the date and time the batch took effect.
Name
This is the name of the batch.
Created
This is the date and time the batch was created.
Created By
This is the name of the user who created the batch.
Status
This field identifies the state of the entire batch. Refer to page 12 for
Status details.
Edit
To edit a pending batch, select the batch and click Edit.
Delete
To delete a pending batch, select the batch and click Delete.
Resubmit
To resend a batch transmission, select the batch and click Resubmit.
Enterprise Maintenance Services User's Manual
10
mymicros.net Enterprise Information Portal
Items View
This option allows you to view the detailed items included in the batch. Use the scroll bar at the
bottom of the screen to view all of the fields.
Items view fields
Publish Date
This is the date and time the batch took effect.
Location
This is the location that will receive the new or modified item in the batch.
Status
This field identifies the state of each item in the batch. Refer to page 12
for Status details.
Status Updated
This is the date and time that the status was last changed.
Type
This identifies the item in the batch.
Name
This is the name of the new or modified item in the batch.
Created By
This is the name of the user who created the batch.
Remote Message
This is a message returned by the POS that indicates the success of the
transmission.
Edit
To edit a pending batch, select the batch and click Edit.
Delete
To delete a pending batch, select the batch and click Delete.
Resubmit
To resend a batch transmission, select the batch and click Resubmit.
Enterprise Maintenance Services User's Manual
11
mymicros.net Enterprise Information Portal
How is the Progress of a Batch Measured?
Batches and each item within the batches are labeled with a status to inform the user of the
transmission's progress. A batch cannot be changed if any of its line items has begun the
transmission process (i.e., In Progress status).
Based on the view you choose (Batches or Items), the statuses are slightly different.
Batch Statuses
The Batch status identifies the state of the entire batch. Statuses are:
•
•
•
•
Awaiting Transmission—The batch has not been processed yet because the publish
date/time has not been met.
In Progress—The batch is currently being processed.
Processed - Failed—All items in the batch did not transmit successfully.
Processed - Success—All items in the batch transmitted successfully.
Item Statuses
The Item status identifies the state of each item within the batch. Statuses are:
•
•
•
•
•
Awaiting Transmission—The item has not been processed yet because the publish date/time
has not been met.
Transmitted—This item in the batch was received, and submitted for processing to the
hosting center.
In Progress—The item is currently being processed, and waiting to hear back from the POS
on its status.
Processed - Failed—This item in the batch failed to transmit.
Processed - Success—This item in the batch transmitted successfully.
Enterprise Maintenance Services User's Manual
12
mymicros.net Enterprise Information Portal
Filtering Criteria
EMS provides a variety of filter criteria to help you easily locate a specific item in the master
database. To avoid having to create an item from scratch, use the filter criteria to search for a
master item with similar attributes to copy, or "clone."
For example, locate "Burger" if you want to add "Cheeseburger," or locate "10% Discount" if
you want to add "50% Discount". After you've located the master item, modify it (change the
name, price, etc.) to create the new item. While the master item remains untouched, you've
quickly created a new one in just a few easy steps!
Filtering Fields
The same filtering controls are available for the Menu Item and Discount screens. .
You can search for a menu item by…
Name 1 or
Name 2
Locate a menu item by its primary name (Name 1) or secondary name (Name 2) in
the master database.
Starts With
Select the Starts With option to locate the menu items whose names begin with the
text you've entered in the Name 1 or Name 2 field. For example, if you search on
Burger, the search results may include Burger, Burger Combo or Burger Platter.
or
Contains
Select the Contains option to locate the menu items whose names include the text
you've entered in the Name 1 or Name 2 field. For example, if you search on Egg,
the search results may include Eggs Benedict, Ham and Eggs, or Veggie Pasta.
or by…
POS Number
Locate a menu item by record number in the master database. You can enter
individual record numbers, or a list of numbers separated by commas, or a range of
numbers separated by a dash. For example: 1, 3, 5-12.
or by…
Major Group
Click Select and choose the major group to which a menu item is assigned. Click
Clear to clear the field and make another selection.
or by…
Family Group
Click Select and choose the family group to which a menu item is assigned. Click
Clear to clear the field and make another selection.
and then…
Search
Click Search to locate menu items based on the criteria you have specified. A list of
items that meet the criteria display. Double-click on an item to copy (create a new
item) or edit.
Enterprise Maintenance Services User's Manual
13
mymicros.net Enterprise Information Portal
If a search does not locate at least one match, No Records Found
displays to the right of the Search button.
No Records Found will also display if your role does not give you
access to a location or Revenue Center where the item your are
searching for exists.
POS Numbers
Menu items and discounts are assigned record numbers in the POS database. When creating new
menu items and discounts, the POS Number defaults to the number assigned to the item you are
copying. But you cannot reuse that number. If you attempt to use a duplicate number, the
following error displays:
Change the POS record number by selecting one of the following options:
•
Select Use Next Available Number to find the first unavailable record number.
•
Select Use This Number to enter a specific record number.
•
Select Use Number in Range to assign the next available number from a pre-configured
range of menu items or discounts. Number ranges can be configured in EMS, in
Administration | Number Ranges. Refer to page 50 for more information on creating POS
number ranges.
Enterprise Maintenance Services User's Manual
14
mymicros.net Enterprise Information Portal
Other Navigational Elements
When adding or editing items, use the following navigational elements to help you throughout
the process.
Cancel
Click this button to return to the EMS home page. It's the same as
clicking the Home hotspot in the upper left corner of the screen.
Previous/Next
Click these buttons to go to the previous or next screen when you are
adding or editing an item.
Open Tasks
The lower-left portion of the screen lists the tasks you have selected,
but not closed or completed. Open Tasks essentially allows you to
keep an unfinished task open, and start another one, then go back by
double-clicking on the unfinished task.
The upper-left portion of the screen displays the path you have taken
to reach the current screen. Items that are checked are tasks you
have completed. The first unchecked task from the top represents the
current screen.
Breadcrumbs
Click this gray bar to hide the EMS menu, and increase the viewing
area of the screen. Click the bar again to re-display the EMS menu.
This option is especially helpful when viewing a screen in Table view.
"Hide" bar
Click here.
Enterprise Maintenance Services User's Manual
15
mymicros.net Enterprise Information Portal
Menu Items
EMS >> Menu Items
Enterprise Maintenance Services User's Manual
16
mymicros.net Enterprise Information Portal
Add a Menu Item
1. Click Add Menu Item.
2. Use the filtering criteria to select the menu item to copy, and then click Search. A list of
menu items that match the criteria display.
3. Double-click on a menu item to "clone."
4. Select a POS Number option.
5. Modify the Name.
Enterprise Maintenance Services User's Manual
17
mymicros.net Enterprise Information Portal
6. (Optional) Typically, you probably will not change the Major Group and/or Family Group.
But if you need to change either, click Select next to the appropriate field. A master list
displays the groups to choose.
If the list is extensive, use the scroll bar to the right to locate the group, or search for a group
by entering its name in the Search Text field. Names that match the text entry will display.
Choose a group and then click OK.
Enterprise Maintenance Services User's Manual
18
mymicros.net Enterprise Information Portal
7. Click Next. You have two viewing options to choose from: Tree and Table.
•
Tree—This is the default. This view provides a hierarchical tree view of each location
and their Revenue Centers that contain the menu item. Select only the locations in the
tree that should receive the menu item, discount, or tax rate changes.
•
Use the Location Hierarchy drop-down list to select another location and Revenue
Center. Select only the locations in the tree that should receive the menu item,
discount, or tax rate changes. Repeat for each company that should receive these
changes.
•
Refer to the Legend to define the selections on the screen.
•
Use the Filter drop-down list in the lower-right corner of the screen to refine your
view:
•
All locations and Revenue Center (None)
•
Only the selected locations and Revenue Centers (Selected)
•
Only the unselected selected locations and Revenue Centers (Unselected)
Enterprise Maintenance Services User's Manual
19
mymicros.net Enterprise Information Portal
•
Table—This view provides a table view of the company's locations and their Revenue
Centers that contain the selected menu item, discount, or tax rate. The information is the
same as the Tree view, and you make selections the same way. (The only thing you
cannot do in Table view is change the Location Hierarchy.)
•
Use the Filter drop-down list in the lower-right corner of the screen to refine your
view.
8. Click Next. The details of all your changes up to this point display on the Edit Locations
screen. There are four location screens you can edit by selecting the following views:
•
Tree—This is the default view. This view displays the locations in a tree view in the left
pane, and the basic POS database details of the item. You can change locations by
selecting a different one in the tree in the left pane. You can change Revenue Centers by
clicking on a different one in the list.
The information on this screen will change, depending to the Location and Revenue
Center you select. As you make changes for each Revenue Center, the Revenue Center
name displays under Changed Items in the left pane. To change any of the POS database
details, you must be familiar with those fields. Options that you turn on or off are
enabled/disabled by clicking them. An option is enabled if it displays inverted in dark
blue. For example, the screen on the next page shows the Main Level/Sub Level fields
all enabled.
Refer to your product's programming documentation for details on the POS fields, as they
are not discussed or defined in this document.
•
Locations Table—This view is used to change the name, major group, or family group
of the selected item in one location, selected locations, or all locations (i.e., a "bulk
change"). Details of each change for each location will display in the table.
•
Definitions Table—This view is used to change the POS definition of the selected item.
The layout here is similar to table view in the POS system. Click inside a field and make
the desired changes. Use the scroll bar at the bottom of the screen to view all of the fields.
•
Prices Table—This view is used to change an item's price for a single location, selected
locations, or all locations (i.e., a "bulk change").
Enterprise Maintenance Services User's Manual
20
mymicros.net Enterprise Information Portal
Tree view (8700/9700)
The Tree View and its accompanying Menu Item Class options provide a different
display for the MICROS 8700/9700 than for the MICROS 3700. The illustrations and
text that follow describe the Tree View for the 8700/9700. Differences in the display for
the MICROS 3700 are described on page 23.
Locations
Select a location in the enterprise. When a location is selected, its
Revenue Centers display.
Changed Items
This window lists the items that have been changed in the location's
Revenue Centers.
Location Details
This section displays the menu item's name, major group, family group,
POS record number, and POS type in the selected location.
Enterprise Maintenance Services User's Manual
21
mymicros.net Enterprise Information Portal
This section displays the menu item's Revenue Center details. This
information is read from the POS system's database.
Revenue Center
Details
To edit these database fields, you must be familiar with them in your POS
system. For details on these fields, refer to your POS system's
programming documentation.
NOTE:
Sequence field
Menu Items can have multiple menu item definitions. A menu item
definition is called a Sequence in EMS.
MI Class options
•
Existing—Select this option to use the existing menu item class. You
can either accept the default or choose a different one. Click Select to
display all menu item classes (shown below). The current menu item
class is selected.
When you choose a different menu item class from the left pane, its
entire definition displays. Viewing this information will assist you when
making an appropriate menu item class selection. After you've made a
selection, click OK to continue.
•
Prices
New—Select this if you already know the menu item class number you
want to enter.
For each definition, enter a Price Level, Menu Level, Tax Class, Price, and
Cost.
Enterprise Maintenance Services User's Manual
22
mymicros.net Enterprise Information Portal
Tree view (3700)
The Tree View that displays for the MICROS 3700 is similar to the 8700/9700 display
described on page 21. The differences for 3700 are described below.
The 3700 Tree View displays a Definition Details section instead of a Revenue Center
Details section.
Allowed Condiments
For each definition, click Select to display a selection box with the
available choices. Click Clear to clear the contents of the field.
Required Condiments
Menu Level Class
Printer Class
SLU
Prices
Enter the item’s Price Level, Price, and Cost.
Enterprise Maintenance Services User's Manual
23
mymicros.net Enterprise Information Portal
Actions
The Actions selection in the upper right corner of the screen displays three selections:
• Copy Definition to Other Locations—Copy this definition to locations on the tree
other than the location(s) selected.
• Copy to Existing Selections—Copy this definition to the selected location(s) in
the tree.
• Set Locations Inactive—Make this definition inactive for the selected location(s).
Enterprise Maintenance Services User's Manual
24
mymicros.net Enterprise Information Portal
Locations Table view
Bulk Changes section
Name 1
Change the menu item's primary name. Click Set to change the name at
all locations. All locations with changes will immediately display in a table
on this screen.
Name 2
Change the menu item's secondary name. Click Set to change the name
at all locations. All locations with changes will immediately display in a
table on this screen.
Click Select to change the Major Group. Click Select to display a pop-up
window.
Major Group
Make the appropriate selection and click OK. Click Set if you want to make
the change at all locations. All locations with changes will immediately
display in the table.
Enterprise Maintenance Services User's Manual
25
mymicros.net Enterprise Information Portal
Click Select to change the Family Group. Click Select to display a pop-up
window.
Family Group
Make the appropriate selection and click OK. Click Set if you want to make
the change at all locations. All locations with changes will immediately
display in the table.
Enterprise Maintenance Services User's Manual
26
mymicros.net Enterprise Information Portal
Definitions Table view
Operations section
Select a location to view its Revenue Centers. The table displays the
menu item's Revenue Center details. This information is obtained from the
POS system's database. To edit these database fields, you must be
familiar with them in your POS system. For details on the remaining fields,
refer to your POS system's programming documentation.
Location Filter
You can change the POS detail of each line item by clicking in a field and
modifying it.
Use the scroll bar to view all of the fields in the table.
Fields that require a selection will display a pop-up window for you to
make a choice.
Don't panic! If you don't know hexadecimal values (e.g., the Main Level
and Sub Level fields). A pop-up window makes it easy for you to make
selections, and the system will then translate your selections into hex.
This selection opens a Bulk Change screen where you can select an item
and make the same changes to multiple locations at one time. A single
screen displays options for both 3700 and 8700/9700 systems.
Bulk Changes
Enter the desired change in the appropriate field and click Set to make the
bulk change. All locations with changes will immediately display in a table
on this screen.
Enterprise Maintenance Services User's Manual
27
mymicros.net Enterprise Information Portal
Prices Table view
Filter
Select a Location, Revenue Center, Sequence, and Price Level to receive
the price changes.
Set Prices
Enter the new price of the item, and click Set to accept the price change at
the selected locations. All locations with changes will immediately display
in a table on this screen.
Adjust Prices section
You can adjust prices by a currency amount, such as dollar, euro, etc.
(Units) or by a percentage (Percent).
Adjust By
•
Select Units and enter the amount to increase or decrease the price
by dollars and cents.
•
Select Percent and enter the amount to increase or decrease the
price by a percentage.
For example, if Burger is currently priced at $5.00 and you want to
increase the price to $6.25, enter 1.25. To decrease the price by $1.00,
enter -1.00. To increase the price by 5%, select Percent and enter 5.00 in
the Adjust By field. When the adjustment is made, the new price is
reflected in the Price field, and the Diff field displays the amount of the
adjustment.
Round By
This option can be used with the Adjust By Percent selection. After you
have entered a percentage adjustment amount, select an amount from the
Round By drop-down list to round the percentage amount.
Add Prices
Click this button to accept the price change at the selected locations. All
locations with changes will immediately display in a table on this screen.
Undo Bulk
Changes
OOPS! You meant to increase that last price by $1.00, not $10.00! Click
this button to undo the last bulk price change. Whew.
Enterprise Maintenance Services User's Manual
28
mymicros.net Enterprise Information Portal
9. When you've completed your changes in the various Location View screens, click Next.
10. Select the publishing schedule to determine when the changes will go into effect.
•
Publish Now—Select this option to publish the changes as soon as possible. This
option is used to immediately change a single item. Immediate changes are made as
soon as the selected locations receive the batch.
•
Create a new batch to publish—Select this option to add these changes to a new
batch to be sent at a later date and time. This option is used to send multiple changes
at one time. So, when you finish adding or editing the first item in the batch, choose
this selection and set up a batch name, date, and time. All remaining items will be
added to this batch by selecting the Add to an existing batch option.
•
•
Name—This field autopopulates with a name for the new batch. Enter a new
name if necessary.
•
Effectivity Date—Select the effective date for the new batch from the drop-down
calendar.
•
Time—Select the effective time for the new batch from the drop-down list.
Add to an existing batch—Select this option to add more changes to batch that has
already been set up but not sent. Double-click on the batch to select it.
Enterprise Maintenance Services User's Manual
29
mymicros.net Enterprise Information Portal
11. Click Next. The Review Changes screen displays all of the changes you've made. Two
views are available—Summary and Detailed.
12. Review the changes you have made.
•
If you need to make any changes before you continue, click Previous and return to
the screen that needs to be changed.
•
If you'd like to keep a hard copy of these changes, click Print in the upper-right
corner.
•
If you want to start all over and delete the changes you've made so far, click Cancel.
You will return to the EMS home page.
•
If the changes are correct and you want to continue, click Publish. The following
prompt displays:
13. Click Done. The new batch displays in the Pending Batches window.
Enterprise Maintenance Services User's Manual
30
mymicros.net Enterprise Information Portal
Edit a Menu Item
The procedure to edit a menu item is similar to adding a menu item. Refer to "Adding a Menu
Item" for descriptions of each field.
1. Click Edit Menu Item.
2. Use the filtering criteria to locate the menu item to edit, and then click Search. A list of
menu items that match the criteria display.
Note: Only the items in the locations and Revenue Centers that your role has access to will
display.
3. Double-click on a menu item to edit.
Enterprise Maintenance Services User's Manual
31
mymicros.net Enterprise Information Portal
4. Change the name and click Next. The following prompt displays if you have changed any of
these fields:
•
Select Yes to continue.
•
Select No to cancel this change.
Only the locations and Revenue Centers that have the selected menu item will display in the
Locations screen. All locations and Revenues are selected by default. If there are any
locations or Revenue Centers that should not be edited, de-select them.
Actions
The Actions selection in the upper right corner of the screen displays three selections:
• Copy Definition to Other Locations—Copy this definition to locations on the tree
other than the location(s) selected.
• Copy to Existing Selections—Copy this definition to the selected location(s) in
the tree.
• Set Locations Inactive—Make this definition inactive for the selected location(s).
Enterprise Maintenance Services User's Manual
32
mymicros.net Enterprise Information Portal
5. Click Next. The details of all your changes up to this point display on the Edit Locations
screen. There are four location screens you can edit by selecting the following views: Tree,
Locations Table, Definitions Table, and Prices Table.
The selections displayed are identical to those described in Add a Menu Item, and
illustrated on pages 21 through 23.
6. When you've completed your changes in the various Location View screens, click Next.
7. Select the publishing schedule to determine when the changes will go into effect.
8. Click Next. The Review Changes screen displays all of the changes. Review the changes you
have made.
•
If you need to make any changes before you continue, click Previous and return to
the screen that needs to be changed.
•
If you'd like to keep a hard copy of these changes, click Print.
•
If you want to start all over and delete the changes you've made so far, click Cancel.
You will return to the EMS home page.
•
If the changes are correct and you want to continue, click Publish. The following
prompt displays:
8. Click Done. The new batch displays in the Pending Batches window.
Enterprise Maintenance Services User's Manual
33
mymicros.net Enterprise Information Portal
Modify Prices
EMS >> Modify Prices
You're probably wondering, "Didn't I already read something about adding or editing a price?"
Why, yes, yes you did—in the "Adding a Menu Item" section (see Prices Table, page 28).
But if all you want to do is change the price of a single item or a whole slew of items for several
locations, we've provided a shortcut for you: the Modify Prices selection on the EMS menu.
The procedure to modify a price here is streamlined. You'll notice it's similar to the steps when
adding or editing a menu item, but it's is a lot quicker.
Refer to "Adding a Menu Item" for descriptions of each field.
1. From the EMS menu, click Modify Prices.
2. Use the filtering criteria to locate the menu item to copy, and then click Search. A list of
menu items that match the criteria display.
Enterprise Maintenance Services User's Manual
34
mymicros.net Enterprise Information Portal
3. Select the menu items to change by clicking the checkbox beside the desired items.
4. Click Next. Only the locations and Revenue Centers that have the selected menu items will
display in the Locations screen. All locations and Revenues are selected by default. If there
are any locations or Revenue Centers that should not receive the price change, de-select
them.
Enterprise Maintenance Services User's Manual
35
mymicros.net Enterprise Information Portal
5. Click Next. The Modify Menu Item Prices screen displays every instance of the menu items
you have selected to change, listed by Location and Revenue Center.
6. To make changes to one location and Revenue Center at a time, use the Location and
Revenue Center drop-down lists to filter your selections. Otherwise, the price changes will
be made to all "like" items in all locations and Revenue Centers at one time.
7. Make your price changes. There are several ways to do this:
•
To change all menu items on this screen to the same price, enter the new price in the Set
Prices field. Click Set.
•
To adjust the prices of all items by the same dollar amount on this screen, enter the price
adjustment in the Adjust By field. Select Units from the drop-down list to the right.
Click Set.
•
To adjust the prices of all items by the same percentage amount on this screen, enter the
percentage adjustment in the Adjust By field. Select Percent from the drop-down list to
the right. Click Set.
The Round By can be used with the Adjust By Percent selection.
After you have entered a percentage adjustment amount, select an
amount from the Round By drop-down list to round the percentage
amount.
Enterprise Maintenance Services User's Manual
36
mymicros.net Enterprise Information Portal
Here's what happens as soon as you click Set:
•
The menu item's Price field immediately reflects the change.
•
The Diff field reflects the amount by which the item was changed.
•
The price change status is set to Change Active. You can disable this status until you are
ready to invoke the price change. For example, all prices will be increased by 2%,
effective November 1, 2003. You can make all the changes you need, way in advance.
Disable the Change Active field for the menu items until you are ready to send the batch
as the November 1 date nears. In the meantime, you can continue to make changes as
needed.
8. OOPS! You meant to increase that last price by 2%, not 20%! Click this button to undo the
last bulk price change. Whew!
9. Click Next. Select the publishing schedule to determine when the changes will go into effect.
When modifying prices, if you choose Create a new batch to publish, you have the option
to enable a date and time to revert the price change. This option is used if you are changing
prices for a set period, such as Valentine's Day (don't the prices always go up for that one
day?) or November 1 through February 28, when your vendor's shellfish prices go up.
To use this option, select the Enable Rollback Date and select the Rollback Date and Time
the changes will revert to their original prices.
Enterprise Maintenance Services User's Manual
37
mymicros.net Enterprise Information Portal
10. Click Next. The Review Changes screen displays all of the changes you've made.
11. Review the changes you have made.
•
If you need to make any changes before you continue, click Previous and return to
the screen that needs to be changed.
•
If you'd like to keep a hard copy of these changes, click Print.
•
If you want to start all over and delete the changes you've made so far, click Cancel.
You will return to the EMS home page.
•
If the changes are correct and you want to continue, click Publish. The following
prompt displays:
12. Click Done. The new batch displays in the Pending Batches window.
Enterprise Maintenance Services User's Manual
38
mymicros.net Enterprise Information Portal
Discounts
EMS >> Discounts
Add a Discount
1. Click Add Discount.
2. Use the filtering criteria to locate the discount to copy, and then click Search. A list of
discounts that match the criteria display.
3. Double-click on a discount to "clone."
4. Select a POS Number option.
5. Modify the Name.
Enterprise Maintenance Services User's Manual
39
mymicros.net Enterprise Information Portal
6. Click Next. You have two viewing options to choose from: Tree and Table. Select the
locations and Revenue Centers to receive the new discount.
Enterprise Maintenance Services User's Manual
40
mymicros.net Enterprise Information Portal
7. Click Next. Click a Revenue Center to display its POS definition if you need to make any
changes.
Note: The illustrations shown displays options available for the 8700/9700 POS systems. The
display for the 3700 has minor variations. Some fields are available for one product line but
not the other (HHT definition, classes, etc.).
Enterprise Maintenance Services User's Manual
41
mymicros.net Enterprise Information Portal
8. Click Next. Select the publishing schedule to determine when the changes will go into effect.
9. Click Next. The Review Changes screen displays all of the changes you've made.
10. Review the changes you have made.
•
If you need to make any changes before you continue, click Previous and return to
the screen that needs to be changed.
•
If you'd like to keep a hard copy of these changes, click Print.
•
If you want to start all over and delete the changes you've made so far, click Cancel.
You will return to the EMS home page.
•
If the changes are correct and you want to continue, click Publish. The following
prompt displays:
11. Click Done. The new batch displays in the Pending Batches window.
Enterprise Maintenance Services User's Manual
42
mymicros.net Enterprise Information Portal
Edit a Discount
1. Click Edit Discount.
2. Use the filtering criteria to locate the discount to edit, and then click Search. A list discounts
that match the criteria display.
3. Double-click on a discount to edit.
4. Change the name if necessary and click Next. The following prompt displays if you have
changed the name:
•
Select Yes to continue.
•
Select No to cancel this change.
Enterprise Maintenance Services User's Manual
43
mymicros.net Enterprise Information Portal
Only the locations and Revenue Centers that have the selected discount will display in the
Locations screen. All locations and Revenues are selected by default. If there are any
locations or Revenue Centers that should not be edited, de-select them.
5. You have two viewing options to choose from: Tree and Table. Select the locations and
Revenue Centers to receive the edited discount.
6. Click on a Revenue Center and click Next to display its POS definition if you need to make
any changes.
Enterprise Maintenance Services User's Manual
44
mymicros.net Enterprise Information Portal
7. Click Next. Select the publishing schedule to determine when the changes will go into effect.
8. Click Next. The Review Changes screen displays all of the changes you've made.
9. Review the changes you have made.
•
If you need to make any changes before you continue, click Previous and return to the
screen that needs to be changed.
•
If you'd like to keep a hard copy of these changes, click Print.
•
If you want to start all over and delete the changes you've made so far, click Cancel. You
will return to the EMS home page.
•
If the changes are correct and you want to continue, click Publish. The following prompt
displays:
10. Click Done. The new batch displays in the Pending Batches window.
Enterprise Maintenance Services User's Manual
45
mymicros.net Enterprise Information Portal
Tax Rates
EMS >> Tax Rates
Edit a Tax Rate
1. Click Edit Tax Rates.
2. Use the filtering criteria to locate the tax rate to edit, and then click Next. The Tax
Definitions of each location that you filtered displays.
3. Select a location and click on a tax rate to change.
4. Make the necessary changes (i.e., change Name, Percent, etc.).
Enterprise Maintenance Services User's Manual
46
mymicros.net Enterprise Information Portal
5. If you want to copy the tax definition to a different location, click Copy Current Definition
To Other Locations in the upper-right corner. The selection screen displays all of the
locations in the enterprise.
6. Select the location(s) to copy the tax definition to. If you want to specify a different tax table
(1 through 8) to copy the definition to, select the appropriate number from the Definition #
drop-down list.
Enterprise Maintenance Services User's Manual
47
mymicros.net Enterprise Information Portal
7. Click OK. The changes you just made display in the Changed Items window. Click on the
item in the Changed Items window to review its tax definition settings.
8. Click Next. Select the publishing schedule to determine when the changes will go into effect.
Enterprise Maintenance Services User's Manual
48
mymicros.net Enterprise Information Portal
9. Click Next. The Review Changes screen displays all of the changes you've made.
10. Review the changes you have made.
•
If you need to make any changes before you continue, click Previous and return to
the screen that needs to be changed.
•
If you'd like to keep a hard copy of these changes, click Print.
•
If you want to start all over and delete the changes you've made so far, click Cancel.
You will return to the EMS home page.
•
If the changes are correct and you want to continue, click Publish. The following
prompt displays:
11. Click Done. The new batch displays in the Pending Batches window.
Enterprise Maintenance Services User's Manual
49
mymicros.net Enterprise Information Portal
Administration
EMS >> Administration
The Administration menu includes two selections:
•
Number Ranges—This selection allows you to add, edit, or delete pre-configured POS
number ranges for menu items and discounts.
When you add a menu item or discount, you must choose a POS number assignment—use
the next number in the system, or use the next number in a specific range.
To assign a number in a specific range, you must select a range from the categories that
display in the drop-down list. Your selection determines which range to use, and the next
number available in that range is assigned to the item you are adding. The ranges you choose
from are configured here, in Administration | Number Ranges.
For details on adding, editing, and deleting a number range, refer to page 51.
•
Edit Batches—This selection allows you to edit Pending Batches. Pending batches can be
modified any time prior to being sent. After they are sent, they will display in the Completed
Batches window. Since Completed Batches have already been sent, they cannot be modified.
A Completed Batch is a packet of information (e.g., price changes) that was sent to one or
more locations sometime within the last seven days. A Pending Batch is a packet of
information that has not completed transmission, or is waiting to be sent at a specific time
within the next seven days.
For details on adding, editing, and deleting a batch, refer to page 53.
Enterprise Maintenance Services User's Manual
50
mymicros.net Enterprise Information Portal
Add a Number Range
1. Click Number Ranges.
2. Click Add.
3. Enter the Name of the new POS number range.
4. Enter a Start value and an End value.
5. Select the Type of range you are adding from the drop-down list.
6. Click OK.
7. Repeat steps 2 through 6 for each new range. When you are finished, click Done.
Enterprise Maintenance Services User's Manual
51
mymicros.net Enterprise Information Portal
Edit a Number Range
1. Click Number Ranges.
2. Highlight the name of the POS number range to change and click Edit.
3. Change the name, range values, and type, as needed.
4. Click OK.
5. Repeat steps 2 through 4 for each range to edit. When you are finished, click Done.
Delete a Number Range
1. Click Number Ranges.
2. Highlight the name of the POS number range to remove and click Delete.
3. Click Yes.
4. Repeat steps 2 and 3 for each range to delete. When you are finished, click Done.
Enterprise Maintenance Services User's Manual
52
mymicros.net Enterprise Information Portal
Add a Batch
The procedures to add a batch are incorporated into the procedures for "Adding a Menu Item,"
starting on page 17 and "Adding a Discount," starting on page 39.
A batch is created when you reach the Publish Data screen during the add process. The
publishing schedule options determine when the changes will go into effect.
•
Publish Now—Select this option to publish the changes as soon as possible. This option is
used to immediately change a single item. Immediate changes are made as soon as the
selected locations receive the batch.
•
Create a new batch to publish—Select this option to add these changes to a new batch to be
sent at a later date and time. This option is used to send one or more multiple changes at one
time. So, when you finish adding or editing the first item in the batch, choose this selection
and set up a batch name, date, and time. All additional items can be added to this batch by
selecting the Add to an existing batch option.
•
•
Name—Enter the name of the new batch.
•
Effectivity Date—Select the effective date for the new batch from the drop-down
calendar.
•
Time—Select the effective time for the new batch from the drop-down list.
Add to an existing batch—Select this option to add more changes to batch that has already
been set up but not sent. Double-click on the batch to select it.
Enterprise Maintenance Services User's Manual
53
mymicros.net Enterprise Information Portal
Edit a Batch
1. Click Edit Batches.
2. Select a view—Batches or Items.
3. Highlight the batch to change and click Edit.
4. Make the necessary changes to the batch and then click Save. You can continue to make
changes to a batch as long as it has not begun transmitting items.
Enterprise Maintenance Services User's Manual
54
mymicros.net Enterprise Information Portal
Delete a Batch
1. Click Edit Batches.
2. Highlight the batch to remove and click Delete.
3. Click Yes to confirm the deletion, or No to cancel the request.
Enterprise Maintenance Services User's Manual
55
mymicros.net Enterprise Information Portal
Error Messages and Prompts
Message
Description
A communications error has occurred. Details: {0}
This message displays if the application cannot
communicate with the hosting center.
An item already exists with this POS number.
This message displays if you are using a
duplicate POS number for the item you are
adding. Select a different POS number for the
new item.
At least one selection must be made.
This message displays if you click Next without
making a selection.
Changes have been made to the master entry. Do
you wish to have the changes applied to every
discount in each location?
This message displays if you change the name
of an existing discount master. Select Yes to
continue, or No to cancel the change.
Changes have been made to the master entry. Do
you wish to have the changes applied to every
menu item in each location?
This message displays if you change the name,
major group, or family group of an existing
menu item master. Select Yes to continue, or
No to cancel the change.
Modifications are not permitted on records
scheduled for immediate transmission.
This message displays if you attempt to edit a
batch or an item in a batch that was created
using the Publish Now option.
No locations to copy to.
This message displays if you click Copy
Current Definition To Other Locations and
you have not selected a location to copy to from
the list of available locations.
Please change the name of this item.
This message displays if you are adding a menu
item, and you have not changed name of the
item to be copied.
Please change the POS Number of this item.
This message displays if you are adding a menu
item, and you have not changed the POS
Number of the item to be copied.
Please select a batch entry to delete.
This message displays if you click Delete and
you have not selected an entry in a batch to
remove.
Please select a batch to delete.
This message displays if you click Delete and
you have not selected a batch to remove.
Please select a location to proceed.
This message displays if you click Next without
selecting a location.
Please select a POS Number Range to delete.
This message displays if you are deleting a
POS Number Range, and you have not selected
a range to delete.
Enterprise Maintenance Services User's Manual
56
mymicros.net Enterprise Information Portal
Message
Description
Please select a POS Number Range to edit.
This message displays if you select Edit, and
you have not selected a range to edit.
Please select a POS Number Range Type to
proceed.
This message displays if you are adding a POS
Number Range, and you have not selected a
Type (i.e., Menu Item or Discount).
Please select a valid time.
This message displays if you are setting up a
scheduled batch, and you have not specified a
time for it to go into effect.
Please select an existing batch.
This message displays if you are editing a
batch, and you have not selected a batch to
open.
Please select an item to proceed.
This message displays if you click Next without
selecting an item from the Search results.
POS Number Ranges must not overlap.
This message displays if you are creating a
POS Number Range and the number range you
have specified overlaps with an existing range.
POS Number Range names must be unique.
This message displays if you are creating a
POS Number Range and the name you have
specified already exists.
Select Location To Copy Definition To.
This message displays if you are using the
Copy Current Definition To Other Locations
option, and you have not selected a location to
copy to.
The Rollback Date must be after the Effectivity
Date.
This message displays if you have selected the
Rollback Date option, and the effective date
you have entered is prior to the current effective
date.
The starting POS Number must be less than the
ending POS Number.
This message displays if you are adding a POS
Number Range, the last number you have
specified in the range is less than the first
number in the range.
This application is unable to find any locations
available for editing. Verify reporting hierarchies
have been established within the portal. The
application is closing.
This message displays if there are no
hierarchies established in the Enterprise
Information portal.
This item has pending changes in the following
batch(es):
This message displays if an item has been
edited, and is in a batch whose status is not
completed.
This menu item doesn't exist in any revenue center
in any location.
This message displays if you have selected a
master item that no longer exists in any
Revenue Center/location.
Unable to delete batch. At lease on entry has
already been transmitted.
This message displays if you attempt to delete a
batch that has items that have already been
transmitted.
Enterprise Maintenance Services User's Manual
57
mymicros.net Enterprise Information Portal
Message
Description
Unable to delete entry. This entry has already been
transmitted
This message displays if you attempt to delete
an item in a batch, and the item has already
been transmitted.
Unable to edit batch. At least one entry has already
been transmitted.
This message displays if you attempt to edit a
batch that has items that have already been
transmitted.
Enterprise Maintenance Services User's Manual
58