1
ope0&ti
R6ol$tiail
tr
f,:rdtl&.6ld&dlllrltrAii&,r
D WXGA (1280x768 pixels)
Catalogue
1.
u User-friendly, multi-language on-scren display
Prcjector Brief
!
!
Safeguards
Waming
ProiectorOveryiew
,l
4.
5.
lmportant safeguards
Please read all
instructions regarding your Led projstor and retain them for future reference. Follow all warnings and instructions markod
All the safety and operating instructions should be read bsfore the appliance is operated.
2. Retain instructions
The safety and operating instructions should be retained for future reference.
mnnecting the projector
3.
Power on/Offthe projeclor
Wamings
All wamings on the appliane and in the operating instructions should be adhered to
4. lnstructiore
User's maintenance
All operating instructions must be followed.
Cleaning the lens
5. Cleaning
Cleaning the Projector Housing
Unplug this prc.iector from the wall outlet before cleaning it. Do not use liquid aerosol cleaners. U6B a damp sofr cloth for deaning.
Cleaning the Fliter Cover
6. Attachmonts an4equipment
Replacing the Lamp
Never add any attachmenb and/or equipment without the approval of the manufac{urer as
Simple repair and solution
such additions may result in the risk offire, electric shock or other personal injury.
Parameter and function
1.
2.
thse
1. Read instructions
Menu opeEtion
1.
2.
3.
4.
5.
6,
keystone correction
With USB,SD Slot,support H.265 fomat vidm for USEilSD input
on the Led projector.
OpeEtionintroduction
1.
2.
Compatibility with PAL
u lnput sour@ USB/SD/3-HDMI/AV /GNS-VIDEo/Compon€flUTv(analdge)
Productor Features
1. Top view
2. Bottomviil
3. Front view
4. Backview
5. Rearview
3,
l mmprssion @mpatibility for VGA, SVGA, XGA and SXGA
!
Productor Features
1.
2.
3.
4.
2,
l
7. Water and
Technimlspecifiction
moisture
Do not use this proiector near water or in contact with water.
Main functions
8. Accessories
Alofes on the AC Power Cord
Do not place this projector on an unstable cart,stand, tripod, brackot or tiable. Use only with a cart, shnd, tripod brackst, or table
'l
AC Power Cord must meet the requirement ofcountries where you use this prcjectolPlease mnfim yourAC plug type with the graphics
This prcjector should be operated only from the type of
and ensure that the properAC Power Cord is used.
power,please consult your appliance dealer or
R------;;',I
tret
i1#:flif
rel
R
h;;l
m
WI
I \--l
11
lo€l
pwer
source indicated on the marking label. lf you are not sure of the type of
power @mpany.
. Power-mrd protection
Power-supply mrds should be routed so that they are not likely to be walked on or pinched by iterns placod upon or against
Projector Features
The prcjector ofiers the following features:
!
Single chip LCD technology
u High perfomance LED lamp (with 50,000 hrs life)
thm.
Pay
particular attention to cords at plugs, convenience r@ptacles, and points where they exit from ths appllance. Do mt put the power cord
under a carpet.
12. Overloading
Oo not ovedoad wall outlels and extension cords as ihis can result in a fre or electric shock.
13. Objects and liquids
I
Never push objecb of any kind through openings of this projector as they may touch dangorous voltags polnts or short{ut parts that could
result in a flre or sleclric shock. Never spill liquid of any kind on the prciecton
14. Servicing
lntroduction
.
0. Power sourcs
Do not attompt to seMce this prcjector yourself.Refer all servicing to qualilied sorvlce personnsl.
16. Dameoa roqulring seruie
Unplug thl! prolector from the wall outlet and refer seruicing to qualified seruico personnal under the following @nditions:
(a) lf the pow.f-supply cord or plug is damaged.
(b) lf llquld has been splll€d, or objocG have fallen into the prcjector.
Operutioil Of Eiah Resol,.rk n Prui@tot
(c) lf the proiector does not operate normally after you follow ths operating instructions.
Do not look into the ai, outlet grille when projec'tor i8 operaiing.
Adjust only those controls that are covered by the operating instructions. An improper adjustment of othsr controls may result in damagg
Heat. dust etc. may blow out of it and hurt your eyes.
and may often require extensive work by a qualifed technician to restore the projector to its normal optration.
(d) lf the proiector has b€en exposed to rain or water.
Place of installation
(e) lf the projector has been dropp€d or the cabinst has b€€n damaged.
For safety's sake, refrain from setting the prcjtrtor at any place subjected to high temperature and high
(D
lfthe projector exhibib
a
distinct change in performancs - this indicates a ne€d for s6rvice.
humidity. Please maintain an operating tmperature, humidity, and altitude as specified below.
16. Replacement parts
When replacement parts are required, be sure that the seruie ttrhnician has used replac€rnent parts specified by the manufaclurer or
parts having the same charaderistiG as the original part. Unauthorized substitutions may result in fire, electric shock or other
1
h%rds.
7. Safety check
Upon completion of any serylce or repair to this prcjector, ask the serui@ tshnician to perfom safety checks detemining that the projsc'tor
is in a safe operating mndition. An appliane and mrt combination should be moved with Ere. Quick stops, excessive
fore
and uneven
surfaces may cause the appliane and mrt mmbination to overturn.
. Operating temperature: between +41 T (+5C) and +95T (+351])
. Operating humidity: between 30% and 90%
. Never put any heat-producing device under the projector so that the projector does not overheat.
. Do not attach the projector to a place that is unstable or subject to vibEtion.
. Do not install the poector near any equipment that produces a strong magnetic field. Also refrain from installing near the prcjector any cabls
carrying a large curent
. Place the prcjector on a solid, vibration
18. Ventilation
fre
surface: otheruise it may fall, eusing serious injury to a child or adult, and serious damage to the
producl.
Slots and openings in the cabinet are provided for ventilation, ensuring roliabls opsration ofthe projector and to protect it from
Do not block these openings or allow them to be blocked by placing the projector on a bed, sofa, rug, or bookcase. Ensure that there is
adequate ventilation and that the manufacturer's instructions have
ben
adhered to.
. Do not stand the prqjector: it.may fall, causing serious injury and damage to the projstor.
. Slanting the projector more than '1o'(right and lefr) o|15' (front and rer) may cause trouble or explosion of the lamp.
. Do not place the prcjeclor near air-conditioning unit or heater to avoid hot air to the exhaust and ventilation hole of the prcjector
WARNING..
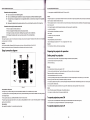
Projector Overview
Unplug immediately if there is something wrong with your prcjector.
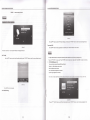
Top view
Do not operate if smoke, strange noise or odor mmes out of your projector. lt might cause fire or electric
shock. ln this case, unplug immediately and coniacl your dealer.
Never remove the cabinet.
This projector contains high voltage circuiiry An inadvertent contact may result in an electric shock.Except as specifically explained in the
Ome/s
Guide, do not attempl to service this product yourself. Please contiact your dealer when you want to fix, adjust or inspecl the
Do not modify this equipment
It can lead to fire or electric shock.
lfyou break or drop the cablnet.
Do not
kep
using this equipment if you
br€k
or drop it. Unplug the prcjector and @ntacl your dealerftr inspstion. lt may
l€d
to fre if you
keep using the equipment.
Do not face tho projector lens to the sun.
It
(picture 1)
1.
mn lead to fire.
Use corec't voltage.
MenuButton 2.PowerButton
indi€tor 10. Remote
Bottom view
g.Red
lfyou use incorrect voltage, it can lead to fire.
sensor
3.Source
1
Button
4.V+
Button
5.V-
l.Green indicator
Do not place the prcjectol on uneven surface.
Place the projection on a leveled and stable surface only. Plsase do not place squlpmsnt on unebbls surfaces.
Do not look into the lens when it is operating. lt may hurt your eyss.Nevor let chlldron look lnto the lens whsn lt ls on.
Do not turn off the main power abrupuy or unplug ths proJsctor durlng oporrtlon.
It can lead to lamp breakage,
fire, electric shock or other troubla. lt is best to walt for th6 fan to tum
of
boforo tuming main power off.
Do not touch Air outlet grille and Bottom plate whlch becomes hot.
Do not touch them
s
put other equipmst in front ofAir outlet grille. The heated Alr outlot grtllo and Bottom plate may cause iniury or damage to
other equipment.Also, do not set the prcjector on the desk which is easlly afioc'ted by heat.
Clean the
airf
lter once a month.
Cl6an the air-filter frequently. lf the filter or ventilalion slots become clogged with dirt or dust, the tmperature inside of the proimtor may rise
and cause some boubles, such as damage of inside parts, and shortgning ths lifo of panel.
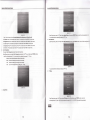
(picture 2)
Button o.CH+ Button
7.CH-
Button
8.Lens
Operuriot Of High Rqohaion PmJetor
Resolildofr
How to hang lhe projector to ceiling?
fix the 3 feet of mount to the prcjector
The height of A and
C
3
& g X L
feet (B D E) hole,
Menubutton for left, right, up and down.
SOURCE:Press this button to select specific source such as
fee can be adjusted;
Back View
TV
SV or other channel.
RETURN:Press this button to exit OSD menu.
0-9:
Press digital button to select chamel.
-/-:
Channel selection button.
REcALL:Return to previous TV chamel.
Al,JDlo:Press this button to switch on somd mode.
INFO: Press this button to show the
CHLIST chamel list
(Picture 3)
1.PR(Red)
2.PB(Blue)
3.Y(Gre6n)
FAV:
4.Left audio input (Red)
5.Right audio input(Whlte)
6,AV-lN(Yellow)
SI.JBTITLE: Not used-
9. Keystone conec-tion knob
AUD.TRAGK: Notused.
7.HDM13
input
8-
l0.HDMh lnput
Remote Sensor
ll.HDM12lnpui
t3.TV
l4.S-video input
t6.vGA
17.USB
19.
12.
Card reader lnput
'15.
't
8.
Left audio output (Red)
I,
I:Press
Power button
Press this button to switch on the
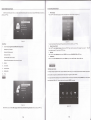
Rear View
TV
L *u*br,,o,
Press this button to mute volume or recovtr.
VOL+/VOL-! SOIJND button
Press this button to adjust volume.
CH+/CH-:
CII button
TV mode, press this button to select the following
(Picture 4)
1-
Exhaustvent
2.Speker
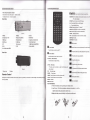
Remote Control
Warning Do not expose the remote control to shocks, liquid or high humidity. Do not expose it to direct sunlight or other intense light
when you operate.)
Press this button to select the favorite charurel
I'usB tir"
Right audio output (White)
Power Switch
above chamel.
FLIP:
Reversedimage.
FREEZE:
Picturefreeze.
P.MODE: Press this button to switch on picture mode.
l6:9/4:3:
Press this button to zoom the
pictue.
ENTER:, okbutton.
MENU:menu butlon.
and
informtion.
button.
""t""t'
this button to zoom the picture(suit for Nb,sd card);
I,
press ttris outton to play video again(suit for usb,sd card);
I,
Press this button to paty setected AB.
I,
press ttris uutton to stop.
L
press ttris uutton to paly or pauser
f,
rr"t
L
r"o ro*urd
I'
ereviouslyellowButton)
L
r"o
uu"L*ard (for UsB/Grd readerxred button).
(for usB/card readerxgreen button).
(btueButton)
lnsert The Batteries
1.
Remove the battery cover by pressing it and sliding it down.
2.
lnsert the two 1.5V (n44
5;r"; batteries making sure the polarity (+ or -) of the
batteries matches the polarity marks inside the unlt.
3. Replace the battery cover by sliding it in until you hear a click sound.
R6olhtion
ODeration Of Hish
R*ol,ttioh Proieclor
. For rear prcjetion, set IMAGE REVERSE in the SET UP menu to FLIP.
Precautions when using batteries
a
a
a
Do not use old and new batteries together.
Do not use different types of batteries (for example, Manganese and Alkaline batteries) together.
a
Remove the batteries from the remote control unit if you do not intend to use the unit for a long time.
Note that there are chargeable and non-chargeable bafteries. Do not attempt to charge non-chargeable
Caution:
. Placing the prcjector on a carpel redu@s ventilation from the fan at lhe bottom and might cause probloms. Place a hard board or slmller ltam
under the prcjector to facilitate ventilation of the unit.
batteries.
. Place the poector more than 1 m (25 inch) ftom the wall to prevent blocking the intake, exhaust slots andventilation of thls projector because
hot air comes out of it.
Precautions when using the remote control unit
a
O
O
O
. Do not use the projector under the following ciremstanes, which may cause fire or electric shock.
. in a dusty or humid place
Do not drop the remote control unit.
Do not subject the remote control unit to physical shocks.
Keep the remote control unit dry. Wetting it may cause the unit to malfunction.
Replace the bafteries with new ones when operation of the unit deteriorates.
Operation area
The range for operation is about 10 m (33 feet) when the remote control points to the prcjector. The distance to the screen back to the
must be less than 6 m (19.6 feet).
. while the projector is lying sideways or upside down
. near a heater
. in a kitchen or oily, smoky or damp place
. in direct sunlight
. with high tmperature, such as the closed
mr
' where the temperature is lower than +41T (+5'C) or higher than +95T (+35C)
lmportant:
lmportant:
Avoid the direct sunlight or fluorescent light to the remote control sensor. Also keep the distance of more than 2 m
between the remote @ntrol sensor and fuorescent lamp on the remote control may not work correctly.
Singal connection diagram
'
Do not put stress on the lens, as this may cause damage.
Preparing the projector for operation
Getting ready for projection
1. Connect
the power cord provided to the projecto(lnput Voltage:100-240VAC;Frequency:50/60H2).
2. Connect the power cord to the wall power outlet.
3. Remove the lens
ep.
Warning:
. Do not look directly into the lens when projector is "ON'.
. The lens €p is for protecting the lens. lf you leave the power on with the cap on, the cap may be warped.
Please remove the lens cap when you turn the power on.
. Use the appropriate power @rd for your country.
t
. A three-pin grounding type power plug is used with the prcjector. Do not remove the grounding pin on the power plug. lf you are unable to
H
insert the plug into the outlet, contact your electrician to replace your Il/C outlet.
. Do not place any objects on the power cord, and keep the pojector away from heat sources to avoid broaking the power cord. A broken power
cord can cause lire or electric shock.
. Do not revise or alter the power cord otheMise it may cause lire or electric shock. Contact your dealsr if the cord is broken.
(Picturo 5)
Front projection, ceiling mount
Caution:
. Plug in firmly and unplug by holding the plug, not by pulling the cable out.
For ceiling mount, you need the ceiling mount kit.Ask a specialist for installation. For more details,consult your dealer.
. Do not plug in or out with wet hands. lt may cause an electric shmk.
. This warranty does not cover damage caused by the use of any unrecommended ceiling mount kit and the installation of the ceiling mount klt
at an improper lomtion.
. When using the ceiling mount, set IMAGE REVERSE in the SET UP menu to FLIP.
. Projected images may appear darker when the unit is used as a ceiling installation than when it is used in the tabletop position. This does
signify a product malfunction.
Rear projection
Ask a specialist for installation. For more details,consult your dealer.
To operate projector power ON
1 .plug in
the power cord,the POWER Gren indicator lights up,then Green indicator off and Red indicator lights up.
2. Turn the poector on by pressing the POWER button. The power lamp will bs
To operate projector power off
grsn.
ODetdlon W frtsh k:salsdrn Ptoiecrd
.
.
.
the new settings.
Press the POWER button. The message "POWER ? "
To exit from this mode, press "RETURN"button on the remote control.
Using the top of projector key button:
Press the POWER button again.The prcjector will be turned off.
1. Press the "
.
MENU'
button to open the OSD menu.
2. When OSD is displayed, use "V+"
KotEtone corection
When the projector is turned on, the projected images btrome brighter gradually. Owning to the different angle of the positions of the pooctor
,
/
"V-' 'CH+'/'CHj key to select
3. After selecting the desired main menu
/'Vr
itm, press
any feature in ihe main menu.
"SOURCE" key to enter sub-menu for feature setting.
"CH+'7"CH-'to select the desired item and adjust the settings with
ry+'/
"V-" or "SOURCE'.
image keystone distortion may occur. ln case of keystone distortion, the image can be projected regularly by adjusting the keystone corection
4. Use "V+"
knob. (i15 degres adjusting angel) (Note: When turning ths keystone rcrection knob, pleass tum it gently, and never use too much efforl, or
5. Press
else unwanted damage should o@ur.)
6. To exit OSD, Press the " MENU" button again. The OSD menu will close and the prcjstor will automatically save the
.
the " MENU"
button, the scre€n will return to the main menu.
ns
settings.
Focusing
The focus length will change with the change ofthe distance between the projsctor and the screen, so that the image will blur. Now you
cn
.
screen mode
When playing DVD discs containing data of letterboxed imags, press the 16:9 button. Exit the Widescreen mode, by pressing the 16:9 button
again.
Caution:
. When you have finished using this equipment, unplug the powar cable from the wall outlet, for safety purposes.
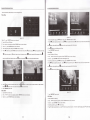
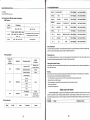
Adiusting Projection lmage Size
lm
dastance
Aspect ratio
lmage
size(inch)
1.5m
2m
2.5m
3.0m
1.
2.
3.
4.
5.
6.
7.
lnput source(seleci lnput source)
Channel
Picture
Sound
Option
Usb
Sd
Pressing "SOURCE' key on the remote to Enter input source, you can seled
Refer to thg graphic and table below to detemine the screen size and projection distance.
Projection
Menu and Operations
Press " MENU" key on the remote to enter OSD menu,The OSD menu has 7 sub-manus
the lens gently with your hand, to corect the focal length so as to obtain distinct images.
3.5m
4m
5.5m
CardRead by pressing
'l'7"v"
4ry,
AV, S-VIDEO, YPBPR ,HDMI, PC-RGB, USB and SD
key, enter the input source by pressing "ENTER" key
.
The sslected item will change to highlight colour.
l6:9
16:9
16:9
16:9
16:9
'16:9
16:9
16:9
25'
47'
63'
82'
100-
118"
135'
200'
(Press,hg 'SOURCE' key on top of the prcjector bufton to Enter kput soure renu, you can select ATV, AV, $V\DEO, YPBPR,HDMI,
PC-RGB, USB ancl SD CardRead by pre*ing "CH+'FCHJ bufton, enter the input source by pressing
y+"
OR
'y-' buftm
.
The selected rtem wil change to hbhlitlht colour.)
IVoter
c
Position the projector in a horizontal psition; other positions can cause heat build-up and damage to the prciector.
tr Keep a space of 30 cm or more betwen the sides of the projector.
lnput:saul,Ce
tr Do not use the prqidctor in a smoky environment. Smoke residue may buildup on critical parts and damage the prciector or its
!
Consult with your dealer for
spsial
installation such as susponding from a ceiling.
System function operation
How to operate
Using the remoter
MENU" button
1. Press the "
on the remote to open the OSD msnu.
2. When OSD is displayed, use
<'/')"A'f
3. After selsting the desired main menu
itm,
V'key to select any feature
prss
in
the main msnu.
"ENTER" kay to enter sutsmenu for feature sstting.
4.Use " "/'V""<"/">"toselectthedesireditemandadjustthessttingswith'{'/"}'and"ENTER'.
5. Prss
the " MENU"
button, the scieen will return to the main menu.
6. To exit OSD, Press the " MENU" button again(or
prss 'RETURN"button).
(picture 6)
The OSD menu will close and the projector will automatically
Method of opemtion:Press Source button on the remote to show sourco ll3t,Prese"a v " bufton to chooa€ the mode,then Press
ODerulion Of Hish
Operutioh Of High Rqolulion Pruieclot
"ENTEN" button to enterthe
R$olation Proiectot
mode
{&r&6tiaris (dr,ptrfi ,re $trb:,}renr
(Picture 8)
Press
"A\V
" button to selectATV Manual Tming, and then press "ENTER" button to enter manul searching(Picture 8).
Programme Edit
(Picture 7)
Press " A
\V " button to
select
programe edit,
and then press "ENTER" button to enter menu.
There are 3 sub-menu' Auto Tuning\ATV lvlanual Tuning\Programme Edit.
r
rll*;
P&t!{€
Auto Tuning
Press "
A\V
Can adjust Picture lvlode,Color Temperature,Aspect
" button to select Auto Serching, and then press "ENTER" button to starl lor auto searching (Picture 8)
Press
'1.
"4"/'V" "<'/'>"
Ratio,Noise Reduction and PC Setup.As below(picture 9):
to move cursor. Press "ENTER" to enter the sub-menu or adjust item. Prsss"MENU" to return or exit menu.
PICTURE MoDE(picture 10):
There are 4 picture modes: Standard/Mild/User/Dynamic.
Standard: middle brightness and contrast;
Mild: low brightness and contrast;
User: user define the brightness and @ntrast.
Dynamic: high brightness and contrast;
value, the picture mode will auto change to User mode.
Note: when user adjust brightness/contrasvhue/saturation/sharpness
(Picture 8)
Press "MENU" button to stop searing
ATV Manual Tuning
(picturs 9)
Press
11
"
"/"V" "<"/'>" button to select Pictue Mode,and thcn
prcss
12
button to enter the sub-menu(pictue 10).
M&errn o{ti:ipb. TeinwtAti frdectot
Oo e
nimu llilh &4b Wet.koie.tot
(Picture 12)
(picture 10)
Press
"<'/">"
button to select Contrast,Brightness,Color,Sharpnoss
Enter Pic'ture menu,
and Iint(sult fol AV)
A. Contmst: Press'<" to dsrease value, Press ">" to increase value. Press'MENU" to return menu.
B. Brightness:Press
"{'to
"<"
to decrease value, Press
">"
to increase value. Press "MENU" to retum menu.
You can adjust the
prss "4"/'V"
itm
key to select Aspect Ratio,and then press "ENTER" button to enter the sub-menu(pictue 12).
selectbd by pressing
"
'7"V" key.
Noise Rdduction
Enter Picture menu, press
"/l"/'V"
key to select Noise Redustion,and then press "ENTER" button to enter the sub-menu(picture 13).
">" to increase value. Press'MENU" to return menu.
D. Sharpness: Press "<'to decrease value, Press'>" to increase value. Pr6s "MENU" to return menu.
E. TintPress "<" to decrease value, Press ">" to increase value. Press "MENU" to return menu.
C. Color:Press
decrease value, Press
Color Temperature
There are 4 Color Temperature modes: Medium/Wam/User/Cool.
Enter Picture
msu,
you can select Color Temperatute by pressing
"l."/'v"
key ,and then press "ENTER' button to
enter the sub-menu(picture 11).You can adjust the itern selected by pressing
'<" / ">"
key.
Medium: inlcuded red setting,green setting and blue setting;
Warm:
inlcuded red setting,green setting and blue setting;
Cool:
inladed red setting,green setting and blue sotting;
you can set red,grsen,blue by prssing '<'/'>' koy.
User:
(picture 13)
You can select the item selected by pressing
"
'7"V" key.
PC Setup
(picture 1 1)
3.
Aspect Ratio
(Plctur. Itt)
" 'fV" k6y to soloct PC Satup (Eult for VGA),and
sub-menu(pictue l4). Pross " 'l'V" key to soloct,and thon p
Enter Piclure menu, press
13
then press "ENTER'button to enter the
NTER'key to adjust the item selected
Oi q a, io n Of Eig h Rq o luti o n. Pruj e c tot
Enter the sound menu (picture 15), you can adjust Sound Mode, Balance,Auto Volume,Surround
pressing'4"/"V"
U
ODqslioit
Sound,SPDlF MODE and EQ item by
'1.
OSD Language;
Press
key.
High Ri$olutiab Prujector
"a'7'v"
to select OSD language,and then press "ENTER" key to enter the sub-mgnu(plcture
(Picture 15)
(picture 17)
Sound Menu
,,
You can choose English,Franais,Espaol,Portugues,Arabic
2.
Sound mode:can support Sbndar&Music/Movielsports/Usq,
and Chinese by pressing
-
'17).
'7"V" key.
Restore Factory Default;
Press"l,"/'V"toselectReatoreFactory,,andthenpress"ENTER"keytoenterthesub-menu.Themessage"Areyousure?"
Standar:suit for TV progrem;
key to restore or press
Music:suit for listening music;
3.
Movie:suit for media:
Press
4.
User:user define te bass and treble.
">"
Press"<'
key to return OPTION menu.
Blending;
"4"/'V"
to
seltrt Blending,and then press
"ENTER" key to choose LOW,MIDDLE,HIGH or OFF mode.
OsdDuration;
Press
"
'l"V" to select OsdDuration,and then press "ENTER'
key to choose 5 Sec,
l0 Sec, l5
Sec or OFF mode.
Sports:su,t for sporfs prcgram music, movie,personal,spotts;
2,
Balance;
3,
4,
Auto Volume;
5,
6,
SPDIF N/ODE;
W
Surround Sound;
USB/Card reader function
This Projector integrates powerful function to support USB/SD Card reader and you can connect Ex-equipmentsvia the USB/SD Card reader. At
EQ;
present, system can support usual USB/card reader media players and upgrade to system software.
ffi
It can support only the files displaying in
the list and the file fomate this product plays. Enter USB by Pressing "SOURCE' key on the remote to
select input source "USB" or "SD " (for card reader),and then pressing "ENTER" key to enten
(Picture 16)
Enterthis menu, you
cn
select OSD Language, Restore Factory Default,Blending,OsdDuration
15
(picture I 8)
item by pressing
",l'7'V" key ,
16
Operaion Of Hish R$olution Pruieclot
ODeration Of High
R*olution Projector
You can choose Photo, Music, l\ilovie, Text in the menu(picture 1 8)
Photo Show
(pictue
Select
l.
2 .
3.
4.
5.
C:\,
press
(Pictue 21)
19)
4. Select the specific song, press "ilX" button to play; press "ENTER" button to confirm.
"ENTER" button to enter submenu
Press
Select
"
{ "/" } " to select photo, and then "ENTER" button
C:\, press "ENTER" button to enter submenu
to enter submenu.
'm"
button to play, and
"X"button to play
next one;
"ENTER' button to confirm
"ENTER" button to show function menu.
gl
o. Press
"1"
Press
bufton to stop or return to the previous menu;
button to play lilP3 music stored at music menu;
Ebutton
to show playlist;
button to play the previous
pressElbutton to show playlist;
Select the specific photo, and press
Press
'im"
5. Press
Insert USB Porl to USB entry.
'fi"
button to pause,
'5"
Ebutton
!X"
button to play the previous one
button to repeat all of the programs.
pr."""E"
to show photo detail information;
7.
Press
n.".. E
one,
press
'ffi"button to
play next one; press
"1"
button to stop or return to the previous menu.
button to show music program detail inlbrmation;
button to set the play period oftime
"RETURN" buflon to exil.
Movie Show
l. Insert USB Port to USB entry.
2.Press "{"/"}"toselectmoyieprogram,andthen"ENTER"buttontoentersubmcnu.
C:\,
3. Select
press
"ENTER" button to enter submenu(pictue 22).
"lX" button to play; press "ENTER" button to conflrm.
5.Pressl:"buttontoplaythepreviousone, press'ilx"buttontoplaynextone; press"I"buttontostoporreturntothepreviousmenu.
4. Select the specific movie, press
pressEtutton to show playlist; press
E
o. Press
I
butto, to show mvie program detail informtion;
buttonto setthe playperiod oftime.
.i-ro
,&
(picture 20)
6.
press ")"button to show the second function
Press
7.
!4,
Etr
,.nu; pr."S,o, E
button to zoom out or zoom in the photo;
E
button to rotate the photo counter-clockwise or rotate clockwise.
ortton to move view.
Press "RETURN" button to exit
Music Show
L InsenUSB Pofl IoUSB entry.
2. Press "<"/'>"toselectmusicprograrlandthen"ENTER"buttontoentersubmenu.
3. Select C:\, press "ENTER" buttonto enter submenu.
(picturc 22)
7.
Press
"RETURN" button to exit.
TEXT Show
L Inserl USB Port to USB entry.
2.
Press "{'7"}"
3. Select
C:\,
to select text program, and then
press
4. Select the specific text, press
5. Press
17
">"
'IINTER'
button to cntor subrncnu.
"ENTER" brtton to onter submcnu.
":"
button to play the next
button to play.
one,
press "<"button to play previous one;press
18
"1""
button to play the pageup ,press "V" button to play
opsefii@i*W&&&&lir
Qiqdtoa Of&tkh Rsqlgd,sn PnJectot
the pagedown
6.Press
MPEGl
.DAN.MPG\.MPEG
1920x1080@30p
Max Data Rat€:2oMbps
MPEG2
.MPG
1920x1080@30p
Max Oata Rate:2oMbpg
MPEG4
.AVI\.MP4
DIVX,XVID
1920x1080@30p
Max Data Ratei2oMbpg
.RM\.RMVB
RV8,RVg,RV1O
1280x720@30p
Max Data Rate:1oMbps
H264
.MK\A.MOV
H.2il
1920x1080@30p
Max Data Rate:2oMbps
MJPEG
.AVI
6a0x480@30p
Max Data Rate:1oMbps
DivX
-DIV)(\.AVI
MPEG.DIVX.H264
1920x1080@30p
Max Data Rate:2oMbps
vc1
WM\A.ASF
VC1
1920x1080@30p
Max Data Rate:2oMbps
FLV
.FLV
Hzil
1920x1080@30p
Max Data Rate:2oMbps
"RETURN" button to exit.
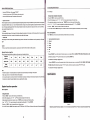
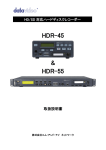
The file format of USB/card reader can Support:
USB Function
RM\RMV
B
file Extenslon
Media
PICTURE
JPEG. BMP.
jpgi\ .bmp\.pns
PNG
MPEG1. MPEG2. MPEG4. H264.
RM. RMVB. MOV. MJPEG. VC1.
MOVIE
DIVX. FLV
.avi\.m pg\.dat\.vob\.div\.mov\.mkv\.rm\.rmv
b\.m p4\.mjpeg\.ts\.hp\.wmv\.asfl .f lv
WMA. MP3. M4A (AAC)
MUSIC
.wma\.mp3\.m4a
Useds maintenance
neds proper
The prcj€tor
maintenance. You should keep th€ lens clean as dust, dirt or spots will pKioct on the screen and diminish image
quality. lf any other parts need replacing, contac-t your dealer or qualifi€d
Photo parameter
Resolution
Compr6ssion option
Progressive JPEG
JPEG
1
5360X8640
Support
boundaries
Resolution Only
support 1024*768
Baseline("standard")
support
Baseline optimized
suppon
homochromatism
9600x6400
256 color
rsmmmended, nonabrasive lenscleaning materials. Do not touch the lens with yourfingsrs.
Cleaning the Proiector Housing
Gently wipe with a soft cloth. lf dirt and stains are not
Warning
Never open any of th6 covers on the projector. Dangerous electrical voltages inside the prcjtrtor
I
support
Turn off the proiector and
rmwe
the AC power cord from the power ouuet before beginning maintenance
ll
lnterlaced
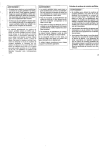
Simple repair and solution
support
Resolution Only
support 1200x800
the Naw small LED prol*tqisa
high-tBch producl intogEting optlcal, mshanlcal, and olectronlc compononts, with CPU and sevtral
protection circuib installed. ln case of vlolating the operation procoduro or lmproper s6ttlng, th6 protoctlon clrcult of it will start to work. Then
some abnormal symptoms will occur to it. Howgvsr, as long as you make th6 corroct 8ettlng or follow the operatlon procodure, the failuros may
be resolved.
File Ext.
Godec
Resolution
rcrk.
u Use a soft doth or lens paper only.
Movie parameter
Media
severe injury Do not aftempt to
Do not use detergents or chemicals other than thGe noted above. Do not uss benzene or thinneE.
32 bit
9600x6400
€n euse
I Do not use chffiical sprays.
24 bit
PNG
use a soft cloth damped with water, or \,t/ater and neutral detergent, and
I Make sure the lens is cool before cl€ning.
16 bir
No interlacing
€sily Emoved,
wipe dry with a sot, dry cloth.
seryice this produc't yourself. Refer all servicing to qualified seruice personnel.
16 color
BMP
p€fsonnel.
Gleaning the Lens
Use a standard lens-doaning brush or a pise of lens tissue dampensd with lens clmning fluid. The lens surface is fEgile. Use only
File type \ the
relevant
paramet6l€
swi€
Remark
20
i&*i& &*.
aeeriii&inirr
The power is off
. The air inlet g,ille, outlet grille
Operaiian
q
U Ifrsh
RaMla,ioa PruJectu
. Remove the obj@t.
airfilter is clogg€d with dust or some objets.
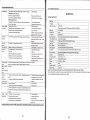
Specifications
POWER lndlcator does not light up.
. Pwer cqd is unplugged frm lho outlst.
.
Prer cqd
is
disonstsd frm
the
.Plug ihe
prcjstq.
pwer cord into the outlet.
. lnsst the power cord into the prcjgctor.
lndl€tor bllnb Bd.
proj*tq hs been tumsd on again t@ s@n sfter
Technical specifi cations
FOWER
. The
. Wait
having beEn turned off.
. Lamp la no longer working.
'
No picture appeac
Lons ls covered by lens cap,
on the scr@n.
Tho equipment
. The air inlet grille, outlet grille
d
cffetly.
airfilter is clogged with dust or some obists
tumed crf.
. The
The image is
prcjeto
is not at a right angle to the
scrsn.
distorted
The image is
dak
. Brightnss, tint and color are not adjusted correlly.
The image is
The prcj@ting distance is beyond
blured.
Lens is dirty.
nry one.
thef6used area
Bdghtn6a and
are not adjusted
Physical resolution: native 1280*768,support
3000 ansi(MAX)
.
Contrast Etio
2OO0:1
Sdst
the corect
sorc6 ffiqding to the
Lamp power
l20W led bulb
. Rgmove th€ object and turn off the main
Focus adjustments
Manual Focusing,Support Vertical Zoomllmage Zoomllmage Shrink
HorizonialNertical rotation
power switch. After about 10 minuts, Turn the
Picture Rotiation function
proj€ctoron.
Compatibility
HDMI: Support
. Adjust tho angle of the p.ojectorto make a
Aspect Etio
4:3/16:9 (support All input 16:9)
right angle to tho screen.
Built-in Sp€ker
2W .2 Audio output (8 o )
. Adjust brightnGs,
OSD Languages
English/Franais/Espaol/PortuguCs/Arabic/chinese
lnput Socket
AVTV,S-video,Audic'out,Audio-in,VGA,YPbPr,
Advanced Feature
3D de.interlace,ZooM,l6:g,video support H.264 for usb/sd input
Lamp life
20000-50000 hours
Dimensions(LxWxH)
L:330 x W:245 x H: 115
iint and color corrsily.
. Adiust the angle of the prcjector
to make a
right angle to the screen
Th€ image remains
. When you see the stationary image for a long time, it may remain
q
bluned.
image. lt is not a breakdMn. The blured image will disappear in a
fil
Red, blue orgreen
It is
the screen if you change the
minuts.
nqmal.
dds are
viiled
1
080P1 1O80i1720P I 576P I 480P1576i1480i
Weight
N.W:3.65 KG; GW:4.5KG
Voltage
AC90-240V s0/60H2:
Noise
30dB
Prcjtrtion distance
1.0-6.0m
Prcjection size
25-250 inch
HDMl.3, USB,SD card reader
Supplied Accessories:Remote control, power cord, user manual,warranty card, AV signal line,lens clear cloth,fuse.
on the text of
Thank you for reading the User Manual. lfyou have any question, please feel fr@ to contact us or lhe dealers. We will provide excellent
image.
The image is
. The cable for conn@tlq with other €quipment is not plugged
disttrted
tqminal,
on the screen
. The prcjstor is installed t@
. The cabls
ssurety into the
No sound is heard.
fq constion
to you. We sincerely hope that you will enjoy your life with our products.
with olher equipmenl
ls not plugged s@urely inio the teminal.
dco
. Tho prcj@ttr i8 installed t@
to other equlpm6nt,
and noise is heard
dce
to other
€qulpment.
. Volume is not turned up.
. Turn up the volume.
. Connection to other equipment is not made corstly.
. This mark is displayed when an invalid opqation ls exeut€d
. Chek csnstions.
(fq examplo, when
lhe COMPUTER or VIDEO button is press€d whlle the m€nu ls dlsplayod). Thts
18
not failure.
Romgts
does not
1280X1024 and 1366x768
equipment conn@t€d to this prcjEtor.
. Adiust brightnss, contrast.
is not at a righl angle to the scr@n
5.8 inch LCD
Brightness
. Reduce screen size to within 35" to 150".
cflectly.
PAL
Display Ttrhnology
csnected equipment.
. Adjust the prcjecting distance.
scrsn size sp@ifications.
cstrst
TV Systm
. Confirm the h@kup,
. Clean lens,
Screen size exceeds
The projetd
Replace the lamp with a
. Tum on the
cffiCtly,with other oqulpment,
The input source is not sel@ted
The imagE i8
Model No.
lighting sequence,
. Take the lens cap off.
cmneted to this proj@tq is not turned on.
H@kup is nol made
fqthe
control
rcrk
. Change new batte.i6
The batteriE in the remote control used up
. lnstall the battery correctly
th€ battery is inslalled not cdr@tly
obstacle between the
projslq
. Remove the object
singal r@eiver ?
. Cl6e
ls the remote control out of operating distance?
the remote control to prcj$tor (ma
distance:7M)
lf all above method can
nd
solve the oroblem. please contact us or the dealoE immediatelv Do not open the machine bv voutself.
21
22
seMe