1
Mlor-ow~v@ Oven
user
r~;g n~ the possibilities
Therlk y(x,~ for purchasing this Sameung
product:. Please register your product at
www,samsung.com/register
~-800..SAMSUNG (726-7864)
ENGI,JSH
IMPORTANT SAFETY SYMBOLS
AND PRECAUTIONS
.................................
manual mean:
What the icons and signs in this user
¢¢liorowav(; ov~Yx ~ his m~:nual coniains irnportan[
ha~orma~ion on ~he installation, use and Oar’O
your applbnoe, Please ~ake ~rne k) read
H’~ar~Llal ~0 take fL.~lJ a(:lvarl[8~e (:)[ your mk;rowave
WHAT YOU NEED TO KNOW
ABOUT SAFETY INSTRUCTIONS
Warnings and Irnpor~arlt Safety Instructiorls irl th~s marius!
do not cow)r all po,~slble corldltion.s arid situations that
may occur. It is your responsibility [o use common sense,
caution, and care when installing, maintaining, and
operating your microwave oven.
PRECAUTIONS TO AVOID
POSSIBLE EXPOSURE TO
EXCESSIVE MICROWAVE
ENERGY
AI DO I]Ot attempt to operale this oven with the door
defeat or tamper with the safety ia[orloaka,
B. Do nol place any objecl belween [he oven front
C. Do r~ot operate the oven if it is damaged, it is
I..lazards or unsafe prao’Iices thai
may resuR in severe personal
WARNING =njury or death,
Z~,
Hazards or unsafe practices that
may result in ~i~or #ersenal
.... ~.A~.~I.~N__. inj~r~_~..~rOP~ da~ a9 e~ ..............
-i~ reduce ~he risk of fire,
explosion, elec[ric shock, or
)ersonal injurywhen using your
6AUTION
microwave oven, follow these
basic safely precau[ioas,
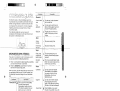
~
Do NOT atl:empt.
Do NOT disassemble.
Do NOT touch.
Follow direc[ions explicitly.
Unplug the power plug frorn the wall
socke[,
Make sure the, machine is grounded [o
)revent electric shock,
Ca!l the servk:e center for help,
Note
These warning signs are here toprevent
inju.ry to you and others, Please tollow them
exphcitly. After reading this section keep it
D. Only properly qualified service personnel should adjust in a safe place for future reference,
SAVE THESE INSTRUCTIONS
2.. safety information
4:04~52 I ]
IMPORTANT SAFETY
INSTRUCTIONS
17.1o reduce the risk of fire ie the oven cavity,
a. Do no[ overcook food, Care, fully attend appliaace
When using ar~y electrical appl]anoe, basic safety
preceu[ions should be followed, including tile following:
WARNING
may spread,
appliance,
this page,
4. Install or locate this appliance only in accordance with
the provided installation instructions.
~i Some products sech as whole eggs and sealed
cof~tairters, for example, elos(~d gl~ss jars, oa~
explode If heated rapidly, Never haiti them in a
microwave oven,
6. Use U~is appliance only for its inteaded Use as
damaged or dropped,
9. This appliance should be repaired or serviced only
adjustment.
appearlng to be boiling, Visible bebbling or boiling
IN V~.NY HO! LIQUIDS SUDDE!NLY BGIL.INQ OVER
WI IFN ’rl IE CONTAINER IS DISTURRFD OR A
SPOON OR O’[I IER UTENSIL IS INSER[:D INTO
THE I IQUI[), To redeee the risk of i~lj;jry:
a. Do not overheat liqeid.
b. Stir ligsld both before and halfway throagh heating
it,
CAUTION
Cleaa Ventilating I Ioods Fr~quenfly - Grease should
repairs to the do~)r,
damaoe the filter.
the back of Ihe oven),
1~. Do not lel the co~’d hang over ed~’le of table or
SAVE THESE INSTRUCTIONS
safe y nformat on _3
Ill
GROUNDING INSTRUCTIONS
Make sore ta install your OVeR iea location with
adequate space,
This appl~ence muet be grounded, In file event of on
eleetrie ~shoel~ by pravldfng ~e escape wire for the
The plug rnust be plugged ieto an outlet the[ is properly
u.’~ing a dry/cloth on a regular basis.
¯ Unplug the power plug and cleon ~t with a
cloth,
,4’, WARNING
Plug the power cord iRto a properly grounded
3 proeged outlet, Your evee should be the oely
apgliaece coenected to this circuit,
h’eproper use of the .qroundieg plu(] earl result in a risk of
electric shriek,
result in electric shock or fire.
othe~wiee defeat the graund~eg plug,
¯ Consult a quallfiod eRx:tricinn or set~k:e person if you
do not understand the grounding inshuetions or if you
provided match the product’s specifications,
children, Children may use them for play,
Extension Oords" sec[iell below,
Use of Extension Cords
A short power-eupply cord ts provided to reduce the risk
of your becor’niRg eeteegled ie or trlppiRg OvOra Ioegor
cord, I ergot cord ee[e or exlenslon cords are evailable
(_~ fhis
ho,~roperly
grounded,
~rl~-appliance
follow the must
specific
’ Gr ~undiag
instr( ;[i 14e~d
;n~
found in the beginning of lhfs Section. Do no1 ground
the appliaece to a gas pipe, plastic water pipe, or
telephone line,
¯ [his may result in electric shock, fire. an
oxplosioe, or problems with the product
¯ Never plug the power cord lets a sacker that Is
not grounded correctly sod make sure that It Is In
accordance with local and eatioeel codes,
Do riot (;u[ or reRiuve the third (ground) prong from
1. The marked electrical ratieg of the cord set or
Is operable.
cord sod it r’euet be plugged into a 3-slot outlet,
3, The longer cord should be etrseged so that it will not
drape over the counter top or tabletop where it can
be pulled on by childrue or tripped uver accidentally,
you use an extension cord, Ihe interior light mey flicker
eed Ihe speed of the blower may vary when
(~} Do,trot lest.till t!/is ~pliance irl a humid, eily, or desty
Iocafioa, of iea Ioualioe exposed [o direct seelight or
water (rain drops),
¯ Ibis may result in electric shock or fire,
Plug the power plug k~to the wat{ socket flrmly, Do
not use a damaged power plug, damaged power
cord, or Ioa,~;e wall srJcket,
¯ ]his IT~ey result in electric shock or fire,
/i’, CRITICAL
INSTALLATION
WARNINGS
Do not mount over a sink,
Do not pull or exceesively bend th¢~ power cord,
De nat lwi.~t or tie thr,. power cord,
(~The irt,stallatlen,~f this applla.rKx~ rnuat be performed
by a qualified technlcian or ,,orvice company,
¯ [’ailing Io have a qualified technician install
the aver may result ia electds shock, firs, an
explosion, problems with the product, or injury.
Unpack the oven, remove all packaging material and
on the Interior or exterior of the oveR, broken door
latches, c~acks in the door, or a door that is not I~nod
t~p correctly, If there is any damage, do ROt operate
SAVE THESE [NSTRUOTIONS
4.... safety iRformation
cord into the space behind the appliance.
¯ This may result in electric shock or fire.
Unplug Ihe oven by pell]eg Ihe plu~j oely.
FeilinO to do so nay reselt in electric shock or fire,
[~
When the power plug ar power cold is damaged,
contacf your rid~rdb[ service oeutor for e
repDcet~’tent or repair,
INSTALLATION
CAUTIONS
fire,
CRITICAL USAGE
WARNINGS
¯ Plu]~.I g epowerpug ~c lew]lls(x:ketagele
.........................................
’ ,,, ,~i’iIt...................................
. ...........................................................................................
...........................
tl~emicrbwa~te’ls"TfdOded;"please"eanta,c~"your
............................................................... ~.]V"~56~j~"~"~j~6~.’~R"5fi~J~’~j&(tIl"ii~"~51c}’dtfi~!}~h~bl~:6f ......................................................................................
L~J nearest service center ’, [:ailing to do so may resutt in
fire
electric shock or fire,
Read and follow the specific "Pr(~caellotls to Avo}d
Possible Exposure to Excessive Microwave Energy",
found in the beginning of this Sectioo,
If the microwave generates a strange noise, a
burning smell or smoke, unplug t[ immediately 81%1
coetact yoer nearest service center,
¯ I:ailh~g to do se may resolt in electric shook or fire,
In the eveet of a gas leak (propane gas, LP gee,
etc.), vest{late Ihe room Immediately, Do not touch
the microwave, power cord, or p}ug,
¯ Do not use a verffilatieg fan,
¯ A spark may resell In se exple£ion or fire.
]~ke care that [h8 door or aay of the o~her parts do
eat come into oo[][ao[ with the body while cooking or
lost after cooking,
¯ FaBling to do so may result In bums,
In the event of a grease fire oe the s(~rface units
below the oven, smother the [li~ming pan o~ the
sodace unit by coveting the pen completely with a
lid, a cookie sheet or a flat tray,
Never leave surface units bel!eath your oven
Keep all packegirlg rqeterials well out el Ihe reech of
children, Packaging materials can be dangerous to
children,
* If a child places a ba£] over its head, the chiM car}
scffocate.
Do not let children or 3ny person with reduced
physical, sons(try or rr~ental oapebilit~es use this
appllalhCO unsupewised,
Make sure that the appliaece is out ol the reach of
children,
¯ Fallleg to do so may result In elec[rlc shock, berne
or ff~jury,
Do no1 touch the inside of lhe appliance [mmedlntely
after cooking, The lnsid~ of the appliaeee will be hot,
¯ lhe heat ot~ tile ~nside of the oven can cause
bums,
De r}o~ put alom}eum foil (except as speciilc~lly
directed in this maeual), metal objects (such as
containers, [orks, ate,) or containe[s with goldea or
silver rims inLo the microwave,
¯ These obiects can cause sparks or a fire,
Do not use or place flammable £pray£ or objects
SAVE THESE INSTRUCTIONS
safety information .5
/k USAGE CAUTIONS
J~l Ihe suria~ o[ Ibe rlfi~ru~ave Is oracke, d, turn it off,
" Failing to do so may ro,,ult in electric ,;hock,
Remove lids [rum baby toed belore healing, After
healieg baby Iood, elir well to distribute Ihe heat
sharp object,
¯ This may result in Ihe glass beieg damaged or
broken,
kJrnod elf,
CRITICAL CLEANING
INSTRUCTIONS
candles, lighted cigarettes, dishes, chenllcala, metal
objeels, e[c,) on Ihe appliance,
¯ This may result in electric 5hock,
Do not spray volalile ela[erial suah as Jllsectietda
onto the surface of fha appliance,
° AS well as being harmful to humans, It may also
result in e~ectric shock, fire or problems wiih the
product,
Do not place the appliance ever a fragile objec[ such
as a sink or glass object,
¯ This may resalf in damage to the sink or
object,
Do not put your face or body close to the applianc~
while cooking or when opening the doer ~t.lst after
cookit ~g,
¯ Take care ~ha~ children do not come lee close te
Ibe appliaeoe,
" Failieg to do so may result in children burning
themselves,
DO not place food or heavy objects over the door
when opealng the door,
Do not abruptly cool the door, the Inside of
appliance, or the dish by pouting water over it during
or jast after cooking,
empty,
lray,
SAVE
THESE iNSTRUCTiONS
6 safety information
Do eel clean fl~e appliance by spraying water dffectly
unto It,
De not t)se benzene, thinner or alcohol to close the
appliance,
¯ This may result in discoloration, delorrnalion,
damage, electric shock or fire,
Befare cleaning or performing rnalr~enance, unplug
the appliance Item ~ho wall socket and remove food
waste from the door and cooking cornpartmeot,
¯ f’adlng to do so may result ~n eleolrlc shock or fire,
’l~ke care not Io hurt yosrself whet) cleaning ~he
appliance (exLemal/internal)
¯ You may hurt yoursel~ on [he sharp edges of
appliance,
Do not close the appliance wilh a siesta cleaaet,
Keep the Ins~de of ~he oven clean, Food parLiclos or
.c__o.._s:Ier ts ..................................
SE~IING UP YOUR MICROWAVE OVEN
8
8
8
9
t0
t0
Ctlecklng the parts
’
Warranty and service IrffermaIlen
Setting ep your rnicrowave oven ....."
Checkiog the coetrol panel
Setting the time
Child lock
USING YOUR MICROWAVE OVEN
¯
10
CLEANING AND MAINTAINING YOUR MICROWAVE
OVEN
~I~ le I ]~ [i" er but.tu ),
10
10
10
11
12
1;3
14
Vent buttons (2 Speed & On/Off)
I,ight Fli/Lo/Off button
Ceokiog Presets buttons
Auto Reheat button
Auto Defrost button
Soften/Melt button
Microwave Cooking Tlrnes&
Power Levels
t4 Eco Mode
t9
19
19
19
t9
19
20
Cleanieg tile exterior
Claaeff~g tile Interior
Oloanlng tile turntable and roller
riags
Storing and repairing your
microwave over~
Replacing the cooktop/night light
Replacing the oven light
Cleaning the grease filter
TROURLESHOOTING
~.:"
APPENDIX
,’ "
":
WARRANTY
COOKWARE GUIDE
¯ ,.... 15 Microwave-safe utensils
13OOKING GUIDE
¯
16
....... 16
17
17
t7
17
18
General micrewave tips
Cooking meat
Oeoking poultry
Cooking seafood
Cookieg eggs
Cookieg vegetables
Recipes
contents 7
WARRANTY AND SERVICE
INFORMATION
To help us to serve you betteh please comglete the
El~!ctronics, trlc,, at 1-800-SAMSUNG (726-7864)
that your qow mlcrowsvc, ovor~ works proporly,
register,
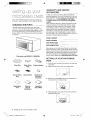
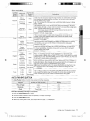
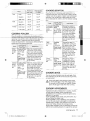
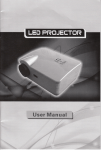
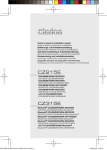
CHECKING THE PARTS
......................................................................................................................................................................... Iocaled on the back o~ bottom of Ih[.) producL Pl{aase
sure you’ve reoelved all the parts shuwn below, If your
rrlk.’rowavo ovon was damaged during shipping, or if you
do riot have all ihe parts, contact S~msung Customer
Service, (Refer to the "Wanan[y a.d service ~tffom~atlon"
MODEL NUMBER
SERIAL NUMBER
BATE PURCHASED
PURCHASED FROM
Microwave oven (SMH1611~ SMH1622)
service center, please call 1-800-SAMSUNG (726-7864).
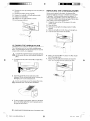
SETTING UP YOUR MICROWAVE
OVEN
Glass Tray
Roller Guide
Ring
Exha~.lst adaptor
1, Opt:In tile rJoor by pulling the hand@ orl the rkjht ’,side
of the door,
2, Wipe the inside ol the oven with a damp cloth,
,
Grease Filters
(~)
Registration
Card
Charcoal filter
Mar~uals
(User &
lestallatton)
Hardware kit
(Screws &
Brackets)
3. Install the pro-assembled ring into Ihe kldsatetJon at
Ihe center of the microwave oveR,
Templates
(Top & Wall)
4, P ace t le glass trey securely in the center ol the proassembled roller ring,
8 setting up yet.It new r~qJcrewave overl
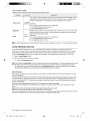
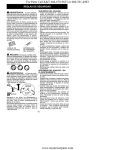
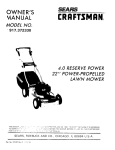
CHECK NG THE CONTROL PANEL
Dieplay ~
See page 1 1 I-
Popcorn
Vegg es
Potato
Pizz~
See page 11 I
.,ae page 12 ~
See page 14 1
I See page 13
4
5
6
7
8
9
0
J’~tchen Tir’rler
~
-,-30
[Stop/Clear
Sac,
Enter/Start
Sea page 10
See page 14 ~.~
setting up your new microwave oven 9
SETTING THE TIME
Yoa~" microwave oven Is equipped wi[h a builb in clock, Set the clock when first installing your microwave oven and after
3. Press ihe Enter/Start button,
CHILD LOCK
Activating/Deactivating
Co)Ring I.~ s .,-;v~ ’ ~ ee e ,s e [ ~ 1 wil you ew S~ ~ ~. ~: rqicrowave over1,
]-I’/e foIJowill,qJ sec[ior~ dasc~ib~.,s e,,veiyl}-iir,!] you r]@ed 1o krlow 8boul usirig your nl[crowav@ overl,
KITCHEN TIMER BUTTON
99 seconds,
1. Press [he Kitehen Timer button,
3. Press the IEnter/Statl: button,
ADD 30 SEC. BUTTON
This simplified cut~trol saves you time, letting you quickly start ceoking st 100% power,
seconds you wish to add,
LIGHT HI/LO/OFF BUTTON
The Light button allows you Io select a light setting for your microwave.
~_._~::L:g:: ::: :: :::: :::: :::.: :.:...... I li.~Jh~ Low Off
COOKING PRESETS BUTTONS
10 u4Jilg your illJcrowave oven
Auto ¢oO table
Cook only one microwave popcorn bag at a tlrne, Be cL~treful when removing
Popcorn
cookedl
Display’.
vegetables
ot~ee
Place I to 4 eorvhlgs of fre,,#~ / frozel~ vogo[ablee in a rnicrowave-safe
ceramiC, g ass or plastic dish and add 2-4 Tbs. water. Cover with lid or vented
Veggies ..........................................
Frozen
)lactic wrap to cook. Stir before letting sLsrld for 3 to 5 minutes. Let oven ceol
2 potatoes
Iwice
¯
............................................. potatoe~z ..................................................
3
AUTO REHEAT BUTTON
I’he Auto Reheat button provides three preset reheating catr~gorles.
Exarnplet Reheating ,3 servings of casserole,
1. Press Ilia Auto Reheat but[,,~ Iwiee.
2. Use the number butto~]s Io enter the quanti~y or etJillber of servings.
g. Press the Enter/Start button.
4. When t!~e cooking time is over, fear beeps will sound aad Z.:,W is dieplayed.
using your microwave oven 11
Auto reheating table
Follow the iu~tru~;tbns below when reheatir+g diff~ront types of food,
Use only pro-cooked, refligerated foods, Cover the plate with n vented plastic wrap or
waxed paper recked under the plate, If the food is not as hot as you weald like after
esiag the reheat fuec~ion, confines hea[[eg asing addiltoeal time a~td poweL
Plate of food
Casserole
1 servieg
(1 plate) Contents:
3..4 oz, meat, poaltty or fish (up Io 6 oz, with bone)
X, cop s[arch (potatoes, pasta, rice,
~, cup vegetables {aboui 3-4
Cover the plate with a lid or vested plas[Ic wrap, If the food Is no[ as hot as yea would
lira ~fter using tile reheat bnc~iorh conL#lue heattn~ using additional time arid power,
~tir the toed one(0 Pelore se~ing,
1 to 4
Contents:
3-4 o7, meat, poult~ or fish {up to 6 oz, with boue)
D cop starch (potatoes, pasta, rice, e[c,)
~1 cap vegetables (sheet 3-4 oz,)
[~lhe ’right’ temperature ot the food varies from person to parsee, Allow food to stand I to ,5 elJnt,ltes before sen/ing,
AUTO DEFROST BUTTON
Press tile Auto Defrost button once and select the food weight, Tile available weigh[ ranges from 0,t to 6,0 Ibs,
2. LJso the number b~ttons to ester the weight,
3, Press the Entmqstart button,
Defrosting tips
Whee using auto defrost, the entered weight is the, net weight in pounds and tenths of po~mds (the wnight of the fond
rTlirlus the container),
Use the auto defrost cycle for raw food only, The acid defrost cycle gives best resells when the bed you want to thaw
is no colder tbae 0~F (taken directly from a true freezer), If food has bees stored in a rofrigerator-free2er that does
maintain a ~emperature of 5~F or below, always program a lower food weight (for a shorter defrosting time) to prevost
the food from cookieg,
If the food is stored outside the freezer for up to 20 mlnates, enter a Iowe~ food weight,
Separate the pieces as ~hey begin ~o defrost, Separaled pieces defrost more easily,
12 using your microwave oven
Auto defrosting table
Follow the) instrualions below when detrosling differenl types of food,
Roast Beef
Pork
Chops,
Fish
Stad with the food placed fat side down, Af[er each stage, ttJrn the feed over and shield
arly warm portions with na~’row s[rips of aluminum foil,
0,5-3,0 tba,
Meat
with foil lor 5 - 10 minutes,
Whole
Chicken
stand for 10 - 2( minutes,
t!:;read
m
SOFTEN/MELT BUTTON
SOF[F.:N/M[~I~r lels yoo melt ehoco#.tt~x ,’sofb:}n cream cheese, nnd realt batter.
Example: To melt chocolate.
1. Touch [he SOFTEN/MELT buIIon,
2, Choose the food category (1,2,or 3) by pressing a eul’nber batten,
,3, Touch the Enter/Start button,
Soften / Melt table
1 stick (1/4 Ib,)
Remove wrapping and cut butter in half vedically,
2 sticks (1/2 Ib,)
Stir well after lirlishing and lot stand 1-2 mlnu[es,
using your microwave oven 13
MICROWAVE COOKING TIMES &
Power Levels
p .o__w_ E~B....!~.EY.E .L_S_ ............................................................................
rue 1 o power ~ev,..,~s
Wsrm (I) to High (t 0),
Cookin at hi h ower levels
’10
(l-llgh)
I O0 %
faoiling wafer,
Cooking ground beef,
Making candy,
(.k)okirlg fresh frait and
vegetables,
Cooking fish and poaby,
Pmheatin0 browning dl£h,
F~eheating beveE~ges,
9
90 %
Reheating meat slices quickly,
Sau~61ng osions, celery, and
~reen pepper
8
80 %
Rehe~in9 sll types of ibras
(Dinner plate, pasta, moat,
soap or sauce, etc,),
Cooking breads an~ cereal
(~ When selecting rnora than one cooking stage, yoo
7
70 %
Cooking cheese dishes, veal,
Cookir]g oakes,
brownies, copcakes.
6
60 %
Cooking
~ Pms~i thl.’ Power Level button twice to set the
2. Press the Power Level button,
Cooking meats, whole poultry,
5
50 %
4
40 %
3
30 %
2
20 %
When the cooking tim~) is over, four beeps will
Cooking whule
turkey, spsre ribs, db roasts,
sirloin1 roasts,
Cooking lass tender cots of
£££kd to mov~ rapidly, -lhe rapid
movomc 0 " 0> o(:~.ue~sc@tl[et C[Of
and the restHlinQ hc-~H c:ook~; the ~ood,
Standing
Foods cooked ie the microwave baild Up irltemal heat
and continue to cook for a few mieatee after the oven
GENERAL
MICROWAVE TIPS
.......................................................................................................................................................................
withoat avorcaokiag the outer arose, All liquids, s,_tch as
Defuse foods, such as potatoes, take longer to heat than
lighter foods, Foods with s delicate texture should be
heated at a low power level to avoid beco~dn£l ~ough,
the icily in the jelly doughlltff will be hollor [haf~ Ilia dough.
soap or hut uhu~olate sh~Juld De shakerl or stirred whorl
coot<ir~g Is complete, Let liquids stand a iflorr1~)rll before
serving, Whee heatlog baby food, stir well and test tho
tempar.:4tOre before serving,
Adding moisture
Microwave eilergy is altr,tlcted to wa~er rnolecuk~s, Food
that ~s unover~ ir~ rnoistLire cor~tont should bo covorod or
sllowed to stand so ttlat the heat disperses evenly, Add a
small a~’qount of water to dw food to holp it cook,
Venting
wrap by tt.~rnJng back one corner to let excess steam
COOKING MEAT
Place the meat fat side clown on a microwave-sate
roastieg rack in a microwava-safo dlsh, Use t~arrow strips
Place the roast fat
aide down on lhe
ioasfillg rack and
cover wttll wax paper,
Tan1 over halfway
thi’oagh the cooking
process, Let steed for
Stirring
Open the microwave door aed stlr foods such as
casseroles aed vegetables occasioaally while cooking
ta distribute heat evenly, Fo~d at the uutsid~ ~f the disg
absorbs more energy aed heats more quickly, so stir
from the outside towards the oaalor, The oven will t[lln off
Arrangement
Pork
Shielding
Shield food wilh narrow strips of alaminum loll [o prevent
overcooklng, Areas that need £hioldJeg it)elude poultry
wing-llps, the end.’~ of poultry legs, and comers of sqoare
16. eookir~g guide
time,
Cookieg Time;
Place fhe roast fat,,
High {t O) lot lirst
lhrough cooking
Beef
Pork
Rare
135 °1:
Medium
/ 50 ~1:
145 ~’F
16g %
WOIJ Donf~
Mudiuln
J60 °F
W0 °F
mlcrowave-safe dish, Use a tight cover Io steam the fish,
A Iigbter cover of wax paper or paper towel will dacrease
steaming, Cool< the fish elgil it flakes easily with a fork,
Do no[ overtook llsh, chock 1l aRor the minimam cooking
time,
Well [:)erie
160 ~F
170 ~1::
........................
..... ................ .........................:1 ................
llghl meet
160 ’=F
170 OF
Tuna st~Jaks Oookin
steaks
Up to 1,5
Ibs.
7-11 min,/~b,
Power
COOKING POULTRY
through the cooking
.................................................................... microwaw~afe,dieh..and.cover, wi~h,we×,pa
fork, Let etand for 3-5
minutes,
Fillets
Arrange the fillets in a
Time:
baking dish, lucking any
4-8 ~r da,/fb,
Power Level’. with wex paper, If the
Medlurn-High
(7},
tip tO 1,5
ibs,
Whole
Up to 4
Cooking Time:
6-10 mie,/Ih,
180 ~F
nqaat
170 "F I}ght
Medium High
(7)
pieces
Up to 2,
Ibs,
5-’10 minutes,
Cooking Time:
6-9 rnln,/lb,
I BO °F dark
meat
the otJtside of the dish,
170 °F light
Cover with wax paper, Turn
Power Level:
Medium High
(7),
Shrimp
Up to 1,5
Ibs.
C:ooking
Time:
4.6~/~ raln./Ib,
Power Level:
Med~um-HIgh
Attar/go the shrimp in
e baking dish without
overlap#rig or leyaring
tkom, Cover with wax
paper, Cook unlil lirm
arid opaque, etirriag 2 or
3 times, Let stand for 5
minutes,
COOKING EGGS
You can use yOUr cnicrowave oven ~o cook eggs Cool<
................................................................................................................................................. ere evercookud,
Never cook eggs in their shells and never Warm
up hard-boiled eggs in thoir shells, Eggs cooked
or warmed up k) thoir shells can explode, Always
pierue whule eggs tO keep them from burs[Ing,
COOKING VEGETABLES
Vegetables should be washed prior to cooking, Usually,
eo extra water is needed, Wben cooking dense
vegetebbs such as pulatoes, cerrots end ,gr~lell beetle,
add aboat ~ cup water,
Small vegetables (sliced carrots, peas, lima beans, etc,)
will cook faster than larger of;as,
Whole vegetables, such as potatoes, acorn squasb or
with the sterns pointing towaKJs ~he edg~ of the dish alld
cooking gu de 17
the tips toward the center,
When cooFdng cut vegelables, always cover Ihe dish with
a lid or w~nled microwavable plastic wrap,
vegetables halfway throegh the cook ~imo,
RECIPES
~ Ibs, beef stew cubes, cut into ~,~-inch pieces
V2 cup chopped onion
Tbs, all-purpose Ilour
Tba, Worcestershire sauce
ean (13.75, 14,5 OZ,) beef broth
i/ledlul[i carrelsI cat into ~-Ineh ~lices (abeul 1 (;ep)
F~ cup barley
bay leaf
tap, pepper
pkg, (9-10 oz,) frozen peas, thawed
1, In a 2-quart casserole, combine lhe beef, onion, floor,
altd Worcestershire sauce and mix well, Cover with
lid, Cook et High for 6 ~o 8 mil~tltes until the beef Is no
longer p~nk, stirring once,
2, Stir in beef broth, carrots, Parley, bay leaves, and
pepper, Curer wilb lid, Cook at Meclium for 1 ~o 1 V~
ho~rs until carrots and beef are tender, stirring 2 to 3
times,
Stir la peas, Cover with lld, Cook at Medium for I O
minutes, let stood for 10 minutes. Remove bay leave£
before serviHg,
Makes 6 servings,
V~a.[~...Pq’[~.~q_?ala~d ...........................................
2 Ibs, small red parolees, col: into W-inch pieces
4 slices bacon (aneooked), out tote ½-inch pieces
~ cup chopped onion
2 tap, sugar
I tap, salt
1 tap, flour
~ lap, celery seed
I/8 Lap, pepper
2~ lbs, apple c[clor vinegar
1, In a 2-quad casserole, eomPlne the potatoes and
~ cup walor, Cover with lid, Cook at Iligh until the
potak~es are tender (7-10 minules); stir twice, Dra~n
a[xJ sot aside to cool slightly.
2, In a rnedlum bowl, cook the bacon at High until crisp
(2N~-3~, minute@ stir once, Place the bacon on a
paper towel, Reserve 1 l’bs, drippings,
3. Cumbit~ethedrippingsandorllorL Covorwithplast~c
wEtp; turrt 8 corner back to vent steam, Cook at High
until feeder (1 Fz-2 ½ mlnutos); stir once,
4, Stir h] sugar, salt, flour, celery seed, and pepper,
Cook at High entit mlx[o~ boils (30-40 secut~ds), Stir
io vinegar and ~/2 cop water, Co(>k at Hi[~b urllil Ik]uk:l
boils aed [bickeos slightly (1-2 minutes); stir once,
Add bacon to dressieg, Pour dressing over potatoes.
Slit well,
Makes 8 servings,
Black be#£ ~£q.p ......................
I cup chopped
t clove g,t-~rlia, minced
2 e~rlS (!,5 oz, each) bbck be~n,~, drairl~xJ
I can (I 4-16 oz,) stewed lematoes, chopped
I can (13,75-14,5 oz,) chicken broth
I car] (7-8,5 oz,) corn
1 can (4 oz,) chopped gree~l chilies
1-2 tap, ground cumin
1, Place the onion and garlic in a 3-qu[~rt casserole,
Cover with lld, Cook at Iligh for 2 to 4 rninute~ until
Broccoli and cheese casserole
1 V2 Tbs, flour
½ t~p, sail
servh~g,
Makes about 2 quarts,
¼ (:up chopped red pepper’
8 oz, (2 caps) cheddar cheese, shredded
4 cops cooked spiral shaped pasta (8 oz, dry)
at High for 3g to 60 seconds eetll rnlxture boils, Stir in
en~il mix[ere belle aad thickens sll,(.]btly, stirring twice,
4, Add b~occoli and pasta, mix well, Cover wlth lid, Cook
at I Ilgh for 4 to 6 minutes uotll heated througb, stirring
onae, Stir before servl~g,
Makes 6 servings,
18 cooking guide
CLEANING THE TURNTABLE AND
ROLLER RINGS
Ko.ep,ng Vo[lr rnicrowavo over d~:~trl iiflOrovos
its pertorman(x; warOs off unneceS,Sary repairs,
end engthe~s i[,_4 li e,
STORING AND REPAIRING YOUR
M ICROWAVE OVEN
CLEANING THE EXTERIOR
It’s best to clean spills oe the outside of your microwave
even as they occur, Use a Soil Cloth and warm, soapy
water, RiHse and dry.
center,
Do not use the ovae it it is damaged, in
pattlcular, if the door er doer seals are damaged,
Regularly cbae grease snd dust frore the bottom of your
rflIorow ire Jsirlg a soletlon )f warrn water aed (Je rgent,
Wipe with a damp cloth and dry Ihoroughly, Do net
use cleaning sprays, large amounts of Soap eed water,
damayed,
REPLACING THE COOKTOP/NIGHT
LIGHT
When replachlg tile ecloktop/nlght light, make.! ,,~ure that
£.le~.n!£,g ~l~e__#.£.o_[ an,~ d.£or .§~al~ ...........................
you are wearing gloves to avoid Injury from the heat of the
bulb.
1. Unplag the oven or turn off the power at the nqain
cloU3 to avoid seretchlno,
CLEANING THE INTERIOR
Eesure that the iTficrowave oven has cooled dowe
before cleaning ~L to avoid iniury,
Remove the glass tray from the overt when cleaning
Ihe ovee or tray, Io prevent the tray Irom brealqng,
handle it with care and do not put it in water
i~,r,ediamly after coelelg, Wash the f~ay o~rof,,y in .RE.PLA~,!N__G...~I~.E O~EN..LI_G.H~ .............................
When replacing the oven light, make sure that you are
wearing gloves to avoid iniuty from the heat of the bulb,
2. Open the door,
4. Slide the veal grille to the left, then pull it straight out,
cleaning and maintaining your microwave oven 19
6, Remove the (:over by pushing the hook e[ld pulllec; Lip
the lever,
7. R~lrlowl thi.i Pulb by turning It gently,
8. Replace the belb with a 40 watt appliance bulb.
9, Replace the belb holder,
10. I{~p#]c~ th~ vent grille and ~he ~ screws,
[~,
REPLACING THE CHARCOAL FILTER
If your oven Is vented [o [h(." inside, Ihe charcoal filter
should be replaced every {3 to 12 moaths and mote oftee
if necessary. The charcoal filter cannot be cleaned, TO
power supply,
2. Open the door,
,3. Remove the vent grille mouating screws (3 rnlddle
4. Slide the vent grille to U/e left, then pull it straight oul,
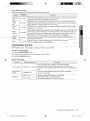
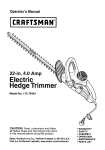
CLEANING THE GREASE FILTER
Your ralcrowave ovc~n I~as two rnelel reesable 9rease
tilters, ’the grease filters should be removed and cleaned
at least once a month, or as required,
"1o avoid risk of personal injury or propert,.y, dafT]age
do not operete the oven head without the filters 11
place,
1. re remove the filter, slide It to tile left (or ri£bl) using
the teb,
3. ]’o return the filter to its position, slide it into the frame
slot et~ the left (or right), then push it upwards end to
the right (or k#f) to lock it,
20_ clean ng and t a nta 1 r g you ¯ ]q c owave eve ]
6. Slide a n~)w charceal filter Itffe place, The tilter should
rest at the angle shown,
7. Replace the ven~ grille end 3 screws end close the
deo~; lure the power back oe and set [he clock,
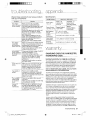
Check these solutions if you have a problem
Specifications
with your microwave:
The displa, y ,
Mal<e sure the plug is properly
conaected [o a groueded outlet,
If the well outlet Is controlled by a well
switch, make suro tho wall-,~wltch~i~
turned on,
Remove the plug from the outlet, wait
Reset fl~e circull breaker or replace
Oven Cavity :
1,6 cu It
Timer : £9
mieutes, 99
Power Source ; Power OuLpul; :
120 VAO, 60 I.-le 1uOu Watts
Nel/Shipping
Weighl
Outside
Controls : 10
power levels,
Consumption
1580 Wette
S’I’ ’ 4 l 2 / 51 8 Ibs
[] / W : ,13,3 / 50.8 Ibs
19 ~,/,/’~V) X 9 ~Y,,"(I I) X 14 :V,"(D)
Plug the oven iato a different outlet,
The display
Is working,
but the power
won’t come on,
cookleg Instructions again,
Is the power
,~loie, g off before,,
SAMSUNG OVER-THE-RANGE(OTR)
MICROWAVE OVEN
Reset the clock end any cook~c9
instructions,
..............................................................................................................................
Limited warranty to original purchaser
Samsung Eleotronll;[~ AmeriSa, Irle, (SAMSUNG) and delivered
mowt the ()veil to its own circuit,
ONE (1) YEAR PARTS AND LABOR, TEN {I0) YEARS
Clean the turntable, roller ring and
oven floor,
Make suro the turntable arid roller ring
are positioned correctly,
This Is slmller to interference caused
by other emall appliances, such as
SAMSUNG will repair or replace t!lls product, at our option
"li~spark~;’ R~4~’~~;~"~iallic u~e};S~i~ ............. PARTS WARRAN~ FOR MAGN£TRON
The turnlablo
makes noise
or bocom¢~s
stuck,
Ceospe rV
or radlo
warranty pedod specified above, All replgeed paris and products
................................................................................................................................................
bocomo tho propolty of SAMSUNG r~nd rT]U~t b~l r0turnOd tO
Ionge~,
troubleshoot}rig 21
~0}1-10-13 4:04:57
II
.~ete ............................
1-800-SAMSUNG (726-7864) or wwwo
samsung,com
22 warranty
Scan the QR code* or visJt
www, samsung.com/spsn
to view our helpFu[
Haw-.ta Wdeos and Live Shows
QUESIIONS OR COMMENTS
Code No,: DE68-03898A-.02