1
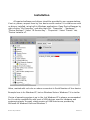
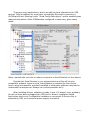
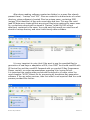
IR Service Key
User Manual
Information contained in this publication regarding device applications and the like is provided only for your convenience and may
be superseded by updates. It is your responsibility to ensure that your application meets with your specifications.
IR Service Key User Manual
Revision 1.1
Installation
All required software and drivers should be provided by our representatives.
If not so, please, request them by Your device serial number. It is visible even with
no drivers installed, using built-in Windows applications. Open Device Manager by
right-clicking “My Computer” and after that click “Properties” - “Hardware” “Device Manager”. Select “IR Service Key” - “Properties”. Select “Details” tab,
“Device Instance id”.
Value, marked with red color on above screenshot is Serial Number of Your device.
Example here is for Windows XP, but on Windows Vista or Windows 7 it is similar.
Choice of operating system is up to You, but Windows XP is always recommended
for it's native compatibility with most of USB devices, used for hardware and
engineering tasks. Anyway, stable version of USB libraries are provided by
Microsoft for Windows Vista and Windows 7.
IR Service Key User Manual
Revision 1.1
There are many applications, which are able to show information for USB
devices. Official software for such tasks provided by Microsoft Corporation is
UVCView.x86.exe. Running it with “Show Config Descriptors” option enabled gives
required information. Older USBView.exe configured in same way, gives same
result.
Value, marked with red color on above screenshot is Serial Number of Your device.
Provide that Serial Number to our representative and You will receive
compatible software. Have in mind, that software is compiled for Your device,
hence using incompatible, patched, modified or third-party software may lead to
undesirable consequences. Always use trusted providers only!
After installing drivers, software is ready to use. If it doesn't start, probably
You do not have device plugged into USB port or driver's installation failed.
Application starts only if compatible hardware is connected. IR Service Key is
powered by USB, so no external power supply is required.
IR Service Key User Manual
Revision 1.1
Instructions
Click “Read” and insert IR Service Key into EIS, like inserting ordinary key.
Do not hurry to do it – software will wait infinitely and reading process will start
when EIS recognizes key inserted. At this stage, You could detect EIS power coil
malfunction – if interface is plugged in and it doesn't detect electromagnetic field
and doesn't start reading process, this means EIS has either “presence switch” or
“power coil” defect. It is common malfunction, which leads to expensive repairs –
programming new keys, replacing EIS unit, etc... In fact, it is easy to re-solder or
repair power coil if You know it has failed.
Remove IR Service Key from EIS when task is completed – keeping it there
for long time causes overheating of inductor inside EIS, which powers the key. This
may lead to malfunction – it is Your responsibility to observe proper conditions for
EIS. On completion of task screen will look like:
Hash fields contain current data from EIS. In it's EEPROM few hash records
are stored for each Key track, but only one is relevant and it is displayed here.
That valid hash has it's “Life” counter – it is same as “Life” counter of MB key, and
both decrement simultaneously when MB key is inserted in EIS. Starting value is
196607 when MB key is new and decrements when MB key is used. Difference in
“Life” counters of EIS and MB key are rare, but it may lead to car unable to start.
Contact our representatives for IR Key Programmer device, which helps solving it.
IR Service Key User Manual
Revision 1.1
Car comes with several keys – it is visible which ones are used and how
many times – simply subtract “Life” counter of hash from 196607 and You will get
the result. In example above Key 1, which was last used on that car as displayed,
was used 196607 – 184618 = 11989 times. Previously used Key 2 had been
inserted in EIS 196607 – 191365 = 5242 times.
Sometimes when MB Key is lost, or for other reason, it is necessary to
disable that key to prevent it's future use. Whether key is enabled or disabled is
shown with green or red color of corresponding Key label.
Car has total eight keys and above information for current hash, lifetime and
status is given for each of them. So called “Magic” hash is also known as “Green”
or “Orange” key, used by MB workshops for security related operations. Those
includes disabling/enabling keys, adding new keys to car, changing data in EIS,
etc... Accordingly EIS changes it's status, which is shown by software. New EIS
comes from factory with some data pre-loaded and it's status is “Initialized”.
Completing all needed tasks for adapting that EIS to car, changes status to
“Activated”, with “TP release” and “Personalized” changed in that process.
All information read, could be saved with button “Save”. Text file is created
in sub-directory “backup” of current directory, where software is located. File has
unique name, containing SSID (unique 32-bit identifier) of EIS and current date
and time. This way You could read and save EIS data many times without worrying
of files being replaced by newer ones. Each time “Save” is clicked it is disabled
and only reading EIS again enables it. So, no duplicate records will be stored in
“backup” folder. By SSID or/and date/time, contained in file name, You could easy
find record you need from all stored in backup directory and view it with Notepad.
IR Service Key User Manual
Revision 1.1
After above reading, software creates two folders (or re-uses files already
present there) - “backup” and “EIS”. Files are created in sub-directories of current
directory, where software is located. Files has unique name, containing SSID
(unique 32-bit identifier) of Key and current date and time. This way You could
read EIS data many times without worrying of files being replaced by newer ones.
So, no duplicate records will be stored in “backup” folder. By SSID or/and
date/time, contained in file name, You could easy find record you need from all
stored in backup directory and view it with binary editor software.
It is very important to note, that if You want to use the provided files for
generation of new Keys or adaptation of ESL, then FIRST You should read EIS with
IR Service Key and then read EIS Password with our product IR Key Programmer.
Please, contact our sales representatives regarding it for having full set.
It is important the reading order and should be obeyed in all cases, when You
need complete “HC08”-format file for processing by standalone Key generation
software. If You use online services, then that order is not important and You could
process provided files further.
IR Service Key User Manual
Revision 1.1
And here is how looks the file for online processing:
Please, note that data at address 0x48 is blank – that is already commented
“EIS Password” for which You have several options to be filled, depending on the
EIS, being read.
If it is Motorola-based EIS, You could read the processor EEPROM with vast
choice of available equipment. It depends on the software, You are using to read
EIS dump, to find exact place of those 8 bytes in EIS dump. For different EIS
models also exact location is different. You have two options when generating key
– read the EIS and take password bytes from the dump, or generate Your own
sequence of 8 bytes for key and put these bytes into EIS dump.
For NEC-based EIS units, You could obtain “Fixed password” by reading it
from key if it has ROM version 57, using our IR Key Programmer. NEC MCUs with
that ROM version usually has marking 567897081 or 00040229 on the case, but
could be different also.
The same option applies to Motorola-based EIS units if they have the new
type “Chrome” key, which has ROM version 57. It is not a rare to work with such
EIS, which has 3rd party made “chrome” keys or same, obtained from MB dealer.
For any additional information for NEC Keys version supported by IR Key
Programmer currently and expected updates, please, contact our representatives.
IR Service Key User Manual
Revision 1.1
Extended functions
Click “>>>” located between “Model” and “Status” tabs (marked in red).
New window will open and “Device identification” tab will be automatically
filled with data, read from EIS. If IR Service Key was not inserted into EIS, software
will ask for that, prior to reading any information. Any field of that information
could be re-read at any moment by simply double-clicking at it's label. In example
“SSID” field is to be read again (clicked label marked in red). Software invites for
insertion of IR Service Key, because it is not plugged into EIS when not performing
useful tasks. Please, note again above mentioned cautions regarding EIS inductor
and overheating, caused by prolonged activeness.
IR Service Key User Manual
Revision 1.1
Except device information much more of EEPROM could be read, clicking at
appropriate button at “Special Functions” tab. Data, which is allowed to be read
from EIS will be saved in sub-directory “backup” in binary format. File name is
assigned “EIS_EE” containing SSID (unique 32-bit identifier) of EIS and current
date and time. Precautions are same as before – easiness of searching and
indexing file amongst all. Your favorite hex-editing software could be used for file
viewing. Example here is:
Format of EEPROM depends on model chosen and is predefined by selection
made before opening “Extended” window. Above screenshot is W204 dump.
Another useful functionality is ability to send custom commands to EIS.
What should be written in “IR bytes to send” is command in hexadecimal format.
Also number of bytes You want to send should be filled in decimal format into
“Len” field. Clicking “Send” button results in transmitting of command via IR and
receiving response if such exists. Not all possible commands have appropriate
response. Be careful with that function – experimenting with EIS is fun, but
consequences and responsibility are only Yours.
Example will be given for that functionality – as discussed above Key 1 has
lifetime counter of 184618. Hexadecimal representation is 0x2D12A. To simulate
that valid Key 1 is inserted into EIS, command “24” containing corresponding SSID
and lifetime lesser by one have to be send.
IR Service Key User Manual
Revision 1.1
So 0x2D12A as counter will be transmitted in known for EIS format.
Response “26” is received as shown below:
Clicking “Save” button will produce text file, logging request and response.
Remark: Some EIS models could be read only if it is mounted on car or
connected to diagnostic software, which keeps them “alive”. Powered-on-only EIS
goes to “sleep” mode if no data is present on CAN bus, and reading it is not
possible!
IR Service Key User Manual
Revision 1.1