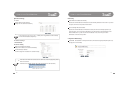
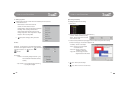
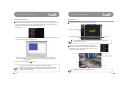
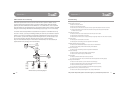
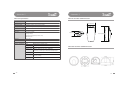
1
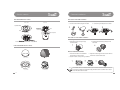
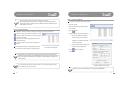
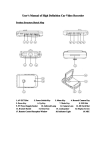
User’s Manual Pitta 300 Series IP Network Camera Pitta300/300R Pitta300D/300DR Pitta 300 Series IP Network Camera Headquarters #1113 Newticastle 429-1 Gasan-Dong, Geumcheon-Gu, Seoul, Korea Tel : 82-2-2626-8800 AS : 82-2-2626-8804 Fax : 82-2-2626-8805 Homepage : www.pittasoft.com Email : [email protected] User’s Manual Pitta 300 Series IP Network Camera Pitta300/300R Pitta300D/300DR wGZWWG v With H.264 compression’s clear digital images transmitted over the internet, real-time monitoring is possible anywhere with an internet connection. Easy remote monitoring control functions and the use of existing networks minimize installation costs. The Pitta 300 series are high-tech IP Network Cameras that use H.264 codec technology to achieve high compression rates and clear picture quality by allowing for high frame rates to be transmitted through the network. By using the network, remote connection, monitoring, and control are possible from any location for simple use. The Pitta 300 series IP Network Camera guarantees performance and safety while offering various solutions through internet integration. Preface Features Thanks for purchasing our Pitta 300 series IP Network Camera. This is a user manual for H.264 IP Network Camera and the product mentioned here designates the H.264 IP Network Camera. Please go through the manual before installation and use of the camera. This manual along with the software and hardware explained here is protected by copyright law. High quality H.264 video H.264 enables excellent image quality at significantly reduced network bandwidth and storage. Product Warranty and Limitations The warranty period is 1 year after the date of purchase, but the warranty does not extend to cover accidents, negligence, abuse, or wrongful use for the whole or any part of the product. Additionally, the manufacturer does not provide warranty for any additional parts or affiliations. The warranty does not extend to malfunction in these areas. • Malfunction due to user’s negligence • Dismantlement or replacement by the user • Connection to alternate power source • Malfunction due to natural disasters (fire, flood, tsunami, etc.) • Replacement due to wear and tear • Instability of network WARNING Changes or modifications not expressly approved by the manufacturer could void the user’s authority to operate the equipment. To prevent electric shock and risk of fire hazards: Do NOT use power sources other than that specified. Do NOT expose this appliance to rain or moisture. Y Changeable lens User can easily replace other lens provided by Pittasoft to match the required viewing angle. Support WDR (Wide Dynamic Range) Built-in progressive CMOS image sensor and support better image in backlight environment than normal sensor. (Pitta 300R/300DR supports only) Motion Detection Intelligent Motion Detection analyzes for any motion in the scene. The reliable functionality is built into the camera and client software. Using the client software, user can set up motion detection to trigger video recording and e-mail alerts. Particular area in the scene could be included or excluded for the motion detection. User-friendly configuration of camera Well designed easy to use and installation, web based client has a user-friendly configuration for normal and advanced users. A normal user can make use of basic settings even without detailed knowledge of camera. Advanced settings allow user to change video quality, network, security and system related parameters. Auto correction of lens distortion Pitta 300 series client software automatically correct distorted images and can deliver near perfect images. Compact size & ultra-light weight Pitta 300 series are compact design and require minimum space for the installation and reduced weight allows flexible mounting. Z {GGj j Components 5 E. Camera information 28 Section names 6 F. The state of camera list 29 Camera installation 7 G. Camera selection 29 Software installation 8 [Live View] 30 Network configuration 10 [Layout] 30 How to use Pitta IP Utility 10 [Digital Zoom function] 30 How to change IP Address 11 [Mode conversion] 31 How to use Pitta WebView 13 [Storage information] 31 Login 13 [Quick button collection] 31 Live View 14 Setup 15 [Setting mode window] 32 [Basic setup] 15 [Storage & additional functions setting] 33 [Advanced setup] 16 A. Setting recording storage 33 A. Users 16 B. Setting alarm 33 B. Network Settings 16 C. Setting log items 34 i. IP and Ports 16 D. Misc. 34 ii. Dynamic DNS Setting 17 C. Video & Image Configuration 18 A. Setting schedule the recording 35 D. Sensor 19 B. Setting motion recording 36 E. Event Configuration 20 i. Motion Detection 20 [Playback mode window] 37 ii. Event Upload 21 [Recorded data map types] 38 [How to set playback] 38 Setting mode [Recording scheduler] Playback mode 37 22 22 ii. LED Settings 22 [Log view mode window] 39 iii. Server Maintenance 23 [How to see log view] 39 24 Logout 24 39 Appendix 1 - DDNS & Router Port Forwarding 40 Appendix 2 - Troubleshooting 41 25 Appendix 3 - Pitta 300 Series Specification 42 Pitta View strat 25 Appendix 4 - Pitta WebView Specification 43 Live View mode 26 Appendix 5 - Pitta View Specification 44 26 Appendix 6 - Dimension 45 [ A. Camera registration 26 B. Camera search 28 C. Cancellation of camera connection 28 D. Deleting Camera 28 LAN cable (Cross cable) Stand User’s manual Pitta 300D/300DR Components Logo 24 [Camera management window] Screw(6pieces) Power adaptor 39 Help How to use Pitta View Installation CD (Pitta View, IP Utility) 35 i. Date & Time [About] Pitta 300/Pitta 300R 32 F. System Operation Log view mode Pitta 300/300R Components Pitta 300D/300DR LAN cable (Cross cable) Installation CD (Pitta View, IP Utility) Power adaptor Screw(2pieces) User’s manual \ zGG jGG Pitta 300/300R Section names Pitta 300 or Pitta 300R installation mG 1. Place a camera stand at the intended place. 3. Connect to the network using the LAN cable. i 2. Connect the camera to the camera stand. 4. Connect the power adaptor to the camera. Operation lamp Reset button Network lamp Power lamp Lens Label yG Tripod receptacle Pitta 300D or Pitta 300DR installation How to separate the hardware Power terminal Ethernet terminal 1. Separate the dome cover by turning it counterclockwise. Data terminal 2. Separate the shield case by pulling from the lock holder. Pitta 300D/300DR Section names How to install the hardware 1. Place the lock holder on the installation surface and fix it with the screws. kGj sG ] zGj wjiGi 2. Adjust the vertical angle of the lens and fix it with the screws then secure the shield case. 3. Secure the dome cover by turning it clockwise. The included cable is a cross cable which is used for a direct connection between the PC and the Camera only. When connecting them using other device such as a switch hub or router, a direct LAN cable needs to be used. ^ zGG zGG 6. Click ‘Finish’ button when the installation is completed. Pitta Utility (Installation tool) Installation 1. Insert the installation CD into the CD drive. 2. Click ‘Next’ button. 4. Click ‘install’ button. 7. “Pitta View” and “Pitta IP Utility” icons will be created on the desktop and in all program files after installation completes. 3. Select the options and folders then click ‘Next’ button. 5. Installation will start Pitta View starts automatically when computer is restarted. If reinstallation is needed, current software has to be uninstalled. To uninstall the software, click on uninstall button in; Start All programs Pittasoft Uninstall If you install many cameras at once, be sure that you need to assign the IP address for each cameras using IP Utility. _ ` uGG uGG How to change IP address Use Pitta IP Utility to change or verify the IP address of the camera. Factory default setting is the DHCP mode : IP address will be automatically assigned. Pitta 300 series software applications work with Windows XP SP2 and Windows Vista on Internet Explorer 5.0 or later. To change the IP address, follow below procedure. 1. Start Pitta IP Utility 2. Select the camera whose IP address needs to be changed. How to use Pitta IP Utility This application is used for searching, changing and verifying the IP address of the camera. 3. Click button. 4. “Assign IP address”, pop-up window appears. Use this to change the IP address of the camera in the list. Use this to change the IP address of the camera using the a. Obtain an IP address automatically camera’s serial number (DHCP) : Select the DHCP option for Use this to open camera homepage (Pitta WebView) of the selected camera assigning the IP address automatically Use this to refresh the list of cameras connected to the and click Assign button. network Several settings can also be accomplished by right clicking <Select the camera to assign the IP address> b. Enter desired IP address to assign static <The list of the cameras connected to the subnet will be displayed.> the mouse button and then selecting corresponding option. IP address and click Assign button. 5. Press button to refresh the camera list. This application can be used if the camera is physically connected in the same Subnet only. Otherwise, access the camera using Pitta WebView by directly connecting the camera to the PC using a cross cable and then change the IP address in the Network Settings. (See page 16 for more information) If you use Pitta IP Utility with cross cable connection, you must assign the static IP. Please do not use DHCP option with cross cable. <Assign IP address pop-up window> Default initial values of administrator’s ID and Password are admin/admin. XW XX uGG oGGGwG~}G Procedures to change the IP address using serial number of the camera. (Serial number can be found at the bottom of the camera.) Login To open Login page, enter IP address in the address bar of your web browser and press Enter. 1. Start IP Utility 2. Click button. 3. “Assign IP address” pop-up window appears. <When Camera’s IP address is 192.168.10.121> a. Enter the S/N of the camera b. Obtain an IP address automatically (DHCP) : Select the DHCP option for Enter user ID and Password, and then press Login button. assigning the IP address automatically and <Start IP Utility> click Assign button. c. Use the following IP address : Enter desired IP address to assign static IP address and click Assign button 4. Press button to refresh the camera list. csGe <Assign IP address pop-up window> Default initial values of administrator’s ID and Password are admin/admin. If you have accessed by administrator account, you may change the password of administrator to ensure IP setting using DHCP could take up to maximum 10 minutes. Network setting can be modified later using Pitta WebView. (See page 16 for more information) the security of the system. In total, six non-administrator user’s can be configured by the administrator. Non-administrator user’s can access only Live View page. In case of login by Guest account, enter the assigned ID and Password and move to Live View page. However, in this case, the access by the Guest should be approved by the administrator. (See page 16 for more information.) XY XZ oGGGwG~}G oGGGwG~}G Setup Live View Live View Setup Help Logout ciGe Snap shot Full screen [Basic setup] Stop / Play Camera Date and time <Live View> : Click Click button then the display of image is paused. button then the screen continues displaying real-time view. : Displays on the full screen. If you press the button again, the display returns to the You can setup basic functions of the camera. Camera Name For assigning a name to the camera. Possible to use up to 64 letters. Resolution Use this to set the size of picture. VGA(640x480 pixel), CIF(352x288 pixel), QVGA(320x240 pixel), QCIF(176x144 pixel) Rotation Use this to rotate the display by 180 degrees. Night Mode Use this to get the better video quality in dark places. Video Quality original screen mode. Frame Rate Use this to choose video display quality. Highest(3Mbps), High(2Mbps), Normal(1Mbps), Low(500Kbps), Lowest(300Kbps) Use this to set the number of frames to be transmitted from the camera per second. 10 fps, 15 fps, 20 fps, 25 fps, 30 fps : You can save captured still images to the desired folder as bmp or jpeg file format. Motion Detection Enable the Motion Detection (Default is enabled) Camera Date and time : Displays the time you set on the camera (Please see page 22 for more information). If you login to Live View at first time, a yellow bar will appear at the top of the screen. Please click on the yellow bar and continue to install the ‘PTAMME_X ActiveX Control Module’. X[ Use Reset button to roll back to the previous settings. If saved, cannot be rolled back to previous setting. X\ oGGGwG~}G [Advanced setup] A. Users oGGGwG~}G DNS Setting Obtain DNS server address automatically : Change Admin’s ID and Password Specifies that network address for DNS servers are automatically obtained from the network. If you select Change User ID, Password and authority. this option, the DHCP server provides this information. Use the following DNS server address : Specifies that network addresses for DNS servers used by the camera are manually specified. If you select this option, you must type the IP addressed for your DNS servers in Preferred DNS server and Alternate DNS server. If you are not sure which IP addresses to use, check with your network You can use up to 4~32 (A-Z, a-z, 0-9,. _ possible) and 4~10 (possible to use all characters) administrator or Internet service provider. to make ID and Password, respectively. ii. Dynamic DNS Setting B. Network Settings Enable DDNS : Activates DDNS. For the Dynamic DNS service, Pitta 300 series support DynDNS (www.dyndns.com). i. IP and Ports (See page 40 for more information) IP and Port Setting Obtain an IP address automatically : Assigns the IP address of the camera automatically. Use the following IP address : Use this to assign the IP address of the camera manually. If the video is not visible when connected as non-admin user, refresh the page using refresh button of the browser. If the Web Port is changed other than 80, provide port number in the URL as follows; c~G~GwGG_Xe X] X^ oGGGwG~}G C. Video & Image Configuration oGGGwG~}G D. Sensor Color Setting Contrast : Use this to adjust contrast. Brightness : Use this to adjust brightness. Saturation : Use this to adjust saturation. Hue : Use this to adjust hue. Video Setting I frame interval : Use this to set I frame(Key frame) interval. If set lower value, quality will be better but, at higher bandwidth Press ‘Default’ button to roll back to initial settings. requirement. (1~60) Bitrate Setting - Variable bitrate : Bit rate is adjusted automatically according to the variation in the video images. Sensor Frequency - Constant bitrate : Bit rate is fixed regardless of the variation in the video images. Select one of the settings based on power frequency for proper sensor operation. (Minimum : 16 kbps, Maximum : 3000 kbps) Exposure JPEG Image Setting Use this to adjust exposure. If the value is higher, the image will be brighter. Compression Ratio : Auto : Automatically adjusts exposure. Use this to set the compression ratio of images to be uploaded to the FTP server or attached to the email. Manual : Exposure is fixed. The size of the image becomes smaller as the set value becomes greater. Enable Night Mode Text Overlay Settings : Enable Night Mode : Allows brightening video images when shooting in dark places. Use this to insert date, time and message to the image to be uploaded to the FTP server or attached to the - Priority : Adjusts video images by giving priority to either frame rate or image quality. email. Supports up to 20 letters. - Night Mode : Images become brighter as the value of this mode becomes greater. X_ X` oGGGwG~}G E. Events Configuration i. Motion Detection Enable Motion Detection Activates the motion detection function. oGGGwG~}G ii. Event Upload Upload Schedule This allows to set up notification to user for motion detection event via email or ftp or both. The image at the time of motion detection is captured and sent to user. Upload interval : Use this to adjust the time interval between two consecutive image transmissions when motion is detected. Be cautious that if the time interval is set to too short, video images may be broken because the camera is overloaded or the images may be considered as spam mails because images are too often transmitted. Motion Parameter Setting Upon setting a motion detection area, you may set at the most 4 different windows including both Included Always : Allows transmitting images according to the Upload interval value upon detecting motion. and Excluded windows. Weekly : Allows transmitting images at the time set according to the Upload interval value upon Included window : Allows detecting any motion within the selected window. Excluded window : Any motion in the Excluded window will be ignored. Add : Use this to add a detection window. Delete : Use this to remove a detection window. Full window : Allows detecting motions in the entire area. Object Size : Use this to set the sensitivity level for the size of objects in detecting their movement. As the set value becomes larger, the bigger object’s motion is detected. detecting motion. Never : Stops transmitting images. Email & FTP Setup SMTP Server Address : Enter your SMTP server host name or IP address. Authentication Required : If your mail server requires authentication, check the box MoT (Motion Threshold) : If larger value is set, then bigger motion will be detected. for “Authentication Required” Background : Sets the time to update background. A larger value is set then the longer duration of and then enter the User Name movement is detected and periodic movement is recognized as a background. and Password in the respective fields. User Email Address : You can enter the subject and “Enable Motion Detection” in Event Configuration needs to be activated. e-mail address. FTP Setup : You may enter FTP information to which YW images to be transmitted. YX oGGGwG~}G oGGGwG~}G F. System Operation iii. Sever Maintenance i. Date & Time Restart : Use this to re-start the camera. Once the camera is Current Server Time restarted, you have to login to the camera again. Date, Time : Displays current camera time. Default : New Server Time Use this to re-start the camera after returning all the Time Zone : Select the region where the camera settings except IP address to the initial settings at the is installed. (Ex. Region - Seoul, Time zone - EMT +09:00) time of purchase. Once the camera is restarted, you have to login to the camera again. If you press the reset button for 3 seconds at the bottom of the camera, then all the settings Time Mode Synchronize with computer time : Use this to synchronize camera time with user’s PC time. Synchronize with NTP server : Use this to synchronize camera time with NTP server time. Set manually : Use this to set the time in manually. will change to initial settings including IP address. Camera Firmware Upgrade How to upgrade the camera frimware 1. Download updated firmware file from support menu in Pittasoft homepage. Standard Date and Time format is 2009-02-22 09:00:00 (YYYY-MM-DD HH:MM:SS) 2. Click ‘Open’ button and then select the updated firmware file ii. LED Setting 3. Click ‘Upgrade’ button. 4. Upgrade will run automatically when the Set the behaviour of the Status Indicator LED transmission is completed. Red LED will be flashing Normal : Allows turning on the LED lamp on on the front of the camera during upgrade. the front side of the camera. Off : Allows turning off the LED lamp on the front side of the camera. When you are accessing this page for the first time, a yellow bar will appear at the top of the screen. Click on the yellow bar to continue to install the “FWUpgradeX Module”. The upgrade time takes up to 10 minutes. After firmware is upgraded, all the settings will be changed to initial setting including IP address. Camera restarts automatically after upgrade you need to login again to access the camera. Use IP Utility for network settings and use Pitta WebView to change date and time after reboot. Red – Starting, Orange – Booting, Green – Operating, Red flashing – Firmware upgrade You must not turn off the camera during upgrade. The camera will automatically restart when upgrade is completed. YY YZ oGGGwG~}G [About] oGGGwG} Pitta View start This page contains current Pitta WebView version, firmware version and the serial number. This is an integrated surveillance program which allows monitoring, recording or playback by connecting up to 16 cameras simultaneously. You can run Pitta View using the shortcut icon on the desktop or Pitta View item on program menu. csGze Help Initial screen start (Live View mode) sG}G wGsG OwG}GGP You can use this to get help and tips. Press the button on the setup page to get help and tips for the current page. j GMG Logout s G jG You can use this to logout. G G tGG lG zGG jGGGG Upon loading, Pitta View searches all the cameras connected in the subnet automatically. The initial screen is activated as Live View mode. You may add those cameras that are not connected to the local network manually. (See page 27 for more information) Y[ Y\ oGGGwG}G oGGGwG}G In case of manually registering cameras that are connected, but not in Available Cameras list. Live View mode (Manual registration) [Camera management window] 1. The authentication window appears when clicking A. Camera registration In case of registering an automatically found camera. (Automatic registration) and 80, respectively. 1. The authentication window appears when double-clicking the camera address in the list of Available Cameras or dragging the camera address into Connected Camera list or clicking button after selecting Connected Cameras. 2. Enter IP, Password, Video Port and Web Port. The default values of Video Port and Web Port are 50001 3. Once the authentication is completed, it appears in the list of Connected Cameras. button after selecting the camera address. 2. Enter ID, Password, Video Port and Web Port. The default values of Video Port and Web Port are 50001 and 80, respectively. You may manually register a camera which has been registered in DDNS. 3. Once the authentication of the selected camera is completed, it moves to the list of Connected In case of authentication failure Cameras. <ID or Password authentication failure > <Video Port or Web Port authentication failure > “Available Cameras” displays only the IP addresses and “Connected Cameras” displays camera names. To see the more information, click on camera name in the list of “Connected Cameras”. In case of ID or Password authentication failure, a message of Authentication failed appears, while a message of Not connected appears when authentication is failed due to issues related to Video Port or Web Port. Y] Y^ oGGGwG}G oGGGwG}G B. Camera search F. The state of camera list You can re-search cameras connected to the local network using The registered cameras are displayed by button. The information (IP address) of the found cameras is their names. updated in the list of Available Cameras. j jGGaGy jGGaGn t jGGaGy jGGaGy k jGGaGn jGGaGn If you click the box in front of a camera icon C.Cancellation of camera connection or double click on a camera name, detailed information of the camera (such as IP address, resolution, motion detection status) appears or disappears if previously displaying the information. When motion is detected, the color of letter is changed to red. Drag and drop the camera to be disconnected into the list of Available Cameras or click button G. Camera selection You can select a camera by clicking the camera from the management list or the image captured by the after selecting the camera from the Connected Cameras list. camera from the Live View screen. The icon’s color of the camera you selected in the list and the outline of the camera screen are changed to yellow. D. Deleting camera A camera is removed from all lists by clicking button after selecting it. You can delete a camera from the Available Cameras by clicking button. E. Camera information Information on the camera (such as camera name, IP address, model name, serial number) appears by clicking Y_ button after selecting the camera. Y` oGGGwG}G oGGGwG}G [Live View] [Mode conversion] If you drag and drop a camera from the list of Connected Cameras into Live View after selecting it, the video image of the selected camera appears. The camera name is displayed on the top left of image, Live View: Use this to move to Live View mode. while recording or event conditions are shown on the top right of the image. You can move the image to Settings: Use this to move to settings a desired location on the split screen of Live View by selecting and dragging the image. Playback: Use this to move to playback mode Camera search: Use this to re-search the cameras connected to the local network. Red Blue tG Log view: Use this to display log view search screen. [Storage information] Recording storage: Displays total data size recorded up to now. Normal recording Motion recording Motion detecting [Quick button collection] [Layout] Pause: Use this to temporarily pause the image captured by a selected camera. 8 different split screen modes are available. Capture: Use this to save a still image captured by a selected camera to a desired folder as 1X1 2X2 3X3 4X4 1P7 1P12 Full screen View conversion for 5 seconds. bmp or jpeg file format. Compulsory recording: Use this to compulsorily record the images captured by all cameras You can change a View conversion mode to the next split screen mode using left and right (Storage for recording should be first set before using this function.) arrow keys If there is no camera in the next page, View conversion is not effective. Minimizing: Use this to minimize Pitta View screen. [Digital zoom function] The image can be reduced or enlarged by 0.5 times (min.) to 2.0 times (max.) using mouse scroll button or up and down arrow keys in ZW 1X1 split screen mode. ZX oGGGwG}G oGGGwG}G Setting mode [Storage & additional functions setting] [Setting mode window] A. Setting recording storage To change to this mode, use button in Live View mode. Displays available disk space of the selected drive. Alarm setup Storage available : Built-in HDD, Removable storage (USB memory, External HDD), Network drive. 1. Select a hard disk in which recorded video to be saved. 2. Adjust the storage capacity using slide bar. 3. Save present settings by clicking button. Misc setup Recording Storage setup Log setup G <Storage and Add-on setting> B. Setting alarm A warning sound is generated when a pre-selected event occurs. 1. Select desired events and set the time duration of warning sound. Connected Recording - Motion Detected : When motion is detected. Cameras Scheduler - Camera Off : When connection of the camera is disconnected G - Storage Shortage : When recording space is insufficient. - Interval : Use this to set alarm interval. - Duration : Use this to select time duration of Recording storage Recording schedule ZY <Recording schedule> warning sound. Save Close 2. Save present settings by clicking button. ZZ oGGGwG}G oGGGwG}G [Recording scheduler] C. Setting log items Creates log files in the folder in which Pitta View is installed upon event occurrence. 1. Check relevant events. A. Setting schedule the recording 1. Select camera - Motion Detected : When motion is detected. - Camera Off : When camera is turned off. - Storage Shortage : When recording space is insufficient. - Recording : When recording is started / ended. - System On/Off: When Pitta View is turned on & off. - Change Configuration : When configuration is changed. 2. Select recording type (among Continue, Motion and None.) - Exception : When recording is failed. 2. - Continue : Allows a continuous recording. - Motion : Records when motion is detected. - None : Does not record. Save present settings by clicking save button. 3. Create a recording schedule block by dragging mouse to the desired time position after selecting continue in recording type. The set area is displayed in red. D. Misc. - Set Holiday : Use this to set holidays. - Reset : Use this to remove the schedule of a selected camera. - Reset to All : Use this to remove the schedules of all cameras. - Apply to All : Use this to apply the current assigned schedule to all cameras. Rectification : Use this function to compensate distorted images. This function can be applied in full screen 1x1 in the largest screens of 1P7 channel and and 1P12 channels. Red: Continue Blue: Motion No color area: None On full storage - Overwrite : If the recording storage is less than 1g, very first recorded data will be deleted and keep recording. - Stop recording : If the recording storage is less than 1g, recording will be stopped. Z[ 4. Save : Allows to present settings. 5. Close : Allows to convert to Live View mode. Z\ oGGGwG}G oGGGwG}G Playback mode B. Setting motion recording Motion recording can be carried out when motion enable settings and motion area settings of the relevant camera in Pitta WebView have been completed (See page 20 for more information). You need [Playback mode window] To change to this mode, use playback button in Live View mode. to check if M is displayed on the top right of the applicable camera’s screen in Live View mode upon detecting motion when the camera’s motion settings have been done. 1. Select a camera List of Recorded Cameras Recorded date display Data map 2. Create a recording schedule block by dragging mouse to the desired time position after selecting motion in recording type. The set area is displayed in blue. Data map displays the data recorded by the selected camera on a specific date by hour, minute and second. The cameras in the list of Recorded Cameras are displayed by their names and contain IP address and serial number in the detail information (if there is no data on the date you selected, the icon of relevant camera is displayed in grey). jG yGG yGaGu GGGGG iGaGtG - Pre recording : Use this to set how many seconds before detecting motion recording begins. - Post recording : Use this to set how many seconds more recording continues from the end point of detecting motion. 3. Save present settings by clicking button. A blue circle will be displayed in Live View mode if recording is in progress. This function can be applied only when Enable Motion Detection function is activated in Events Configuration (See page 20 for more information.) of Pitta WebView. If it is not activated, it will not be recorded. Z] yG Searching is not possible in the playback mode. Z^ oGGGwG}G oGGGwG}G [Recorded data map types] Log view mode [Log view mode window] To convert to this mode, use log view convert button. It allows searching for log data of camera and Pitta View by date. You can search log data for up to 3 years. Normally recorded data map (Red) Motion recorded data map (Blue) [How to set playback] 1. Click the desired camera among cameras in the list of Recorded Cameras and drag and drop it onto the screen. 2. Select a date on which you can search recordings (Red circle: recorded date, Yellow circle: current selected date) 3. Carry out record searching using playback mode button. 4. You can move to the image of a desired time by clicking data mark in data map. Possible to search by hour, minute and second basis. csG}Ge [How to see log view] 1. Select a date in the calendar on which log data is recorded. 2. Maximum 1,000 lines of log data are displayed in a page. You can move to the next page using left or right arrow key. 3. Current log list can be backed up as cvs file format (Excel file format) using button. 4. If there are data more than 1,000 lines on a specific date, you may move to the desired page using left or right arrow key or Snapshot : You can save still images you selected as bmp or jpeg format. by directly entering a page number. Print : Use this to print the current view of the camera you selected. : Display or change of the selected camera : Use to display or change the currently selected camera. : Allows to move to the first frame of video of selected date. : Allows to move backward frame by frame. : Playback, pause : Allows to move foreward frame by frame : Allows to move to the last frame of video of selected date. Recording storage: Indicates total data size recorded. Logo Version information on Pitta View is displayed when double-clicked on the logo. Maximum playback time is 24 hours. Data recorded next day can be played back by selecting the date in the calendar. Z_ Z` hGX hGY Troubleshooting DDNS & Router Port Forwarding If there are problems in operation, please refer to the items below. DDNS uses a specific domain name to access the device which has a dynamic IP address. User can access the camera through the domain name, any dynamic IP address changes will be automatically updated by the camera’s DDNS client with the DDNS server. To use DDNS service, connect to DynDNS (http://www.dyndns.com) and registered with one of the several free domain names. And then do the DDNS setting for the camera through Pitta WebView’s DDNS settings page. (See page 17 for more information) Nothing appears on the screen. ▶ Please check the power connection. ▶ Please check the network cable connection. ▶ Please make sure the LAN cable is cross cable (PC connection) or general LAN cable (Switch Hub, Router connection) ▶ If IP utility or Pitta WebView is not able to detect the camera after checking the above items, press the ‘Reset’ button to initialized it and then try again. IP or domain name serviced by DDNS is not accessible when the dynamic IP is the hidden internal IP by The video image is not clear. the router. In this case, if you use port forwarding provided by the router then you will be able to access the ▶ Please check if the lens is clean. Please clean the lens with a clean cloth or brush. dynamic IP. The router’s port forwarding is the functionality to distinguish the internal IP from the router’s ▶ Please adjust the contrast feature of the monitor. port. For instance, you can set the access port 80 and 81 using the router IP (121.140.158.405), access from the web to internal IP 192.168.10.100 and 192.168.10.101. Then it can be accessed by http://121.140.158.405:80 and http://121.140.158.405:81. If DDNS activates, it can be accessed by the registered domain name. (See page 16 for more information) Pitta Client PC /121 .140 .158 .405 :80 ▶ Please adjust the contrast feature of the monitor. ▶ Please adjust the Color Setting of Sensor Configuration in Pitta WebView The Motion Detection function is not working. DDNS http://pitta.dyndns.com:81 Service (DynDNS) http :/ ▶ Please make sure that the screen is not exposed directly to a bright light. Please move the camera if necessary. The screen is dark. ▶ Please check the 'Enable Motion Detection' mode is turned on in Pitta WebView. ▶ Please check the setting of Motion Parameter Setting in Pitta WebView. Colors are not quite right. Internet ▶ Please check the Color Setting of Sensor Configuration in Pitta WebView. The screen is flickering. ▶ Please check if the camera is facing directly into fluorescent light. ▶ Please check the Sensor Frequency in Pitta WebView. Router http://192.168.10.150:82 Video is stopped (Port Forwarding) ▶ Please check whether network cable is correctly connected Pitta Client PC Subnet ▶ In case user uses hub or IP router, check whether these network equipments are working properly. No image from Pitta WebView ▶ Please click ‘refresh (shortcut; F5) ’ button at browser to recall the page Pitta 300 Pitta 300R Pitta 300D Pitta 300DR ▶ Please check whether power of camera and network cable is properly connected. ▶ Please check whether computer is connected to network. ▶ If you use hub or IP router, check whether such equipments are properly operating. Port 80 Port 81 Port 82 Port 83 Image transfer to FTP or by E-mail cannot be received. ▶ Please check the Event Upload Configuration is set correctly in Pitta WebView. <DDNS & Router port forwarding diagram> [W If the problem still persists, please contact the agent you purchased this product from. [X hGZ hG[ Pitta 300 Series Specification Pitta WebView Specification Pitta 300/300R Camera Pitta 300D/300DR Camera type Fixed type Dome type Image sensor 1/4” CMOS VGA 1/4” CMOS VGA 1/3” CMOS VGA(WDR) 1/3” CMOS VGA(WDR) Live View ActiveX based Live View with snapshot and full screen Setup Basic Easy configuration for beginners Advanced Advanced configuration options for high-end users Video resolutions 640X480 (VGA) No. of effective pixels 320,000 pixels 352X288 (CIF) Lens type Board-mount lens, fixed focus 320X240 (QVGA) Focal length F=4.4mm, 800mm~infinity Field of view 67° F-number F2.0 176X144 (QCIF) Video configuration Frame rate, resolution, bit-rate, I-frame interval configuration settings Maximum 3 Mbps bit-rate supported Interface JPEG configuration Configurable compression ratio Ethernet 10/100 Base-TX(RJ-45) User list Maximum 7 users (1 admin with full access and 6 viewers access password entry) Protocol TCP/IP, HTTP, DHCP, SMTP, FTP, DNS, DDNS Event configuration Motion detection : 4 included/excluded windows supported with Object size, Button Reset Cable type UTP CAT 5 LEDs Red-Starting, Orange-Booting, Green-Operating, Red flicker - Software upgrade Email/FTP configuration 3 email & 3 FTP configuration for event notification Power supply External power adapter: DC5V/1.0A Overlay Event captured JPEG image with text, date and time Power consumption Max 3W Date & time Camera date and time selection with automatic adjustment System settings Remote camera reboot, Restore factory default setting, Firmware upgrade MoT, Background options Weekly scheduled motion detection event with selectable upload interval Environment Certification FCC, CE, RoHS Operating temp. 32°F to 122°F (0°C to 50°C) Storage temp. -40°F to 140°F (-40°C to 60°C) Unit weight 96g [Y 139g [Z hG\ hG] Pitta View Specification Pitta 300 and Pitta 300R Dimension Display resolution 1024x768 Video codec H.264 decoder Transport protocol Pittasoft IP Network Camera protocol (TCP/IP) Security Advanced Encryption Standard (AES), 128-bit (Rijndael) Live View Up to 16ch Display layout 1, 4, 8, 9, 13, 16, rotation, full screen Recording Recording scheduler W2.79”(71mm) H1.69”(43mm) Storage settings D5.31”(135mm) Recording mode (continue, motion, none) MP4 file format Playback Up to 16ch Digital zoom Up to 2.0X Camera searching Automatically IP Network Camera searching Minimum requirements CPU Intel Pentium 4 2.0Ghz or higher RAM Minimum 1GB Network Ethernet Graphics card Minimum 1024x768, 24bit colors, 128MB RAM Pitta 300D and Pitta 300DR Dimension DirectX 9.0 or newer support, Direct Draw Overlay Support Hard disk type E-IDE, SATA, SCSI, SAS Hard disk space Minimum 80Gbyte free(depends on number of camera and recording settings) OS [[ Windows XP SP2, Windows Vista [\