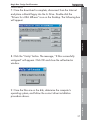
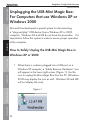
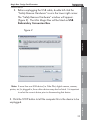
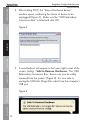
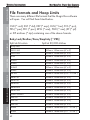
1
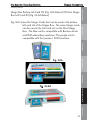
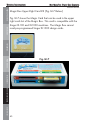
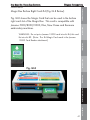
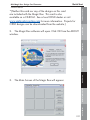
OESD
Magic
Box
Design Card Converters
Instruction Manual for
OESD Magic Box & OESD Mini Magic Box
Installation:
Introduction ......................................................................... 3
Installation:
Disclaimers .......................................................................... 5
Limited Warranty ................................................................ 6
Accessories........................................................................11
Software Installation.........................................................12
OESD Magic Box Installation .........................................13
Driver Installation..............................................................15
Unplugging the Magic Box in Windows 2000 and XP......................27
Starting the Magic Box Program.....................................31
General Information:
The Magic Box .................................................................35
Card Formats ....................................................................37
File Formats .......................................................................42
Product Registration..........................................................46
Sizing Program .................................................................48
Main Screen:
Design Area ......................................................................55
Dialog Box ........................................................................56
Read...................................................................................57
Load Card .........................................................................63
Write Card ........................................................................66
Delete.................................................................................72
Options ..............................................................................73
Exit......................................................................................76
Color Editor:
Introduction..................................................................................... 78
File ................................................................................................... 79
Print.................................................................................................. 80
Options ........................................................................................... 81
Quick Start:
Lesson 1: Reading and writing designs
from a CD-ROM...................................................................... 85
Lesson 2: Loading and writing designs
from a design card by browsing the
card .......................................................................................... 92
Lesson 3: Loading and writing a design
from a design card using index ...........................................100
Lesson 4: Using Color Editor to adjust the
colors in a design and then writing the
design to magic card ............................................................106
Mini Magic Box - Design Card Converter
Introduction
Introduction
About This Manual
The Mini Magic Box software gives the user the unique ability
to convert favorite designs from one card to another. This
manual is not only filled with information about how to use the
program, but it also includes many timesaving tips.
Installation
Why the Mini Magic Box
Is a Good Choice
Introduction
Table of Contents
Software Manual
3
Color Editor
General Information
Quick Start
Main Screen
The Mini Magic Box enables the user to transfer designs from
most Bernina-Deco, Bernina-artista, Brother, Viking, Babylock,
Simplicity, Janome 10000 and Pfaff pre-written design cards
to a compatible re-writable Magic Card quickly and easily.
It will also give the ability to read designs in the HUS, CSD,
PES, PCS, EXP, PEC and DST formats and save them to a
Magic Card.
Installation
Magic Box - Design Card Converter
Software Manual
Table of Contents
Installation
Items Found in This Section:
Introduction
1. Disclaimers
2. Limited Warranty
3. Accessories
4. Software Installation
5. Magic Box Installation
6. Driver Installation
7. Unplugging the Magic Box in Windows 2000 and XP.
8. Starting the Magic Box Program
Installation
Main Screen
Quick Start
General Information
Color Editor
4
Magic Box - Design Card Converter
Installation
o
o
o
o
o
o
o
5
Introduction
Installation
o
Main Screen
o
Quick Start
o
This product is not to be used to violate copyright, trademarks
or other rights of third parties.
The converter box will not read manufacturers’ alphabet
memory cards.
All designs must fit inside the sewing hoop capabilities of the
embroidery machine. Reducing the design to fit inside the
hoop may affect the sewability.
Some designs may have stitches that cannot be read correctly
into the converter box.
The converter box cannot warranty the quality of third party
digitizers.
Any user of the converter box should adhere to applicable
license agreements of all third parties of the designs.
This product will only save designs to an official Magic Box
card.
Inserting the wrong card type or any foreign object other than
an embroidery memory card into the correct slot could bend
connector pins and damage the converter box. Connector pins
are not covered under the Limited Warranty.
Each card will access 120,000 to 180,000 stitches. It is
possible that some designs could have more stitches than a
card will allow.
Not all designs will work on all machines due to machine
capabilities.
Colorizing the design may be necessary through Color Editor
so that the color displays correctly on the machine’s LCD
screen, if applicable.
General Information
o
Color Editor
Disclaimers
Table of Contents
Software Manual
Installation
Magic Box - Design Card Converter
Software Manual
Table of Contents
Limited Warranty
Introduction
1. All parts, other than connector pins, are warranted to be free
from defects for a period of one year and will be, at the
manufacturer’s option, replaced or repaired at no charge
to you, the consumer, for a period of one year from date
of original purchase, provided said parts or machine are
returned, transportation prepaid.
Installation
2. There is no charge for covered parts or labor when a Magic
Converter Box is returned within 90 days of the original
purchase. Proof of purchase date (a copy of the sales receipt)
must be included with the machine. The machine will be
returned to you, the consumer, prepaid.
Main Screen
Quick Start
3. A flat fee of $50.00 will be charged for service of nonwarranted parts when returned after 90 days and before 365
days from the date of original purchase. Proof of purchase
date, and a check or money order for $50.00, must be
included with the machine.
Make checks or money orders payable to:
OESD TECH AUTHORIZED SERVICE CENTER,
12101 I-35 Service Road
Oklahoma City, OK 73131
General Information
The Magic Converter Box will be returned to you, the consumer,
freight prepaid.
4. This warranty does not cover bent connector pins.
Color Editor
5. This warranty does not cover postage, transportation to a
service center, or service provided by anyone other than
OESD Tech Service Centers.
6
Magic Box - Design Card Converter
Installation
6. After one year, service may be obtained by contacting any
local sewing machine repair center, or returning the Magic
Converter Box to OESD Tech Service Center for an estimate of
repair charges to the address below.
Installation
Introduction
7. THIS LIMITED WARRANTY IS THE EXCLUSIVE WARRANTY
AND ALL OTHER WARRANTIES, WHETHER EXPRESSED
OR IMPLIED, ARE HEREBY DISCLAIMED, INCLUDING
WITHOUT LIMITATION, THE IMPLIED WARRANTIES OF
MERCHANTABILITY AND FITNESS FOR A PARTICULAR
PURPOSE.
Table of Contents
Software Manual
Main Screen
8. This warranty is in effect provided the Magic Converter Box
is used only for normal household sewing purposes and
not commercial use, and given reasonably good care. The
manufacturer is also not to be held responsible for damage,
normal wear, accident, abuse, neglect, acts of God, or if the
Magic Converter Box has been repaired (worked on) by
unauthorized personnel.
Quick Start
9. Any machine returned:
7
Color Editor
General Information
A. Must be packed securely to avoid damage in shipping.
We suggest using the original carton and non-static styrofoam
packing.
B. Shipping charges are to be paid by sender.
C. To protect against damage in shipment, the Magic
Converter Box should be insured for full value.
D. Proof of purchase (a copy of the sales receipt) must be
included.
E. Be sure to include sender’s name and address (yours) on
outside and inside of carton.
F. Please specify problem.
Installation
Magic Box - Design Card Converter
Software Manual
Table of Contents
10. Warranty only applies to the Converter Box. Warranty does
not apply to incidental or consequential damages including
but not limited to embroidery cards, embroidery machines,
garments, or other soft goods.
Introduction
Installation
11. This warranty is not transferable and extends only to the
original purchaser when new and when purchased from
a duly authorized dealer. This warranty is in lieu of all
other warranties. The manufacturer is not responsible for
any representation, expressed or implied, other than those
contained herein.
This warranty gives you specific legal rights, and you may also
have other rights which vary from state to state.
Main Screen
This warranty disclaims liability for incidental, or consequential
damages, which apply during and after the warranty period.
Some states do not allow the exclusion or limitation of
incidental or consequential damages, so the above limitation
or exclusion may not apply to you.
Quick Start
If you have any questions or comments concerning this product,
please feel free to contact the manufacturer at the address
below:
General Information
OESD Tech
12101 I-35 Service Road
Oklahoma City, OK 73131
888-223-6943
[email protected]
Color Editor
8
Magic Box - Design Card Converter
Installation
Table of Contents
Software Manual
Important Information: Regulations
Federal Communications Commission
Compliance Notice (for U.S.A. only)
Important - About the Interface Cable
This equipment has been certified to comply with FCC standards,
which are applied to the U.S.A. only. A shielded interface
cable should be used according to FCC 15.27 (C)
Caution: Changes or modifications not expressly approved by the
manufacturer or local sales distributor could void the user’s
authority to operate the equipment.
9
Color Editor
General Information
Quick Start
Main Screen
Installation
Introduction
This equipment has been tested and found to comply with the
limits for a Class B digital device pursuant to Part 15 of the
FCC Rules. These limits are designed to provide reasonable
protection against harmful interference in a residential
installation. This equipment generates, uses and can radiate
radio frequency energy and, if not installed and used
in accordance with the instructions, may cause harmful
interference to radio communications. However, there is
no guarantee that interference will not occur in a particular
installation. If this equipment does cause interference to radio
or television reception, which can be determined by turning
the equipment off and on, the user is encouraged to try to
correct the interference by one or more of the following
measures:
- Reorient or relocate the receiving antenna.
- Increase the separation between the equipment and receiver.
- Connect the equipment into an outlet on a circuit different from
that to which the receiver is connected.
- Consult the dealer or an experienced radio/TV technician for
help.
Installation
Magic Box - Design Card Converter
Software Manual
Table of Contents
Canadian Department of Communication
Compliance Statement (for Canada only)
Introduction
This digital apparatus does not exceed the Class B limits for
radio noise emission from digital apparatus as set out in the
interference causing equipment standard entitled “Digital
Apparatus”, ICES-003 of the Department of Communications
Radio Interference (220-240V are only)
Installation
This machine complies with EN55022 (CISPER Publication 22)/
Class B.
Main Screen
Quick Start
General Information
Color Editor
10
Magic Box - Design Card Converter
Installation
Table of Contents
Software Manual
Accessories
Introduction
Included with the factory packaging:
1 Magic Converter Box
1 USB Cable
1 (Blank) Magic card for your specific machine must be
obtained from your dealer.
1 Program Software on CD ROM
1 Sizing Magician and Design Catalog on CD ROM
Installation
Additional Magic cards are available from your dealer or order
through www.embroideryonline.com.
Computer Requirements
11
Color Editor
General Information
Quick Start
Main Screen
Pentium Processor
32 megabytes RAM
5 MB hard drive space
Windows 98SE/ME/2000/XP
CD ROM Drive
Display 800 x 600 or better
USB Port
Microsoft Compatible Mouse
Magic Box - Design Card Converter
Installation
Software Manual
Table of Contents
Software Installation
Introduction
Installation
Main Screen
1. From the Windows desktop close all open programs.
2. Place the Magic Box Program Disk CD in the CD-ROM drive.
Wait a few seconds. If the program begins to install, skip to step 7.
3. From the Windows desktop, click on the Start button.
4. Click on the Run button.
5. At the Run prompt you will need to type the letter of your CDROM Drive followed by Setup. (Ex: D:\SETUP or E:\SETUP.)
You may also press the Browse button and click on the CDROM drive then click on setup.exe file. Once the setup.exe file
is highlighted press Open. This will copy the command to the
command prompt. Press the Enter key.
6. This will activate the installation.
7. Click Next.(Fig. Inst-1 Below)
8. Click “I accept”& then click next. (Fig. Inst-2 Below)
Quick Start
General Information
Fig. Inst-1
Color Editor
Fig. Inst-2
12
Magic Box - Design Card Converter
Installation
Table of Contents
Software Manual
Introduction
9. Click Install. (Fig. Inst-3 Below) 10. Click Finish. (Fig. Inst-4)
The Magic Box will connect directly and be powered by an
available USB port on the computer. The computer supplies all
the power that the Magic Box will need.
Connecting the Magic Box to the computer is very simple. Take the
square end of the USB cable (Fig. Inst-5A Below), and plug it into
the USB port on the Magic Box (Fig. Inst-5B Below).
Next, take the flat end of the USB cable (Fig. Inst-6 Below), and plug it
Fig. Inst-5A
Fig. Inst-5
Fig. Inst-5B
13
Quick Start
The Magic Box software MUST be installed before connecting the
USB Magic Converter Box to the computer.
General Information
Magic Box Installation
Main Screen
Installation
Fig. Inst-4
Color Editor
Fig. Inst-3
Installation
Magic Box - Design Card Converter
Software Manual
Table of Contents
into any available USB port on the computer (Fig. Inst-7 Below).
NOTE: Some computers have USB ports on the front and/or the
back. Use any available USB port.
Introduction
After plugging the Magic Box into the USB port, the computer will
automatically begin looking for drivers for the Magic Box.
Installation
Main Screen
Quick Start
Fig. Inst-6
General Information
Color Editor
Fig. Inst-7
14
Magic Box - Design Card Converter
Installation
1. Once the Mini Magic Box is plugged in, the Hardware
Installation Wizard activates and begins searching for the USB
Mini Magic Box drivers (USB Embroidery Conversion Box files).
Windows XP will automatically search for the correct drivers. Click
“Next” and skip to Step 8.
Windows 2000 may also search for the drivers automatically. If it
does, skip to Step 8.
If it does NOT search automatically, go to Step 2.
15
Color Editor
General Information
Quick Start
2. If the Hardware Installation Wizard Window does NOT open
when the Mini Magic Box is plugged in, right-click on the “My
Computer” icon (found on the Desktop, Start Menu or Windows
Explorer). Then, left-click on “Properties” to open the System
Properties window.
Introduction
Windows XP or 2000 Driver installation:
Installation
Now that the Mini Magic Box software and hardware have been
installed, the drivers will need to be installed. First determine the
Windows operating system the computer is running and then
follow the instructions below that correspond to that version.
Main Screen
Installing the Drivers
Table of Contents
Software Manual
Installation
Magic Box - Design Card Converter
Software Manual
Table of Contents
3. Go to the “Hardware” tab and click on “Device Manager”.
Introduction
Installation
Main Screen
4. Find the listing for “Other devices”. Locate the “USB Embroidery
Conversion Box” underneath and right-click on it. (If “Other
devices” is not listed, skip to Step 6).
Quick Start
General Information
Color Editor
16
Magic Box - Design Card Converter
Installation
Table of Contents
Software Manual
17
Color Editor
General Information
Quick Start
6. If “Other devices” is not listed, go to the bottom of the Device
Manager list, to the “Universal Serial Bus controllers” and click the
+ sign. It may be listed as “Unknown device” or “USB Embroidery
Conversion Box” under this heading. Right-click on this listing and
then left-click on “Properties”.
Main Screen
Installation
Introduction
5. Click on “Properties”:
Installation
Magic Box - Design Card Converter
Software Manual
Table of Contents
7. The Properties window opens. Click on “Reinstall Driver”. (If
there is not a “Reinstall Driver” option, click “Update Driver” from
the “Driver” tab.) This will then activate the Update Wizard.
Introduction
Installation
Main Screen
Quick Start
8. Click “Install from a list or specific location {Advanced}” and
click “Next”.
General Information
Color Editor
18
Magic Box - Design Card Converter
Installation
Table of Contents
Software Manual
19
Color Editor
General Information
Quick Start
Main Screen
Click OK from this window and a window should open that looks
like the one below. Just click and swipe the “Copy files from:” line
and type in the CD-ROM location (example- D:). Remember, the
CD-ROM letter on the computer may vary, so be sure to check to
see what letter the CD-ROM drive is.
Installation
Introduction
NOTE: Windows 2000 may present the window below when the USB Mini
Magic Box is first plugged in.
Installation
Magic Box - Design Card Converter
Software Manual
Table of Contents
9. Choose “Search for the best driver in these locations” and
check the “Search removable media” option. Click “Next”.
Introduction
Installation
Main Screen
10. The dialog may state, “This driver is not digitally signed”. This
window asks whether to stop the installation or continue. Click the
“Continue Anyway” button to proceed. This will not harm the USB
Mini Magic Box or system in any way.
Quick Start
General Information
Color Editor
20
Magic Box - Design Card Converter
Installation
Main Screen
Installation
Introduction
11. The Installation Wizard will continue to copy the appropriate
files to the proper location. A meter bar will fill from the left to the
right as the information is copied.
Table of Contents
Software Manual
21
Color Editor
General Information
Quick Start
12. Once the files are copied, the completed window will open.
Click “Finish” to complete the process.
Installation
Magic Box - Design Card Converter
Software Manual
Table of Contents
Win 98 or ME Driver install:
1. Windows 98 and Windows ME may automatically begin
searching for the drivers when the USB cable is plugged in. If they
do NOT, specify where to look on the computer to find the drivers
and then follow the instructions in the previous section, Steps 2-8.
Introduction
2. When the Add New Hardware Wizard opens, click “Next”.
Installation
Main Screen
Quick Start
3. Windows will search for the drivers or will request the location
where they are stored. Choose “Search for the best driver for your
device” and click “Next”.
General Information
Color Editor
22
Magic Box - Design Card Converter
Installation
Table of Contents
Software Manual
23
Color Editor
General Information
Quick Start
NOTE: If the drivers are NOT located, they will need to be downloaded from
the Internet. Please click “Cancel” on the window below and skip to section
titled, “What to do if the Drivers do not install” on page 23
Main Screen
Installation
Introduction
4. In the next window, uncheck any boxes that may already be
checked. Check the CD-ROM drive from the list and click ‘Next’.
Installation
Magic Box - Design Card Converter
Software Manual
Table of Contents
5. Windows may want to confirm the files that are to be installed.
If so, the window shown below will open. Click “Next”.
Introduction
Installation
Main Screen
6. Once the files are copied, the completed window will open.
Click “Finish” to complete the process.
Quick Start
General Information
Color Editor
24
Magic Box - Design Card Converter
Installation
Table of Contents
Software Manual
What to do if the Drivers do not install
If the Drivers do not install, it will be necessary to download the
drivers from the Internet.
Installation
Introduction
1. Log onto OESD’s Online Support Center with this address:
http://embroideryonlinesupport.custhelp.com.
Quick Start
Main Screen
2. Scroll down to the ANNOUNCEMENTS Box in the lower left
corner.
4. Scroll to the bottom of the page and click on the link to
download the drivers.
25
Color Editor
General Information
3. Locate the listing “Drivers for the USB Mini Magic Box
software” and click on the link.
Installation
Magic Box - Design Card Converter
Software Manual
Table of Contents
5. Click to “Save” this file to the computer.
Introduction
Installation
6. Use the dropdown arrow to select the Desktop. Click “Save” to
download the file.
Main Screen
Quick Start
General Information
Color Editor
26
Magic Box - Design Card Converter
Installation
Installation
Introduction
7. Once the download is complete, disconnect from the Internet
and place a blank floppy into the A: Drive. Double-click the
“Drivers for v33A MB.exe” icon on the Desktop. The following box
will appear:
Table of Contents
Software Manual
9. Once the files are on the disk, determine the computer’s
operating system, and follow the correct driver installation
procedure above.
27
Color Editor
General Information
Quick Start
Main Screen
8. Click the “Unzip” button. The message, “2 files successfully
unzipped” will appear. Click OK and close the self-extractor
window.
Magic Box - Design Card Converter
Installation
Software Manual
Table of Contents
Unplugging the USB Mini Magic Box:
For Computers that use Windows XP or
Windows 2000
Introduction
Installation
Microsoft has developed a special system for disconnecting
a “plug and play” USB device from a Windows XP or 2000
computer. Windows 98 and ME do not have this procedure. It is
important to follow this system in order to ensure proper operation
of the computer.
How to Safely Unplug the USB Mini Magic Box in
Windows XP or 2000
Main Screen
Quick Start
1. When there is a device plugged into a USB port on a
Windows XP computer, a “Safely Remove Hardware” icon
will appear in the lower right corner. (Figure 1). Use this
icon to unplug the Mini Magic Box from the PC. (Windows
2000 may display the icon as well. Windows 98 and ME
will not display the icon).
General Information
Figure 1
Color Editor
28
Magic Box - Design Card Converter
Installation
Introduction
2. Before unplugging the USB cable, double left click the
“Safely Remove Hardware” icon in the lower right corner.
The “Safely Remove Hardware” window will appear.
(Figure 2). The Mini Magic Box will be listed as USB
Embroidery Conversion Box.
Table of Contents
Software Manual
3. Click the STOP button to tell the computer this is the device to be
unplugged.
29
Color Editor
Note: If more than one USB device (i.e. Palm Pilot, digital camera, scanner,
printer, etc.) is plugged in, those other devices may also be listed. It is important
to select the correct device prior to disconnecting that device.
General Information
Quick Start
Main Screen
Installation
Figure 2
Magic Box - Design Card Converter
Installation
Software Manual
Table of Contents
4. After clicking STOP, the “Stop a Hardware device”
window opens, confirming the choice of device to be
unplugged (Figure 3). Make sure the “USB Embroidery
Conversion Box” is listed and click OK.
Introduction
Figure 3
Installation
Main Screen
Quick Start
5. A word balloon will appear in the lower right corner of the
screen, stating: “Safe to Remove Hardware. The ‘USB
Embroidery Conversion Box.’ device can now be safely
removed from the system” (Figure 4). It is now safe to
unplug the USB Mini Magic Box cable from the computer’s
USB port.
General Information
Figure 4
Color Editor
30
Magic Box - Design Card Converter
Installation
Start Program
Introduction
Windows 98 and ME do not require this procedure because they
do not have the capabilities of Windows 2000 or XP. When
the USB Mini Magic Box cable is inserted or removed from a
Windows 98 or ME computer, the mouse cursor will change to
the busy icon (spinning hourglass). Once the change in device is
detected, the cursor will revert back to the normal arrow icon.
Table of Contents
Software Manual
To start the program:
Double click on the Magic Box Icon that has been placed on the
desktop.
If an error is shown when loading the Magic Box’s software, contact the
Software Support Department at 1-888-223-6943 between Mon.-Fri. 8am-6pm
Central Time.
31
Color Editor
Magic Box appears on the screen as shown. The Magic Box and software are
properly installed and are ready to be used.
General Information
Quick Start
Main Screen
OR
1. Go to Start
2. Click on PROGRAMS
3. Click on OESD
4. Click on Magic Box
Installation
Follow the steps below in order to run the Magic Box.
General Information
Mini Magic Box - Design Card Converter
Software Manual
Table of Contents
General Information
Items found in this Section:
Introduction
1. The Mini Magic Box
2. Card Formats
3. File Formats
4. Product Registration
5. Sizing Program
Installation
Main Screen
Quick Start
General Information
Color Editor
32
Mini Magic Box - Design Card Converter
General Information
Table of Contents
Software Manual
NOTE: The Magic Box cannot read a pre-programmed Singer XL1000 Card.
Fig. GI-1D Lower Right Card Slot #4
This is the card slot for Janome 8000 and 9000, Elna,
New Home and Kenmore Cards.
Fig. GI-1E Red Light
The red light is the activity light. It indicates that the
Magic Box is either Reading, Loading or Writing a
card.
WARNING! Do not remove the card or attempt to perform another
function when the red light is on.
33
Quick Start
Fig. GI-1C Upper Right Card Slot #3
This is the correct card slot for Singer Cards.
General Information
Fig. GI-1B Lower Left Card Slot #2
This is the correct card slot for Bernina artista, Janome
10000 and Pfaff Cards.
Color Editor
Fig. GI-1A Upper Left Card Slot #1
This is the correct card slot for the Bernette-Deco,
Brother, Viking, Babylock and Simplicity Cards.
Main Screen
Installation
Introduction
The Magic Box (Fig. GI-1 Below)
General Information
Mini Magic Box - Design Card Converter
Software Manual
Table of Contents
Fig. GI-1F Green Light
The green light indicates that the Magic Box is ON,
and available for use.
Introduction
A. USB port
Fig. GI-2 shows the USB connection for the Magic Box.
This is the input and output port that allows the Magic
box to communicate with the computer.
Installation
Main Screen
Quick Start
General Information
B. USB Cable
Fig. GI-3 shows the USB cable. The cable plugs into
the back or front (on some models) of the computer as
shown in Fig. GI-4.
Color Editor
34
Mini Magic Box - Design Card Converter
General Information
The Mini Magic Box (Fig. GIA-1)
Fig. GIA-1A Right Card Slot #1
This slot is the correct card slot for Bernette-Deco,
Brother, Viking, Babylock and Simplicity Cards.
Fig. GIA-1B Left Card Slot #2
This is the correct card slot for Bernina artista, Janome
10000 and Pfaff Cards.
Fig. GIA-1D Green Light
The green light indicates that the Magic Box is ON,
and is available for use.
35
Color Editor
General Information
Quick Start
Fig. GIA-1C Red Light
The red light is the activity light. It indicates that
the Magic Box is either Loading or Writing a card.
WARNING! Do not remove the card or attempt to
perform another function when the red light is on.
Main Screen
Installation
Introduction
NOTE: The Mini Magic Box is a smaller version of the Magic Box and has two slots instead of four.
Table of Contents
Software Manual
General Information
Mini Magic Box - Design Card Converter
Software Manual
Table of Contents
A. USB Port
Fig. GIA-2 shows the USB connection for the Mini
Magic Box. This is the input and output port that allows
the Mini Magic Box to communicate with the computer.
Introduction
Installation
Main Screen
B. USB Cable
Fig. GIA-3 shows the USB cable. The cable plugs into
the back or front (on some models) of the computer as
shown in Fig. GIA-4.
Quick Start
General Information
Color Editor
36
Mini Magic Box - Design Card Converter
General Information
37
Color Editor
General Information
Quick Start
Main Screen
Installation
The Magic Box can read original manufacturers’ cards but
can only write to cards made especially for the Magic Box. For
more information on purchasing additional cards, please contact
your local dealer or visit www.embroideryonline.com.
Introduction
Card Formats
Table of Contents
Software Manual
General Information
Mini Magic Box - Design Card Converter
Software Manual
Table of Contents
Magic Box Upper Left Card #1 (Fig. GI-5 Below) OR Mini Magic
Box Right Card #1 (Fig. GI-5A Below)
Introduction
Installation
Fig. GI-5 shows the special Magic Card that can be used in the
upper left card slot of the Magic Box. Fig GI-5A shows
the same card inserted into the right card slot on the
Mini Magic Box. This card is compatible with BernetteDeco, Brother, Viking #1+, Rose, Iris, Babylock and
Simplicity embroidery machines. The Magic Box
cannot read Brother Disney series design cards.
Main Screen
Fig. GI-5
Quick Start
General Information
Fig. GI-5A
Color Editor
38
General Information
Mini Magic Box - Design Card Converter
Main Screen
Installation
Fig. GI-6 shows the Magic Cards that can be used in the bottom
left card slot of the Magic Box. The same Magic cards
can be used in the Left card slot on the Mini Magic
Box. The blue card is compatible with Bernina artista
and Pfaff embroidery machines. The purple card is
compatible with the Janome 10000 machine.
Introduction
Magic Box Bottom Left Card #2 (Fig. GI-6 Below) OR Mini Magic
Box Left Card #2 (Fig. GI-6A Below)
Table of Contents
Software Manual
Quick Start
Fig. GI-6
39
Color Editor
General Information
Fig. GI-6A
General Information
Mini Magic Box - Design Card Converter
Software Manual
Table of Contents
Magic Box Upper Right Card #3 (Fig. GI-7 Below)
Introduction
Fig. GI-7 shows the Magic Card that can be used in the upper
right card slot of the Magic Box. This card is compatible with the
Singer XL100 and XL1000 machines. The Magic Box cannot
read pre-programmed Singer XL1000 design cards.
Installation
Main Screen
Fig. GI-7
Quick Start
General Information
Color Editor
40
Mini Magic Box - Design Card Converter
General Information
Magic Box Bottom Right Card #4 (Fig. GI-8 Below)
Fig. GI-8 shows the Magic Card that can be used in the bottom
right card slot of the Magic Box. This card is compatible with
Janome 5000/8000/9000, Elna, New Home and Kenmore
embroidery machines.
Main Screen
Installation
WARNING: Do not put a Janome 10000 card into slot #4, this card
fits into slot #2. (Note: The #4 Magic Card reads in the Janome
10000 Card Reader attachment.)
Introduction
Table of Contents
Software Manual
41
Color Editor
General Information
Quick Start
Fig. GI-8
General Information
Mini Magic Box - Design Card Converter
Software Manual
Table of Contents
File Formats and Hoop Limits
There are many different file formats that the Magic Box software
will open. You will find them listed below.
Introduction
CSD (*.csd), DST (*.dst), EXP (*.exp), HUS (*.hus), PCS (*.pcs),
PES (*.pes), PEC (*.pec), SEW (*.sew), PSW (*.xxx), JEF (*.jef)
or ZIP archives (*.zip) containing one of the above formats.
Installation
Baby Lock/Brother/Deco/Simplicity [*.PES]
Split at 64 colors
Split at 30,000 stitches
Hoop sizes:
Main Screen
Quick Start
General Information
Color Editor
DECO 500
100mm x 100mm max (4” x 4”)
DECO 600
100mm x 100mm max (4” x 4”)
BL ES
100mm x 100mm max (4” x 4”)
BL ESI2
100mm x 100mm max (4” x 4”)
BL EM1
100mm x 100mm max (4” x 4”)
BL EM2
100mm x 100mm max (4” x 4”)
BL EAC
100mm x 100mm max (4” x 4”)
BR 260
160mm x 260mm max (6.29” x 10.24”)
BR PE150
100mm x 100mm max (4” x 4”)
BR PE100
100mm x 100mm max (4” x 4”)
BR PE200
100mm x 100mm max (4” x 4”)
BR PE300S
100mm x 100mm max (4” x 4”)
BR PE7500
100mm x 100mm max (4” x 4”)
WHITE W3300
100mm x 100mm max (4” x 4”)
SIM SE1
100mm x 100mm max (4” x 4”)
SIM SE2
100mm x 100mm max (4” x 4”)
SIM SE3
100mm x 100mm max (4” x 4”)
BL ESE
130mm x 180mm max (5.11” x 7.08”)
BL ES2
130mm x 180mm max (5.11” x 7.08”)
42
Mini Magic Box - Design Card Converter
General Information
130mm x 180mm max (5.11” x 7.08”)
BR 8200
130mm x 180mm max (5.11” x 7.08”)
BR 8500
130mm x 180mm max (5.11” x 7.08”)
BL 260
160mm x 260mm max (6.29” x 10.24”)
BL Ellageo
160mm x 260mm max (6.29” x 10.24”)
BL Ellageo2
160mm x 260mm max (6.29” x 10.24”)
BL Ellageo3
160mm x 260mm max (6.29” x 10.24”)
BR ULT
160mm x 260mm max (6.29” x 10.24”)
BR 2002D
160mm x 260mm max (6.29” x 10.24”)
BR 2002
160mm x 260mm max (6.29” x 10.24”)
A “PES” file is an expanded file format that works with Bernette Deco Wizard, Baby Lock Palette,
and Brother PE-Design software.
Main Screen
Split at 30,000 stitches
Hoop size:
Viking Rose
100mm x 100mm max (4” x 4”)
Viking 1+
100mm x 100mm max (4” x 4”)
Viking IRIS
100mm x 100mm max (4” x 4”)
Pfaff [*.PCS]
Split at 16 colors
-
Quick Start
An “HUS” file is an expanded file format that works with Viking DOS Customizer and Viking
Customizer 95.
Split at 14,000 stitches
Hoop size:
Pfaff 7570
115mm x 120mm max (4.52” x 4.72”)
Pfaff 7560
115mm x 120mm max (4.52” x 4.72”)
A “PCS” file is an expanded file format that works with Pfaff PC-Designer v2.0 (PC), and Pfaff PCDesigner v2.1 (PC).
43
General Information
-
Color Editor
Viking [*.HUS]
Split at 12 colors
Installation
BR 6500
Introduction
Table of Contents
Software Manual
General Information
Mini Magic Box - Design Card Converter
Software Manual
Table of Contents
Singer XL1000 [*.XXX]
Split at 24 colors
Hoop size
Split at 30,000 stitches
130mm x 240mm max (5.1” x 9.4”)
An “XXX” file is an expanded file format that works with Singer PSW software.
Introduction
Singer XL150 [*.XXX]
Split at 24 colors
Hoop size
Split at 30,000 stitches
130mm x 240mm max (5.1” x 9.4”)
An “XXX” file is an expanded file format that works with Singer PSW software.
Installation
Singer XL100
Split at 24 colors
-
Hoop size
Split at 30,000 stitches
112mm x 80mm max (4.4” x 3.15”)
Main Screen
Janome 10000 [*.SEW or *.JEF]
Split at 16 colors
Split at 18,000 stitches
Hoop size
140mm x 200mm max (5.5” x 7.8”)
A “SEW” file is an expanded file format that works with Janome Scan-n-Sew PC and other
software. The “JEF” format is an additional expanded format that is used by more recent versions of
Janome software.
Quick Start
Janome 8000-9000/ Elna/New Home/ Kenmore [*.SEW]
(Magic Box Only)
Split at 16 colors
-
Split at 18,000 stitches
General Information
Hoop size
Color Editor
JAN 8000
80mm x 70mm max (3.15” x 2.75”)
ELNA 9006
80mm x 70mm max (3.15” x 2.75”)
ELNA CE20
122mm x 88mm max (4.8” x 3.4”)
ELNA 8007
122mm x 88mm max (4.8” x 3.4”)
ELNA 8006
122mm x 88mm max (4.8” x 3.4”)
JAN 9000
122mm x 88mm max (4.8” x 3.4”)
JAN 5700
122mm x 88mm max (4.8” x 3.4”)
44
Mini Magic Box - Design Card Converter
General Information
JAN 5000
122mm x 88mm max (4.8” x 3.4”)
KEN 19000
122mm x 88mm max (4.8” x 3.4”)
KEN 19001
122mm x 88mm max (4.8” x 3.4”)
152mm x 198mm max (6” x 7.7”)
artista 170
152mm x 198mm max (6” x 7.7”)
artista 180
152mm x 198mm max (6” x 7.7”)
A “CSD” file is an expanded file format that works with DOS HuskyGram, Toyota POEM and
Singer Embroidery Unlimited,
A “DST” file is one of the expanded file formats that works with the Tajima embroidery machines,
and some home machines.
An”EXP” file is one of the expanded file formats that works with the Magic Box.
An expanded format is any format that will not regenerate new stitches when resized. This means
that if an expanded design is reduced, the stitch count will not change. The stitches will get closer
together and thread/needle breaks and/or damage to your garment could occur.
General Information
NOTE: The Magic Box software does not read the ART (*.art) format. Use the sizing software that
is included with your Magic Box to convert ART designs to another format before Reading them to
the Magic Box. The free OESD designs in the Magician Sizing by Simon Software and the “100
Free Designs” CD that you will receive when you send in your registration card are in the ART
format.
45
Color Editor
artista 165
Main Screen
Hoop Size:
Quick Start
Bernina artista
Installation
Introduction
An “SEW” file is an expanded file format that works with Janome Scan-n-Sew PC and
Elna Envision Scan PC.
Table of Contents
Software Manual
General Information
Mini Magic Box - Design Card Converter
Software Manual
Table of Contents
Product Registration
Introduction
Installation
Main Screen
Quick Start
If you have not registered your Magic Box, please do so as it will
make you eligible for technical support. When OESD receives
your registration, we will mail you a “100 Free Designs” CD. If
you have sent in the registration card, but have not received the
“100 Free Designs” CD, please call 1-888-223-6943 Mon.-Fri.
8AM-6PM Central time. You can also register online at www.emb
roideryonline.com, under the “Magic Box Information” link.
General Information
Color Editor
46
Quick Start
Main Screen
Installation
Introduction
Table of Contents
Notes
General Information
Software Manual
47
Color Editor
Mini Magic Box - Design Card Converter
General Information
General Information
Mini Magic Box - Design Card Converter
Software Manual
Table of Contents
Magician Sizing Software
Introduction
Magician Sizing is a free program that is included
with the Mini Magic Box. Install it from the OESD
Digital Catalog CD (Fig. H-CD) that is located in the
Product Guide (Fig. H-PG) that came with the Mini
Magic Box. This program can be used to size,
mirror image and rotate ART designs.
Fig. H-CD
Installation
Use this software to convert ART designs to another
format before Reading them to the Mini Magic Box
(see page #36).
Main Screen
Place the OESD Digital Design Gallery CD-ROM
into the CD-ROM drive and wait for it to open.
Follow the instructions to install the Magician Sizing
Software.
Fig. H-PG
Open Magician Sizing by clicking the desktop icon
or going to Start, Programs.
Quick Start
When the program opens, click File, Open and
Look in: OESD Designs. (Fig. MS-1)
General Information
Fig. MS-1
Color Editor
48
Mini Magic Box - Design Card Converter
General Information
Table of Contents
Software Manual
Introduction
Select a design and click Open (Fig. MS-3)
Fig. MS-3
Fig. MS-4
49
Color Editor
General Information
Quick Start
Main Screen
Installation
Click File and Save As (Fig. MS-4)
General Information
Mini Magic Box - Design Card Converter
Software Manual
Table of Contents
Introduction
Click Save As Type and choose another format. In this exercise,
we will use the .pes format. (Fig. MS-5)
Installation
Main Screen
Quick Start
Fig. MS-5
General Information
Color Editor
50
Mini Magic Box - Design Card Converter
General Information
Table of Contents
Software Manual
Quick Start
Main Screen
Installation
Introduction
Click Save and choose the hoop size, if applicable. (Fig. MS-6)
51
Color Editor
General Information
Fig. MS-6
General Information
Mini Magic Box - Design Card Converter
Software Manual
Table of Contents
Introduction
The design is now saved in the .pes format. Convert the
remaining designs if desired. Note that the 100 free designs CDROM that you will receive when you send in your registration
card are in the .art format and must be converted with Magician
Sizing before writing them to the Mini Magic Box.
For information on editing ART designs, refer to Magician Sizing’s
Online Manual, under the Help menu.
Installation
Main Screen
Quick Start
General Information
Color Editor
52
Mini Magic Box - Design Card Converter
Main Screen
Table of Contents
Software Manual
MAIN SCREEN
53
Color Editor
General Information
Quick Start
Main Screen
Installation
Introduction
(Converter Box window)
Main Screen
Mini Magic Box - Design Card Converter
Software Manual
Table of Contents
Main Screen (converter box window) (fig. MS-2 below)
Introduction
A.
B.
C.
D.
E.
F.
Installation
G.
H.
Main Screen
Quick Start
General Information
Color Editor
54
Design Area (Fig. MS-2a below)
Dialog Box (Fig. MS-2b below)
Read (Fig. MS-2c below)
Load (Fig. MS-2d below. Clickable when a proper
card is inserted)
Write Card (Fig. MS-2e below. Clickable when a
proper card is inserted)
Delete (Fig. MS-2f below. Clickable when a design is
present and selected in Fig. MS-2a)
Options (Fig. MS-2g below)
Exit (Fig. MS-2h below)
Fig. MS-2
Main Screen
Mini Magic Box - Design Card Converter
Six designs can be placed onto a Magic Card at one time,
depending on the size, stitch count and/or color changes in the
design. The six boxes allow a preview of the designs before they
are written to a Magic Card. Fig. MS-3 below shows the five free
designs from the Magician Sizing software in the Design Area.
There is still one empty box available to Read a design.
Introduction
A. Design Area (Fig. MS-3 Below)
Table of Contents
Software Manual
55
Color Editor
General Information
Quick Start
Main Screen
Installation
Fig. MS-3
Main Screen
Mini Magic Box - Design Card Converter
Software Manual
Table of Contents
B. Dialog Box (Noted in Fig. MS-2b)
Moving the mouse over the different buttons on the Main Screen
will display information about that feature in the Dialog Box.
Introduction
Installation
Main Screen
Quick Start
General Information
Color Editor
56
Mini Magic Box - Design Card Converter
Main Screen
Table of Contents
Software Manual
C. Read Noted in Fig. MS-2c, (page 52)
Introduction
The Read function opens designs from a computer’s hard drive,
a floppy disk or a CD-ROM. Choose either the “Standard
Windows” or the “Browse by Icon” viewing options from the
Options menu, which is located to the right on the Main Screen.
57
Color Editor
General Information
Quick Start
Main Screen
Installation
Fig. MS-2cc
Main Screen
Mini Magic Box - Design Card Converter
Software Manual
Table of Contents
Standard Windows Option
To set the Magic Box to Read using the Standard Window option,
click on Options (See fig.MS-2c, page 52). The Standard Windows
option (See fig. MS-2cc above) functions like the Windows
Operating System, making it easy to find file on the computer.
Introduction
Read using Standard Windows
Click the Read button to open a standard window.
Click on the desired design and click Open.
Installation
Main Screen
Quick Start
General Information
Color Editor
The design will appear on the Main Screen in the first empty space
in the Design Area.
58
Mini Magic Box - Design Card Converter
Main Screen
Main Screen
Installation
Introduction
Table of Contents
Software Manual
Click the Read button to open the Select by Icons window. The
“Sort By” function sorts designs by name or by file extension.
Click on the arrow under Directory to show the listing of the
subdirectories on the computer. Select the Directory that contains
the desired designs (note the image below).
59
General Information
Read using Browse by Icon
Color Editor
To use the Browse by Icon option, click on Options (See fig. MS2g, page 52) to open the Options window. Choose Browse by
Icon from the “File Open Preference” section of the window. This
option allows the viewer to see thumbnails of the designs in a
directory.
Quick Start
Browse by Icon Option
Main Screen
Mini Magic Box - Design Card Converter
Software Manual
Table of Contents
Introduction
Installation
Main Screen
Quick Start
If there are designs in this Directory, thumbnail icons of the designs
will appear on screen (note image below).
General Information
Color Editor
60
Mini Magic Box - Design Card Converter
Main Screen
61
Color Editor
General Information
Click on a design and click OK or double-LEFT click on the design
to be loaded into the Design Area of the Converter Box window.
Quick Start
Main Screen
Installation
Introduction
Table of Contents
Software Manual
Table of Contents
Introduction
Installation
Main Screen
Quick Start
General Information
Color Editor
62
Mini Magic Box - Design Card Converter
Main Screen
Software Manual
Mini Magic Box - Design Card Converter
Main Screen
D. Load (Noted in Fig. MS-2d, page 52)
Installation
Load is used to open designs from a purchased memory card or
Magic Card. There is only one button that makes up the Load
function. When a card is inserted, clicking Load will cause the
software to search and recognize the card. The Read Design
dialog box will open. (fig. MS-6a below). For the following
exercise, an OESD design card was used.
Introduction
Table of Contents
Software Manual
63
Color Editor
2. After typing in the design number, click on OK and the design
will load.
General Information
Quick Start
Main Screen
1. Type in the desired design number (fig. MS-6a Below).
Main Screen
Mini Magic Box - Design Card Converter
Software Manual
Table of Contents
Introduction
Installation
Main Screen
3. Clicking browse will view a directory of all the designs on the
card (fig. MS-7 below)
Fig MS-7
Quick Start
General Information
a)
Color Editor
b)
64
As many as six designs will show at one time
depending on the number of designs on the card.
Clicking on one of the six shown designs and then
Mini Magic Box - Design Card Converter
Main Screen
e)
General Information
Quick Start
Main Screen
Installation
Fig. MS-8
Introduction
d)
65
Color Editor
c)
clicking on “Load” will take the design to the Magic
Box’s Main Screen.
Clicking on the “Next Page” button will show the next
six designs that are on the card.
Clicking on the “Prev Page” button will show the
previous six designs that are on the card.
Clicking on “OK” will return to the Magic Box’s Main
Screen. (Fig. MS-8 below)
Table of Contents
Software Manual
Main Screen
Mini Magic Box - Design Card Converter
Software Manual
Table of Contents
E. Write Card (Noted in Fig. MS-2e, page 52)
The Write Card function saves designs to a Magic Card.
There are 3 buttons that make up the Write Card function (Fig.
MS-9a below)
Introduction
Installation
Main Screen
Quick Start
General Information
These buttons are waiting to be assigned a card type. They will
recognize a card when it has been inserted into its proper slot in
the Magic Box.
Color Editor
Slot 1: This slot is for the magic card compatible with BernetteDeco, Brother, Babylock, Viking and Simplicity
machines.
Slot 2: This slot is for the magic cards compatible with Pfaff, artista
and Janome 10000 machines.
66
Mini Magic Box - Design Card Converter
Main Screen
Installation
With the Magic Card inserted, click one of the 3 “Unknown”
buttons under the Write Card section. After one of the “Unknown”
buttons is selected, a prompt window will open requesting the
machine type the card will be written for. (See figure MS-9b)
Introduction
Slot 3: This slot is for the magic card compatible with Singer
machines (Does not apply to the Mini Magic Box).
Slot 4: This slot is for the magic card compatible with Janome
8000 or 9000 machines (Does not apply to the Mini
Magic Box).
Table of Contents
Software Manual
Quick Start
Main Screen
Fig MS-9b
67
Color Editor
General Information
Click the drop down menu arrow to choose the machine. The
type of card that is inserted will dictate what machines will be
available from the list. Below is a chart listing the machines that
are available for each card slot:
Main Screen
Mini Magic Box - Design Card Converter
Software Manual
Table of Contents
SLOT #1
SLOT #2
Introduction
SLOT #3
SLOT
#4
(Magic Box only)
DECO 500
JAN 10000
XL100
JAN 8000
DECO 600
Pfaff 7570
XL150
Jan 9000
BL ESI
Pfaff 7560
XL1000
Elna 9006
BL ESI2
artista 165
Elna CE20
BL EM1
artista 170
Elna 8007
BL EM2
artista 180
Elna 8006
(Magic Box only)
Installation
BL EAC
JAN 5700
BR PE150
JAN 5000
BR PE100
KEN 19000
BR PE200
KEN 19001
BR PE300S
BR PE7500|
WHITE W3300
SIM SE1
Main Screen
SIM SE2
SIM SE3
BL ESE|
BL ES2
BR 6500
Quick Start
BR 8200
BR 8500
BL 260
BR 260
General Information
BL Ellageo
BL Ellageo2
BL Ellageo3
BR ULT
BR 2002D
BR 2002
Color Editor
Viking Rose
Viking 1+
Viking IRIS
68
Mini Magic Box - Design Card Converter
Main Screen
Quick Start
Main Screen
Installation
Introduction
From the drop down list, choose the machine that the card is to be
written for. As shown in the figure below, when writing designs for
a Deco machine, choose DECO from the menu and click OK.
Table of Contents
Software Manual
69
Color Editor
General Information
A warning box will appear indicating that the card in the slot is
about to be erased (Fig MS-10 Below)
Main Screen
Mini Magic Box - Design Card Converter
Software Manual
Table of Contents
Fig MS-10
Introduction
Installation
Main Screen
Remember, the software will recognize the card that is inserted
and will offer the choices for that card in the Write Selection
Menu. A soft click should be felt when inserting the card,
signalling that it is properly seated.
Quick Start
After the card is written to, the “Unknown” button will change to
the machine type that was selected from the menu. The software
allows three types of machines to be selected and remembered
at one time. (Fig. MS-10a). The user can go into the Options and
change the type of machine selected for each button as desired.
General Information
Color Editor
70
General Information
Quick Start
Main Screen
Installation
Introduction
Table of Contents
Fig. MS-10a
71
Color Editor
Mini Magic Box - Design Card Converter
Main Screen
Software Manual
Main Screen
Mini Magic Box - Design Card Converter
Software Manual
Table of Contents
F. Delete (Noted in Fig. MS-2f, page 52)
Introduction
This function deletes a design from the Main Screen (Converter
Box window). Click on a design to select it and then click on the
delete button. In the Figure MS-11, the first and second design
were deleted. (Note that this deletes the design from the Main
Screen, NOT from the Magic Card.)
Fig MS-11
Installation
Main Screen
Quick Start
General Information
Color Editor
72
Mini Magic Box - Design Card Converter
Main Screen
Table of Contents
Software Manual
G. Options (Noted in Fig. MS-2g, page 52)
73
Color Editor
Use the drop down arrow in the Write Button Preferences area to
choose the machine type for the Magic Card that is to be written
to. When a card is inserted into the Magic Box for the first time,
the “Unknown” button will be matched to the machine type by the
user. After that first use, the button is then labeled for that machine.
General Information
Quick Start
Main Screen
Installation
Introduction
Fig. MS-11a USB Port Magic Box
Options Window
Main Screen
Mini Magic Box - Design Card Converter
Software Manual
Table of Contents
However, the machine can be changed in the Options when
desired. In fig. MS-11c below, “Deco” appears in the Write Button
Preferences because it was chosen when writing to the Deco card.
Fig. MS-11c
Introduction
Installation
Main Screen
Quick Start
General Information
Color Editor
To change the machine that has been assigned to a button, click
the menu arrow and choose a machine from the list (see fig. MS11d below). All machine types that are compatible with the USB
Magic Boxes will be listed. It is possible to open the Options and
assign machines to the three buttons before writing to a Magic
Card for the first time.
74
Mini Magic Box - Design Card Converter
Main Screen
75
Color Editor
General Information
After making changes to the Options window, click OK. Clicking
Cancel will exit the Options window WITHOUT changes being
made to the any of the preferences.
Quick Start
Main Screen
Installation
Introduction
Table of Contents
Software Manual
Main Screen
Mini Magic Box - Design Card Converter
Software Manual
Table of Contents
H. EXIT (Noted in Fig. MS-2h, page 52)
Click the Exit button from the Converter Box window to close the
Magic Box software.
Introduction
Installation
Main Screen
Quick Start
General Information
Color Editor
76
General Information
Quick Start
Main Screen
Installation
Introduction
Table of Contents
NOTES
77
Color Editor
Mini Magic Box - Design Card Converter
Main Screen
Software Manual
Color Editor
Mini Magic Box - Design Card Converter
Software Manual
Table of Contents
Color Editor
This section of the manual explains other features of the Color
Editor. To use the color changing feature, see Quick Start Lesson 4
on page 106.
Introduction
Introduction:
Installation
The Color Editor is a program provided as part of the Mini Magic Box program
for the sole purpose of adding color information to the designs that are to be
written to Magic Cards. To input correct color information for the Bernette
Deco, Viking, Baby Lock, Elna 9000, Janome, Kenmore, Singer or Brother
models which store color information, use the Color Editor program. Some
machine formats (Bernina artista, Pfaff, Elna 8006, Janome 5006) and some file
formats (EXP and DST) do not store color information, but the user may want to
use the Color Editor for customizing the sewing colors of the designs.
Main Screen
NOTE:
The Mini Magic Box is packaged with another program, Magician Sizing by
Simon, that sizes, mirror images, rotates and converts ART files. See page 48 for
information about this program.
Quick Start
General Information
Color Editor
78
Mini Magic Box - Design Card Converter
Color Editor
File
Open
Main Screen
Installation
Click on “Open” to open a design. These designs can be from the
hard drive of the computer, a floppy disk or a CD-ROM.
Introduction
Table of Contents
Software Manual
Click on “Save” to save color changes. The Save command
automatically places the design in one of the six windows of the
Main Screen for writing to the Magic Card with the color changes
selected. The Save command does not save the file to the computer
or anywhere else except the Mini Magic Box Main Screen.
Save As
Save As works the same as the
Save Icon. This will save the
design to one of the six windows in the Mini Magic Box Main
Screen to write to a Magic card.
79
Color Editor
Save
General Information
Quick Start
After selecting a design, it appears in the
“File name” box. Click on “Open” to load the design. Click the
“Cancel” button to cancel the Open command.
Color Editor
Mini Magic Box - Design Card Converter
Software Manual
Table of Contents
Print
Introduction
Click “Print” to print a copy of
a design to a piece of paper. The
design will print out, and will show
the file name of the design, the size,
number of stitches and number of
colors.
Print Preview
Installation
Main Screen
Click on “Print Preview” to display
the printed page. On the right side
of the screen the File Name, size of
design in millimeters & inches, stitch
count, number of colors and thread
chart are displayed.
Quick Start
The “Print” button
will send the instruction sheet to the
printer.
General Information
The
“Next Page” button will display the
instructions from the second page (if
applicable).
The “Prev Page” will return to the
previous page (if applicable).
Color Editor
Click the “Two Page”
button to view a preview of both
pages.
80
Mini Magic Box - Design Card Converter
Color Editor
Click the “Zoom In” button to enlarge the preview
image.
Click the “Zoom Out” button to reduce the preview
image.
Introduction
Table of Contents
Software Manual
Click the “Close” button to close the Print Preview
Installation
screen.
Click the “One Page” button to bring the Print
Preview screen back to one page.
Exit
Exit will close the Color Editor.
Quick Start General Info. Main Screen Introduction Installation Troubleshoot Color Editor
Main Screen
Quick Start General Info. Main Screen Introduction Installation Troubleshoot Color Editor
OPTIONS
The workspace grid will shrink or enlarge to show the workable
area available for that particular machine and size.
81
Color Editor
Click on “Hoop Size” to
open the dialog box for choosing
the machine and hoop size for
the design to be sewn.
General Information
Quick Start
Hoop Size
Color Editor
Mini Magic Box - Design Card Converter
Software Manual
Table of Contents
Preferences
Click on “Preferences” to bring up a dialog box. Several options
can be set, depending on what kind of sewing machine is being
used.
Introduction
Installation
First is the setting for Viking/Husqvarna machines. This option will
split the design at every 12th color change.
Main Screen
Note: When a design is split, the file name will be renamed with an A,
B, C etc. at the end of the file name. For example, if a design named
FL222.hus has 13 color changes in it, the file will be saved as FL222_
A.hus and FL222_B.hus.
Quick Start
General Information
Color Editor
82
Mini Magic Box - Design Card Converter
Color Editor
Last is the setting for Pfaff PCS. The first option will make PCS
files 100% compatible Pfaff PCS. The second option will split the
design at every 16th color change.
Installation
Note: When a design is split, the file name will be renamed with an A, B, C
etc. at the end of the file name. For example: a design named FL222.pcs
that has 18 color changes will be saved as FL222_A.pcs, FL222_B.pcs
and FL222_C.pcs.
Introduction
Table of Contents
Software Manual
Click OK to set the preferences.
Main Screen
Click Cancel to close the dialog box without
making any changes to the preferences.
Density Icon
The density icon is grayed out and not available. This will
only work with .gnc files.
Quick Start
Note: Magician Sizing by Simon is the best way to change designs.
Magician Sizing by Simon, included with this package, will scale, mirror
and rotate .art files. This is the format of choice for sizing, mirroring or
rotating designs. Order .art files from www.embroideryonline.com.
Click on the “Zoom In” icon to zoom in on the design and
get a closer look.
Zoom Out Icon
Click on the “Zoom Out” icon to zoom out and make the
design look further away.
83
Color Editor
General Information
Zoom In Icon
Quick Start
Mini Magic Box - Design Card Converter
Software Manual
Table of Contents
Quick Start
Items found in this Section:
Lesson 1: Reading and writing a design from a CD-ROM
Introduction
Lesson 2: Loading and writing designs from a design card by
browsing the card.
Installation
Lesson 3: Loading and writing a design from a design card using
the index.
Lesson 4: Using Color Editor to adjust the colors in a design and
then writing the design to a Magic Card.
Main Screen
Quick Start
General Information
Color Editor
84
Mini Magic Box - Design Card Converter
Quick Start
Main Screen
Installation
In this lesson we will use OESD’s “Home Grown” Premium Design
CD.*
Introduction
Quick Start Lesson 1
This lesson will demonstrate how to Read designs from a CD-ROM
and Write them to a Magic Card.
Table of Contents
Software Manual
Notes:
•
Designs can also be Read from the computer’s hard drive and from a floppy disk.
•
All clicks of the mouse are LEFT clicks unless otherwise noted as right clicks.
•
These directions are for the Standard Windows setting from the Options Menu.
85
Color Editor
General Information
Quick Start
*(Neither this CD-ROM nor any of the designs on this CD-ROM
are included with the Magic Box. This CD is also available
as an embroidery card. See a local OESD dealer or visit
www.embroideryonline.com for more information. Projects for
OESD designs can be downloaded from the website.)
Quick Start
Mini Magic Box - Design Card Converter
Software Manual
Table of Contents
1. Launch the Magic Box Program:
Double click the Magic Box icon from the Desktop of your PC
or
Introduction
•
•
•
•
2.
Installation
Main Screen
Quick Start
General Information
Color Editor
86
Click on Start
Go to Programs
Go to OESD
Click Magic Box
The Magic Box software will open. Click OK from the ABOUT
window. (Fig. QS-2)
Fig. QS-2
Mini Magic Box - Design Card Converter
Quick Start
3.
Table of Contents
Software Manual
Click the Read button. (Fig. QS-3)
Main Screen
Installation
Introduction
Fig. QS-3
4. Click the drop-down arrow from the Open box and choose
the CD-ROM (Fig. QS-4)
87
Color Editor
General Information
Quick Start
Fig. QS-4
Quick Start
Mini Magic Box - Design Card Converter
Software Manual
Table of Contents
5. Open the Designs Folder by double clicking on the listing.
(Or single click on the Designs folder and then click Open.) (Fig.
QS-5)
Fig. QS-5
Introduction
Installation
Main Screen
6.
Click on the desired design and click Open. (Fig. QS-6)
Quick Start
Fig. QS-6
General Information
Color Editor
88
Mini Magic Box - Design Card Converter
Quick Start
Table of Contents
Software Manual
7. The design will appear on the Main Screen in the first empty
space in the Design Area (Fig. QS-7)
Main Screen
Installation
Introduction
Fig. QS-7
8. Continue Reading designs, as in Steps 3-6, until the desired
designs are on the Main Screen. A maximum of six designs can
be written to a Magic Card at one time. (Fig. QS-8)
89
Color Editor
General Information
Quick Start
Fig. QS-8
Quick Start
Mini Magic Box - Design Card Converter
Software Manual
Table of Contents
9. Insert the correct Magic Card into the appropriate colorcoded and numerically identical slot on the Magic Box. In this
lesson, a #1 (Brother/Deco/Babylock/Simplicity/Viking) Magic
Card is being used. It fits into slot #1 (Fig. QS-9)
Introduction
Fig. QS-9
Installation
Warning: Some embroidery design cards can be erased or overwritten. ALWAYS remove
any design cards before writing to a Magic Card.
Main Screen
10. Click any one of the 3 “Unknown” buttons under the Write
Card section of the Converter Box window. (Fig. QS-10)
Fig. QS-10
Quick Start
General Information
Color Editor
90
Mini Magic Box - Design Card Converter
Quick Start
11. The Write Selection box will open. Click the drop down
menu and choose the machine this card is being written for. Click
OK to accept this machine. (Figures QS-11 & QS-11a)
Table of Contents
Software Manual
Main Screen
Installation
Introduction
Fig. QS-11
Quick Start
Fig QS-11a
Fig. QS-12
91
Color Editor
General Information
12. A Warning Box will appear, explaining that the card will be
erased. Click Yes. (Fig. QS-12)
Quick Start
Mini Magic Box - Design Card Converter
Software Manual
Table of Contents
13. The Writing Block dialog box will appear. After writing
is complete, the “Success” dialog window will be displayed,
indicating that the card is ready for use. Click OK. (fig. QS-13)
Fig. QS-13
Introduction
Installation
The Magic Card is now ready for use in the embroidery machine.
Main Screen
Quick Start Lesson 2
This lesson will demonstrate how to Load designs from a preprogrammed design card by Browsing the card. It will also
demonstrate how to Write the designs to a Magic Card.
Quick Start
In this lesson, we will use OESD’s “Sunflowers” Premium Design
Card.*
General Information
Color Editor
92
Mini Magic Box - Design Card Converter
Quick Start
Table of Contents
Software Manual
Notes:
•
Designs can also be Loaded from a Magic Card once designs have been written to that
Magic Card.
•
All clicks of the mouse are LEFT clicks unless otherwise noted as right clicks.
Introduction
Installation
*(Neither this card nor any of the designs on this card
are included with the Magic Box. This card is also
available as a CD-ROM. See a local OESD dealer or visit
www.embroideryonline.com for more information. Projects for
OESD designs can be downloaded from the website.)
General Information
Quick Start
2. The Magic Box software will open. Click OK from the ABOUT
window.
Main Screen
•
•
•
•
Launch the Magic Box program:
Double click the Magic Box icon on the Desktop or
Click on Start
Go to Programs
Go to OESD
Click Magic Box
93
Color Editor
1.
Quick Start
Mini Magic Box - Design Card Converter
Software Manual
Table of Contents
2. The Magic Box software will open. Click OK from the ABOUT
window.
Introduction
Installation
Main Screen
4.
Insert the design card into the correct card slot on the
Magic Box. In this lesson, a Bernina artista “Sunflowers” Design
Card is being used. It fits into slot #2.
Quick Start
5. Click the Load button from the right hand side of the Converter
Box window.
General Information
Color Editor
94
Mini Magic Box - Design Card Converter
Quick Start
Table of Contents
Software Manual
General Information
Quick Start
Main Screen
The first page of the Card’s Directory will open.
95
Color Editor
7.
Installation
Introduction
6. The Read Design window will appear. Click the Browse
button to view the designs on the entire card. Wait while the
Magic Box reads the design card.
Quick Start
Mini Magic Box - Design Card Converter
Software Manual
Table of Contents
Introduction
8. Click on the first design and click Load (or double-LEFT click
on the design). The design will disappear from the Directory
screen but it will NOT be removed from the original design card.
Do not click the OK button until all of the desired designs have
been loaded. Remember, six designs can be loaded to a Magic
Card at one time.
Installation
Main Screen
9. Click “Next Page” and click on a design. Click Load and the
design will disappear from the Directory screen.
Quick Start
General Information
Color Editor
96
Mini Magic Box - Design Card Converter
Quick Start
Table of Contents
Software Manual
97
Color Editor
General Information
12. Insert the correct Magic Card into the appropriate colorcoded and numerically identical card slot on the Magic Box. In
this lesson, a #3 (Singer XL100, XL150, XL1000) Magic Card is
being used. It fits into slot #3. If using the Mini Magic Box, choose
a card appropriate for slots 1 or 2 instead.
Quick Start
11. Remove the design card from the Magic Box.
Main Screen
Installation
Introduction
10. Continue loading until six designs have been selected.
Click OK and the designs will appear in the Design Area of the
Converter Box window.
Quick Start
Mini Magic Box - Design Card Converter
Software Manual
Table of Contents
Warning: Some embroidery design cards can be erased or overwritten. Always remove any
design cards before writing to a Magic Card.
13. Click any of the “Unknown” buttons under the Write Card
section of the Converter Box window.
Introduction
Installation
Main Screen
Quick Start
14. The Write Selection window will open. Click the drop down
menu and choose the machine this card is being written for. Click
OK to accept this machine.
General Information
Color Editor
98
Mini Magic Box - Design Card Converter
Quick Start
Table of Contents
Software Manual
Installation
Introduction
15. A Warning Box will appear, explaining that the card will be
erased. Click Yes.
99
Color Editor
The Magic Card is now ready for use in the embroidery machine.
General Information
Quick Start
Main Screen
16. The Writing Block dialog box will appear. After writing
is complete, the “Success” dialog window will be displayed,
indicating that the card is ready for use. Click OK.
Quick Start
Mini Magic Box - Design Card Converter
Software Manual
Table of Contents
Quick Start Lesson 3
Introduction
In this lesson will use OESD’s “Animal Instincts” Premium Design
Card.*
This lesson will demonstrate how to Load designs from a preprogrammed design card by using the Index function. It will also
demonstrate how to Write the designs to a Magic Card.
Installation
Main Screen
Quick Start
•
•
1.
General Information
•
•
•
•
Color Editor
100
Notes:
Designs can also be Loaded from a Magic Card once designs have been written to that
Magic Card.
All clicks of the mouse are LEFT clicks unless otherwise noted as right clicks.
Launch the Magic Box program:
Double click the Magic Box icon on the Desktop or
Click on Start
Go to Programs
Go to OESD
Click Magic Box
Mini Magic Box - Design Card Converter
Quick Start
*(Neither this card nor any of the designs on this card
are included with the Magic Box. This card is also
available as a CD-ROM. See a local OESD dealer or visit
www.embroideryonline.com for more information. Projects for
OESD designs can be downloaded from the website.)
General Information
The Main Screen of the Magic Box will appear.
101
Color Editor
3.
Quick Start
Main Screen
Installation
2. The Magic Box software will open. Click OK from the ABOUT
window.
Introduction
Table of Contents
Software Manual
Quick Start
Mini Magic Box - Design Card Converter
Software Manual
Table of Contents
4. Insert the design card into the correct card slot on the
Magic Box. In this lesson, a Brother/Babylock/Deco compatible
“Animals Instincts” Design Card is being used. It fits into slot #1.
Introduction
Installation
5. Click the Load button from the right hand side of the
Converter Box window.
Main Screen
Quick Start
General Information
6. The Read Design window will appear. Click in the Index
Number box and type in the number of the desired design. (The
design number is found on the embroidery card thread chart.)
Click OK. Wait while the Magic Box reads the design card.
Color Editor
102
Mini Magic Box - Design Card Converter
Quick Start
Installation
Introduction
7. The design will appear on the Main Screen in the first empty
space in the Design Area.
Table of Contents
Software Manual
Remove the design card from the Magic Box.
Warning: Some embroidery design card can be erased or overwritten. Always remove any
design cards before writing to a Magic Card.
103
Color Editor
General Information
Quick Start
9. Insert the correct Magic Card into the appropriate colorcoded and numerically identical card slot on the Magic Box. In
this lesson, a #2 (Pfaff, artista) Magic Card is being used. It fits
into slot #2.
Main Screen
8.
Quick Start
Mini Magic Box - Design Card Converter
Software Manual
Table of Contents
10. Click any of the “Unknown” buttons under the Write Card
section of the Converter Box window.
Introduction
Installation
Main Screen
11. The Write Selection window will open. Click the drop down
menu and choose the machine this card is being written for. Click
OK to accept this machine.
Quick Start
General Information
Color Editor
104
Mini Magic Box - Design Card Converter
Quick Start
Installation
Introduction
12. A Warning Box will appear, explaining that the card will be
erased. Click Yes.
Table of Contents
Software Manual
The Magic Card is now ready for use in the embroidery
machine.
105
Color Editor
General Information
Quick Start
Main Screen
13. The Writing Block dialog box will appear. After writing
is complete, the “Success” dialog window will be displayed,
indicating that the card is ready for use. Click OK.
Quick Start
Mini Magic Box - Design Card Converter
Software Manual
Table of Contents
Quick Start Lesson 4
Introduction
This lesson will demonstrate how to use the Color Editor to adjust
the colors in a design and how to Write the design to a Magic
Card.
In this lesson we will use the “Fanciful Frogs by Stephanie Stouffer”
Premium Design Card.*
Installation
Main Screen
•
•
Quick Start
1.
General Information
•
•
•
•
Notes:
Designs can also be Loaded from a Magic Card once designs have been written to that
Magic Card.
All clicks of the mouse are LEFT clicks unless otherwise noted as right clicks.
Launch the Magic Box program:
Double click the Magic Box icon on the Desktop or
Click on Start
Go to Programs
Go to OESD
Click Magic Box
Color Editor
*(Neither this card nor any of the designs on this card
are included with the Magic Box. This card is also
available as a CD-ROM. See a local OESD dealer or visit
www.embroideryonline.com for more information. Projects for
OESD designs can be downloaded from the website.)
106
Mini Magic Box - Design Card Converter
Quick Start
Table of Contents
Software Manual
General Information
Quick Start
The Main Screen of the Magic Box will appear.
107
Color Editor
3.
Main Screen
Installation
Introduction
2. The Magic Box software will open. Click OK from the
ABOUT window.
Quick Start
Mini Magic Box - Design Card Converter
Software Manual
Table of Contents
4. Insert the design card into the correct card slot on the Magic
Box. In this lesson, a Bernina artista compatible “Fanciful Frogs by
Stephanie Stouffer” Design Card is being used. It fits into slot #2.
Introduction
Installation
Main Screen
5. Click the Load button from the right hand side of the
Converter Box window.
Quick Start
General Information
Color Editor
108
Mini Magic Box - Design Card Converter
Quick Start
109
Color Editor
General Information
Quick Start
Main Screen
7. The design will appear on the Main Screen in the first empty
space in the Design Area.
Installation
Introduction
6. The Read Design window will appear. Click in the Index
Number box and type in the number of the desired design. (The
design number is found on the embroidery card thread chart.)
Click OK. Wait while the Magic Box reads the design card.
Table of Contents
Software Manual
Quick Start
Mini Magic Box - Design Card Converter
Software Manual
Table of Contents
8. Remove the design card from the Magic Box. Open the
Color Editor program:
Introduction
Double click the Color Editor icon on the Desktop or
• Click Start
• Go to Programs
• Go to OESD
• Click Color Editor
9.
The License box appears. Click OK
Installation
Main Screen
10. The Color Editor’s Main Screen opens.
Quick Start
General Information
Color Editor
110
Mini Magic Box - Design Card Converter
Quick Start
Installation
Introduction
11. Return to the Magic Box Converter Box window by clicking
on the converter box icon on the task bar at the bottom of the
Windows screen. OR hold down the ALT key on the keyboard
and press the TAB key at the same time to switch between the
screens.
Table of Contents
Software Manual
*Holding ALT and pressing TAB alternates your windows on your desktop.
111
Color Editor
General Information
Quick Start
Main Screen
12. Double click on the design from the Design Area in the
Converter Box window and it will be sent to the Color Editor
Quick Start
Mini Magic Box - Design Card Converter
Software Manual
Table of Contents
13. There are 14 colors in this design. They appear at the
bottom of the screen. The thread color chart shows the following
colors:
Introduction
Installation
Main Screen
14. Click the first color box from the group of color blocks at the
bottom of the screen. The color palette opens.
Quick Start
General Information
Color Editor
112
Mini Magic Box - Design Card Converter
Quick Start
Main Screen
Installation
Introduction
15. Click the Palette Type drop down arrow to choose palettes
for different machines. In this lesson, the Babylock/Bernina Deco/
Brother palette will be selected.
Table of Contents
Software Manual
113
Color Editor
General Information
Quick Start
16. Click the Light Brown color button and click OK.
Quick Start
Mini Magic Box - Design Card Converter
Software Manual
Table of Contents
17. Color 1 (eyes) of the frog changes to Brown.
Introduction
Installation
Main Screen
18. Click the second box and choose the color that is next in
the Thread Color Chart. Continue this process until the frog is recolored to match the thread chart.
Quick Start
General Information
Color Editor
114
Mini Magic Box - Design Card Converter
Quick Start
Warning: Some embroidery design card can be erased or overwritten. Always remove any design
cards before writing to a Magic Card.
115
Color Editor
General Information
21. Insert the correct Magic Card into the appropriate colorcoded and numerically identical card slot on the Magic Box. In
this lesson, a #4 (JAN 8000, JAN 9000) Magic Card is being
used. It fits into slot #4. (Is using the Mini Magic Box, choose a
card appropriate for slots 1 or 2 instead).
Quick Start
Main Screen
Installation
20. The design will appear on the Magic Box Main Screen with
the colors that were selected in the Color Editor.
Introduction
19. When finished, click the Save icon on the top of the tool bar.
Table of Contents
Software Manual
Quick Start
Mini Magic Box - Design Card Converter
Software Manual
Table of Contents
22. Click any of the “Unknown” buttons under the Write Card
section of the Converter Box window.
Introduction
Installation
Main Screen
23. The Write Selection window will open. Click the drop down
menu and choose the machine this card is being written for.
Click OK to accept this machine.
Quick Start
General Information
Color Editor
116
Mini Magic Box - Design Card Converter
Quick Start
Installation
Introduction
24. A Warning Box will appear, explaining that the card will be
erased. Click Yes.
Table of Contents
Software Manual
117
Color Editor
The Magic Card is now ready for use in the embroidery machine.
General Information
Quick Start
Main Screen
25. The Writing Block dialog box will appear. After writing
is complete, the “Success” dialog window will be displayed,
indicating that the card is ready for use. Click OK.
Notes
Notes