1
Hlliillll III III ■III ■1
1 11
II II 1 II III
OWNER'S GUIDE STATEMENT
"This equipment generates and uses radio frequency energy. If it is not properly instaT"1
ed and used in strict accordance with the manufacturer's instructions, this equipmen.
may interfere with radio and television reception. This machine has been tested and
-
found to comply with the limits tor a Class B computing device in accordance with the—
specifications in Subpart J of Part 15 of the FCC Rules, which are designed to providf"
reasonable protection against such interference in a residential installation. If you
w'
suspect interference, you can test this equipment by turning it off and on. If you dete^_^
mine that there is interference, with radio or television reception, try one or more of th«
following measures to correct It:
• reorient the receiving antenna
__^
• move the computer away from the receiver
• change the relative positions of the computer equipment and the receiver
• plug the computer into a different outlet so that the computer and the receiver are
different branch circuits
If necessary, consult your Commodore dealer or an experienced radio/television technT'
cian for additional suggestions. You may aiso wish to consult the following booklet.
^J
which was prepared by the Federal Communications Commission
"How to Identify and Resolve Radio-TV Interference Problems". This booklet is
available from the U.S. Government Printing Office, Washington. D.C. 20402, Stock Nfe^
004-000-00345-4."
You should use only the cables, accessories, and peripherals recommended by Com
modore for your Commodore 16. All cables, including the cables for the television
WP
hookup, serial port, video port, Datassette, and joysticks, are specially shielded, in
accordance with the regulations of the Federal Communications Commission. Failure'to'
use the appropriate accessories and cables will invalidate the FCC grant of Certifica- wtion, and may cause harmful radio interference.
U
U
-
—
~~
COMMODORE 16
OWNER'S GUIDE
A FRIENDLY INTRODUCTION TO YOUR
COMMODORE 16
Published by
Commodore Business Machines, Inc.
THE INFORMATION IN THIS MANUAL HAS BEEN REVIEWED AND IS BELIEVED TO BE ENTIRELY RELIABLE.
NO RESPONSIBILITY. HOWEVER, IS ASSUMED FOR INACCURACIES THE MATERIAL IN THIS MANUAL IS FOR
INFORMATION PURPOSES ONLY, AND IS SUBJECT TO CHANGE WITHOUT NOTICE.
Copyright © l98d by Commodore Electronics Limited
All rights reserved.
THIS GUIDE CONTAINS COPYRIGHTED AND PROPRIETARY INFORMATION. NO PART OF THIS PUBLICATION
MAY BE REPRODUCED. STORED IN A RETRIEVAL SYSTEM, OR TRANSMITTED IN ANY FORM OR BY ANY
MEANS. ELECTRONIC. MECHANICAL, PHOTOCOPYING, RECORDING OR OTHERWISE. WITHOUT THE PRIOR
WRITTEN PERMISSION OF COMMODORE ELECTRONICS LIMITED.
w^
^
Commodore BASIC v 3.5
Copyright
=
1984 by Commodore Electronics Limited, all righis reserved.
Copynahi © 1977 by Microsoft, all riahls reserved.
"-—
TABLE OF CONTENTS
INTRODUCTION
i
SECTION 1
Setting Up
SECTION 2
Looking at the Keyboard
11
SECTION 3
Using Software
25
SECTION 4
Learning the BASICs
36
SECTION 5
1
Numbers and Calculations
37
Programming
42
Sound and Music
45
Graphics and Color
48
ETC.
Peripherals
53
Book List
56
\
Introduction
The Commodore 16 personal computer is your pass
port to the Information Age. With the Commodore 16.
you have the ability to quickly process many kinds of
information — personal, educational, scientific, finan
cial. And with the Commodore 16 you can present this
information in almost any form — in words, numbers,
pictures or sound, or in any combination of these
forms.
You can use your Commodore 16 in a number of
ways. You can select from many easy-to-use software
products that are available on cartridge, tape and
disk. You can also create and store your own pro
grams. In either case, the full processing power of the
Commodore 16 is at your disposal.
Using This Guide
To start using your Commodore 16, follow these steps:
• Unpack all the equipment and set it up according to
the directions given in Section 1, Setting Up Your
Computer.
• Plug in the Commodore 16 Tutor Cartridge which will
give you complete "hands-on" training on all
keyboard functions. (Note: Information related to
what this cartridge covers is presented in Section 2
of this Guide, Looking At The Keyboard. You can
refer to the printed version of the instructions when
you are away from the keyboard, or when you have
another cartridge plugged in.)
Read Section 3, Using Software. This section tells
you how to use software that is packaged in any of
the three basic packaging forms — cartridge,
cassette tape, and disk — as well as the units
needed to use cassettes and disks. When you have
completed this section, you will be ready to use the
Commodore software packages available at your
local dealer. You'll be able to use software even
without reading the rest of the Guide.
If you are interested in programming the
Commodore 16 yourself, you will want to read Sec
tion 4, Learning the BASICs. This section describes
the Commodore 16's computational capabilities
and introduces the advanced BASIC programming
language that is built into your computer. The
sophisticated sound, music, color, and graphics
capabilities of the Commodore 16 are also intro
duced in this section. For detailed descriptions
of all these topics, see the Commodore 16
Intermediate User's Manual.
Consult the appendices for additional helpful infor
mation, including information on equipment that
can expand the Commodore 16's capabilities even
more, and a list of books you may find helpful.
You'll soon see that you can begin to use your
Commodore 16 as soon as you have set up and
connected all the equipment. How far and how fast
you go from here is up to you. You are in control.
—
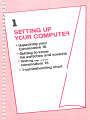
-A
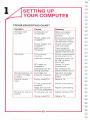
. unpacking your
Commodore 16
. setting up your
Commodore 16
.Troubleshooting chart
—
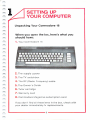
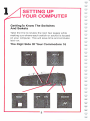
SETTING UP
YOUR COMPUTER
Unpacking Your Commodore 16
When you open the box, here's what you
should have:
1. Your Commodore 16
2. The supply power
3. The TV switchbox
4. The RF (Radio Frequency) cable
5. The Owner's Guide
6. Tutor cartridge
7. Warranty card
8. Commodore Magazines subscription card
If you don't find all these items in the box, check with
your dealer immediately for replacements.
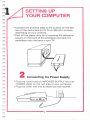
SETTING UP
YOUR COMPUTER
—
Getting To Know The Switches
And Sockets
Take the time to review the next few pages while
making sure where each switch or socket is located
on your computer. This will save time and confusion
later on.
The Right Side Of Your Commodore 16
—
—
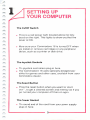
SETTING UP
YOUR COMPUTER
The On/Off Switch
• There is a red power light located above the key
board on the right. This lights to show you that the
power is ON.
•
Make sure your Commodore 16 is turned OFF when
you install or remove cartridges or any peripheral
device, such as a printer or disk drive.
The Joystick Sockets
• The joystick controllers plug in here.
• Your Commodore 16 uses specially designed joy
sticks for games and other uses/available from your
Commodore dealer.
The Reset Button
•
Press the reset button when you want to "start
over", to get a cleared screen and memory as if you
just turned your computer off then on again.
The Power Socket
• The round end of the cord from your power supply
plugs in here.
-
SETTING UP
YOUR COMPUTER
-
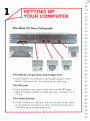
The Back Of Your Computer
The Memory Expansion (Cartridge) Port
• Commodore 16 software cartridges plug in here.
(Port is the term for the rectangular opening.)
The RF Jack
• This is where you plug in one end of the RF cable
(the thin black cable) to hook up your computer to a
TV set.
The Video Socket
• Here's where you plug in the round end of the cable
if you want to connect a color monitor (instead of a
TV set) to your Commodore 16.
SETTING UP
YOUR COMPUTER
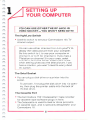
YOU CAN USE EITHER THE RF JACK OR
VIDEO SOCKET—YOU WONT NEED BOTH!
The High/Low Switch
• Use this switch to set your Commodore 16s TV
channel output:
You can use either channel 3 or 4 on your TV to
display the video picture from your computer.
Set this switch to L to use your computer on
channel 3, or to H for channel 4. If you have a
TV station on channel 3 in your area, select
channel 4, and vice versa. Experiment to see
which setting gives you the best picture. If you
have a monitor, you won't need to worry about
this switch.
The Serial Socket
• You can plug a disk drive or a printer into this
socket.
To use both, first plug the disk drive into this open
ing, then plug the printer cable into the back of
the disk drive.
The Cassette Port
• The Commodore 1531 Datassette™ tape recorder
for cassette tape software plugs in here.
• The Datassette is used to load or store programs
on cassette tape, and is specially designed for your
Commodore 16.
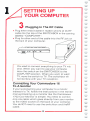
SETTING UP
YOUR COMPUTER
Setting Up Your Commodore 16
Connecting your Commodore 16 is as easy as 1-2-3:
1
2
3
Hook up the silver SWITCHBOX to the
back of your TV.
Plug in the POWER SUPPLY on the right
side of your computer and into a wall plug.
Connect the RF cable (the thin black one)
from the TV SWITCHBOX to the RF
SOCKET on the back of your computer.
REMINDER: The power on everything (com
puter, TV, etc.) should be turned OFF until you
are completely set up and ready to go.
1
Installing The TV Switchbox
You'll need a small flat-headed screwdriver to connect
the switchbox. (A dime is even too thick!)
• Disconnect the VHF antenna leads from the back of
the TV.
• Connect the leads on the switch box to the
VHF screws.
SETTING UP
YOUR COMPUTER
Connect the antenna leads to the screws on the bot
tom of the switchbox (to the 75 or 300 ohm screws,
depending on your antenna).
Peel off the paper strip that's covering the adhesive
square on the back of the switchbox and stick the
switchbox onto the back of your TV.
2
Connecting The Power Supply
• Plug the round end of the POWER SUPPLY into the
POWER JACK on the right side of your computer.
" Plug the other end into an electrical wall socket.
SETTING UP
YOUR COMPUTER
Plugging In The RF Cable
Plug either end fit doesn't matter which) of the RF
cable into the top of the SWITCHBOX in the opening
labelled "COMPUTER".
Plug the other end of the cable into the RF jack on
the back of your computer.
You need to connect everything to your TV only
once. When you want to use your computer,
move the switch on the SWITCHBOX to the
COMPUTER position. When you want lo watch
TV, move the switch to TV. The switchbox will
not interfere with your TV reception.
Connecting Your Commodore 16
To A Monitor
If you're connecting your computer to a monitor
instead of a TV, follow the instructions in the monitor
manual. Hooking up a monitor like the Commodore
1702 Color Monitor is simple. You need to connect
only one cable which goes directly from your monitor
to the VIDEO socket on the back of your computer.
You do NOT need to use the switchbox and the RF
cable.
S
SETTING UP
YOUR COMPUTER
Finally ...
Now it's time to turn on your computer. Turn on the
POWER switch on the right side of your computer.
If all went well, the red POWER light will go on, and
here's how your screen will look:
BLACK
LETTERS
WHITE
BACKGROUND
PURPLE
BORDER
The flashing block under the word READY is called the
cursor. The cursor tells you that the computer is
ready. If something went wrong, the Troubleshooting
Chart should come in handy.
IMPORTANT: Some TV sets cannot display the
entire Commodore 16 screen. Instead, their pic
ture cuts off the far left and far right column of
the screen. We recommend using a different TV
set or a monitor such as the Commodore 1702,
1802 or 1803 color monitor.
If this isn't possible, you can deal with the prob
lem by pressing the ESC key, followed by the R
key. This reduces the computer screen display
size to 38 columns, so that the entire picture fits
on the screen. You must repeat this each time
you power up or reset your computer.
SETTING UP
YOUR COMPUTER
TROUBLESHOOTING CHART
Symptom
Cause
Remedy
Indicator light
not 'ON1
Computer not
Make sure power
switch is in ON
turned ON
position
Power cable not
plugged in
Check power socket
Power supply not
Check connection
with wall outlet
for loose or disconnecled power cable
plugged in
Bad fuse in
computer
No picture
TV on wrong
Take system to
authorized dealer for
replacement of fuse
channel
Check other channel
for picture (3 or 4)
Incorrect hookup
Computer hooks up
to VHF antenna
terminals
Random pattern on
TV with cartridge
in place
Picture without
RF cable not
Check TV cable
plugged in
connection
Computer set for
wrong channel
Set computer for
same channel as TV
Cartridge not
Reinsert cartridge
properly inserted
after turning OFF
power
Poorly tuned TV
RetuneTV
TV not connected
Check connections
color
properly
Picture OK, but no
Color set too low
on TV or computer
Adjust color setting
TV volume too low
Adjust volume of TV
Poorly tuned TV
RetuneTV
sound
10
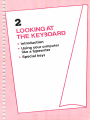
2
LOOKING AT
THE KEYBOARD
. introduction
.Using your computer
like a typewriter
. special keys
-
w
_
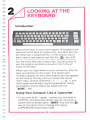
LOOKING AT THE
KEYBOARD
Introduction
Most of the keys on your Commodore 16 keyboard are
identical to the keys on a typewriter, but each key can
do more than a typewriter key. In this section you'll
learn how to use special keys like the £s
key and
the four separate cursor keys. This section will show
you the extra features of every key, including how to
use the graphic symbols pictured on the fronts of
many of the keys.
When you first type letters on your computer, they ap
pear as capitals on the screen. The letters and
numbers appear on the screen exactly as they appear
on the face of the key when you press the key by
itself. Also, several other keys ( + , - , - , @, *, and
the English pound sign) may be typed alone. Some
punctuation marks need to be typed with the
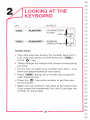
Using Your Computer Like A Typewriter
• If you want to do "regular" typing, you can type in
CAPITAL and lowercase letters (as you would on a
typewriter) by pressing the
SHiCCr key and the £x
key at the same time to change into typing
(UPPERCASE/lowercase) mode.
11
LOOKING AT THE
KEYBOARD
After you do this, all letter keys typed alone are in
lower-case. When you press the "SHf^ key along
with a letter, you get a capita! letter. Try typing with
and without the ^iaigf^ key.
Numbers and punctuation keys work the same as
they would in non-typing mode.
_
To get out of typing mode, just press the two keys
(^Sffiflf and
C* ) together again. The lower-case
letters on your screen become capitalized and the
capitals become graphic symbols.
KEY
+
KEY
=
=
EFFECT
ENTER (OR EXIT)
TYPING MODE
_
The Commodore 16 keyboard contains special
symbols not found on many typewriters, or even
on most computers. These include:
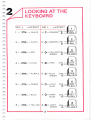
The English pound sign (£) — Press
by itself.
Pi (7D —Press I = | with the
key.
12
_
LOOKING AT THE
KEYBOARD
Greater and less than signs (
Brackets ([ ]) — Press
SHIFT
Arrows ( <with
> ) —Press
along with
or
with
<
SHIFT
.
or
.
f )— Press
or
.!
Many of the keys on your Commodore 16 keyboard
behave differently than normal typewriter keys.
These keys act to enable other keys to do things
thay wouldn't ordinarily do, or perform functions
related to programming.
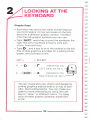
Enters information and instructions into your
computer.
13
LOOKING AT THE
KEYBOARD
—
Used to modify what other keys print on the screen.
The =SHIFT key allows you to type capital letters,
graphic symbols, punctuation marks, and get into
typing mode when pressed with another key.
key is the same as the
key, except that it is locked into place, so you don't
have to hold it down.
To release the lock, just press
SHIFT LOCK
again
so that everything you type is back to normal {unshifted).
^
—
Press this key to STOP what your Commodore 16 is
doing.
When your computer is running a program, pressing
this key gets you back in control of the keyboard.
When you hold down the JSHIFT
and
1_B1IN/STQP_ keys simultaneously, the
Commodore 16 loads and runs the first
program on a disk in the disk drive.
14
LOOKING AT THE
KEYBOARD
The Cursor Keys
• The cursor, the flashing block that marks where you
are on the computer screen, can be moved quickly
and easily around the screen by using the CURSOR
KEYS.
• There are four separate cursor keys, each with an
arrow pointing in the direction the key moves the
cursor: up, down, left or right.
• You can use the cursor keys to move the cursor
over anything on the screen without affecting those
characters.
Like all keys on the Commodore 16 keyboard,
each cursor key can automatically repeat. This
means that if you hold down the key contin
uously, the cursor keeps moving in the direction
of the key you press until you release it. Keys
that print on the screen will fill each space
with their characters while you hold them down
like this.
15
-
LOOKING AT THE
KEYBOARD
You can INSERTand DELETE letters and numbers
from the line you are typing with this key.
When you press this key by itself, the typed char
acter immediately to the left of the cursor disap
pears, and the cursor moves to where the missing
character was.
To open up space to insert letters and numbers, type
this key along with >SHifT^. When you insert space
in the middle of a line, the line to the right of the cur
sor moves further to the right.
The
INST/DEL
key saves a lot of time when you want
to edit or change what you've typed.
- EFFECT
KEY
/DEL
= DELETE (ERASE
SHIFT
TYPED
CHARACTERS) |
= INSERT (ADD
SPACES)
CLEAR/HOME^
• This is a "double" key: you can use it for CLEAR and
HOME functions.
• When you press this key alone, the cursor imme
diately moves to the top left corner of the screen
(which is known as the HOME position). The rest of
your screen stays the same.
16
_
LOOKING AT THE
KEYBOARD
• If you hold down the ^*^ key and press
fJ,, not only
y does the cursor move to
HOME, but everything on the screen is erased (or
cleared). All that remains on the screen is the blink
ing cursor at the top left corner of the screen.
KEY
+
= EFFECT
= HOME POSITION
1 + |5S^ = CLEAR SCREEN
"CLEARff-SHIFT
HOME
(Control)
The
;C!iL"- key is like the ^ttfT= key in that it
always works with another key.
=j has three functions:
1. As the COLOR KEYS section explains, pressing
rzQTB^ and a color key lets you change the
color of what you print on the screen.
2. You can pause a program that is PRlNTing or
LISTing on the screen by pressing ii£ilil and
the S key.
(To restart the program, press any key.)
3. ^GTft^ is also used with
and HJEgSSlSHlbfF^. These are explained later
in this section.
In addition, some software programs you can buy
make use of the li^Ei key for their own special
functions.
LOOKING AT THE
KEYBOARD
?
(Commodore Key)
The Commodore key is very similar to ^FRlJ, and
can be used to perform four functions:
1. When used with the
SKl^ key, the Cr key
lets you get into typing mode, where you can use
both upper and lowercase letters.
The C^
key always acts as a shift to let you type
the graphic symbol pictured on the LEFT front of
each key. Just hold down ^ and press the
graphic key you want.
3. The Cr key is used like the
CTRtT" key to
change the color of what you type on the screen
when pressed with a COLOR KEY.
4. When you want to slow down a scrolling display (a
program that appears line-by-line on the screen
but might be going by too fast to follow), hold
down the
£= key. The display scrolling speed
slows down considerably. When you release the
key, it goes back to normal speed.
_.
NOTE: When pressing a modifying key (3! _
SHJFT=-: or
£= ) along with another key,
_
make sure you press them at the same time or
press the modifying key a split second earlier.
_
18 ^-^—-^—^——
LOOKING AT THE
KEYBOARD
(Reverse On/Off)
_QM
Press
RVSON
and
CTRL" at the same time to
print the reverse image of letters and numbers on
your screen. In other words, if your cursor is black
and the screen background is yellow, what you type
appears in yellow letters on a black background.
REVERSED LINE
To turn off reverse printing, press the
and
RVS OFF
CTB1T key. You can also turn oft reverse by
pressing the RETURN
key, or the IESC_ key and
0. This returns you to typing in normal print.
KEY
CTRL
= EFFECT
+
RVS ON
= REVERSE
PRINTING
ON
CTRL
= NORMAL
PRINTING
CTRL
You can make the characters on your screen flash
on and off continuously, like the cursor flashes.
Press ^^SELOM= and the CTRL key together
to make whatever you type flash.
Typing =F=LAt|^PFEE and
CTRL-, or
ESGP and 0 makes your typing normal
(non-flashing) again.
19
LOOKING AT THE
KEYBOARD
= EFFECT
KEY
.
;, ■■■■■■
= CHARACTERS
FLASH
CTRL _J/ FLASH,
"'
ON
= NORMAL
DISPLAYctrl
Colors Keys
• The color keys are actualiy the number keys from 1
to 8, when you press one with either the _ CTRL_
or the Q:
key.
• These change the color on the screen of everything
you type.
• On the front of each of the number keys from 1 to 8,
there are abbreviations for two colors.
• Press ~~CTfit= along with a number key to get the
color listed on top.
• Press the Cr key with a number to get the color
on the bottom.
• Make sure you press the two keys at the same time;
if you press the number key first, you'll just type the
number on the screen.
20
LOOKING AT THE
KEYBOARD
KEY+
1
+
CTRL
KEY+
= EFFECT
=
BLACK
= WHIT
:
= EFFECT
---
2 +O^ BROWN CTRL
3 +Cr= YELLOWctrl
GREEN
4 + "€?IK^ = CYAN
z = PURPLE
6 + 1ICTRL- -GREEN
7 +
CTRL
=BLUE
8 +
CTRL
= YELLOW
C=
CTRL
5+^i-BLUE
CTRL
6 + C==L!GHT
CTRL
DARK
CTRL
BLUE
C=
GREEN
BLUE
C=
C=
CTRL
GREEN
21
C=
W-WHT \
LOOKING AT THE
KEYBOARD
—
Graphic Keys
• Each letter key (and a few other symbol keys) on
your Commodore 16 has two boxes on the front,
each with a different graphic symbol. There are
more than 60 graphic symbols you can use.
♦ Type
u
and a key to print the symbol on the
right. This set of symbols contains card suits,
circles, lines and arcs.
Type Cr
and a key to print the symbol on the left.
The left side graphics are ideal for creating charts,
graphs, and business forms.
KEY +
A +
= EFFECT
F
(GRAPHIC ON
LEFT SIDE OF KEY)
A
+
4*
(GRAPHIC ON
RIGHT SIDE OF KEY)
You can create pictures, charts and designs by
printing graphics side-by-side or on top of each
other, like building blocks. You can make your
graphics more interesting by using the color
keys to "draw" in different colors. Try typing
some of these graphic symbols; experiment
_-
a little.
22
_
LOOKING AT THE
KEYBOARD
• When you're in typing mode, you can use only the
graphic symbols on the left front of the keys {by
pressing Cr
and the appropriate key).
Function Keys
• The four larger keys on the right side
of your keyboard, apart from the
rest of the keys, are special function
keys that let you save typing time by
automatically printing or actually
carrying out a frequently-used com
mand (such as clearing the screen
or RUNning a program) with the
press of one key.
• Each function key can be con
sidered to be two separate keys:
one when pressed aione (f 1, f2, f3
and HELP functions) and a second
when pressed along with ^SjflFii
(f4, f5, f6 and f7).
• The function keys are useful when
you get into BASIC programming.
More information on these keys is
available in the Commodore 16
Intermediate User's Manual and
the Series 264 Programmer's
Reference Guide.
23
LOOKING AT THE
KEYBOARD
The Help Key
• When you make a mistake in a pro
gram, your computer displays an
error message to tell you what you
did wrong.
• When you press the LHE^ri key,
the line causing a problem is auto
matically displayed, flashing on
and off.
HELP
f 7
For example, if you get this message:
7SYNTAX ERROR IN LINE 10
When you press JHEPJ, the computer shows the
offending line flashing on and off, for example:
10 PRONT "COMMODORE
COMPUTERS"
You typed PRONT
instead of PRINT,
as you can see in
the flashing line.
24
—
-J,
-4
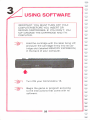
3
USING
SOFTWARE
. introduction
• Cartridges
• Cassettes
• Diskettes
-
_
~
USING SOFTWARE
Introduction
Software expands the scope of your computer, giving
you access to an entire library of personal, business,
educational, scientific and entertainment programs.
Software can be defined as the programs that can be
entered and run on a computer. To use any software
on your computer, you must LOAD the software pro
gram into the computer's memory. There are different
LOADing instructions, depending on what kind of soft
ware it is. The hardware (in this case, your Commodore
16) can use software in many forms: plug-in cartridges,
pre-recorded tapes and diskettes. The family of soft
ware available for your Commodore 16 is growing
quickly. Your dealer can keep you up-to-date on new
products and inform you about the features of soft
ware that's currently available.
Cartridges
• Commodore produces a full assortment of cartridges
software for your Commodore 16. There is a variety
of personal, education, and business programs,
as well as exciting games available for your
Commodore 16.
• You don't need any additional equipment to use
cartridge software. All you do is plug the car
tridge into the back of your computer and turn the
power on.
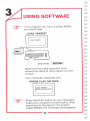
Loading Cartridges
• The steps for loading a cartridge are as follows:
1
Turn OFF your Commodore 16.
25
USING SOFTWARE
IMPORTANT: YOU MUST TURN OFF YOUR
COMPUTER BEFORE YOU INSERT OR
REMOVE CARTRIDGES. IF YOU DON'T, YOU
MAY DAMAGE THE CARTRIDGE AND THE
COMPUTER.
Hold the cartridge with the label facing UP,
and push the cartridge firmly into the car
tridge slot (labeled MEMORY EXPANSION)
in the back of your computer.
3
4
Turn ON your Commodore 16.
Begin the game or program according
to the instructions that come with the
software.
26
^
USING SOFTWARE
Cassettes
A variety of programs for the Commodore 16 is
available recorded on cassette tape.
To use cassettes, the only extra equipment you
need is a model 1531 Datassette™ tape recorder,
available from your Commodore dealer.
■ The only step involved in hooking up the Datassette
is plugging the cable into the CASSETTE PORT in
the back of your Commodore 16.
• You can also use cassette tapes and the Datassette
to store programs you write yourself.
NOTE: You MUST use the special Datassette to
load or record cassette software, rather than a
regular audio cassette recorder.
27
USING SOFTWARE
Loading A Program On Cassette Tape
• The steps for loading a program on cassette tape
are as follows:
1
Insert the cassette into your Datassette
and close the door.
2
Rewind the tape to the beginning by press
ing the REWIND button on the Datassette.
3
Press the STOP button on the Datassette.
when the tape is rewound to the beginning.
Then type LOAD and press the Ijj
key.
The computer responds with:
PRESS PLAY ON TAPE
Press the PLAY button on the Datassette.
The screen goes blank as the Datassette
starts. When a program is found the screen
displays this message:
28
—
USING SOFTWARE
FOUND program name
f'
■>
FOUND
Press the Commodore key to load the pro
gram that was FOUND. If there is more
than one program on the tape, and the pro
gram your Commodore 16 found isn't the
one you want, after about 8 seconds (if you
don't press the
Qi key) the computer
keeps searching.
When the program is loaded, the word READY
appears. If you wantjo stop Vne_loading before
it's complete, press i
. on the key
board, then the STOP button on the Datassette.
After the software is loaded, type RUN and
press
ISETJiBN^ to start the program.
Loading A Specific Program
• To LOAD a specific program on the tape, type the
name of the program you want after typing LOAD.
The instructions are the same as typing LOAD with
no name, with just a few differences.
29
USING SOFTWARE
1
If the program you want is called BASES,
you would type:
LOAD "BASES"
and press
zpETffitP
Make sure you type quotation marks
around the name of the program you wish
to load.
Your computer responds with:
PRESS PLAY ON TAPE
LOAD "BASES''
PRESS PLAVON TAPE
2
Press the PLAY button on your Datassette
to get your computer to start looking. After
searching on the tape for the program
called BASES, the message should appear:
30
~*
USING SOFTWARE
SEARCHING
FOUND BASES
LOADING
The screen goes blank while your computer
then "reads" the program into its memory.
Once your computer has digested the en
tire program, your Commodore 16 tells you:
READY.
I
3
At the cursor, you instruct it to
RUN
and press
= . At this point, your
i
Commodore 16 runs (executes) the pro
gram "BASES".
If the entire tape goes by without the found message,
rewind the tape and try again'.
31
_i
USING SOFTWARE
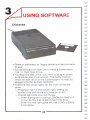
Diskettes
Disks (or diskettes, or floppy disks) are fast and easy
to use.
To use software on disk, you'll need a Commodore
1541 or 1551 Disk Drive.
To set up the disk drive, you have to plug its power
cord into an electrical socket. The cable that con
nects the disk drive to the Commodore 16 must be
plugged into the SERIAL SOCKET.
There are two small lights on the front of the disk
drive.
—The green light is the power light, telling you
whether the disk drive is turned on or off.
—The red light tells you two things:
1, When a program is being LOADed or SAVEd, it
is lit while the disk is spinning in the drive.
When the red light goes off, the LOAD or SAVE
is complete.
32
—
USING SOFTWARE
2. if there is a problem with the diskette or drive,
the red fight flashes on and off, even after the
disk stops spinning in the drive.
You can also use disks to store programs that you
write yourself.
Here are the steps to follow to load software from
disk:
1
Make sure that your disk drive is ON.
2
Insert the disk into the disk drive. The label
side of the disk must face up. Insert the
disk into the opening so the labeled end
goes in last. Look for a little notch on the
side of disk (it might be covered with a
sticker). This notch should be to your left as
you put in the disk, assuming that you're
facing your disk drive. Be sure the disk is in
all the way.
33
USING SOFTWARE
3
Close the protective door on the disk drive
after you insert the disk.
A
Type:
DLOAD "program name" Specific name of
the program to be LOADed
(To save time, you could press FUNCTION
KEY 2 and type in the program name
and the second
quote marks.)
1
DIOAD
5
Press the
RETURN
NAME1
key. The disk spins
and your screen says:
SEARCHING FOR program name
FOUND program name
LOADING
SEARCHING FOR NAME
FOUND NAME
READY.
LOADING
I
34
-
USING SOFTWARE
6
Your software is now ready to use. Type
RUN and press the ^gRli key to start
the program.
• You have to supply either program name for a *) in
the DLOAD command. Follow the instructions that
came with the software.
.,.
• If the red light on the disk drive blinks after the
DLOAD is finished, something went wrong. Type:
?DS$ (and press J*
to find out what went wrong.
Examples of DLOAD commands:
DLOAD "*"
LOADs the first program on the
disk.
DLOAD "FILES"
LOADs a disk program called
FILES.
35
-
-
x
A
4
LEARNING
THE BASICS
.Numbers and Calculations
. BASIC programme
. sound and Nlusic
. Graphics and Color
_
LEARNING
THE BASICS
This is an introduction to let you know something
about the BASIC programming language that is includ
ed with your computer. This section will begin to give
you an idea of what you can do with your Commodore
16. In the following sections, there will be reviews of
the BASIC capabilities of your computer for numbers
and calculations, sound and music, graphics and col
or, and programming. These reviews are just introduc
tions; to further your understanding, a more thorough
Intermediate User's Manual is available for you when
you're comfortable with your Commodore 16, after
you've struck up an initial rapport. If you aspire to
greater programming heights, the Series 264 Pro
grammer's Reference Guide contains information
about the advanced programming capabilities of the
Commodore 16.
36
4
• introduction
. Calculations
. Advanced functions
-
NUMBERS AND
CALCULATIONS
You don't have to be a math genius to understand and
make use of the mathematical capabilities of your
Commodore 16. You can use your computer to per
form addition, subtraction, multiplication, division and
relational operations (< , >
= ), as well as advanced
functions like square roots and sines. Your computer
understands fractions and scientific notation. You can
figure out and use variables. Your computer can han
dle single-digit whole numbers or complex numbers of
up to 38 places in exponential notation with equal effi
ciency. You can do your calculations directly or as
part of programs. You can also design your own equa
tions for your computer to evaluate each time you
need the formula applied, without having to retype the
whole equation in each instance. Your Commodore 16
is also a random number generator, which is useful in
programming.
As a calculator:
• Besides the standard + and - operation signs,
your Commodore 16 uses the * sign for multiplica
tion and the / sign for division and fractions.
• To solve a problem, type in PRINT followed by the
equation. Then press ~R£T58S| to get your com
puter to perform the math involved.
• These are the operators you can use:
37
NUMBERS AND
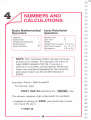
CALCULATIONS
Basic Relational
Operators
Basic Mathematical
Operators
Addition
Greater than
>
Subtraction
Less than
<
Division and fractions
Equals
=
Multiplication
Greaterthanorequal
Exponentiation
Less thanorequal
Not equal to
= >or> =
<= or =<
<> or><
NOTE: Your computer doesn't accept commas
as part of a number. For example, you have to
type 30359 instead of 30,359. If you put a
comma in a number, your computer thinks you
mean two numbers (separated by the comma),
and would read it as 30 and 359 instead of
30359.
Example: What's 1959 times 33?
To find out, type:
PRINT 1959*33 and press the
The answer appears right underneath the problem.
• Instead of typing out PRINT, you could use a ques
tion mark (?), as in:
71959*33
38
—
NUMBERS AND
CALCULATIONS
Your computer reads this the same as it would inter
pret PRINT.
Order Of Calculation
• You can do more than one calculation in one line,
like this:
PRINT 200*50 + 5
or this:
PRINT 50+ 5*200
These nearly identical problems give completely
different answers. Your Commodore 16 always
performs calculations in a certain order:
FIRST:
Your computer checks for negative
numbers (not subtraction, just negative
numbers).
SECOND:
Your computer solves any exponents.
THIRD:
Your computer solves all multiplication
and division, from left to right.
FOURTH:
Your computer solves addition and sub
traction, from left to right.
NOTE: Your Commodore 16 always solves any
part of the problem surrounded by parentheses
first.
39
-
NUMBERS AND
CALCULATIONS
Advanced Functions
• Your computer can also calculate higher-level
mathematical functions when you type in a BASIC
numeric function command and the number or
variable to be figured out, and press |
• Numeric function follow this form:
FUNCTION (X)
where the FUNCTION is the specific command and
X is the number or variable to be calculated.
Here are the BASIC functions you can use:
ABS (X)
(absolute value)
ATN (X)
(arctangent)
COS(X)
(cosine)
EXP (X)
(the mathematical constant e (2.71828183)
raised to the power of X)
INT (X)
(integer of X, rounded down)
LOG(X)
(logarithm)
—To convert to log base 10, divide by
LOG (10).
RND (X)
(generate a random number)
SGN (X)
(sign: positive, negative or zero)
SIN (X)
(sine)
SQR (X)
(square root)
TAN(X)
(tangent)
^———— 40
NUMBERS AND
CALCULATIONS
When you use these functions, remember to type
PRINT before the function, like this:
PRINT SQR (16)
■41
4
S
BASIC keywords
BASIC
PROGRAMMING
Introduction
At the heart of the computer is programming. If pro
gramming is the heart of the Commodore 16, then
BASIC language is the lifeblood. A language is what
you use to communicate with your computer. The
computer understands the terms (or keywords) that
make up the language, and interprets them as in
structions. Your computer has a version of BASIC
built in called BASIC 3.5. This version contains many
terms not found in other BASICS — over 100 key
words in all. In the following sections on Sound and
Music and Graphics and Color, you'll see some dif
ferent BASIC terms being used in different ways.
Communicating With Your Commodore 16
• There are two different ways to communicate with
your computer:
— immediate (directly)
— in a program (indirectly)
• Direct communication means that you give your
orders directly and the computer carries them out
right away, like this:
PRINT "ANYTHING"
When you press JlEfFUfiN^, this tells the computer
to print what is between the quotes immediately.
42
-^
BASIC
PROGRAMMING
A program features lines of commands, but each
line has a number. The number tells the computer in
what order to read the program, lowest being read
first, such as this:
10 PRINT "ANYTHING"
Nothing seems to happen when you press
N
. The line is entered in the computer, but
it doesn't do anything. You need to tell it to execute
(or RUN) the program^Youjjo this by typing RUN
and pressing the itfTURN key. Then the computer
goes through each line in order and carries out what
each line tells it to do.
Basic 3.5 Keywords
• The keywords in BASIC 3.5 may be divided into
three types:
— COMMANDS
— STATEMENTS
— FUNCTIONS
• Commands are keywords that are most often used
in direct communication (with no line numbers). An
example of a command keyword is LOAD.
• Statements are keywords that usually appear in
numbered program lines. PRINT is a statement
keyword.
• Functions (as shown in the Numbers review) can be
used in either fashion. Instead of carrying out a com
mand, the computer returns numbers or letters.
43
BASIC
PROGRAMMING
See the Intermediate User's Manual for a thorough
review of the BASIC 3.5 keywords and a detailed ex
planation of their applications. If you are interested in
learning how to program with BASIC, there are many
good books and tutorials available. There is a book
list at the end of this guide, containing many good
sources for learning programming.
44
4
SOUND AND MUSIC
. volume command
. sound command
.A sound effect
—
SOUND AND MUSIC
With your Commodore 16, you can design music and
sound programs, enhance other programs with music
and sound effects, or just play around and experiment
with your computer's sound.
• Here's how to play a single note on your
Commodore 16:
First: Type VOL 8 and press lETURN
Second: Type SOUND 1,266,60 and press
RETURN
You should hear a note play for about a second
and then stop. If you don't hear anything, turn
up the volume of your television or monitor and
try it again.
• These two steps are the only commands you need to
know to play music on your Commodore 16. Both
commands are easy to understand and easier to use.
The Volume Command
• The VOL command controls the VOLume of the
notes that your Commodore 16 plays.
• The number after VOL sets the volume from LOUD
(VOL 8) to OFF (VOL 0)
45-
SOUND AND MUSIC
The Sound Command
• The SOUND command tells your computer
everything it needs to know about the sound you
want to play.
• The SOUND command is followed by three
numbers that describe the note:
SOUND voice, note value, duration
• The first number in the sound command refers to
voice. The number for voice can be a 1, 2 or 3. The
Commodore 16 sound is produced by two different
voices, 1 for the first voice and 2 for the second. The
third voice option refers to voice 2's capacity to pro
duce noice rather than a tone. You can use voice 3
to create sound effects like thunder or wind.
• The second number after the word SOUND is the
note value (frequency).
• This can be any number from 0 to 1023. It tells your
Commodore 16 how low- or high-pitched a note
to play.
• As the numbers get larger, the notes get higher. The
highest values (in the 1023 neighborhood) are not
audible to the human ear.
Note: With voice 3, noise is "white" (static)
only in the frequency range of 600-940. You
can use register value outside this range to
create interesting sound effects.
46,
SOUND AND MUSIC
This displays all of the notes in one scale, along with
the note value to use:
NOTE
A
B
C
D
E
F
G
VALUE
770
7S8
810
834
854
864
881
658
699
782.2
ACTUAL FREQUENCY
440.4 494.8 522.7 588.7
(HZ)
•The third number after the word SOUND controls
the duration (length) of the note, telling your com
puter how long to play the note.
•This number can be anything from 0 to 65535. This
number sets a timer, which counts time in 60th's
of a second. A duration of 60 keeps the note on for
one second.
•The rule of thumb for duration is the larger the num
ber, the longer the note stays on.
A Sound Effect
• Here is a short program to give you an idea of how
you can create different sound effects on your
Commodore 16. Type it in exactly as it appears
here, pressing =J*ETURN
after each line.
NEW
10 VOL 8
20FORL = 1 TO 10
30 SOUND 1,466,20
40 SOUND 1,1020,15
50 NEXT L
60 SOUND 3,500,20
RUN
This program simulates a busy signal, and the line be
ing disconnected.
47
—
4
4
GRAPHICS AND
COLOR
. Graphic characters
and animation
. controUing colors
. Other commands
GRAPHICS AND
COLOR
Introduction
The old expression, "a picture is worth a thousand
words", is appropriate when discussing the graphics
and color capabilities of your Commodore 16. With
out going into a lengthy explanation of what you can
do artistically, this section will review some of the
Commodore 16's graphic flair.
Using Graphic Symbols
• Earlier, in Section 2, the graphic symbols were
discussed. You can use the symbols to create
graphs and figures, as well as more elaborate
representations.
•You can simulate animation by alternating graphic
symbols or moving a graphic figure around the
screen in a program.
Simple Animation
This program simulates animation by alternating the
circle {" SHIFT & Q) and heart ( SHIFT & S) symbols.
If you use your imagination, you could consider this a
heartbeat of sorts.
48
•"*
GRAPHICS AND
COLOR
IMPORTANT TO NOTE: Each time ^SffifH or
Ql appears in the program, it should be
typed at the SAME TIME as the key following it
when entering the program, since nothing hap
pens when either key is typed by itself.
Remember to type NEW and press .RETURN
before entering each new program, and press
j to enter each line in all these programs.
Type this in exactly:
10 PRINT = "I
20 FOR L = 1 TO 100
30 NEXT L
40 PRINT = " =MOMEz
50 FOR M = 1 TO 200
60 NEXT M
70 GOTO 10
RUN
• To stop this program, press the
More Animation
In that program, the object was stationary.
To move an object {in this case a ball), just erase
the ball and replace it at a new position, as in this
program:
49,
_
GRAPHICS AND
COLOR
NEW
10 PRINT = "
20 PRINT = "
30FORL = 1 TO ;-.!)■ ;' ::i
40 GOTO 20
RUN
• When you RUN the program, remember to press
the
RJ&&ST6E-
key when you want to stop moving
the ball.
Controlling Colors
Separate colors can be put into each part of the
screen.
The border can be one color, the background a dif
ferent one, and each character can have its own
color. You saw in Section 2 how to change the color
using the keyboard. You can change the colors of
the other screen areas using the BASIC statement
COLOR. The COLOR statement looks like this:
COLOR area, color, luminance
The first number after the word COLOR specifies
the area on the screen you want to change. This
table lists what each screen area number controls;
areas 2 and 3 refer to more advanced multi-color
graphics.
50'
GRAPHICS AND
COLOR
Screen Area Numbers
AREA#
AREA NAME
0
Background
BORDER
1
Character
2
Multi-COlor 1 CHARACTERS
3
Multi-color 2
4
Border
BACKGROUND
The second number after COLOR selects the color
you want to put on the area of the screen you've
specified. The color numbers correspond to the
color keys on the keyboard.
Color Numbers
#
#
COLOR
COLOR
BLACK
9
WHITE
10
BROWN
RED
11
YELLOW GREEN
CYAN
12
PINK
PURPLE
13
BLUE GREEN
GREEN
14
LIGHT BLUE
BLUE
15
DARK BLUE
YELLOW
16
LIGHTGREEN
51
ORANGE
GRAPHICS AND
COLOR
• The third number refers to an adjustable brightness
level, called the luminance. You can add a number
from 0 (darkest) through 7 (brightest) after the color
number to vary the color.
Type:
=====
COLOR 4, 3, 0 and press RETURfF.
The border becomes a dark red.
Now type:
COLOR 4, 3, 7 and press
REfiHI.
The border changes to bright red.
• The BASIC 3.5 language includes commands that let
you create geometrical shapes, lines and dots on
the screen.
. Commands like DRAW, CIRCLE, BOX and
GRAPHIC can be used to create shapes, designs,
charts, graphs and figures.
• Other commands such as PAINT can be used to
color in parts of the screen.
The Intermediate User's Manual, available at your
bookstore, contains a complete review and explana
tion of the commands in your computer's BASIC that
are used for graphics and color. The Series 264 Pro
grammer's Reference Guide deals with graphics on a
programmer's level.
52
5
ETC
perip
herals
Books
ETC.
Peripherals
Peripherals are accessories that increase what you
can do with your computer. These accessories are
available at your Commodore dealer, and allow you to
use your computer to the fullest. Peripherals give you
the capability to save and store data, print out on
paper, use software programs that are stored on cas
sette tape and floppy disk, and give you a sharp, clear
picture of your computer's display.
To save or recall programs, you'll need a device that
stores data. Data can be recorded on and retrieved
from both cassette tapes and diskettes. To use
cassette tape software (and to record your own pro
grams on cassettes), you'll need the Commodore
DATASSETTE tape recorder. For diskettes, you'll want
a Commodore DISK DRIVE. Disk drives are typically
fast and efficient to use.
53
ETC
Model numbers:
Datassette
• 1531 Datassette
Disk Drives
i 1541
• 1551
Your television set may not give you as clear a picture
as you'd like for your computer. Commodore color
monitors are specially designed to give you the sharp
est, brightest picture for viewing your Commodore
16 output.
Color Monitor Model Numbers:
• 1701
• 1702
• 1802/1803
54
_
ETC.
When using a wordprocessing program or a graphics
package on your Commodore 16, a printer will repro
duce what is on the screen on paper. There are sev
eral models of Commodore printers available that
work with your computer. Different printers specialize
in different kinds of printing. Ask your Commodore
dealer which printer best suits your needs.
Printer Model Numbers:
•MPS-801 (dot matrix)
•MPS-802 (dot matrix)
•MPS-803 (dot matrix with tractor feed)
•DPS-1101 (letter quality)
-
■55
ETC
Books for Commodore Products
The following lists include a sampling of the computer
and programming books available. The title of the book
is listed first, followed by the author and publisher.
Commodore Books
Commodore 16 Intermediate User's Manual
Commodore Series 264 Programmer's
Reference Guide
Mastering Your VIC 20
Four VIC 20 Computer Books:
VIC Revealed, Nick Hampshire
VIC Games, Nick Hampshire
VIC Graphics, Nick Hampshire
Stimulating Simulations for the VIC,
C.W. Engel
Introduction to BASIC, Part 1 and 2, Andrew Colin
Commodore Software Encyclopedia.
Third Edition
BASIC Programming
Armchair BASIC: An Absolute Beginner's Guide
to Programming in BASIC: Fox & Fox,
Osborne/McGraw-Hill
BASIC Handbook, Second Edition; Lien,
Compusoft
Basic Commodore 64 BASIC: Coan, Hayden
Elementary BASIC: Ledgard & Singer. SRA
How to Build a Program; Emmerichs,
Dilithium Press
56,
-
ETC.
Instant Freeze-Dried Computer Programming
in BASIC; Brown
My Computer Likes Me When I Speak in BASIC:
Albrecht, Dilithium Press
Nailing Jelly to a Tree; Willis & Danley
Dilithium Press
The Programmer's Book of Rules; Ledin & Ledin,
Lifetime Learning Publishers
Technical BASIC; Kassab, Prentice-Hali
Machine Language Programming
Machine Language for Beginners:
Mansfield, COMPUTE! Books
Programming the 6502; Zaks, Sybex
6502 Assembly Language Programming;
Leventhal, Osborne/McGraw-Hill
6502 Micro Chart; Micro Logic Corp.
6502 Software Design; Scanlon, Sams
The 6502 Software Gourmet Guide & Cookbook;
Findlay, Hayden
n
Learning About the "Learning Computer"
The Commodore 16 Owner's Guide is an easy-to-follow
introduction to using your new computer. The Commodore 16 is
designed to be the "learning computer"—perfect to use to learn
about computing. You can use your Commodore 16 to write
programs, run software, play games and more.
Using the Commodore 16 Owners Guide, you can learn about:
• How to set up your computer
• How you can use the different keys
• Different types of software and how to use them
• Different peripherals you can get to expand your computer
system
Also, the Owner's Guide will introduce you to the BASIC
computer language built into your Commodore 16, used for
• Numbers and calculations
• Writing programs
• Sound and music
• Color and graphics
Included with your computer is a software cartridge, the
Keyboard Tutorial Cartridge, which teaches you about using
the computer keyboard. This cartridge supplements this
Owner's Guide, and comes with its own instructions for use.
t commodore
COMPUTERS
Commodore Business Machines, Inc.—Computer Systems Division
1200 Wilson Drive, West Chester, PA 19380
P/N2517
—


![3.3 Test Report [17 September 2003] PDF](http://vs1.manualzilla.com/store/data/005797517_1-9a96a1d49c489ee795f322ac4fe31348-150x150.png)