1
SAFETY INSTRUCTIONS
1
STATEMENT
Copyright
Copyright© 2012 Ningbo Xijia Electrical Appliance Co.,Ltd All Rights
Reserved.
No part of this manual, including the products and software described in it,
may be reproduced, transmitted, transcribed, stored in a retrieval system,
or translated into any language in any form or by any means, except
documentation kept by the purchaser for backup purposes, without the
express written permission of Xijia Electrical Appliance Co.,Ltd. ("XIJIA").
Disclaimer
The information in this document is subject to change without notice. The
manufacturer makes no representations or warranties with respect to the
contents hereof and specifically disclaims any implied warranties of
merchantability or fitness for any particular purpose. The manufacturer
reserves the right to revise this publication and to make changes from time
to time in the content hereof without obligation of the manufacturer to notify
any person of such revision or changes.
Trademark Recognition
HDMI, the HDMI Logo, and High-Definition Multimedia Interface are
trademarks or registered trademarks of HDMI Licensing LLC in the United
States and other countries.
All other product names used in this manual are the properties of their
respective owners and are acknowledged.
1
2
SAFETY INSTRUCTIONS
WARNING/CAUTION
Please take note of the safety instructions to prevent any potential accident
or misuse of the projector.
• Read these instructions.
• Keep these instructions.
• Heed all warnings.
• Follow all instructions.
WARNING
• To reduce the risk of fire and electric shock,do not expose this product to
rain or moisture.
• Unplug the projector from the wall socket before cleaning. Use a damp
•
•
•
•
cloth for cleaning the projector housing. Do not use liquid or aerosol
cleaners.
Do not block the vents of the projector or restrict air-flow in any way.
Do not place the Projector in direct sunlight or near heat sources such
as radiators, fires, stove etc.
When replacement parts are required, be sure that the replacement
parts are specified by the manufacture. Unauthorized substitutions may
result in fire, electric shock or other hazards.
Do not attempt to service this projector yourself. Refer all servicing to
qualified service personnel.
NOTES
• When installing the projector on a table, be careful not to place it near
the edge.
• Disconnect from the power supply and remove all connections before
moving, or cleaning.
• Only use the projector on a level and stable surface.
• Do not drop the projector when connecting to external devices.
2
SAFETY INSTRUCTIONS
3
Power
WARNING
• The power cord should be inserted fully into the power outlet to avoid
fire hazard.
• Do not place heavy objects on the power cord. This may cause a fire or
an electric shock hazard.
• Never touch the power plug with a wet hand. This may cause an electric
shock hazard.
• Do not plug in too many items into one power outlet. It may result in
overheating of the outlet and create a fire hazard.
• Prevent dust from collecting on the power plug pins or outlet.This may
cause a fire hazard.
NOTES
• Hold the plug firmly when unplugging. If you pull the cord, it may be
damaged.
• Do not use if the power cord or the plug is damaged or any part of the
power outlet is loose.
• Place the projector where people will not trip or tread on the power cord.
• Do not turn the projector On/Off by plugging-in or unplugging the power
plug to the wall outlet. (Allow the unit to cool before removing power.)
Others
WARNING
• Do not attempt to service the projector yourself. Contact your dealer or
service center.
NOTES
• Be sure to unplug if the projector is not to be used for a long period.
Accumulated dust may cause a fire hazard or damage to the unit!
3
4
TABLE OF CONTENTS
TABLE OF CONTENTS
1
SAFETY INSTRUCTIONS
copyright information.......................................1
Notes.................................................... 2
Power................................................... 3
Others................................................... 3
ASSEMBLING AND PREPARING
6
Unpacking ............................................... 6
Parts and Buttons ......................................... 7
Installation ............................................... 8
- Basic Operation of the Projector ............................. 8
- How to Install the Projector Using a bracket .....................9.
REMOTE CONTROL
10
Remote Control.......................................... 10
WATCHING PROJECTOR
11
Basic Introduction ........................................ 11
- Using Mouse........................................... 11
- Power on/off............................................11
- Focus and Position of the Screen Image ......................11
- Status bar..............................................11
- Connecting to the computer ................................11
Applications..............................................13
- Music................................................. 13
- Movie..................................................14
- Photo................................................. 17
- Office Viewer........................................... 19
- Screen Projection........................................20
4
TABLE OF CONTENTS
5
- HDMI................................................ 22
- Network Settings........................................ 23
- File Browser............................................28
- Settings............................................... 30
MAINTENANCE
35
Cleaning the Projector .....................................35
- Cleaning the lens ....................................... 35
- Cleaning the Projector Case ............................... 35
SPECIFICATIONS
36
Specifications............................................ 36
5
6
ASSEMBLING AND PREPARING
ASSEMBLING AND PREPARING
Unpacking
Check your product box for the following items. If there are any missing
accessories, contact the local dealer where you purchased your product.
The illustrations in this manual may differ from the actual product and item.
채널목록
Reset
선택
선호채널
한/영/숫자
화면크기
지움
조용히
메뉴
쌍자음
페
이
지
간편설정
확인
ᯙ
ᰙ
이전 자동조정 나가기
ᰧ
ᰪ
화면정지
Projector
HDMI Cable
Remote Control
Power Adapter
Gift
Projector Bracket
Poejector Carrying Bag
6
ᰦ
ᰩ
ᰨ
화면가림
정보표시 방송안내
User Manual
ASSEMBLING AND PREPARING
7
Parts and Buttons
Up Cursor
/Volume up Menu
LED light
Enter
Right Coursor
Left Cursor
Reset
Power on/off
Reset the system
and power off
Exit
Down Cursor
/Volume down
Res
et
Ventilation openings
DC IN
MINI-HDMI
RC Window
Audio out
MINI USB
Projector Bracket Socket
Speakers
USB Focus Ring Lens
7
8
ASSEMBLING AND PREPARING
Installation
Basic Operation of the Projector
1 Place the projector with the desired distance from the screen. The
distance between the projector and the screen determines the actual
size of the image.
2 Position the projector so that the lens is set at a right angle to the screen.
If the projector is not set at a right angle, the screen image will be
crooked. Although, slight angles can be counteracted using the
Keystone adjustement.
3 After placing the projector in its desired location, connect the video input.
Then connect the power cable to the projector and the wall outlet.
Projection offset ratio: 100%
X/2
X/2
Projection distance (D)
Diagonal Size(mm)
508
635
762
889
1016
1143
1270
1397
1524
1651
1778
1905
2032
2159
2286
2413
2540
Y/2
Screen
Y/2
51mm
Horizontal Size (Y)
Vertical Size (X)
Screen
Projection distance (D)
16 : 9 Scale
Projector Distance(D)
Horizontal Size(Y)
Vertical Size(X)(mm)
(mm)
(mm)
431
269
586
538
337
737
646
404
887
754
471
1038
861
539
1200
969
606
1342
1077
673
1492
1185
741
1643
1292
808
1794
1400
875
1947
1508
943
2097
1615
1010
2248
1723
1077
2399
1831
1145
2552
1938
1212
2702
2046
1279
2853
2154
1347
3004
8
ASSEMBLING AND PREPARING
9
How to Install the Projector Using a Bracket
* When stabilizing the projector bracket,we recommend using the locking
bolt of standard size 6.0 mm.
Bottom side of Projector
Part connected to
the bracket
+
Projector Bracket
Projector is connected to
this part.
Locking bolt
9
10 REMOTE CONTROL
REMOTE CONTROL
The descriptions in this manual are based on the buttons on the remote
control. Please read this manual carefully and use the projector correctly.
To replace batteries, open the battery cover, replace batteries (1.5 V AAA)
matching the and ends to the label inside the compartment, and close
the battery cover. To remove the batteries, perform the installation actions
in reverse.
CAUTION
• Do not mix old and new batteries, as this may damage the remote control.
• Dispose of used batteries at a recycling drop-off location.
• Optimal remote range is less than 6 meters and within a 60 degree arc
of the IR receiver.
Laser Pointer
Exit
Up Cursor/Vol +
Menu
Enter/Suspend
Left Cursor
FunctionDown Cursor/Vol -
Right Coursor
F-
F+
Function+
Func
Power off
Function
CAUTION
• Press “Func” and “F+” /“F-” key of the remote control to set the Volume
/ Brightness / Keystone , and press “Func” key confirmed.
10
WATCHING PROJECTOR 11
WATCHING PROJECTOR
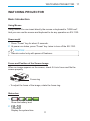
Basic Introduction
Using Mouse
Using mouse:You can insert directly the mouse or keyboard to “USB host”.
And you can use the mouse and keyboard to do any operation on EX-1120.
Power on/of
1 Press “Power” key for about 3 seconds.
2 At power-on status, press “Power” key twice to turn off the EX-1120.
CAUTION
• Remote control only with power off features.
Focus and Position of the Screen Image
When an image appears on the screen, check if it is in focus and fits the
screen properly.
Us
b-
dis
pla
y
Focus ring
• To adjust the focus of the image, rotate the focus ring.
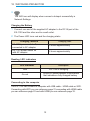
Status bar
1
Show the battery level
2
Display the system time
11
12 WATCHING PROJECTOR
3
The WiFi icon will display when connect a hotspot successfully in
Network Settings.
Charging the Battery
1 Connect one end of the supplied AC adapter to the DC IN port of the
EX-1120 and the other end to a wall outlet.
2 The Power LED turns red and the charging starts.
Charging Method
Charging time
EX-1120 power switch off,
connected to AC adapter
EX-1120 power switch on
with AC adapter
4 hours approximately
6 hours approximately
Reading LED indicators
LED Indicator
Description
Red
Go out
EX-1120 is charging
When AC power adapter is connected
that indicates a fully charged battery
Connecting to the computer
The EX-1120 can connect to computer with USB cable、HDMI cable or WIFI.
Connecting with WIFI you can reference page 21,connecting with HDMI cable
you can reference page 22 and with HDMI you can reference page 33.
12
APPLICATIONS 13
Applications
Music
Music file compatibility
mp3, mp2, aac, amr, ape, wma, awb, flac, m4a, ogg, mid, midi,
wav, mka, ra, mp1, ac3
1 Open music list: Press “Up” / “Down” / “Left” / “Right” key to select the
Music icon in main menu, and press “OK” key to open the music list.
2 Play music : By default, it selects the first item of the song list, press
“Up”/“Down” key to select a song, then press “OK” key to play it.
Meanwhile theplaying UI will appear as below.
Equalizer
Play mode
Track
Playing time/Total time
Back Previous Stop
Pause
Next
3 Adjust volume:You can press “Up” / “Down” key to adjust the volume at
any application interface.
13
14 APPLICATIONS
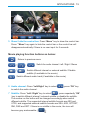
Movie
Movie file compatibility
mkv, 3gp, 3g2, avi, flv, mov, mp4, ts, mpg, m4v, vob, dat,wmv,
asf,ram
1 Open movie list: Press “Up” / “Down” / “Left” / “Right” key to select the
Movie icon in main menu, and press “OK” key to open the movie list.
2 Play the movie: By default, it select the first item of the movie list, press
“Up”/“Down” key to select a movie, then press “OK” key to play it at full
screen.
CAUTION
• Adjust volume:You can press “Up” / “Down” key to adjust the volume at
any application interface.
3 Pause / Resume the movie: When playing the movie at full screen,
press the “OK” key to pause the movie, and press the “OK” key again to
resume it.
4 Fast forward / Fast backward: When playing the movie at full screen,
press repeatedly “Left” key to fast backward the movie at the speed of
2X/4X/8X/16/32X; press repeatedly “Right” key to fast forward the movie
at the speed of 2X/4X/8X/16/32X. The speed of fast forward or fast
backward will display on the top left corner of the screen.
Resume normal playback: When you press the “Left” or “Right” key to
fast backward or fast forward the movie, press the reverse key will
resume the normal playback mode.
14
APPLICATIONS 15
5 Show / hide the control bar: Press “Menu” key to show the control bar.
Press“Menu” key again to hide the control bar or the control bar will
disappearautomatically if there is no user input for 5 seconds.
Movie playing function buttons as below:
Return to previous menu
/
/
/
Switch the audio channel: Left / Right / Stereo
Switch different internal or external subtitle / Disable
subtitle (if available in the movie)
Switch different audio track (if available in the movie)
6 Audio channel: Press “Left/Right” key to select
, press “OK” key
to switch the audio channel.
7 Subtitle: Press “Left / Right” key to select
, press repeatedly “OK”
key to switch different internal / external subtitle or disable the subtitle.
The number on the button will be changed accordingly when switch
different subtitle. The supported internal subtitle formats are ASS and
UTF8, and supported external subtitle formats are SSA, ASS, QTTEXT,
SMI, DKS and SRT. If there is no subtitle in the movie, the icon will
become grey andunusable (
).
15
16 APPLICATIONS
8 Audio track: Press “Left / Right” key to select
, press
repeatedly “OK” key to switch different audio track. The number on the
button will be changed accordingly when switch different audio track. If
there is no audio track in the movie, the icon will become grey and
unusable (
).
16
APPLICATIONS 17
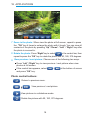
Photo
Photo file compatibility
jpeg, bmp, png
1 Open Photo: Press “Up” / “Down” / “Left” / “Right” key to select the
Photo icon in main menu, and press “OK” key to open the photo list.
2 View details of the photo: Press “Up” / “Down” / “Left” / “Right” key to
select a photo, the photo’s details such as name, image resolution, image
size and update time will display at the bottom of the screen.
3 View photos at full screen: Press “Up” / “Down” / “Left” / “Right” key to
select a photo, then press “OK” key to view it at full screen.
4 Slide show: Press “Menu” key to switch the selection to the back button,
then press “Right” key to select
, then press “OK” key to view the
photos in slideshow mode. If you set the background music on in
Settings>Audio Option>Background music, it will play the music of
the .mp3 format in the folder of “Musics” in local memory as the
background music.
5 Stop slide show: Press “Menu” key to stop slideshow and display the
control bar as below.
6 Show/hide the control bar: Press “Menu” key to show the control buttons
and the file name. Press “Menu” key again to hide them or the control bar
will disappear automatically if there is no user input for 5 seconds.
17
18 APPLICATIONS
7 Zoom in the photo: When view the photo at full screen, repeat to press
the“OK” key 4 times to enlarge the photo with 4 levels. You can view all
contents of the photo by pressing “Up” /“Down” /“Left” / “Right” key after
the photo is zoomed in.
8 Rotate the photo: Press “Right”key to select
in the control bar, then
repeat to press the “OK” key to rotate the photo with 90, 180, 270 degrees.
9 View previous / next picture: Choose one of the following two ways:
Press “Left” /“Right” key to view previous / next picture when view
photos at full screen.
If the control bar appears, select
/
at the bottom of screen
and press “OK” key.
Photo control buttons:
Return to previous menu.
/
View previous / next picture.
View pictures in a slideshow mode.
Rotate the picture with 90, 180, 270 degrees.
18
APPLICATIONS 19
Office Viewer
Office viewer file compatibility
txt, pdf, doc, ppt, xls, docx, pptx, xlsx, hwp, htm, html,jpg, jpeg,
gif, bmp, epf, png, emf, wmf
1 Open file list: Press “Up” / “Down” / “Left” / “Right” key to select the Office
Viewer icon in main menu, and press “OK” key to open the file list.
2 Open the file: By default, it select the first item of the file list, press “Up”
/ “Down” key to select a file, then press “OK” key to open it.
3 Turning a page: You can press “Up” /“Down” key to turn the page when the
page size is original. The turning page is not available after the page size is
zoomed in.
4 Zoom in the document: When view the document, repeat to press the “OK”
key 4 times to enlarge the document with 4 levels. You can view all contents
of the document by pressing “Up” /“Down” /“Left” / “Right” key after the page
size is zoomed in.
Resume the original size: After zoom in to the largest level, press the “OK”
key, the document will go back to the original size.
19
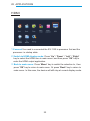
20 APPLICATIONS
Screen Projection
Press “Up” / “Down” / “Left” / “Right” key to select the Screen Projection
icon in main menu, and press “OK” key to enter into below UI.
1 Set the login code: By default, the “Disable” item is selected, and the
login code function is disabled. If you want to set the login code, you can
press “Right” key to select “Assign” item, then select the login code input
box and then press “OK” key to open the virtual keyboard, you can input
the login code using the virtual keyboard.
CAUTION
• If you select “Random” item, system will assign a login code randomly.
• You are allowed to input 4 digits for the login code.
2 Start connection: Press “Menu” key to switch the selection to the “Start”
button, and then press “OK” key to enable the network connection and
setup with the configured network settings.
20
APPLICATIONS 21
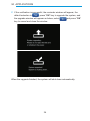
You need to start the screen projection on EX-1120 first. Then, start the
screen projection from PC side by using the MirrorOp sender software.
Please refer to the descriptions on www.mirrorop.com website to get the
details on the PC sender software. While waiting for connection, the standby
window shown above will be displayed. After the software on PC runs
successfully, you would see the display desktop of the PC on the device screen.
21
22 APPLICATIONS
HDMI
1 Connect:You need to connected the EX-1120 to processor first and the
processor in startup state.
2 Switch to HDMI display mode: Press “Up” / “Down” / “Left” / “Right”
key to select the HDMI icon in main menu, and then press “OK” key to
enter the HDMI output application.
3 Back to main menu: Press “Menu” key to switch the selection to , then
press “OK” key to return to main menu. Or press “Back” key to return to
main menu. In this case, the device will still stay at current display mode.
22
APPLICATIONS 23
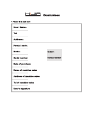
Network Settings
Press “Up” / “Down” / “Left” / “Right” key to select the Network Settings
icon in main menu, and then press “OK” key to enter into below UI.
Device name / SSID
1 Set Device name / SSID: Select the “Device name / SSID” item, and
then press “OK” key to open the virtual keyboard in full screen. You can
input the device name / SSID using the virtual keyboard.
After complete the device name/SSID input, press “Menu” key to select
and then press “OK” key to close the virtual keyboard and return to Network
settings UI. Alternatively, you can also use the off-the-shelf wireless keyboard
to enter the device name / SSID.You are allowed to input only total 15 letters
or numbers for the device name / SSID.
23
24 APPLICATIONS
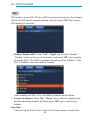
WiFi
WiFi mode is to use EX-1120 as a WiFi device and connect to other hotspot.
Select the WiFi item in network settings, and then press “OK” key to enter
WiFi setting UI as below.
1 Enable / Disable WiFi: Press “Left” / “Right” key to select “Enable” /
“Disable” button on the top of the screen, and press “OK” key to enable
or disable WiFi. If the WiFi is enabled, the button will be “Disable”. If the
WiFi is disabled, the button will be “Enable”.
After enabling the WiFi, a list of available hotspots will be shown.
2 Connect a hotspot: Press “Up” / “Down” key to select a hotspot in the
list after searching hotspot, and then press “OK” key to connect the
hotspot.
Input key:
-If there is signal & lock icon in front of the hotspot name, it means this
24
APPLICATIONS 25
hotspot is encrypted. Consequently, the above connection window will
appear on the screen when connect the hotspot. Select the input box of
key and then press “OK” key to open the virtual keyboard in full screen.
You can input the key using the virtual keyboard. Press “Menu” / “Down”
key to select “Connect” button after completed the key input, and then
press “OK” key to connect the hotspot. Alternatively, you can also use
wireless keyboard to input.
-If there is the signal icon without lock icon in the front of the hotspot name,
you can connect this hotspot directly and no need to input key.
3 Show the key: By default, the key inputted is not shown. If you want to
see the key after input the password, you can press “Down” key to select
the item “Show the key” and then press “OK” key to enable the item
before the key input.
4 WPS: If there is a “W” icon in front of the hotspot name, it means that this
hotspot supports WPS. When connect this hotspot, a different connection
window will be shown. You can select the WPS option to enable the WPS
function.
Auto assign IP: If selected “Auto assign IP”, it will automatically request
an IP address via DHCP.
Manually assign IP: If select “Manually assign IP”, you can set IP
address, Netmask, Gateway, DNS manually.
WiFi hotspot
WiFi hotspot function is to program EX-1120 as a hotspot so that other WiFi
device can connect to EX-1120.
25
26 APPLICATIONS
1 Enable / Disable WiFi hotspot: Press “Right” key to select “Enable” /
“Disable” button on the top of the screen, and press “OK” key to enable
or disable WiFi hotspot.
2 IP configure: By default, the “Use default IP” is selected, the items ”IP
address”, “Netmask”, “Gateway” and “DNS” are invalid, and their default
values will be displayed on the screen. You can select “Use other IP”
by pressing “Right” key and then set the new IP.
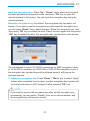
3 Set wireless encryption key: Press “Down” key to select the “Set
wireless encryption key” button, and then press “OK” key to open the
“Set wireless encryption key” window as below. By default, the projector
will work under no-encryption mode.
4 Set the encryption mode: By default, the “Disable” item is selected,
and you cannot set the encryption key. But you can press “Left” / “Right”
key to select one of other two encryption modes, and set the encryption
key accordingly.
26
APPLICATIONS 27
Input the encryption key: Press “Up” / “Down” key to select the key input
box after selected an encryption mode, and press “OK” key to open the
virtual keyboard in full screen. You can input the encryption key using the
virtual keyboard.
Show the encryption key: By default, the encryption key inputted is not
shown. If you want to see the encryption key after input the encryption key,
you can press “Down” key to select the item “Show the encryption key” and
then press “OK” key to enable the item. Select the item again and then press
“OK” key to disable the item, the encryption key inputted will not be shown.
You are allowed to input 10-20 ASCII characters for WEP encryption mode
or 10-20 ASCII characters for WPA-PSK or WPA2-PSK encryption mode. If
the encryption key inputted beyond the allowed amount, will pop-up the
reminder window.
5 Apply the encryption key: Press “Down” / “Menu” key to select “Apply”
button after completed the key input, and the encryption key inputted will
be saved and return to WiFi hotspot UI after pressing “OK” key.
NOTE
• If you want to remove the encryption key after set the encryption key
successfully, you can select “Disable” item on the above window, and
the encryption key will become invalid.
27
28 APPLICATIONS
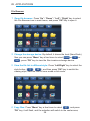
File Browser
1 Open file browser: Press “Up” / “Down” / “Left” / “Right” key to select
the File Browser icon in main menu, and press “OK” key to open it.
2 Change the storage device: By default, it shows the local (Nand flash)
files,you can press “Menu” key a few times to select
or
, press “OK” key to view the files invarious storage device.
or
3 View the file list in different style: Press “Left/Right” key to select the
style button (
/
), and then press “OK” key to switch the
viewing style, view the files in icons mode or list mode.
4 Copy files: Press “Menu” key a few times to select
, and press
“OK” key, it will flash, and the selection will switch to the center area,
28
APPLICATIONS 29
press “Up” / “Down” /“Left” / “Right” key to select the file you want to copy,
press “OK” key to confirm your selection, when the selection finished,
press “Menu” key to select
file(s) will be copied.
again and press “OK” key, the selected
Paste files: When the copying finished, select the path which you want
to paste to, select
and press “OK” key to paste the copied files.
The waiting animation will appear when pasting.
5 Delete files: Press the “Menu” key to switch the selection to
, press
“OK” key, it will flash, and the selection will switch to the center area,
press “Up” /“Down” / “Left” / “Right” key to select the file you want to
delete, press “OK” key to confirm your selection, when the selection
finished, press the “Menu” key to select the
again and press “OK”
key, the reminder window will appear as below.
6 Sort the files: Press “Menu” key to switch the selection to the bottom
buttons, and then press “Left” / “Right” key to select the sort button
(
), press “OK” key to change the sort according to the file’s size,
name, type or date.
7 Music playing: Select the music you want to play, and press “OK” key
to play it, the stop music button (
) will appear at the bottom right of
the screen.
Stop music: Press “Menu” key to switch the selection to the bottom button,
press “Left” / “Right” key to select
, and then press “OK” key to stop
the music. Meanwhile the stop music button will disappear.
29
30 APPLICATIONS
Settings
Audio option
1 Set EQ: By default, it select “Equalizer”, press “OK” key to show the EQ
sub menu, press “Up” / “Down” key to select the EQ: Normal / Classical /
Jazz / Pop / Rock / Bass / User EQ set, press “OK” key to set it and close
the sub menu.
2 Speaker set up: Press “Down” key to select “Speaker”, press “Left” /
“Right” key to select “Always on” or “Auto”.
3 Background music for photo slideshow: Press “Down” key to select
“Background music”, press “Left” / “Right” key to select “On” or “Off”. If
you select “On”, it will play the music file in the folder named “musics” in
Local when photo slideshow.
4 Set track: Press “Down” key to select “Track”, press “Left” / “Right” key
to select the track status: “Left”, “Right” or “Stereo”.
Display option
1 Model: By default, it select “Normal”, press “Left” /“Right” key to set the
display mode:Ceiling /Manual / Regr.
2 Adjust Keystone: Press “Menu” key to select “Keystone”, press “Left” /
“Right” key to set the adjust keystone: Manual / Auto.
30
APPLICATIONS 31
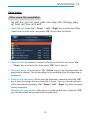
System option
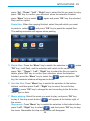
The system setting includes language setting, system information, date and
time, loading default settings and formatting memory / SD card.
1 Set the language: By default the “Language” item is selected, press
“OK” key to show the sub menu, press “Up” / “Down” key to select the
language you want to use: English / 简体中文 / Français / Deutsch /
español / Português / Italiano, press “OK” key to set it and close the sub
menu.
2 System information: Press “Up” / “Down” key to select “Information”,
press “OK” key to show the system information.
31
32 APPLICATIONS
3 Date/Time: Press “Up” / “Down” key to select “Date/Time”, press “OK”
key to show the setting window.
Set the time zone: By default it select “Time zone”, press “OK” key to
show the sub menu of time zone, then press “Up” / “Down” key to select
your location, and press “OK” key to set it and close the sub menu.
Automatic get time from network: Press “Menu” key to select the
automatic get network time, press “OK” key to disable or enable
automatic get time from network.
4 Format memory / SD card: Press “Down” key to select “Format
memory / SD card”, press “OK” key to show the sub menu. Select
“Format memory” or “Format SD card” and press “OK” key, the reminder
window will appear, select
and press “OK” key to do it, and the
reminder info will appear as below. Press “Right” key to select
press “OK” key to cancel and close the reminder window.
and
Play mode
1 Set the play mode: Press “Up” / “Down” key to select a play mode for
music and movie: Repeat none / Shuffle / Repeat one / Repeat all.
USB option
1 Data storage mode: By default it select the “Data storage mode” item,
press “OK” key, will enter file exchange mode, and the reminder
massage will appear at the screen. You will see one or more removable
disks partitions on your PC, depending on a SD card being inserted in
the EX-1120 or not.
32
APPLICATIONS 33
2 VGA streaming mode: Connect the PC to the “USB device” port on the
device via the USB cable, then select the item of “VGA streaming mode”
and press “OK” key, it will enter the USB streaming mode. Waiting a few
seconds, the EX-1120 screen will display the desktop of the PC. Press
“Back” key to back to USB Option UI during USB streaming.
If the USB cable is not inserted when you start to enter Data storage
mode or VGA streaming mode, the reminder window will appear.
System upgrade
System upgrade will upgrade the system from the image files stored on SD
card or USB disk. SD card or USB disk should contain a folder called
“upgrade” at the root level. This folder shall contain two files, one is
“upgrade.img” and another is “upgrade.md5”. Both should be copied from
the release package.
1 System upgrade: Press “Up” / “Down” key to select “System upgrade”,
press “OK” key to verify the upgrade package in the SD card or USB disk.
33
34 APPLICATIONS
2 If the verification is successful, the reminder window will appear, the
default selection is
, press “OK” key to upgrade the system, and
the upgrade window will appear as below, select
key to cancel and close the window.
and press “OK”
When the upgrade finished, the system will shut down automatically.
34
MAINTENANCE 35
MAINTENANCE
Cleaning
Cleaning the lens
Use an air spray or cleaning cloth for product exterior, provided with the
product, to lightly clean the product. Please use a recommended air spray
or lens cleaning product.To clean lens, small amount of cleaning agent on a
swab or a soft cloth and rub on the lens. Please be aware that liquid may
flow pass through the lens if the product is sprayed on lens directly.
Cleaning the Projector Case
To clean the projector case, first unplug the power cable. To remove dirt or
dust, wipe the casing with polish cloth provided. When you want to remove
the dust or stain on the lens, use the cloth for product exterior, provided with
the product.
Do not use alcohol, benzene, thinners or other chemical detergents as these
can cause the casing to be warped or discolored.
35
36 SPECIFICATIONS
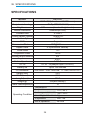
SPECIFICATIONS
MODEL
Lamp
Projector technology
Brightness
Native Resolution
Contrast ratio
Colors Gamut(Typical)
Uniformity
EX-1120
RGB LED(Life of over 30,000 hours)
DLP(.3"DMD WVGA)
120Lumens (standard bright mode)
854x480(WVGA)
≥1000:1
100%NTSC
≥70%
Support
100"@360mm
4:3(Horizontal:Vertical)
WIFI
Screen size/Distance
Aspect Ratio
Throw Ratio
Projection Offset
1.67
100%
Remote control distance
6m
Keystone
±30°
Built-in Speakers
0.8Wx2
DC 5V 3A(Adaptor Input 100-240V)
DC IN
Battery life
Up to 150 minutes
mini HDMI、USB、miniUSB,TF card,AUDIO OUT
I/O connector
Height(mm)
22.0
74.0
Width(mm)
Length(mm)
138.0
Weight(g)
300(with battery)
Power consumption(W)
12
Temperature
In operation
-10℃-50℃
In storage and transit -20℃-60℃
Operating Condition
Humidity (relative humidity)
In operation
25%-75%
Not in operation
0%-85%
36
37
38
Ningbo Xijia Electrical Appliance Co.,Ltd
Add:No.168 Industrical zone,Hainan Village,Simen Town,
Yuyao City,Ningbo,Zhejiang Province,China
P.C:315470
Tel:+86-0574-62189992
Fax:+86-0574-62189993
http://www.cnxjdq.com


![PLAS A O ]-OR](http://vs1.manualzilla.com/store/data/005852706_1-5db0b7ed584537f0e62af161fb124638-150x150.png)