1
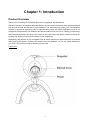
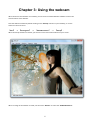
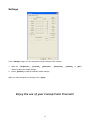
User Manual Flexcam 2.0 megapixel with Microphone CLLFLCAM20 C08-208 V3.0 CONTENTS Chapter 1: Introduction .............................................. 1 Product Overview Main Features Package Contents Chapter 2: Installation ................................................ 3 Hardware installation Basic webcam usage Driver installation Chapter 3: Using the webcam ...................................... 5 Resolution configuration Extra features Settings i Chapter 1: Introduction Product Overview Thank you for choosing CLLFLCAM20 Flexcam 2.0 megapixel with Microphone. With this Flexcam 2.0 megapixel with Microphone you can communicate and share special moments with anyone through the Internet in high resolution! The extremely high quality real 2.0 megapixel webcam is perfect for capturing video in high definition quality and taking snapshots of up to 5.0 megapixels (interpolated)! The webcam has special features like Auto Face Tracking (a technology that automatically keeps your face in the center of the video frame) and Photo Frames (a feature for creating and adding your own photo frames to your snapshots)! Additionally, this webcam is fully compatible with all instant messenger applications and is equipped with a built-in microphone. Thanks to the unique foot of the webcam, you can use it both hanging on your LCD / LED screen as well as standing on your desk. Front Panel 1 Main Features • Compatible with all messenger & chat applications • High resolution (HD) 2.0 megapixel webcam • Includes Snapshot button for photos & photo frame software • Interpolated 5.0MP Package Contents • Flexcam 2.0 megapixel with Microphone • Product CD-ROM • Multi Language Quick Installation Guide 2 Chapter 2: Installation Hardware installation The Conceptronic Flexcam is an UVC (Universal Video Class) webcam, meaning that you can plug the Flexcam in a free USB port of a computer with UVC support (like Windows XP SP2, Windows Vista, Windows 7 and Linux), without the need to install any drivers. Turn on your computer. Connect the USB connector of the Flexcam to a free USB port of your computer. The computer will recognize and install the Flexcam automatically with the default drivers of your operating system. After the installation, you can use your Flexcam. Note: When using the Driverless Installation of the Flexcam, you can only use the basic webcam functions. The driver installation and the extra features of the Flexcam are described in the User Manual, which can be found on the CD-ROM. Select “View User Manual” from the autorun menu. Basic webcam usage When you have connected the webcam to your computer and the webcam is recognized, you can use the webcam in webcam enabled applications, like Microsoft Live Messenger & Skype. To configure the webcam in Live Messenger, use the „Tools‟, „Audio and Video setup‟ in the Live Messenger main window. To configure the webcam in Skype, use the „Tools‟, „Options‟ menu and select „Video Settings‟. Note: When using the Driverless Installation of the webcam, you can only use the basic webcam functions. To obtain the extra features, you need to install the drivers. Driver installation If you want to use the extra features of the webcam, you need to install the drivers from the included product CD-ROM. Before you can install the drivers, you need to connect the webcam to your computer, as described in Hardware installation. 3 A. Insert the CD into the CD-ROM drive on your PC. The autorun program should start automatically. If it does not, please run autorun.exe under your CD-ROM drive. In the autorun screen, click “Drivers” to begin the software installation. Note: You might get a “User Account Control” warning message, which you will need to accept by clicking on “Yes”. B. The Setup Wizard will appear on your screen. Click “Next” to proceed with the installation of the drivers and software. C. When the installation is finished, click on “Finish” to close the installation wizard. 4 Chapter 3: Using the webcam When the drivers and software are installed, you can use the installed webcam software to access the extra functions of the webcam. Start the webcam software by double clicking on the “Amcap” shortcut on your desktop, or use the shortcut in the start menu: “Start” --> “All Programs” --> “USB Video Device” --> “Amcap”. When the Amcap software is started, you will see a live stream of the webcam on your screen: When no image of the webcam is visible, use the menu “Devices” to select the ”USB Video Device”. 5 Resolution configuration Through the menu“Options”-->“Video Capture Pin”, you are able to change the default resolution settings for the webcam: Note: If you select a higher resolution, the frame rate will drop. To have a smooth webcam stream, lower the resolution. Extra features The webcam has extra features, like “Effects” and “Zoon / Face Tracking”. These features can be set through the properties of the webcam, which can be accessed in different ways. In the “Effect” page, you can select an image effect, or a photo frame, to adjust your webcam image. 6 In the “Zoon / Face Tracking” page, you can manually zoom your webcam image, or use the face tracking option to automatically zoom into your face. 1. Use the manual zoom option to manually zoom. 2. Use the face tracking option to automatically zoom into your face. You can define a tracking speed and show the original webcam image in a Picture in Picture window in a corner of your screen. When you have selected an option, click “Apply” to use the selected option. Note: The “Face Tracking” features are only available when the resolution of your webcam is 640x480 or lower. 7 Settings In the “Settings” page, you can change the image settings for the webcam. 1. Slide the “Brightness”,“Contrast”,“Saturation”,“Sharpness”,“Gamma”, or“Gain” sliders to adjust the image settings. 2. Select“Default”to load the webcam default settings. When you have changed your settings, click “Apply”. Enjoy the use of your Conceptronic Flexcam! 8