1
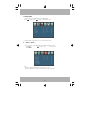
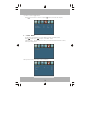
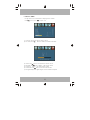
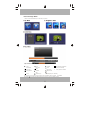
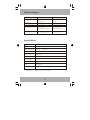
Tivax MiniVu7 C Portable TV
User Manual
Getting Started
10
PICTURE Menu
12
12
AUDIO Menu
TIMER Menu
13
SETUP Menu
13
V-CHIP Menu
14
CHANNEL Menu
18
20
20
Safety Precautions
Introduction
WARNING:
This symbol indicates that high
voltage is present inside. It is
dangerous to make any kind of
contact with any internal part of
this product.
THE MAIN PLUG/APPLIANCE COUPLER IS
USED AS THE DISCONNECT DEVICE, THE
DISCONNECT DEVICE SHALL REMAIN
READILY OPERABLE. ALWAYS REMEMBER TO
REMOVE THE PLUG FROM THE MAIN SOCKET
BEFORE DISCONNECTING THE POWER FROM
THE
UNIT. THE APPARATUS SHALL NOT BE
EXPOSED TO DRIPPING OR SPLASHING
AND THAT NO
OBJECTS FILLED WITH LIQUIDS, SUCH AS
VASES, SHALL BE PLACED THE APPARATUS
NO OPEN FLAME SOURCES SUCH AS LIGHTED
CANDLES SHOULD BE PLACED ON THE
APPARATUS.
This symbol alerts you that
important literature concerning
operation and maintenance
has been included with this
product.
WARNING:
WARNING:
PAY ATTENTIO N TO BATTERY DISPOSAL.
DANGER OF EXPLOSION OF BATTERY IF
INCORRECTLY REPLACED. REPLACE ONLY WITH
THE SAME OR EQUIVALENT TYPE
OF BATTERY.
TO PREVENT FIRE OR ELECTRIC SHOCK, DO
NOT EXPOSE THE UNIT TO RAIN OR
MOISTURE. NEVER ATTEMPT TO OPEN THE
CABINET,
HIGH VOLTAGES SOURCE IN THE
UNIT. REFER SERVICING TO
QUALIFIED SERVICE PERSONNEL.
CAUTION:
TO
PREVENT ELECTRIC
SHOCK,
MATCH WIDE- BLADE PLUG WITH
WIDE SLOT AND FULLY INSERT.
THE APPARATUS SHALL NOT BE
EXPOSED TO WATER AND NO OBJECTS
FILLED WITH LIQUID SUCH AS VASES
SHALL BE PLACED ON THE APPARATUS.
WARNING:
FCC REGULATIONS STATE THAT ANY
CHANGE OR MODIFICATION TO THE
EQUIPMENT,
NOT
EXPRESSLY
APPROVED
BY
MAKER
OR
ITS
AUTHORIZED
PARTIES, COULD VOID
USER'S AUTHORITY TO OPERATE THIS
EQUIPMENT.
2
Important Safety Instructions
1. Read, follow and keep these instructions
All Safety and operating instructions in this manual
should
be read and followed before the product is operated.
Please retain instructions for future reference.
Introduction
9. Outdoor Antenna Grounding
If an outside antenna or cable system is connected
to the product, be sure the antenna or cable system
is grounded so as to provide some protection
against voltage surges and built-up static charges.
Ar ticle 810 of the National Electrical Code,
ANSI/NFPA 70,
provides information with regard to proper grounding
of the mast and suppor ting structure, grounding of
the
lead-in wire to an antenna discharge unit, size of
grounding conductors, location of
antennadischarge unit, connection to grounding
electrodes, and requirements for the grounding
electrode. See figure below.
2. Cleaning
Unplug this product from the wall outlet before
cleaning. Do not use liquid cleaners or aerosol cleaners.
Use a damp cloth for cleaning.
3. Attachments
Do not use attachments not recommended by
the product manufacturer as they may cause
hazards.
4. Water and Moisture
Do not use this product near water for example,
near a bathtub, wash bowl, kitchen sink, or laundry
tub; in a wet basement; or near a swimming pool; and
the like.
5. Ventilation
Slots and openings in the cabinet are provided for
ventilation and to ensure reliable operation of the
product and to protect it from overheating, and
these openings must not be blocked or covered.
The openings should never be blocked by placing
the product on a bed, sofa, rug, or other similar
surface. This product should not be placed in a
built-in installation such as a bookcase or rack
unless proper ventilation is provided or the
manufacturer's instructions have been adhered to.
10. Lightning
For added protection for this product during a lightning
storm, or when it is left unattended and unused for
long periods of time, unplug it from the wall outlet and
disconnect the antenna or cable system. This will
prevent damage to the product due to lightning and
power lines surges.
6. Power Sources
This product should be operated only from the type
of power source indicated on the marking label. If
you are not sure of the type of power supply to your
home, consult your product dealer or local power
company. For products intended to operate from
battery power
or other sources, refer to the operating instructions.
11. Power Lines
An outside antenna system should not be located
in the vicinity of overhead power lines or other
electric light or power circuits, or where it can fall
into such power lines or circuits. When installing
an outside
antenna system, extreme care should be taken to
keep from touching such power lines or circuits as
contact with them might be fatal.
7. Grounding or Polarization
This product may be equipped with a polarized
alternating current line plug (a plug having one blade
wider than the other). This plug will fit into the power
outlet only one way. This is a safety feature. If you
are unable to inser t the plug fully into the outlet, try
reversing the plug. If the plug should still fail to fit,
contact your electrician to replace your obsolete
outlet. Do not defeat the safety purpose of the
polarized plug.
12. Overloading
Do not overload wall outlets, extension cords, or
integral convenience receptacles, as this can result in
a risk of fire or electric shock.
13. Object and Liquid Entry
Never push objects of any kind into this product
through openings as they may connect with high
voltage parts that could results in a fire or electric
shock . Never spill liquid of any kind on the
product.
8. Power Cord Protection
Power supply cords should be routed so that they
are not likely to be walked on or pinched by items
placed upon or against them, paying part icular
attention to cords at plugs, convenience receptacles,
and the point where they exit from the product.
3
Important Safety
Instructions
Introduction
14. Servicing
Do not attempt to service this product yourself as
opening or removing covers may expose you to
dangerous voltage or other hazards. Refer all
servicing to qualified service personnel.
15. Damage Requiring Service
Unplug this product from the wall outlet and
refer servicing to qualified service personnel
under the following conditions:
A)When the power-supply cord or plug is
damaged, B)If liquid has been spilled, or objects
have fallen into the product,
C)If the product has been exposed to rain or
water, D)If the product does not operate normally
by following the operating instructions. Adjust
only those controls that are covered by the
operating instructions as an improper adjustment
of other controls may result in damage and will
often
require extensive work by a qualified
technician to restore the product to its normal
operation,
E)If the product has been dropped or damaged
in any way.
F)When the product exhibits a distinct change
in performance this indicates a need for
service.
16. Replacement Parts
When replacement par ts are required, be sure the
service technician has used replacement parts
specified by the manufacturer or have the same
characteristics as the original part . Unauthorized
substitutions may result in fire, electric shock, or
other hazards.
17. Safety Check
Upon completion of any service or repairs to this
product, ask the service technician to perform
safety checks to determine that the product is in
proper operating condition.
18. Heat
The product should be placed away from heat
sources such as radiators, heat registers, stoves,
or
other products (including amplifiers) that produce heat.
4
Introductio
n
Safety Information
Thank you for purchasing this product which has been designed and manufactured
to give you many years of trouble-free serv ice.
About This User Guide
This user guide contains all the information you need to know about how to
setup and watch free off the air channels using your Port able ATSC TV.
Accessories In the Box
Remove your Port able ATSC TV carefully from the box , and remove
the packaging from each part .
You will find the following items:
Port able ATSC TV
Remote Control (CR2025 battery
included) User Manual
Magnetic base antenna
Power adaptor
Look out for this symbol. It indicates useful and import ant tips.
If the AC/DC adapter is connected while the TV is powered on, it will supply the
unit with power. Note: the battery will always be recharged while the AC/DC
adapter is connected.
Warning: Change or modifications to this unit not expressly by the part responsible for compliance could
void the user 's authority to operate the Equipment.
NOTE:
This equipment has been tested and found to comply with the limits for a Class B digital device,
pursuant to Part 15 of the FCC Rules. These limits are designed to provide reasonable protection against
harmful interference in a residential installation. This equipment generates, uses, and can radiate radio
frequency energy and, if not installed and used in accordance with the instructions, may cause
interference. If this equipment does cause interference to radio or televisionreception, which can be
determined by turning the equipment off and on, the user is encouraged to try to correct the
interference by one or more of the following measures:
- Reorient or relocate the receiving antenna.
- Increase the separation between the equipment and receiver.
- Connect the equipment into an outlet on a circuit different from that to which the receiver is connected .
-Consult the dealer or an experienced radio TV technician or help.
Shield cables must be used with this unit to ensure compliance with the Class B FCC limits.
5
Safety Information
Do not expose the Portable ATSC TV do dripping or splashing and not not place around any
objects
filled with liquids, such as vases.
The main plug is used as the disconnect device.
Always remember to remove the plug from the main socket before
disconnecting the power lead from the back of the unit.
Safety is Important
To ensure your safety and the safety of others, please ensure you read the
Safety Instructi ons before you operate this product.
Keep this information in a safe place for future
reference. Please read all the safety information before
use.
Safety Considerations
Position the cables so that they cannot be walked on or pinched by items
placed on or against them.
Do not use the Portable ATSC TV in humid or damp
conditions. Do not allow the Porta ble ATSC TV to get wet.
Do not expose the Portable ATSC TV to dripping or splashing.
Do not place water filled objects, such as vases around the Portable ATSC TV.
Do not have open flame sources, such as candles around the Portable ATSC TV.
Cleaning
ALWAYS unplug the Portable ATSC TV before you
clean it. Do not use liquid or aerosol cleaners.
Clean the Portable ATSC TV with a soft, damp (not wet) cloth.
Ventilation
The slots and openings on the Portable ATSC TV are for
ventilation. Do not cover or block them as it may cause
overheating.
NEVER let children push anything into the holes or slots on the case.
Servicing
There are no user servi ceable parts i n this Portable ATSC
TV. When servici ng, refer to qualified servi ce personnel.
Consult your dealer if you are ever in doubt about the installation, operation
or safety of this unit.
Battery Disposal
Please ensure batteries are disposed of safely.
Never dispose of batteries in the fire or with household
waste. Check with your local authority for disposal
regulations.
6
Remote Control
Remote Key Function:
1)
POWER:
Powers TV on or sets standby mode.
2) P.M.:
Switches picture mode.
3) NUMBER KEYS:
Numeric keys to select desired channel.
4) RECALL:
Recalls last channel.
5) VOL+:
Increases volume.
6) MENU:
Displays TV menu or returns to previous menu.
7) EPG:
Displays/Removes all program information .
8) TV DISPLAY:
Displays/Removes program information.
9) FAV:
Used to access your favorite program.
10) MUTE:
Disables or enables sound.
11) S.M.:
Switches sound mode.
12) SLEEP:
Timer to turn off TV.
13) ASPECT:
Adjusts aspect mode.
14) AUDIO:
Switches TV/audio mode.
15) SOURCE:
Displays or exits TV input source menu.
16) CH+:
Changes to next channel up.
17) VOL-:
Decreases volume.
18) OK:
Confirms selection.
19) EXIT:
Exits menu.
20) CH-:
Changes to next channel down.
21) CC:
Enables/Disables CC function.
22) CH.LIST:
Displays channel list.
7
Using the Remote Control
Point the remote control at the remote sensor in order for the player to function
correctly. The remote will function to approximately 21' from the remote sensor at an
angle of
approximately 30O in each direction.
Note: Directing the remote sensor toward any light source, such as direct sunlight,
may cause the unit to malfunction. Do not spill water or put wet items on the remote
control. Never disassemble the remote control.
HOW TO REPLACE THE BATTERY
STEP 1: PUSH THE BUTTON TOWARDS THE
LEFT; STEP 2: PULL THE BATTERY LOADER
OUT.
Caution:
Incorrect use of the battery may cause leaks, corrosion, or
explosions. Be sure to place the batteries in the correct direction.
It is dangerous to charge/heat/open or short -circuit the
battery. Do not leave dead or expired battery inside the
remote.
Remove the battery when not using the remote control for a long period of
time. When the operating range is reduced, replace the battery with new,
fresh ones.
If leakage from the battery occurs, wipe the battery liquid from the
battery compart ment, then replace.
Built-in Rechargeable Battery Management
The capacity of built-in rechargeable Lithium Polymer battery is 1800mAh,
which can provide about 1.5 hours of operation depending on the usage
conditions. This portable TV uses a smart battery management system inside
which can support low battery detection.
1. If the battery voltage falls below a specific value, the unit will enter the low
battery mode, displaying a flashing low battery icon in the OSD, indicating the
user needs to recharge the TV immediately.
2. If the AC/DC adapter is connected while the TV is powered on, it will supply the
unit with power. Note: the battery will always be recharged while the AC/DC
adapter is connected.
3. If the TV is kept running on low battery without using AC/DC adapter, the TV
will shut down after a short time to protect the battery from depletion.
BATTERY CAUTION
Do not store or use this portable TV in extremely hot or cold environments. This
product works best in a temperature range from 32
F to 95
F. Storage or
operation outside this temperature range, especially above 95
F cansignificantly and
irreparably degrade the performance of the lithium polymer battery.
Do not store this device in the sun or in a hot car, such as the glove box.
8
Front Panel
1) SOURCE: Selects the input source.
2) POWER: Powers TV on or sets standby mode.
3) CH+: Navigates the menu screens or selects the channels in non-menu state.
4) OK: Confirms a selection within a menu.
5) VOL-: Navigates the menu screens or adjusts the volume in non-menu state.
6) VOL+: Navigates the menu screens or adjusts the volume in non-menu state.
7) CH-: Navigates the menu screens or selects the channels in non-menu state.
8) ASPECT: Changes display mode 19:9 or 4:3.
9) MENU: Opens the main menu window.
10) EXIT: Exits menu.
11) REMOTE CONTROL SENSOR: Receives the signal from the remote control
12) TFT screen: Displays the TFT widescreen display.
13) Antenna input: Connects to an external RF signal.
14) Speaker Left: The left speaker.
15) USB card slot
16) Memory Card slot
17) Speaker Right
2. Left View
1) AV IN JACK: For connection to an external CVBS video and analog audio input.
2) AUDIO OUT JACK: Out puts analog audio L/R and coaxial digital Audio signal.
3) EARPHONE JACK: Outputs analog audio L/R signal to earphone.
4) POWER SWITCH: System on/off.
5) DC IN JACK: AC-DC adaptor input, the voltage range is 12V.
6) CHARGE INDICATOR: The system is charging when the red LED is lit, Will
turn green when fully charged.
The AUDIO IN and VIDEO IN inputs should be used at the same time.
AUDIO IN cannot be used for audio-only without an associated video connection
9
Getting Started
Switch the button to ON position
to power on the system
Switching on the first
time
1.Connect the antenna to the antenna jack on the left side of the unit.
2.Connect the power adaptor to the “DC IN 12V” jack on the right side of the unit
3.Switch on the portable LCD TV using the power key on the right side of the unit.
4.Press the MENU key and select the rightmost icon-channel menu.
5.Use the navigation key to select the TV source and then select Air or CATV.
6.Select the Auto Scan item and press the Right key to start auto search
(It will search for all available channels in your area).
7. After completing the Auto Scan, use the channel+/- key or numeric keys
(remote control only) to select the TV programs.
10
Getting Started
For good reception, place the antenna as close as possible to the window of your house,
and as far away as possible from the portable TV.
Don't place the antenna near other machine/appliances (such as motors,
computers, switching power, TVs, power amplifiers, speakers... etc), since these
machines/ appliances can cause interferences to the antenna.
To conserve power while the TV is not in use, the power switch key on the right side
should be turned to the OFF position.
How to use the USB interface
1.Insert a USB device into the USB interface
2. Press the source key and select External Storage item.
3. Select the USB icon.
4. Select the JPG/MUSIC/MOVIE icons to play the JPG/MP3/MOVIE file .
How to use 3 In 1 Card Reader
1. Insert an SD / MS / MMC card into the Card Reader interf ace.
2. Press the source key and select the External Storage item.
3. Select the SD/MS/MMC icon.
4. Select the JPG/MUSIC/MOVIE icons to play the JPG/MP3/MOVIE file.
Please refer to page 19 for details of the USB and card reader use.
11
1. PICTURE MODE
The first item of the Main MENU is the PICTURE
MODE. You can adjust the contrast, brightness, etc.
Press
to select, press
to adjust, press MENU to exit.
Note:
If you want to adjust contrast, brightness, color and sharpness , the picture mode must
return to personal
status.
2.AUDIO MODE
The second item of the Main MENU is the SOUND MODE.
Press
to select, press
to adjust, press MENU to exit.
12
3.TIMER MENU
The third item of the Main MENU is the TIMER MENU.
Press
to select, press
to adjust, press MENU to exit.
1).SLEEP TIMER: adjust this item , you can set the sleep timer .
4. SETUP MENU
1).The forth item of the Main MENU is the SETUP MENU for system
setup. Press
to select, press
to adjust, press
MENU to exit.
Note:
Restore Default: Reset all the settings to default value.
Software Upgrade: Only use for system software upgrade by USB .
13
2). Closed Caption: Toggles on/off .
Press
button to select Closed Caption ,Press button, the screen will display:
5. V-CHIP MENU
The fifth item of the MENU is the V-CHIP MENU for setting up Parental Control.
Press
to select, press
to adjust, press MENU to exit.
Parental control: input the password, it will go into the Parental Control menu. Factory
default password is 6666.
5.1 .Input the correct password ,the screen will display:
1). Change Password: Press button, the screen will display:
1).Enter Old Password: Input the old password.
2).Enter New password: Input the new password.
3).Confirm password: Input the new password again.
5.2 V-CHIP switch:
When the System Lock is ON, the options below can be adjusted.
5.3 US: Press
button, the screen will display:
1):TV: Press
button, the screen will display as follow:
15
And use the OK key to switch lock/ unlock the Parental Control feature.
2).MPAA:switch the movie-rating control level; N/A, G,PG, PG-13,R,NC-17,X.
5.4 Canada: Press
button, the screen will display:
16
1): Canadian English: switch the english rating control level:E,C,C8+,G,PG,14+,18+.
Rating
Age
Description
E
Exempt: Includes news, sports, documentsand other information programming: talkshows, music videos, and
variety programming.
C
Children: Intended for youngerchildren under the age of8. Pays careful attentionto themes that could
threaten t heir sense of security and well-being.
C8+
Children over 8 years old: Contains no portrayal of violence as the preferred, acceptable, or only wayto resolve
conflict;
nor encourage children to imitate dangerous actswhich they may see onthe screen
General: Considered acceptable for all age groups, Appropriate viewing for the entire family, contains very little
violence, physical, verbal or emotional.
G
PG
14+
18+
Parental Guidance: Intendedfor a general audience, butmay not be suitable for younger children (underthe age of 8)
because it could contain controversialthemes or issues.
Over 14 Years: Could contain themes where violence is one of the dominant elements of the storyline But it must be
integral to the development of plot or character.Language usage could be profaneand nudity present with inthe
context of theme
Adults: Intended for viewers 18 years and older and might contain depictions of violence, which while related to the
development of plot, character orthemes, are intended for adult viewing. Could contain graphic languageand
portrayals of nudity.
2).Canadian French: switch the French-rating control level: E, G,8ANS+,13 ANS+,16ANS+,
18ANS+.
Rating
E
Exempt programming
G
General :All ages and children, contains minimal directviolence, but may be integrated intothe plot in a
humorousor unrealistic manner .
8ans+
Age
Description
General but unadvisable for young children :May beviewed by a wide public audience, but could contain scene
disturbing to children under 8 whocannot distinguish between imaginary and real situations. Recommended fo
viewing with parents
13ans+ Over 13 years: Could contain scenes of frequent violence and tense violence.
16ans+ Over 16 years: Could contain frequent violence scenesand violence.
18ans+ Over 18 years: Only for adult viewing. Could contain frequent violent scenes and extreme violence.
17
6. Channel MENU
The right most icon is Channel MENU for adjusting the TV Channels.
Press
to move, press
to adjust here.
1). TV Source: select Air TV signal or cable TV signal.
2). Auto Scan: press the
button to confirm, you will see below menu :
3). Favorite: Press
button to choose/delete the favorite channel .
4). Show/Hide: Press button to display or hide current channel.
5). Channel NO. :Display the currentl channel number.
6). Channel lable: Press
button to edit current channel name.
7). DTV signal: Display DTV signal strength. Cannot be selected or adjusted.
18
External Storage MENU
Please use the CURSOR key and OK key to operate.
Play Control Bar:
/
Fast
backward
Fast
Forward
Volume
level
Previous
Play/Pause
Next
Repeat all
Repeat one
Stop
Normal
play
Six window navigation
(only for JPG file)
T
JPG play interval time
ZOOM(only for JPG file)
Shuffle play
To use the button on front panel to adjust volume,please select the Play Control Bar
and select
icon and press OK key, then press V+/V- key for volume control.
19
Service & Support
Problem
Probable cause
What to do
No signal found
Antenna is disconnected
Antenna is
damaged/misaligned Out of
Check
No picture or sound
In standby mode
Press the POWER button
Encrypted channel message
It is a pay per view channel
Select an alternative channel
No response from remote control
Remote control is not aimed correctly
Front panel obstructed
Remote control batteries inserted incorrectly
Remote control batteries exhausted
Aim remote control at front panel
Check for obstructions
Check batteries are inserted correctly
Replace remote control batteries
Square blocks in picture or
picture freezes
Antenna may not be compatable
Antenna is damaged/misaligned
Check with dealer
Check Antenna
Specifications
Video Signal System
ATSC
Display Device
Color TFT-LCD
Receiving Channels
Air: 2-69
Screen Size
7 inches
Screen pixels
480x234 dot
Audio output
2CH
Power Voltage
DC IN 12V
Power consumption
Cable: 2-135
15W
Size
220X130X31mm
Weight
0.65kg
Specifications are subject to change without notice.
20
Antenna
Check aerial
Michley/Tivax Limited Warranty to Original Purchaser
Michley/Tivax warrants this product purchased in the USA
against defects in material and workmanship under normal use and
service for
a period of one year from the date of retail purchase by the
original end-user
purchaser.
Products
will
not
be
warranted if the serial number is removed or defaced.
This warranty shall be void upon transfer of ownership of this
product and is effective only when used in the United States.
Michley/Tivax agrees to repair or replace this unit at no charge, within
warranty
period,
providing
that
the
product
is
the
delivered to Michley/Tivax in its original package or equivalent,
fully insured, with all shipping charges prepaid and a return
authorization number listed on the outside of the packaging.
A handling charge of $25 will be applied to any returned
product found not to be defective. To honor this warranty and to ensure
the best service to our customer, Michley/Tivax requires the following
information to be included with the returned unit:
A copy of the original sales invoice from your vendor.
Model number & serial number of the unit.
A detailed description of the problem associated
electrical connection and hardware.
A Return Authorization number can be requested by sending a fax
to
650-963-3585 or an email to [email protected] prior to returning
the unit.
This warranty contemplates the owner will reasonably maintain
this product
without
alteration,
negligent
use,
misuse,
or
abuse. Furthermore, any unauthorized alteration of this device
without written approval by Michley/Tivax will void any warranty and
the owner's right to operate this device.
This warranty presented above is exclusive and in lieu of
all other expressed
or
implied warranties.
Any warranty
applicable
to
this product
is
limited
to
the
period
described above. In no event will Michley/Tivax be liable
for any special, incidental, or consequential damage, loss of
revenue, or cost of replacement goods resulting from the use of
malfunction of this product to the equipment system on
which it is used. This warranty gives specific legal rights and you may
have other rights that vary from state to state.
Michley Electronics Inc. / Tivax
530 Showers Dr., Suite #7-204
Mountain View, CA 94040
Tel. 1-888-33-Tivax (1-888-338-4829)
Fax. 1-650-963-3585
Web. Www.tivax.com
General Information: [email protected] (1-888-338-4829)
Customer Support: [email protected]
www.tivax.com