1
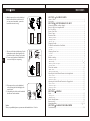
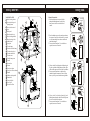
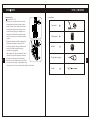
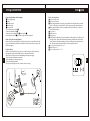
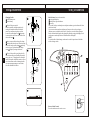
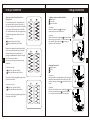
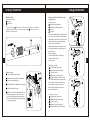
Michley/Tivax Limited Warranty To Original Purchaser
Michley/Tivax warrants this product purchased in the USA against defects in material
and workmanship under normal use and service for a period of one year from the date
of retail purchase by the original end-user purchaser. Products will not be warranted
if the serial number is removed or defaced.
Sew & Sew Electronic Sewing Machine SS 602
Instruction Manual
This warranty shall be void upon transfer of ownership of this product and is
effective only when used in the United States.
Michley/Tivax agrees to repair or replace this unit at no charge, within the warranty
period, providing that the product is delivered to Michley/Tivax in its original
package or equivalent, fully insured, with all shipping charges prepaid and a return
authorization number listed on the outside of the packaging. A handling charge of $25
will be applied to any returned product found not to be defective. To honor this
warranty and to ensure the best service to our customer, Michley/Tivax requires the
following information to be included with the returned unit:
•A copy of the original sales invoice from your vendor.
•Model number & serial number of the unit.
•A detailed description of the problem, associate electrical connection and hardware.
A Return Authorization number can be obtained by faxing to 650 963-3585 or
Emailing [email protected] prior to returning the unit.
This warranty contemplates the owner will reasonably maintain this instrument or
product without alteration, negligent use, misuse, or abuse. Furthermore, any
unauthorized alteration of this device without written approval by Michley/Tivax
will void any warranty and the owner's right to operate this device.
This warranty presented above is exclusive and in lieu of all other expressed or
implied warranties. Any warranty applicable to this product is limited to the period
described above. In no event will Michley/Tivax be liable for any special, incidental,
or consequential damage, loss of revenue, or cost of replacement goods resulting
from the use of malfunction of this product to the equipment system on which it is
used. This warranty gives specific legal rights and you may have other rights that
vary from state to state.
Model SS 602
For correct usage read these instructions carefully and
keep in a safe place for future reference.
Please note that this sewing machine is only suitable
for domestic use.
Caution:
1 This appliance is not intended for use by persons (including children) with reduced
physical, sensory or mental capabilities, or lack of experience and knowledge, unless
they have been given supervision or instruction concerning use of the appliance by a
person responsible for their safety.
2 Children should be supervised to ensure that they do not play with the appliance.
Correct Disposal of this product:
This marking indicates that this product should not be disposed with other household
wastes throughout the EU. To prevent possible harm to the environment or human
health from uncontrolled waste disposal, recycle it responsibly to promote the
sustainable reuse of material resources. To return your used device, please use the
return and collection systems or contact the retailer where the product was purchased.
They can take this product for environmental safe recycling.
We reserve the right to improve appearance of product. Please check product by real one, picture in the manual is just for your reference.
IMPORTANT SAFETY INSTRUCTIONS
When using an electrical appliance, basic safety precautions should always be followed,
including the following:
Read all instructions before using this appliance.
DANGER---To reduce the risk of electric shock:
1. An appliance should never be left unattached when plugged in. Always unplug this sewing
machine from the electric outlet immediately after using and before cleaning.
2. Always unplug before replacing a sewing machine bulb. Replace bulb with same type
rated 15 Watts.
WARNING---To reduce the risk of burns, fire, electric shock or injury to persons:
1. Do not allow to be used as a toy. Close attention is necessary when using this sewing
machine by or near children.
2. Use this appliance only for its intended use as described in this owner's manual. Use only
attachments recommended by the manufacturer as contained in this owner's manual.
3. Never operate this sewing machine if it has a damaged cord or plug, if it is not working
properly, if it has been dropped or damaged, or dropped into water. Return this sewing
machine to the nearest service center for examination, repair, electrical or mechanical
adjustment.
4. Never operate the appliance with any air opening blocked. Keep ventilation openings of
this sewing machine and foot controller free from accumulation of lint, dust and loose cloth.
5. Never drop or insert any object into any opening.
6. Do not use outdoors.
7. Do not operate where aerosol (spray) products are being used or where oxygen is being
administered.
8. To disconnect, turn all controls to the off ( “O” ) position, then remove plug from outlet.
9. Do not unplug by pulling on cord. To unplug, grasp the plug, not the cord.
10. Keep fingers away from all moving parts. Special care is required around the sewing
machine needle.
11. Always use the proper needle plate. The wrong plate can cause the needle to break.
12. Do not use bent needles.
13. Do not pull or push fabric while stitching. It may deflect the needle causing it to break.
14. Switch this sewing machine off (“O”) when making any adjustment in the needle area,
such as threading the needle, changing the needle, threading the bobbin, changing the
presser foot, and the like.
15. Always unplug this sewing machine from the electrical outlet when removing covers,
lubricating, or when making any other adjustments mentioned in this owner's manual.
SAVE THESE INSTRUCTIONS
NOTE: Sewing machine design and specifications are subject to change without prior notice
SECTION
MACHINE SPECIFICATIONS
Item
Specification
Sewing speed (Maximum):
Stitch length:
Stitch width:
Stitch package (Stitch function):
(Built-in stitches):
Machine dimensions:
Weight (Net):
Over 350 s.p.m
3.5 mm (Maximum)
6.5 mm (Maximum)
60
12
345 L
275 W
2.9 kg
. CARE OF YOUR MACHINE
TROUBLESHOOTING
Problem
No power or the machine
runs slowly
Skipping stitches
157 H
Problem cause
·Adaptor power inadequate
·Use compatible adaptor
·Needle eye not in the
middle
·Remove and re-insert the
needle with the flat side of
the needle to the back
·Needle bent
·Remove and re-insert a
new needle
·Presser foot too loose
·Tighten the presser foot
·Lower thread has been
used up
·Replace with new full
bobbin
·Needle threaded incorrectly
·Re-thread the needle,
making sure it is threaded
from the front to the back
·Needle bent
·Remove and re-insert a
new needle
·Needle shank not properly
seated
·Remove and re-insert a
new needle
·Thread tension dial, thread
guide or thread pulling bar
too tight
·Loosen the thread tension
between 3-5 number
·Thread blocked by upper
bobbin
·Pull out the spool pin and
make the bobbin or thread
run smoothly
mm
Bobbin thread cannot be
drawn up
Thread keeps breaking
Stitches too loose or
uneven
·Upper thread too loose
Needle breaks
Amendment
·Needle bent or deformed
·Remove and re-insert a
new needle
20
SECTION
. SEWING
8. Raise the presser foot, turn the cloth head
back( because cloth is sewed forward, if
you want to sew buttonhole, you need to
turn the direction of sewing.)
19
9. Choose stitch 2 and stitch adjusting E, push
dialing button to the right to make presser
foot can feed cloth. ( same as 4th procedure)
10. Turn on switch and sew till buttonhole is
oversewed fully, then stop sewing.
11. Raise presser foot, turn the handwheel
with one hand, pull the cloth lightly with
another hand.
12. After pulling the cloth, cut the thread with
thread cutter on the machine.
Notice:
When you push dialing button, you must turn the handwheel into 1-2 circles.
TABLE OF CONTENTS
SECTION
. NAME OF PARTS
Name of Parts....................................................................................................1
Accessories.......................................................................................................2
SECTION
. GETTING READY TO SEW
Connecting Machine to Power Supply..................................................................3
Before Using Your Sewing Machine.....................................................................3
For Your Safety..................................................................................................3
Presser Foot Lifter..............................................................................................4
Thread Cutter.....................................................................................................4
Extension Table..................................................................................................4
•Detaching the table..................................................................................................4
•Attaching the table...................................................................................................4
•Accessory box.......................................................................................................4
Changing Needle................................................................................................5
To Remove and Attach the Foot Holder.................................................................6
•To remove.............................................................................................................6
•To attach..............................................................................................................6
Changing Presser foot.........................................................................................6
•To remove.............................................................................................................6
•To attach..............................................................................................................6
Bobbin winding..................................................................................................7
•Horizontal spool pin.................................................................................................7
•Bobbin winding..................................................................................................7 8
•Removing the hock cover plate....................................................................................9
•Insert the bobbin.....................................................................................................9
Thread the machine...........................................................................................10
•Needle thread.......................................................................................................11
•Drawing up bobbin thread .........................................................................................11
Adjusting the Needle Thread Tension for a Straight Stitch....................................12
•Correct tension.....................................................................................................12
•Tension is too tight.................................................................................................12
•Tension is too loose................................................................................................12
Adjusting the Needle Thread Tension for a Zigzag Stitch.....................................13
•Correct tension.....................................................................................................13
•Tension is too tight.................................................................................................13
•Tension is too loose................................................................................................13
Stitch Selector..................................................................................................14
SECTION
. SEWING
Stitch...............................................................................................................15
•Starting to sew......................................................................................................15
•Finishing sewing...................................................................................................15
Stitch choosing button.......................................................................................16
Button sewing...................................................................................................17
Manual buttonhole......................................................................................18 19
SECTION
. CARE OF YOUR MACHINE
Troubleshooting...............................................................................................20
SECTION
1
. NAME OF PARTS
NAME OF PARTS
1 Stitch choosing button
2 Power switch & speed
adjusting button
12
3 Reverse stitch control
13
4 Reset
5 Stitch panel
14
6 Thread tension lever
7 Thread winding bobbin
15
8 Thread pressing circle
16
9 Bobbin thread
10 Spool pin
17
11 Thread clamp
12 Bracket of thread clamp
13 Thread take-up lever
18
14 Thread tension dial
15 Thread cutter
16 Needle clamp screw
19
17 Needle
18 Presser foot
19 Drawer
20 Hook cover plate
23
21 Hook cover release button
24
22 Handle
23 Bobbin winder spindle
24 Handwheel
25 Foot pedal jack
26 Power jack
27 Presser foot lifter
SECTION
Manual Buttonhole
1. Pull out the drawer on your left side
and push dialing button to the left so
that presser foot is not in cloth feed
status.
10
8
11
9
7
6
. SEWING
Dialing
button
5
2. Put cloth under presser foot and press down
the presser foot on the cloth where you need
to sew buttonhole, then choose stitch and
stitch adjusting E.
3. Turn on switch and sew 3-4 stitch in low
speed, then turn off switch.
4
3
2
1
20
18
21
22
4. Choose stitch 2 and keep stitch adjusting in
E place, push the dialing button to the right
side to make presser foot in cloth feed status.
5. Turn on switch and sew on the cloth in
suitable length, then turn off switch. Note
that try to keep sewed stitch in straight line.
27
26
25
6. Choose stitch 3 and stitch adjusting E, push
dialing button back to the left so that presser
foot is not in cloth feed status.
7. Turn on switch and sew 3-4 stitch in low
speed, then turn off switch.
SECTION
17
SECTION
. SEWING
Button Sewing
Stitch selector: 2 to 3
1.Draw the accessory table and you will see an
adjusting button for button sewing. Push the
button to the left, thus, machine is in the state
of button sewing. Place the button you want
to sew below the zigzag foot, making sure to
align the holes with the horizontal slot in the
foot. Lower the presser foot to hold the button
in place.
2.Determine which stitch width setting matches
the distance between the button holes. The
needle must go safely through each hole when
sewing. Unthread the needle to help you
determine the zigzag width.
3.Thread the needle. Turn the handwheel, so that
the needle is in its leftmost position, and then
drop the needle through the left buttonhole.
4.Press the foot control and sew about 10 stitches.
5.Sew the other row of holes ( if applicable) using
the steps above. Trim excess threads from both sides of the fabric.
. NAME OF PARTS
Accessories
Foot pedal
1
Thread spool
2
Bobbin
2
Needle threader
1
Needle
1
2
SECTION
. GETTING READY TO SEW
Connecting Machine to Power Supply
Power supply plug
Outlet
Machine socket
Machine plug
Power switch
1.Turn off the power switch .
2.Insert the machine plug
3.Insert the power supply plug into the outlet .
4.Turn the power switch to the left or right to turn on the power.
Before Using Your Sewing Machine
Before using your sewing machine for the first time, place a waste fabric under the
presser foot and run the machine with thread for a few minutes. Wipe away any oil
which may appear.
3
For Your Safety
While in operation, always keep your eyes on the sewing area. Do not touch any
moving parts such as the thread take-up lever, handwheel or needle.
Always turn off the power switch and unplug from the power supply:
nWhen leaving the machine unattended.
nWhen attaching or removing any parts.
nWhen cleaning the machine.
Do not place anything on the foot control, when not sewing.
SECTION
. SEWING
Stitch choosing button
Sewing straight stitch
Sewing other stitches
When you push button to the right, green indicator of stitch pattern is on default
stitch 1. All stitches can be chosen as you like by pressing stitch pattern button.
When you push button to the left, straight stitch is chosen. Moreover, there are
three needle positions.
Left position
Middle position
Right position
Needle position adjusting. If you need another needle position to sew fabric with
a straight stitch , draw fabric and needle thread out, push button to the right and
choose stitches other than straight stitch, then needle position is changed as you
like. Stitches can be adjusted into different needle positions below.
Left & right needle positions:3 to 6
Middle position: 2
Three needle positions:7 to 12
16
SECTION
. SEWING
Stitch
Straight stitch: 1
Zigzag stitch: 2 to 12
• Starting to sew
Raise the presser foot and position the fabric on the needle plate. Turn the handwheel
and lower the needle to the point where you want to start. Lower the presser foot and
pull the threads toward the back. Depress the foot control. Gently guide the fabric
along a seam guide line letting the fabric feed naturally.
SECTION
. GETTING READY TO SEW
Presser Foot Lifter
Presser foot lifter
The presser foot lifter raises and lowers the
presser foot.
CAUTION: Do not place fingers near the presser foot when guiding fabric, or the
needle clamp screw may strike and injure your fingers.
• Finishing sewing
To fasten the ends of a seam, press the reverse stitch control and sew several reverse
stitches. Raise the presser foot. Remove the fabric, draw the threads to the back and
cut them with the thread cutter. The threads are now the proper length to begin
sewing the next seam.
15
Thread Cutter
Thread cutter
You do not need a pair of scissors to cut the
thread after sewing. Simply use the built-in
thread cutter.
Extension Table
• Detaching the table
Pull the table away from the machine for
“free-arm” sewing of cuffs and sleeves.
• Attaching the table
Push the extension table until it snaps into
the machine.
Pin
Holes
Tab
Free-arm
• Accessory box
Open the cover of the accessory box toward
you. The sewing accessories are conveniently located in the box.
4
SECTION
. GETTING READY TO SEW
Changing Needle
Needle clamp screw
Needle clamp
Turn off the power switch.
Raise the needle to its highest position by
turning the handwheel counterclockwise,
toward you, and lowering the presser foot.
Loosen the needle clamp screw by turning
it counterclockwise. Remove the needle from
the needle clamp .
Insert a new needle into the needle clamp
with the flat side to the rear. When inserting
the needle into the needle clamp , push it up
as far as it goes. Tighten the needle clamp
screw
firmly by turning it clockwise.
5
SECTION
. GETTING READY TO SEW
Stitch Selector (how to select stitches)
Sewing guide display
Stitch pattern in green indicator
Reset key
Choose the stitch you need and press stitch pattern button, green indicator will show
the desired stitch.
If you want to choose another stitch pattern, first press the reset key and green
indicator returns to default stitch ( stitch 1), then press your desired stitch pattern.
Stitch width and stitch length can be changed by turning sewing guide display. Each
stitch pattern can be adjusted into 5 different widths and lengths.
NOTE:
To avoid needle or fabric damage, make sure the needle is up and out of the fabric
while selecting a stitch.
To see if the needle is good, place the flat
side of the needle onto something flat (needle
plate, glass, etc.).The gap between the needle
and the flat surface should be consistent. Never
use a bent or blunt needle. A damaged needle
can cause permanent snags or runs in knits,
fine silks and silk-like fabrics.
14
Reverse Stitch Control
Press the stitch control to sew in reverse.
SECTION
. GETTING READY TO SEW
Adjust the Needle Thread Tension for a
Zigzag Stitch
For an ideal zigzag stitch, the bobbin thread
does not show on the right side (Top side) of
the fabric, and the needle thread shows slightly
on the wrong side (Bottom side) of the fabric.
See the illustrations for the correct appearance.
To match this appearance, adjust the needle
tension.
• Correct tension
Right side (Top side) of fabric
Wrong side (Bottom side) of fabric
13
SECTION
To Remove and Attach the Foot Holder
Thumb screw
Foot holder
Presser foot lifter
• To remove
Remove the thumb screw
by turning it
counterclockwise with a screwdriver.
• To attach
Match the hole in the foot holder
with the threaded
hole in the presser foot lifter Fit the thumb screw
into the hole. Tighten the screw
by turning it
clockwise with a screwdriver.
Minimize the amount of needle thread visible
on the wrong side (Bottom side) of the fabric
without causing excessive puckering, or
causing the bobbin thread to show on the right
side (Top side) of the fabric.
Results vary with fabric, thread and sewing
conditions.
• Tension is too tight
Right side (Top side) of fabric
Wrong side (Bottom side) of fabric
The corner of each zigzag pulls together on the
right side of the fabric.
• Tension is too loose
Right side (Top side) of fabric
Wrong side (Bottom side) of fabric
The corner of each zigzag pulls together on the
wrong side of the fabric.
. GETTING READY TO SEW
6
Changing Presser Foot
Snap-on button
Groove
Pin
• To remove
Raise the needle to its highest position by turning the
handwheel counterclockwise. Raise the presser foot,
and press the snap-on button on the back of the foot
holder.
• To attach
Place the selected presser foot, so that the pin on the
foot lies just under the groove on the foot holder.
Lower the presser bar to lock the foot into place.
SECTION
. GETTING READY TO SEW
Bobbin Winding
• Horizontal spool pin
Spool pin
Spool holder
Lift up the spool pin . Place a spool of thread on the spool pin with the thread
coming off the spool as shown. Attach the spool holder , and press it firmly
against the spool of thread.
7
• Bobbin winding
Draw the thread from the spool
Guide the thread around the thread guide.
For the horizontal spool pin
Put the bobbin on the bobbin winder spindle.
Push the bobbin to the right.
With the free end of the thread held in your
hand, turn on switch or depress the foot
control. Bobbin will make turns and wind
thread. Touch bobbin winder stopper tightly,
it stops automatically.
SECTION
Adjust the Needle Thread Tension for a
Straight Stitch
• Correct tension
Needle thread (Top thread)
Bobbin thread (Bobbin thread)
To loosen
To tighten
The ideal straight stitch has threads locked
between two layers of fabric, as illustrated
(magnified to show detail).If you look at the
top and bottom of a seam, notice that the
stitches are evenly balanced.
When adjusting the needle thread tension,
the higher the number, the tighter the top
thread tension.
Results depend on:
-stiffness and thickness of the fabric
-number of fabric layers
-type of stitch
• Tension is too tight
Needle thread (Top thread)
Bobbin thread (Bottom thread)
To loosen tension
Right side (Top side) of fabric
Wrong side (Bottom side) of fabric
The bobbin thread shows through on the
wrong side of the fabric, and the stitch
feels bumpy. Turn the dial to a lower
tension setting number to loosen the
needle thread tension.
• Tension is too loose
Needle thread (Top thread)
Bobbin thread (Bottom thread)
To tighten tension
Right side (Top side) of fabric
Wrong side (Bottom side) of fabric
. GETTING READY TO SEW
12
SECTION
. GETTING READY TO SEW
•Needle threader
Needle threader
Ring
Needle eye
Thread end
Raise the needle to its highest position. Paying attention to the needle point,
put ring of needle threader to go through needle eye.
Draw thread into ring and pull ring back from needle eye. Release the needle
threader and the thread has been threaded through needle eye.
NOTE:
Thread length leaves for 5-10 cm is recommended when sewing.
11
SECTION
. GETTING READY TO SEW
The position of the bobbin winder stopper is adjustable depending on the required
amount of thread on the bobbin. Using a screwdriver, loosen the screw one turn or
less ,so that you can adjust the position of the bobbin winder stopper. Do not take
the screw all the way out. Retighten the screw to fix the stopper at the desired
position.
When the bobbin is wound, turn off switch. Return the bobbin winder to its
original position by moving the spindle to left, and cut the thread as shown.
The machine will not sew until the clutch is engaged.
8
•Drawing up bobbin thread
Raise the presser foot. Hold the needle thread
lightly with your left hand and rotate the
handwheel counterclockwise for one complete
turn.
Bring the bobbin thread up by pulling the needle
thread up.
Pull both threads 10 to 15 cm under and behind
the presser foot.
SECTION
. GETTING READY TO SEW
• Removing the hook cover plate
Hook cover plate release button
Hook cover plate
Slide the hook cover plate release button
to the right, and remove the cover plate
• Inserting the bobbin
End of thread
Notch
Notch
Place a bobbin in the bobbin holder with
the thread running off counterclockwise.
Draw the thread to the left, Pull out about
15.0 cm of thread.
Attach the hook cover plate.
9
SECTION
. GETTING READY TO SEW
Threading the machine
Raise the thread take-up lever to
its highest position by turning the
handwheel counterclockwise.
Raise the presser foot lifter.
Place a spool on the spool pin,
with the thread coming off as
shown.
Draw the end of the thread
around the upper thread guide.
While holding the thread near
the spool, draw the end of the
thread down around the check
spring holder.
Firmly draw the thread up from
right to left over the take-up
lever, and down into the take-up
lever eye.
Slide the thread behind the needle bar thread guide on the left.
Thread the needle from front to back, or use a needle threader.
10