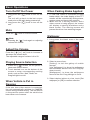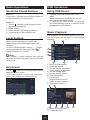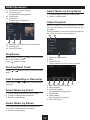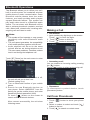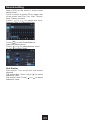
1
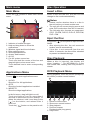
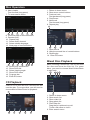
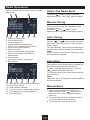
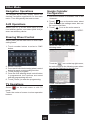
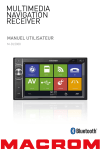
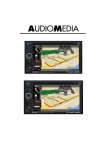
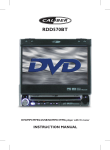
2-Din DVD Multimedia Station
Built-in Navigation / Bluetooth
AN6Q24
OWNER'S MANUAL
Precautions
Thank you for purchasing this product.
Please read through the Owner’s Manual to
learn how to properly operate the unit. After
you have finished reading the manual, please
keep it in a safe place for future reference.
Never expose this unit, amplifier or speakers
to moisture or water to prevent electronic
sparks or fires.
Only connect the unit to a 12-volt power
supply with proper negative grounding.
Please don’t change the fuse on the power
cord without professional guidance, using
an improper fuse may cause damage to this
unit or even cause fire.
MUTE
OK
Never install this unit where the operation
and condition for driving safely is
compromised.
Please power off this unit at once and send it
back to the after-sales service center or the
dealer /distributor you purchased from if one
of the following symptoms is found:
MUTE
OK
MUTE
MUTE
OK
OK
Never use the video display while the car
is in motion. The use of video playback
while driving is a violation of traffic laws and
increases the risk of traffic accidents.
MUTE
OK
(a). No audio output;
(b). No image output;
(c). Water or other obstacle enters the unit;
(d). Smoking;
(e). Peculiar smell.
To provide a clear demonstration and an
alternative for easy understanding of the
operation of this unit, graphic illustration
was used. However, this illustration is not
necessary printed as the actual image found
on the unit.
MUTE
OK
MUTE
MUTE
OK
OK
To ensure safe driving, please adjust the
volume to a safe & comfortable level in case
of emergency situations.
1
Precautions
Contents
Warning
Precautions................................................1
Operate the unit correctly according to the
instruction manual to prevent unnecessary
problems.
Remote Control..........................................4
Control Panel ............................................3
Basic Operations.......................................6
Turn On/Off the Power............................6
Mute.........................................................6
Adjust the Volume...................................6
Playing Source Selection.........................6
When Vehicle is Put in Reverse..............6
When Parking Brake Applied...................6
Wallpaper................................................6
CAUTIONS ON HANDLING
This product is a CLASS 1 LASER PRODUCT.
Use of controls or adjustments or performance
of procedures other than those specified
herein may result in hazardous radiation
exposure. Do not open covers and do not
repair yourself. Refer servicing to qualified
personnel.
Main menu..................................................7
Main Menu...............................................7
Applications Menu...................................7
Two laser products
Disc Operation...........................................7
Wave length: CD: 780mm DVD: 650mm
Laser power: No hazardous radiation is
emitted with safety protection.
To reduce the risk of fire electric shock, and
annoying interference, use only the included
components.
Radio Operations.....................................10
USB Operations.......................................11
Bluetooth Operations..............................14
iPod/iPhone Operations..........................16
Internet.....................................................17
3G APN Settings...................................17
Wi-Fi Settings........................................18
Create Wi-Fi Hotspot.............................18
Visit Website..........................................19
E-mail....................................................19
Caution of disc using
1. DO NOT use irregular shaped disc.
Other Mode...............................................20
Navigation Operations...........................20
AUX Operations.....................................20
Steering Wheel Control.........................20
TV Operations.......................................20
Google Calendar Configuration.............20
Delete Gmail Account............................21
2. Disc Cleaning. Use a dry, soft cloth to
wipe the disc from center to edge, only neutral
detergent can be used.
System settings.......................................22
Sound setting...........................................23
Device Connections................................24
Wiring Diagram......................................26
3. When playing a new disc. New disc may
have some rough spots around the inner and
outer edges. If such a disc is used, remove
these rough spots with a pencil or ball-point
pen, etc.
Troubleshooting......................................27
Specifications..........................................28
2
Control Panel
Long press [
] knob (3) to turn on the unit.
1.
MUTE Button
>Mute the Volume (Press)
>Eject disc (when disc inserted)
(Long press)
HOME Button
9.
Show main menu
2.Volume
Increase the volume
BACK Button
Back to previous MENU.
3.
MENU Button
>Show main menu (Press)
>Power “ON” / “OFF” (Long press)
Control Button
>Touch to show / hide the Control
Buttons
>Touch and hold to move icons.
MENU Button
Show MENU options
4.Volume
Decrease the volume
10.Map Card Slot
5. USB Connector
11.Disc Slot
Insert the disc with label side facing up.
6.Reset
Load factory settings
12.Remote Sensor
* Default Path:
1. Path of USB(5): /mnt/sdcard/external_usb
2.Path of Map Card(10): /mnt/sdcard/
external_sd
The path is used for navigation. To install
a new map, please install the apk file first,
then start the application and set the path
to "/mnt/sdcard/external_sd".
7. AUX in Jack
8. Microphone (Built in and External Microphone)
We recommend to use External
Microphone for better Quality. Internal
Mic. is just for urgent use, in case of
External Mic. broken.
3
Remote Control
1. Change playing source in sequence
2. Eject the disc
3.Select audio language
Show music catalog
4. Display playback information
5.Zoom
6. Select radio band
7. Call out - Outgoing call
8.Go-to search
9. DVD title
10. Repeat playback
11. Setup menu
12. Play / Pause
13.Move the cursor up/down/left/right.
Up/down: Manual tuning
14. Numeric keys
15. Mute the volume
16. Unit power
17. Select DVD subtitle language
18. Select DVD angle
19. Show / exit home menu
20. Return to previous display
21. Clear information
22. Hang up
23.Previous/Next
Auto tuning (long press)
Fast backward/forward (long press)
24. Display settings
25. Adjust volume
26. Stop playback
Rear zone (not used)
27. Change next rear source
28.Play/Pause
29. Previous/Next track
Fast backward/forward (long press)
4
Remote Control
Notes of remote control using
1)Aim the remote control at the remote sensor on the unit.
2)Remove the battery from the remote control or insert a battery insulator if the battery has not
been used for a month or longer.
3)DO NOT store the remote control under direct sunlight or in high temperature environment, or it
may not function properly.
4)The battery can work for 6 months under normal conditions. If the remote control doesn’t work,
change the battery.
5)Use“button shaped” lithium battery “CR2025”(3V) only.
6)DO NOT recharge, disassemble, heat or expose the battery to fire.
7)Insert the battery in proper direction according to the ( + ) and ( - ).
8)Store the battery out of children reach it can be hazardous if swallowed to avoid the risk of
accident.
Uninstall Battery
Install Battery
Slide out the battery compartment tray
at the bottom on the back of the remote
control.
Use button-shaped lithium battery
CR2025 (3V)” only. Insert the battery
to the battery tray with proper direction
according to the (+) and (-) poles.
PUSH IN
PULL OUT
5
Basic Operations
Turn On/Off the Power
When Parking Brake Applied
1.Long press the [
] knob to turn on the
unit.
The unit will go back to the last source
used prior to the radio being powered off.
2.Long press the [
] knob to turn off the
unit.
1.If 'PRK SW' cable is connected to hand
brake switch, the video display of the TFT
monitor will be controlled by driving status,
system setup and input video sources.
2.W hen the car is moving forward, and a
video source is being played, the screen
will display a warning disclaimer and a
blank screen. The warning screen will
prevent the driver from watching images.
Mute
Press the [
] knob to mute the sound.
Wallpaper
Note:
1.L ong press the blank area of the main
menu.
• P
ressing the [
] knob again or adjusting
volume will unmute.
Adjust the Volume
Press the [
] or [
] knob to increase or
decrease the volume level.
The adjustable range of volume is 0 to 50.
2.Select a source from:
[Gallery]: to visit the gallery of mobile
storage.
[Live wallpapers]: to show the wallpapers
with animation stored in the unit. Drag up/
down to scroll.
[Wallpapers]: to show the wallpapers
stored in the unit. Drag left/right to scroll.
Playing Source Selection
1.Press the [
] button on the panel to
show main source menu.
2.Touch desired icon on the bottom of the
screen to enter corresponding working
mode, such as Disc, Navi, Radio, etc.
Drag left/right to scroll.
3.Select desired picture to view, touch [Set
wallpaper] or [OK] to confirm selection.
When Vehicle is Put in
Reverse
If the rear view video camera is connected,
the unit automatically switches to CAMERA
source during reverse driving. The unit returns
to the previous source after the vehicle has
been taken out of reverse.
6
Main menu
Disc Operation
Main Menu
Insert a Disc
Touch the [
menu.
Insert a disc into the slot, and the unit will
change to disc mode automatically.
] button to enter main source
1
2
Notes:
3
4
6
5
7
•Please confirm whether there is a disc in
the unit before you insert another one.
•The unit will exit current playing source and
enter DVD mode when one disc is inserted.
• The following disc formats are supported:
CD-R, CD-RW, DVD-R, DVD+R, DVD-RW,
DVD + RW .
Eject the Disc
8
Long press [
] on the panel to eject the disc.
Notes:
•After ejecting the disc, the unit reverts to
another source automatically.
•If the disc is not removed from the unit
within 10 seconds, the disc will be reloaded
to prevent accidental damage.
1. Indicator of mobile storages.
2.Hold and drag down to show the
notifications.
3. Wireless signal and time indicator.
4. Enter settings menu
5. Show applications list.
6. Access web browser.
7. AV Off
8. Car AV system source bar:
Touch and hold the center of the bar and
drag left/right to show more icons.
Touch desired icon to enter corresponding
mode.
Disc Playback
When a disc is inserted, the display will
show “Loading...”. For MP3/WMA or a disc
with mixed files, reading time may exceed 1
minute.
DVD Playback Menu
Applications Menu
During playback, touch the screen (except top
left corner) to show control buttons.
Touch [
] to enter applications menu.
1. IN-CAR
Show the Car AV applications.
2.APPS
Show the Android applications installed.
3.WIDGETS
Show the widget applications.
1
In the list menu, drag left/right to scroll.
Touch and hold an icon for more than 2
seconds to add shortcut to the desktop. To
delete the shortcut, hold it and drag to the
[
] on the bottom, and release after it
turns red.
Touch the [
] button on the panel to exit.
2
3
4
5
6
1. Return to home menu
2. Show more control buttons
3. Stop playback
4. Previous chapter
Fast backward (long press)
5.Play/Pause
7
7
Disc Operation
6. Next chapter
Fast forward (long press)
7. To enter search menu
1. Return to home menu
2. Show more control buttons
3. Previous track
Fast backward (long press)
4.Play/Pause
5. Next track
Fast forward (long press)
6. Repeat play
7
8
9
10
11
12
13
8. Previous page of control buttons
9. Random play
10. Repeat play
11. Select audio channel
12. Select subtitle language
13. Next page of control buttons
8
9
10
7. Show file list
8. Hide the second line of control buttons
9. Shuffle play
10. Enter EQ menu
Mixed Disc Playback
8
14
15
16
17 18
When inserting a mixed disc, the unit will read
the disc and show the files list. For some
discs, you need to choose Music/Video/Photo
to play back.
19
14. Show DVD informations
15. Show DVD title
16. Select viewing angle
17. Show DVD menu
18. Progress bar
19. Enter EQ menu
1
2
3
4
CD Playback
Insert a CD in the disc slot, and the unit will
read the disc. For some discs, you will need to
choose Music/Video/Photo for playback.
1
5
6
1. Return to home menu
2. Show music list
3. Show video list
4. Show photo list
5. File/Folder list
Drag the list up/down to scroll.
Touch a file name to visit it.
6. Enter search menu
2
3
4
5
6
8
Disc Operation
When viewing a picture, touch the screen
(except top left corner) to show control
buttons.
Note:
If you do not select Repeat on, when the
entire disc or TITLE playback has finished,
the system will stop. If no other control, after 5
minutes the unit will turn into standby mode.
1
Random Track Playback (for
CD/VCD/MP3/WMA Only)
2
3
4
5
You can play all the tracks in random order.
1.During playback, press [
] button on the
screen to select random playback.
2.Press again to select normal playback.
6
1. Return to home menu
2.Play/Pause
3. Zoom out
4. Zoom in
5. Rotate counterclockwise
6. Rotate clockwise
Search
For DVD/VCD:
1. Touch [Go-to] on the control bar.
2. Input the chapter number.
3. Touch [OK] to confirm.
*Video/Audio playback reference DVD/CD
playback.
For Mixed disc:
] icon.
1. Touch [
2. Input the file name.
3. Touch [ Done ] to confirm.
Stop Playback Temporarily
1.D u r i n g p l a y b a c k , p r e s s
to pause
playback. The sound will be muted.
2.Press to continue playback.
DVD Audio Select
Press [
] button to select audio language to
listen if the DVD has multiple audio languages.
Select Desired Track/Chapter
Press
or
to skip to the previous or next
track/chapter.
VCD Audio Select
Press [
] button to select audio channel to
listen (L, R, Stereo).
Fast Forward/Backward
During Playback
DVD Subtitle Select
Press and hold
or
button to fast
backward or forward during playback.
During the fast forward or backward operation,
the volume will be muted.
Press [
] button to select the subtitle
language to show if the DVD has multiple
language subtitles.
Repeat
DVD Title Select
During playback, press
select repeat playback.
•Default setting is off.
Touch [ T ] button to display title or chapter
list, touch desired title to play.
button on screen to
9
Radio Operations
Select One Radio Band
Select [Radio] on the main menu to enter
radio mode.
1
2
Touch the [ ] button to select one radio
band among FM1, FM2, FM3, AM1 and AM2.
3
Manual Tuning
During manual tuning, the frequency will be
changed in steps.
Touch the [
] or [
] button on the
operation bar to tune in a lower/higher station.
4
5
6
7
8
9
Auto Tuning
1. Return to home menu
2. Preset stations list
3. Current frequency
4. Preset stations of current band
Touch 1~6 to listen to preset station.
5. Show more control buttons
6. Tune backward
Auto tune backward. (long press)
7.Search and store preset stations
automatically
8. Tune forward
Auto tune forward. (long press)
9. Band switch
Hold the [
] or [
] button on the operation
bar for more than 2 seconds to seek a lower/
higher station.
To stop searching, repeat the operation above
or press other buttons having radio functions.
Note:
When a station is received, searching stops
and the station is played.
Auto Store
Only stations with sufficient signal strength will
be detected and stored in the memory.
To start automatic station search, touch the
] button on the operation bar.
[
To stop auto store, press other buttons having
radio functions.
Note:
10
After auto store, the previous stored stations
will be overwritten.
11
12
13
14
15
10. Hide the second line of control buttons
11. Show RDS options
12. Save stations manually
13. To receive local / distant radio stations
14. Goto station by inputting frequency
15. Enter EQ menu
Manual Store
1.When one expected radio station has
been detected, touch [
] button on the
operation bar to show the preset station
store list.
2.Touch to select an item on the list to store
the current station in the memory.
3. Touch top left of the screen to exit.
10
Radio Operations
USB Operations
Recall the Stored Stations
Using USB Device
Method 1:
Touch the 1~6 on the left of screen to listen to
the preset station of current band.
1.Connect your USB device to the USB
cable.
When connecting a USB device, the unit
will read the files automatically.
2.T o remove the USB device, you should
first select another source, in order to avoid
damaging the USB device.
Method 2:
1.Touch [ ] button on the screen to show
the preset stations list.
2. Select a band
3. Touch a station on the list to listen to.
4. Touch top left of the screen to exit.
Music Playback
Select [Music] on the applications menu, the
unit will display all the music on the mobile
storages.
Local Seeking
1
When LOCAL seeking is on, only radio
stations with strong radio signal will be be
received.
To open LOCAL function, touch [
] button
on the operation bar, then touch the [
]
button to select “Loc” or “DX”.
3
4
5
Note
The number of radio stations that can be
received will decrease after the Loc seeking
mode is on.
6
7
8
1. Return to home menu
2. Select file source
3. List the files by song name
Touch a song to start play.
4. List the files by artist
5. List the files by album
6. Show the folders
7. List window
Drag up/down to scroll.
Touch an item to select.
8. Enter search menu.
Key Search
Touch [
] button on the operation bar to
show key search menu.
Touch the keypad to input the frequency,
touch [ OK ] to goto the station directly.
9
Touch [
2
10
] to clear all the digits.
11
12
13
14
9. Return to home menu
10. Show list menu
11
15
USB Operations
Select Music by Song Name
11. Show more control buttons
12. Previous track
Fast backward (long press)
13.Play/Pause
14. Next track
Fast forward (long press)
15. Repeat play
1. Touch [Songs] on the left of the screen.
2. Select a song to play.
Video Playback
Select [Video] on the applications menu,
the unit will display all the video files on the
storages.
During playback, touch the screen(except top
left corner) to show control buttons.
1
16
17
2
18
16. Hide the second line of control buttons.
17. Shuffle play
18. Enter EQ menu.
Play/Pause
3
When playing, press [ ] button to pause, and
the sound will be mute.
Press [ ] button to play.
1. Return to home menu
2. Back
3. Folder/File list
Drag up/down to scroll, touch to access.
Previous/Next Track
Press
track.
or
button to go to previous or next
Fast Forwarding or Reversing
ress and hold
P
/ forward.
or
button to fast backward
4
5
6
7
8
4. Show more control buttons
5. Stop playback
6. Previous chapter
Fast backward (long press)
7.Play/Pause
8. Next chapter
Fast forward (long press)
9. Enter EQ menu
Select Music by Artist
1. Touch [Artists] on the left of the screen.
2. Touch an artist shown on the list.
3. Select a song to play.
Select Music by Album
1. Touch [Albums] on the left of the screen.
2. Touch an album shown on the list.
3. Select a song to play.
12
9
USB Operations
Gallery Operations
1. Select [Gallery] on the APPS menu.
2. Select one gallery to show the picture list.
10
11
12
13
10.Show previous page of control buttons
11.Enter search menu
12.Repeat play
13.Random play
3. Touch to view it.
Notes
• D
isconnect USB storage devices from the
unit when not in use.
• Use an optional cable to connect the USB
audio player/USB memory as any device
connected directly to the unit will protrude
out from the unit and may be dangerous.
• Do not use unauthorized products.
Drag left/right to scroll.
Touch the top right corner to delete the
photo.
Touch top left corner to back.
Using an Android mobile
phone as a USB storage
device
If you want to use your Android mobile phone
as a USB storage device.
1.Connect your Android mobile phone to the
unit with a USB cable.
2.Set USB connection type of your mobile
phone to “Mount SD card”.
* If you select “Charge only”, it won’t be
recognized by the unit.
3.In the setting menu of the unit, select
“Storage”, then “Mount USB disk”.
13
Bluetooth Operations
The Bluetooth allows you to utilize your car’s
built-in audio system for handsfree wireless
mobile phone or music communication. Some
Bluetooth mobile phones have the audio
features, and some portable audio players
support Bluetooth feature. This system can
play audio data stored in a Bluetooth audio
device. The car stereo with Bluetooth will be
able to retrieve phonebook contacts, received
calls, dialed calls, missed calls, incoming calls,
outgoing call and listen to music.
Making a Call
• Dial Number
1.Input numbers by digit-keys on the screen.
Touch [
] to clear the digits.
2. Touch [
] button to dial out.
3. Touch [
] button to terminate call.
Notes:
• T
his system will not operate or may operate
improperly with some Bluetooth audio
players.
• The unit cannot guarantee the compatibility
of all mobile phones together with the unit.
• Audio playback will be set to the same
volume level as set during telephone call.
This can cause problems, if extreme volume
level is set during the telephone call.
Touch [BT Phone] on the main menu to enter
Bluetooth Phone mode.
• Answering a call
You can answer an incoming call by pressing
the [
] button.
] button to reject an incoming call.
Touch [
1.If the Bluetooth function of the unit is off,
the unit will ask you to turn it on.
(Default setting is on)
2.Turn on Bluetooth function of your mobile
phone.
3.S earch for new Bluetooth devices on
your phone. Select “ANDROID” from the
pairing list on the mobile phone, and enter
password (Default password: 0000)
Or touch [
] button on the screen to
search mobile Bluetooth devices.
After connect successfully, the unit show
following menu.
• Disconnect
To disconnect a paired device, touch
[Disconnect] button.
Call from Phonebook
1.Touch [
] button to show your phone
book.
]
2.Select a number to select and touch [
button to dial out.
] to search a contact name.
3. Touch [
14
Bluetooth Operations
: Previous track
: Play/Pause
Call History
: Next track
Access Call History by touching [
] button.
Bluetooth Settings
Touch [
menu.
Then select a number from Dialled/Missed/
Received calls.
Bluetooth Audio Streaming
What is audio streaming?
Audio streaming is a technique for transferring
audio data such that it can be processed
as a steady and continuous stream. Users
can stream music from their external audio
player to their car stereo wirelessly and listen
to the tracks through the car’s speakers.
Please consult your nearest dealer for more
information on the product of wireless audio
streaming transmitter offered.
CAUTION
Please avoid operating your connected
mobile phone while audio streaming as
this may cause noise or the sound to cut in
and out on playback.
Audio streaming may or may not resume
after telephone interrupt as this is
dependent on your mobile phone.
Touch [BT Music] button to play music on your
mobile phone.
15
] button to show Bluetooth setting
iPod/iPhone Operations
This unit supports only the following iPod/iPhone models:
· iPhone 5
· iPhone 4S
· iPhone 4
· iPod touch (5th generation)
· iPod touch (4th generation)
· iPod classic
· iPod nano (7th generation)
· iPod nano (6th generation)
· iPod nano (5th generation)
“Made for iPod,” and “Made for iPhone” mean that an electronic accessory has been designed to
connect specifically to iPod, or iPhone, respectively, and has been certified by the developer to
meet Apple performance standards.
Apple is not responsible for the operation of this device or its compliance with safety and
regulatory standards. Please note that the use of this accessory with iPod or iPhone may affect
wireless performance.
iPhone and iPod are trademarks of Apple Inc., registered in the U.S. and other countries.
Accessing iPod mode
2.Touch the [
] button twice to move back
to the beginning of the previous track.
Connect an iPod or iPhone to the USB
connector via an iPod cable.
Fast forward/Fast reverse
Fast forward
Touch and hold the [
Fast reverse
Touch and hold the [
] button .
] button .
Repeat play
This function allows you to play the track
repeatedly.
Touch the [
] button to select Repeat one
or Repeat all.
Touch [iPod] on the main menu to enter iPod
menu.
If [iPod] isn’t on the current menu, slide the
bottom bar left or right to find it.
Random play
Pausing play
This function allows you to play all tracks
recorded in a random order.
Touch the [
] button to perform random
play.
1.Touch the [ ] button on the bottom of the
screen to pause play.
“PAUSE” appears in the display, and [ ]
button becomes [ ] .
2.Touch [ ] button to resume play.
Search function
Selecting a track
1.Touch the [
] button to enter search
menu.
2Input number by touching buttons on
the screen, then touch [
] to begin
searching.
] button to delete inputted
Touch [
number.
Track-up
T ouch the [
] button to move to the
beginning of the next track.
Track-down
1.Touch the [
] button to move back to
the beginning of the current track.
16
Internet
3G APN Settings
7.Must setup following options: Name, APN,
MCC, MNC.
Touch the dialogue box to show keypad,
and input your desired name.
APN according to the operator to
determine.
Note:
Contact the manufacturer for latest compatible
3G devices.
User set the APN to access the internet.
1.Insert the 3G dongle.
2.Select [
] on the main menu to enter
the setting interface.
3.Click the [Wireless & networks] to enter
the Wireless & network settings and click
[more...].
The unit will detect your 3G module to
determine the MCC and MNC.
8.Then press the [
] button and click the
“Save” button.
4.Click [Mobile network] to enter the Mobile
network settings.
9.Select the APN, 3G icon appears on the
top right corner of the taskbar.
5. Click the [Access Point Names].
6.Press the [
] button on the front panel,
then click the [New APN].
17
Internet
Wi-Fi Settings
Create Wi-Fi Hotspot
This unit generally supports the following:
realtek 8188cu, 8188eu.
User can use the unit to create a personal
Wi-Fi hotspot. All your other Wi-Fi enabled
devices will then be able to connect to this
hotspot and share the primary internet
connection.
1.Connect the WiFi dongle to the unit.
Touch the [
] icon on the main menu
to enter setting menu, and turn on Wi-Fi (if
necessary).
1.Connect the Wifi and 3G dongle to the USB
slots on the rear of the unit.
Refer to “Device Connections”.
2.Touch the [
2.Touch [
WiFi setting menu.
] icon on the main
menu, and drag down to “WIRELESS &
NETWORKS”.
] to enter
3. Select “More...”.
3. Touch an available WiFi hotspot.
4. Touch “Tethering & portable hotspot”.
4.Touch [
] and input the
password, touch [Connect] to confirm.
5. Touch “Portable Wi-Fi hotspot”.
After setting done, you can touch “Set up WiFi hotspot” to modify the settings.
5.After successfully connected, the [
]
icon appears on the top right corner of the
screen. Now you can access internet.
18
Internet
If your device can’t connect to the Wi-Fi
hotspot:
1.Check the Wi-Fi network.
The
icon will appear on the top left of
the screen after setting successfully. If not,
check your Wi-Fi dongle connection and
the Hotspot settings.
2. Check the 3G network.
If the signal indicator
on the top taskbar
turns grey, the network is unavailable,
check your 3G dongle connection and 3G
settings.
3.Be sure to input the correct password.
4.There may be too many devices connected
to the hotspot.
Visit Website
To access the internet, you must setup
“wireless & network” in system settings menu.
] on the main menu to view a
Select [
website.
Touch the dialog box on the upper side of
the screen to show keypad. Input the website
address, and touch [Go] to visit it. Drag the
web page to scroll.
E-mail
Select [Email] or other mail software on the
applications menu.
First you must setup an account, or sign into
an existing account. Enter your Email address
and password. Then you can send/receive
E-mails through the unit.
19
Other Mode
Navigation Operations
Google Calendar
Configuration
To navigate by the unit, simply select the
desired navigation application on the main
menu. Then navigate by the touch screen.
1.Ensure the network is available, refer to the
<Internet>.
2.Touch [
] icon on the main menu, select
[Date & time] in the settings menu, then set
the correct local time.
3.Touch [
] icon on the main menu to
AUX Operations
Select [Aux In 1] on the main menu to visit
front auxiliary device, and select [AUX IN 2] to
enter rear auxiliary device.
enter applications menu and select “APPS”.
Steering Wheel Control
Select [SWC] on the main menu to enter SWC
setting menu.
Select the Calendar icon to show the
following menu.
1.T ouch number button to select a SWC
button.
Touch the
2. Select a function.
3.Press each individual steering wheel control
button for each corresponding function.
4. Touch [Study] to program.
5.Once the final steering wheel control button
is programmed, the functions are saved
and the programming will end.
6. Touch [ Reset ] to reset the programming.
TV Operations
Select [
icon on the top right corner,
the unit will pop up the following menu when
you use the Calendar for the first time.
Touch "Add account".
] on the main menu to visit TV
mode.
Touch the center of screen to show operation
buttons.
Select “Google”.
20
Other Mode
Delete Gmail Account
If you want to establish a new account,
please touch [New].
If you want to use an existing account,
please touch [Existing].
After select “Existing”, input your mail
account and password. Then touch [ ].
1.Touch [
] icon on the main menu to
enter settings menu, slide down the screen
to find "Google".
Touch [OK] button to confirm
2.Touch [Google], if you logged on a google
account before, the address appears.
Select the mail address to show the details.
Press the [
] button on the front panel
to pop up the sub-menu.
Touch [
] to finish setting.
Select "Remove account" to delete this
account.
4.Select Calendar in APPS menu to show the
calendar and the arrangements. You can
select a date to view the details.
To add a new event, touch the
icon
on the top right corner, or touch [ + ] icon on
the blank area.
21
System settings
Select [
Input Gain
] on the main menu to enter
Choose input volume gain of each source.
settings mode.
Drag up/down to scroll the options.
Wireless & networks
To setup the wireless configuration, such as
Wi-Fi, VPN, 3G network.
* For 3G APN settings, refer to “Internet”.
DEVICE
To setup the Display, Storage and Apps.
CAR
Video
PERSONAL
Video output option: Choose video output
mode.
Rear camera option: Choose rear camera
display mode.
Parking: Select Parking On or Off.
DivX registration code: Show DivXCode.
To Setup Location services, Security and
Language & input, etc.
ACCOUNTS
Accounts management.
General
Lighting: Choose button backlight.
Radio region: Choose radio region.
Radio range: Choose radio Frequency:
local or distance.
Microphone: Choose Microphone Internal
or External.
Blackout: Choose screen blackout off, 15s
or 30s.
Beep:Turn on or off button beep sound.
SYSTEM
To setup Date & time and Accessibility, etc.
DVD rating
DVD audio: Choose DVD audio language.
D V D s u b t i t l e : C h o o s e D V D s u b t i t l e
language.
Disc menu: Choose DVD menu language.
Set password: To set password for rating.
Input 4-digit password, touch [√] to confirm,
touch [DEL] to delete a number inputted.
Touch [X] to exit.
Rating level:To setup the rating level.
Kid safe, G, PG, PG-13, PG-R, R, NC-17,
Adult.
22
Sound setting
Select [EQ] on the menu to enter sound
setting mode.
Touch to select a preset EQ on upper side
of the screen from Flat, Pop, User, Techno,
Rock, Classic and Jazz.
Touch [
] or [
] to adjust the level,
Frequency and Q for Bass/Mid/Treb.
Touch [
] to enter Fader/Balance/
Subwoofer setting menu.
Touch [ ] or [ ] to setup Balance, touch
[ ] or [ ] to setup Fader.
Sub Woofer
ub woofer: Turn on/off the sub woofer
S
playback.
Sub woofer filter: Touch [ ] or [ ] to select
subwoofer Filter.
Sub woofer Level: Touch [ ] or [ ] to adjust
subwoofer Level.
23
Device Connections
Notes of connection
• T
his unit is designed to be used in a vehicle with a 12-volt battery and negative grounding.
Before installing this unit to a recreational vehicle, a bus, or a truck, make sure the battery
voltage is appropriate for this unit to be used, otherwise, have a professionally installed
transformer to convert the output voltage to 12V.
•To avoid short circuit in the electrical system, ensure that the negative battery cable is
disconnected before installation.
• To prevent short circuit in the wiring and damaging to this unit, secure all wirings with cable
clamp or adhesive tape. Route the wirings in a secured, out of heating place without touching
any moving parts such as gear shift, handbrake, and seat rails to prevent the wiring insulation
being melted / worn off.
• Never pass the yellow power cord through the installation hole into the engine compartment and
connect to the car battery. Otherwise, a high possibility of serious short circuit to the electrical
system may occur.
• If you need to replace the fuse, please replace with a 15A fuse. Using no fuse or a fuse with an
improper rating may cause damage to the unit or a potential fire. If a proper fuse is installed and
problems continue to occur, please contact your local retailer or installer.
• DO NOT connect other equipments with the car battery to avoid battery overheating.
• Please make sure all the wiring connections & the cables of the speakers are well-insulated.
Otherwise, this unit may be damaged by short circuit.
• If there is no ACC available, please connect ACC lead to the power supply with a switch.
• If an external power amplifier is connected, please don't connect P.CONT lead to the power
lead of the external power amplifier, otherwise, electric spark or other damage may result.
• Never ground the speaker output to prevent the damage to the built-in power amplifier.
24
Device Connections
Parking Brake Cable Connections
Orange Wire
Back Up Camera Connections
25
Microphone
26
REAR OUT
Grey
Red(R)
White(L)
Yellow
Yellow
White(L)
Red(R)
Blue
Black
CAMERA VIDEO
Black
VIDEO IN
Red
AUX IN
Black
SUB WOOFER
Black
VIDEO OUT
Black
White(L)
Yellow
FRONT OUT
3G/WIFI
3G/WIFI
RADIO ANT
MICROPHONE
Red(R)
Black
Black
Black
Black
Brown
(optional)
DTV BUS
(Sold separately)
TV BOX
6
7
P.ANT
Illumination
ACC
5
6
7
GND
4
Battery +12V
4
8
3
NC
3
8
5
2
NC
2
1
PIN
NC
PART A
Black
Pink
Orange
1
PIN
SWC
REVERSE
PARKING
GPS ANTENNA
Rear L-
Rear L+
Front L-
Front L+
Front R-
Front R+
Rear R-
Rear R+
PART B
GND
Key B
Key A
Device Connections
Wiring Diagram
Green
White
Troubleshooting
The following checklist can help you solve the problems which you may encounter when using the
unit. Before consulting it, check the connections and follow the instructions in the user manual.
Problem
General
Possible cause
Solution
Car ignition is not on.
Cable is not properly
The unit will not switch on.
connected.
Fuse is burnt.
Volume is set at minimum or
No sound
the mute function is on.
The unit or screen does
The unit system is unstable.
not function normally.
DVD mode
Turn your car key in the ignition.
Check cable connection.
Replace fuse with a new fuse of the
same capacity.
Check the volume or switch the mute
function off.
Press the RESET button.
Disc must be inserted with the label
The appliance will not play The disc is inserted incorrectly.
side facing up. Clean the disc and
discs.
The disc is dirty or damaged.
check for damage. Try another disc.
Adjust mounting angle to less than
Sound skips due to
Mounting angle is over 30˚.
30˚.
vibration.
Mounting is unstable.
Mount the unit securely with the
supplied parts.
TUNER mode
The antenna is not connected
Connect the antenna properly.
Unable to receive stations.
properly.
Poor quality reception of The antenna is not fully
Fully extend the antenna and if
radio station.
extended or it is broken.
broken, replace it with a new one.
The battery cable is not
Connect the permanent live on the unit
Preset stations are lost.
properly connected.
to the permanent live on the vehicle.
USB mode
Unable to insert USB
The USB device has been
Insert USB the other way around.
device.
inserted the wrong way round.
Check that the USB disk file system
is in FAT or FAT32 format. Due to
The USB device cannot
NTFS format is not supported. different formats, some models of USB
be read.
storage devices or MP3 players may
not be read.
Remote control
The remote control is not
working or does not work The battery is low or empty.
Change the batteries.
properly
27
Specifications
General
Reference Supply Voltage..................................................................... 12V(DC)
Operating Voltage Range.........................................................10.5 - 15.8V(DC)
Max Operating Current..................................................................................15A
Grounding System..................................................... Car Battery Negative Pole
Dimensions(WXHXD)....................................................... 178X101.5X161.8mm
Weight(main unit)....................................................................................... 1.9kg
FM
Signal Noise Ratio................................................................................. ≥55dB
Usable Sensitivity(S/N=30dB)...........................................................≤15dBμV
Frequency Response(-3dB)...........................................................20Hz~7KHz
Station Seeking Level..................................................................... 20~28dBμV
Distortion............................................................................................... ≤1.0%
Stereo Separation(1KHz)...................................................................... ≥25dB
Antenna Impedance....................................................................................75Ω
AM
Usable Sensitivity(S/N=20dB)...........................................................≤30dBμV
Frequency Response(-3dB)...........................................................50Hz~2KHz
LCD
Screen size............................................................................ 6.75 inches(16:9)
Display resolution.........................................................................800X480dots
Contrast radio.............................................................................................. 400
Brightness.......................................................................................... 400cd/m2
DVD Player
Signal / Noise Ratio............................................................................... ≥70dB
Dynamic Range..................................................................................... ≥70dB
Distortion(line out)................................................................................. ≤0.8%
Frequency Response(±3dB)........................................................20Hz~20KHz
Maximum Output Power.........................................................................4×45W
Load Impedance............................................................................................4Ω
AUX IN
Distortion............................................................................................... ≤0.8%
Frequency Response(±3dB)........................................................20Hz~20KHz
Audio Input Level....................................................................................500mV
Audio
Audio Output Impedance.......................................................................... 10KΩ
Audio Output Level........................................................................ 2Vrms(Max)
Video
Normal Video Input Level(CVBS)........................................................1.0±0.2V
Video Input Impedance...............................................................................75Ω
Video Output Impedance.............................................................................75Ω
Video Output Level..............................................................................1.0±0.2V
Environment
Operating Temperature..............................................................-10°C ~ +60°C
Storing Temperature..................................................................-20°C ~ +70°C
Operating Humidity...................................................................... 45%~80%RH
Storing Humidity.......................................................................... 30%~90%RH
Notice:
When the unit is operated in extreme conditions, such as operated with maximum power output
for a long time, or the temperature is over 70°C, it will enter heat protection mode, the volume will
automatically be lowered. This is normal.
28
CLASS 1
LASER PRODUCT
P/N: 127075006299