1
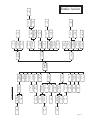
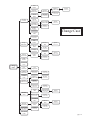
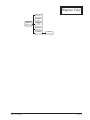
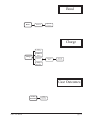
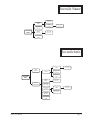
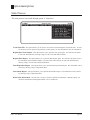
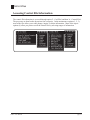
JUVENILE
TRACKING
REPORTING
SYSTEM
AND
USER
MANUAL
Version 1.0
Local Government Data Processing Corporation
ALL RIGHTS RESERVED
© 1994
Table of Contents
System Overview
System Description ....................................................................................................................... 1-1
System Flow ................................................................................................................................. 1-2
Intake Action ................................................................................................................... 1-3
Change Case .................................................................................................................... 1-4
Dispose Case ................................................................................................................... 1-5
Bond ................................................................................................................................ 1-6
Charge ............................................................................................................................. 1-6
Case Outcomes ................................................................................................................ 1-6
Juvenile Name ................................................................................................................. 1-7
Juvenile Info .................................................................................................................... 1-7
Option Descriptions
Case Management ......................................................................................................................... 2-1
Maintenance .................................................................................................................................. 2-2
Court Docket ................................................................................................................................ 2-3
Reports ........................................................................................................................................ 2-4
Control Files ................................................................................................................................. 2-6
State Process ................................................................................................................................. 2-9
Control Files
Acccessing Control File Information ............................................................................................ 3-1
Setting Up The User File .............................................................................................................. 3-2
Case Management
Intake A Juvenile .......................................................................................................................... 4-1
Change Case Information ............................................................................................................. 4-1
Inquire Into A Case ....................................................................................................................... 4-1
Delete A Case ............................................................................................................................... 4-2
Dispose A Case ............................................................................................................................. 4-2
Forms and Reports
Forms Processing .......................................................................................................................... 5-1
Court Docket ................................................................................................................................ 5-2
Rap Sheet ...................................................................................................................................... 5-3
State File
State File Process .......................................................................................................................... 6-1
Transfers
Cross Case Transfers .................................................................................................................... 7-1
Transferring Funds ....................................................................................................................... 7-2
i
System Overview
System Description
The purpose of the Juvenile Tracking and Reporting System (JTRS) is to collect and store information about a
juvenile, record certain court activity, store history information, and produce forms and reports. The JTRS System
will also have the option to record on magnetic media the juvenile information required by the State of Tennessee,
therefore replacing the juvenile court data form.
Files used in tracking a juvenile are the
• Master File
• Defendant Information File
• Linked Cases File
• Rule Docket File
• Witness File
• Charge File
• Juvenile History File
• CoProcess File
• Relations to the Juvenile File
• Name File
• Court File.
If a juvenile is not on the system, it will prompt for all pertinent information; i.e. juvenile name, address, school
information, living arrangements, guardianship, and priors. If a juvenile is already on the system, it will allow for
any updating on the juvenile. The system will also allow the tracking of witnesses, listing of charges, linking
cases, and the recording of dockets that are to be processed together.
All updating completed on a juvenile is recorded on the Juvenile History File. Reports are available on the History
File to show the progress of a particular juvenile through the system.
Charges brought against a juvenile may be reduced or disposed at any time. Besides keeping track of all charges
for a particular docket, the system will record the arresting officer, intake officer, assigned officer to the case, and
the probation officer.
Some forms and reports will be automatically generated at certain points in the processing of the juvenile. All
forms and reports can be selected from the menu by the user at any time.
J.T.R.S. User Manual
page 1-1
System Overview
Sytem Flow
The following pages of flowcharts represent the general flow of the screens when you select options and processes.
J.T.R.S. User Manual
page 1-2
Zip
Code
Zip
Code
Zip
Code
Zip
Code
Zip
Code
Adult Def.
AKA Name
Zip
Code
Officer
Zip
Code
Zip
Control
Zip
Code
Witness
AKA Name
Attorney/
Firm
Officer
Zip
Code
Zip
Code
User
Codes
Judge
Adult
Defendant Info
Change
Juvenile Name
Linked
Cases
Bond
Case
Outcomes
Co-Processed
Cases
Rule
Docket
Witness
Information
Zip
Code
Attorney/
Firm
Adult
Def. Name
User
Codes
Officer
Zip
Code
Juvenile
AKA Name
Bond
Control
Case
Dispositions
Witness
Name
Optional Selections
Intake
Action
Charge
Juvenile
Case Info
Juvenile
Name Index
Case
Outcomes
Charge
Disposition
Name:
Petitioner
(Control File)
Charge
Rule
Docket
User
Codes
Detention
Reason
Name: Living
Arrangements
Zip
Code
School
Name
Guardian
Rule
Docket
User
Codes
Probation
Officer
Zip
Code
Case
Disposition
Zip
Code
AKA
Zip
Code
AKA
Zip
Code
Relationship
Type
Name
Index
Zip
Code
Zip
Code
Zip
Code
Zip
Code
AKA
Zip
Code
Intake Action
page 1-3
Rule
Docket
Juvenile
Case Info.
Relation/
Guardian Info.
Relation/
Guardian Name
School
Name
Zip File
Relation/
Guardian AKA
Zip File
(Control File)
Relation Type
(Control File)
(Control File)
Zip File
(Control File)
Living
Arngmts Name
Detention
Reason
Living Arngmts
Name AKA
Zip File
(Control File)
Zip File
(Control File)
Change Case
(Control File)
User Defined
Codes
Charge File
(Control File)
Charge
Information
Rule
Docket
Petitioner's
Name
Petitioner's
AKA
Zip File
(Control File)
Zip File
(Control File)
Charge
Disposition
Witness
Information
Witness
Name
Witness's
AKA
Zip File
(Control File)
Zip File
(Control File)
Rule
Docket
Co-Processed
Cases
Change
Case
Case
Outcomes
Case
Dispositions
Bond
Information
Bond File
Zip File
(Control File)
(Control File)
Linked
Cases
Relation/
Guardian AKA
(Control File)
Relation/
Guardian Name
(Control File)
Zip File
Relation File
Juvenile
Name
Attorney/Firm,
Judge, Officer
(Control File)
User Defined
Codes
Zip File
(Control File)
(Control File)
Juvenile
AKA
Probation Officer
Zip File
(Control File)
(Control File)
Probation Officer
Zip File
(Control File)
(Control File)
User Defined
Codes
Adult Def.
Information
Zip File
Adult Def.
Name
Zip File
Adult Def.
AKA
Zip File
(Control File)
Zip File
(Control File)
(Control File)
page 1-4
Dispose Case
Disposition for
All Charges
Rule
Docket
Dispose
A Case
Charge
(Control File)
Rule Docket
Disposition
Case
Outcomes
J.T.R.S. User Manual
Case
Disposition
page 1-5
Bond
Bond
Zip Code
Bondsman
(Control File)
Charge
Charge
(Control File)
Rule
Docket
Charge
Petitioner's
AKA
Petitioner
Zip Code
(Control File)
Charge
Disposition
Case Outcomes
Case
Outcomes
J.T.R.S. User Manual
Case
Disposition
(Control File)
page 1-6
Juvenile Name
Zip Code
Juvenile
AKA
Zip Code
(Control File)
Officer
Zip Code
(Control File)
(Control File)
(Control File)
Juvenile
Name
Officer
Zip Code
(Control File)
(Control File)
User Defined
Codes
Juvenile Info
AKA
Rule
Docket
Name
Zip Code
(Control File)
Zip Code
(Control File)
Relationship
Type
Juvenile
Info
School
Name
Relation/
Guardian Info
Zip Code
(Control File)
Zip Code
(Control File)
Living
Arngmts Name
Detention
Reasons
AKA
Zip Code
(Control File)
Zip Code
(Control File)
User Defined
Codes
J.T.R.S. User Manual
page 1-7
Option Descriptions
Case Management
The Case Management is accessed through option '1 - Case Management'.
Intake Action - This option allows you to enter all of the appropriate information when a juvenile is brought into
custody.
Change Case - This option allows you to change the case information.
Delete Case - This option allows you to delete a case.
Dispose Case - This option allows you to dispose of a case.
Case Inquiry - This option allows you to inquire into a case's information.
Forms Proccessing
Subponea - This option allows you to print subponea forms.
Others - This option allows you to print 'other' types of special forms.
J.T.R.S. User Manual
page 2-1
Option Descriptions
Maintenance
The Maintenance is accessed through option '2 - Maintenance'.
Bond File - This allows you to add, change, or inquire into a juvenile's bond information or to print a Bondsman
Report.
Case Outcome File - This allows you to add, change, or inquire into a juvenile's case outcome information.
Charge File - This allows you to add, change, or inquire into a juvenile's charge information or print a Charge
Report or Rap Sheet.
Co-Processed File - This allows you to add, change, or inquire into a juvenile's co-processed case information or
to print reports in docket number order or juvenile name order.
Juvenile File - This allows you to add, change, or inquire into a juvenile's general or name information or print
various reports containing the juvenile's information.
Linked Cases File - This allows you to add, change, or inquire into a juvenile's linked case information or to
print reports with the information listed in docket number or juvenile name order.
Name Index File - This allows you to add, change, or inquire into a juvenile's name or the name index
information.
Relation/Guardian File - This allows you to add, change, or inquire into a juvenile's relationship/guardianship
information.
Rule File - This allows you to add or void a rule from a docket or print/display various rule dockets.
Witness File - This allows you to add, change, inquire into, or delete witnesses from a selected case/docket
number.
J.T.R.S. User Manual
page 2-2
Option Descriptions
Court Docket
The Court Docket is accessed through option '3 - Court Dkt'.
Court Calendar/Crt Date Order - This option allows you to print the Court Calendar by court date. The
information may be printed on an 80 column page (8 1/2" x 11" paper) or 132 column page (14 7/8" x 11"
paper).
Court Calendar/Judge Order - This option allows you to print the Court Calendar by judge order. The
information may be printed on an 80 column page (8 1/2" x 11" paper) or 132 column page (14 7/8" x 11"
paper).
J.T.R.S. User Manual
page 2-3
Option Descriptions
Reports
The reports are accessed through option '4 - Reports' and 'A - Reports'.
Case Reports
Bondsman - This option allows you to print the Bondsman Report. You will have the option to select the report
to print in court date or docket number order and to include disposed and/or undisposed cases.
Co-Processed Cases - This option allows you to print the Co-Processed Cases Report. You will have the option
to select the report to print in docket number or juvenile name order.
Docket Number - This option allows you to print the Docket Number Report. You will have the option to select
a range of court codes and docket numbers to be included on the report.
Linked Cases - This option allows you to print the Linked Cases Report. You will have the option to select the
report to print in docket number or juvenile name order.
Charge Reports
Charge - This option allows you to print the Charge Report. You will have the option to select the report to print
in court date or docket number order and to include disposed and/or undisposed cases.
Rap Sheet - This option allows you to print the Rap Sheet Report. You will have the option to select the report to
print in 80 columns ( 8 1/2" x 11" paper) or 132 columns (14 7/8" x 11" paper).
History Reports
Court History - This option allows you to print the Court History Report. You will have the option to select a
range of court codes and juvenile names to be included on the report.
J.T.R.S. User Manual
page 2-4
Option Descriptions
Reports
History Reports (continued)
Drug Free Youth Act History - This option allows you to print the Drug Free Youth Act History Report. You
will have the option to select a range of juvenile names to be included on the report.
Guardian History - This option allows you to print the Guardian History Report. You will have the option to
select a range of juvenile names to be included on the report.
Living Arrangements History - This option allows you to print the Living Arrangements History Report. You
will have the option to select a range of juvenile names to be included on the report.
School History - This option allows you to print the School Report. You will have the option to select a range of
juvenile names to be included on the report.
Name Reports
AKA Names - This option allows you to print the AKA Names Report. You will have the option to select the
juvenile name to be included on the report.
Rule Reports
Rule & Execution - This option allows you to print the Rule & Execution Report. You will have the option to
select the court code and docket number range or juvenile name range to be included on the report.
Rule - This option allows you to print the Rule Report. You will have the option to select the court code and
docket number range to be included on the report.
Active Rule - This option allows you to print the Active Rule Report. You will have the option to select the court
code and docket number range to be included on the report.
Void Rule - This option allows you to print the Rule Void Report. You will have the option to select the court
code and docket number range to be included on the report.
J.T.R.S. User Manual
page 2-5
Option Descriptions
Control Files
The control file information is accessed through option '5 - Cntl Files' and then 'A - Control Files'.
Juvenile Control Maintenance
Juvenile System Parameter - This option allows you to add, change, or inquire into the information on the
system parameter file.
Case Disposition - This option allows you to add, change, inquire, or delete the case disposition information..
Charge Disposition - This option allows you to add, change, inquire, or delete the charge disposition
information.
School Name - This option allows you to add, change, inquire, or delete the school name file information.
User Defined Codes - This option allows you to add, change, inquire, or delete the information on the user
defined codes file.
T-CAST Control Maintenance
Bondsman - This option allows you to add, change, inquire, or delete information on the Bondsman File.
Charge - This option allows you to add, change, inquire, or delete information on the Juvenile Charge File.
Clerk - This option allows you to add, change, or inquire into the information on the Clerk's File. This file only
contains one record.
County - This option allows you to add, change, inquire, or delete information on the County Name File.
Court - This option allows you to add, change, inquire, or delete information on the Court File.
Personnel - This option allows you to add, change, inquire, or delete information on the Personnel File. You may
access the file information by Attorney/Firm, Judge, or Officer.
Zip Codes - This option allows you to add, change, inquire, or delete information on the Zip Code File.
J.T.R.S. User Manual
page 2-6
Option Descriptions
Control Files
Global Maintenance
Address Location - This option allows you to access the address location information. A code is assigned to an
address description.
Detention Reason - This option allows you to access the detention reason code information. A code is assigned
to a detention reason description along with the abbreviated screen description.
Form Names - This option allows you to access the information on form names. A form code is assigned to each
form description and its related information.
Marital Status - This option allows you to access the marital status information. A code is assigned to each
marital status description.
Name Suffix - This option allows you to access the name suffix information on file.
Name Title - This option allows you to access the name title information on file.
Personnel Agency - This option allows you to access the personnel agency information. A code is assigned to
the personnel agency description.
Relationship Type - This option allows you to access the relationship type information. A code is assigned to
each relationship type description. You may only add codes to the file.
State Abbreviation - This option allows you to access the state abbreviation information. A two-digit code is
assigned to each state name.
T-CAST Control File Reports
Bondsman - This option allows you to print or display the bondsman file information. The information may be
processed in bondsman code or first and last name order with beginning and ending ranges.
Charge - This option allows you to print or display the charge file information. The information may be processed
in charge code or description order with beginning and ending ranges on these fields.
Clerk - This option allows you to print or display the clerk's file information.
County - This option allows you to print or display the county file information. The information may be selected
with beginning and ending ranges for the county.
Court - This option allows you to print or display the court file information. The information may be selected with
beginning and ending ranges for the court.
Personnel - This option allows you to print or display the personnel file information. The information may be
processed by attorney/firm, judge, or officer. The attorney/firm information may be processed in code, law
firm, or first and last name order. The judge information may be processed in code or first and last name
order. The officer information may be processed in agency, code, or first and last name order.
J.T.R.S. User Manual
page 2-7
Option Descriptions
Control Files
T-CAST Control File Reports
(continued)
Zip Code - This option allows you to print or display the zip code file information. The information may be
processed in city or zip code order with beginning and ending ranges on these fields.
J.T.R.S. User Manual
page 2-8
Option Descriptions
State Process
The state process is accessed through option '6 - State Proc'.
Create State File - This option allows you to create a new state file (after deleting the current state file). If errors
are detected, an error report will be produced. In this option, you can also print the state file information.
Reprint State Error Report - This option allows you to print the error report again. You will have the option
to select the information by entering a range of court codes and docket numbers.
Reprint State Report - This option allows you to print the State Report again. You will have the option to have
the information listed in docket number or juvenile name order and you can select the information by
entering a range of court codes and docket numbers.
State Disposition Report - This option allows you to print the State Disposition Report. The information can be
selected by entering a range of disposition dates.
State Intake Report - This option allows you to print the State Intake Report. The information can be selected
by entering a range of disposition dates.
Delete State Information - The state file is set up to contain 12 months of information. With this option, you
can delete information with disposition dates over 12 months old.
J.T.R.S. User Manual
page 2-9
ControlFiles
Accessing Control File Information
The control file information is accessed through option '5 - Cntl Files' and then 'A - Control Files'.
The processes are then broken down into four categories. In the maintenance options (1, 2, 3),
most of the files allow you to add, change, inquire, or delete information. Most of the report
options (4) allow you print or scroll the control files by selecting ranges of information.
J.T.R.S. User Manual
page 3-1
Case Management
Intake A Juvenile
Select option '1 - Case Management' and 'A - Intake Action'.
1.
Enter case court code and docket number on the Intake Action screen.
2.
Enter the juvenile name index information on the Add/Change Juvenile Name screen.
After the information has been entered, you will have the option to go to the AKA Name
maintenance process.
3.
Enter the case information on the Add/Change Juvenile Case Info screen.
4.
Enter the charge information on the Add/Change Charge screen.
5.
You will return to the Intake Action screen where you will enter the remaining information.
6.
When all of the juvenile's information has been entered, you will be prompted to confirm that all of
the information is correct.
7.
You will have the option to enter the Forms Processing routine where you can select various forms to
be printed.
Change Case Information
Select option '1 - Case Management' and 'B - Change Case'.
1.
Enter case court code and docket number on the Change Case screen.
2.
The juvenile's case information will be displayed. Make any necessary changes.
6.
When all of the juvenile's information has been entered, you will be prompted to confirm that all of
the information is correct.
7.
You will have the option to enter the Forms Processing routine where you can select various forms to
be printed.
Inquire Into A Case
Select option '1 - Case Management' and 'E - Case Inquiry'.
1.
Enter case court code and docket number on the Case Inquiry screen.
2.
The juvenile's case information will be displayed. Refer to the option keys to continue through the
inquiry or exit the routine.
J.T.R.S. User Manual
page 4-1
Case Management
Delete A Case
Select option '1 - Case Management' and 'C - Delete Case'.
1.
Enter case court code and docket number on the Delete Case screen.
2.
The juvenile's information will be displayed. You may use the option keys to view other information
related to the juvenile selected.
3.
You will be prompted to confirm that you are sure you actually want the juvenile to be deleted.
Dispose A Case
Select option '1 - Case Management' and 'D - Dispose Case'.
1.
Enter case court code and docket number on the Dispose Case screen.
2.
Enter the disposition information for the case. Refer to the option keys for other processes available.
3.
When all of the disposition information has been entered, you will be prompted to confirm that all of
the information is correct.
J.T.R.S. User Manual
page 4-2
Forms and Reports
Forms Processing
SUBPOENA
Select option '1 - Case Management' and the Forms Processing option 'F - Subpoena'.
1.
Select the case by entering the court code and docket number.
2.
Select or enter the witness name(s).
3.
Confirm the correctness of the information.
4.
Select the process. You can choose to print the subpoena or to go to the Rule Entry process.
OTHERS
Select option '1 - Case Management' and the Forms Processing option 'G - Others'.
1.
Select the case by entering the court code and docket number.
2.
Select the form to process.
The available forms will be scrolled on the screen so a selection can be made. After selecting a
form, you will be entered into the WordPerfect environment.
NOTE: Forms may also be processed in the 'Intake Action' and 'Change Case' process.
J.T.R.S. User Manual
page 5-1
Forms and Reports
Court Docket
Select option '3 - Court Docket'.
1.
Select the order in which the information will be listed. You can choose to have the information
listed by court date or in judge order.
2.
Select the listing format. You can have the information printed in 80 columns (8 1/2" x 11" paper) or 132
columns (14 7/8" x 11" paper).
3.
Enter the criteria to be used in selecting the information for the Court Docket.
4.
Select the listing media. You have the option to have the information listed on the terminal screen or
printed on the printer.
J.T.R.S. User Manual
page 5-2
Forms and Reports
Rap Sheet
Select option '4 - Reports', 'A - Reports', '2 - Charge Rpts', and 'B - Rap Sheet'.
1.
Select the listing format. You can have the information printed in 80 columns (8 1/2" x 11" paper) or 132
columns (14 7/8" x 11" paper).
2.
Select the printer to be used.
3.
Enter the juvenile's name to be selected for the Rap Sheet.
4.
Select the listing media. You have the option to have the information listed on the terminal screen or
printed on the printer.
J.T.R.S. User Manual
page 5-3
StateFile
State File Process
Select option '6 - State Proc'.
1.
Select 'A - Create State File'.
This will delete your current state file. Be sure all previous reporting has been completed.
If errors occur, an error listing will be produced. Exit the program and make the appropriate
changes. Then, run this option again. You can use option 'B - Reprint State Error Report' if
necessary.
If no errors occur, the State Juvenile Docket Report will be produced. You can use option 'C Reprint State Report' if necessary.
2.
Select 'D - State Disposition Report'.
The information to be included on the report will be selected by disposition date ranges. You can
have the information displayed on the screen or printed on the printer.
3.
Select 'E - State Intake Report'.
The information to be included on the report will be selected by disposition date ranges. You can
have the information displayed on the screen or printed on the printer.
4.
Select 'F - Delete State Information'.
This will delete the state reported information that is over one year (12 months) old.
J.T.R.S. User Manual
page 6-1


![[1 ] Oracle® Enterprise Manager](http://vs1.manualzilla.com/store/data/005669073_1-0396df232df5e560fdd03210f5126330-150x150.png)