1
USER'S MANUAL
CONTENTS
SPECIAL FEATURES
WHY AMIGA?
WHAT IS A GENLOCK?
WHAT DOES GENLOCKING D O ?
C O N N E C T I N G T H E R O C G E N PLUS
OPERATION O F D E M O DISK
FREQUENTLY ASKED QUESTIONS
SPECIFICATIONS
IN N O EVENT, WHETHER BASED IN C O N T R A C T O R T O R T (INCLUDING
NEGLIGENCE) SHALL R O C T E C ELECTRONICS LTD. BE LIABLE FOR
INCIDENTAL, CONSEQUENTIAL, INDIRECT, SPECIAL O R PUNITIVE
DAMAGES O F ANY KIND, O R FOR LOSS O F REVENUE, LOSS O F
BUSINESS O R O T H E R FINANCIAL LOSS ARISING O U T O F O R IN
C O N N E C T I O N WITH T H E SALE, INSTALLATION, USE, PERFORMANCE,
FAILURE O R INTERRUPTION O F THIS P R O D U C T .
All brand names are registered trademarks of their owners.
SPECIAL FEATURES
Fully compatible with the complete line of Amiga Personal Computers Series:
A500, A1000, A2000, A3000 and Commodore's CDTV.
Fully accessible, user-friendly panel design and easy installation.
Auto Video Pass-Thru: This allows the signal from the Amiga or external video
source to pass through the RocGen Plus to the monitor or recorder, even if either
the Amiga or the external video signal is off.
AMIGAIVIDEO control: This feature provides for User-control of the varying
degrees of "fade" and "dissolve" between the Amiga graphics and external video
source simultaneously. The RocGen Plus is the most affordable Amiga genlock
offering this feature.
Extra Video-Thru Port: Provides separate "line" monitoring of the video signal
only.
Extra RGB-Thru Port: Enables separate line of RGB signals for real time editing
of your Amiga graphics.
Extra Key-In Port: Allows the RocGen Plus to engage external keying devices
for the production of special video keying effects.
Internal Sync Generator: The RocGen Plus generates its own internal timing
signals if it does not sense synchronization from an external video source.
WHY AMIGA?
Any discussion of the functionality of Amiga genlock must begin with the Amiga
itself. With custom processors that support up to 4096 colours and smooth, quick
screen updating, the Amiga is an ideal tool for sophisticated graphic and animation
projects. Another attractive function is its ability to output a full-overscan screen (a
screen whose images display. all the way to the edge of the monitor, leaving no
visible border) as a standard feature, something no other personal computer does
without elaborate and expensive add-ons. The build-in colour NTSCIPALcompatible output is another powerful video-related feature of the Amiga . This
combination of features made for compelling reasons to use the Amiga in a video
production environment.
But, the most important Amigalvideo advantage stems from the very foundation of
the Amiga's architecture: the Amiga's processors were designed to easily match the
timing of the industry-standard NTSCIPAL video signal. This single factor, more
than any other, is the reason that powerful, video peripherals, like RocGen Plus, can
be offered for the Amiga at a fraction of the price of comparable products on other
PC platforms.
WHAT IS A GENLOCK?
The word ''genlock" is somewhat misused by the Amiga community. In strict video
terminology, genlock is used to describe the electronic synchronization of two
separate video signals, a critical video function that must occur before any multisignal processing can begin. An engineer in a TV studio might say, "let's genlock
(synchronize) these two signals together." Two video signals are GENerated and then
LOCKed, hence the term "genlock".
Amiga desktop videographers, on the other hand, use the term genlock to describe a
device (an external device in the case of RocGen Plus) that actually performs many
different video functions; the synchronization of two video signals being just one of
its many capabilities.
This equipment has been tested and found to comply with the limits for Class B
digital device, pursuant to Part 15 of the FCC Rules. These limits are designed to
provide responsible protection against harmful interference in a residential installation. This equipment generates, uses and can radiate radio freguency energy
and, if not installed and used in accordance with the instructions, may cause
harmful interference to radio communications. However. there is no "
guarantee
that interference will not occur in a particular installation. If this equipment does
cause harmful interference to radio or television reception, which can be determined by turning the equipment off and on, the user is encourage to try to correct the interference by one or more of the following measures:
-
Reorient or relocate the receiving antenna.
-
Increase the separation between the equipment and receiver.
-
Connect the equipment into an outlet on a circuit different from that to which
the receiver is connected.
-
Consult the dealer or an experienced radioITV technician for help.
[ Shielded interconnect cables ] [ Shielded power cords ] must be employed with
this equipment to insure compliance with the pertinent RF emission limits governing this device.
Changes or modifications not expressly approved by Roctec Electronics Inc.
could void the user's authority to operate the equipment.
WHAT DOES GENLOCKING DO?
As previously mentioned, your RocGen Plus is a sophisticated, multi-purpose
genlock. RocGen Plus is responsible for three major videolgraphic functions.
1.
RocGen Plus is an encoder. It processes the Amiga's standard RGB colour signal,
which is incompatible with standard video, into a NTSCIPAL video signal.
This allows the Amiga's sophisticated graphics and animations to be displayed on
standard video monitors and recorded on standard video types, via video
recorders.
Unfortunately, the encoding of these distinct, pure signals into one "composite"
signal usually results in a visible degradation in the quality of the resulting
NTSCIPAL-compatible signal. This is not a flaw in the genlock, but rather an
inherent deficiency in the NTSCIPAL video signal. High quality genlocks, like
RocGen Plus, employ sophisticated signal processing algorithms to minimize the
loss of signal integrity.
Some Amiga genlocks will not operate exclusively as an encoder without a
second video signal being applied to provide necessary synchronization signals.
Your RocGen Plus, however, was designed to sidestep this limitation by
generating its own internal synchronization signals if no external "sync" is
detected.
2.
The second important function of your RocGen Plus is the previously mentioned
"signal synchronization". This feature allows the genlock to monitor two separate
video signals and adjust the timing of these two signals until they are perfectly
matched. This synchronization is of critical importance and allows the two video
signals to be processed and displayed together without the vertical and horizontal
disturbances that mark unsynchronized signals.
O f the two synchronized video signals, one of them always belongs to the
Amiga. This is, of course, after the RGB signal has been transformed (encoded)
into a standard video signal. The second of these two signals can come from a
variety of video sources including: video cameras, VCRs, camcorders and laser
disk players. The precise, electronic synchronization of the Amiga's encoded
signal with a second video signal paves the way for the most important of
RocGen Plus's features.
3.
Overlaying Amiga graphics on top of video is perhaps the primary reason that
desktop videographers use genlocks. RocGen Plus provides this overlay
capability. Graphic overlay begins by combining the Amiga's graphic screen with
a video picture. Once this has occurred, RocGen Plus electronically removes the
Amiga's background colour, exposing the video picture and leaving the Amiga's
foreground graphic overlaid on top of the now uncovered video.
If you were to picture the two synchronized video signals as two separate sheets
of paper lying flat on a table, one on top of the other, the bottom piece of paper
would represent t+e video signal and the top piece of paper would represent the
encoded Amiga signal. If part of the top sheet (background colour of the Amiga
signal) was removed, portions of the bottom piece (the video signal) would
suddenly be exposed and become visible.
The electronically removed background colour is known as "colour zero" because
it occupies the "zero" position in the Amiga's colour palette. O n the default
Amiga Workbench screen the background colour (colour zero) is blue and the
foreground colour is white. O n the default Deluxe Paint I11 screen the
background colour is black. Because the Amiga's palette is modifiable, "colour
zero" can be any one of the Amiga's 4096 possible colours. It makes no difference
to RocGen Plus; whatever colour occupies the "colour zero" position becomes
transparent when the overlay mode is activated. The fader knobs give you the
added capability of controlling the degree of transparency in either the
background or the foreground graphic. This feature can be used to create many
sophisticated effects.
NOTE: The stability of the overlaid graphic image is highly dependent on the
quality of the synchronization signal of the underlying video picture. Many
consumer-quality video recorders that were never intended to be used in
"sync" situations, produce a very poor "sync" signal. This can result in a
visibly unstable overlay, characterised by shakiness, vibrations and other
undesirable effects. This is not a flaw in the genlock, but simply the result
of the genlock matching its timing with the sub par incoming video signal.
Using industrial or professional quality video equipment will minimize the impact of
this condition. A high quality "sync" output is one of the major differences between
consumer and higher end equipment. Always use the highest quality video signal you
can afford.
CONNECTING T H E ROCGEN PLUS
WARNING!!! Before attempting the connection of RocGen Plus you must turn off
your Amiga. Never attempt to connect any peripheral device when
the Amiga is powered up. Failure to heed this warning can result in
serious damage to the Amiga andlor RocGen Plus.
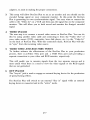
Connecting RocGen Plus is really quite -,imple:
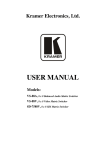
RGB THRU
5 m8 6 6
Figure 1 The back panel of RocGen Plus
1.
RGB PORT
Plug the D-sub 23-pin female connector at the end of the cable that connects to
the rear of RocGen Plus to the 23-pin male RGBIVIDEO port on the Amiga. If
you are facing the computer, the RGBIVIDEO port is at the rear on the leftmost
side of the Amiga 50013000 and at the rear on the rightmost side of the Amiga
2000. Be careful to gently align the connector with the port. This connection is
easily made when properly done. If you find yourself forcing the connection then
STOP, because you are doing something wrong.
2.
VIDEO OUT JACK
Connect one end of a standard RCA-type video cable into the jack on the back
side of RocGen Plus labeled "Video Out". The other end of this cable should be
connected to the composite "Video In" on your monitor.
NOTE: Arniga 1080 and 1084 monitors can be used as composite monitors by
hitting a switchlbutton on the front control panel of the monitor.
Don't use RCA-type AUDIO cables, even though they look the same
as the one produced for video use. They are n i t designed to carry the
higher frequencies that are found in the NTSCIPAL video signal.
Some video monitors, especially those designed for industrial and professional
use, have connectors that are quite different from the RCA-type usually found
on consumer equipment. The B N C connector is the most commonly found
alternative. RCA to BNC cable are readily available, as well as RCA to B N C
adapters, to assist in making the proper connections.
3.
This setup will allow RocGen Plus to act as an encoder and you should see the
encoded Amiga signal on your composite monitor. At this point the RocGen
Plus is generating its own synchronization signal. You may want to connect the
cable to the "Video In" on a VCR and then pass the signal thru to the composite
monitor. This will allow you to both record and monitor the Amiga's encoded
signal.
4.
VIDEO IN JACK
The next step is to connect a second video source to RocGen Plus. You can do
this by using another video cable and connecting it from the "Video Out" of
your video source (VCR, camcorder, laser disk player, etc.) to the "Video In"
on the back of RocGen Plus. With this connection made, RocGen Plus will take
its "sync" from the incoming video source.
5.
VIDEO THRU AND RGB THRU PORTS
T o further enhance the effectiveness of the RocGen Plus in your production
process, there is anvideo Thru port and a RGB Thru port each providing a
separate connection to your video and RGB monitor, respectively.
This will enable you to monitor signals from the two separate sources and is
most useful when there is a need to view the video signals or the RGB signals
that are not genlocked.
6. KEY IN JACK
The "key-in" jack is used to engage an external keying device for the production
of special keying effects.
The RocGen Plus will switch to use external "Key in" signal while an external
keying device-is connected and in the "active" mode.
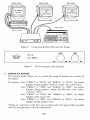
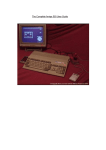
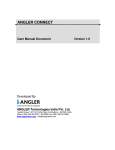
Display monitor
Display monitor
RGB monitor
VCR or TV recelver
Figure 2
Connecting RocGen Plus with the Amiga
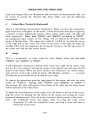
Figure 3
The front panel of RocGen Plus
7. DISSOLVE KNOBS
The dissolve knobs allows you to control the range of dissolve and overlay of
the signals.
For instance, Turn "VIDEO" to "MAX" and "AMIGA" to "MAX", the output
displays Amiga graphics which is overlay onto video source.
Turn "VIDEO" to "MIN" and "AMIGA" to "MIN", the output
displays Amiga graphics' outline and fills with video source.
("inverse" effect)
Turn "VIDEO" to "MAX" and "AMIGA" to "MIN", the output
displays video source only.
Turn "VIDEO" to "MIN" and "AMIGA" to "MAX", the output
displays Amiga graphics only.
"Hands-on" experience is the best way to explore all of the special effects possible
with the wide spectrum of knob combinations.
OPERATING THE DEMO DISK
Load your Amiga with your Workbench disk and insert the demonstration disk, use
the mouse to activate the "RocGen Plus Demo Disk" icon and the following
programmes.
I.
Colour Bars (Vertical & Horizontal)
This is a self-running demonstration programme. When you start the programme,
eight colour bars will appear on the screen. Colour of the bars from left to rightltop
to bottom are grey (background colour), white, yellow, green, pink, red, blue and
black respectively. When both "VIDEO" and "AMIGA" are turned to "MAX",
the background (grey colour) of the Amiga will be replaced by the input video
source of RocGen Plus. The colour bars could be scrolled by moving the mouse
to the right side of the screen. The nearer of the mouse to the right, the faster the
scrolling effect. Exit the programme by moving the mouse to the left top corner of
the screen and click the left mouse button.
II.
Script
This is a programme to write script for video display when you turn both
"VIDEO" and "AMIGA" to "MAX" .
A self-explanatory instruction is shown on the screen.You could choose colour, style
and size for your script by moving the mouse to the desired item and press the left
button of the mouse. When you press <Enter> (or <Return>), the chosen colour,
style and size of the script would be shown. All alphabets, numbers, ...... or nearly
all characters on the keyboard can be used for your script.
T o remove the instructions, press the right button of the mouse, and only the script
would be displayed. Turning both "VIDEO" and "AMIGA" to "MAX" at
this moment, the script will appear at the bottom of the video and the whole screen
will be replaced by the video source.
T o adjust the vertical position of the script, move the mouse to the top of the screen,
drag the screen by pressing the left button of the mouse and moving the mouse
downward simultaneously. Now the script is located in the lower part of the screen.
Note: the workbench screen may appear when you drag the script screen
downward. T o hide the workbench screen, just drag it down and place it
behind the script screen.
"Script" requires fonts downloaded from your workbench disk (or any disk where
the directory FONTS located). In order to increase the speed of access, however, by
adding buffers to the drive where the directory FONTS located would reduce
accessing time a lot.
Key in:
Addbuffers dfx: 25
(X
X
= 0 internal floppy drive,
= 1 external floppy drive)
at CL1 to add buffers.
Few keys for your convenience:
<ESC>
<BACKSPACE>(<-)
<ENTER> (or Return)
ZZI.
to clear script line;
to erase one character backward;
to make choice effective immediately.
CROSSHAZRS
This is a shooting effect demonstration programme. When you start the programme
in the INVERSE mode of RocGen Plus, a crosshair will appear on the screen. The
crosshair is controlled by the mouse. Click the left mouse button to trigger the
shooting effect. Exit the programme by moving the mouse to the left top corner of
the screen and click the left mouse button or by pressing "ESC" key.
FREQUENTLY ASKED QUESTIONS
What's the difference between a Genlock and a Digitizer? I thought they were
the same thing.
A Genlock unit enable you to synchronize the Amiga with a video source, a
digitizer is a unit that enables you to produce a computer version of a video
image.
I am using RocGen Plus and getting a bad picture from the video output, what
can I do to enhance it?
The most common causes of bad video output are:
i. the use of audio cable as video cable you are using are designed to be used
with video equipment.
ii. the genlock unit being placed near strong electrical current i.e. Amiga power
supply, video power supply.
I want to use my S-VHS camera with RocGen Plus, how can I do this?
RocGen Plus accepts CVBS (composite video) inputs, S-VHS is a different signal
type. You would need to use the CVBS output of your camera, if available.
I have setup RocGen Plus as the manual instructed and I can't get it to work,
what can I do?
Your dealer should be able to help you with any problems you may experience.
However, before contacting your dealer, it is advisable to check whether you
have installed 'many devices (e.g. external drive, memory expansion, etc.) on the
Amiga system. If yes, then it may be the root of the problems since your
Amiga's power supply can't support so many add-on devices. This could be
solved easily by plugging an +12VDC adaptor into the RocGen Plus.
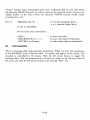
SPECIFICATIONS
Computer Compatibility
Amiga computer series and Commodore CDTV
Video Input/Output
Compatibility
PAL or NTSC composite video signal (*)
Encoder
NTSC (RG310CN), PAL (RG31OCP)
Luminance Bandwidth
(3dB) 5MHz
Interface
D-sub 23-pin Amiga Video Port Connector
RCA jack for composite video input
RCA jack for external keying input
RCA jack for composite video output
RCA jack for video-thru output
DB-23 Amiga RGB-thru output
Video Signal
Keying Signal
TTL compatible
Power Supply
Optional +12VDC 800mA external power supply
Display Control
Overlay and fading effects are adjustable via the dual
dissolve dials.
Panel Indication
Red LED for Amiga on.
Green LED for video active.
Dimensions
* Depends on model