1
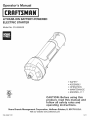
Operator's
Manual
M
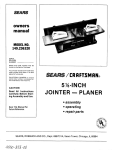
LITHIUM-ION BATTERY=POWERED
ELECTRIC STARTER
Model No. 316.859530
*
*
*
*
.
E324672
SAFETY
ASSEMBLY
OPERATION
MAINTENANCE
ESPANOL, R 7
C@US
L|STED
CAUTION:
Before using this
product, read this manual and
follow all safety rules and
operating
instructions.
41ZM
Sears Brands
Management
Corporation,
Visit our website:
769-06887 P01
Hoffman
Estates,
IL 60179 U.S.A.
www.craftsman.com
12/11
TABLE OF CONTENTS
Rules for Safe Operation
.......................................
2
Warranty ....................................................
Know Your Unit ...............................................
3
4
Assembly
4
Instructions
..........................................
Operating Instructions
.........................................
Maintenance and Repair Instructions ..............................
5
5
Cleaning and Storage ..........................................
Troubleshooting Chart .........................................
5
5
Specifications
................................................
Service Numbers .....................................
MEANING
Attention is ALERT:
required inIndicates
order to avoid
injury. May
SAFETY
danger,serious
warningpersonal
or caution.
be used in conjunction with other symbols or pictographs.
,_
injury
to yourself
or totoothers.
safety
DANGER:
Failure
obey aAlways
safety follow
warningthewill
resultprecautions
in serious
to reduce the risk of fire, electric shock and personal injury.
,_
to yourself and Failure
others. toAlways
safety can
precautions
WARNING:
obey afollow
safetythe
warning
result in to
injury
reduce the risk of fire, electric shock and personal injury.
MEANINGS
V .......................................................
Volts
A ......................................................
Hz ......................................................
Amps
Hertz
Read the Operator's
Manual and follow
all warnings
and safety
instructions. Failure to do so can result in serious injury to the operator
and/or bystanders.
+ IMPORTANT
CALiFORNiA
PROPOSiTiON
NOTE: Advises you of information or instructions
maintenance of the equipment.
vital to the operation
or
+
Personal safety:
65
Battery posts, terminals and certain finished
components contain lead, lead compounds and chemicals known
to the State of California to cause cancer and birth defects or
other reproductive harm. Wash hands after handling.
POWER TOOL SAFETY WARNINGS
WARNING: Read all safety warnings and all instructions. Failure to follow
the warnings and instructions may result in electric shock, fire and/or
serious injury.
Save all warnings and instructions for future reference.
The term "power tool" in the warnings refers to your mains-operated
(corded) power tool or battery-operated
(cordless) power tool.
Work area safety:
a) Keep work area clean and weU lit. Cluttered or dark areas invite accidents.
b) Do not operate power tools in explosive atmospheres,
such as in the
presence of flammable liquids, gases or dust. Power tools create
sparks which may ignite the dust or fumes.
c) Keep children and bystanders
away while operating
Distractions can cause you to lose control.
Electrical safety:
property
damage
or personal
to yourself
others.in
CAUTION:
Failure
to obey ainjury
safety
warning or
mayto result
Always follow the safety precautions to reduce the risk of fire,
electric shock and personal injury.
SAFETY INSTRUCTIONS
WARNING:
GENERAL
SYMBOL
5
Back Cover
All information, illustrations, and specifications in this manual are based on
the latest product information available at the time of printing. We reserve
the right to make changes at any time without notice.
MEASURE
The purpose of safety symbols is to attract your attention to possible dangers.
The safety symbols, and their explanations, deserve your careful attention and
understanding. The safety warnings do not by themselves eliminate any danger.
The instructions or warnings they give are not substitutes for proper accident
prevention measures.
a power tool.
a) Power tool plugs must match the outlet. Never modify the plug in any
way. Do not use any adapter plugs with earthed (grounded} power tools.
Unmodified plugs and matching outlets will reduce risk of electric shock.
b) Avoid body contact with earthed or grounded surfaces such as
pipes, radiators, ranges and refrigerators.
There is an increased risk of
electric shock if your body is earthed or grounded.
c) Do not expose power tools to rain or wet conditions.
Water entering a
power tool will increase the risk of electric shock.
d) Do not abuse the cord. Never use the cord for carrying, pulling or
unplugging
the power tool. Keep cord away from heat, oil, sharp
edges or moving parts. Damaged or entangled cords increase the risk
of electric shock.
e) When operating a power tool outdoors, use an extension cord
suitable for outdoor use. Use of a cord suitable for outdoor use reduces
the risk of electric shock.
f) If operating a power tool in a damp location is unavoidable,
use a
residual current device (RCD) protected supply. Use of an RCD
reduces the risk of electric shock.
a) Stay alert, watch what you are doing and use common sense when
operating a power tool Do not use a power tool while you are tired or
under the influence of drugs, alcohol or medication. A moment of
inattention while operating power tools may result in serious personal injury.
b) Use personal protective equipment. Always wear eye protection.
Protective equipment such as dust mask, non-skid safety shoes, hard
hat, or hearing protection used for appropriate conditions will reduce
personal injuries.
c) Prevent unintentional starting. Ensure the switch is in the off=position
before connecting
to power source and/or battery pack, picking up
or carrying the tool. Carrying power tools with your finger on the switch
or energizing power tools that have the switch on invites accidents.
d) Remove any adjusting key or wrench before turning the power tool
on. A wrench or a key left attached to a rotating part of the power tool
may result in personal injury.
e) Do not overreach. Keep proper footing and balance at all times. This
enables better control of the power tool in unexpected situations.
f) Dress properly. Do not wear loose clothing or jewelry. Keep your hair,
clothing and gloves away from moving parts. Loose clothes, jewelry or
long hair can be caught in moving parts.
g) If devices are provided for the connection
of dust extraction and
collection facilities, ensure these are connected and properly used.
Use of dust collection can reduce dust-related hazards.
Power tool use and care:
a) Do not force the power tool. Use the correct power tool for your
application.
The correct power tool will do the job better and safer at the
rate for which it was designed.
b) Do not use the power tool if the switch does not turn it on and off.
Any power tool that cannot be controlled with the switch is dangerous
and must be repaired.
c) Disconnect the plug from the power source and/or the battery pack
from the power tool before making any adjustments,
changing
accessories,
or storing power tools. Such preventive safety measures
reduce the risk of starting the power tool accidentally.
d) Store idle power tools out of the reach of children and do not allow
persons unfamiliar with the power toot or these instructions to
operate the power tool Power tools are dangerous in the hands of
untrained users.
e) Maintain power tools. Check for misalignment
or binding of moving
parts, breakage of parts and any other condition that may affect the
power tool's operation. If damaged, have the power tool repaired
before use. Many accidents are caused by poorly maintained power tools.
f) Keep
cutting
toolssharp
andclean.
Properly
maintained
cutting
tools
withsharp
cutting
edges
arelesslikely
tobindandareeasier
tocontrol.
g)Usethepower
tool,accessories
andtoolbitsetc.inaccordance
with
these
instructions, taking into account the working conditions and
the work to be performed.
Use of the power tool for operations
from those intended could result in a hazardous situation.
Battery
OTHER SAFETY PRECAUTIONS
should always be used to reduce the risk of fire, electric shock
I
and personal injury. Only use UL listed extension cords suitable for I
outdoor use, such
WARNING:
When
as Type
using SW-A,
electric STW-A.
tools, basic
STOW-A,
safety SJW-A,
precautions I
SJOW-A, SJTW-A, or SJTOW-A.
j
different
_
tool use and care:
a) Recharge only with the charger specified by the manufacturer.
A
charger that is suitable for one type of battery pack may create a risk of
fire when used with another battery pack.
b) Use power tools only with specifically
designated
battery packs. Use
of any other battery packs may create a risk of injury and fire.
c) When battery pack is not in use, keep it away from other metal objects,
like paper clips, coins, keys, nails, screws or other small metal objects,
that can make a connection from one terminal to another. Shorting the
battery terminals together may cause burns or a fire.
d) Under abusive conditions,
liquid may be ejected from the battery;
avoid contact, if contact accidentally
occurs, flush with water, if
liquid contacts eyes, additionally
seek medical help. Liquid ejected
from the battery may cause irritation or burns.
Service:
+ Extension Cords: Make sure the extension cord is in good condition, is
heavy enough to carry the current that the unit will draw. If in doubt, use
the next heavier gauge cord. An undersized extension cord will cause a
drop in line voltage resulting in a loss of power and overheating. The table
shown illustrates the correct size to use depending on the cord length and
nameplate amperage rating.
I
MINIMUM
WIREAPPUANCES
SIZE FOR EXTENSION
USING 6-10CORDS
AMPS FOR 120 VOLT
I£o dLe gth 1tt.! 2+ !
Iw+reS,zelAWG)
I 18 I
+0 1
16
I
100
1
150
14
I
12
+ If the extension cord is damaged in any manner while plugged in,
disconnect the extension cord from both the house and the unit. Do not
re-use until the extension cord has been repaired or replaced.
a) Have your power tool serviced by a qualified repair person using only
identical replacement
parts. This will ensure that the safety of the power
tool is maintained.
+ Ground Fault Circuit Interrupter (GFCI) protection should be provided on the
circuit(s) or outlet(s) to be used for this unit. Receptacles are available having
built-in GFCI protection and may be used for an added measure of safety.
+ Wear safety glasses or goggles with side shields that are marked as
meeting ANSI Z87.1-1989 standards, and ear/hearing protection when
operating this unit. Wear a face or dust mask if the operation is dusty.
+ Keep cutting tools sharp and clean. Properly maintain cutting tools with
sharp cutting edges are less likely to bind and are easier to control.
+ Allow the unit to cool before storing or transporting.
unit while transporting.
Be sure to secure the
+ Never douse or squirt the unit with water or any other liquid. Keep handles
dry, clean and free from debris. Clean after each use.
+ Keep these instructions. Refer to them often and use them to instruct other
users. If loaning someone this unit, also loan them these instructions.
SAVE THESE INSTRUCTIONS
CRAFTSMAN
ONE YEAR
FULL WARRANTY
FOR ONE YEAR from the date of purchase, this product is warranted against any defects in material or workmanship.
Defective product will be replaced free of charge.
For warranty coverage details to obtain free replacement,
visit the web site: www.craftsman.com
This warranty is void if this product is ever used while providing commercial services or if rented to another person.
This warranty gives you specific legal rights, and you may also have other rights, which vary from state to state.
Sears Brands Management
Corporation,
3
Hoffman Estates, IL 60179
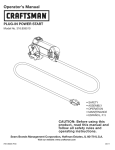
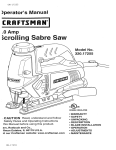
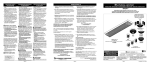
NO TOOLS REQUIRED!
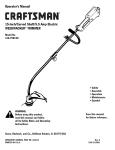
Charger
Red LED
Keyed
Tip
Trigger
This unit comes completely
UNPACKING
assembled.
1.
Carefully remove the product and any accessories
2.
Inspect the product carefully to make sure no breakage or damage occurred
during shipping. Do not discard the packing material until you have
carefully inspected and satisfactorily operated the product.
CHARGING
from the box.
THE BATTERY
NOTE: The battery is not shipped fully charged. It is recommended to fully
charge the battery before use to ensure that maximum run time can be
achieved. The lithium-ion battery will not develop a memory and may be
charged at any time. A fully discharged battery will require approximately
3-5 hours to completely charge.
NOTE: Use only the supplied charger (Model # SH-DC120400, P/N 75306672) when charging. The use of any other charger could damage the
battery or create a hazardous condition.
1.
Plug the charger into an AC wall outlet / receptacle.
2.
3.
Insert the charger into the back of the unit (Fig. 1).
The red LED will illuminate (Fig. 1).
4.
The red LED will turn off when the battery is fully charged.
c o,o°o i ic tion
1 otex es
the party responsible for compliance could void the user's authority
to operate the equipment.
NOTE: This equipment has been tested and found to comply with the limits
for a Class B digital device, pursuant to part 15 of the FCC Rules. These
limits are designed to provide reasonable protection against harmful
interference in a residential installation. This equipment generates, uses
and can radiate radio frequency energy and, if not installed and used in
accordance with the instructions, may cause harmful interference to radio
communications. However, there is no guarantee that interference will not
occur in a particular installation. If this equipment does cause harmful
interference to radio or television reception, which can be determined by
turning the equipment off and on, the user is encouraged to try to correct
the interference by one or more of the following measures:
--
Reorient or relocate the receiving antenna.
---
Increase the separation between the equipment and receiver.
Connect the equipment into an outlet on a circuit different from that to
which the receiver is connected.
--
Consult the dealer or an experienced
radioiTV technician
for help.
5. Disconnect the unit from the charger.
NOTE: The unit may be stored with the
charger still attached, but the charger
should be disconnected from the wall
outlet / receptacle when doing so.
NOTE: Lithium-ion batteries, while in use,
will continue to provide full power
without power fade, unlike typical
batteries; when the battery is fully
discharged, the battery circuitry will
immediately cut power to the tool and
require immediate charging.
ove
Red LED
\
Charger
Fig. 1
IMPORTANT! DO NOT use the unit while it is charging. Doing so may
damage the unit and battery.
NOTE:
Thisaccessory
istobeused
onelectric
startcapable
units
only.
Refer
totheStarting Instructions section of the unit's Operator's Manual
NOTE: Do not attempt to repair; there are no user serviceable parts inside.
for proper starting instructions when using this accessory.
NOTE: This accessory is FOR INTERMIqKENT USE ONLY; use only as
directed below.
OPERATING THE ELECTRIC
STARTER
CLEANING
not use the plug-in
powerserious
start inpersonal
damp orinjury
wet locations,
in rain ordo
WARNING:
To avoid
and unit damage,
snow.
WARNING:
if any part is damaged
Inspect
theany
in
unitway.
priorA to
damaged
use. DO unit
NOTmay
usecause
the unit
serious personal injury due to electrical shock.
Use a small brush to clean off the outside of the unit and keyed tip. Do not
use strong detergents. Household cleaners that contain aromatic oils such
as pine and lemon, and solvents such as kerosene, can damage plastic
housing or handle. Wipe off any moisture with a soft cloth.
STORAGE
• Check unit before storage to be sure the equipment
condition.
is in safe working
Stop the motor.
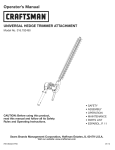
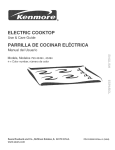
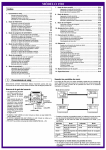
1.
Place the electric starter keyed tip into the Speed Start TM port, making sure
the engine tabs are flush with the indents on the electric starter. (Fig. 2)
NOTE: It may be necessary to slightly twist the electric starter until the key
fits securely into the Speed Start TM port.
Store the unit indoors, in a dry and locked place, out of the reach of children.
Maintain or replace safety and instruction
labels, as necessary.
2.
With the electric starter flush with the engine, squeeze the trigger in
intervals of no more than 4 seconds
each until the unit starts. (Fig. 3)
Speed Start TM port
tt_'Y_/_'::
NOTE: The electric starter is designed to be Indents
used intermittently. Squeeze the trigger ,-with a 120 second cooling period in
for no longer than 4 seconds at a time
3.
X_a;_
_._
Once
the engine has started, remove
b etweeneachstartingattempt
__f_.
the electric starter from the Speed
Start TM port. The unit is ready for use.
If... the electric starter does not turn on or
suddenly stops while in use, wait at
least 5 seconds to allow the unit to cool.
Engi_e Ta
"
Fig. 2
iMPORTANT! The battery is equipped with
an internal circuit breaker that will shut
off power to the electric starter if the
battery becomes overloaded in the
course of use. Once cooled, the battery
will reset itself. Follow these steps if an
overload occurs:
1. Release the trigger
_
_I_}_
Motor Type ...............................
Motor Voltage
Trigger
Fig. 3
2. Squeeze the trigger to resume the starting process.
NOTE: The battery may need to cool for approximately 1 minute
Cordless,
Battery-powered
..........................................
12 V max.
Unit Weight .....................................
Charge Time ...........................................
1.66 Ibs. (0.75 kg)
3-5 Hours
Optimum Charging Temperature ..............
Battery Charger Input ...........................
Battery Charger Output Maximum
32 ° to 104 ° F (0 ° to 40 ° C)
120 V 60 Hz AC only
..............................
Battery Charger Weight .............................
12 V
0.6 Ibs. (0.27 kg)
* All specifications are based on the latest product information available at
the time of printing. We reserve the right to make changes at any time
without notice.
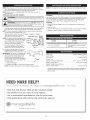
HELP?
"_"_
N,,I//.,@+%_:;_aY}SW@_I' aY}@ KI,Oiif({_!
_ Find this and all your other product manuals online.
_ Get answers from our team of home experts.
_;_Get a personalized maintenance plan for your home.
_,Find information and tools to help with home projects.
B:;/'e'_;_.g_
; so '!/e'_;_]:;_'s,,s
Se
.............
_'£s
6
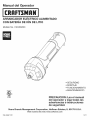
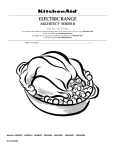
Manual del Operador
M
ARRANCADOR ELECTRlCO ALIMENTADO
CON BATERJA DE ION DE LITIO
Modelo No. 316.859530
*
*
*
*
E324672
SEGURIDAD
MONTAJE
FUNCIONAMIENTO
MANTENIMIENTO
C@US
L|STED
PRECAUCION: Lea el manual
del operador y siga todas las
advertencias
e instrucciones
de seguridad.
41ZM
Sears Brands
Management
Visite
769-06887 P01
Corporation,
nuestro
Hoffman
Estates,
IL 60179 U.S.A.
sitio web: www.craftsman.com
12/11
INDICE DE CONTENIDOS
Normas para una operaci6n segura ...............................
Garantia ....................................................
Conozca su unidad ...........................................
10
Instrucciones
de ensamblaje
10
Instrucciones
Instrucciones
de operaci6n
....................................
de mantenimiento y reparaci6n ......................
...................................
11
11
Limpieza y almacenamiento
....................................
Resoluci6n de problemas ......................................
11
11
Especificaciones
11
.............................................
Numeros de servicio
................................
SIMBOLO
puede conducir a que usted u otras personas sufran dahos materiales o
lesiones personales. Siga siempre las precauciones de seguridad para
PRECAUCI(DN: El no obedecer una advertencia de seguridad
reducir el riesgo de incendio, descarga electrica y lesiones personales.
_
DE LA MEDIDA
V ......................................................
precauci6n. DE
DebeSEGURIDAD:
prestar atenci6n para
sufriradvertencia
graves lesiones
ALERTA
Indicaevitar
peligro,
o
personales. Puede ser utilizado junto con otros simbolos o figuras.
Voltios
A ...................................................
Hz ......................................................
Amperios
Hertz
,_
Lea el Manual del Operador y siga todas las advertencias
e instrucciones
de seguridad. De no hacerlo, el operador y/o las personas que Io rodean
pudieran sufrir graves lesiones.
• INSTRUCCIONES
PROPOSICI()N
65 DEL ESTADO DE CALIFORNIA
Los bornes y terminales de las baterias, asi
come determinados productos terminados contienen plomo,
compuestos de plomo y otros productos quimicos de los que el
estado de California tiene conocimiento provocan cancer,
malformaciones cong6nitas u otros da_os al sistema reproductor.
LAvese las manos despues de manipularlo.
GENERALES
DE MOTOR
DE SEGURIDAD
DE LAS
ADVERTENClA:
Lea todas las instrucciones
y advertencias
de
seguridad. El incumplimiento de las advertencias e instrucciones puede
resultar en descarga el6ctrica, incendio y/o lesiones graves.
Conserve
el futuro.
todas las advertencias
e instrucciones
para consultarlas
en
La expresi6n "herramienta el6ctrica" en las advertencias se refiere a su
herramienta el6ctrica que se conecta a la red principal (con cable) o a su
herramienta el6ctrica accionada per bateria (sin cable).
Seguridad del Area de trebajo:
a) Mantenga el Area de trabajo limpia y bien iluminada. Los accidentes
suelen producirse en las Areas de trabajo desordenadas u oscuras.
b) No opere herramientas
de motor en ambientes explosivos, tales
como en presencia de liquidos, gases o polvos inflamables. Las
herramientas de motor generan chispas que pueden infiamar el polvo o
los gases.
c) Mantenga alejados a los niSos y alas personas que est_n presentes
mientras est_ utHizando una herramienta
de motor. Las distracciones
pueden hacerle perder el control.
Seguridad
el_ctrica:
a) Los enchufes de las herremientas de motor deben corresponder
al
tomacorriente.
No modifique nunca el enchufe de ningen modo. No
emplee adaptadores de enchufe con herramientas de motor
conectadas a tierra. Los enchufes no modificados y las tomas de corriente
que correspondan al enchufe reducir&n el riesgo de descarga el6ctrica.
b) Evite el contacto corporal con superficies
conectadas
a tierra, tales
como tuberias, radiadores,
cocinas y refrigeradores.
Existe un mayor
riesgo de descarga el6ctrica cuando su cuerpo esta conectado a tierra.
c) No exponga herramientas
de motor a condiciones
lluviosas o
hemedas. Si le entra agua a la herramienta de motor, esto aumentar& el
riesgo de descarga el6ctrica.
conducir
a queElusted
u otras personas
sufran graves
lesiones.
PELIGRO:
no obedecer
una advertencia
de seguridad
puede
Siga siempre las precauciones de seguridad para reducir el riesgo
de incendio, descarga el6ctrica y lesiones personales.
NOTA: Le ofrece informaci6n o instrucciones
operaci6n o mantenimiento del equipo.
IMPORTANTES
ADVERTENCIA:
ADVERTENClAS
HERRAMIENTAS
SIGNIFICADO
seguridad
puede conducir
que usteduna
u otras
personas
ADVERTENCIA:
El no a
obedecer
advertencia
de sufran
lesiones. Siga siempre las precauciones de seguridad para reducir
el riesgo de incendio, descarga el6ctrica y lesiones personales.
Contraportada
Toda la informaci6n, las ilustraciones y especificaciones que contiene este
manual se basan en la informaci6n mas reciente disponible en el momento
de impresi6n del manual. Nos reservamos el derecho de hacer cambios en
cualquier memento sin previo aviso.
SIGNIFICADOS
El prop6sito de los simbolos de seguridad consiste en atraer su atenci6n
hacia posibles peligros. Los simbolos de seguridad y las explicaciones de
los mismos merecen su cuidadosa
atenci6n y debe entenderlos
a
cabalidad. Las advertencias de seguridad no eliminan per si mismas ningQn
peligro. Las instrucciones o advertencias que ofrecen no sustituyen las
medidas adecuadas de prevenci6n de accidentes.
8
9
DE SEGURIDAD
que son esenciales para la
•
d) No maltrate el cable de la herramienta.
Jam_s transporte,
arrastre o
desenchufe
la herramienta de motor pot el cable. Mantenga el cable
alejado de fuentes de calor, aceite, bordes afilados o piezas en
movimiento.
Los cables daRados o enredados aumentan el riesgo de
descarga el6ctrica.
e) Cuando opere una herramienta de motor al aire libre, use un cable
de extensi6n diseSado para uso a la intemperie. El uso de un cable
diseSado para uso a la intemperie reduce el riesgo de descarga el6ctrica.
f) Si es inevitable manejar una herramienta
de motor en un lugar
h_medo, utilice una fuente de alimentacibn
protegida pot un
dispositivo
de corriente residual (ROD). El use de un RCD reduce el
riesgo de descarga el6ctrica.
Seguridad
personal:
a) Mant_ngase alerta, fijese en Io que est_ haciendo y utilice el sentido
com_3n cuando opere una herramienta de motor. No utHice una
herramienta
de motor si est_ cansado o bajo la influencia de drogas,
alcohol o medicamentos.
$61o hace falta un memento de distracci6n
durante la operaci6n de herramientas de motor para que se produzcan
lesiones personales graves.
b) Use equipos de protecci6n personal. Utilice siempre protecci6n ocular.
El use de equipos de protecci6n apropiados para las condiciones de
trabajo, tal come mascaras antipolvo, calzado de seguridad antideslizante,
casco o protecci6n auditiva, reducira las lesiones personales.
c) Evite el arranque accidental
Aseg_rese de que el interruptor est_ en
la posici6n de apagado ("OFF") antes de conectar la herramienta
a la
fuente y/o unidad de alimentaci6n,
levantar la herramienta o
transportarla.
El hecho de transportar herramientas de motor con su
dedo en el interruptor o energizar herramientas de motor que tienen su
interruptor en la posici6n de encendido ("ON") propicia los accidentes.
d) Retire toda Ilave de ajuste antes de encender la herramienta
de
motor. Si se deja alguna Ilave en una pieza giratoria de la herramienta de
motor, esto podria provocar lesiones.
e) No se esfuerce pot Ilegar a lugares dificiles de alcanzar. Mantenga una
posici6n y un equiHbrio adecuados en todo momento. Esto permite tener
un mayor control de la herramienta de motor en situaciones inesperadas.
f) Vistase adecuadamente.
No utilice ropa holgada ni joyas. Mantenga
su pelo, ropa y guantes alejados de piezas m6viles. La ropa suelta, las
joyas y el pelo largo pueden quedar atrapados en las piezas m6viles.
g) Si se proveen dispositivos
para la conexi6n de medios de extracci6n
y recogida de polvo, asegQrese de que los mismos est_n conectados
y se utilicen como es debido. El use de medios de recogida de polvo
puede reducir los peligros relacionados con el polvo.
OTRAS PRECAUCIONES
Uso y cuidado de las herrarnientas de motor:
a) No fuerce la herrarnienta de motor. Use la herrarnienta de motor
correcta para su aplJcaci6n. La herramienta de motor apropiada hara un
trabajo mejor y m_s seguro si se usa de la forma y a la velocidad para la
que rue disefiada.
b) No use la herrarnienta de motor si el interruptor no puede encenderla
y apagada. Cualquier herramienta de motor que no pueda ser controlada
con el interruptor es peligrosa y debe ser reparada.
c) Desenchufe
la herrarnienta de motor de la torna de corriente y/o de la
unidad de alirnentaci6n
antes de hacer cualquJer ajuste, carnbiar de
accesorio o guardar la herrarnienta.
Dichas medidas preventivas de
seguridad reducen el riesgo de arrancar accidentalmente
la herramienta
de motor.
ADVERTENCIA:
AI usar herramientas el6ctricas siempre
deben seguirse las precauciones ba.sicas de seguridad a fin de
reducir el riesgo de incendio, descarga el6ctrica y lesiones
personales. Use solamente los cables de extensi6n listados en UL
que sean adecuados para usarse al aire libre, como los del tipo
SW-A, STW-A. STOW-A, SJW-A, SJ©W-A, SJTW-A o SJT©W-A.
Cables de extensi6n: AsegOrese de que el cable de extensi6n est6 en
buen estado, y que sea Io suficientemente pesado para conducir la
corriente que la unidad consumir&. Si tiene alguna duda, utilice el cable
del siguiente calibre. Si utiliza un cable de extensi6n demasiado liviano,
esto ocasionar& una caida de voltaje de la linea, y por consiguiente, se
producira una p6rdida de potencia y un recalentamiento. La tabla que
aparece a continuaci6n muestra cu&l es el tamafio correcto a usar, de
acuerdo con la Iongitud del cable y el amperaje nominal que aparece en la
placa de datos de la m&quina.
d) Guarde las herrarnientas
de motor que no est_ usando fuera del
alcance de los niSos y no deje que personas que no est_n
farniliarJzadas con la herrarnienta de motor o con estas Jnstrucciones
utilJcen la herrarnienta. Las herramientas de motor son peligrosas en
manos de usuarios no capacitados.
e) Mantenga las herrarnientas
de motor. Cornpruebe que no haya falta
de alinearniento
o agarrotarniento
en los elernentos m6viles, ni que
haya elernentos rotos o cualquier otra condici6n que pudiera afectar
el funcJonarniento
de la herrarnienta. Si la herrarnienta de motor est_
daSada, haga que la reparen antes de usarla. Muchos accidentes son
causados por herramientas de motor mantenidas deficientemente.
I TAMAI_IO
EQUIPOS
DE CABLE
DE 120MJNIMO
VOLTIOSDE
QUE
LOSUSAN
CABLES
DE 6DE
A 10
EXTENSION
AMPERIOS PARA
ILong,t.dde,
cab,elp,esll I
I 100 I
ICa,bredelca lelAWGII
18 I 10 114 I 12
• Si el cable de extensi6n se dafia de alguna manera mientras esta
enchufado, desconecte el cable de extensi6n tanto del tomacorriente
como de la unidad. Si el cable de extensi6n ha sido reparado o
reemplazado, no Io vuelva a usar.
• Debe proveerse protecci6n mediante Interruptores de Circuito de Falla a
Tierra (GFCI) para el/los circuito(s) o toma(s) que se utilizaran para esta
unidad. Hay cajas tomacorrientes que tienen protecci6n GFCI
incorporada, y 6stas deberian usarse como medida de seguridad.
f) Mantenga las herrarnJentas de corte afiladas y lirnpias. Es menos
probable que las herramientas de corte mantenidas debidamente, con
bordes de corte afilados, se atoren, y dichas herramientas son m&s f&ciles
de controlar.
g) Use la herrarnJenta de motor, los accesorios
y las brocas, etc. de
acuerdo con estas instrucciones, teniendo en cuenta las condiciones
de trabajo y el trabajo a realizar. El uso de la herramienta de motor para
operaciones distintas a aquellas para las que rue disefiada podria causar
una situaci6n peligrosa.
Uso y cuidado de la herrarnienta de baterias:
Use lentes o gafas de protecci6n con protectores laterales que est6n
clasificados como que cumplen con las normas ANSI Z87.1-1989 asi
como protecci6n para los oidos/audici6n, mientras opere esta unidad.
Use siempre una mascara facial o para protegerse contra el polvo si la
operaci6n levanta polvo.
a) Recargar solo con el cargador especificado
pot el fabrJcante. Es
posible que un cargador que sea adecuado para un tipo de bateria pueda
crear un riesgo de incendio si se utiliza con otra bateria.
Mantenga las herramientas de corte afiladas y limpias. Es menos probable
que las herramientas de corte mantenidas debidamente, con bordes de
corte afilados, se atoren, y dichas herramientas son m&s f&ciles de controlar.
b) Usar las herrarnientas
el_ctricas solo con el juego de baterias
especificarnente dise_ado para elias. El uso de cualquier otro juego de
baterias puede crear riesgo de lesiones e incendio.
c) Cuando el juego de baterias no est_ instalado en la unidad,
rnant_ngalo alejado de objetos rnet_licos corno presiUas para papel,
rnonedas, Uaves, clavos, torniUos u otros objetos pequeSos de metal
que pudieran hacer conexi6n entre los terrninales. Un cortocircuito entre
los terminales de la bateria puede ocasionar quemaduras o un incendio.
d) En condiciones
el contacto. Si
liquido entrara
liquido que sale
Servicio:
Deje que el motor se enfrie antes de guardar la herramienta o transportarla.
Cerci6rese de que la unidad quede bien sujeta al transportarla.
Nunca moje ni rocie la unidad con agua ni con ningOn otro liquido. Mantenga
las manijas secas, limpias y sin residuos. Limpiela despues de usarla.
Guarde estas instrucciones. ConsOltelas con frecuencia y utilicelas para
ensefiar a otros usuarios. Si le presta esta unidad a alguien, pr6stele
tambien estas instrucciones.
de uso excesivo, puede saHr liquido de la bateria; evite
ocurre contacto accidental,
enju_guese con agua. Si el
en los ojos, busque asistencia rn_dica adicionaL El
de la bateria puede causar irritaci6n o quemaduras.
GUARDE ESTAS
INSTRUCCIONES
a) Haga reparar su herrarnienta de motor pot un t_cnico de reparaci6n
calificado, utilizando s61o repuestos id_nticos a los originales. Esto
garantizar& que se mantenga la seguridad de la herramienta de motor.
GARANTIA
TOTAL
POR UN A_IO,
DE CRAFTSMAN
Este producto se garantiza DURANTE UN ANO a partir de la fecha de compra, contra defectos
ser& sustituido sin cargo alguno.
Para conocer
los detalles
de la cobertura
a fin de Iograr el reernplazo
gratuito,
Esta garantia es nula si este producto se utiliza alguna vez durante la prestaci6n
Esta garantia le otorga a usted derechos
DE SEGURIDAD
en el material o en la mano de obra. El producto defectuoso
visite el sitJo web: www.craftsrnan.corn
de servicios de tipo comercial o si se le alquila a otra persona.
legales especificos, y usted puede adem&s poseer otros derechos, los cuales varian de un estado a otro.
Sears Brands Management Corporation, Hoffman Estates, IL 60179
9
iNO SE NECESITAN
HERRAMIENTAS!
Cargedor
LED rojo
Punta
enchavetada
Gatillo
Esta unidad se vende totalmente
ensamblada.
NOTA: La bateria no sale de la fAbrica totalmente cargada. Se recomienda
cargar completamente la bateria antes de usarla para asegurarse de
Iograr el m&ximo tiempo de funcionamiento.
La bateria de i6n de litio no
desarrollara memoria y puede cargarse en cualquier momento. Una
bateria totalmente descargada necesitarA aproximadamente
3-5 horas
para cargarse por completo.
DESEMPAQUE
1.
Saque con cuidado el producto
2.
Inspeccione minuciosamente el producto para tener la seguridad de que
no se rompi6 ni da_6 nada durante el envio. No deseche los materiales de
envase y embalaje hasta tanto no haya inspeccionado minuciosamente y
operado satisfactoriamente el producto.
y los accesorios
de la caja.
NOTA: AI cargar, use solamente el cargador suministrado con el producto
(NOmero de modelo: SH-DC120400, P/N 753-06672). Usar cualquier otro
cargador podria dafiar la bateria o crear una situaci6n peligrosa.
1. Enchufe el cargador en un tomacorriente / receptAculo de pared de CA.
CARGA DE LA BATERJA
expresamente por la parte responsable de cumplir los requisitos
pueden anular la autoridad del usuario para operar el equipo.
NOTA: Este equipo ha sido probado y cumple con los limites de un
dispositivo de Clase B, segOn la Parte 15 de las Reglas de la FCC. Estos
limites estan disefiados para ofrecer una protecci6n razonable contra la
interferencia dafiina en una instalaci6n residencial. Este equipo genera,
usa y puede transmitir energia de frecuencias de radio, y si no se instala
y se usa de acuerdo con las instrucciones, puede causar interferencia
que entorpecen las comunicaciones
de radio. No obstante, no hay
garantias de que ocurrirA una interferencia en una instalaci6n particular.
Si este equipo causara interferencia perjudicial a la recepci6n de radio o
televisi6n, Io cual puede determinarse encendiendo y apagando el
equipo, se recomienda al usuario que trate de corregir la interferencia
con una o mAs de las siguientes medidas:
---
Reorientar o reubicar la antena receptora.
Aumentar la separaci6n entre el equipo y el receptor.
--
Conectar el equipo a un tomacorriente
esta conectado el receptor.
--
Consultar con un distribuidor o un t6cnico con experiencia
instalaciones de radio/TV para obtener ayuda.
2.
Inserte el cargador
3.
4.
Se encender& el LED rojo (Fig. 1).
El LED rojo se apagar& cuando la bateria est6 totalmente
en la parte de atr_s de la unidad (Fig. 1).
5.
Desconecte
cargada.
la unidad del cargador.
NOTA: La unidad puede guardarse con el
cargador aOn conectado, pero el
cargador deber& estar desconectado
del tomacorriente/receptAculo
de la
pared cuando Io haga.
NOTA: Las baterias de i6n de litio, mientras
LED rojo
\
est&n en uso, continuarAn
Cargador
proporcionando plena potencia sin
disminuir su potencia a diferencia de las "
Fig. 1
baterias normales; cuando la bateria est6
totalmente descargada, el circuito de la bateria cortarA inmediatamente la
corriente a la herramienta y necesitar& cargarse de inmediato.
ilMPORTANTE!
NO use la unidad mientras se estA cargando. Hacerlo
puede dafiar la unidad y la bateria.
en un circuito diferente al que
en
10
NOTA: Este accesorio debera usarse solamente en unidades con capacidad de
arranque el6ctrico. AI usar este accesorio, consulte las instrucciones de
arranque adecuadas en la secci6n de Instrucciones de Arranque del Manual
del Operador de la unidad.
NOTA: Este accesorio es SOLO PARA USO INTERMITENTE; usar solo como
se indica a continuaci6n.
COMO OPERAR EL ARRANQUE EL_:CTRICO
daSos a la unidad, no use
comienzo
enchufable
de graves
la energia
ADVERTENClA:
Para elevitar
lesiones
personales
y
NOTA: No trate de repararla; la unidad no tiene piezas dentro que puedan
ser reparadas por el usuario.
UMPIEZA
Use un cepillo peque_o para limpiar la parte exterior de la unidad y la punta
enchavetada. No use detergentes fuertes. Los limpiadores caseros que
contengan aceites aromAticos como el pino y el lim6n, y los disolventes
como keroseno, pueden da_ar la caja o la manija de plAstico. Sequela
humedad con un paso suave.
ALMACENAMIENTO
en
lugares hOmedos ni mojados, bajo la Iluvia o en la nieve.
use la unidad si algunaInspeccione
parte esta
ADVERTENCIA:
daSada
de antes
cualquier
forma. Una
la unidad
de utilizarla.
NO
unidad daSada puede ocasionar lesiones personales graves debido
a descarga el6ctrica.
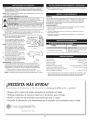
1.
Coloque la punta con Ilave del arrancador el6ctrico en
Speed Start TM, asegurandose de que las lengQetas del
con las hendiduras del arrancador el6ctrico. (Fig. 2)
NOTA: Tal vez sea necesario girar levemente el arrancador
que la punta encaje de manera segura
dentro del puerto Speed Start TM.
Puerto Speed
2. Con el arrancador el6ctrico a ras del
IndentacJones
• Revise la unidad antes de guardarla para asegurarse de que el equipo
esta en condiciones seguras de funcionamiento.
Pare el motor.
el puerto de
motor est6n a ras
Guarde la unidad bajo techo en un lugar seco y bajo Ilave, fuera del
alcance de los ni_os.
el6ctrico hasta
Mantenga o reemplace
segOn sea necesario.
las etiquetas de seguridad
y de instrucciones,
Start TM
\
motor, apriete el gatillo a intervalos de
no mas de 4 segundos por vez hasta
que la unidad arranque. (Fig. 3)
NOTA: El arranque el6ctrico esta diseSado
para usarse de manera intermitente.
Leng_etas del motor
Apriete el gatillo durante 4 segundos
como mAximo por vez con un periodo
Fig. 2
de enfriamiento de 120 segundos entre
cada intento de arranque.
3. Una vez que arranque el motor, retire
del mismo el arrancador el6ctrico. La
unidad esta lista para el uso.
Si... el arrancador el6ctrico no enciende o
se detiene de repente mientras esta en
uso, espere al menos 5 segundos para
Gatillo
dejar que la unidad se enfrie.
ilMPORTANTE! La bateria esta equipada
Fig. 3
con un disyuntor interno que desconectara automaticamente
la
alimentaci6n del arrancador el6ctrico en caso de sobrecarga de la
bateria durante su funcionamiento.
Una vez se enfrie, la bateria se
restablecera por si misma. En caso de sobrecarga, siga estos pasos:
1.
2.
Tipo de motor
Sin cable, alimentado
3-5 Horas
Temperatura de carga 6ptima ............
Entrada del cargador de baterias .............
Salida maxima del cargador de baterias
Peso del cargador
1 minuto.
de baterias
por bateria
Maximo de 12 V
1.66 Ibs. (0.75 kg)
Tiempo de carga ........................................
Suelte el gatillo y, despues, vuelva a arrancar la unidad.
La bateria puede necesitar enfriarse aproximadamente
1 minuto.
NOTA: La bateria puede necesitar enfriarse aproximadamente
.......................
Voltaje del motor ...................................
Peso de la unidad
................................
De 32 ° a 104 ° F (De 0° a 40 ° C)
120 V 60 Hz AC solamente
..........................
.......................
12 V
0.6 Lbs. (0.27 kg)
* Todas las especificaciones
se basan en la informaci6n del producto mAs
reciente disponible en el momento de la impresi6n. Nos reservamos el
derecho de hacer cambios en cualquier momento sin previo aviso.
11
12
13
14
15
Your Home
product manuals and expert advice:
For troubleshooting,
managemylife
www.managernylife.com
For repair - in your home - of all major brand appliances,
lawn and garden equipment, or heating and cooling systems,
no matter who made it, no matter who sold it!
For the replacement parts, accessories and
owner's manuals that you need to do-it-yourself.
For Sears professional installation of home appliances
and items like garage door openers and water heaters.
1-800-4-MY-HOME
Call anytime,
®
day or night (U.S.A. and Canada)
www.sears.oorn
www.sears.ca
Our
For repair of carry-in
items
and electronics,
call anytime
Sears
Parts
1-800-488-1222
Home
like vacuums,
lawn equipment,
for the location
of your nearest
& Repair
(U.S.A.)
www.sears.corn
To purchase
a protection
1-800-827-6655
agreement
(U.S.A.)
Para pedir servicio de reparaci6n
a domicilio, y para ordenar piezas:
1-888-SU-HOGAR
(1-888-784-6427)
www.sears.com
®
(1-8oo-469-460s)
Service
Center
1-800-469-4663
(Canada)
www.sears.ca
on a product serviced
by Sears:
1-800-361-6665
(Canada)
Au Canada pour service
en fran(_ais:
I=800=LE=FOYER
(1-800-533-6937
www.sears.ca
S@SFS
® Registered Trademark / TMTrademark of KCD IP, LLC in the United States, or Sears Brands, LLC in other countries
® Marca Registrada / TMMarca de F&brica de KCD IP, LLC en Estados Unidos, o Sears Brands, LLC in otros paises
MCMarque de commerce / MDMarque d6pos6e de Sears Brands, LLC
No