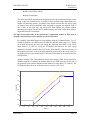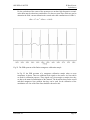
1
User’s Manual BRUKER ANALYTIK W-Band System Information W-Band Electron Paramagnetic Resonance Spectrometer ELEXSYS E 600 / 680 W-BAND SYSTEM INFORMATION Written by G.G. Maresch Version 1.25 Date 04.04.1997 Bruker Analytik GmbH Division IX Silberstreifen 76287 Rheinstetten Germany Tel. ++49 (0) 721 5161-141 Fax ++49 (0) 721 5161-237 DIVISION IX Page 2 BRUKER ANALYTIK W-Band System Information Outline 1. Quick Start 1.1. Power On 1.2. Xepr Operation 1.3. Pulsed Operation 2. System Configuration 2.1. E 600 The W-Band EPR Spectrometer 2.2. E 680 The W-Band CW And Pulsed EPR Spectrometer 2.3. E 680 X The W-Band And X-Band CW And Pulsed EPR Spectrometer 3. W-Band EPR Probehead 3.1. Microwave Cavity 3.2. Sample Insertion 3.3. Frequency Tuning 3.4. Cavity Coupling 3.5. Magnetic Field Modulation 3.6. Oversized Waveguide Transmission 3.7. Light Irradiation Of Samples 3.8. Sample Rotation 3.9. Sample Preparation Techniques 3.9.1. Sealing of Sample Tubes 3.9.2. Grinding and Packing Powder Samples 3.9.3. Diluting and Injecting Liquid Samples 3.9.4. Sealing and Transferring Cold Samples 4. W-Band Microwave Bridge 5. W-Band Microwave Bridge Controller 5.1. Bridge Controller Functions 5.2. Upconverter Control 5.3. Downconverter Control 6. Intermediate Frequency Unit 6.1. Continuous-Wave Intermediate Frequency Unit 6.2. Pulsed And Continuous-Wave Intermediate Frequency Unit 6.3. X-Band Operation of Intermediate Frequency Units 7. Continuous-Wave Control Electronics 7.1. Signal Channel 7.2. Modulation Amplifier 7.3. Field Controller 7.4. Field-Frequency Lock 7.5. NMR Teslameter DIVISION IX Page 3 BRUKER ANALYTIK W-Band System Information 8. Pulse Control Electronics 8.1. Pulse Bridge Controller 8.2. PatternJet 8.3. SpecJet 8.4. Pulse Signal Integrator 8.5. DICE Unit 9. Acquisition Server 9.1. Acquisition Server Configurations 9.2. Acquisition Server Operation 10. Computer Workstation 11. Xepr Software 11.1. Xepr Main Menue 11.2. File Menue 11.3. Acquisition Menue 11.3.1. Connecting and Disconnecting a Superconducting Magnet 11.3.2. Main Magnet Sweeps and Conversion Times 11.3.3. Performing Main Magnet Sweeps 11.4. Processing Menue 11.5. Viewports Menue 11.6. Properties Menue 11.7. Options Menue 11.8. Error Messages and Help 12. Hybrid Magnet System 12.1. 6 T EPR Superconducting Magnet 12.2. Room-Temperature Magnet 12.3. Magnet Power Supply 12.3.1. Direct Server Control of Magnets 12.3.2. Manual Operation of the Magnet Power Supply 12.4. Hybrid Magnet Controller 12.5. The CJ Method 12.6. Magnet Calibration 12.6.1 Main Magnet Calibration 12.6.2 Room-Temperature Magnet Calibration 12.6.3 Determination of Current Rates 12.6.4 Determination of Main Magnet Inductance for Xepr 12.7. Magnet Safety 12.7.1. Introduction 12.7.2. Fringe Fields of High-Field EPR Magnets 12.7.3. Medical Implants 12.7.4. Attractive Forces 12.7.5. Effect on Equipment 12.7.6. Magnetic Environment 12.7.7. Cryogens 12.7.8. Magnet System Summary DIVISION IX Page 4 BRUKER ANALYTIK W-Band System Information 13. Facility Planning 13.1. Laboratory Space Requirements 13.2. Electrical Power Consumption 13.3. Installation Preparation 13.4. On-Site Customer´s Preparations DIVISION IX Page 5 BRUKER ANALYTIK W-Band System Information 1. Quick Start 1.1. Power On Under usual conditions the computer workstation is running. The system needs the running workstation for booting. l Main Power On with green button on EleXSys console. The bootup procedure is finished when three green LEDs are lit on the front panel of the Microwave Bridge Controller. l Main Power On on W-Band Bridge Controller. l Switch W-Band Bridge Controller from Standby to On. l Turn on the cooling water for the IF Unit and the Room-Temperature Magnet. l Switch on the monitor power of the workstation. l Only on pulsed systems: Activate the IND and ALT button at the Pulse Bridge Controller. l Login into the UNIX system. Xuser is a guest account at low priviledges and can be accessed with the password user@xepr. l Start Xepr by double clicking on the Xepr symbol in the Icon Catalog > Applications window or type „Xepr“ in a UNIX windows terminal. 1.2. Xepr Operation By default Xepr wakes up allowing directly to load data files and for data processing. For spectrometer operation the following lists briefly the way to the first EPR spectrum acquisition. For beginners a sample with a narrow line width in the one to several tens Gauss range should be inserted into the probehead. l Acquisition > Connect to Spectrometer. l Acquisition > Microwave Bridge Tuning. l Click on Tune. DIVISION IX Page 7 BRUKER ANALYTIK W-Band System Information l Click Reference Arm Off. l Lower Attenuation until the mode picture appears on the screen. l Turn the Frequency knob of the probehead until the cavity dip is in the center of the mode picture. l Click on Operate, increase attenuation until the diode current on the meter os close to the center at about 200 mA. l Adjust the Frequency in the Microwave Bridge Tuning window for minimum diode current, decrease attenuation accordingly. l Adjust the Coupling knob of the probehead until the minimum of the diode current is reached. The Frequency and Coupling adjustment may need several iterations. l Click Reference Arm On. l Close Microwave Bridge Tuning Window. l Acquisition > New Experiment > Experiment Type CW with Abscissa 1 Field, Abscissa 2 None, Ordinate Signal Channel, OK. l Parameters to Hardware. l Parameters l Setup Scan On. l Set Time Constant in the Parameter window to minimum. l Adjust the magnetic field in the parameter window until the signal is in the center of the setup scan window. l Adjust the Center Field value in the parameter window to the actual field value. l Set Time Constant longer. l Close Parameter window. l Run the experiment. After these steps the signal appears in the center of the field sweep. The field Sweep Width can be adjusted to the spectral width of the sample in the Parameter window. The signal to noise ratio of the spectrum can be improved by choosing a longer Time Constant and a longer Conversion Time. For the description of the Xepr software structure and its operation refer to the Xepr manual or practice yourself with mouse clicks. DIVISION IX Page 8 BRUKER ANALYTIK W-Band System Information 1.3. Pulsed Operation If the cavity is tuned and the microwave bridge is in Operate mode then E 680 systems are ready for pulsed operation. l CW button to Off at the Pulse Bridge Controller. l (remember that for W-band operation both IND and ALT must be on.) l HPP on. l QUAD on. l DIG on. l Acquisition > New Experiment > Experiment Type Pulse with Abscissa 1 Time, Abscissa 2 None, Ordinate Transient Recorder, OK. l Open the parameter window. l Pulse Patterns > Channel Selection > + x. l Enter pulses in the pulse table, e.g. for a spin echo: Pulse number 1: position 0, length 80 ns, pulse number 2: position 2000 ns, length 80 ns. l Click on Calculate. l Click on Start. On the oscilloscope after trigger adjustment, you can look on the pulse sequence. In the Parameter window the field position must be adjusted to the operating frequency for signal observation on the oscilloscope. Alternatively with the SpecJet transient signal averager the signal can be observed directly on the Xepr monitor screen. For this click on TSA Control. In the TSA Control window click on Run. The E 680 system is now ready for other pulse experiments with the pulse tables or with PulseSpel programs. For more detailed information about this refer to the Xepr program manual. DIVISION IX Page 9 BRUKER ANALYTIK W-Band System Information 2. System Configuration 2.1. E 600 The W-Band EPR Spectrometer The E 600 System is a high-sensitive high-frequency continuous-wave EPR spectrometer. It can be configured in basically two different ways. The E 600 A consists of the W-band bridge, the Intermediate Frequency Unit, the spectrometer electronics console, the Workstation, and the Probehead. The Superconducting Magnet is not included in this configuration. Fig. 1 The E 600 A Spectrometer (shown with superconducting magnet). With the E 600 A it is possible to perform EPR experiments on samples in magnets which may differ from the BRUKER Hybrid Magnet System for special needs of the spectroscopist. The E 600 A includes all the microwave units needed for EPR, all the electronics to operate the microwave units, and the workstation with Xepr, the EPR acquisition and data manipulation software. DIVISION IX Page 10 BRUKER ANALYTIK W-Band System Information The second configuration of the E 600 is the same system described above, but includes in addition the Hybrid Magnet System with its control electronics. With a E 600 continuous-wave EPR experiments are possible with wide field sweeps using the main superconducting coil and fast field sweeps with a water-cooled room-temperature coil. The Xepr software includes the operation of the magnet power supply in a way that both, sweep speeds and field accuracy are controlled with high precision. Fig. 2 The E 600 Spectrometer. DIVISION IX Page 11 BRUKER ANALYTIK W-Band System Information 2.2. E 680 The W-Band CW And Pulsed EPR Spectrometer The E 680 System is a high-frequency high-field pulsed and continuous-wave EPR spectrometer. With the E 680 one- and two-dimensional EPR experiments, spin-echoes, spin-relaxation, and multi-pulse experiments can be performed as well as high-sensitive standard EPR spectroscopy. Fig. 4 The E 680 Spectrometer. The E 680 consists of all the microwave units for 94 GHz operation, the Hybrid Magnet System, all the electronics for microwave and field control, and the workstation with the Xepr software for highly effective data acquisition and processing. DIVISION IX Page 12 BRUKER ANALYTIK W-Band System Information 2.3. E 680 X The W-Band And X-Band CW And Pulsed EPR Spectrometer With the E 680 X System the most versatile EPR machine for 94 GHz and 10 GHz operation is available. Pulsed EPR and continuous-wave EPR experiments can be performed either in the high-field Hybrid Magnet or in the electromagnet. The Xepr software includes operation control of all the components for microwave and field determination and measurement. Fig. 5 The E 680 X Spectrometer. DIVISION IX Page 13 BRUKER ANALYTIK W-Band System Information 3. W-Band EPR Probehead The W-band EPR probehead is not only a microwave resonator. It also is a highprecision mechanical assembly for frequency control of the microwave cavity, for its coupling adjustment, and sample positioning. The probehead also carries the magnetic field modulation coil. Optimum microwave transmission is obtained by the oversized waveguides used for the long distances outside and inside the probehead. As an option it can have an optical fibre for the transmission of light to the sample. Fig. 6 The top of the W-band probehead on top of the hybrid magnet. Since the probehead consists of many small and sensitive parts it must always be handled with great care. DIVISION IX Page 14 BRUKER ANALYTIK W-Band System Information 3.1. Microwave Cavity The microwave cavity of the W-band probehead is a cylindrical cavity operating in TE011 mode. Since the wavelength of the microwaves is on the order of 3 mm, the typical dimensions of the cavity are also 3 mm. For frequency tuning the size of the cavity can be changed by turning the frequency tuning knob on top of the probehead. Due to its high filling factor the resonance frequency of the microwave cavity depends strongly on the sample size, its shape, and its physical properties. For the adjustment of the resonance frequency for different samples, the frequency tuning range is more than 10 GHz. 3.2. Sample Insertion For easy handling and sample protection a typical sample for W-band EPR spectroscopy is contained in a quartz sample tube which is sealed at the bottom. Sensitive samples have to be sealed at both ends. For non-lossy samples BRUKER supplies 0.9 mm outer diameter and 0.5 mm inner diameter fused quartz sample tubes. These thick-wall tubes are easy to handle without breaking them. A 0.8 mm ID metallic sample holder is supplied with the probehead. It is screwed to the sample rod. DIVISION IX Page 15 BRUKER ANALYTIK W-Band System Information Fig. 7 An EPR powder sample in the sample tube held by the sample tube holder. For comparison of the actual size the head of a match is shown to the right. DIVISION IX Page 16 BRUKER ANALYTIK W-Band System Information Lossy samples are prepared in 0.5 mm outer diameter and 0.2 mm inner diameter quartz sample tubes. They can be inserted in the 0.5 mm sample holder which is supplied with the probehead. Fig. 8 Sample Height position indicator. After sample insertion into the sample holder and screwing the sample holder to the sample rod it carefully has to be pushed down vertically into the probehead. The unprotected sample at the front end of the sample rod has to handled carefully outside the probehead. After insertion of the rod for a few centimeters into the probehead, its guiding mechanisms protect the sample from damage. Therefore pushing the sample rod to the bottom of the probehead can be done safely without special caution. A metallic stopping ring at the top of the sample stick prevents it from being put too far into the probehead. It is adjusted in the factory that a sample which has been correctly inserted into the sample holder well enters the microwave cavity. 3.3. Frequency Tuning There are three red tuning knobs at the top of the probehead outside of the cryostat. From the top these are 1. vertical sample position, 2. frequency tuning, and 3. coupling adjustment. On the rear side of the probehead there are the three corresponding position indicators which allow reproducible adjustments of the probehead for different samples. DIVISION IX Page 17 BRUKER ANALYTIK W-Band System Information Fig.9 Frequency Tuning position indicator. The position indicator of the frequency tuning mechanics is factory adjusted to the value 4.5 that the empty cavity resonates at room temperature at 94.0 GHz. Insertion of any sample at room temperature requires to turn the frequency tuning knob to the right that the indicator reads a lower value than 4.5. This can be done either by slow insertion of the sample over the last 4 mm. While at the beginning the indicator reads 4.5 the operator observes the cavity dip on the tuning picture. When the sample enters the cavity the cavity dip moves to the right which means to lower frequency. Turning the frequency tuning knob to the right compensates for this and shifts the cavity dip back to the left. This can be done in an iterative way until the sample is far enough in the microwave cavity. Another way of inserting another sample into the cavity is to start from a previous adjustment for another sample. If the size and the properties of the new sample are similar to the previous one then the cavity dip comes back in the tune picture while the sample is pushed into the cavity. Some samples may broaden the cavity resonance when they are inserted into the cavity too far. Then a slight withdrawal of the sample rod allows to tune the cavity more easily. At low temperatures the readings of the frequency position indicator are larger values than those for room temperature adjustments. This compensates for the temperature coefficient of the cavity of about -3 MHz / K. Otherwise frequency adjustments at low temperatures are the same as at room temperature. 3.4. Cavity Coupling Coupling of the microwave cavity is adjusted with the third of the three tuning knobs at the top of the probehead (see Fig. 7). Coarse adjustment of the coupling should be done with an empty cavity. Some samples depending on their physical properties can be inserted into the cavity without changes of the coupling adjustment. Only the frequency shift has to be compensated by turning the frequency tuning knob - NOT the coupling. In most cases the coarse coupling adjustment on the empty cavity dip is a good starting point for coupling adjustment after sample insertion. This can be checked on the tune DIVISION IX Page 18 BRUKER ANALYTIK W-Band System Information picture where the cavity is shifted in frequency by the sample. At the same time the intensity of the dip is altered only slightly. Fig. 10 Coupling position indicator. Some samples may affect the cavity coupling more strongly. Then both the vertical sample position and the coupling have to be adjusted at the same time. This may require some experience but is successfully in most cases. Only if the sample shape or its physical properties are very irregular then a new sample must be prepared in another sample tube. 3.5. Magnetic Field Modulation The magnetic field at the sample position can be modulated with the modulation coil around the microwave cavity. In its center the direction of the magnetic field must be parallel to the external magnetic field. For its operation the modulation amplifier output must be connected to the modulation input of the probehead. During standard EPR experiments this modulation is needed for high-sensitivity detection of the EPR signal. The modulation amplitude must be chosen due to the spectral properties of the sample. Principally the signal amplitude increases with increasing modulation amplitude. However, when the modulation amplitude is on the order or larger than the signal linewidth then the signal becomes distorted and its amplitude becomes saturated. The modulation frequency is chosen for maximum signal-to-noise conditions. Since mechanical vibrations can be caused by the modulation field interacting with the high external field used in high-frequency EPR spectroscopy, accustically generated noise can be avoided by choosing the right modulation frequency. Using the setup scan for signal optimization, in addition to the field modulation the modulation coil is used to generate the fast magnetic field ramp of the setup scan. DIVISION IX Page 19 BRUKER ANALYTIK W-Band System Information 3.6. Oversized Waveguide Transmission The microwave connection between the W-band bridge output port and the probehead consists of an oversized low-loss waveguide. The standard W-band waveguide size is WR 10 specified for operation from 75 GHz to 110 GHz. To minimize losses over decimeter distances oversized waveguides WR 28 are used. The flanges of the oversized waveguide connection are mounted with M3 x 8 screws. During normal operation waveguide connections are fixed and the waveguides do not need to be disconnected and reconnected. If so, special care has to be taken for clean and gentle handling of open waveguides. Dirt or dust may never be able to enter an open waveguide. 3.7. Light Irradiation Of Samples Samples inside the W-band probehead can be irradiated with light. An optional sample rod carries an optical fibre for light transmission from the outside connector. The optical fibre is a quartz fibre for low-loss transmission of visible and ultraviolet light. The quartz fibre is fixed to the sample rod. For insertion of the sample tube into the sample tube holder the fibre has to be inserted into the tube before. 3.8. Sample Rotation Since the sample rod axis is perpendicular to the magnetic field, samples can be turned with respect to the field axis by turning the sample rod at the top of the probehead. This is done in the most easy way when the microwave bridge is in TUNE mode. While the cavity dip is observed in the mode picture turning of the sample allows to keep the operation frequency the same as before. If the cavity dip shifts during turning the sample this can be corrected with the sample height. DIVISION IX Page 20 BRUKER ANALYTIK W-Band System Information 3.9. Sample Preparation Techniques There are several techniques of sample preparation and handling for the different sample types. W-band EPR spectroscopy can be done of a variety of samples: They can be liquids, frozen liquids, solid powders, or single crystals. The sample itself and also the sample tube reduces the quality of the cavity. To minimize losses caused by the sample tube it should be made of fused quartz. 3.9.1. Sealing of Sample Tubes Chemically stable solids, powders or single crystals can be prepared in sample tubes which are sealed at one end. The sealed end of the tube is the bottom side which is inserted later into the microwave cavity. One example is shown in Fig. 6. To avoid that the sample falls out of the open end of the sample tube when it is handled outside the probehead it is highly recommended that a small piece of cleaning paper is pushed inside the tube after the sample has been inserted into the tube. It is possible to fix a solid sample with vaccum grease to the inside of one end of an open tube. Using such a sample the risk of polluting the cavity with vacuum grease or even the sample itself is high. Therefore, the use of open sample tubes inside the Wband probehead is not recommended. Pollution of the microwave cavity is equivalent to severe damage of the probehead. The use of sealed tubes at both ends is recommended for standard operations. The minimum tube length is about 25 mm. This is enough for easy handling of samples and allows to insert about 15 mm of the sample tube into the sample holder for safe fixing. Although very much longer sample tubes can be used with the sample rod a maximum length of 45 mm is recommended. The shape of the sample tube influences also the quality of the microwave cavity. The sample tube seal must be made very symmetrical. Sealing sample tubes by melting the quartz at the end during turning the tube inside the hot flame is an easy and the most straight forward way. However, then it is unavoidable that the seal extends about 0.4 mm ore more along the tube axis. With a diamond tool the sealed end of the sample tube can be grinded down to about 0.2 mm which still is safe to contain the sample. By doing so it is important to grind possibly sharp edges to round form. This prevents damage to the cavity by the sample tube. DIVISION IX Page 21 BRUKER ANALYTIK W-Band System Information 3.9.2. Grinding and Packing Powder Samples Powder samples must be milled to very small particle sizes to avoid microcrystallinity effects. These effects show up in EPR spectra as suprisingly many features on the expected powder spectrum. To prove microcrystallinity effects the sample must be measured in several orientations with respect to the magnetic field. The structure on the spectrum will be dependent on orientation. Packing of powder samples into the sample tube must be done for efficient use of the sample volume. A factor of two in increase of sensitivity can be easily obtained by correct packing of the sample. To enshure homogeneous packing it must be done with small amounts of sample. About ten to twenty packing cycles are required to fill a powder sample up to about 4 mm height (see Fig. 7). DIVISION IX Page 22 BRUKER ANALYTIK W-Band System Information 3.9.3. Diluting and Injecting Liquid Samples Injection of liquid samples is donw with a drawn. 3.9.4. Sealing and Transferring Cold Samples Chemically stable solids, DIVISION IX Page 23 BRUKER ANALYTIK W-Band System Information 4. Microwave Bridge The W-Band Microwave Bridge converts the IF Input signal in the frequency band from 9 to 10 GHz to an excitation signal around 94 GHz. This is available at the bridge-toprobehead output port which is designed as an oversized waveguide flange. The spin signal enters the bridge through the same flange and is downconverted to the intermediate frequency. This signal is available at the IF Output connector at the rear of the bridge. There are no user servicable parts inside the W-band microwave bridge. In fact, the sensitive millimeter-wave devices inside are protected by the shielding capabilities of the solid metal bridge box. The box should be properly grounded for safe operation and storage of W-band components and may only be opened by BRUKER service personal. The W-Band Microwave Bridge contains highly sensitive microwave components. The Burndy Power Control Cable connects the W-Band Microwave Bridge Controller and the W-Band Bridge. It performs both, power supply of the components and operation control. After installation of a microwave system this cable should always be properly in place. Unplugging and reconnection of this cable to the bridge has to be done under safely grounded conditions. This requires a proper electrical connection of the Bridge Controller, IF Unit, W-Band Bridge and the person which is handling the equipment with electrical ground. Fig. 11 Functional Schematics Of The W-Band Microwave Bridge. The W-band oscillator (OSC in Fig. 2) supplies microwave power around 84.5 GHz to the coupler. It can be phase locked to a high precision oscillator at lower frequencies. DIVISION IX Page 24 BRUKER ANALYTIK W-Band System Information Then the W-band oscillator frequency is adjusted to 84.5000 GHz with an accuracy better than 100 kHz. Fig. 12 Front panel of the W-Band Microwave Bridge. On the right on the front panel there are the Lock Ok LED, the Lock Offset Display, and a potentiometer for Lock Control. An unlocked oscillator is locked by turning the Lock Control potentiometer all the way to the left until it reads 0.00. Then by slowly turning the potentiometer to the right, the Lock Ok LED will go on. Then the Lock Offset Display shows numbers between -9.99 and 9.99. The Lock Control potentiometer should be adjusted so that the Lock Offset Display is around 000. During warm up the oscillator can loose its lock. It should then be locked again by slight adjustment of the Lock Control potentiometer. During normal operation of the spectrometer the oscillator stays locked. The coupler divides the microwave signal to both, the upconverter and the downconverter. Before the IF Input signal reaches the upconverter, there is a microwave switch which protects the upconverter from too high IF power in case that the upconverter is switched off. The IF Input of the W-band bridge is specified for signals from 9.0 GHz to 10.0 GHz. The power of these signals must be lower than 2 mW. Application of signals exceeding these limits may cause severe damage of microwave components. The upconverter generates the combination of 84.5 GHz and the IF frequency to the operating frequency around 94 GHz. This excitation signal leaves the W-Band Bridge after passing the circulator at its port 2 (see Fig. 2). The EPR signal from the cavity enters through port 3 of the circulator directly to the downconverter. A low noise IF amplifier after the downconverter raises the signal power before it leaves the W-Band Microwave Bridge at the IF Output. The W-band bridge waveguide connector is an oversized rectangular waveguide flange with two dowel pins. The four threaded holes around the waveguide allow the precise attachment of the oversized waveguide to the probehead with four M3 x 8 screws. Dirt of any size lowers the performance of the spectrometer. Even hardly visible dust particles and any liquid must be avoided to enter the waveguide. Mounting or DIVISION IX Page 25 BRUKER ANALYTIK W-Band System Information dismounting the probehead at the bridge flange has to be performed avoiding scratches and dust. Either the protection cover or the probehead should be left on the flange for longer periods of time. DIVISION IX Page 26 BRUKER ANALYTIK W-Band System Information 5. W-Band Microwave Bridge Controller The W-Band Microwave Bridge Controller performs two different functions. It supplies power to the W-Band Bridge components and it contains protection circuits to avoid possible damage of sensitive components. Fig.13 W-Band Microwave Controller Front Panel. The leftmost part on the front panel is the upconverter power supply and control (2 in Fig. 4). The Standby / On switch controls the operation of the W-Band Bridge. In Standby there is zero voltage at the output to the upconverter for protection. The voltage displayed is either the voltage applied to the upconverter in On position of the upconverter switch or the voltage to be applied to the upconverter, but not connected to the output in Standby position. The upconverter current display is the actual measured DC current through the upconverter. Before switching the W-Band Bridge from Standby to On it has to be enshured that the voltage display is close to the normal upconverter voltage (see test data sheet!). Switching the upconverter to on with a heavily misadjusted upconverter voltage may result in damage of the millimeter-wave component depending on the power from the IF input and the W-band power from the millimeter-wave source. The second functional partition on the front panel of the W-Band Microwave Bridge Controller is the downconverter power supply and control (3 in Fig. 4). Its operation and displays are similar to the upconverter control. The difference to the upconverter operation is that the downconverter is operated with reverse voltages around -0.8 V (see test data sheet!). Its optimum performance is around -0.9 mA. Regarding electrical discharge and misadjustment of operating voltages the same safety protection requirements hold as for the upconverter control. The W-Band Microwave Bridge Controller contains logical circuits which protect the millimeter-wave components in case of possible operator errors. The most serious conditions of the control system are avoided by careful controller design. However, not any electrical situation can be guarded by the controller logical circuits. Therefore, it is highly recommended to read and follow the operating instructions given in this manual. DIVISION IX Page 27 BRUKER ANALYTIK W-Band System Information 6. Intermediate Frequency Unit The Intermediate Frequency Unit provides the IF excitation signal for the W-band bridge and receives the downconverted electron spin signal for highly sensitive signal detection. The intermediate frequency used is in X-band in the range from 9.2 to 9.9 GHz. The IF unit contains the IF microwave source, the IF signal excitation arm, the detection reference arm, and the electronics for source control, AFC stabilization, power attenuation, reference arm amplitude and phase control, and tuning picture generation. The Intermediate Frequency Unit operates high-power microwave components. Disconnected microwave outputs are potentially hazardous due to damage of skin and eyes by microwave irradiation. Keep off from operating microwave equipment. 6.1. Continuous-Wave Intermediate Frequency Unit On the back of the IF unit, there are four switches for the different operating modes, one potentiometer, two IF connectors, two BNC connectors, one RS 232 connector, and the cooling water connections for power dissipation of the IF microwave source: 1. IF OUT This is the intermediate frequency output to the W-band microwave bridge. 2. IF IN This is the intermediate frequency input from the W-band microwave bridge. 3. X-AFC / W-AFC This switch determines the AFC frequency modulation amplitude. In W-AFC position the frequency modulation amplitude is optimum for cavities with bandwidths around 100 MHz. In E 600 systems the X-AFC position is not used. 4. RS 232 This connector provices the output of the optional microwave counter which measures the actual IF frequency. 5. AFC On / Off This switch determines AFC operation. In On position the AFC loop controls the IF source frequency. In Off position the IF microwave source is voltage stabilized. 6. AFC Mod. Level This potentiometer is for fine adjustment of the AFC frequency modulation amplitude. Its position is factory adjusted for optimum AFC range. 7. AFC Gain This switch has two positions which determine the time constant for AFC operation. 8. Tune Width This potentiometer adjusts the width of the mode picture in DIVISION IX Page 28 BRUKER ANALYTIK W-Band System Information TUNE mode. 9. Leveler On / Off This switch controls the IF microwave source leveler operation. In its Off position maximum power over the whole frequency band is available at the IF Out connector. In its On position the IF output power is leveled to 30 mW. 10. BNC Outputs On the back of the Preamplifier are two BNC output connectors which provide the EPR signal for display and acquisition. The output impedance is determined to 50 W. An IF Unit equipped with the IF microwave frequency counter option there is on the front of the IF Unit the display of the measured IF microwave frequency in GHz. The resolution of the microwave frequency counter is 1 kHz. The actual value of the counter is also available at the RS 232 output of the IF Unit. The Fine AFC potentiometer on the front of the IF Unit operates as a fine adjustment of AFC operation for intermediate microwave power levels. If the AFC operation of the system is well adjusted at the Microwave Controller in the range of 0 to 10 dB but the lock is lost at attenuation settings of more than 20 dB then the Fine AFC potentiometer is used to compensate the AFC Lock Offset changes at intermediate power levels. Fig. 14 Functional schematics of the continuous-wave intermediate frequency unit. DIVISION IX Page 29 BRUKER ANALYTIK W-Band System Information 6.2. Pulsed And Continuous-Wave Intermediate Frequency Unit On the back of the pulsed and cw IF unit there are four switches, two potentiometers, three Type-N connectors, 12 BNC connectors, one RS 232 connector, and the cooling water connections for power dissipation of the IF microwave source: 1. PULSE OUT This type-N connector is the X-band pulse output port to either a TWT amplifier or to the high-power attenuator. 2. IF OUT This type-N connector is the intermediate frequency output to the W-band microwave bridge. 3. RS 232 This connector provides the output of the microwave counter which measures the actual IF frequency. 4. AUX This SMA connector provides low-power microwave for auxilluary devices like an FF-Lock. 5. AFC This switch has to be on the X position for X-band, and on W for W-band operation. 6. Remote Control Connection to the microwave bridge controller. 7. Power Supply Burndy connection to the main power supply. 8. Check Connector for service purposes. 9. Iris Motor not used. 10. Accessory not used. 11. Tune Picture Width Potentiometer for adjustment of the tune picture width from about 80 MHz to 800 MHz. 12. Gain The AFC Gain switch has two positions which determine the time constant for AFC operation. 13. AFC Mod. Level This potentiometer is for fine adjustment of the AFC frequency modulation amplitude. Its position is factory adjusted for optimum AFC range. 14. AFC Off / On This switch determines AFC operation. In On position the AFC loop controls the IF source frequency. In Off position the IF microwave source is voltage stabilized. 15. Leveler Off / On Regardless of the switch position the microwave power is always levelled. DIVISION IX Page 30 BRUKER ANALYTIK W-Band System Information 16. +x, -x, +y, -y 9-pin D subminiature connectors to the pulse programmer. 17. 50 W Outputs On the back of the Preamplifier are two BNC output connectors which provide the EPR signal for display and acquisition. The output impedance is determined to 50 W. 18. Waveguide-TypeN X-band input from the TWT amplifier for pulsed operation. 19. MB Power A Burndy connector for power supply in pulsed operation. 20. ZTO 9-pin D subminiature connector to the pulse programmer. 21. Tdec 9-pin D subminiature connector to the pulse programmer. 22. PP 9-pin D subminiature connector to the pulse programmer. 23. HPP 9-pin D subminiature connector to the pulse programmer. 24. LPP 9-pin D subminiature connector to the pulse programmer. 25. MB Control 1 Flat-band cable to the pulse bridge controller. 26. MB Control 2 Flat-band cable to the pulse bridge controller. 27. MB Control 3 Flat-band cable to the pulse bridge controller. 28. TM BNC connector for the transmitter monitor signal. 29. RM BNC connector for the receiver monitor signal 30. SM1 BNC connector for the signal monitor. 31. S1 BNC connector for signal transmisstion. 32. S2 BNC connector for signal transmisstion. 33. SM2 BNC connector for the signal monitor. 34. DS1 BNC connector for the digitizer. 35. DS2 BNC connector for the digitizer. 36. - unused BNC connector. 37. ZTO BNC connector for the trigger signal. On the right hand side of the pulsed and cw IF unit there is one X-band waveguide connection and one type-N connector: DIVISION IX Page 31 BRUKER ANALYTIK W-Band System Information 1. Waveguide Circulator port for the connection to the X-band probehead. 2. Type-N IF input port for the IF signal from the W-band bridge. An IF Unit equipped with the IF microwave frequency counter option has a display in the front panel which for the measured IF microwave frequency in GHz. The resolution of the microwave frequency counter is 1 kHz. The actual value of the counter is also available at the RS 232 output of the IF Unit. The fine AFC potentiometer on the front panel of the IF unit is adjusted for optimum AFC function. DIVISION IX Page 32 BRUKER ANALYTIK W-Band System Information 6.3. X-Band Operation Of Intermediate Frequency Units For X-band EPR spectroscopy with an EleXSys E 680 System the IND and ALT buttons on the Pulse Bridge Controller must be off. In Xepr the Spectrometer Configuration > Microwave Bridge must be switched to X-band. Then the system is ready to operate in X-band mode with an X-band cavity in an electromagnet which is controlled by the Hall Field Controller. The output of the IF Unit is directed to the Pulse Output instead to the IF Output for Wband operation. The output of the optional TWT Amplifier is connected to the waveguide-type N adaptor at the rear of the IF Unit. The input for the signal is the Xband waveguide connection at the right hand side of the IF Unit. Note that the output level in X-band operation is determined by the high-power attenuator position which is controlled manually at the front panel of the Pulse Bridge Controller. DIVISION IX Page 33 BRUKER ANALYTIK W-Band System Information 7. Continuous-Wave Control Electronics The standard or optional equipment for cw EPR spectroscopy are Signal Channel, Modulation Amplifier, Field Controller, Field-Frequency Lock, and NMR Teslameter. 7.1. Signal Channel The SCT Signal Channel is a transputer controlled, straight-in-line lock-in amplifier featuring direct digital synthesis (DDS) of modulation frequencies, and digital phase setting for unsurpassed phase resolution and stability. The Signal Channel generates the modulation frequency and contains the lock-in electronics for demodulation of the EPR signal from the preamplifier in the IF unit. The 6-to-100 kHz version of the SCT generates frequencies from 6 kHz to 100 kHz in steps of 1 Hz. The Signal Channel also produces the field ramp for the modulation coil for the Setup Scan function. Fig. 14 The Signal Channel on the left hand side. The front panel of the Signal Channel Power Supply holds three green LEDs: +15 V, -15V, -5 V, one red LED: TEMP, SWADV: sweep address, SIG IN: signal input from preamplifier. Under normal operating conditions the three green LEDs are illuminated. The SWADV is not connected. SIG IN must be connected one of the 50 W outputs of the preamplifier at the rear of the IF unit. DIVISION IX Page 34 BRUKER ANALYTIK W-Band System Information The front panel of the Signal Channel holds six LEDs: three transputer connectors: EXT MOD OUT: MOD REF: ESR OUT: LOCK OUT: EXT. TRG: EXT SIG IN: R (ready), A, Q, E, O, M, IN, OUT 1, OUT 2, external modulation output, modulation reference output, DC EPR signal output lock-in amplifier signal output external trigger, external signal input. Under normal operating conditions the green Ready LED is on, all others off. Two transputer cables, one transputer in IN, one in OUT 1 are plugged in. None of the input and outputs with sub-click connectors are used. For standard operation the neccessary connections are made internally. In the Xepr Parameters, Options window the default signal channel conditions are External Trigger: External Lock In: Signal Input: Modulation Input: Modulation Output: AFC Trap Filter: High Pass Filter: deactivated deactivated Internal Internal Internal activated activated Fig. 15 Schematical block diagram of the signal channel. DIVISION IX Page 35 BRUKER ANALYTIK W-Band System Information 7.2. Modulation Amplifier Fig. 15 The Modulation Amplifier on the right hand side. The front panel of the modulation amplifier holds EXT MOD IN: external modulation input, RS IN: rapid scan signal input, RESONATOR 1: modulation output to resonator, RESONATOR 2: modulation output to resonator, RS 50 G: rapid scan output 50 G, RS 200 G: rapid scan output 200 G. The E 600 spectrometer uses the RESONATOR 1 connection with a twin-BNC cable to the modulation input of the probehead. All other plugs on the modulation amplifier front panel are not used. The E 680 X spectrometer uses the RESONATOR 1 connection to operate the W-Band Probehead and the RESONATOR 2 connection to the X-Band Probehead. Changing experiments from one to the other frequency does not require any rewiring. DIVISION IX Page 36 BRUKER ANALYTIK W-Band System Information 8. Pulse Control Electronics For pulsed EPR spectroscopy the standard or optional equipment is the Pulse Bridge Controller, PatternJet, SpecJet, and the Signal Integrator. 8.1. Pulse Bridge Controller The Pulse Bridge Controller is needed in addition to the microwave bridge controller for pulse microwave bridges. Fig. 16 The Pulse Bridge Controller Front Panel. Switch Control Panel: CW HPP STAB IND LPP AMP QUAD ALT LCW DIG LED Condition Indicators: WAKEUP READY +5V -5V +20V +15V -15V Attenuation Control Stabilizer Frequency Control: Min, Max Video Amplifier Gain / dB Bandwidth / MHz DIVISION IX Page 37 BRUKER ANALYTIK Potentiometer Adjustments: CW j MON 1 REF BIAS LVL X LVL <X> LVL -X LVL <-X> LVL Y LVL <Y> LVL -Y LVL <-Y> DIVISION IX W-Band System Information TRANS LEV j MON 2 REF BAL jX j <X> j -X j <-X> jY j <Y> j -Y j <-Y> Page 38 BRUKER ANALYTIK W-Band System Information 8.2. PatternJet PatternJet, the high-speed pulse programmer supplies the proper timing for pulsed EPR spectroscopy. Several channels are required for the formation of pulses, pulse blanking, acquisition triggering. etc. On the left hand side of the PatternJet, there are the PCPU and PCLK plug-ins. The PCPU is the central processing unit of the PatternJet providing access via the transputer network. The PCLK is the clock board which generates the time base of the pulse channels. The PatternJet can be equipped with up to 16 PDCH plug-ins. The PDCH are the PatternJet data channels which generate the timing pattern with their output on the front panel. Fig. 17 PatternJet Front Panel. The PCPU front panel holds one transputer bus input (IN) and two transputer bus outputs (OUT 1 and OUT 2). On top there is a green ready LED (R), and a red error LED (E). During normal operation the green ready LED is on, the error LED is off. The PCLK front panel has five input or output connectors: CALIB CLK IN CLK OUT TRG IN TRG MON Each of the PDCH plug-in front panels provides five output connectors: C1 B1 / C2 A1 B2 / C3 C4 DIVISION IX Page 39 BRUKER ANALYTIK W-Band System Information The main time base of the PatternJet can be either 1 ns, 2 ns, or 4 ns. The maximum number of channels is related to the main time base or the resolution of the PatternJet. With 1 ns resolution the maximum number of channels is 16, with 2 ns resolution 32 channels, or with 4 ns resolution there can be up to 64 channels. Depending on the mode of operation each PDCH plug-in provides a different number of outputs. Operating in the 1 ns resolution mode there is one output (A1) per PDCH. In 2 ns operation the B1 and B2 outputs must be used. In the 4 ns resolution mode there are four outputs (C1, C2, C3, and C4). DIVISION IX Page 40 BRUKER ANALYTIK W-Band System Information 8.3. SpecJet SpecJet, the ultra-fast transient signal averager is used for high-speed pulsed EPR signal acquisition. It can be equipped with either a 250 MHz or a 500 MHz digitizer with 8 bit resolution. Both can be configured as single or true dual channel transient digitizers. Fig. 18 SpecJet Front Panel. To the left hand side of the SpecJet there is the PCPU plug-in. The PCPU is the central processing unit of the SpecJet and operates also the transputer interface for control. The PCPU front panel holds one transputer bus input (IN) and two transputer bus outputs (OUT 1 and OUT 2). On top there is a green ready LED (R), and a red error LED (E). During normal operation the green ready LED is on, the error LED is off. The TCLK is the clock board which generates the time base of the acquisition channels. The TCLK front panel has four input or output connectors: SYN OUT CLK IN ECL TRG TTL TRG One acquisition channel consists of two plug-ins. The TADC is the analog-to-digital converter plug-in and the TACC is the accumulator board. There is only one input connector (A IN) which is located on the TADC front panel. The four plug-ins of a dual channel transient signal averager must be on the location shown in Fig. 18. They may not be mounted in a different way to avoid electrical damage to the sensitive electronics. DIVISION IX Page 41 BRUKER ANALYTIK W-Band System Information 8.4. Dual Channel Pulse Signal Integrator The pulse signal integrator can be used for gated integration of pulsed EPR signals. The integrator is used in combination with the SDI which serves as an ADC for the integrated signals and it acts as a distributor for various monitor signals to be observed on the oscilloscope. 8.4.1. Rear Panel Connections Make the following connections at the rear panel of the integrator: The power cable from the bridge controller to the integrator The BNC cables DS1 and DS2 from the microwave bridge to S1-IN and S2-IN at the integrator The BNC cables RM and TM from the microwave bridge to RM and TM at the integrator The ECL cable from the pulse programmer channel 6 (SDI channel) to TRIGGER-IN at the integrator One ECL cable from SDI at the integrator to the SDI board in the computer Two BNC cables from I1-OUT and I2-OUT at the integrator to AI1 and AI2 at the SDI board in the computer 8.4.2. Front Panel Fig. 19 Pulse Signal Integrator Front Panel. Connect MONITOR A and MONITOR B to the oscilloscope With the MONITOR SELECT switch A the signals S1, S2, I1, I2 and RM can be directed to MONITOR A With the MONITOR SELECT switch B the signals S1, S2, I1, I2 and TM can be directed to MONITOR B The integrator gate can be observed at the output connector GATE DIVISION IX Page 42 BRUKER ANALYTIK W-Band System Information 8.4.3. Signal Integrator Operation The integrator is activated with the switch INT, a LED will be on if the integrator is active. If the integrator is off the signals DS1 and DS2 will be passed directly to the SDI board. In any case the amplitudes of the signals S1 and S2 observed on MONITOR A and B should be S1, S2 £ 500mV. An offset calibration of the integral outputs I1 and I2 can be performed with the potentiometers OFF1 and OFF2 if the corresponding switch is put to CAL. The offset signals are obseved on MONITOR A and B with the MONITOR SELECT adjusted to I1 and I2. Propperly adjusted the amplitude of the offset signals is about 30mV to 50mV. Put the switch back to OP when the offset calibration is finished. The output amplitude of the integrated signal can be adjusted with the FINE and COARSE gain switch in steps of 2dB (fine) and 20dB (coarse). The amplitudes of I1 and I2 should be I1, I2 £ 1V. If the integrator is on the integration gate position and gate width is defined in the SDI table on program level P-P by "pulse position" and "pulse length". If the integrator is off the SDI table is programmed as usual, i.e. pulse length = 80ns. The minimum gate width for the integrator is 24ns. To define the position and width of the integrating gate it is best to scan with a 24ns gate across the time domain signal. To control the integrator from pulseSPEL it has to be specified in the exp-section exp [ ... intg] In this way the inegrator gate length is controlled by the (hidden) variable pg. DIVISION IX Page 43 BRUKER ANALYTIK W-Band System Information 8.5. DICE Unit SpecJet, the ultra-fast transient signal averager is used for high-speed pulsed EPR signal DIVISION IX Page 44 BRUKER ANALYTIK W-Band System Information 9. Acquisition Server The Acquisition Server controls all the electronic hardware for EPR spectroscopy independently from the user operating surface on the workstation. 9.1. Acquisition Server Configurations Fig. 20 The Acquisition Server. The E 600 spectrometer is controlled by the Acquisition Server which needs the following configuration: slots 1 and 2 slot 3 slots 4 and 5 slot 6 slots 7 to 13 slot 14 slots 15 and 16 slot 17 slots 18 to 20 DIVISION IX ACQ-CPU TVI unused ADF unused GSI SIP unused PSU Central Processing Unit Transputer Interface Fast Analog / Digital Converter General Spectrometer Interface Spectrometer Interface Panel Power Supply Unit Page 45 BRUKER ANALYTIK W-Band System Information The E 680 spectrometer is controlled by the Acquisition Server which needs the following configuration [DD]: slots 1 and 2 slot 3 slots 4 and 5 slot 6 slot 7 slot 8 slot 9 to 13 slot 14 slots 15 and 16 slot 17 slots 18 to 20 ACQ-CPU TVI unused ADF RSC SDI unused GSI SIP unused PSU Central Processing Unit Transputer Interface Fast Analog / Digital Converter Rapid Scan General Spectrometer Interface Spectrometer Interface Panel Power Supply Unit The E 680 spectrometer is controlled by the Acquisition Server which needs the following configuration [wftcw]: slots 1 and 2 slots 3 to 5 slot 6 slot 7 slot 8 slot 9 slot 10 slot 11 to 13 slot 14 slots 15 and 16 slot 17 slots 18 to 20 ACQ-CPU unused SDI ADF RSC EIF TVI unused GSI SIP unused PSU Central Processing Unit Fast Analog / Digital Converter Rapid Scan Transputer Interface General Spectrometer Interface Spectrometer Interface Panel Power Supply Unit 9.2. Acquisition Server Operation The Acquisition Server is switched on and off with the console. It does not need any special attention. After power on the Acquisition Server loads via ethernet its software from the computer workstation. For this remote bootup procedure the workstation must be running already. After a few seconds the Acquisition Server finished its own booting and boots the transputer devices. After this the system is ready for EPR spectroscopy. DIVISION IX Page 46 BRUKER ANALYTIK W-Band System Information 10. Computer Workstation The Silicon Graphics Computer Workstation is the main spectrometer computer. On it Xepr, the EPR acquisition and processing software is the operator surface for the scientist. The workstation includes Computer Workstation Indy 5000, O2, or similar Monitor Mouse Keyboard CD-ROM Drive Printer Video Camera Passive Monitor Shield Active Monitor Shield The workstation is designed to run permanently. This allows remote access to data on the workstation even in times the spectrometer is not in operation. The default guest account uses the password user@xepr. Log in to the workstation by double clicking on your icon on the login window. Enter your password. In the Applications Window there is the Xepr icon. Double click on the Xepr icon to start. The Xepr program can be started alternatively by entering the string „Xepr“ in a UNIX terminal window. Note that the UNIX operating system is case sensitive. At the time of installation of an ELEXSYS system the root password is xepr@sgi. Either the EPR system operator or the network administrator at the installation site needs this information for the embedding of the workstation in the local computer network. After installation he is responsible for changing the root password according to local regulations. Since W-band spectrometers require the operation of a computer monitor in the vicinity of a high-field magnet, the monitor is magnetically shielded for proper display operation. The passive monitor screen is a ferromagnetic box. Flat band cables around the monitor can be operated as an active monitor screen. They can be connected to a current power supply for active magnetic field compensation to improve the quality of the monitor display. DIVISION IX Page 47 BRUKER ANALYTIK W-Band System Information 11. Xepr Software The Xepr software is an elaborate package for data acquisition, data processing, and spectra manipulation and simulation. For details see the Xepr software manual. 11.1. Keyboard and Mouse Functions 11.1.1. Keyboard in standard Xepr window: Alt-f Alt-a Alt-r Alt-v Alt-p Alt-o Alt-h File Acquisition Processing Viewports Properties Options Help display the submenus. To close the submenu selection list hit <Esc>. 11.1.2. Keyboard in submenus: Up, Down arrows (bot navigate within submenu list standard and Num-Bloc arrows) Perforation line If you highlight the perforation line a permanen submenu selection window is generated. exit the submenu selection list by hitting <Esc>. 11.1.3. Keyboard in dialog windows: Tab shift-Tab right and left arrows <Space> numbers <Enter> moves active dialog block forward moves active dialog block backward move inside dialog blocks activates buttons can be entered applies the active selection To be able to use keyboard funtions in dialog windows, the mouse must be inside the window! (input focus selected). DIVISION IX Page 48 BRUKER ANALYTIK W-Band System Information With Move Window (Alt-F7) and Up, Down, Right, Left Arrows any window can be moved. In addition the mouse cursor is centered inside the window by Alt-F7. Alt-F1 Alt-F3 Alt-F4 Alt-F5 Alt-F7 Alt-F8 Alt-F9 Alt-F10 Raise window Lower window remove client from mwm management ! Restore window size move window, use arrows, then <Enter> resize window, use arrows, then <Enter> minimize window maximize window . DIVISION IX Page 49 BRUKER ANALYTIK W-Band System Information 11.2. Xepr Main Menue File Acquisition Processing Viewports Properties Options Help DIVISION IX file handling, printing, and program exit acquisition and spectrometer properties control processing of datasets viewport selection and configuration Xepr program properties Xepr options for convenient use help functions Page 50 BRUKER ANALYTIK W-Band System Information 11.3. File Menue Load... Import... Save... Dataset Table... Print Viewport Setup Printer Exit DIVISION IX load dataset from harddisk import dataset from harddisk save dataset to harddisk table of datasets in memory print spectrum on printer set printer configuration exit Xepr Page 51 BRUKER ANALYTIK W-Band System Information 11.4. Acquisition Menue New Experiment... Select Experiment... Experiment:2 Parameters Show Description Get Parameters From Exp. Get Parameters From Dataset Create Experiment Link Remove Experiment Link Microwave Bridge Tuning Spectrometer Configuration Panel Properties Auto Connect To Spectrom. Connect To Spectrometer Disconnect From Spectrom. Auto-Post-Processing Check Post-Processing Set Parameters From Display Tools Experiment Table DIVISION IX create a new experiment select one of the loaded experiments display of the actual experiment open the parameter window show the description of the actual experiment get parameters from another experiment get parameter from a loaded data set create a link between two or more experiments remove a link between experiments open the tuning window display the spectrometer configuration window microwave bridge monitor panel properties control of auto-connection to a spectrometer connect to a spectrometer disconnect from the spectrometer open the auto-post-processing window check the actual auto-post-processing setup set parameters from display to the hardware activate sweep tool, gain tool, etc. open the experiment table window Page 52 BRUKER ANALYTIK W-Band System Information 11.4.1. New Experiment With the Acquisition > New Experiment the experiment configuration selection window opens. Experiment Name Type Abscissa1 Abscissa2 DIVISION IX may not contain blank(s) may not be 16 characters long or longer XW XW XW XW XW XW C.W. Pulse Simulation Calibration Field Field with Teslameter Field (FF Lock) Field (Rapid Scan) Time Sample Angle (Goniom) Sample Temperature Sample Concentration Microwave Frequency Microwave Power R.F. (ENDOR) Modulation Frequency Modulation Amplitude Modulation Phase Receiver Gain Receiver Time Constant Receiver Harmonic Receiver Offset None Field Field with Teslameter Field (FF Lock) Field (Rapid Scan) Time Sample Angle (Goniom) Sample Temperature Sample Concentration Microwave Frequency Microwave Power R.F. (ENDOR) Modulation Frequency Modulation Amplitude Modulation Phase XW ? W W W W W W W W W ✔ ✔ ✔ ✔ ✔ i✔ ✔ ✔ ✔ ✔ W W ?W W W - ✔ i✔ i✔ ✔ ✔ ✔ ✔ i✔ ✔ ✔ ✔ ✔ Page 53 BRUKER ANALYTIK Ordinate Teslameter Goniometer V.T.U. W-Band System Information Receiver Gain Receiver Time Constant Receiver Harmonic Receiver Offset Signal Channel Fast Digitizer Transient Recorder Off On Off On Off On W ✔ ✔ W ✔ ✔ W ✔ ✔ W i✔ i✔ SCT, SCTH, SCTL ADF SDI, TSA, Integr., LeCroy always always always Not all of the combinations of abscissa1 and abscissa2 are useful experiments. Therefore many of them are not supported. Some selected and useful experiments can be found in the following table. W CW Field SCT W CW Time SCT X CW Field SCT X CW Time SCT W CW Field Time SCT W CW Field Angle SCT W CW Field Temp SCT W CW Field Conc SCT W CW Field MWFreq SCT W CW Field MWPower SCT W CW Field RF SCT W CW Field ModFreq SCT W CW Field ModAmp SCT W CW Field ModPhase SCT W CW Field RecGain SCT W CW Field RecTC SCT W CW Field RecHarm SCT W CW Field RecOffset SCT W CW Time Field SCT W CW Time Time SCT W CW Time Angle SCT W CW Time Temp SCT W CW Time Conc SCT W CW Time MWFreq SCT W CW Time MWPower SCT W CW Time RF SCT W CW Time ModFreq SCT DIVISION IX not supported not supported Page 54 BRUKER ANALYTIK W-Band System Information W CW Time ModAmp SCT W CW Time ModPhase SCT W CW Time RecGain SCT W CW Time RecTC SCT W CW Time RecHarm SCT W CW Time RecOffset SCT W CW Field ADF W CW Time ADF W CW Field Time ADF W CW Time Field ADF W Pulse Field SDI W Pulse Time SDI W Pulse Field Time SDI W Pulse Time Field SDI W Pulse Time Time SDI W Pulse Field TSA W Pulse Time TSA W Pulse Field Time TSA W Pulse Time Field TSA W Pulse Time Time TSA W Pulse Field LeCroy W Pulse Time LeCroy W Pulse Field Time LeCroy W Pulse Time Field LeCroy W Pulse Time Time LeCroy DIVISION IX Page 55 BRUKER ANALYTIK W-Band System Information W CW Field SCT Field Sweep Parameter Window Signal Channel Calibrated Mod Freq [kHz] Mod Amp [G] Mod Phase Harmonic ~ Rec Gain [dB] Time Const [ms] Conv Time [ms] Sweep Time [s] Offset [%] Attenuation [dB] 0.0 ... 60.0 dB Power [mW] Auto Scaling Replace Mode Auto Offset ~ On ~ Off ~ On ~ Off ~ On ~ Off Number of Scans Scans Done Accumulated Scans 0, 1, ... 0, ... 0, ... ~ Left Center Right ~ ~ ~ Microwaves Scan Field Position Field Position [G] Stop Field Abscissa 1 Sweep Quantity: Field Low Field Value [G] Center Field [G] Sweep Width [G] 33525.000 33550.000 50.000 High Field Value [G] Number of Points 33575.000 64, ..., 8192 Close Setup Scan Help gray! Options Field Sweep Options Signal Channel Resonator Ext. Trigger Signal Input Modulation Input Modulation Output Quad Detection Phase Double Modulation Field Field Settling Sweep Direction Initialize IPS Tuning Caps Ext. Lock In AFC Trap Filter High Pass Filter Self Test Quad Detection Double Mod. Control Ext. Lock In Delay At rest (1st) Up ~ Settling Delay [s] Sweep Profile 0.0 Fast Flyback ~ Sweep Width [%] Setup Scan SCT 100, ..., 0 A? Microwaves Acq Fine Tuning Setup Scan Setup Scan DIVISION IX Page 56 BRUKER ANALYTIK W-Band System Information W CW Time SCT Time Sweep Parameter Window Signal Channel Calibrated Mod Freq [kHz] Mod Amp [G] Mod Phase Harmonic ~ 100.00 1.00 0.0 1 Rec Gain [dB] Time Const [ms] Conv Time [ms] Offset [%] 40 1.28 163.84 0.0 Static Field [G] 33550.000 Stop Field ~ Attenuation [dB] 25.0 Power [mW] Auto Scaling Replace Mode Auto Offset ~ On ~ Off ~ On ~ Off ~ On ~ Off Number of Scans Scans Done Accumulated Scans 1 0 0 Abscissa 1 Sweep Quantity: Time Sweep Time [s] 83.89 Number of Points 512 Close Options Setup Scan Help Resonator Ext. Trigger Signal Input Modulation Input Modulation Output Quad Detection Phase Double Modulation 1 ~ Internal Internal Internal 90.0 Tuning Caps Ext. Lock In AFC Trap Filter High Pass Filter Self Test Quad Detection Double Mod. Control Ext. Lock In Delay 94 ~ ~ ~ Off ~ ~~ 1.0 Field Settling Initialize IPS At rest (1st) ~ Settling Delay [s] Sweep Profile 0.0 Fast Flyback Acq Fine Tuning Never Field Microwaves Scan Time Sweep Options Signal Channel Field ~ Microwaves DIVISION IX Page 57 BRUKER ANALYTIK W-Band System Information W CW Field ADF Field Sweep Parameter Window Signal Channel Calibrated Mod Freq [kHz] Mod Amp [G] Mod Phase Harmonic ~ 100.0 1.0 0.0 1 Rec Gain [dB] Time Const [ms] 40 1.28 Offset [%] 0 Attenuation [dB] 60 Power [mW] 0.000102 Auto Scaling Replace Mode Auto Offset ~On ~Off ~On ~Off ~On ~Off Number of Scans Scans Done Accumulated Scans 1 0 0 Field Position [G] Left Stop Field 33550.000 Center Right ~ ~ 33525.000 33550.000 50.0 High Field Value [G] Number of Points 22575.000 1024 Trigger Mode Trigger Slope Input Mode Internal Sweep Rise / Fall A, B, A&B Gate Duration [ms] Accumulations per Pt. Trigger Timeout [s] 10.000 10000 3 Options Setup Scan Help Resonator Ext. Trigger Signal Input Modulation Input Modulation Output Quad Detection Phase Double Modulation 1 or 2 ~ Internal Internal Internal 90.0 Tuning Caps Ext. Lock In AFC Trap Filter High Pass Filter Self Test Quad Detection Double Mod. Control Ext. Lock In Delay Field Settling Sweep Direction Initialize IPS At Rest (1st) Settling Delay [s] Up,Down,Auto Sweep Profile ~ Acq Fine Tuning Never / E. S. Microwaves Scan Field Position Abscissa 1 Sweep Quantity: Field Low Field Value [G] Center Field [G] Sweep Width [G] ~ ~ Fast Digitizer Close Field Sweep Options Window Signal Channel Field ~ 32 ~ ~ ~ Off /High/Low ~ ~~ 1.0 0.0 Fast Flyback Microwaves DIVISION IX Page 58 BRUKER ANALYTIK W-Band System Information W CW Time ADF Time Sweep Parameter Window Signal Channel Calibrated Mod Freq [kHz] Mod Amp [G] Mod Phase Harmonic ~ 100.0 1.0 0.0 1 Rec Gain [dB] Time Const [ms] 40 1.28 Offset [%] 0.0 Static Field [G] 33550.000 Stop Field ~ Attenuation [dB] 25.0 Power [mW] Auto Scaling Replace Mode Auto Offset ~On ~Off ~On ~Off ~On ~Off Number of Scans Scans Done Accumulated Scans 1 0 0 2.048 Spectrum Resolution 32, ..., 4096 Trigger Mode Trigger Slope Input Mode Internal Sweep Rise / Fall A, B, A&B Accumulations per Pt. 10000 Options Setup Scan Help Resonator Ext. Trigger Signal Input Modulation Input Modulation Output Quad Detection Phase Double Modulation 1 ~ Internal Internal Internal 90.0 Tuning Caps Ext. Lock In AFC Trap Filter High Pass Filter Self Test Quad Detection Double Mod. Control Ext. Lock In Delay 94 ~ ~ ~ Off ~ ~~ 1.0 Field Settling Sweep Direction Initialize IPS At rest (1st) Up Settling Delay [s] Sweep Profile 0.0 Flyback Par Acq Fine Tuning Never Field Microwaves Scan Abscissa 1 Sweep Quantity: Time Sweep Time [s] Fast Digitizer Close Time Sweep Options Signal Channel Field ~ Microwaves DIVISION IX Page 59 BRUKER ANALYTIK W-Band System Information 11.4.2. Connecting and Disconnecting a Superconducting Magnet In the Spectrometer Configuration > W-Band Configuration window there are the Wband relevant parameters and the buttons to operate a hybrid magnet system with the IPS 120-10 magnet power supply. Frequency Offset [GHz] Sweep of RT Magnet Sweep Of Main Magnet RT Magnet Field/Current [G/A] Main Magnet Field/Current [G/A] Persistent Field [G] Main Magnet Inductance [H] Supercon Switch Resistance [V/A] Main Magnet Max. Voltage [V] Switch Heater Current [mA] Safe Current Rate [A/min] actual frequency of the W-band oscillator activated for room-temperature magnet sweeps activated for sweeps with a superconducting magnet. During normal operation of the hybrid magnet system the Xepr program toggles automatically between the two alternatives. In case of missing cables or powered down devices Xepr cannot automatically detect the status of the hybrid magnet system. Then the desired sweep device has to be activated in the W-band configuration window. calibration value of the room-temperature magnet calibration value of the superconducting magnet persistent field value which is used as an offset field during sweeps with the room-temperature magnet. The persistent field is zero in main magnet sweep operation. inductance of the superconducting coil resistance of the superconducting switch when the switch is activated. This is when the switch is normal conducting. the maximum voltage accross the main coil allowed for sweeps. Not used within Xepr. not used within Xepr the safe current rate for sweeping the main magnet. Refer to the description of the jump current method in chapter 12.6. Setting this value bigger than the maximum speed of the actual magnet results in unsafe operation of the magnet. Warning: Setting the safe current rate to higher values than specified in the acceptance test protocol may cause severe damage of the superconducting magnet. Jump Current Rate [A/min] DIVISION IX the jump current rate for sweeping the main magnet. Refer to the description of the jump current method in chapter 12.6. Setting this value bigger than the maximum speed of the actual magnet results in unsafe operation of the magnet. Page 60 BRUKER ANALYTIK W-Band System Information Warning: Setting the jump current rate to higher values than specified in the acceptance test protocol may cause severe damage of the superconducting magnet. Max. RT Magnet Current [A] Max. Main Magnet Current [A] RT Magnet Resistance [mV/A] Main Magnet Resistance [mV/A] Minimum Helium Level Minimum Nitrogen Level [%] Connect Main Magnet Disconnect Main Magnet maximum current allowed for the room-temperature magnet. maximum current allowed for the main superconducting magnet. resistance of the room-temperature magnet including its leads. Not used within Xepr. resistance of the leads to the main magnet. Not used within Xepr. Not used within Xepr. Not used within Xepr. opens the check list window for connecting a superconducting magnet opens the check list window for disconnecting a superconducting magnet For safe and comfortable hybrid magnet operation two check lists are used to guide through the procedures of connecting the superconducting magnet for an experimental session of sweeping the main coil. During main magnet sweeps the helium consumption is higher than with the magnet being in persistent mode. The operation of the magnet with the Xepr software optimizes the required manual and automatic operations. The software is designed for minimum helium consumption for the main magnet handling. The check list activates automatically functions of Xepr and the magnet power supply. In addition, it requires manual actions of the operator. The Xepr program interprets the activation of the corresponding button in case of manual action as an acknowledgement that the action has been performed successfully. DIVISION IX Page 61 BRUKER ANALYTIK W-Band System Information 11.4.2.1. Connect Main Magnet: Check List for Connecting the Main Magnet: Warning: The instructions below for connecting the main magnet to the power supply must be followed carefully. Incorrect operation of the superconducting magnet may cause severe damage of the magnet! Helium Level Far Above Minimum Magnet Controller Switch on RTC Zero Current of Magnet Power Supply Shim Rod Inserted into Magnet Magnet Controller Switch on Main Magnet Main Coil Lead Inserted into Magnet Magnet Controller Heater Select Switch on M Energize Leads Activate Switch Heater Switch Heater Confirmed Manual action required: Check on the helium level meter if sufficient helium for the planned session is in the magnet cryostat. If not so refill helium tank. Check if the high current switch of the Hybrid Magnet Controller is on R (roomtemperature magnet) position. Automatic action: By pressing this button the power supply is set to zero output current and clamps its output. Manual action: Insert the shim rod into the magnet and connect it to the shim rod cable. Manual action: Turn the high current switch of the hybrid magnet controller to M (main magnet). Manual action: Insert main magnet leads. Put the heater select switch on the hybrid magnet controller to its M (main magnet heater switch) position. Automatic action: The magnet power supply sets its output current to the value which is calculated from the persistent field value stored in Xepr and its calibration value. Automatic action: The main magnet switch heater is activated. Manual action: Check on the magnet power supply if the confirmed LED is on. After pressing the buttons of this list successively from top to the bottom the main magnet is connected successfully for supercon sweeps. The main magnet voltage monitor on the hybrid magnet controller can show for a short time a small voltage in the 10 mV range. It will decrease rapidly to zero. If the operator decides to interrupt the procedure for connecting the main magnet the buttons which are already activated must be pressed in reverse order and the corresponding actions must be performed for safe reactivation of room-temperature coil sweeps. DIVISION IX Page 62 BRUKER ANALYTIK W-Band System Information After an experimental session with magnetic field sweeps with the superconducting main magnet the disconnect main magnet check list is used to guide a safe and comfortable return to sweeps with the room-temperature magnet. DIVISION IX Page 63 BRUKER ANALYTIK W-Band System Information 11.4.2.2. Disconnect Main Magnet: Check List for Disconnecting the Main Magnet: Warning: The instructions below for connecting the main magnet to the power supply must be followed carefully. Incorrect operation of the superconducting magnet may cause severe damage of the magnet! Deactivate Switch Heater Zero Current of Magnet Power Supply Main Coil Leads Removed from Magnet Shim Rod Removed from Magnet Magnet Vacuum Tight Magnet Controller Switch on RTC Automatic action: The switch heater current is deactivated. After this there must be some time to allow the heater switch to close. Automatic action: The power supply goes to zero current through the main leads and clamps its output. Manual action: Remove the main coil leads from the magnet. Manual action: Remove the shim rod from the magnet. Manual action which must be done very carefully to provide the magnet from ice. Check several times during the warm up of the turrets that the helium space magnet seals are vacuum tight. Turn the high-current switch on the hybrid magnet controller to R (room-temperature magnet) operation. After pressing the buttons in the check list successively from top to bottom the system is ready for sweeps with the room-temperature magnet and safely back in its low helium consumption persistent mode. The Xepr program is ready for faster sweeps and considers the persistent field as a field offset to the field produced by the roomtemperature magnet. In case the operator decides to interrupt the disconnect procedure this is done by pressing the buttons in the check list window in reverse order and performing the corresponding actions. DIVISION IX Page 64 BRUKER ANALYTIK W-Band System Information 11.4.3. Main Magnet Sweeps and Conversion Times Due to the high inductance of the main magnet it only can be swept with a limited rate. The Xepr program has stored the maximum possible rate in the Acquisition, Spectrometer Configuration, W-Band Configuration menue as the value of the Safe Current Rate. The Safe Current Rate value is used for magnetic field adjustments. Then the magnet is swept at the fastest rate possible to optimize adjustment procedures for the required EPR experiment. In field sweep EPR experiments the situation requires different which depend on the parameters chosen by the scientist. In field-swept continuous-wave experiments then Conversion Time of the signal channel and the Sweep Width determine the field sweep rate. Therefore, the experimentator must choose a correct Conversion Time. It is possible to select Conversion Times too short for the speed of the magnet. For safety reasons the Xepr software performs the experiment but the magnet does follow only with its fastest sweep speed to avoid quenching the magnet. Since the maximum sweep speed of an individual magnet depends on many factors it is different for each magnet. The following tables give approximate main magnet voltages for a number of selected Conversion Times and Sweep Widths. Where no voltages are given in these tables the magnet may not always be at the desired field and the experimentator must decide if the selected parameters are useful or if a larger Conversion Time will be better for obtaining the desired spectrum. CT \ SW 1.28 2.56 5.12 10.24 20.48 40.96 81.92 163.84 327.68 655.36 1310.72 2621.44 5242.88 100 1.60 0.80 0.40 0.20 0.10 0.05 0.02 0.01 0.01 0.01 0.01 0.01 0.01 200 X 1.60 0.80 0.40 0.20 0.10 0.05 0.02 0.01 0.01 0.01 0.01 0.01 500 X X 1.60 0.80 0.40 0.20 0.10 0.05 0.02 0.01 0.01 0.01 0.01 1000 X X X 1.60 0.80 0.40 0.20 0.10 0.05 0.02 0.01 0.01 0.01 2000 X X X X 2.20 1.10 0.50 0.20 0.10 0.05 0.02 0.01 0.01 5000 X X X X X 1.90 1.00 0.50 0.25 0.13 0.07 0.04 0.02 10000 X X X X X X 1.90 1.00 0.50 0.25 0.13 0.07 0.04 20000 X X X X X X X 1.90 1.00 0.50 0.25 0.13 0.07 30000 X X X X X X X X 1.60 0.80 0.40 0.20 0.10 40000 X X X X X X X X 2.20 1.10 0.60 0.30 0.15 50000 X X X X X X X X X 1.30 0.70 0.35 0.18 60000 X X X X X X X X X 1.70 0.90 0.45 0.22 Table 5. Main Magnet Voltages for field-swept continuous-wave EPR experiments with different Conversion Times (in ms) and Sweep Widths (in Gauss) for the acquisition of 8 k points. DIVISION IX Page 65 BRUKER ANALYTIK CT \ SW 1.28 2.56 5.12 10.24 20.48 40.96 81.92 163.84 327.68 655.36 1310.72 2621.44 5242.88 100 X X X 1.60 0.80 0.40 0.20 0.10 0.05 0.02 0.01 0.01 0.01 200 X X X X 1.60 0.80 0.40 0.20 0.10 0.05 0.02 0.01 0.01 W-Band System Information 500 X X X X X 1.60 0.80 0.40 0.20 0.10 0.05 0.02 0.01 1000 X X X X X X 1.60 0.80 0.40 0.20 0.10 0.05 0.02 2000 X X X X X X X 2.20 1.10 0.50 0.20 0.10 0.05 5000 X X X X X X X X 1.90 1.00 0.50 0.25 0.13 10000 X X X X X X X X X 1.90 1.00 0.50 0.25 20000 X X X X X X X X X X 1.90 1.00 0.50 30000 X X X X X X X X X X X 1.60 0.80 40000 X X X X X X X X X X X 2.20 1.10 50000 X X X X X X X X X X X X 1.30 60000 X X X X X X X X X X X X 1.70 Table 5. Main Magnet Voltages for field-swept continuous-wave EPR experiments with different Conversion Times (in ms) and Sweep Widths (in Gauss) for the acquisition of 1 k points. DIVISION IX Page 66 BRUKER ANALYTIK W-Band System Information 11.5. Processing Menue Diff. & Integ. Filtering Algebra Peak Analysis Complex Window Functions Transformations Fitting Structure ProDeL Automatic undo DIVISION IX differentiation and integration of a data set open the window for filtering a data set basic algebra on a data set open the peak analysis window operations on a complex data set window functions Fourier, linear and reziprocal transformations open the fitting window structural changes of a data set control of the procedure description language automatic data processing window undo the last data processing action Page 67 BRUKER ANALYTIK W-Band System Information 11.6. Viewports Menue Current Viewport Clear (Current) New 1D Viewport New 2D Viewport 1D <--> 2D Remove Viewport Link Viewports Unlink Viewport DIVISION IX control the current viewport clear the current viewport create a new 1D viewport create a new 2D viewport toggle between 1D and 2D display remove actual viewport link two or more viewports unlink viewports Page 68 BRUKER ANALYTIK W-Band System Information 11.7. Properties Menue Display Range... 2D Z-Range Individual Scaling Relative Ordinate Scale Autoranging Background Color Axis Display Dataset Display Slice Direction 1D Slice Number 1D Slice Position 2D Level Curve 2D Curve Center 2D Color Scheme 2D Projection Type 2D Perspective Dataset History Panel Properties Panel Position DIVISION IX determine display range by keyboard inputs determine 2D z-range by keyboard inputs control for individual scaling determine a relative ordinate scale control of autoranging determine the background color for data sets control of the axis display control of the data set display determine the slice direction by keyboard inputs determine the 1D slice number determine the 1D slice position adjustment of the 2D level curve adjustment of the 2D curve center adjustment of the 2D color scheme determine the 2D projection type determine the 2D perspective open the data set history window microwave bridge monitoring panel properties microwave bridge monitoring panel position Page 69 BRUKER ANALYTIK W-Band System Information 11.8. Options Menue Display Tools Accelerator Buttons Commands & History Save Properties Load Properties DIVISION IX display options display tool selection window open the accelerator button control window open the command input window save properties of Xepr load properties of Xepr Page 70 BRUKER ANALYTIK W-Band System Information 11.9. Error Messages And Help ERROR: AcqHidden.sysConf: Error reading from IPS 120-10 (Error #140:001) In case of connecting a spectrometer when the main power switch of the magnet power supply is off this error meassage is displayed. Then the Xepr program cannot automatically determine which magnet is currently the magnet which the operator wants to sweep. After a few steps routine sweeps with the room-temperature magnet can be performed: l Close the ERROR window. l Switch the main power switch of the magnet power supply on. l Click in the Spectrometer Configuration, W-Band Configuration window on the Sweep of RT Magnet button. After this the system is ready for sweep with the room-temperature coil. In case that the main magnet should be swept the analogue actions to connecting a superconducting magnet must be performed. In routine cases it is recommended to operate first the roomtemperature coil after a power failure and use the Check List for Connecting the Main Magnet in the Spectrometer Configuration, W-Band Configuration window. ERROR: AcqHidden.sysConf.ChkSwHeatAct: Cannot activate switch heater - chec persistent current In case of trying to activate the switch heater during the procedure to connect the main magnet this error message is displayed in case the persistent current value of the magnet power supply differs from the actual current value after energizing the main leads. After unusual events, for example after activating the Auto Run-Down of the magnet power supply because of unsufficient cooling power of the room-temperature magnet, the magnet status information of the magnet power supply can be wrong. The magnet protection function of the magnet power supply prohibits then incorrect operation of the superconducting magnet. Manual operation of the magnet power supply is required to put the system back to routine function: l Close the ERROR window. l Check on the front panel of the magnet power supply the Magnet Status. l Make shure that the actual current of the power supply in the leads is really the persistent current of the magnet. DIVISION IX Page 71 BRUKER ANALYTIK W-Band System Information l On the front panel of the magnet power supply hit the Loc/Rem button and put the power supply into local mode. l Press the Heater button. The power supply then displays the recorded persistent magnet current. If the operator is confident that no damage will be done, then the safety feature can be overridden by holding down the switch heater button for a period of four seconds. Then the switch heater opens with the actual power supply current. l Put the power supply back to remote mode by pressing the Loc/Rem button. l In Xepr click again on activate switch heater. Continue normal operation. DIVISION IX Page 72 BRUKER ANALYTIK W-Band System Information 12. Hybrid Magnet System To achieve magnetic fields in the several Tesla range in volumes of the order of cm3 superconducting magnets have to be employed. In principle a standard NMR magnet for 200 MHz or 300 MHz proton resonance frequency can be used. A wide bore magnet provides enough room for an EPR probehead. There are basically two additional requirements regarding a superconducting magnet system for EPR. These are sweepability and easy sample access. Many experiments require to sweep the magnetic field over the whole range of the EPR spectrum in a time which is convenient for a single experiment. Two-dimensional experiments very often have as one of their axes the magnetic field. The second EPR requirement is easy sample access. Sample changes in the probehead while it is at low temperatures are possible by retracting the sample holder from the cavity and inserting it later with another sample. The probehead stays in the sample cryostat during this operation and does not have to be warmed up and cooled down again. Sample rotation is possible by turning the sample holder from the outside. The Hybrid 6 T EPR Magnet System of Bruker has been designed for the needs of EPR spectroscopy. It consists of a 6 T superconducting magnet and a !30 mT (!300 G) watercooled room-temperature magnet. The two magnets can be operated by the same power supply using the Hybrid Magnet Controller. Both magnets are optimized for safe, fast, and precise operation together with the magnet power supply, the magnet controller and the Xepr software. 12.1. 6 T EPR Superconducting Magnet The 6 T (60000 G) EPR magnet is a split-coil magnet with three room-temperature bores. The vertical bore contains the sample cryostat and the probehead with free access from the top of the magnet. The magnetic field in the center of the magnet is along one of the horizontal bores. This bore is wide enough for the room-temperature magnet. The other horizontal bore direction is perpendicular to the magnetic field in the center. The superconducting magnet operates at 4.2 K in the magnet cryostat which holds liquid helium and liquid nitrogen. Vacuum insulation reduces the boiloff of the liquid cryogens which must be topped up in certain time periods depending on the specific operation of the magnet. The consumption of cryogenic liquids must be regularly controlled to ensure the proper conditions of the magnet. Cryogen level meters are part of the Hybrid Magnet Controller. During the installation of the magnet its field / current value has to be calibrated. By default the system wakes up with a value of 600 G / A. With this value the 94 GHz resonance of a free electron shows up at 3.35 T or at a Main Magnet current of 55.8 A. After calibration of the field / current values their precise values are stored on harddisk. DIVISION IX Page 73 BRUKER ANALYTIK W-Band System Information 12.2. Room-Temperature Magnet The Room-Temperature Magnet consists of two water-cooled coils which are inserted into the big Main Magnet horizontal bore. Electrically they are connected in series to enshure that they carry perfectly the same current. The cooling water connections must be in parallel for optimum cooling which is needed to dissipate the 1 kW of electrical power, which is converted into heat when the coils carry the maximum current. Both coils have temperature sensors which prevent damage to the magnet system in case of water failure. The two sensor cables which connect each coil separately to the Hybrid Magnet Controller cause an Auto-Run Down of the magnet power supply in case of overheating. 12.3. Magnet Power Supply The Magnet Power Supply generates the current for both magnets, the superconducting and the room-temperature magnet. In case of room-temperature magnet operation it additionally initiates an Auto-Run Down of the output current if overheated coils are detected. Improperly connected cables can also lead to Auto-Run Down. In case of superconducting magnet operation the Magnet Power Supply limits current changes to prevent the magnet from quenching. If there are other failures the Quench Detection Mechanism of the power supply limits the magnet voltage to protect the magnet from damages by quenching. Additionally the Quench Detection Mechanism minimizes helium losses during quenches in a way that the heat generated in the magnet during a quench is not completely dissipated in the magnet but most of the energy is taken over by the power supply. The Magnet Power Supply is controlled from the Xepr software via IEEE interface bus. Only in case of a magnet quench the power supply protection mechanisms operate independently. All other normal operations like field sweeps, field steps, sweep ranges, sweep speeds, heater switch operation, and others are software controlled by Xepr. DIVISION IX Page 74 BRUKER ANALYTIK W-Band System Information 12.4. Hybrid Magnet Controller The Hybrid Magnet Controller contains the cryogenic liquid level meters, magnet current control, and heater switch control. The helium level meter indicates on its LCD display a number equivalent to the helium level in the magnet. It operates two probes inside the magnet which are selected by the switch PROBE 1 or 2. The sampling time is set by a switch SAMPLE to 10 s or 7 h. This switch should normally be in the 7 h position to minimize helium boiloff. Only during topping up the magnet with liquid helium or during main magnet sweeps this switch can be set to the faster sampling rate. By pressing the READ button, a helium level measurement can be requested immediately. LEVEL is a potentiometer which sets the alarm level. The ALARM blinks red if the helium level in the magnet is less than the minimum. In case of low helium level in charged superconducting magnets the topping-up of liquid helium obtaines highest priority. The nitrogen level meter indicates on an analogue display the nitrogen content of the magnet in percent. The LEVEL potentiometer sets the alarm level. The ALARM blinks red if the nitrogen level in the magnet is less than the minimum. For magnet heater switch operation the heater current output of the Magnet Power Supply is used. The HEATER SELECT switch determines which heater is potentially in operation. There are five positions of this switch: O: M: Z: X: Y: no heater connected main magnet heater Z1 shim coil heater X shim coil heater Y shim coil heater This switch may not be operated when the Magnet Power Supply indicates Confirmed in the Heater Control field. Switching the HEATER SELECT switch with a heater being open and energized magnet leads may cause severe damage of the superconducting magnet. The big switch on the Hybrid Magnet Controller determines if the Room-Temperature Magnet or the Main Magnet current leads are connected to the Magnet Power Supply. A very low resistance connection is made on its M position to the Main Magnet, or on its R position to the Room-Temperature Magnet. It is not recommended to leave the switch at its O position. DIVISION IX Page 75 BRUKER ANALYTIK W-Band System Information The operation of the main switch is potentially hazardous if the magnet power supply is at non-zero current. There are five magnet status monitors. Electrical connections, the Room-Temperature Magnet and the Main Magnet can be examined: ON: TEMP: MAIN VOLTAGE: TOP TEMP: BOTTOM TEMP: monitor on high temperature main magnet voltage main magnet top temperature main magnet bottom temperature. The green ON LED is on when the Magnet Power Supply Parallel I/O is connected to the Hybrid Magnet Controller. This enables the Auto-Run Down feature in case of Room-Temperature Magnet operation. The Magnet Power Supply activates the AutoRun Down of the output current to Zero if there is not sufficient cooling of the RoomTemperature Magnet. The red TEMP LED only is on if the Room-Temperature Magnet is overheated or if the sensor cables are unplugged. MAIN VOLTAGE is an output for a battery operated voltage meter to observe the voltage of the Main Magnet. The connection to the magnet is established when the shim rod is inserted to the magnet and connected with its 19 way plugs. TOP TEMP and BOTTOM TEMP are leads to Allan Bradley resistors at the top and the bottom of the Main Magnet coil. During magnet cool down or after a quench the resistance at these two outputs should be checked. The connection to the magnet is established when the shim rod is inserted to the magnet and connected with its 19 way plugs. DIVISION IX Page 76 BRUKER ANALYTIK W-Band System Information 12.5. The CJ Method For field control of sweeps with the Room-Temperature Magnet it is sufficient to directly convert the current through the two water-cooled room-temperature coils which are connected in series. The precision of the magnetic field offset generated by the Room-Temperature Magnet is determined by the precision of the field / current calibration which is typically 10-4 of the hyperfine constant. Using the Bruker Manganese Calibration Sample a precision of better than 10 mG over the full sweep width of the Room-Temperature Magnet can be achieved. Field sweeps of superconducting magnets in general are more complicated. The superconducting Main Magnet of the Bruker Hybrid Magnet system has been optimized for safe, fast, and precise field control. The safety requirements of superconducting coils can only be achieved with additional electrical elements like resistors and diodes inside the magnet. The consequence of these additional elements is that the output current of the magnet power supply is not neccessarily the current through the magnet. Fig. 22 Simplified Model of a superconducting magnet connected to a power supply. A largely simplified model is illustrated in Fig. 22. The Main Magnet with its inductance LMM is connected with normal-conducting main leads with their resistance RML to the power supply delivering the current IPS. Parallel to the magnet there is the heater switch with its resistance RHS. Changes in the power supply output current create first an additional current through RHS and accordingly also a voltage across the magnet which slowly changes the magnetic field. The magnet current and accordingly its magnetic field depend on the actual status of the magnet and on the conditions before. Therefore the field / current calibration of the Main Magnet is precise only under static conditions. The static condition of a superconducting magnet after current changes is usually reached after waiting times of minutes or even hours. Such long waiting times are acceptable for the installation of magnets used for NMR spectroscopy or beam accelerators but they are not acceptable for EPR spectroscopy. DIVISION IX Page 77 BRUKER ANALYTIK W-Band System Information 52 50 Current / A 48 46 44 42 40 38 0 20 40 60 80 100 120 140 160 180 200 220 Tim e / s Fig. 23 The field hysteresis of a superconducting magnet (see text!). In Fig. 23 the current hysteresis for a superconducting magnet is demonstrated. The curve labelled (PS) is a linear current ramp of the power supply beginning at time 60 s with a start value of 40 A and ending at 180 s at 50 A. The curve labelled (up) shows the current through the coil of the magnet. It slowly starts to follow the current ramp. After 60 s the slope of the current through the magnet is about the desired slope. But there is a constant difference in current. At the end of the sweep the current through the magnet still increases and the difference between the current through the magnet and that of the power supply decreases. The curve labelled (down) is valid when time is reversed, i.e. for a down sweep with otherwise the same parameters. There are three obvious effects from sweeping a superconducting magnet. (i) One is the slow start of the current in the magnet and therefore its magnetic field. (ii) The shift in current around the center of the sweep. (iii) The slow approach of the magnet to the desired field at the end of the sweep. The Current Jump Method (CJM) is the solution for safe, fast, and precise field control of the Main Magnet of the Bruker Hybrid Magnet system. After entering the Main Magnet Sweep Mode with „Connect Main Magnet“ in the Spectrometer Configuration, W-Band Configuration window of the Xepr program the CJ method automatically is selected for field control. The CJM requires two additional parameters to the magnet calibration values. These are the DIVISION IX Page 78 BRUKER ANALYTIK W-Band System Information l Safe Current Rate, and the l Jump Current Rate. The Safe Current Rate determines the maximum speed a superconducting magnet can be swept. If the Safe Current Rate is exceeded for time constants longer than minutes the magnet will definitely quench. For shorter times, higher current rates are used to push the magnet to the desired condition, either sweeping or stopping the magnetic field. If this is done in the right way, fast and precise field changes are possible without quenching the magnet. For this the CJ method employs the Jump Current Rate which is larger than the Safe Current Rate. The Safe Current Rate value in the spectrometer configuration window of Xepr must be carefully chosen and may not be changed by untrained personel. For example, if the Main Magnet is swept without using the CJ Method from 1 T to 5 T (10000 to 50000 G), the shift between an EPR line detected in the center at 3 T during an up-field sweep and the same line during the following down-field sweep can be larger than 0.1 T (1000 G). Using the CJ Method and otherwise the same sweep parameters, the shift is smaller than 1 mT (10G). Note that this is not the inaccuracy of the magnetic field, since it can be directly reduced by slowing down the sweep speed. So for higher precision experiments just the Conversion Time must be increased to increase field precision. Another example is the field behaviour shortly after starting a field sweep experiment. Without using the CJ Method, the distance between two EPR lines close to the side of the spectrum can be smaller than their actual distance by more than 0.1 T (1000 G). The CJ Method reduces the error in line distances to less than 1 mT (10 G). 52 50 Current / A 48 46 44 42 40 38 0 20 40 60 80 100 120 140 160 180 200 220 Tim e / s DIVISION IX Page 79 BRUKER ANALYTIK W-Band System Information Fig. 24 Eliminated field hysteresis of a superconducting magnet using CJM (see text!). The elimination of the field hysteresis using the CJ Method is shown in Fig. 24. The curve labelled (up) is the current through the power supply for sweeping the magnet upward from 40 A to 50 A. At the beginning the power supply increases its output current relatively fast. At the end of the sweep this current jump occurs in the opposite direction. The reaction of the magnet is labelled (MM). It begins its constant current ramp, sweeps the field linearly, and at the end when the current of the power supply is jumped back the magnet is at the desired current. The curve labelled (down) is the power supply current for the down sweep. With this type of magnet operation the hysteresis of the magnetic field of superconducting magnets is greatly reduced. It is clear however, in reality the simple model illustrated before is not sufficient to explain and compensate all of the current / field effects during sweeps of superconducting magnets. But if the parameters for the magnet operations using the CJ Method are chosen carefully then high-precision field sweeps with superconducting magnets can be done in a simple, fast, and still safe way. The operation of the CJ Method is observed at the Main Voltage output of the Hybrid Magnet Controller. Under static conditions the Main Magnet Voltage is 0 mV. Starting a field sweep experiment from the actual field to a higher field, the software pushes rapidly the magnet power supply with the Jump Current Rate to a certain, but safe, positive Main Magnet Voltage. This voltage is constant during the field sweep experiment indicating a constant magnetic field change and jumps back close to zero at the end of the experiment. During the sweep experiment, the Safe Current Rate cannot be exceeded to protect the magnet from quenching. But at the beginning and at the end of the field sweep, the natural time constants of the Main Magnet in the order of many minutes are greatly reduced by CJM. The Jump Current Rate is always bigger than the Safe Current Rate. However, it cannot be extraordinary larger because the Quench Detect Mechanism of the magnet power supply watches for big current changes of the magnet. A safe recommendation for choosing the Jump Current Rate is to determine it as ten times the Safe Current Rate. For the Quench Detect Mechanism then it is important that the inductance value of the magnet power supply has to be set to about the magnet inductance divided by five. Note that the inductance value in the spectrometer configuration menue of Xepr has to be the correct magnet inductance. With this setup the Quench Detect Mechanism of the power supply is enabled to protect the magnet in case of malfunctions of the spectrometer control electronics or the magnet itself. DIVISION IX Page 80 BRUKER ANALYTIK W-Band System Information 12.6. Magnet Calibration EPR experiments are performed either by sweeping the magnetic field or at a fixed magnetic field. In many cases the actual applied field at the sample position is an extremely important parameter which must be known with high precision. Ideally the magnetic field is measured simultaneously with but independently from the EPR experiment. In general this is impossible or at least impractical. An elegant method to measure the magnetic field simultaneously to the EPR experiment is done with a probe outside the microwave cavity. The probe can be made in a way that it does not interact with the EPR experiment. Since most experiments are performed in a cryostat it is very likely that the distance of the field measurement position and the EPR sample is on the order of centimeters. This requires a very careful consideration of magnetic field gradients around the sample position. If the magnet power supply has a very precise current control and the magnet is made so that its electrical parameters are highly constant, then it is possible to calibrate the current to the field at the sample position in advance. The calibration values are stored and used at later times for other samples. The Bruker E 600 / 680 series spectrometers are equipped with such a highly precise magnet power supply and the Bruker / Magnex 6 T EPR magnet has been developed for precise and reproducible magnetic field control. The spectrometers are tested with special manganese-doped calcium oxide powder samples. One sample is delivered with the spectrometer to the customer that he also can use the sample for sensitivity checks and calibration routines. Most of the manganese ions responsible for six intense and narrow lines are surrounded by the cubic crystal symmetry of the CaO lattice. The g-tensor of these samples is highly isotropic and the g-factor has been determined very precisely to g = 2.0011. Both, g-tensor and hyperfine anisotropic contributions must be much smaller than the observed peak-to-peak linewidth of the individual lines which is about DBpp = 0.7 G. Together with the high signal-to-noise ratio which is obtainable from the calibration samples the line positions in an experimental EPR spectrum can be measured theoretically with precision better than 100 mG. The isotropic hyperfine interaction coupling constant has been precisely determined to Aiso = 86.23 G. DIVISION IX Page 81 BRUKER ANALYTIK W-Band System Information For the evaluation of the center of the spectrum even at these high frequencies secondorder shifts must be taken into consideration. For the two center lines which are used to determine the field / current calibration the second-order shift contribution at 94 GHz is DBsos = 17 Aiso2 / 4 Bcenter = 0.94 G. Fig. 25. The EPR spectrum of the Bruker manganese calibration sample. In Fig. 25 the EPR spectrum of a manganese calibration sample taken at room temperature is shown. There are additional weak signals to the narrow six lines which are used for calibration purposes. These signals vary from sample to sample since they are due to the natural contamination of the minerals. The broad line between the second and third manganese lines prehibits that they can be used for the calibration of the modulation coil. One of the other lines should be chosen for this. DIVISION IX Page 82 BRUKER ANALYTIK W-Band System Information 12.6.1. Main Magnet Calibration The main magnet can be calibrated even with other parameters being set imperfectly. However, if other parameters like the Main Magnet Inductance or the Supercon Switch Resistance are changed later by a considerable amount then the main magnet calibration can be inaccurate and must be checked. Warning: Setting the Main Magnet Calibration value to a very erroneous number can cause malfunction of the superconducting magnet. This value in the spectrometer configuration window of Xepr must be carefully chosen and may not be changed by untrained personel. The Main Magnet Calibration value is determined from two EPR spectra taken from the manganese calibration sample. A relatively wide field sweep of 2000 G or more approximately around the center of the spectrum is chosen and the main magnet is swept up-field measuring one EPR spectrum and it is swept down-field to record a second one. Depending on the actual sweep speed there is a small hysteresis between the two spectra. This hysteresis vanishes only for very small sweep speeds with a long Conversion Time. For optimum calibration a fast sweep speed is appropriate and the hysteresis can be taken into consideration. From the two spectra the four line positions B3up of the third line in the up-field sweep, B4up of the fourth line, B3dn of the third line in the down-field sweep, and B4dn are read out from the Xepr program. These values are only approximate values since they are derived from the actual Main Magnet Calibration value CMapp before calibration. From the four line positions the approximate center field has to be calculated to Bcenter = (B3up + B4up + B3dn + B4dn) / 4. From Bcenter, the measurement spectrometer frequency ns, and the actual Main Magnet Calibration value CMapp the new Main Magnet Calibration value is then calculated to CM = CMapp * 357.05844 G * ns / (Bcenter + 0.94 G) GHz . This value has to be entered in the W-Band Configuration table in the Spectrometer Configuration window and must be saved there that Xepr uses the improved calibration value from then on. Spectra from previous field sweeps are not automatically recalibrated. If neccessary this can be done via the Data Processing capabilies of Xepr. Note, that the second-order shift is taken into account in the calculation of CM. DIVISION IX Page 83 BRUKER ANALYTIK W-Band System Information 12.6.2. Room-Temperature Magnet Calibration The Room-Temperature Magnet Calibration is done in a similar way as that for the Main Magnet using the center two lines of the manganese calibration sample. A field swept EPR spectrum is recorded with a Sweep Width of 600 G performed with the Room-Temperature Magnet. Depending on the actual parameters there may be also some hysteresis between up-field and down-field spectra. But with reasonable Conversion Times the much smaller hysteresis of the Room-Temperature Magnet can be neglected. Fig. 26. The third and fourth maganese lines. In Fig. 26. the third and fourth lines of the manganese calibration sample are shown. The distance Aapp = B4 - B3 between the inner two lines is measured with the cursor in Xepr. The new Room-Temperature Magnet Calibration value is then CR = CRapp * 86.23 G / Aapp. This value has to be entered in the W-Band Configuration table in the Spectrometer Configuration window and must be saved there that Xepr uses the improved calibration value from then on. Spectra from previous field sweeps are not automatically recalibrated. If neccessary this can be done via the Data Processing capabilies of Xepr. Note, that the second-order shift is taken into account in the calculation of CR. DIVISION IX Page 84 BRUKER ANALYTIK W-Band System Information 12.6.3. Determination of Current Rates The Safe Current Rate and the Jump Current Rate are determined carefully during main magnet field sweeps. This can be done with a conventional field swept continuous-wave experiment setup. No EPR signal is required for this. Warning: The Main Magnet may not be operated with incorrect set current rates.Setting the values to too big numbers can cause malfunction of the superconducting magnet. These values in the spectrometer configuration window of Xepr must be carefully chosen and may not be changed by untrained personel. If you are not shure that the current rates are set correctly consider the specifications of the individual magnet and calculated how fast the magnet can be swept. Then start using about half of this value which is on the order of 1 A / min. Set both, the Safe Current Rate and the Jump Current Rate to this value. Set a sweep width of 1000 G and pull the magnet up or down with the adjustment buttons Left or Right in the magnet control window of the parameter window. The main magnet voltage rises slowly and settles then with a much longer time constant to a dynamically stable value. This value must always be smaller than 3.1 V. If you observe at any time higher voltages than 3.1 V hit immediately the Stop Field button in the magnet control window of the parameter window. If the Safe Current Rate value is set too small for the specified field sweep rates its value must be increased in the spectrometer configuration window. It is correctly set if under stable field sweep conditions a constant voltage of 3.0 V can be reached. After this the Jump Current Rate is set to ten times the Safe Current Rate. The Jump Current Rate value is less critical than the Safe Current Rate but it should be in the range of the above given value since the quench protection mechanism is active during main magnet field sweeps. If the Jump Current Rate is too high the quench protection mechanism can ramp the magnet to zero field even if the magnet is in best condition. DIVISION IX Page 85 BRUKER ANALYTIK W-Band System Information 12.6.4. Determination of the Main Magnet Inductance for Xepr The values of the Main Magnet Inductance and the Supercon Switch Resistance determine the amplitude of current jumps. These are used for magnetic field adjustmens with the Left, Center, and Right buttons in the magnet control window and they are also used for field sweep experiments. Since the determination of the precise value for the Supercon Switch Resistance requires a costly procedure it should be fixed to a constant value. The best assumption is to keep its default value of 5.0 W. The precise determination of the Main Magnet Inductance allows to minimize the field hystersis for magnetic field sweeps under different parameter conditions. Fig.27. Up-field sweep (top) and down-field sweep (bottom) with approximately adjusted main magnet inductance. If the value of the Main Magnet Inductance is set approximately to the value given in the Superconducting Magnet manual EPR spectra taken at different Conversion Times show a field hysteresis. The hysteresis is measured with an up-field swept EPR spectrum and a down-field swept EPR spectrum of a sample with narrow lines. The Bruker manganese calibration sample can be used. The appearent field position Bup and Bdn of two corresponding lines is determined with the cursors of Xepr. With the new value of the Main Magnet Inductance L = Lapp + (Bup - Bdn) npts (18ms + CT) RMM / (SW * 2000 ms) DIVISION IX Page 86 BRUKER ANALYTIK W-Band System Information the following sweeps show a minimized hysteresis. This value has to be entered in the W-Band Configuration table in the Spectrometer Configuration window and must be saved there that Xepr uses the improved calibration value from then on. Spectra from previous field sweeps are not automatically recalibrated. If neccessary this can be done via the Data Processing capabilies of Xepr. DIVISION IX Page 87 BRUKER ANALYTIK W-Band System Information 12.7. Magnet Safety 12.7.1. Introduction Superconducting magnets may be operated in complete safety as long as correct procedures are adhered to, negligence can however result in serious accidents. Safety is an important site planning consideration as the customer must ensure that the site is sufficiently spacious to allow safe and comfortable operation. It is the sole responsibility of our customers to ensure safety in the EPR laboratory and to comply with local safety regulations. Bruker is not responsible for any injuries or damage due to an improper room layout or due to improper operating routines. The magnet is potentially hazardous due to: l The effect on people fitted with medical implants (see section 8.2). l The large attractive forces it may exert on metal objects (see section 8.3). l The effect magnetic fields have on certain equipment (see section 8.4). l The large content of liquid cryogens (see section 8.5). A magnetic field surrounds the magnet in all directions. This field (known as the fringe field) is invisible and hence the need to post adequate warning signs in areas close to the magnet. The extent of the fringe field will depend on the magnet, the higher the frequency and the larger the bore, the larger the fringe field. You should note that the fringe field exists in three dimensions and is often significantly greater along the main field direction. Since the fringe field will permeate walls, ceilings and floors, remember to consider personnel and equipment on the floors immediately above and below, as well as next door to the magnet. DIVISION IX Page 88 BRUKER ANALYTIK W-Band System Information 12.7.2. Fringe Fields of High-Field EPR Magnets The fringe field of the Bruker/Magnex 6 T EPR Magnet is larger than that of conventional solenoid magnets. The split-coil design of the EPR magnet with horizontal field direction has as consequence high fringe fields. Fig. 28 The 5 Gauss lines of the 6 T EPR Magnet for different center fields. DIVISION IX Page 89 BRUKER ANALYTIK W-Band System Information Fig. 29 The 5, 10, and 50 Gauss lines of the 6 T EPR Magnet with a center field of 3.5 T. DIVISION IX Page 90 BRUKER ANALYTIK W-Band System Information 12.7.3. Medical Implants The operation of cardiac pacemakers may be affected by magnetic fields. There is also a possibility of harmful effects to people fitted with ferromagnetic implants such as surgical clips. Under no circumstances should people fitted with cardiac pacemakers be allowed to approach the magnet. The 0.5 mT line represents a suitable safety limit for medical devices. This effectively imposes a safety limit upon the general public. The customer must ensure that areas within which the fringe field exceeds 0.5 mT are not open to the public. Figures 8.1 and 8.2 display how far from the magnetic centre the 0.5 mT fringe field extends for the Bruker / Magnex EPR magnet. Display warning signs giving notice of the presence of magnetic fields and the potential hazards at all access points to the 0.5 mT region. These signs are normally delivered with the magnet or can be obtained from Bruker / Spectrospin. 12.7.4. Attractive Forces Large attractive forces may be exerted on ferromagnetic objects brought close to the magnet. The closer to the magnet and the larger the mass, the greater the force. The attractive force may become large enough to move objects uncontrollably towards the magnet. A plastic chain surrounding the magnet is a very simple but effective way of ensuring that no metal objects are brought too close. The recommended safety limit for large magnetic objects that are easily moved (e.g. chairs, gas cylinders, hand carts) is 0.5 mT. You are recommended not to use a metal chair in the magnet room. Gas cylinders containing gaseous nitrogen and helium should be securely strapped to the wall, preferably outside the room altogether. Smaller hand held objects such as screwdrivers, nuts, bolts etc. must never be left lying around on the floor close to the magnet. Dewars containing liquid helium and nitrogen are normally brought close to the magnet when topping up liquid cryogen levels. These dewars must be constructed of non-magnetic material. Any ladders used when working on the magnet should be made of non-magnetic material such as aluminium or wood. DIVISION IX Page 91 BRUKER ANALYTIK W-Band System Information 12.7.5. Effect on Equipment Various devices are affected by the magnet and should be located outside the limits specified in the following section (see figures 8.1 and 8.2 for corresponding fringe field distances). 5 mT: Magnet power supply, RF power amplifier, turbomolecular pumps, helium mass spectrometer leak detector. Electrical transformers which are a component of many electrical devices may become magnetically saturated in fields above 5 mT. The safety characteristics of equipment may also be affected. 2 mT: Magnetic storage material e.g. tapes. The information stored on tapes may be destroyed or corrupted. 1 mT: Computers, X-ray tubes, radiography equipment, credit cards, bankers cards, watches, clocks, cameras. The magnetically stored information in computers and credit cards may be corrupted in fields greater than 1 mT. Small mechanical devices such as watches or cameras may be irreparably damaged. (Digital watches may be worn safely). 0.5 mT: Cathode ray tubes, monochrome computer displays. Magnetic fields greater than 0.5 mT will deflect a beam of electrons leading to a distortion of the screen display. 0.2 mT: Colour computer displays. Color displays, televisions, and video monitors are more sensitive to distortion than monochrome displays. The precise threshold field strength at which computer displays are distorted will depend on shielding and orientation relative to the magnet. 0.1 mT: Only very sensitive electronic equipment such as image intensifiers, nuclear cameras, electron microscopes, PET scanners, CT scanners, ultrasound instruments, linear accelerators, lithotriptors, high-precision measuring scales, and cyclotrons will be affected. DIVISION IX Page 92 BRUKER ANALYTIK W-Band System Information 12.7.6. Magnetic Environment While minimum requirements for routine EPR operation are not particularly stringent, it is worthwhile to optimize the magnet´s environment if more sophisticated experiments need to be carried out. The proposed site may appear quite adequate for present needs but future developments in EPR must always be considered. The trend will undoubtedly be towards higher field strengths with subsequently more demanding environments. Every site is unique and customer requirements differ. Very often a customer must make a compromise between system performance and practical realities. It may not be feasible to remove previously installed structures. The presence of any ferromagnetic materials in the immediate vicinity of the magnet will decrease the magnet´s homogeneity and may degrade overall performance. The effect of such objects as metal pipes, radiators etc. can be overcome by appropriate shimming but where possible this should be avoided. When estimating the effect of ferromagnetic materials the following points should be noted: The strength of interaction depends most strongly on distance (by the 7th power) whereas it varies in direct proportion with mass. Distance of the object from the magnet is far more critical than the mass of the object itself. Moving magnetic material will cause a much greater problem than static masses. Distortion caused by a stationary mass e.g. radiator can usually be overcome, whereas the effect of moving masses (e.g. metal doors, chairs etc.) is unpredictable. The presence of any ferromagnetic materials in the immediate vicinity of the magnet will decrease the magnet´s homogeneity and may degrade overall performance. The effect of objects such as metal pipes, radiators etc. can be overcome by appropriate shimming but where possible this should be avoided. There should no static iron be present within the 5 mT region. The customer should consider removing iron piping that is likely to lie within such fields prior to installation. If the magnet must be located close to iron or steel support beams a proper alignment is important. Support beams should pass through or be symmetric to the magnet axis. The 5 mT limit is suitable for a mass of up to 200 kg. For greater masses the limiting area must of course be accordingly extended. The presence of static magnetic material close to the magnet presupposes that these masses are firmly secured e.g. radiators, pipes. No moveable masses should be located within the 0.5 mT region. Potential sources of moving iron are metal doors, drawers, tables chairs etc. For larger masses than 200 kg distorting effects may be experienced at fields as low as 0.1 mT. DIVISION IX Page 93 BRUKER ANALYTIK W-Band System Information For high precision work extending the region within which there are no moveable magnetic material to 0.05 mT may be justified. Table 8.1 gives a list of common sources of magnetic distortion and the recommended limits outside of which these sources should be located. It must be emphasised however that such recommendations represent a situation which may not always be achievable. Object Steel reinforced walls Iron beams Radiators, plumbing pipes Metal table, metal doors Filing cabinet, steel cabinet Massive objects, e.g. boiler Hand trolley Elevators Cars, fork-lifts Trains, trams Maximum Field Strength 5 mT 3 mT 3 mT 3 mT 3 mT 3 mT 0.2 mT 0.05 mT 0.05 mT 0.01 mT Table 8.1 Acceptable magnetic objects. DIVISION IX Page 94 BRUKER ANALYTIK W-Band System Information 12.7.7. Cryogens The magnet contains liquid helium and nitrogen. These liquids, referred to as cryogens, serve to keep the magnet core at a very low temperature. Topping-up of the liquid helium and nitrogen levels within the magnet is effectively the only magnet maintenance required. Ensuring adequate safety procedures when handling cryogens must be taken into account at the site planning stage. When topping up the cryogen levels large dewars must be brought close to the magnet. Ensure that the magnet room is suitably spacious to allow easy access for the dewars. There must also be enough room for a ladder. As a rule of thumb the magnet should be accessible to a distance of 2m over at least half of its circumference and be no closer than 0.65m to the nearest wall. Molecular weight Boiling point at atmospheric pressure (K) (°C) Approximate expansion ratio (Volume of gas at 15°C and atmospheric pressure produced by unit volume of liquid at normal boiling point) Density of liquid at normal boiling point (kg / m3) Density of gas at room temperature (g / m3) Latent heat (J / g) Enthalpy difference from gas at boiling point to 77 K (J / g) Enthalpy difference (gas) from 77 K to 300 K (J / g) Evaporation rate (l / hW) Colour of liquid Colour of gas Odour of gas Toxicity Explosion hazard with combustible material Pressure rupture if liquid or cold gas is trapped Fire hazard: combustible promotes ignition directly liquefies oxygen and promotes ignition Table 8.2 Properties of cryogenic substances. Nitrogen 28 77 -196 Helium 4 4.2 -269 680 740 808 1250 198 234 0.023 none none none very low no yes no no yes 125 179 20.9 384 1157 1.38 none none none very low no yes no no yes All magnets release evaporated helium and nitrogen gas. Adequate ventilation must be provided, even though these gases are non-toxic. The magnet must never be located in an airtight room. Even in the case of a quench, whereupon the room may suddenly fill with evaporated gases, doors and windows will provide sufficient ventilation. The door must be accessible from all parts of the magnet room. Ventilated storage space for the liquid helium and nitrogen dewars must also be planned for. DIVISION IX Page 95 BRUKER ANALYTIK W-Band System Information 12.7.8. Magnet System Summary When site planning the primary consideration is safety and you should follow the procedure outlined below. Refer to figures 21 and 22 for the extent of the fringe magnetic field appropriate to the magnet type which you have ordered. Establish the position of the 0.5 mT line relative to the proposed location of the magnet. Do not forget that the fringe field exists in three dimensions. Assess the feasibility of ensuring that no members of the public are exposed to fields greater than 0.5 mT. Apart from posting adequate warning signs you may have to limit access by means of locked doors or other suitable barriers such as plastic chains etc. Ensure that no heavy moveable magnetic objects are likely to pass within the 0.5 mT zone. Ensure that the site is adequately spacious so that cryogen containing dewars can easily be moved in and out of the magnet room. Check that there is adequate working space immediately around the magnet. Take an inventory of equipment in the EPR laboratory itself and also in adjoining rooms that may be affected by the fringe field. Ensure that all relevant personnel are adequately informed of the potential hazards of superconducting magnets. This must include people working in adjoining rooms as well as cleaning and security staff. Some customers prefer not to give non-EPR staff access to the magnet room. If non-EPR staff do have access to the magnet room then, in the case of problems, a contact telephone number should always be at hand. DIVISION IX Page 96 BRUKER ANALYTIK W-Band System Information 13. Facility Planning 13.1. Laboratory Space Requirements Low-temperature EPR experiments and the regular topping up of cryogens for the superconducting magnet requires space behind or in front of the spectrometer. Depending on the local laboratory conditions there must be paths for the liquid helium and liquid nitrogen storage dewars. In addition, it is highly recommended to allow enough free space around the magnet because of its possibly high fringe field (see magnet section of this manual!) . Fig. 30. ELEXSYS E 600 layout. View from top for a E 600 / 680 system. Dimensions are in mm. The dotted line marks the 5 mT (50 G) fringe field surface at the height of the magnetic center with the magnet being at 3.5 T. All dimensions have to be considered as a possible suggestion for the placement of the units. DIVISION IX Page 97 BRUKER ANALYTIK W-Band System Information Fig. 31. ELEXSYS E 600 layout. View from front of magnet of a E 600 system. Dimensions are in mm. The dotted line marks the 5 mT (50 G) fringe field surface with the magnet being at 3.5 T. DIVISION IX Page 98 BRUKER ANALYTIK W-Band System Information Fig. 32. ELEXSYS E 600 / 680 layout. Bridge and probehead arrangement around the magnet. Dimensions are in mm. The crosshair inside the magnet marks the magnetic center. The height of the W-band bridge, of the waveguide connection to the probehead, the probehead’s length, and the distance to the magnetic center are given with respect to the top of the sample cryostat. DIVISION IX Page 99 BRUKER ANALYTIK W-Band System Information Fig. 33. ELEXSYS E 680 X. View from top of an E 680 X system. Dimensions are in mm. The dotted line marks the 5 mT (50 G) fringe field surface at the height of the magnetic center with the magnet being at 3.5 T. All dimensions have to be considered as a possible suggestion for the placement of the units. DIVISION IX Page 100 BRUKER ANALYTIK W-Band System Information Fig. 34. ELEXSYS E 680 X. View from front of magnet of an E 680 X system. Dimensions are in mm. The dotted line marks the 5 mT (50 G) fringe field surface with the magnet being at 3.5 T. DIVISION IX Page 101 BRUKER ANALYTIK W-Band System Information Fig. 35. Fringe field distribution of the Bruker / Magnex 6 T EPR magnet. The gray circle in the center represents the magnet outside diameter. The plotted lines mark the 0.5 mT (5 G) surface of the magnet being at different center fields. DIVISION IX Page 102 BRUKER ANALYTIK W-Band System Information Fig. 36. Fringe field distribution of the 6 T EPR magnet being at 1 T. The elliptical lines mark the 5 mT (50 G), 1 mT (10 G), and the 0.5 mT (5 G) surfaces. Fig. 37. Fringe field distribution of the 6 T EPR magnet being at 3.5 T. The elliptical lines mark the 5 mT (50 G), 1 mT (10 G), and the 0.5 mT (5 G) surfaces. DIVISION IX Page 103 BRUKER ANALYTIK W-Band System Information 13.2. Electrical Power Consumption Spectrometer Type E 500 E 580 E 600 A E 600 E 680 EMX 6/1 EMX 2.7 ESP 300 A ESP 300-2.7 ESP 300-7 ESP 300-12 ESP 300-15 ESP 300-22.5 Basic System 5.5 kW 10 kW 2.5 kW 5.7 kW 6.5 kW 3 kW 5 kW 1.4 kW 5 kW 10 kW 16 kW 19 kW 25 kW Complete System 11.5 kW 15.8 kW Breaker Current Specification 208 / 220 V 380 / 420 V 32 A 20 A 47 A 32 A 25 A 15 A 12.9 kW 32 A 20 A 13.7 kW 32 A 20 A single phase including magnet 10.8 kW 32 A 20 A 7.2 kW 25 A 15 A 10.8 kW 32 A 20 A 15.8 kW 47 A 32 A 22 kW 60 A 38 A 25 kW 75 A 40 A 32 kW 88 A 48 A Table 16.1 Electrical Power Requirements DIVISION IX Page 104 BRUKER ANALYTIK W-Band System Information 13.3. Installation Preparation l Weights: Weight of the empty superconducting magnet: 600 kg. Weight of magnet including cryogenic liquids: 700 kg. l Outline dimensions of the magnet: Maximum diameter of cryostat: 860 mm. Outer diameter of magnet stand: 800 mm. Overall height of magnet on stand without probehead and retracted leads: 1970 mm. Minimum ceiling height required for probehead insertion and helium filling: 3.5 m. l Floor loading: Magnet with square stand: 1.1 t / m2 (230 lb / sq ft). l For vacuum pumping a turbomolecular pump with 100 l / s power and a two-stage pump with 4 m3 / h are recommended. A helium leak detector is useful during installation. l Cooling the magnet from room temperature to 4.2 K: Liquid helium volume: 400 l. Liquid nitrogen volume: 400 l. For the cool down with interrupts caused by events not connected with the magnet installation some extra amount of liquid helium should be reserved. Helium gas tank with 200 bar (purity 4.6 or better). Nitrogen gas tank with 200 bar (purity 4.6 or better). l The electrical power consumption of the magnet power supply is 3.3 kW @ 220 V single phase outlet. The total power consumption of the W-band spectrometer without accessories amounts to 6.5 kW from a three phase line. l Cooling water: Water pressure: min. 0.3 MPa (43 psi, 3 bar). Microwave bridge: 1 l / min. Room-temperature magnet: 0.5 l / min. l Safety in the vicinity of large magnetic fields: People with pacemakers and medical metallic implants must stay outside the 0.5 mT (5 Gauss) line. Consider the local legislation rules. All large ferromagnetic objects must be kept far away from the magnet and must be securely fixed. Objects like gas cylinders, tranformers, tool cases, etc. Should also stay outside the 0.5 mT (5 Gauss) line. All forms of magnetic storage media should be kept outside the 1 mT (10 Gauss) line. This includes credit cards, hard disks in computers and floppy disks. Mechanical watches are also at risk. Electrical equipment using transformers and relays, magnet power supplies, turbo molecular pumps, etc. must always be outside the 5 mT (50 Gauss) line. DIVISION IX Page 105 BRUKER ANALYTIK W-Band System Information 13.4. On-Site Customer´s Preparations For successful installation of W-band spectrometers Bruker prepares at the time of shipment as much as can be done in the factory. Because for installation and later operation of the system some details depend on the local customs at the customers site the customer himself must read and understand the installation information. The customer in advance must prepare the positions listed in the following table. The W-band system installation cannot begin if not all of these requirements are met. Please acknowledge each position in the following table in the OK column, sign a copy of this page and send it to Bruker. After reception of this page the installation arrangements can be made. Pos. 1. Laboratory space 2. 3. 4. 5. 6. 7. 8. 9. 10. 11. 12. 13. 14. Required see facility planning in this manual. Date Amount OK Laboratory access Cooling water outlet Electricity outlet Magnet in place on stand Vacuum pump available Nitrogen gas Helium gas Liquid nitrogen available Liquid helium available Adaptor at helium storage dewar for transfer siphon available Sufficient capacity of the helium recovery system. 3 bar, 2 l / min 3-phase 380 V 20 A levelled and rigid 100 l/s, 4m3 / h 200 bar 200 bar 400 l 400 l depends on on-site helium storage dewars 100 l LHe / h correspond to 74 m3 helium gas per hour Adaption of magnet to recovery DN 25 outlet at magnet line Protection considerations of high see magnet section of magnetic fields taken into account this manual. Table 3. Installation preparation check list. The above listed installation preparations will be arranged in time before actual installation will take place. Customer´s Name DIVISION IX Date Signature Page 106