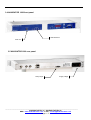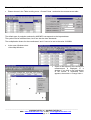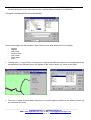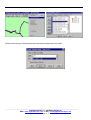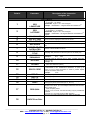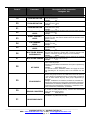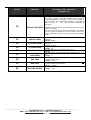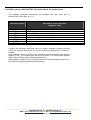
1
FM NAVIGATOR
USER’S MANUAL
Edition : 05/09
Language : English
____________________________________________________________________________________________________________
AUDEMAT-AZTEC SA – AUDEMAT-AZTEC INC
WEB : www.audemat-aztec.com - e-mail : [email protected]
Page 1/57
SUMMARY
1. BEFORE YOU START.....................................................................................................................................................5
2. INTRODUCTION..............................................................................................................................................................6
3. DESCRIPTION OF THE EQUIPMENTS..........................................................................................................................7
3.1 BLOCK DIAGRAM OF THE MODELS NAVIGATOR 10, NAVIGATOR 100, NAVIGATOR 1000..........................................7
3.2 NAVIGATOR 10/100 FRONT PANEL..............................................................................................................................8
3.3 NAVIGATOR 10/100 REAR PANEL ...............................................................................................................................9
3.4 NAVIGATOR 1000 FRONT PANEL...............................................................................................................................11
3.5 NAVIGATOR 1000 REAR PANEL ................................................................................................................................11
4. FRONT PANEL OPERATION .......................................................................................................................................12
4.1 SIGNIFICATION OF THE "MENU LOGOS"..........................................................................................................................12
4.2 GENERAL RULES .........................................................................................................................................................12
4.3 THE FREQUENCY MEMORIES MENU (SHORT DEPRESSION OF THE PGM BUTTON) ..........................................................12
4.4 TO CONFIGURE THE NAVIGATOR 10 FM (LONG DEPRESSION OF THE PGM BUTTON) ................................................13
¯ To return to the "main parameters" menus ...........................................................................................................13
¯ To adjust the headphones output volume (headphone jack) ................................................................................13
¯ MUTE function (audio inhibition of the headphones output) .................................................................................13
¯ To adjust the display brightness............................................................................................................................14
¯ To configure the scanning mode ...........................................................................................................................14
¯ To enable the RDS error correction procedure .....................................................................................................14
¯ To configure the type of DARC frame to be decoded ...........................................................................................14
¯ To configure the "group code" section of the pager address ................................................................................14
¯ To configure the "individual code" section of the pager address ..........................................................................14
¯ To select the FM Multiplex signal source (tuner/BNC socket) ..............................................................................14
¯ To adjust the FM multiplex signal input level.........................................................................................................15
¯ To adjust the FM multiplex signal output level ......................................................................................................15
¯ To reinitialize the FM Navigator in factory set-up..................................................................................................15
4.5 NAVIGATOR 10 NAVIGATOR GENERAL MENU .............................................................................................................16
¯ To choose the reception frequency .......................................................................................................................16
¯ To evaluate the signal level received on the antenna input ..................................................................................16
¯ To display the deviation generated by the FM multiplex signal ............................................................................16
¯ To display the FM multiplex signal power: CCIR conformity.................................................................................16
¯ To display the FM multiplex signal overshoot (ref=75 KHz)..................................................................................17
¯ To display the demodulated audio levels: Left, Right............................................................................................17
¯ To display the demodulated audio levels: Mono track M=L+R, Stereo track S=L-R ............................................17
¯ To display the status of the stereophonic detector / to force into monophonic.....................................................17
¯ Deviation generated by the 19000Hz stereo pilot signal.......................................................................................17
¯ Detection of the 57KHz RDS sub-carrier ..............................................................................................................17
¯ Deviation generated by the RDS signal at 57KHz ................................................................................................17
¯ Detection of the 76 KHz DARC sub-carrier/ DARC frame type definition .............................................................18
¯ Deviation generated by the DARC signal at 76 KHz.............................................................................................18
¯ RDS : to display the PS code (Program Service)..................................................................................................18
¯ RDS : to display the PI code (Program Identification)...........................................................................................18
¯ RDS : to display the TA and TP codes (Traffic Announcement and Traffic program) ..........................................18
¯ RDS : PTY code (Program TYpe) .........................................................................................................................18
¯ RDS : to display the PTYN code (Program TYpe Name)......................................................................................18
¯ RDS: to display the alternative frequencies ..........................................................................................................19
¯ RDS: to display the time and the offset transmitted in RDS..................................................................................19
¯ RDS: to display the date transmitted in RDS ........................................................................................................19
____________________________________________________________________________________________________________
AUDEMAT-AZTEC SA – AUDEMAT-AZTEC INC
WEB : www.audemat-aztec.com - e-mail : [email protected]
Page 2/57
¯ To access the menus related to the recording of measurement campaigns (NAVIGATOR 100) ........................19
¯ To access the GPS parameters measured (model NAVIGATOR 100 only).........................................................19
¯ To access the advanced measurements display ..................................................................................................19
4.7 ADVANCED MEASUREMENT ..........................................................................................................................................20
¯ To exit the "ADVANCED MEASUREMENTS" menu.............................................................................................20
¯ RDS: To display the RDS error rate ......................................................................................................................20
¯ RDS: To display the non-recovered RDS BLOCKS error counter ........................................................................20
¯ RDS : To display the recovered RDS BLOCKS counter .......................................................................................20
¯ RDS : To display the received RDS group counters .............................................................................................20
¯ RDS : To display the IN HOUSE data ...................................................................................................................20
¯ To display the SLOW LABELLING CODES (SLC) ...............................................................................................20
¯ To display the OPEN DATA APPLICATIONS (ODA) information.........................................................................21
¯ To display the RADIO TEXT (RT) .........................................................................................................................21
¯ RDS: To display the RDS paging network identifier (GRPD)................................................................................21
¯ RDS: To display the paging messages .................................................................................................................21
¯ RDS: To clear the RDS paging message memory................................................................................................21
¯ RDS: To display the RDS Music/Speech parameter (MS)....................................................................................21
¯ RDS: To display the Decoder Identifier parameter (DI) ........................................................................................21
¯ To store the 50 strongest FM stations in the program memories .........................................................................21
¯ To store the 50 strongest FM stations with RDS in program memories ...............................................................22
¯ To display the DARC error rate .............................................................................................................................22
4.8 NAVIGATOR 100 NAVIGATOR: GPS MEASUREMENTS.................................................................................................22
¯ GPS: To exit the GPS measurements menu.........................................................................................................22
¯ GPS: To display the number of satellites used by the GPS receiver....................................................................22
¯ GPS: To display the latitude ..................................................................................................................................22
¯ GPS: To display the longitude ...............................................................................................................................22
¯ GPS: To display the altitude ..................................................................................................................................22
¯ GPS: To display the speed....................................................................................................................................22
¯ GPS: To display the UTC time ..............................................................................................................................23
¯ GPS: To display the UTC date ..............................................................................................................................23
4.9 NAVIGATOR 100 : MEASUREMENT CAMPAIGNS ..........................................................................................................24
¯ To exit the campaigns menu .................................................................................................................................24
¯ To define the campaign type .................................................................................................................................24
¯ To select the scanning mode during the measurement campaigns......................................................................24
¯ Define a title for the current campaign (10 chars) .................................................................................................25
¯ To select the scanning mode during the measurement campaigns......................................................................25
¯ To display the available FLASH memory capacity................................................................................................25
¯ To clear the FLASH memory card and all the stored campaigns .........................................................................25
4.10 EXPORTATION OF NAVIGATOR 100 MEASUREMENT CAMPAIGNS ...............................................................................26
4.11 MEASUREMENT CAMPAIGN DOWNLOAD WITH FM EXPLORER .......................................................................................27
4.12 NAVIGATOR 100: EXPORTING MEASUREMENTS TO MAPINFO .................................................................................28
5. NAVIGATOR 1000 NAVIGATOR ..................................................................................................................................32
5.1 NAVIGATOR 1000 MAIN FEATURES ...........................................................................................................................32
5.2 DETECTORS CONFIGURATION ......................................................................................................................................32
5.3 RELAYS OUTPUT .........................................................................................................................................................33
5.4 SIGNALING LEDS ........................................................................................................................................................33
5.5 FAQ: FREQUENTLY ASKED QUESTIONS .........................................................................................................................33
6. OPERATION FROM THE RS232 COM PORT .............................................................................................................35
6.1 TO CONNECT A PC TO THE COM PORT OF THE FM NAVIGATOR ....................................................................................35
6.2 CHOOSING A "TERMINAL" APPLICATION AND PRINCIPLES OF ASCII COMMUNICATION .......................................................35
6.3 ASCII PROTOCOL: GENERAL INSTRUCTION SET OF THE NAVIGATOR 10, 100, 1000 FM NAVIGATOR ........................36
6.4 ASCII PROTOCOL: MEASUREMENT INSTRUCTIONS.........................................................................................................37
6.5 ASCII PROTOCOL: INSTRUCTION SET RELATED TO RDS ................................................................................................38
6.6 ASCII PROTOCOL: INSTRUCTION SET RELATED TO DARC .............................................................................................39
6.7 ASCII PROTOCOL: NAVIGATOR 100 INSTRUCTIONS FOR DOWNLOADING OF MEASUREMENT CAMPAIGNS .......................40
6.8 ASCII PROTOCOL: NAVIGATOR 1000 INSTRUCTIONS FOR THE DETECTORS .................................................................44
7. TECHNICAL SPECIFICATIONS ...................................................................................................................................45
____________________________________________________________________________________________________________
AUDEMAT-AZTEC SA – AUDEMAT-AZTEC INC
WEB : www.audemat-aztec.com - e-mail : [email protected]
Page 3/57
APPENDIX 1: MAPPOINT LIBRARY................................................................................................................................50
1. INSTALLING THE LIBRARY ......................................................................................................................................50
2. IMPORTING MEASUREMENT CAMPAIGN DATA TO MAPPOINT ..........................................................................51
3. EXAMPLE...................................................................................................................................................................53
APPENDIX 2: FM CALIBRATED ANTENNA ...................................................................................................................54
2.1 RF FIELD MEASUREMENT ............................................................................................................................................54
2.2 RESTRICTIONS.......................................................................................................................................................54
2.3 HOW TO CONFIGURE FM EXPLORER FOR REAL TIME FIELD MEASUREMENT? ...................................................................55
2.4 PERFORMING RF FIELD STRENGTH MEASUREMENT IN REAL TIME ...................................................................................56
2.5
HOW TO CONFIGURE FM EXPLORER FOR FIELD MEASUREMENT WITH CAMPAIGN ......................................................57
____________________________________________________________________________________________________________
AUDEMAT-AZTEC SA – AUDEMAT-AZTEC INC
WEB : www.audemat-aztec.com - e-mail : [email protected]
Page 4/57
1. Before you start...
Make sure that your shipment is complete:
Please check that the following components are present in your shipment:
¾ The FM Navigator corresponding to the model that you have ordered
- NAVIGATOR 10: simple FM Navigator without GPS receiver, without Flash memory card
- NAVIGATOR 100: FM Navigator with GPS receiver and Flash memory card
- NAVIGATOR 1000: FM Navigator rack 19" version
¾ Power cable for cigarette lighter socket
¾ 115-240V power supply and cable to power the FM Navigator from an A/C
socket
¾ One RS232 or USB/serial adapter cable to connect to a PC
¾ The 20dB BNC-BNC attenuator *
¾ One 8 MB PCMCIA Flash memory card (except Navigator 10/1000)
¾ Calibrated FM magnetic mount whip antenna
¾ A folder including Audemat-Aztec CD-Rom, control quality and satisfaction
survey
* Note: we recommend using the 20dB attenuator whenever a signal over 90dBµV can be observed at
the input of the navigator: better performances are obtained if the Navigator input is protected against
very high signals. Use of the attenuator is also recommended on transmission sites or in towns where
the entire FM spectrum is full with high signal levels.
IMPORTANT: the FM NAVIGATOR receiver has been designed to operate in compatibility with the "FM
Explorer" PC software. A measurement utility (FM Explorer) is available on our website and on the CDRom provided.
Web site: http://www.audemat-aztec.com
This software can be freely used, without specific license with a NAVIGATOR 10, NAVIGATOR 100,
Navigator 1000.
____________________________________________________________________________________________________________
AUDEMAT-AZTEC SA – AUDEMAT-AZTEC INC
WEB : www.audemat-aztec.com - e-mail : [email protected]
Page 5/57
2. Introduction
The range of FM NAVIGATOR 10, NAVIGATOR 100, NAVGATOR 1000 receivers
The equipment that you have just acquired is a precision unit intended for physical and logical field analysis
of FM multiplex composite signal components and the RF level of any FM radio station.
The AZ10 and AZ100 versions are portable, the AZ1000 model is rack mount. This analysis can be carried
out with ease due to an ergonomic man machine interface.
. AZ10: FM Navigator.
. AZ100: FM Navigator with flash card and GPS receiver for measurement campaigns.
. AZ1000: FM Navigator in 19’’rack with internal 115/230V power supply.
AUDEMAT-AZTEC has incorporated into the AZ10, AZ100 and AZ1000 FM Navigators all the processing
power necessary for DSP (Digital Signal Processing) of the FM sub-carriers (Stereo, RDS, DARC), the
measurement of the RF signal, the measurement of the power of the FM multiplex signal, the accurate
evaluation of deviation overshoots, etc...
The FM Navigator has incorporated and improved all the functions of the decoding and display of RDS data
that you may be familiar with from the AZ1 RDS Monitor product, developed by AUDEMAT-AZTEC several
years ago.
The rotary wheel, buzzer and battery (optional) provide the FM Navigator with the ergonomics essential for
measurements in the field, in the car, and at difficult transmitter sites. The advanced integration of the
electronic functions, thanks to the large memory capacities results in a portable, light and integral product.
The location of the measurements by GPS and their storage in FLASH memory, in ASCII format, on PCMCIA
card medium make the AZ100 model an extremely practical portable unit for use in measurement campaigns
which can now be carried out without a portable PC.
The purpose of this user guide is to allow you to familiarize yourself with your new equipment and discover
all of its functions.
____________________________________________________________________________________________________________
AUDEMAT-AZTEC SA – AUDEMAT-AZTEC INC
WEB : www.audemat-aztec.com - e-mail : [email protected]
Page 6/57
3. Description of the equipments
3.1 Block diagram of the models NAVIGATOR 10, NAVIGATOR 100, NAVIGATOR 1000
Power
Audio
output
MPX
output
MPX
input
Amplifier
Amplifier
+
Amplifier
RS232
+
Attenuator
RS232
Attenuator
Antenna
input
+
Attenuator
L&R
Power
supply
DSP
Measurem
ents
Stereo
decoding
L+R, L-R,
S19, S57,
S76
MPX
RF
front
end
RF level
Flash+GPS
extension
or
Relay
CPU
Display +
LEDs
DARC
decoding
RDS
decoding
PLL
Wheel +
buttons
____________________________________________________________________________________________________________
AUDEMAT-AZTEC SA – AUDEMAT-AZTEC INC
WEB : www.audemat-aztec.com - e-mail : [email protected]
Page 7/57
3.2 NAVIGATOR 10/100 front panel
10 digit alphanumeric
Scrolling & selection wheel
"Stereo" LED
"RDS" LED
"Program" button
"DARC" LED
"Enter" button
____________________________________________________________________________________________________________
AUDEMAT-AZTEC SA – AUDEMAT-AZTEC INC
WEB : www.audemat-aztec.com - e-mail : [email protected]
Page 8/57
3.3 NAVIGATOR 10/100 rear panel
(8)
(7)
(1)
(2)
(3)
(9)
(4)
(6)
(5)
Connectors
1: BNC, 87,5MHz - 108MHz, FM antenna input
2: BNC, FM multiplex input, level can be configured from the front panel.
3: BNC, FM multiplex output, signal coming from the internal tuner, level can be configured on the front
panel.
4: 3.5mm jack, stereo audio output: level can be configured on the front panel
This output can also supply an external amplifier and 600Ω headphones.
5: RS232 serial interface. This connector is designed so that the connection to a PC can be made with a
male-female RS232 ribbon cable.
Pin 1: not connected
Pin 2: TX of the FM Navigator
Pin 3: RX of the FM Navigator
Pin 4: Connected to pin 6 of the same connector
Pin 5: Ground of the FM Navigator, common to the 0V of the plug
Pin 6: connected to pin 4
Pin 7: RTS of the FM Navigator
Pin 8: CTS of the FM Navigator
Pin 9: Power supply input of the FM Navigator, nominal 12V (11 to 15 volts).
6: Power supply. The FM Navigator accepts supply voltages from 11 to 15 volts.
Pin 1: Ground
Pins 2 and 3: Not used
Pin 4: +12V
7: Connector for memory card.
Do not insert any PCMCIA card other than the "Flash Intel series100" type PCMCIA memory cards
into this location. (FM Navigator model NAVIGATOR 100 only).
____________________________________________________________________________________________________________
AUDEMAT-AZTEC SA – AUDEMAT-AZTEC INC
WEB : www.audemat-aztec.com - e-mail : [email protected]
Page 9/57
8: GPS Antenna. Connect the GPS antenna supplied with your Navigator model NAVIGATOR 100.
9: Auxiliary connector (NAVIGATOR 100 only)
Pin 1, 2, 4, 6, 8 and 9: Do not use, reserved for future applications.
Pin 3: RTCM input for differential GPS.
Pin 7: Power supply output for dGPS receiver protected by polyswitch 250mA fuse. The voltage on
this pin is the same as this on the main power supply input.
____________________________________________________________________________________________________________
AUDEMAT-AZTEC SA – AUDEMAT-AZTEC INC
WEB : www.audemat-aztec.com - e-mail : [email protected]
Page 10/57
3.4 NAVIGATOR 1000 front panel
LEDs detectors
Audio out
3.5 NAVIGATOR 1000 rear panel
Relay output
Supply voltage
____________________________________________________________________________________________________________
AUDEMAT-AZTEC SA – AUDEMAT-AZTEC INC
WEB : www.audemat-aztec.com - e-mail : [email protected]
Page 11/57
4. Front panel operation
4.1 Signification of the "menu logos"
)
Enter
Represents a depression of the
‘Enter’ button (right button)
Represents a rotation of the
wheel to the left or right
4.2 General rules
To modify a parameter, press ‘Enter’ to go into modification mode. A ‘=‘ or ‘:’ sign flashes and the wheel is
used to modify the value. A second press on ‘Enter’ locks in the new value. The parameters having only two
possible values change value each time the ‘Enter’ button is pressed.
All the modifiable parameters are saved in non volatile memory unless otherwise stated in the menu
descriptions.
4.3 The frequency memories menu (SHORT depression of the PGM button)
The FM Navigator can save up to 50 frequencies in non volatile memory. Wherever you are in the menus, a
short press on the ‘PGM’ button enters the frequency memory menu. A memory can be chosen by using
the wheel. Another short press on ‘PGM’ returns you to the main menu.
To modify a memory, select it and press ‘Enter’. The ':' sign flashes and you can change the frequency by
using the wheel. Press ‘Enter’ a second time to save it. Between the value 108.0 and 87.5 is an ‘EMPTY’
value that clears the selected memory.
P13: 103.7
P12: 96.4
P12: 96.4
)
Enter
Flash!
P12: 96.4
P14:EMPTY
Flash!
P12: 97.5
)
Enter
CAUTION : you cannot exit this menu after having selected an EMPTY memory, a beep will be emitted if you
attempt to do so and no action is performed.
____________________________________________________________________________________________________________
AUDEMAT-AZTEC SA – AUDEMAT-AZTEC INC
WEB : www.audemat-aztec.com - e-mail : [email protected]
Page 12/57
4.4 To configure the NAVIGATOR 10 FM (LONG depression of the PGM button)
At any time, a long press on the ‘PGM’ button calls up the configuration menu of the FM Navigator. It is
then possible to configure, amongst other things, the following parameters:
¯ the headphones output volume (jack socket)
¯ the MUTE function (audio inhibition of the headphones output)
¯ the display brightness
¯ the scan mode
¯ the RDS error correction
¯ the type of DARC frame to be decoded
¯ the "group code" section of the pager address
¯ the "individual code" section of the pager address
¯ the FM Multiplex signal source (tuner/BNC socket)
¯ the FM multiplex signal input level
¯ the FM multiplex signal output level
¯ To return to the "main parameters" menus
EXIT CFG?
)
Enter
Exits from the configuration menu and returns to the general parameters list. This action is equivalent
to a short push of the "pgm" button.
¯ To adjust the headphones output volume (headphone jack)
VOL: -20.0
)
Enter
Flash!
VOL: -20.0
The output volume is adjustable from -60 to +30 dBu.
However, levels of more than +6dB must be reserved for
the amplification of small signals as the FM Navigator
cannot supply levels of more than +6dBu without distortion
or saturation of the signal.
¯ MUTE function (audio inhibition of the headphones output)
MUTE:
OFF
)
Enter
MUTE: ON
Each depression of ‘Enter’ toggles between ON and OFF.
MUTE state is stored in non volatile memory.
____________________________________________________________________________________________________________
AUDEMAT-AZTEC SA – AUDEMAT-AZTEC INC
WEB : www.audemat-aztec.com - e-mail : [email protected]
Page 13/57
¯ To adjust the display brightness
BRIGHT. 7
)
Enter
Flash!
BRIGHT:
The brightness is adjustable from level 1 to 7.
7
¯ To configure the scanning mode
SCAN: RDS
)
Enter
Flash!
SCAN: RDS
The 4 available modes are :
* STEP: The frequency changes in steps of 100 kHz.
* FM: scan + stop on all the FM stations.
* RDS: scan + stop on the RDS stations.
* DARC: scan + stop on the stations transmitting DARC.
Caution, DARC detection can only be performed correctly if
the type of DARC frames is defined to the required value
(see corresponding configuration menu).
¯ To enable the RDS error correction procedure
RDScor: NO
)
RDScor: YES
Enter
RDS error correction can be enabled or disabled by
pressing the ‘Enter’ key. This parameter is not saved. Error
correction is disabled by default.
¯ To configure the type of DARC frame to be decoded
FRAME: C
)
Enter
Flash!
FRAME: C
Selects the type of DARC Frame to decode. This
information is very important for the error rate.
Note: this function is also available and more practical in the
main menu, "DARC: 1/0" display.
¯ To configure the "group code" section of the pager address
GC: ALL
)
Enter
Flash!
GC: 32
This menu filters the reception of paging messages by
giving a group code to the receiver. This code is from 0 to
99. Between 99 and 0 is a value ‘ALL’ which disables the
group code filter (all of the paging messages are then
decoded by the FM Navigator).
¯ To configure the "individual code" section of the pager address
IC: ALL
)
Enter
Flash!
IC: 5328
This menu filters the reception of paging messages by
giving an individual code to the receiver. This code is
between 0 and 9999. Between 9999 and 0 is an ‘ALL’ value
which disables the individual code filter.
¯ To select the FM Multiplex signal source (tuner/BNC socket)
SOURCE: INT
)
Enter
SOURCE: EXT
This function selects :
* INT: internal FM Tuner.
* EXT: external multiplex input via BNC. The maximum input level
allowed on this input is +12dBu.
____________________________________________________________________________________________________________
AUDEMAT-AZTEC SA – AUDEMAT-AZTEC INC
WEB : www.audemat-aztec.com - e-mail : [email protected]
Page 14/57
¯ To adjust the FM multiplex signal input level
MPXI:
0.0
)
Enter
Flash!
MPXI:
0.0
Adjusts the level of the inputted multiplex signal. The level at multiplex
input must be displayed and not the gain to apply to this signal to bring
it to 0dBu.
The input level is adjustable from -18 to +12 dBu.
¯ To adjust the FM multiplex signal output level
MPXO:-12.0
)
Enter
Flash!
MPXO:-12.0
Adjusts the level of the Multiplex output. This level is adjustable from 18 to +12dBu. It is nevertheless recommended not to exceed +6dBu
as above this value, the signal may be distorted at a high level.
The use of the value +6 to +12dBu must be reserved for the
amplification of small signals.
¯ To reinitialize the FM Navigator in factory set-up
INIT?
)
Enter
SURE?
)
Enter
All the parameters of the Navigator are then reinitialised to
the factory set-up except for the calibration factors of the
equipment. The program memories are all cleared except
the first one which is set to 87.5MHz.
____________________________________________________________________________________________________________
AUDEMAT-AZTEC SA – AUDEMAT-AZTEC INC
WEB : www.audemat-aztec.com - e-mail : [email protected]
Page 15/57
4.5 NAVIGATOR 10 Navigator general menu
IMPORTANT: Validity of the measurements. The level measurements (whatever the type) must only be
taken as valid when the RF level on the observed frequency is greater than 60dBuV and on the assurance
that no multipath phenomenon is present during the measurements.
¯ To choose the reception frequency
FREQ= 96.4
)
Enter
Flash!
FREQ= 96.4
This function is always accessible unless the Navigator is
set to BNC input (see advanced configuration, above). The
display will alternate between frequency and RDS PS.
¯ To evaluate the signal level received on the antenna input
RF: 55dB
Displays the RF signal level in dBµV (as seen at the antenna input of the FM Navigator).
The audio output is normally muted during the display and measurement of the RF level.
The audio output can be forced on by pressing the “Enter" button, some interference in the audio is usually
perceptible under this condition.
Do not forget to add 20dB to the indicated value if you are using the 20dB external attenuator!
The RDS and DARC signals are also affected by this function.
IMPORTANT: we recommend to use the +20dB attenuator whenever a
signal over 90dBµV can be observed at the input of the navigator: better
performances are obtained if the Navigator input is protected against very
high signals. Use of the attenuator is also recommended on transmission
sites or in towns where the entire FM spectrum is full with high signal
levels (when making a measurement campaign).
¯ To display the deviation generated by the FM multiplex signal
MPX: 68kHz
Displays the peak level (max) observed over 1 second, thus about 500000 samples performed by the FM
Navigator in this time interval.
NOTE1: to evaluate the intrinsic level of the pilot, RDS and other sub-carriers, use the corresponding menus
and not this menu. Indeed, the maximum accuracy of the multiplex deviation, by design, at 75KHz, means that
the small deviations (less than 20KHz and notably the sub-carriers) will inevitably contain some inaccuracies.
NOTE2: RF level must be stable and no noise must occur for MPX measurements. RF value of 60dBµV is
recommended. MPX observations are generally useless when mobile : perform MPX measurements in sable
conditions : roof antenna or vehicle stopped and direct field reception.
¯ To display the FM multiplex signal power: CCIR conformity
Flash!
PMPX-4.5dB
Displays the multiplex average power over 1 minute, in accordance with the UER recommendation n°450-1. It
is a rolling average, over one minute, measured by DSP ( digital signal processing). The higher the indication
is, the more dense the signal and audio.
Modulating with a continuous sinusoidal signal to a deviation of +/- 75 kHz will produce an indication of
+11.9dB. The unit (dB) flashes when the indication does not conform with the recommendation (1 minute not
reached). Wait 1 minute to obtain a accurate measurement.
____________________________________________________________________________________________________________
AUDEMAT-AZTEC SA – AUDEMAT-AZTEC INC
WEB : www.audemat-aztec.com - e-mail : [email protected]
Page 16/57
¯ To display the FM multiplex signal overshoot (ref=75 KHz)
Flash!
>75: 4E-5
Displays the overshoot ratio observed over the last minute. The rate is expressed as the amount of time spent
over 75KHz over the total time.
NOTE: a mean overshoot of 1% above the 75KHz limit results in the value >75: 1E-2 being displayed! The
accuracy on this overshoot measurement is approximately 1000 points.
¯ To display the demodulated audio levels: Left, Right
RIGHT: 45%
)
LEFT: 55%
Enter
Displays the level of the audio channels in %. 100% corresponds to
a deviation of 75kHz for a 1000Hz modulating sinusoidal signal,
without any sub-carrier enabled.
Press ‘Enter’ to switch from the left channel to the right.
¯ To display the demodulated audio levels: Mono track M=L+R, Stereo track S=L-R
L+R: 56%
)
L-R: 31%
Enter
Displays the level of the audio channels in %. 100% on L+R
corresponds to a deviation de 75kHz for a 1000Hz modulating
sinusoidal signal, without any sub-carrier enabled.
100% on L-R corresponds to a deviation of 75kHz for a 1000Hz
modulating signal in the S band, without any sub-carrier enabled.
Press ‘Enter’ to switch from L+R to channel L-R
¯ To display the status of the stereophonic detector / to force into monophonic
STEREO:Yes
)
Enter
MONO USE
This menu shows if the 19kHz pilot frequency is present.
Pressing ‘Enter’ forces the Navigator into mono mode.
¯ Deviation generated by the 19000Hz stereo pilot signal
19: 6.3 kHz
Displays the deviation of the 19000 Hz pilot signal. No indication if no pilot detected.
The value of this deviation is typically 6.8kHz +/- 10%
¯ Detection of the 57KHz RDS sub-carrier
RDS: Yes
)
Enter
RAZ RDS
synchro
This menu shows if the RDS sub-carrier is present.
Pressing ‘Enter’ reinitialises all the RDS parameters and
restarts a RDS synchronisation procedure for the receiver.
¯ Deviation generated by the RDS signal at 57KHz
57: 6.3 kHz
Displays the deviation of the RDS sub-carrier. No indication if no RDS detected.
This deviation is typically between 2 and 6 kHz. The exactitude of this measurement depends on the reception
quality of the station in question.
____________________________________________________________________________________________________________
AUDEMAT-AZTEC SA – AUDEMAT-AZTEC INC
WEB : www.audemat-aztec.com - e-mail : [email protected]
Page 17/57
¯ Detection of the 76 KHz DARC sub-carrier/ DARC frame type definition
DARC: Yes
)
Enter
Flash!
FRAME: B
This double function menu selects the type of frame level
decoding to apply and see, and to detect the type of frame
used in the signal.
¯ Deviation generated by the DARC signal at 76 KHz
76: 6.6 kHz
Displays the deviation of the DARC sub-carrier. No information displayed if no DARC detected.
WARNING: in certain transmission configurations, this deviation is susceptible to variations according to the
audio modulation. The value displayed is a mean value.
¯ RDS : to display the PS code (Program Service)
)
BBC2
Enter
INIT_PS
reinitialises the display
to ????????
Displays the PS code (eight characters) of the selected station.
‘????????’ is displayed if the receiver does not decode RDS.
¯ RDS : to display the PI code (Program Identification)
PI: F731
)
Enter
INIT_RDS
reinitialises RDS
decoding.
Displays the PI code (four hexadecimal characters) of the selected
station. ‘PI:????’ is displayed if RDS is not decoded by the receiver.
¯ RDS : to display the TA and TP codes (Traffic Announcement and Traffic program)
TP:1 TA:0
)
Flash!
TA BEEP: 1
Enter
Displays the state of the TA and TP codes.
NOTE: A change of state of the TA code is signalled by a series of
‘beeps’ and a display indicating that TA flag is at 1.
Pressing ‘Enter’ opens a menu that allows the TA indicator beeps to
be disabled using the wheel.
¯ RDS : PTY code (Program TYpe)
PTY:
10
)
Enter
Signification of the PTY code Displays the PTY code (0-31).
Pressing ‘Enter’ displays the authorized definition of the code.
authorized definition
¯ RDS : to display the PTYN code (Program TYpe Name)
FOOT
Displays the PTYN code (eight characters). ‘????????’ is displayed if the receiver does not decode PTYN.
____________________________________________________________________________________________________________
AUDEMAT-AZTEC SA – AUDEMAT-AZTEC INC
WEB : www.audemat-aztec.com - e-mail : [email protected]
Page 18/57
¯ RDS: to display the alternative frequencies
AF: 12
)
Enter
Displays the AF number. Pressing ‘Enter’ shows each
transmitted frequency. The wheel can be used to move
around the AF list.
AF 1: 96.4
¯ RDS: to display the time and the offset transmitted in RDS
12H56
)
Enter
2H00
Displays the time transmitted in the groups 4a.
Pressing ‘Enter’ displays the offset transmitted in these same groups.
¯ RDS: to display the date transmitted in RDS
25/04/97
Displays the date transmitted in the groups 4a.
¯ To access the menus related to the recording of measurement campaigns
(NAVIGATOR 100)
CGN MES?
)
Enter
Measurement campaign recording functions sub-menu (see following pages).
Measurement campaigns can be performed on the Navigator 100 only, with the data stored
in the Flash memory. The output of measurement data can be performed on the model
NAV10: the data is output on the RS232 interface instead of being recorded in Flash memory
(not present on the model NAVIGATOR 10). And on the NAVIGATOR10, the fields reserved
for GPS data are empty.
¯ To access the GPS parameters measured (model NAVIGATOR 100 only)
GPS?
)
Enter
Measurement campaign recording functions sub-menu. (see following pages).
Function only available on the NAVIGATOR 100.
¯ To access the advanced measurements display
MORE?
)
Advanced measurement functions sub-menu. (see following pages).
Enter
____________________________________________________________________________________________________________
AUDEMAT-AZTEC SA – AUDEMAT-AZTEC INC
WEB : www.audemat-aztec.com - e-mail : [email protected]
Page 19/57
4.7 Advanced measurement
¯ To exit the "ADVANCED MEASUREMENTS" menu
EXIT MORE?
)
Return to main menu.
Enter
¯ RDS: To display the RDS error rate
TER= 24%
)
Enter
Displays the number of erroneous RDS blocks based on the last 100 RDS blocks received.
<Enter> reinitializes this error counter.
¯ RDS: To display the non-recovered RDS BLOCKS error counter
NER: 2365
)
Enter
Displays the number of erroneous RDS blocks since the last counter reset. The counter is reset to
zero either by pressing the ‘Enter’ button, by a change of frequency or when it reaches 999999.
¯ RDS : To display the recovered RDS BLOCKS counter
REC: 23
)
Enter
Displays the number of RDS blocks RECovered since the last counter reset. The counter is reset to
zero either by pressing the ‘Enter’ button, by a change of frequency or when it reaches 999999.
¯ RDS : To display the received RDS group counters
GRP COUNTS
)
Enter
0A:
At each frequency change, the Navigator counts all the
group types received.
To make the display of the transmitted groups easier, only
the counters which are not at zero are displayed.
Turn the wheel to display the counters of each group.
2513
)
Enter
3 secs
The counters are reset to zero by a long press on ‘Enter’ or
a by a frequency change.
¯ RDS : To display the IN HOUSE data
1FFF00FF00
Displays the data received in the last group 6 in hexadecimal.
¯ To display the SLOW LABELLING CODES (SLC)
SLC...
)
Enter
Only the SLCs received can be displayed.
SLC 0: 000
____________________________________________________________________________________________________________
AUDEMAT-AZTEC SA – AUDEMAT-AZTEC INC
WEB : www.audemat-aztec.com - e-mail : [email protected]
Page 20/57
¯ To display the OPEN DATA APPLICATIONS (ODA) information
)
ODA...
Enter
Displays the AIDs received to the right with the group
concerned to the left. If an "Encoder error" is received for a
certain AID, the left field no longer displays a group name
but T1 or T2, etc following the AID number declared on
time-out.
8A: CD46
¯ To display the RADIO TEXT (RT)
RADIO TEXT
)
Enter
The FM Navigator displays the Radio Text received and scrolls it on the display. The wheel is used to
move back and forth in the text. The scrolling restarts automatically after a few seconds without action
from the user.
¯ RDS: To display the RDS paging network identifier (GRPD)
GRPD:
4
¯ RDS: To display the paging messages
MSG:
0
)
Enter
Displays the number of paging messages received. Pressing ‘Enter’ scrolls all the messages one
after another. The Navigator decodes the 10 and 18 digit messages as well as the alphanumeric
st
messages of up to 80 characters. 50 messages can be stored in memory. The arrival of the 51
st
message clears the 1 and resets the counter to 1.
¯ RDS: To clear the RDS paging message memory
CLR MSG ?
)
Pressing ‘Enter’ clears the memory of the paging messages and resets the message counter to zero.
Enter
¯ RDS: To display the RDS Music/Speech parameter (MS)
M/S: 1
)
Displays the M/S parameter. Pressing ‘Enter’ displays the signification of the parameter.
Enter
¯ RDS: To display the Decoder Identifier parameter (DI)
DI:
1
)
Displays the DI parameter. Pressing ‘Enter’ displays the signification of the parameter.
Enter
¯ To store the 50 strongest FM stations in the program memories
BEST
FM
)
Enter
START ?
)
Clears the program memory and stores the stations having
the best reception (by RF signal).
Enter
____________________________________________________________________________________________________________
AUDEMAT-AZTEC SA – AUDEMAT-AZTEC INC
WEB : www.audemat-aztec.com - e-mail : [email protected]
Page 21/57
¯ To store the 50 strongest FM stations with RDS in program memories
BEST
RDS
)
Enter
)
START ?
Clears the programme memory and stores the FM RDS
stations having the best reception (by RF signal).
Enter
¯ To display the DARC error rate
TER76: 76%
)
Enter
Displays the BLOCK error rate of the DARC sub-carrier received. Caution, you must explicitly state
the type of frame to be received (the configuration menus can be accessed by a long press on the
<Enter> key.
4.8 NAVIGATOR 100 Navigator: GPS measurements
The following menus display the GPS measurements performed by the GPS receiver which is incorporated in the model
NAVIGATOR 100.
¯ GPS: To exit the GPS measurements menu
EXIT GPS?
)
Return to the main menu.
Enter
¯ GPS: To display the number of satellites used by the GPS receiver
SAT : 5
Displays the number of satellites seen and used by the GPS receiver. This number is between 3 and 8.
¯ GPS: To display the latitude
4609.3200
Displays the latitude in the format ddmm.mmmm. The North or South data is displayed alternately.
Example: North, 4609.3200 gives 46 degrees 9.3200 minutes North.
¯ GPS: To display the longitude
10636.6480
Displays the longitude in the format dddmm.mmmm. The East or West data is displayed alternately.
Example: West, 10636.6480 gives 106 degrees 36.6480 minutes West.
¯ GPS: To display the altitude
306.5m
¯ GPS: To display the speed
138.7km/h
____________________________________________________________________________________________________________
AUDEMAT-AZTEC SA – AUDEMAT-AZTEC INC
WEB : www.audemat-aztec.com - e-mail : [email protected]
Page 22/57
¯ GPS: To display the UTC time
UTC:04H56
¯ GPS: To display the UTC date
12/05/97
____________________________________________________________________________________________________________
AUDEMAT-AZTEC SA – AUDEMAT-AZTEC INC
WEB : www.audemat-aztec.com - e-mail : [email protected]
Page 23/57
4.9 NAVIGATOR 100 : measurement campaigns
The following menus permit measurement 'campaigns' to be conducted. No PC is required to counduct a
measurement campaign. The measurement campaign data is stored in the 8Mb FLASH memory card
plugged in to the back of the unit.
The analysis of the measurement campaigns is done by means of the FM Explorer software which permits
the memory card to be read directly from the FM Navigator.
The measurement campaigns are stored in the memory card in the form of tabulated text files. The data can
be exported by using the FM Explorer software to generate files compatible with many different programs, or
imported into MapPoint with the included DLL.
NOTE : if a measurement campaign is started without flash card, the data is directly sent to the serial port :
19200 bit/s, 8 bits, no parity, 1 stop bit.
IMPORTANT : if the FM Navigator power supply is turned off during a measurement campaign, the
campaign will restart, with a blank file name, when power returns.
¯ To exit the campaigns menu
EXIT CNG?
)
Return to the main menu.
Enter
¯ To define the campaign type
MODE: SLOW
)
Enter
MODE:FAST
2 campaign types:
*FAST: 300ms to 2000ms per station analysed.
The FM Navigator records approximately ten parameters per station
analysed in the FLASH memory card.
*SLOW: 5 minutes per station analysed.
About twenty additional parameters are stored in the FLASH card for
each station analysed in addition to those in FAST mode.
¯ To select the scanning mode during the measurement campaigns
SCAN:
OFF
)
Enter
Flash!
SCAN:
OFF
Set the station(s) to be analysed in the measurement
campaign :
* OFF: no frequency change during the campaign. (the
current frequency is used).
* FM: at the end of the analysis of a station, the FM
Navigator searches for the next FM station in the band and
restarts the analysis.
* RDS: identical to FM but stops on the next station
detected in RDS.
* PGM: sequentially analyses the frequencies stored in
memory, except those declared EMPTY. 50 programmes.
____________________________________________________________________________________________________________
AUDEMAT-AZTEC SA – AUDEMAT-AZTEC INC
WEB : www.audemat-aztec.com - e-mail : [email protected]
Page 24/57
¯ Define a title for the current campaign (10 chars)
CGN TITLE
WEST PARIS
)
Enter
The campaign title will appear.
If there is no title (as with a new campaign) pressing 'Enter' will
cause the first spot in the display to flash. Scrolling the wheel will
allow you to select a character to occupy that space, and 'Enter' will
lock that character and move you to the next space. It is not
necessary to give each campaign a name.
¯ To select the scanning mode during the measurement campaigns
CGN START
CGN CINGLE
)
Enter
)
START?
START?
Enter
)
Enter
)
Pressing ‘Enter twice quickly starts the campaign. The data
is written (added) in the FLASH memory (model
NAVIGATOR 100) or is output directly on the serial
interface (model NAVIGATOR 10).
The campaign stops with another push of the Enter button
or automatically when the FLASH memory is saturated
(model AZ100 only).
During the campaign, each measurement operation is
indicated by a small BEEP. The frequency of each station
being analysed is displayed.
The measurement campaign is done only once and
automatically stops after the first cycle.
Enter
¯ To display the available FLASH memory capacity
43%
Indication in % of the quantity of full memory in the total FLASH memory.
¯ To clear the FLASH memory card and all the stored campaigns
CGN ERASE?
)
Enter
ERASE ALL?
)
The memory card is completely cleared. This operation
takes about 90 seconds.
Enter
____________________________________________________________________________________________________________
AUDEMAT-AZTEC SA – AUDEMAT-AZTEC INC
WEB : www.audemat-aztec.com - e-mail : [email protected]
Page 25/57
4.10 Exportation of NAVIGATOR 100 measurement campaigns
The Navigator is delivered with the FM Explorer software which is a tool that allows you to display the
measurements of the Navigator and download the measurement campaigns to a PC.
____________________________________________________________________________________________________________
AUDEMAT-AZTEC SA – AUDEMAT-AZTEC INC
WEB : www.audemat-aztec.com - e-mail : [email protected]
Page 26/57
4.11 Measurement campaign download with FM Explorer
Please select the "Campaign Download" tab at the bottom of the main window and double click on the
Navigator picture.
To configure the COM port that is connected to the Navigator, click the 'Options' menu at the top of the
screen and select 'Serial Port (local)'.
¾ Select the antenna calibration file that corresponds to the antenna used for the campaign, and select
whether you want the readings converted to dBµV/M (optional).
¾ Click 'Download' to begin downloading all of the measurement campaigns stored in the Navigators
Flash memory card.
NOTE: If the Flash card contains a large campaign, or several small campaigns, this process could take a
long time!
Each campaign will display in a separate line of the grid, with the title of the campaign (if any), the mode
used, the time and date of the first measurement in the campaign, and the number of lines downloaded. A
bar at the bottom of the screen will indicate the progress of the entire download.
Once the campaigns have been downloaded, put a check in the box of each campaign you want to save,
and then select 'Save' from the 'File' menu.
You will then have the opportunity to name or rename each campaign as it is saved to your local disk.
____________________________________________________________________________________________________________
AUDEMAT-AZTEC SA – AUDEMAT-AZTEC INC
WEB : www.audemat-aztec.com - e-mail : [email protected]
Page 27/57
4.12 NAVIGATOR 100: exporting measurements to MAPINFO
In order to display the measurements graphically, you can use the following procedure to export the results
to MAPINFO Professional.
For additional information (technical support, list of retailers,…), do not hesitate to consult the web site
http://www.mapinfo.com
Export procedure :
Note : For good export results, especially for the reception frequency value, the format of the numbers has to
be defined with decimal separator « . ». For that, you have to select in the general menu of Windows «Start»,
« Parameters », « Configuration panel », « Regional parameters », and with the index «Number» please
select « decimal symbol » : « . »
Then within MAPINFO, please proceed as follows :
• Under the File menu, open Table (measurement campaign file)
• Choose file type 'Delimited ASCII'
• Select the option “Use First Line for Column Title”
By default, the measurement campaign file are stored by FM Explorer during the download in
C:\FMNET\FM_EXPLO\DATA\
____________________________________________________________________________________________________________
AUDEMAT-AZTEC SA – AUDEMAT-AZTEC INC
WEB : www.audemat-aztec.com - e-mail : [email protected]
Page 28/57
Then the file is loaded by MAPINFO as a data table. With this table, points can be generated on a map.
•
Please choose in the Table scrolling menu « Create Points » and select the measurement table :
The default type of projection selected by MAPINFO corresponds to the imported data.
The symbol can be redefined here, but it can also be done afterwards.
The multiplication factors for the coordinates X and Y have to be set to the value: 0.000001
•
In the menu Window select :
« New Map Window »
•
A part of the trajectory done during the
measurement is displayed in a
window; if you click on the right button
of the mouse, a contextual menu
appears, then select « Change View ».
____________________________________________________________________________________________________________
AUDEMAT-AZTEC SA – AUDEMAT-AZTEC INC
WEB : www.audemat-aztec.com - e-mail : [email protected]
Page 29/57
•
The trajectory map can now be added to a real map delivered with MAPINFO Professional in the
following directories (if you have selected the complete default installation of MAPINFO) :
C:\Program Files\MapInfo\Professional\Data\MAP
Then proceed again with the operation "Open Table" for the other different files for example:
-
borders
capitals
main cities
medium cities
main roads
other roads
rivers
•
The Map menu, « Layer Control » allows you to organise the different elements to be displayed and the
superposition of the different layers, the displays of the various labels (e.g. name of the cities).
•
The menu « Create Thematic Map » allows you to create a legend correlated to the different values (e.g.
the measured RF levels).
____________________________________________________________________________________________________________
AUDEMAT-AZTEC SA – AUDEMAT-AZTEC INC
WEB : www.audemat-aztec.com - e-mail : [email protected]
Page 30/57
Please select the type of legend and the measurement parameter to be used.
____________________________________________________________________________________________________________
AUDEMAT-AZTEC SA – AUDEMAT-AZTEC INC
WEB : www.audemat-aztec.com - e-mail : [email protected]
Page 31/57
5. NAVIGATOR 1000 Navigator
The FM NAVIGATOR 1000 is build upon an FM NAVIGATOR 10 core, with additional functionalities for
switching applications. Depending on sub-carriers (audio, stereo, RDS, DARC) compared to preset
thresholds, relays can be switched ON or OFF.
5.1 NAVIGATOR 1000 main features
•
•
•
•
rack 19' 1U mounting
230/115 VAC integrated power supply
signal detection on one particular frequency
5 relays output (DB15 female) related to :
¾
¾
¾
¾
¾
•
•
RDS detection
Stereo detection (pilot tone)
RF detection
AUDIO detection
DARC detection
signaling LEDs indicating the relay status on front panel
headphone output on front panel
5.2 Detectors configuration
5 detectors have been implemented in the NAVIGATOR 1000 versions:
¾
¾
¾
¾
¾
RF detector
AUDIO detector (L+R signal detection)
PILOT TONE detector
RDS detector
DARC detector
The output of each of these 5 detectors are directed to :
- a RELAY output (20mA, 24V, isolated, SPDT common / N.O./ N.C).
- a red LED placed on the front panel of the AZ1000 Navigator
Each of these 5 detectors can be set from the front panel and/or from the serial link
with the following parameters:
- DELAY before detection (_TO extension as Time Out, given is seconds),
DELAY=0 means no detection
- THRESHOLD of action ( _TH extension for RF and AUDIO only, no threshold for RDS, PILOT TONE
and DARC detection which are yes/no binary)
____________________________________________________________________________________________________________
AUDEMAT-AZTEC SA – AUDEMAT-AZTEC INC
WEB : www.audemat-aztec.com - e-mail : [email protected]
Page 32/57
5.3 Relays Output
Relays are connected through the SUBDB15 female connector placed at the rear panel of the unit.
Connector pin-out :
Pin
Detector
State
1
2
3
4
5
6
7
8
9
10
11
12
13
14
15
RF
RF
DARC
RDS
RDS
PILOT
AUDIO
AUDIO
RF
DARC
DARC
RDS
PILOT
PILOT
AUDIO
Normally Closed
Normally Open
Common
Normally Closed
Normally Open
Common
Normally Closed
Normally Open
Common
Normally Closed
Normally Open
Common
Normally Closed
Normally Open
Common
5.4 Signaling LEDs
The 5 LED indicate the relay status, these LED are red when an alarm condition is set meaning that a
relay is NOT ‘on’.
When LEDS are flashing instead of solid, it means that:
- the CONTROL operation has been stopped via the front panel or an RS232 request or
- the AZ1000 has just been turned on : then you must wait until the CTRL_TO delay has elapsed
5.5 FAQ: frequently asked questions
Q: I have set CTRL_TO to 240 seconds (4 minutes)… I do not want to wait this time each time I
check if the control operation is working. How can I force the control operation immediately?
A: Enter in the “RELAYS?” menu, then “EXIT REL?” indication appears, press Enter to exit the menu, in
this case, the control operation will take place immediately instead of CTRL_TO seconds.
____________________________________________________________________________________________________________
AUDEMAT-AZTEC SA – AUDEMAT-AZTEC INC
WEB : www.audemat-aztec.com - e-mail : [email protected]
Page 33/57
Q: I hear glitches in the headphone when the control operation is active, what is the problem?
A: If you have programmed the AZ1000 to verify the RF level (RF_TO<>0 and RF_TH<>0) : when the
FM Navigator (AZ10, AZ100 and AZ1000) performs a RF level measurement, the RF input attenuator is
activated during the measurement, that causes the glitch. When the AZ1000 is placed in a high RF field,
this glitch is not heard because the input signal is high enough to enable good reception whatever the
input attenuator value.
Q: I am anxious about the fact that if somebody touches the front panel the control operation can
be turned off or an or an alarm inadvertently triggered. Am I right?
A: No! When somebody plays on the AZ1000 front panel and, for example, listens to other FM stations
or checks RDS parameters on other frequencies, the relays are simply frozen during this manual
operation. After the CTRL_TO timeout, the control operation will resume automatically on the frequency
programmed in setup program P1. This feature enables you to use the AZ1000 on site for other
purposes, and it will automatically return to checking parameters on the programmed station.
Q : I do not like relays, I would like to put the AZ1000 on my SNMP network on site.
A: We advise you not choose the AZ1000, but choose the FMTEL5 which has Network Ethernet
connectivity. With the FMTEL5 from AUDEMAT-AZTEC , you get a TCP/IP oriented solution with FTP,
TELNET and SNMP features.
____________________________________________________________________________________________________________
AUDEMAT-AZTEC SA – AUDEMAT-AZTEC INC
WEB : www.audemat-aztec.com - e-mail : [email protected]
Page 34/57
6. Operation from the RS232 COM port
6.1 To connect a PC to the COM port of the FM Navigator
A PC can be connected to the Navigator via the SUBD9female connector, labeled "RS232", situated on the
rear panel. Locate an unused communication port on your computer. If the free port has a DB25 connector,
use a SUBD9 (male) to SUBD25 (female) adapter. Do not use the port assigned to the mouse. Connect the
open communication port of your computer to the port of the FM Navigator with a RS232 cable (not crossed),
or A USB-RS232 adapter, if your computer has only USB ports.
6.2 Choosing a "terminal" application and principles of ASCII communication
To communicate directly with the FM Navigator, AUDEMAT-AZTEC recommends the use of an ASCII
terminal running in MS-DOS© or Windows©.
The terminal program included in Windows has all the characteristics to communicate easily in ASCII mode
with the FM Navigator. If you require a higher level interface, AUDEMAT-AZTEC offers the FM Explorer utility
which is available on Internet and can be used freely (no license required). FM Explorer is an utility which
offers a very user-friendly graphics interface, for AUDEMAT-AZTEC products: FM Navigator NAVIGATOR
10, NAVIGATOR 100, NAVIGATOR 1000, FMTEL3 and FMTEL5.
Internet address where the FM Explorer software can be downloaded:
http://www.audemat-aztec.com or Audemat-Aztec provided CD-Rom
Set up the parameters of the terminal used as follows:
▼ Transmission speed : 9600
▼ Data bits : 8
▼ Stop bits : 1
▼ Parity: None
▼ Flow control : None
▼ Port : the free communication port on your PC
▼ Parity check : non
▼ Carrier detection : none
Once configured, the terminal can be used. To check if your communication setup is functioning correctly,
type "?" then <Enter> to display the version of the FM Navigator internal software. If nothing is displayed on
the screen, try a second time, then verify the following points :
=> Power supply to the FM Navigator
=> Cable used
=> Recheck the configuration of the terminal application
IMPORTANT : the serial link is inhibited when the CGN or GPS menus are selected
on the front panel : exiting these menus will enable the serial link again.
____________________________________________________________________________________________________________
AUDEMAT-AZTEC SA – AUDEMAT-AZTEC INC
WEB : www.audemat-aztec.com - e-mail : [email protected]
Page 35/57
Before moving on to examine the numerous commands which are available, the following explains the
structure of the FM Navigator’s ASCII command interpreter:
The FM Navigator’s ASCII command interpreter obeys the following rules. Any instruction sent, must be
validated by <Enter> (chr$(13)). The character chr$(10) is ignored by the interpreter.
If the command entered meets with success, the character ‘+’ followed by one or several line returns is sent
back by the FM Navigator. In the case of a failure (command not understood or parameter incorrect) the
character ‘!’ is sent back in a similar fashion.
6.3 ASCII PROTOCOL: general instruction set of the NAVIGATOR 10, 100, 1000 FM Navigator
Instruction syntax
?
SN?
Description of the instruction
Navigator 10, 100, 1000
Displays the version of the internal software.
Displays the serial number of your Navigator
BRIGHTNESS=v
BRIGHTNESS?
Sets the display brightness from 1 to 7 where 1 is the lowest level and 7 is the highest.
F=v
F?
50K=0 or 50K=1
PGMn=v
PGMn?
PGM?
Set the reception frequency of the FM Navigator where v represents the frequency in tens of kHz.
Example: F=9450 F=10440.
Send the current frequency in tens of kHz.
Example: F9840.
Defines if the Navigator frequency step is 100KHz or 50KHz
100KHz is default
Save the frequency v in memory n.
Example: PGM3=9840.
Return the frequency saved in memory n.
MPX_SOURCE=v
MPX_SOURCE?
Select the source of the multiplex signal. If v=TUNER the FM Navigator will use its RF reception
head to supply the multiplex signal. If v=BNC, the BNC input will be selected.
Return the source selected for the multiplex signal.
Return the display brightness level from 1 to 7.
Return the list of the 50 frequency memories.
____________________________________________________________________________________________________________
AUDEMAT-AZTEC SA – AUDEMAT-AZTEC INC
WEB : www.audemat-aztec.com - e-mail : [email protected]
Page 36/57
6.4 ASCII protocol: measurement instructions
Certain measurement instructions send a continuous stream of data. In this case, the front panel of the FM
Navigator is locked and the display shows « RS232 BUSY ». The incoming data stream can be stopped by
simply sending the character <ESC> (chr$(27)) or <CR> (chr$(13)) via the serial interface. A second option
is to press the 2 buttons on the front panel simultaneously; the FM Navigator returns to the operating mode
indicated on the front panel and stops the data stream.
Instruction syntax
Description of the instruction
Navigator 10, 100, 1000
*M
The M instruction returns a decimal number between 0 and 255 representing 8 status bits :
- bit 0: not used.
- bit 1: stereo presence.
- bit 2: TP.
- bit 3: TA.
- bit 4: M/S.
- bit 5: not used.
- bit 6: RDS presence.
- bit 7: DARC presence.
Output of the RF level in dBµV in constant stream (approximately 1 measurement per second). Each
measurement is separated by a line return (CRLF). During these measurements, the audio output is in
silent mode and the RDS and DARC channels can be disrupted. Send the <Esc> or <CR> characters to
stop the operation or press the two buttons on the front panel simultaneously.
Output of the multiplex power and the number of continuous multiplex overshoots. 2 components are
transmitted every second, as follows:
[#]<MPX power>chr$(9)< MPX overshoots (ppm)<CRLF>
*RF
*PWR_PEAK
As shown in the menu list, these two measurements require 60 seconds before being able to give a value
conforming to the CCIR recommendation n°450-1. The validity of the measurements is shown by the
disappearance of the # opposite the measurement lines.
Example:
- Measurements not valid : #9.5<chr$(9)>1333<CRLF>
- Measurements valid :
#-0.4<chr$(9)>0<CRLF>
*MPX
*G+D
*L+R
*G-D
*L-R
*G
*L
*D
*R
*19
*57
*76
*19
INIT
Continuous output of the FM multiplex signal deviation value in kHz.
Continuous output of the level value of the left channel plus the right in %.
Continuous output of the level value of the left channel minus the right in %.
Continuous output of the level value of the left channel in %.
Continuous output of the level value of the right channel in %.
Continuous output of the 19KHz sub-carrier deviation value in kHz.
Continuous output of the 57KHz sub-carrier deviation value in kHz.
Continuous output of the 76KHz sub-carrier deviation value in kHz.
Continuous output of the 19KHz sub-carrier deviation value in kHz.
Re-initializes the FM Navigator with the "factory set-up" parameters including the decoding and DARC
related parameters.
NOTE for the functions *MPX till *76 : the character '*' can be replaced by '#' in order to return only one
value instead of a constant data stream.
____________________________________________________________________________________________________________
AUDEMAT-AZTEC SA – AUDEMAT-AZTEC INC
WEB : www.audemat-aztec.com - e-mail : [email protected]
Page 37/57
6.5 ASCII protocol: instruction set related to RDS
Instruction syntax
COR=v
COR?
PI?
PS?
TP?
TA?
MS?
DI?
PTY?
PTYN?
RT?
PAGER_GC=v
PAGER_GC?
PAGER_IC=v
PAGER_IC?
GRP=v
UECP=v
EBU?
R+
R1
RG
Description of the instruction
Navigator 10, 100, 1000
Enables (v=1) or disables (v=0) RDS correction.
Displays the RDS correction parameter
Display the PI code of the station received in 4 characters. If the PI code is not received, the FM
Navigator returns ‘????’.
Displays the PS code of the station received in 8 characters.
Displays the status of the TP parameter.
Displays the status of the TA parameter.
Displays the status of the M/S parameter.
Displays the value of the DI parameter (from 0 to 15).
Displays the value of the PTY parameter (from 0 to 31).
Displays the PTYN code in 8 characters.
Displays radio text in 64 characters. The characters not decoded are replaced by ‘?’ and the characters
not displayable by ‘_’.
Select the paging group code to filter the paging messages. v is either a number from 0 to 99, or ‘ALL’ to
disable the filter.
Displays selected paging group code.
Select the paging identification code to filter the paging messages. v is either a number from 0 to 9999, or
‘ALL’ to disable the filter.
Display the selected paging identification code.
v represents a 0A to 15B group type. Each time the FM Navigator decodes a group of this type, it is
transmitted by the serial interface in the format bb cccc dddd chr$(13) chr$(10).
bb: 5 least significant bits of the B block.
cccc: block C.
dddd: block D.
The display indicates the type of groups transmitted.
This parameter is saved in non volatile memory, thus permitting the Navigator to restart in this mode after
power down.
This command sets the FM Navigator into EBU mode for the retransmission of groups by the command
GRP=.
The format of the data conforms to the UECP standard SPB490.
The values accepted for v are 0 and 1.
Caution, the EBU mode can only be applied to the command GRP= this is why the other RDS data
retransmission commands do not operate if EBU=1.
Return the status of the EBU parameter.
Retransmission of all the RDS blocks received.
Format: xhhhh chr$(13) chr$(10).
x: Type of bloc A, B, C, Y, D (Y represents the blocks C’ of the type B groups). A block type displayed in
lower case letters indicates a CRC error for this block. A ‘?’ indicates the absence of RDS.
hhhh: 16 bits of data in 4 hexadecimal characters.
If RDS error correction is enabled, a recovered block is declared by the addition of the character ‘r’
directly behind the 4 characters of data.
Identical to R+ but no distinction exists between the recovered blocks and the others.
CAUTION, stream of data at 19200 baud !
Format : xhhhhccc<h>vv<l00> chr$(13) chr$(10)
x: Identical to the function R+.
hhhh: Identical to the function R+.
ccc: 10 bits of CRC in 3 hexadecimal characters.
<h>: character ‘h’.
vv: Quantitative representation of the RF level.
<l00>: text ‘l00’ kept for compatibility with the Monitor AZ1.
To exit this function, the characters <Esc> or <CR> must be sent at 19200 baud! A second possibility is
to press the two buttons on the front panel simultaneously.
____________________________________________________________________________________________________________
AUDEMAT-AZTEC SA – AUDEMAT-AZTEC INC
WEB : www.audemat-aztec.com - e-mail : [email protected]
Page 38/57
Instruction syntax
Description of the instruction
Navigator 10, 100, 1000
ERR?
Displays the number of erroneous RDS blocks (incorrect CRC) received since the last reset to zero of the
counter.
Use the ‘Z’ function to reset the counter.
Sends the number of correct RDS blocks received since the last reset to zero of the counter.
Use the ‘Z’ function to reinitialize the counter.
Displays the number of RDS blocks since the last reset of the counter. Use the function 'Z' for resetting
the counter.
Reinitialises the recovered and erroneous block counters.
GOOD?
REC?
Z
RDS_ERR or
*RDS_ERR
#RDS_ERR
Displays the RDS block error rate in a constant stream.
Same as previous function but only one value is returned.
6.6 ASCII protocol: instruction set related to DARC
Instruction syntax
Description of the instruction
Navigator 10, 100, 1000
FRAME=v
FRAME?
CORV=v
CORV?
CORH=v
CORH?
DARC_ERR
GO
Selects the type of DARC Frame to receive. v can be A0, A1, B or C. Warning, An incorrect Frame type
will not stop the FM Navigator from detecting a DARC signal, but the data will be totally erroneous.
Shows the Frame type selected.
Enables or disables vertical correction (v=0 or 1).
The vertical correction is enabled by default.
Shows the vertical correction status.
Enables or disable horizontal correction (v=0 or 1).
The horizontal correction is enabled by default.
Shows the horizontal correction status.
Displays the DARC block error rate in constant stream.
WARNING, stream of data at 38400 baud.
Transmission of 22 bytes of useful data of each block. Each byte is transmitted in the form of two
hexadecimal characters.
Each block is displayed as follows :
<BBBBBBBBBBBBBBBBBBBBBBBBBBBBBBBBBBBBBBBBBBB>[ X or SH or SV][T][R]<CR>
<BB....B> indicates the 22 bytes of the block data
One of the three following extensions is added at the end of the block.
X indicates an error
SH means that the block has been corrected by the horizontal correction
SV means that the block has been corrected by the vertical correction
If no extension is present, the block is correct.
T means that the block do not result of received data but comes from a time-out.
R means that the block belongs to one of the 12 blocks "real time" interlaced in the parity block of the
vertical parity of a frame A1.
The termination is <CR>
INIT_DARC
Initialises the DARC parameters to their default value.
____________________________________________________________________________________________________________
AUDEMAT-AZTEC SA – AUDEMAT-AZTEC INC
WEB : www.audemat-aztec.com - e-mail : [email protected]
Page 39/57
6.7 ASCII protocol: NAVIGATOR 100 instructions for downloading of measurement
campaigns
It is easiest to download the measurement campaigns from the FLASH memory card to a PC by using the
FM Explorer software. You can also download send the contents of the FLASH memory via the serial
interface by using the ASCII protocol instructions which follow.
Instruction syntax
CGN_SCAN=
CGN_TITLE=
CGN_MODE=
DL_CGN
POS?
Description of the instruction
Navigator 100
CGN_SCAN=OFF
CGN_SCAN=FM
CGN_SCAN=RDS
CGN_SCAN=PGM
Sets the operating modes described in the man machine interface of the CGN MES? display menu SCAN
menu
Defines the next campaign title
CGN_TITLE? Pour read the parameter
CGN_MODE=SLOW
CGN_MODE=FAST
Uses the operating modes described in the man machine interface of the CGN MES? Display menu,
MODE menu
For NAVIGATOR 100 : Specifies that the FM Navigator must read all the " measurement campaigns"
information stored in the Flash memory and to send this information in ASCII format via the RS232 COM
port at the speed of 19200,N,8.
Enter DL_CGN<CR><LF> in 9600,N,8,1, then turn on 19200,N,8,1, then <CR><LF>, then listen at 19200
the serial port… end of download is mentioned by 2 successive <CR><LF> (<CR><LF><CR><LF>)
For NAVIGATOR 10 : triggers the measurement campaign, the data is outputted on the serial interface,
the campaign is stopped by the reception of a CRLF sequence via the serial interface or by a long
depression of the <Enter> button
Returns the main GPS data (Longitude, Latitude, speed, time, date, altitude and number of satellites) if
available. The format is the same as the first seven fields of the measurement campaign.
The line is terminated with <CRLF>.
If the GPS data are not available, the message 'NO GPS!' is returned.
The output data of a measurement campaign is transmitted in the form of lines of text each representing a
group of associated measurements. The end of a line is marked by a <CR> <LF> "chr$(13)+chr$(10)". The
data fields on a line are separated by a tabulation character "chr$(9)". Certain data fields contain several
bytes of data which are then separated by a semicolon "chr$(59)".
If a data field is not available, such as GPS during the passage through a tunnel or the PI code of a non RDS
station, it is left empty.
The FM Navigator has two measurement campaign modes, the fast mode, which only records 10 fields per
measurement line, and the slow mode, which adds about twenty additional fields to the first ten. The slow
mode requires a relatively long analysis time for each station (approximately 5 minutes) and is not advised in
a moving vehicle.
____________________________________________________________________________________________________________
AUDEMAT-AZTEC SA – AUDEMAT-AZTEC INC
WEB : www.audemat-aztec.com - e-mail : [email protected]
Page 40/57
Field N°
Parameter
Description of the instruction
Navigator 100
FAST MODE
1
2
3
4
5
6
7
8
GPS
LONGITUDE
GPS
LATITUDE
longitude is given as : sddddddddd
s : + for EAST, - for WEST
ddddddddd : angle in 10E-6 units of degree
E-6
Example : +007694000 Ö 7 degrees EAST and 694000*10 .
latitude is given as : sddddddddd
s : + for NORTH, - for SOUTH
ddddddddd : angle in 10E-6 units of degree
E-6
Example : +048576966 Ö 48 degrees NORTH and 576966*10
degrees
GPS UTC DATE
The UTC date is shown in the form dd/mm/yy
GPS UTC TIME
The UTC time is displayed in the form hh:mm:ss
GPS ALTITUDE
GPS SPEED
NUMBER OF GPS
SATELLITES
CAMPAIGN
TITLE
9
RECEPTION
FREQUENCY
10
RF LEVEL
11
STEREO
12
RDS PI CODE
13
14
15
16
RDS TA
RDS TP
RDS MS
17
RDS QUAL
18
DARC Error Rate
DARC
GPS altitude in meters
GPS speed measured by the GPS receiver in km/h, Example :
76.7
Number of GPS satellites received.
Campaign title (entered from the front panel or the serial port)
Examples :
88.4
102.5
The level of the RF signal is given in dBµV, possible values are
from 0 to 100
Example : 58
0 : station in mono
1 : pilote tone detection (stereo)
If the receiver decodes RDS, the PI code of the received station
is transmitted in four hexadecimal characters. A quote (‘) is
placed in front of these characters in order to prevent implicit
strange conversions into Excel.
Example :
F104
TA code (RDS)
TP code (RDS)
MS code (RDS)
No data here if no darc. If DARC detected, the programmed
frame type is placed in this field (A0, A1, B ou C).
RDS Bit error indicator: RDS QUAL is the sum of the result of 100
samples of the QUAL pin of the Philips SAA6579T RDS decoder:
clock is RDS clock.
0 : RDS reception perfect
from 20 to 40 : bit errors, but RDS decoding may be possible but
uncertain
more than 45 : too much errors for RDS decoding
Darc bloc error rate indicated here when DARC is detected.
____________________________________________________________________________________________________________
AUDEMAT-AZTEC SA – AUDEMAT-AZTEC INC
WEB : www.audemat-aztec.com - e-mail : [email protected]
Page 41/57
Field N°
Parameter
Description of the instruction
Navigator 100
SLOW MODE
19
19KHz DEVIATION
20
57KHz DEVIATION
21
76KHz DEVIATION
22
LEFT CHANNEL
LEVEL
23
RIGHT CHANNEL
LEVEL
24
L-R CHANNEL
LEVEL
25
L+R CHANNEL
LEVEL
26
MULTIPLEX SIGNAL
OVERSHOOTS
27
MULTIPLEX POWER
28
AF PAIRS
29
EON GROUPS
30
GROUP COUNTERS
31
RDS ERROR RATE
This field gives the mean deviation level of the 19KHz sub-carrier
in kHz (de 0.0 à 25.5).
Example :
6.8
This field gives the mean deviation level of the 57KHz sub-carrier
in kHz (from 0.0 to 25.5).
Example :
4.0
This field gives the mean deviation level of the 76KHz sub-carrier
in kHz (from 0.0 to 25.5).
Example :
7.5
This field gives the mean deviation level of the left audio channel
in %( from 0 to 100).
Example :
30
This field gives the mean peak level of the right audio channel in
%( from 0 to 100). This value is identical to the left deviation if the
signal is in mono.
Example :
45
This field gives the mean deviation level of the L-R sub-carrier in
%( from 0 to 100).
Example :
15
This field gives the mean deviation level of the L+R sub-carrier in
%( from 0 to 100).
Example :
16
The multiplex signal is sampled at high speed and the number of
times that the deviation is greater than 75 kHz is counted. This
number of overshoots is given in ppm (from 0 to 1000000) .
Example :
25465
The multiplex power is measured over a period of 60 seconds
and is given in dB (from -26.0 to 20.0).
Example :
-3.8
This field displays all the different AF pairs received in the C
blocks of the 0A groups.
This data is transmitted in hexadecimal. Each pair is separated by
a semicolon.
Example :
53CD;E41A;2446
For a specific contract, AUDEMAT-AZTEC can supply the source
code permitting the AF frequency lists to be extracted from this
data.
This field displays the data concerning the EON stations of all the
different 14A groups received. This data is the last 5 bits of the B,
C and D blocks in hexadecimal format. The first digit corresponds
to the ‘TP other network’ flag only. Each group is separated by a
semicolon.
Example :154B62F201;151638F201;1C0000F201;1D0000F201;
1E0000F201;002043F202;01554CF202;025455F202;035245F20
2;054B02F202;051698F202;054B02F202;051677F202;0C0000F
202;0D0001F202;0E0000F202;102020F201;11494EF201;12544
5F201;135220F201;154B62F201;151639F201
This field displays 3 numbers from 0 to 65536 corresponding to
the number of valid (without errors), incorrect and recoverable
groups over the analysis period.
Example :
2639;383;186
If RDS is received and decoded, the RDS BLOCKS error rate is
transmitted in % (value from 0 to 100).
____________________________________________________________________________________________________________
AUDEMAT-AZTEC SA – AUDEMAT-AZTEC INC
WEB : www.audemat-aztec.com - e-mail : [email protected]
Page 42/57
Field N°
Parameter
Description of the instruction
Navigator 100
This field displays 33 numbers from 0 to 65535 corresponding to
the number of groups of each type decoded during the analysis
period (approximately 5 minutes) as well as the number of
erroneous groups. The counters are transmitted in the following
order: 0A, 0B, 1A, ... 15A, 15B, erroneous, separated by
semicolons.
32
GROUP COUNTERS Example :1416;0;227;0;0;0;0;0;4;0;0;0;0;0;281;0;0;0;0;0;0;0;0;0;0
;0;0;0;711;0;0;0;569
Note : the sum of the group counters corresponds to the number
of correct groups of the field 21 and the number of erroneous
groups corresponds to the sum of the incorrect and recoverable
groups.
33
RDS PS CODE
34
PTYN RDS CODE
35
PTY RDS CODE
36
DI RDS CODE
37
GRPD PAGING
CODE (RDS)
38
RDS TIME
39
RDS DATE
40
RDS TIME OFFSET
This field displays the PS code of the station received in eight
characters.
Example: MUSIC...
This field displays the PTYN of the station received in eight
characters.
Example: WORLD...
This field displays the PTY (from 0 to 31).
Example : 25
This field displays the DI parameter (from 0 to 15)
Example : 2
This field displays the GRPD RDS paging parameter (from 0 to
15)
Example : 2
This field displays the time transmitted in the 4a groups corrected
by the transmitted offset.
Example : 15:42
This field displays the date transmitted in the 4a groups not
corrected by the transmitted offset.
Example : 25/05/97
This field displays the RDS time and date offset.
Example : -0:30
____________________________________________________________________________________________________________
AUDEMAT-AZTEC SA – AUDEMAT-AZTEC INC
WEB : www.audemat-aztec.com - e-mail : [email protected]
Page 43/57
6.8 ASCII protocol: NAVIGATOR 1000 instructions for the detectors
The following additional commands are available from the serial port of
NAVIGATOR 1000 (9600, N, 8, 1):
Instruction syntax
RF_TO=<t>
RF_TH=<v>
LF_TO=<t>
LF_TH=<v>
RDS_TO=<t>
DRC_TO=<t>
PLT_TO=<t>
CTRL_TO=<t>
Description of the instruction
Navigator 1000
RF LEVEL Time Out : 0<=t<=999 seconds
RF LEVEL Threshold : 0<v<95 (dB)
Audio LEVEL Time Out : 0<=t<=999 seconds
Audio LEVEL Threshold: 0<v<100 (%)
RDS detection Time Out : 0<=t<=999 seconds
DARC detection Time Out : 0<=t<=999 seconds
PILOT tone detection Time Out : 0<=t<=999 seconds
Delay before detection restarts : 10<=t<=999 seconds
If one of the detectors has been set to be active, detection process will start
CTRL_TO seconds after power up, on the frequency programmed on channel 1
(PGM:1).
If the selection wheel is moved, then, detection stops immediately and remains
stopped CTRL_TO seconds after the last movement of the front panel buttons
and/or wheel. Relays remain locked during this time.
When detection restarts, the P1 frequency (the one stored in program preset #1) is
then selected again automatically for monitoring.
____________________________________________________________________________________________________________
AUDEMAT-AZTEC SA – AUDEMAT-AZTEC INC
WEB : www.audemat-aztec.com - e-mail : [email protected]
Page 44/57
7. Technical specifications
General features
Weight : 1200 g (model NAVIGATOR 100)
: 2500 g (model NAVIGATOR 1000)
Dimensions : NAVIGATOR 10 and NAVIGATOR 100: L=124mm W=212mm H=44mm (without feet)
: NAVIGATOR 1000 1U, 19"
Operating conditions
Specifications given for an ambient temperature of 20°C
Equipment operational between
: 0° and 50°C
Storage temperature
: -30°C to 70°C
Humidity
: class F DIN40040
EMC
: CENELEC EN5022 and generic standards
Power supply input of the equipments
Connector
NAVIGATOR 10
NAVIGATOR 100
NAVIGATOR 1000
: 4 pin, male XLR, pin-compatible with video power supplies and batteries.
: 11,0V to 15,0V, 350mA, max voltage without damage = 25V
: 11,0V to 15,0V, 450mA, max voltage without damage = 25V
: IEC connector, 115 - 230V (integral power supply), approximately 10VA
Power supply accessories for models NAVIGATOR 10 and NAVIGATOR 100:
* mains transformer (included)
* cigarette lighter cable (included)
* optional battery pack (not included)
Relay output (NAVIGATOR 1000 only)
Connector:
Number of relay output:
Relay features:
SUBDB15 female on the rear panel
5
24Volts, 20mA maximum.
Human machine interface
-
2 push buttons
1 LED, 10 characters, red, adjustable intensity, alphanumeric display
1 wheel to move around the menus
fine button control, differentiation between short presses (clicks) and long presses
1 buzzer
internal loudspeaker (NAVIGATOR 100 only)
5 signaling LEDs on front panel (NAVIGATOR 1000 only)
____________________________________________________________________________________________________________
AUDEMAT-AZTEC SA – AUDEMAT-AZTEC INC
WEB : www.audemat-aztec.com - e-mail : [email protected]
Page 45/57
Antenna input
Connector
Impedance
External attenuator
:
:
:
BNC on rear panel
50 ohms
20dB, advised for using the FM Navigator in high fields environments
RF receiver
FM frequency
:
RDS sensitivity
:
DARC sensitivity
:
Strong fields
:
RF level measurement
:
Dynamic
:
External attenuator delivered:
87.5-107.9 MHz
0 errors at Vrf=-90dBm, 4 KHz RDS deviation, no modulation
0 errors at Vrf=-65dBm, 6 KHz DARC deviation, no modulation
3 AGC loops, AGC device taking the adjacent levels into account
+/- 2dB typical; +/- 4dB guaranteed
94dB
20dB
Stereophonic decoding
Guaranteed Cross-talk
Typical cross-talk
:
:
>20dB for a modulating signal at a deviation of 1KHz, 75KHz.
30dB.
RDS data decoding
RDS indicator
Error Correction
Group counting
Error counting
Correction counting
Radio Text
Paging
ODA
Time/Date
PS
AF decoding
PTYN
PTY, DI, MS
TA/TP
SLC
IN HOUSE
RDS BLOCKS
RDS GROUPS
UECP protocol
:
:
:
:
:
:
:
:
:
:
:
:
:
:
:
:
:
:
yes, led on front panel.
yes, can be enabled from the configuration menu.
yes (advanced functions).
yes.
yes.
yes (advanced functions).
yes, the FM Navigator behaves as a RDS Pager.
yes 3A groups (advanced functions).
yes (main menu).
yes, main menu.
yes, main menu.
yes, main menu.
yes, advanced functions.
yes, beeps when TA changes state.
yes, advanced functions.
yes, dynamic display in advanced functions.
:
yes output in ASCII on RS232 at 9600 baud (R1function).
yes output in ASCII on RS232 at 19200 (RG function).
yes RS232 output of the groups in the format UECP "free format".
DARC data decoding
DARC decoding
:
DARC indicator
Type of frames
Error correction
Error rate
:
:
:
:
yes, output of DARC data, layer 2 levels at 38400 baud.
(cf. ASCII protocol command "GO").
yes, led on front panel.
yes, configurable A0, A1, B and C.
yes, can be enabled disabled in vertical, and horizontal.
yes, displayed on front panel and accessible via COM port (ASCII protocol).
____________________________________________________________________________________________________________
AUDEMAT-AZTEC SA – AUDEMAT-AZTEC INC
WEB : www.audemat-aztec.com - e-mail : [email protected]
Page 46/57
Headphones output, loudspeaker
Headphones connector
Volume
Max level
Loudspeaker
:
Stereo / 3.5mm jack for NAVIGATOR 10 and NAVIGATOR 100; 6.35 for
NAVIGATOR 1000.
:
Adjustable via front panel and ASCII protocol (RS232).
:
+6dBu for 75 KHz deviation.
:
On NAVIGATOR 100 only, disabled when headphones are plugged in.
FM Multiplex output (BNC socket)
Connector
Impedance
Max level
Pass-band
Stereo cross-talk
:
:
:
:
:
BNC.
< 20ohms.
4400mV (+6dBu).
+/- 1dB from 50Hz to 50 KHz.
32dBu type at 1 KHz (adjustable by potentiometer).
Typical cross-talk obtained when the FM Navigator is used in FM multiplex
signal retransmission mode
FM Multiplex input (BNC socket)
Connector
Impedance
Max level
:
:
:
BNC
50 K ohms
8800mV (+12dBu)
Analysis of the Audio, MPX, Pilot, RDS, DARC levels
Type of analysis
Measurement validity
Multiplex level
Audio level
Pilot level
RDS level
DARC level
:
:
:
:
:
:
:
DSP sampling of the Multiplex signal, 12 bits, 500KHz
RF level preferably > 60dBµV
peak level displayed over 120000 samples during 300ms approx.
peak level displayed over 120000 samples during 300ms approx.
mean peak level, over 500000 samples, 1 second, (calib @6,8KHz)
mean peak level, over 500000 samples, 1 second, (calib @4,0KHz)
mean peak level, over 500000 samples, 1 second, (calib @6,0KHz)
Maximum deviation of MPX :
Accuracy on measure of MPX deviation:
Accuracy on measure of audio level:
Accuracy on display of sub-carrier levels:
+/- 140 kHz
+/- 5 KHz.
+/- 1dB typical; +/- 2dB guaranteed
+/-10% typical
Measurement of the FM Multiplex signal power
Type of analysis
:
DSP sampling of the multiplex FM signal at 500000 samples / sec.
integral calculation on the signal and optimization of the mean sliding
calculation of the instantaneous power over one minute conforming to the CCIR
recommendation n°450-1
Accuracy
:
+/- 0,2dB typical; +/- 0.4 dB guaranteed for powers from 0dB to +12dB.
Measurement of the FM Multiplex signal overshoots
____________________________________________________________________________________________________________
AUDEMAT-AZTEC SA – AUDEMAT-AZTEC INC
WEB : www.audemat-aztec.com - e-mail : [email protected]
Page 47/57
Type of analysis
:
DSP sampling of the multiplex FM signal at 500KHz.
Unit
:
the FM Navigator indicates the mean overshoot time rate
sliding over one minute in ppm (reference is unit time = 1)
Thresholds
:
75KHz +/- 5KHz, with RDS deviation = 4KHz, without DARC deviation and
pilot deviation at 6.8KHz
GPS receiver (NAVIGATOR 100 only)
Make
Type
Number of channels
Antenna
Connector
GPS differential
:
:
:
:
:
:
Trimble
Lassen SK8
8
pre-amplified, 5m of cable, magnetic.
SMB, rear panel of the FM Navigator.
dGPS input on the rear panel of the FM Navigator (extension connector).
Measurement campaigns and Flash memory (NAVIGATOR 100 only)
Analysis modes
: fast mode (16 parameters), one frequency per ½ second approx.
: fast mode (more than 38 parameters), 5 minutes of analysis per frequency.
: see chapter devoted to the data recording formats.
Storage
: NAVIGATOR 100 => the data is stored in the FLASH memory card.
: NAVIGATOR 10 => the data is outputted on the serial interface without GPS info.
Data formats
: the FM Explorer utility software permitting the measurements to be exported in
ASCII format compatible with Excel, Mapinfo, MapPoint.
Flash read back
: 2 modes (NAVIGATOR 100 only)
by leaving the Flash card in the FM Navigator and by initiating the corresponding ASCII
protocol command.
Operation in RDS Pager mode
Modes
Messages
Addressing
Signal
: numeric and alphanumeric.
: up to 50 messages memorized in volatile memory.
: a specific address or all addresses (configurable cf. GC IC).
: beep emitted by the buzzer at each message arrival.
Communication protocol, command interpreter
Refer to the chapter devoted to operating the FM Navigator from the RS232 communication port.
Speed
: 9600 bauds except for certain commands at 19200 bit/s
Format : ASCII commands, compatible with the 98 and NT terminals.
Parameters : Measurements, RDS, DARC, configuration, calibration.
Frequency program memories
____________________________________________________________________________________________________________
AUDEMAT-AZTEC SA – AUDEMAT-AZTEC INC
WEB : www.audemat-aztec.com - e-mail : [email protected]
Page 48/57
Capacity
Usage
: 50 frequencies.
: the "program" memory is used in the measurement campaigns.
Loudspeaker
Present on the NAVIGATOR 100. Monophonic, monitoring. The loudspeaker is disabled when a headphone
is plugged into the headphone socket.
Buzzer
Uses
: error signaling, TA switching, arrival of a paging message.
: signaling during scrolling of a measurement campaign.
: signaling of manipulation errors in the man-machine interface.
Accessories
Battery
20 dB attenuator
: optional portable battery pack.
: always delivered with the NAVIGATOR 10, NAVIGATOR 100 and NAVIGATOR 1000
Utility software
FM Explorer v7.0
Latest version available on the AUDEMAT-AZTEC Web page and on the Audemat-Aztec provided CD-Rom.
____________________________________________________________________________________________________________
AUDEMAT-AZTEC SA – AUDEMAT-AZTEC INC
WEB : www.audemat-aztec.com - e-mail : [email protected]
Page 49/57
APPENDIX 1: MAPPOINT LIBRARY
Audemat-Aztec has developed its “Audemat-Aztec Exploitation Campaign Tool” DLL to enable a graphic
display of data from a measurement campaign from Audemat-Aztec NAVIGATOR 100 Navigator.
Note: AUDEMAT-Aztec’s ‘FM Explorer’ software available free of charge on http://www/audemat-aztec.com
and Microsoft's MapPoint must be installed in order to use this DLL.
Compatibility starts with:
¾ FM Explorer : V7.01
¾ DLL MapPoint : V5.00
1. INSTALLING THE LIBRARY
-
Insert the Audemat-Aztec CD Rom in the driver.
Go to the Meter Silver page
Click on “MApPOINT Utilities”
Follow the instructions of the installation program
The “Audemat-Aztec Exploitation Tool Campaign” DLL is installed on your computer.
-
Start Microsoft's MapPoint software
You will see now the new tool : "Audemat-Aztec Exploitation Campaign Tool".
The MapPoint software is now ready to receive data from your NAVIGATOR 100 measurement
campaign.
____________________________________________________________________________________________________________
AUDEMAT-AZTEC SA – AUDEMAT-AZTEC INC
WEB : www.audemat-aztec.com - e-mail : [email protected]
Page 50/57
2. IMPORTING MEASUREMENT CAMPAIGN DATA TO MAPPOINT
-
Download the measurement campaign onto your computer with the FM Explorer software.
In the "Tools menu” of MapPoint, select "Audemat-Aztec Aztec exploitation tool campaign". The
following window appears :
-
Fill in the following fields :
1. "Campaign name»: Name the display to be created. A file with the same name and with the
.TXT extension will automatically be created, by default, in the directory:
c:\fmnet\fm_explo\mappoint\
2. "Units" : choose km or miles
3. "Group values" : if you don’t select this field, all data will be displayed.
To declutter the display, you can fill in this field. The various values will be gathered to points,
with the spacing specified here. The data synthesis is defined by selecting "average", "max" or
"min" in the "Display" field.
4. "Add file(s)": choose the .txt file you want to import to MapPoint. This file could come from a
measurement campaign directly downloaded from a FM Navigator through the FM Explorer
software or from data, already processed in MapPoint (file mentioned in §1.). Several campaign
files may be imported and displayed under the same name by simply selecting several files with
the 'Add Files' button.
5. A filter may be configured for the measurements, enabling selection of data according to
specific criteria.
____________________________________________________________________________________________________________
AUDEMAT-AZTEC SA – AUDEMAT-AZTEC INC
WEB : www.audemat-aztec.com - e-mail : [email protected]
Page 51/57
"Generate extended pushpin data»: if this option is selected, labels will be associated with each
measurement points with the following information:
* RF level
* Frequency and PI code
* Distance travelled in km (since the beginning of the campaign)
* Source file name
To set up a filter for the map data, choose 'Select Filter'
•
To create a new filter, select "New filter", name the filter and select OK. You can
configure up to 5 fields.
Ex : RF Level > 40
PI = F204 etc…
Select "Save filter"
Select "Use filter"
Select "Generate", the map will then display the campaign data according to the
filtering criteria.
Note: for filtering by FM, please use the following syntax => 94.50 means 94, 5 MHz,
106.10 for 106.1 MHz, etc…
•
To modify a filter, choose "Edit filter" in "Select Filter".
____________________________________________________________________________________________________________
AUDEMAT-AZTEC SA – AUDEMAT-AZTEC INC
WEB : www.audemat-aztec.com - e-mail : [email protected]
Page 52/57
Note: after modification of the filter, don’t forget to select "Save filter" before leaving
this menu.
•
To delete a filter, go to "Select Filter", choose the filter to delete and select "Delete
Filter".
6. Select "Generate", the measurement campaign is automatically added to the corresponding
map on the MapPoint software.
3. EXAMPLE
NOTE: For configuration and modification of the map background, scale or display format of the data,
please refer to the user manual or to the Help menu of "Microsoft MapPoint".
____________________________________________________________________________________________________________
AUDEMAT-AZTEC SA – AUDEMAT-AZTEC INC
WEB : www.audemat-aztec.com - e-mail : [email protected]
Page 53/57
APPENDIX 2: FM CALIBRATED ANTENNA
2.1 RF Field measurement
The NAVIGATOR 10/NAVIGATOR 100/NAVIGATOR 1000 equipments provide measurement of RF signal
amplitude on its BNC socket input. Therefore the unit of RF measurement either on the front Led display or
on the FM Explorer software is in dBµV.
For real-world measurements and coverage evaluation it is more desirable to get RF field strength
measurements. This is possible using the calibrated antenna included with the Navigator 100.
Compatibility starts with FM Explorer: V7.0.1.
2.2 RESTRICTIONS
-
The CCIR specifies the conditions of normalized measurements. These specifications include that
measurement have to be done at 10 meters above ground level. This condition is obviously not
compatible with measurement using moving vehicle, and is the main restriction to measurement
campaign you can acquire with NAVIGATOR 100.
-
The calibrated antenna has been approved in C2R laboratories a branch of French national
broadcaster TDF. The conditions of antenna use are critical to the validity of the calibration. The
antenna is supposed to be placed on a metal roof of a car. The antenna should be placed in a center
of a metal surface with a minimum size of 1 m2. Any other antenna nearby (roof car antenna) will
affect antenna measurement accuracy. Plastic, fiber or composite material vehicle roof is prohibited.
-
The antenna cable along with its connector is part of the delivered antenna and their characteristics
are taken in account in the measurement conversion process. If the cable is changed or modified the
measurement accuracy will be affected.
-
The guaranteed accuracy on field measurement is +/- 4dB providing strict respect of above
statements.
____________________________________________________________________________________________________________
AUDEMAT-AZTEC SA – AUDEMAT-AZTEC INC
WEB : www.audemat-aztec.com - e-mail : [email protected]
Page 54/57
2.3 How to configure FM Explorer for real time field measurement?
The antenna selection is a general setting of FM Explorer. The activation of field conversion can be selected
or disabled in different measurement displays,
With "browse", select the calibration file of the antenna.
Please check if the file fits with the name of the antenna and if the frequency range fits with your needs.
Confirm by clicking the Ok button.
NOTE: to change antenna type you must first disconnect then go to the menu shown below.
____________________________________________________________________________________________________________
AUDEMAT-AZTEC SA – AUDEMAT-AZTEC INC
WEB : www.audemat-aztec.com - e-mail : [email protected]
Page 55/57
2.4 Performing RF field strength measurement in real time
Select the option "Apply antenna characteristics" if you want to apply the antenna calibration factors.
Then you can read RF field strength measurements (in dBµV/m).
____________________________________________________________________________________________________________
AUDEMAT-AZTEC SA – AUDEMAT-AZTEC INC
WEB : www.audemat-aztec.com - e-mail : [email protected]
Page 56/57
2.5 How to configure FM Explorer for field measurement with campaign
The conversion to RF field strength readings takes place when you save a campaign, after downloading from
the NAVIGATOR 100 Flash card.
The same downloaded campaign can be saved with and without the conversion to dBµV/m.
The antenna type used is the one selected in the general FM Explorer settings as described in the previous
section. Any change of the antenna selection will affect general FM Explorer setting.
After the download of the measurement campaign, select the option "convert dBµV into dBµV/m" in order to
save the data as field strength measurements.
The exportation of the measurement campaign to Microsoft MapPoint can then be done as described in the
previous chapter.
For more details about the FM Explorer see the manual in the Audemat-Aztec CD-ROM provided.
____________________________________________________________________________________________________________
AUDEMAT-AZTEC SA – AUDEMAT-AZTEC INC
WEB : www.audemat-aztec.com - e-mail : [email protected]
Page 57/57