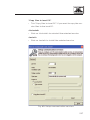
1
Vec t r on S y s t ems Vec t r on C ommander 7 Use r m a n u a l fo r ve rsi o n 7. 0 . 0 . 0 Your Vectron dealer Stamp Date: 27.12.2012 © 2009 by Vectron Systems AG Subject to error and technical modification Manufacturer Vectron Systems AG Willy-Brandt-Weg 41 48155 Münster, Germany www.vectron.de Vectron Leading in POS Technology 3 Inhal t 1. Important user instructions . . ............................................. 11 2. About this manual. . ............................................................. 14 2.1. Target group........................................................................................ 14 2.2.Purpose................................................................................................ 14 2.3. Explanation of content....................................................................... 14 2.4. Signs and symbols.............................................................................. 15 3.Specification....................................................................... 17 3.1.Specification . . ...................................................................................... 17 3.2. Changes compared to previous versions of Vectron Commander 7...................................................................................... 18 3.3. Restrictions of Vectron Commander 7............................................ 18 3.4. System requirements......................................................................... 19 3.4.1. Single station installation. . ...................................................... 19 3.4.2. Server installation in a network . . ............................................ 20 3.4.3. Client installation in a network............................................... 20 4.Shipment.. ............................................................................ 21 5. Installing and uninstalling. . ................................................ 22 5.1. 5.2. 5.3. 5.4. Installing the hardlock driver. . .......................................................... 22 Connecting the hardlock. . .................................................................. 22 Installing Vectron Commander 7...................................................... 23 Uninstalling Vectron Commander 7................................................. 25 6. First steps........................................................................... 26 6.1. Starting the software......................................................................... 26 6.2. Installing the software....................................................................... 26 6.2.1. Log in with Service login. . ........................................................ 27 6.2.2. Importing Vectron Commander 6 Migration data. . ............... 29 6.2.3. Defining users.. .......................................................................... 30 6.2.3.1. Editing user definitions............................................................ 32 6.3. Importing Vectron POS software packages.................................... 35 6.4. Connecting and installing VPOS-systems . . ...................................... 36 6.4.1. Creating VPOS-systems........................................................... 37 5 V e c t r on c omm a nder 7 6.4.2. Editing ECR definitions. . ........................................................... 39 6.5. Calling basic information................................................................... 44 6.6. Calling ECR programs. . ....................................................................... 46 6.7. Editing ECR programs........................................................................ 47 6.7.1. User interface. . .......................................................................... 48 6.7.2.Navigation.................................................................................. 50 6.7.3. Change records......................................................................... 52 6.7.3.1. Overview on commands.. .......................................................... 55 6.7.3.2. Explanation of commands........................................................ 56 6.8.Reporting............................................................................................. 66 6.8.1. Call pollings............................................................................... 66 6.8.2. Define output reports . . ............................................................. 68 6.8.3. Display reports.......................................................................... 69 7.Reference............................................................................ 71 7.1. User interface.. .................................................................................... 71 7.2. Menu bar.............................................................................................. 72 7.2.1.File.............................................................................................. 72 7.2.1.1.File\Export\Pollings.. ................................................................ 73 7.2.1.2. File\Export\ECR programs. . ..................................................... 75 7.2.1.2.1. File\Export\ECR programs\Set options................................. 77 7.2.1.3.File\Export\Parameters........................................................... 79 7.2.1.4.File\Export\ECRs. . ..................................................................... 80 7.2.1.5.File\Export\Stations................................................................. 81 7.2.1.6. File\Export\Output reports..................................................... 82 7.2.1.7.File\Export\User.. ...................................................................... 83 7.2.1.8.File\Export\Jobchains . . ............................................................ 85 7.2.1.9.File\Export\Timer.. .................................................................... 86 7.2.1.10. File\Export\Report templates................................................. 87 7.2.1.11. File\Import\Process import file.............................................. 88 7.2.1.11.1.Import definition....................................................................... 89 7.2.1.12. File\Import\Import Vectron Commander 6 migration data.91 7.2.1.13.File\Pollings\Overview............................................................. 92 7.2.1.14.File\Pollings\Move.................................................................... 93 7.2.1.15.File\Pollings\Combine.............................................................. 94 7.2.1.15.1.File\Pollings\Combine\Delete individual pollings.. ............... 97 7.2.1.15.2.File\Pollings\Combine\Save as............................................... 98 7.2.1.16.File\Pollings\Delete.................................................................. 99 7.2.1.17. File\Pollings\Book subsequently..........................................100 6 7.2.1.17.1. File\Pollings\Book subsequently\Create new polling........ 102 7.2.1.17.2.File\Pollings\Book subsequently\Select existing polling.. 102 7.2.1.17.3.File\Pollings\Book subsequently\Subsequent booking of turnover data...................................................................... 103 7.2.1.17.4.File\Pollings\Book subsequently\Book................................106 7.2.1.18.File\Pollings\Edit....................................................................108 7.2.1.19. File\Vectron POS software packages\Import. . .................... 110 7.2.1.20. File\Vectron POS Software packages\Manage driver files........................................................................................... 112 7.2.1.21.File\Reorganize....................................................................... 114 7.2.1.22.File\Logoff............................................................................... 114 7.2.1.23.File\Terminate......................................................................... 114 7.2.2.Edit. . .......................................................................................... 115 7.2.2.1.Edit\Save.................................................................................. 115 7.2.2.2. Edit\Save as Vectron POS dump........................................... 116 7.2.2.3.Edit\Configuration.................................................................. 116 7.2.2.4.Edit\Operations....................................................................... 118 7.2.2.5. Edit\Record\Insert record.....................................................120 7.2.2.6. Edit\Record\Delete record....................................................121 7.2.2.7. Edit\Record\Move record . . .....................................................122 7.2.2.8. Edit\Record\Copy record.......................................................124 7.2.2.9. Edit\Record range\Insert range. . ..........................................126 7.2.2.10. Edit\Record range\Delete range...........................................127 7.2.2.11. Edit\Record range\Modify range..........................................128 7.2.2.12. Edit\Edit default record.........................................................130 7.2.2.13. Edit\Edit range record . . .......................................................... 131 7.2.2.14.Edit\Assistants........................................................................132 7.2.2.14.1.Edit\Assistants\Icons.............................................................132 7.2.2.14.2.Edit\Assistants\Buttons . . .......................................................132 7.2.2.14.3.Edit\Assistants\Layouts........................................................132 7.2.2.14.4.Edit\Assistants\Table maps...................................................133 7.2.2.14.5.Edit\Assistants\Plausibility...................................................133 7.2.2.14.6.Edit\Assistants\Keyboard. . ....................................................133 7.2.2.14.7.Edit\Assistants\Text forms....................................................133 7.2.2.14.8.Edit\Assistants\Touchkey programming. . ............................134 7.2.3.View..........................................................................................134 7.2.3.1. View\Table view. . .....................................................................135 7.2.3.2. View\Mask view.......................................................................136 7.2.3.3.View\Sort.................................................................................137 7 V e c t r on c omm a nder 7 7.2.3.4.View\Filter...............................................................................139 7.2.3.5. View\Folder list....................................................................... 141 7.2.3.6.View\Reload. . ........................................................................... 141 7.2.3.7. View\Previous report............................................................. 141 7.2.3.8. View\Next report.................................................................... 141 7.2.3.9.View\Zoom............................................................................... 141 7.2.4.Reports..................................................................................... 141 7.2.4.1.Reports\Display.. .....................................................................142 7.2.4.1.1. Overview on commands.. ........................................................144 7.2.4.1.2. Explanation of commands . . ................................................... 145 7.2.4.2.Reports\Print.. ......................................................................... 147 7.2.5. ECR programs.......................................................................... 149 7.2.5.1. ECR programs\Edit.. ................................................................ 149 7.2.5.2. ECR programs\Copy. . ..............................................................150 7.2.5.3. ECR programs\Assistants...................................................... 151 7.2.5.3.1. ECR programs\Assistants\Icons........................................... 151 7.2.5.3.2. ECR programs\Assistants\Buttons....................................... 151 7.2.5.3.3. ECR programs\Assistants\Layouts. . .....................................152 7.2.5.3.4. ECR programs\Assistants\Table maps.................................152 7.2.5.3.5. ECR programs\Assistants\Plausibility.................................152 7.2.5.3.6. ECR programs\Assistants\Keyboard....................................153 7.2.5.3.7. ECR programs\Assistants\Text forms..................................153 7.2.5.3.8. ECR programs\Assistants\Touchkey programming............153 7.2.6.Communication .. ......................................................................154 7.2.6.1. Communication\Communication journal.. ............................155 7.2.6.2. Communication\Display communication jobs.....................156 7.2.6.3. Communication\Evaluate communication jobs...................157 7.2.6.4. Communication\Call pollings. . ...............................................159 7.2.6.5. Communication\ECR programs\Transmit . . ...........................160 7.2.6.6. Communication\ECR programs\Call.....................................162 7.2.6.7. Communication\Execute jobchains.. .....................................163 7.2.6.8. Communication\Execute remote jobs..................................164 7.2.6.9. Communication\Call basic information................................ 165 7.2.6.10. Communication\Transmit date/time. . ................................... 167 7.2.6.11. Communication\Vectron POS Anywhere. . ............................168 7.2.6.12. Communication\Vectron POS dump\Call............................. 169 7.2.6.13. Communication\Vectron POS Dump\Transmit.................... 170 7.2.6.14. Communication\Vectron POS software update . . ................. 171 8 7.2.6.15. Communication\Communication module\Execute communication module.......................................................... 173 7.2.6.16. Communication\Communication module\Start communication monitor......................................................... 173 7.2.7.Configuration . . ......................................................................... 174 7.2.7.1.Configuration\Jobchains....................................................... 175 7.2.7.2.Configuration\Timer...............................................................180 7.2.7.3.Configuration\Parameters.....................................................188 7.2.7.4. Configuration\Gateway parameters.....................................189 7.2.7.5.Configuration\Settings\ECRs................................................ 190 7.2.7.6.Configuration\Settings\Stations.. ......................................... 198 7.2.7.7.Configuration\Settings\User.................................................203 7.2.7.8. Configuration\Reports\Output reports.. ..............................209 7.2.7.9. Configuration\Reports\Report definition. . .......................... 214 7.2.7.10. Configuration\Reports\Report templates........................... 216 7.2.7.11.Configuration\Licences..........................................................221 7.2.8. Helper functions . . ....................................................................224 7.2.8.1. Helper functions\External programs\Configure external applications..............................................................224 7.2.8.2. Helper functions\Modem\Init. branch modem....................227 7.2.8.3. Helper functions\Modem\Init. local modem........................229 7.2.8.4. Helper functions\Create program shortcuts. . ..................... 231 7.2.8.4.1. Vectron Commander...............................................................231 7.2.8.4.2. Communication module. . ........................................................234 7.2.8.5. Helper functions\Setup communication services. . .............236 7.2.9.Window.....................................................................................238 7.2.9.1.Window\Overlapping.. .............................................................238 7.2.9.2. Window\One below the other................................................238 7.2.9.3. Window\Side by side. . .............................................................238 7.2.9.4.Window\Close..........................................................................238 7.2.9.5. Windows\Close all...................................................................238 7.2.9.6. Window\Reset window settings . . ...........................................239 7.2.10.Help...........................................................................................239 7.2.10.1. Help\View readme...................................................................239 7.2.10.2. Help\Vectron on the web . . ......................................................239 7.2.10.3. Help\Send feedback mail.......................................................239 7.2.10.4.Help\About. . .............................................................................240 7.3.Toolbar............................................................................................... 241 7.3.1. Explanation of commands......................................................242 9 V e c t r on c omm a nder 7 7.4. Choose entries from selection fields.............................................245 8. Recurring settings............................................................247 8.1. Select polling.. ................................................................................... 247 8.2. Select polling range.........................................................................250 8.3. Select polling.. ...................................................................................252 8.4. Select polling types..........................................................................252 8.5. Select export mode..........................................................................253 8.5.1. Automatic export....................................................................253 8.5.2. Manual export with template. . ...............................................253 8.5.3. Manual export. . ........................................................................254 8.5.3.1. Manual export select options................................................255 8.6. Select report data.. ...........................................................................257 8.7. Select ECR programs. . ......................................................................258 8.8. Select options...................................................................................259 8.9. Select comparison levels.................................................................260 8.10. Select mode.......................................................................................262 8.11.Search................................................................................................264 9.Glossary. . ...........................................................................265 10. Errors, possible reasons and troubleshooting...............268 11. Customer service..............................................................270 12. Document revision............................................................270 10 1. Impor t an t us er ins t r uc t ions Do not install Vectron Commander 7 in a directory of Vectron Commander 6 or a previous version of Vectron Commander. If you do not follow this note your data and settings can be deleted. Attention! To avoid data loss you have to update your data regularly. Data should be updated daily. Attention! Changing the settings of Vectron Commander 7 can cause data loss, malfunction and a system crash. Changes at the default settings are at your own risk. Attention! The tax payer has to make sure that data, which is created with the software, complies with the tax- and commercial laws and the generally accepted accounting principles. Attention! 11 V e c t r on C omm a nder 7 Attention! Attention! Attention! Note 12 According to Vectron's experience the relevant tax laws and -regulations for POS systems are subject to different interpretation in practice. Vectron therefore recommends keeping the printed Z-reports per day of each POS system in addition to storing the reports in Vectron Commander 7. Protect the software from unauthorized access. Every user account should be assigned a password to prevent changes at the configuration. Assign the users the appropriate rights in user administration. Protect passwords and data from being spied out. Only the user must know the password for his account. Forwarding of the password has to be prevented. You must not note down the password where it is accessible for others. Change the passwords within an adequate period. Settings of Vectron Commander 6 can partly be migrated to Vectron Commander 7. For migration of settings please see chapter 6.2.2. „Importing Vectron Commander 6 Migration data" on page 29. Settings of Vectron Commander 7 cannot be migrated to Vectron Commander 6. For information on migration in a standard installation of Vectron Commander 7 please see the directory <\Vectron\VCom 7\Doc\> in file MigrationEng.txt. Note Note Vectron POS support: Generally, Vectron POS systems as of software version 4.2.0.0 are supported. Concerning the data interface (import / export of ECR programs), full compatibility is guaranteed as of version 4.3.2.3. Modifications and restrictions of Vectron Commander 7 are recorded in a document revision, which you can call in the menu bar of Vectron Commander 7 under <Help\Readme>. The released functions of Vectron Commander 7 depend on the licences that you purchased. Note 13 V e c t r on C omm a nder 7 2. A bou t t his manual 2 .1 . Ta rg e t g ro u p This user manual is meant for Vectron-dealers and experienced end users. 2 . 2 . P u r p os e Purpose of this end user manual is to explain the installation and configuration of the software. It will inform you about the operation and the commands of Vectron Commander 7. 2 . 3 . E x p l a n a ti o n of co nte nt The chapter "Specification" gives an overview on the tasks for which Vectron Commander 7 can be used. The chapter "Installation" describes how to install the software on a PC. The chapter "First steps" informs you on how to configure the software and on the most important functions of Vectron Commander 7. The chapter "Reference" explains the structure of the user interface and the commands in menu- and tool bar. The chapter "Recurring settings" explains entries in windows, which are to be made repeatedly in various program parts. The "Glossary" explains abbreviations and terms that are used in connection with Vectron Commander 7. The chapter "Errors, possible reasons, troubleshooting" helps you to remove errors. The chapter "Customer service" explains how to get technical support for Vectron Commander 7. 14 2 . 4 . Si g n s a n d sy m b o l s This chapter explains the signs and symbols that are used in this manual. Indicates danger in case you do not heed the information. Attention! Indicates additional information. Note Mark Function Example Single quotation marks Designate a window. Tick the POS systems in window 'ECR marking'. Double quotation marks Designate input fields in a window. Enter date and time in field "Delayed execution". Angle brackets Designate commands and paths to commands. In the menu bar click on <Communication\Call basic information>. Bullets Call for action. •Tick the POS systems in window 'ECR marking'. 15 V e c t r on C omm a nder 7 Mark Indented bullets 16 Function Indicate that the following steps are subordinate to the previous ones. Example •If you want to call the basic information later tick "Delayed execution" in window 'Execution'. •Enter date and time in field "Delayed execution". 3. Speci f ic a t ion 3 .1 . S p e cif i c a ti o n Vectron Commander 7 enables you to program VPOS-systems and to manage and change data of the VPOS-systems. You can call ECR programs and pollings from VPOS-systems, edit ECR programs and PLU data and transmit them to VPOS-systems. The software can update VPOS-systems with new VPOSversions. Dumps can be created and transmitted to the Vectron-POS-systems. Vectron Commander 7 can display reports (e.g. on turnover data) on the screen and print them. The reports can be tailored to the demands in your company in order to evaluate data. Vectron Commander 7 supplies various report templates, e.g. PLU-, operator-, transaction reports. The software offers the possibility to correct reports. You can enter missing sales subsequently and redate and combine pollings. The communication module of Vectron Commander 7 can simultaneously call or send data from / to several VPOSsystems. Communication tasks can be pre-programmed, for example to call turnover data automatically at a defined time. Vectron Commander 7 can address up to 2,000 VPOSsystems. You can define users with individual rights and configure output reports. 17 V e c t r on C omm a nder 7 By means of Vectron-POS-Anywhere you can connect to VPOS-systems via network or modem, in order to telecontrol them or to check transactions. You can use Vectron Commander 7 as interface between merchandise management systems and VPOS-systems. Vectron Commander 7 is no and cannot be used as VPOSsystem. The software is no merchandise control system. 3 . 2 . Ch a n g es co m p a re d to p rev i o u s ve r si o n s of Ve c tro n Co m m a n d e r 7 Changes at Vectron Commander 7 will be registered in a change document to be called in Vectron Commander 7. • Click on <Help\View readme> in the menu bar. 3 . 3 . Res tr i c ti o n s of Ve c tro n Co m m a n d e r 7 Restrictions of Vectron Commander 7 will be registered in a change document to be called in Vectron Commander 7. • Click on <Help\View readme> in the menu bar. 18 3 . 4 . Sys te m re q u i re m e nt s To use Vectron Commander 7 the PCs have to meet defined system requirements. 3 . 4 .1 . Si n g l e s t a ti o n i n s t a l l a ti o n Software Operating system • Windows XP or Windows Vista Hardware • PC which meets the system requirements of the operating system. • Hard disk with min. 50 MB free memory capacity. Depending on the number of VPOS-systems to be managed and called pollings a higher memory capacity may be required. Note • Screen with a recommended resolution of min. 1024 x 768 pixels. 19 V e c t r on C omm a nder 7 3 . 4 . 2 . S e r ve r i n s t a l l a ti o n i n a n e t wo r k Software Operating system • Windows XP or Windows Vista Hardware • PC which meets the system requirements of the operating system. • Hard disk with min. 50 MB free memory capacity. Depending on the number of VPOS-systems to be managed and called pollings a higher memory capacity may be required. Note • Screen with a recommended resolution of min. 1024 x 768 pixels. 3 . 4 . 3 . Cl i e nt i n s t a l l a ti o n i n a n e t wo r k Software Operating system • Windows XP or Windows Vista Hardware • PC which meets the system requirements of the operating system. • Screen with a recommended resolution of min. 1024 x 768 pixels. 20 4. Shipmen t The content of delivery of Vectron Commander 7 depends on your order. Enclosed to the shipment you find a letter that lists the content of delivery. Please check the delivery for completeness. 21 V e c t r on C omm a nder 7 5. Ins t alling and unins t alling This chapter tells you how to install and uninstall Vectron Commander 7. If your Vectron-dealer installed the software for you you can proceed with chapter 6. „First steps" on page 26. 5 .1 . I n s t a l l i n g th e h a rd l o ck d r i ve r Vectron Commander 7 requires a hardlock driver for reading the licence information of the hardlock. The installation program will guide you through the installation of the hardlock driver. • Insert the installation-CD of Vectron Commander 7 to the CD-ROM-drive. • Double click on the My Computer-icon. • Double click on the CD-ROM-drive icon. • Open the <\DRIVERS> directory. • Double click on file <hldrv32.exe>. • Read the notes on installation and click on <Next> to install the software. • Click on <Complete> to finish installation. 5 . 2 . Co n n e c ti n g th e h a rd l o ck Plug the supplied hardlock to a parallel or USB-port at your PC. 22 5 . 3 . I n s t a l l i n g Ve c tro n Co m m a n d e r 7 This chapter tells you how to install Vectron Commander 7 on a single station. The installation program will guide you through the installation of Vectron Commander 7. Please contact your Vectron-dealer if you want to install Vectron Commander 7 in a network. Note If Vectron Commander 7 is already installed on your PC the installation software overwrites the program files of the previous installation. It does not overwrite your data and settings. In the installation program you can use the <Previous> command to return to previous dialogues. Note • Insert the installation-CD of Vectron Commander 7 to the CD-ROM-drive. • Double click on the My Computer-icon. • Double click on the CD-ROM-drive icon. • Open the <\VCom\VCom7> directory. • Double click on the installation file. The name of the installation file contains the software version and the language. Note Example: VCom7-7.0.0.0-International.exe •Software version 7.0.0.0 •All languages supported by Vectron Commander 7 23 V e c t r on C omm a nder 7 • Select the language in which the dialogues are to be displayed during installation and click on <OK>. • Read the notes on installation and click on <Next>. Attention! Do not install Vectron Commander 7 in a directory of Vectron Commander 6 or a previous version of Vectron Commander. If you do not follow this note your data and settings could be deleted. You should not change the default installation directory <\Vectron\VCom7>. Note • Click on <Next> to install Vectron Commander 7 to the indicated directory. • Select if and for whom the program groups in Windowsstart menu shall be installed and click on <Next>. • In an international setup select the language in which Vectron Commander 7 shall be installed and click on <Next>. • Check your settings in window 'Summary' and click on <Install>. • Click on <Finish> to finish installation. 24 5 . 4 . U n i n s t a l l i n g Ve c tro n Co m m a n d e r 7 You can uninstall Vectron Commander 7 on your PC. The uninstall program will guide you through the uninstalling of Vectron Commander 7. Note Note Before uninstalling Vectron Commander 7 you have to terminate the software and the started services of Vectron Commander 7. The uninstall program removes the program files of Vectron Commander 7. Your data and settings are kept. After new installation of Vectron Commander 7, data and settings will be available again. If you want to delete all data, remove the installation directory <\Vectron\VCom7> or your selected installation directory after uninstalling. • In Windows-start menu click on <Start\All Programs\Vectron\Vectron Commander 7\Utilities\Uninstall>. • Read the uninstall notes, select the uninstall method 'Automatic' and click on <Next>. • Click on <Finish> to finish the uninstalling. 25 V e c t r on C omm a nder 7 6. F ir s t s t eps This chapter tells you how to start Vectron Commander 7 and how to install the software. Note On start of Vectron Commander 7 the software checks whether a hardlock is connected. If the hardlock is connected to the parallel port of a printer you may have to switch on the printer so that Vectron Commander 7 recognizes the hardlock. 6 .1 . St a r ti n g th e s of t wa re Start Vectron Commander 7 via the Windows-start menu. • Click on <Start\All programs\Vectron\Vectron Commander 7\Vectron Commander 7>. You find the start file VCom7.exe after a standard installation in directory <\Vectron\VCom7\Bin>. Note 6 . 2 . I n s t a l l i n g th e s of t wa re After installation of Vectron Commander 7 you first have to make some settings before you can use the software. 26 6 . 2 .1 . Lo g i n wi th S e r v i ce l o g i n If no user has been configured you have to use the service login to configure a user. The service login exclusively serves for configuring users; other program functions can only be used to a limited extent. If your Vectron dealer has configured the users for you you can proceed with chapter 6.2.2. „Importing Vectron Commander 6 Migration data" on page 29. • In 'Login' window under "User" enter the Service login no. 9999. • In 'Login' window under "Password" enter the master password, which is contained in shipment of Vectron Commander 7. • Click on <OK> to sign in with the Service login. Fig. 1: Service login 27 V e c t r on C omm a nder 7 • Read the hint under 'Attention' and click on <OK>. Fig. 2: Service login 28 6 . 2 . 2 . I m p o r ti n g Ve c tro n Co m m a n d e r 6 M i g ra ti o n data With this command you import the migration data of Vectron Commander 6 to Vectron Commander 7. If you do not want to import migration data you can proceed with chapter 6.2.3. „Defining users" on page 30. Migration data should be imported directly after installation of Vectron Commander 7. Previous settings in Vectron Commander 7 might get lost. Attention! • In the menu bar click on <File\Import\Import Vectron Commander 6 migration data>. • Read the hint under 'Important notes' and click on <Continue>. • In window 'Choose migration file' under "Import file(s)" to select the enter the path and file name or click on migration file. • If the migration file is to be deleted after import tick "Delete file(s) after import" in window 'Choose migration file' and click on <Continue>. • Check your settings in window 'Summary' and click on <Execute> to import the migration data. • Read the hints under 'Done' and click on <Finish> to complete the import. 29 V e c t r on C omm a nder 7 6 . 2 . 3 . D ef i n i n g u s e r s You have to define at least one user with administrator rights to use the software. • In the menu bar click on <Configuration\Settings\User>. • In window 'User definition' click on <Insert>. Fig. 3: User definition • In window 'Create new record' under "User" enter an integer between 1 and 9999. In field "Copy data from" you can copy the user definitions of other existing users. Note 30 • If you want to copy the user definition of a user enter the user number in window 'Create new record' under "Copy data from" or click on to select a user from the selection list. • Click on <OK> to create the user. Fig. 4: Create new record: User 31 V e c t r on C omm a nder 7 6 . 2 . 3 .1 . Ed i ti n g u s e r d ef i n i ti o n s After having created a new user a window opens where you have to edit the user definition. In this chapter you are informed on how to edit the user definitions and how to make the required settings for an administrator account. Fig. 5: Editing the user definition "General\Name" The user is identified in Vectron Commander 7 by user number and user name. • Enter a user name in field "Name", e.g. "Administrator". 32 "General\Windows user name" In field "Windows user name" you can enter the Windows user name for log in to Vectron Commander 7. Note The Windows user name is the user name with which you log in when starting Windows. If a Windows user name is entered, Vectron Commander 7 recogizes the user and starts without password inquiry. "General" <Change password> You should determine an administrator password to prevent other users from changing the settings. • Click on <Change password>. • In window 'Change password' enter the desired password under "Password (New)" and click on <OK>. Attention! Memorise the password and protect passwords and data from being spied out. Only the user must know the password for his account. Forwarding of the password has to be prevented. You must not note down the password where it is accessible for others. Change the passwords within an adequate period. • Click on <OK> to confirm the message that the password has been changed. 33 V e c t r on C omm a nder 7 "Rights\All rights" In order to use the various program parts of Vectron Commander 7 you have to assign rights to the users. An administrator account should be assigned all rights. • Click on "Rights" in the selection window. • In field "All rights" select <Yes>. • In field "Supervisor" select <Yes>. Saving the user definition • Click on <OK> to assign the user the changed settings. • Click on <Close> to close the 'User definition' window. • Click on <File\Logoff> in the menu bar. • Log in with the created user account. 34 6 . 3 . I m p o r ti n g Ve c tro n P OS s of t wa re p a cka g es When installing Vectron Commander 7 a Vectron POS programming driver file (VPP) is installed. Import now the VPP that suit your VPOS-systems. Log in to Vectron Commander 7 with a user account, which has been assigned the respective rights. Note • In the menu bar click on <File\Vectron POS software packages\Import>. • In window 'Import Vectron POS software packages' under "Software archive(s)" enter the path and the file to select the Zip-file of the Vectron POS or click on software package. • In window 'Import Vectron POS software packages' select under "Options" the drivers to be installed and click on <Continue>. You should import all drivers of a Vectron POS software package. Note • Check your settings in window 'Summary' and click on <Execute> to install the driver. • In window 'Done' click on <Finish> to complete the installation. In a standard installation you find the imported VPP in directory <\Vectron\ VCom7\VPosDrv>. Note 35 V e c t r on C omm a nder 7 6 . 4 . Co n n e c ti n g a n d i n s t a l l i n g VP OS- sys te m s All VPOS-systems have to be installed and configured in Vectron Commander 7. The VPOS-systems can be connected to the PC via serial cables, network cables, modems or per ISDN. If several VPOS-systems are networked only one VPOS-system has to be connected to the PC. The other VPOS-systems are addressed via the ECR-network. Note 36 How many VPOS-systems can be addressed with Vectron Commander 7 depends on the purchased licence. Please ask your Vectron-dealer if you want to extend your licence. 6 . 4 .1 . Cre a ti n g VP OS- sys te m s All VPOS-systems have to be created in Vectron Commander 7. Create the VPOS-systems now. • In the menu bar click on <Configuration\Settings\ECRs>. • In window 'ECR definition' click on <Insert>. Fig. 6: ECR definition • In window 'Create new record' under "ECR" enter an integer between 1 and 99999999. Note This number identifies the VPOS-systems in Vectron Commander 7 unambiguously. You don't have to assign the numbers consecutively. If there are several subsidiaries in your company you can assign the VPOS-systems of the first subsidiary for example numbers 101, 102, 103 and the VPOS-systems of the second subsidiary numbers 201, 202, 203. 37 V e c t r on C omm a nder 7 In field "Copy data from" you can copy the ECR definitions of other available ECRs. Note • If you want to copy the ECR definition of a POS system go to 'Create new record' and enter the ECR no. under "Copy data from" or click on to select an ECR from the list. • Click on <OK> to create the ECR. Fig. 7: Create new record: ECR 38 6 . 4 . 2 . Ed i ti n g ECR d ef i n i ti o n s After having created a new ECR, a window opens to which the ECR definition must be entered. In this chapter you are informed on how to make the required settings for communication between Vectron Commander 7 and VPOS-systems. Fig. 8: Edit ECR definition 39 V e c t r on C omm a nder 7 "General\Name" The VPOS-systems are identified in Vectron Commander 7 by ECR number and ECR name. • Enter the ECR name in field "Name". You can enter for example the name of the subsidiary or the site of the VPOSsystem. Note "General\ECR type" The ECR type determines which ECR programs the VPP provides in Vectron Commander 7. • In field "ECR type" enter the number of the connected ECR type or select the ECR type from the list. "General\Memory" The size of the installed memory determines e.g. how many PLUs and departments can be entered to the ECR programs. You find the size of the installed memory in the VPOS-system. To read the memory you require the respective rights. Note • Enter the installed memory in field "Memory". 40 Note Note Vectron POS-PC adjusts the memory requirements dynamically to the programs and data. The VPP cannot adjust the memory requirements dynamically. Vectron recommends entering ten megabyte in field "Memory" because the VPP requires an information. For internal purposes the VPP contains additional information. The value entered in field "Memory" may not be sufficient. You should enter an extra of 10 % under <Configuration\Parameters\ECRs\General settings\Memory overhead>. "General\Inline address" The inline address is configured in the VPOS-system and assigns the VPOS-system to an ECR network. You find the inline address in the VPOSsystem. To read the inline address you require the respective rights. Note • In field "Inline address" enter the network address from the VPOS-system. "General\Channel type" The channel type determines how the VPOS-system is connected to the PC. • In field "Channel type" enter the number of the channel type or select it from the list. 41 V e c t r on C omm a nder 7 "General\Phone no. / Pipe-Host / IP / Site ID" This information depends on the selected channel type. Serial • Do not enter anything in field "Phone-no. / Pipe-Host / IP / Site ID" if the selected "Channel type" is serial. Windows-Pipe • Enter the computer name or the IP-address of the PC in field "Phone no. / Pipe-Host / IP / Site ID" if the selected "Channel type" is Windows-Pipe. If Vectron Commander 7 is installed on the same PC as VPOS-PC, you can enter a dot. Network • Enter the IP-address of the PC in field "Phone no. / Pipe-Host / IP / Site ID" if the selected "Channel type" is Network. You find the IP address in the VPOS-system. To read the IP address you require the respective rights. Note Modem • In field "Phone no. / Pipe-Host / IP / Site ID" enter the phone number of the VPOS-system if the selected "Channel type" is Modem. 42 "General\Access password" VPOS-systems can be protected with passwords against unauthorized access. You find the access passwords in the VPOS-system. To read the access passwords you require the respective rights. Note • In field "Access password" enter the access password from the VPOS-system (if available). Save ECR definition • Click on <OK> to save the ECR definition. • Click on <Close> to close the window 'ECR definition'. 43 V e c t r on C omm a nder 7 6 . 5 . C a l l i n g b a si c i nfo r m a ti o n The command <Communication\Call basic information> calls the basic information from VPOS-systems. Basic information comprise e.g. the Vectron POS-version that is installed in the VPOS-system. After calling the basic information, Vectron Commander 7 uses the VPP that suits the VPOS-systems. The VPP allows access to the ECR programming. • In the menu bar click on <Communication\Call basic information>. As soon as you have made the minimum settings in the assistant you can click on <Execute> to call the basic information. Note • In window 'ECR marking' tick those VPOS-systems, the basic information of which you want to call and click on <Continue>. • If you want to call the basic information later, tick "Delayed execution" in window 'Execution'. • Enter date and time in field "Delayed execution" and click on <Continue>. • Check your settings in window 'Summary' and click on <Execute>. • In window 'Done' click on <Finish> to call the basic information. The basic information is called by the communication module. 44 Note You find the read information in the menu bar under <Configuration\Settings\ECRs>, when clicking on <Edit> and then on <Information\ECR>. Note After installation of a new VPOS-version in VPOS-systems you should always call the basic information so that Vectron Commander 7 uses the suitable VPP. 45 V e c t r on C omm a nder 7 6 . 6 . C a l l i n g ECR p ro g ra m s It is useful to call the ECR programs after having called the basic information. If the VPOS-systems are already completely configured the whole programming can be taken as basis for program changes. • In the menu bar click on <Communication\ECR programs\ Call>. As soon as you have made the minimum settings in the assistant you can click on <Execute> to call the ECR programs. Note • In window 'ECR marking' tick those VPOS-systems, the ECR programs of which you want to call and click on <Continue>. • In window 'Program data marking' tick "Configuration". • In window 'Program data marking' click on all ECR programs and click on <Continue>. to select • If you want to call the basic information later, tick "Delayed execution" in window 'Execution'. • Enter date and time in field "Delayed execution" and click on <Continue>. • Check your settings in window 'Summary' and click on <Execute>. • In window 'Done' click on <Finish> to call the ECR programs. The communication module calls the ECR programs. You can then edit the ECR programs in Vectron Commander 7. 46 6 .7. Ed i ti n g ECR p ro g ra m s You can edit the programs called from the VPOS-systems in Vectron Commander 7. • In the menu bar click on <ECR programs\Edit>. As soon as you have made the minimum settings in the assistant you can click on <Execute> to open the ECR programs. Note • In window 'ECR selection' select the VPOS-system the ECR programs of which you want to edit and click on <Continue>. • In window 'Select mode' you choose the mode in which you want to edit the ECR programs and click on <Execute>. For possible settings in window 'Select mode' please see chapter 8.10. „Select mode" on page 262. Note 47 V e c t r on C omm a nder 7 6 .7.1 . Us e r i nte r fa ce This chapter informs you about the user interface and the meaning of symbols in the user interface. Folder list The VPP controls which ECR programs are displayed in the folder list. See figure 9: "User interface ECR programs" on page 49. The structure of the ECR programs in the folder list is identical to that of the POS system. Working pane The working pane displays the records of the ECR program selected in the folder list. See figure 9: "User interface ECR programs" on page 49. Show subfields The -icon means that this column or line contains additional records, which are presently faded out. • Click on to fade in hidden records. Hide subfields The -icon means that this column or line contains additional records, which are presently faded in. • Click on 48 to fade out displayed records. folder list working pane Fig. 9: User interface ECR programs 49 V e c t r on C omm a nder 7 6 .7. 2 . N av i g a ti o n In this chapter you are informed on how to navigate in the user interface. Switching between folder list and working pane You can use the tab key to switch between the folder list on the left side and the working pane on the right side. Navigation in the working pane After having marked a cell in the working pane you can use the cursor keys for navigation in the working pane. Calling records in mask view A record is displayed in the working pane of the mask view. You can call the mask view by clicking on <View\Mask view> in the menu bar. Note • Keep the Ctrl-key pressed and press one of the page up/ down keys to call another record. Changing the ECR program -icon means that this column or line refers to data The in another ECR program. to open the ECR program to which the refe• Click on rence is made. 50 You can open the ECR program in a separate window. Keep the shift key pressed -icon. when clicking on the Note 51 V e c t r on C omm a nder 7 6 .7. 3 . Ch a n g e re co rd s This chapter informs you on how to change and sort records and on the meaning of icons and notes. You cannot enter data to the grey fields. Note • Mark the cell in the working pane which you want to edit. • Press the enter key to edit the data of a marked cell or doubleclick on the cell to open a selection list or the text editor. • Change the data. • Press the enter key to confirm the data input. Calling selection list or text editor The -icon means that you can open a selection list or the text editor. You can select default values from a selection list. • Click on the -icon to open selection list or text editor. • Select a default value from the selection list or enter a text in the text editor. • Click on <OK> to adopt the value. 52 Sorting records You can sort the records in the columns by content. The ‑icon means that the records are sorted in ascending order. The -icon means that the records are sorted in descending order. In the working pane click on the column header of the table to sort the records in ascending or descending order. You can sort several columns simultaneously. • Keep the Ctrl-key pressend and in the working pane click on the column headers of the table. Note The order in which you click on the column headers controls the priority of sorting. Sorted columns are marked in pale yellow. Table view: Icons for changed records Various icons mark the changed records in table view in the first column of the working pane. The -icon means that this record was changed. The change has not yet been saved in the ECR program of Vectron Commander 7 and the changed ECR program has not yet been transmitted to the VPOS-system. The -icon means that this record was changed. The change has been saved in the ECR program of Vectron Commander 7 but the changed ECR program has not yet been transmitted to the VPOS-system. 53 V e c t r on C omm a nder 7 Mask view: Note to changed records A text in the first line "State" of the working pane informs you about changed records in mask view. The note "Not yet saved / Not yet transmitted" means that this record was changed. The change has not yet been saved in the ECR program of Vectron Commander 7 and the changed ECR program has not yet been transmitted to the VPOS-system. The note "Not yet transmitted" means that this record was changed. The change has been saved in the ECR program of Vectron Commander 7 but the changed ECR program has not yet been transmitted to the VPOS-system. 54 6 .7. 3 .1 . O ve r v i ew o n co m m a n d s Icon Command Shortcut key Back Alt + left cursor Next Alt + right cursor Save CTRL + S Folder list Table view CTRL + Enter Mask view CTRL + Enter Sort Filter Configuration CTRL + C Operations Edit default record Insert record CTRL + Ins Copy record Move record Delete record CTRL + Del Edit range record Insert range Shift + Alt + Ins Modify range 55 V e c t r on C omm a nder 7 Icon Command Delete range Shortcut key Shift + Alt + Del 6 .7. 3 . 2 . E x p l a n a ti o n of co m m a n d s <Back> Opens the last opened ECR programs in reverse direction. <Next> Opens the last opened ECR programs in forward direction. <Save> Saves the modified records in the ECR programs. <Folder list> Fades the folder list in or out. <Table view> Shows the records of the selected ECR program as table in the working pane. <Mask view> Shows a record of the selected ECR program as mask in the working pane. <Sort> Controls the sorting of records in the table view. 56 Configure sorting • Click on the <Sorting> icon. • In field "1. sorting" determine the column to be used for sorting and select "Ascending" or "Descending". • If required select additional sorting criteria. • Click on <OK> to confirm the sorting. Delete sorting • Click on <Sorting> . • Click on <Delete all> to delete all sorting criteria. • Click on <OK> to delete the sorting. <Filter> Controls the display of records of the selected ECR program. Define filters • Click on the <Filter> icon. • In the selection list "Column" select the column to which the filter shall be applied. • In the selection list "Condition" select the condition to be used for the filter. • In field "Value" enter the filter value. • Click on <Add> to define the filter. • Click on <OK> to confirm your entries. Note If filters are defined a line with filter definition is faded in to the working pane. You can fade in and out the filters by clicking on the filter definition marked in blue. 57 V e c t r on C omm a nder 7 Edit defined filters • Click on the <Filter> icon. Active filters are ticked in field "Defined filters". With a click on the tick you disable the filter. Note • Mark the filter in window 'Define filter' under "Defined filters". • Click on <Edit>. • Carry out the changes. • Click on <Add> to define the filter. • Click on <OK> to confirm your entries. Delete defined filters • Click on the <Filter> icon. • Mark the filter in window 'Define filter' under "Defined filters". • Click on <Delete> to delete the filter. • Click on <OK> to confirm your entries. Delete all defined filters • Click on the <Filter> icon. • Click on <Delete all> to delete all filters. • Click on <OK> to confirm your entries. 58 <Configuration> Opens the window for editing the ECR configuration. • Click on the <Configuration> icon. • Change the ECR configuration. Attention! Take into account the consequences of a new configuration. If for instance you reduce the number of PLUs in configuration but more PLUs are stored in the ECR program, a change of configuration may result in data loss. • Click on <OK> to configure the POS system anew. • Answer the confirmation prompt with <Yes> to carry out the new configuration. <Operations> Opens the window for carrying out operations. It contains commands which for example update or sort a PLU selection. • Click on the <Operations> icon. • Select the operation you want to carry out. • Click on <OK>. • Answer the confirmation prompt with <Yes> to carry out the operation. 59 V e c t r on C omm a nder 7 <Edit default record> Opens the window for editing the default record. The editing of the default record affects the ECR program selected from the folder list. The default record saves data that is written to a new record whenever one is created. • Click on the <Edit default record> icon. • Edit the default record. • In the menu bar click on <Edit\Save> to save your changes. <Insert record> Inserts a new record in the selected ECR program. • Click on the <Insert record> icon. • Enter the record number in field "Number". If in field "Number" you enter the number of an existing record, the latter is neither changed nor overwritten. Note • Click on <OK> to insert the record. • In the menu bar click on <Edit\Save> to save your changes. 60 <Copy record> Copies a record of the selected ECR program. • Click on the <Copy record> icon. • In field "From number" enter the number of the record that you want to copy. • In field "To number" enter the number of the record that you want to insert. If you enter the number of a record that is not available in field "From number" no record is copied. Note Note If you enter the number of a record that is not available in field "To number" you are asked whether the existing record is to be overwritten. • Click on <OK> to copy the record. • In the menu bar click on <Edit\Save> to save your changes. 61 V e c t r on C omm a nder 7 <Move record> Re-numbers the record of the selected ECR program. • Click on the <Move record> icon. • In field "From number" enter the number of the record that you want to re-number. • In field "To number" enter the number of the record to which you want to assign the record. If you enter the number of a record that is not available in field "From number" the record is not re-numbered. Note Note If you enter the number of a record that is not available in field "To number" the existing record is neither changed nor overwritten. • Click on <OK> to re-number the record. • In the menu bar click on <Edit\Save> to save your changes. 62 <Delete record> Deletes the record of the selected ECR program. • Click on the <Delete record> icon. • In field "Number" enter the number of the record that you want to delete. • Click on <OK> to delete the record. • In the menu bar click on <Edit\Save> to save your changes. <Edit range record> Opens the window for editing the range record. The editing of the range record affects the ECR program selected from the folder list. The range record saves data that is written to the selected records when editing a range. • Click on <Edit range record>. • Edit the default record. • In the menu bar click on <Edit\Save> to save your changes. 63 V e c t r on C omm a nder 7 <Insert range> Inserts records in the selected ECR program. • Click on the <Insert range> icon. • In field "From number" enter the record number as of which records are to be inserted. • In field "Up to number" enter the record number up to which records are to be inserted. Note If you enter an already existing range in fields "From number" and "Up to number" the existing records are neither changed nor overwritten. • Click on <OK> to insert records. • In the menu bar click on <Edit\Save> to save your changes. <Modify range> Opens the window for editing a record range. • Click on the <Modify range> icon. • In field "Records" enter the number range to be edited. • Edit the range. • Click on <OK>. • In the menu bar click on <Edit\Save> to save your changes. 64 <Delete range> Deletes records of the selected ECR program. • Click on the <Delete range> icon. • In field "From number" enter the record number as of which records are to be deleted. • In field "Up to number" enter the record number up to which records are to be deleted. • Click on <OK> to delete the records. • In the menu bar click on <Edit\Save> to save your changes. 65 V e c t r on C omm a nder 7 6 . 8 . Re p o r ti n g This chapter informs you on how to call report data from VPOS-systems and how to display and print them in Vectron Commander 7. 6 . 8 .1 . C a l l p o l l i n g s For display and printout of reports you have to call the report data from the VPOS-systems. Vectron Commander 7 saves the pollings for each VPOS-system with date and time. Note The user entries under "Call pollings" depend on the respective VPOS-configuration. The window 'Administrational jobs' for instance is hidden if administrational jobs are not programmed in VPOS-configuration. • In the menu bar click on <Communication\Call pollings>. • In window 'ECR marking' select whether you want to carry out a "Regular polling", a "Shift polling" or a "Card journal polling". Note With a "Regular polling" you can call all programmed data from VPOS-systems. With a "Shift polling", shift-related data is called from VPOS-systems. A "Card journal polling" calls card journals which concern the electronic direct debit. • In window 'ECR marking' tick those VPOS-systems, the pollings of which you want to call and click on <Continue>. 66 • In window 'Polling options' select the type, "Polling X" or "Polling Z". An X-polling keeps the data in the VPOSsystem after polling. A Z-polling deletes the data in the VPOS-system after polling. Note Note If you call a Z-polling and the VPOSsystems are configured for saved reports you find the polling options "Call saved reports" and "Save running reports". • In window 'Polling options' under 'Save as' determine under which date and time the pollings are to be saved and click on <Continue>. • In window 'Report jobs' select the report jobs to be called and click on <Continue>. • In window 'Administrational jobs' select the administrational jobs to be called and click on <Continue>. • If you want to call the pollings later tick "Delayed execution" in window 'Execution'. • Enter date and time under "Delayed execution" and click on <Continue>. • Check your settings in window 'Summary' and click on <Execute>. • In window 'Done' click on <Finish> to call the pollings. Note To check whether the polling has been called successfully click on <Communication\Communication journal> in the menu bar. 67 V e c t r on C omm a nder 7 6 . 8 . 2 . D ef i n e o u tp u t re p o r t s Output reports define the layout and content of reports. If no output reports are defined, reports cannot be displayed on the screen or printed. By means of the assistant you can select between various default reports. This chapter informs you on the required settings for display and printout of output reports. • In the menu bar click on <Configuration\Reports\Output reports>. • Click on <Templates>. • In window 'Mark output reports' tick the ones you want to use and click on <Execute>. • Read the hints under 'Done' and click on <Finish>. • Click on <Close> to close the output report window. 68 6 . 8 . 3 . D i s p l ay re p o r t s This chapter informs you on how to display the report data stored in Vectron Commander 7. Display reports with individual settings • In the menu bar click on <Reports\Display>. As soon as you have made the minimum settings in the assistant you can click on <Execute> to display the reports. Note Note The user entries under "Display reports" depend on the respective VPOS-configuration. The window 'Report templates' for instance is hidden if no templates are defined in Vectron Commander 7. • In window 'Report templates' select "(No report template)" and click on <Continue>. • In window 'ECR marking' tick those VPOS-systems, the reports of which you want to display and click on <Continue>. • In window 'Pollings' select "Polling range", "Pollings" and "Polling types" and click on <Continue>. Note For possible settings in window 'Pollings' please see chapter 8.2. „Select polling range" on page 250, chapter 8.3. „Select polling" on page 252 and chapter 8.4. „Select polling types" on page 252. 69 V e c t r on C omm a nder 7 • If you want to add comparison levels click on "Add comparison..." in window 'Comparison levels' and then click on <Continue>. For possible settings in window 'Comparison levels' please see chapter 8.9. „Select comparison levels" on page 260. Note • In window 'Output report marking' select the reports you want to display and click on <Continue>. • Check your settings in window 'Summary' and click on <Execute> to display the reports. 70 7. Re f er enc e The chapter reference describes the user interface. You can look up the commands of Vectron Commander 7 and their function, for instance the command "Call pollings". 7.1 . Us e r i nte r fa ce The five and and user interface of Vectron Commander 7 consists of areas, the title bar, menu bar, tool bar, working pane status bar. This chapter informs you on the functions information that the user interface provides. tool bar menu bar title bar working pane status bar Fig. 10: User interface 71 V e c t r on C omm a nder 7 7. 2 . M e n u b a r The menu bar divides the commands of Vectron Commander 7 into groups. This chapter informs you about the commands contained in the menu bar, about the calling of commands and the effects of these commands. 7. 2 .1 . F i l e With the commands in this menu you can export, import and reorganize data. You are enabled to edit pollings, log out users, install software packages and to close the program. 72 7. 2 .1 .1 . F i l e\E x p o r t\P o l l i n g s With this command you export pollings which you called from VPOS-systems. The exported pollings can be further processed with other programs. • In the menu bar click on <File\Export\Pollings>. Note In the "Export pollings" assistant there is a dynamic inquiry of user entries. The 'Options' window for ex. is faded out when selecting a different export mode than "Manual Export" under 'Settings'. As soon as you have made the minimum settings in the assistant you can click on <Execute> to export the pollings. Note • In window 'ECR marking' tick those VPOS-systems, the pollings of which you want to export and click on <Continue>. • In window 'Settings' select the "Polling range" and "Export mode". Note For possible settings in window 'Settings' please see chapter 8.2. „Select polling range" on page 250 and chapter 8.5. „Select export mode" on page 253. • Click on <Continue>. • In the 'Options' window select "File settings", "Export settings" and "Currency settings". 73 V e c t r on C omm a nder 7 For possible settings in window 'Options' please see chapter 8.5.3.1. „Manual export select options" on page 255 Note • Click on <Continue>. • In window 'Report data' tick those that you want to export. For possible settings in window 'Report data' please see chapter 8.6. „Select report data" on page 257. Note • Click on <Continue>. • In window 'ECR programs' tick those that you want to export. For possible settings in window 'ECR programs' please see chapter 8.7. „Select ECR programs" on page 258. Note • Click on <Continue>. • Check your settings in window 'Summary' and click on <Execute> to export the pollings. • Read the hints under 'Done' and click on <Finish> to complete the export. Export files are stored in directory <\Vectron\VCom7> if no other export directory was selected. Note 74 7. 2 .1 . 2 . F i l e\E x p o r t\ECR p ro g ra m s With this command you export ECR programs which you called from VPOS-systems. The exported ECR programs can be further processed with other programs. • In the menu bar click on <File\Export\ECR programs>. As soon as you have made the minimum settings in the assistant you can click on <Execute> to export the ECR programs. Note • In window 'ECR marking' tick those VPOS-systems, the ECR programs of which you want to export and click on <Continue>. • In window 'Program data marking' tick the VPOS-systems, the ECR programs of which you want to export and click on <Continue>. • Select the "Options" and enter the name of the "Export files(s)". Note For possible settings in window 'Options' please see chapter 7.2.1.2.1. „File\Export\ECR programs\Set options" on page 77. • Click on <Continue>. • Check your settings in window 'Summary' and click on <Execute> to export the ECR programs. • Read the hints under 'Done' and click on <Finish> to complete the export. 75 V e c t r on C omm a nder 7 Export files are stored in directory <\Vectron\VCom7> if no other export directory was selected. Note 76 7. 2 .1 . 2 .1 . F i l e\E x p o r t\ECR p ro g ra m s\ S e t o p ti o n s "Export mode" The export mode determines the format in which ECR programs are exported. You find the settings of the "Export mode" under <Configuration\Parameters\Data interface\Export\ECR programs\Mode>. Note "Marked records only" At present, Vectron Commander 7 does not support this function. "ANSI-character set" • Tick "ANSI-character set" if you want to export the ECR programs using the ANSI-character set. "Data type marks" • Tick "Data type marks", if you want to export the ECR programs with data type marks. During export the data type is written into the file. "Export empty fields" • Tick "Export empty fields", if you want to export empty fields. 77 V e c t r on C omm a nder 7 "Max. line length" • Enter a number in field "Max. line length" to determine how many characters are maximally written into a line during export of the ECR programs. Note You find the settings of "Max. line length" under <Configuration\Parameter\Data interface\Export\ECR programs\Max. line length>. "Export file(s)" • In field "Export file(s)" enter path and name of the export file. You can enter several file names, separated by semicolon. If you enter several file names the same information is written to each of the files. Fig. 11: Export ECR programs – Options 78 7. 2 .1 . 3 . F i l e\E x p o r t\Pa ra m e te r s With this command you export the parameters that you defined under <Configuration\Parameters>. You can import the exported parameters for example to other installations of Vectron Commander 7. • In the menu bar click on <File\Export\Parameters>. As soon as you have made the minimum settings in the assistant you can click on <Execute> to export the parameters. Note • Select the "Options", enter the file name under "Export file(s)" and a comment under "Comment". For possible settings in window 'Options' please see chapter 8.8. „Select options" on page 259. Note • Click on <Execute> to export the parameters. • Read the hints under 'Done' and click on <Finish> to complete the export. Export files are stored in directory <\Vectron\VCom7> if no other export directory was selected. Note 79 V e c t r on C omm a nder 7 7. 2 .1 . 4 . F i l e\E x p o r t\ECRs With this command you export the ECR definitions that you created under <Configuration\Settings\ECRs>. You can import the exported ECR definitions for example to other installations of Vectron Commander 7. • In the menu bar click on <File\Export\ECRs>. As soon as you have made the minimum settings in the assistant you can click on <Execute> to export the ECR definitions. Note • In window 'ECR marking' tick those VPOS-systems, the ECR definitions of which you want to export and click on <Continue>. • Select the "Options", enter the file name under "Export file(s)" and a comment under "Comment". For possible settings in window 'Options' please see chapter 8.8. „Select options" on page 259. Note • Click on <Execute> to export the ECR definitions. • Read the hints under 'Done' and click on <Finish> to complete the export. Export files are stored in directory <\Vectron\VCom7> if no other export directory was selected. Note 80 7. 2 .1 . 5 . F i l e\E x p o r t\ St a ti o n s With this command you export the station definitions that you created under <Configuration\Settings\Stations>. You can import the exported station definitions for example to other installations of Vectron Commander 7. • In the menu bar click on <File\Export\Stations>. Note As soon as you have made the minimum settings in the assistant you can click on <Execute> to export the station definitions. • In window 'Station marking' tick the stations, the definitions of which you want to export and click on <Continue>. • Select the "Options", enter the file name under "Export file(s)" and a comment under "Comment". For possible settings in window 'Options' please see chapter 8.8. „Select options" on page 259. Note • Click on <Execute> to export the station definitions. • Read the hints under 'Done' and click on <Finish> to complete the export. Export files are stored in directory <\Vectron\VCom7> if no other export directory was selected. Note 81 V e c t r on C omm a nder 7 7. 2 .1 . 6 . F i l e\E x p o r t\O u tp u t re p o r t s With this command you export the output reports that you created under <Configuration\Reports\Output reports>. You can import the exported output reports for example to other installations of Vectron Commander 7. • In the menu bar click on <File\Export\Output reports>. As soon as you have made the minimum settings in the assistant you can click on <Execute> to export the output reports. Note • In window 'Output report marking' tick the output reports that you want to export and click on <Continue>. • Select the "Options", enter the file name under "Export file(s)" and a comment under "Comment". For possible settings in window 'Options' please see chapter 8.8. „Select options" on page 259. Note • Click on <Execute> to export the output reports. • Read the hints under 'Done' and click on <Finish> to complete the export. Export files are stored in directory <\Vectron\VCom7> if no other export directory was selected. Note 82 7. 2 .1 .7. F i l e\E x p o r t\Us e r With this command you export the user definitions that you created under <Configuration\Settings\User>. You can import the exported user definitions for example to other installations of Vectron Commander 7. Note During export of user definitions no password data is exported. Users, which were created by imported user definitions, are not password-protected. • In the menu bar click on <File\Export\User>. As soon as you have made the minimum settings in the assistant you can click on <Execute> to export the user definitions. Note • In window 'User marking' tick the users which you want to export and click on <Continue>. • Select the "Options", enter the file name under "Export file(s)" and a comment under "Comment". For possible settings in window 'Options' please see chapter 8.8. „Select options" on page 259. Note • Click on <Execute> to export the user definitions. • Read the hints under 'Done' and click on <Finish> to complete the export. 83 V e c t r on C omm a nder 7 Export files are stored in directory <\Vectron\VCom7> if no other export directory was selected. Note 84 7. 2 .1 . 8 . F i l e\E x p o r t\ J o b ch a i n s With this command you export the job chains that you created under <Configuration\Jobchains>. You can import the exported job chains for example to other installations of Vectron Commander 7. • In the menu bar click on <File\Export\Jobchains>. As soon as you have made the minimum settings in the assistant you can click on <Execute> to export the job chains. Note • In window 'Jobchain marking' tick the job chains which you want to export and click on <Continue>. • Select the "Options", enter the file name under "Export file(s)" and a comment under "Comment". For possible settings in window 'Options' please see chapter 8.8. „Select options" on page 259. Note • Click on <Execute> to export the job chains. • Read the hints under 'Done' and click on <Finish> to complete the export. Export files are stored in directory <\Vectron\VCom7> if no other export directory was selected. Note 85 V e c t r on C omm a nder 7 7. 2 .1 .9. F i l e\E x p o r t\T i m e r With this command you export the timer definitions that you created under <Configuration\Timer>. You can import the exported timer definitions for example to other installations of Vectron Commander 7. • In the menu bar click on <File\Export\Timer>. As soon as you have made the minimum settings in the assistant you can click on <Execute> to export the timer definitions. Note • In window 'Timer marking' tick the timer definitions which you want to export and click on <Continue>. • Select the "Options", enter the file name under "Export file(s)" and a comment under "Comment". For possible settings in window 'Options' please see chapter 8.8. „Select options" on page 259. Note • Click on <Execute> to export the timer definitions. • Read the hints under 'Done' and click on <Finish> to complete the export. Export files are stored in directory <\Vectron\VCom7> if no other export directory was selected. Note 86 7. 2 .1 .10 . F i l e\E x p o r t\Re p o r t te m p l a tes With this command you export the report templates that you created under <Configuration\Reports\Report templates>. You can import the exported report templates for example to other installations of Vectron Commander 7. • In the menu bar click on <File\Export\Report templates>. As soon as you have made the minimum settings in the assistant you can click on <Execute> to export the report templates. Note • In window 'Report template marking' tick the report templates which you want to export and click on <Continue>. • Select the "Options", enter the file name under "Export file(s)" and a comment under "Comment". For possible settings in window 'Options' please see chapter 8.8. „Select options" on page 259. Note • Click on <Execute> to export the report templates. • Read the hints under 'Done' and click on <Finish> to complete the export. Export files are stored in directory <\Vectron\VCom7> if no other export directory was selected. Note 87 V e c t r on C omm a nder 7 7. 2 .1 .11 . F i l e\I m p o r t\P ro ces s i m p o r t f i l e With this command you import the import- and export files of Vectron Commander 7 and external programs. Vectron Commander 7 recognizes the data by means of the file content. • In the menu bar click on <File\Import\Process import file>. As soon as you have made the minimum settings in the assistant you can click on <Execute> to import the import file. Note • In window 'Process import file' under "Import file(s)" to select enter the path and the file name or click on the import file. • If the import file is to be deleted after import, tick "Delete file(s) after import" and click on <Continue>. • Click on <Execute> to carry out the import. • If the window 'Definition import' is displayed, select "Mode" and "Key no.". For required settings in window 'Definition import' please see chapter 7.2.1.11.1. „Import definition" on page 89. Note • Click on <OK>. • Read the hints under 'Done' and click on <Finish> to complete the import. 88 7. 2 .1 .11 .1 . I m p o r t d ef i n i ti o n In window 'Definition import' you define how data is to be imported from a file. "Data type" Displays the data contained in the file. "Key no." Displays the key number with which data was exported. "Remark" Displays the comment that was entered during data export. "Mode" • Select if and when data is to be imported. Note When selecting the "Later" mode you are asked again whether you want to import the data during the next call of "Edit import file". When selecting the "Import" mode, the data is imported immediately. When selecting the "Discard" mode the data is not imported. "Key no." • Select the key number under which data is to be imported. 89 V e c t r on C omm a nder 7 Fig. 12: Import definition 90 7. 2 .1 .12 . F i l e\I m p o r t\I m p o r t Ve c tro n Co m m a n d e r 6 m i g ra ti o n d a t a With this command you import migration data of Vectron Commander 6 to Vectron Commander 7. Migration data should be imported directly after installation of Vectron Commander 7. Previous settings in Vectron Commander 7 might get lost. Attention! You require supervisor rights to import the Vectron Commander 6 migration data. Note • In the menu bar click on <File\Import\Import Vectron Commander 6 migration data>. • Read the hint under 'Important notes' and click on <Continue>. • In window 'Choose migration file' under "Import file(s)" to select enter the path and the file name or click on the migration file. • If the migration file is to be deleted after import tick "Delete file(s) after import" in window 'Choose migration file' and click on <Continue>. • Check your settings in window 'Summary' and click on <Execute> to import the migration data. • Read the hints under 'Done' and click on <Finish> to complete the import. 91 V e c t r on C omm a nder 7 7. 2 .1 .13 . F i l e\P o l l i n g s\O ve r v i ew With this command you open an overview of the pollings stored in Vectron Commander 7. • In the menu bar click on <File\Pollings\Overview>. • In window 'ECR marking' tick those VPOS-systems, the pollings of which you want to display and click on <Continue>. • If you want to close the polling overview click on <Finish>. "Details" If "Details" is ticked, the window 'Pollings overview' also shows the ECR number and the polling status. "Polling range" Here you select the pollings to be displayed in window 'Pollings overview'. <Update> A click on the -icon updates the display in window 'Pollings overview'. 92 7. 2 .1 .14 . F i l e\P o l l i n g s\M ove With this command you assign the pollings a new date and a new time. • In the menu bar click on <File\Pollings\Move>. Note As soon as you have made the minimum settings in the assistant you can click on <Execute> to assign the pollings a new date and a new time. • In window 'ECR marking' tick those VPOS-systems that are to be assigned a new date and time and click on <Continue>. • In window 'Polling range' select the range. For possible settings in window 'Polling range' please see chapter 8.2. „Select polling range" on page 250. Note • Click on <Continue>. • In window 'Options' under "Destination date/time", select date and time to be assigned to the selected pollings. • If you want to assign all pollings to one POS system you can optionally tick "Assign all pollings to one ECR". • Mark the POS system to which the pollings shall be assigned and click on <Continue>. • Check your settings in window 'Summary' and click on <Execute> to move the pollings. • Read the hints under 'Done' and click on <Finish> to complete the move. 93 V e c t r on C omm a nder 7 7. 2 .1 .15 . F i l e\P o l l i n g s\Co m b i n e With this command you combine pollings. • In the menu bar click on <File\Pollings\Combine>. As soon as you have made the minimum settings in the assistant you can click on <Execute> to combine the pollings. Note • In window 'ECR marking' tick those VPOS-systems that are to be combined and click on <Continue>. • In window 'Polling range' select the range. For possible settings in window 'Polling range' please see chapter 8.2. „Select polling range" on page 250. Note • Click on <Continue>. • In window 'Destination polling' under "Combine" determine whether only Z-pollings, only X-pollings or all pollings are to be combined. • In window 'Destination polling' under "Delete individual pollings" determine whether no, only accumulated or all pollings in this period are to be deleted. Note 94 For possible settings in window 'Polling range' please see chapter 7.2.1.15.1. „File\Pollings\Combine\ Delete individual pollings" on page 97. • In window 'Destination polling' under "Save" determine in which VPOS-system the destination polling shall be stored. • In window 'Destination polling' under "Save as" select date and time under which the combined pollings shall be stored. • In window 'Destination polling' under "Save as" select the polling type to be used for storing the combined pollings. Note For possible settings in window 'Polling range' please see chapter 7.2.1.15.2. „File\Pollings\Combine\Save as" on page 98. • Click on <Continue>. • Check your settings in window 'Summary' and click on <Execute> to combine the pollings. • Read the hints under 'Done' and click on <Finish> to complete the operation. 95 V e c t r on C omm a nder 7 Fig. 13: Combine pollings – Destination polling 96 7. 2 .1 .15 .1 . F i l e\P o l l i n g s\Co m b i n e\ D e l e te i n d i v i d u a l p o l l i n g s This chapter informs you about the meaning of settings in selection list "Delete individual pollings". "Don't delete any pollings" No individual pollings are deleted. The destination polling is saved as additional polling. "Only delete accumulated pollings" Deletes only those individual pollings that are saved in the destination polling. The destination polling is saved as additional polling. "Delete all pollings in period" Deletes all pollings of defined VPOS-systems from the selected polling range. Deletes also those pollings that are not saved in the destination polling. The destination polling is saved as additional polling. If for instance you only combine Z-pollings, the X-pollings are also deleted although these are not saved in the destination polling. 97 V e c t r on C omm a nder 7 7. 2 .1 .15 . 2 . F i l e\P o l l i n g s\Co m b i n e\ S ave a s This chapter informs you about the meaning of settings in selection list "Save as". "Automatically" Vectron Commander 7 determines the type of destination polling. If a Z-polling is among the selected pollings, the combined polling is saved as Z-polling. If no Z-polling is among the selected pollings, the combined polling is saved as X-polling. "Z polling" The destination polling is saved as Z-polling. "X polling" The destination polling is saved as X-polling. 98 7. 2 .1 .16 . F i l e\P o l l i n g s\D e l e te With this command you delete pollings. • In the menu bar click on <File\Pollings\Delete>. As soon as you have made the minimum settings in the assistant you can click on <Execute> to delete the pollings. Note • In window 'ECR marking' tick those VPOS-systems, the pollings of which you want to delete and click on <Continue>. • Select the "Polling range". For possible settings in window 'Polling range' please see chapter 8.2. „Select polling range" on page 250. Note • Click on <Continue>. • If only X-pollings are to be deleted tick "Only X pollings" in the 'Options' window. If the field "Only X-pollings" is not ticked, all pollings in the selected range are deleted. Note • Click on <Continue>. • Check your settings in window 'Summary' and click on <Execute> to delete the pollings. • In window 'Done' click on <Finish> to complete the deletion of pollings. 99 V e c t r on C omm a nder 7 7. 2 .1 .17. F i l e\P o l l i n g s\B o o k su b s e q u e ntl y This command serves for subsequent booking of PLUs by editing existing pollings or creating new ones. • In the menu bar click on <File\Pollings\Book subsequently>. As soon as you have made the minimum settings in the assistant you can click on <Execute> to book the pollings. Note • In window 'ECR selection' tick the VPOS-system the polling of which you want to book and click on <Continue>. • In window 'polling selection' select the polling to be booked or enter date and time under which you want to create a new polling. Note For possible settings in window 'Polling selection' please see chapter 7.2.1.17.1. „File\Pollings\Book subsequently\ Create new polling" on page 102 and chapter 7.2.1.17.2. „File\Pollings\Book subsequently\ Select existing polling" on page 102. • Click on <Continue>. • Enter the turnover data in window 'Subsequent booking of turnover data'. Note 100 For possible settings in window 'Subsequent booking of turnover data' please see chapter 7.2.1.17.3. „File\Pollings\ Book subsequently\ Subsequent booking of turnover data" on page 103. • Click on <Continue>. • In window 'Book' enter the details for the subsequent booking. Note For possible settings in window 'Book' please see chapter 7.2.1.17.4. „File\Pollings\Book subsequently\Book" on page 106. • Click on <Execute> to complete the booking. • In window 'Done' click on <Finish> to finish the booking of turnover data or click on <Book new receipt> to enter another booking. 101 V e c t r on C omm a nder 7 7. 2 .1 .17.1 . F i l e\P o l l i n g s\B o o k su b s e q u e ntl y\ Cre a te n ew p o l l i n g This chapter informs you on the settings in window 'Polling selection' in order to create a new polling with subsequent booking. Enter date • Click into the date field to enter the date with the keyboard or click on the -icon to choose a date from the selection window. Enter time • Click into the time field to enter the time with the keyboard or mark hours, minutes or seconds in the time fields and click on the -icon to adjust the time. Fig. 14: Create new polling 7. 2 .1 .17. 2 . F i l e\P o l l i n g s\B o o k su b s e q u e ntl y\ S e l e c t exi s ti n g p o l l i n g This chapter informs you on how to select an existing polling in window 'Polling selection'. • Click on the -icon to open the selection window. • Mark the polling you want to edit under 'Select polling' and click on <OK> to confirm your entry. Fig. 15: Select existing polling 102 7. 2 .1 .17. 3 . F i l e\P o l l i n g s\B o o k su b s e q u e ntl y\ Su b s e q u e nt b o o ki n g of tu r n ove r d a t a In this window you enter the data for a new or existing polling. "PLU" Column "PLU" lists the PLU numbers. "Name" Column "Name" lists the PLU names. "Count" • In column "Count" enter the number of PLUs to be booked subsequently. In column "Count" you can also enter negative numbers, e.g. for reversing unsold PLUs. Note "Price" • In this column check the PLU price or change the price. "Value" Vectron Commander 7 calculates the total value from the number of sold PLUs and the price. The total is displayed in column "Value". "Tax" • In this column enter the tax rate for the PLU to be booked subsequently. 103 V e c t r on C omm a nder 7 "Price turnover level" • In this column enter the price turnover level for the PLU to be booked subsequently. <Delete> Deletes all entries in column "Count". • Click on <Delete> to delete all entries in column "Count". • Confirm the message "Clear entries" with <Yes>. <Prices> Enters the prices of the selected level in column "Price" and deletes all entries in column "Tax". • Click on <Prices> to open the window 'Take over prices'. • Enter the price level to enter the prices from one level in column "Price". • In window 'Take over prices' click on <OK> to take over the prices from the price level. <Price turnover level> Enters the selected turnover level in the whole column "Price turnover level" and deletes all entries in column "Count". • Click on the command <Price turnover level> to open the window. • Enter the price turnover level to enter the value in column "Price turnover level" . • In window 'Price turnover level' click on <OK> to take over the price turnover level. 104 <Search> Searches for a value in column "Name". • Click on <Search> to open the window. • Enter the PLU name you want to search in column "Name", select "Search direction" and "Options". For possible settings in window 'Search' please see chapter 8.11. „Search" on page 264. Note • Click on <OK> to start the search. Fig. 16: Subsequent booking of turnover data 105 V e c t r on C omm a nder 7 7. 2 .1 .17. 4 . F i l e\P o l l i n g s\B o o k su b s e q u e ntl y\B o o k In this window you enter details of a booking. Note In window "Book" there is a dynamic inquiry of user entries. The field 'Clerk' for example is hidden if no clerks are defined in the POS system. "Clerk" • Select the "Clerk" to whom the subsequent booking is to be assigned. "Operator" • Select the "Operator" to whom the subsequent booking is to be assigned. "Time" Enter the time when the PLUs were sold. • Click into the time field to enter the time with the keyboard or mark hours, minutes or seconds in the time fields and click on the -icon to adjust the time. "Media" • Select the media with which the invoice was settled. "Tax" • Choose the tax rate from the selection list. "Customers/Guests" • In this field you can enter the number of guests to whom the subsequent booking refers. 106 Fig. 17: Book 107 V e c t r on C omm a nder 7 7. 2 .1 .18 . F i l e\P o l l i n g s\Ed i t With this command you edit pollings or create new ones. Note If you want to edit pollings or create new ones this function has to be released in report definitions. In the menu bar click on <Configuration\Reports\Report definition>. Mark the desired definition and click on <Edit>. In column "Input mode" select <Yes> at the data lines that you want to edit and click on <OK>. Then click on <Close> to close the window. • In the menu bar click on <File\Pollings\Edit>. As soon as you have made the minimum settings in the assistant you can click on <Execute> to edit pollings. Note • In window 'ECR selection' select the VPOS-system the pollings of which you want to edit or for which you want to create new pollings and click on <Continue>. • In window 'Enter turnover data' under "Polling" enter date and time of the polling. For possible settings in window 'Enter turnover data' please see chapter 8.1. „Select polling" on page 247. Note • In window 'Enter turnover data' under "Report" select the report the polling data of which you want to edit or enter anew. • Click on <Continue>. 108 • Check your settings in window 'Summary' and click on <Execute> to open the window for entering the polling data. • Enter the changed and new polling data in window 'Data input'. • Click on <Save> to adopt the changes. 109 V e c t r on C omm a nder 7 7. 2 .1 .19. F i l e\Ve c tro n P OS s of t wa re p a cka g es\ Import With this command you import Vectron POS software packages to Vectron Commander 7. A Vectron POS software package contains several files: Vectron POS software updates with the installation file of Vectron POS PC and flash updates for the POS systems; the Vectron POS Anywhere driver, which is required for a Vectron POS Anywhere session, and the Vectron POS programming driver for display of ECR programs. • In the menu bar click on <File\Vectron POS software packages\Import>. • In window 'Import Vectron POS software packages' under "Software archive(s)" enter path and file name to select the Zip-file of the Vectron POS or click on software package. • In window 'Import Vectron POS software packages' under "Options" select the driver to be installed and click on <Continue>. You should import all drivers of a Vectron POS software package. Note 110 Fig. 18: Import Vectron POS software packages • Check your settings in window 'Summary' and click on <Execute> to install the drivers. • In window 'Done' click on <Finish> to finish the installation. You find the imported VPP in a standard installation in directory <\Vectron\ VCom7\VPosDrv>. Note 111 V e c t r on C omm a nder 7 7. 2 .1 . 20 . F i l e\Ve c tro n P OS S of t wa re p a cka g es\ M a n a g e d r i ve r f i l es With this command you open the window for administration of driver files installed in Vectron Commander 7. • In the menu bar click on <File\Vectron POS software packages\Manage driver files>. Fig. 19: Manage Vectron POS driver files <Update> Updates the display of installed driver files. 112 <Import> Calls the assistant for importing Vectron POS software packages. Note For import of Vectron POS software packages please see chapter 7.2.1.19. „File\ Vectron POS software packages\ Import" on page 110. <Delete> Deletes installed driver files. • In window 'Driver files' mark the file that you want to delete and click on <Delete>. • Answer the confirmation prompt with <Yes>. <Check> Checks whether required driver files are missing and whether driver files are installed, which are no longer required. Close window • Click on <Close> to close the window 'Manage Vectron POS driver files'. 113 V e c t r on C omm a nder 7 7. 2 .1 . 21 . F i l e\Re o rg a n ize With this command you reorganize the polling database of Vectron Commander 7. The database is cleaned and database errors are corrected. Note Stations must not access the database during reorganization. If the database is very large the reorganization may take very long. • In the menu bar click on <File\Reorganize>. • Read the hint in window 'Note' and click on <Execute> to reorganize the polling database. • Read the hints in window 'Done' and click on <Finish> to finish the reorganization. 7. 2 .1 . 2 2 . F i l e\Lo g of f Logs off the current user. • In the menu bar click on <File\Logoff>. 7. 2 .1 . 2 3 . F i l e\Te r m i n a te Terminates Vectron Commander 7. • In the menu bar click on <File\Terminate>. 114 7. 2 . 2 . Ed i t Commands in this menu serve for creating Vectron-POSdumps and for editing ECR configurations. You can edit and save records in ECR programs. Part of the entries in the "Edit" menu bar can only be addressed if an ECR program is opened. Note 7. 2 . 2 .1 . Ed i t\ S ave Saves the changed records of the selected ECR program. • In the menu bar click on <Edit\Save> to save a changed ECR program. 115 V e c t r on C omm a nder 7 7. 2 . 2 . 2 . Ed i t\ S ave a s Ve c tro n P OS d u m p With this command you create an image of the POS system selected in Vectron Commander 7. Dumps, which contain changed ECR programs or PLU data can be loaded to POS systems with a USB-stick for example. • In the menu bar click on <Edit\Save as Vectron POS dump>. • Select the directory in which the Vectron-POS dump is to be saved. • In field "File name" enter a name and click on <Save>. 7. 2 . 2 . 3 . Ed i t\Co nf i g u ra ti o n With this command you open the window for configuration of the POS system. • In the menu bar click on <Edit\Configuration>. • Change the configuration. Attention! Consider the consequences of a new configuration. If for instance you reduce the number of PLUs but more PLUs are stored in the ECR program a change of configuration can lead to data loss. • Click on <OK> to configure the POS system anew. • Answer the confirmation prompt with <Yes>. 116 Fig. 20: Edit ECR configuration 117 V e c t r on C omm a nder 7 7. 2 . 2 . 4 . Ed i t\O p e ra ti o n s With this command you open the window for executing operations. This window contains commands, which e.g. update or sort a PLU selection. • In the menu bar click on <Edit\Operations>. • Select the operation you want to execute. • Click on <OK>. • Answer the confirmation prompt with <Yes>. 118 Fig. 21: Edit operations 119 V e c t r on C omm a nder 7 7. 2 . 2 . 5 . Ed i t\Re co rd \I n s e r t re co rd With this command you insert a new record to the selected ECR program. • In the menu bar click on <Edit\Record\Insert record>. • In field "Number" enter the record number. If you enter the number of a record that is already available, the existing record is neither changed nor overwritten. Note • Click on <OK> to insert the record. • In the menu bar click on <Edit\Save> to adopt your changes. Fig. 22: Insert record 120 7. 2 . 2 . 6 . Ed i t\Re co rd \D e l e te re co rd With this command you delete a record of the selected ECR program. • In the menu bar click on <Edit\Record\Delete record>. • In field "Number" enter the number of the record that you want to delete. • Click on <OK> to delete the record. • In the menu bar click on <Edit\Save> to adopt your changes. Fig. 23: Delete record 121 V e c t r on C omm a nder 7 7. 2 . 2 .7. Ed i t\Re co rd \M ove re co rd With this command you re-number a new record to the selected ECR program. • In the menu bar click on <Move record>. • In field "From number" enter the record that you want to re-number. • In field "To number" enter the new number to be assigned to this record. If in field "From number" you enter the number of a record that is not available, the record is not re-numbered. Note Note If in field "To number" you enter the number of a record that is already available, the record is neither changed nor overwritten. • Click on <OK> to re-number the record. • In the menu bar click on <Edit\Save> to adopt your changes. 122 Fig. 24: Move record 123 V e c t r on C omm a nder 7 7. 2 . 2 . 8 . Ed i t\Re co rd \Co py re co rd With this command you copy a record of the selected ECR program. • In the menu bar click on <Edit\Record\Copy record>. • In field "From number" enter the number of the record that you want to copy. • In field "To number" enter the number of the record that you want to insert. If in field "From number" you enter the number of a record that is not available, no record is copied. Note Note If in field "To number" you enter the number of a record that is already available, you are asked whether the record shall be overwritten. • Click on <OK> to copy the record. • In the menu bar click on <Edit\Save> to adopt your changes. 124 Fig. 25: Copy record 125 V e c t r on C omm a nder 7 7. 2 . 2 .9. Ed i t\Re co rd ra n g e\I n s e r t ra n g e With this command you insert records to the selected ECR program. • In the menu bar click on <Edit\Record range\Insert record range>. • In field "From number" enter the number of the record as of which records are to be inserted. • In field "Up to number" enter the number of the record up to which records are to be inserted. Note If you enter an already existing range in fields "From number" and "Up to number" the existing records are neither changed nor overwritten. • Click on <OK> to insert records. • In the menu bar click on <Edit\Save> to save your changes. Fig. 26: Insert range 126 7. 2 . 2 .10 . Ed i t\Re co rd ra n g e\D e l e te ra n g e With this command you delete records from the selected ECR program. • In the menu bar click on <Edit\Record range\Delete record range>. • In field "From number" enter the record number as of which records are to be deleted. • In field "Up to number" enter the record number up to which records are to be deleted. • Click on <OK> to delete the records. • In the menu bar click on <Edit\Save> to save your changes. Fig. 27: Delete range 127 V e c t r on C omm a nder 7 7. 2 . 2 .11 . Ed i t\Re co rd ra n g e\M o d if y ra n g e With this command you open the window for editing a record range. • In the menu bar click on <Edit\Record range\Modify range> • In field "Records" enter the number range to be edited. • Edit the range. • Click on <OK>. • In the menu bar click on <Edit\Save> to adopt your changes. 128 Fig. 28: Edit range 129 V e c t r on C omm a nder 7 7. 2 . 2 .12 . Ed i t\Ed i t d efa u l t re co rd With this command you open the window for editing the default record. This change affects the POS system selected in the folder list. The default record stores data that is written to a newly created record. • In the menu bar click on <Edit\Edit default record>. • Edit the default record. • In the menu bar click on <Edit\Save> to adopt your changes. Fig. 29: Edit default record 130 7. 2 . 2 .13 . Ed i t\Ed i t ra n g e re co rd With this command you open the window for editing the range record. The editing of the range record affects the ECR program selected from the folder list. The range record saves data that is written to the selected records when editing a range. • In the menu bar click on <Edit\Edit range record>. • Edit the range record. • In the menu bar click on <Edit\Save> to adopt your changes. Fig. 30: Edit range record 131 V e c t r on C omm a nder 7 7. 2 . 2 .14 . Ed i t\ A s si s t a nt s Assistants are plugins. Vectron Commander 7 provides several plugins, which support you with the ECR programming. Additional plugins can be installed in Vectron Commander 7. 7. 2 . 2 .14 .1 . Ed i t\ A s si s t a nt s\I co n s This plugin serves for managing the icons of the POS systems. You can add, delete and convert icons. • In the menu bar click on <Edit\Assistants\Icons>. 7. 2 . 2 .14 . 2 . Ed i t\ A s si s t a nt s\B u t to n s This plugin serves for designing and programming buttons. You can create, change and delete buttons. • In the menu bar click on <Edit\Assistants\Buttons>. 7. 2 . 2 .14 . 3 . Ed i t\ A s si s t a nt s\L ayo u t s This plugin serves for programming the graphical user interface of POS systems. • In the menu bar click on <Edit\Assistants\Layouts>. 132 7. 2 . 2 .14 . 4 . Ed i t\ A s si s t a nt s\Ta b l e m a p s This plugin serves for programming table maps. You can adjust the working pane size to the display size of the POS system and design table maps. You can create, change and delete table map elements. • In the menu bar click on <Edit\Assistants\Table maps>. 7. 2 . 2 .14 . 5 . Ed i t\ A s si s t a nt s\P l a u si b i l i t y This plugin serves for checking ECR programs and -configurations for errors. The plausibility plugin shows the found errors and suggests solutions. • In the menu bar click on <Edit\Assistants\Plausibility>. 7. 2 . 2 .14 . 6 . Ed i t\ A s si s t a nt s\Key b o a rd This plugin serves for programming the keyboard assignment of POS systems. You can create, change and delete keys. • In the menu bar click on <Edit\Assistants\Keyboard>. 7. 2 . 2 .14 .7. Ed i t\ A s si s t a nt s\Tex t fo r m s This plugin serves for programming text forms of POS systems. You can create, change and delete text forms. In this plugin you can program forms for registration of orders and customer data. • In the menu bar click on <Edit\Assistants\Text forms>. 133 V e c t r on C omm a nder 7 7. 2 . 2 .14 . 8 . Ed i t\ A s si s t a nt s\ To u ch key p ro g ra m m i n g This plugin serves for programming operator locks. • In the menu bar click on <Edit\Assistants\TouchkeyProgramming>. 7. 2 . 3 . V i ew With commands in this menu you can adjust the display of ECR programs in the working pane. You can filter and sort records in ECR programs. Entries in the "View" menu bar can only be addressed if an ECR program or a report is opened. Note 134 7. 2 . 3 .1 . V i ew\Ta b l e v i ew With this command you display records of the selected ECR program as table in the working pane. Note When opening ECR programs these are displayed in table view. You can choose between display in table view and mask view. • In the menu bar click on <View\Table view>. Fig. 31: Table view 135 V e c t r on C omm a nder 7 7. 2 . 3 . 2 . V i ew\M a s k v i ew With this command you display a record of the selected ECR program as mask in the working pane. Note When opening ECR programs these are displayed in table view. You can choose between display in table view and mask view. • In the menu bar click on <View\Mask view>. Fig. 32: Mask view 136 7. 2 . 3 . 3 . V i ew\ S o r t With this command you control the sorting of records of an ECR program in table view. Configure sorting • In the menu bar click on <View\Sort>. • In field "1. Sorting" select the column by which the sorting is to be made and select "Ascending" or "Descending". • If required select additional sorting criteria. • Click on <OK> to configure the sorting. <Delete all> • In the menu bar click on <View\Sort>. • Click on <Delete all> to delete all sorting criteria. • Click on <OK> to delete the sorting. 137 V e c t r on C omm a nder 7 Fig. 33: Configure sorting 138 7. 2 . 3 . 4 . V i ew\F i l te r With this command you control the display of records of the selected ECR program. Fig. 34: Define filters Define filters • In the menu bar click on <View\Filter>. • In the selection list choose the "Column" to which the filter shall be applied. • In the selection list choose the "Condition" by which the filter is to be made. • In field "Value" enter the filter value. • Click on <Add> to define the filter. • Click on <OK> to confirm your entries. Note If a filter is defined, a filter definition bar is faded in to the working pane. You can fade the filter in or out by clicking on the blue-marked filter definition. 139 V e c t r on C omm a nder 7 Edit defined filters • In the menu bar click on <View\Filter>. Active filters are ticked in field "Filters defined". With a click on the tick you disable the filters. Note • Mark the filter in window 'Define filter' under "Definded filters". • Click on <Edit>. • Edit the filter. • Click on <Add> to define the filter. • Click on <OK> to confirm your entries. Delete defined filters • In the menu bar click on <View\Filter>. • Mark the filter in window 'Define filter' under "Definded filters". • Click on <Delete> to delete the filter. • Click on <OK> to confirm your entries. Delete all defined filters • In the menu bar click on <View\Filter>. • Click on <Delete all> to delete all filters. • Click on <OK> to confirm your entries. 140 7. 2 . 3 . 5 . V i ew\Fo l d e r l i s t Fades the folder list in or out. • In the menu bar click on <View\Folder list>. 7. 2 . 3 . 6 . V i ew\Re l o a d Updates the screen display of reports. • In the menu bar click on <View\Reload>. 7. 2 . 3 .7. V i ew\P rev i o u s re p o r t Changes to the previous report. • In the menu bar click on <View\Previous report>. 7. 2 . 3 . 8 . V i ew\N ex t re p o r t Changes to the next report. • In the menu bar click on <View\Next report>. 7. 2 . 3 .9. V i ew\ Zo o m Zooms the report view in or out. • In the menu bar click on <View\Zoom> and choose from the selection list. 7. 2 . 4 . Re p o r t s With commands in this menu you can display reports on the screen and print them on a printer. 141 V e c t r on C omm a nder 7 7. 2 . 4 .1 . Re p o r t s\D i s p l ay Displays reports on the screen. You can display reports with a pre-defined report template, define new templates or display reports with individual settings. Note In the "Display reports" assistant there is a dynamic inquiry of user entries. The window 'Report templates' for example is hidden if no templates are defined in Vectron Commander 7. Display reports with individual settings • In the menu bar click on <Reports\Display>. As soon as you have made the minimum settings in the assistant you can click on <Execute> to show the reports. Note • In window 'Report templates' select "(No report template)" and click on <Continue>. • In window 'ECR marking' tick those VPOS systems, the reports of which you want to display and click on <Continue>. • In window 'Pollings' select "Polling range", "Pollings" and "Polling types". Note 142 For possible settings in window 'Pollings' please see chapter 8.2. „Select polling range" on page 250 chapter 8.3. „Select polling" on page 252 and chapter 8.4. „Select polling types" on page 252. • Click on <Continue>. • If you want to add comparison levels click on "Add comparison..." in window 'Comparison levels'. For possible settings in window 'comparison levels' please see chapter 8.9. „Select comparison levels" on page 260. Note • Click on <Continue>. • In window 'Output report marking' select the reports you want to display and click on <Continue>. • Check your settings in window 'Summary' and click on <Execute> to display the reports. 143 V e c t r on C omm a nder 7 7. 2 . 4 .1 .1 . O ve r v i ew o n co m m a n d s Icon Command F5 Previous report Alt + page up Next report Alt + page down Settings F6 Range Shift + F6 Print Excel export Zoom 144 Shortcut Reload 7. 2 . 4 .1 . 2 . E x p l a n a ti o n of co m m a n d s <Reload> Updates the screen display of reports. <Previous report> Changes to the previous report. <Next report> Changes to the next report. <Settings> Opens the assistant again to show reports. You can add additional POS systems to the report display or remove them. <Range> Opens the window to define ranges. The first column shows the key levels. In the cells of columns "From" and "To" you determine the range that is filtered from the key levels and displayed in the report. Note To use the range command, key levels for output reports have to be defined. In the menu bar click on <Configuration\Reports\Output reports>. Select an output report and click on <Edit>. Click on key levels and define them in this window. <Print> Prints reports. 145 V e c t r on C omm a nder 7 <Excel export> Opens an Excel workbook to which the data to be exported is written. To write data into an Excel workbook Microsoft Excel has to be installed on your PC. Note <Zoom> Zooms the report view in or out. 146 7. 2 . 4 . 2 . Re p o r t s\P r i nt Prints reports on a printer. You can print reports with a pre-defined report template, define new templates or print reports with individual settings. Note In the "Print reports" assistant there is a dynamic inquiry of user entries. The window 'Report templates' for example is hidden if no templates are defined in Vectron Commander 7. Print reports with individual settings • In the menu bar click on <Reports\Print>. As soon as you have made the minimum settings in the assistant you can click on <Execute> to print the reports. Note • In window 'Report templates' select "(No report template)" and click on <Continue>. • In window 'ECR marking' tick those VPOS systems, the reports of which you want to print and click on <Continue>. • In window 'Pollings' select "Polling range", "Pollings" and "Polling types". Note For possible settings in window 'Pollings' please see chapter 8.2. „Select polling range" on page 250, chapter 8.3. „Select polling" on page 252 and chapter 8.4. „Select polling types" on page 252. 147 V e c t r on C omm a nder 7 • Click on <Continue>. • If you want to add comparison levels click on "Add comparison..." in window 'Comparison levels. For possible settings in window 'comparison levels' please see chapter 8.9. „Select comparison levels" on page 260. Note • Click on <Continue>. • In window 'Output report marking' select the reports you want to print and click on <Continue>. • To select another printer than the one displayed in field "Printer" click on <Change> in window 'Printer settings'. • In window 'Printer settings' under "Split" select the partition of the printout. • Click on <Continue>. • Check your settings in window 'Summary' and click on <Execute> to print the reports. • Read the notes in window 'Done' and click on <Finish> to finish the print. 148 7. 2 . 5 . ECR p ro g ra m s With commands in this menu you can edit and copy ECR programs. You can call assistants for ECR programming. 7. 2 . 5 .1 . ECR p ro g ra m s\Ed i t Opens the window for editing ECR programs. • In the menu bar click on <ECR programs\Edit>. As soon as you have made the minimum settings in the assistant you can click on <Execute> to open the ECR programs. Note • In window 'ECR selection' select the VPOS-system the ECR programs of which you want to edit and click on <Continue>. • In window 'Select mode' you choose the mode in which you want to edit the ECR programs. For possible settings in window 'Select mode' please see chapter 8.10. „Select mode" on page 262. Note • Click on <Execute>. For editing of ECR programs please see chapter 6.7. „Editing ECR programs" on page 47. Note 149 V e c t r on C omm a nder 7 7. 2 . 5 . 2 . ECR p ro g ra m s\Co py With this command you copy ECR programs in Vectron Commander 7 from one POS system to other POS systems. • In the menu bar click on <ECR programs\Copy>. As soon as you have made the minimum settings in the assistant you can click on <Execute> to copy the ECR programs. Note • In window 'ECR selection' select the VPOS-system the ECR programs of which you want to copy and click on <Continue>. • In window 'Program data marking' tick the ECR programs that you want to copy and click on <Continue>. • In window 'ECR marking' tick those VPOS-systems to which you want to copy the ECR programs and click on <Continue>. • Check your settings in window 'Summary' and click on <Execute> to copy the ECR programs. • Read the notes in window 'Done' and click on <Finish> to finish the copy. 150 7. 2 . 5 . 3 . ECR p ro g ra m s\ A s si s t a nt s Assistants are plugins. Vectron Commander 7 provides several plugins, which support you with the ECR programming. Additional plugins can be installed in Vectron Commander 7. 7. 2 . 5 . 3 .1 . ECR p ro g ra m s\ A s si s t a nt s\I co n s This plugin serves for managing the icons of the POS systems. You can add, delete and convert icons. • In the menu bar click on <ECR programs\Assistants>. • Mark the "Icons" plugin and click on <Execute...>. • In window 'Select ECR' select the POS system the icons of which you want to edit and click on <OK>. 7. 2 . 5 . 3 . 2 . ECR p ro g ra m s\ A s si s t a nt s\B u t to n s This plugin serves for designing and programming buttons. You can create, change and delete buttons. • In the menu bar click on <ECR programs\Assistants>. • Mark the "Buttons" plugin and click on <Execute...>. • In window 'Select ECR' select the POS system the buttons of which you want to edit and click on <OK>. 151 V e c t r on C omm a nder 7 7. 2 . 5 . 3 . 3 . ECR p ro g ra m s\ A s si s t a nt s\L ayo u t s This plugin serves for programming the graphical user interface of POS systems. • In the menu bar click on <ECR programs\Assistants>. • Mark the "Layouts" plugin and click on <Execute...>. • In window 'Select ECR' select the POS system the layouts of which you want to edit and click on <OK>. 7. 2 . 5 . 3 . 4 . ECR p ro g ra m s\ A s si s t a nt s\Ta b l e m a p s This plugin serves for programming table maps. You can adjust the working pane size to the display size of the POS system and design table maps. You can create, change and delete table map elements. • In the menu bar click on <ECR programs\Assistants>. • Mark the "Table maps" plugin and click on <Execute...>. • In window 'Select ECR' select the POS system the table maps of which you want to edit and click on <OK>. 7. 2 . 5 . 3 . 5 . ECR p ro g ra m s\ A s si s t a nt s\P l a u si b i l i t y This plugin serves for checking ECR programs and -configurations for errors. The plausibility plugin shows the found errors and suggests solutions. • In the menu bar click on <ECR programs\Assistants>. • Mark the "Plausibility" plugin and click on <Execute...>. • In window 'Select ECR' select the POS system the plausibility of which you want to check and click on <OK>. 152 7. 2 . 5 . 3 . 6 . ECR p ro g ra m s\ A s si s t a nt s\Key b o a rd This plugin serves for programming the keyboard assignment of POS systems. You can create, change and delete keys. • In the menu bar click on <ECR programs\Assistants>. • Mark the "Keyboard" plugin and click on <Execute...>. • In window 'Select ECR' select the POS system the keyboard of which you want to edit and click on <OK>. 7. 2 . 5 . 3 .7. ECR p ro g ra m s\ A s si s t a nt s\Tex t fo r m s This plugin serves for programming text forms of POS systems. You can create, change and delete text forms. In this plugin you can program forms for registration of orders and customer data. • In the menu bar click on <ECR programs\Assistants>. • Mark the "Text forms" plugin and click on <Execute...>. • In window 'Select ECR' select the POS system the text forms of which you want to edit and click on <OK>. 7. 2 . 5 . 3 . 8 . ECR p ro g ra m s\ A s si s t a nt s\ To u ch key p ro g ra m m i n g This plugin serves for programming operator locks. • In the menu bar click on <ECR programs\Assistants>. • Mark the "Touckey programming" plugin and click on <Execute...>. • In window 'Select ECR' select the POS system the touchkey programming of which you want to edit and click on <OK>. 153 V e c t r on C omm a nder 7 7. 2 . 6 . Co m m u n i c a ti o n With commands in this menu you can display the communication journal. The communication journal contains the recorded data of connections between Vectron Commander 7 and the POS systems. You can display and evaluate communication jobs. Futhermore, you can transmit and call ECR programs and Vectron-POS dumps. Additional commands serve for calling pollings and carrying out Vectron POS software updates. In this menu you can start the communication module and the communication monitor. 154 7. 2 . 6 .1 . Co m m u n i c a ti o n\Co m m u n i c a ti o n j o u r n a l Opens the window in which communication protocols are displayed. The communication journal shows information about completed or faulty communication jobs. The communication journal records for instance when and why a communication job failed. • In the menu bar click on <Communication\Communication journal>. Fig. 35: Communication journal 155 V e c t r on C omm a nder 7 7. 2 . 6 . 2 . Co m m u n i c a ti o n\D i s p l ay co m m u n i c a ti o n jobs Opens the window in which communication jobs are displayed. The 'Job overview' shows information about communication jobs, like e.g. a description, status and maturity of communication jobs. • In the menu bar click on <Communication\Display communication jobs>. Fig. 36: Communication jobs 156 7. 2 . 6 . 3 . Co m m u n i c a ti o n\Eva l u a te co m m u n i c a ti o n jobs This command serves for deleting communication jobs. • In the menu bar click on <Communication\Evaluate communication jobs>. • In window 'Evaluate communication jobs' select "Evaluate finished communication jobs only" or "Evaluate all communication jobs" and click on <Execute>. Note Select "Evaluate finished communication jobs only" if already finished communication jobs are to be deleted. Communication jobs that are not finished will not be deleted. Select "Evaluate all communication jobs", if all communication jobs are to be evaluated, including those that are not yet finished. Select this option e.g. for deleting faulty communication jobs. Fig. 37: Evaluate communication jobs • In window 'Done' click on <Finish> to finish the evaluation of communication jobs. 157 V e c t r on C omm a nder 7 Fig. 38: Evaluate communication jobs 158 7. 2 . 6 . 4 . Co m m u n i c a ti o n\C a l l p o l l i n g s With this command you call pollings from ECR systems. Note In the "Call pollings" assistant there is a dynamic inquiry of user entries.The window 'Administrational jobs' for instance is hidden if administrational jobs are not programmed in VPOS-configuration. • In the menu bar click on <Communication\Call pollings>. • In window 'ECR marking' select whether you want to carry out a "Regular polling", a "Shift polling" or a "Card journal polling". Note With a "Regular polling" you can call all programmed data from VPOS-systems. With a "Shift polling", shift-related data is called from VPOS-systems. A "Card journal polling" calls card journals which concern the electronic direct debit. • In window 'ECR marking' tick those VPOS-systems, the pollings of which you want to call and click on <Continue>. • In window 'Polling options' select the type, "Polling X" or "Polling Z". An X-polling keeps the data in the VPOSsystem after polling. A Z-polling deletes the data in the VPOS-system after polling. Note 159 V e c t r on C omm a nder 7 Note If you call a Z-polling and the VPOSsystems are configured for saved reports you find the polling options "Call saved reports" and "Save running reports". • In window 'Polling options' under 'Save as' determine under which date and time the pollings are to be saved and click on <Continue>. • In window 'Report jobs' select the report jobs to be called and click on <Continue>. • In window 'Administrational jobs' select the administrational jobs to be called and click on <Continue>. • If you want to call the pollings later tick "Delayed execution" in window 'Execution'. • Enter date and time under "Delayed execution" and click on <Continue>. • Check your settings in window 'Summary' and click on <Execute>. • In window 'Done' click on <Finish> to call the pollings. Note 7. 2 . 6 . 5 . To check whether the polling has been called successfully click on <Communication\Communication journal> in the menu bar. Co m m u n i c a ti o n\ECR p ro g ra m s\Tra n s m i t With this command you transmit ECR programs to POS systems. • In the menu bar click on <Communication\ECR programs\ Transmit>. 160 As soon as you have made the minimum settings in the assistant you can click on <Execute> to transmit the ECR programs. Note • In window 'ECR marking' tick those POS systems, the ECR programs of which you want to transmit and click on <Continue>. • In window 'Program data marking' tick "Configuration" if you want to transmit the configuration. • In window 'Program data marking' tick the ECR programs which you want to transmit and click on <Continue>. • In window 'Options' in field "Send mode" select the mode from the list and click on <Continue>. Note Send mode "Changed only" transmits only changed data. Send mode "Full replication" transmits all data. Send mode "Optimized replication" transmits all data. However, the attempt is made to reduce the data amount to be transmitted. • If you want to transmit the ECR programs later tick "Delayed execution" in window 'Execution'. • Enter date and time under "Delayed execution" and click on <Continue>. • Check your settings in window 'Summary' and click on <Execute>. • In window 'Done' click on <Finish> to transmit the ECR programs. 161 V e c t r on C omm a nder 7 7. 2 . 6 . 6 . Co m m u n i c a ti o n\ECR p ro g ra m s\C a l l With this command you call ECR programs from the POS systems. You can then edit the ECR programs in Vectron Commander 7. • In the menu bar click on <Communication\ECR programs\ Call>. As soon as you have made the minimum settings in the assistant you can click on <Execute> to transmit the ECR programs. Note • In window 'ECR marking' tick those VPOS systems, the ECR programs of which you want to call and click on <Continue>. • In window 'Program data marking' tick "Configuration" if you want to display the configuration for selection. • In window 'Program data marking' tick the ECR programs which you want to call and click on <Continue>. • If you want to call the ECR programs later tick "Delayed execution" in window 'Execution'. • Enter date and time under "Delayed execution" and click on <Continue>. • Check your settings in window 'Summary' and click on <Execute>. • In window 'Done' click on <Finish> to call the ECR programs. ECR programs are called by the communication module. 162 7. 2 . 6 .7. Co m m u n i c a ti o n\E xe cu te j o b ch a i n s Opens the window for executing job chains. Note Job chains have to be configured under <Configuration\Jobchains> before you can execute them. For configuration of job chains please see chapter 7.2.7.1. „Configuration\Jobchains" on page 175. • In the menu bar click on <Communication\Execute jobchains>. As soon as you have made the minimum settings in the assistant you can click on <Execute> to execute job chains. Note • In window 'ECR marking' tick those VPOS systems where you want to execute job chains and click on <Continue>. • In window 'Job chain marking' tick the job chains that you want to execute and click on <Continue>. • If you want to execute the job chains later tick "Delayed execution" in window 'Execution'. • Enter date and time under "Delayed execution" and click on <Continue>. • Check your settings in window 'Summary' and click on <Execute>. • In window 'Done' click on <Finish> to execute job chains. 163 V e c t r on C omm a nder 7 7. 2 . 6 . 8 . Co m m u n i c a ti o n\E xe cu te re m ote j o b s Opens the window for executing remote jobs. • In the menu bar click on <Communication\Execute remote jobs>. As soon as you have made the minimum settings in the assistant you can click on <Execute> to execute remote jobs. Note • In window 'ECR marking' tick the POS systems where you want to execute remote jobs and click on <Continue>. • In window 'Remotejob marking' tick the remote jobs that you want to execute and click on <Continue>. • If you want to transmit the remote jobs one after the other tick "Transmit remote jobs individually" in window 'Options'. • If you want to check the transmission after execution of remote jobs tick "Check result" in window 'Options' and click on <Continue>. • If you want to execute the remote jobs later tick "Delayed execution" in window 'Execution'. • Enter date and time under "Delayed execution" and click on <Continue>. • Check your settings in window 'Summary' and click on <Execute>. • In window 'Done' click on <Finish> to execute remote jobs. 164 7. 2 . 6 .9. Co m m u n i c a ti o n\C a l l b a si c i nfo r m a ti o n The command <Communication\Call basic information> calls the basic information from VPOS-systems. Basic information comprise e.g. the Vectron POS-version that is installed in the VPOS-system. After calling the basic information, Vectron Commander 7 uses the VPP that suits the VPOS-systems. The VPP allows access to the ECR programming. • In the menu bar click on <Communication\Call basic information>. As soon as you have made the minimum settings in the assistant you can click on <Execute> to call the basic information. Note • In window 'ECR marking' tick those VPOS-systems, the basic information of which you want to call and click on <Continue>. • If you want to call the basic information later, tick "Delayed execution" in window 'Execution'. • Enter date and time in field "Delayed execution" and click on <Continue>. • Check your settings in window 'Summary' and click on <Execute>. • In window 'Done' click on <Finish> to call the basic information. The basic information is called by the communication module. 165 V e c t r on C omm a nder 7 166 Note You find the read information in the menu bar under <Configuration\Settings\ECRs>, when clicking on <Edit> and then on <Information\ECR>. Note After installation of a new VPOS-version in VPOS-systems you should always call the basic information so that Vectron Commander 7 uses the suitable VPP. 7. 2 . 6 .10 . Co m m u n i c a ti o n\Tra n s m i t d a te/ti m e With this command you transmit the Windows-System date and system time to POS systems and adjust them there. • In the menu bar click on <Communication\Transmit date/ time>. As soon as you have made the minimum settings in the assistant you can click on <Execute> to transmit date and time. Note • In window 'ECR marking' tick those VPOS-systems to which you want to transmit date and time and click on <Continue>. • If you want to transmit date and time later, tick "Delayed execution" in window 'Execution'. • Enter date and time in field "Delayed execution" and click on <Continue>. • Check your settings in window 'Summary' and click on <Execute>. • Read the notes in window 'Done' and click on <Finish> to transmit date and time. 167 V e c t r on C omm a nder 7 7. 2 . 6 .11 . Co m m u n i c a ti o n\Ve c tro n P OS A ny w h e re With this command you establish a Vectron-POS-Anywhere-connection. Vectron-POS-Anywhere serves for configuration and remote control of POS systems with Vectron Commander 7. • In the menu bar click on <Communication\ Vectron POS Anywhere>. Note As soon as you have made the minimum settings in the assistant you can click on <Execute> to establish the Vectron-POSAnywhere connection. • In window 'ECR selection' select the POS system with which you want to establish a Vectron-POS-Anywhere connection and click on <Continue>. • In window 'Options' under Access enter the "Terminal number", the "Access type" and a possibly existing "Password" and click on <Continue>. Note You find the settings for Vectron-POSAnywhere under <Configuration\Settings\ ECRs> when clicking on <Edit> and then on <Settings\Vectron POS Anywhere>. In window "Vectron POS Anywhere" you can define the desired settings as default. • Check your settings in window 'Summary' and click on <Execute> to establish a Vectron-POS-Anywhere session. 168 7. 2 . 6 .12 . Co m m u n i c a ti o n\Ve c tro n P OS d u m p\C a l l With this command you call images from POS systems. • In the menu bar click on <Communication\ Vectron POS Dump\Call>. As soon as you have made the minimum settings in the assistant you can click on <Execute> to call the Vectron-POS dump. Note • In window 'ECR marking' tick those VPOS-systems, the Vectron-POS dumps of which you want to call and click on <Continue>. • In window 'Options' enter a "File name" and a "Comment" and click on <Continue>. By means of the -icon you can call a selection list to create a file name. Note • If you want to call the Vectron-POS dumps later, tick "Delayed execution" in window 'Execution'. • Enter date and time in field "Delayed execution" and click on <Continue>. • Check your settings in window 'Summary' and click on <Execute>. • Read the notes in window 'Done' and click on <Finish> to call the Vectron-POS dumps. Called Vectron-POS dumps are stored in folder <\Vectron\VCom7\VPosDump> in a standard installation. Note 169 V e c t r on C omm a nder 7 7. 2 . 6 .13 . Co m m u n i c a ti o n\Ve c tro n P OS D u m p\ Tra n s m i t With this command you transmit images to POS systems. The command <Communication\Vectron POS Dump\Transmit> overwrites all data in the POS system. Attention! • In the menu bar click on <Communication\ Vectron POS Dump\Transmit>. Note As soon as you have made the minimum settings in the assistant you can click on <Execute> to transmit the Vectron-POS dump. • In window 'ECR selection' choose the POS system to which you want to transmit the Vectron-POS dump and click on <Continue>. • In window 'Options' under "File name" enter path and file name or click on the -icon to select the VectronPOS dump and click on <Continue>. • If you want to transmit the Vectron-POS dumps later, tick "Delayed execution" in window 'Execution'. • Enter date and time in field "Delayed execution" and click on <Continue>. • Check your settings in window 'Summary' and click on <Execute>. • Read the notes in window 'Done' and click on <Finish> to transmit the Vectron-POS dumps. 170 7. 2 . 6 .14 . Co m m u n i c a ti o n\Ve c tro n P OS s of t wa re u p d a te With this command you update Vectron-POS versions in POS systems. Attention! Attention! Attention! Prior to an update read the document revision of the Vectron-POS version since functions of the currently installed version may have been changed and this does influence the operation of the POS systems. Make sure that during the update the POS systems and the PC on which the update is carried out are supplied with energy. If there is a power failure during the update the POS system can only be restored by a Vectron-dealer or Vectron. Make sure that during the update no other programs are carried out on the PC. Do not terminate the communication module during the update. If there is a power failure during the update the POS system can only be restored by a Vectron-dealer or Vectron. • In the menu bar click on <Communication\ Vectron POS software Update>. Note As soon as you have made the minimum settings in the assistant you can click on <Execute> to carry out the Vectron POS software update. 171 V e c t r on C omm a nder 7 • In window 'ECR marking' under update mode select "Inline update" or "Individual update". Attention! An individual update updates the Vectron-POS versions of the selected POS systems. We strictly recommend refraining from individual updates because version conflicts within an ECR inline may occur if different Vectron-POS versions are installed in the POS systems. An inline upate updates the Vectron-POS versions of all POS systems in an ECR network. Note • In window 'ECR marking' tick those VPOS-systems, which you want to update and click on <Continue>. • In window 'Version selection' choose the Vectron-POS version to which the POS systems are to be updated. • If you want to transmit the Vectron POS software update later, tick "Delayed execution" in window 'Execution'. • Enter date and time in field "Delayed execution" and click on <Continue>. • Check your settings in window 'Summary' and click on <Execute>. • Read the notes in window 'Done' and click on <Finish> to transmit the Vectron POS software update. 172 7. 2 . 6 .15 . Co m m u n i c a ti o n\Co m m u n i c a ti o n m o d u l e\ E xe cu te co m m u n i c a ti o n m o d u l e This command starts the communication module. The communication module shows the available communication channels and informs you e.g. about the status of data transfer of a communication channel. • In the menu bar click on <Communication\Communication module\Execute communication module>. 7. 2 . 6 .16 . Co m m u n i c a ti o n\Co m m u n i c a ti o n m o d u l e\ St a r t co m m u n i c a ti o n m o n i to r This command starts the communication monitor. The communication monitor serves for monitoring all communication modules. • In the menu bar click on <Communication\Communication module\Start communication monitor>. 173 V e c t r on C omm a nder 7 7. 2 .7. Co nf i g u ra ti o n The commands in this menu serve for configuring job chains and timers. You can edit parameters and configure POS systems, stations and users. Furthermore you can display licence information and update licences. 174 7. 2 .7.1 . Co nf i g u ra ti o n\ J o b ch a i n s This command opens the window "Jobchain definition". Job chains process several communication jobs in a defined order, for example polling calls. Up to five jobs can be defined in one job chain. • In the menu bar click on <Configuration\Jobchains>. Fig. 39: Jobchain definition 175 V e c t r on C omm a nder 7 <Edit> Opens the window for editing job chain definitions. You can only edit job chain definitions if job chains are defined. Note • In window 'Jobchain definition' mark the job chain that you want to edit and click on <Edit>. For possible edit settings please see <Insert> in this chapter. Note <Insert> Opens the window for creating job chains. • In window 'Jobchain definition' click on <Insert>. • In window 'Create new record' under "Jobchain" enter an integer between 1 and 9999. In field "Copy data from" you can copy the job chain definitions of other existing job chains. Note • If you want to copy a job chain definition enter the job chain number in window 'Create new record' under "Copy data from" or click on to select a job chain from the list. • Click on <OK> to create the job chain. 176 Fig. 40: Create new record: Jobchain "Name" A job chain is identified in Vectron Commander 7 by job chain number and job chain name. • In field "Name" enter a job chain name. "Jobs" • In field "Job 1" select a job from the list. • Click on the -icon to open the window for editing job options and define them. • Click on <OK> to save the job options. • If required select additional jobs. Save job chain definition • Click on <OK> to save the job chain definition. 177 V e c t r on C omm a nder 7 Fig. 41: Edit jobchain definition <Delete> Deletes job chains. • In window 'Jobchain definition' mark the job chain that you want to delete and click on <Delete>. • Confirm the confirmation prompt with <Yes>. 178 <Search> Searches for job chains. • In window 'Jobchain definition' click on <Search>. • In window 'Search' under "Search text" enter the name of the job chain and select "Search direction" and "Options". For possible settings in window 'Search' please see chapter 8.11. „Search" on page 264. Note <Check> Checks whether job chains are defined correctly. • In window 'Jobchain definition' click on <Check>. <Update> Updates the display of job chains. • Click on <Update> to update the display of job chains. Close window • Click on <Close> to close the window 'Jobchain definition'. 179 V e c t r on C omm a nder 7 7. 2 .7. 2 . Co nf i g u ra ti o n\T i m e r Opens the window 'Timer definition'. Timers process commands at a defined time, e.g. polling calls. • In the menu bar click on <Configuration\Timer>. Fig. 42: Timer definition 180 <Edit> Opens the window for editing timer definitions. You can only edit timer definitions if these are defined. Note • In window 'Timer definition' mark the timer that you want to edit and click on <Edit>. For editable settings please see <Insert> in this chapter. Note <Insert> Opens the window for creating timers. • In window 'Timer definition' click on <Insert>. • In window 'Create new record' under "Timer" enter an integer between 1 and 9999. In field "Copy data from" you can copy the timer definitions of other existing timers. Note • If you want to copy a timer definition enter the timer number in window 'Create new record' under "Copy data from" or click on to select a timer from the list. • Click on <OK> to create the timers. 181 V e c t r on C omm a nder 7 Fig. 43: Create new record: Timer "Name" A timer is identified in Vectron Commander 7 by timer number and name. • In field "Name" enter a timer name. "Job type" The job type determines the job that is carried out when starting the timer. • In field "Job type" select a job from the list to be executed. • Click on the -icon to open the window for editing job options and define them. • Click on <OK> to save the job options. 182 "Activated" Determines whether a timer is active. • In field "Activated" select <Yes> if the timer is to be executed. You can disable the timer by selecting <No> in field "Activated". The job is not executed until the timer is enabled again. Note "Execute on station" Determines on which stations the timer is executed. • In field "Execute on Station" enter a station number or select the station from the list. Note If zero is entered in field "Execute on station" the communication job may be carried out from any available communication module. "From date" Determines as of which date the timer is executed. • Tick the field "From date". • Click to the field "From date" to enter the date via keyboard or click on the -icon to select a date from the window. 183 V e c t r on C omm a nder 7 "To date" Determines up to which date the timer is executed. • Tick the field "To date". • Click to the field "To date" to enter the date via keyboard or click on the -icon to select a date from the window. "From time" Determines when the timer is executed. • Click to the field "From time" to enter the time via keyboard or mark hours, minutes or seconds and click on the -icon to adjust the time. "To time" Determines up to which time the timer is executed. • Click to the field "To time" to enter the time via keyboard or mark hours, minutes or seconds and click on the -icon to adjust the time. Note If a time is entered in fields "From time" and "To time" these entries determine a period. In this period the timer is executed in the defined interval. In field "Interval" you have to enter a time. "Interval" Determines after how many minutes a timer is executed anew. • Enter the time in minutes after which the timer is executed anew. 184 "Days of week" Determines at which weekdays the timer is executed. • Click in field "Days of week" to enter the weekdays via keyboard or click on the -icon to select the days from the window. "Max. no. of tries" If the timer creates communication jobs, this field determines how may tries are made to execute the created jobs until they are aborted. • Determine the max. number of tries for execution of communication jobs. Note If you enter zero to field "Max. no. of tries" the value that is entered in ECR definition is written to the communication job. You find the settings for maximum number of tries under <Configuration\ Settings\ECRs> when clicking on <Edit> and then on <Settings\Communication>. in field "Tries" you can define the desired setting as default. "Last execution" Informs you about the last successful timer execution. <Reset> Resets the entry in field "Last execution". • Click on <Reset> to set back the entry in field "Last execution". Save timer definition • Click on <OK> to save the timer definition. 185 V e c t r on C omm a nder 7 Fig. 44: Edit timer definition <Delete> Deletes the timers. • In window 'Timer definition' mark the timer that you want to delete and click on <Delete>. • Confirm the confirmation prompt with <Yes>. 186 <Search> Searches for timers. • In window 'Timer definition' click on <Search>. • In window 'Search' under "Search text" enter the name of the timer and select "Search direction" and "Options". For possible settings in window 'Search' please see chapter 8.11. „Search" on page 264. Note <Check> Checks whether timers are defined correctly. • In window 'Timer definition' click on <Check>. <Update> Updates the display of timers. • Click on <Update> to update the display of timers. Close window • Click on <Close> to close the window 'Timer definition'. 187 V e c t r on C omm a nder 7 7. 2 .7. 3 . Co nf i g u ra ti o n\Pa ra m e te r s Opens the window 'Parameters'. In this window you define general settings, data interface and settings for communication jobs. You can determine defaults for report display and -printout. Furthermore, you can determine settings for hardware and POS systems. The parameters store defaults for output reports, users, stations, Gateway/VectroNet and external programs. • In the menu bar click on <Configuration\Parameters>. Fig. 45: Edit parameters 188 7. 2 .7. 4 . Co nf i g u ra ti o n\G a teway p a ra m e te r s Opens the window 'Parameters VCom Gateway'. Here you define the Gateway parameters. Note To define Gateway parameters you have to enter the directory of the Gateway server under <Configuration\Parameters>, "Gateway/VectroNet" in field "Server folder". • In the menu bar click on <Configuration\Gateway parameters>. • In window 'Parameters VCom Gateway' under "Site root directory" enter the main path of the Gateway server or click on the -icon to select the path. • In window 'Parameters VCom Gateway' under "Site information file" enter the path where the site information file is stored or click on the -icon to select the file. Save Gateway parameters • Click on <OK> to save the Gateway parameters. 189 V e c t r on C omm a nder 7 7. 2 .7. 5 . Co nf i g u ra ti o n\ S e t ti n g s\ECRs Opens the window 'ECR definition'. In this window you create e.g. POS systems with which Vectron Commander 7 can communicate and define their settings. • In the menu bar click on <Configuration\Settings\ECRs>. Fig. 46: ECR definition 190 <Edit> Opens the window for editing ECR definitions. You can only edit ECR definitions if ECRs are defined. Note • In window 'ECR definition' mark the POS system that you want to edit and click on <Edit>. For editable settings please see <Insert> in this chapter. Note <Insert> Opens the window for creating ECRs. • In window 'ECR definition' click on <Insert>. • In window 'Create new record' under "ECR" enter an integer between 1 and 99999999. Note This number identifies the VPOS-systems in Vectron Commander 7 unambiguously. You don't have to assign the numbers consecutively. If there are several subsidiaries in your company you can assign the VPOS-systems of the first subsidiary for example numbers 101, 102, 103 and the VPOS-systems of the second subsidiary numbers 201, 202, 203. 191 V e c t r on C omm a nder 7 In field "Copy data from" you can copy the ECR definitions of other available ECRs. Note • If you want to copy the ECR definition of a POS system go to 'Create new record' and enter the ECR no. under "Copy data from" or click on to select an ECR from the list. • Click on <OK> to create the ECR. Fig. 47: Create new record: ECR "General\Name" The POS systems are identified in Vectron Commander 7 by ECR number and ECR name. • Enter the ECR name in field "Name". You can use e.g. the name of the subsidiary or the location of the POS system. Note 192 "General\ECR type" The ECR type determines which ECR programs the VPP provides in Vectron Commander 7. • In field "ECR type" enter the number of the connected ECR type or select the ECR type from the list. "General\Memory" The size of the installed memory determines e.g. how many PLUs and departments can be entered to the ECR programs. You find the size of the installed memory in the VPOS-system. To read the memory you require the respective rights. Note • Enter the installed memory in field "Memory". Note Note Vectron POS-PC adjusts the memory requirements dynamically to the programs and data. The VPP cannot adjust the memory requirements dynamically. Vectron recommends entering ten megabyte in field "Memory" because the VPP requires an information. For internal purposes the VPP contains additional information. The value entered in field "Memory" may not be sufficient. You should enter an extra of 10 % under <Configuration\Parameters\ECRs\General settings\Memory overhead>. 193 V e c t r on C omm a nder 7 "General\Inline address" The inline address is configured in the VPOS-system and assigns the VPOS-system to an ECR network. You find the inline address in the VPOSsystem. To read the inline address you require the respective rights. Note • In field "Inline address" enter the network address from the VPOS-system. "General\Channel type" The channel type determines how the VPOS-system is connected to the PC. • In field "Channel type" enter the number of the channel type or select it from the list. "General\Phone no. / Pipe-Host / IP / Site ID" This information depends on the selected channel type. Serial • Do not enter anything in field "Phone no. / Pipe-Host / IP / Site ID" if the selected "Channel type" is Serial. Windows-Pipe • Enter the computer name or the IP-address of the PC in field "Phone no. / Pipe-Host / IP / Site ID" if the selected "Channel type" is Windows-Pipe. If Vectron Commander 7 is installed on the same PC as VPOS-PC, you can enter a dot. 194 Network • Enter the IP-address of the PC in field "Phone no. / Pipe-Host / IP / Site ID" if the selected "Channel type" is Network. You find the IP address in the VPOS-system. To read the IP address you require the respective rights. Note Modem • In field "Phone no. / Pipe-Host / IP / Site ID" enter the phone number of the VPOS-system if the selected "Channel type" is Modem. "General\Access password" VPOS-systems can be protected with passwords against unauthorized access. You find the access passwords in the VPOS-system. To read the access passwords you require the respective rights. Note • In field "Access password" enter the access password from the VPOS-system (if available). Save ECR definition • Click on <OK> to save the ECR definition. 195 V e c t r on C omm a nder 7 Fig. 48: Edit ECR definition <Delete> Deletes ECRs. • In window 'ECR definition' mark the ECR that you want to delete and click on <Delete>. • Confirm the confirmation prompt with <Yes>. 196 <Search> Searches for ECRs. • In window 'ECR definition' click on <Search>. • In window 'Search' under "Search text" enter the name of the ECR and select "Search direction" and "Options". For possible settings in window 'Search' please see chapter 8.11. „Search" on page 264. Note <Check> Checks whether ECRs are defined correctly. • In window 'ECR definition' click on <Check>. <Update> Updates the display of ECRs. • Click on <Update> to update the display of ECRs. Close window • Click on <Close> to close the window 'ECR definition'. 197 V e c t r on C omm a nder 7 7. 2 .7. 6 . Co nf i g u ra ti o n\ S e t ti n g s\ St a ti o n s With this command you open the window 'Station definition'. Here you create e.g. stations and define their communication channels. • In the menu bar click on <Configuration\Settings\Stations>. Fig. 49: Station definition 198 <Edit> Opens the window for editing station definitions. You can only edit station definitions if stations are defined. Note • In window 'Station definition' mark the station that you want to edit and click on <Edit>. For editable settings please see <Insert> in this chapter. Note <Insert> Opens the window for creating stations. • In window 'Station definition' click on <Insert>. • In window 'Create new record' under "Station" enter an integer between 1 and 9999. In field "Copy data from" you can copy the station definitions of other available stations. Note • If you want to copy a station definition go to 'Create new record' and enter the station no. under "Copy data from" or click on to select a station from the list. • Click on <OK> to create the station. 199 V e c t r on C omm a nder 7 Fig. 50: Create new record: Station "Name" A station is identified in Vectron Commander 7 by station number and name. • Enter a station name in field "Name". Save station definition • Click on <OK> to save the configuration of the station definition. 200 Fig. 51: Edit station definition <Delete> Deletes stations. • In window 'Station definition' mark the station that you want to delete and click on <Delete>. • Confirm the confirmation prompt with <Yes>. <Search> Searches for stations. • In window 'Station definition' click on <Search>. • In window 'Search' under "Search text" enter the name of the station and select "Search direction" and "Options". 201 V e c t r on C omm a nder 7 For possible settings in window 'Search' please see chapter 8.11. „Search" on page 264. Note <Check> Checks whether stations are defined correctly. • In window 'Station definition' click on <Check>. <Update> Updates the display of stations. • Click on <Update> to update the display of stations. Close window • Click on <Close> to close the window 'Station definition'. 202 7. 2 .7.7. Co nf i g u ra ti o n\ S e t ti n g s\Us e r With this command you open the window 'User definition'. Here you create e.g. users and define their rights in Commander 7. • In the menu bar click on <Configuration\Settings\User>. Fig. 52: User definition 203 V e c t r on C omm a nder 7 <Edit> Opens the window for editing user definitions. You can only edit user definitions if users are defined. Note • In window 'User definition' mark the user that you want to edit and click on <Edit>. For editable settings please see <Insert> in this chapter. Note <Insert> Opens the window for creating users. • In window 'User definition' click on <Insert>. • In window 'Create new record' under "User" enter an integer between 1 and 9999. In field "Copy data from" you can copy the definitions of other available users. Note 204 • If you want to copy a user definition go to 'Create new record' and enter the user no. under "Copy data from" or click on to select a user from the list. • Click on <OK> to create the user. Fig. 53: Create new record: User "General\Name" A user is identified in Vectron Commander 7 by user number and name. • Enter a user name in field "Name", e.g. "Administrator". "General\Windows user name" In field "Windows user name" you can enter the Windows user name for login to Vectron Commander 7. Note With the Windows user name you login when starting the Windows program. If a Windows user name is entered, Vectron Commander 7 recognizes the user and starts without password inquiry. 205 V e c t r on C omm a nder 7 "General\Change password" You should determine a password to prevent other users from changing the settings. • Click on <Change password>. • In window 'Change password' enter the desired password under "Password (New)" and click on <OK>. Attention! Memorise the password and protect passwords and data from being spied out. Only the user must know the password for his account. Forwarding of the password has to be prevented. You must not note down the password where it is accessible for others. Change the passwords within an adequate period. • Click on <OK> to confirm the message that the password has been changed. 206 "Rights\All rights" In order to use the various program parts of Vectron Commander 7 you have to assign rights to the users. • Click on "Rights" in the selection window. • Assign the user the desired rights. Fig. 54: Edit user definition Save user definition • Click on <OK> to save the configuration of the user definition. 207 V e c t r on C omm a nder 7 <Delete> Deletes users. • In window 'User definition' mark the user that you want to delete and click on <Delete>. • Confirm the confirmation prompt with <Yes>. <Search> Searches for users. • In window 'User definition' click on <Search>. • In window 'Search' under "Search text" enter the name of the user and select "Search direction" and "Options". For possible settings in window 'Search' please see chapter 8.11. „Search" on page 264. Note <Check> Checks whether users are defined correctly. • In window 'User definition' click on <Check>. <Update> Updates the display of users. • Click on <Update> to update the display of users. Close window • Click on <Close> to close the window 'User definition'. 208 7. 2 .7. 8 . Co nf i g u ra ti o n\Re p o r t s\O u tp u t re p o r t s With this command you open the window 'Output report definition'. Here you edit output reports, which determine the layout of reports in Vectron Commander 7. • In the menu bar click on <Configuration\Reports\Output reports>. Fig. 55: Output report definition 209 V e c t r on C omm a nder 7 <Edit> Opens the window for editing output report definitions. You can only edit output reports if these are defined. Note • In window 'Output report definition' mark the output report that you want to edit and click on <Edit>. For editable settings please see <Insert> in this chapter. Note <Insert> Opens the window for creating output reports. • In window 'Output report definition' click on <Insert>. • In window 'Create new record' under "Output report" enter an integer between 1 and 9999. In field "Copy data from" you can copy the definitions of other available output reports. Note 210 • If you want to copy an output report definition go to 'Create new record' and enter the output report no. under "Copy data from" or click on to select an output report from the list. • Click on <OK> to create the output report. Fig. 56: Create new record: output report "Name" An output report is identified in Vectron Commander 7 by output report number and name. • Enter an output report name in field "Name". Save output report definition • Click on <OK> to save the configuration of the output report definition. 211 V e c t r on C omm a nder 7 Fig. 57: Edit output report definition <Delete> Deletes output reports. • In window 'Output report definition' mark the output report that you want to delete and click on <Delete>. • Confirm the confirmation prompt with <Yes>. <Search> Searches for output reports. • In window 'Output report definition' click on <Search>. • In window 'Search' under "Search text" enter the name of the output report and select "Search direction" and "Options". 212 For possible settings in window 'Search' please see chapter 8.11. „Search" on page 264. Note <Templates> Loads output reports. • In window 'Output report definition' click on <Templates>. • In window 'Mark output reports' tick the output reports that you want to load and click on <Execute>. • Read the hints under 'Done' and click on <Finish> to complete the loading of output reports. <Check> Checks whether output reports are defined correctly. • In window 'Output report definition' click on <Check>. <Update> Updates the display of output reports. • Click on <Update> to update the display of output reports. Close window • Click on <Close> to close the window 'Output report definition'. 213 V e c t r on C omm a nder 7 7. 2 .7.9. Co nf i g u ra ti o n\Re p o r t s\Re p o r t d ef i n i ti o n With this command you open the window 'Report definition'. Here you edit report definitions and define their content. • In the menu bar click on <Configuration\Settings\Report definition>. Fig. 58: Report definition 214 <Edit> Opens the window for editing report definitions. You can only edit report definitions if reports are defined. Note • In window 'Report definition' mark the report that you want to edit and click on <Edit>. 215 V e c t r on C omm a nder 7 7. 2 .7.10 . Co nf i g u ra ti o n\Re p o r t s\Re p o r t te m p l a tes With this command you open the window 'Report templates definition'. Here you edit report templates and define their content. • In the menu bar click on <Configuration\Settings\Report templates>. Fig. 59: Report templates definition 216 <Edit> Opens the window for editing report template definitions. You can only edit report template definitions if report templates are defined. Note • In window 'Report template definition' mark the report template that you want to edit and click on <Edit>. For editable settings see <Insert> in this chapter. Note <Insert> Opens the window for creating report templates. • In window 'Report template definition' click on <Insert>. • In window 'Create new record' under "Report template" enter an integer between 1 and 9999. In field "Copy data from" you can copy the definitions of other available report templates. Note 217 V e c t r on C omm a nder 7 • If you want to copy a report template definition go to 'Create new record' and enter the report template no. under "Copy data from" or click on to select a report template from the list. • Click on <OK> to create the report template. Fig. 60: Create new record: Report template "Name" A report template is identified in Vectron Commander 7 by report template number and name. • Enter a report template name in field "Name". Save report template definition • Click on <OK> to save the configuration of the report template definition. 218 Fig. 61: Edit report template definition <Delete> Deletes report templates. • In window 'Report template definition' mark the report template that you want to delete and click on <Delete>. • Confirm the confirmation prompt with <Yes>. <Search> Searches for report templates. • In window 'Report template definition' click on <Search>. • In window 'Search' under "Search text" enter the name of the report template and select "Search direction" and "Options". 219 V e c t r on C omm a nder 7 For possible settings in window 'Search' please see chapter 8.11. „Search" on page 264. Note <Templates> Loads report templates. • In window 'Report template definition' click on <Templates>. • In window 'Mark report templates' tick the report templates that you want to load and click on <Execute>. • Read the hints under 'Done' and click on <Finish> to complete the loading of report templates. <Check> Checks whether report templates are defined correctly. • In window 'Report template definition' click on <Check>. <Update> Updates the display of report templates. • Click on <Update> to update the display of report templates. Close window • Click on <Close> to close the window 'Report template definition'. 220 7. 2 .7.11 . Co nf i g u ra ti o n\Li ce n ces With this command you open the window for licence information. • In the menu bar click on <Configuration\Licences>. Fig. 62: Licences <Update> Updates the display of licences. • Click on <Update> to update the display of licences. 221 V e c t r on C omm a nder 7 <Licence manager> Opens the licence manager. You can only open the licence manager if a Hardlock is connected to the PC. Note • In window 'Licences' click on <Licence manager> to open the licence manager. <New> Opens the window for input of a licence key. • In window 'Hardlock Licenses' click on <New> to enter a licence key. • In field "License code" enter the licence key and click on <OK>. <Update> Updates the display of licences. • In window 'Hardlock Licenses' click on <Update> to update the display of licences. 222 Fig. 63: Licence manager 223 V e c t r on C omm a nder 7 7. 2 . 8 . H e l p e r fu n c ti o n s With commands in this menu you configure external programs that you can start from Vectron Commander 7, initialize modems, create program links and install communication services. 7. 2 . 8 .1 . H e l p e r fu n c ti o n s\E x te r n a l p ro g ra m s\ Co nf i g u re ex te r n a l a p p l i c a ti o n s Opens the window for configuration of external programs. • In the menu bar click on <Helper functions\External programs\Configure external applications>. "Name" In this cell you enter the name of the program to be started. It is entered under <Helper functions\External applications>. A click on this entry starts the configured program. • In cell "Name" enter the name of the program to be started. "Command line" In this cell you enter the file name of the start file. • In cell "Command line" enter the file name of the program to be started with the file extension. 224 "Working directory" In cell "Working directory" you have to enter the path in which the start file is stored. • In cell "Working directory" enter the path in which the start file is stored. <Fill column> Opens the window for filling columns. All cells in the selected column are filled with the same value. • Mark a cell in the column, which you want to fill with the same value. • Click on <Fill column> to open the window. • In window 'Fill column' enter the value that you want to enter to all cells of the selected column. • Click on <OK> to enter the value to the cells. • Confirm the confirmation prompt with <Yes>. Save configuration • Click on <OK> to save the configuration of external programs. 225 V e c t r on C omm a nder 7 Fig. 64: Configure external applications 226 7. 2 . 8 . 2 . H e l p e r fu n c ti o n s\M o d e m\I n i t . b ra n ch modem Opens the window for initializing branch modems. • In the menu bar click on <Helper functions\Modem\Init. branch modem>. As soon as you have made the minimum settings in the assistant you can click on <Execute> to initialize the branch modem. Note • In window 'Settings' select the "Modem" to be initialized. Note You find the configuration of the modems displayed in the selection list of field "Modem" under <Configuration\Parameters\ Hardware\Modems>. • In window 'Settings' select the "Interface" to which the modem is connected. • In window 'Settings' select the "Baud rate" with which the modem communicates and click on <Continue>. • Check your settings in window 'Summary' and click on <Execute>. • Read the hints under 'Done' and click on <Finish> to complete the initialization. 227 V e c t r on C omm a nder 7 Fig. 65: Init branch modem 228 7. 2 . 8 . 3 . H e l p e r fu n c ti o n s\M o d e m\I n i t . l o c a l m o dem Opens the window for initializing local modems. • In the menu bar click on <Helper functions\Modem\Init. local modem>. As soon as you have made the minimum settings in the assistant you can click on <Execute> to initialize the local modem. Note • In window 'Settings' select the "Modem" to be initialized. Note You find the configuration of the modems displayed in the selection list of field "Modem" under <Configuration\Parameters\ Hardware\Modems>. • In window 'Settings' select the "Interface" to which the modem is connected. • In window 'Settings' select the "Baud rate" with which the modem communicates and click on <Continue>. • Check your settings in window 'Summary' and click on <Execute>. • Read the hints under 'Done' and click on <Finish> to complete the initialization. 229 V e c t r on C omm a nder 7 Fig. 66: Init local modem 230 7. 2 . 8 . 4 . H e l p e r fu n c ti o n s\Cre a te p ro g ra m s h o r tcu t s This command opens the window for creating program shortcuts. You can create program shortcuts for Vectron Commander 7 and the communication module. • In the menu bar click on <Helper functions\Create program shortcuts>. 7. 2 . 8 . 4 .1 . Ve c tro n Co m m a n d e r • Click on the tab "Vectron Commander". "Shortcut name" • Enter the name of the shortcut. "Station number" • Enter the station number of the PC on which you want to create the shortcuts. "Desktop" • Tick "Desktop" if you want to create a shortcut on the desktop. • Tick "General" if you want to create the shortcut for all users of the PC. 231 V e c t r on C omm a nder 7 "Start menu" • Tick "Start menu" if you want to create a shortcut in the start menu. • Tick "General" if you want to create the shortcut for all users of the PC. • In field "Folder name" enter the name of the folder in start menu where you want to store the shortcut. "Quick launch bar" • Tick "Quick launch bar" if you want to create a shortcut there. "Register file associations" • Tick "Register file associations" if you want to create shortcuts in the Windows-registration file. <Create shortcuts> • Click on <Create shortcuts> to create shortcuts at the selected locations. 232 Fig. 67: Create program shortcuts to Vectron Commander 7 233 V e c t r on C omm a nder 7 7. 2 . 8 . 4 . 2 . Co m m u n i c a ti o n m o d u l e • Click on the tab "Communication module". "Shortcut name" • Enter the name of the shortcut. "Station number" • Enter the station number of the PC on which you want to create the shortcuts. "Desktop" • Tick "Desktop" if you want to create a shortcut on the desktop. • Tick "General" if you want to create the shortcut for all users of the PC. "Start menu" • Tick "Start menu" if you want to create a shortcut in the start menu. • Tick "General" if you want to create the shortcut for all users of the PC. • In field "Folder name" enter the name of the folder in start menu where you want to store the shortcut. "Autostart" • Tick "Autostart", if you want to create a shortcut in the Autostart-folder. "Quick launch bar" • Tick "Quick launch bar" if you want to create a shortcut there. "Register file associations" • Tick "Register file associations" if you want to create shortcuts in the Windows-registration file. 234 <Create shortcuts> • Click on <Create shortcuts> to create shortcuts at the selected locations. Fig. 68: Create program shortcuts to the communication module 235 V e c t r on C omm a nder 7 7. 2 . 8 . 5 . H e l p e r fu n c ti o n s\ S e tu p co m m u n i c a ti o n s e r v i ces Opens the window for installing and deinstalling communication services. • In the menu bar click on <Helper functions\Setup communication services>. "Service" • In field "Service" enter the service number. "State" The field "State" informs you whether a service is installed or deinstalled. "Installation path" The field "Installation path" informs you in which path the service is installed. "Station number" • Enter the "Station number". "Start type" • In field "Start type" select from the list how the service is to be started. "Login as" • In this field select whether you want to log in with the local system account or with another account. • If required enter the account password in field "Password" and "Password confirmation". 236 "Copy files to local PC" • Tick "Copy files to local PC" if you want to copy the service files to the local PC. <Uninstall> • Click on <Uninstall> to uninstall the selected service. <Install> • Click on <Install> to install the selected service. Fig. 69: Setup communication services 237 V e c t r on C omm a nder 7 7. 2 .9. W i n d ow With commands in this menu you arrange windows in the working pane, close windows and setback window settings. 7. 2 .9.1 . W i n d ow\O ve r l a p p i n g Arranges opened windows overlapping. • In the menu bar click on <Windows\Overlapping>. 7. 2 .9. 2 . W i n d ow\O n e b e l ow th e oth e r Arranges opened windows one below the other. • In the menu bar click on <Windows\One below the other>. 7. 2 .9. 3 . W i n d ow\ Si d e by si d e Arranges opened windows side by side. • In the menu bar click on <Windows\Side by side>. 7. 2 .9. 4 . W i n d ow\Cl o s e Closes the currently marked window. • In the menu bar click on <Windows\Close>. 7. 2 .9. 5 . W i n d ows\Cl os e a l l Closes all opened windows. • In the menu bar click on <Windows\Close all>. 238 7. 2 .9. 6 . W i n d ow\Res e t wi n d ow s e t ti n g s Resets changed window settings to default. • In the menu bar click on <Windows\Reset window settings>. • Read the note and click on <OK>. 7. 2 .10 . H e l p With commands in this menu you call the helper functions of Vectron Commander 7 and program information. 7. 2 .10 .1 . H e l p\V i ew re a d m e Opens the change documentation of Vectron Commander 7 in your text editor. • In the menu bar click on <Help\Readme lesen>. 7. 2 .10 . 2 . H e l p\Ve c tro n o n th e we b Opens the Vectron Homepage in your Internet browser. • In the menu bar click on <Help\Vectron on the web>. 7. 2 .10 . 3 . H e l p\ S e n d fe e d b a ck m a i l Opens your E-mail program with a template for sending a feedback mail. • In the menu bar click on <Help\Send feedback mail>. 239 V e c t r on C omm a nder 7 7. 2 .10 . 4 . H e l p\ A b o u t Opens the window with copyright- and version information on Vectron Commander 7. • In the menu bar click on <Help\About>. Fig. 70: Version information 240 7. 3 . To o l b a r The toolbar contains important commands of the menu bar. You can call the commands with a click on an icon. Icon Command Shortcut key Display reports CTRL + B Print reports CTRL + D Pollings overview Call pollings CTRL + Alt + L Edit ECR programs CTRL + P ECR program assistants Transmit ECR programs CTRL + Alt + P Call ECR programs Shift + CTRL + Alt + P Communication j ournal CTRL + Alt + J Display communication jobs Shift + CTRL + Alt + J Evaluate communication jobs CTRL + Alt + W Edit ECRs Shift + CTRL + K Vectron POS Anywhere CTRL + Alt + A Call basic information CTRL + Alt + B Edit user Shift + CTRL + U Logoff current user 241 V e c t r on C omm a nder 7 Icon Command Shortcut key Execute communication module CTRL + Alt + C Start communication monitor Shift + CTRL + Alt + C 7. 3 .1 . E x p l a n a ti o n of co m m a n d s <Display reports> Opens the assistant for display of reports. <Print reports> Opens the assistant for print of reports. <Pollings overview> Opens the assistant for display of polling overviews. <Call pollings> Opens the assistant for call of pollings. <Edit ECR programs> Opens the assistant for editing ECR programs. <ECR program assistant> Opens the ECR program assistant in which you can edit e.g. icons, buttons, layouts and table maps. 242 <Transmit ECR programs> Opens the assistant for transmitting ECR programs. <Call ECR programs > Opens the assistant for calling ECR programs. <Communication journal> Opens the communication journal. <Display communication jobs> Displays the current communication jobs. <Evaluate communication jobs > Opens the assistant for evaluating communication jobs. <Edit ECRs> Opens the assistant for editing ECR definitions. <Vectron POS Anywhere> Opens the assistant for establishing a Vectron-POS-Anywhere connection. <Call basic information> Opens the assistant for calling the basic information of an ECR. <Edit user> Opens the assistant for editing user definitions. 243 V e c t r on C omm a nder 7 <Logoff current user> Logs off the current user. <Execute communication module> Starts the communication module. <Start communication monitor> Starts the communication monitor. 244 7. 4 . Ch o os e e ntr i es fro m s e l e c ti o n f i e l d s This chapter informs you on the selection of entries from selection fields. Vectron Commander 7 provides various display modes for selection of entries. The mode is configured in parameters. Default setting is the "Automatically" mode, which is described in the following. Note You find the settings for selection of entries under <Configuration\Parameters\ User\Default settings\Settings\User interface> under "Selection fields". The example for creation of output reports illustrates how the display changes with default setting "Automatically". If there are up to 20 entries in window 'Output report definition' you select the entries from a so-called "Combo Box" as marked in red in figure 71: "Combo Box" on page 245. Fig. 71: "Combo Box" • In the menu bar click on <Configuration\Reports\Output reports>. • In window 'Output report definition' click on <Insert>. 245 V e c t r on C omm a nder 7 • In window 'Create new record' under "Output report" enter an integer between 1 and 9999. • In window 'Create new record' under "Copy data from" click on the -icon to select an output report from the list. As of the 21st entry you select the entries in window 'Output report definition' from a so-called "Selection window", as marked in red in figure 72: "Selection window" on page 246. Fig. 72: "Selection window" • In the menu bar click on <Configuration\Reports\Output reports>. • In window 'Output report definition' click on <Insert>. • In window 'Create new record' under "Output report" enter an integer between 1 and 9999. • In window 'Create new record' under "Copy data from" click on the -icon to open the window for selection of an output report. • In window 'Copy data from' select an output report and click on <OK>. 246 8. Recur r ing s e t t ings In Vectron Commander 7 there are settings where you have to fill in identical input fields in different program parts. This chapter tells you how to make these settings. 8 .1 . S e l e c t p o l l i n g Here you determine which polling is considered in the selected program part. With the polling selection you influence for example the number of polling data to be edited. You have several options for selecting a polling. Fig. 73: Select polling Enter date • Click in the date field under "Polling" to enter the date via the keyboard. • Click on the window. -icon to choose a date from the selection Enter time • Click in the time field under "Polling" to enter the time via the keyboard. • Mark the hours, minutes or seconds in the time fields and click on the -icon to adjust the time. 247 V e c t r on C omm a nder 7 Select polling • Click on the tion. -icon to open the window for polling selec- • Mark the polling in the overview. • Click on <OK> to confirm your entries. You can tick the "Details" field to display polling number and -type in the overview. Note In field "Polling range" you can select the range to be displayed in overview. Note 248 Fig. 74: Select pollings 249 V e c t r on C omm a nder 7 8 . 2 . S e l e c t p o l l i n g ra n g e Here you determine which pollings are considered in the selected program part. With the polling range selection you can reduce the file size of a polling export or the number of pages in a report. You have several options for selecting a polling range. Fig. 75: Select polling range Enter date • Click in the date fields under "From" and "To" to enter the date via the keyboard. • Click on the window. -icon to choose a date from the selection Enter time • Click in the time fields under "From" and "To" to enter the date via the keyboard. • Mark the hours, minutes or seconds in the time fields and click on the -icon to adjust the time. Select polling • Click on the tion. -icon to open the window for polling selec- • Mark the pollings in window 'Select polling' under "Overview". • Click on <OK> to confirm your entries. 250 You can tick the "Details" field to display polling number and -type in the overview. Note In field "Polling range" you can select the range to be displayed in overview. Note Fig. 76: Select pollings 251 V e c t r on C omm a nder 7 8 . 3 . S e l e c t p o l l i n g With this selection you choose the pollings to be displayed in the report. • Tick the weekdays the pollings of which shall be displayed in the report. • Tick "Only Z pollings" if only these shall be displayed in the report. Fig. 77: Select pollings 8 . 4 . S e l e c t p o l l i n g t y p es Here you determine which polling types are displayed in the report. • Tick "Regular pollings" if all pollings except shift pollings shall be displayed in the report. • Tick "Shift pollings" if these shall be displayed in the report and in field "Shift-ID" enter the identification number of the shift polling. If you enter 0 in field "Shift-ID" all shift pollings are displayed in the report. Note Fig. 78: Select polling types 252 8 . 5 . S e l e c t ex p o r t m o d e Here you determine how the export is to be carried out in the selected program part. Through selection of the export mode you can adapt the data so that they can be further processed by external programs. Fig. 79: Select export mode 8 . 5 .1 . Au to m a ti c ex p o r t No settings are required for "Automatic export". The software uses the default settings. You find the default settings for "Automatic export" under <Configuration\Parameters\Data interface\Export\Pollings>. Note 8 . 5 . 2 . M a n u a l ex p o r t wi th te m p l a te For "Manual export with template" you have to select a template, which has to be configured before you can use it. 253 V e c t r on C omm a nder 7 You find the default settings for "Manual export" under <Configuration\Parameters\Data interface\Export\Pollings>. Note 8 . 5 . 3 . M a n u a l ex p o r t You have to determine all settings for "Manual export" yourself. Fig. 80: Manual export, select options 254 8 . 5 . 3 .1 . M a n u a l ex p o r t s e l e c t o p ti o n s In window 'Options' you select the settings for manual export. "Export file(s)" • In field "Export file(s)" enter path and name of the export file. You can enter several file names, separated by semicolon. If you enter several file names the same information is written to each of the files. "Max. line length" • Enter a number in field "Max. line length" to determine how many characters are maximally written into a line during polling export. "Data type marks" • Tick "Data type marks", if you want to export the ECR programs with data type marks. During export the data type is written into the file. "ANSI character set" • Tick "ANSI character set" if you want to export the ECR programs using the ANSI-character set. "Mode" • Select the "Mode" to be used for polling export. "Polling types" • Under "Polling types" select the pollings to be exported. "Only Z pollings" • Tick "Only Z pollings" if only these shall be exported. "Only not exported" • Tick "Only not exported" if only not yet exported pollings shall be exported. 255 V e c t r on C omm a nder 7 "Export report definitions" • Tick "Export report definitions" if texts of Vectron Commander 7 with polling information shall be exported. "Currency settings" At present Vectron Commander 7 does not support this function. 256 8 . 6 . S e l e c t re p o r t d a t a Here you determine the report data to be considered in the selected program part. With report data selection you can reduce e.g. the file size of a polling export or the number of displayed reports. You find the default settings for "Manual export" under <Configuration\Parameters\Data interface\Export\Pollings>. Note Fig. 81: Select report data 257 V e c t r on C omm a nder 7 8 .7. S e l e c t ECR p ro g ra m s Here you determine the ECR programs to be considered in the selected program part. With ECR program selection you can reduce e.g. the file size of an export. • Tick "Export ECR programs". • Select the "ECR program mode" from the list. • Tick the ECR programs that you want to export. Fig. 82: Select ECR programs 258 8 . 8 . S e l e c t o p ti o n s In window 'Options' you define e.g. how data is exported. Fig. 83: Select options "Zero suppresssion" • Tick "Zero suppression" if empty data fields are to be suppressed. "ANSI character set" • Tick "ANSI-character set" if data shall be processed using the ANSI-character set. "Export file(s)" • Enter path and name in field "Export file(s)". You can enter several file names, separated by semicolons. "Comment" • In field "Comment" enter a description, which indicates the file content. 259 V e c t r on C omm a nder 7 8 .9. S e l e c t co m p a r i s o n l eve l s In window 'Comparison levels' you define comparisons between POS systems. Fig. 84: Select comparison levels <Add comparison...> The command <Add comparison...> opens the window for adding comparisons. • Click on <Add comparison...>. • In window 'ECR marking' tick those POS systems that you want to add to comparisons. • In window 'Pollings' choose the polling settings of the comparison. 260 Note For possible settings in window 'Pollings' please see chapter 8.2. „Select polling range" on page 250, chapter 8.3. „Select polling" on page 252 and chapter 8.4. „Select polling types" on page 252. • Click on <OK> to confirm your settings. <Edit comparison...> Opens the window for editing comparisons. • Mark the comparison that you want to edit. • Click on <Edit comparison...>. • Edit the settings. • Click on <OK> to confirm your settings. <Delete comparison> Deletes comparisons. • Mark the comparison that you want to delete. • Click on <Delete comparison...>. <Move up> Moves up comparisons in the list. • Click on <Move up> to move up a comparison. <Move down> Moves down comparisons in the list. • Click on <Move up> to move down a comparison. 261 V e c t r on C omm a nder 7 8 .10 . S e l e c t m o d e Determines the mode in which the ECR programs are opened. Fig. 85: Select mode "Continue with current data" "Continue with current data" opens those ECR programs, which are currently stored in Vectron Commander 7. • In window 'Select mode' choose "Continue with current data". • Click on <Execute> to open the ECR programs. 262 "Call data from the ECR" "Call data from the ECR" starts the communication module and calls the ECR programs from the POS system. • In window 'Select mode' choose "Call data from the ECR". • Click on <Execute> to call the ECR programs. "Copy data from another ECR" "Copy data from another ECR" opens the ECR programs of another POS system, currently stored in Vectron Commander 7. • In window 'Select mode' choose "Copy data from another ECR" and click on <Select>. • In window 'Select ECR' choose the POS system the ECR programs of which you want to copy and click on <OK>. • Click on <Execute> to open the ECR programs. "Read data from dump" "Read data from dump" imports the ECR programs from a dump. • In window 'Select mode' choose "Read data from dump". • In window 'Select mode' under "File" enter the path where the dump is stored or click on the -icon to select the path. • Click on <Execute> to call the ECR programs. "Start with empty data" "Start with empty data" opens empty ECR programs. • In window 'Select mode' choose "Start with empty data". • Click on <Execute> to open the ECR programs. 263 V e c t r on C omm a nder 7 8 .11 .S e a rch Here you define the search criteria for a text. Fig. 86: Search "Search text" • In field "Search text" enter the text you want to search for. "Search direction" • In field "Search direction" you determine the direction. "Options" • Tick "Case sensitive" if capitalization is to be considered for search. 264 9. Glo s s ar y ANSI character set ANSI is the abbreviation for American National Standards Institute. The ANSI-character set is one that contains special characters, for example umlaut. ANSI is the Windows-character set. Clerk The 'Clerk' in Commander 7 corresponds to the 'Seller' in Commander 6. Data type mark A data type mark describes the data type of a data field, for excample in an export file. The data type can be e.g. "TX" for text or "NR" for integer data. Dump A dump is an image of a VPOS-system. A dump stores the ECR programming and the sales data. ECR definition An ECR definition contains settings, which Vectron Commander 7 requires for communication with VPOS-systems. ECR program ECR programs contain the programming of VPOS-systems. Job chain A job chain processes several communication tasks in a pre-defined order, e.g. polling calls. 265 V e c t r on C omm a nder 7 Mask view and table view The mask view in the working pane displays just one record. Each line contains the information of one field. The table view in the working pane displays all records. Each line contains one record. Operator The 'operator' in Commander 7 corresponds to the 'Clerk' in Commander 6. Output report An output report determines content and layout of reports. Polling A polling contains data that is called from VPOS-systems, particularly sales. With each call a polling of a VPOS-system is stored. A polling can be identified by ECR number, date and time of the call. POS POS is the abbreviation for Point Of Sale. Report A report shows PLU-, operator- and sales data of VPOS-systems. Reports can be displayed on the screen or printed on a printer. Timer Timers automatically start tasks at defined times. 266 VPA VPA is the abbreviation for Vectron POS-Anywhere-driver file. The VPA-driver file is required for remote maintenance of VPOSsystems. VPOS VPOS is the abbreviation for Vectron POS. This abbreviation designates software if VPOS is followed by figures, e.g. VPOS 4.2.0.0. The figures indicate the software version. This abbreviation designates POS systems if VPOS is followed by the name of the POS model, e.g. VPOS MobilePro. VPP VPP is the abbreviation for Vectron-POS-Programming driver file. The VPP-driver file is required for the table configuration of POS programs in Vectron Commander 7. X-polling An X-polling calls data from VPOS-systems. After the polling the data is not deleted from the VPOS-system. Z-polling A Z-polling calls data from VPOS-systems. After the polling the data is deleted from the VPOS-system. Zero suppression The zero suppression suppresses empty data fields, e.g. for export or import. 267 V e c t r on C omm a nder 7 10.Er r or s, po s sible r e as ons and t r ouble shoo t ing This chapter informs you about errors, possible reasons and troubleshooting. Error Troubleshooting ".run" files available Delete the ".run" in the Cache-direcfiles in a standard tory. installation from the Cache-directory <\Vectron\VCom7\ Cache>. Vectron Commander 7 does not start. The installation of Vectron Commander 7 is faulty. Install Vectron Commander 7 again. The hardlock is not connected. Connect the hardlock. No valid licence available. Purchase a vaild licence. The hardlock-driver is not installed properly. Install the hardlockdriver again. The hardlock does not work in the selected USB-port. Plug the hardlock into another USBport. The hardlock is faulty. Have the hardlock exchanged. False entry of user name or password. Check the input of user name and password. Vectron Commander 7 does not start although a hardlock is connected. You cannot log in to Vectron Commander 7. The software is closed after the third login failed. 268 Possible reasons You cannot install Vectron Commander 7 and the message "Vectron Commander 7 programs active" is displayed. Error Possible reasons Troubleshooting The user is not created. Create the user. Commands in menuand tool bar can only be called to a limited extent. A user with the desired rights is not created. Create a user with the desired rights. No display of reports possible. The VPOS-system is not initialized properly. Initialize the VPOSsystem and call the ECR programs again. The window 'ECR selection' in Vectron Commander 7 does not show all VPOS-systems. The basic information of the VPOS-systems has not been called. Call the basic information of the VPOSsystems. In the ECR definition the selected licence mode for VPOS-systems is not "Fully licensed". Change the license mode to "Fully licensed" in ECR configuration. In the ECR definition the entered memory for VPOSsystems is not sufficient. Enter the actually available memory in VPOS-systems in the ECR definition. The job "Call ECR programs" is interrupted. Increase the "Memory overhead" in parameters. You cannot use a VPOS-keyboard under Vectron-POSAnywhere. The keyboard profiles are not configured correctly. Control the VPOSsystem with the PC-keyboard and check the keyboard profiles. 269 V e c t r on C omm a nder 7 11.Cus t omer s er v ic e In case of questions and if you need help with the operation of Vectron Commander 7 please do not hesitate to contact your Vectron-dealer. 12.D ocumen t r e v ision Date Modifications 18.12.2009 First creation and publication 27.12.2012 Update Vectron POS support 270