1
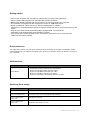
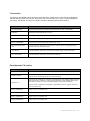
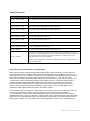
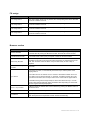
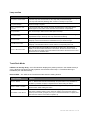
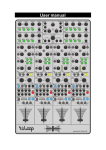
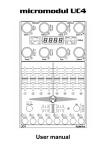
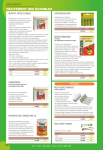
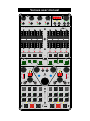
Versus user manual
BPM
Dry/Wet
Param 1
Group 1
Param 2
Group 2
On/Off
Group 3
Reset
A/B
Param 3
Group 4
Btn 1
Btn 2
Deck
select
C/D
System
Tree
Fav
Pedal assign
Refresh
Group 2
Group 3
Group 4
FX1
FX2
V E R S U S
Group 1
Group 2
Group 3
FX1
FX2
Group 4
Group 1
Shift
FX3
FX4
FX3
FX4
FX assign
FX assign
Sync
Loop
Loop
Seek
Play
Seek
Play
Move
Loop
Move
Loop
Browser
Out
In
Load
Beatj.
Out
View
In
Load
Beatj.
Mode
Mode
In
In
Out
Out
Size
Set
Pitch
Size
Set
Bend
Pitch
Pitch
Bend
Hotcues
Pitch
Hotcues
2
3
4
5
6
7
8
powered by faderfox
1
Shift
1
2
3
4
5
6
7
8
Table of contents
Introduction
Page 3
Provision of guarantee and product liability
Page 4
Safety precautions and servicing
Page 4
Features
Page 5
Getting started
Page 6
Quick references
Page 6
• Shift functions
Page 6
• Switching Deck assign
Page 6
• Tree section
Page 7
• Potentiometer FX section
Page 7
• Fader FX section
Page 8
• FX assign
Page 9
• Browser section
Page 9
• Loop section
Page 10
• Track Deck mode
Page 10
Page 11
• Remix Deck mode
Page 11
Page 12
• Pedal assign
Page 12
Extensions
Page 13
Versus user manual 2 / 13
Introduction
In recent years, the concept of DJing has changed a lot. Mixing can now be composed of much more
complex structures and layers. Our goal was to design a piece of gear which allows us to
connect the studio and live environments; something with the versatility to adopt easily to modern
standards. Through our daily work as DJs and engineers, we see endless creative possibilities to
integrate into our performances. We faced a real challenge, between simply playing music
and embracing technology. We wanted to balance and merge these two worlds without losing any of
the fun in our performances. The main focus from the beginning was to build a high-quality controller
with a practical layout and a clear design that has enough functionalities to go deeper if needed. An
instrument you appreciate playing rather than a quick, exchangeable solution. What you see is the
result of passionate people collaborating with the aim of getting the best out of their performances
and believing in creative expression.
We want to thank you for supporting our idea of the Versus controller and hope you will enjoy it as
much as we do.
MAGDA vs NYMA
Versus user manual 3 / 13
Provision of guarantee and product liability
The seller warrants for faultless material and proper manufacture for a period of 24 months
from the date of sale to the end user.
Excluded from the stated guarantee are defects on parts as the result of normal wear-and-tear.
These parts are mostly potentiometers, encoders, buttons and USB, Jack connection.
Also excluded from the guarantee are damages that are the result of :
incorrect or inappropriate handling, excessive force, mechanical or chemical influences,
incorrectly connecting the instrument with other instruments, incorrect or inappropriate use.
The warranty is void if the instrument is opened or changed. In addition, there is no warranty
for individual parts and components (in particular, semiconductors) and disposables /
consumables. The seller is not liable for consequential damages which are not the result of
criminal intent or negligence on his part. The following conditions must be met in order to
claim the warranty services:
• Instrument is either in its original packaging or similar packaging.
• Copy of the invoice with the serial number clearly visible.
• Meaningful error report or description of the error is attached.
The buyer assumes all costs and dangers of return shipments to the manufacturer
Safety precautions and servicing
• Instrument's intended use is based on the functions and procedures contained in this manual
• Read all instructions for use as well as all enclosed literature before using the instrument
• Use only in closed rooms (not for outdoor use)
• Never use in a moist or humid environment (laundry rooms, swimming pools, etc, …)
• Not for use in the vicinity of heat sources (radiators, ovens, etc, …)
• Operational temperature is in the range of 0° - + 40° C
• Not for use in the vicinity of flammable material
• The instrument should not be in direct or prolonged contact with sunlight
• Dusty environmental conditions should be avoided
• Connect only USB ports of computers or hubs
• No foreign objects are permitted inside the instrument casing
• No liquids should get inside the instrument casing
• Never let the instrument fall to the ground (casing and/or control elements may be damaged)
If the instrument must be opened (for example, to remove foreign objects from the casing or
for other repairs), this may only be done by qualified personnel. Guarantee is void for defects that
occur if the instrument was opened by an unauthorised or unqualified person. Use a soft towel or
brush to clean the instrument. Please do not use any cleaning liquids or water, so you avoid any
damages to the instrument.
Versus user manual 4 / 13
Features
Hardware specifications
• 4 Potentiometer FX
• 8 Fader FX
• 8 Push Encoder, Browser / Load, Seek / Play, Loop Size / move
• 64 Push buttons in different colors and sizes, double functions with shift button
• 92 Led’s different colors to display various informations
• Rubber knobs for best tactile feeling
• 3 Displays, Master Clock, Loop Size
• 1 Jack input for additional control with external foot switch / expession pedals
• 1 DIN Input / Output Midi and Power supply (link)
• 1 DIN Output Midi
• 268 Midi commands
• USB bus powering Power supply via USB- Bus / consumption less than 200mA
• USB interface class compliant / no driver necessary
Software specifications
• Special controller for DJ Software (optimised for Native Instruments, Traktor Pro 2)
• Setup Files for Traktor Pro 2 in current Version 2.5.0 or higher
• Indication of each relevant state by feedback data from software
• System mode for different basic settings and external midi programming
Dimensions
• Dimensions 7.28“ (185 mm) x 2.36“ (60 mm) x 14.17“ (360 mm)
• Weight 2.2kg
System requirements
• Windows® XP (latest Service Pack, 32 Bit), Windows Vista®/Windows® 7 (latest Service Pack,
32/64 Bit), Intel® Pentium 4® 2.4 GHz or Intel® Core™ Duo or AMD Athlon™ 64, 2 GB RAM
• Mac OS® X 10.6 (latest update) or 10.7, Intel® Core™ Duo, 2 GB RAM
• General Monitor with 1024 x 768 screen resolution, USB 2.0, 500 MB free disk space required
Case
• CNC shaped case Aluminium from Swiss aircraft industry (Avional)
• Compact and ergonomic
• Eloxalprint scratch proof layout, clearly designed
Setup Files Traktor Pro 2
• File is suitable for Windows or Mac.
Versus user manual 5 / 13
Getting started
Connect the controllers with the DIN Link cable before you connect the USB cable.
Connect ONLY ONE controller with the USB cable (master controller).
Blinking bpm Display indicates that the controller is not yet recognized by the computer.
The controller is recognized by the computer as 'Versus' or 'USB audio device'.
Import the setup file 'Versus V01.tsi' by clicking the add button in Traktor’s
Preferences / Controller Manager and don’t forget to activate the midi- in and midi out ports for that
device.
• Program your external midi commands (DIN) in System Mode. You will find the
description under Potentiometer FX and Fader FX section.
• Push Tree and Fav button (Refresh) in the Tree section at the same time to synchronize all
LED’s with the Traktor software.
•
•
•
•
•
Quick references
This appendix provides you with quick reference tables summing up the basic functionality of each
control element on your Versus. This gives you a quick and concise overview of all basic functions of
your controller.
Shift functions
Control element
Function
SHIFT Button
•
•
•
•
•
Potentiometer mute for external midi controls (DIN)
Shows currently Deck assign with bpm display
Shows currently Master Deck with Sync LED
Shows currently Move size with Loop display
Shows the active Remix-Decks-Rows with Hotcue LED’s
Switching Deck assign
Control element
Function
Deck select Button A/B
Controller in Deck A/B mode (Standard Deck assign)
Deck select Button C/D
Controller in Deck C/D mode (Standard Deck assign)
SHIFT + Deck select
Button A/B
Standard Deck assign
SHIFT + Deck select
Button C/D
Alternative Deck assign C/A, B/D
Versus user manual 6 / 13
Tree section
The device’s bpm display has a range from 50 to 250 bpm. Values below or above that are displayed
with the limiting values of the device, being 50 to 250. The accuracy is 0.1 bpm. In case the display is
not correct, the refresh function on the device should be activated (Tree and Fav button).
Control element
Function
Fav / Tree Encoder
Browsing through tree or favorite list. Push encoder ! open / close folder
Fav Button
Browsing through favorite list, LED is lit
Tree Button
Browsing through tree (track collection, playlists, itunes etc.), LED is lit
SHIFT + Fav Button
Link function for group switching Fader Group ! on
SHIFT + Tree Button
Link function for group switching Fader Group ! off
Select Deck Button A/B
+ C/D
Push both buttons more than one second ! System mode for programming the
external midi controlls (DIN output)
Select Deck Button C/D
+ Tree Button
Push both buttons more than one second ! Pedal assign mode (Jack input)
Tree + Fav Button
Push both buttons more than one second ! Refresh
Potentiometer FX section
Control element
Function
DRY/WET knob
Adjusts the ratio between unprocessed (dry) signal and processed (wet) signal
PARAM 1-3 knob
In single mode: FX-parameter 1-3 (FX-dependent)
In group mode: parameter for the 1st, 2nd und 3rd FX
FX Button 1-4
In single mode: FX Button 1 activates / deactivates FX Unit globally (green LED is lit
when activated). FX Button 2 resets all FX parameters to their default value (short
LED flash). FX Button 3 and 4: FX-dependent (LED is lit when activated)
In group mode: FX Button 2-4 activates / deactivates FX slot 1-3 (green LED is lit
when slot activated)
SHIFT + FX Button 1
Group 1 ! FX 1, red LED is lit
SHIFT + FX Button 2
Group 2 ! FX 2, red LED is lit
SHIFT + FX Button 3
Group 3 ! FX 3, red LED is lit
SHIFT + FX Button 4
Group 4 ! FX 4, red LED is lit
Versus user manual 7 / 13
Fader FX section
Control element
Function
Group 1 Fader 1-4 left
Free (dependend on deck selection) ! recommended group for external commands
Group 1 Fader 1-4 right
Free (dependend on deck selection) ! recommended group for external commands
Group 2 Fader 1-4 left
Remix Slot volumes (dependend on deck selection)
Group 2 Fader 1-4 right
Remix Slot volumes (dependend on deck selection)
Group 3 Fader 1-4 left
FX 1 ! control Dry/Wet, Param 1-3
Group 3 Fader 1-4 right
FX 2 ! control Dry/Wet, Param 1-3
Group 4 Fader 1-4 left
FX 3 ! control Dry/Wet, Param 1-3
Group 4 Fader 1-4 right
FX 4 ! control Dry/Wet, Param 1-3
SHIFT + Group 1-4 Button
Group 1-4 selection (red LED is lit)
Group 1-4 Button
If group 2 is active (red LED is lit) ! Remix Slot mute
Group 1-4 Button
If group 3 or 4 is active (red LED is lit) ! In single mode: FX Button 1 activates /
deactivates FX Unit globally (green LED is lit when activated). FX Button 2 resets all
FX parameters to their default value (short LED flash). FX Button 3 and 4: FXdependent (LED is lit when activated)
In group mode: FX Button 2-4 activates / deactivates FX slot 1-3 (yellow LED is lit
when slot activated)
Programming external midi (Din) in system mode:
Start system mode by pushing the Deck select A/B and Deck select C/D button for more than one
second so both LEDs are blinking. Select control by holding Deck select A/B Button and move FX
Potentiometer (Pot 1-4) / FX Button 1-4 (Pbt1-4) or FX Fader (Fad 1-8) / FX Button (Fbt1-8). Pushing
Deck select C/D Button and select control mode with Tree encoder (----, note, PC, CC, CCtg).
Pushing the Tree button and select midi channel with Tree encoder (Ch1-16). Select note / PC / CC
number with the Tree encoder after pushing the Fav Button (n0-127). Leave the system mode by
pushing the Deck select A/B and Deck select C/D button again for more than one second. All
preferences will be stored by leaving system mode. Clear all preferences (extern commands) in
system mode by holding Deck select C/D Button and pressing the Tree encoder. Midi Clock is
available on DIN Output if Midi Clock send is activated in Traktor.
Control modes: note (only buttons) = sends note on command by pressing the button, send note off
command by releasing the button. PC (only buttons) = sends program change command
CC (only buttons) = sends control change command (value 127 by pressing the button, value 0 by
releasing the button). CCtg (only buttons) = sends control change command (toggle mode: alternately
value 0 and 127 by pressing the button). A programmed control doesn't send any commands to the
USB port (to Traktor)! You can program each control separately for each of the 4 possible groups.
Versus user manual 8 / 13
FX assign
Control element
Function
FX1 assign Button
If the effect assign button FX1 is pressed, the corresponding deck will be allocated
to FX slot 1 and the LED is lit
FX2 assign Button
If the effect assign button FX2 is pressed, the corresponding deck will be allocated
to FX slot 2 and the LED is lit
FX3 assign Button
If the effect assign button FX3 is pressed, the corresponding deck will be allocated
to FX slot 3 and the LED is lit
FX4 assign Button
If the effect assign button FX4 is pressed, the corresponding deck will be allocated
to FX slot 4 and the LED is lit
Browser section
Control element
Function
Browser Encoder
The Browser encoder with a push function allows browsing through folder, playlists
or favorite lists. By turning the Browser encoder, the folder list can be scrolled
Push Browser Encoder
Push the Browser button (View) to expand / reduce the browser window
Seek / Play Encoder
The Seek / Play encoders are used for coils in the decks. The track will be
forwarded to the end by turning the encoders clockwise, for rewinding back to the
start, anti-clockwise. Push the Seek / Play encoder shortly to start or stop a
playback
SHIFT + Seek / Play
Encoder
Fine seek
Push the Sync button, to automatically match the tempo and the phase of the
playing track to:
Sync Button
The master deck or the master clock, if no deck is selected as master deck. The
Sync button can be left permanently on. However, sometimes a deck cannot be
synced at the moment, then the Sync button on the screen will be appear half-lit.
The Master Deck gives the target tempo to which other decks can sync. In Auto
mode Traktor will automatically select the Master Deck depending on which track
has the longest uninterrupted playtime.
SHIFT + Sync Button
In Manual mode the master deck can be selected by pushing the Master button on
the desired deck
Sync Led
The Sync LED is lit when Sync is active
Load Button
By pushing the Load button, the selected track can be loaded into the respective
track deck (reduces the expanded browser window automatically)
Versus user manual 9 / 13
Loop section
Control element
Function
Loop Size / Set Encoder
Turn the Loop Size / Set encoder to obtain higher or lower value of the loop length
Push the Loop size / Set Encoder to set a loop with pre-selected length
The Loop LED indicates (blinking) when a track is currently in loop mode
Loop Size Display
Shows currently Loop size
Shift + Loop Size / Set
Encoder
Turn the Loop Size / Set encoder and push the Shift button at the same time to
obtain higher or lower value of the move size. Move Size on Loop Display
Loop In Button
Click on the Loop in button to set a start point of the loop
Loop Out Button
Click on the Loop out button to set an end point of the loop. The Track will begin to
loop between Loop in and Loop out. Loop Active LED is blinking
Move Encoder
With turning the Move / Size encoder, the active Loop, Loop In, Loop Out or
Beatjump can be moved forward or backward with a pre-selected length
Push Move Encoder
By pushing the Move Encoder the move mode will be switched ! Loop / Out / IN /
Beatjump. The selected function is active and the corresponding LED is lit
SHIFT + Move Encoder
With pushing Shift and turning Move encoder at the same time, the waveform
display in the deck window increases or decreases. Deck Zoom doesn’t works in
deck size Micro and Small. Push Shift and Move encoder at the same time to reset
the Deck Zoom to standard value
Track Deck Mode
LED bars in the Key-Array – the LED indication displays the present position in the loaded track by a
spot. A blinking LED shows the play operation and a lit LED shows stop. A Track-End-Warning is
indicated by the red LED blinking.
Hotcue LEDs – The LEDs in the Track Deck mode show an existing Hotcue.
Control element
Function
Pitch +/- Button
Pitch +/- Buttons slow down or speed up the tempo of the track in small steps. The
Pitch +/- Buttons offer the same functionality as a pitch fader on any standard DJ
turntable or pitchable CD player. Repeat function while holding the button
SHIFT + Pitch +/- Button
Push Shift + Pitch +/- Button at the same time, changes the tempo in large steps. No
repeat function while holding the button
Bend BWD / FWD Button
The Pitch Bend buttons are used if two tracks are playing at the same tempo, but
their phase is slightly shifted. This is similar to nudging a record to slow down or
speed up as the tracks go slightly out of sync. Press the Bwd button to slightly slow
down the track and the Fwd button to speed it up
Versus user manual 10 / 13
Control element
Function
HOTCUE 1-8 Button
Each deck has eight Hotcue buttons numbered from 1 to 8. In Traktor, you can
assign any stored Cue Point or Loop to one of the 8 Hotcue buttons. This allows for
instant access to your most important Cue Points and Loops. Using stored Cue
Points, you can mark specific positions in your tracks; e.g. beginning vocals,
instrumentals or breaks. Storing a Cue Point instantly maps it to the next available
Hotcue
SHIFT + HOTCUE 1-8
Button
Shift + Hotcue 1-8 deletes stored Cue Points 1-8
Play Button (red)
Push the Play button to start or stop playback. The Led bar indicates activation or
deactivation of Play by a blinking or lit LED, at track end warning the red LED is
blinking
SHIFT + Play Button (red)
The Cue button has multiple functions depending on the playback state of the track.
On a paused deck, pushing Cue sets a new current cue Point at the current play
position. In Snap mode this cue point will snap to the beat nearest the play position.
Pushing Cue during playback jumps the current play position back to the previously
set current cue point and stops playback
Loop Active Button
(to the right of the play
Button)
To activate / deactivate a loop push Shift and Loop Active button. The Loop LED
indicates activation or deactivation of a loop
Beatjump BWD Button (to
the left of the play Button)
Serves to move a Beatjump one beat backward. (Attention! The Move mode is
always set to Beatjump as well as the Move size adjusted to 1 beat)
Remix Deck mode
Remix Deck – works only for Deck D in the current setup V01.
Hotcue-LEDs – In the Remix Deck mode the LEDs 1 – 8 show an occupied slot in the loop mode.
Control element
Function
Pitch +/- Button
Pitch +/- Buttons slow down or speed up the tempo of the track in small steps. The
Pitch +/- Buttons offer the same functionality as a pitch fader on any standard DJ
turntable or pitchable CD player. Repeat function while holding the button
SHIFT + Pitch +/- Button
Push Shift + Pitch +/- Button at the same time, changes the tempo in large steps. No
repeat function while holding the button
Bend BWD / FWD Button
The Pitch Bend buttons are used if two tracks are playing at the same tempo, but
their phase is slightly shifted. This is similar to nudging a record to slow down or
speed up as the tracks go slightly out of sync. Press the Bwd button to slightly slow
down the track and the Fwd button to speed it up
Hotcue 1-8 Button
Play / Retrigger sample in slot 1-4
Versus user manual 11 / 13
Control element
Function
SHIFT + Hotcue 1
Button
Page one, upper two rows
SHIFT + Hotcue 5
Button
Page one, lower two rows
SHIFT + Hotcue 2
Button
Page two, upper two rows
SHIFT + Hotcue 6
Button
Page two, lower two rows
SHIFT + Hotcue 3
Button
Page three, upper two rows
SHIFT + Hotcue 7
Button
Page three, lower two rows
SHIFT + Hotcue 4
Button
Page four, upper two rows
SHIFT + Hotcue 8
Button
Page four, lower two rows
Play Button (red)
Press to start playback of sample slots 1-8 (group play, looped samples only). Press
again to stop playback
SHIFT + Play Button (red)
Press and hold the Cue button to start playback of sample slots 1-4 (group play,
looped samples only). Upon release, playback stops and skips back to start
Loop Active Button
(to the right of the play
Button)
To activate / deactivate a loop push Shift and Loop Active button. The Loop LED
indicates activation or deactivation of a loop
Beatjump BWD Button (to
the left of the play Button)
Serves to move a Beatjump one beat backward. (Attention! The Move mode is
always set to Beatjump as well as the Move size adjusted to 1 beat)
Pedal assign
Programming in pedal assign mode:
Note: the Pedal is always assigned to FX Potentiometer / Button or FX Fader / Button, according to
the selected group.
Push Deck select C/D button and Tree button at the same time (more than one second) to enter Pedal
assign mode. Select control by holding Deck select A/B Button and move FX Potentiometer (Pot 1-4) /
FX Button 1-4 (Pbt1-4) or FX Fader (Fad 1-8) / FX Button (Fbt1-8). Leave the pedal assign mode by
pushing the Deck select C/D and Tree button again for more than one second.
The pedal inlets measure themselves automatically, so that a possible available minimum adjustment
at the pedal can be varied at any time. Pedal latches must have 3 poles and foot switch latches 2
poles. Expression pedals such as the Roland EV-5 and the switch-pedal by Boss FS-5U are used.
Versus user manual 12 / 13
Extensions
All the controls in Traktor Pro may be assigned to new functions, which are accessed in the
Preferences/Controller-Manager.
Particulars are given in the Traktor Pro manual.
Since some shift functions of the controller remain unassigned, the following extensions are
suggested:
• FX- potentiometers
• FX assign buttons
As long as LED’s are allocated to buttons, they may be controlled by the same Midi- commands as
those for the buttons. For information about the numbers of the particular Midi- commands, first
check the included list of the corresponding functions in the included setup.
Especially, the two large grey buttons in each deck (on either side of the red Play buttons) offer
themselves for allocation of often-required functions.
Versus user manual 13 / 13