1
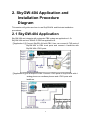
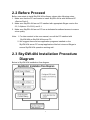
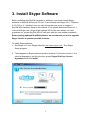
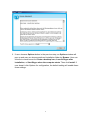
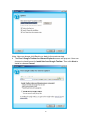
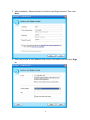
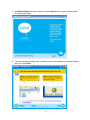
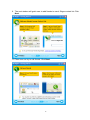
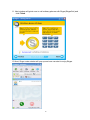
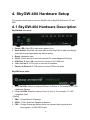
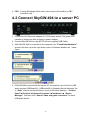
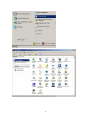
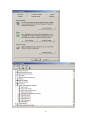
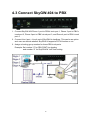
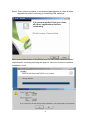
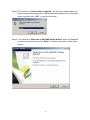
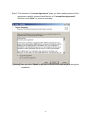
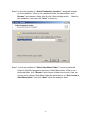
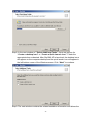
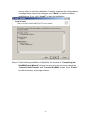
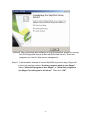
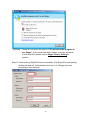
SkyGW-404 Quick Operation Manual V1.0 Table of Contents 1. Introduction.................................................................................................. 3 1.1 Package Contents............................................................................ 4 1.2 Product Specification ....................................................................... 4 1.3 Main Features .................................................................................. 4 1.4 Minimum System Requirements ...................................................... 5 2. SkyGW-404 Application and Installation Procedure Diagram ...................... 6 2.1 SkyGW-404 Application ................................................................... 6 2.2 Before Proceed ................................................................................ 7 2.3 SkyGW-404 Installation Procedure Diagram.................................... 7 3. Install Skype Software ................................................................................. 8 4. SkyGW-404 Hardware Setup .................................................................... 15 4.1 SkyGW-404 Hardware Description ................................................ 15 4.2 Connect SkyGW-404 to a server PC ............................................. 16 4.3 Connect SkyGW-404 to PBX ......................................................... 19 5. Install SkyGW4 Software ........................................................................... 20 5.1 SkyGW4 Software Installation........................................................ 20 2 1. Introduction Nowadays Skype™ has been a popular IM for voice/chat application and has been a big community worldwide. However, Skype scares enterprises for its strict security. In order to prevent employee sending out confidential information easily, many companies prohibit Skype usage in office. With the increasing Skype user base and possible huge phone bill reduction, many companies would like to have Skype applications, but still worry about security issues. SkyGW-404, a four port Skype gateway product can help enterprise solve the dilemma. After connecting SkyGW-404 with company’s existing PBX, employees can make/receive Skype calls through user‘s extension. In addition to 4 FXS ports support for Skype, there are 4 FXO ports in SkyGW-404 for you to have the PSTN line when the corresponding port is not occupied by a Skype call. Employees don’t need to install Skype in personal PC to increase MIS’s burdens and security concerns. Through Skype’s click to call function, 0800 customer service call can be replaced by a free Skype call. Enterprise can benefit cheaper communication fee and even better communication platform for B2B through the new office telephone platform. Furthermore SkyGW-404 provides a very simple way to contact colleagues. Usually you can call colleague’s office extension number first and then call his/her mobile number if he/she is not in office. With SkyGW-404 Cheese button function, you call colleague’s extension number with prefix “*” key and press “#” key all the way until you find him. You don’t need to memorize any phone numbers. User preset a contact table with contact’s reachable phone numbers. There are two kinds of contact tables, namely, Public and Private Contact Table. Employees can maintain own Private contact table through web style updates without MIS’s help. In addition, SkyGW-404 has flexible Skype call management and statistics. MIS can manage SkyGW-404 remotely. SkyGW-404 also sends out immediate SMS alert to MIS if any failure happens. Thanks for choosing this innovative and user friendly SkyGW-404 product. 3 1.1 Package Contents One SkyGW-404 device One type B USB cable(Male A, Male B) Four telephone cables(RJ-11) One installation CD One DC power adapter( 5V/3Amp) 1.2 Product Specification One USB port (Type B receptacle connector) to connect to PC USB port Dip switch for devices cascading up to 16 FXS & FXO ports One reset button to reset SkyGW-404 hardware and firmware 4 FXS ports for connecting to PBX’s CO ports 4 FXO ports for CO Skype V. 2.5, 3.0( 3.0.0.216 above) and 3.1 compatible LED: On/Off, blinking per FXO & FXS port connection & status Power: DC 5V power adapter with maximum 3Amp current rating 1.3 Main Features Connect Skype through office extension phones, no need of microphones, speakers and everyone’s PC Support maximum 4 independent Skype calls concurrently 4 FXS ports for Skype application and 4 FXO for landline when the corresponding FXS port is not busy Support devices cascading up to 16 FXS/FXO ports in one PC Support international busy tones Only need an unique corporate Skype account for contacts Make both Skype and PSTN calls with existing office extension phones Support Speed Dial(up to 20 digits) or SkypeOut™ calls directly through the office extension phone keypad dialing Receive a PSTN or Skype call in the way as user does with office extension phones Cheese Button Dialing: If Skype quality is not good or contact doesn’t answer your call …Just press “#” key through phone keypad to switch to a presetting SkypeOut or PSTN call “Just remember extension number for contact”: Need to find your colleague? 4 All you need to remember now is his/her extension number. Ex. Dial “*” + extension “168” no matter he/she is in office or not. If the connection is bad or no answer, then press a single “#” key(Cheese Button) to dial his/her preset alternative connections (Home, remote office, SkypeOut,…,etc.) without dialing or memorizing lengthy phone numbers Easy of use and user friendly interface Support CDR (Call Detail Record) for view and back up. Support public and private contacts phonebook Allow every user to export personal Skype contacts into SkyGW4 private phonebook via web interface (IE, Internet Explorer). Automatically check SkypeOut credit and send notification via SMS for MIS Advanced operation administration messages like HW/SW error, Skype/SkypeOut status & call connection status 1.4 Minimum System Requirements One Computer running at 3.2 GHz or quicker, 1024 MB RAM with a USB port and a CD-ROM drive Microsoft Windows XP (Service Pack 2) 100MB Free Hard Disk Space at least Skype Version 2.5, 3.0( above 3.0.0.216) or 3.1 128 kbps Internet connection (ADSL, Cable Modem…) Four available PSTN channels in PBX 5 2. SkyGW-404 Application and Installation Procedure Diagram This section will guide user how to use SkyGW-404 and illustrate installation procedures. 2.1 SkyGW-404 Application SkyGW-404 can integrate with enterprise PBX system as application A. Or SkyGW-404 can be a SOHO IP-PBX as application B. 【Application A】Connect SkyGW-404 with PBX: User can connect 4 FXS ports of SkyGW-404 to PBX trunk ports and connect 4 landlines with SkyGW-404 4 FXO ports. 【Application B】As a simple IP-PBX: Connect 4 FXS ports of SkyGW-404 with 4 analog phones or cordless phones and 4 FXO ports with landlines. 6 2.2 Before Proceed Before user starts to install SkyGW-404 software, please take following notes: 1. Make sure that the PC user wants to install SkyGW-404 is with Windows XP +Service Pack 2. 2. Make sure SkyGW-404 server PC installed with appropriate Skype version like 2.5, 3.0(above 3.0.0.216) and 3.1. 3. Make sure SkyGW-404 server PC has a dedicated broadband access to ensure voice quality. Note:1. For later content in the user manual, we call the PC installed with SkyGW-404 as SkyGW-404 server PC. 2. We suggest there are less application programs installed on the SkyGW-404 server PC except applications like Anti-virus and Skype to ensure SkyGW-404 operation working well. 2.3 SkyGW-404 Installation Procedure Diagram Below is SkyGW-404 installation flow diagram. 7 3. Install Skype Software Before installing SkyGW-404 hardware or software, user should install Skype software on SkyGW-404 server PC first. If user already has Skype V2.5, 3.0(above 3.0.0.216) or 3.1 installed, user can skip this section and move to chapter 5 SkyGW-404 Hardware Setup in this manual. If not, please download Skype V3.1 from www.Skype.com. Skype might change API for the new release, we can't guarantee our current SkyGW-404 AP can work with the new update seamlessly. Before getting updated SkyGW4 software, we recommend you not to upgrade Skype version to prevent possible troubles. To install Skype software: 1. Get Skype v3.1 from Skype web site Http://www.skype.com . Run Skype Setup program. 2. There appears a Skype welcome window as below. Follow blue circles 1~3 to select a language by scrolling the bar, accept Skype End User License Agreement and click Install. 8 3. If user chooses Options button in the previous step, an Options window will pop up and user can choose preferred installation folder by Browse. User can choose to check boxes for Create a desktop icon, Launch Skype after installation, or Start Skype when the computer starts. Then click Install. If user doesn’t click Options for configuration, the default setting will enable these three settings. 9 Note: User can always click Back to go back to the previous step. 4. The Free! Google Toolbar for Internet Explorer screen will pop out. User can choose to check boxes for Install the free Google Toolbar. Then click Next to Install or choose Cancel. 10 5. After installation, Skype will ask for Create a new Skype Account. Then click Next. 6. User can provide e–mail address and country information and then click Sign In. 11 7. A Getting Started window comes up. Press Start button to get a simple guide for setting up Skype. 8. The next window will help user to check your sound settings by making a Skype test call. Click Next. 12 9. The next window will guide user to add friends to user’s Skype contact list. Click Next. 10. Then user can try to call friends. Click Next. 13 11. Next window will guide user to call ordinary phones with Skype(SkypeOut) and click Finish. 12. Next, Skype main window will pop up and user can start to enjoy Skype. 14 4. SkyGW-404 Hardware Setup This section shows how to connect SkyGW-404 to SkyGW-404 server PC and PBX. 4.1 SkyGW-404 Hardware Description SkyGW-404 rear panel 1. Power LED: Red LED is light when power is on. 2. Stack Switch: SkyGW4 can stack with another SkyGW4 to add more Skype channels through appropriate dip switch setting. 3. 4. 5. 6. 7. Reset: Hardware reset. 5V DC: Power socket to connect external DC power adapter(5V/3Amp). USB Port: B type USB connector to connect to PC USB port. Line1 to Line 4: 4 FXO ports to connect to landlines. Phone1 to Phone 4: 4 FXS ports to connect PBX trunk ports. SkyGW4 front panel 1. P1 to P4 LEDs: Stand for status of Phone1 to Phone 4. For example: P1 LED represents Phone1. 2. L1 to L4 LEDs: Stand for status of Line1 to Line 4. For example: L1 LED represents Line1. 【Note】 1. PBX:Private Branch Exchange 2. PSTN:Public Switched Telephone Network. 3. FXS:Foreign Exchange Station which can connect with regular phone, electrograph, or PBX PSTN card. 15 4. FXO:Foreign Exchange Office which can connect with landline or PBX extension card. 4.2 Connect SkyGW-404 to a server PC 1. Connect the 5V/3A power adapter to 5V DC power socket. The power LED indicator is always on after plugging in power adapter. 2. Connect SkyGW-404 to a server PC with the supplied USB Cable. 3. After SkyGW-404 is connected to the computer, the “Found New Hardware” window will show up in the right down corner of Windows desktop as below figure: 4. If SkyGW-404 connects with the server PC successfully, user will find 4 USB audio devices (USBAudio00 ~ USBAudio03) in Windows Device Manager. Go to “Start” menu from the left bottom corner of Windows desktop→“Control Panel”→“System”→“System Properties”→“Hardware”→ “Device Manager”, and then click “Sound, video and game controllers” to check USB audio device. 16 17 18 4.3 Connect SkyGW-404 to PBX 1. Connect SkyGW-404 Phone 1 port to PBX’s trunk port 1, Phone 2 port to PBX’s trunk port 2, Phone 3 port to PBX’s trunk port 3, and Phone 4 port to PBX’s trunk port 4. 2. Connect Line1 port ~ Line 4 port of SkyGW4 to landlines. This can be an option and user can decide whether SkyGW-404 supports PSTN function or not. 3. Assign a hunting group number for these PBX trunk ports. Example: Set number “0” for PBX PSNT line hunting and number “9” for SkyGW-404 VoIP line hunting. 19 5. Install SkyGW4 Software This section guides user how to install SkyGW4 software into a server PC. 5.1 SkyGW4 Software Installation Before installing SkyGW4 software, please verify the following items. 1. Please make sure Skype 2.5, 3.0(above 3.0.0.216) or 3.1 is installed. 2. Please make sure 4 registered Skype accounts including one cooperate account are registered. 3. Please make sure SkyGW-404 is connected with SkyGW-404 server PC . To install SkyGW4 software: Step1: Insert the Installation CD into the CD-ROM drive of the computer. SkyGW4 installation screen will pop out. Click Install to start to install SkyGW4 software. 20 Step2: There comes a window to recommend administrator to close all other applications before continuing to install SkyGW4 as below: After clicking Next button, if SkyGW4 server PC can’t meet minimum system requirements, a warning message will pop out. User can choose to continue installation or not. 21 Step 3: The window of “Select Setup Language” will show up, administrator can select a preferred language by scrolling down the selection bar as the figure below, and then click “OK” to continue next step. Step 4: The window of “Welcome to SkyGW4 Setup Wizard” pops out. Read the on-screen instructions and click “Next” to continue next step, as the figure below: 22 Step 5: The window of “License Agreement” pops out. After reading content of the agreement carefully, please check the box of “I accept the agreement”. And then click “Next” to continue next step. 【Notice】User can click “ Back” to go back to the previous step anytime during the installation. 23 Step 6: In the next window of “Select Destination Location”, designate a folder for the installation. If this is not a preferred folder for administrator, click” Browse” and choose a folder from the list. After deciding which folder for the installation, user can click” Next” to continue. Step 7: In the next window of “Select Start Menu Folder”, choose a preferred folder for SkyGW4 program’s shortcuts in Start Menu folder. If this is not a preferred folder, click “Browse” and choose a folder from the list. User can choose not to create a Start Menu folder by check the box of “Don’t create a Start Menu folder”, and click “Next” when the setting is done. 24 Step 8: In the next window of ”Select Additional Tasks”, there are options for “Create a desktop icon” or “Create a Quick Launch icon”. Check the appropriate box as desired. After SkyGW4 AP is launched, the desktop icons will appear on the computer desktop and the quick launch icon will appear in the left bottom corner of the Windows screen. Click “Next” to continue. Step 9: The next window contains the related installation information and allows the 25 user to select to start the installation. Carefully examine the configurations. If configurations need to be changed, click “Back” to make necessary modifications. If not, click “Install” to start the installation. Step 10: After finishing installation of SkyGW4, the window of “Completing the SkyGW4 Setup Wizard” will pop out and user can choose to check the “Launch Check Tomcat” and “Launch SkyGW4” boxes. Click “Finish” to finish the setup, as the figure below. 26 【Notice】After completing the installation of SkyGW4 software, please do not stop two DOS programs(Tomcat & Start SkyGW4 Web Server). These two programs are used for Web server management. Step 11: If administrator attempts to launch SkyGW4 in previous step, Skype will invoke one warning window “Another program wants to use Skype”. Select “Allow this program to use Skype” or “Allow this program to use Skype, but ask again in the future”. Then click “OK”. 27 【Notice】 Please do not select the option of “Do not allow this program to use Skype”. If this option has been chosen, and user still wants to use SkyGW4, please refer to Skype Privacy Setting for solution. Step 12: After finishing SkyGW4 setup successfully, Sub Skype Accounts setting window will pop out. Administrator could set 1 to 3 Skype Accounts according to own demand. 28 Enter Skype name and password and select “Apply”. Administrator could see the exact Skype icon numbers at the right corner bottom of Windows desktop as the figure below. 29