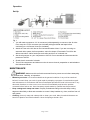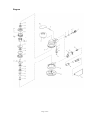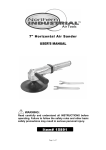
1
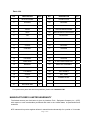
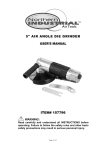
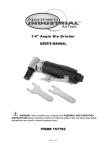
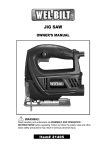
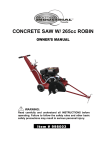
6" Self-Vacuuming
Air DA Sander
USER’S MANUAL
WARNING:
Read carefully and understand all INSTRUCTIONS before
operating. Failure to follow the safety rules and other basic
safety precautions may result in serious personal injury.
Item# 120168
Page: 1 of 9
For technical questions and replacement parts, please call 1-800-222-5381.
Thank you very much for choosing a NORTHERN TOOL & EQUIPMENT CO., INC.
Product! For future reference, please complete the owner’s record below:
Model: _______________
Purchase Date: _______________
Save the receipt, warranty and these instructions. It is important that you read the
entire manual to become familiar with this product before you begin using it.
This machine is designed for certain applications only. Northern Tool + Equipment
strongly recommends that this machine is not modified and/or used for any
application other than that for which it was designed. If you have any questions
relative to a particular application, DO NOT use the machine until you have first
contacted Northern Tool + Equipment to determine if it can or should be performed
on the product.
Before using this product, please read the following instructions carefully.
Technical Specifications
Free Speed
Max air pressure
Air Consumption
Air Inlet
Pad Size
Specifications
10,000 RPM
90 PSI
4 CFM
1/4"
6"
GENERAL SAFETY RULES
WARNING: Read and understand all instructions. Failure to follow all instructions listed
below may result in electric shock, fire and/or serious injury. The terms “tool” and “power tool” in the
instructions and warnings listed below refer to your pneumatic tool.
WARNING: The warnings, cautions, and instructions discussed in this instruction
manual cannot cover all possible conditions or situations that could occur. It must be
understood by the operator that common sense and caution are factors which cannot be built into
this product, but must be supplied by the operator.
SAVE THESE INSTRUCTIONS
Page: 2 of 9
WORK AREA
•
Keep work area clean, free of clutter and well lit. Cluttered and dark work areas can cause
accidents.
•
Do not use your tool where there is a risk of causing a fire or an explosion; e.g. in the
presence of flammable liquids, gasses, or dust. Power tools create sparks, which may ignite
the dust or fumes.
•
Keep children and bystanders away while operating a power tool. Distractions can cause
you to lose control, so visitors should remain at a safe distance from the work area. Do not
let them handle machines, tools, extension cords, or air hoses.
•
Be aware of all power lines, electrical circuits, water pipes and other mechanical hazards
in your work area, particularly those hazards below the work surface hidden from the
operator’s view that may be unintentionally contacted and may cause personal harm or
property damage.
•
Be alert of your surroundings. Using power tools in confined work areas may put you
dangerously close to cutting tools and rotating parts.
PERSONAL SAFETY
•
Stay alert, watch what you are doing and use common sense when operating a power tool.
Do not use a power tool while you are tired or under the influence of drugs, alcohol or
medication. A moment of inattention while operating power tools may result in serious
personal injury.
•
Dress properly. Do not wear loose clothing, dangling objects, or jewelry. Keep your hair,
clothing and gloves away from moving parts. Loose clothes, jewelry or long hair can be
caught in moving parts. Air vents often cover moving parts and should be avoided.
•
Use safety apparel and equipment. Use safety goggles or safety glasses with side shields
which comply with current national standards, or when needed, a face shield. Use as dust
mask in dusty work conditions. This applies to all persons in the work area. Also use
non-skid safety shoes, hardhat, gloves, dust collection systems, and hearing protection
when appropriate.
•
Avoid accidental starting. Do not carry the power tool with your finger on the switch.
Ensure the switch is in the off position before plugging tool into power outlet. In the event of
a power failure, while a tool is being used, turn the switch off to prevent surprise starting
when power is restored.
•
Do not overreach. Keep proper footing and balance at all times. Do not reach over or
across running machines or air hoses.
•
Remove adjusting keys or wrenches before connecting to the power supply or turning on
the tool. A wrench or key that is left attached to a rotating part of the tool may result in
personal injury.
PNEUMATIC TOOL USE AND CARE
•
Do not force the tool. Pneumatic tools do a better and safer job when used in the manner
for which they are designed. Plan your work, and use the correct tool for the job.
•
Never use a tool with a malfunctioning switch. Any power tool that cannot be controlled
with the switch is dangerous and must be repaired by an authorized service representative
before using.
Page: 3 of 9
•
Disconnect air supply from tool and place the switch in the locked or off position before
making any adjustments, changing accessories, or storing power tools. Such preventive
safety measures reduce the risk of starting the power tool accidentally.
•
Secure work with clamps or a vise instead of your hand to hold work when practical. This
safety precaution allows for proper tool operation using both hands.
•
Store idle tools. When tools are not is use, store them in a dry, secure place out of the
reach of children. Inspect tools for good working condition prior to storage and before
re-use.
•
Use only accessories that are recommended by the manufacturer for your model.
Accessories that may be suitable for one tool may create a risk of injury when used on
another tool.
•
Keep guards in place and in working order.
Never leave tool running unattended.
USE COMPRESSED AIR ONLY. Use clean, dry and regulated compressed air at no more
than 90 PSI to power this tool. Never use oxygen, carbon dioxide or any other bottled gas
as a power source for this tool.
•
•
•
Use proper size and type air pressure line and fittings. The recommended air line for
this tool is 3/8" delivering no more than 90 PSI. Recommended air inlet size is 1/4".
•
Make sure the hose is free of obstructions or snags. Entangled hoses can cause loss of
balance or footing.
Note: Performance of the compressor (if powered by line voltage) may vary depending
on variations in local line voltage. Extension cord usage may also affect tool
performance.
Additional Safety Warnings
•
•
•
•
•
•
•
Repetitive motions or exposure to vibration may be harmful to your hands and arms.
When wearing gloves to operate the Horizontal Sander, make sure that the gloves do not
interfere with operating the trigger. Test your gloves with the trigger before attaching the unit
to an air source.
Never start the tool unless you have a firm grip with both hands and you are positioned at
your workpiece or area.
Before using the Air Sander, know what is directly underneath the work area or workpiece.
The Air Sander can quickly penetrate material. If working directly on the ground, make sure
you are not directly above shallow cables, lines, or pipes.
Never point the tool or the air hose (not included) at anyone.
Keep your finger away from the trigger until you are ready to work.
Page: 4 of 9
Operation
Set Up
Fig. 1
1. You will need to prepare a 1/4" air connector (sold separately) to connect to the Air Inlet.
First, wrap the 1/4" air connector (not included) with pipe thread seal tape before
connecting to a Air Source Hose (not included).
2. Attach air hose to the Air Inlet on the Horizontal Sander. Note: If you are not using an
automatic oiler system, before operation, add a few drops of Pneumatic Tool Oil to the
airline connection. Add a few drops more after each hour of continual use.
3. Set the air pressure on your compressor to 90 PSI. Do not exceed the recommended air
pressure of 90 PSI.
4. Check the air connection for leaks.
5. Turn off the compressor and disconnect the air source hose in preparation to add wheels to
the Horizontal Sander.
MAINTENANCE
WARNING: Make sure this tool is disconnected from its power source before attempting
any maintenance, cleaning, or inspection.
•
Maintain your tools. It is recommended that the general condition of any tool be examined
before it is used. Keep your tools in good repair by adopting a program of conscientious repair
and maintenance in accordance with the recommended procedures found in this manual. If any
abnormal vibrations or noise occurs, turn the tool off immediately and have the problem
corrected before further use. Have necessary repairs made by qualified service personnel.
•
Keep cutting tools sharp and clean. Properly maintained cutting tools with sharp cutting
edges are less likely to bind and are easier to control. Keep handles dry, clean, and free from oil
and grease.
•
Cleaning. Use only soap and a damp cloth to clean your tools. Many household cleaners are
harmful to plastics and other insulation. Never let liquid get inside a tool.
Page: 5 of 9
Diagram
Page: 6 of 9
Parts List
NO.
DESCRIPTION
QTY.
NO.
DESCRIPTION
QTY.
1
INLET BUSHING
1
22
FRONT PLATE
1
2
WASHER
1
23
BEARING
1
3
SPRING
1
24
O-RING
1
4
VALVE
1
25
SAFEGUARD BUSHING
1
5
SEAT
1
26
MOTOR SHAFT BALANCER
1
6
PIN
1
27
ROTOR KEY
1
7
LEVER
1
28
BEARING
1
8
STEM
1
29
SHIM
1
9
O-RING
1
30
BEARING
1
10
CONTROL
1
31
WASHER
1
11
SNAP RING
1
32
SNAP RING
1
12
RUBBER COVER
1
33
SPINDLE
1
13
HOUSING
1
34
SHROUD
1
14
SNAP RING
1
35
6" VAC HOOK FACE PAD
1
15
BEARING
1
36
EDUCTOR ASSEMBLY
1
16
REAR PLATE
1
37
SCREW
2
17
CYLINDER
1
38
VAC. NOZZLE
1
18
O-RING
1
39
VAC. TUBE
1
19
PIN
1
40
RUBBER HOSE
1
20
ROTOR
1
41
BAG
1
21
ROTOR BLADE
5
For replacement parts and technical questions, please call 1-800-222-5381.
MANUFACTURER’S LIMITED WARRANTY
The limited warranty set forth below is given by Northern Tool + Equipment Company Inc., (NTE)
with respect to new merchandise purchased and used in the United States, its possessions and
territories.
NTE warrants this product against defects in material and workmanship for a period of 12 months
Page: 7 of 9
parts/ 12 months labor commencing on the date of original purchase and will, at its option, repair
or replace, free of charge, any part found to be defective in material or workmanship. This limited
warranty shall only apply if this product has been operated and maintained in accordance with the
Owner’s Manual furnished with the product, and has not been subject to misuse, abuse,
commercial use, neglect, accident, improper maintenance, alteration, vandalism, theft, fire, water
or damage because of other peril or natural disaster. Damage resulting from the installation or use
of any accessory or attachment not approved by NTE for use with the products(s) covered by this
manual will void your warranty as to any resulting damage. This warranty is limited to ninety (90)
days from the date of original retail purchase for any NTE product that is used for rental or
commercial purposes, or any other income-producing purposes.
This limited warranty does not provide coverage in the following cases:
1. Failure to heed the Pneumatic Tool Use and Car as outlined on pages 3 and 4 of
this manual.
2. Failure to follow specific Set Up instructions as outlined on page 5 of this
manual.
NTE reserves the right to change or improve the design of any NTE product without assuming any
obligation to modify any product previously manufactured.
No implied warranty, including any implied warranty of merchantability or fitness for a
particular purpose, applies after the applicable period of express written warranty above as
to the parts as identified. No other express warranty or guaranty, whether written or oral,
except as mentioned above, given by any person or entity, including a dealer or retailer,
with respect to any product shall bind NTE during the period of the Warranty, the exclusive
remedy is repair or replacement of the product as set forth above. (Some states do not allow
limitations on how long an implied warranty lasts, so the above limitation may not apply to you.)
The provisions as set forth in this warranty provide the sole and exclusive remedy arising
from the sales. NTE shall not be liable for incidental or consequential loss or damages
including, without limitation, expenses incurred for substitute or related expenses, or for
rental expenses to temporarily replace a warranted product. (Some states do not allow
limitations on how long an implied warranty lasts, so the above limitation may not apply to you.)
In no event shall recovery of any kind be greater than the amount of the purchase price of the
product sold. Alteration of the safety features of the product shall void this warranty. You assume
the risk and liability for loss, damage, or injury to you and your property and/or to others and their
property arising out of the use or misuse or inability to use the product.
This limited warranty shall not extend to anyone other than the original purchaser, original lessee
or the person for whom it was purchased as a gift.
How State Law Relates to this Warranty: This warranty gives you specific legal rights, and you
may also have other rights which vary from state to state.
For questions about your warranty, please call 1-800-222-5381.
Page: 8 of 9
WARNING
Some dust created by power sanding, sawing, grinding, drilling, and other construction activities
contains chemicals known to the State of California to cause cancer, birth defects or other
reproductive harm. Some examples of these chemicals are:
• Lead from lead-based paints,
• Crystalline silica from bricks and cement and other masonry products
• Arsenic and chromium from chemically treated lumber.
Your risk from these exposures varies, depending on how often you do this type of work. To reduce
your exposure to these chemicals: work in a well-ventilated area, and work with approved safety
equipment, such as those dust masks that are specially designed to filter out microscopic particles.
Northern Tool + Equipment Co.,
2800 Southcross Drive West
P.O. Box 1499 Burnsville, MN 5337-0499
Made in China
Page: 9 of 9