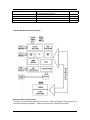
1
uCdimm™ ColdFire 5282
Hardware / Firmware Reference Guide
© 2004 ARCTURUS NETWORKS INC.
REV.9
© 2004 ARCTURUS NETWORKS INC
-1-
UC5282 REFERENCE GUIDE
COPYRIGHT NOTICE
This document, the text and graphics used in this document, its cover, CD-ROM artwork, images and
implementation design represent proprietary, patentable and copyrighted materials and are protected from
misuse under local and international laws. All rights are reserved.
All rights of Arcturus Networks Inc. to be identified as authors of this work have been reserved. Arcturus
Networks Inc. and all subsidiaries have license to reproduce this work. [All rights reserved]. No part of this
publication may be reproduced, stored in a retrieval system or transmitted in any form or by any means
electronic, mechanical, photocopying, recording, or otherwise without prior written permission of the authors.
NOTICE OF MARKS
ARCTURUS, ARCTURUS NETWORKS and the Arcturus Networks Star Logo are Trademarks of Arcturus
Networks Inc. MIBflex, sentryVPN, SIPstream, SIPjack, AIRmarshal, I-net ready, uCmib, uCwebmib
uCsimm, uCdimm, uClinux, uCbootloader, uCbootstrap, uCgardener, uCacademix, uCdimm, uCchip,
uCkernel, uCbsd, Geek Kit and GeekCreek and their respective logos are trademarks of Arcturus Networks
Inc. Linux is a trademark or Linus Torvalds. All other products, services and companies are trademarks of
their respective owners.
COMMUNITY USE OF THE UCLINUX TRADEMARK
Arcturus Networks encourages the use of uClinux, its trademark name and logo on any and all works as
defined under Canadian and US Copyright law as derived works from uClinux subject to conditions of fair
and appropriate use. It is the intended spirit that the authors and trademark owners of uClinux be
represented and lend their endorsement to derived works, in the support of Linux, embedded Linux and the
Embedded Microcontroller Linux Project (uClinux). Arcturus Networks Inc. and its successors reserve the
right to protect on behalf of the community this trademark from any misuse.
CONTACT INFORMATION
Arcturus Networks Inc., the Authors of this document can be contacted at:
Arcturus Networks Inc.
116 Spadina Ave. Suite 100
Toronto, ON
Canada
M5V 2K6
URL: www.ArcturusNetworks.com
TEL: +1 416.621.0125
FAX +1 416.621.0190
FOR PRODUCT SUPPORT CONTACT x239 OR EMAIL: [email protected]
ARCTURUS NETWORKS INC. - LIMITATION OF LIABILITY, INTENDED USE.
Arcturus Networks Inc. reserves the right to make changes without further notice to any products herein.
Arcturus Networks makes no warranty, representation or guarantee regarding the merchantability, suitability
or fitness of its products for any particular purpose, nor does Arcturus Networks assume any liability arising
out of the application or use of any product or circuit, and specifically disclaims any and all liability, including
without limitation consequential or incidental damages. “Typical” parameters can and do vary in different
applications. All operating parameters, including “Typicals” must be validated for each customer application
by the customer’s technical experts. Arcturus Networks does not convey any license under its rights nor the
rights of others. Arcturus Networks products are not designed, intended, or authorized for use as
components in systems intended for surgical implant into the body, or other applications intended to support
or sustain life, or for any other application in which the failure of the Arcturus Networks product could create
a situation where personal injury or death may occur. Should the Buyer purchase or use Arcturus Networks
products for any such unintended or unauthorized application, Buyer shall indemnify and hold Arcturus
Networks Inc. and its officers, employees, subsidiaries, affiliates, and distributors harmless against all
claims, costs, damages, and expenses, and reasonable legal fees including, without limitation, court costs
arising out of, directly or indirectly, any claim of personal injury or death associated with such unintended or
unauthorized use, even if such claim alleges that Arcturus Networks was negligent regarding the design or
manufacture of the part.
© 2004 ARCTURUS NETWORKS INC
-2-
UC5282 REFERENCE GUIDE
TABLE OF CONTENTS
INTRODUCTION ........................................................................................................................................ 7
WELCOME TO THE WORLD OF EMBEDDED LINUX ........................................................................................ 7
GETTING STARTED.................................................................................................................................. 8
CONTENTS OF THE KIT ................................................................................................................................ 8
WHAT’S ON THE CD? .................................................................................................................................. 8
DEVELOPMENT ENVIRONMENT ................................................................................................................... 9
FAST START: CHECKING THE SYSTEM......................................................................................................... 9
PART I – ABOUT THE UCDIMM™ COLDFIRE® 5282 ................................................................... 10
DESCRIPTION ............................................................................................................................................. 10
DEFAULT CONFIGURATION ....................................................................................................................... 10
CLOCK SPEED AND CONFIGURATION......................................................................................................... 10
UCDIMM 5282 HARDWARE BLOCK DIAGRAM ........................................................................................... 11
OPTIONAL ADDITIONAL COMPONENTS ..................................................................................................... 11
ADDITIONAL DESCRIPTIONS ............................................................................................................. 12
THE COLDFIRE 5282 CORE ....................................................................................................................... 12
EXTERNAL MEMORY ................................................................................................................................. 12
I/O MEMORY............................................................................................................................................. 12
FLASH ROM ........................................................................................................................................... 12
SDRAM.................................................................................................................................................... 12
ETHERNET CONTROLLER ........................................................................................................................... 13
RS232 ....................................................................................................................................................... 13
QSPI (QUEUED SERIAL PERIPHERAL INTERFACE)..................................................................................... 13
HARDWARE TIMERS AND PWM ................................................................................................................ 13
HARDWARE MULTIPLY / ACCUMULATE (MAC) UNIT .............................................................................. 13
CAN BUS CONTROLLER ........................................................................................................................... 13
QADC (QUEUED ANALOG-TO-DIGITAL CONVERTER).............................................................................. 13
SODIMM EDGE CONNECTOR BUS DESCRIPTION ........................................................................ 14
MEMORY MAP......................................................................................................................................... 15
FUNCTION ................................................................................................................................................. 15
PART II – ABOUT THE BOARD SUPPORT PACKAGE.................................................................... 16
ABOUT THE CD ROM ............................................................................................................................... 16
SYSTEM REQUIREMENTS ........................................................................................................................... 16
Notice to Windows® Users.................................................................................................................... 16
PART III – UCLINUX DEVELOPMENT ENVIRONMENT ............................................................... 17
INTRODUCTION .......................................................................................................................................... 17
UCLINUX VERSUS LINUX ........................................................................................................................... 17
AN OVERVIEW OF THE DEVELOPMENT ENVIRONMENT ............................................................................. 17
Target Hardware .................................................................................................................................. 17
Development Workstation..................................................................................................................... 18
Interconnection Between Target and Development Systems ................................................................ 18
AN OVERVIEW OF THE DEVELOPMENT PROCESS ....................................................................................... 19
CONFIGURING THE DEVELOPMENT ENVIRONMENT................................................................................... 20
INTRODUCTION .......................................................................................................................................... 20
CONFIGURING THE LINUX WORKSTATION -INSTALLING THE TOOL CHAINS .............................................. 20
SETTING UP THE UCLINUX ENVIRONMENT................................................................................................ 20
BUILDING THE DISTRIBUTION: ................................................................................................................... 21
BUILDING THE DISTRIBUTION: .................................................................................................................. 21
© 2004 ARCTURUS NETWORKS INC
-3-
UC5282 REFERENCE GUIDE
Makefile ................................................................................................................................................ 21
config, tools .......................................................................................................................................... 22
linux-2.4.x............................................................................................................................................. 22
uClibc ................................................................................................................................................... 22
user ....................................................................................................................................................... 22
vendors ................................................................................................................................................. 22
romfs..................................................................................................................................................... 22
images................................................................................................................................................... 22
RECONFIGURING YOUR BUILD USING “MAKE MENUCONFIG” .................................................................... 22
CONFIGURING THE TARGET ....................................................................................................................... 23
The Console Serial Connection ............................................................................................................ 23
The Ethernet Connection ...................................................................................................................... 23
SETTING UP YOUR WORKSTATION TO CONNECT TO THE TARGET............................................................... 24
GETTING THE SERIAL CONNECTION UP AND RUNNING ............................................................................. 24
Booting uClinux.................................................................................................................................... 25
UPLOADING A NEW OS IMAGE VIA TFTP.................................................................................................. 25
UPLOADING A NEW OS IMAGE VIA THE SERIAL CONNECTION ................................................................... 26
slow....................................................................................................................................................... 26
fast ........................................................................................................................................................ 26
Writing The Newly Uploaded Image to Flash ...................................................................................... 27
GETTING THE ETHERNET CONNECTION UP AND RUNNING ........................................................................ 28
THE UCLINUX BOOT PROCESS................................................................................................................... 28
PART IV – THE BOOTLOADER............................................................................................................ 30
DESCRIPTION ............................................................................................................................................. 30
UNDERSTANDING BOOTLOADER FLASH SECTOR CONSOLE DESCRIPTIONS ............................................... 30
BOOTLOADER COMMAND LINE USER INTERFACE ..................................................................................... 31
BOOTLOADER SPECIAL ENVIRONMENT VARIABLES .................................................................................. 34
Writing an OS Image into Flash ROM from the bootloader ................................................................ 38
BOOTLOADER API..................................................................................................................................... 38
PART V – LINUX COMMAND REFERENCE ..................................................................................... 41
COMMAND REFERENCE ............................................................................................................................. 41
PART VI – SIGNAL DESCRIPTIONS.................................................................................................. 43
POWER AND GROUND SIGNALS ................................................................................................................. 43
RESET........................................................................................................................................................ 43
GENERAL PURPOSE TIMERS ...................................................................................................................... 43
QSPI ......................................................................................................................................................... 43
RS232 PORT A / TTYS0 ............................................................................................................................ 44
RS232 PORT B / TTYS1............................................................................................................................. 45
10/100 BASET ETHERNET INTERFACE ...................................................................................................... 45
GENERAL PURPOSE I/O PORT A ................................................................................................................ 45
GENERAL PURPOSE I/O PORT B ................................................................................................................ 46
GENERAL PURPOSE I/O PORT C ................................................................................................................ 46
CAN BUS .................................................................................................................................................. 46
HARDWARE INTERRUPTS ........................................................................................................................... 46
CPU BUS ................................................................................................................................................. 47
PART VII – ELECTRICAL CHARACTERISTICS ............................................................................ 47
MAXIMUM RATINGS .................................................................................................................................. 47
DC OPERATING CHARACTERISTICS AT 3.3V............................................................................................. 47
POWER CONSUMPTION AT 3.3V ................................................................................................................ 47
APPENDIX - A ........................................................................................................................................... 49
AN APPLICATION NOTE TO BLINK THE HEARTBEAT LED ........................................................................ 49
© 2004 ARCTURUS NETWORKS INC
-4-
UC5282 REFERENCE GUIDE
APPENDIX B.............................................................................................................................................. 52
CONFIGURING SOURCE LEVEL DEBUGGING FOR USERLAND APPLICATIONS USING GDBSERVER ............ 52
BACKGROUND ........................................................................................................................................... 52
Build bdm and gdb-6.0 ......................................................................................................................... 52
Apply the patch and compile gdb-6.0 ................................................................................................... 52
Notes..................................................................................................................................................... 52
Problems and Bugs............................................................................................................................... 56
APPENDIX C ............................................................................................................................................. 57
COMMON USERLAND APPLICATIONS ........................................................................................................ 57
agetty .................................................................................................................................................... 57
boa........................................................................................................................................................ 57
busybox................................................................................................................................................. 57
cat ......................................................................................................................................................... 57
clear...................................................................................................................................................... 57
cp .......................................................................................................................................................... 57
date ....................................................................................................................................................... 57
dd.......................................................................................................................................................... 57
df........................................................................................................................................................... 58
dhcpcd .................................................................................................................................................. 58
dmesg.................................................................................................................................................... 58
du.......................................................................................................................................................... 58
echo ...................................................................................................................................................... 58
expand .................................................................................................................................................. 58
false ...................................................................................................................................................... 58
flashloader............................................................................................................................................ 58
free........................................................................................................................................................ 58
gdbserver .............................................................................................................................................. 58
hostname............................................................................................................................................... 58
ifconfig.................................................................................................................................................. 59
inetd ...................................................................................................................................................... 59
init......................................................................................................................................................... 59
insmod .................................................................................................................................................. 59
ln........................................................................................................................................................... 59
login...................................................................................................................................................... 59
ls ........................................................................................................................................................... 59
lsmod .................................................................................................................................................... 59
mkdir..................................................................................................................................................... 59
mount.................................................................................................................................................... 59
passwd .................................................................................................................................................. 60
ping....................................................................................................................................................... 60
prinbtenv............................................................................................................................................... 60
portmap ................................................................................................................................................ 60
ps .......................................................................................................................................................... 60
pwd ....................................................................................................................................................... 60
ramloader ............................................................................................................................................. 60
reset ...................................................................................................................................................... 60
rmdir..................................................................................................................................................... 60
rmmod................................................................................................................................................... 60
route ..................................................................................................................................................... 60
setbenv .................................................................................................................................................. 60
sh .......................................................................................................................................................... 60
sleep...................................................................................................................................................... 61
stty ........................................................................................................................................................ 61
telnet ..................................................................................................................................................... 61
© 2004 ARCTURUS NETWORKS INC
-5-
UC5282 REFERENCE GUIDE
telnetd ................................................................................................................................................... 61
test ........................................................................................................................................................ 61
touch ..................................................................................................................................................... 61
umount.................................................................................................................................................. 61
uptime ................................................................................................................................................... 61
xloader.................................................................................................................................................. 61
APPENDIX D ............................................................................................................................................. 63
THINGS TO WATCH OUT FOR WHEN WRITING UCLINUX CODE .................................................................... 63
APPENDIX E.............................................................................................................................................. 64
GNU GENERAL PUBLIC LICENSE ..................................................................................................... 64
PREAMBLE ................................................................................................................................................ 64
GNU GENERAL PUBLIC LICENSE ..................................................................................................... 65
TERMS AND CONDITIONS FOR COPYING, DISTRIBUTION AND MODIFICATION ................... 65
APPENDIX: HOW TO APPLY THESE TERMS TO YOUR NEW PROGRAMS ..................................................... 69
APPENDIX F.............................................................................................................................................. 70
THE BSD LICENSE .................................................................................................................................... 70
© 2004 ARCTURUS NETWORKS INC
-6-
UC5282 REFERENCE GUIDE
Introduction
Welcome to the world of embedded Linux
Embedded systems are everywhere. In fact, you touch more embedded systems in your
everyday life than you probably realize. They come in many shapes and sizes, from the TV
remote control to the “engine computer” in your car. These devices are so prevalent that you
likely don’t even realize your interaction with them. They are required to be highly robust and
reliable for the end user.
One of the interesting things about embedded devices is the wide range of sizes, both in terms of
physical size and computing power, in which they are found. Large embedded systems, like
those found in Automated Teller Machines, are likely to be “hardened” PCs... But what if you
could add the kind of functionality normally associated with larger devices, to something as
common as a home appliance, and do it at a low cost? This is the role of embedded Linux,
designed to operate on microcontroller devices, embedded Linux can be used in place of custom
code to take full advantage of the powerful features of the operating system, and to provide new
features that were not originally considered or otherwise possible
The uCdimm in combination with the Linux OS creates a compelling, feature rich solution for
product integrators.
Generally speaking, the basic Board Support Package contains the following open source
components:
! Linux kernel
! Drivers
! Libraries
! Basic userland distribution
! GNU cross-compiler, binary utilities
! Linker
! Debugger
These components on their own provide adequate resources for the development of various
networked products in almost any vertical market. Developers are given an extra step, they are
provided a module that can easily be snapped into a socket and connected to almost any device.
The uCdimm can be the core of a system, or it can be a network add-on, either way, the uCdimm
reduces engineering costs and time to market.
© 2004 ARCTURUS NETWORKS INC
-7-
UC5282 REFERENCE GUIDE
Getting Started
Contents of the Kit
When receiving a new product there is always a natural inclination to immediately shed all
packaging. Take a moment and inventory your kit to ensure it includes the following items:
! This Hardware / Firmware Reference Guide
! A software CD
! uCevolution Host Board
! uCdimm Microcontroller Module
! Ethernet Straight-Through Cable
! Ethernet Cross-Over Cable
! DB-9 Style Serial Cable
! Four Rubber Feet for the uCevolution Board
! Power Supply
If, by some chance you are missing any part of your development kit, please contact Arcturus for
details.
What’s on the CD?
The uClinux CD included with this kit is a complete development environment for
uClinux/ColdFire. To make installation easier, the CD includes binaries and source for the
toolchain, uClinux kernel and user applications. All the software needed to develop for uClinux
from a Linux workstation is included.
© 2004 ARCTURUS NETWORKS INC
-8-
UC5282 REFERENCE GUIDE
Development Environment
The uClinux System requires a Linux host machine as the development workstation. Binaries of
the compilers, tools and libraries are provided on the uClinux CD for libc6 x86 based machines.
Source code is provided for other platforms and can also be used to rebuild the system.
Fast Start: Checking the System
uCdimm modules are shipped with a default bootloader and uClinux image. This image is
configured to boot into the Bootloader shell and then wait for user intervention. For those
naturally anxious to test their device follow these steps:
1. Insert your uCdimm module into your uCevolution Host Development Board
2. Connect your Host machine serial port to UART0 of the uCevolution Development
Board
3. Open your Host machine serial console (Minicom or HyperTerminal)
4. Configure your Host machine serial port settings for
! BPS:
9600 (default)
! Databits:
8
! Parity:
None
! Stop Bits:
1
! Flow Control: None
! Echo Locally: Checked
5. Ensure flow control is disabled on your Host machine serial console
6. Apply power to the uCevolution Host Development Board
7. At the bootloader command prompt B$ enter ‘go’
8. Log into uClinux using the follow:
! login: root
! password: uClinux (note the capitalization)
© 2004 ARCTURUS NETWORKS INC
-9-
UC5282 REFERENCE GUIDE
PART I – About The uCdimm™ ColdFire® 5282
Description
The uCdimm ColdFire 5282 microcontroller module (uC5282) is a complete “system on a
module”, including three basic functional blocks; core processor, memory and Ethernet. . These
three functional blocks form a highly integrated component. No external support is required with
the exception of a regulated 3.3Volt power supply. This provides the Engineer functionality that
would normally require a far greater “design-in” effort. The uC5282 provides all needed system
memory, Ethernet transformer and RS232 line drivers, high speed serial and parallel I/O and
uClinux core operating system all on board.
Default Configuration
The default configuration, and as such the module described in this document consists of the
Motorola MCF5282, 4MB NOR Flash part, 16MB of SDRAM and a 10/100 BaseT Ethernet
system including MAC and PHY. Table-1 below describes the hardware configuration and where
each is supported, either on-chip (by the MCF5282) or on board (on the uCdimm Module,
external to the MCF5282). It should be noted that the MCF5282 include 512KB of flash On-Chip.
This Flash is used on the uCdimm module to store the resident bootloader. Access to the
available On-Chip Flash is managed by the internal flash device support provided by the
bootloader. Figure – 2 Provides a simplified block diagram of how the hardware interacts on the
uCdimm module.
Clock Speed and Configuration
The 5282 microcontroller on-board the uCdimm module is rated for a max operating speed of
66MHz. The operating frequency of the uCdimm implementation is 64MHz.
Table 1 – Hardware Feature Matrix
Feature
16 MB RAM
4/8/16 MB NOR Flash
XX MB NAND
64 MHz ColdFire RISC Core
Cache
32 Bit wide SDRAM addressing
512KB on-chip flash
64 Kbytes of static RAM
eMAC
10/100 Ethernet MAC
Ethernet PHY
CAN 2.0 Bus interface
Two RS232 serial UARTs
QSPI with four chip selects
QADC
© 2004 ARCTURUS NETWORKS INC
Description
Standard configuration 16MB
Standard configuration 4MB
NAND Flash version
On-Board
On-Board
On-Board
Data and instruction Cache
Fast Memory
Bootloader and environment storage
DSP functionality
Fast Ethernet Support
Ethernet Physical Interface
CAN Serial Bus for connecting CAN devices
Console and other serial device support
For the connection of additional devices
Analog-to-Digital converter
- 10 -
On-Chip
On-Chip
On-Chip
On-Chip
On-Chip
On-Chip
On-Board
On-Chip
On-Board
On-Chip
On-Chip
UC5282 REFERENCE GUIDE
Timer Module
I2C bus controller
16 dedicated GPI/O
BDM
Operation from 0C to +70C
Four 32-bit timers, Eight 16-bit timer channels,
Four periodic interrupt timers
For the connection of additional devices
Multi-purpose Input/Output
Background Debug Support
Extended Temp (-40C to +85C ) available
On-Chip
On-Chip
On-Chip
On-Chip
uCdimm 5282 Hardware Block Diagram
Optional Additional Components
To augment the development process Arcturus offers a CAN bus daughter card designed for the
uCevolution development platform. Please contact Arcturus for additional information.
© 2004 ARCTURUS NETWORKS INC
- 11 -
UC5282 REFERENCE GUIDE
Additional Descriptions
The uCdimm has a highly integrated design that eliminates the need for external hardware
normally associated with component level MCUs. Simultaneously, this provides the Engineer
functionality that would normally require a far greater “design-in” effort
In addition, a command line build development environment including a full ANSI C compliant
GNU C tool chain supports the uC5282. Example code, showing the unique capabilities of the
uC5282 for embedded internet appliances and control applications is provided.
The ColdFire 5282 Core
The on board ColdFire is based on a 32 bit RISC architecture based on the ColdFire V2 core and
provides bus control logic (including SDRAM controller). Also included is a 10/100 BaseT
Ethernet controller, a Multiply and Accumulate (MAC) unit for DSP, UARTs, QSPI ( high speed
serial), Various Timers, Parallel I/O and a CAN 2.0 bus controller.
External Memory
The uCdimm 5282 module, in its standard configuration includes 4MB of FLASH ROM and 16MB
of SDRAM configured in 32bit wide memories. SDRAM refresh is handled transparently by the
MCU core. Both the SDRAM and FLASH ROM go into low power shutdown automatically when
idle.
I/O Memory
I/O memory is mapped into the CPU’s main memory space at 2 locations. The I/O peripherals
and system control registers appear at 0x40000000. The ColdFire 5282 provides an emulation
chip select in this address range as well, however, this feature is not available on the uC5282
module. For more detailed information about the registers, see the later sections of this manual
or the Motorola MCF 5282 Users’ Guide.
FLASH ROM
The FLASH ROM device on the uC5282 is an AMD 29LV, 29DL or compatible series 3.3Volt
FLASH device. The exact FLASH device used on any given uC5282 module depends on market
conditions. The Bootloader included with the module provides the necessary system calls to
manage its FLASH device. The Reset Monitor provides additional under voltage write/erase
protection to avoid accidental data corruption and guarantees the FLASH device returns to a
known state at “power on” or “reset”.
Program and erase of the FLASH device is handled by system calls into the bootloader. There is
no need to program directly to the hardware and this is discouraged. See the bootloader chapter
for details on the FLASH services offered.
SDRAM
The SDRAM device on the uC5282 provides 16MB of SDRAM. Refresh is handled by the
ColdFire MCU and is configured by the bootloader or the OS kernel at run time.
After reset, the bootstrap runtime configures the SDRAM device and copies the bootloader code
from FLASH to the first 128K of SDRAM. From this point, the bootloader no longer relies on the
FLASH, allowing it to be erased and reprogrammed. This first 128K block of SDRAM also
contains the global environment variables, default fault handlers and the debug stubs. It is
therefore important not to corrupt this block of memory.
© 2004 ARCTURUS NETWORKS INC
- 12 -
UC5282 REFERENCE GUIDE
Ethernet Controller
The uC5282 contains an on-chip 10/100 BaseT Ethernet controller on the ColdFire MCU. All
additional circuitry required to implement a Ethernet support is included on the uC5282 module
with no requirements for external components (such as magnetics). Driver code for the Ethernet
controller must be provided by the Operating System running on the module. The Bootloader
provides the Arcturus Networks IEEE OUI (MAC address) which is contained in the environment
variable HWADDR0. The assigned MAC addresses of the module can also be obtained through
the bootloader system call gethwaddr(0). The bootloader is also capable of receiving boot
images and a limited command set via TFTP. Please refer to the bootloader manual for more
detail.
RS232
The uC5282 provides two, 5 wire (RXD, TXD, RTS, CTS and GND) RS232 ports capable of
running at up to 5Mbps. RS232 line drivers are integrated; no external components are required.
The bootloader will initialize RS232 port 0 at 9600,8,N,1 and uses it as the System Console at
reset if the Global Environment Variable CONSOLE is set to ttyS0 (this is the default).
The RS232 line drivers will automatically sense if a powered on RS232 device is connected by
checking the voltage on the RXD pin. If no RS232 device is detected, the line drivers
automatically go into low power shutdown.
QSPI (Queued Serial Peripheral Interface)
The uC5282 provides a four wire (Dout, Din, CLK and CS) Motorola QSPI serial connection with
one chip select . Direct connection to a large range of peripherals, including D/A and A/D
converters, UARTS, DSPs and other SPI slaves are supported without additional components.
Hardware Timers and PWM
Two 16-bit, four channel general purpose timers, four 16-bit periodic interrupt timers and one 16bit software watchdog timer are provided by the MCF5282. Pulse width modulation is useable on
the general purpose timers.
The general purpose timers can be used for input transition event capture or output toggle mode.
A prescaler is provided.
Hardware Multiply / Accumulate (MAC) Unit
The on-board MAC unit provides hardware support for signal processing in a variety of
applications including digital audio. The MAC unit and is capable of both 16 bit and 32 bit word
lengths.
CAN Bus Controller
Please refer to MCF5282 documentation or contact Arcturus for additional information.
QADC (Queued Analog-to-Digital Converter)
The MCF5282 provides eight direct, or eighteen multiplexed, A-to-D channels. Each channel has
a 10-bit resolution, and 7 microsecond conversion time.
© 2004 ARCTURUS NETWORKS INC
- 13 -
UC5282 REFERENCE GUIDE
soDIMM Edge Connector Bus Description
Pin #
1
3
5
7
9
11
13
15
17
19
21
23
25
27
29
31
33
35
37
39
41
43
45
47
49
51
53
55
57
59
61
63
65
67
69
71
73
75
77
79
81
83
85
87
89
91
93
95
97
99
101
103
105
107
109
111
113
115
117
119
121
123
125
127
129
131
133
135
137
139
141
143
Signal
ETXD+
ETXDERXD+
ERXDVDD
TXD0
SCL / TXD2
RTS0
RXD0
CANRX
SDA / RXD2
CTS0
CANTX
SGND1
ETH LINK
ETH DATA
ANALOG0
ANALOG2
VDD
TCK
DSI / TDI
QSPI DOUT
QSPI_DIN
QSPI_CS0
QSPI_CLK1
AN55
DDATA0
DDATA2
PST0
PST2
SYNCA / PE3
PTA0
PTA2
PTB0
PTB2
PTC0
PTC2
#RSTO
#IRQ1
#IRQ3
#CS0
#CS2
PQA0
PSD2
VDD
#TIP
#WE
#BS2
#OE
VDD
A0
A2
A4
A6
A8
A10
A12
A14
A16
A18
A20
A22
VDD
D16
D18
D20
D22
D24
D26
D28
D30
VDD
I/O
O
O
I
I
P
O
O
O
I
I
I
I
I
P
I/O
I/O
I/O
I/O
P
I
I
I/O
I/O
I/O
I/O
O
I/O
I/O
I/O
I/O
I/O
I/O
I/O
I/O
I/O
I/O
I/O
O
I/O
I/O
O
O
I
O
P
O
O
O
O
P
O
O
O
O
O
O
O
O
O
O
O
O
P
I/O
I/O
I/O
I/O
I/O
I/O
I/O
I/O
P
Description
Pos. Transmitted Data
Neg. Transmitted Data
Pos. Received Data
Neg. Received Data
VDD
Transmitted Data
Transmitted Data
Request To Send
Receive Data
CAN Bus Receive Data
Receive Data
Clear To Send
CAN Bus Transmit Data
Signal Ground
Ethernet Link LED
Ethernet Data LED
Analog Input / Digital I/O
Analog Input / Digital I/O
VDD
JTAG Clock Input
BSM Serial Input / JTAG Data Input
QSPI Data Out
QSPI Data In
QSPI Chip Select
Serial Peripheral Interface Clock / SCLK
Analog Input / Digital I/O
BDM Debug Data
BDM Debug Data
BDM Processor Status
BDM Processor Status
Timer Sync Input / Port E
Port A Bit 0
Port A Bit 2
Port B Bit 0
Port B Bit 2
Port C Bit 0
Port C Bit 2
Reset Signal
Interrupt
Interrupt
Chip Select
Chip Select
Queued Analog Input
Column Address Strobe
VDD
Bus Transfer In Progress
Write Enable
Byte Strobe
Output Enable
VDD
Address BUS
Address BUS
Address BUS
Address BUS
Address BUS
Address BUS
Address BUS
Address BUS
Address BUS
Address BUS
Address BUS
Address BUS
VDD
Data BUS
Data BUS
Data BUS
Data BUS
Data BUS
Data BUS
Data BUS
Data BUS
VDD
Pin #
2
4
6
8
10
12
14
16
18
20
22
24
26
28
30
32
34
36
38
40
42
44
46
48
50
52
54
56
58
60
62
64
66
68
70
72
74
76
78
80
82
84
86
88
90
92
94
96
98
100
102
104
106
108
110
112
114
116
118
120
122
124
126
128
130
132
134
136
138
140
142
144
Signal
ETXD2+
ETXD2ERXD2+
ERXD2GND
TXD1
TXD1_T
RTS1
RXD1
RTS1_T
RXD1_T
CTS1
CTS1_T
SGND2
JTAG EN
#TA
ANALOG1
ANALOG3
GND
DSO / TDO
#BKPT / TMS
QSPI CS1
QSPI_CS2
QSPI_CS3
DSCLK2
AN56
DDATA1
DDATA3
PST1
PST3
SYNCB / PE2
PTA1
PTA3
PTB1
PTB3
PTC1
PTC3
CLKOUT
#IRQ2
#IRQ4
#CS1
BOOT_D
PQA1
#IRQ5
GND
#TS
#TEA
#BS3
#MR
GND
A1
A3
A5
A7
A9
A11
A13
A15
A17
A19
A21
A23
GND
D17
D19
D21
D23
D25
D27
D29
D31
GND
I/O
O
O
I
I
P
O
I/O
O
I
O
I
I
I
P
I/O
I
I/O
I/O
P
O
I
I/O
I/O
I/O
I/O
O
I/O
I/O
I/O
I/O
I/O
I/O
I/O
I/O
I/O
I/O
I/O
O
I/O
I/O
O
I
O
O
P
O
I
O
I
P
O
O
O
O
O
O
O
O
O
O
O
O
P
I/O
I/O
I/O
I/O
I/O
I/O
I/O
I/O
P
Description
Pos. Transmitted Data
Neg. Transmitted Data
Pos. Received Data / DSL
Neg. Received Data / DSL
Ground
Transmitted Data
Transmitted Data TTL Level
Request To Send
Receive Data
Request To Send TTL Level
Receive Data TTL Level
Clear To Send
Clear To Send TTL Level
Signal Ground
JTAG Enable
Transfer Acknowledge
Analog Input / Digital I/O
Analog Input / Digital I/O
Ground
BDM Serial Output / JTAG Data Output
BDM Breakpoint / JTAG Test Mode
QSPI Chip Select
QSPI Chip Select
QSPI Chip Select
BDM Serial Clock
Analog Input / Digital I/O
BDM Debug Data
BDM Debug Data
BDM Processor Status
BDM Processor Status
Timer Sync Input / Port E Bit 2
Port A Bit 1
Port A Bit 3
Port B Bit 1
Port B Bit 3
Port C Bit 1
Port C Bit 3
Processor Clock Output
Interrupt
Interrupt
Chip Select
Boot Device Selector
Queued Analog Input
Interrupt
Ground
Transfer Start
Bus Transfer Error Acknowledge
Byte Strobe
Master Reset
Ground
Address BUS
Address BUS
Address BUS
Address BUS
Address BUS
Address BUS
Address BUS
Address BUS
Address BUS
Address BUS
Address BUS
Address BUS
Ground
Data BUS
Data BUS
Data BUS
Data BUS
Data BUS
Data BUS
Data BUS
Data BUS
Ground
Table 2 - soDIMM Edge Connector Bus Description
© 2004 ARCTURUS NETWORKS INC
- 14 -
UC5282 REFERENCE GUIDE
Memory Map
Address Range
0x00000000
0x00000400
0x00040000
0x00040400
0x10000000
0xf0000000
0xf0020000
0x000003ff
0x0003ffff
0x000403ff
0x00ffffff
0x103fffff
0xf001ffff
0xf003ffff
© 2004 ARCTURUS NETWORKS INC
Function
Interrupt vectors in RAM
uCbootstrap code and data
Operating system interrupt vectors
Operating system code and data
4M External Flash (user programmable)
bootloader in internal flash
bootloader environment variables in internal
flash
- 15 -
UC5282 REFERENCE GUIDE
PART II – About The Board Support Package
About the CD ROM
The Software CD included with this kit contains complete development environment for Linux
tailored with all the tools and source code specific to the uCdimm ColdFire 5282 microcontroller,
including a full ANSI-compliant GNU C tool chain. To make installation easier, the CD includes
binaries and source code for the toolchain, uClinux kernel and user applications. All the software
needed to develop for Linux from a Linux workstation is included.
System Requirements
The development environment requires a Linux host machine as the development workstation.
Binaries of the compilers, tools and libraries are provided on the Linux CD for libc6 x86 based
machines.
®
NOTE: It is possible to use a virtual machine either to run Linux on top of windows or
®
see VMware (www.vmware.com) for more information.
Binary distribution system requirements
• CD-ROM drive
• x86 Linux
• 64 MB RAM 128 MB recommended.
• 1 free serial port
• 10BaseT Ethernet (minimum)
®
Notice to Windows Users
While you must have a Linux-based workstation to modify and build code for the uCdimm board,
it is possible to use Windows-based machines as "dumb terminals" to allow interaction with the
evaluation board. This section provides details on setting up the HyperTerminal program to allow
such use.
Hyperterminal (windows 95, 98 or NT) Setup
Hyperterminal is a Windows utility program for serial port communications. It should be noted
that the development environment is required to be Linux and though Hyperterminal can be used
to connect to the console port of the target board, Windows is not suitable as a host development
environment. For information on configuring Hyperterminal refer to Windows documentation.
The following settings are required.
BPS:
9600 (default)
Databits:
8
Parity:
None
Stop Bits:
1
Flow Control: None
Echo Locally: checked
© 2004 ARCTURUS NETWORKS INC
- 16 -
UC5282 REFERENCE GUIDE
PART III – uClinux Development Environment
Introduction
The BSP resident operating system is based on embedded Linux. The version of embedded
Linux provided, is much like standard Linux, only it has been optimized for an embedded
environment and to operate on a device without relying on hardware memory management. This
includes the cross-compilation tool chain specific for the ColdFire architecture. This section is
intended for those familiar with the C programming language and the Linux Operating System,
and who need to become familiar with specifics of the uClinux Board Support Package.
uClinux versus Linux
The important consideration when comparing Linux to uClinux is primarily application. Typically
Linux is thought of as a server operating system running in on an X86 based machine replete with
memory and storage. Linux however, has gained a formidable reputation within the embedded
community, thus capitalizing on some of the robustness, features and functions found in Linux
and reducing the size to become practical for an embedded environment. Enter uClinux, uClinux
takes this strategy one-step further by providing a Linux environment for low-cost microcontroller
devices. These devices are typically not x86 architecture and many do not include memory
management hardware (an MMU). This class of device is the purview of uClinux, typically
capable of deployment in under 4MB of Flash and 8MB of SDRAM.
Considering that the absence of MMU support in uClinux constitutes a fundamental difference
from mainstream Linux, surprisingly little kernel and user space software is affected. Developers
familiar with Linux will notice little difference working under uClinux and will already be familiar
with some of the issues specific to uClinux. This being said, the lack of memory management
hardware on uClinux target processors has prompted some changes to the Linux system
interface. Perhaps the greatest difference is the absence of the fork() and brk() system calls.A call
to fork() clones a process to create a child. Under Linux, fork() is implemented using
copy_on_write pages. Without an MMU, uClinux cannot completely and reliably clone a process,
nor does it have access to copy-on-write.
More Detailed information is available from Arcturus in a white paper available for download form
the website.
An Overview of the Development Environment
In broad terms, a development environment consists of three elements:
•
•
•
Target hardware and associated, device-resident, software
Development workstation
Interconnection between these two machines
Target Hardware
The target hardware, must have at least the following functional subsystems:
•
•
•
•
One Ethernet port
Serial port (ttyS0)
uCbootloader
A resident OS (in this case uClinux)
© 2004 ARCTURUS NETWORKS INC
- 17 -
UC5282 REFERENCE GUIDE
Development Workstation
The second element of the development environment is a development workstation, also referred
to as the Host Machine. As a development environment, the development workstation must be a
Linux-based machine that can connect to and communicate with the Target Hardware.
Minimally, such a machine should include:
• Available serial port
• Terminal emulator software (minicom is included in most Linux distributions)
• Ethernet card
• CD ROM drive
Thus, the development workstation is a rather typical Linux machine. The CD ROM is needed to
access the Linux Firmware Distribution, which is provided on CD. This CD contains the
development tool chains (consisting of a cross compilation tool set and related utility programs). It
is of particular interest that both the target and development workstation OS is Linux, despite the
different CPUs. Of course, the target OS is a very special version of Linux, optimized for
microcontrollers.
However, the common Linux underpinnings can provide a consistent
development and target environment, thus reducing the learning curve, and simplifying
application development. Embedded Linux is quite unique in this regards; while some RTOS and
desktop operating systems provide “simulators”, there are no known or widely available boxes
that offer the development consistency of Linux and embedded Linux.
Interconnection Between Target and Development Systems
The third element of the development environment is the interconnection between the workstation
and the target. There are potentially two such connections:
• Console serial port (default configuration)
• Ethernet connection
The workstation must include a terminal emulator program; for the purpose of this document it is
assumed that the popular ‘minicom’ program is the terminal emulator program being used. When
power is applied, the MCF5282 starts the 'Bootloader', (uCbootloader) which configures and
initializes the board, decompresses the OS, and, if configured to do so, starts the OS.
uCbootloader is essentially a sophisticated system monitor with a command line user interface.
uCbootloader also has a defined API which responds to various program calls. Among the
commands available prior to booting the OS are:
•
•
•
•
A command to download a new Linux image from the workstation to the target
A command to write the RAM image into Flash ROM
A command to boot the Linux image in the Flash ROM
An alternative command to boot an image in RAM
In summary, the workstation issues commands to the Bootloader and, once Linux boots, the
workstation becomes the Linux terminal. During, or subsequent to, the Linux boot, the Ethernet
connection is enabled. This allows an appropriate directory on the workstation to be mounted via
NFS, integrating that area with the Linux file hierarchy on the target device. This provides a
convenient way to upload new code to the target from the workstation, instead of the relatively
slow serial connection. flashloader, a special Linux command, can then be used to load an
image file into target memory and then write that image into Flash ROM (using the bootloader
commands provided for this purpose). Then, flashloader will re-boot the system with the
new OS image.
© 2004 ARCTURUS NETWORKS INC
- 18 -
UC5282 REFERENCE GUIDE
In comparing the convenience of Ethernet to serial, remember that a usable Ethernet connection
between target and workstation does not exist until after Linux boots. If the Linux bootup fails (for
example, if the loaded OS image is incorrect), the serial connection must be used to transfer a
new image. Recall that the bootloader has a command to boot a Flash ROM image, and another
to boot an image in RAM. These are mutually exclusive, but together they provide the ability to
test code via an NFS mounted partition from your Linux workstation, to simplify testing.
An Overview of the Development Process
The developer uses the Linux workstation for the design and implementation of the embedded
application. The usual resources of a Linux workstation are available including the X Window
System and familiar editors such as emacs, vi, or nedit and so on. Once the source code for the
application is ready for testing, it is compiled, incorporated into a Linux image, and transferred to
the target device RAM, either by serial upload or via the flashloader command which relies on
an NFS mounted directory. Once the image is loaded into the device RAM, it can be run from
RAM or loaded into the Flash ROM and then executed. It should be noted that an image built to
run from RAM is different from one to be run from Flash ROM. If you are using RAM-based
loading to test code, it is necessary to ‘fixate’ the code for Flash before loading it.
© 2004 ARCTURUS NETWORKS INC
- 19 -
UC5282 REFERENCE GUIDE
Configuring The Development Environment
Introduction
Upon getting a system, there is a natural desire to begin operating it immediately despite not
understanding all the relevant details. This section is designed to provide the basic installation
instruction of a standard development environment with more thorough understanding and details
in the following sections.
Configuring the Linux Workstation -Installing the tool chains
It is assumed that the Linux workstation already has a current Linux distribution already up and
running. Linux workstation installation is well documented and as such will not be discussed in
this document. Once the workstation is properly configured with an appropriate Linux distribution,
the Linux tool chains must be installed from the uClinux Software Distribution CD. The tool chains
can be installed as binaries or built from source, this section will discuss installing the binaries.
Become root and:
• mount the Linux CD, e.g. 'mount -t iso9660 /dev/cdrom /mnt/cdrom'
• change into the installation source file directory, e.g. 'cd /mnt/cdrom/
As root, and from the root directory, install the toolchain:
make
This installs the kernel, toolchain and userland to /opt/uClinux-m68k-elf.
localhost:/opt/uClinux-m68k-elf # ls
Setting Up the uClinux Environment
As a non-privileged user: Put /opt/uClinux-m68k-elf/bin in your path to use the installed
toolchain.
© 2004 ARCTURUS NETWORKS INC
- 20 -
UC5282 REFERENCE GUIDE
To insert the toolchain to your path (note that root privilege is not required to build the
distribution):
$ export PATH=/opt/uClinux-m68k-elf/bin:$PATH
Install the kernel and distribution sources to a workspace of your choosing:
$ cd ~; mkdir uClinux-workspace; cd uClinux-workspace
$ buildenv
Link the kernel source into the distribution:
$ cd uClinux-dist
Building the distribution:
Configure the distribution:
$ make clean
$ make menuconfig
Choose "Target Platform Selection"
Choose Arcturus for Vendor and the uC5282 for the product. At this point, you may also opt to
change elements of kernel configuration or userland componentry.
Finally exit and save the configuration
Building the distribution:
$ make dep
$ make
This will rebuild the kernel, the selected set of userland programs, and build a flash loadable
image.
The resulting image.cramfs in the images/ directory can be uploaded using the uCbootloader
"rx" xmodem function, programmed into flash, and run, or programmed via a mounted NFS
partition using the flashloader program.
Looking at the contents of the example directory /home/my_username/uClinux-workspace:
uClinux-2.4.x uClinux-dist
uClinux-2.4.x/ contains the uClinux kernel source tree, and uClinux-dist/ contains the
sources for the userland applications, libraries, and the build configuration and environment.
Examining elements of interest under uClinux-dist/ in a bit more detail:
Makefile
The root makefile for uClinux-dist. It is used to configure both the uClinux kernel and
userland components, to build the dependency graph, and finally to build all sources
create a bootable root filesystem image to be programmed into the uCdimm's flash
memory.
© 2004 ARCTURUS NETWORKS INC
- 21 -
UC5282 REFERENCE GUIDE
config, tools
Directories containing configuration menus and accompanying menu configuration, build,
and installation tools.
linux-2.4.x
A link to ../uClinux-2.4.x, the uClinux kernel sources.
uClibc
The C library used by default for uClinux on the ColdFire.
user
Directory containing source code for the user programs, from terminal server and login
shell, to network tools and daemons.
vendors
The vendors/ directory contains directories arranged by vendor/product, containing
Makefiles and template files for platform specific filesystem image creation.
romfs
This directory is created during the build process. It contains an image of the complete
root filesystem that will be installed into flash memory on the uCdimm target hardware.
bin
dev
etc
home
lib
@linux.bin
mnt
proc
tmp
usr
var
images
This directory contains the binary images of the make process. This image is either
destined for Flash ROM or to be run from RAM. Your embedded projects will involve
code that will be incorporated into this image. Later we will see how this can be
transferred to the target.
Reconfiguring your Build Using “make menuconfig”
To reconfigure your default build follow the steps below from your top level working directory :
/home/my_username/uClinux-workspace/uClinux-dist
make clean
The make clean process removes previously compiled binaries and objects.
make menuconfig
The make menuconfig invokes the curses based configuration tool that allows you to change the
default configuration of your build.
make dep
The make dep command creates the dependencies required for the build mechanism to ensure
associated components will be installed properly. Finally to begin the build process enter the
make command:
make
The final product of the build will reside in images/image.cramfs
© 2004 ARCTURUS NETWORKS INC
- 22 -
UC5282 REFERENCE GUIDE
Configuring the Target
Once the serial and Ethernet cables have been connected from the Platform to the workstation,
you can power up the target device.
The Console Serial Connection
The connecting cable between the Linux workstation and the platform should have a connector at
one end to fit the workstation (this typically means the cable at this end needs a female DB9
connector) while the cable terminator at the device end should connect to the required UART
connection on the platform.
The Ethernet Connection
The connecting cable from the workstation to the Platform should be a standard category 5
Ethernet cable, terminating in standard RJ-45 male Ethernet connectors. It is important to keep
in mind the different purposes and capabilities of the specific Ethernet connections.
If you are connecting your workstation's Ethernet card directly to platform it is important to note
that the Ethernet controller is not capable of sensing and adjusting for a direct machine-tomachine connection. Therefore a cross-over cable or intervening hub/router connection will be
required.
© 2004 ARCTURUS NETWORKS INC
- 23 -
UC5282 REFERENCE GUIDE
Setting up your Workstation to connect to the target
The serial console, ttyS0 terminates in DB-9 style male serial connector labeled UART, which
connects to the UART0 serial console controller. It is used by default as the console port for both
the Bootloader as well as uClinux. It may be configured to operate at a wide variety of bit rates,
word lengths, stop bits and parity settings.
When powered up, the target boots into the bootloader program, sends initial display information
and is ready to accept simple commands from its terminal. Of course, the Linux workstation,
running minicom or the equivalent, is that terminal. By default the device sends information out
the console port at 9600 bps, 8 data bits, no parity, and one stop bit. For our purposes here, we
will assume minicom is the terminal emulator program being used.
Make sure your development machine has the correct permissions to allow access to the serial
port connected to the target and ensure the NFS server is configured to export your working
environment.
Getting the Serial Connection Up and Running
Serial ports under Linux are accessed as the files /dev/ttySn where n is a number starting at
0; that is, /dev/ttyS0 is COM1, /dev/ttyS1 is COM2 and so on. Ensure the permissions
of the device you’ll be using to talk to the target are set so normal users can access it. You will
also need a terminal emulator. We suggest you try minicom for your terminal program. man
minicom will display its user manual. There are other terminal emulators available in Linux;
however, we find minicom to be the easiest to use. Before you can use minicom as a normal
user, you need to configure it as root for each serial line you will be using. Assuming your target
will be connected to the console serial port, /dev/ttyS0, the following commands will set the
permissions and let you create a minicom configuration for root and non-root users.
# chmod oug+rwx /var/lock
# chmod oug+rw /dev/ttyS0
# minicom -o ttyS0
If you have just installed your Linux system you may need to configure minicom for the first time.
Enter the following command for initial setup.
minicom -s
When minicom starts up, you will need to set a number of options. To set up minicom on your
Linux workstation, invoke it as root by entering minicom at the command line. Enter ctrl-a
followed by z (do not hold the ctrl key when you press the z) to get the "Minicom Command
Summary" screen. This is configurable and can also be <Alt-z> or <esc><z>. Choose
"cOnfigure Minicom" by entering the letter o. This opens a sub menu where you must do the
following:
A. Choose the Serial port setup and within that choice:
• select your Serial Device (e.g. /dev/ttyS0)
• next set your Bps/Par/Bits as 9600 8N1
• finally say no (N) to both Hardware and Software Flow Control
B. Choose Modem and dialing and within that choice
• remove the Init string
• remove the Reset string
© 2004 ARCTURUS NETWORKS INC
- 24 -
UC5282 REFERENCE GUIDE
C. Choose Save setup as
and save under some name (let's say ksmin). When you next start minicom, as a user, (rather
than as root) start by entering minicom ksmin at the command line. You can exit minicom now
(from the "Minicom Command Summary" screen). Then you might check the permissions of the
serial port device chosen to assure that you have access as a user. Now restart minicom as a
user e.g. minicom ksmin and press the reset button on the target device. You should see a
something like this:
The B$ prompt indicates the Bootloader has initialized hardware and is waiting for a command. At
the prompt, enter help to see a list of commands to which the bootloader program responds. If
this all works as indicated, the serial connection is established and the device has successfully
booted the bootloader program.
Booting uClinux
From the bootloader's B$ prompt, one of the commands available is ‘go’, which will execute the
OS image in the Flash ROM. As shipped, the platform has a version of Linux factory installed and
tested, which will boot up. Type the ‘go’ command and Linux boots and ultimately presents a
login screen. Choose a login name (the system as shipped doesn't care about the name) and
enter as the password, uClinux (note the capitalization).
Uploading a new OS image via TFTP
If an ethernet connection is available to the target, the fastest method of transmitting software to
board is via tftp, the trivial file transmission protocol. uCbootstrap. Give the target an IP address,
for example:
B$ setenv IPADDR0 192.168.100.1
© 2004 ARCTURUS NETWORKS INC
- 25 -
UC5282 REFERENCE GUIDE
Then run the bootloader's TFTP server:
B$ tftp
uCTFTP Console 1.0 is running ...
IPADDRESS is 192.168.100.1
From the workstation on which the desired image resides, use the tftp client to make a connection
and transmit the image:
my_username@localhost:~/my_work/uClinux-dist/images>
192.168.100.1
tftp> verbose
Verbose mode on.
tftp> binary
mode set to octet
tftp> put image.cramfs
putting image.cramfs to 192.168.100.1:image.cramfs [octet]
Sent 1138688 bytes in 7.7 seconds [1183052 bits/sec]
tftp> q
tftp
On the target, hit <Escape> to terminate the TFTP server. At this point, you may program the
image into flash memory.
Uploading a new OS image via the Serial Connection
Although it is more efficient to transfer an image via Ethernet, the serial method may be
necessary in cases where the Ethernet connection is not available. In such a situation, a serial
upload is necessary. Serial uploads can be invoked to the devices RAM at one of two speeds
9600 bps(slow), or 115200bps (fast).
slow
• At the B$ prompt type rx,
B$ rx
• Press ctrl-a and then z to enter the "Minicom Command Summary" screen
• Choose s for Send files, then as prompted choose the xmodem for upload protocol
• Next you'll be prompted for the filename so choose your directory containing the file,
press CR, and enter the file name as prompted. The screen will show the progress of the file
transfer and prompt you when finished.
Take Note:
It is likely that these steps will take too long, the first try, and the device’s
bootloader will time-out and terminate the transfer prior to completion.
Re-attempt the process.
fast
• At the B$ prompt, type fast,
B$ fast
•
•
•
•
Press ctrl-a and then z to enter the "Minicom Command Summary" screen
Choose p for comm Parameters and change to 115200bps
Press CR upon returning from the "Minicom Command Summary" screen
At the B$ prompt, type rx
B$ rx
© 2004 ARCTURUS NETWORKS INC
- 26 -
UC5282 REFERENCE GUIDE
• Press ctrl-a and then z to enter the "Minicom Command Summary" screen
• Choose ‘s’ for Send files, then as prompted choose the xmodem for upload
protocol
• Next you'll be prompted for the filename, so choose your directory containing
the file, press CR, and enter the file name as prompted. The screen will show the progress of the
file transfer and prompt you when finished.
Take note:
Some Linux distributions don’t have the XMODEM protocol program set
up properly. Change directory to /usr/bin and look for the files sx,
rx, sz and rz. If sx or rx are missing, make a symbolic link for it (or
them) to the appropriate program(s). eg,
ln -sf /usr/bin/rz /usr/bin/rx
ln -sf /usr/bin/sz /usr/bin/sx
On certain Linux distributions, sx is not an XMODEM protocol program. If this is the case, set
minicom to use ‘sz -X’ for XMODEM protocol.
Writing The Newly Uploaded Image to Flash
To move the newly uploaded image to Flash ROM, use the program command:
B$ program
This command will write the image in RAM to the Flash ROM. It first erases an appropriate area
starting at : 0x10000000
Once that has completed you can run the Flash ROM image via the bootloader command ‘go’.
B$ go
© 2004 ARCTURUS NETWORKS INC
- 27 -
UC5282 REFERENCE GUIDE
Getting the Ethernet Connection Up and Running
The Linux boot process, toward the very end, executes the shell script /etc/rc. You can look at
the default script in your work area at rootfs/etc/rc. The script sets up the device’s network
parameters as follows:
ETH0
•
•
•
•
•
IP address = 192.168.0.200
network mask = 255.255.255.0
network address = 192.168.1.0
gateway address = 192.168.1.100
interface type = eth0
The above defaults may be overridden using standard variable definitions in the bootloader
environment. The IPADDR0 variable overrides the default built in to /etc/rc, for example:
B$ setenv IPADDR0 192.168.1.2
or even:
B$ setenv IPADDR0 dhcp
The variable GATEWAY may also be set (note that DHCP servers also usually specify a default
gateway, making the GATEWAY variable unnecessary). For more bootloader environment
variables and their use in the startup process, please refer to /etc/rc, below.
The uClinux Boot Process
When the Linux kernel boots up, it executes the program /sbin/init This program first
executes the shell script /etc/rc to finish the process of bringing up the system. Here is the
default Linux /etc/rc:
#!/bin/sh
# system startup.
mount -t ramfs none /var
# Building the read write directories
mkdir /var/tmp
mkdir /var/usr
mkdir /var/run
mkdir /var/conf
touch /var/tmp/profile
# Import uCbootloader environment variables we need
printbenv -q -e HOSTNAME > /etc/profile
printbenv -q -e IPADDR0 >> /etc/profile
printbenv -q -e GATEWAY >> /etc/profile
printbenv -q -e NFSMOUNT >> /etc/profile
printbenv -q -e RCLOCAL >> /etc/profile
. /etc/profile
touch /var/tmp/resolv.conf
mkdir /var/tmp/dhcpc
echo Mounting proc file system ...
mount -t proc proc /proc
# set up the hostname
if [ "$HOSTNAME" != "(null)" ]; then
© 2004 ARCTURUS NETWORKS INC
- 28 -
UC5282 REFERENCE GUIDE
hostname $HOSTNAME
else
hostname uC5282
fi
echo Configuring local network loopback
ifconfig lo inet 127.0.0.1 netmask 255.0.0.0
if [ "$IPADDR0" != "(null)" ]; then
if [ "$IPADDR0" = "dhcp" ]; then
echo Configuring IP address for eth0 using DHCP
dhcpcd eth0 &
echo Waiting for dhcp lease...
while [ ! -f /etc/dhcpc/dhcpcd-eth0.info ]; do
sleep 1
done
else
echo Configuring stored IP address $IPADDR0 on eth0
ifconfig eth0 inet $IPADDR0
fi
else
echo Configuring **default** IP address 192.168.1.200 on
eth0
ifconfig eth0 inet 192.168.1.200 netmask 255.255.255.0
fi
# setup default routing through gateway
if [ "$GATEWAY" != "(null)" ]; then
echo Adding default route via $GATEWAY
route add -net default gw $GATEWAY
fi
if [ "$NFSMOUNT" != "(null)" ]; then
echo NFS mounting $NFSMOUNT
portmap &
mount $NFSMOUNT
fi
if [ "$RCLOCAL" != "(null)" ]; then
if [ -x $RCLOCAL ]; then
echo Running $RCLOCAL
$RCLOCAL
fi
fi
# clear BOOT_CYCLE upon successful startup:
setbenv BOOT_CYCLE
exit 0
After /etc/rc exits, init starts up the programs listed in /etc/inittab. init “hooks up” the
standard input, output and error to the terminal line listed and sets the bps rate before the
program is exec()’d. In this case, the serial line ttyS0 is set up for 9600bps and the program
/sbin/agetty is run (/etc/agetty presents a login prompt).
The process list that is spawned by init is specified in /etc/inittab, reproduced below. A login
screen and terminal session are started on ttyS0, the first serial port, and the internet daemon,
inetd, is started with no controlling terminal:
ttyS0:vt100:/bin/agetty ttyS0 9600
inet:unknown:/bin/inetd
© 2004 ARCTURUS NETWORKS INC
- 29 -
UC5282 REFERENCE GUIDE
PART IV – The Bootloader
Description
Whether embedded device, PC, or mainframe computer the startup process is known as the
booting stage. Embedded devices, however, can have some special requirements The
Bootloader (uCbootloader) serves the same function as the BIOS or Boot PROM in your PC or
workstation, except it resides physically on the same Flash ROM as the Linux OS and Filesystem
and is much more flexible. The Bootloader includes a command line interface and the ability to
define and use environment variables, enter commands and start more copies of a Bootloader
shell. It initializes the hardware to a known state, tests the attached devices and can pass control
to the operating system.
The Bootloader also “hooks” (attaches itself to) exception vectors and attempts to recover from
unexpected events during the boot process. Lastly, uCbootloader hooks the Undefined
Instruction Interrupt vector to provide system calls for managing the Flash ROM,
reading and writing environment variables and other functions.
The Board Support Package defaults into the Bootloader shell at system reboot. The shell is an
interface where you can enter commands to change the boot process if you wish; or, you can let
the Bootloader automatically start the device.
Understanding Bootloader Flash Sector Console Descriptions
The console output from the Bootloader shows the type of Flash device found, and lists the
sectors on the device in the following format.
DP|004000
004000
P
D
This sector ends at offset 0x004000 from the beginning of the Flash device
Indicates sector is write Protected.
Indicates sector is Dirty -not completely erased. All sectors are considered dirty
unless completely erased.
Take Note:
© 2004 ARCTURUS NETWORKS INC
A “dirty” sector is any non-blank sector on the Flash
Device; It may well be that it contains desirable code or
data
- 30 -
UC5282 REFERENCE GUIDE
Bootloader Command Line User Interface
The Bootloader provides a command line interface to facilitate interaction with the device from
outside an OS. The commands available are described here. Optional parameters are in square
brackets [ ].
sh
Recursively invokes a new bootloader shell.
exit
Exits from the current bootloader shell. If the shell was invoked
as a response to an exception, the bootloader attempts to
return from the exception and continue execution. If there is
nothing to return to, a new shell is spawned automatically.
help
Prints a list of bootloader commands.
printenv [name]
Displays the environment variables if permissions allow. If no
arguments are specified, printenv prints all environment
variables allowed by permissions.
If name is specified,
printenv displays only the value of the variable with that
name.
setenv name [value]
Sets the environment variable with name name to the value
value if value is specified. If value is not specified, the
variable with name name is erased. Permissions are checked
prior to erasing existing variables, and new variables are
created with the current protection mask.
eraseenv
Erases the Flash block containing user modifiable environment
variables without regard to permissions. It should be pointed
out that unlike other types of memory devices, Flash devices
are subject to finite number or writes. This life expectancy
should be taken into consideration when programming the
device.
pmask [bsu+-rw]
Sets or displays the current environment variable protection
mask. Permissions are individually modifiable for u (user), s
(supervisor) and b (bootloader) protection domains.
+ adds permissions
© 2004 ARCTURUS NETWORKS INC
- 31 -
UC5282 REFERENCE GUIDE
- removes them
r allows reads of a given variable
w allows its contents to be modified or erased
in the future.
eg.
pmask
Print the current protection mask.
pmask r Add read permission to all domains.
pmask –r Remove read permission from all
domains.
pmask bu+rw
Add read and write permission to
bootloader and user
rx
Receives a binary image, through the console port, using the
XMODEM protocol. The new image is stored in SDRAM
starting an address offset by 0x40000. After receiving, the
image may be burned into Flash with the program command,
or executed in RAM with the goram command.
Program
Erases the Flash ROM starting at an address of 0x10000000
(the OS area) and writes the image currently in RAM (received
with the rx command) into it.
Verify
Verifies the image in RAM matches the contents of the Flash
ROM’s OS area.
go [-f] [hex_addr]
Take note: The commands go and goram
assume that the first four bytes of
the image contain the stack pointer
address and subsequent four bytes
contain the address of the program
counter.
The bootloader then
transfers control over to this
location.
Checks for file type and executes the OS
image from Flash ROM. [-f] copies the
image from Flash into RAM beginning at
0x00040000 and then attempts to execute the
RAM image
[hex_addr] instructs the bootloader to begin
executing from the specified memory location.
goram
Take note: The commands go and goram
assume that the first four bytes of
the image contain the initial stack
pointer
initial
address
and
subsequent four bytes contain the
address of the program counter.
© 2004 ARCTURUS NETWORKS INC
Executes the RAM image.
- 32 -
UC5282 REFERENCE GUIDE
The bootloader then transfers
control over to the program counter
location.
fast
Change the serial speed to 115200bps.
uploading a large OS image via XMODEM.
Useful before
slow
Change the serial speed to 9600bps.
speed<baudrate>
change the serial speed acceptable [baudrate] values are
1200, 2400, 4800, 9600, 19200, 38400 or 57600 and 115200.
md address [endaddress]
Display a hexdump and ASCII dump of the module’s memory
starting at address. If endaddress is specified, memory is
displayed up to endaddress, otherwise 16 bytes will be
displayed.
mm <hex_addr> <hex_values>
Take note: Warning! this
command, if used
improperly, can
crash the device.
Write, a byte at a time, the values listed in <hex_values> into
consecutive memory locations starting at <hex_addr>.
eg
mm 00040000 123456
Write the values 0x12, 0x34
0x00040000-0x00040002
and 0x56
to locations
envmm
Take note: Incorrect values in
the envmm
environment
variables can
crash the module.
Read the environment variable pairs of the form
address=values and write, a byte at a time values into
consecutive memory locations stating at address.
eg
setenv >00020000 123456
envmm Write the values 0x12, 0x34 and 0x56 to locations
0x00020000-0x00020002
cat <filename>
Display the contents of file filename from the cramfs
filesystem. This command will return an error message if the
Flash memory does not contain a valid cramfs superblock, the
file does not exist, or the file is actually a directory.
© 2004 ARCTURUS NETWORKS INC
- 33 -
UC5282 REFERENCE GUIDE
ls [filename]
Take note:
due to space limitations, there
are none of the usual "ls"
command-line options.
Produce a directory listing of the files in cramfs;
if filename is specified, list only that file's
directory entry. This command returns an error
message if the Flash memory does not contain
a valid cramfs superblock, or the user-specified
file doesn't exist.
Bootloader Special Environment Variables
These environment variables affect the operation or bootup sequence of the module.
FACTORY
The Arcturus Networks copyright string for the design.
REVISION
The hardware revision number of the device
HWADDRn
The hardware address of network interface n. n Since the
5282 has a singe network interface the default value is 0 for
the 10/100 Ethernet Controller.
SERIAL
The serial number of this device.
CONSOLE
Specifies the console device. If CONSOLE is ttyS0 or yes,
the serial port is initialized to 9600,8,N,1 and used as the
console (this is the default).
Otherwise, no console if
configured. If the bootloader requires operator input, the
console is initialized regardless of the value of CONSOLE.
© 2004 ARCTURUS NETWORKS INC
- 34 -
UC5282 REFERENCE GUIDE
AUTOBOOT
If AUTOBOOT is a number, the bootloader will pass control to
the OS image after the specified number of seconds has
passed without waiting for a character from the console at
bootup. If AUTOBOOT is yes AND AUTOKEY is properly set,
the module boots into the OS with no delay. All other values
for AUTOBOOT generate error messages.
RAMIMAGE
If RAMIMAGE is set to yes the bootloader will automatically
copy the Flash image into RAM beginning at an offset
0x40000 and execute from this location
AUTOKEY
If set to iknowmyimageworks, and if AUTOBOOT is set to yes,
the module will boot directly into the OS Flash image.
ENVMM
Take note: Warning when AUTOBOOT and
AUTOKEY are set to boot into
the OS with no delay, there is
NO method to reprogram the
Flash should the OS image
prove faulty, leaving the module
unbootable.
If this variable is set to auto, the envmm
command is run at bootup.
Take note: Warning: test your envmm
instructions first by manually
running the envmm command
and verifying that the results are
as you expect before setting
ENVMM to auto. If one of the >
environment
variables
hard
crashes the module, there is no
way to erase it, leaving the
module unbootable if ENVMM is
set.
CACHE
If CACHE is set to ON, cache on the microcontroller is enabled.
If CACHE is set to OFF, cache on the microcontroller is
disabled.
KERNEL
KERNEL defaults to 0:linux.bin, which tells the bootloader
© 2004 ARCTURUS NETWORKS INC
- 35 -
UC5282 REFERENCE GUIDE
to load the file linux.bin from the first image in flash
KERNEL_ARGS
KERNEL_ARGS defaults to "root=/dev/rom0", instructing
the uClinux kernel to mount /dev/rom0, the block device
created out of the user flash area by the blkmem driver.
KERNEL_ARGS could be used to, for example, tell the kernel
to boot from a bootp server or a root filesystem on nfs.
_0
_0 is a special variable used internally to the bootloader to
define the region of flash memory accessible to the user in the
format:
start address (hex):length (hex):properties
Bootloader variables used by default /etc/rc script:
HOSTNAME
Used in /etc/rc to set the hostname of the device
IPADDR0
If set to an IP address in dotted quad notation (eg
192.168.1.200), /etc/rc will set the IP address of the
ethernet interface directly. If set to the keyword "dhcp", it will
run dhcpcd to acquire an IP address (along with any provided
gateway and DNS server information) from a dhcp server
on the local network.
GATEWAY
If the uCdimm must be able to communicate with hosts outside
of the current network segment, set this to the IP address of
the default gateway. Note that if you are using DHCP, this will
likely be redundant.
NFSMOUNT
/etc/rc will optionally automatically mount an NFS volume
on startup if NFSMOUNT is set to the source and mount point,
© 2004 ARCTURUS NETWORKS INC
- 36 -
UC5282 REFERENCE GUIDE
for example: "192.168.1.3:/tftpboot /mnt". Be aware
that IPADDR0, and possibly GATEWAY, must be set up
correctly otherwise /etc/rc startup will stall at this point, and
only time out after a long period.
RCLOCAL
/etc/rc will also optionally execute a localizing script
(similarly to rc.local on some linux distributions). This script
may be located, for example, on the automatically mounted
NFS volume eg. "/mnt/rc.local"
© 2004 ARCTURUS NETWORKS INC
- 37 -
UC5282 REFERENCE GUIDE
Writing an OS Image into Flash ROM from the bootloader
Boot the module to the B$ prompt. If you have selected an AUTOBOOT timeout, press the <esc>
key on the console terminal within the time specified.
You can change the speed of the console port to 115200bps before uploading, if you choose, by
using the fast command at the B$ prompt.
B$ fast
At the B$ prompt, type rx and start the XMODEM upload function of your terminal emulator.
Send the OS binary image you wish to program into the module. When complete, type program.
The new OS image is now programmed into Flash ROM.
Bootloader API
The uCbootstrap API is accessed through the UNDEFINED INSTRUCTION INTERRUPT.
The function number is passed in CPU register d0
The function arguments are passed in registers d1-d5
The return value is passed in register d0. If the system call has failed and the absolute value of
d0 is the error number as enumerated in booterr.h
See bootstd.h for macros that facilitate making bootloader system calls from C. Some
functions listed are deprecated, only for testing purposes or are stubbed out. Only functions
recommended for use are listed here.
void reset(int flags);
Reset the module. If flags has the value PGM_EXEC_AFTER,
the OS is automatically started after reset.
void program(mnode_t * chain, int flags);
Program the new OS image pointed to by chain
Into the OS Flash area. Flags contain the bitwise OR of a
combination of
PGM_ERASE_FIRST
PGM_EXEC_AFTER
PGM_RESET_AFTER
PGM_HALT_AFTER
If flags contains PGM_ERASE_FIRST The memory to be written
will first be erased.
If flags contains PGM_EXEC_AFTER, the new OS image just
written to Flash will be started.
If flags contains
PGM_RESET_AFTER, the module will do a full reset after the
image is programmed. if flags contains PGM_HALT_AFTER the
module will go into low power stop after the image is
programmed.
© 2004 ARCTURUS NETWORKS INC
- 38 -
UC5282 REFERENCE GUIDE
If
flags
contains
none
of
PGM_EXEC_AFTER,
PGM_RESET_AFTER, PGM_HALT_AFTER, this system call
returns after the image is programmed.
unsigned char *gethwaddr(int iface);
Returns a pointer to the MAC address of the interface number
iface. iface should always be 0 or 1. The MAC address
pointed to is in binary format.
char *getserialnum();
Returns a pointer to a string containing the serial number of this
module.
char *getbenv(char *var);
Looks up the value of the bootloader environment variable with
the name pointed to by var. Returns a pointer to a string
containing the value of the variable or 0 if no environment
variable with the correct permissions is found. This function
checks the permissions.
int setbenv(char *pair);
Writes an environment variable pointed to by pair in the form
NAME=value. If pair is of the form NAME, the environment
variable with name NAME will be erased. This function checks
permissions.
int setpmask(unsigned short pmask);
Sets the protection mask to the value pmask. pmask is the
bitwise OR of the protection permissions listed in env.h
char *readenv(int fcn);
Reads environment variables in order.
If fcn is 0,
readenv() returns a pointer to the name of the first stored
environment variable. If fcn is 1, readenv() returns a pointer
to the name of the next stored environment variable. If
readenv() is 2, a pointer to the value of the current
environment variable is returned.
This function checks
permissions.
int flash_chattr_range( unsigned short,
*flashprt
int start,
int end,
char andmask,
char orfield);
Changes the bootloader protection for a range of locations in
the Flash device at base address flashptr.
start and end are byte offsets. andmask is the bitwise OR
of the protection values listed in flash.h and is bitwise
ANDed with the present value to form the final value. orfield
is the the bitwise OR of the protection values listed in flash.h
and is ORed with the present value to form the final value.
returns 0 on success.
int flash_erase_range(
int start,
int end);
© 2004 ARCTURUS NETWORKS INC
volatile unsigned short *flashptr,
- 39 -
UC5282 REFERENCE GUIDE
If permissions allow, this function erases the range of locations
from offset start to offset end in the Flash device pointed to
by flashptr. Returns 0 on success.
int flash_write_range(
mnode_t *chain,
int offset);
volatile unsigned short *flashptr,
If permissions allow, programs the Flash device pointed to by
flashptr, starting at offset from the beginning of the
device with the image contained in mnode chain chain.
© 2004 ARCTURUS NETWORKS INC
- 40 -
UC5282 REFERENCE GUIDE
PART V – Linux Command Reference
Embedded Linux contains many of the commands found in workstation Linux. Some additional
commands, or replacements for missing commands are provided. A few of these are
documented here.
Command Reference
flashloader
ramloader
ifconfig
Flash image writer.
usage: flashloader [-d] imagefile
Loads imagefile into memory and transfers to the bootloader to
write into the OS area of the Flash. After the OS image is written
to Flash, it is started.
-d causes debugging information to be displayed
RAM image writer.
usage: ramloader [-d] imagefile
Loads imagefile into memory and hands it to the bootloader to
write into the OS area of the RAM. After the OS image is written
to RAM, it is started. -d causes debugging information to be
displayed.
Configures a network interface.
usage: ifconfig [-a] [-i] [-v] <interface> [[<AF>]
<address>][add
<address>[/<prefixlen>]][del
<address>[/<prefixlen>]][[-]broadcast
[<address>]]
[[-]pointopoint
[<address>]][netmask
<address>]
[dstaddr
<address>]
[tunnel <address>][outfill <NN>]
[keepalive <NN>][hw <HW> <address>]
[metric
<NN>] [mtu <NN>] [[-]trailers]
[[-]arp]
[[]allmulti][multicast]
[[-]promisc][mem_start
<NN>][io_addr
<NN>]
[irq
<NN>]
[media
<type>][txqueuelen <NN>][[-]dynamic][up|down] ...
Configures the specified interface with the given address and
netmask.
route
ifattach
© 2004 ARCTURUS NETWORKS INC
Defines network routing for an attached network interface.
usage: route [-nNvee] [-FC] [<AF>] List kernel routing
tables route [-v] [-FC] {add|del|flush} Modify routing
table for AF.
Attach a network interface and set up routing.
usage: ifattach [--addr x.x.x.x] [--mask x.x.x.x] \
[--net x.x.x.x] [--gw x.x.x.x] [iface]
Configures the specified interface with the given address,
netmask, network address. It then sets up routing based on
netmask and network address. If --gw is specified, the default
route is set to go though the gateway.
- 41 -
UC5282 REFERENCE GUIDE
If --addr is not specified it defaults to 127.0.0.1
If --mask is not specified it defaults to 255.0.0.0
If --net is not specified it defaults to 127.0.0.0
If --gw is not specified, the default route is not set
if –iface is not specified, it defaults to lo
inetd
init
login
login is a
Take note:
stub implementation.
We
DO NOT recommend using it
in a production environment!
It checks the password
against the compiled-in static
string;
no
other
authentication is performed.
The default password that
ships is uClinux.
Listen on network ports and spawn programs.
usage: inetd
inetd reads /etc/inetd.conf and listens on the ports
specified for incoming connections. When a connection arrives,
the network connection is hooked up to the standard input, output
and error of the specified program (which is spawned). inetd
reads /etc/services and /etc/protocols to translate
names of protocols and services.
Parent of all processes, init starts the system.
usage: none, run by the kernel at boot
init is run by the kernel at boot time. It first executes the shell
script /etc/rc and then enters a loop which keeps the processes
listed in /etc/inittab running.
Verify a password and exec() a shell.
usage: login
usage: login -t
login is normally run from agetty or telnetd when a user tries
to login. If -t is specified, login will first present the login: prompt
to ask for a user name, otherwise it assumes agetty has asked
already and moves right on to password:
printbenv
setbenv
reset
© 2004 ARCTURUS NETWORKS INC
Reset the system and cause bootloader to run.
usage: reset
- 42 -
UC5282 REFERENCE GUIDE
PART VI – Signal Descriptions
Power and Ground signals
Signal Function
DIMM Bus Pin Number
Voltage +3.3v
Ground 0v
DIMM Bus
Description
9, 89, 99, 125, 143
10, 28, 90, 100, 126, 144
VDD
GND
The uC5282 requires a single regulated 3.3volt power supply. The pins provided for VDD (+3.3v)
and GND (0v) are listed above. See the section Electrical Specifications for more details.
Reset
Signal
Function
Reset
DIMM Bus Pin Number
DIMM Bus
Description
98
/RESET
The /RESET signal is an active low, internally pulled up signal. For most applications, this signal
can be left unconnected. The on board Reset Monitor will ensure that the module will properly
reset after power is applied. The Reset Monitor will also hold the module in reset if the power
supply drops below 2.9 volts. When this signal is asserted, the CPU resets, the FLASH device
returns to normal READ mode, the Ethernet controller is disabled (but remains powered up) and
most I/O pins go into High Impedance state. The uC5282 comes out of reset 200mS after both
/RESET is deasserted and the power supply stabilizes above 2.9 volts (see the
MAX6319LHUK29C or MIC2775-29BM5 datasheet).
General Purpose Timers
General Purpose Timer counter input and Pulse Width Modulator outputs (see the MCF5282
user’s manual section 20).
QSPI
ColdFire
Description
QSPI_Dout
QSPI_Din
QSPI_CLK
SPI_CS0
Signal Function
Data Out
Data In
Clock
Chip Select
© 2004 ARCTURUS NETWORKS INC
DIMM Bus
Pin Number
43
45
49
47
- 43 -
DIMM Bus Description
STXD
SRXD
SCLK
SS1
UC5282 REFERENCE GUIDE
The QSPI interface consists of 4 pins and is multiplexed with functions on RESET
QSPI_Dout the (STxD) Data pin is the serial data output from the QSPI (see the MCF5282 users’
manual, section 22).
QSPI_Din the (SRxD) Data pin, is the serial data input to the QSPI (see the MCF5282 users’
manual, section 22).
QSPI_CLK (SCLK) Data pin, is the clock output from the QSPI (see the MCF5282 users’
manual, section 22).
SPI_CS0, the chip select (SS1) pin when used, select an external device as the source or
destination of serial data. Three additional QSPIs can be supported through the chip selects 1..3.
(see the MCF5282 users’ manual, section 22).
RS232 Port A / ttyS0
Signal Function
Received Data
Transmitted Data
Request to Send
Clear to Send
DIMM Bus
Pin Number
17
11
15
23
DIMM Bus
Description
RXD1
TXD1
RTS1
CTS1
The RS232 Port A / ttyS0 consists of 4 dedicated pins RXD1, TXD1, RTS1 and CTS1 pins.
These pins have internal RS232 line transceivers.
RXD1, the RS232 port A receive pin. This pin is connected through an RS232 line receiver (see
the MAX3225 or ICL3225 datasheet) to the UART receiver (see the MCF5282 users manual,
section 23).
TXD1, the RS232 port A transmit pin. This pin is connected through an RS232 line driver (see
the MAX3225 or ICL3225 datasheet) to the UART transmitter (see the MCF5282 users manual,
section 23).
RTS1 is the RS232 port A Request to Send signal. This pin is connected through an RS232 line
driver (see the MAX3225 or ICL3225 datasheet) to the UART RTS (see the MCF5282 users
manual, section 23).
CTS1 is the RS232 port A Clear to Send signal. This pin is connected through an RS232 line
driver (see the MAX3225 or ICL3225 datasheet) to the UART CTS (see the MCF5282 users
manual, section 23).
© 2004 ARCTURUS NETWORKS INC
- 44 -
UC5282 REFERENCE GUIDE
RS232 Port B / ttyS1
Signal Function
Received Data
Transmitted Data
Request to Send
Clear to Send
DIMM Bus
Pin Number
18
12
16
24
DIMM Bus Description
RXD1
TXD1
RTS1
CTS1
The RS232 Port B / ttyS1 consists of 4 dedicated pins RXD2, TXD2, RTS2 and CTS2 pins.
These pins have internal RS232 line transceivers.
RSRXD2, the RS232 port B receive pin. This pin is connected through an RS232 line receiver
(see the MAX3225 or ICL3225 datasheet) to the UART receiver (see the MCF5282 users
manual, section 23).
RSTXD2, the RS232 port B transmit pin. This pin is connected through an RS232 line driver
(see the MAX3225 or ICL3225 datasheet) to the UART transmitter (see the MCF5282 users
manual, section 23).
RSRTS1 is the RS232 port B Request to Send signal. This pin is connected through an RS232
line driver (see the MAX3225 or ICL3225 datasheet) to the UART RTS (see the MCF5282 users
manual, section 23).
RSCTS2 is the RS232 port B Clear to Send signal. This pin is connected through an RS232 line
driver (see the MAX3225 or ICL3225 datasheet) to the UART CTS (see the MCF5282 users
manual, section 23).
10/100 BaseT Ethernet Interface
The 10/100 BaseT interface provides RX and TX pairs for direct connection to a 10/100Mb/s
twisted pair ethernet LAN. Support for this interface is provided by the ColdFire 5282 MCU.
Signal Function
Negative
Positive
Negative
Positive
Receive Data
Receive Data
Transmit Data
Transmit Data
DIMM Bus
Pin Number
7
5
3
1
RJ45 Connector - A
Pin Number
6
3
2
1
DIMM
Bus
Description
ERXD1ERXD1+
ETXD1ETXD1+
General Purpose I/O Port A
ColdFire
Description
PC0
PC1
PC2
PC3
PC4
PC5
PC6
PC7
Signal Function
General
General
General
General
General
General
General
General
© 2004 ARCTURUS NETWORKS INC
Purpose
Purpose
Purpose
Purpose
Purpose
Purpose
Purpose
Purpose
I/O
I/O
I/O
I/O
I/O
I/O
I/O
I/O
- 45 -
DIMM Bus
Pin Number
53
54
55
56
57
58
59
60
DIMM Bus
Description
PA0
PA1
PA2
PA3
PA4
PA5
PA6
PA7
UC5282 REFERENCE GUIDE
General Purpose I/O Port B
ColdFire
Description
PC8
PC9
PC10
PC11
PC12
PC13
PC14
PC15
Signal Function
General
General
General
General
General
General
General
General
Purpose
Purpose
Purpose
Purpose
Purpose
Purpose
Purpose
Purpose
DIMM Bus
Description
I/O
I/O
I/O
I/O
I/O
I/O
I/O
I/O
DIMM Bus
Pin Number
63
64
65
66
67
68
69
70
DIMM Bus
Description
I/O
I/O
I/O
I/O
DIMM Bus
Pin Number
71
72
73
74
PB0
PB1
PB2
PB3
PB4
PB5
PB6
PB7
General Purpose I/O Port C
ColdFire
Description
PA0
PA1
PA2
PA3
Signal Function
General
General
General
General
Purpose
Purpose
Purpose
Purpose
PC0
PC1
PC2
PC3
CAN Bus
ColdFire
Description
CANRX
CANTX
Signal Function
Input
Output
DIMM Bus
Pin Number
19
25
DIMM Bus
Description
DIMM Bus
Pin Number
77
78
79
80
DIMM Bus
Description
CANRX
CANTX
Hardware Interrupts
ColdFire
Description
/INT2
/INT3
/INT4
/INT6
Signal Function
Interrupt
Interrupt
Interrupt
Interrupt
© 2004 ARCTURUS NETWORKS INC
- 46 -
IRQ0
IRQ1
IRQ2
IRQ3
UC5282 REFERENCE GUIDE
CPU BUS
The CPU bus is available on the uCdimm module connector please see the uCdimm schematic
provided with your development kit for details.
PART VII – Electrical Characteristics
The Electrical Characteristics of the uC5282 are a composite of its components. When looking at
individual datasheets, be aware of the other components on the module.
Maximum Ratings
Ratings
Supply Voltage
Input Voltage
Symbol
Vpp
Vin
Value
-0.5 to +4.0
-0.5 to +7.0
Unit
Volt
Volt
Ta
Tstg
0 to 70
-55 to 150
C
C
Symbol
Ipp
Ipps
Vih
Vil
Voh
Vol
Min
2
2.4
-
Unit
mA
mA
Volt
Volt
Volt
Volt
(except RS232, ETH)
Operating Temperature Range
Storage Temp Range
DC Operating Characteristics at 3.3V
Ratings
Supply
Standby
Input High
Input Low
Output High
Output Low
Max
110
1.5
0.8
0.4
Power Consumption at 3.3V
Ratings
Standard uCevolution Power Circuit
Reset
Idling without Ethernet
Idling with Ethernet
Idling with Kernel/OS and Ethernet
Ping Flood (Duress)
Writing Flash
Erasing Flash
Unit
250mA
150mA
290mA
330mA
300mA
390mA
390mA
410mA
Note: above power consumption metrics do not include standard uCevolution power
circuit. This power circuit is provided as a reference.
© 2004 ARCTURUS NETWORKS INC
- 47 -
UC5282 REFERENCE GUIDE
© 2004 ARCTURUS NETWORKS INC
- 48 -
UC5282 REFERENCE GUIDE
Appendix - A
An Application Note to Blink The Heartbeat LED
uCdimm Application Example
This application note (courtesy of Matthew T. Linehan) makes use of kernel discovered code in
the kernel code that is used to make an LED blink in a heartbeat pattern, even speeding up and
slowing down in response to the 5 minute load average.
kernel heartbeat code is located in:
./uClinux-2.4.x/arch/m68knommu/kernel/time.c:timer_interrupt()
In order to enable this feature, you need to do two things.
1. define the symbol CONFIG_HEARTBEAT during kernel compile time
2. provide machine specific code to turn the LED on and off
First, CONFIG_HEARTBEAT support is needed to be added to the kernel build options. This
heartbeat code is conditionally compiled only if the symbol CONFIG_HEARTBEAT is set at
compile time. The ColdFire arch types typically do not support this option, so we shall add
support for CONFIG_HEARTBEAT by modifying the following file:
./uClinux-2.4.x/arch/m68knommu/config.in
During 'make xconfig' the contents of this file is used to dynamically construct the menu
options displayed. We will add an a new button, which provides an option to turn on
CONFIG_HEARTBEAT.
Optionally you might wish to add custom configuration items into a special 'My Custom Options'
button which makes them easier to find. To do this, add the following text to the end of the
config.in file.
mainmenu_option next_comment
comment 'My Custom Kernel Options'
bool 'Enable the heartbeat feature' CONFIG_HEARTBEAT
end menu
After enabling the config_heartbeat support machine dependent code to implement the
heartbeat needs to be added.
The timer interrupt code expects the mach_heartbeat
function_pointer to point at a machine dependent function for turning the led on/off. The
machine dependent function takes a single int parameter which is either true for on or false for
off.
This code can optionally be stored in a location such as:
./uClinux-2.4.x/arch/m68knommu/platform/5282/config.c
To accomplish this we need to add a new pulse_led() function to config.c this can be
inserted right above the config_BSP() function. On the uC5282 development system, port bit
E[2] is connected to an LED labeled health and is the LED we will reference in this example.
#if defined(CONFIG_HEARTBEAT)
//SETE = Port E Set Register (1s set output bits)
© 2004 ARCTURUS NETWORKS INC
- 49 -
UC5282 REFERENCE GUIDE
#define SETE (*(volatile unsigned char *)(MCF_IPSBAR + 0x10002C))
//CLRE = Port E Clear Register (0s clear output bits)
#define CLRE (*(volatile unsigned char *)(MCF_IPSBAR + 0x100040))
//allocate storeage for the function pointer
void (*mach_heartbeat)(int);
void pulse_led(int led_on)
{
if (led_on)
{
//turn the heartbeat led on
SETE = 0x04;
}
else
{
//turn the heartbeat led off
CLRE = ~0x04;
}
}
#endif
Next, we need to add code to set the mach_heartbeat function pointer and configure the output
pin to run the LED. Very early in the boot sequence, the function config_BSP() is called to,
among other things, initialize several function pointers. I chose to add the heartbeat LED
initialization code to the bottom of this function:
#if defined(CONFIG_HEARTBEAT)
//CCR
= Chip Configuration Register
#define CCR
(*(volatile unsigned short *)(MCF_IPSBAR + 0x110004))
//PEPAR = Port E Pin Assignment Register
#define PEPAR (*(volatile unsigned short *)(MCF_IPSBAR + 0x100052))
//DDRE = Data Direction Register E
#define DDRE (*(volatile unsigned char
*)(MCF_IPSBAR + 0x100018))
//Make port E bit 2, pin M16, a GPIO output
CCR
&= ~0x0040; //Clear SZEN bit, disable SIZ[0:1] outputs
PEPAR &= ~0x0010; //Assign Port E[2] to GPIO Module
DDRE |= 0x04; //Make Port E[2] an Output
//Provide Time.c:timer_interrupt() a pointer to our machine
//specific function for turning the led on and off
mach_heartbeat = pulse_led;
#endif
Next we need to recompile the new kernel. A good habit is to 'make clean' To build the new
system image, switch to the top of the uClinux distro: ./uClinux-dist
make clean; make xconfig
When the 'uClinux configuration' dialog comes up. Select the 'Kernel/Library/Defaults
Selection' button, set 'Customize Kernel Settings' to yes, then click on 'Main Menu', and
then on 'Save and Exit’. You may be prompted to enable the heartbeat feature (new).
© 2004 ARCTURUS NETWORKS INC
- 50 -
UC5282 REFERENCE GUIDE
The Kernel Configuration menu will come up, which will now have a new 'My Custom Kernel
Options' button. Click this button to get at your new 'Enable the heartbeat feature'
option. Set the heartbeat option to yes. Save your changes and exit.
Finally rebuild the kernel and file system image by executing:
make dep; make
Lastly follow the steps in Chapter-4 to upload the new image to the device and flash.
© 2004 ARCTURUS NETWORKS INC
- 51 -
UC5282 REFERENCE GUIDE
Appendix B
Configuring Source Level Debugging for Userland Applications Using GDBserver
Debugging userland applications on an embedded target such as a ColdFire device requires
several steps to ensure the appropriate components are in place. This brief tutorial is designed to
provide users with the steps involved to enable userland debugging on a Motorola 5282 target.
Debugging in this environment enables the following support:
!
!
!
!
Source Level debugging with ddd / gdb
Single step
Breakpoints
Data inspection
Background
Target debugging requires three key components
1. Target software debug support – GDBserver
2. Hardware Debugger Support – BDM Background Debug Mode
3. Host software - GDB 6.0 with BDM support
First setup and build GDB-6.0 and BDM support for your host system by following the procedure
below.
Build bdm and gdb-6.0
$
$
$
$
$
$
tar xzf m68k-bdm-1.3.0.tar.gz
mkdir build
cd build
../m68k-bdm-1.3.0/configure --prefix=/opt/uClinux-m68k-elf
make
make install
Apply the patch and compile gdb-6.0
$
$
$
$
$
$
$
$
$
tar xvzf gdb-6.0.tar.gz
cd gdb-6.0
patch -b -p1 < ../gdb-6.0-bdm-m68k.patch
patch -b -p1 < ../gdb-6.0-m68k-psw-patch
cd ..
mkdir gdb-build
cd gdb-build
../gdb-6.0/configure --target=m68k-bdm-elf --prefix=/opt/uClinux-m68k-elf
make
( as root )
$ make install
Notes
GDBserver within the distribution has all the required hooks for basic functionality.
includes:
! kernel ptrace
! gdbserver
© 2004 ARCTURUS NETWORKS INC
- 52 -
Support
UC5282 REFERENCE GUIDE
Features Include:
! Source Level debugging with ddd / gdb
! Single step
! Breakpoints
! Data inspection
Features not tested
! Signals
! Threads
© 2004 ARCTURUS NETWORKS INC
- 53 -
UC5282 REFERENCE GUIDE
1. build bdm and gdb-6.0
$
$
$
$
$
$
tar xzf m68k-bdm-xx.tar.gz
mkdir build
cd build
../m68k-bdm-xxx/m68k/configure
make
make install
2. After building the bdm system, patch and compile gdb-6.0 the patched gdb will not compile
without the bdm library.
wget http://ftp.gnu.org/gnu/gdb/gdb-6.0.tar.gz
tar xvzf gdb-6.0.tar.gz
cd gdb-6.0
patch -b -p1 < gdb-6.0-bdm-m68k.patch
patch -b -p1 < gdb-6.0-m68k-psw-patch
cd ..
mkdir gdb-build
cd gdb-build
./configure --target=m68k-bdm-elf
make
( as root )
$ cp gdb/gdb /opt/uClinux-m68k-elf/bin/m68k-elf-gdb
$
$
$
$
$
$
$
$
$
$
3. Enable gdbserver and ensure kernel ptrace support from the uClinux distribution
How is this done?
4. Finally, add nfs support to the default system, this is required to allow the user to debug code
from an NFS mounted directory
You need this to allow the user to debug code from an NFS mounted
directory.
under uClinux-dist
make menuconfig
[*] Customize Kernel Settings
File Systems --->
Network File Systems --->
<*> NFS file system support
[*]
Provide NFSv3 client support
Example setup of development environment and debug of application:
1. Send image to target
Target
setenv IPADDR0 192.168.1.200 ( do this once )
tftp 192.168.1.100 ( host )
Host
tftp 192.168.1.200
© 2004 ARCTURUS NETWORKS INC
- 54 -
UC5282 REFERENCE GUIDE
verbose
binary
put image.cramfs
Target
<esc>
program
2. Example on target
B$ tftp 192.168.1.100
uCTFTP Console 1.0 is running ...
IPADDRESS is 192.168.1.200
Downloading..................................
B$ program
erase...
done.
write...
done.
B$
3. Example on host
tftp 192.168.1.200
tftp> v
Verbose mode on.
tftp> b
mode set to octet
tftp> put image.cramfs
putting image.cramfs to 192.168.1.200:image.cramfs [octet]
Sent 1146880 bytes in 5.3 seconds [1716315 bit/s]
tftp>q
4. Mount filesystem
/bin/mount -t nfs 192.168.1.100:/home/philwil/work /mnt
use user/fileutils/ls as an example
When you use the load to ram you have to increase the stack size
m68k-elf-flthdr -r ../user/fileutils/ls
m68k-elf-flthdr -s 8096 ../user/fileutils/ls
Here is the result
m68k-elf-flthdr ../user/fileutils/ls
../user/fileutils/ls
Magic:
bFLT
Rev:
4
Build Date:
Thu Aug 19 08:20:37 2004
Entry:
0x48
Data Start:
0x7540
Data End:
0x78c0
BSS End:
0x7ed0
Stack Size:
0x1fa0
Reloc Start: 0x78c0
Reloc Count: 0x1b
© 2004 ARCTURUS NETWORKS INC
- 55 -
UC5282 REFERENCE GUIDE
Flags:
0x3 ( Load-to-Ram Has-PIC-GOT )
Test this on the target system
cd /mnt/arc5282/uClinux-dist/user/fileutils
./ls
COPYING
cat
chgrp.c
chmod.gdb
chown.o
cp
dd.c
grep.c
l.gdb
ln.o
mkdir
mkfifo.c
mknod.gdb
more.o
rm
rmdir.c
sync.gdb
touch.o
COPYING.sash
cat.c
chgrp.gdb
chmod.o
cmp
cp.c
dd.gdb
grep.gdb
l.o
ls
mkdir.c
mkfifo.gdb
mknod.o
mv
rm.c
rmdir.gdb
sync.o
Makefile
cat.gdb
chgrp.o
chown
cmp.c
cp.gdb
dd.o
grep.o
ln
ls.c
mkdir.gdb
mkfifo.o
more
mv.c
rm.gdb
rmdir.o
touch
README
cat.o
chmod
chown.c
cmp.gdb
cp.o
futils.h
l
ln.c
ls.gdb
mkdir.o
mknod
more.c
mv.gdb
rm.o
sync
touch.c
WARRANTY
chgrp
chmod.c
chown.gdb
cmp.o
dd
grep
l.c
ln.gdb
ls.o
mkfifo
mknod.c
more.gdb
mv.o
rmdir
sync.c
touch.gdb
Now you should be ready to debug.
Problems and Bugs
NOTE: When using the remote target instead of the BDM target some features are not
set up properly.
The patch gdb-6.0-m68k-psw-patch corrects the following problems
!
!
register message size
breakpoint setup
NOTE: There are many hacks inside the gdb remote target code that indicate problems
with communications.
© 2004 ARCTURUS NETWORKS INC
- 56 -
UC5282 REFERENCE GUIDE
Appendix C
Common Userland Applications
The following is a list of common user applications installed by default on the uCdimm module.
This list is generic and all applications may not be supported across all Arcturus Platforms.
agetty
This program enables you to log in through a serial device such as a virtual terminal, a text
terminal, or a modem. It displays the login prompt. Once you enter your username, agetty hands
this over to login, which asks for a password, checks it out and gives you a shell.
boa
Boa is a single-tasking HTTP server that unlike traditional web servers does not fork for each
incoming connection, nor does it fork many copies of itself to handle multiple connections. It
internally multiplexes all of the ongoing HTTP connections, and forks only for CGI programs
(which must be separate
processes.)
busybox
BusyBox combines tiny versions of many common UNIX utilities into a single small executable. It
provides minimalist replacements for most of the utilities you usually find in fileutils, shellutils,
findutils, textutils, grep, gzip, tar, etc. BusyBox provides a fairly complete POSIX environment for
any small or embedded system. The utilities in BusyBox generally have fewer options than their
full-featured GNU cousins; however, the options that are included provide the expected
functionality and behave very much like their GNU counterparts.
cat
The cat utility reads files sequentially, writing them to the standard output. The file operands are
processed in command line order. A single dash represents the standard input.
clear
clears the terminal screen.
cp
In the first synopsis form, the cp utility copies the contents of the sourcefile to the targetfile. In the
second synopsis form, the contents of each named sourcefile is copied to the destination target
directory. The names of the files themselves are not changed. If cp detects an attempt to copy a
file to itself, the copy will fail.
date
The date utility displays the current date and time when invoked without arguments. Providing
arguments will format the date and time in a user-defined way or set the date. Only the superuser
may set the date.
dd
The dd utility copies the standard input to the standard output. Input data is read and written in
512-byte blocks. If input reads are short, input from multiple reads are aggregated to form the
output block. When finished, dd displays the number of complete and partial input and output
blocks and truncated input records to the standard error output.
© 2004 ARCTURUS NETWORKS INC
- 57 -
UC5282 REFERENCE GUIDE
df
The df utility displays statistics about the amount of free disk space on the specified filesystem or
on the filesystem of which file is a part. Values are displayed in 512-byte-per-block block counts.
If neither a file or a filesystem operand is specified, statistics for all mounted filesystems are
displayed.
dhcpcd
The dhcpcd utility gets an IP address and other information from a corresponding DHCP server,
configures the network interface automatically, and tries to renew the lease time according to
RFC2131 or RFC1541 depending on the command line option(s).
dmesg
Prints the kernel ring buffer.
du
Estimates the file space usage.
echo
The echo utility writes any specified operands, separated by single blank (`` '') characters and
followed by a newline (``\n'') character, to the standard output.
expand
The expand utility processes the named files or the standard input writing the standard output
with tabs changed into blanks. Backspace characters are preserved into the output and
decrement the column count for tab calculations.
false
The false utility tests for the appropriate status "false" before running (or failing to run) a list of
commands, typically in a shell script.
flashloader
Loads imagefile into memory and transfers to the bootloader to write into the OS area of the
Flash. After the OS image is written to Flash, it is started. -d causes debugging information to
be displayed
free
The free utility displays the amount of RAM available via a cat call to /proc/meminfo.
gdbserver
GdbServer is a kind of debugging agent that receives commands from the GNU debugger and
uses them to control an inferior application. GdbServer uses the target's operating system to
exert control over the inferior application, rather than by manipulating the target's CPU state
directly.
A GdbServer is designed for debugging applications running in a hosted environment on a
remote system, a'la Embedded Linux.
hostname
The hostname utility prints the name of the current host.
© 2004 ARCTURUS NETWORKS INC
- 58 -
UC5282 REFERENCE GUIDE
ifconfig
The ifconfig utility is used to assign one or more addresses to a network interface and/or
configure network interface parameters. ifconfig must be used at boot time to define the network
address of each interface present on a machine; it may also be used at a later time to redefine
the address or other interface operating parameters.
inetd
The inetd program should be run at boot time by /etc/rc. It then listens for connections on certain
internet sockets. When a connection is found on one of its sockets, inetd decides which service
the socket corresponds to, and invokes a program to service the request. The server program is
invoked with the service socket as its standard input, output and error descriptors. After the
program is finished, inetd continues to listen on the socket (except in some cases which will be
described below). Essentially, inetd allows running one daemon to invoke several others,
reducing load on the system.
init
The init program is the last stage of the boot process. It normally runs the automatic boot
sequence as described in boot (8), and if this succeeds, begins multi-user operation. If the boot
scripts fail, init commences single user operation by giving the super-user a shell on the console.
The init program may be passed parameters from the boot program to prevent the system from
going multi-user and to instead execute a single user shell without starting the normal daemons.
insmod
Insmod tries to load a module into the kernel.
kill / killall
The kill utility sends a signal to the process specified by the pid operand(s).
ln
The ln utility creates a new directory entry, i.e. a new name in the filesystem. There are two types
of links: hard links and symbolic links.
login
The login utility logs users (and pseudo-users) into the computer system. It is normally only
executable by the super user.
ls
The ls command displays a list of files in a directory. For each operand that names a file of a
type other than directory, ls displays its name as well as associated information, as requested.
lsmod
lsmod shows information about all loaded modules. The format is name, size, use count, list of
referring modules. The information displayed is identical to that available from /proc/modules. If
the module controls its own unloading via a can_unload routine then the user count displayed by
lsmod is always -1, irrespective of the real use count.
mkdir
Mkdir creates the directories named as operands, in the order specified, using mode a=rwx
(0777) as modified by the current file mode creation mask.
mount
The mount command calls the nmount (2) system call to add a special device to the filesystem
tree.
© 2004 ARCTURUS NETWORKS INC
- 59 -
UC5282 REFERENCE GUIDE
passwd
passwd is a utility to change passwords
ping
The ping utility sends a packet to the specified host and waits for a reply. The host address and
round-trip times for each pair of packets are displayed.
prinbtenv
The printbenv command prints out the names and values of the variables in the environment, with
one name/value pair per line. If name is specified, only its value is printed.
portmap
Portmap is a utility that maps RPC ports for use mostly with NFS. This utility should be run prior
to mounting any remote filesystems using NFS.
ps
The ps utility gives a status of all the current active processes.
pwd
Prints the name of the current working directory.
ramloader
Loads imagefile into memory and hands it to the bootloader to write into the OS area of the RAM.
After the OS image is written to RAM, it is started. -d causes debugging information to be
displayed.
reset
The reset command forces a software reset. This is essentially the same as depressing the
hardware reset button.
rmdir
Deletes or removes the specified directory eg. rmdir <directory name>.
rmmod
Rmmod tries to unload a set of modules from the kernel, with the restriction that they are not in
use and that they are not referred to by other modules.
If more than one module is named on the command line, the modules will be removed in the
given order. This supports unloading of stacked modules.
route
The route utility manually manipulates the network routing tables.
setbenv
Sets bootloader environment variable
sh
The sh utility is the standard command interpreter shell for the uClinux system.
© 2004 ARCTURUS NETWORKS INC
- 60 -
UC5282 REFERENCE GUIDE
sleep
Sleep is a delay loop that will result in a delay in seconds equal to the argument.
stty
The stty utility sets or reports on terminal characteristics for the device that is its standard input. If
no options or operands are specified, it reports the settings of a subset of characteristics as well
as additional ones if they differ from their default values.
telnet
The telnet client Connects the local host with a remote host, using the Telnet interface.
telnetd
telnetd is a server which supports the Internet standard TELNET virtual terminal protocol. telnetd
is invoked by the Internet super-server.
test
Capability to compare values and return true or false.
touch
The touch utility sets the modification and access times of files to the current time of day. If the
file doesn't exist, it is created with default permissions.
umount
The umount command calls the unmount system call to remove a special device from the
filesystem tree.
uptime
Provide the on-going uptime of the system.
xloader
xloader is the actual utility used by flashloader and ramloader to load images into their respective
locations.
© 2004 ARCTURUS NETWORKS INC
- 61 -
UC5282 REFERENCE GUIDE
© 2004 ARCTURUS NETWORKS INC
- 62 -
UC5282 REFERENCE GUIDE
Appendix D
Things to watch out for when writing uClinux code
The uClinux memory model is a single flat 32bit address space. All user programs and the kernel
share this single address space. As such, there is limited memory protection between programs
and between programs and the kernel. Care must be taken not to corrupt the kernel memory or
the memory of another process.
Since there is only one 32bit address space shared by all other processes, it is important to be
careful with the allocation patterns of applications as the memory space can become fragmented.
It is best for a program to allocate as few blocks as possible (preferably only 1) at start up and
hand out chunks of that block internally as the program runs.
uClinux does not provide a complete fork() implementation. Instead, uClinux provides an
implementation of BSD’s vfork(), a simplified version of fork(). With vfork(), execution of the
parent process is suspended until the child process calls exec() or exit(). In most cases the use
of vfork() will not affect the operation of existing UNIX or Linux programs. See ‘man fork’.
However, it is important to realize that both the child process and the parent process share the
same stack and global variables. As such, it is important that the child process not return from
the function that called vfork() or corrupt the parent’s variables before it calls exec() or exit(). If
the child process returns, the parent will find its stack frame corrupted and crash. If the child
writes to variables it shares with the parent, the parent will also find them changed.
uClinux implements a large subset of the API implemented in Linux. With the exception of the
above, writing for uClinux is the same as writing for Linux.
© 2004 ARCTURUS NETWORKS INC
- 63 -
UC5282 REFERENCE GUIDE
Appendix E
GNU GENERAL PUBLIC LICENSE
Version 2, June 1991
Copyright (C) 1989, 1991 Free Software Foundation, Inc.
675 Mass Ave, Cambridge, MA 02139, USA
Everyone is permitted to copy and distribute verbatim copies of this license document,
but changing it is not allowed.
Preamble
The licenses for most software are designed to take away your freedom to share and change it.
By contrast, the GNU General Public License is intended to guarantee your freedom to share and
change free software—to make sure the software is free for all its users. This General Public
License applies to most of the Free Software Foundation’s software and to any other program
whose authors commit to using it. (Some other Free Software Foundation software is covered by
the GNU Library General Public License instead.) You can apply it to your programs, too.
When we speak of free software, we are referring to freedom, not price. Our General Public
Licenses are designed to make sure that you have the freedom to distribute copies of free
software (and charge for this service if you wish), that you receive source code or can get it if you
want it, that you can change the software or use pieces of it in new free programs; and that you
know you can do these things.
To protect your rights, we need to make restrictions that forbid anyone to deny you these rights or
to ask you to surrender the rights. These restrictions translate to certain responsibilities for you if
you distribute copies of the software, or if you modify it.
For example, if you distribute copies of such a program, whether gratis or for a fee, you must give
the recipients all the rights that you have. You must make sure that they, too, receive or can get
the source code. And you must show them these terms so they know their rights.
We protect your rights with two steps: (1) copyright the software, and (2) offer you this license
which gives you legal permission to copy, distribute and/or modify the software.
Also, for each author’s protection and ours, we want to make certain that everyone understands
that there is no warranty for this free software. If the software is modified by someone else and
passed on, we want its recipients to know that what they have is not the original, so that any
problems introduced by others will not reflect on the original authors’ reputations.
Finally, any free program is threatened constantly by software patents. We wish to avoid the
danger that redistributors of a free program will individually obtain patent licenses, in effect
making the program proprietary. To prevent this, we have made it clear that any patent must be
licensed for everyone’s free use or not licensed at all.
The precise terms and conditions for copying, distribution and modification follow.
© 2004 ARCTURUS NETWORKS INC
- 64 -
UC5282 REFERENCE GUIDE
GNU GENERAL PUBLIC LICENSE
TERMS AND CONDITIONS FOR COPYING, DISTRIBUTION AND MODIFICATION
0. This License applies to any program or other work which contains a notice placed by
the copyright holder saying it may be distributed under the terms of this General Public
License. The “Program”, below, refers to any such program or work, and a “work based
on the Program” means either the Program or any derivative work under copyright law:
that is to say, a work containing the Program or a portion of it, either verbatim or with
modifications and/or translated into another language. (Hereinafter, translation is
included without limitation in the term “modification”.) Each licensee is addressed as
“you”.
Activities other than copying, distribution and modification are not covered by this
License; they are outside its scope. The act of running the Program is not restricted, and
the output from the Program is covered only if its contents constitute a work based on the
Program (independent of having been made by running the Program). Whether that is
true depends on what the Program does.
1. You may copy and distribute verbatim copies of the Program’s source code as you
receive it, in any medium, provided that you conspicuously and appropriately publish on
each copy an appropriate copyright notice and disclaimer of warranty; keep intact all the
notices that refer to this License and to the absence of any warranty; and give any other
recipients of the Program a copy of this License along with the Program.
You may charge a fee for the physical act of transferring a copy, and you may at your
option offer warranty protection in exchange for a fee.
2. You may modify your copy or copies of the Program or any portion of it, thus forming a
work based on the Program, and copy and distribute such modifications or work under
the terms of Section 1 above, provided that you also meet all of these conditions:
a) You must cause the modified files to carry prominent notices
you changed the files and the date of any change.
stating that
b) You must cause any work that you distribute or publish, that in whole or in part
contains or is derived from the Program or any part thereof, to be licensed as a
whole at no charge to all third parties under the terms of this License.
c) If the modified program normally reads commands interactively when run, you
must cause it, when started running for such interactive use in the most ordinary
way, to print or display an announcement including an appropriate copyright
notice and a notice that there is no warranty (or else, saying that you provide a
warranty) and that users may redistribute the program under these conditions,
and telling the user how to view a copy of this License. (Exception: if the
Program itself is interactive but does not normally print such an announcement,
your work based on the Program is not required to print an announcement.)
These requirements apply to the modified work as a whole. If identifiable
sections of that work are not derived from the Program, and can be reasonably
considered independent and separate works in themselves, then this License,
and its terms, do not apply to those sections when you distribute them as
separate works. But when you distribute the same sections as part of a whole
which is a work based on the Program, the distribution of the whole must be on
© 2004 ARCTURUS NETWORKS INC
- 65 -
UC5282 REFERENCE GUIDE
the terms of this License, whose permissions for other licensees extend to the
entire whole, and thus to each and every part regardless of who wrote it.
Thus, it is not the intent of this section to claim rights or contest your rights to
work written entirely by you; rather, the intent is to exercise the right to control the
distribution of derivative or collective works based on the Program.
In addition, mere aggregation of another work not based on the Program with the
Program (or with a work based on the Program) on a volume of a storage or
distribution medium does not bring the other work under the scope of this
License.
3. You may copy and distribute the Program (or a work based on it, under Section 2) in
object code or executable form under the terms of Sections 1 and 2 above provided that
you also do one of the following:
a) Accompany it with the complete corresponding machine-readable source
code, which must be distributed under the terms of Sections 1 and 2 above on a
medium customarily used for software interchange; or,
b) Accompany it with a written offer, valid for at least three years, to give any
third party, for a charge no more than your cost of physically performing source
distribution, a complete machine-readable copy of the corresponding source
code, to be distributed under the terms of Sections 1 and 2 above on a medium
customarily used for software interchange; or,
c) Accompany it with the information you received as to the offer to distribute
corresponding source code. (This alternative is allowed only for noncommercial
distribution and only if you received the program in object code or executable
form with such an offer, in accord with Subsection b above.)
The source code for a work means the preferred form of the work for making
modifications to it. For an executable work, complete source code means all the
source code for all modules it contains, plus any associated interface definition
files, plus the scripts used to control compilation and installation of the
executable. However, as a special exception, the source code distributed need
not include anything that is normally distributed (in either source or binary form)
with the major components (compiler, kernel, and so on) of the operating system
on which the executable runs, unless that component itself accompanies the
executable.
If distribution of executable or object code is made by offering access to copy
from a designated place, then offering equivalent access to copy the source code
from the same place counts as distribution of the source code, even though third
parties are not compelled to copy the source along with the object code.
4. You may not copy, modify, sublicense, or distribute the Program except as expressly
provided under this License. Any attempt otherwise to copy, modify, sublicense or
distribute the Program is void, and will automatically terminate your rights under this
License. However, parties who have received copies, or rights, from you under this
License will not have their licenses terminated so long as such parties remain in full
compliance.
5. You are not required to accept this License, since you have not signed it. However,
nothing else grants you permission to modify or distribute the Program or its derivative
works. These actions are prohibited by law if you do not accept this License. Therefore,
© 2004 ARCTURUS NETWORKS INC
- 66 -
UC5282 REFERENCE GUIDE
by modifying or distributing the Program (or any work based on the Program), you
indicate your acceptance of this License to do so, and all its terms and conditions for
copying, distributing or modifying the Program or works based on it.
6. Each time you redistribute the Program (or any work based on the Program), the
recipient automatically receives a license from the original licensor to copy, distribute or
modify the Program subject to these terms and conditions. You may not impose any
further restrictions on the recipients’ exercise of the rights granted herein. You are not
responsible for enforcing compliance by third parties to this License.
7. If, as a consequence of a court judgment or allegation of patent infringement or for any
other reason (not limited to patent issues), conditions are imposed on you (whether by
court order, agreement or otherwise) that contradict the conditions of this License, they
do not excuse you from the conditions of this License. If you cannot distribute so as to
satisfy simultaneously your obligations under this License and any other pertinent
obligations, then as a consequence you may not distribute the Program at all. For
example, if a patent license would not permit royalty-free redistribution of the Program by
all those who receive copies directly or indirectly through you, then the only way you
could satisfy both it and this License would be to refrain entirely from distribution of the
Program.
If any portion of this section is held invalid or unenforceable under any particular
circumstance, the balance of the section is intended to apply and the section as a whole
is intended to apply in other circumstances.
It is not the purpose of this section to induce you to infringe any patents or other property
right claims or to contest validity of any such claims; this section has the sole purpose of
protecting the integrity of the free software distribution system, which is implemented by
public license practices. Many people have made generous contributions to the wide
range of software distributed through that system in reliance on consistent application of
that system; it is up to the author/donor to decide if he or she is willing to distribute
software through any other system and a licensee cannot impose that choice.
This section is intended to make thoroughly clear what is believed to be a consequence
of the rest of this License.
8. If the distribution and/or use of the Program is restricted in certain countries either by
patents or by copyrighted interfaces, the original copyright holder who places the
Program under this License may add an explicit geographical distribution limitation
excluding those countries, so that distribution is permitted only in or among countries not
thus excluded. In such case, this License incorporates the limitation as if written in the
body of this License.
9. The Free Software Foundation may publish revised and/or new versions of the
General Public License from time to time. Such new versions will be similar in spirit to
the present version, but may differ in detail to address new problems or concerns.
Each version is given a distinguishing version number. If the Program specifies a version
number of this License which applies to it and “any later version”, you have the option of
following the terms and conditions either of that version or of any later version published
by the Free Software Foundation. If the Program does not specify a version number of
this License, you may choose any version ever published by the Free Software
Foundation.
10. If you wish to incorporate parts of the Program into other free programs whose
distribution conditions are different, write to the author to ask for permission. For
© 2004 ARCTURUS NETWORKS INC
- 67 -
UC5282 REFERENCE GUIDE
software which is copyrighted by the Free Software Foundation, write to the Free
Software Foundation; we sometimes make exceptions for this. Our decision will be
guided by the two goals of preserving the free status of all derivatives of our free software
and of promoting the sharing and reuse of software generally.
NO WARRANTY
11. BECAUSE THE PROGRAM IS LICENSED FREE OF CHARGE, THERE IS NO
WARRANTY FOR THE PROGRAM, TO THE EXTENT PERMITTED BY APPLICABLE
LAW. EXCEPT WHEN OTHERWISE STATED IN WRITING THE COPYRIGHT
HOLDERS AND/OR OTHER PARTIES PROVIDE THE PROGRAM “AS IS” WITHOUT
WARRANTY OF ANY KIND, EITHER EXPRESSED OR IMPLIED, INCLUDING, BUT
NOT LIMITED TO, THE IMPLIED WARRANTIES OF MERCHANTABILITY AND
FITNESS FOR A PARTICULAR PURPOSE. THE ENTIRE RISK AS TO THE QUALITY
AND PERFORMANCE OF THE PROGRAM IS WITH YOU. SHOULD THE PROGRAM
PROVE DEFECTIVE, YOU ASSUME THE COST OF ALL NECESSARY SERVICING,
REPAIR OR CORRECTION.
12. IN NO EVENT UNLESS REQUIRED BY APPLICABLE LAW OR AGREED TO IN
WRITING WILL ANY COPYRIGHT HOLDER, OR ANY OTHER PARTY WHO MAY
MODIFY AND/OR REDISTRIBUTE THE PROGRAM AS PERMITTED ABOVE, BE
LIABLE TO YOU FOR DAMAGES, INCLUDING ANY GENERAL, SPECIAL,
INCIDENTAL OR CONSEQUENTIAL DAMAGES ARISING OUT OF THE USE OR
INABILITY TO USE THE PROGRAM (INCLUDING BUT NOT LIMITED TO LOSS OF
DATA OR DATA BEING RENDERED INACCURATE OR LOSSES SUSTAINED BY YOU
OR THIRD PARTIES OR A FAILURE OF THE PROGRAM TO OPERATE WITH ANY
OTHER PROGRAMS), EVEN IF SUCH HOLDER OR OTHER PARTY HAS BEEN
ADVISED OF THE POSSIBILITY OF SUCH DAMAGES.
END OF TERMS AND CONDITIONS
© 2004 ARCTURUS NETWORKS INC
- 68 -
UC5282 REFERENCE GUIDE
Appendix: How to Apply These Terms to Your New Programs
If you develop a new program, and you want it to be of the greatest possible use to the public, the
best way to achieve this is to make it free software which everyone can redistribute and change
under these terms.
To do so, attach the following notices to the program. It is safest to attach them to the start of
each source file to most effectively convey the exclusion of warranty; and each file should have at
least the “copyright” line and a pointer to where the full notice is found.
<one line to give the program’s name and a brief idea of what it does.>
Copyright (C) 20yy <name of author>
This program is free software; you can redistribute it and/or modify it under the terms of the GNU
General Public License as published by the Free Software Foundation; either version 2 of the
License, or (at your option) any later version.
This program is distributed in the hope that it will be useful, but WITHOUT ANY WARRANTY;
without even the implied warranty of MERCHANTABILITY or FITNESS FOR A PARTICULAR
PURPOSE. See the GNU General Public License for more details.
You should have received a copy of the GNU General Public License along with this program; if
not, write to the Free Software Foundation, Inc., 675 Mass Ave, Cambridge, MA 02139, USA.
Also add information on how to contact you by electronic and paper mail.
If the program is interactive, make it output a short notice like this when it starts in an interactive
mode:
Gnomovision version 69, Copyright (C) 19yy name of author
Gnomovision comes with ABSOLUTELY NO WARRANTY; for details type `show w’.
This is free software, and you are welcome to redistribute it
under certain conditions; type `show c’ for details.
The hypothetical commands `show w’ and `show c’ should show the appropriate parts of the
General Public License. Of course, the commands you use may be called something other than
`show w’ and `show c’; they could even be mouse-clicks or menu items—whatever suits your
program.
You should also get your employer (if you work as a programmer) or your school, if any, to sign a
“copyright disclaimer” for the program, if necessary. Here is a sample; alter the names:
Yoyodyne, Inc., hereby disclaims all copyright interest in the program
`Gnomovision’ (which makes passes at compilers) written by James Hacker.
<signature of Ty Coon>, 1 April 1989
Ty Coon, President of Vice
This General Public License does not permit incorporating your program into proprietary
programs. If your program is a subroutine library, you may consider it more useful to permit
linking proprietary applications with the library. If this is what you want to do, use the GNU
Library General Public License instead of this License.
© 2004 ARCTURUS NETWORKS INC
- 69 -
UC5282 REFERENCE GUIDE
Appendix F
The BSD License
The Regents of the University of California Copyright
Notice and Disclaimer
Copyright (c) 1988, 1993
The Regents of the University of California. All rights reserved.
Redistribution and use in source and binary forms, with or without modification,
are permitted provided that the following conditions are met:
1. Redistribution of source code must retain the above copyright notice, this list of
conditions and the following disclaimer.
2. Redistribution in binary form must reproduce the above copyright notice, this
list of conditions and the following disclaimer in the documentation and/or other
materials provided with the distribution.
3. All advertising materials mentioning features or use of this software must
display the following acknowledgement: This product includes software
developed by the University of California, Berkeley and its contributors.
4. Neither the name of the University nor the names of its contributors may be
used to endorse or promote products derived from this software without specific
prior written permission.
THIS SOFTWARE IS PROVIDED BY THE REGENTS AND CONTRIBUTORS
``AS IS’’ AND ANY EXPRESS OR IMPLIED WARRANTIES, INCLUDING, BUT NOT LIMITED
TO, THE IMPLIED WARRANTIES OF MERCHANTABILITY AND FITNESS FOR A
PARTICULAR PURPOSE ARE DISCLAIMED. IN NO EVENT SHALL THE REGENTS OR
CONTRIBUTORS BE LIABLE FOR ANY DIRECT, INDIRECT, INCIDENTAL, SPECIAL,
EXEMPLARY, OR CONSEQUENTIAL DAMAGES (INCLUDING, BUT NOT LIMITED TO,
PROCUREMENT OF SUBSTITUTE GOODS OR SERVICES; LOSS OF USE, DATA, OR
PROFITS; OR BUSINESS INTERRUPTION) HOWEVER CAUSED AND ON ANY THEORY OF
LIABILITY, WHETHER IN CONTRACT, STRICT LIABILITY, OR TORT (INCLUDING
NEGLIGENCE OR OTHERWISE) ARISING IN ANY WAY OUT OF THE USE OF THIS
SOFTWARE, EVEN IF ADVISED OF THE POSSIBILITY OF SUCH DAMAGE.
© 2004 ARCTURUS NETWORKS INC
- 70 -
UC5282 REFERENCE GUIDE