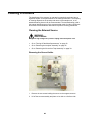
1
NOTICE: Varian, Inc. was acquired by Agilent Technologies in May 2010. This document is provided as a courtesy but is no longer kept current and thus will contain historical references to Varian. For more information, go to www.agilent.com/chem. Varian, Inc. 2700 Mitchell Drive Walnut Creek, CA 94598-1675/usa 4000 GC/MS Hardware Operation Manual ©Varian, Inc. 2004-2009 Printed in U.S.A. 03-914998-00:Rev. 5 All rights reserved including the right of reproduction in whole or in part in any form. This document may be electronically reproduced, distributed, or printed in its entirety provided this copyright and statement are attached. Any modification or any other reproduction, distribution, or use of this document or portions hereof is strictly prohibited without the express written permission of Varian, Inc. COPYRIGHT 2004-2009. All rights reserved. Contents Introduction ...............................................................................................................................3 Functional Description .............................................................................................................5 Overview ..................................................................................................................................................................... 5 Analyzer ...................................................................................................................................................................... 8 Vacuum System........................................................................................................................................................ 15 Pneumatics ............................................................................................................................................................... 17 Electronics ................................................................................................................................................................ 19 Periodic Maintenance ............................................................................................................. 25 Procedure Interval .................................................................................................................................................... 25 Checking Foreline Pump Oil Level and Oil Condition .............................................................................................. 25 Changing Foreline Pump Oil .................................................................................................................................... 25 Changing the Oil Mist Cartridge ............................................................................................................................... 28 Checking Cooling Fans ............................................................................................................................................ 29 MS Maintenance Procedures .................................................................................................31 General Recommendations ...................................................................................................................................... 31 Recommended Tools and Materials ......................................................................................................................... 31 Common Procedures ................................................................................................................................................ 32 Cleaning Procedures ................................................................................................................................................ 48 Replacing a GC Column ........................................................................................................................................... 69 Replacing Consumable Components ....................................................................................................................... 73 Changing Operational Configuration ........................................................................................................................ 81 Chemical Ionization Options .................................................................................................89 Introduction ............................................................................................................................................................... 89 Installing CI Reagent Gas ......................................................................................................................................... 90 Setting Flows of CI Reagents in Internal Configuration............................................................................................95 Setting Flows of CI Reagents in External Configuration .......................................................................................... 96 Setting Flows of CI Reagents in Hybrid Configuration ............................................................................................. 96 The Liquid CI Inlet Option ......................................................................................................................................... 97 Troubleshooting ..................................................................................................................... 99 How to Isolate a GC/MS Problem.............................................................................................................................99 Checking the Data System ....................................................................................................................................... 99 Checking the GC ...................................................................................................................................................... 99 Checking the Mass Spectrometer ............................................................................................................................ 99 Troubleshooting Problems with Spectra ................................................................................................................. 100 Checking for Leaks .................................................................................................................................................103 Fixing High Water Levels ........................................................................................................................................106 GC Troubleshooting................................................................................................................................................107 1 Using the COLTEST Sample for Troubleshooting ................................................................................................. 107 Miscellaneous Procedures and Instructions ......................................................................113 Other Documents.................................................................................................................................................... 113 Site Requirements ..................................................................................................................................................113 Operating Environment ...........................................................................................................................................116 Gas Requirements ..................................................................................................................................................117 How to Install the 4000 MS .....................................................................................................................................118 How to Move the 4000 MS .....................................................................................................................................119 Parts and Supplies.................................................................................................................................................. 120 Varian Service ........................................................................................................................................................125 2 Introduction This hardware manual is composed of six sections. The first section is a functional description describing the operating principles of the spectrometer and details of the subsystems that make up the instrument. The next two sections describe the various maintenance procedures that need to be carried out to keep the instrument in proper working condition. The fourth section describes the installation and set up of the Chemical Ionization hardware. The fifth section provides troubleshooting procedures for resolving problems that may be encountered when using the instrument. The final section provides miscellaneous information including site requirements, installation instructions and parts lists. 3 4 Functional Description Overview Each subsystem of the 4000 Mass Spectrometer is described. The mass spectrometer is like an analyzer contained in a vacuum manifold surrounded by electronics components that drive the analyzer operation and acquire the resulting data. Foreline Pump GC Oven Turbomolecular Pump Transfer Line Ion Trap Assembly Capillary Column System Block Diagram (Shown in External Ionization Mode) 5 Samples are first injected into the GC either manually or by way of an autosampler. The sample is vaporized and the gas goes though a column in the GC oven. After separation in the column, the sample enters the mass spectrometer through a heated transfer line. The MS analyzer consists of three parts: the source, ion trap, and detector. The samples flow from the transfer line into either an external source, where the sample is ionized, or directly into the ion trap for ionization. Once ionized, the ions are stored in the ion trap where they are systematically ejected for analysis. After ion ejection, the detector (consisting of a conversion dynode and electron multiplier) senses the ions. The vacuum manifold maintains the necessary vacuum conditions for proper analyzer operation. A turbomolecular pump and foreline pump create the necessary vacuum in the manifold. Various pneumatics components feed required gases into the vacuum manifold. An ion gauge and thermocouple gauge measure the vacuum levels in the manifold and foreline respectively. Physically the vacuum manifold is mounted on top of an RF coil assembly. RF generation and ion detection electronics components are placed around the RF coil assembly. Some source and trap related electronics components reside in an enclosure mounted to the vacuum manifold top flange. A system controller and power board are contained in an enclosure formed by a central bulkhead and outer cover. WARNING: SHOCK HAZARD HIGH VOLTAGES INSIDE. No user serviceable parts under screw-attached covers. Contact your local Varian, Inc. service representative for instrument repair and service. Electronic Flow Control Service Switch Thermocouple Vacuum Gauge Electronics Compartment Manifold Electronics Enclosure ForelinePump Line Ion Amplifier Transfer Li Turbomolecular Pump 4000 Mass Spectrometer 6 Getter Vacuum Manifold Transfer Line A stainless steel tube transfer line directly couples the GC to the mass spectrometer. The purpose of the transfer line is to keep the GC column warm as the column enters the mass spectrometer to avoid condensation of the sample, which could result in tailing. One end of the transfer line enters a hole in the right side of the GC before passing into the GC oven. The other end enters the vacuum manifold in one of two positions, depending on where the sample is to be ionized. If the sample is to be ionized in the external source, the transfer line is inserted into the source volume. If the sample is to be ionized in the trap, the transfer line is inserted into a hole in the trap close to an electron generating filament. Two different tips must be used to extend the GC column into the point of ionization, depending on the mode used. A short Polyimide tip is used for internal ionization and a long metal tip is used for external ionization. The body of the transfer line consists of a stainless steel body fitted with a center tube, a heat exchanger, and a boot. The heat exchanger is an aluminum cylinder that contains a cartridge heater and a thermocouple as the temperature sensor. The temperature sensor measures the temperature of the tube. The cartridge heater heats the cylinder, which distributes heat evenly throughout the length of the transfer line tube. The boot of the transfer line, which mates to the GC, prevents hot air from leaking from the GC oven. Weldment Captive Screw (4 places) Bayonet Mount Feature Quad O-Ring Heater Cable Weldment Block Heater Compression Spring No-Hole Ferrule Nose-Collar Brass Nut Retaining Clip Air Seal Boot Retaining Clamp (E Clip) Exploded View of Transfer Line A bayonet mount feature secures the transfer line. Before you remove the trap, push gently on the bayonet mount as you twist it counterclockwise and pull the mount out. Make sure the transfer line extends out from the trap. 7 Failing to remove the transfer line before removing the trap may result in damage to the transfer line tip. The power board supplies power to the cartridge heater via a transfer line heater cable. The heater cable projects out from one end of the transfer line. It then plugs into a soft-shell connector on the top of the power board panel. The transfer line temperature is set in the Temperature Dialog in System Control. The maximum temperature that the transfer line can sustain is 350 °C; the minimum temperature depends on the GC oven and trap temperatures. In general, the transfer line temperature can be set as much as 30 °C below the maximum column operating temperature and not cause adverse chromatographic effects (e.g., retention time shifts or peak broadening). After the sample stream passes through the transfer line it is ionized either in the ion trap or in the external source. Analyzer The Analyzer consists of an Internal Ionization Assembly or External Source, the Ion Trap and a Conversion Dynode/Electron Multiplier Detector. All components except the detector are mounted on a flange, which also contains an enclosure holding electronics related to the analyzer. For the purposes of this manual, this assembly is referred to as the “Analyzer Assembly”. The Internal Ionization Assembly or External Source is attached to the Ion Trap Assembly. This combination is referred to as the “Source/Ion Trap Assembly” in this manual. Internal Ionization Configuration When the system is in internal ionization configuration, ions are generated directly in the ion trap. Electrons for ionization are produced and gated by an internal ionization source that resides just outside the ion trap’s entrance electrode. The source consists of a filament assembly and electron gate electrode with associated mounting hardware. It is held on a U shaped structure, which is also used to hold collimating magnets for external ionization. 8 Center Ring 03-931737-01 Isolator 03-931611-01 Base 03-931738-01 Screw 12-168105-00 Filament Disk 03-920174-01 Spring 21-709281-00 Gate 03-931739-01 Screw 12-168001-00 Magnet Structure 03-931677-02 03-931696-01 Retaining Plate 03-931736-01 Belleville Washer 14-998260-00, 3 pcs Captive Screw 03-931696-01 Internal Ionization Assembly The filament assembly consists of two filaments and a repeller plate. The two filaments are mounted side-by-side, with each filament approximately equidistant from the entrance hole of the oven’s electron focusing lens. Note that the 4000 MS only uses one filament at any given time; the extra filament is provided as a backup in case the first one burns out. The repeller plate is a stainless steel plate that is held at a lower potential than the filament to repel the electrons into the trap. Each filament is a rhenium ribbon. When sufficiently heated by electric current, the filament produces electrons by thermionic emission. The filament emission current refers to the flow of emitted electrons from the filament. The filament emission current is set in the Internal EI or (CI) Properties tab dialog in the 4000 MS Method. Emission current settings range from 5 to 100 µA. NOTE: It is unlikely that two filaments will have the same net flow of electrons into the ion trap. Thus, the signal amplitudes from two different filaments will probably not be the same. A typical difference is 2:1, but it may be as high as 5:1. The electron gate is a cylindrical electrode that controls the entry of electrons into the ion trap cavity. When electrons emitted from the heated filament are not needed for ionization, the electron gate is held at a -150 Vdc potential. An anodization layer insulates the electron gate from the filament end cap. When the ion trap requires electrons, the electron gate potential changes from -120 to +120 Vdc. The gate potential remains positive for a variable length of time, e.g., from 10 μsec to 65 ms. During this interval, the electrons are focused into the ion trap cavity with sufficient energy to achieve electron ionization of the sample molecules (or of the reagent gas molecules in the case of chemical ionization). 9 External Ionization Configuration In external ionization configuration, either positive or negative ions are generated outside the trap in an external source and then injected into the trap. The external source is also used to produce reagent ions for hybrid ionization, which then ionize the sample inside the trap. The external source is an assembly that consists of an ion volume surrounded by two filament assemblies, a set of lenses, a collimating magnet, and a heater, all supported by a source block. The sample enters the source volume where it is ionized. Both low and high pressure ion volumes are used by the system. Electron ionization (EI) uses the low pressure volume. Chemical ionization (CI) uses the high pressure volume. Both volumes are thin stainless steel cylinders that are chrome plated to minimize any reactions with the sample. The low pressure volume is open at the end facing the trap. The high pressure CI volume is sealed at that end with a small hole to allow ions to be entrained in the gas stream that flows from the volume. Both volumes have additional holes to allow ionizing electrons and the sample to enter. The CI volume also has an opening for the CI reagent. When in use, the CI volume is inserted into the EI volume by a pneumatically-activated plunger which is controlled by the software. The sample in the case of EI or reagent in the case of CI is ionized by electrons generated by one of two filament assemblies. Each assembly has a rhenium filament sandwiched between a repeller plate and electron lens, all supported by a ceramic base. The filament generates electrons through thermionic emission resulting from the heat generated by current flowing through the filament. During ionization, the repeller is set to a negative voltage and the electron lens to a positive voltage to gate electrons into the source. When ionization is not taking place, these voltages are reversed to prevent electrons from entering the source. This patented pulsed ionization technique reduces ion noise during mass scanning and also reduces contamination of the ion volume. The repeller and electron lens voltages need to be properly balanced, using an Auto Tune routine, to keep the electron current stable during switching. In addition to gating electrons into the ion volume, the electron lens also focuses the electron beam. To collimate the electron beam further, two magnets adjacent to each filament assembly collimate electrons into the source. 10 Retainer, Lens, Pins 03-931681-01 Screw 12-168105-00 Spring 03-931758-01 CI Volume Holder 03-931607-01 Screw 03-931619-01 Filament Assembly 03-931510-01 Screw 12-168304-00 Block 03-931610-01 CI Volume 03-931608-01 Gasket 03-931680-01 Lens 1 03-931684-01 EI Volume 03-931684-01 Screw 12-168105-00 Lens 3 03-931686-01 Screw 12-168306-00 Screw 12-168105-00 Lens 2 03-931685-01 Centering Ring 03-931683-01 Heater Assembly 03-931027-03 External Source Components Magnet Structure 03-931677-01 Collimating Magnets 77-299014-00 Magnet Disks Location 03-931761-01 External Source Assembled 11 Isolator 03-931511-01 After the sample is ionized, three lenses are used to direct the resulting ions towards the ion trap using electrostatic focusing. In the case of EI, the first lens also extracts ions from the source. The center (L2) lens also acts to gate the ions into the trap by changing its polarity. The lenses are nickel-plated stainless steel cylinders with an anodized insulating layer to prevent the lens from shorting together. Each lens has a voltage connecting post. A heater maintains the source at an elevated temperature. Electrical connections are made to the source through a flexible printed circuit cable that connects to the electronics through a printed circuit board mounted to the top flange. A heat shield between the source and the flexible cable protects the solder joints. Hybrid Configuration The 4000 MS supports a unique mode of operation called hybrid chemical ionization. In the hybrid configuration, reagent ions are generated in the external source then drawn into the ion trap to react with analytes from the GC column. This approach has a number of potential advantages including avoiding ion molecule reactions with the neutral reagent and avoiding losses of negative ions that occur when they move from the external source to the trap. The hybrid mode requires the external ionization option and a security chip to be present but does not involve any unique hardware. In the hybrid mode, the external source must be in place and the transfer line must be positioned with the sample directly entering the ion trap. Ion Trap The ion trap assembly consists of three electrodes separated by quartz spacers, and contained in a heated oven. The three electrodes are the entrance, ring and exit electrodes. These electrodes have hyperbolic inner surfaces that together form a cavity in which ionization, fragmentation, storage, and mass analysis take place. There is a single hole in the center of both the entrance and exit end cap electrodes. The hole in the entrance electrode allows the entry of ionizing electrons when the system is configured for internal ionization. The hole in the exit end cap allows the exit of ions to the detector. There are also holes in the edge of the end caps in which banana plugs are placed that make contact with springs that carry supplemental waveform signals. One of these holes in the entrance end cap also acts as the sample inlet to the ion trap in internal and hybrid ionization modes. Four identical quartz or silica-coated spacers separate the central ring electrode from the entrance and exit end cap and from the trap oven plates. The trap oven and its clamping plate hold the electrodes and spacers in place. The RF generator assembly provides high voltage 1 MHz RF voltage that is applied to the RF ring electrode through a feedthrough on the underside of the vacuum manifold. Under the proper RF voltage, the ion trap electrodes create a three-dimensional, hyperbolic electric field. This field is capable of trapping the ions in stable, aperiodic orbits. In the presence of helium damping gas, the ions are cooled towards the center of the trap. As the RF voltage increases, the ion trajectories become unstable in increasing order of mass to charge ratio. The ion trap ejects the ions and sends them to the conversion dynode and then to the electron multiplier for detection. 12 Supplemental Waveform Plug 03-931667-01 Thumbscsrew 03-931672-01 Silco End Cap Electrode 03-931644-93 Banana Plug 51-15194-00 Silco End Cap Electrode 03-931644-93 Trap Oven, Entrance Half 03-931028-01 Spring 21-719939-00 Trap Oven, Exit Half 03-931028-02 RF Electrode, Silco Coated 03-931675-93 Quartz, Silco Spacer 03-930535-02 Quartz, Silco Spacer 03-930535-02 Ion Trap During mass analysis, a dipole voltage at the trapping RF frequency is applied across the end caps to offset the ions from the center of the trap. Two additional supplemental waveforms are applied to the end caps. The dipole signal is applied out of phase across the end caps while the quadrupole signal is applied in phase. These supplemental waveforms interact with the ions and cause ejection when they correspond to one of the secondary secular frequencies of ion motion. The end caps receive these signals by way of small banana plugs that are inserted into the electrodes. The plugs receive the signal in turn from springs attached to feedthroughs in the upper flange. A DC offset voltage can also be applied to all three electrodes in the trap. The DC offset is used in external ion mode to assist in the introduction of ions into the trap. Detector After ions are ejected from the trap, they are detected by a combination conversion dynode/electron multiplier detector. The detector is enclosed in a cylindrical stainless steel shield that prevents metastable ions from entering the source. 13 Conversion Dynode 03-931691-00 Electron Multiplier 03-931751-01 Screws 12-168304-00 Multiplier Base Multiplier Clip High Voltage Strap 03-931753-01 Anode Feedthrough High Voltage Feedthrough 4000 MS Detector After exiting the trap, ions are first accelerated onto an off axis conversion dynode that generates a combination of positive ions and electrons through secondary electron emission. The conversion dynode is made up of a rounded stainless steel cup suspended on a post. The cup is manufactured with a smooth surface finish to prevent spurious field emissions. If positive ions are to be detected, the conversion dynode is set to a large negative voltage (typically -10 kV). In this case, the secondary electrons will be attracted to the relatively positive multiplier. For negative ions, the conversion dynode is set to a large positive voltage, in which case positive ions from the dynode are attracted to the relatively negative multiplier. In addition to allowing the detection of both positive and negative ions, the off axis conversion dynode eliminates detection of photons that would be seen by an on axis detector. The continuous-dynode electron multiplier consists of a lead-oxide/glass, funnellike resistor. A negative voltage of between -800 and -3000V is applied to the front end of the electron multiplier, referred to as the cathode. The back end of the cathode is held near ground potential, and is referred to as the anode. Electrons or ions emitted from the conversion dynode strike the cathode with sufficient velocity to dislodge additional electrons from the inner curving surface of the cathode. The increasingly positive potential gradient draws the ejected electrons into the electron multiplier, further accelerating them in the process. Because the electron multiplier is curved, the ejected electrons do not travel far before they again strike the inner surface of the multiplier, resulting in the emission of more electrons. This configuration produces a cascade of electrons that is accelerated toward ground potential at the exit end of the cathode. The anode collects the electrons and passes the resulting ion signal to the ion amplifier that is mounted on the side of the vacuum manifold directly next to the 14 multiplier. The ion current is proportional to the total number of ions that the ion trap ejects. Typically, the voltage applied to the electron multiplier should be adjusted until the gain is about 105, i.e., until each electron or positive ion that enters the electron multiplier generates approximately 105 electrons. Vacuum System The analyzer is contained in a vacuum manifold maintained at a pressure of 10 µTorr. A turbomolecular pump provides the vacuum required. The turbo pump is backed by a mechanical rotary foreline pump, which also performs the initial evacuation of the vacuum manifold during pump down. A thermocouple gauge is used to measure the foreline pressure and an ion gauge to measure the vacuum manifold pressure. Vacuum Manifold The analyzer is contained in a nickel-plated aluminum vacuum manifold that provides feedthroughs for the various electrical and pneumatic lines that are required. A top flange feeds the end cap voltages and supplies all the source electrical connections by way of a printed circuit board feedthrough. A front flange feeds the CI and Calibration gases and supports the CI ion source switching mechanism. A side flange provides multiplier connections. All three flanges are sealed by Viton® O-rings. The manifold has line voltage heaters in its base to provide heat for bake-out. Insulating material surrounds the manifold to retain the heat. The turbomolecular pump is mounted horizontally to the rear of the manifold. Foreline Pump The foreline pump has two purposes. The first is reducing the vacuum system pressure to a level that will allow the operation of the high vacuum turbomolecular pump. The second is maintaining the vacuum system pressure by removing the turbomolecular pump’s exhaust gases. The foreline pump is connected to the turbomolecular pump by a 2.1m (84 in.) length of 1.9 cm (0.75 in.) ID vacuum tubing. The pump plugs into the rear panel outlet labeled “LINE VOLTAGE - PUMP ONLY” on the rear of the MS. Power is supplied through this outlet and is controlled by the power switch on the rear panel. The foreline pump used on the 4000 MS is a Varian DS-102 two-stage rotary vane pump with a pumping speed of 90 L/min and a vacuum potential of 1.5 x 10⁻³ Torr (2 x 10⁻¹ Pa). If you use the 4000 MS to analyze hazardous materials, be sure to direct the foreline pump exhaust to an exhaust system that complies with applicable safety regulations. Turbomolecular Vacuum Pump The Varian TV-301T Turbomolecular Vacuum Pump provides the high vacuum for the 4000 MS. Under normal operating conditions, this pump supplies a vacuum of approximately 10-5 Torr (1.33x10⁻³ Pa) in the manifold region outside 15 the ion trap assembly. The pump is rated at 230 liters/second; it is air cooled and thermostatically protected. If the temperature of the pump housing near the bearing exceeds 60 °C, the pump will automatically shut down. A turbomolecular-pump controller regulates and supplies power to the pump. The controller sits below the pump in the analyzer compartment of the spectrometer. Turning off the main power switch on the rear panel of the mass spectrometer shuts off power to the turbomolecular-pump controller and thus to the pump. The electronics service switch does not turn off the vacuum pumps. The turbomolecular-pump controller monitors the pump’s rotational speed. The controller sends a signal proportional to the pump speed to the controller board via the power board. You can monitor the turbomolecular pump speed from the Diagnostics or the Startup/Shutdown tab dialogs in System Control. If the pump speed falls below 94% of its maximum operating speed, the VACUUM OK signal read by the Controller board turns off. The filament, electron multiplier, RF generator, CI reagent gas valve, and calibration gas valve turn off automatically. This condition probably indicates a major air leak in the system or that the pump is too warm. Ion Gauge An ion gauge is present on the bottom of the vacuum manifold. Its design is based on the Bayard-Alpert gauge tube. The specifications for the gauge are similar to those of commercially available gauges. Fixed pressure readings with nominally identical gauges may exhibit variations of ±15%. An accuracy of ±25% in mid-range for any one gauge is considered typical. The ion gauge generally exhibits good repeatability. However, the ion gauge response depends on gas composition. A given pressure of air and water will give a different reading than that of helium. The ion gauge is meant to be a rough indicator of vacuum conditions. It is not a precise quantitative tool. The gauge uses thoria-coated iridium (ThO-Ir) filaments. These filaments are burnout resistant, and therefore exhibit high tolerance to air and water in the vacuum manifold. There is a time delay associated with heating the filament to allow it to stabilize. Stable readings will be obtained in 15 – 20 seconds. The ion gauge measures pressures between 0.1 and 10,000 Torr. A logarithmic amplifier on the ion detection board amplifies the collector current, and the data system interprets this current as measured pressure. Ion gauge pressures can be monitored from the Manual Control, Diagnostics, and Startup/Shutdown tab dialogs in System Control. Thermocouple Gauge A thermocouple gauge is attached to the foreline pump hose to measure pressure to check for gross leaks and foreline pump failure. The thermocouple gauge is a simple, rugged, vacuum gauge that is used to measure vacuum pressures in the 2 Torr (267 Pa) to 1 x 10⁻³ Torr (1.3 x 10⁻¹ Pa) range. The gauge’s main purpose is to enable the detection of gross leaks and foreline pump failure. 16 Pneumatics Pneumatics components deliver the required gases to the analyzer including helium damping gas, calibration gas (FC-43), and various CI reagents. CI IN 4 mL C2S 50 mL CI Block 03-930555-01 Needle Valve Block 03-931015-01 Getter Turbo 03-931438-01 27-230680-00 HE IN Cal Gas Vial 0 EFC Block 03-92641-00 C2S HE/CI Block 03-931014-01 V2S 3 V2P Liq CI IN 10 mL Vent Vent Stem Turbo 27-230680-00 Manifold 03-931603-01 Trap Ext Source 03-931018-01 03-931017-01 Plunger V3P Roughing Pump Roughing Elbow 03-931726-01 Vent Transferline 03-931012-01 Rear Panel Sample Symbols: Front Panel Vent Stem Proportioning Valve 2-Way Clipard Valve Needle Valve Restrictor External Only Pneumatics Interconnections 17 Helium Flow In internal ionization and hybrid mode, helium damping gas is provided to the trap through the GC column flow. In external ionization mode, the helium damping gas must be provided separately. Helium enters through a Swagelok® fitting in the back of the instrument. It is then immediately routed through an electronic flow controller (EFC) that maintains a constant flow, set through the workstation in the Module Attributes tab dialog in Manual Control. The EFC measures the pressure drop across the flow path and then adjusts the position of an electronically controlled valve to keep the proper flow (see “Electronic Flow Control” on page 23). After passing through the EFC, the helium flows through a heated getter to remove water and other contaminants from the system. The getter normally operates at about 400 °C. It is critical to run only helium through the getter. Running air or any oxidizing gases may destroy the getter and result in hazardously high temperatures and fire. Helium enters the vacuum manifold through a solenoid valve on the side of the vacuum manifold. The controller board monitors the temperature of the getter on a continuous basis. If high temperature, loss of inlet pressure or vacuum failure is observed, the controller shuts off flow of helium on both sides of the getter. Calibration Gas Flow The calibration compound is perfluorotributylamine (PFTBA) or C12F27N, also known as fluorocarbon-43 (FC-43). A small glass vial inside the front door of the 4000 MS holds the compound. The flow of calibration gas into the manifold is set manually via a needle valve. The needle valve is in a block below the CI reagent needle valve inside the front door of the 4000 MS. The MS Workstation controls the opening and closing of a three-way solenoid-operated valve downstream of the needle valve. When the Cal Gas flow is off, a vacuum is placed on the vial, by way of a line connected to the foreline elbow, to prevent a pressure build up that would result in a pulse of calibrant when the gas is turned on. The CI Reagent Gas Flow The CI reagent enters the system through a solenoid valve on the back of the instrument. It then passes through a restrictor and second solenoid valve that is in the same block, on the side of the manifold, as the helium solenoid valve. A line to the roughing elbow is attached to the CI line to pump away some of the reagent to prevent pressure pulses when the CI is turned on. The CI control needle valve controls the flow in this vacuum line that in turn controls the flow of reagent into the source by changing the split ratio. After passing through the solenoid valve, the flow passes through the magnet structure inside the vacuum manifold. In the case of Internal Chemical Ionization, the reagent then flows into the entire manifold. In the case of External Chemical ionization, the flow is routed directly into the CI source volume. 18 Electronics HIGH VOLTAGES INSIDE. No user serviceable parts under screw-attached covers. Contact your local Varian, Inc., service representative for instrument repair and service. The electrical functions of the 4000 MS are distributed among eight boards (see block diagram) each carrying out some specific functions. In some cases, the boards are located as close as possible to the associated part of the spectrometer. The RF coil plays a part in generating the trapping field RF and is a power entry subsystem in the back of the instrument. The functions of the boards are as follows: • Controller Board – controls spectrometer operations and acquires data generated by the system. • Power Board – generates all power sources for the instrument, controls the temperature of heated zones, routes signals between other boards and drives all solenoid valves. • Lower Manifold Board – drives various source voltages and controls filament operation. • Upper Manifold Board – contains circuitry that handles supplemental excitation waveforms and trapping field dipole switching. • RF Generator Assembly – generates and controls the RF trapping field. • Ion Detector Board – has the circuitry for the Multiplier and Ion Gauge, both of which detect ions in the system. • Ion Amplifier – an electrometer that amplifies the ion signal. • Electronic Flow Controller – the module that controls the flow of the helium damping gas. 19 A power input sub-system distributes line voltage to various components as needed. Power Board Controller Board USB Electronic Flow Control RF Coil & Detector RF Generator Assembly To Controller Board Manifold Boards (2) Ion Detection Board (Conversion Dynode, IG Multiplier) Trap Source Coupling Ion Amplifier Detector (Source Voltage Supplies/Emission Regulator, End Cap Electronics) Source Ion Trap 4000 MS Electronics Block Diagram Controller The controller (see block diagram) is the “brains” of the spectrometer, controlling all operations as well as acquiring all data. The controller executes scan functions, sets various static voltages and switches components such as valves. Commands and data are communicated between the controller and the MS Workstation computer through a universal serial bus (USB) interface. The processing subsystem of the controller utilizes two TI DSP (Digital Signal Processing) microchips. The use of two processors allows time critical operations, handled by the scan processor, to be separated from non-time critical operations, handled by the communication processor. The processors each have their own local memory where programs reside and a shared dual processor memory that is used to hold data and exchange command or status information. The scan processor handles instrument control, including scan function execution and data acquisition, in a synchronous manner. Receiving of commands from the workstation and transmission of accumulated data is performed asynchronously by the communications processor. Acquisition method segments are pre-downloaded in their entirety to the communications processor prior to their execution and stored in shared memory. The segments are then activated at the appropriate time by the controller. Multiple method segments can be preloaded. 32 megabytes of dynamic random access memory (DRAM) is used to store a library of waveforms used for scan function supplemental waveforms. The combination of preloaded waveform libraries and preloaded segments eliminates any delays between segments. Various switched components in the system (such as solenoid valves) are controlled through latches. Analog control voltages are set by the scan processor through a set of digital to analog converters ranging in resolution from 10 bits for lens voltages to 16 bits for the trapping field RF level. 20 A number of specialized functions are implemented on the controller using field programmable gate arrays. (FPGAs). These functions include an acquisition controller, waveform/memory controller, and RF scanning module. Power Board The power board supplies power to all electronic components except the turbomolecular pump controller. It also controls a number of heaters and solenoid valves as well as providing signal routing between the controller board and other boards in the system. NOTE: The switching power supply is protected by a 5A, Non-Time-Delay, fuse. Switching power supplies are utilized for all voltages. The following switching power supplies reside on the board: • A +5 Vdc power supply, which supplies +5 Vdc voltage to all digital circuits. • -15V and +15 Vdc power supplies, which supply the voltages to the analog circuits on the power board and the manifold electronics assembly. • +20V and -20 Vdc power supplies, which supply the voltages to the Controller and RF generator board’s analog circuitry. • A +24 Vdc power supply which provides power for the solenoid valves, heaters, the EFC, electronics compartment fan, and the electron multiplier power supply. • A +60 Vdc power supply, which supplies unregulated +55 Vdc voltage to the RF generator board. • The 200-volt power supply that supplies voltages to various lens circuits and gate circuits as well as the ion gauge. The following circuits also reside on the board: • Four heater control circuits that provide feedback control for the manifold, trap, external source and transfer line heaters. The trap heaters use proportional integral (PI) control circuits. Because there is an integrator component in this controller, removing power from the circuit may produce a lengthy stabilization time, e.g., up to two hours (dependent on the temperature set point). • Four solenoid control circuits, which turn the calibration gas, CI reagent gas, CI shutoff valve and EI/CI volume solenoids on and off. • The diagnostic multiplexer circuit, which routes the voltage output of various components, and circuits on the power control board to the Controller board. You can access these voltage outputs through the diagnostic pages. Mounted on the top edge of the power board are 15 monitor LEDs. When illuminated, these lights indicate that the voltages of the various circuits on the power board are at their proper levels, and that there are no faults. During normal operation, all green LEDs should be on. The power board supplies most of the regulated voltages for other electronic subsystems in the spectrometer. The voltages include +5 volts for digital components, ±15 volts for analog components (such as amplifiers), +24 volts for all the heaters except the manifold, 60 volts for the trapping field RF generator. 21 Manifold Electronics The manifold electronics consists of two boards stacked in an enclosure directly on top of the vacuum manifold. The boards perform a variety of functions related to the ionization and mass scanning processes. Functions related to the external source include providing lens voltages and heater control. These boards provide filament control for both external and internal ionization. The function of the upper manifold board is to handle the signals that are applied to the ion trap end cap electrodes. As explained in the user guides, dipole waveforms are applied to the end caps during the ionization, isolation and mass scanning processes. Quadrupole waveforms are applied during the mass scanning process. The dipole signal is applied, out of phase, to the two end caps to provide a signal across the end caps. The quadrupole is applied in phase to provide a voltage between the end caps and the ring electrode. Waveform signals are received from the controller board through the power board. They are then buffered by high-power operational amplifiers and applied to the end caps through transformers that step up the waveform voltage. Two transformers apply the dipole waveforms, one for high frequency dipole waveforms and the other for low frequency square waves applied during non resonant CID. A trapping field dipole (TFD) voltage is applied during the mass scanning process to offset the trapped ions from the center of the trap. The TFD signal is derived from trapping field RF currents flowing in the end caps coupled from the 1 MHz signal applied to the ring electrode by the RF generator and coil. The TFD is switched on and off by changing the impedance between end caps and ground; when the TFD is off, a low impedance is switched in. When the TFD is turned on, a high capacitive impedance on one end cap and inductance impedance on the other end cap are switched on, resulting in the out of phase dipole signal. The lower manifold board handles a number of source related electronics functions. It has amplifiers that apply the appropriate lens voltages to the source, based on set points received from the controller board. The source filament emission regulator circuit is also present on the board. In addition, there is also conditioning electronics that produce high-level temperature measurement signals from resistive temperature devices (RTDs) on the source and traps that are used for temperature control and diagnostic purposes. RF Generator Assembly The RF generator assembly consists of an RF generator circuit board, an RF detector circuit board, and the RF coil. A shielded housing beneath the vacuum manifold encloses the coil and RF detector circuit board. The RF generator circuit board is attached to the back of the shielded housing. The RF generator circuit board receives an analog signal from the controller board that is proportional to the current mass position in the scan, which is in turn proportional to the desired RF voltage applied to the ion trap. The RF detector circuit board sends a signal proportional to the actual amount of RF voltage applied to the ion trap to the RF generator board. The RF generator board compares the desired and actual amount of the RF voltage and adjusts the gain of an RF amplifier to cause the actual RF voltage to equal the desired RF voltage. Since the high voltage required at the ion trap exceeds the capabilities of conventional electronic amplifiers, a resonant LC circuit consisting of the RF coil and the ion trap capacitance is used. At resonance, the RF voltage at the ion trap end of the coil is about 150 times that at the RF generator circuit end of the coil. 22 Ion Detection Board The ion detection board contains key elements of the electronics associated with detecting ions by either the electron multiplier or ion gauge. The board contains a power supply that applies voltage to the cathode of the electron multiplier. That supply consists of a chain of voltage multiplier circuits that are switched between –800 and –3000 volts by a multiplier on signal from the controller. The ion detection board also has the emission current regulation circuitry for the ion gauge, as well as the electronics to obtain and condition its vacuum signal. Ion Amplifier The ion amplifier converts the current received from the electron multiplier to voltage that can then be read by the controller board analog to digital converter. This amplifier boosts the signal by a factor of 107. To maximize the bandwidth, the amplifier is mounted on the side of the vacuum manifold as close to the multiple output feed-through as possible. Electronic Flow Control An electronic flow controller (EFC) controls the flow rate of helium damping gas in external ionization mode. The EFC maintains the proper flow using a closed loop feedback control system. The flow set point is set through a digital to analog converter (DAC) that receives its setting from the controller board. The control electronics then reads the flow by measuring the pressure across a known orifice using two pressure transducers. It sets the required flow using a proportional solenoid valve. The relationship between flow and differential pressure is factory calibrated. Ambient temperature is measured to compensate for flow differences with temperature. The EFC also is used to control the state of the helium cutoff valve at the manifold. This valve is closed if excess getter temperature is detected or if the helium inlet pressure drops below 20 psi. Power Input Subsystem and Turbomolecular Pump Controller The power input subsystem contains the following circuits and switches: • Main power switch • SERVICE switch • Line voltage switches 23 Main Power Circuit Line power of 90 - 130 Vac, 60 Hz ±3 Hz (or 180 - 230 Vac, 50 Hz ±3 Hz) first enters the rear panel of the mass spectrometer through J1, and then passes through a line filter and the circuit breaker. After the circuit breaker, power is split in two directions. One path supplies the turbomolecular pump controller and foreline pump via J2. The second path goes to the electronics service switch, which controls power going to the power board and the rest of the electronics. The electronics service switch allows the vacuum to the maintained in the event that the electronics need to be serviced. The turbo pump controller provides startup power to the power board, in addition to regulating the speed of the turbo pump. WARNING: SHOCK HAZARD In the event of an emergency, shut off all power. If the equipment is used in a manner not specified in this manual, the protection provided by the equipment may be impaired. 24 Periodic Maintenance Procedure Interval To ensure peak GC/MS performance, you need to perform periodic maintenance on the vacuum and cooling systems. The following list identifies relevant maintenance intervals. • Check the foreline pump oil level and oil condition weekly • Purge foreline pump oil weekly • Check cooling fans weekly • Change foreline pump oil and filter at least every nine months Checking Foreline Pump Oil Level and Oil Condition Ideally, the level and condition of the pump oil should be checked with the pump switched off and warm, though a reasonable assessment can be made with the pump running. The oil level should be between the maximum and minimum levels on the sight glass. If the oil level falls below the minimum level, use a funnel to gradually add more oil (88-299517-00) through the filler port until the oil level is centered between the maximum and minimum levels. NOTE: Pump models are subject to change. If not using a model DS-102 pump, refer to the pump manual for details. The pump oil should be clear and light amber in color. If the oil becomes thick, dark in color, becomes opaque, or has a burnt smell, change it and the Oil Mist Filter Cartridge as described in Changing Foreline Pump Oil. Changing Foreline Pump Oil To ensure peak performance and maximum pump lifetime, change the pump oil whenever the oil becomes thick, dark in color, and has a burnt smell, or at least every six months. The oil change should be performed while the oil is warm but not immediately after stopping the pump. Materials Needed • 5/16" Allen Wrench • Varian GP Oil (88-299517-00) • 1.0-liter (1 US qt) or larger container 25 Gas Ballast Valve Filler Plug Drain Plug To change the pump oil: 1. To turn off and vent the MS, go to “Turning Off the Mass Spectrometer” (page 32). Disconnect the pump power cord from the rear of the MS. Dangerous high voltages are present. Unplug power cord. Hot Surface. Take appropriate precautions. Wait for the pump to be cool enough to touch before continuing the oil changing operation. 2. Disconnect the vacuum hose from the foreline pump by removing the clamping ring. 3. Pull the hose free, and place the seal on a clean lint-free surface for later use. 4. Carefully place the foreline pump on a raised surface. The surface should be high enough to allow a 1.0-liter (1 US qt) or larger container to be placed under the drain port when the pump is tilted forward. A container with an opening diameter of at least six inches will make this task easier. 5. Place an oil pan beneath the drain port to catch any spillage. 26 CAUTION The pump weighs at least 22 kg (48 lb.). Use proper lifting techniques to avoid physical injuries. Hazardous chemicals may be present in the used pump oil. Avoid contact with skin. Use proper eye and skin protection. 6. Remove the filler plug on top of the pump. 7. With the container in place to catch the oil, slowly remove the drain plug in the front of the pump using a 5/16 Allen wrench. Toxic residues from mass spectrometer samples will build up in used pump oil. Dispose of all used pump oil in accordance with applicable regulations. Place a hazardous chemical warning label on the container. 8. Tilt the pump forward and hold until oil flow ceases. 9. Return the pump to the horizontal and refit the plug. 10. Run the pump for approximately ten seconds with the intake port open. This will remove any residual oil from the pumping block. CAUTION Avoid breathing oil mist coming from the exhaust port during this operation. 11. Remove the plug, tilt the pump, and drain any remaining oil. 12. Return the pump to the horizontal. 13. Wipe the oil residue from the drainage port, and refit the drain plug. 14. If the pump oil was particularly dirty, flush the pump. 15. Fill the pump with fresh oil (88-299517-00) through the filler port until the oil level reaches the maximum level in the sight glass. A funnel may be helpful. 16. Replace the filler plug. 17. Run the pump for at least one hour with the gas ballast valve open to achieve a good vacuum. Flushing the Pump Oil The pump should be flushed if the pump oil is particularly dirty. After draining the pump, (as described previously in steps 1 – 14) do the following: 27 CAUTION Avoid breathing oil mist coming from the exhaust port during this operation. 1. Pour 330 mL (0.35 US qt) of fresh pump oil in through the inlet port then run the pump. 2. Stop the pump, drain the flushing oil, and then continue filling with fresh oil. 3. Change the oil mist cartridge. Changing the Oil Mist Cartridge Replace the cartridge of the oil mist eliminator on the exhaust port of the pump when you change the oil. The part number for a package of cartridges is 2710100200. There are two in a package. Note: When the cartridge is saturated, excessive mist or oil sprays out, and the cartridge must be replaced. Disassembling the oil mist eliminator 1. Remove assembly screws A 2. Remove Upper housing B 3. Remove Spring C 4. Remove Valve D 5. Remove Cartridge E 6. Remove O-ring F 7. Clean the parts with a dry cloth. 8. Degrease with a water soap solution. 9. Rinse with clean water and dry. Reassembling the oil mist eliminator 1. Install a new cartridge in lower housing B 2. Press gently to check that it is firmly seated. 3. Install valve D with polished side toward cartridge. 4. Center the spring C over the valve, fit gasket, F in the groove. 5. Cover entire assembly with the second casing B 6. Tighten the two casings B, using screws A 28 Checking Cooling Fans CAUTION To prevent overheating, do not block air intakes. The cooling fans maintain an optimal temperature for the turbomolecular pump and the other electronics modules. Without the cooling fans, the lifetime of the turbomolecular pump and temperature-sensitive PC-board components can be shortened. To ensure proper operation of the cooling system, operate the MS with its covers in place. In addition, be sure to check the fans at least once each week. The MS is equipped with two fans on its rear panel. The function of these fans is to pull air into the instrument. To check fan operation proceed as follows: 1. Make sure that the main power switch and service switch are turned ON. 2. Place a large sheet of paper over one of the fan guards. a. If the paper is sucked toward the fan guard, the fan is working. b. If the paper is not sucked toward the fan guard, the fan is broken. Contact your Varian Customer Support Representative to arrange for a replacement. 3. Check the second fan in the same manner. If the fans are excessively noisy, e.g., if they whine or whir, one of the fans may be about to fail and it should be replaced. 29 30 MS Maintenance Procedures General Recommendations There are a number of considerations to take into account when maintaining a high-vacuum trace analysis instrument such as the 4000 MS. In particular, considerable care must be taken not to introduce contaminants into the system. Wash your hands before working on the system. Hand creams and highly perfumed soaps should be avoided Gloves should be used when handling any parts that are internal to the analyzer. Care must be taken when using gloves since many types of gloves can leave chemical residues. Powder free Nitrile gloves are best to be used followed by lintfree cotton or lint-free nylon gloves. Nylon and Nitrile gloves should not be used to handle parts at elevated temperatures. Keep all tools clean and free of grease or other contaminants. Store sources and transfer line tips in the containers provided. The containers are designed to be contaminant-free. Take particular care to eliminate particles inside the vacuum manifold and on sealing surfaces. Clean and filtered compressed air and chemical wipes (such as Kimwipes®) can be used to remove such particles. Cover open manifolds or exposed parts when they are not being worked on. Chemical wipes or aluminum foil work well. Recommended Tools and Materials Use the following tools and materials for performing MS maintenance procedures. • Tweezers or long nose pliers • Longneck Phillips head screwdriver • Longneck flat head screwdriver • 3/16" wrench (or transfer line tool provided) • 5/16" wrench • 1.5 mm Allen wrench • Toothbrush • Beakers • Ultrasonicator • Thin blade knife (such as an X-acto® knife) 31 • Pasteur pipettes • Gloves - powder-free Nitrile, or lint-free cotton or lint-free nylon • Chemical wipes such as Kimwipes® • De-ionized water • Isopropyl alcohol, methanol or methylene chloride • Acetone • Mild detergent (ph 6 to 7.5) • Aluminum oxide • Cotton swabs • Sandpaper Common Procedures The procedures in this section are common to many of the maintenance procedures described later in this section. The manual contains links to these common procedures where appropriate. Click the link to jump to the common procedure indicated, then press the back arrow located on the Navigation Toolbar to return to the original procedure. The page numbers of these procedures are also indicated in the manual. It may be necessary to use the Acrobat View menu to display the Navigation toolbar, if it isn’t already visible. Turning Off the Mass Spectrometer WARNING: BURN HAZARD Allow heated zones to cool before disassembly. 1. Shut down the mass spectrometer through the Startup/Shutdown tab in System Control. Click the Shut Down button in the upper left corner of the screen. The heaters will be turned off and the speed of the turbo pump will be gradually reduced to 35% of full speed. It may take several hours for full shutdown and cooling to take place. To speed the shutdown process, the system can be powered down and purged with Nitrogen. See “Turning Off the Mass Spectrometer with Nitrogen Purge” on page 34. 32 2. Once the shutdown is complete as indicated in the shutdown log window, exit the System Control program and then shut off the turbomolecular pump, foreline pump, and all electronics by turning off the main power switch on the back panel. 3. Disconnect the 4000 MS power cord. WARNING: BURN HAZARD Dangerous high voltages are present. Unplug power cord. 4. Open the front-panel door and turn the vent valve one turn counterclockwise. 33 5. Listen for the sound of the turbo pumps spinning down and wait until the turbomolecular pump has completely stopped. Leave the vent open for about 10 minutes to allow the pressure to equilibrate. 6. Close the vent valve by turning it clockwise fully. Turning Off the Mass Spectrometer with Nitrogen Purge Purging the vacuum manifold with nitrogen after the trap has partially cooled can reduce the shutdown time. WARNING: BURN HAZARD Allow heated zones to cool before disassembly. 1. Shut down the mass spectrometer through the Startup/Shutdown tab in System Control. Click the Shut Down button in the upper left corner of the screen. The heaters will be turned off and the speed of the turbo pump will be gradually reduced to 35% of full speed. It will take a few minutes for this to take place. 2. Open the front door and attach a source of nitrogen at 5 PSI pressure or less through a polyurethane tube to the barbed fitting at the center of the vent valve. 3. Once the pump spin speed has reached 35% and the trap temperature has fallen to 150 °C, exit the system control program, and then shut off the turbomolecular pump, foreline pump, and all electronics by turning off the main power switch on the back panel. 4. Disconnect the 4000 MS power cord. 34 WARNING: SHOCK HAZARD Dangerous high voltages are present. Unplug power cord. 5. Open the vent valve one turn counterclockwise with the Nitrogen flow on. NOTE: Opening this valve more than one turn risks damage to the equipment. 6. Listen for the turbomolecular pump to fully spin down, then wait one hour for the trap to cool down. 7. Close the vent valve by turning it fully clockwise. Remove the nitrogen line. Moving the Mass Spectrometer Away From the GC 1. Turn off the GC column oven and heater through the 3800 GC keyboard by pressing the Column Oven button and the blue soft key labeled Turn Oven Off. WARNING: SHOCK HAZARD Dangerous high voltages are present. Unplug power cord. 2. Open the GC oven door. Make sure that about 30 cm (12 in.) of the massspectrometer end of the capillary column is hanging freely and that the column is not caught on the column rack or cage. 3. Check for sufficient lengths of pneumatics tubing at the back of the instrument to move the spectrometer. 4. While keeping an eye on the capillary column in the GC oven, gently slide the mass spectrometer away from the GC with the transfer line lined up with the GC hole. As you slide the mass spectrometer, take care not to allow the column to bind or kink. When you have fully withdrawn the mass spectrometer from the GC, the distance separating them should be ~23 cm (9 in.). The transfer line should be fully removed from the GC oven. Removing the Analyzer Assembly 1. Move the mass spectrometer away from the GC. 2. Remove the top cover from the MS instrument by lifting it up. 35 WARNING: SHOCK HAZARD Dangerous voltages exposed when cover is removed. Unplug power cord. 3. Be sure the transfer line is cool. Retract the transfer line by grabbing the front nose and turning counterclockwise while pulling out. A mild amount of force may be needed to release residual vacuum. If the transfer line does not pull out, reopen the vent to be sure the analyzer is at atmospheric pressure. If the transfer line is still difficult to retract, try using the transfer line tool or a 3/16” wrench to twist the end of the transfer line counterclockwise as you retract it. After the transfer line has been fully retracted, lock it into position by turning it clockwise. 36 4. Press out on the release tabs to remove the controller to manifold cable (1). 5. Pull on the white pull-tab to remove the manifold lens cable (2). 6. Press down on the locking connector and pull out to remove the manifold power cable (3). Verify that the transfer line is fully retracted and locked into position to prevent damaging its tip. 7. Lift the analyzer assembly up and out of the manifold and place it upside down on the work area. 8. Cover the manifold opening with a Kimwipe® or other low lint material to avoid dust. 9. From this point, use clean tools and wear powder-free gloves. 37 Removing the Source/Ion Trap Assembly 1. Using your thumb and forefinger, gently wiggle each connector attached to the external source or internal ionization assembly, while pulling the connector off the pins. It is best to keep the internal source filament adaptor attached to the flex cable if in internal ionization mode. Use tweezers or pliers to get the connector off if necessary. 2. Loosen the two screws holding on the heat shield and slide it away from the source or remove it. 3. Fully loosen the two screws that attach the trap assembly to the top flange. 4. Lift the assembly out and place the assembly on the holder provided (if servicing the ion trap) or on a lint-free cloth with the source facing upwards. Never rest the assembly on its heater connectors or source pins. 38 Reinstalling the Source/Ion Trap Assembly Check to see that all the connection fingers are even as shown. If any fingers are substantially bent, bend them back in line with the other fingers. Connector Fingers Down 1. Place the Source/Ion Trap assembly on the analyzer flange with the connector fingers down. Align the two screw holes on the flange with the screws on the Source/Ion Trap assembly then tighten the two screws evenly. 2. Replace the heat shield and tighten the two screws securing it to the flange. If the external source is in place, the shield should be positioned on the rear set of screws. The shield should be positioned on top of the ridge on the source heater block, see figure that follows. If using the internal configuration, the screws should be closer to the center part of the source. Be sure the two screws in the alternate shield position are also tightened down. 39 Heat Shield Position with External Ionization Shield - Heater Block Alignment Heat Shield Position with Internal Ionization Source 40 3. Check source connection pins for proper alignment and straighten as necessary. 41 4. Push the connectors onto the source pins. Each pin must be correctly aligned to prevent the pins from being bent. 5. If a pin is not aligned, use a pair of tweezers to move the pin into alignment. Reinstalling the Analyzer Assembly Prior to installing the analyzer, check for any particles inside the manifold or on the analyzer assembly. If necessary, blow out any particles with clean and filtered compressed inert gas. Inspect the upper flange O-ring for particles and clean if needed. There are three tubes protruding from the bottom of the manifold. Verify that these tubes are pointing straight up. If they are bent more than 20 degrees or damaged, they need to be replaced. 42 1. Be sure the transfer line is still retracted. The analyzer assembly has four metal pins that need to align with four holes in the manifold. Align these pins and slide the analyzer into the manifold. Ensure the wire harnesses and pneumatic lines between the manifold and bulkhead are not crimped when the analyzer is reinstalled. 2. Reconnect the three cables associated with the analyzer: • The controller to manifold cable (1) • The manifold lens cable (2) • The manifold power cable (3) 43 3. Gently push the transfer line assembly towards the manifold to check that it slides all the way into the manifold and does not stop prematurely. If the transfer line stops, remove the analyzer and check the tip on the transfer line. It may be bent and need to be straightened or replaced to ensure proper operation of the transfer line. Also, for external mode, be sure the hybrid mode plug is not in place. Once the transfer line slides all the way in, turn it clockwise to lock it into place. Turning On the Mass Spectrometer 1. Make sure the vent in front of the mass spectrometer is closed (turned clockwise completely). 2. Check that all cables are plugged in. 3. Check that the column from the GC is installed properly, the transfer line is locked in its operating position and the GC is operating. 4. Plug in the MS power cable into the rear of the instrument. 44 5. Turn the power switch on the rear panel to its ON position. The foreline pump should turn on and then stop gurgling after about 10 to 20 seconds. If the pump continues to gurgle then check that the analyzer assembly is seated on the manifold properly, (there should be no gaps). 6. Start up the System Control program. 7. Go to the Startup/Shutdown tab dialog in System Control if the program doesn’t automatically start there. Startup/Shutdown page 8. Go to “Checking the Vacuum Status” on page 46. 9. If in external or hybrid mode, turn on the damping gas and getter heater using the buttons in the lower left of the startup/shutdown dialog. 10. Go to “Baking Out the Mass Spectrometer” on page 47. 11. Go to “Checking Ion Trap Operation” on page 47. 45 Checking the Vacuum Status Select the Diagnostics tab in System Control. Vacuum System Field The vacuum readings (at the lower left of the screen) tell a lot about the state of the MS after pump down (and during operation). Typical operating ranges for the 4000 MS in internal mode are: Speed 100% Current 200 – 300 mA Power 9 – 13 Watts Ion Gauge Pressure < 20 μTorr Foreline Line < 50 mTorr If the Pump Spin Speed does not steadily increase, there may be a leak in the system. Large leaks will be indicated by a turbo speed less than 100%. Small leaks will show up by an increase in the pump current once at 100% or in the ion gauge pressure (See Diagnostics Mode section in the 4000 GC/MS Operation Manual, 03-914999-00.) Small leaks are diagnosed by changes in the ion gauge reading and can be pinpointed using the leak check section in the internal or external service method. For more detail on troubleshooting leaks, go to the “Troubleshooting” section on page 105 about checking for air leaks. 46 Baking Out the Mass Spectrometer Any time the system is vented you should bake out the system to eliminate water and contaminants in the vacuum manifold. The vent knob, CI plunger and surrounding area may be extremely hot, especially during bakeout. Take appropriate precautions. To bake out the Mass Spectrometer, proceed as follows: 1. Open the System Control and click on the Temperatures tab dialog. 2. Select Bakeout and enter a bakeout time of 2 to 6 hours. 3. Use the following temperatures: • Trap at 220 °C or 10 °C higher than the analysis temperature. • Transfer line at 280 °C. • Manifold at 120 °C. • Source at 220 °C. 4. Click on Start Bakeout. Checking Ion Trap Operation To check the ion trap operation, proceed as follows: 1. Once bakeout is finished, re-establish the analysis temperature in the trap for at least 2 hours to achieve thermal equilibrium. 2. The manifold temperature should be at or below 50 °C. 3. Run Auto Tune. 4. Open the Manual Control page and activate the “C:\VarianWS\4000MSservice\4000 MS Int (or Ext) Service.mth” file. 5. Use the second segment of the method to check the background. Turn on the ion trap. The ionization time should be above 20,000 μsec. If the ionization time is below 20,000 μsec, continue to bake out the trap or check the GC for contamination. 47 Cleaning Procedures The cleanliness of the sources, ion trap and conversion dynode can have a significant impact on the performance of the mass spectrometer. The frequency of cleaning depends on the quantity and nature of the samples run, so no standard cleaning interval can be recommended. The troubleshooting guide in this manual describes some of the symptoms that result from dirty components and makes recommendations about when to perform cleaning procedures. Cleaning the External Source WARNING: SHOCK HAZARD Dangerous high voltages are present. Unplug instrument power cord. • Go to “Turning Off the Mass Spectrometer” on page 32. • Go to “Removing the Analyzer Assembly” on page 35. • Go to “Removing the Source/Ion Trap Assembly” on page 39. Removing the Source Holder 1. Remove the two screws holding the source to the magnet structure. 2. Lift off the source assembly and place on its side on a lint-free cloth. 48 Removing the Lenses NOTE: The lens parts are anodized to insulate each from the other. The anodizing process creates a black coating on the surface of these aluminum parts. Scratches in the coating can create a conductive path after re-assembly. 1. Place each part on a lint-free cloth after removing. 2. Remove the lens insulator. 3. Remove the lens holding screw. 4. Remove each lens. 49 Cleaning the Lenses To clean the lenses you will need the following items: • Cotton swabs • Isopropyl Alcohol or Methanol • Beakers • Ultrasonicator 1. Clean the center shiny part of each lens with a cotton swab and isopropyl alcohol or methanol. 2. Sonicate the lenses in IPA or methanol for 1 minute. 3. Dry the parts in air or in an oven set to approximately 120 °C for 30 minutes. Removing the Ion Volumes 1. Remove the two source heater block screws. 2. Place the source heater block on a lint-free cloth. 50 3. Loosen the ion volume retaining screw until the spring pushes the CI ion volume out. EI Volume 4. Turn the source assembly so the EI ion volume can fall out. If the ion volume does not fall out, loosen the source screw until it does fall out. Cleaning the EI/CI Ion Volumes To clean the ion volumes you will need the following items: • Aluminum oxide • Cotton swabs • De-ionized water • Isopropyl Alcohol or Methanol • Beakers • Ultrasonicator CI Volume Holder CI Volume 1. Remove the spring from the CI ion volume. 2. Remove the screw to separate the ion volume from the ion volume holder. 3. Rinse the ion volume and holder with de-ionized water and sonicate them in de-ionized water for 2 minutes. 4. Sonicate another 2 minutes in isopropyl alcohol or methanol. 51 5. If the volume is discolored, perform the following steps. • Dip a cotton swab in de-ionized water and then aluminum oxide. • Gently scrub any discolored areas with slurry of aluminum oxide and water NOTE: Do not allow the aluminum oxide to dry on the surface. • Repeat steps 3 and 4 on the parts cleaned with aluminum oxide 6. Repeat these steps for the EI ion volume. 7. Dry all the parts in air, or in an oven set to approximately 120 °C for 30 minutes. Re-Assembling the CI Ion Volume 1. Line up the large holes in the holder and CI ion volume. 2. Slide the CI ion volume onto the holder. 3. Place the screw through the CI ion volume into the holder and gently tighten. While tightening, ensure the tip of the screw remains centered in the hole in the CI ion volume. NOTE: Do not over tighten. Over tightening may cause the CI ion volume to bulge and stick when moving in and out of position. Check to be sure the volume maintains its cylindrical shape. 4. Slip the spring over the assembly. Cleaning the Filaments and External Ion Source Block The filaments and source block normally do not require cleaning except when high pressure CI is performed. High pressure CI can coat the filaments with a carbon layer that needs to be cleaned to prevent leakage currents. To clean the source block you will need the following items: • Aluminum oxide • Cotton swabs • De-ionized water • Isopropyl Alcohol or Methanol • Beakers • Ultrasonicator 52 Removing the Filaments 1. Remove the two filament screws. 2. Lift out the filament and place on a lint-free cloth. 3. Remove the lens insulator screw and lens insulator. 4. Turn the source over and remove the second filament. Cleaning the Source Block 1. Use a cotton swab and slurry of aluminum oxide and de-ionized water to clean the ion volume hole and the filament entry holes. NOTE: Do not allow the aluminum oxide to dry on the source block 2. Rinse thoroughly with de-ionized water. 53 3. Sonicate in de-ionized water for 2 minutes. 4. Sonicate in isopropyl alcohol or methanol for 2 minutes. 5. Dry the parts in air, or in an oven set to approximately 120 °C for 30 minutes. Cleaning the Filaments 1. Disassemble the lenses from filament base by removing the two socket cap screws using a 1.5 mm. Allen wrench. 2. Clean the base near and between the filament posts with a piece of super fine grade (400 grit) silicon carbide sand paper until most discoloration disappears. Be very careful not to touch or deform the filament during the process. 3. Using a sharp razor blade (or tip of utility knife), scrape off the same areas as thinly as possible, until a surface similar in color to the original base is exposed. 4. Wash off any powder and contamination with isopropyl alcohol or methanol. Dry the filament before installing. 5. Clean the lenses with a cotton swab and isopropyl alcohol or methanol. It is recommended to use a second swab after initial cleaning. 6. Reassemble the lenses onto the filament base. 54 Reinstalling the Filaments 1. Install the lens insulator and lens insulator screw. Be sure the step in the lens insulator fits into the cut-out in the source. 2. Place a filament assembly into the source with the notched side down. Be sure the assembly is fully seated in place. 3. Place the two screws into the screw holes and tighten each screw evenly. Do not over tighten. 4. Turn the source assembly over and repeat the steps for the other filament. Reassembling the External Source Reassembling the external source essentially reverses the process used to disassemble the source. Reinstalling the Ion Volumes 55 1. Align the EI volume as shown with large and small holes on opposite ends. These holes need to align with the ion volume screw and transfer line hole. 2. Slide the EI ion volume into the source block. 3. Slide the CI ion volume into the source block so that the slot is aligned with the ion volume screw. 4. Fully compress the spring. Ensure the proper hole in the CI ion volume aligns with the transfer line hole. 5. Hold the CI ion volume in and slowly tighten the ion volume screw until it stops. The CI ion volume should be captured by the screw entering the slot, but still be able to freely slide in and out of the EI ion volume. Adjust the slot position so that the CI ion volume slides freely after the screw is tightened. Reinstalling the Lenses 56 1. Reinstall lens 1. The pin should slide through the left hole in the insulator. 2. Reinstall lens 2. The pin should slide through the middle hole in the insulator. 3. Reinstall lens 3. The pin should slide through the right hole in the insulator. 57 4. Reinstall the screw insulator and the lens screw through the lens and into the source. 5. Push the centering ring onto lens 3. 6. Reinstall the external source assembly and tighten the two source mounting screws. Maintain source symmetry in the assembly while tightening the screws. 7. Reinstall the source heater assembly. • Go to “Reinstalling the Source/Ion Trap Assembly” on page 39. • Go to “Reinstalling the Analyzer Assembly” on page 42. • Go to “Turning On the Mass Spectrometer” on page 44. Cleaning the Internal Ionization Assembly • Go to “Turning Off the Mass Spectrometer” on page 32. • Go to “Removing the Analyzer Assembly” on page 35. • Go to “Removing the Source/Ion Trap Assembly” page 38). Removing the Internal Ionization Assembly 1. Place all parts on a lint-free cloth. 2. Loosen the two screws holding the internal ionization assembly until it can be lifted out. The screws are captured in the source plate. 3. Lift out the assembly and place it on a lint-free cloth. 58 4. Remove the filament retention screw. 5. Remove the ceramic plate. 6. Remove the filament assembly. 7. Remove the gate retaining screw. 8. The Center Ring is clipped around the end of the lens. Push a capillary pick into the gap in the ring, lift and slide the ring over the edge of the gate. 9. Pull the insulator off the lens. 59 Cleaning the Gate To clean the gate you will need the following items: • Cotton swabs • Isopropyl Alcohol or Methanol • Beaker • Ultrasonicator NOTE: The outside of the gate is anodized. Do not scratch the coating or the gate may short to the filament block. 1. Clean the shiny center of the gate with a cotton swab and IPA or methanol. 2. Sonicate in isopropyl alcohol or methanol for 2 minutes. 3. Dry in air or in an oven set to approximately 120 °C for 30 minutes. Cleaning the Internal Source Base To clean the Internal Source Base you will need the following items: • Aluminum oxide • Cotton swabs • De-ionized water • Isopropyl Alcohol or methanol • Beaker • Ultrasonicator NOTE: Do not allow the aluminum oxide to dry on the base. 1. Clean the center tube in the Internal Ionization Base with a cotton swab using slurry of aluminum oxide and DI water. 2. Rinse thoroughly with DI water. 3. Sonicate in DI water for 2 minutes. 4. Sonicate in isopropyl alcohol or methanol for 2 minutes. 5. Dry in air or in an oven set to approximately 120 °C for 30 minutes. 60 Re-assembling the Internal Ionization Assembly 1. Push the Center Ring over the gate so it snaps into the groove around the edge. 2. Place the Gate on the Internal Source Base. 3. Insert the Insulator into the screw hole. 4. Place the screw into the Insulator and tighten. 5. Place the assembly into the Internal Source Base. 6. Reinstall the ceramic plate over the protruding pins. 61 7. Be sure the filament assembly is seated fully flat in the Internal Source Base. 8. Push down on the ceramic plate while installing the holding screw and tighten. Cleaning Ion Trap Components Disassembling the Ion Trap 1. If the source is left in place, place the trap assembly on the holder provided, with the source pins facing down. 2. Remove the four retaining screws. 3. Lift off the trap oven and place on a lint-free cloth. 4. If necessary, remove the quartz spacer from the trap oven if it is going to be cleaned. 5. Lift out each trap electrode and quartz spacer and place them on a lint-free cloth. NOTE: Endcaps must be placed cone side up to avoid damage to the electrode. 62 Cleaning the Silica Coated Electrodes CAUTION DO NOT use aluminum oxide, other abrasives or harsh laboratory cleaners because this will remove the silica layer on the trap! Use only mild detergent (pH between 6 and 7.5). The protective surface layer of the silica-coated ion trap electrodes is very thin (only about 1 μm) but durable and it is strongly bonded to the bulk stainless steel body. However, abrasives such as aluminum oxide powder must not be used to clean the trap electrodes, because this will definitely destroy the silica layer! Strongly acidic or strongly basic laboratory cleaners must not be used to clean the trap parts because they will also remove the silica layer! • Remove Polyimide banana plugs from the end caps. • Use a toothbrush and liquid hand soap or dish detergent (pH between 6 and 7.5) to gently scrub the trap parts. • Rinse in de-ionized water. • Rinse in methylene chloride or methanol. 1. Air dry or dry in an oven set to approximately 120 °C for 30 minutes. 2. Replace the banana plugs, preferably in a different hole than prior to cleaning. Cleaning the Quartz Spacers 1. Wipe all surfaces of the four quartz spacers with a clean, soft, lint-free cloth that has been dampened with reagent-grade acetone. Take care to avoid extraction of glove material by the acetone. 2. Rinse each of the quartz spacers with de-ionized water. 3. Rinse in isopropyl alcohol or methanol. 4. Dry the spacers in air or in an oven set to approximately 120 °C for 30 minutes. Re-assembling the Ion Trap 63 1. Place the first quartz spacer in the bottom half of trap oven. Be sure the quartz is properly seated in the oven. The outside edge should have the same spacing around the perimeter and the quartz should not move when touched. The orientation of the notch in the spacer is not important. 2. The two end cap electrodes are identical. Place the end cap electrode on the quartz spacer, cone side up, with the banana plug on the same side as the gold connectors. The handle of a wooden handled cotton swab may be helpful to gently guide the electrodes into the assembly. 3. Place another quartz spacer on the end cap. Be sure the spacer is seated completely flat on the end cap. 64 4. Place the ring electrode on the quartz spacer. 5. Place another quartz spacer on the ring electrode. Be sure the spacer is seated completely flat on the electrode. 6. Place the last end cap electrode on the quartz spacer cone side in. The banana plug should be on the same side as the lower end cap. 7. Place the last quartz spacer on the end cap electrode. Be sure the spacer is seated completely flat on the end cap. 8. Place the oven top on the electrode stack with the gold connectors on the same side as the lower half. Check the oven and quartz spacers. There should not be any gaps. If the quartz is a very tight fit, try placing the quartz into the trap oven before putting the trap oven on the electrode stack. 65 NOTE: The gold connectors on the trap ovens should line up on the same side. The banana plugs should be visible in the notches in the trap oven and should be seated all the way to the end of the grooves in the trap oven. If there is a gap, disassemble and recheck the alignment of the spacers and electrodes. 9. Reinstall the four screws and tighten them evenly until they stop. 66 Reinstalling the Source 1. With the trap oven screws on the bottom, place the ceramic spacers in their countersunk holes. 2. Align the magnet structure with the three ceramic spacers, insert the screws and tighten. 3. Place the source into the end cap and align the two screws. When the internal source is properly installed, the lens sits flat in the end cap and the source plate is flat against the magnet structure. Check for proper positioning then tighten the screws. Internal Source 67 External Source • Go to “Reinstalling the Source/Ion Trap Assembly” on page 39. • Go to “Reinstalling the Analyzer Assembly” on page 42. • Go to “Turning On the Mass Spectrometer” on page 44. 68 Replacing a GC Column Tools and Materials Required: • 3/16" wrench • Ceramic scoring wafer • 5/16" wrench • Scribing tool • Graphite/Vespel® ferrule • Column measuring tool: 03-931805-01 (for internal mode) • Methanol • Lint free cloth Removing the Capillary Column from the System 1. Go to “Moving the Mass Spectrometer Away From the GC” on page 35. 2. Go to “Turning Off the Mass Spectrometer” on page 32. WARNING: SHOCK HAZARD Dangerous voltages are present. Unplug power cord. 3. Use a 3/16" and a 5/16" wrench to loosen the brass nut on the end of the transfer line. 4. Remove the capillary column from the transfer line. 5. Remove the brass nut with ferrule from the column. 6. Remove the ferrule from the nut. Discard the ferrule. Alternatively, a new column nut can be used (03-949551-00). 7. From inside the GC oven, pull the transfer line end of the column back into the hole in the side of the GC. Leave the free end of the column on the floor of the oven. 8. Use a 5/16" wrench to loosen the capillary column nut that secures the column to the injector. 9. Carefully remove the nut, ferrule, and column from the injector. 69 10. Slide the column nut, along with the ferrule, off the end of the column if desired. 11. Carefully lift the column support cage, along with the column, from the column hanger and remove from the oven. 12. Seal the end of the column or insert the ends of the column into a septum. 13. Store the column and the support cage. Installing a New Capillary Column in the System 1. Remove the 4000 MS Top Cover Dangerous voltages are present. Unplug power cord. 2. Unplug the transfer line heater cable from connector J37 on the bulkhead. Confirm that the transfer line is cool. 3. Grasp the nose of the transfer line; then rotate counterclockwise as you press lightly toward the manifold. Gently slide the transfer line away from the manifold. 4. Remove the nose clip, and then pull the transfer line away from the analyzer. 5. Wrap the transfer line in clean lint-free material and place it on a clean, dry surface. 6. Unwind about 60 cm (24") of the mass spectrometer end of the column from the support cage in the GC. 7. Place the column and its cage onto the column rack inside the GC oven. 8. Install the GC end of the column into the GC injector (see GC manual for instructions). 70 9. Purge the column inside the GC oven with carrier gas for at least 15 minutes to remove residual air. 10. It is advised that you condition the column in the GC oven before connecting to the MS to prevent contamination. Do not exceed maximum allowable operating temperature for the column. 11. Insert the MS end of the column through the transfer line hole in the right side of the GC. 12. Slide a brass nut onto the column and slide the nut several inches down the column. The wide, threaded opening of the nut should face the end of the column. 13. Place a new graphite/Vespel ferrule on the column with the taper facing the nut. Slide the ferrule, along with the nut, about 30 cm (12") down the column. If the system is in internal mode, replace the transfer line tip with the columnmeasuring tool. If the measuring tip is not available, a ruler will be needed to measure the extension length. Column Measuring Tool 14. Carefully insert the tip of the column into the nose end of the transfer line. Slide the column all the way through the transfer line until the tip of the column projects a few inches beyond the transfer line tip. 15. Using a ceramic scoring wafer, score the column once lightly about 2 cm (1") from its end. 71 16. Bend the column slightly to break it at the mark. The column should break cleanly. 17. Using a Kimwipe® tissue dipped in methanol, carefully wipe the last 15 cm (6.0 in.) of the column. Be sure to wipe toward the end of the column so that the Kimwipe tissue fibers do not enter the opening at the column end. 18. Install the brass nut on the end of the transfer line, but do not tighten the nut completely. 19. Position the tip of the column so that about 1 mm (1/32") extends beyond the transfer line tip for External mode. If in Internal or Hybrid mode, the column should just barely extend beyond the end of the measuring tool. If there is no measuring tool available, the end of the column should be measured to extend 8 mm beyond the internal transfer line tip opening. 20. Grasping the transfer line securely with a 3/16" wrench, use a 5/16" wrench to tighten the brass nut. Tighten the nut until snug, but do not over tighten. As you tighten the nut, the position of the column in the transfer line may change. If this happens, loosen the nut and readjust the column until the column extends the proper distance from the transfer line tip. 21. If in Internal mode, replace the measuring tip with the actual brown transfer line tip. Internal Tip 22. Clean the tip end of the transfer line with methanol and pull any service loop back into the GC oven. 72 23. Position the transfer line so that the heater cable aligns with the slot on the right side of the transfer line. 24. Remove the analyzer assembly during this step to avoid damaging the transfer line tip. Insert the transfer line into the manifold, and install the clip on the transfer line into the holes provided. 25. Gently push the transfer line toward the manifold, and rotate the collar in the clockwise direction until the bayonet lock engages. 26. Route the transfer line heater cable below the transfer line, through the white retainer and under the thermocouple vacuum gauge. Then plug the transfer line heating cable to connector J37. 27. Replace the 4000 MS top cover. • Gently push the mass spectrometer toward the GC, until the transfer line nut is visible inside the GC oven. Take caution not to damage rear pneumatics lines. The boot should fit snugly into the hole on the side of the GC oven. • Turn the GC oven on through its keyboard by pressing the Column Oven button and the blue soft key entitled Turn Oven On. • Go to “Turning On the Mass Spectrometer” on page 44. 28. After the trap, source, and manifold temperatures have reached their setpoints, condition the new column to prevent MS contamination. Replacing Consumable Components Replacing External Source Filaments • Go to “Turning Off the Mass Spectrometer” on page 32. • Go to “Removing the Analyzer Assembly” on page 35. • Go to “Removing the Source/Ion Trap Assembly” on page 38. 73 WARNING: SHOCK HAZARD Dangerous voltages are present. Unplug power cord. When removing the filament screws do not allow ceramic dust to fall into the ion trap. Use a flow of clean pressurized gas to blow off any dust observed. Removing Old Filament Assemblies 1. Place the Source/Ion Trap Assembly on a lint-free surface with the filament screws in the horizontal position. Do not stand the ion trap on its end or ceramic dust may fall into the ion trap. 2. Remove the two Phillips screws. 3. Carefully lift the filament assembly out of the source holder. 4. Inspect the metal disc (03-931761-01) on the magnet for discoloration and carbon build up. If the disk looks dirty, slide the disc off and place a new one on the magnet. 5. Turn the assembly over and repeat the steps for the other filament and magnet disc. 74 Installing a New Filament Assembly 1. Place the new filament into the source holder with the notched side down. Be sure the filament is seated firmly in place. 2. Place the two screws into the screw holes and tighten each screw evenly. Do not over tighten. 3. Turn the assembly over and repeat the steps for the other filament. New filaments undergo conditioning in the first few days of operation. It is recommended that filament tuning be checked daily during the first few days of full operation until the filaments remain solidly in tune. • Go to “Reinstalling the Source/Ion Trap Assembly” on page 39. • Go to “Reinstalling the Analyzer Assembly” on page 42. • Go to “Turning On the Mass Spectrometer” on page 44. Conditioning the Filaments 1. Run Auto Tune of electron lens voltage three times. 2. Run the method External_Filament_Conditioning.mth that applies multiple cycles of turning the filaments on/off. 3. Re-run the Auto Tune twice. Filaments are ready to go at this point. 4. Over the next four days, re-tune the lens voltages as required. Refer to the Ion Source indicators on the diagnostics page. If the Ion Source deviation number is larger than 2 μAmps, the filament is probably off tune. Replacing Internal Source Filaments • Go to “Turning Off the Mass Spectrometer” on page 32. • Go to “Removing the Analyzer Assembly” on page 35. • Go to “Removing the Source/Ion Trap Assembly” on page 38. 75 WARNING: SHOCK HAZARD Dangerous voltages are present. Unplug power cord. Removing Old Filament Assembly 1. Remove the filament retention screw and place it on a lint-free cloth. 2. Lift off the ceramic plate and remove the filament assembly. Installing the New Filament Assembly 1. Transfer the springs to the new filament assembly. 2. Place the assembly in the filament block. 3. Reinstall the ceramic plate over the protruding pins. 76 4. Ensure that the filament assembly is seated flat in the filament block. 5. Reinstall the holding screw and tighten. • Go to “Reinstalling the Source/Ion Trap Assembly” on page 39. • Go to “Reinstalling the Analyzer Assembly” on page 42. • Go to “Turning On the Mass Spectrometer” on page 44. Replacing the Electron Multiplier • Go to “Turning Off the Mass Spectrometer” on page 32. • Go to “Removing the Analyzer Assembly” on page 35. WARNING: SHOCK HAZARD Dangerous voltages are present. Unplug power cord. Removing the Old Electron Multiplier 1. Remove the two screws holding the multiplier cover in place. 2. Grasp the cubical part of the cover and lift straight out to remove the cover. 3. Place the cover on a lint-free cloth. 77 4. Loosen both multiplier retainer screws one turn. 5. The retainer bracket will swing down and out of the way, in the direction of the arrow, allowing the multiplier to be lifted out. 6. Lift out the multiplier Installing the New Multiplier 1. Place the multiplier into the holder as shown. The multiplier must be fully engaged by the clip at the bottom of the holder by pressing down and to the left as shown. Failure to properly engage the clip adversely affect performance. The horn should be near the centerline of the plastic holder. 2. Swing the holding bracket back into position and tighten the bottom screw. 3. Tighten the top screw. 78 4. Check the position of the multiplier so it is centered under the holding bracket. Be sure the notch in the multiplier cover is aligned with the throat of the multiplier. Visually check for any particles and remove if found. The cover is designed to have a tight fit and requires a small amount of force to push onto the mount. 5. Push the cover straight into place. 6. Reinstall the two screws and tighten. • Go to ”Reinstalling the Analyzer Assembly” on page 42. • Go to “Turning On the Mass Spectrometer” on page 44. Replacing the Damping Gas Getter The getter in the damping gas line removes water and contaminants from the damping gas helium supply. It has a limited life, the length of which is dependent on the amount of material to which it has been exposed. To replace the getter, order a replacement kit (Part number 03-931124-91 Kit, Getter Replacement). Detailed instructions for replacing the getter are contained in this kit. Replacing the Turbomolecular Pump To replace a Turbomolecular Pump, order a replacement kit (Part number 03931119-91 Kit, Turbo Replacement, V301). Detailed instructions for replacing the pump are included in the kit. Tools Required • Phillips Head Screwdriver • L-Shaped 6 mm Allen wrench (provided in 4000 MS Ship Kit) • Screen Pick (provided in 4000 MS Ship Kit) 1. Go to “Turning Off the Mass Spectrometer” on page 32. 79 WARNING: SHOCK HAZARD Dangerous high voltages are present. Unplug power cord. 2. Follow the replacement procedure included with the Turbo Replacement Kit. 3. Turn On the Mass Spectrometer (page 44) but DO NOT Start System control. The turbomolecular pump will go through a SoftStart conditioning process that will take about 30 minutes. 4. After 30 minutes start up System Control and go to the Startup/Shutdown page if this doesn’t happen automatically. 5. Go to “Checking the Vacuum Status” on page 46. 6. Go to “Baking Out the Mass Spectrometer” on page 47. Filling the Calibration Compound Vial The calibration compound used with the 4000 MS is perfluorotributylamine (PFTBA), which has the chemical formula C12F27N. This compound is also known as FC-43 (fluorocarbon-43). NOTE: There is no need to vent the vacuum system before you fill the Cal Gas vial with calibration compound, provided the Cal Gas needle valve is closed. To close the Cal Gas needle valve, turn it fully clockwise. To fill the Cal Gas vial, proceed as follows: 1. Loosen the two retaining screws about 2-3 turns with a Phillips screwdriver. 2. Pull the Cal Gas vial down gently with a slight twisting motion until it clears the pneumatics manifold. 3. Refill the vial using a Pasteur pipette until the vial is filled just less than one half full with PFTBA compound (03-920353-00). Care must be taken not to overfill the vial to avoid inconsistent Cal Gas flow. Excess PFTBA can be stored in the capped spare vial (03-931112-01) provided in the ship kit, or in a standard 2 mL autosampler vial. 80 4. While holding the vial vertically, carefully push the vial into the Cal Gas port on the manifold with a slight twisting motion. 5. After you have pushed the vial in as far as it will go, tighten the retaining screws. 6. Open the Cal Gas needle valve 10 turns counterclockwise. Leave the needle valve open for at least 30 minutes. Any excess Cal Gas and water vapor will be pumped away. 7. Under Manual Control’s Checks and Adjustments tab, select Cal Gas Adjustment and press Start. 8. Adjust the Cal Gal pressure so that the indicator bar is near the center of the display, within the OK region. NOTE: Other adjustments that affect ion time, such as the multiplier gain, filament current and background levels will influence this adjustment. Changing Operational Configuration Changing between ionization configurations requires swapping the source and/or placing the transfer line into its proper position for that mode. In this section, the major steps for each possible conversion are listed, followed by a series of general descriptions for handling the key steps in the conversion process. The following steps are required for any system reconfiguration: • Go to “Turning Off the Mass Spectrometer” on page 32. • Go to "Removing the Analyzer Assembly” on page 35. Perform appropriate change procedure described below. • Go to “Reinstalling the Analyzer Assembly” on page 42. • Go to “Turning On the Mass Spectrometer” on page 44. 81 Changing from Internal to External Configuration 1. To switch sources from Internal to External, go to “Switching Between External and Internal Sources” on page 82. 2. To switch the transfer line position from entering the Ion Trap to entering the External source, go to “Changing the Transfer line Position from Internal to External” on page 85. Changing from External to Internal Configuration 1. To switch sources from External to Internal, go to “Switching Between External and Internal Sources” on page 82. 2. To switch the transfer line position from entering the External source to entering the Ion Trap, go to “Changing the Transfer line Position from External to Internal” on page 83. Changing from Internal to Hybrid Configuration 1. To switch sources from Internal to Hybrid, go to “Switching Between External and Internal Sources” on page 82. 2. Go to “Installing or Removing the Hybrid Plug” on page 87. Changing from External to Hybrid Configuration 1. To switch the transfer line position from entering the External Source to entering the Ion Trap, go to “Changing the Transfer line Position from External to Internal” on page 83. 2. Go to “Installing or Removing the Hybrid Plug” on page 87. Changing from Hybrid Mode to External Configuration 1. Go to “Installing or Removing the Hybrid Plug” on page 87. 2. To switch the transfer line position from entering the Ion Trap to entering the External Source, go to “Changing the Transfer line Position from Internal to External” on page 85. Changing from Hybrid Mode to Internal Configuration 1. Go to “Installing or Removing the Hybrid Plug” on page 87. 2. To switch sources from External to Internal, go to “Switching Between External and Internal Sources” on page 82. Switching Between External and Internal Sources 1. To remove the Source/Ion Trap Assembly, go to page 38. 2. Swap sources by loosening the three screws on the magnet structure, pulling out existing source while leaving the ceramic spacers in place and placing the source on a lint-free surface. 82 3. Take the screws from the source that was removed, and place them in the source being installed. 4. Position the replacement source with the three screws aligned into the ceramic spacers. If switching to external mode, be sure the centering ring is in place. Retighten the three screws. The source you removed should be stored in the box provided. 5. Go to “Reinstalling the Source/Ion Trap Assembly” on page 39. Changing the Transfer line Position from External to Internal 1. To move the 4000 MS away from the GC, go to page 35. 2. Unplug the transfer line heater cable from connector J37 on the bulkhead. 3. Be sure the transfer line is cool; then remove the transfer line assembly (Including the weldment) from the manifold by loosening the four captive screws holding it in place. Be sure not to lose the sealing O-ring. Internal Measuring Tool 4. Remove the external tip and replace it with the Internal measuring tool provided with the system. If you do not have an Internal measuring tool, you will need a ruler to measure the column length. 83 5. Using a sapphire-, or carbide-tipped scribing tool or ceramic scoring wafer, score the column once lightly at the end of the measuring tip and cleanly break the column. If there is no measuring tip available, cut the end of the column 8 mm beyond the internal transfer line tip opening after the internal tip is installed. 6. Remove the measuring tool. Internal Tip 7. Screw the brown Polyimide internal tip onto the transfer line and clean the column and surrounding area with methanol and a lint-free wipe. 8. Return the transfer line assembly to the manifold, positioning it towards the rear of the instrument, and tighten the four screws. Be sure that the O-ring is clean and properly seated in the manifold groove (no kinks or twists). 9. Route the transfer line heater cable through the white retainer clip on the side of the manifold and under the thermocouple gauge. Then plug it into J37 on the bulkhead. 84 10. Change the position of the ionization mode switch on the manifold electronics enclosure to the left (internal) position. Changing the Transfer line Position from Internal to External 1. To move the 4000 MS away from the GC, go to page 35. 2. Unplug the transfer line heater cable from connector J37 on the bulkhead. 3. Be sure the transfer line is cool; then remove the transfer line assembly (including the weldment) from the manifold by loosening the four captive screws holding it in place. Be sure not to lose the sealing O-ring. 4. Remove the internal tip and replace it with the long metal external transfer line tip provided with the external source. If necessary, a 3/16" wrench can be used to stabilize the transfer line and a 5/16" wrench used to remove the tip. External Tip 5. Loosen the brass nut at the GC side of the transfer line and then reposition the column until it extends 1 mm from the end of the tip. If the column won’t move, it may be necessary to cut off the column before the transfer line, remove the ferrule from the brass nut, and reinsert the column using a new ferrule (as described in the column replacement procedure). 6. Replace the transfer line assembly, positioning it towards the front of the instrument, and tighten the four screws. Be sure that the O-ring is clean and properly seated in the manifold groove (that there are no kinks or twists). 85 7. Route the transfer line heater cable through the white retainer clip on the side of the manifold and under the foreline line. Plug the cable into J37 on the bulkhead. 8. Change the position of the ionization mode switch on the manifold electronics enclosure to the right (External) position. 86 Installing or Removing the Hybrid Plug Operation in hybrid configuration requires a plug that prevents reagent gas from escaping the high pressure CI source through the unused transfer line hole in the CI Volume. The supplied plug is installed in the transfer line hole in the external source by inserting the plug and turning until the plug engages with the side of the source heater block. The plug is removed in the reverse fashion by turning the plug until it disengages. 87 88 Chemical Ionization Options Introduction Chemical ionization (CI) provides mass spectral data that complement electron ionization (EI) data for chemical analysis. In the 4000 MS, there are three optional modes of CI operation depending upon the instrument configuration – Internal Configuration positive CI (PCI), External Configuration positive or negative CI (PCI/NCI) or Hybrid Configuration positive or negative CI (PCI/NCI). NOTE: The CI mode is an option on the 4000 MS. If your system does not have this option, you will not be able to perform CI analyses. Internal Configuration CI When the 4000 MS is in Internal Configuration, the CI reagent gas (from an external gas cylinder) enters the analyzer through a length of a 4 mL/min restrictor tubing. The reagent gas is ionized by EI to form reagent ions. These reagent ions then ionize sample molecules entering the analyzer with He carrier gas from the capillary column. The operation and adjustment of reagent gases for the Internal Configuration CI option are described in the first part of this section. Internal CI is possible only in PCI mode. An additional Liquid CI Inlet (or LCI Inlet) option allows the selection of certain liquids as sources for CI. A 50 mL/min restrictor is used for admitting reagent through the Liquid CI Inlet when one is in Internal Configuration. The operation of this option and switching between Liquid and Gaseous CI is described later in this section. External Configuration CI When the 4000 MS is in External Configuration, the CI reagent gas (from an external gas cylinder) enters the external ion source through a length of 4 mL/min restrictor tubing. A special CI volume is automatically inserted into the EI volume (under software control) to create a high-pressure environment that enhances CI reactions. The reagent gas is ionized by EI to form reagent ions. These reagent ions react immediately with sample molecules entering the external ion source. Both positive and negative ions may be formed in these processes and the ions carried into the ion trap for analysis depend upon whether the user has specified to perform positive or negative CI in the 4000 MS Method section. The use of liquid CI reagents is not recommended for External Configuration CI because the pressure of relatively nonvolatile liquid reagents is too low for efficient CI processes to occur in external PCI or NCI modes. 89 Hybrid Configuration CI When the 4000 MS is in Hybrid Configuration, the CI reagent gas (from an external gas cylinder) enters the external ion source through a length of restrictor tubing. In standard Hybrid High Pressure Source (HPS) Configuration, a high pressure CI volume is automatically inserted into the EI volume to create a highpressure environment to enhance CI reactions. The reagent gas is ionized by EI to form reagent ions. Both positive and negative ions may be formed in these processes and reagent ions of either positive or negative charge are transferred immediately to the ion trap. The polarity of ions carried into the ion trap for analysis depend upon whether the user has specified to perform positive or negative CI in the 4000 MS Method section. Once reagent ions have been stored in the ion trap for the designated ion time, waveforms are applied to isolate only the reagent ions within a mass range designated in the 4000 MS Method. Finally, the chosen reagent ions react with neutral analytes entering the ion trap through the GC column. An additional Liquid CI Inlet (or LCI Inlet) option allows the selection of certain liquids as sources for CI. A 200 mL/min restrictor is used for admitting reagent through the Liquid CI Inlet when one is in Hybrid Configuration. The operation of this option and switching between Liquid and Gaseous CI is described later in this section. Installing CI Reagent Gas We recommend that the inlet gas line be as short as possible. Ideally you should secure the gas cylinder close to the rear of the 4000 MS so that the 4 mL/min restrictor tube can be attached by a 1/8” Swagelok fitting directly to the two-stage gas regulator and the other end of the restrictor attached through the CI Gas inlet into the MS. Make sure, however, that the gas line is long enough to run to the rear of the 4000 MS and to accommodate the movement of the mass spectrometer 9 inches (23 cm) to the right (for access to the transfer line and turbomolecular pump). Gas cylinders or lecture bottles should not be stored where they can damage cables or gas lines, and they should be secured in accordance with standard safety practices. Lecture bottles have rounded ends and will require some means of support (e.g., Matheson Model 505 Non-Tip Stand). Before installing the CI reagent gas supply, you should complete the following procedures: • Tune the instrument in EI mode • Check the 4000 MS system for leaks 90 CI Reagent Gas Requirements These paragraphs give the requirements for the reagent gases used for CI operation with the 4000 MS. The following reagent gases are recommended: methane and isobutane. Use high-purity reagent gas for maximum sensitivity and good spectral quality. Impurities can react with sample ions, creating confusing mass spectral data. The amount of reagent gas consumed during CI operation is very low (typically 1 to 2 mL/minute). Depending upon how much CI you plan to do, choose the size of the gas cylinder appropriately. The requirements for the recommended gases are as follows: Methane Methane should have a purity of 99.99% or better. Use a gas cylinder with a two-stage pressure regulator that has a stainless steel diaphragm and maximum inlet pressure of 30 psi (200 kPa). Isobutane Isobutane should have a purity of 99.99% or better. Use a gas cylinder with a two-stage pressure regulator that has a stainless steel diaphragm and maximum inlet pressure of 30 psi (200 kPa). The CI reagent gas should contain less than 1 ppm of water. Water in the CI reagent gas may interfere with CI operation. If you need to use a longer line than the 4 mL/min restrictor alone, use precleaned copper or stainless steel gas lines for methane or isobutane. All gas lines should be free of oil (and other contaminants) and preferably flame dried. If possible, use the pre-cleaned copper tubing from the GC Start-Up Kit. DO NOT flame! Dry the reagent gas lines with CI reagent gas present. Setting Up the CI Reagent Gas Supply Use the following procedure to set up the CI reagent gas supply. CI reagent gases may be hazardous. Use proper protection when installing the reagent gas. 1. Enter System Control and select the Manual Control tab dialog. 91 2. Make sure that the electron multiplier, filament, and RF voltage are all off. The Multiplier, Filament (Ion Source), and RF text should be red or black not green. NOTE: Two solenoid-operated valves control the flow of CI reagent gas into the manifold. The valves are opened and closed by clicking on the CI button on the Instrument Control display. A needle valve controls the amount of reagent gas flowing into the manifold. The needle valve is mounted directly behind the door of the mass spectrometer. The needle valve is adjusted manually by using the knob labeled CI GAS. Turning the knob clockwise increases the flow of reagent gas into the manifold. See Functional Block Diagrams in the Pneumatics section. 3. Check that the CI Gas solenoid valves are closed. When these valves are closed, the CI Gas icon to the left of the ion trap symbol is not green. (If the CI icon is green, click on the icon so that it turns to black.) 4. Install a two-stage pressure regulator on the reagent gas cylinder or lecture bottle. Tighten the connection securely. NOTE: A two-stage pressure regulator typically consists of the following components: Secondary valve, pressure adjustment valve, supply pressure gauge, and delivery pressure gauge Reagent gas is turned on and off with the main valve on the cylinder or lecture bottle. The secondary valve on the pressure regulator is next in line. This valve is used for coarse control of the flow of gas from the gas cylinder up to the pressure adjustment valve. The supply pressure gauge is used to monitor the gas pressure in the bottle. The pressure adjustment valve is used to set the head pressure of the gas delivered to the mass spectrometer. 5. Connect one end of the 1/8" OD gas supply line to the pressure regulator. 92 6. On the back of the instrument, loosen the two screws that hold the plug in the CI Shutoff Manifold 2 to 3 turns. Remove the plug by pulling straight out and twisting. 7. Use the 4 mL/min restrictor tube for the supply line between the gas cylinder and the CI shutoff manifold. No ferrule is required on the mass spectrometer end of this tube. The seal is made with an elastomer O-ring. 8. Carefully insert the restrictor tube into the CI shutoff manifold hole (the one the plug came out of) until it is firmly seated. Tighten the two screws. 9. Ensure that the secondary valve on the regulator on the gas cylinder is closed. 10. Open the main control valve on the lecture bottle. Next, open the secondary valve and adjust the pressure valve to approximately 20 psi. 11. Open the mass spectrometer door. Verify that the CI GAS needle valve is turned fully counterclockwise. 12. Next, flush the gas line of air and water vapor by doing the following. • Monitor the foreline pressure on the diagnostics screen. Do not allow the foreline pressure to exceed 500 mTorr for more than 20 seconds. • Turn the adjustment valve clockwise to reduce the pressure. • Open the CI Gas solenoid valves by clicking on the CI icon in the Control and Status field of the Manual Control tab dialog in System Control. When the valves are opened, the CI button is green. • Evacuate the CI reagent supply line for about 30 minutes. 93 Checking the Reagent Gas Plumbing for Leaks To check for air leaks in the reagent gas line connections and the presence of water vapor in the gas line, follow the procedure using a leak detection gas to troubleshoot for air leaks in the Troubleshooting section. Depending upon the results you obtain, you may need to modify the procedure as follows: If a large air leak exists, check the CI GAS fitting on the rear of the instrument and the fitting on the pressure regulator for tightness. Then recheck the air/water spectrum; or If excess water vapor is indicated by a high 19/18 ratio, there may be water in the gas line and/or an atmospheric air leak in the reagent gas plumbing. Proceed as follows: 1. Shut off the flow of reagent gas into the manifold by closing the CI solenoid valves. If necessary, click on the CI icon in the Control and Status field of the Manual Control tab dialog in System Control. When the valves are closed, the CI button is black or red - not green. 2. Recheck the air/water spectrum. If the peak at mass 19 (for water) decreases, then water is present in the gas line. In this case, go to step 3. If the peak at mass 19 does not decrease significantly, little water is present in the gas line. In this case, the MS system probably has an air leak. You will need to fix the leak as described in the Troubleshooting Section. Be sure to check for leaks around: • The CI GAS port on the rear of the mass spectrometer • The fitting that connects the reagent gas line to the pressure regulator 3. To flush excess water from the gas line proceed as follows: a. Ensure that the electron multiplier, filament, and RF voltage are off. b. Open the main valve on the lecture bottle. (The secondary valve on the pressure regulator is already open.) c. Turn the CI needle valve fully counterclockwise to divert gas to foreline pump. d. Open the CI Gas solenoid valves and allow the system to pump down for about 1 hour. e. Close the main valve on the CI Gas cylinder but keep the CI GAS solenoid valves open. Allow the system to pump down for about 15 minutes. f. Recheck the air/water spectrum. If excess water is not present, go to paragraph: Setting Delivery Pressure of the CI Reagent Gas. 94 Setting Flows of CI Reagents in Internal Configuration After any leaks have been located and fixed, set the delivery pressure of the CI reagent by doing the following: 1. Ensure that the CI Gas solenoid valves are closed. If necessary, click on the CI icon in the Control and Status field of the Manual Control tab dialog in System Control. When the valves are closed, the CI button is black or red not green. 2. Open the main valve on the lecture bottle. Using the pressure adjustment valve on the regulator, set the head pressure to about 20 psi. You are now ready to operate the system in the CI mode. Read the respective users guides for more detailed operational information. Internal Mode Default Parameters for CI Reagents Reagent Gas Methane Isobutane Acetonitrile d3-Acetonitrile Methanol Reagent Low Mass (m/z) 15 35 35 35 25 Reagent High Mass (m/z) 45 65 60 60 50 Reaction Storage Level (m/z) 35 35 33 33 25 15 15 15 Ejection Amplitude (v) 15 15 Target TIC 5000 5000 5000 5000 5000 Maximum Ionization Time (μsec) 2500 2500 2500 2500 2500 Maximum Reaction Time (μsec) 100 100 100 20* 100 * Use short reaction times for deuterated reagents. Longer reaction times allow more H/D exchange with background water and the resulting spectrum will show more [M+H]+ and less [M+D]+. External Mode Default Parameters for CI Reagents Reagent Gas CI Background (m/z) Methane Isobutane Ammonia Acetonitrile d3-Acetonitrile Methanol 45 65 35 Target TIC 5000 5000 5000 5000 5000 5000 Maximum Ionization Time (μsec) 2500 2500 2500 2500 2500 2500 Maximum Reaction Time (μsec) 100 100 100 100 20* 100 95 60 60 50 Ion Intensities for Standard CI Reagents The CI Adjust function gives recommendations of an acceptable level of CI reagent ions for each of the five standard CI reagents. The general principles used in implementing these tests are: Methane Adjust the reagent gas pressure so that the peak height at m/z 17 (CH5+) is about 25% of that at m/z 29 (C2H5+). The ratio of the ions at + m/z 17 to m/z 16 should be about 10:1. The ion at m/z 41 (C3H5 ) should be visible. Isobutane Adjust the reagent gas pressure so that the peak heights at m/z 57 [(CH3)3C+] and m/z 43 [(CH3)2CH+] are about equal. There may also + be an intense reagent ion at m/z 41 (C3H5 ). Acetonitrile Adjust the reagent gas pressure so that the ion at m/z 42 [CH3CNH+] is more than 5 times higher than at m/z 41. The valley between the 41/42 ions should reach a minimum at less than half the height of the + m/z 41 ion. The m/z 54 ion [CH3CHCNH ] will be present at 10 - 15% the height of m/z 42. Too much acetonitrile in the trap can cause early filament failures. d3-Acetonitrile Adjust the reagent gas pressure so that the ion at m/z 46 [CD3CND+] is more than 5 times higher than at m/z 44. The m/z 58 ion [CD3CDCND+] will be present at 10 - 15% the height of m/z 46. Methanol The ion at m/z 33 [(CH3OH)H+] will dominate the spectrum. No ion is observed at m/z 32, but a small peak is observed at m/z 31 and m/z 47. In each case, by following these guidelines, the reagent gas pressure in the ion trap will be approximately 1 to 2 x 10⁻⁵ Torr (about 1.3 to 2.6 x 10⁻³ Pa). The CI reagent molecules comprise about 1% of the gas pressure in the ion trap. He atoms from column flow are present at 100 times this pressure. Setting Flows of CI Reagents in External Configuration In External Configuration CI reagent flow is set using the ion gauge pressure measured in Manual Control. 1. Open the main valve of the methane (or isobutane) CI Gas cylinder and set the second—stage regulator pressure to 20 psi. 2. Open System Control. Turn on the CI and Ion Gauge using the check boxes beneath the 4000 MS icon. If the CI line has not been evacuated already, allow a few minutes for this process. 3. Adjust the CI valve so that the ion gauge reading is between 50 – 80 µTorr. Setting Flows of CI Reagents in Hybrid Configuration See the 4000 MS Software Operator’s Manual for inforamation on setting flows for CI reagents. 96 The Liquid CI Inlet Option Liquid CI is an effective tool for internal ionization CI. Because of the difficulty of getting sufficient CI reagent into the external source, Liquid CI is not recommended for external CI use. Once the Liquid CI inlet Assembly has been installed, it is possible to switch between using a pressurized CI Gas and using liquid CI reagents, without removing the assembly. Switching from Gaseous to Liquid CI Reagent Operation: 1. Loosen the 2 screws that attach the CI Gas restrictor to the CI shutoff block in the back of the instrument. If there is no Liquid CI restrictor attached to the Liquid CI Inlet Assembly, also loosen the two screws that attach the L bracket to the assembly. 2. Remove the 4 mL/min gas restrictor from the CI shutoff block. 3. Install the Liquid CI restrictor between the Liquid CI Inlet Assembly and the CI shutoff block. If you are in Internal Configuration, use the 50 mL/min restrictor (03-930024-01). For Hybrid Configuration, use the 200 mL/min restrictor (03-931440-01). 4. Tighten all screws. 5. Adjust CI reagent as described in the User Manual. Filling/Refilling Reservoir Bulb 1. Be sure the CI valves are closed. Loosen the four screws that retain the liquid CI reservoir cover. The screws may remain in the block. 2. Remove the reservoir cover. 3. Gently pull the bulb down to remove it from the block. The O-ring and O-ring retainer may stay attached to the bulb. 4. Use the reservoir cover as a stand for filling; place the bulb into the reservoir cover. Place O-ring retainer over the bulb stem. Place the O-ring over the bulb stem. 5. Use a 1 mL syringe to fill the bulb halfway with liquid CI reagent. This requires about 3 mL of reagent. 6. Pick up the reservoir cover with the bulb, retainer and O-ring, and insert the bulb stem into the block. 7. Orient the cover so that the four screws can engage the cover. Tighten the four screws, being careful not to strip the threads in the plastic cover. 8. After installing liquid CI, and each time the reservoir bulb is refilled with liquid, always use care when first opening the CI valves. Do not turn on the filament or multiplier for 2-3 minutes after opening the CI valves from the Manual Control Page. 97 Switching from Liquid to Gaseous CI Reagent Operation To switch from the Liquid CI Inlet back to a pressurized CI Gas (such as methane), the CI Gas line may be Reinstalled without removing the liquid CI inlet assembly. 1. Loosen the 2 screws that attach the liquid CI inlet restrictor to the back of the instrument. Also, loosen the 2 screws that attach the L-bracket to the liquid CI inlet block. 2. Remove the liquid CI restrictor end that inserts into the back of the instrument; rotate the restrictor out of the way. 3. Install the 4 mL/min CI Gas restrictor (03-930597-01) between the gas supply and the CI shutoff block, below the L-bracket. 4. Tighten all screws. 5. Adjust CI reagent as described in the User Manual. If the equipment is used in a manner not specified in this manual, the protection provided by the equipment may be impaired. 98 Troubleshooting How to Isolate a GC/MS Problem In general, whenever you attempt to isolate a 4000 MS problem, you will check the system in the following order: • Data System • Gas Chromatograph • Mass Spectrometer Checking the Data System Please refer to the 4000 MS software release notes for relevant software troubleshooting procedures. Checking the GC The simplest and most effective way of isolating a GC problem is to run a test sample. Running a sample will allow you to check several operational and performance factors, including the carrier gas supply, chromatographic characteristics, and sample-related problems. The test sample that is most frequently run is the COLTEST mixture. This multiple component mixture is very well suited to troubleshooting injector and column problems. Please see “Running the COLTEST Sample” on page 107 for a description on the use of this test mixture. To identify the source of a GC electronics problem, press the STATUS key and a CONTROL key, (i.e., injector, column oven, etc.), to determine if a fault is present. If a fault is present, the message FAULTED appears. Consult the 3800 GC manuals for information about fixing GC faults. Make sure that you are thoroughly familiar with all safety issues before you attempt to repair any electronics component. Checking the Mass Spectrometer If your data system and GC are operating normally, the problem could be caused by the mass spectrometer or by the communication channel between it and the data system. Typical problems with the ion trap include lack of response (no spectra), low response, poor resolution, and mass mis-assignment. 99 The MS Workstation includes diagnostics tests for isolating problems associated with the mass spectrometer. These tests may be used to isolate simple ion trap problems, e.g., air leaks, burned-out filaments, electronic failures, etc. A 4000 MS Service directory is included in the MS Workstation (C:\VarianWS\4000 MS Service). There are service methods in this directory for internal (4000 MS Int Service.mth) and external (4000 MS Ext Service.mth) modes. These service methods are designed to be used in Manual Control to identify common spectrometry issues such as elevated air/water and hydrocarbon background levels, mass assignment, and resolution. In certain cases, you may need to separate physically the GC and MS to isolate an ion-trap problem. In these cases, remove the column from the injector, and plug its end with a septum. This will minimize the input of air. Maintain the column and transfer line at ambient temperature to prevent degradation of the stationary phase. You do not need to vent the MS vacuum system to complete this procedure. If you wish to isolate the mass spectrometer further, you must remove the column from the ion trap by shutting down the system and capping the transfer line with a no-hole ferrule. Troubleshooting Problems with Spectra The following describes the common problems a user may encounter with an ion trap mass spectrometer. No Spectrum Appears If a spectrum fails to appear on the screen when you click on the ion trap icon in the Manual Control Page, regardless of mass range, you should investigate the following potential causes: • If the method segment is a FIL/MUL Delay segment, ionization is turned off. When a segment is set up with the ionization off the trap icon is red. • The “filament is open (broken).” • The turbomolecular pump has stopped. • An RF adjustment is required. • The instrument parameters are inappropriate. • The trap has been incorrectly assembled. • There is a problem with the electronics. • The system has not finished baking out. Before you begin troubleshooting, however, be sure that you have baked out the 4000 MS for at least 2 hours. Run Diagnostics to determine if any hardware problems are present. If you have done this, and the missing-spectrum problem persists, continue as follows. These steps apply if either air/water or Cal Gas peaks are missing. Check for an Open Filament Diagnostics will determine if one or both filaments are open. • If necessary, replace the filaments. 100 Check the Turbomolecular Pump Diagnostics will report the turbomolecular pump speed. Make sure the pump speed reading is 100 ±2%. • If it is not, inspect cooling fans for proper operation. Check the RF Adjustment Check whether an RF adjustment is needed (particularly after you have changed the ion trap temperature). Check the Parameter Settings Check whether you have set inappropriate method parameters. • Make sure that the ionization storage level permits storage in the trap of the ions selected in the scan range. If the spectrum returns, note which parameter(s) were causing the problem. If no spectrum is present, and the trap was recently disassembled, the assembly of the trap must be checked. Check Ion Trap Assembly 1. Check whether you have incorrectly assembled the trap components. 2. Check whether there is a problem with the electron multiplier. Loss of High Mass Peaks The loss of high mass peaks may be due to: • RF ramp needs adjustment • Too many low mass ions (for example, air or water leak) • Improper method parameters • High trap temperatures may cause loss of high mass Cal Gas peaks 1. Check for an air leak. 2. Check RF ramp adjustment. 3. Reduce trap temperature to 150 °C. 4. Enter Method Builder, check method parameters. Part of the Spectrum is Missing If you do not observe high- or low-mass ions in manual control but the ions in the mid-range of the spectrum appear normal, you should investigate the following possibilities: • An RF adjustment may be required, particularly if you have just changed the ion trap temperature. • The ionization RF storage level may be incompatible with the scan range. 101 • The trap temperature may be too high to allow you to observe all of the Cal Gas ions. Reduce trap oven temperature to 150 °C, and wait for thermal equilibrium. Check the RF Adjustment Check whether an RF ramp adjustment is needed. Check the RF Storage Level Check whether the RF storage level is incompatible with the scan range. Check the Trap Temperature Check whether the trap temperature is too high to permit you to observe all Cal Gas ions. If the trap temperature is too high, the height of the mass 614 peak may be reduced, and the mass 502 peak may disappear entirely (above 200 °C). Reduce trap oven temperature to 150 °C and wait for thermal equilibrium. Poor Resolution with Acceptable Air and Water Levels If the peaks are broader than you would have expected, you should investigate the following possible causes: • There are too many ions in the trap (i.e., contamination or high column bleed). • The supplemental waveform value is too high or too low. • Supplemental waveforms are not functioning properly. Check the Ion Content of the Trap With the trap turned on, note the TIC (total ion current) value. If the TIC value exceeds 20,000 counts in full-scan mode, reduce the number of stored ions. Run Auto Tune If problems with the supplemental waveforms are suspected, run the Auto Tunes to reset these values. Troubleshooting High Baseline at High Masses If the baseline on the Manual Control page increases sharply between masses 400 and 1000, there may be particles on the electrode surface. Check for Particles in the Trap In Manual Control, activate C:\VarianWS\4000 MS Service\4000 MS (Int or Ext) Service.mth, go to segment 2, and turn the Trap on and the Ion Source off. If the trap is free of particles there will be no significant spiking above the baseline and the base amount will be less than 10. If spiking or a base amount greater than 10 is observed, the system should be shut down and the trap cavity and manifold area should be blown free of particle matter using a compressed inert gas. 102 Checking for Leaks A common issue in mass spectrometry is keeping the system as leak-tight as possible. Air leaks may result in reduced sensitivity, tuning problems, and decreased resolution; in addition, they may reduce the lifetimes of the capillary column, filaments, turbomolecular pump, and the electron multiplier. Check the system each day for air and water leaks before you begin running acquisitions. Establishing Conditions Required for Leak Checks To establish the conditions required to check for leaks, proceed as follows: 1. Activate C:\VarianWS\4000 MS Service\4000 MS (Int or Ext) Service.mth, go to segment 1 and turn the trap on. 2. Verify the column flow rate is 1.0 mL/min. 3. Set the GCMS temperatures: • Trap temperature to 150 °C. • Transfer line temperature to 270 °C. • Manifold temperature to 35 °C. • Source temperature to 150 °C. 4. Set the column-oven and injector temperatures to 100 and 230 °C respectively. CAUTION Often, major air leaks are accompanied by a hissing sound. These leaks may be due to extremely loose fittings, improperly seated O-rings, or open valves. If you suspect a major leak, do not turn on the electron multiplier, RF voltage, or filament. Using the Diagnostics section, confirm that the turbomolecular pump is operating at 100% speed. If it is not, there may be a major air leak. • If the ratio of the height of the peak of mass 18 (H2O+) to mass 19 (H3O+) is about 10:1, there is little water vapor in your system. • If the ratio of peak height of mass 18 to mass 19 is less than 10:1 but greater than 5:1, additional bakeout may be necessary. • If the ratio of the peak height of mass 18 to mass 19 is much less than 10:1, your system contains excess water vapor. An Air/Water Spectrum Obtained from a System with No Significant Air Leaks and Little Water Vapor is indicated by: • The peak at mass 18 (H2O+) may be the base (highest) peak. This is dependent on the level of water vapor. • The ratio of the peak height at mass 18 (H2O+) to that at mass 19 (H3O+) is greater than or equal to 10:1. • The base amount value is significantly less than 500. • The ratio of the peak height at mass 28 to that at mass 32 is about 4:1. 103 5. If there are no air or water leaks in your system, you should obtain the following approximate values. Actual values may vary from system to system. Base Amount TIC 18:28 ratio 19:18 ratio 28 width <500 <5000 ~ 1:1 10 to 15% < 1 m/z An air/water spectrum obtained from a system with a small air leak and little water vapor is indicated by: • The peak height at mass 28 is noticeably greater than that at mass 18. • The base amount value has increased to greater than 500. • The ratio of the peak height at mass 18 to that at mass 19 is greater than or equal to 10:1. An air/water spectrum obtained from a system with a moderate air leak and little water vapor is indicated by: • The peak at 28 starts to overload. • The Base Amount value may be several thousand counts. An air/water spectrum obtained from a system with a large air leak and little water vapor is indicated by: • The peaks at masses 18, 19, 28 and 32 are broadened. As a leak increases, all peaks broaden and eventually become undifferentiated. Fixing a Large Air Leak Typical sources of large air leaks are • Particles or damage on the manifold flange O-ring seal. • Particles or damage on the transfer line O-ring seal. • The transfer line brass nut is loose. • Poor O-ring sealing between the turbomolecular pump and the manifold. Do not over tighten the fittings; otherwise, you may generate an even larger leak. If you cannot eliminate the leak, vent the system, and check the O-ring on the manifold and transfer line for particles. Wipe off both O-rings with lint-free cloth. The turbomolecular pump will probably fail to achieve its 100% speed if there is a leak or poor seal at the turbo/manifold interface. Never attempt to operate the system under these conditions. Fixing a Small-To-Moderate Air Leak You may have more trouble finding and correcting a small-to-moderate air leak than a large one. Symptoms associated with small-to-moderate air leaks include the following: 104 • The peak at mass 28 will have increased, becoming significantly larger than the mass 18 peak. • The air leak will probably increase the water background, particularly in humid environments. An increase in water vapor content will likely be accompanied by a 20% or greater increase in the 19:18 intensity ratio. Checking GC Connections NOTE: Check the GC Maintenance Section for additional information for trouble shooting leaks. To identify and correct a leak at the connections between the capillary column and the injector or transfer line, proceed as follows: • Make sure that you are using ferrules of the correct size, i.e., 0.4 mm for 0.25-mm ID columns, and 0.5 mm for 0.32-mm ID columns. • Make sure that the ferrule on the transfer line is a graphite/Vespel mixture. Most transfer line connection leaks occur on the high vacuum side (e.g., around the transfer line O-ring). In the case of a graphite/Vespel ferrule, tighten each ferrule one-half turn beyond finger tightness. In the case of a graphite ferrule, tighten each ferrule threequarters of a turn beyond finger tight. • Leaks at the septum may arise from loose injector nuts or overuse of the septum. Regularly change the septum as part of your routine GC preventive maintenance program. To reduce the level of air bleeding into the system and any background from the septum material, use good quality, low bleed septa. • Air leaks in the GC pneumatics are the most difficult leaks to detect and eliminate because detection gases are not particularly effective for this purpose. In general, you should tighten all fittings. • Saturated filters on the GC may produce an increase in the air/water background. Replace the filters at regular intervals and whenever moisture or other background from the GC becomes a problem. Troubleshooting Air Leaks Using Leak Detection Gas You may use a leak detection gas such as difluoroethane to locate leaks. For example, difluoroethane is sold commercially under the name Dust-Off. A leak at the transfer line (the high vacuum side) should produce an immediate response. If, on the other hand, the leak is coming from the GC injector, it will take about 90 sec to register a response. (It takes about that length of time for the gas molecules to travel through the capillary column.) If you discover a leak at the injector, you can correct the problem without venting the system; however, be sure to wait until all GC zones are cool before beginning. If the leak is coming from a transfer line O-ring seal, you will have to shutdown the GC/MS system and vent the system before fixing it. NOTE: Use the Leak segment of the C:\VarianWS\4000 MS Service\4000 MS (Int or Ext) Service.mth method in Manual Control. If necessary, edit the mass range as appropriate for the detection gas selected. 105 NOTE: Do not spray indiscriminately around the fittings. Typical leak detection gases such as Freon or argon diffuse very rapidly from the fitting you are testing toward a true leak. This could lead you to identify mistakenly the fitting that you are testing as the leak source. Check for leaks: • Spray a fine stream of detection gas on the transfer line closest to the analyzer. • Examine the monitor for a response. If a peak at an appropriate mass for the gas selected does not appear, there is no leak at the transfer line seal. • If a peak appears, there is a leak. The transfer line O-ring may have particles on its surface. Shut down the system and check the O-ring. Also, check the following gaskets and fittings for leaks. (Tighten the fittings and/or flanges as needed. Wait a few seconds between subsequent applications of leak detection gas.) • Pneumatics manifolds • Vent valve fitting • Vacuum manifold flange • Transfer line nut • Injector nut • Septum nut Fixing High Water Levels The presence of excess water vapor may be due to • Failure to bakeout for a sufficient length of time (i.e., at least two hours, when you vent the system). • Introduction of water vapor when you clean the ion trap. • Introduction of water vapor when you replace the capillary column. • Water vapor in the carrier gas tank. • An atmospheric air leak in the system. This problem most often occurs under conditions of high relative humidity. • In external mode, the helium getter is expended. You will often observe high water backgrounds after venting the system, and especially after cleaning the trap. Several hours of bakeout may be required for the water vapor to desorb from surfaces in the vacuum system, and for the water level to drop to a stable level. Never operate your system if the mass 18 and 19 peaks are the same height. After the system has baked out sufficiently (e.g., overnight), the presence of excess water is due to contamination in the carrier gas tank, moisture collecting in cold spots, or an air leak. Saturated filters on the GC may produce an increase in the air/water background. Replace the filters at regular intervals, and whenever moisture or other background from the GC becomes a problem. 106 GC Troubleshooting NOTE: Please refer to the GC Operator’s Manual for information about GC troubleshooting and diagnostics procedures not described in this section. This section describes chromatographic troubleshooting, with particular emphasis on GC/MS applications. You will be able to investigate most of the problems addressed in this section by running the COLTEST mixture (03-920273-00). The following procedure describes the chromatographic conditions and the expected results when running the COLTEST sample with a 30-m vf5ms column (0.25 mm ID, 0.25 µm film thickness). Using the COLTEST Sample for Troubleshooting The Coltest sample provides a good mechanism for identifying a variety of chromatography problems. A COLTEST method can be found in the C:\VarianWS\4000 MS Service directory of the software. Running the COLTEST Sample Flow Pressure Conditions Use a constant flow of 1.0 mL/min. Injector Conditions • 1177 Injector: Use an isothermal temperature of 240 °C. Set up the following split program conditions: Time Split State 1 Split Ratio initial On 100 0.01 Off Off 1.00 On 100 MS Temperature Conditions 1. Set the transfer line temperature to 250 °C. 2. Set the trap temperature to 150 °C. 3. Set the manifold temperature to 40 °C. 4. Set the source temperature to 150 °C if the 4000 MS is in external mode. The COLTEST test mixture contains the following compounds at levels of 1 to 5 ng/µL. No. Compound Formula 107 Integer Weight Quantitation Mass No. Compound Formula Integer Weight Quantitation Mass 1 Decane C10H22 142 57 2 1-octanol C8H18O 130 69 3 Undecane C11H24 156 71 4 Nonanal C9H18O 142 67 5 2,6-dimethylphenol C8H10O 122 107 6 2-ethylhexanoic acid C8H16O2 144 73 7 2,6-dimethylaniline C8H11N 121 106 8 decanoic acid, methyl ester C11H22O2 186 74 9 undecanoic acid, methyl ester C12H24O2 200 87 10 Dicyclohexylamine C12H23N 181 138 11 dodecanoic acid, methyl ester C13H26O2 214 143 12 Hexachlorobenzene C6Cl6 282 284 You can also effectively separate the individual components in the mixture for subsequent data manipulation, e.g., library searches and quantitation. Troubleshooting Common Chromatographic Problems The COLTEST mixture includes polar or active compounds such as 1-octanol, 2,6-dimethylphenol, and 2,6-dimethylaniline. Also present are some non-polar or inactive compounds such as decane and dodecane at approximate levels of 1 ppm in hexane. Analysis of the mixture yields information about solvent tailing, column efficiency, dead volume, active sites in the injector/column, etc. You can use the analysis to troubleshoot common chromatographic problems. The following table identifies many of the problems, and proposes solutions. Correcting Solvent Tailing or Broadening Problems Possible Cause Solution Poor column installation resulting in dead volume in the injector Reinstall the column in the injector. Make sure you have a good cut on the column by examining the column under magnification. Solvent flashing in hot injector. Reduce the injection speed. If possible, reduce the injector temperature. If you are using sandwich injection, reduce the solvent plug to 0.5 µL. Septum purge line is plugged Check that the septum purge flow is 3.5-4.5 mL/min with a 10-psi head pressure. If necessary, adjust the valve setting. Injector is not purged properly following splitless injection For a splitless injection, the vent flow should be at least 70 mL/min. The injector should be switched to the split mode 30 to 90 sec after the injection. 108 Correcting Tailing Sample Peaks for Particularly Active Components Possible Cause Solution Active sites in the injector insert or liner Change or clean the injector insert. If necessary, silanize it. Active sites or degraded phase present in the column Remove the front 15 cm of the column and reinstall it. If the retention times are changing, or if cutting the column does not fix the problem, replace the column. Correcting Low Response and Severe Tailing with High Boiling Point Compounds Possible Cause Solution Injector not hot enough to vaporize high boilers Increase the temperature of the injector High levels of column bleed masking component peaks Condition the column at 30 °C below its maximum operating temperature. Switch to a high temperature column if conditioning does not help. High levels of silicone or other contamination are coated on the ion trap surfaces Clean the ion trap as outlined in the Maintenance section. Insufficient vaporization of the Raise the injector temperature and lower the injection higher boiling point components speed. Trap temperature is too low Increase the trap temperature in increments of 20 °C. Correcting Leading Sample Peaks (Reverse Tailing) Possible Cause Solution Column overhead due to injection of excessive amounts of a component Dilute the sample, or perform a split injection. Degradation of the stationary phase Change the column. Carrier gas velocity is too low Increase the carrier flow rate. Correcting Poor Resolution1 Possible Cause Solution Column temperature or program is not optimized Modify the method (e.g., slow the column ramp rate) to improve the separation Carrier gas flow is not optimized Decrease the carrier gas linear velocity to improve the resolution. Column cannot separate certain species, (e.g., those with similar boiling points) Use a more polar column. Column stationary phase is degraded, resulting in poor efficiency Replace the column. 1 Peaks are not well separated, e.g., 2,6-dimethylphenol and 2-ethylhexanoic acid in the COLTEST mixture. 109 Lack of Peak Size Reproducibility Possible Cause Solution Leaking or partially plugged syringe Visually check that the syringe is pulling up the sample. Check that the nut is tight. Flush the syringe with solvent. Replace the syringe. Leak at the septum Replace the septum regularly and ensure that the septum nut is tight. Improper installation of column in the injector, or a leak at the column inlet Check the installation of the column in the injector. Tighten the capillary column nut. Sample is being absorbed by active surfaces in the injector or column Change the injector insert. Remove the front 15 cm of the column, or replace the column. Incomplete vaporization of sample in the injector Increase the injector temperature. Injector splits too soon. Confirm that the switch time is chromatographically optimized. Correcting Peak Splitting (Particularly for Low Boilers) Possible Cause Solution Sample flashing in injector simulating two injections Lower the injection temperature. Column is cracked Re-cut and install the column. A piece of septum is stuck in the injector insert. Replace the insert and septum. Correcting Extra, Unexpected Peaks in the Chromatogram Possible cause Solution Septum bleed Use high-temperature, low-bleed septa. Make sure that the septum purge flow is set correctly. Impurities from the sample vials (e.g., plasticizers present) Confirm that this is indeed the case by running a solvent blank with a new syringe. Use certified sample vials, and keep the samples refrigerated. Impurities from the carrier gas present Install or replace the carrier gas filters. Injector or GC pneumatics contaminated Remove the column from the injector and bake it out at elevated temperature, (e.g., 350 °C) using a split vent flow of at least 20 mL/min. Impurities present in the sample Confirm that this is indeed the case by running a blank or standard. Solvents are extracting impurities from the septum. Switch to a new septum type, lower the injection temperature, or reduce the injection volume. Impurities present in syringe wash solvent Use high purity grade solvents. 110 Correcting Retention Time Differences Between Runs Possible Cause Solution Unstable carrier gas flow controller/regulator Check the pneumatics for leaks. If necessary, replace the flow controller/ regulator. Column contamination or degradation Condition or replace the column. Injector leaks Replace the septum at regular intervals. Check that the septum nut and capillary column nut are tight. If the equipment is used in a manner not specified in this manual, the protection provided by the equipment may be impaired. 111 112 Miscellaneous Procedures and Instructions Other Documents Other documents that you may wish to consult regarding 4000 MS operation include the following: • 4000 GC/MS Internal Ionization Users Guide (03-954032-00) • 4000 GC/MS External Ionization Users Guide (03-954033-00) • 4000 GC/MS Hybrid Ionization Users Guide (03-954034-00) • 4000 MS Data Handling Users Guide (03-954038-00) • 4000 GC/MS Software Operation Manual (03-914999-00) • 4000 GC/MS Pre-installation Instructions (03-914997-00) Site Requirements Site Preparation The 4000 MS has been designed to operate reliably under carefully controlled environmental conditions. It is the responsibility of the purchaser to provide a suitable location, a power source of acceptable quality, and a suitable operating environment. Operating a system or maintaining it in operational condition outside of the power and operating environment limits listed below could cause failures of many types. The repair of such failures is specifically excluded from the standard warranty and service contract coverage. For additional information, please request specific pre-installation support directly through your local Varian Sales/Service Center. Power You are responsible for providing two dedicated fourplex single-phase power sources with earth grounds hard-wired to the main power panel ground. Within North America or Japan these power sources must be 20A, 90-130 Vac, 60 Hz ±3 Hz, and outside North America they must be 10A, 180-260 Vac, 50 Hz ±3 Hz. One of these fourplex power sources is for the mass spectrometer, computer, monitor, and printer. The other fourplex power source is for the gas chromatograph and (optional) autosampler. If you have additional sample 113 preparation devices or test equipment, we recommend a separate dedicated power source for their operation. NOTE: Do not use the free outlet for equipment that draws more than 2 amps. Interconnect Diagram for the 4000 MS Avoid using power supplies from sources that may be subject to RF interference, such as electric motors and elevators. Care must be taken to ensure that sources of radio frequency interference (RFI) and electromagnetic interference (EMI) are not placed on the same power line, or share the same ground plane, since this can degrade the performance of the GC. Equipment such as motors, solenoids, fluorescent light fixtures, and radio communication transmitters should be isolated from the instrument and connecting cables as much as possible. The power cable from the GC is approximately 2m (6 ft) long and fitted with National Electronics Manufacturers Association (NEMA) 5-20P power plugs. The NEMA 5-20P power plug and corresponding outlet are shown in Figure (a). NEMA 5-20P plugs are rated at 20A and 120 Vac. The power cable from the mass spectrometer is approximately 2.5m (8 ft) long and fitted with US Standard National Electronics Manufacturers Association (NEMA) 5-15P power plugs. The NEMA 5-15P power plug and corresponding outlet are shown in Figure (b). NEMA 5-15P plugs are rated at 15A and 120 Vac. Systems shipped outside the United States, Canada or Japan are fitted with CEE 7/7 plugs; these are rated at 16A and 230 Vac. The CEE 7/7 plug and outlet are shown in Figure (c). The power cables for the computer, monitor, and printer are approximately 2m (6 ft) long. They are fitted with NEMA 5-15P plugs. The power cable from the 8400 AutoSampler is about 2m (6 ft) long, and is fitted with a NEMA 5-15P plug rated at 120V. 114 NEMA 5-20P, NEMA 5-15P, and CEE 7/7 Power Plugs and Outlets With a 120V power source, the maximum amperage requirements for each of the 4000 MS components are as follows: Component Amperes Mass Spectrometer 12 Gas Chromatograph 20 Varian 8400 AutoSampler 0.5 Computer 3 Monitor 2 Laser Printer 3-4 NOTE: With a 230V power source, the maximum amperage requirement of each of the above components is one-half of the amperage given above. Never plug the mass spectrometer and the gas chromatograph into the same power source; otherwise, you may overload the fourplex power source. The Interconnect Diagram for the 4000 MS shows the five power cables of a typical installation. Never use the free outlet on each of the power sources for equipment that draws more than 2A. 115 Quality of Power The quality of the power supplied to your 4000 MS is very important. The power must be 90 -130 Vac, 60 Hz ±3 Hz (180-260 Vac, 50 Hz ±3 Hz), and it must be stable. It must be free of fluctuations due to slow changes in the average voltage or to changes resulting from surges, sags, or transients. • Slow average changes are gradual, long-term changes in the average root mean square (RMS) voltage level, with typical durations greater than 2 seconds. • Sags and surges are sudden changes in average RMS voltage level, with typical durations between 50 µsec and 2 seconds. • Transients (or impulses) are brief voltage excursions of up to several thousand volts with durations of less than 50 μsec. Constant high line voltage or surges in voltage can produce overheating and component failures. Constant low line voltage or sags in voltage may cause the system to function erratically or to stop functioning. Transients, even of a few microseconds duration, may cause electronic devices to fail catastrophically or degrade sufficiently to significantly shorten their lives. Therefore, it is important to establish the quality of the line power in your laboratory before you install your 4000 MS. Occasionally, you may encounter line power sources of unacceptable quality; such power sources may adversely affect the operation of the 4000 GC/MS. The 4000 GC/MS is tested under EMC Standard 61326-A1 + A2. If voltage conditions exceed those standards, additional power conditioning or surge protection is advised. You may want to contact a specialist in power conditioning services. To protect against power failures, an Uninterruptible Power Supply (UPS) can be used. The amount of power drawn depends on instrument operating conditions but 4KVA should be sufficient under typical acquisition conditions, at normal line voltage. Greater power may be drawn during system power up or bakeout. The UPS should have a switchover time of 20 ms. or less. Operating Environment It is your responsibility to provide an acceptable operating environment. Attention paid to the operating environment will ensure continued high performance of your 4000 MS. Expenditures for air conditioning will be more than offset by good sample throughput and a reduction in repair costs. Temperature The laboratory temperature must be held between 15 and 30 °C (59 and 86 °F). As the laboratory temperature increases, system reliability decreases. All electronic components generate heat while operating. This heat must be dissipated to the surrounding air if the components are to operate reliably. 116 The turbomolecular pump’s temperature cutoff protects the bearing and prolongs its lifetime. If the laboratory temperature is significantly above 30 °C (86 °C), the pump cutoff temperature could be reached, and if so reached, would result in the pump being shutdown. There must be a good flow of air around the system, and the air conditioning must be capable of maintaining a constant temperature (within operational limits) in the immediate vicinity of the system. Using demanding GC methods the average steady-state heat load of the 4000 MS is 6000 BTUs. Humidity The relative humidity of the operating environment must be between 40 and 80%, with no condensation. Operating a 4000 MS at very low humidity will result in the accumulation and discharge of static electricity; this will shorten the life of electronic components. Operating the system at high humidity will produce condensation and result in short circuits. High humidity will also block the filters on cooling fans and accelerate wear of the heads in the diskette drives. Varian recommends that your laboratory be equipped with a temperature/humidity monitor. This will ensure that your laboratory is always in conformance with temperature and humidity specifications. Exhaust System It is your responsibility to provide an adequate exhaust system. Much of what is introduced into the mass spectrometer will eventually be exhausted from the mechanical pump, along with the small amounts of oil vapor that these pumps characteristically emit. Therefore, the pump outlets should be connected to a fume exhaust system. Consult local regulations for the proper method of exhausting the fumes from your system. Gas Requirements Helium - GC Carrier Gas Minimum 99.998% ultra-high purity with less than 1.0 ppm each of water, oxygen, and total hydrocarbons. One 257-ft3 tank with Matheson regulator #3104-580, or equivalent tank and regulator. NOTE: The presence of >1 ppm oxygen or water in the carrier gas supply may significantly affect the performance of the 4000 MS, and it may damage such components as the capillary column, filaments, and multiplier. Varian recommends that its customers verify that their gas suppliers use controlled tanks; this will ensure that purity standards are maintained. If you purchase pure gases in contaminated tanks, you may end up with a contaminated system requiring costly and time consuming repair. Methane, Isobutane, Ammonia - CI Reagent Gases (with CI option only) 99.99% purity. One gas cylinder with a two-stage pressure regulator that has a stainless steel diaphragm and maximum inlet pressure of 30 psi (200 kPa). 117 Cryogenics Systems equipped with SPI/1079 injectors or column oven cryogenics require one of the following: • Liquid CO2 at 850-1000 psig • Liquid N2 at 20-50 psig If you are not sure which one of these cryogenic options you ordered, check your purchase order. How to Install the 4000 MS To install the 4000 MS, proceed as follows: 1. Connect the GC to a helium source, and then purge the system filters and columns for 15 minutes. 2. Feed the capillary column and nut through the side of the GC. Connect the column to the transfer line. 3. Slide the 4000 MS toward the GC until the transfer line is protruding into the GC oven. 4. Connect vacuum tubing from the rear of the 4000 MS to the foreline pump with a clamping ring. 5. Connect the power cord from the foreline pump to the rear of 4000 MS (J2 label pump power only). 6. Connect the GC Ethernet cable to the Ethernet port on the computer. There should be a tee connector and a terminator at each end of the 50-ohm coax cable. 7. Connect the USB cable to the 4000 MS and the computer. 8. Plug in the GC, ms-spectrometer, and data-system power cords. 9. Switch on the power to the 4000 MS, the GC, and the computer. 10. Bring up System Control on the computer. 11. Select Diagnostics. 12. Check the turbomolecular pump speed. The pump speed should reach the 100% value within 30 min of turning on the power to the mass spectrometer. 13. Bake-out the trap (250 °C) and manifold (120 °C) for at least 2 hours before you tune it. 118 How to Move the 4000 MS To move the 4000 MS proceed as follows: 1. Using the shutdown procedure, shut down the GC and mass spectrometer. 2. Turn off the GC and computer. Then unplug the GC, mass spectrometer, and data system power cords. 3. Keep an eye on the capillary column inside the GC as you gently slide the mass spectrometer away from the GC. Be sure not to bend or kink the capillary column. 4. Use the alignment tool to prevent the transfer line from turning while you loosen the brass capillary nut connecting the column to the transfer line. 5. Cap the transfer line with a capillary nut and no-hole ferrule. 6. Place the capillary column and nut inside the GC oven. This will protect them from damage. 7. Turn off the carrier gas, and then disconnect the helium gas line that is connected to the GC filter. 8. Cap the filters with Swagelok® plugs or caps. 9. Move the 4000 MS to its new location. Be sure the new location satisfies the power and environmental requirements. 119 Parts and Supplies Electronics Part Number Description 392530502 Assy, Chassis Fan, Analyzer Side 393141001 Assy, Transferline Heater 393141701 Assy , Cable, Power, Turbo 393240301 Cable, Flat, 4000 EFC 393010204 Valve, Solenoid,2-Way,BUNA-N W/Pins 393010601 Valve, Solenoid,2-Way, Manifold Mount, Chemrez Seals 393010703 Valve, Solenoid,3- Way , Manifold Mount, Vitron Seals 393132501 Assy, Flex Circuit, Heaters 393142001 Assy, Flex Circuit, Filament 393142501 Assembly, Adaptor, Int Ion Source 393143701 Assy, Cable, GC/4000MS Start Pneumatics Part Number Description 393112491 Kit, Getter Replacement 393010001 Valve, Needle, Parker, CAL-GAS 393264101 He EFC Assembly 393177201 Tube, CI IN, Pneumatic Blk/Needle Blk 393010101 Valve, Needle , Parker , CI-GAS 393010702 Valve, Solenoid, 3-way, Manifold Mount, Vitron Seals 392570700 Rivet, Solid, 1/8 X ¾ Analyzer, Attached to Top Flange Part Number Description 393173901 Assy, Gate, Int Ion Source, Clean 393173801 Assy, BASE, Int Ion Source, Clean 393173701 Ring, Center, Int Ion Source 393173601 Plate, Retaining, Int Ion Source, Clean 393102001 Assy, Source, Internal Ionization 393053501 Spacer, Quartz Clean, Not Coated 393053502 Spacer, Quartz, Clean, Silco Coated 393101801 Assy, Trap 393161101 Isolator, Lens and Screw 393162201 Shield, Flex Circuit 393167101 Spacer, Magnet/Oven 393167201 Thumbscrew, Trap Oven 120 Part Number Description 393102801 Trap Oven Half, Entrance (see Note below) 393102802 Trap Oven Half, Exit (see Note below) 393102703 Assy, Trap Heater, External Source 393167701 Structure, Magnet, External, w/Magnet Holes 393167702 Structure, Magnet, External, No Magnet Holes 392017401 Filament, 4000MS, Internal Ionization 393167593 RF Electrode, Silco Stl Coated, Cleaned 393164493 Assy, Silco End Cap With Plug 393171201 Internal Transfer line Tip, Cleaned 393060501 Spring Gold Plated, Trap 393167001 Block, External Source 393167801 Magnet Holder 393167901 EI Volume 393168001 Gasket, Ext. Source 393168101 Retainer, Lens, Pins, External Source 393168301 Ring, Center, Trap 393168401 Assy, Lens 1 393168501 Assy, Lens 2 393168601 Assy, Lens 3 393161001 Assy, External Filament, Base w/Posts, Filament and Screws 393101701 Assy, External Source 393175801 Spring, External Source, CI Volume Retract 393176101 Disc, Magnet 393171101 Tip, Transfer line, External 393160701 Holder, CI Volume 393160801 Volume, CI NOTE: If your oven has either a solid aluminum or solid black anodized surface, you must order both halves of the oven in (part number 393113991). If the front and back of the oven are black anodized and the sides are aluminum, then order only the half you need. The ovens include a heater and a temperature sensor. 121 Analyzer, Attached to Manifold Part Number 03-931012-01 03-931640-01 03-931689-01 03-931691-01 03-931751.01 03-931753-01 03-931757-01 03-931762-01 21-719935-00 21-709266-00 03-931774-01 03-931726-01 Description Assy, Transfer line, 4000 MS Clamp, Turbo Assy, Vent Stem Electrode, Conversion, Dynode Multiplier, Channel, Model CEM 4755 Strap, High Voltage, Multiplier Inlet, Helium, Manifold-Trap, Polyimide Knob, Vent Spring, COMP, 0.210 OD, 0.026 DIA, 0.380L, SST Spring, COMP, .720 OD, .055 Wire, 3.0L, SH.587 CI Gas Inlet , Manifold Elbow, Vacuum, 4000 MS Chemical Ionization Part Number Description 03-930555-01 CI Manifold 03-931790-01 CO Block Frit Spacer 03-930556-01 CI Plate 03-931774-01 CI Gas Inlet, Manifold 12-221106-24 6-32 x 1½ Screw Vacuum Part Number Description 03-931119-91 Kit, Turbo Replacement, V301 88-299538-00 GP Oil 27-101002-00 Oil Mist Cartridge Replacements pk. of 2 03-930660-01 DS102 115V 03-930661-01 DS102 230V 03-930662-01 DS102 100-120V, 200-240 122 O-Rings Part Number Description 03-930109-25 O-ring, 1.176 ID, .070 DIA, Viton, Clean 03-930109-20 O-ring , 2-135, 1.925ID, 0.103 DIA, Viton (transfer line) 03-930109-24 Viton O-ring , Top Flange PCB, 2-148, 7.484 ID, Quad 03-930109-10 BUNA O-ring Clean 0.125 03-930109-07 O-ring , 2-108, 0.237 ID, 0.103 DIA, Viton 03-930109-27 O-ring , 1.049 ID, 0.103 IDA, Viton, Clean 03-930109-18 O-ring , Baked, Quad-X Seal, 1.112 ID 03-930109-28 0.145 ID Viton O-ring 03-930109-11 0.239 ID Viton O-ring 03-905960-09 0.348 OD O-ring Miscellaneous/Other Part Number Description 28-693976-00 Union 1/16 SST for PID, ELCD (HALL) 28-247071-00 1/8" Brass Plug 03-917084-00 1/8" Capillary Column Nut 03-931783-01 He Getter Mounting Clip 88-299440-00 Vacuum Grease 03-917142-00 Viton Ferrule 03-917157-00 Viton Ferrule Washer 22-119650-00 Cable Tie 28-849792-00 Fitting, Screw Plug, 10-32 Brass NI Plated 28-158923-00 Polyurethane Tubing Clear 28-993060-00 1/8" Clutch Clamp 28-158611-00 Tubing, Poly, 1/8" X 1/16" Red 28-158603-00 Tubing poly, green 28-849793-00 Fitting, 10-32 THD, Male Tube, Brass NI 03-931805-01 Tool, Internal Column Length 03-930604-01 Alignment Tool Wrench, Saturn 2000 29-900077-00 Key, Hex, 6 mm 03-931411-03 Cable, USB 2.0, 3 Meter Long 03-931699-01 Holder Trap Service 03-931103-91 Kit, Standard Accessory, 4000 MS 123 Test Samples Part Number Description 03-931126-01 Perf. Eval. Std. GC/MS (Internal EI & CI) 03-930127-01 Test Std. 4000 MS In External EI (2 pg/µL OFN) 03-920305-00 Benzophenone External CI Sensitivity Sample (50 pg/µL) 03-931130-01 Test Std, 4000MS In External NCI (1 pg /µL DFB) 03-920353-00 Calibration Compound/Haz 03-920273-00 GC/MS Column Test Mix/Haz 124 Varian Service If you have a problem with your 4000 MS that you are unable to resolve using the procedures described, you may want to call a Varian Customer Support Representative. When you call, please be prepared to provide the following information: • 4000 MS serial number (located on the front panel) • Installed options. • Diagnostics test results If you are having problems with the gas chromatograph, please be prepared to provide the following information: • GC model • Autosampler model, if any • Type of injector you are using • Cryogenics • Information about your GC column, (i.e., the manufacturer, bonded phase, film thickness, ID, and length) If you are having problems with your computer and/or software, please be prepared to provide the following information: • Computer manufacturer and model • Windows version • Mouse driver version • Printer manufacturer and model • Network configuration • Printouts of your Autoexec.bat and Config.sys files • MS Workstation software version In addition, you should observe the following guidelines when describing the problem to the Customer Support Representative: • Tell the service representative which part of the software, System Control, Manual or Acquisition, for example, you were using when the problem occurred. 125