1
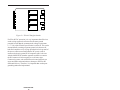
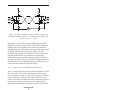
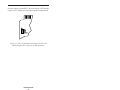
MOD HUB Series
A Line of Modular Active Hubs for ARCNET®
Local Area Networks
User Manual
#TD401600-0ML
Trademarks
Contemporary Controls, ARC Control, ARC DETECT and
EXTEND-A-BUS are trademarks or registered trademarks of
Contemporary Control Systems, Inc. ARCNET is a registered
trademark of Datapoint Corporation. Other product names may be
trademarks or registered trademarks of their respective companies.
TD401600-0MI Revised 6-29-07
Copyright
© Copyright June 1996–2007 by Contemporary Control Systems,
Inc. All rights reserved. No part of this publication may be
reproduced, transmitted, transcribed, stored in a retrieval system, or
translated into any language or computer language, in any form or
by any means, electronic, mechanical, magnetic, optical, chemical,
manual, or otherwise, without the prior written permission of:
Contemporary Control Systems, Inc.
2431 Curtiss Street
Downers Grove, Illinois 60515 USA
Tel:
+1-630-963-7070
Fax:
+1-630-963-0109
E-mail: [email protected]
WWW: http://www.ccontrols.com
Contemporary Controls Ltd
Sovereign Court Two
University of Warwick Science Park
Sir William Lyons Road
Coventry CV4 7EZ UK
Tel:
+44 (0)24 7641 3786
Fax:
+44 (0)24 7641 3923
E-mail: [email protected]
Disclaimer
Contemporary Control Systems, Inc. reserves the right to make
changes in the specifications of the product described within this
manual at any time without notice and without obligation of
Contemporary Control Systems, Inc. to notify any person of such
revision or change.
TD401600-0ML
i
Contents
Chapter 1 Introduction ......................................................... 1
1.1
Description ................................................ 1
1.2
Benefits ..................................................... 2
1.3
Specifications ............................................ 2
1.4
Regulatory Compliance ............................. 4
1.5
Power Requirements ................................. 4
1.6
Ordering Information ................................ 4
Chapter 2 Installation ........................................................... 7
2.1
Introduction ............................................... 7
2.2
Electromagnetic Compliance ..................... 7
2.3
Flange Mounting ....................................... 8
2.4
MTG-RAK — Rack Mounting Kit ........... 8
2.5
Connecting Cables to the MOD HUB ....... 9
2.6
Turning the Active HUB “ON” ............... 17
2.7
Ensuring Proper HUB Operation ............ 18
2.8
Troubleshooting Tips .............................. 18
2.9
Isolating Faulty Nodes with Line
Activity Indicators................................... 20
2.10 Supporting Extended Timeouts ............... 21
Chapter 3 Operation .......................................................... 23
3.1
Theory of Operation ................................ 23
Chapter 4 Service ............................................................... 25
Warranty ............................................................. 25
Technical Support ............................................... 26
Warranty Repair ................................................. 26
Non-Warranty Repair ......................................... 27
Returning Product for Repair ............................. 27
TD401600-0ML
ii
Appendices
Appendix A — Permissible Segment Lengths .... 29
Appendix B — Declaration of Conformity ......... 32
List of Figures
Figure 2-1 EIA-485 Daughterboards .................................. 14
Figure 2-2 Each -485 hub port has provisions for
applying bias and termination. Make sure
common mode voltage (Vcm) does not
exceed +/–7 Vdc ............................................... 15
Figure 2-3 AC Coupled EIA-485 Option (-485X) ............. 16
Figure 2-4 Front Panel of the MOD HUB Shown
Fully Loaded ..................................................... 17
Figure 2-5 The extended timeout settings only affect
the RECON light with no affect to the hub
operation ........................................................... 22
TD401600-0ML
iii
1
Introduction
1.1
Description
The MOD HUB series of modular active hubs provides a
convenient and flexible method of expanding ARCNET local
area networks. EXP expansion modules are installed into the
MOD HUB that support the particular cabling technology
desired. The MOD HUB is available with either four expansion
slots or twelve. Since most expansion modules support four
ports each, a total of 48 ports can be provided within one hub.
MOD HUBs can be cascaded via an expansion port on each hub
to expand the network to the limit of the ARCNET technology.
The MOD HUB is provided with an integral universal voltage
power supply, four or sixteen slot card cage and internal timing
module permanently installed into the hub's backplane. There
are no expansion modules provided with the MOD HUB. The
timing module uses a precision delay line timing generator
which regenerates the incoming ARCNET signal without
introducing excessive bit jitter. The regenerated signal is then
sent to all other ports on the hub. A watchdog timer is included
to prevent the possibility of hub lockup eliminating the necessity
of cycling power on a failed hub. The hub unlatch delay time is
derived from a crystal oscillator for high accuracy and
repeatability.
Active hubs increase the robustness of ARCNET networks.
They maximize the distance that can be achieved on each cable
segment — up to 2000 feet on coaxial segments. They prevent
interference to the network by squelching reflections caused by
open or shorted cable segments attached to the hub. Unused hub
ports need not be terminated. Active hubs allow for a distributed
star topology, thereby minimizing the cabling required in a
plant.
TD401600-0MK
1
There are several LED indicators that assist in troubleshooting
the network. One LED indicator informs if the network has
undergone a reconfiguration. Another indicator senses if the hub
is properly generating internal hub signals. There are separate
LEDs that monitor the two internal power supplies.
1.2
Benefits
•
Compatible with the baseband ARCNET network
•
Compatible with all Contemporary Controls’ (CC) network
interface modules (NIMs)
•
Supports up to 48 ports in four-port increments
•
Two sizes of enclosures: 16 and 48 ports
•
Offers easy expansion with plug-in modules
•
Mixes coaxial, twisted-pair and glass fiber optic cable
in one hub
•
Isolates network faults with diagnostic LEDs
•
LED indicator identifies reconfiguration of the network
•
Minimizes hub jitter with precision delay line timing
•
Activity LEDs for each port
•
Provision for rack mounting
•
Watch-dog timer prevents hub lockup
•
Hub unlatch delay digitally controlled
1.3
Specifications
Mechanical
See diagrams on page 3.
TD401600-0ML
2
Environmental
Operating temperature: 0°C to +60°C
Storage temperature: –40°C to +85°C
Functional
Hub delay: 320 ns (typ)
Unlatch delay time: 5.9 µs (typ)
Extended timeouts: Supports all three extended ARCNET
timeouts.
Signalling rate: 2.5 Mbps nominal
Compliance: ANSI/ATA 878.1
TD401600-0ML
3
1.4
Regulatory Compliance
UL 1950 listed
cUL listed per CSA 22.2 No. 950-95
IEC 950 classified
CFR 47, Part 15 Class A
CE Mark
1.5
Power Requirements
Electrical
MODHUB-16 series
100 VAC to 230 VAC
(+/–10%)
Input current:
0.5 amps max
Input frequency: 47 Hz to 63 Hz
Input fuse(s):
1 amp slo blo
5 mm x 20 mm
Input voltage:
1.6
MODHUB-48 series
100 VAC to 230 VAC
(+/–10%)
1.0 amps max
47 Hz to 63 Hz
1 amp slo blo
5 mm x 20 mm
Ordering Information
Select an adequately sized MOD HUB for the number of ports
required. The MODHUB-16 has four slots and can support up
to 16 ports. The MODHUB-48 has twelve slots and can support
up to 48 ports. EXP expansion modules generally support four
ports each and are ordered separately. Refer to EXP data sheets
for detailed information.
MOD HUB “E” designation means export model and is shipped
with a continental Europe power cord. These units have two
input fuses to address unpolarized power systems and carry the
CE Mark. This model can be modified at the factory for single
fuse operation if requested.
MOD HUB “F” designation means flange-mounted enclosure
which is standard for panel-board mounting. For rack mounting,
do not specify the “F” designation, but order a MTG-RAK
instead. The MTG-RAK supports either two MODHUB-16s
(-16Es) or one MODHUB-48.
TD401600-0ML
4
MODHUB-16F-N designation means that a version of the
MODHUB-16F (with vented cover) is installed into a NEMA 1
enclosure. A duplex receptacle is provided inside the NEMA 1
enclosure. This receptacle must be wired via a conduit
connection from an appropriate power source.
Model
MODHUB-16
MODHUB-16E
MODHUB-16F
MODHUB-16EF
MODHUB-16F-N
MODHUB-48
MODHUB-48E
MTG-RAK
Description
16-pt. powered card cage
(120V 50/60 Hz)
16-pt. powered card cage
(230V 50/60 Hz)
16-pt. powered card cage flange
mounted (120V 50/60 Hz)
16-pt. powered card cage flange
mounted (230V 50/60 Hz)
16-pt. powered card cage flange
mounted NEMA 1 enclosure
(120V 50/60 Hz)
48-pt. powered card cage
(120V 50/60 Hz)
48-pt. powered card cage
(230V 50/60 Hz))
MODHUB rack-mounting kit
TD401600-0ML
5
TD401600-0ML
6
2
Installation
2.1
Introduction
The MOD HUB can be either desktop mounted, panel mounted
or rack mounted. One model, the MODHUB-16F-N has its own
NEMA 1 enclosure for wall mounting.
2.2
Electromagnetic Compliance
The MOD HUB series complies with Class A radiated and
conducted emissions as defined by CFR 47 Part 15 and EN55022.
This equipment is intended for use in nonresidential areas. Refer
to the following notices in regard to the location of the installed
equipment.
Note: This equipment has been tested and found to comply
with the limits for a Class A digital device, pursuant to Part 15
of the CFR Rules. These limits are designed to provide
reasonable protection against harmful interference when the
equipment is operated in a commercial environment. This
equipment generates, uses, and can radiate radio frequency
energy and, if not installed and used in accordance with the
instruction manual, may cause harmful interference to radio
communications. Operation of this equipment in a residential
area is likely to cause harmful interference in which case the user
will be required to correct the interference at his own expense.
Warning
This is a Class A product as defined in EN55022. In a
domestic environment this product may cause radio
interference in which case the user may be required to take
adequate measures.
TD401600-0ML
7
The MOD HUB has been tested to EN55024 Generic Immunity
Standard–Industrial Environment. This standard identifies a
series of tests requiring the equipment to perform to a particular
level during or after the execution of the tests. The three classes
of performance are defined by CC as follows:
Class A — Normal operation, however, occasional
reconfigurations may occur or throughput reduced due to error
recovery algorithm by the ARCNET data link level protocol.
Class B — Throughput reduced to zero and continuous
reconfigurations occur. Normal operation resumed after
offending signal removed.
Class C — Complete loss of function. Unit resets and normal
operation restored without human intervention.
At no time did the MOD HUB fail to return to normal operation
or become unsafe during the execution of these tests.
A copy of the Declaration of Conformity is in the appendix.
2.3
Flange Mounting
The MODHUB-16 is also available in a flange mount
(MODHUB-16F) for mounting to a panel board or subpanel.
Make sure the MODHUB-16F flanges are mounted onto a
vertical surface to ensure proper airflow to the MOD HUB. If
desired, the four mounting feet located at the bottom of the
enclosure can be removed using a small screwdriver.
2.4
MTG-RAK — Rack Mounting Kit
Both the MODHUB-16 and MODHUB-48 can be installed in
standard EIA 19" racks using the MTG-RAK rack mounting kit
occupying 7" of vertical rack space. Either one MODHUB-16
(16E), two MODHUB-16s (16Es) side-by-side, or one
MODHUB-48 can be mounted using one rack mounting kit. To
install the MOD HUBs to the shelf provided with this kit,
simply remove the four rubber feet and attach the MOD HUB
directly to the shelf using the screws from the rubber feet. Be
TD401600-0ML
8
careful that the complete rack does not become unstable due to
the increased mechanical load.
The height of the MTG-RAK exceeds the height of the MOD
HUB to ensure that air flow will still be maintained through the
MOD HUB when 19" equipment is stacked vertically with no
voids. Still it is important to check that the MOD HUB does not
experience an increase in its ambient temperature that exceeds
its specified rating of 60°C.
Ensure that there is adequate power service for the MOD HUB
and that circuit overloading is not introduced with the addition
of the MOD HUB. This is especially important when power
strips are used in mounting racks. Make sure that earthing
(ground connection) is maintained to the MOD HUB through
any power strip.
2.5
Connecting Cables to the MOD HUB
The MOD HUB is shipped without EXP expansion modules.
Select the appropriate expansion modules for the cable type and
distance desired. Refer to the individual expansion module
installation instructions for information on installing the
modules. More information on designing an ARCNET cabling
system can be found in CC’s publication “ARCNET Tutorial &
Product Guide.”
Attach the coaxial, twisted-pair or fiber optic cables to the
devices that are being networked in the ARCNET LAN (refer to
Appendix A to verify that maximum cabling distance
specifications are not exceeded).
2.5.1
Connecting Coaxial Cable Star Networks (-CXS)
There are generally two types of coaxial cables that are used
with ARCNET, RG-59/u and RG-62/u. RG-59/u is 75-ohm
cable which does not precisely match the impedance of the
transceivers used on the MOD HUB expansion modules. This
cable will work, but communication distances are reduced
compared to RG-62/u because of the higher attenuation of
TD401600-0ML
9
RG-59/u cable. We recommend RG-62/u because it is a better
match to the transceivers and a full 2000 foot segment distance
can be achieved using this cable. Both cables support male BNC
connectors which the -CXS expansion module accommodates.
2.5.2
Connecting Coaxial Cable Bus Networks (-CXB)
There is no expansion module for a bus transceiver (-CXB);
however, bus topology is supported with the MOD HUB. In a
bus configuration, one end of the segment terminates into a
-CXS expansion module without a passive terminator.
However, the other end of the bus segment is terminated with a
passive terminator. Be sure to use the proper passive terminator,
93 ohms for RG-62/u and 75 ohms for RG-59/u. Do not attach
the -CXS expansion module in the middle of a bus segment
using a BNC “T” connector. However, the same effect can be
accomplished by splitting the bus segment into two pieces, each
of which attaches to a -CXS port. Again, no passive termination
needs to be applied to the hub side of a bus segment.
2.5.3
Connecting Twisted-Pair Star Networks (-TPS)
Each -TPS port is constructed as a -CXS port with an internal
BALUN transformer. A BALUN (which is an acronym for
BALanced-UNbalanced) connects the single-ended -CXS
transceiver to a balanced transceiver suitable for driving
balanced twisted-pair cabling. The internal BALUN in the -TPS
port is compatible in wiring to an external MUX LAB's part
number 10070 BALUN. Therefore, a -TPS port can directly
connect to another -TPS port on either a hub or a NIM or
connect to an external BALUN attached to a -CXS port. In both
cases use straight-through twisted-pair cable with RJ-11
connectors. Straight-through cable provides a one to one
correspondence in cable connections at both ends. Straightthrough cable can be identified as follows. Take both connectors
from a cable length and lay them side by side with the locking
clip facing the same direction. The wire color present on the
left-most side of one connector must be the same color on the
TD401600-0ML
10
left-most side of the other connector. This is a straight-through
cable which is used exclusively to connect -TPS ports. If the
cable color on the left side of a connector appears on the right
side of the other connector, this inverted cable will result in
operational problems with your twisted-pair network.
2.5.4
Connecting Twisted-Pair Bus Networks (-TPB)
The -TPS transceivers use internal BALUNs and, therefore, are
not directly compatible with twisted-pair bus networks. All
-TPS systems must be tied in either a star (one hub and multiple
NIMs) or distributed star (multiple hubs and multiple NIMs)
topology. Under no circumstances should more than two -TPS
ports be connected to the same cable. However, a -TPS port can
terminate the ends of a -TPB network. Connect one end of the
bus segment to a -TPS port without passive termination. Do not
attach a -TPS port to the middle of the bus segment. It will be
necessary to invert the wiring sense at the -TPS port since the
-TPS port has inverted polarity to a -TPB port (BALUNs
introduce a signal inversion).
2.5.5
Connecting Fiber Optic Cable (-FOG), (-FG3)
Single mode fiber optic cable is available in one size and
multimode fiber optic cable is typically available in three sizes,
50/125, 62.5/125, and 100/140. The larger the size, the more
energy that can be launched and, therefore, the greater the
distance. Two connectors are supported — the SMA and the ST.
The conventional SMA connector offers a threaded termination.
When this type of connection is tightened excessively, the fiber
optic cable can break resulting in unreliable communications.
Also, the degree of tightening affects the optimum throughput of
the cable. Depending upon the degree of tightening, fiber
alignment can vary from the optimal coupling, thereby
introducing some attenuation. The ST connector alleviates both
of these problems but is generally more expensive than the SMA
connector. The ST provides a bayonet style connector similar in
operation to a BNC coaxial cable connector.
TD401600-0ML
11
Fiber optic connections require a duplex cable arrangement.
Two unidirectional cable paths provide the duplex link. There
are two devices at each port on the MOD HUB expansion
module. One device, colored light gray, is the transmitter and
the other, dark gray, is the receiver. Remember that “light goes
out of the light (gray).” To establish a working link between a
hub and a network interface module or a hub to another hub, the
transmitter of point A must be connected to a receiver at point
B. Correspondingly the receiver at point A must be connected to
a transmitter at point B. This establishes the duplex link which
is actually two simplex links. Fiber optic cable is available
paired for this purpose.
Usually the manufacturers’ labeling is only on one cable of the
pair which is handy for identifying which of the two cables is
which. Establish your own protocol for connecting cable
between hubs and NIMs in the field using the manufacturers’
labeling as a guide. But remember that to connect point A to
point B requires a paired fiber optic cable and that the light
gray connector at one point must connect to a dark gray
connector at the other point.
2.5.6
Connecting DC-Coupled EIA-485 Networks
One RJ-11 connector is provided for each DC-coupled EIA-485
segment. This segment can be up to 900 feet long of IBM Type
3 unshielded twisted-pair cable, and as many as 17 nodes can
occupy the segment. Make sure that the phase integrity of the
wiring remains in tact. Pin 3 of the modular jack on each NIM
and hub port must be connected together. The same applies to
pin 4. Most modular (satin cable) telephone wiring flips the
phase of the wiring thereby reversing the connections to pins 3
and 4 at each end. Do not use this type of cable. Some modular
cable is not even twisted. Be sure to use the proper cable.
TD401600-0ML
12
Termination
Each end of the segment must be terminated in the characteristic
impedance of the cable. A 120-ohm resistor can be invoked with
a jumper which resides on the EIA-485 daughterboard adjacent
to the RJ-11 connector on the expansion module. With the middle
jumper inserted at location E1 on the daughterboard, 120 ohms of
resistance is applied across the twisted-pair. With the jumper
removed, no termination is applied. If it is desired to apply
external termination instead, remove this jumper and insert an
RJ-11 style tap (not provided) and terminator in the RJ-11 port.
Bias
In addition to the termination, it is also necessary to apply bias
to the twisted-pair network so that when the line is floated
differential receivers will not assume an invalid logic state.
There are two precision bias resistors (Rb) of equal value on
each daughterboard. One resistor is tied to the +5 V line while
the other is tied to ground. Each resistor has a jumper associated
with it. If the two jumpers are installed, the resistor tied to +5 V
is connected to the (+) signal line while the grounded resistor is
connected to the (–) line. This voltage drop will bias the
differential receivers into a defined state when no differential
drivers are enabled. Differential receivers typically switch at or
near zero volts differential and are guaranteed to switch at
+/–200 mV. Through the transition point, 70 mV of hysteresis
will be experienced. Therefore, a positive bias of 200 mV or
greater will ensure a defined state. We recommend that bias be
applied to both ends of the wiring segment by installing the two
end jumpers located at position E1 on the daughterboard. This
is to be done for only the hub ports or NIMs located at the ends
of the segment. All other NIMs will have their jumpers removed.
The termination and bias rules are simple. If the NIM or hub
port is located at the extreme ends of the segment, install all
three jumpers at location E1 on the daughterboard. If the NIM
is located between the two end NIMs or hub ports, remove all
three jumpers. If external termination is desired, remove the
middle jumper at E1 and provide the external termination.
TD401600-0ML
13
Figure 2-1. EIA-485 Daughterboards
For EIA-485 DC operation, it is very important that all devices
on the wiring segment be referenced to the same ground
potential in order that the common mode voltage requirement
(+/–7 Vdc) of the EIA-485 specification is achieved. This can be
accomplished by running a separate ground wire between all
hubs and computers or by relying upon the third wire ground of
the power connector assuming that the DC power return is
connected to chassis ground on all computers (this is the case
with the MOD HUB). Another approach would be to connect
the DC common of each computer to a cold water pipe.
Connected systems, each with different elevated grounds, can
cause unreliable communications or damage to the EIA-485
differential drivers. Therefore, it is important that an adequate
grounding method be implemented.
TD401600-0ML
14
+5V +5V Rb
Rb
P1P2
TXEN
P1P2
Rt
Rt
RXIN
TXEN
RXIN
Rb
Rb
Vcm
Figure 2-2. Each -485 hub port has provisions for applying
bias and termination. Make sure common mode voltage (Vcm)
does not exceed +/–7 Vdc.
Segments of -485 (-485D) connected NIMs can be extended
through the use of active hubs. Select a MOD HUB expansion
module with a -485 compatible port. Connect one end of the
segment to this port following the same termination rules as used
for a NIM. This hub port counts as one NIM when cable
loading is being calculated. The NIM electrically closest to the
hub port should not have any termination or bias applied.
Follow the same rules for other segments attached to different
hub ports. Each hub effectively extends the segment another 900
feet. Maintain the same cabling polarity as the NIMs by using
cable connections that do not invert the signals.
2.5.7
Connecting AC-Coupled EIA-485 Networks
The AC-coupled EIA-485 transceiver offers advantages over the
DC-coupled EIA-485. No bias adjustments need to be made
since each transceiver has its own fixed bias network isolated by
a pulse transformer. Unlike the DC-coupled EIA-485, wiring
polarity is unimportant. Either inverted or straight through cable
can be used or even mixed within one AC-coupled network.
Much higher common mode voltage levels can be achieved with
TD401600-0ML
15
AC coupling due to the transformer coupling which has a 1000
Vdc breakdown rating.
There are disadvantages to the AC-coupled transceiver as
compared to the DC-coupled technology. The DC-coupled
distances are longer (900 feet) compared to the AC-coupled
distance (700 feet).
The cabling rules of the -485X are similar to the -485. Wire a
maximum of 13 NIMs (reduce by one for each hub port) in a
daisy-chain fashion leaving the end devices as either NIMs or
hub ports. On these NIMs or hub ports insert a jumper at E1 on
both -485X daughterboards to invoke 120-ohm termination
resistors or leave the jumpers open and insert RJ-11 style
passive terminators. In the case of a hub port, an RJ-11 style tap
is required. Termination should not be applied to any of the
NIMs located between the two end NIMs or hub ports of the
segment. Do not mix -485 (-485D) and -485X NIMs together
on one segment; however, bridging of the technologies is
possible using two appropriate expansion ports on the MOD
HUB. To extend -485X segments, use a hub as discussed under
the -485 section. Cable inversion is not of any consequence.
Figure 2-3. AC Coupled EIA-485 Option (-485X)
TD401600-0ML
16
WIRING CHART
RJ-11 CONNECTOR
PIN
1
2
3
4
5
6
2.6
-TPS
–
N/C
+SIG
–SIG
N/C
–
-485
–
N/C
–SIG
+SIG
N/C
–
-485X
–
N/C
SIG
SIG
N/C
–
Turning the Active HUB “ON”
Turn the MOD HUB unit on by depressing the Power switch
located on the lower right of the MOD HUB’s front panel.
Note: Once your MOD HUB is on, we recommend that it be
left on unless you are installing/removing modules to/from
the MOD HUB. Connecting/ disconnecting cables with the
hub on will cause no damage to the MOD HUB.
3
8
4
5
6
1
7
2
9
10
11
12
1.
2.
3.
4.
5.
BNC Connector
Port Activity Indicator
Timing Module
Reconfiguration Indicator
Power Supply
Indicator for +Pwr
6. Power Supply
Indicator for –Pwr
7.
8.
9.
10.
11.
12.
Timing Indicator
RJ-11 Connector
ST or SMA Connector
Power Switch
Fuse Box
Power Cord Receptacle
Figure 2-4. Front Panel of the MOD HUB Shown Fully Loaded
TD401600-0ML
17
2.7
Ensuring Proper HUB Operation
Check each port's line activity indicator. All indicators on the
front panel of the active hub should light up when the hub is
turned on, assuming the cables connected to the hub are also
connected at the other end to ARCNET network interface
modules or active hubs. Please note that the RECON indicator,
in the right-most location on the front panel, will only flash for a
second when the hub is powered on or when reconfigurations
occur on the network. The other three indicator lights located in
line with the RECON indicator, specifically the +PWR, –PWR
and TIMING indicators, should always be lit when the hub is on
and operating properly. Additionally, the activity indicator for
each port should be lit if a cable is connected to that port and
the device at the opposite end of the cable is on. Refer to the
next section covering troubleshooting tips if normal hub
operation is not observed.
2.8
Troubleshooting Tips
If one of the devices in your ARCNET LAN loses its
communications capabilities after the MOD HUB has been
installed and used, first check the four indicator lights on the
timing module, the right-most module on the front panel of the
MOD HUB unit.
Note: Whenever any problems occur with the MOD HUB
unit, carefully document exactly what happened and what
steps you took to handle the problem. This will assist us in
helping you solve the problem.
2.8.1
Timing Module Indicators
+PWR This indicator should be lit when the MOD HUB is
powered. The internal positive DC power is continually
monitored to verify that this voltage is within specification. If
this indicator is not lit when the hub is turned on, there is a
problem with the internal positive power supply.
TD401600-0ML
18
–PWR This LED should also be lit when the MOD HUB is
powered. This LED monitors the internal negative DC power to
ensure that it is operating within an acceptable power range. If
this indicator is not lit when the hub is turned on, there is a
problem with the internal negative power supply.
If neither the +PWR nor the –PWR indicators light when the
MOD HUB is turned on, check for a blown fuse in the
MOD HUB.
To open the fuse box on the front panel of the MOD HUB
(domestic models only):
Turn off the MOD HUB by depressing the power switch
located on the right side of the front panel of the MOD
HUB. Unplug the power cord from the power receptacle on
the front panel of the MOD HUB.
Locate the fuse box (between the power switch and the power
receptacle on the front panel of the hub). Gently place the wide
edge of a screwdriver beneath the fuse box cover and lift to
dislodge the cover.
Lift out the fuse attached to the fuse box cover and check the
fuse. The fuse is blown if the wire in the fuse is broken.
If the fuse is blown, replace it with the spare 5 mm x 20 mm
fuse located in the fuse box cover, and then close the fuse box,
reattach the power cord, and turn on the MOD HUB.
If, after replacing the fuse, the +PWR and –PWR indicators still
do not light up when the hub is turned on, call technical support.
Note: Export models do not have spare fuses. Both fuses in
the fuse holder are actively used.
TIMING If no cables are connected to the MOD HUB or if
no valid ARCNET activity is present on any one port on the
MOD HUB, this indicator is off. If ARCNET activity is present
and the internal regeneration of the ARCNET signal is proper,
this indicator will light, telling you that the MOD HUB is
receiving ARCNET signals and (faithfully) reproducing these
TD401600-0ML
19
signals to other ports on the MOD HUB. If this indicator does
not light when activity is present on any hub port, as it should,
then the timing module is defective.
RECON Reconfigurations of the network routinely occur as
nodes are added to the network and pose no problem to the
network. When they occur, this LED will flash on for one
second to facilitate viewing even though the reconfiguration
process takes a fraction of a second. However, frequent
reconfigurations can degrade performance of the network as
indicated by this LED flashing repeatedly or lighting
continuously. If this is occurring on your MOD HUB, you need
to isolate the connected computers to find out which node is
causing these reconfigurations.
The cause of frequent reconfigurations could be a faulty
network interface module, defective cable, duplicate node IDs,
or a high incidence of electrical interference. An occasional
flash of this light is normal as automatic reconfigurations are a
feature of ARCNET. If this is all that is viewed, you can feel
well assured that the network is operating properly.
2.9
Isolating Faulty Nodes with Line Activity
Indicators
In addition to the four indicators on the timing module, each
port on each expansion module has a line activity indicator.
Each line activity indicator lights whenever the corresponding
port on the MOD HUB receives ARCNET signals. The
intensity of these indicator lights changes with the amount of
activity and this is how defective nodes can be isolated.
The worst possible occurrence is the “chattering node.” A
chattering node generates reconfigurations continuously, as
evidenced by the RECON light being continuously lit, because
this node has a defective receiver on its network interface
module. Under these circumstances, the line activity indicator
that corresponds to the port on the expansion module connected
to the chattering node will light brightly while all other line
activity indicators will appear dim. Disconnecting this cable
TD401600-0ML
20
from the MOD HUB will extinguish the RECON indicator and
return all other port activity lights to equal brightness, thereby
isolating the defective node. For large installations, the time
saved in identifying the problem can be immense.
Line activity indicators can also point out other problems with
the network. For example, line activity indicators light up when
the MOD HUB is on and each ARCNET-compatible device that
is connected to the MOD HUB is on. If a line activity indicator
is not on for a device that is properly connected to the MOD
HUB, then disconnect the cable from the connector and
reconnect the cable to a similar vacant connector on another
module. If the indicator on the other module does not light when
the cable is connected, check the cable, the computer or the
network interface module for possible problems.
If the line activity indicator goes on when the cable is plugged
into another module, then the problem probably lies with the
original module.
If a hub port has a line activity indicator that is on but no cable
is attached to the connector, then the module is defective and
should be returned. Contact our Customer Service Department.
2.10
Supporting Extended Timeouts
Although seldom used, ARCNET networks can be configured
for extended timeouts to facilitate geographically larger
networks. In this situation, each network interface module must
be configured for the same timeout. The MOD HUB will work
with any of the four available timeout settings, but the RECON
indicator will function unreliably if the reconfiguration detection
circuitry is not configured for the same timeout as the network.
There are four jumper settings on the timing module to
accommodate extended timeouts. With the power removed from
the MOD HUB, use a small star screwdriver to remove the
timing module. Along one edge of the module is jumper setting
E1. A jumper can be found installed in the NORM position.
This is the factory setting and the default setting for standard
ARCNET networks which is the shortest setting. The next
TD401600-0ML
21
available setting is marked ET1, the next longest is ET2 and the
longest is ET3. Simply move the jumper to the desired position.
Figure 2-5. The extended timeout settings only affect the
RECON light with no affect to the hub operation.
TD401600-0ML
22
3
Operation
3.1
Theory of Operation
Hub States
When the MOD HUB has installed expansion modules, the
timing module waits for the first instance of an ARCNET signal
on any one of its ports. During this time, the hub is in IDLE
mode with all port receivers enabled and all port transmitters
disabled. As soon as the first port senses an ARCNET signal
(there should only be one in a normally operating ARCNET
system), the hub enters the ACTIVE state with the receiving
port left enabled and all other receivers disabled. During this
state all transmitters are enabled with the receiving port's
transmitter disabled. This allows all nodes on the network to
hear a particular node which has momentary control of the
network while squelching any echoes from unterminated lines
(open or shorted cables). The hub remains in the ACTIVE mode
until the last ARCNET signal is received by the originating
port. To determine if the last signal has been sent, the hub times
the absence of an ARCNET logic “1.” Once the unlatch delay
time is exceeded (typically 5.9 ms), the hub reverts back to the
IDLE state.
Signal Regeneration
To generate an ARCNET signal requires the synthesis of signals
P1 and P2. These 100 ns non-overlapping pulses in turn drive
the various transceivers on each of the expansion modules. A
precision delay line gated oscillator forms the basis of the
regeneration circuitry and was chosen because of the predictable
delay experienced from this type of oscillator which is important
in reducing bit jitter.
EIA-485 expansion modules incorporate a non-return to zero
(NRZ) signalling scheme with a logic “1” signal equivalent to
the logical OR of P1 and P2. The expansion modules
TD401600-0ML
23
accommodate this signal generation while maintaining
compatibility with coaxial and fiber optic signals.
Timers
A simple crystal oscillator and divider are used to develop the
unlatch delay time and reconfiguration timers. Although not
critical, the unlatch delay timer is more repeatable from a
crystal oscillator. However, the reconfiguration timer is more
critical. The reconfiguration timer does not sense a
reconfiguration on the network, it only predicts that a
reconfiguration will occur. This is accomplished by noting that
no data has occurred for 82 µs (at standard timeouts). Once this
timer is exceeded, the yellow RECON LED is lit for about
950 ms. If the hub is operated on a network with extended
ARCNET timeouts, jumpers must be set on the timing module
to extend the reconfiguration timer to match the network
timeouts. There are a total of four jumper settings
corresponding to the four possible timeouts.
Watchdog Timer
If no hub activity is sensed after a predetermined time, a
watchdog timer will automatically reset the MOD HUB timing
module. This is to ensure that the hub reestablishes
communication after a significant electrostatic or
electromagnetic phenomenon without requiring any human
intervention.
TD401600-0ML
24
4
Service
Warranty
Contemporary Controls (CC) warrants its new product to the original purchaser for two years from the product shipping date. Product returned to CC
for repair is warranted for one year from the date that the repaired product is
shipped back to the purchaser or for the remainder of the original warranty
period, whichever is longer.
If a CC product fails to operate in compliance with its specification during the
warranty period, CC will, at its option, repair or replace the product at no
charge. The customer is, however, responsible for shipping the product; CC
assumes no responsibility for the product until it is received.
CC’s limited warranty covers products only as delivered and does not cover
repair of products that have been damaged by abuse, accident, disaster, misuse, or incorrect installation. User modification may void the warranty if the
product is damaged by the modification, in which case this warranty does not
cover repair or replacement.
This warranty in no way warrants suitability of the product for any specific
application. IN NO EVENT WILL CC BE LIABLE FOR ANY DAMAGES
INCLUDING LOST PROFITS, LOST SAVINGS, OR OTHER INCIDENTAL
OR CONSEQUENTIAL DAMAGES ARISING OUT OF THE USE OR
INABILITY TO USE THE PRODUCT EVEN IF CC HAS BEEN ADVISED
OF THE POSSIBILITY OF SUCH DAMAGES, OR FOR ANY CLAIM BY
ANY PARTY OTHER THAN THE PURCHASER.
THE ABOVE WARRANTY IS IN LIEU OF ANY AND ALL OTHER
WARRANTIES, EXPRESSED OR IMPLIED OR STATUTORY, INCLUDING THE WARRANTIES OF MERCHANTABILITY, FITNESS FOR
PARTICULAR PURPOSE OR USE, TITLE AND NONINFRINGEMENT.
Repair or replacement as provided above shall be the purchaser’s
sole and exclusive remedy and CC’s exclusive liability for any
breach of warranty.
TD401600-0ML
25
Technical Support
Contemporary Controls (U.S.A.) will provide technical support
on its products by calling 1-630-963-7070 each weekday
(except holidays) between 8:00 a.m. and 5:00 p.m. Central time.
Contemporary Controls Ltd (U.K.) will provide technical
support on its products by calling +44 (0)24 7641 3786 each
weekday (except holidays) between 8:00 a.m. and 5:00 p.m.
GMT. If you have a problem outside these hours, leave a voicemail message in the CC after hours mailbox after calling our
main phone number. You can also fax your request by calling
1-630-963-0109 (U.S.) or +44 (0)24 7641 3923 (U.K.), or
contact us via e-mail at [email protected] or
[email protected]. When contacting us, please leave a
detailed description of the problem. We will contact you by
phone the next business day or in the manner your instructions
indicate. We will attempt to resolve the problem over the phone.
If unresolvable, the customer will be given an RMA number in
order that the product may be returned to CC for repair.
Warranty Repair
Products under warranty that were not subjected to misuse or
abuse will be repaired at no charge to the customer. The
customer, however, pays for shipping the product back to CC
while CC pays for the return shipment to the customer. CC
normally ships ground. International shipments may take
longer. If the product has been determined to be misused or
abused, CC will provide the customer with a quotation for
repair. No work will be done without customer approval.
TD401600-0ML
26
Non-Warranty Repair
CC provides a repair service for all its products. Repair
charges are based upon a fixed fee basis depending upon the
complexity of the product. Therefore, Customer Service can
provide a quotation on the repair cost at the time a Returned
Material Authorization (RMA) is requested. Customers pay the
cost of shipping the defective product to CC and will be
invoiced for the return shipment to their facility. No repair will
be performed without customer approval. If a product is
determined to be unrepairable, the customer will be asked if the
product can be replaced with a refurbished product (assuming
one is available). Under no circumstances will CC replace a
defective product without customer approval. Allow ten
working days for repairs.
Returning Products for Repair
To schedule service for a product, please call CC Customer
Service support directly at 1-630-963-7070 (U.S.) or +44 (0)24
7641 3786 (U.K.). Have the product model and serial number
available, along with a description of the problem. A
Customer Service representative will record the appropriate
information and issue, via fax, an RMA number—a code
number by which we track the product while it is being
processed. Once you have received the RMA number, follow
the instructions of the Customer Service support representative
and return the product to us, freight prepaid, with the RMA
number clearly marked on the exterior of the package. If
possible, reuse the original shipping containers and packaging.
In any event, be sure you follow good ESD-control practices
when handling the product, and ensure that antistatic bags and
packing materials with adequate padding and shock-absorbing
properties are used. CC is not responsible for any damage
incurred from improper packaging. Shipments should be
insured for your protection.
TD401600-0ML
27
Ship the product, freight prepaid, to the location from which it
was purchased:
Contemporary Control Systems, Inc.
2431 Curtiss Street
Downers Grove, IL 60515
U.S.A.
Contemporary Controls Ltd
Sovereign Court Two
University of Warwick Science Park
Sir William Lyons Rd.
Coventry CV4 7EZ
U.K.
TD401600-0ML
28
Appendices
Appendix A — Permissible Segment Lengths
A segment is defined as any portion of the complete ARCNET
cabling system isolated by one or more hub ports. On a hubless
or bus system, the complete ARCNET cabling system consists
of only one segment with several nodes; however, a system with
hubs has potentially many segments. An ARCNET node is
defined as a device with an active ARCNET controller chip
requiring an ARCNET device address. Active and passive hubs
do not utilize ARCNET addresses and, therefore, are not nodes.
Each segment generally supports one or more nodes, but in the
case of hub-to-hub connections there is the possibility that no
node exists on that segment.
The permissible cable length of a segment depends upon the
transceiver used and the type of cable installed. Table A-1
provides guidance on determining the constraints on cabling
distances as well as the number of nodes allowed per bus
segment.
The maximum segment distances are based upon nominal cable
attenuation figures and worst case transceiver power budgets.
Assumptions are noted.
When approaching the maximum limits, a link loss budget
calculation is recommended.
When calculating the maximum number of nodes (except
EIA-485 networks) on a bus segment, do not count the hub
ports that terminate the bus segment as nodes.
However, do consider the maximum length of the bus segment
to include the cable attached to the hub ports.
Several bus transceivers require a minimum distance between
nodes. Adhere to this minimum since unreliable operation can
occur.
TD401600-0ML
29
Appendix A (continued)
Permissible Cable Lengths and Nodes Per Segment
Trans
ceiver Description
Cable
Connectors
-CXS coaxial star
-CXS coaxial star
-CXB coaxial bus
RG-62/u
RG-59/u
RG-62/u
BNC
BNC
BNC
-FOG duplex fiber optic
-FOG duplex fiber optic
-FOG duplex fiber optic
50/125
62.5/125
100/140
SMA or ST
SMA or ST
SMA or ST
-FG3
-FG3
-FG3
duplex fiber optic
duplex fiber optic
duplex fiber optic
single mode
50/125
62.5/125
ST
ST
ST
-TPS
-TPB
twisted-pair star
twisted-pair bus
IBM Type 3 RJ-11
IBM Type 3 RJ-11
-485 DC-coupled EIA-485 IBM Type 3 RJ-11
-485X AC-coupled EIA-485 IBM Type 3 RJ-11
1
2
This represents the minimum distance between any two nodes or
between a node and a hub.
May require a jumper change on the EXP to achieve this distance.
Table A-1. Permissible Cable Length
and Nodes Per Segment
TD401600-0ML
30
Cable Length
Max
Min
Max Nodes
Bus Segment
Notes
0
2000 ft/610 m
0
1500 ft/457 m
6 ft/2 m1 1000 ft/305 m
N/A
N/A
8
5.5 dB/1000 ft max
7.0 dB/1000 ft max
5.5 dB/1000 ft max
0
0
02
3000 ft/915 m
6000 ft/1825 m
9000 ft/2740 m
N/A
N/A
N/A
4.3 dB/km max
4.3 dB/km max
4.0 dB/km max
02
02
02
46000 ft/14000 m N/A
32800 ft/10000 m N/A
35000 ft/10670 m N/A
0.5 dB/km max
1.5 dB/km max
1.5 dB/km max
02
330 ft/100 m
6 ft/2 m1 400 ft/122 m
N/A
8
uses internal BALUNs
0
0
17
13
DC coupled
transformer isolated
900 ft/274 m
700 ft/213 m
TD401600-0ML
31
Appendix B — Declaration of Conformity
Applied Council Directives:
Low Voltage Directive 73/23/EEC Council Directive as
amended by Council Directive 93/68/EEC
Electromagnetic Compatibility Directive, 89/336/EEC Council
Directive as amended by Council Directive 92/31/EEC &
Council Directive 93/68/EEC
Standard to which Conformity is Declared
EN 55022:1995 CISPR22: 1993, Class A, Limits and Methods
of Measurement of Radio Disturbance Characteristics of
Information Technology Equipment
EN 55024:1998, Information Technology Equipment — Immunity
Characteristics — Limits and Methods of Measurement
EN 60950, IEC 950 Safety of Information Technology
Equipment Including Electrical Business Equipment
Manufacturer:
Contemporary Control Systems, Inc.
2431 Curtiss Street
Downers Grove, IL 60515 USA
Authorized Representative:
Contemporary Controls Ltd
Sovereign Court Two
University of Warwick Science Park
Sir William Lyons Road
Coventry CV4 7EZ
UNITED KINGDOM
TD401600-0ML
32
Type of Equipment:
Industrial local area network modular hub and associated
expansion modules
Model
Directive *
EMC
LVD
MODHUB-16E
MODHUB-16EF
EXP-CXS
EXP-CXS/FG3-ST
EXP-CXS/FOG-SMA
EXP-CXS/FOG-ST
EXP-FOG-SMA
EXP-FOG-ST
EXP-TPS
EXP-TPS/FOG-ST
Yes
Yes
Yes
Yes
Yes
Yes
Yes
Yes
Yes
Yes
Yes
Yes
N/R
N/R
N/R
N/R
N/R
N/R
N/R
N/R
* Yes — product is certified to this directive
N/R — this directive is not required for this product
I, the undersigned, hereby declare that the product(s) specified
above conforms to the listed directives and standards.
George M. Thomas, President
TD401600-0ML
33
December 21, 2004